


全自动 drecko 牧场
A step-by-step walkthrough for constructing simple, automated drecko ranches. 1. Introduction Last updated 01/10/2026 for the November 2025 QoL Update - Build 700386That's right, drecko starvation ranching is back!I never intended to write a guide on dreckos. After my guides for ranching hatches and divergents, I was ready to take a break and actually play the game for a while :) I've seen some really well done drecko ranches, but for reasons that make a lot of sense I've never seen a single one use a 'critter dropper' to automate repopulation. For that reason I decided to challenge myself to see if a drecko ranch was even possible with a critter dropper design. I figured it would require several compromises in space usage and efficiency, assuming I got it to work at all, but I wanted to try nonetheless. If you're not following why this might be challenging, there are a handful of unique requirements for ranching dreckos that don't match well with the critter dropper technique: Since dreckos can climb on walls and ceilings, you can't simply leave open doors in the floor for dropped critters to fall through. Otherwise the other dreckos in the stable would crawl through the open doors into the stables above and below. In order to shear dreckos for plastic and reed fiber, they must spend time in a hydrogen atmosphere. Whatever mechanism is used to allow critters to fall between floors would also allow hydrogen to rise and mix with other gasses. Managing gas pressure between floors could be a challenge unless the entire ranch is full of hydrogen. I ended up building 4-5 designs with working critter droppers, and some of the more exotic ones even included thermo regulators, aquatuners and steam turbines for cooling. But while those results scratched the "challenge" itch, none of them were interesting enough or efficient enough to write a guide about. Then, I stumbled into a drecko ranch design I found truly inspiring: thegroundbelowme & Beardo09 - Optimized Drecko Ranch Design v3https://www.reddit.com/r/Oxygennotincluded/comments/qarpve/optimized_drecko_ranch_design_v3/ Within this guide I will refer to the above design as the TGBM/B09 design. My own designs had a lot of empty, wasted space, and though it doesn't look like it on the surface, the TGBM/B09 design does as well. Looking at the two side by side it became clear that I could combine elements from both to remove much of the empty space. And by building the TGBM/B09 design 'upside down' it would allow the integration of a critter dropper from the shearing area into the breeding stable. Ultimately, that is how I came up with my new design, and then decided to write this guide. 2. Objectives As stated above, this all started as a fun personal challenge, not an exercise in optimizing drecko ranching. Even so, I'll document below what I set out to achieve. Requirements Must be a “horizontal” stable This is just personal preference; Drecko ranches more than most critters come in all shapes and sizes, but I wanted to emulate my previous ranch designs Must integrate a "critter dropper" to deliver new dreckos to lower levels of the ranch This was the whole point of the challenge, after all :) Must automate all required resource delivery Dreckos don't eat delivered materials, but consume plants directly As such, the resources required to maintain plant growth (dirt) must be automatically delivered Must automate all required resource extraction Plastic Reed Fiber Eggshells Meat Phosphorite Optionally: extra meal lice and mealwood seeds Must automate population maintenance to keep up to eight dreckos in the breeder stable Removal of eggs Addition of new breeding dreckos when required (e.g. after natural death) Goals / "Nice to Haves" (In approximate order of importance) Should minimize time between breeder death and replacement i.e. should not wait 33 cycles for a new egg to hatch and grow to adulthood Should confine dreckos to a small area to expedite grooming and shearing 2025 update - This is no longer relevant 4 years later after the patches allowing critters to queue for grooming, but there also wasn't any reason to let the dreckos run crazy. Should be relatively easy to build, no tricky order of operations or dupe pathing I'd argue that I failed this objective due to the vertical liquid locks required, but I'll provide a tip on how to build those in the construction section Should try to keep automation requirements reasonable (subjective, I know) 3. Mark III - What's New This Time? I can't believe I'm rewriting this guide for a third time! To be fair, we made it 3 years and 3 months after the Fast Friends patch to drecko feeding mechanics, so that was a pretty good run. The November 2025 QoL update drastically changed scale growth mechanics and all but destroyed starvation ranching for dreckos... or so I thought. As it turns out, most everything about starvation ranching still "works", the critters just need a bit more space to prevent them from becoming "miserable". Crowded is OK, un-groomed is OK, un-fed is OK, pretty much everything else is OK, as long as they're not "miserable". So what does that really mean? The new miserable status applies when a critter's happiness hits -10. When a critter is miserable all scale growth stops, so it's impossible to continue shearing dreckos for plastic or fiber. Importantly this is a binary status, it's either applied or it's not. I don't want to give Klei any ideas, but thankfully there's no linear reduction in scale growth the more unhappy a creature gets. It's 100% growth down to -9 happiness and 0% at -10 or "miserable". With that understood we need to determine what factors affect a critter's happiness. All of our dreckos will be tame, so they start at -1. We will not be grooming the critters in the starvation/shearing chamber, so that -1 penalty will be permanent. Speaking of starvation, critters with 0 calories become "starving" and also automatically apply "miserable" regardless of their happiness score. Dreckos will have already been sheared ~7 times before they run out of calories, after which they'll become miserable and simply take up space for 10 more cycles until they die. Finally we come to space, the other parameter affecting happiness. Each drecko normally requires 12 tiles of space to prevent being "crowded". For example, a full-sized 96-tile stable can comfortably hold 8 dreckos, but adding a 9th would make them all crowded. After this QoL update, the crowded debuff applies a -1 happiness penalty for *each* additional critter sharing the space. Considering the smallest 12-tile space with a single tame drecko inside, it would be at -1 happiness from the tame, but not crowded. Adding one extra decko would make them both -2, another gives -3, and on until an 8th extra drecko would make them all -9. Finally, a 9th extra drecko pushes them all to -10 happiness, applying the miserable debuff. This is the key mechanic any redesigned starvation ranch need to work around. Instead of cramming an "infinite" number of dreckos into a single starvation/shearing chamber, the dreckos need to be divided between multiple chambers, with no more than 8 "extra" dreckos in any given chamber to maintain -9 happiness or better. It seems worth noting that while any eggs in the same room will add a "cramped" debuff, this debuff does not impact critter happiness thus cannot cause them to be miserable. So eggs can be safely stored in the starvation/shearing rooms. I loaded up several old saves of colonies that had built my old drecko ranch and run for collectively thousands of cycles. Each of them had between 20 and 30 dreckos in the starvation/shearing room. With that information I decided to split the old design into two shearing rooms, so that each could support 8 "extra" dreckos, accounting for 16 total. That leaves no more than 14 dreckos (totaling 30) that need to be provided adequate space in the shearing rooms. So the new design should ideally provide either one room of 96-tiles (holding 8+8) and one of 72-tiles (holding 6+8), or two rooms of 84-tiles (holding 7+8 each). The design I settled on went with the former option. We end up with one 96-tile shearing room and one 77-tile shearing room, supporting up to 30 starved dreckos at a time. The population of the larger room is controlled at no more than 16 dreckos, so you'll always be able to shear some plastic and fiber in that room. If the second smaller room becomes overcrowded and miserable then scale growth in that room will pause until a critter or two die off. In a couple hundred cycles of play testing I rarely noticed this and was always producing massive amounts of plastic. If you're especially concerned with maximizing plastic production, then a critter sensor tied to an alarm could alert you of this situation, allowing you to manually cull dreckos with the starving status, preventing any pause in plastic production. Comparison of Old and New Design Features Overall size / construction OLD: Two "standard" 24x4 rooms, one 64-tile starvation/shearing chamber NEW: Three "standard" 24x4 rooms, two starvation/shearing chambers totaling 170+ tiles Utility Area OLD: Stable contains a 14x4 open area to add whatever you like NEW: Stable contains three open areas, 14x4, 7x4 and 11x4 to add whatever you like Note: As with any ranch, you must be careful not to add conflicting buildings that would attempt to turn the space into a different room, thus losing the stable designation. For example, a single research station is fine, but two science buildings would attempt to create a laboratory and invalidate the stable. Incubators OLD: Supports up to 4 incubators, two for glossy dreckos and two for regular dreckos. NEW: Supports up to 2 incubators, one for glossy dreckos and one for regular dreckos. Note: I don't believe extra incubators would benefit this new ranch, since eggs don't count against drecko happiness while baby drecklets do. The single incubators will produce a steady stream of dreckos to repopulate the breeders and shearing stables, without unnecessarily increasing the chances of overcrowding. 4. Bottom Line Up Front - The Design The updated design still consists of a control room paired with a single breeding stable. Both rooms use a "standard" 24x4 layout, however the control room is now two floors high. For comparison, examples of both the previous MkII and latest MkIII designs are shown below:
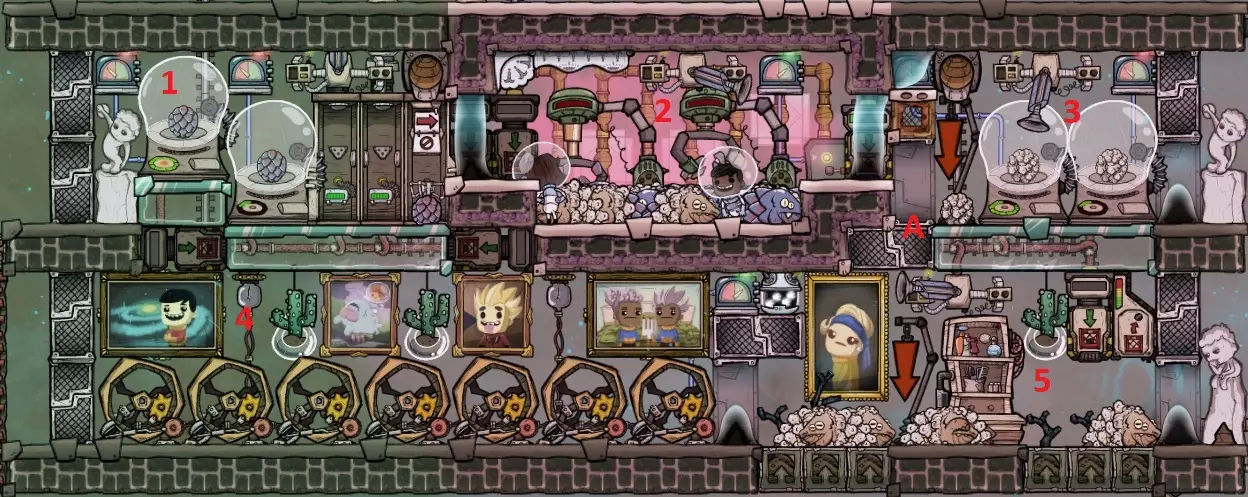
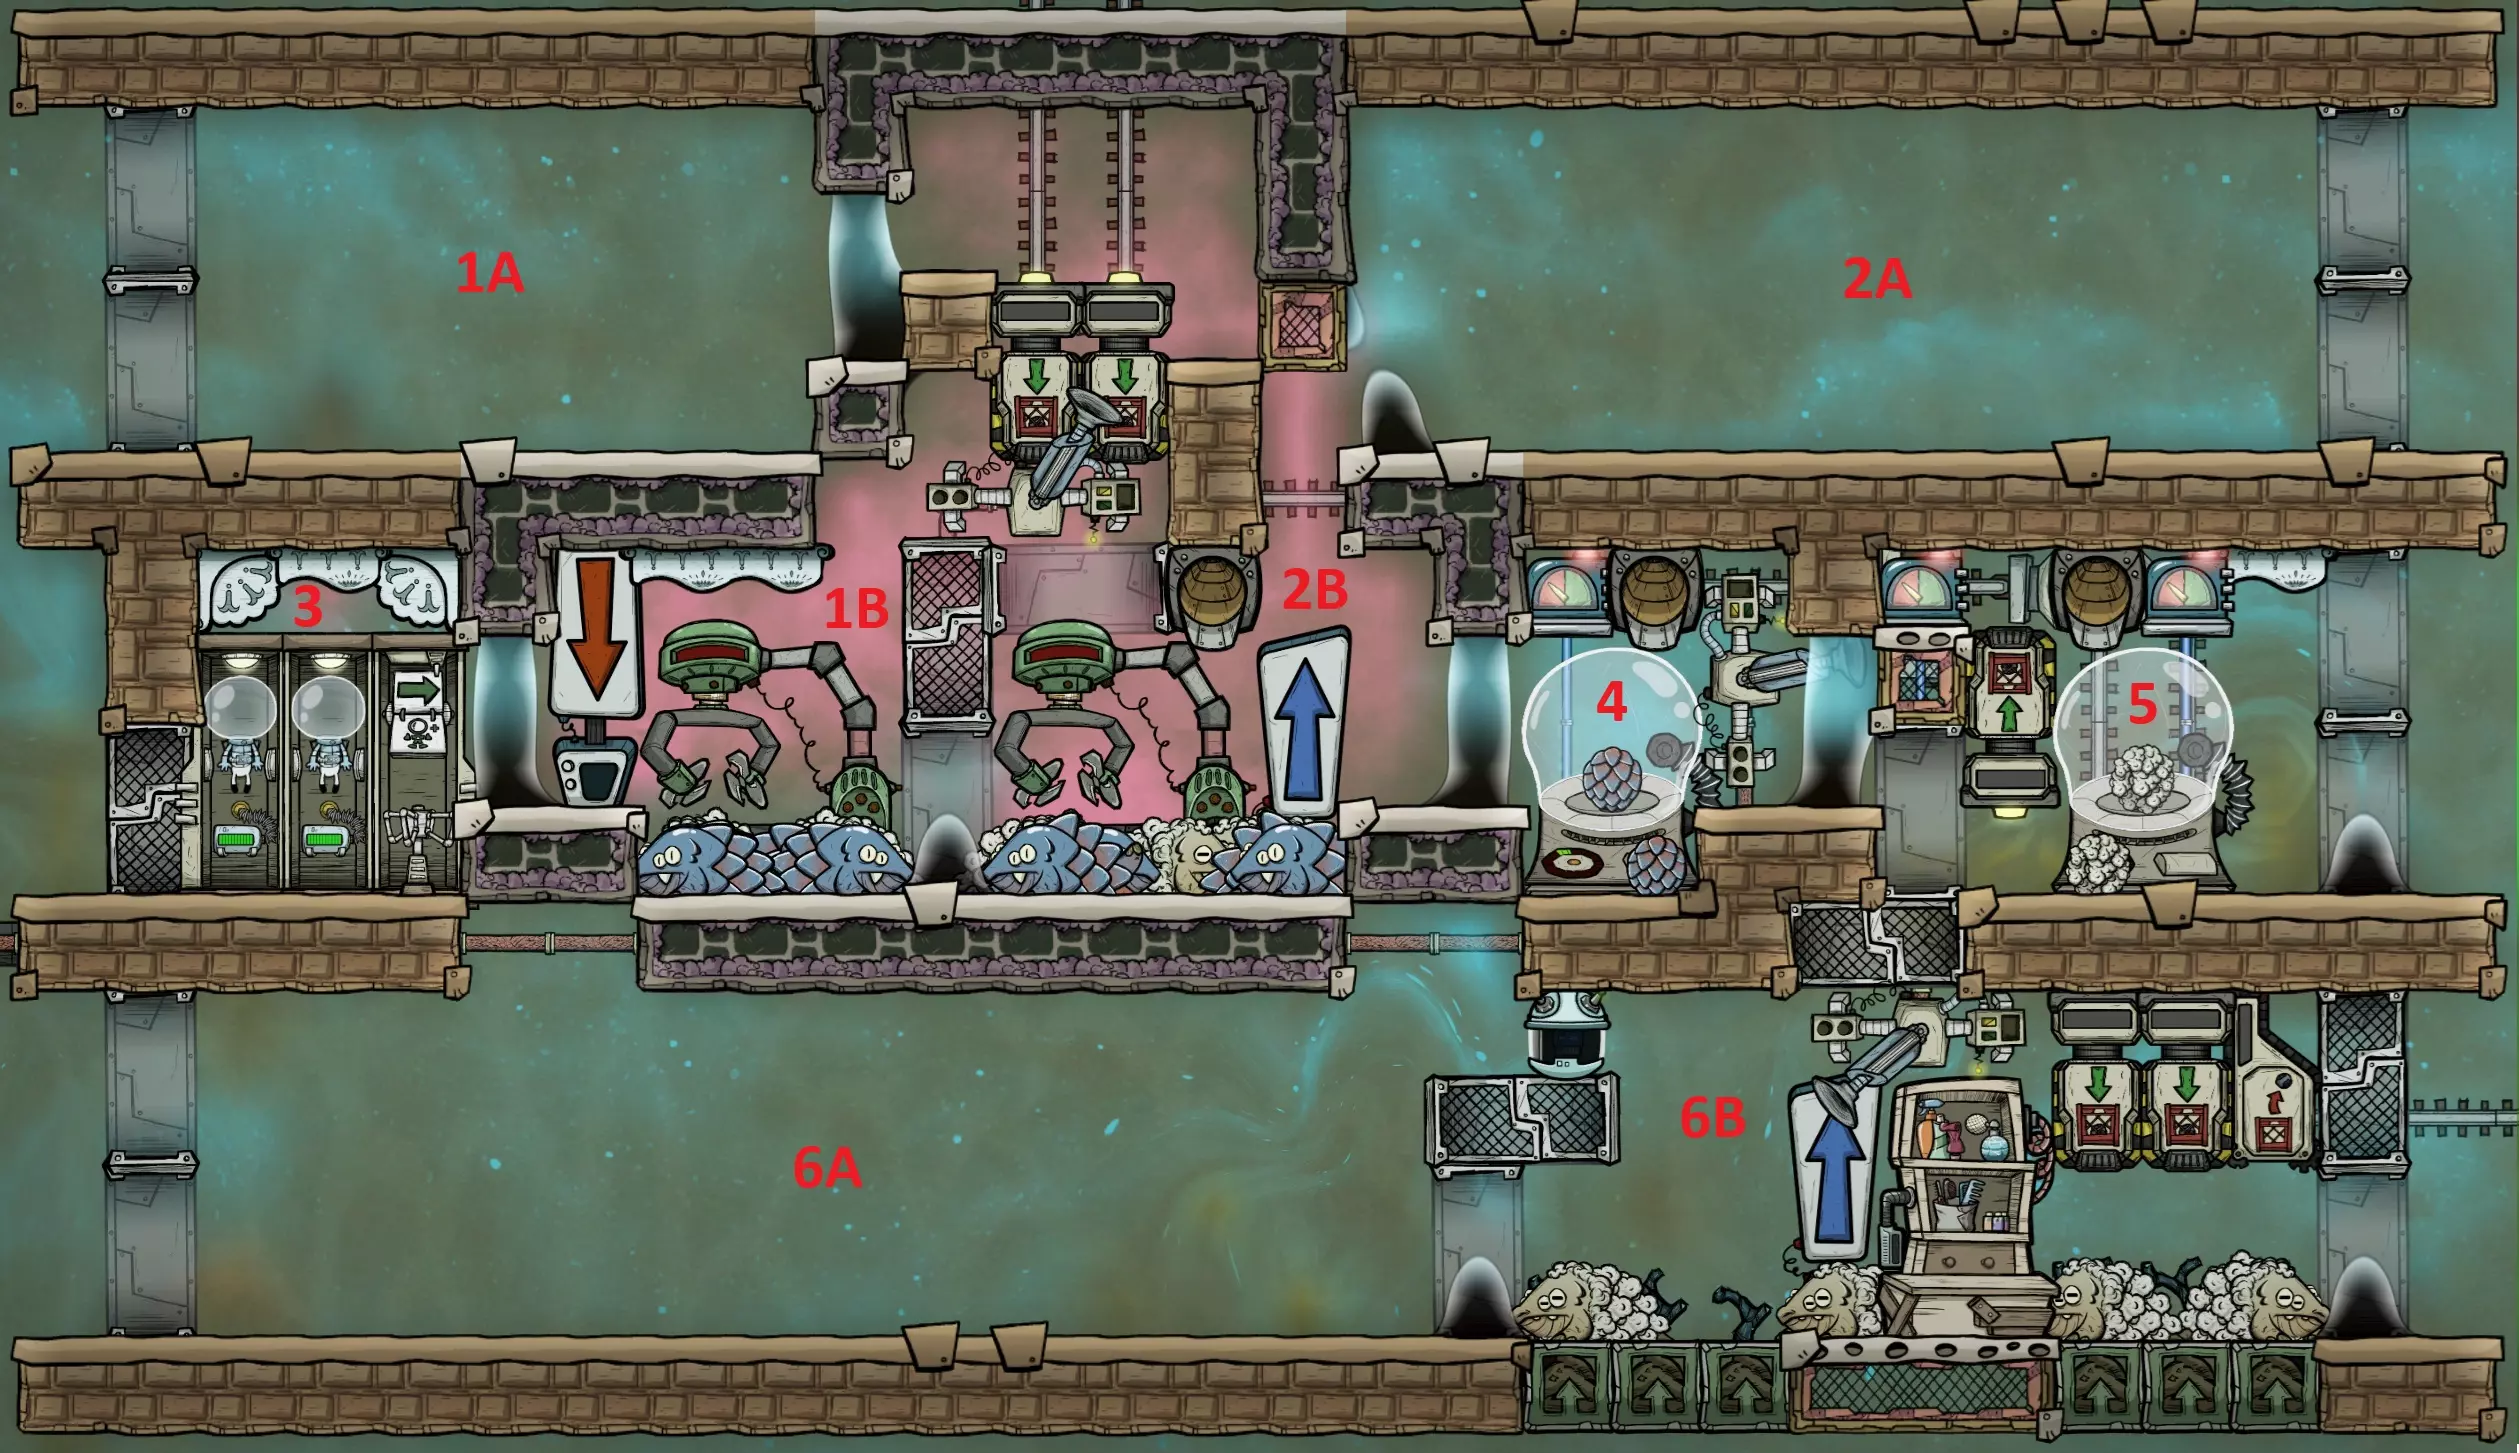
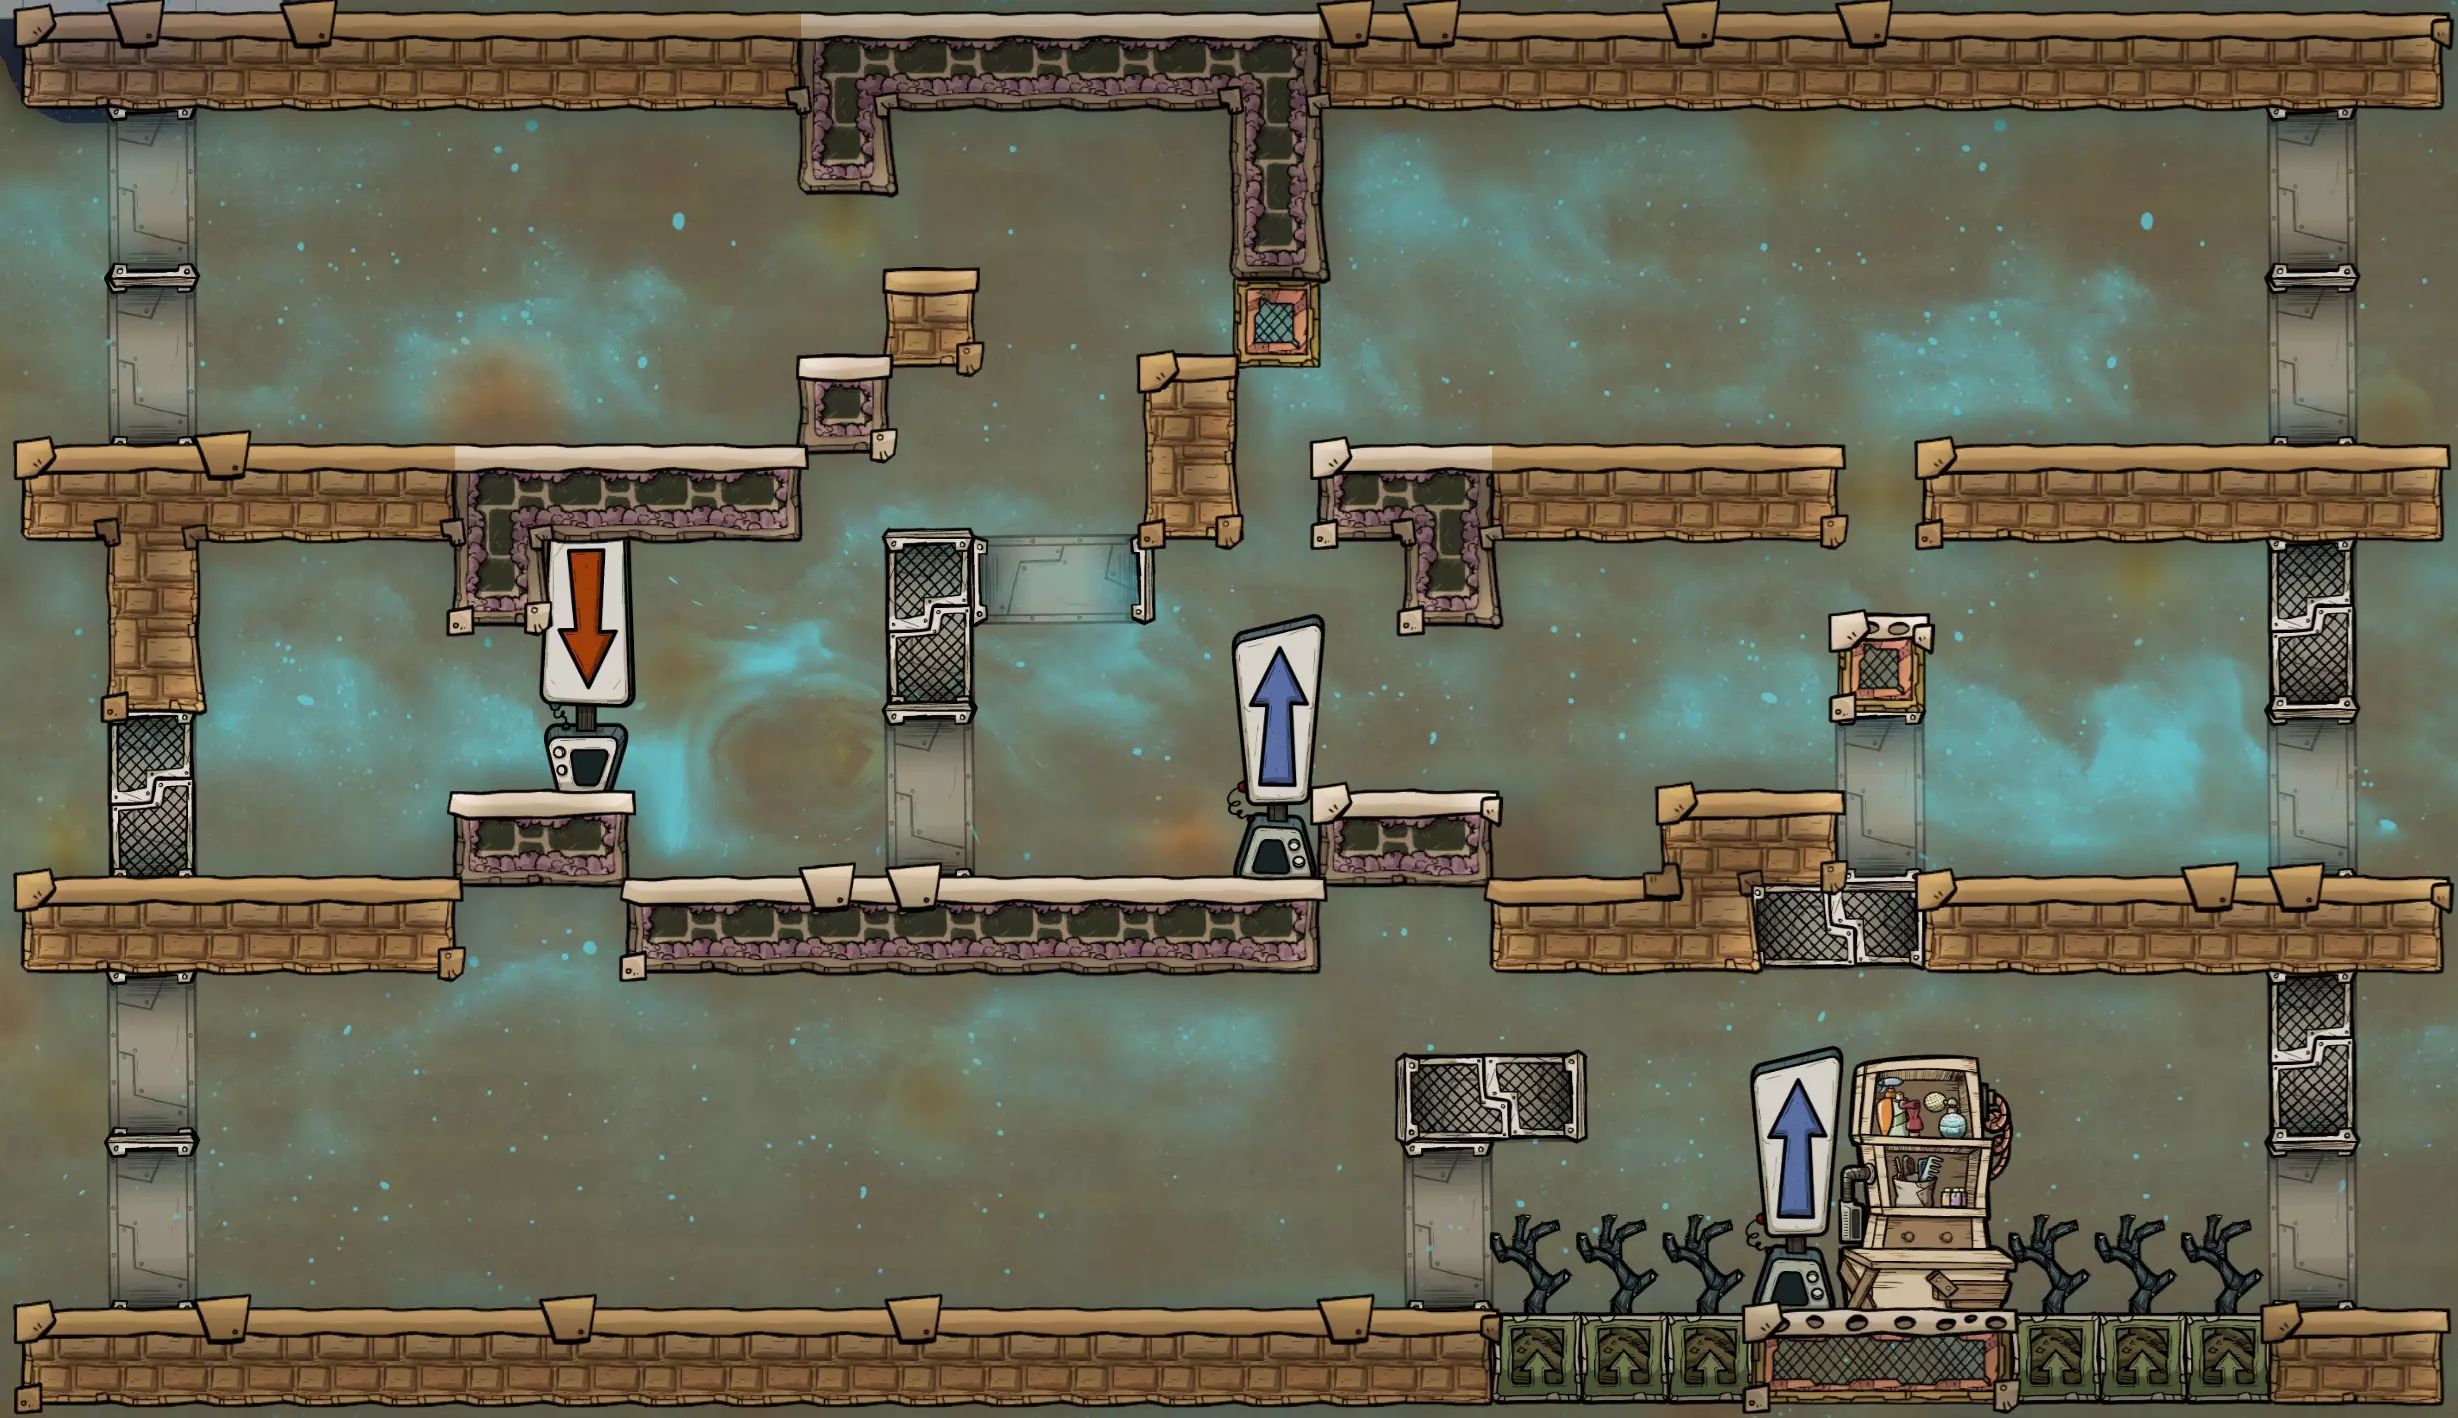
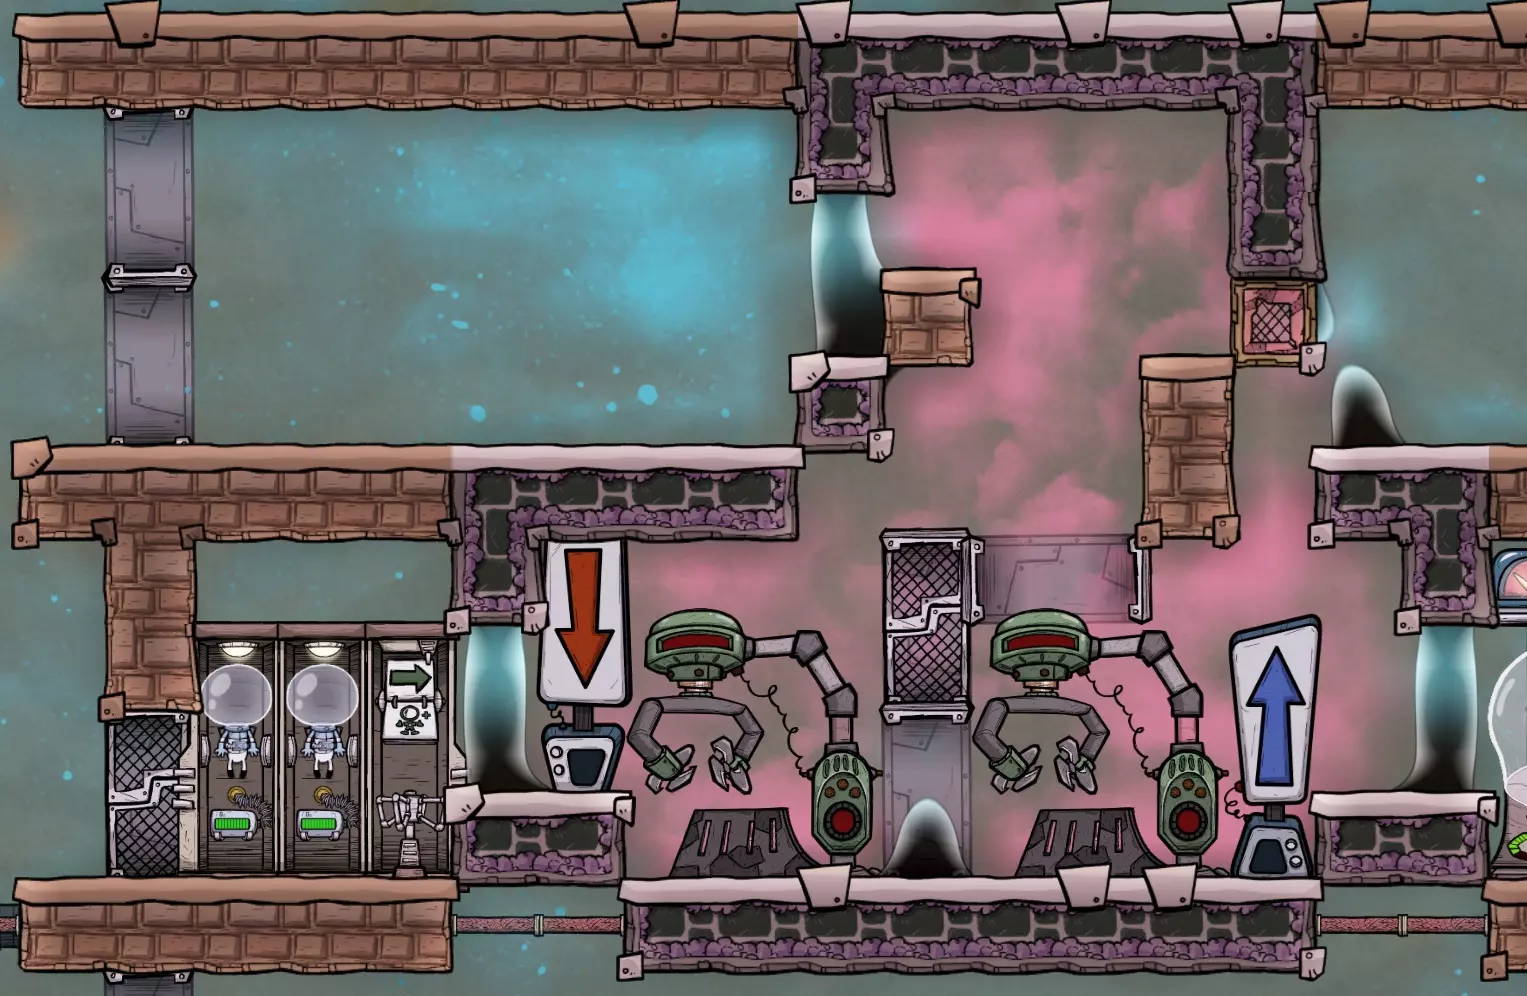
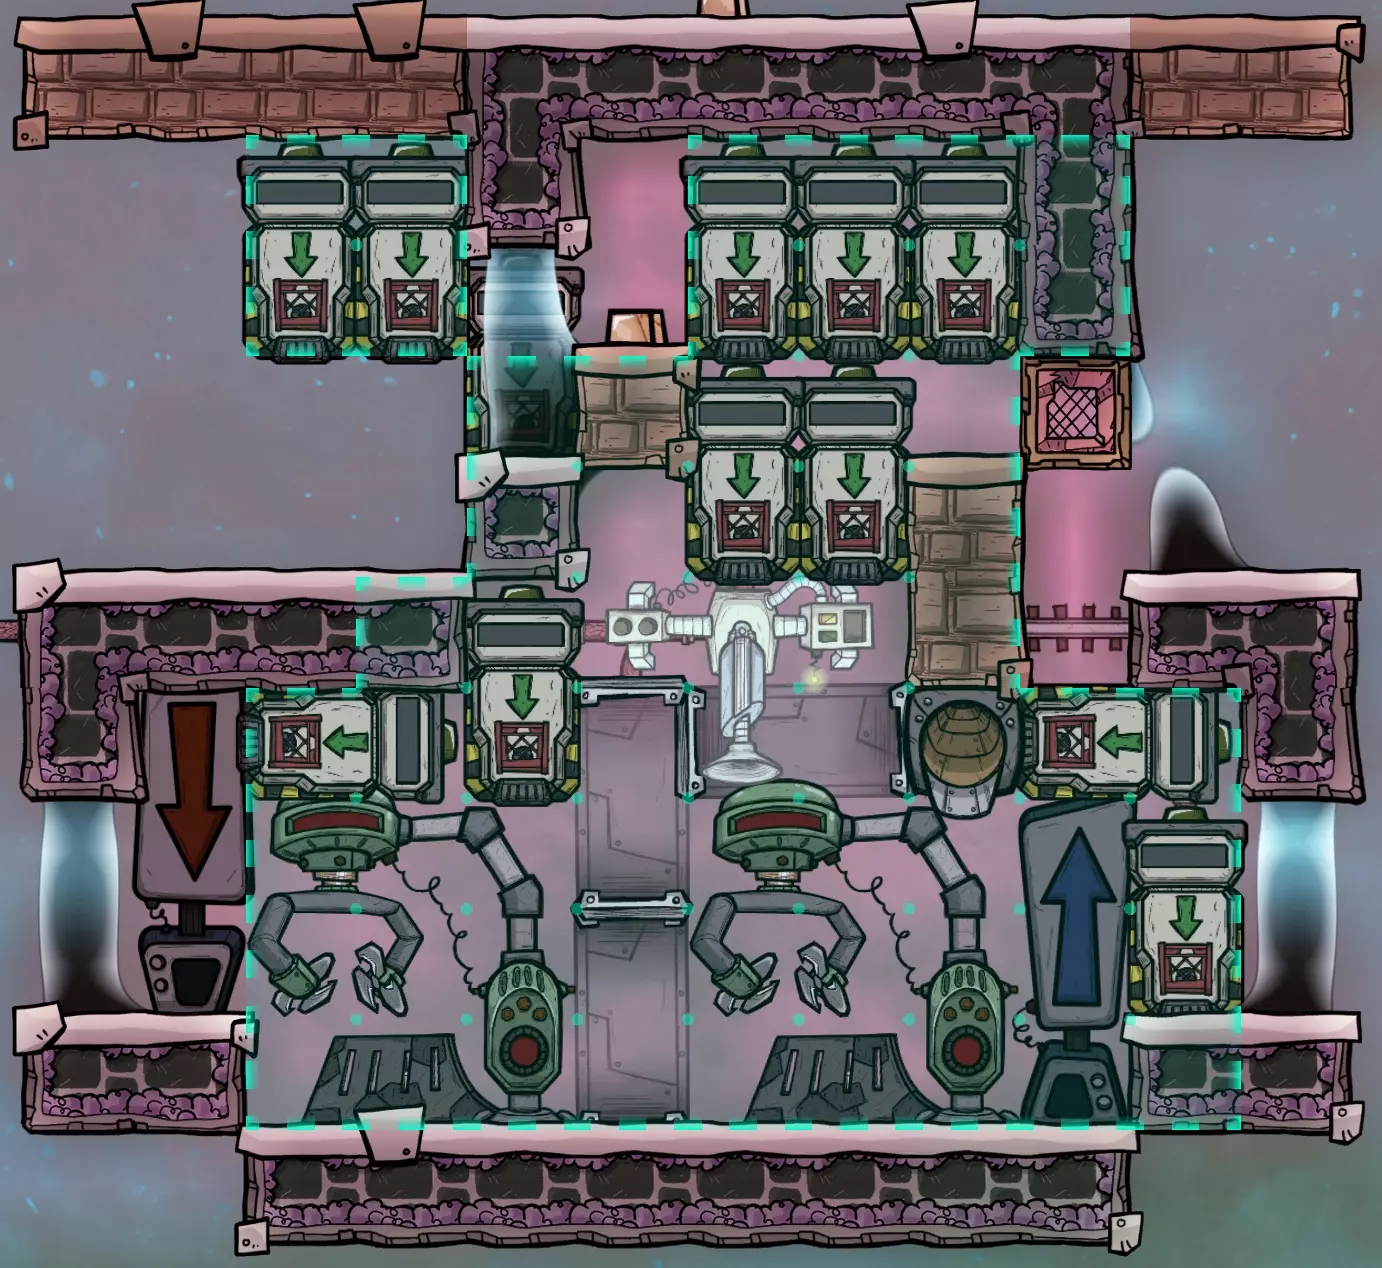
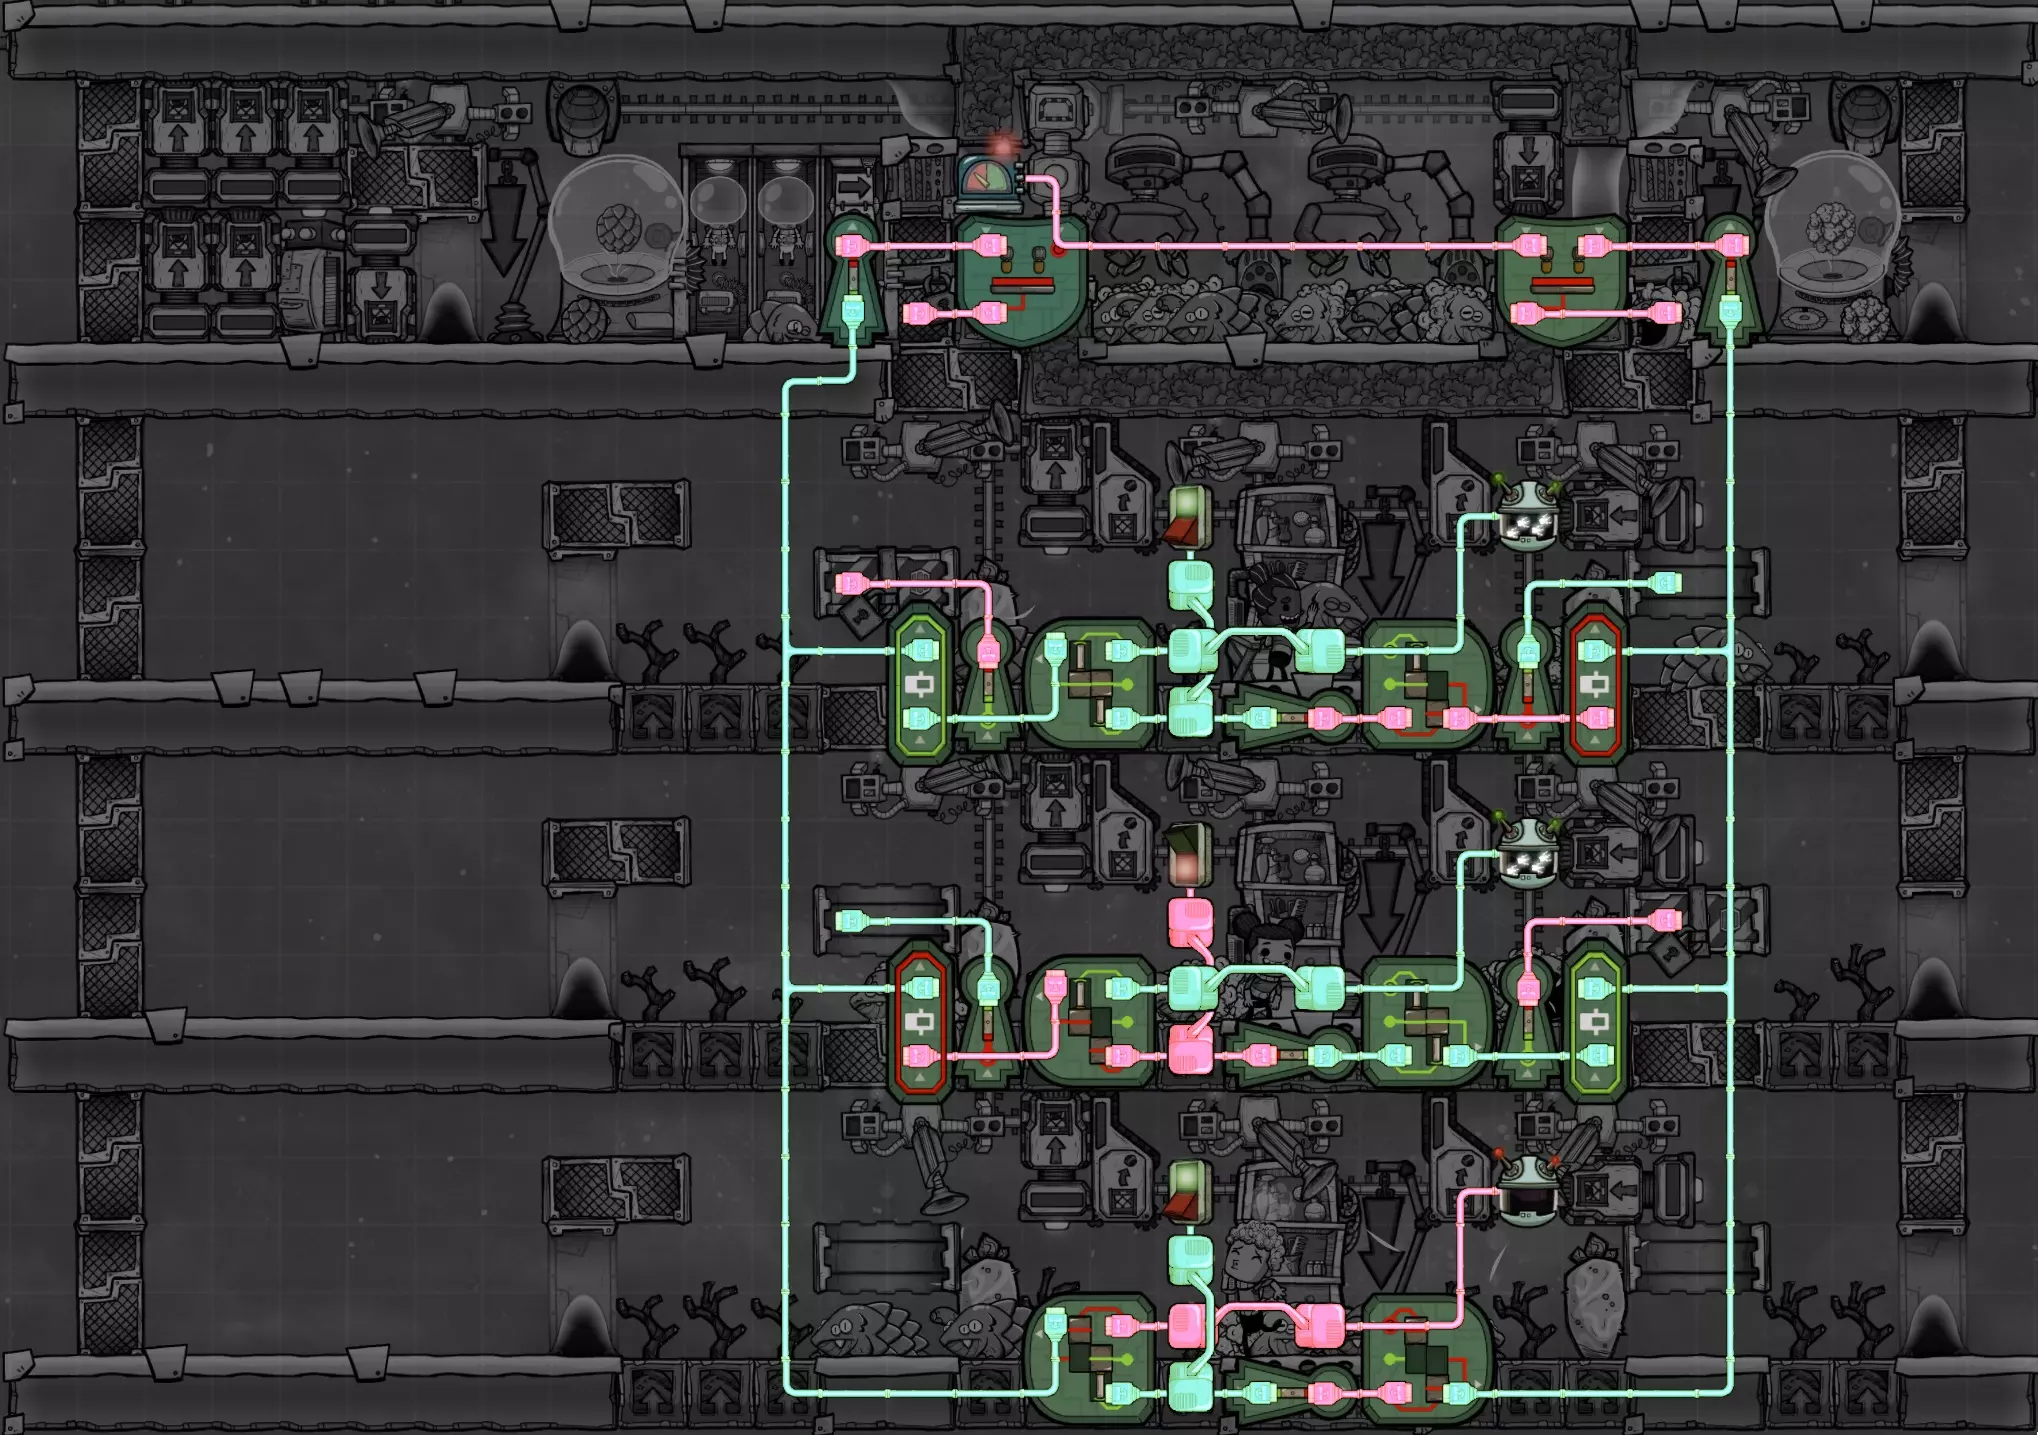
Unlike my ranch designs for other critters, this is not intended to be stacked. There is little reason to have more than one stable of breeding dreckos, especially after the QoL addition of the 'miserable' status. All non-breeder dreckos are kept in a hydrogen chamber full time to maximize shearing output, but shoving too many in that chamber would stop all resource production. The Control RoomThe control room generally consists of two chambers which I’ve subdivided into labels 1A/B, 2A/B, 3, 4 and 5 in the screenshot above. Chamber 1 - Incubation and Primary ShearingThis area consists of the four right-side sub-areas labeled 2A, 2B, 4 and 5. The first three sub-areas all combine to form a single 96-tile stable, separated by a door from sub-area 5. This stable is population controlled to contain no more than 16 (8+8) dreckos of both types. Area 2A is the first of our utility areas, 11x4 in size. It counts towards the stable size but can be used for whatever buildings you like that won't de-activate the stable. Area 2B is the shearing area, containing a shearing station and critter pick-up. Dreckos are confined to the floor, unable to climb up the walls on either side due to the step and liquid lock. The purpose of the critter pick-up is to remove any extra dreckos if the total goes above 16. These extra critters will be deposited in the secondary shearing chamber to the left. Areas 4 and 5 are for incubating glossy and regular dreckos, respectively. The stair-stepped floors and liquid locks are specifically constructed to ensure dreckos can only ever move to the left through these areas. A critter dropper in Area 5 will push drecklets into the breeder stable (6B) whenever a new breeder is required. Otherwise, after 5 cycles the drecklet will become an adult and crawl left into Area 4. In Area 4, glossy drecklets will be stuck, unable to move right into the critter dropper and contaminate the breeder population. Adult dreckos (of either type) will move left into the shearing area to live out the rest of their lives. Chamber 2 - Entrance and Secondary ShearingThis area consists of the three left-side sub-areas labeled 1A, 1B and 3. All three areas combine to form a 60+ tile stable, separated from Chamber 1 by the stacked doors. Area 1A is the second of our utility areas, 7x4 tiles in size. Just like Area 2A, this can be used for anything you like that will not break the stable. Area 1B is the shearing area, containing a shearing station, a critter drop-off and an overhead auto sweeper. The purpose of the critter drop-off is to ensure that if the breeder stable or primary shearing stable ever become over-crowded, the extra dreckos will be relocated here. This chamber is not population controlled, so containing more than 13 (5+8) dreckos will cause the miserable status and pause scale growth temporarily. There is plenty of room to add a critter sensor and alarm to inform you of this condition and allow a manual culling of extra dreckos, but I didn't find that particularly necessary. Usually when this happens some extra critters are within a cycle or two of starving to death anyway, so the problem rapidly resolves itself. The auto-sweeper in this room is responsible for exporting all resources from the ranch. From its central position it can see the entire floor space to pick up any dropped items, and can reach up to 12 conveyor loaders, far more than we could ever make use of. Any resources created in areas 4, 5 and 6A are first deposited in area 2B, where they are sorted and exported by this sweeper. Finally, Area 3 provides the entrance to both shearing areas, through two atmo-suit docks. This allows ranchers to operate both shearing stations simultaneously, optimizing the flow of resources. Duplicants cannot climb up or down from areas 1A or 2A, and the door between areas 4 and 5 is configured to disallow dupe travel. In this way, Area 3 provides the only access into or out of the shearing stables. The Breeding StableThe breeding stable is fairly straightforward. The areas marked 6A and 6B combine to form a 96-tile stable able to hold up to 8 breeder dreckos. These dreckos are fed and groomed to maximize egg production and keep the shearing chambers full. Area 6A is the third of our utility spaces, measuring 14x7. You should know by now what you can do with this space. Area 6B is where the breeding dreckos are contained, unable to climb up the doors due to the liquid locks. Six mealwood plants provide just enough food for eight dreckos after the Fast Friends bug fix. The critter pick-up ensures that the stable never goes above 8 breeders. Because the critter dropper in Area 5 is an extremely simple design, it may occasionally drop more than one drecklet into the breeding stable. We can't afford the space for more complex and reliable critter droppers, but with this critter pick-up any mistakes are corrected quickly. 5. Construction The following sections describe how to build both the control room and the breeding stable in a progressive fashion. The expectation is that you would begin the early game with a fully manual ranch and an empty control room, then gradually build up to the final design. - Early Ranching - Zero Automation By far the most difficult part of this build is at the very beginning, with the vertical liquid locks. Note that I recommend changing the three tiles under the grooming station and critter pick-up to airflow tiles as soon as you can. Otherwise CO2 will build up between the liquid locks and be unable to escape. Here's the initial layout:
锁已设置完毕:
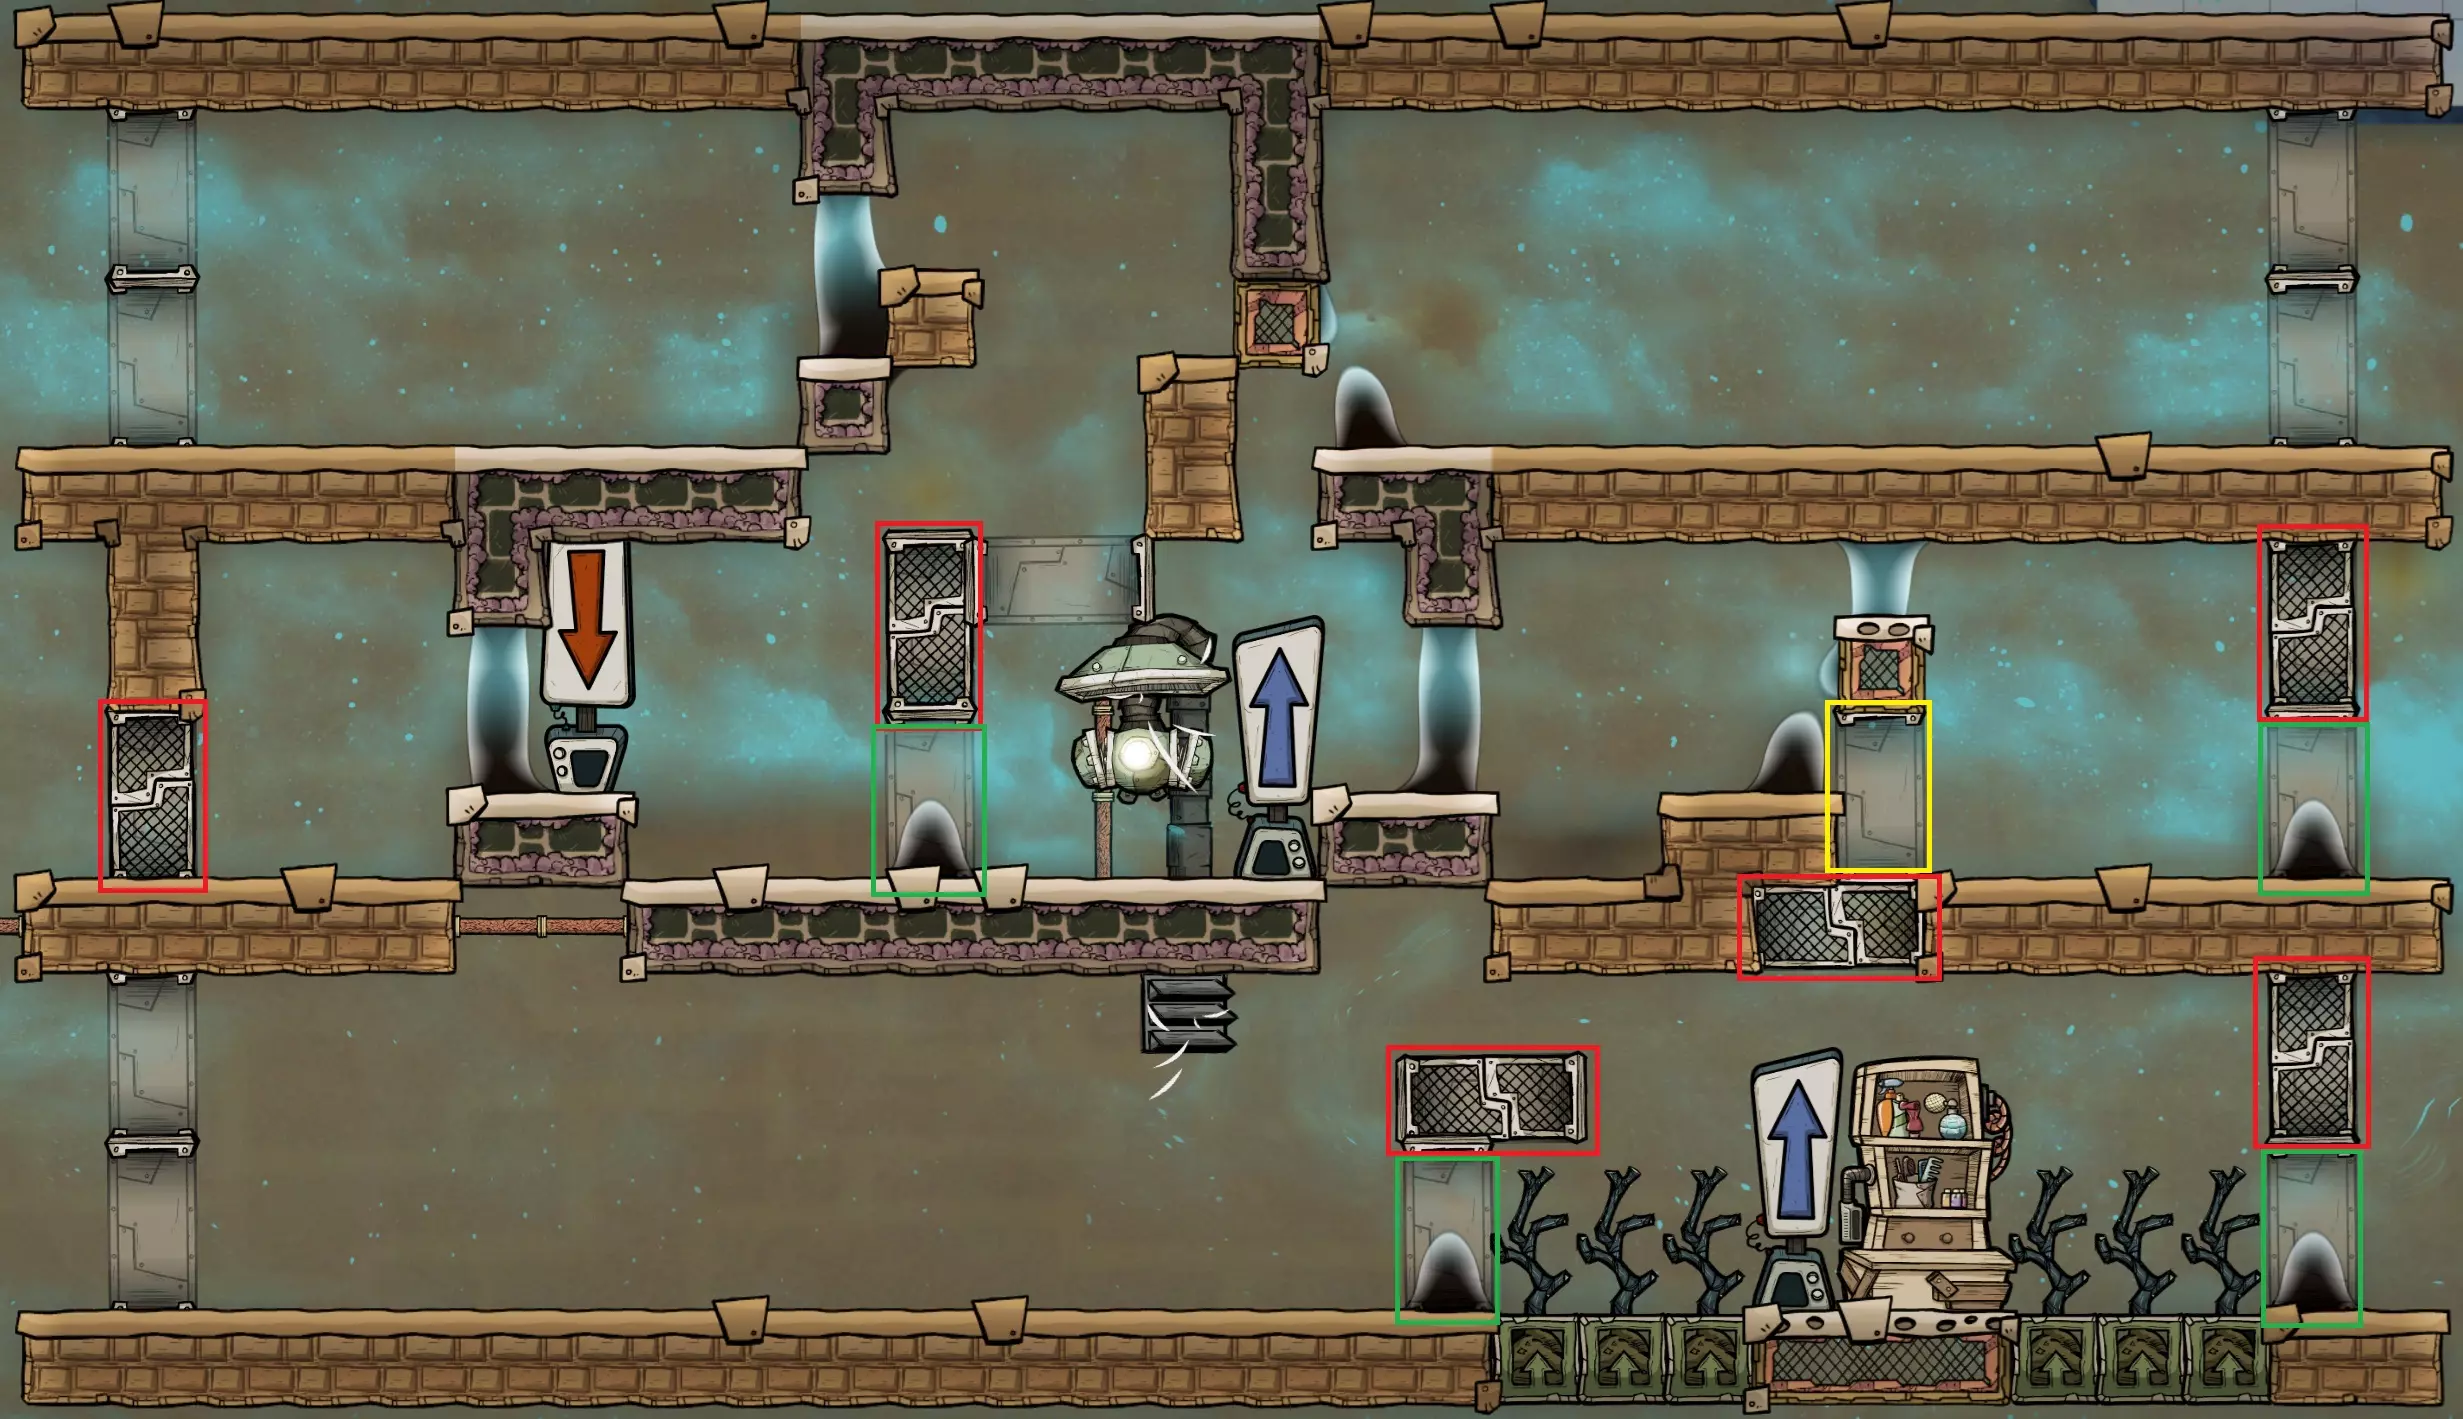
注意,在黄色标记的门上方留有一个未封闭的瓷砖,以及一个气流瓷砖,以便将水引到那里。一旦有一滴水位于气流瓷砖上方,就在其上方建造普通瓷砖,即可完成液封。 不要忘记将四个绿色标记的门设置为“开启”(非自动),六个红色标记的门设置为“自动”。如果其中任何一个门设置错误,之后你就得满世界追天花板上逃跑的滑鳞蜥了。 黄色标记的那扇门还必须设置为禁止复制人双向通行(取消勾选左右箭头)。我建议将四个绿色门也设置为禁止复制人通行。这样可以迫使复制人使用液封上方的门,避免“湿脚”和“浑身湿透”的负面状态。所有未标记彩色矩形的门,你可以将其设置为任意开启/自动状态。 建造液体锁:我的所有锁都使用原油上方的水来展示,但黄色门气流瓷砖上方有一滴水珠除外。当锁位于门下方而非瓷砖下方,或者靠近气流瓷砖时,你无法看到顶部的液体,但它们的工作原理完全相同。以下是液体覆盖层,以确保最大清晰度:
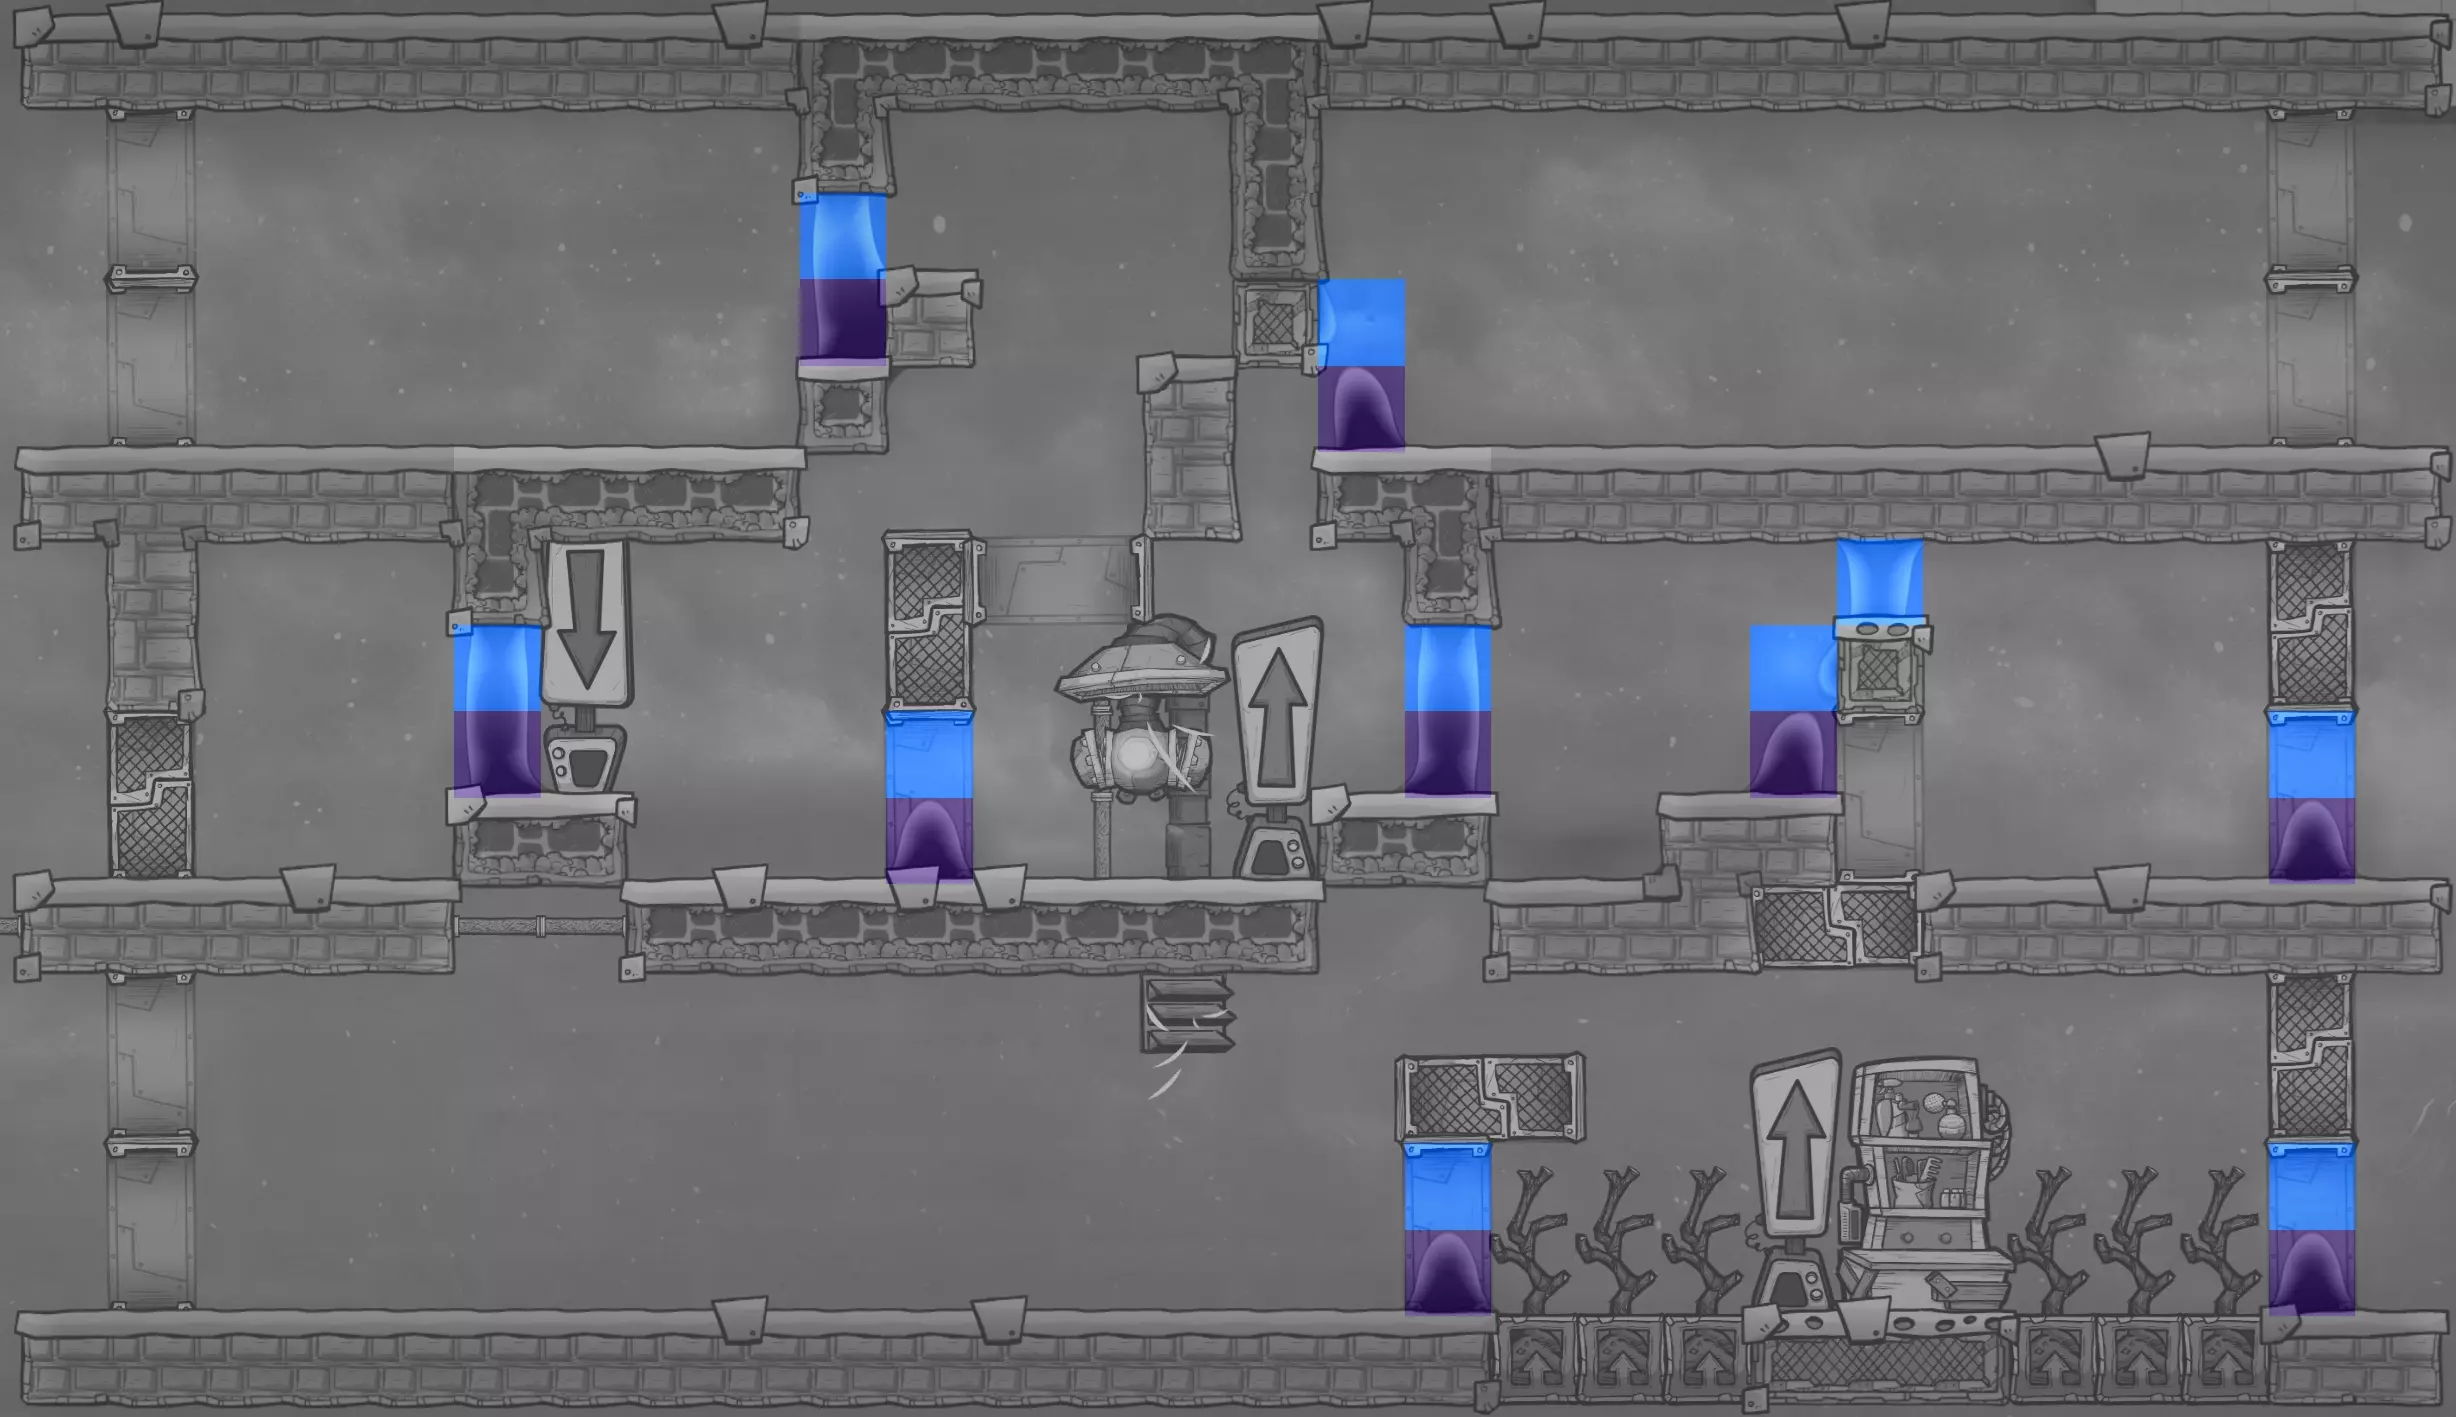
你可以用任意两种液体来建造液封,水覆盖盐水或污染水都能正常工作,但考虑到所需的液体量极少,且石油的密度高得多,我认为石油+水是前期最佳方案。 如果你难以找到原油(例如在《缺氧:太空版》中),传送器附近会有足够多的原油,你可以用拖把清理并装瓶。需要注意的是,液封形成后污染水不会释放气体,但如果有人在液封附近弄脏,他们的污染水会立即破坏液封。因此,我建议用其他液体作为底层。 建造过程中最困难的部分是获取液封所需的少量液体。底部的油可以是任意量,350克或更少(我测试过最低30克),顶部的水则在30-35克范围内。尝试用倒瓶器倒完后再擦拭多余液体是件非常麻烦的事,尤其是在添加顶部液体时。顶部液滴过大的话会把底部液体挤开,无法形成锁定状态,导致你不得不重新开始。因此,我推荐使用下面展示的阶梯倾倒法。 这种方法并非我原创,但我发现制造小液滴的最佳方式是使用阶梯式设计,就像这样:
其余液体流走后,每级台阶上残留的小液滴量总是恰到好处,能形成垂直液封。你可以用普通地砖建造这样的阶梯,通过排空瓶一次性倾倒液体就能生成所需的所有液滴,然后将台阶上的液体拖入单个瓶子中。这种方法也适用于其他所有液体,但如果使用污染水,需准备好拖拭并快速使用瓶子,以防止过多气体逸出。 小液滴装入瓶后,应使用“移至此处”命令将瓶子移至所需位置。命令先排空底部的液体瓶(本例中为原油),在地面留下小液滴。然后再排空顶部的液体瓶(水)。这是我发现的创建这些垂直水封最简便且最稳定的方法。偶尔会失败,导致水落到油的一侧。我认为这是因为复制人在倒空瓶子的同时恰好呼气,或者其他气体包阻止了水占据目标格子。不过没关系,清理这两种液体并重复倒空过程非常简单。 早期畜牧业:除非你出生在炎热的 biome,否则暂时不需要为食用树降温。 drecko( drecko)的体温为 35°C / 95°F,而食用树在 30°C / 86°F 时会枯萎,但它们的热量需要时间渗透到周围格子并导致植物枯萎。一旦你让小滑鳞蜥在孵化室里活动,并且整个剪毛室开始缓慢散热,那么很可能不将基地的冷却循环覆盖到植物上,就无法让食用树继续生长了。 繁殖围栏中的生物捕捉器应设置为统计亮鳞滑鳞蜥、普通滑鳞蜥以及小滑鳞蜥,最大数量允许为8只。 右侧剪毛围栏中的生物捕捉器应设置为统计亮鳞滑鳞蜥、普通滑鳞蜥以及小滑鳞蜥,最大数量允许为16只。 左侧剪毛围栏中的生物投放器应设置为允许亮鳞滑鳞蜥、普通滑鳞蜥以及小滑鳞蜥进入,最大数量允许为40只。 关于剪毛室的注意事项:最终你需要在这个房间内制造真空环境。最简单的方法是按照图示安装一个气体泵并让它持续运行。房间会在你需要之前很久就变成真空状态,一旦达到真空,气泵会自动关闭并不再消耗电力。 - 第一项升级 - 鸡蛋移除与污物供应 一旦你掌握了机电一体化工程技能并完成相应研究,首先要实现自动化的就是从畜栏中提取鸡蛋。这主要是因为如果鸡蛋留在畜栏里,你会受到“拥挤”减益效果的影响,从而阻止更多鸡蛋(进而影响肉类、塑料、芦苇纤维等)的产出。 此升级需要600单位精炼金属来建造一个自动清扫器和两个传送带装载器,如运输覆盖图所示。
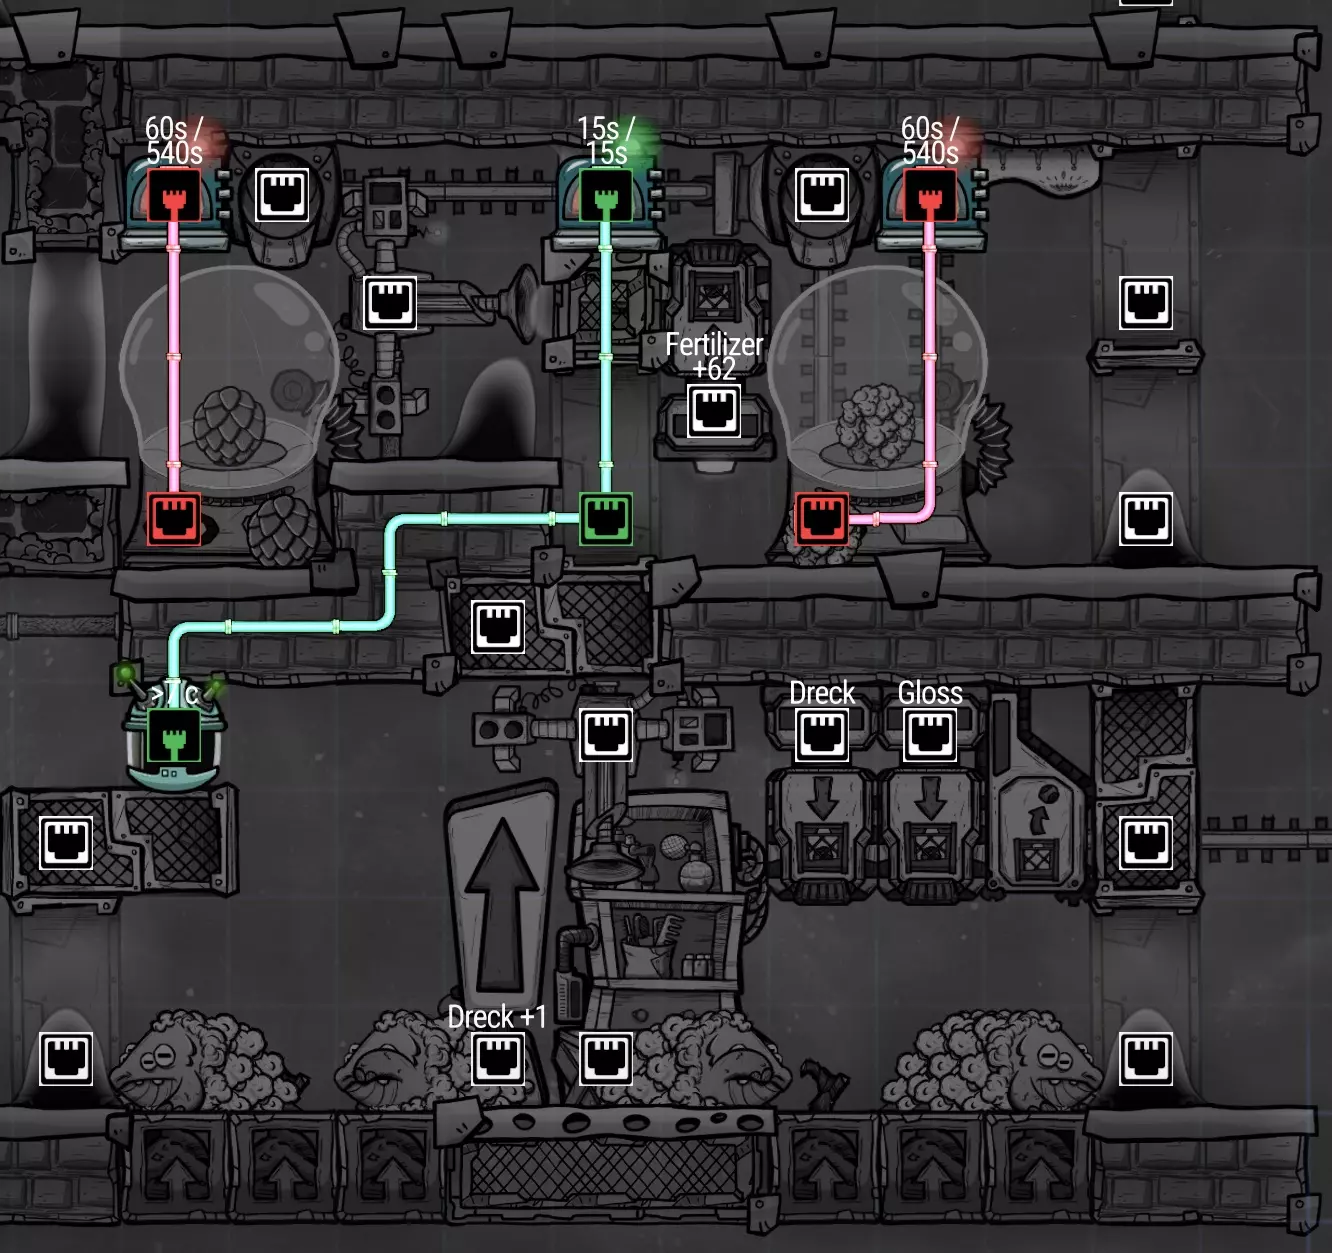
本指南中不会展示任何电力覆盖图,因为布局非常简单。只需确保为所有需要电力的设备供电即可。我通常会在楼层中铺设横向电力总线,然后所有设备通过向上或向下连接到最近的电力总线。你可以按自己的喜好来做,这个布局没有任何复杂之处。 左侧的装载器直接向上连接到一个斜槽,我们最终会在那里孵化普通 drecko 蛋。因此,它应设置为只允许 drecko 蛋通过。 右侧的装载器直接向上,然后通过传送带桥向左跳转。它连接到一个斜槽,我们最终会在那里孵化亮泽 drecko 蛋。因此,它应设置为只允许亮泽 drecko 蛋通过。最右侧的传送带接收器应连接到基地其他存储位置的泥土供应。这些泥土将由自动清扫器自动输送给植物。这完全是可选的,你也可以让复制人在植物需要时手动获取泥土,但本指南的目的是最大化自动化以节省复制人劳动力。 - 第二次升级 - 孵化 现在我们安装两个孵化器,并添加一些小型自动化装置以降低其能耗。每个孵化器应设置为持续孵化相应类型的蛋,右侧孵化普通 drecko,左侧孵化 glossy drecko。此次升级共需695个精炼金属,其中200个用于第二个自动清扫器,每个孵化器需200个,两个计时器需50个,九段自动化线缆需45个。
中间的新型清扫器可以触及两个孵化器,以及从滑道掉落的两堆蛋。孵化器中的蛋孵化且幼崽被移走后,它会自动为孵化器补充蛋。在后续步骤中,这个清扫器还将用于导出该房间内产生的蛋壳等材料。 使用计时器的自动化可能会被一些人视为漏洞利用,但它存在于游戏中已有很长时间,感觉像是有意设计的,而且还有其他几种方法可以达到相同效果(例如通过机械化气闸门地板禁用建筑)。如果你认为这种自动化是漏洞利用,可以选择不使用,让孵化器持续供电。否则,我将在下文说明其工作原理和自动化的好处。计时器电路的作用是让孵化器每个周期仅启用一次,持续60秒。每个孵化器的启用时段应交错设置,确保一个孵化器即将关闭时,下一个孵化器随即启用。这可以通过初次设置计时器传感器时使用“重置计时器”按钮来实现。一旦所有孵化器都完成设置并交错运行,同一时间最多只会有1个(或因几秒钟重叠而出现2个)孵化器处于通电状态,从而降低电源线的负载。当任何孵化器通电时, rancher 会立即赶来拥抱蛋(建议将孵化器的优先级至少设为7以促进此行为),拥抱后不久孵化器便会断电。“摇篮曲”增益效果会在蛋上持续一整个周期,期间无需消耗电力,之后该过程会在一个周期后重复。这使得我们能将每个孵化器的电力负载从持续240瓦降至仅在60秒(一个周期的1/10)内消耗240瓦,其余时间则为0瓦。在效果相同的情况下,每个孵化器的平均功耗为24瓦,总功耗降低了90%! - 第三次升级 - 剪毛 到这里,我们才真正成为了 drecko 牧场。请注意,开始照料 drecko 后约10个周期会产下第一批蛋,第一批幼崽约在之后7个周期出生(如果不使用孵化器则需要33个周期!),再经过5个周期它们就会成长为成年个体并进入剪毛室。所以你需要在建造初始稳定设施后的22个周期内准备好这个,如果你不使用孵化器的话,大约有48个周期的时间。 如果你还没做的话,首先需要在剪毛室制造一个真空环境。我过去曾推荐过一种替代方法,即用瓷砖填满房间然后拆除它们,但由于这种新设计的形状特殊,最好的方法还是像初始建造部分提到的那样直接抽出空气。 一旦房间内形成真空,就应该移除气泵,并用临时的气体排放口向房间内充入氢气(之后可以删除排放口)。氢气的量并不重要,因为 drecko( drecko)不会消耗这种气体,它们只需要浸泡在氢气中就能生长鳞片。我甚至测试过每格只放几微克,但水垢的生成速度没有任何区别,不过我建议每格至少放入几百克,而且粉色的外观也挺别致的。 这次升级总共需要300单位精炼金属,用于左侧的太空服对接站和检查站。一旦 drecko( drecko)数量开始增加,两个剪毛站就能提供足够的处理量。
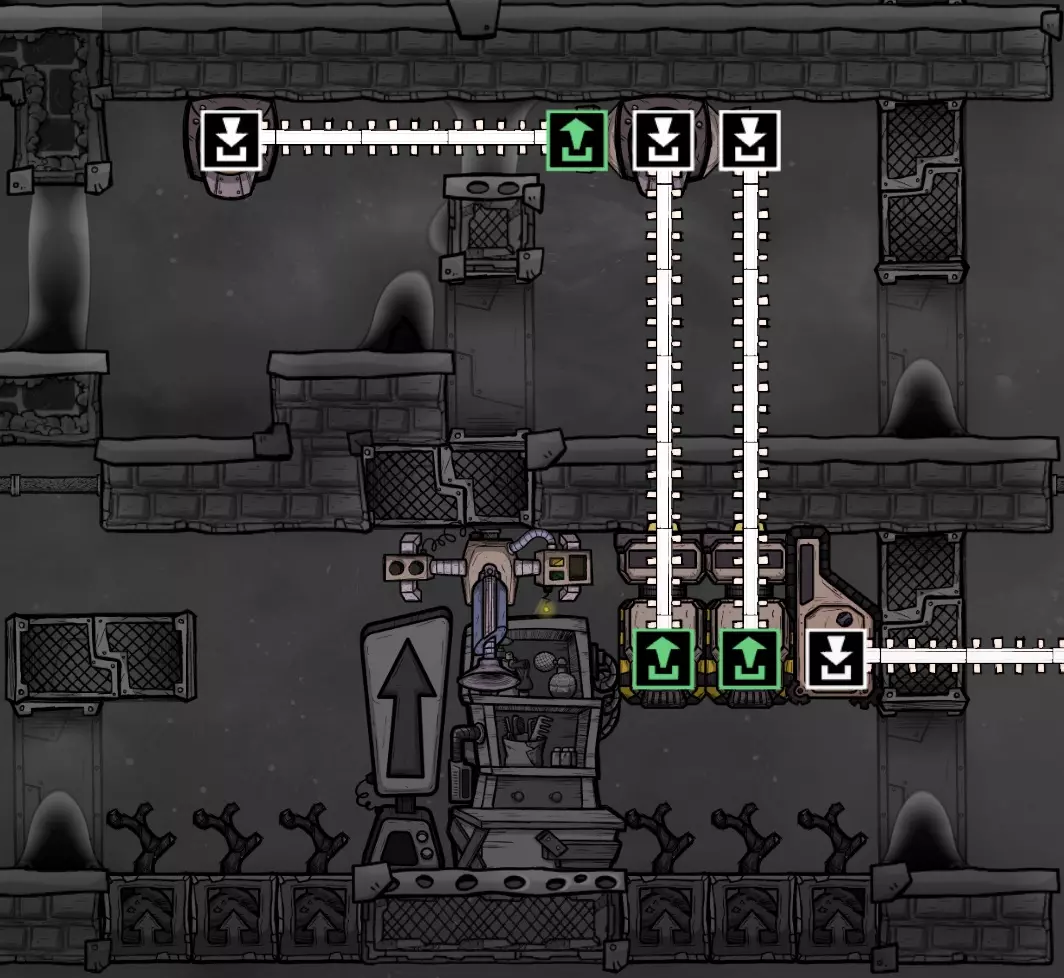
关于此步骤的几点说明:我假设此时你已经建造了第一个电解器,为基地供氧。如果是这样,很容易用该过程产生的氢气充满剪毛室,并从其中一条氧气管路为太空服对接站供气。 如果你还没有太空服技术,也完全可以不用。复制人永远不会在无法吸入气体的区域呼气,因此他们不会将二氧化碳带入充满氢气的剪毛室,从而不会干扰鳞片生长。让复制人不穿太空服进入的唯一缺点是,他们会因氢气而眼睛刺痛,并增加压力。 - 第四次升级 - 输出分配 此升级需要800单位精炼金属来安装最后一个自动清扫器和至少三个传送带装载器。
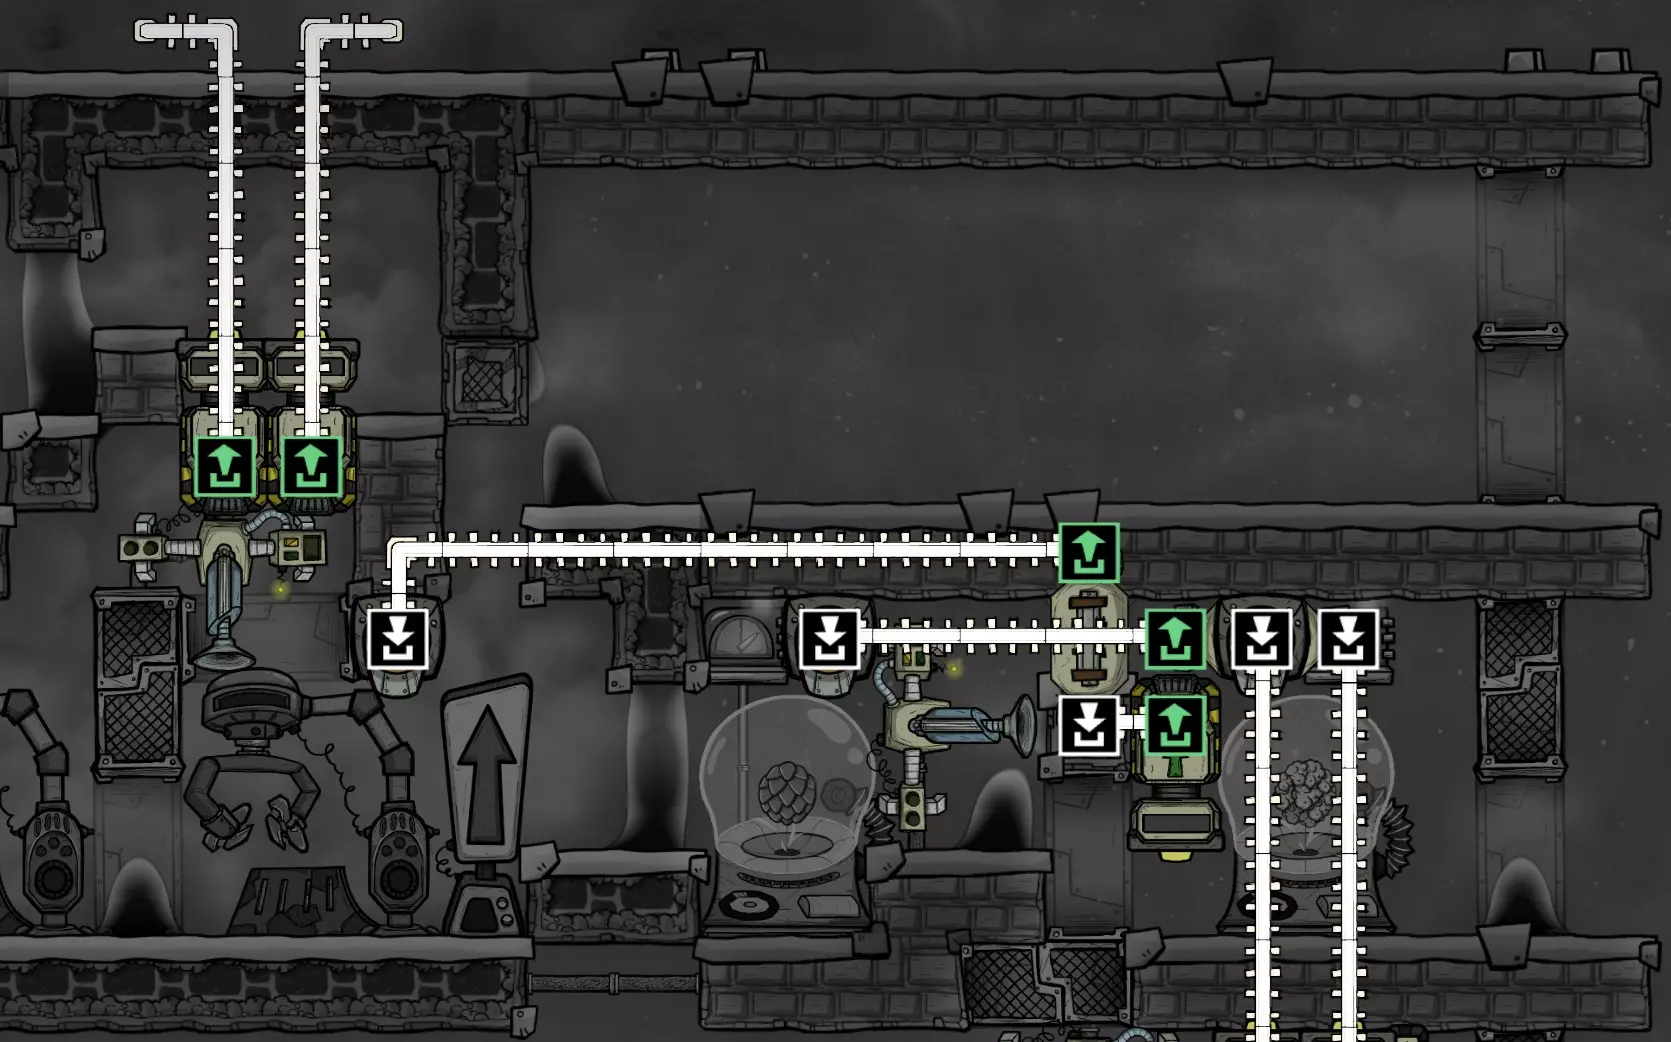
第一个装载器放置在孵化器旁边,这样育种室左侧和下方的清扫器都能触及到它。此装载器应设置为接收除蛋和泥土外的所有物品,并将所有资源输送到剪毛室的斜槽中。 剪毛室的地面现在会散落各种资源(可能还有一些建筑废料),需要将其清理并送回基地。这是最后一个自动清扫器的工作,它可以搭配多达12个传送带装载器,将资源分流到不同的传送带上。以下截图显示了该清扫器的覆盖范围以及所有可能安装装载器的位置:
这个牧场会生产多达七种资源,你需要决定如何出口: 磷矿 肉 塑料 芦苇纤维 蛋壳 食用虱(数量可忽略不计) 食用木种子(数量可忽略不计) 在上方第一张图片中,我只使用了两个装载机。一个装载机设置为接收所有“可食用”和“烹饪原料”物品,直接将其送往我的冷冻库/厨房。这会运走肉类以及生产出的任何食用虱。 第二个装载机的设置则完全相反,它接收除可食用物品和烹饪原料之外的所有东西。这会将磷矿、塑料、芦苇纤维、蛋壳以及任何食用木种子送往中央存储/仓库/分配中心。如上所述,你有充足的空间来定制你的物流系统,想使用多少种不同的传送带都可以。塑料可以被送往酸气锅炉,蛋壳可以送入工业桑拿房用于石灰/钢铁生产,任何符合你基地需求的配置都是可行的。 关于传送带桥的注意事项:一般来说,桥梁,尤其是传送带桥,是极佳的热传递工具。甚至有利用这一特性来搭建蒸汽轮机的取巧建筑,但我们要确保不会意外利用到这个机制。 这意味着,在将传送带轨道接入或接出剪切室以输送资源时,我们需要非常小心。任何所需的管道桥理想情况下应将其输入和输出节点都置于隔热瓷砖内。从隔热瓷砖开始并延伸至牧场外部(你的基地内)也是可以接受的。有两件事绝对不能做:一是管道桥从剪毛室内部开始并在隔热瓷砖内结束(这会迅速加热瓷砖,导致热量泄漏到基地中),更糟糕的是,让管道桥跨越隔热瓷砖,将高温的剪毛室直接与你基地内的空气相连。 - 第五项升级 - 种群补充 由于 drecko( drecko)的生命周期为 150 周期,因此在需要激活生物投放器来补充繁殖种群之前,你将有充足的时间。话虽如此,这个生物投放器所需的自动化系统极其简单,你不妨早点安装。升级仅需约100个精炼金属,其中生物传感器和定时传感器各需25个,另外还需要约50个用于自动化线路。
生物传感器设置为“7只以上”(仅生物,不含蛋),这会在稳定舱满员时使投放门保持开启状态。孵化室中任何成年的 drecko( drecko)都会通过开启的门爬入剪毛稳定舱。如果繁殖稳定舱需要新的繁殖个体,此输入会变为红色,此时门将完全由计时器控制。在《缺氧》中,绿色信号始终优先于红色信号,因此无需使用与门或或门来控制门。当计时器变为绿色时,它将覆盖生物传感器并打开门。 计时器应根据你最常使用的游戏速度进行设置。对于默认的最慢速度,2-5秒的开启时间后跟随2-5秒的关闭时间应该是一个不错的循环。如果你通常将游戏速度设置得较高,就需要将这些数值相乘。例如,我总是以极高速度进行游戏,发现15秒开启、15秒关闭的循环效果很好。具体数值并不重要,只要门有足够时间完全打开和关闭,并在再次循环前保持该状态一小段时间即可。 和大多数生物一样, dreckos( dreckos)往往会待在围栏的边缘而非中间。 由于计时器的作用,围栏左侧有一半时间会处于门开启状态, dreckos( dreckos)会站在那里。如果计时器变红,这扇门就会关闭,将 dreckos( dreckos)从下方推出,使其穿过下方的第二扇门,进入繁殖围栏。重复前面提到的内容,如果这个简化投放器将过多的 drecko 放入畜栏,生物收集器会确保多余的 drecko 被自动捕捉并带到左侧的剪毛室。 - 第六项升级 - 冷却 最终你需要为 mealwood(食用树)提供冷却,因为 drecko 的体温过高会抑制它们的生长。你或许可以在没有冷却的情况下撑过一百多个周期,但这终究无法避免。这项升级很简单,一旦你建立了基地的冷却回路,将畜栏与之相连即可。 我只对繁殖畜栏中的九个格子进行冷却,即六个种植箱和三个通风砖。
尽管剪毛棚会变得非常热,但无需为该区域降温,我将在下文说明原因。植物所需的冷却极少,因此只要将所有九根管道都用花岗岩制成,或许不使用辐射管道也能应付。到游戏的这个阶段,少量精炼金属已不再是障碍,所以我倾向于至少在六个种植箱中铺设辐射管道,因为种植箱的热传导率较低。透气砖的传导性更好(且对植物温度的直接影响没那么大),因此花岗岩管道用于透气砖区域完全足够。你还应考虑冷却回路中液体的温度。如果天气非常寒冷,花岗岩是更好的选择,尤其是当温度低于10°C时,辐射管道可能会使温度降得过低,从而抑制食用树的生长。如果液体温度较高,特别是接近食用树30°C的耐受上限时,则应使用辐射管道以优化散热效果。 那么剪毛稳定区呢?过去有人问我,为什么剪毛稳定区周围要铺设隔热瓷砖,答案是该区域需要保持高温,稳定在40°C左右。我们不能让热量散失,否则会抑制食用树的生长。也有人问过,液封会在隔热层中形成缝隙,这是否会导致热量外泄。 这些问题用图片来解释最直观,所以下面我会展示两个例子。首先是未使用隔热瓷砖建造的牧场外观,其内部标准温度约为40°C。

这张图片拍摄于普通瓷砖吸收了足够热量,与内部空气温度达到平衡后的几个周期。如你所见,热量正在四处泄漏。养殖场的生物捕捉器和网状门已经开始变黄,用不了多久,所有东西都会变热, Mealwood 也会因此枯萎。你完全可以这样建造 ranch,但之后就必须将剪毛棚也接入你的冷却循环系统。虽然前期可以通过不建造隔热瓷砖节省一些原材料成本,但代价是需要持续为这些额外的热量进行冷却,从而形成一个永久性的能量消耗源。第二张图片展示了带有隔热瓷砖的标准牧场,不过我人为地将内部温度提升到了极高的水平(约125°C)。这远高于液封的沸点,但由于热传导性较差,液封目前仍维持在70-80°C左右。
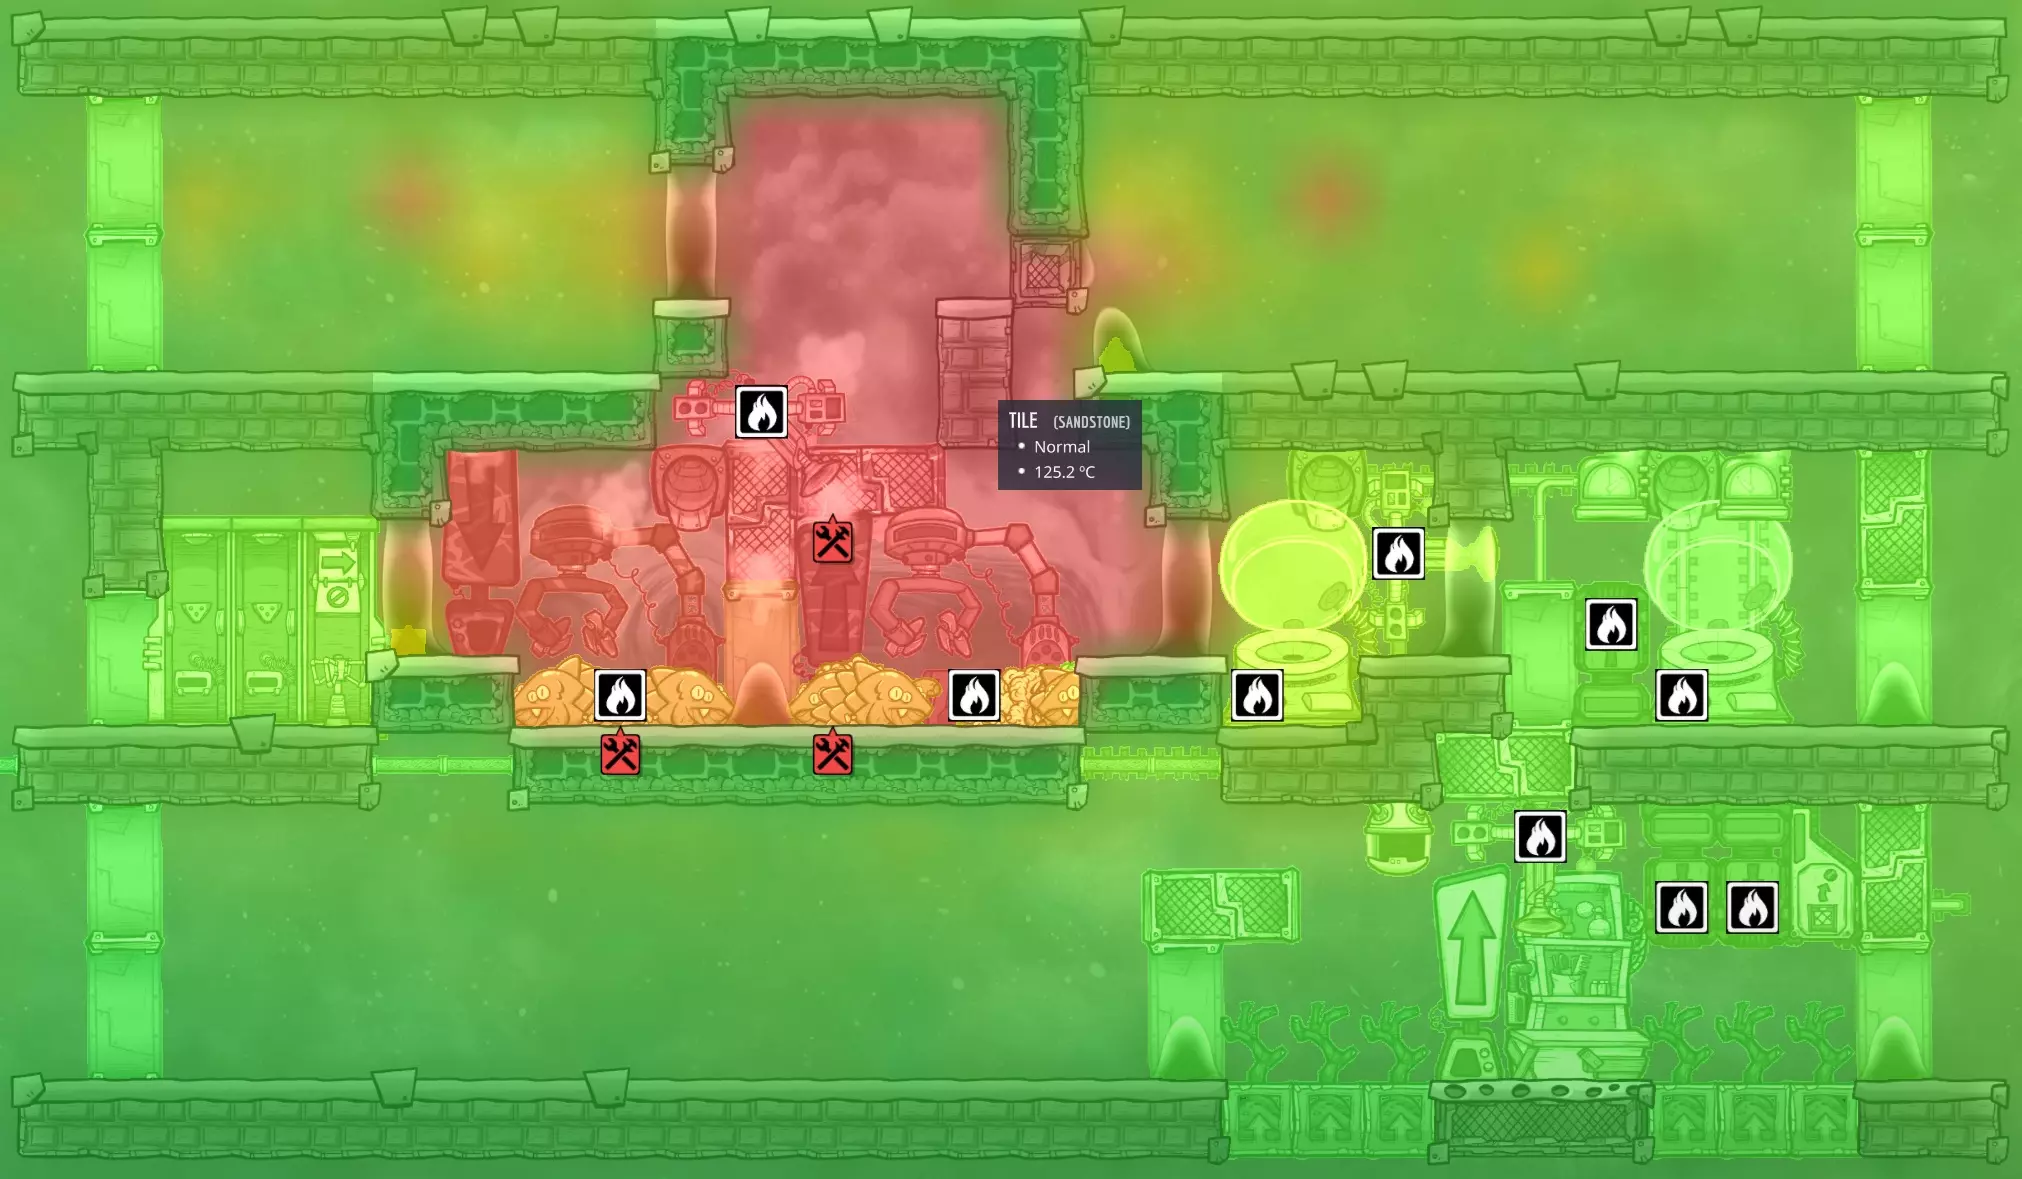
从顶层红色和橙色的光点可以看出,液封确实会让少量热量向侧面泄漏到你的基地中。不过,这些热量都不会向下传导到食用树。此外,如果稳定温度是正常的40°C,而非人为设定的125°C,这种泄漏几乎无法被察觉。我们反正都要直接为食用树提供冷却,这足以抵消来自剪毛稳定区的任何微小热泄漏。同时,我们不用冷却这个区域,能节省大量能源,让它稳定在 drecko( drecko)的体温。 - 可选 - 装饰 游戏后期,在复制人花费大部分周期工作的地方添加装饰会很不错。在美容站和剪毛站附近有空间放置一些装饰物品,比如雕像和悬挂花盆。你也可以在实用区域大量布置装饰,还可以考虑将区域之间的一些标准(非绝缘!)地砖替换成窗户地砖,以进一步扩大装饰的覆盖范围。 drecko 每只可提供 10 点装饰度加成,我们将它们限制在剪毛站和美容站周围的几块地砖范围内,这样它们就能持续为操作这些工作站的复制人提供增益。 总而言之,无需过度追求,就能轻松让整个牧场的装饰评分达到很高水平。

6. Summary and Statistics NOTE: All statistics below were collected from the earliest version of the ranch (2021), even before the Fast Friends patch. Nothing significant has changed in the ranch design, or the production mechanics, so the numbers should still be relatively accurate.I've run this ranch design for around 300 cycles and calculated the average output of each resource. Note that due to the longer lifetime of dreckos it takes longer to start obtaining eggs and meat than other ranches. This style ranch is not intended to be a primary food supply. You would build this for the sustainable plastic and reed fiber, and as a bonus you'll eventually get a little meat to feed just under three dupes. PhosphoriteWow do these dreckos like to excrete phosphorite! With each of the eight breeders producing 10 kg per cycle you should have more of it than you can handle. In my testing I only measured ~90% of the theoretical 80 kg, so I assume some of the dreckos aren't eating every single cycle. Regardless, this is enough to feed ~70 Pincha Pepper plants, over ~350 shine bugs, or just synthesize a ton of fertilizer for rocket engine oxidizer or the farm station bonus. Plastic and Reed FiberYour first plastic and fibers should come out around cycle 22 using the incubators, or around 48 without them. The first round of eggs might not have any glossy dreckos, so it could be another 10 or 20 cycles beyond that point before you have enough for reliable plastic output. Over the long term, I measured over 700 kg of plastic and ~1.3 reed fibers per cycle. Meat and EggshellsEven with the incubators running, it takes over 50 cycles for the first drecko to starve and produce any meat. Without incubators running that number is closer to 80 cycles. You'll definitely need to have food figured out for your colony long before you see any meat production from a drecko ranch, but eventually it will add a bit to your stockpile. I measured around 2800 KCal output per cycle, assuming you're cooking the meat into barbecue, and a little over 0.75 kg of eggshells per cycle. Converting the eggshells to lime and then steel, you'd be able to produce 100 kg of steel every 13.5 cycles. As with meat, you'll probably want to ranch another critter with a shorter lifecycle if you're looking to mass produce eggshells for steel. Meal Lice and Mealwood SeedsFor all practical purposes I would assume that you will not see any of these resources from the ranch. We provide the breeding dreckos just barely enough mealwood plants to survive on, so none of the plants should ever reach full maturity and produce a harvest or seed. That said you might have multiple breeders die of old age around the same time, or might not be able to find 8 wild dreckos from the get-go when setting up the ranch. For those short periods of time with less than 8 dreckos in the stable you may see small amounts of meal lice produced, and depending on the skill of your farmers they might also produce some seeds. I wouldn't even bother mentioning these outputs except that meal lice left on the ground will eventually turn to rot and produce polluted oxygen in your base. So at the very least you should be prepared to clean these resources up. 7. DEPRECATED - The Overkill Drecko Ranch This entire section is now invalid after the November 2025 QoL patch. I never updated it after the Fast Friends patch, and I don't plan to update it now. I could delete it, but I decided to leave it here for fun and to show what used to be possible at the most extreme end of starvation drecko ranching. My previous guide discouraged anyone from actually building this, but post-patch it wouldn't even work if you tried. I'll leave the rest of the text in this section as it was in 2022 for posterity. You probably shouldn't build the ranch I'm about to describe in this section. When I finished the original guide I was looking at the final design's simplicity, and looking at some of the complicated prototypes I'd gone through, and got to thinking... "What if I took some of the neat features from the throwaway designs and integrated them into this design?" Specifically what if I: Modified the stable to allow stacking like a traditional hatch ranch Added a second critter dropper to the control room Added a bunch of automation to allow each stable in a stack to independently request breeder dreckos of a specific typeTo get all this I decided to grow the design by 2 tiles in width, so each level is now 26x4. It's also possible (and in retrospect, better?) to keep it at the standard 24x4 size by going to 7 dreckos per stable, and getting creative with the warehouse/distribution space. But enough build up already. Construction OverviewNOTE: This section and screenshots have not been updated to reflect possible improvements since the Fast Friends patch. I never intended anyone to actually build this style ranch, but if you wanted to you could apply most of the improvements from the MkII design above here as well. Specifically, far fewer plants are required, more incubators can be used with smarter automation, and the wheezewort can be replaced with a cooling loop. It's a fun design, it's just unnecessary for normal gameplay.I'm not going to do a complete construction guide, but it should be obvious that most of the same step-by-step instructions from the main guide apply. Here's what the finished product would look like:
这张截图展示了“过度杀戮牧场”井的新功能。每个畜栏的最大变化是增加了机械化气闸和气动门。这种组合允许生物从堆叠的畜栏中掉落或在下落过程中被捕获,同时防止 drecko( drecko)通过地板上的敞开大门攀爬。 还需要注意的是,截图中的三个畜栏最初都只有普通 drecko。每个 grooming station( grooming station)的左侧都有一个手动开关。当此开关开启/呈绿色时,表示你希望从左侧生物投放器补充繁殖者,在本例中是 glossy drecko( glossy drecko)。相反,当开关关闭/呈红色时,新的繁殖者将来自右侧投放器,即此处的普通 drecko。在截图中,顶部和底部的兽栏几乎已完全替换为光面 drecko,而中间的兽栏按照其开关的设置,仍然只饲养普通 drecko。你还可以看到左上角和中间右侧的两个气闸目前处于关闭状态。这两个兽栏各缺少一只 drecko,正通过其开关位置所指示的生物投放器请求补充。 在深入讲解之前,我需要传达一些次要的建造注意事项:底部兽栏中的两个机械气闸应设置为常开。其他所有兽栏的气闸将由自动化系统控制。所有8扇带有油斑的门(4扇在最右侧,4扇在中左侧)应设置为禁止复制人从两侧通过,以防止负面状态。右侧孵化舱左侧那扇进入剪毛室的门,必须设置为禁止复制人从两侧进入。这能防止 atmosuit(太空服)丢失以及复制人可能受到的烫伤伤害。解决完这些问题后,以下是运输和自动化覆盖图:
运输系统并不复杂,泥土从每个养殖栏的中心向下输送,然后通过T型管道分流至两个接收器。每个养殖栏的装载机会将资源向上输送,然后向左进入与原始设计相同的固体过滤器。看起来有点复杂,但实际上和原版没什么区别。 自动化系统看起来更复杂,但其实相当简单。控制室的逻辑与原始设计几乎相同,使用计时器来交替控制投放门,但只有当一个或多个养殖栏需要 drecko 时才会启动。 从最底部的养殖栏开始解释最简单,它少了4个部件: 这里有两个与门,都连接到生物传感器,传感器设置为低于8只。因此,除非稳定器需要新的繁殖生物,否则一切都会变为红色。这会在控制室中反转,并保持投放门打开,这样 dreckos( dreckos)就会爬入剪毛室,而不是被投放下去。这与原始设计非常相似。 第二个“与”门输入来自手动开关,左侧直接输入,右侧则通过一个反相器输入。因此,单个稳定器在同一时间只能触发一个生物投放器,要么是左侧的,要么是右侧的。这就是你选择用哪种类型的繁殖生物填充稳定器的方式。底部稳定器的情况基本上就是这样了。如果它需要生物,就从你用开关指示的投放器那里获取一个,否则就不获取 :) 至于它上方的稳定器,只需要再添加一点点东西。每个“与”门(左右两侧)输出的信号会同时发送至一个反相器和一个缓冲门。缓冲门的作用是将“与”门的输出与其他所有稳定装置的相同输出相连,这样一来,只要有任何一个稳定装置需要繁殖器,整个线路就会变为绿色,从而激活生物投放器。通常情况下,这一步无需使用门电路,因为共享线路上的任何绿色信号都会覆盖其他红色信号,但在这种情况下,缓冲门明确用于防止这种情况发生。观察右上角或中左位置的电路可以发现,如果没有缓冲门,反相器接收到的红色信号会被来自其他稳定装置的绿色信号覆盖。逆变器与机械化气闸相连,用于控制是否允许 drecko( drecko)通过该畜栏掉落或被拦截。如果需要育种个体,“与”门输出为绿色,此时逆变器会将其转为红色以关闭气闸。相反,当畜栏已满时,气闸保持开启状态,让生物掉落到下方的畜栏。以上就是主要内容,供那些想要极致配置的玩家参考。我认为标准的两层设计已经很棒,但如果你确实需要每个周期产出数吨塑料和少量芦苇纤维,并且希望能随意切换育种类型,那么这种设计或许能帮你实现目标。 8. 感谢阅读 感谢您阅读本指南,希望您能从中获得有用的内容!我也想再次感谢thegroundbelowme和Beardo09的协作牧场设计。我见过很多不错的 drecko( drecko)牧场,但没有一个接近我脑海中的样子。他们的设计帮助我极大地优化了自己的牧场,希望他们能喜欢我的改良版本。 thegroundbelowme & Beardo09 - 优化型 drecko( drecko)牧场设计 v3 https://www.reddit.com/r/Oxygennotincluded/comments/qarpve/optimized_drecko_ranch_design_v3/
2026-02-12 06:31:15 发布在  缺氧
缺氧


说点好听的...
收藏
0
0