


所有成就/鬼魂解析 新手指南 - 恐鬼症
大家好!欢迎阅读这份《恐鬼症》全成就(54/54)及新手完全指南!本指南将详细介绍《恐鬼症》中的每一项成就以及解锁方法,如果你在解锁过程中遇到困难,也能在这里找到正确的方向。如果你正在收集成就,那么你来对地方了!如果你是新玩家,这份指南也能为你提供很好的指导和帮助!重要提示:诸如“声望成就”“启示录成就”“装备成就”等,若你在这些成就添加前就已完成相关要求,将直接解锁。其他成就则需在触发相关条件后解锁。若想更快找到特定成就,别忘了使用(Ctrl+F)打开搜索功能!请分享您可能有的任何反馈,这不仅对我有帮助,也对所有可能将此作为资源的人有帮助! (我还将在指南底部添加一个鸣谢部分,以感谢所有贡献者) 让我们开始吧,猎鬼者们!:D 简介 成就信息难度:中等 总成就数:54(可能会有变动) 线上/线下成就:53/54 仅线上成就:1/54 预计完成所有成就所需时间:未知 所需最低通关次数:3次( prestige ) 存在问题的成就:未知 可错过的成就:无 实用资源 注意:我不拥有此处发布的任何指南或链接,但它们是帮助您进行猎鬼之旅的绝佳资源! 《恐鬼症》官方 Discord[discord.官方Discord服务器是获取帮助或了解游戏更多信息的最佳途径。前往服务器中的#ghost-huntin-resources频道,你可以找到本指南中许多信息的来源! Tyban的《恐鬼症》速查表[tybayn.github.io] 这里有一些你在其他地方找不到的极其有用的资源,例如用于帮助缩小鬼魂范围的脚步声BPM测试器、能力的视觉展示等等! 'Prestige' 成就 这些成就只需通过游玩游戏即可获得! 成就等级范围为Prestige 1至3。每达到100级即可 prestige 一次。 在此过程中,当你达到Prestige 3时,你应该已经解锁了几乎所有其他成就,只需额外花点功夫就能完成剩下的少数几个。注意:如果您在成就添加前已完成相关内容,那么在您打开游戏时,这些成就将自动解锁。

- 声望等级1: "达成声望等级I"

威望等级 2:“达到威望等级 II”

- prestige 3: "达成 prestige III" 休闲经验值获取方法 获取这些成就的休闲玩法就是按自己的节奏游玩游戏。不过要达到 prestige 3 需要相当长的常规游戏时间。 难度 获取经验值的最佳方式是每次都选择你能轻松获胜的最高难度。可以是任意难度(新手、中级、专家或噩梦)。建议避开疯狂难度,因为该难度下的对局通常耗时更长且难度更高。个人建议:如果你有信心游玩噩梦难度,那就尽可能多玩;但如果你发现自己一直难以应对,专家难度仍然是个不错的选择。单局游戏经验值 要在单局游戏中获得最多经验值,需做到: - 找出正确的鬼魂类型 - 完成所有3个可选任务 - 收集骨头(你也可以轻松拍摄到骨头的3星照片) - 完美游戏奖励(参见“完美执行”部分) - 照片 - 每日和每周任务奖励 关于照片,可前往《恐鬼症》维基百科的此页面[phasmophobia.fandom.com],查看不同照片对应的经验值和美元奖励。你需要在日志中填满3星照片,以获取最多的经验值和美元。 每周挑战模式 挑战模式是一种难度模式,支持单人或多人游玩,每周更换不同的挑战。 每周挑战要求你在特定地图上完成3次带有特殊条件的游戏。这些要求和地图每周都会变化,其中有些比其他的更容易完成。因此,我建议如果你有能力的话,每周都查看并尝试挑战模式,因为对于休闲玩法来说,这能极大地提升经验值。 挑战模式很棒,因为不需要花费任何游戏内货币购买物品,而且死亡也不会损失任何东西!你仍然可以完成可选目标和拍照(如果配备了正确的物品)来获取额外的经验值和金钱。但你的主要目标是在指定地图上完成3次挑战。这将为你带来5000美元和5000经验值,这在前期等级中是一个巨大的提升,通常也是休闲玩家获取经验值最快的方式!如果你遇到困难,通常可以在YouTube上找到视频,或在其他地方找到关于每周任务完成方法的文字攻略!另请查看“挑战模式”成就以获取更多信息。(这也会计入“挑战”成就) 经验值/金钱刷取方法 通过休闲玩法获取这些成就需要花费大量时间才能达到3级声望。但幸运的是,有一种相对“快速”的经验值和金钱获取方法。 此策略的前提是在自定义难度下使用高倍率(12.97倍),尽可能快速地进入和离开,并确定正确的鬼魂类型。这种策略难度很高,你需要了解每种鬼魂的大量信息、它们在狩猎时的不同特征以及脚步声速度,才能分辨出你面对的是哪种鬼魂。此策略的前提是在自定义难度下使用高倍率(12.97倍),尽可能快速地进出,并确定正确的鬼魂类型。这种策略难度很高,你需要了解每种鬼魂的大量信息,例如:它们在狩猎时的不同特征、脚步声速度以及其他任何有助于你判断所面对鬼魂的特点。 (关于每种鬼魂的信息以及你需要知道的一切,都可以在本指南末尾附近的“鬼魂”部分找到) 难度设置 以下是你需要复制的精确设置:
https://www.youtube.com/watch?v=RCx_rqSUnNI 这段来自Maggstor的视频是一份出色的指南,详细展示了从1级到50级的经验值速刷方法中具体该如何操作。我将此视频分享出来供大家观看,并且强烈推荐大家观看此视频以及Maggstor的其他指南。这将帮助你深入理解该策略,并了解如何运用此方法。 'Equipment' Achievements

基础必备:“解锁所有一级装备(等级16)”

-专业工具: "解锁所有二级装备(等级49)"

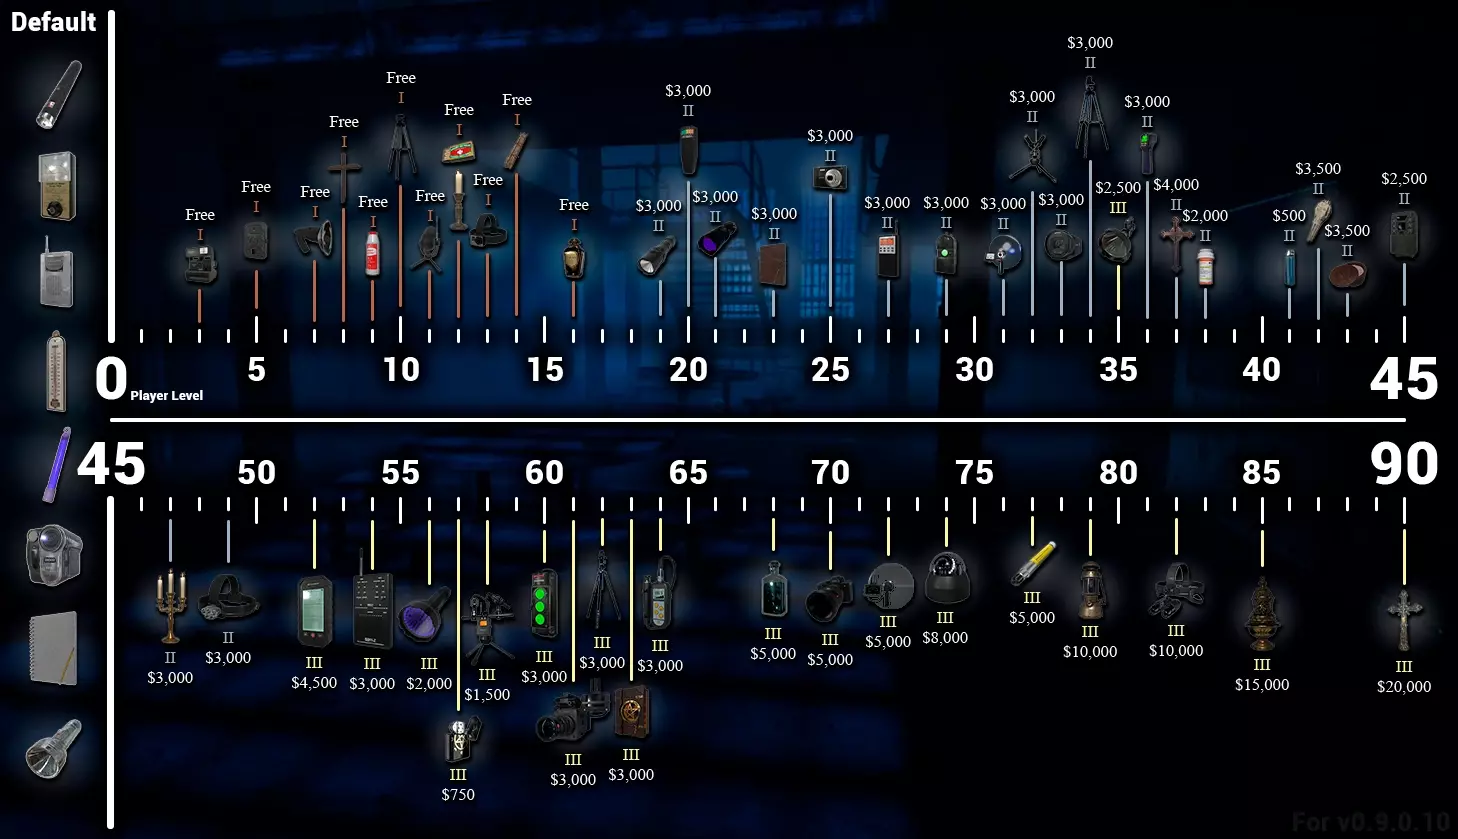
-Fully Loaded: "解锁所有三阶装备(等级90级)" 注:若你在成就添加前已完成相关内容,启动游戏时将自动解锁这些成就。 这些“装备”类成就要求你解锁所有一阶、二阶和三阶物品。在冲击“Prestige”类成就的过程中,你将很容易达成这些成就! 要升级装备,你必须达到特定等级(各装备对应等级不同),之后即可使用游戏内货币升级该装备。(这会计入所有“Spend”类成就) 等级16级时,你将解锁所有一阶物品。(Bare Essentials) 等级49级时,你将解锁所有二阶物品。(Tools of the Trade) 等级90级时,你将解锁所有三阶物品。(Fully Loaded) (以下是获取每个成就的最早机会) 请查看下方图片,其中详细说明了每个物品解锁的具体关卡、升级所需费用,以及物品升级的演示方法。
“Contract”成就 合约,也被称为调查,是《恐鬼症》的核心玩法。 “完成”合约意味着成功猜出鬼魂类型并离开。 如果你在多人游戏大厅中,至少有一名玩家(无论是你还是队友)必须存活并从厢式货车处离开地图。此外,无论你是否存活,都必须在日志中输入正确的鬼魂类型,这样才能算作“完成合约”。 这些成就与声望成就类似,只需通过游玩游戏即可随着时间推移解锁。 注意:如果你在成就发布前已完成任何里程碑,完成一次合约即可更新进度,并自动获得成就。

-工作经验: “完成1份合约”

-新手: “完成10份合约”

完成50份合约

-头目: “完成100份合约” “消费”类成就 此类成就只需在商店/仓库菜单中花费游戏内货币即可解锁。该菜单位于大厅公告板的右侧。 有关刷钱/刷经验的方法,请查看“声望成就”。

-Chump Change "花费1美元"

"Fat Stack" "花费10,000美元"

-Cash Cow "花费50,000美元"

-洗劫银行 "花费100,000美元" "任务"成就 这些任务是你在主菜单以及游戏内的剪贴板上可以看到的每日任务和每周任务。并非可选目标! 以下是每个任务的示例,分别为游戏大厅中的任务和游戏内的任务:
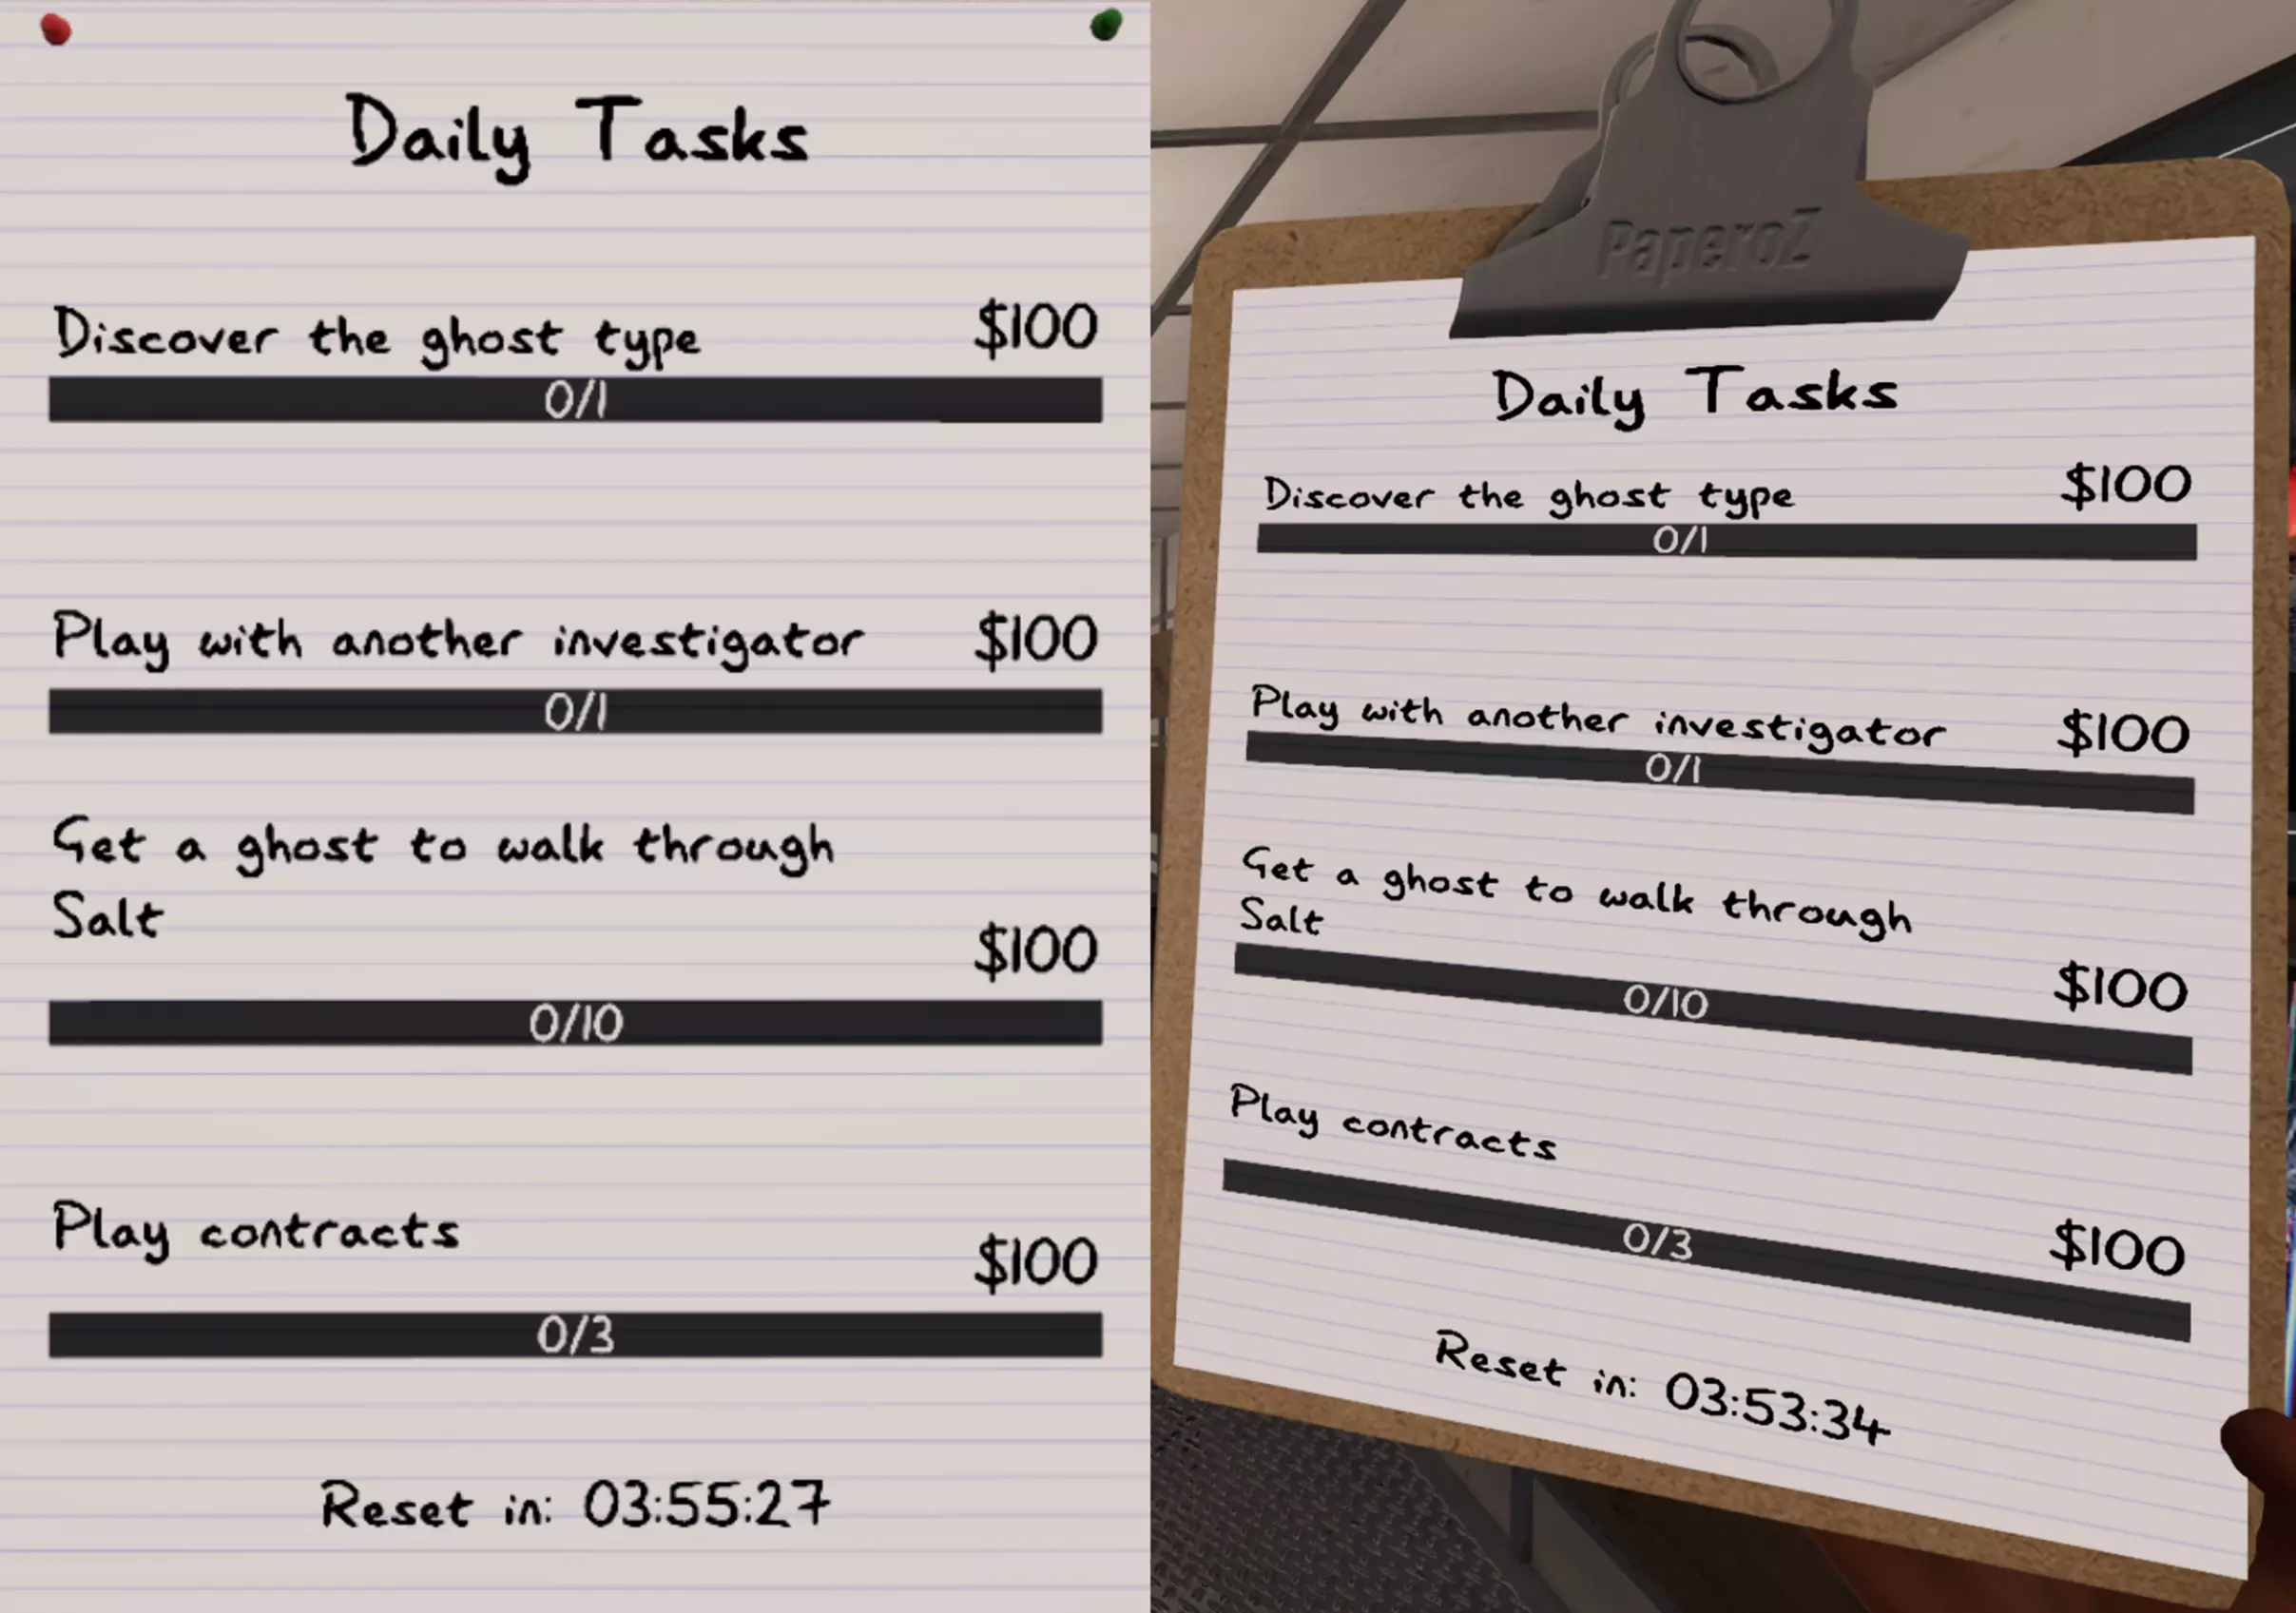
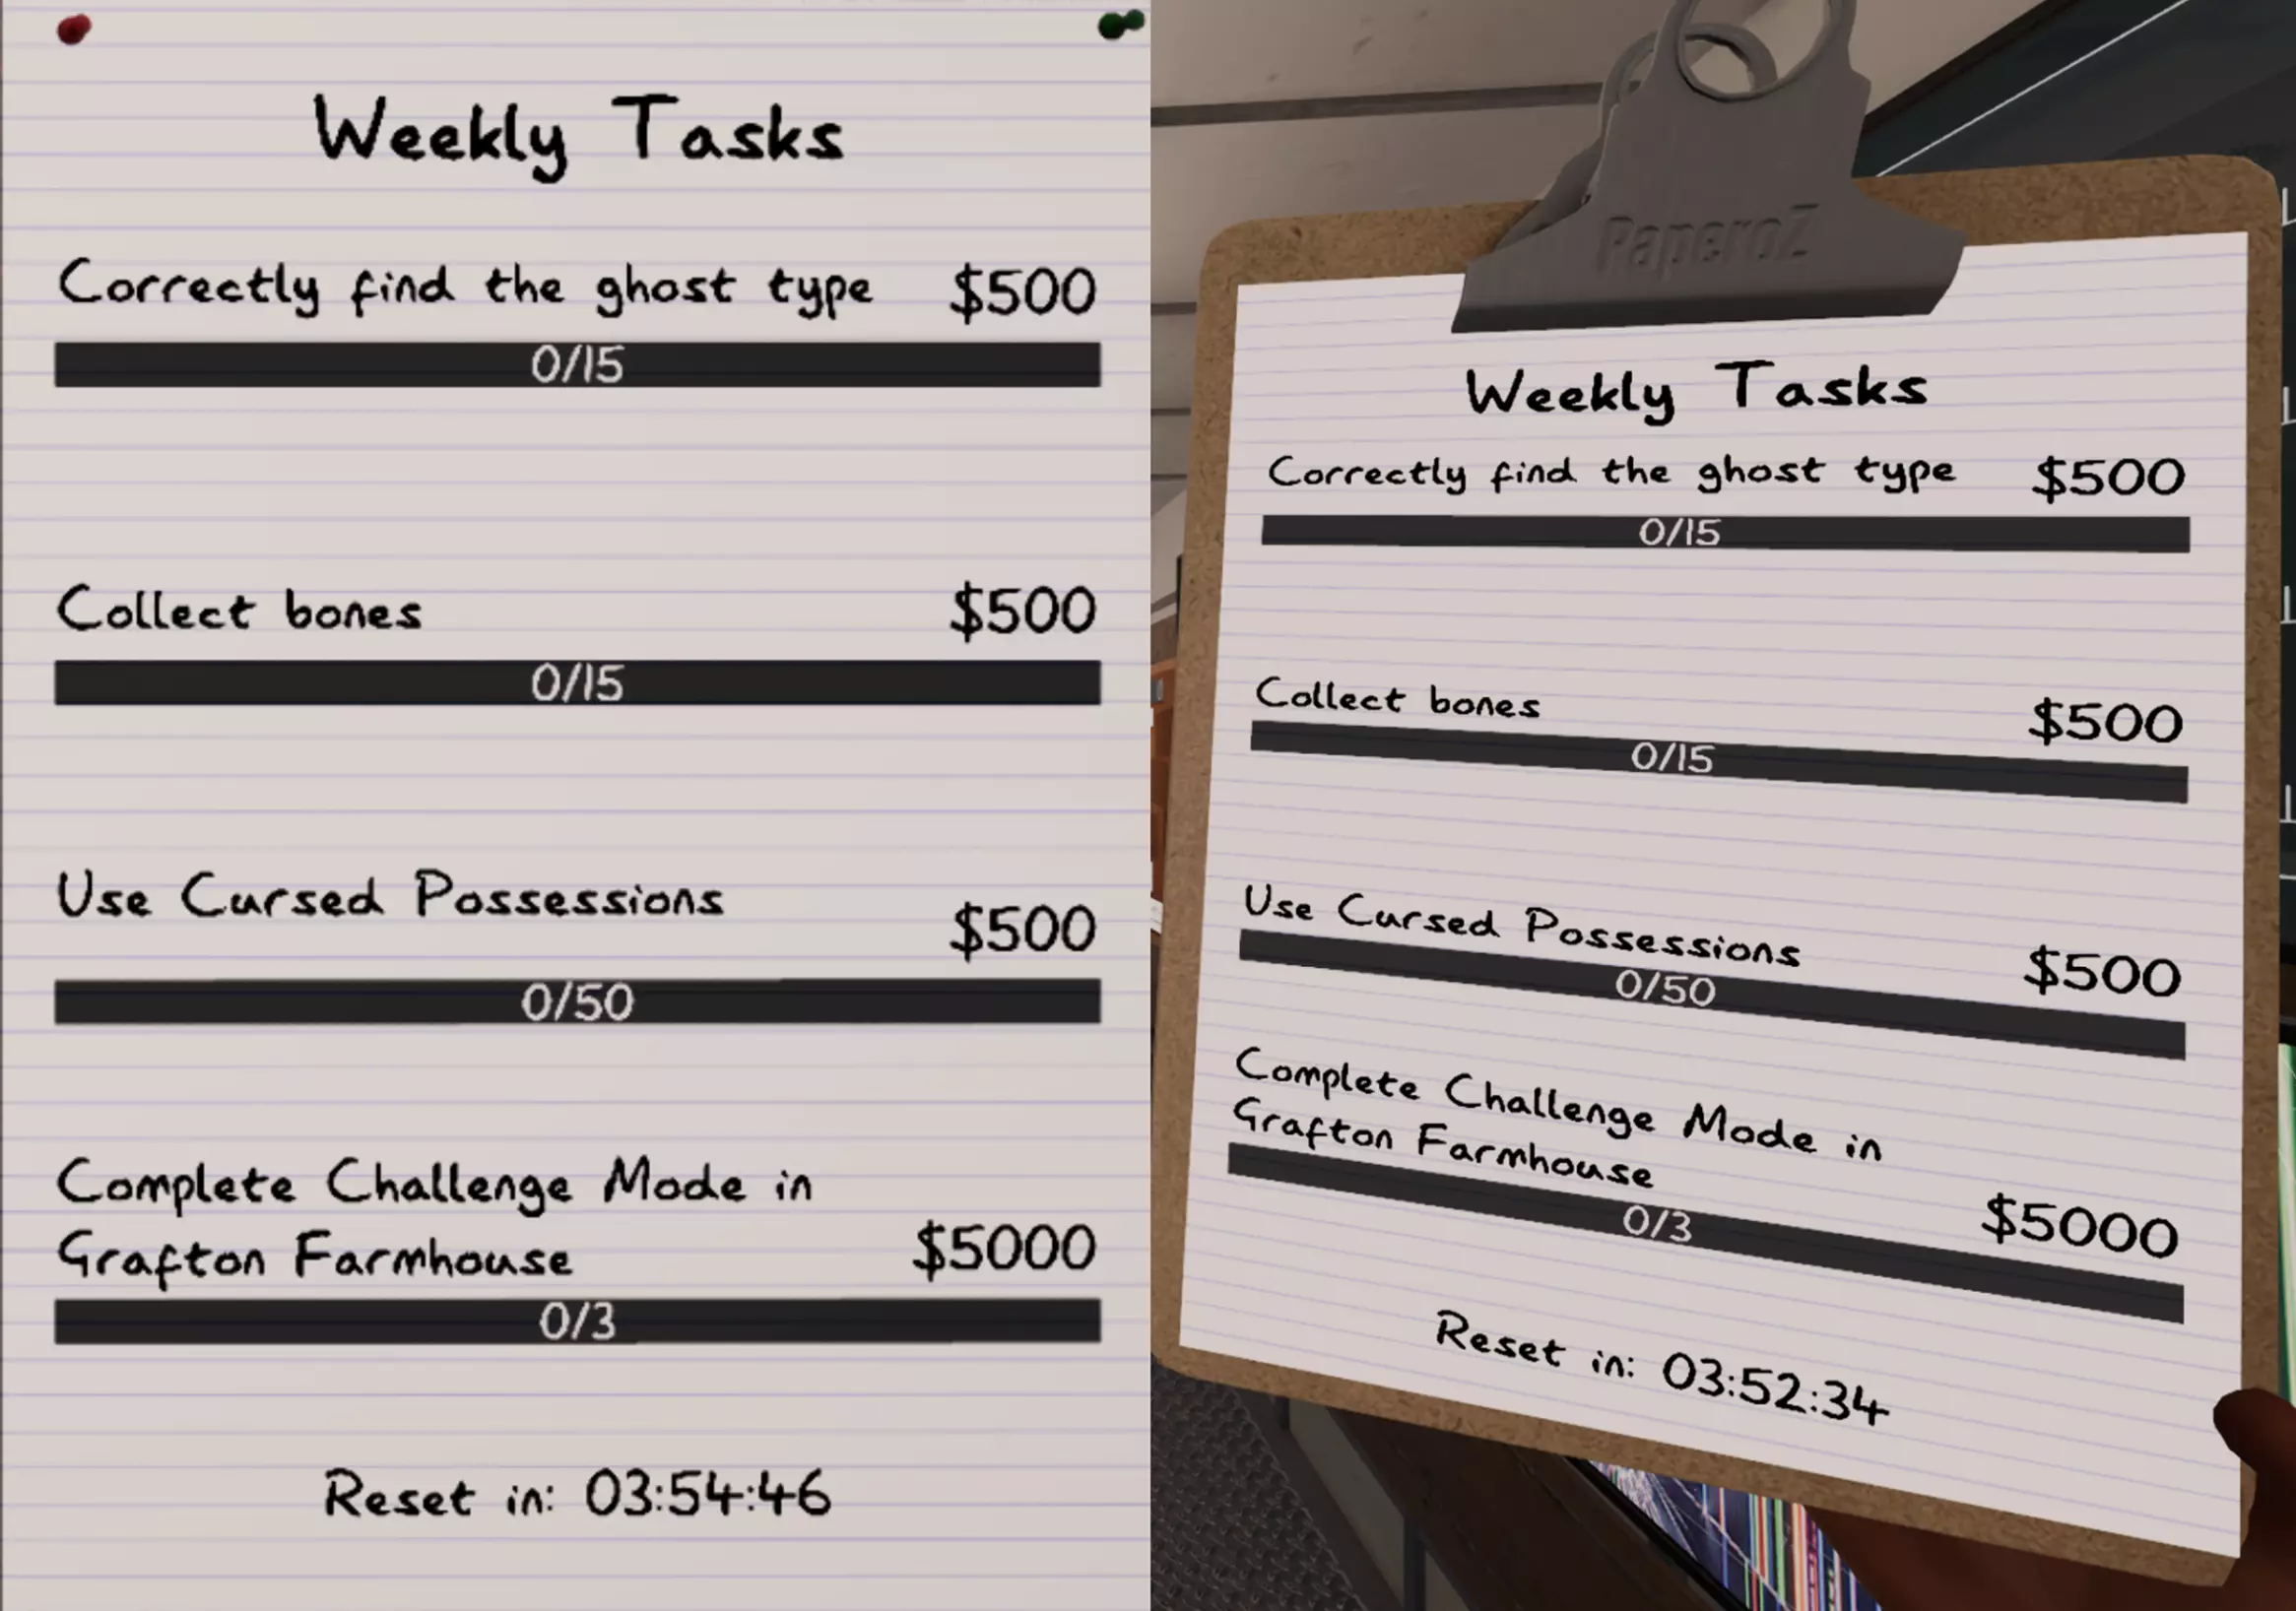
你可以在厢式货车内“案件”板的左侧、显示器/键盘和鼠标的右侧,以及进入游戏大厅前的主菜单中找到剪贴板。对于这些成就,你只需在它们每日/每周出现时完成足够数量即可。

“坚持不懈”:“完成30个每日任务”

-专注: “完成10个每周任务” 下面,我将列出所有可能的每日/每周任务及其完成要求。为避免内容杂乱,此处不列出奖励,详情请查看《恐鬼症》维基[phasmophobia.fandom.com]! 若你完成的每日/每周任务不在你的任务列表中,则不会被计入。请务必完成游戏内显示的每日/每周任务。 每日任务 实际要求(如适用) 在商店购买物品 在装备商店购买3件物品 拍摄3星鬼魂照片 拍摄3星鬼魂照片(D.O.T.S.(幽灵照片同样计入) 完成任务目标 在多个合约中完成6个任务目标 发现幽灵类型 在合约结束时正确选择幽灵种类 找到骨头 在多个合约中收集3根骨头 获取50美元以上的照片奖励 获得总计50美元的照片奖励这可以跨多个合约完成 获得通灵板回应 获得 spirit box(通灵盒)回应 让鬼魂穿过盐堆 在多个合约中让鬼魂踩中10个盐堆 游玩中等难度地图 在枫叶小屋营地或监狱进行游戏 进行合约 完成3个合约 与另一名调查员一同游玩 加入并与至少一名其他玩家完成一个合约 理智值归零 个人理智值降至0% 在猎杀阶段存活 此成就不需要被鬼魂发现 仅使用初始物品存活 不添加任何额外装备完成一个合约 每周任务 实际要求(如适用) 收集骨头 收集15根骨头 正确找出鬼魂类型 正确识别鬼魂类型15次 完成[地图名称]中的任务 完成12个在多个合约的指定地图中达成目标:获得完美调查奖励。完成5场满足以下条件的游戏:正确识别鬼魂类型、完成全部3个目标、收集骨头,并用有效的3星照片填满所有照片槽位(详情见“完美执行”)。在噩梦或更高难度下获得完美调查奖励:完成3场奖励倍率达到4倍或以上且满足以下条件的游戏:正确识别鬼魂类型、完成全部3个目标、收集骨头,并用有效的3星照片填满所有照片槽位。(详见“Flawless Execution”) 获取经验值 获得7500点经验值 通过合约赚钱 从合约中获得25000美元 使用抛物线麦克风听到超自然声音 用抛物线麦克风捕捉到15次超自然声音 用运动传感器探测到鬼魂 用运动传感器探测到30次鬼魂 用十字架阻止狩猎 用十字架阻止15次狩猎 在狩猎中存活 存活30次狩猎 拍摄三星级脚步声照片 拍摄30张三星级的脚步声照片。盐堆照片不计入此任务。拍摄3星鬼魂照片。拍摄15张3星鬼魂照片。拍摄3星照片。拍摄50张任何主题的3星照片。使用诅咒物品。激活或使用50个诅咒物品。完成每日任务。完成15个每日任务。在[地图名称]中完成挑战模式。在指定地图中游玩挑战模式三次。此任务始终存在,但地图和挑战每周都会变化。“Challenge Mode”成就

挑战者登场:“完成每周挑战模式”

勇攀挑战:“完成5次每周挑战模式”

-接受所有挑战: “完成10次每周挑战模式” 关于挑战模式 每周都会有一个新的挑战,设定为特定难度,要求你在指定地图上完成某项挑战。完成后将获得5000美元和经验值,非常适合休闲刷级,这也是每周都要完成挑战的另一个原因。 在游玩挑战模式时,你不会损失任何游戏内货币或装备,因为系统会免费提供装备,根据挑战内容和你的等级,装备的品级有时会高于或低于你常用的水平。这使得参与挑战变得轻松有趣,也让每个人每周都有更多理由至少尝试一下! 如何参与 进入单人或多人游戏大厅。在任务板上选择难度时。按向右箭头切换难度,直到找到“挑战模式”(位于“疯狂难度”之后、自定义难度之前)。选择此难度并留意它提到的地图,因为挑战必须在该地图上完成!选择难度后,前往地图面板并选择它提到的地图。之后无需担心装备,直接准备就绪并进入即可。

'Apocalypse Trophy' 成就

-青铜猎手: “获得青铜启示录奖杯”

-银猎手: “获得‘Silver Apocalypse’成就”

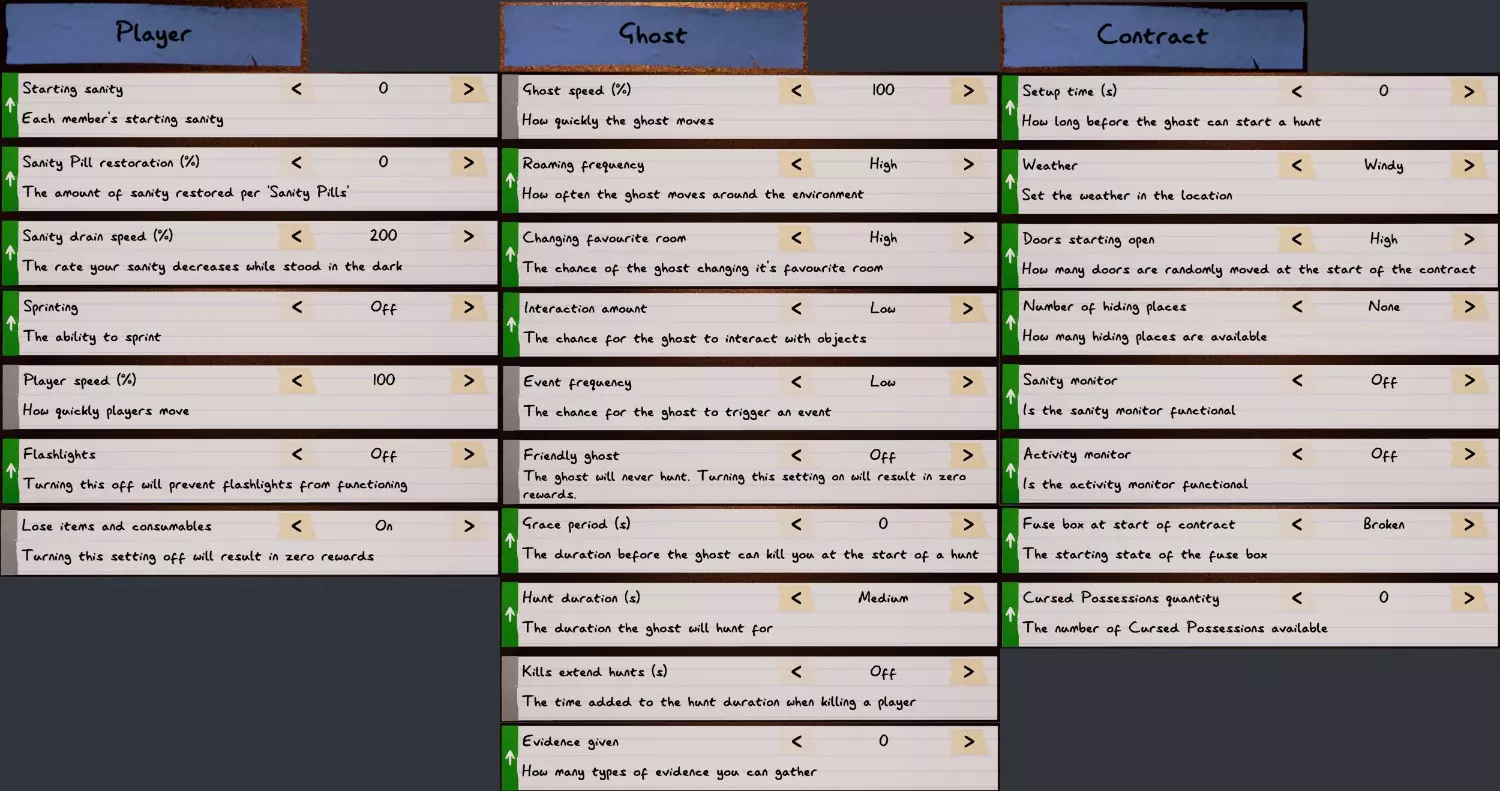
-Gold Hunter: "Obtain the Gold Apocalypse Trophy" The Apocalypse Trophies are very difficult trophies to get. They require you to play on a custom difficulty (netting you the 'Director' achievement) at high difficulty multipliers and with specific requirements. These can be extremely difficult, especially for newcomers. You can complete these at any time, so it's suggested to attempt this challenge when you have most/all Tier 3 items (especially Tier 3 Para-mic and Tier 3 Head-cam. Especially for Gold), and a good understanding and knowledge of the game. The requirements for the challenge are as follows: To earn each Challenge trophy, you must: - Have a 6x/10x/15x Custom difficulty multiplier - Be in Singleplayer mode - On the map Sunny Meadows (Un-Restricted) - Complete all 4 Objectives (includes 3 optional objectives + correctly identifying the ghost) - Get a Ghost photo The trophies range from Bronze to Gold:Bronze requires you to find the ghost and complete all requirements on a 6x multiplier or higher. Silver requires you to find the ghost and complete all requirements on a 10x multiplier or higher. Gold requires you to find the ghost and complete all requirements on a 15x multiplier or higher. Note: Earning a higher level trophy will reward the lower level trophy. Meaning you dont have to worry about doing all 3 separately, and can get all 3 trophies in 1 complete run, as long as you complete a x15 run (for the gold trophy). This is the easiest way to unlock all the trophies as quick as possible. Hence, if you are going for all achievements or all 3 trophies in the first place, I suggest SKIPPING Bronze and Silver, and focusing on Gold immediately, it will save you time. And get you more accustomed to the Gold difficulty quicker. For simplicity, I will only outline the Gold Trophy strategy, as the same strategy would similarly apply to Bronze and Silver, or you would simply achieve both Bronze and Silver trophies after Gold. Each difficulty also has an in-game preset. Where is the Presets tab?To find the preset tab, head into a singleplayer/multiplayer lobby (bear in mind, you need to be in singleplayer for the apocalypse achievement). Scroll to the right until you meet the custom difficulties, select the edit button (to the left of the dice), and select 'Presets' in the top right. Bronze Optimal Difficulty SettingsI would suggest using either, the 'Apocalypse I' preset, or insanity for ease of use. (although if you have another difficulty you'd prefer to use, as long as it is above 6x, it will work fine) There are multiple differences between the two which may factor which one you want to try. (The way the arrow is pointing is which is better for that scenario.) Sprinting ON in Insanity <--- OFF in Apocalypse I Ghost Speed 100% in Insanity <--- 150% in Apocalypse I Event frequency high in Insanity <---> low in Apocalypse I Hiding spaces low in Insanity <--- none in Apocalypse I 1 Evidence Given in Insanity ---> 2 in Apocalypse I Sanity, Activity and Fuse Box start off in Insanity ---> All on in Apocalypse I No Cursed Possession in Insanity ---> Cursed Possession in Apocalypse I As you can see, there are many differences between the 2, and a reason to use either. I'd still suggest leaving the Bronze and Silver run alone and going directly for the gold either way to make your hunting life easier. But it's your choice if you choose to do Bronze and which preset you choose based on the type of player you are! Silver Optimal Difficulty Settings I suggest not attempting Silver and moving straight to gold, although you can use the recommended preset in-game 'Apocalypse II' if you'd like to give it a go! For more information about the challenge, please read below! Gold Optimal Difficulty SettingsFor the gold Difficulty setting, I recommend using the preset 'Apocalypse III' (to find where presets are, please read above). Apocalypse III is by far the hardest, but will also net you both other trophies and achievements at the same time after completing it. Which is why i suggest you skip Bronze and Silver and give Gold a good stab before anything. If you're looking to get all achievements, you'll have to at some point anyway!
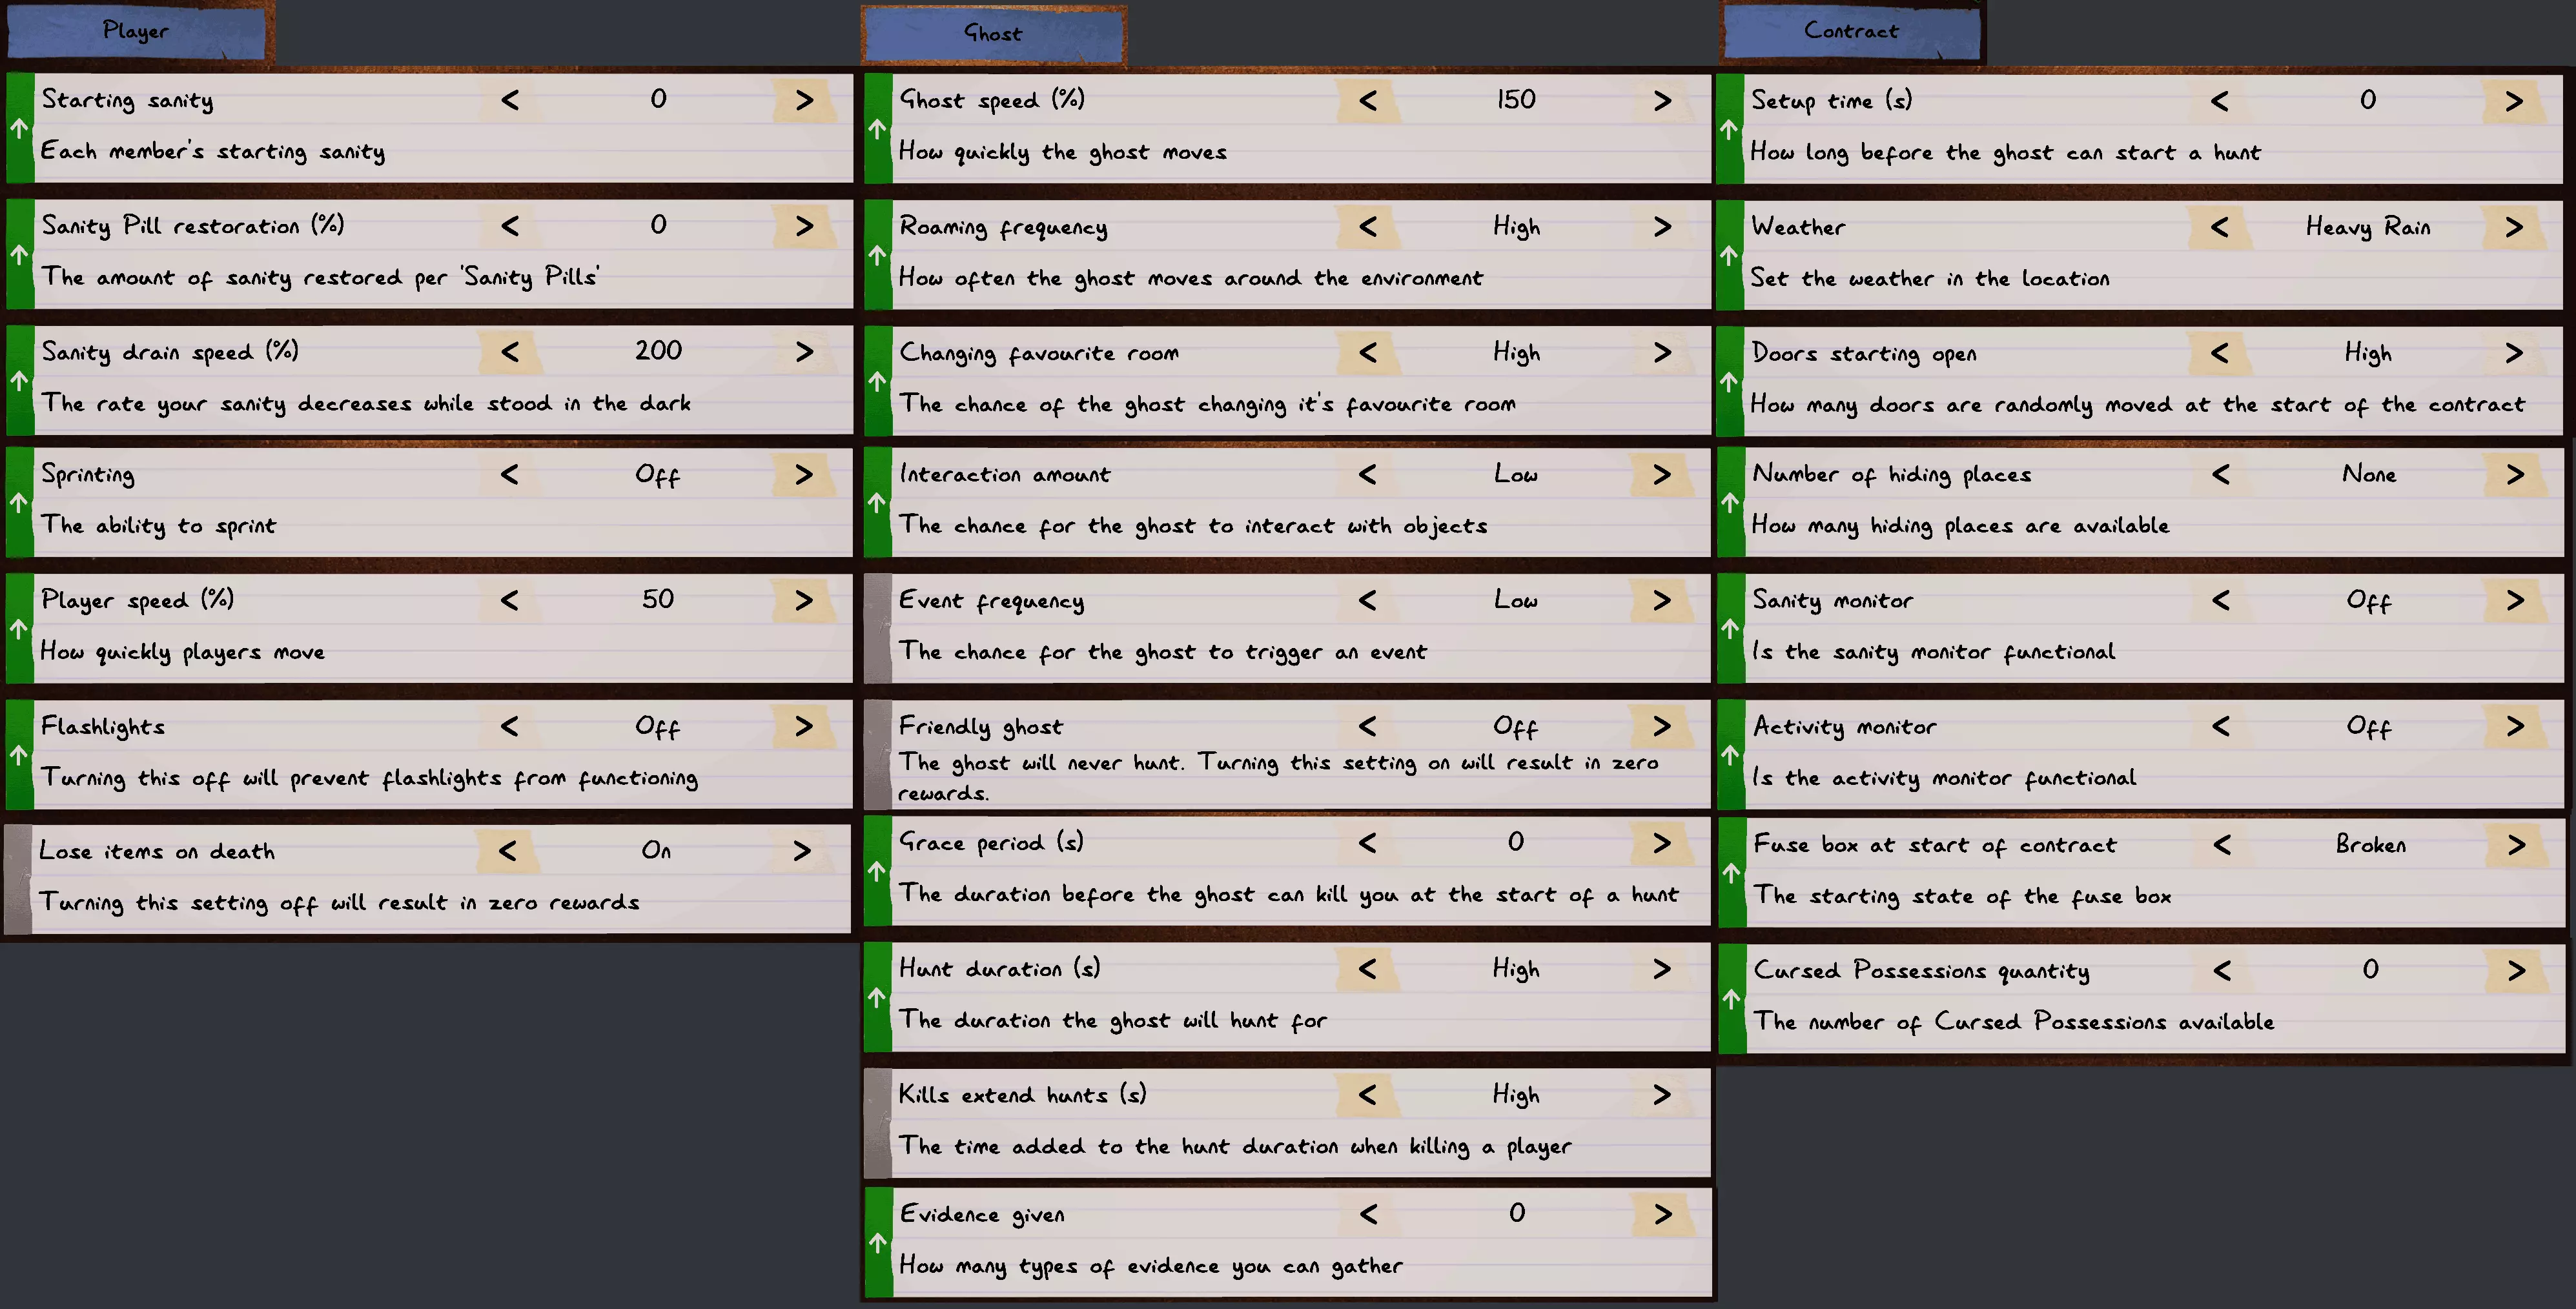
Here are the recommended settings that are given by the Phasmophobia Discord[discord.gg]. And are the exact same as 'Apocalypse III' IMPORTANT NOTE: You are able to change 1 small setting somewhere in this preset to make your life slightly easier while still keeping that 15x multiplier. My recommendation is putting 'Event frequency' up to Medium rather than low. This can make the optional objective 'Witness a ghost event', and capturing a ghost photo much easier! (although this is mainly used to get an easier ghost photo) Please see the next section for more information, tips and resources! 'Apocalypse Trophy' Achievements pt.2 The gold Apocalypse trophy is the hardest achievement/challenge in Phasmophobia and will take a lot of practice, patience and knowledge about the game before you can even attempt it. Hence, I suggest leaving these achievements till last, or at least until you've prestiged once or more. The Optional Objectives When attempting the challenge, you're probably going to have many failed attempts, but your main priority is making sure you get easy/do-able optional challenges as you'll have to complete all 3 as a part of the challenge. I will list all the challenges here, although I will list them from top to bottom, from easiest to impossible. If you get any hard-impossible challenges, head back to the lobby and re-enter to re-roll your challenges. These are what make or break an apocalypse run! Optional Objective Easy Hard Reset Get an average sanity below 25% ✓ Capture a photo of the ghost ✓ Repel the Ghost with Incense while it's chasing someone ✓ Have a member of the team escape the Ghost during a Hunt ✓ Cleanse the area near the ghost using Incense ✓ Detect a ghost's presence with a Motion Sensor ✓ Get the Ghost to blow out a Candle ✓ Detect a paranormal sound with a Parabolic Microphone ✓ Find evidence of paranormal activity with an EMF Reader ✓ ✓ Have a member of your team witness a Ghost event ✓ Prevent the ghost from hunting with a Crucifix* ✓ *if you have a tier 3 Crucifix ✓ This is a rough guide on which optional objectives are worth going for, are harder, or which to avoid entirely. Your best bet is resetting until you get 3 easy, or 2 easy and 1 hard. They are ordered from easiest (top) to hardest (bottom), so if you settle for a harder one, getting one higher up on the list is better. The 'Find evidence of paranormal activity with an EMF Reader' is on both hard and reset, although id suggest resetting if you see it in most cases. But for isn't the end of the world if you have it as one of you objectives, you can definitely complete the challenge with it, although it is dangerous and usually just worth skipping. What items to bring in Most of the time, packing everything you can isn't the best idea, plus we are playing as a solo player so I'm here to guide you with what items you should be bringing into the contract with you, and at what preferable tier! There are a few items that are practically necessary to complete a full run, I will list those at the top. Note: dashes (-) mean any tier or a lower can be used and all have different use cases, although if there is a ✓, make sure to try prioritize that tier. Item Bring In? How Many? Tier 1 Tier 2 Tier 3 Head Gear ✓ 1 ✓ Incense ✓ 4 - - - Igniter ✓ 2 ✓ ✓ Photo Camera ✓ 1 ✓ EMF Reader ✓ 1 ✓ Thermometer ✓ 1 - - - Video Camera ✓ 1/2 - ✓ Crucifix ✓ 2 ✓ Firelight ✓ 2 ✓ Motion Sensor ✓ 2 - - ✓ Parabolic Microphone ✓ 1 - ✓ Tripod ✓/✗ 0/1 ✓ Sound Sensor ✓/✗ 0/1 ✓ Flashlight ✗ 0 D.O.T.S Projector ✗ 0 Ghost Writing Book ✗ 0 Spirit Box ✗ 0 UV Light ✗ 0 Sanity Medication ✗ 0 These items here should be all you need. Please do take into account that this is a small outline, you can definitely take in more items, but this is the bare minimum you should be taking in with you if you're trying to save money, but taking in 1 extra of each (where you can) can help you from losing important items. You can always ignore any of the items i've got an ✗ next to, as they are useless on this difficulty and would be a waste of money if you died. 'Apocalypse Trophy' Achievements pt.3 Please do take a look at Youtube, or ask in the Phasmophobia Discord server for help if you need it, there are always more people to help! They would also be able to explain it better than i ever could here in writing too! Here is a video by Insym, an amazing player and content creator, explaining the challenge and how to complete it - Please use this as a video guide, it is a great resource and will evidently help you get a grip of the challenge and includes a lot of what i have written in Part 2, just in video form! https://www.youtube.com/watch?v=FM-CGtFat3o Director

-导演: “创建自定义难度” 只需创建一个自定义难度即可完成此操作。进入游戏大厅,无论是单人游戏还是多人游戏(只要你是主机)。按下更改难度的按钮,一直向右(挑战模式之后)。在这里,你可以根据自己的喜好编辑难度。 No More Training Wheels

-告别辅助轮 "完成训练" "告别辅助轮"非常简单。 只需在任意时间完成《恐鬼症》的教程即可。 要找到训练内容,在初始菜单(进入大厅前)选择训练并完成教程。 你也可以在打开游戏时直接找到它。 Flawless Execution

-完美执行 “完成一场完美游戏” 完美游戏包含几项略有难度的要求,具体如下: 找到所有可能的证据 (业余、中级和专家难度为3个,噩梦难度为2个,疯狂难度为1个) 完成全部3个可选目标 找出正确的鬼魂类型 收集骨头 用3星照片填满整本日志 照片内容可以是任何事物,鬼魂、互动现象、盐、鬼魂笔迹等均可。但所有照片必须为3星,若有一张照片为2星,则本次游戏无效;若所有照片均为3星,但有1张照片未被计入任何类别,本次游戏同样无效。 其中最困难的要求是用3星照片填满日志。获取所有三星照片最简单的方法是使用3级盐(且鬼魂不是幽灵)。你需要将所有盐叠放在一起或排成一行。当鬼魂走过盐堆后,你可以为每个放置的盐堆拍摄“盐被扰动”的照片。例如,如果你将三堆盐叠放在一起,就可以对着同一个盐堆拍摄三张照片。1级和2级盐也能使用,只是能拍摄的照片数量会减少,可能更难达到相同效果,但仍是填满相册的好方法。只需专注于拍摄安全且容易的三星照片(通常是互动场景,或鬼魂与设备的互动),尽量避免在事件中慌乱地拍摄鬼魂照片。虽然在游玩过程中这会自然而然地发生,而且你越是优秀的玩家,就会越轻松! Extra Mile

-Extra Mile: "Complete 50 optional objectives" This one will come naturally from playing. Although here are some tips for each Optional Objective in the game. Please do refer to this whenever you may be struggling with one. You can check if you have completed each objective by going to 'Overview' in your journal. Objectives Capture a photo of the ghostFor this objective, you'll have needed to bring a Photo Camera along with you into the contract beforehand. Capturing a photo of the ghost can sometimes be very tough depending on the Ghost you're dealing with. If you still have your Cursed Object available, use it to try to trigger a hunt, or ghost event near you. Although be weary, and have Incense and an Igniter ready in-case a hunt happens. A hunt may also be a blessing in disguise, as if it is a slow/normal speed ghost, its not too difficult to take a photo, then use your Incense to run away to hide. Give it a go if you're confident! Cleanse the area near the ghost using IncenseFor this objective, you'll have needed to bring an Incense and Igniter along with you into the contract beforehand. Grab an Incense, and use it in the ghost's favourite room, don't forget to walk around the room a bit, and if you have time, walk slightly outside the room, as the ghost may have wandered. If you have tried this and it's still not triggered the objective. The ghost has most likely moved room entirely. Go search for it and give it another go! Detect a ghost's presence with a Motion SensorFor this objective, you'll have needed to bring a Motion Sensor along with you into the contract beforehand. Usually your best option is to bring in 2 Motion Sensors, if you're in a room with 1 exit, stick one Motion Sensor on the door, and one in the middle of the room where you feel the ghost may wander. If you only have 1, I'd recommend putting it near the exit, but facing in and towards the main room, rather than the small area where the door may be. This gives the ghost more of a chance to walk into it, while still catching it if it tried to leave. Detect a paranormal sound with a Parabolic MicrophoneFor this objective, you'll have needed to bring a Parabolic Microphone along with you into the contract beforehand. Simply enter the map and point the Parabolic Microphone around and wait for a sound. You'll need to point it in the direction of the ghost/ghost room, so if you know where it is, this task should be simple. Find evidence of paranormal activity with an EMF ReaderKeep an EMF Reader in the room at all times, and as soon as you hear any kind of interaction such as, a book being thrown, or a piece of equipment being used by the ghost, scan it with the EMF Reader. Usually leaving the EMF Reader on in the room will gather you this objective too. Get an average sanity below 25%Very simple objective, simply sit in a dark room or hiding spot without any light and you'll get this done quickly. Just make sure you're not up against a Deogen before hand if you're looking to hide. Get the Ghost to blow out a FirelightFor this objective, you'll have needed to bring a Firelight and Igniter along with you into the contract beforehand. For this objective, you'll want to place a Firelight in/near the ghost room for the best chance of it being extinguished. Grab both a light and firelight, if you're holding the firelight and igniter in your inventory, right click when holding out the firelight to ignite it, and place it on a surface. Alternatively, place the firelight on a surface before hand, hold out your lighter, right click and press your use key ('F' is default) to light the firelight. Then leave it be and hopefully the ghost will blow it out. If it doesn't after a while, consider moving it or check if the ghost has moved rooms. Have a member of the team escape the Ghost during a Hunt This objective can be slightly difficult. The one pre-requisite this objective has is the ghost must see you/have vision on you at some point during the hunt, then lose sight of you. It will lose sight of you when you hide or successfully evade the ghost. Once it has lost you, the objective will check off. Have a member of your team witness a Ghost event This objective is done by witnessing a Ghost event. This can be a multitude of events such as: The ghost hissing at the player The ghost showing itself Infront of the player (which leaves EMF 4) ↪ During this ghost event, the ghost also has a chance to sing The ghost exploding the lightbulb or changing it red The ghost showing itself and chasing the player Note: Ghost hunts and events from cursed objects do NOT count as ghost events Prevent the ghost from hunting with a CrucifixFor this objective, you'll have needed to bring a Crucifix along with you into the contract beforehand. Sometimes this objective can be tricky if you have a shy ghost, but will just take extra time. Your best bet is to find the ghost room and place the Crucifix where it covers the most area. For larger rooms, you may need 2 Crucifixes. For ghosts more prone to roaming/changing favourite rooms, you may need 2 Crucifixes and place one outside the current ghost room. After your Crucifix(es) are placed, make sure you're in the map with low enough sanity (or team sanity) that allows your ghost to hunt. From there, just wait and re-position the Crucifix(es) if the ghost still hunts out of range of it/them. Repel the Ghost with Incense while it's chasing someoneFor this objective, you'll have needed to bring a Incense and Igniter along with you into the contract beforehand. This objective can get tougher depending on the ghost type you have. To complete this objective you'll need to start a hunt, making sure you have BOTH a Incense and igniter in your inventory. Your best bet is to find a longer corridor to see the ghost approaching you which also has a hiding or loop spot nearby. Now during a hunt, wait until the ghost starts approaching you. When you know it has line of sight of you and is now 'chasing you', press right click (or whatever you may have it bind to) while holding out the Incense to use it. From here the ghost will lose interest in you and you can go hide or loop it safely and complete the objective. Doom Slayed

-Doom Slayed: "Get killed by a demon ability within the first minute" Doom Slayed is one of the achievements that the developers intend for you to unlock after simply playing for a while. If you are looking to grind this achievement out, it's not too difficult but will take time and a lot of luck to do so. Head into a Singleplayer Lobby and select a custom difficulty. Your best bet for completing this achievement as quickly as possible is to change a few settings beforehand. I suggest going to a custom difficulty and selecting the 'Amateur' Preset, then changing the settings I list below: Difficulty Settings Player: Starting Sanity: 100% Sprinting: Infinite Player Speed: 150% Lose items and consumables: Off Ghost: Ghost Speed: 150% Grace Period: 0s Hunt duration: High Contract: Setup time: 0s These are the only ones you need to change for this method to go as fast as possible, but don't be afraid to tweak them if you'd like. And make sure you don't enter the contract with any items! The Strategy Firstly, i suggest opening a stopwatch/1 minute timer on another device. This can be your phone, tablet, a second monitor on your PC, or even a real stopwatch. Anything would work as long as it has a stopwatch or timer! This is to track how long you've been in the house for, so that when you reach the 1 minute mark, you leave the map and retry. Important Note: The in-game timer for this achievement starts after you unlock the door/gate to the map, meaning you want to start your 1 minute timer after you unlock the door to the map to get the full 1 minute. The goal of this grind is to: Start a contract with any small map (I will be using Willow Street House, but Tanglewood, Camp Woodwind etc. would work just as well) with no items. Enter the contract, grab the key to the map, and head to the front door. As soon as you open the door, start your stopwatch or timer and enter the house From here, stay inside the map at all times and wait for a hunt (I usually sit in the near to the middle of the map such as the kitchen in Willow Street House) Since you're at 100% Sanity, only Demon's will be able to hunt, so if your stopwatch or timer reaches 1 minute from after you open the front door, leave the game and try again If you receive a hunt before your 1 minute mark, try your best to run towards the ghost and die as quickly as possible (as the time it takes from when the hunt starts and it kills you counts to the total time spent in the house!) When you head back to the lobby and get past the stats and XP screen (after clicking continue), the achievement will unlock if everything was done correctly For some this may be really quick, and for others this may take a very long time. But is the only way to grind out the achievement! Alternate (no stopwatch) Strategy There is a more laid back way of grinding this achievement without a stopwatch, although may take even longer as it's not as optimized. Copy the exact difficulty settings as listed above Except: Player: Starting Sanity: 0% Having Sanity at 0% means any ghost can hunt at any point when you enter, meaning you'll most likely die before the 1 minute point to every ghost in the game. This means you don't have to worry about a stopwatch or having to leave the contract and restart a new singleplayer game each time the ghost doens't hunt after a minute. As you can simply wait to die and carry on, over and over until you get a demon that hunts with its ability. Although, as every ghost can hunt, this includes Demon's and means that they can hunt without using their ability. Rendering this achievement void if you die to it when it doesn't use its ability and does a regular hunt. Either way, this is still a great way to grind the achievement if you would like to be more laid back, and not have to worry about a stopwatch or leaving, but may take a longer time than the previous and is completely up to you how you'd like to approach it! Escape Artist

-逃脱大师(Escape Artist): “逃离 revenant( revenant 为游戏内幽灵类型,中文可译为‘ revenant 幽灵’)” “逃脱大师”是一个相对简单的成就,不过做些准备能让这个成就变得简单得多。 首先,我来解释一下这个成就。 要“逃离 revenant 幽灵”,你必须满足以下前提条件: revenant 幽灵必须能看到你。当它开始加速时,你就知道它看到你了。 你必须让 revenant 幽灵失去你的位置,这可以通过 revenant 幽灵明显减速来判断。 需要注意的是,如果在你仍处于它视线范围内时狩猎结束,是无法触发这个成就的,你必须彻底摆脱该幽灵。 简单策略:一个非常简单的基础策略需要几样物品。你需要准备的物品: 香 点火器 (可选)3级盐 首先,你需要在任意地图中找到尽可能长的走廊,并且在对 revenant( revenant 指游戏中一种幽灵类型)使用香后,附近最好有可以躲藏的地方。 这些长走廊可能出现在任何地方,例如坦格伍德房屋的第一个走廊(附近还有多个躲藏点)、柳街房屋的房间和通往地下室的楼梯(只有当你的幽灵已经在地下室时才使用这些)。说实话还有很多其他地方,几乎每张地图都能轻松找到这样的走廊。策略本身很简单: (可选)如果你携带了3级盐,将其放置在亡魂出现的位置,以进一步减缓其速度,让你的逃脱更轻松。确保你的物品栏中有点火器,并手持熏香。 降低理智值并等待猎杀开始,确保你处于走廊尽头的位置,并准备好逃生路线。 当亡魂转过拐角看到你并向你靠近时,右键点击熏香,将其扔在地上,然后跑向你的躲藏点。 现在只需等待猎杀结束,通过卡车退出游戏即可完成!成就应会在你退出时解锁。 They're Here

-它们来了: “见证一次骚灵的能力” 只需在鬼屋附近或内部将一堆可互动物品堆叠在一起。如果你遇到的是骚灵,它迟早会使用其能力并一次性将所有物品扔出! 如果是专门为了达成这个成就,确保将“互动数量”难度设置调至“高”以获得最佳机会。你也可以同时降低其他设置,例如理智值消耗以阻止猎杀等。
诹鼾

-诱饵: “在多人游戏中被女妖杀死” “诱饵”是一个非常简单的成就。你只需在多人游戏中被女妖杀死即可。 要了解女妖的机制,一定要查看本指南的末尾,我在那里详细解释了女妖及其运作方式。 简而言之,女妖会锁定你 lobby 中的 1/X 名玩家。如果目标不在屋内,女妖会正常进行猎杀,但会基于目标的理智值。如果目标在屋内,那么除目标外,所有其他在屋内的玩家都是安全的,除非目标在猎杀过程中被杀死。在这种情况下,女妖会选择新的目标,循环往复。 如果你知道谁是目标,可以让他们离开房子,或者牺牲他们来切换目标。继续努力,直到你成为那个为了解锁成就而被杀死的人! “我可以独自进入多人游戏并获得这个成就吗?” 重要的是要知道,独自进入多人游戏不会计入该成就。你必须与至少2人组成队伍。 “已发现”成就 注意:无论在成就系统添加前你完成了多少份合约,都需要重新解锁所有这些成就。 游戏中的每个鬼魂都有一个单独的成就,要求在完成合约后成功识别出相应的鬼魂。要解锁每个成就,你必须在离开前在日志中找到并输入正确的鬼魂类型。 所有这些成就在“业余难度”下最容易完成。但所有困难都会迎刃而解,在游玩或完成其他成就的过程中,你最终会遇到所有鬼魂。 另请参阅以下章节,了解更多关于每种鬼魂的信息! - 具体包括:它们提供的证据、行为模式、特征、基本信息,以及如何在“3证据挑战”中找到它们!

-发现灵体: “成功识别你的第一个灵体”

-幽灵发现: “成功识别你的第一个幽灵”

-幻影已发现: “成功识别你的第一个幻影”

-发现骚灵: “成功识别你的第一个骚灵”

-女妖已发现: “成功识别你的第一个女妖”

-发现精灵: “成功识别你的第一个精灵”
-发现 mare:成功识别你的第一个 mare

-发现 revenant: “成功识别你的第一个 revenant”

-暗影已发现: “成功识别你的第一个暗影”

-发现恶魔: “成功识别你的第一个恶魔”

-发现怨灵: “成功识别你的第一个怨灵”

-发现鬼: “成功识别你的第一个鬼”

-发现妖怪: “成功识别你的第一个妖怪”

-寒图发现: “成功识别你的第一个寒图”

-Goryo发现: “成功识别你的第一个Goryo”

-双子发现: “首次成功识别双子”

-雷兽已发现: “成功识别你的第一只雷兽”

-怨灵发现: “成功识别你的第一个怨灵”

-拟态者已发现: “首次成功识别拟态者”

-发现莫罗伊: “成功识别你的第一个莫罗伊”

-亡魂发现: “成功识别你的第一个亡魂”

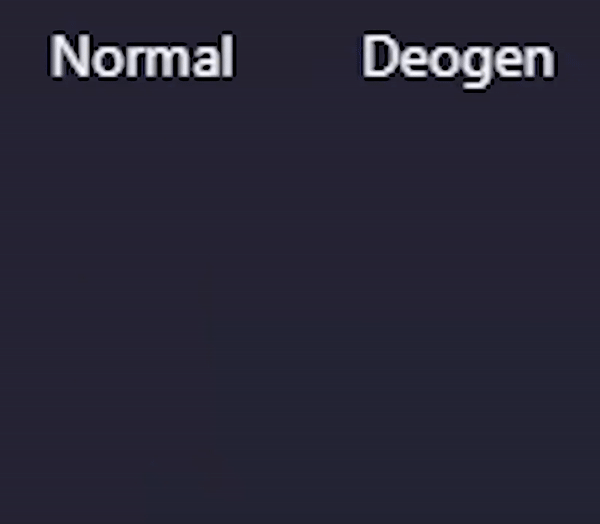
-Thaye Discovered: "Successfully identify your first Thaye" Ghosts - Spirit, Wraith, Phantom (A lot of information here is taken from the Phasmophobia Official Discord server, in the channel #ghost-huntin-resources, and Tybans cheat sheet! Please find links to them throughout the guide and in the section 'Helpful Resources') The aim of these next few sections is to teach you about the evidence they supply, their behaviors, their tells, general information about each ghost, and how to find them in <3 evidence runs. And a quick and easy reference for whenever you need it! This should make finding them for the first time, and any time after that easier! Please refer back to this section at any time while playing and don't forget to use (Ctrl+F) to find the ghost you're looking for with ease. Spirit Evidence Hunt Sanity Ghost Speed Tells Special Behavior EMF 5 Spirit Box Ghost Writing <50% Sanity 1.7 m/s (Regular Speed) Incensing the ghost will prevent a hunt for 180s instead of the normal 90s. N/A Note: Sprit is undifferentiable to other regular ghosts when using the XP/Money Grind method and Gold Apocalypse Trophy listed in this guide. 1) 'Increased Incense Duration'If you have a feeling it may be a spirit, I'd suggest getting your phone and opening any app with a stopwatch, (or opening the Clock app if you're on Windows). Then enter the ghost's favourite room, use your Incense, then switch on your stopwatch and wait the 3 minutes. If it doesn't hunt within the 3 minutes, but then hunts soon after. You know you're dealing with a spirit! If it hunts within 90 seconds, then you know you've either missed your Incense and have got to retry, or you're dealing with a Demon, if it's even possible (Incense only lasts 60s instead of 90s). Wraith Evidence Hunt Sanity Ghost Speed Tells Special Behavior EMF 5 Spirit Box DOT's <50% Sanity 1.7 m/s (Regular Speed) Ghost will never step in salt of any tier. Ghost will not be slowed down by tier 3 salt during a hunt. Can teleport to random players, leaving either EMF 2 or EMF 5 where it teleported to. 1) 'Wraith Hunt Test - Refuses to step in Salt'The Wraith is a very simple ghost to catch in lower evidence runs. Simply lay down some salt in the ghost's favourite room or a doorway leading up to it, and see if the ghost walks through the salt. The ghost will also walk through salt during hunts, so if you place it in a doorway, or loop-able area and you know it walked through without the salt being disturbed, you know you're dealing with a Wraith. If you also randomly receive EMF 2 or 5 for seemingly no reason (no interaction or event near you), you may be up against a Wraith that just teleported to you, and it's worth chucking down Salt to test! Please see this super short video by Shuee 01 for a representation of the Wraith ability https://www.youtube.com/watch?v=4gC5lvFj2jc Phantom Evidence Hunt Sanity Ghost Speed Tells Special Behavior Spirit Box Ultraviolet DOT's <50% Sanity 1.7 m/s (Regular Speed) Does not appear in ghost photo's. During events of DOT's state, taking a photo will cause the Phantom to disappear. Less visible during hunts (Blinks/Flickers in and out less often, and is invisible for longer) Can roam to a random player, leaving EMF 2 Phantom is a very simple ghost to check for if you don't have all evidences, or if DOT's or Spirit Box is being stubborn. If you have a feeling you may possibly be dealing with a Phantom, there is 2 approaches you can take. 1) 'Phantom Hunt Test - Phantom's Blinking Speed'If you're not able to check with the camera, another way to confirm a Phantom is to check its blinking speed during a hunt. Phantom is the only ghost in the game that blinks less during a hunt, and is invisible for longer. Right down below is a direct comparison between the Phantom, any other ghost (excluding Oni and Deogen). Notice how the Phantom is invisible for much longer, and blinks a lot less than normal ghosts. This is how to spot if you're up against a Phantom or not without a camera. This trick can also be an immediate tell even if you don't have any evidence yet! (This image is taken from Tybayn's Phasmophobia Cheat Sheet[tybayn.github.io], credit to them for their fantastic visual representation!)
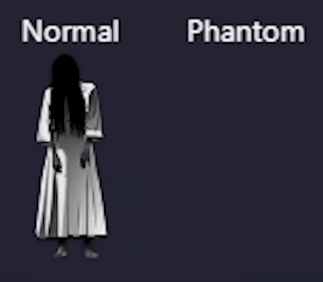
幻影的漫游能力也可能是你正面对幻影的一个信号,不过对此你也没什么太多办法。但如果你注意到它已经漫游,要记住它在漫游时会留下EMF 2级反应,并且从这时起,你需要更加警惕在猎杀期间寻找速度更慢、频率更低的闪烁,或者它在被拍照后会进入隐身状态。 2)“不会出现在幽灵照片中”你需要随身携带相机,并尝试在幻影出现时给它拍照。无论是通过使用诅咒物品、幽灵事件还是猎杀期间。一旦你拍下它的照片,它会立即消失,而你日志中的照片会显示为“幽灵照片”,但照片中不会包含幽灵,并且照片会非常清晰。鬼魂 - 骚灵、女妖、精灵 骚灵 证据 狩猎理智值 鬼魂速度 特征 特殊行为 通灵盒 紫外线 鬼魂笔记 <50% 理智值 1.7 米/秒(常规速度) 可同时投掷多个物品,每投掷一个物品使玩家理智值降低 2%。狩猎期间每 0.5 秒投掷一个物品 投掷和互动物体的概率更高 能更快、更远地投掷物体 骚灵凭借其特征和行为很容易区分。骚灵的特点是比其他所有鬼魂更频繁、更用力且更远地投掷物体。这在狩猎期间尤为明显。1) “吵闹鬼猎杀测试——更高的物体投掷与互动概率”如果你擅长绕圈。测试吵闹鬼的最佳方法是找到一个可绕圈的区域(例如坦格伍德的柜台,或伍德温德营地的长椅/营火处),并在该表面上或附近投掷尽可能多的物品。当鬼魂开始猎杀时,你会看到它非常频繁且快速地投掷大量物体。其投掷方式与其他鬼魂相比很容易区分。(当我下次遇到吵闹鬼时,会制作一个GIF动图放在这里作为视觉辅助) 2) “吵闹鬼能力”测试吵闹鬼的第二种方法是测试其能力。吵闹鬼的能力是同时投掷多个物体。(这也会计入“They're Here”成就!)测试此能力的最佳方法是在鬼魂房间内或附近堆放物品,然后等待现象发生。不过要记住,小心点,因为在该能力发动期间,吵闹鬼每扔出一件物品,你的理智值就会降低2%。 请查看下方GIF以获得直观演示。感谢Shuee 01提供的素材。
Banshee Evidence Hunt Sanity Ghost Speed Tells Special Behavior Ultraviolet Ghost Orb D.O.T.S <50% Target Sanity (ignores average sanity) 1.7 m/s (Regular Speed) Banshee will scream through the Parabolic Microphone When hunting, it will only go after its target (unless target is outside); therefore, if its target is in the map during a hunt, all other players will be safe unless the target dies. Will roam towards its target, without leaving any EMF 2. When shown in a D.O.T.S state, it will attempt to roam towards its target. Firstly, I should mention how Banshee's hunting sanity works. When in multiplayer, the Banshee will target one of the players at random. Banshee will then hunt based on that players sanity rather than the average sanity. If the chosen target is above 50% sanity, whether inside the house or not, the banshee cannot hunt. This means that it does not matter what everyone elses sanity is for a hunt apart from the target. Banshee will only target one player for the entirety of the contract as long as that player is alive and inside the house. If the target is outside the house, the banshee will hunt normally (still at the sanity of the target). If the target dies, the Banshee will select a new target. 1) 'Banshee Scream'One of Banshee's tells is its chance to scream into the parabolic microphone. This is a unique sound. Therefore, if you hear it, It's guaranteed to be a Banshee. I'm not able to add audio files into steam, so if you'd like to hear what the scream sounds like, please head to this video by Shuee 01. https://www.youtube.com/watch?v=4gC5lvFj2jc 2) 'Singing Ghost Events'A small tell that you're dealing with a Banshee is if you're getting many ghost events, all/most of which are singing ghost events. Banshee has a higher chance for these, hence you can pay attention to it if you're able to. Although I'd still suggest looking for the other tells or evidence and not to base your conclusion on this alone. 3) 'Roaming/Stalking'Banshee is also one of the few ghosts that can roam to a specific player. In Banshee's case, they will only ever roam and follow their target but will never leave any EMF. The way to tell if it has roamed or not is usually when it starts enacting ghost events or interacting with objects near you or its target when you're not close to the ghost room. It may also start a hunt from its roamed position rather than its ghost room. 4) 'Ignoring non-targets during hunts'A massive tell that you're dealing with a Banshee is only available in multiplayer. And is when the Banshee's target is in the house during a hunt. While the target is in the house, all other players will be safe from the Banshee unless the target is killed. And you'll notice the Banshee simply walking past you. Jinn Evidence Hunt Sanity Ghost Speed Tells Special Behavior EMF 5 Ultraviolet Freezing Temperatures <50% Sanity 1.7 m/s | 2.5m/s Ability to drop nearby players' sanity by 25% instantly, with EMF 2 or EMF 5 given at the breaker afterwards (This only occurs when the breaker is on) Cannot turn off breaker directly Note: Jinn is undifferentiable to other regular ghosts when using the XP/Money Grind method and Gold Apocalypse Trophy listed in this guide. 1) 'Jinn Hunt Test - Hunt Speed'Jinn's hunting speed is one of its main tells. Jinn's hunting speed increases to 2.5m/s (from the normal 1.7m/s) when: The breaker is on, Jinn has Line Of Sight of you (is able to see you directly) and is further than 3m away from the player. When it reaches 3m away from the player, its speed will return to 1.7m/s like any other normal ghost. 2) 'Sanity Drain Ability'Jinn has an ability to instantly drain 25% of any players sanity when it's near the player and the breaker is on. After it does this ability, it will leave EMF 2 or EMF 5 at the breaker. 3) 'Jinn is dependant on the breaker'To stop Jinn's abilities entirely, simply turn off the breaker, just be weary as Jinn is able to turn the breaker back on at any point. Ghosts - Mare, Revenant, Shade Mare Evidence Hunt Sanity Ghost Speed Tells Special Behavior Spirit Box Ghost Orbs Ghost Writing <60% | 40% Sanity 1.7 m/s (Regular Speed) Ability to immediately turn off a light that a player has turned on ( Cannot turn on lights (keyboard and TV excluded) More likely to turn off and explode lights More likely to wander to a room where lights are off. Note: Mare is undifferentiable to other regular ghosts when using the XP/Money Grind method and Gold Apocalypse Trophy listed in this guide. 1) 'Mare Hates Lights'Mare tries many things in their power to keep the lights off. There are multiple examples of this in Mare's abilities: Mare will never turn on a light. Has a higher chance for the 'explode light bulbs' ghost event. And has a chance to immediately turn off a light after you've switched one on (can only test for the ability every 10s). You can test for a Mare simply by turning on a light every 10-15s and seeing if it's turned off immediately after. 2) 'Mare Hunting Sanity'Mare hunts at both 60% sanity, and 40% sanity depending on the room it is in. If Mare is in a room with the lights switched on, it can only hunt at 40% sanity or under. Although, if Mare is in a room with the slights switched off. It can hunt from 60% sanity or under. Mare will also be more likely to switch to rooms with the lights off to hunt earlier. Revenant Evidence Hunt Sanity Ghost Speed Tells Special Behavior Ghost Orbs Ghost Writing Freezing Temperatures <50% Sanity 1m/s | 3.0m/s Hunt speed incredibly slow (↓1m/s) until Revenant knows player location (↑3m/s) See 'Tells' 1) 'Revenant Hunt Test - Hunting Speed'Revenant's hunting speed is the main way to tell you're up against a Revenant without any evidence. Revenants speed works like this: Revenant will be very slow when player location is not known. (1m/s). When the ghost finds the players location (using electronics, voices, or line of sight) it will instantly speed up to 3m/s. After reaching the player's last known location, it will slow back down gradually if its target is not found. Revenant's footsteps are also very easy to tell apart from other ghosts, this is true for both the 1m/s and the 3m/s, although you'll mainly notice it's a revenant when you hear it speed up dramatically. Shade Evidence Hunt Sanity Ghost Speed Tells Special Behavior EMF 5 Ghost Writing Freezing Temperatures <35% Sanity 1.7m/s (Regular Speed) Does not do interactions that result in EMF 2, 3 or 5 with someone in the same room (except from Ghost Writing and blowing our firelights) Will never hunt when someone is in the same room. The lower the average sanity, the more ghost events Shade will do More likely to appear as a 'Shadow Form' during ghost events Shade is the only ghost that has a chance to appear as a shadow when summoned from the music box, monkey paw, or summoning circle. Note: Shade is undifferentiable to other regular ghosts when using the XP/Money Grind method and Gold Apocalypse Trophy listed in this guide. 1) 'Least Active Ghost'Shade is overall less active. Meaning, less ghost events, less interactions and even a lower hunt sanity than all other ghosts at <35% sanity. These are shades main tells, and there isn't an easy way to tell if it's a shade other than ruling out other ghosts, and seeing if your shade is being inactive or not. 2) 'Cursed Object Test'One of the only definitive ways to test for a shade when you have <3 evidence is to use your Cursed Object. You'll need either a Music Box, Monkey Paw or Summoning Circle to test this. Each time you summon the ghost with either one of these. Shade is the only ghost that has a chance to appear in a 'Shadow' State. This is a definite tell for a shade if you have a Cursed Object available. 3) 'Shadow Form ghost events'Shade has a higher chance to do ghost events in a 'Shadow Form', where it shows itself in all black. This is hard to notice, but if you're getting many of these 'Shadow Form' ghost events I would suggest trying to take notice if the ghost is being inactive or not. Ghosts - Demon, Yurei, Oni Demon Evidence Hunt Sanity Ghost Speed Tells Special Behavior Ultraviolet Ghost Writing Freezing Temperatures <70% Sanity + Ability to hunt at any Sanity 1.7 m/s (Regular Speed) Incensing the ghost will prevent a hunt for 60s instead of the normal 90s 20s minimum hunt cool-down instead of the normal 25s Crucifix Range increased by 50% per tier Note: Demon is undifferentiable to other regular ghosts when using the XP/Money Grind method but is still possible when attempting the Gold Apocalypse Trophy listed in this guide. 'Ability to hunt at any Sanity'Along with a <70% Hunt Sanity, Demon has the ability to hunt at ANY sanity, meaning it can hunt as soon as you walk into the map! (This ability is also linked to the achievement 'Doom Slayed', please see that section for more information!) 1) 'More Frequent Hunts'Demon, thanks to its abilities, can hunt much more frequently than other ghosts (every 20s rather than 25s), and at a quicker pace (hunts at <70% sanity instead of the usual <50%). Usually you can tell the difference once you're used to how the demon acts. 2) 'Lessened Incense Duration'The main way to test for a Demon, similarly to Spirit, you'll want to test with Incense. Incense isn't as effective against Demons, and only temporarily stops their hunt for 60s instead of the regular 90s (and 120s for Spirit). If you have a feeling you're up against a Demon, simply head to the ghost room, incense the ghost room and wait 60s (note that if it hunts before the 60s, you'll most likely missed your incense and need to try again). If it hunts after 60s but before 90s, then you've got a Demon on your hands. 3) 'Increased Crucifix Range'Crucifix Range is increased by 50% per tier (Tier 1 = 4.5m (instead of 3m) Tier 2 = 6m (instead of 4m) Tier 3 = 7.5m (instead of 5m)). It should be noted that the white ring around the crucifix when it's being placed does not change. So this is not a way of testing if the ghost is a demon at one glance, but is ultimately helpful if you're looking to complete objectives and know you're dealing with a demon. Yurei Evidence Hunt Sanity Ghost Speed Tells Special Behavior Ghost Orbs Freezing Temperatures DOTs <50% Sanity 1.7 m/s (Regular Speed) Can shut a door and drop sanity of nearby players by 15% if a door is in the room. Yurei is the only ghost that can close or interact with the enter/exit door (such as the gate on camp woodwind) outside of a hunt or ghost event. Incense traps the ghost in its room and prevents wandering for 60 seconds. 1) 'Door Shut Ability'Yurei can fully close a door in the room it's in as well as being the only ghost to be able to fully close the main entrance door without doing a ghost event or hunt. This will also zap 15% of your sanity, so if you're ever keeping track and you notice a door randomly fully close near you, check your sanity on the sanity monitor to rule out the Yurei! This is Yurei's only tell during the XP/Money Grinding method and is pretty rare to happen, but does have a chance to happen. Other than this, Yurei is indistinguishable from other ghosts during the method. Oni Evidence Hunt Sanity Ghost Speed Tells Special Behavior EMF 5 Freezing Temperatures DOTs <50% Sanity 1.7 m/s (Regular Speed) Drains 20% Sanity on ghost events, rather than the usual 10% Is incapable of doing 'ghost mist' event More visible during hunts (Blinks/Flickers in and out less often and is visible for longer) More active around multiple people More likely to appear as full ghost model 1) 'Oni Hunt Test - Oni's Blinking Speed'Oni is one of only two ghosts in the game that blinks less and is visible for longer during a hunt; the other ghost being the Deogen. The Deogen is very similar in regards to being visible for longer and blinking less, although blinks slightly more often and is visible for slightly less time than the Oni. Yet still comparably more visible than regular ghosts. Use this, along with the other tells (such as Deo's fast speed when far away, and snail's pace when close), to differentiate the two of these ghosts. Right down below is a direct comparison between the Oni, and any other regular ghost (excluding Phantom and Deogen). Notice how the Oni is visible for much longer, and blinks a lot less than normal ghosts due to being more visible. This is your best bet to know if you're up against an Oni. (This image is taken from Tybayn's Phasmophobia Cheat Sheet[tybayn.github.io], credit to them for their fantastic visual representation!)
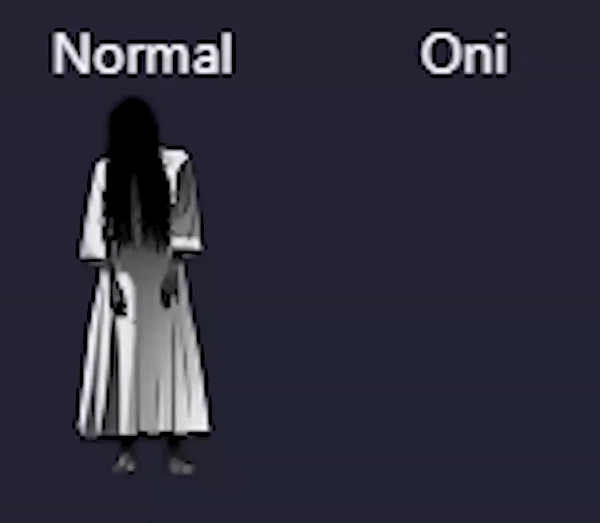
2) 'Incapable of Ghost Mist'Ghost Mist is an event that all ghosts BUT Oni can do, if you ever see it, you can immediately cross off Oni. 3) 'Double Sanity Drain from ghost events'Oni drains 20% Sanity on ghost events, rather than the usual 10%. If you are either keeping track of your sanity (on the sanity monitor), or have a feeling you're up against an Oni, this can be a great test if you have the sanity monitor available. 4) 'Full Form Ghost Events'Oni is more likely to show its full form during ghost events (not shadow or stealth). So always pay attention to ghost events/hunts. If you notice you're getting an abnormal amount of full form ghost events, then consider hunt/sanity testing for an Oni. Ghosts - Yokai, Hantu, Goryo Yokai Evidence Hunt Sanity Ghost Speed Tells Special Behavior Spirit Box Ghost Orbs DOTs <80% | 50% Sanity 1.7 m/s (Regular Speed) Cannot detect voices or sense your equipment further than 2.5m away during hunts. Can hunt up to 80% sanity when talking near it, otherwise, hunts at 50% More active when talked around Music box can be brought much closer to the ghost before it breaks. 1) 'Yokai Hunt Test - Voice/Detection radius decreased during hunts'Yokai seems to have bad hearing as it cannot seemingly hear the player's voice or equipment unless within 2.5m of the player. You can test this quite easily when around a loopable surface (such as benches or campfire in Camp Woodwind, or countertop in Tanglewood) or hiding spot. You'll want to hide behind/in it, as to not give line of sight to the ghost, and wait for a hunt. When it hunts, your easiest option is to hold your radio hotkey ('B' is default) and/or talk at the same time for the same results. If you find that it comes straight after to from a while away, it's most likely not a Yokai, if it seemingly ignores you and/or doesn't acknowledge you. It's most likely a Yokai. 2) 'More active while talking near the Yokai'Whenever you or any teammates you may have are talking around a Yokai, the ghost will become more active. Although, this alone is hard to pinpoint a Yokai. And you should look at doing a Yokai Hunt test. Hantu Evidence Hunt Sanity Ghost Speed Tells Special Behavior Ultraviolet Ghost Orbs Freezing Temperatures <50% Sanity 1.44m/s - 2.7m/s Ghost can have visible freezing breath in any room during hunts when the breaker is off or broken Cannot turn breaker on High chance to turn breaker off Guaranteed Freezing Temperatures on Nightmare/Insanity mode 1) 'Hantu Hunt Test - Hantu Freezing Breath during hunts'Hantu is the only ghost that can actually produce its own freezing breath during a hunt. But only when the breaker is off or broken. This is a trade off, as the Hantu will move slower when the breaker is on, making hunts slightly safer, but then you won't be able to see this tell or do this hunt test. The best way to look for freezing breath is when looping the ghost. It will look very similar to your own freezing breath, but simply coming from the ghost instead. 2) 'Hantu Hunting Speed'Hantu's speed changes based on the temperature of each room at any given time, the lower the temperature, the faster the Hantu is. Meaning it fluctuates quite often. The best way to combat this is to turn off the breaker, although bear in mind, you will not be able to do the Hunt test I mentioned before, and it will make the ghost more difficult to distinguish from a hunt alone. Down below is the Hantu's Speed relative to the temperature of the room: 15°C+ = 1.4m/s 12°C = 1.75m/s 9°C = 2.1m/s 6°C = 2.3m/s 3°C = 2.5m/s 0°C = 2.7m/s Note that Hantu will never increase speed because of Line Of Sight, and only based on temperature. Goryo Evidence Hunt Sanity Ghost Speed Tells Special Behavior EMF 5 Ultraviolet DOTs <50% Sanity 1.7m/s (Regular Speed) DOTs only appear on video camera and will not show if a player is in the same room, however, DOTS state can start outside of a room, and enter a room where a player is Cannot change favourite rooms Does not roam/leave room as often as other ghosts Guaranteed DOTs on Nightmare/Insanity mode Note: Goryo is undifferentiable to other regular ghosts when using the XP/Money Grind method and Gold Apocalypse Trophy listed in this guide. 1) 'Goryo DOTs'Goryo's only tell is that it's DOTs is only available to see on cameras when no-one else is in the room. If you ever see DOTs without looking through a camera, you can immediately rule out Goryo. When playing with no evidence, there is nothing you can do to figure out you're against a Goryo, as it's simply got nothing to give you unrelated to evidence, other than knowing it can never switch favourite rooms, which is very difficult to track and usually not worth your time. Ghosts - Myling, Onryo, The Twins Myling Evidence Hunt Sanity Ghost Speed Tells Special Behavior EMF 5 Ghost Orbs DOTs <50% Sanity 1.7 m/s (Regular Speed) Myling cannot hear footsteps and voices from more than 12m away during hunts (rather than the usual 20m) More frequent parabolic responses 1) 'Myling Footsetps'The only definitive tell that the Myling has is that you can only hear their footsteps starting from 12m away rather than 20m. Once you get a better grip of the game, this tell can be easily tested. Such as setting up line of sight a certain distance away, and seeing how long it takes you to hear the footsteps. There isn't much else to the Myling! Onryo Evidence Hunt Sanity Ghost Speed Tells Special Behavior Spirit Box Ghost Orbs Freezing Temperatures <60% Sanity 1.7 m/s (Regular Speed) Will attempt to hunt at ANY sanity after extinguishing every 3rd flame on a candle. Ghosts - Raiju, Obake, The Mimic Apologies on lack of updates, will finish these sections soon! (hopefully, i strongly dislike exams...) Ghosts - Moroi, Deogen, Thaye Deogen Evidence Hunt Sanity Ghost Speed Tells Special Behavior
反馈与感谢 若遇到任何问题或有难以理解之处,请发表评论。如果发现我有任何错误,提出者将获得署名! 包括: 拼写错误 细节不足 指南中与其他部分不一致的内容 关于添加内容的建议 以及其他任何您认为哪怕只有一点帮助的内容,都欢迎发表评论!任何帮助都将不胜感激,您不仅在帮助我,也在帮助其他许多人! 贡献者名单 Riaxandra - 指出了指南中多处错误。 Holy - 指出了多处拼写错误,并重写了部分指南内容以使其更易于阅读和理解,同时还提供了多个想法。ywhs - 指出了所有提及“完美游戏”时遗漏的要求(收集骨头)。 ynto - 在成就“Doom Slayed”方面提供了极大帮助,并指出了该成就描述中的一处错误。 MacLeod - 指出了整篇指南中一个严重错误,即“<”和“>”完全颠倒使用,并为“Bronze Apocalypse Trophy Hunter”贡献了策略。 祝各位猎鬼人好运! 祝您早上、下午、晚上或夜晚愉快!
2026-02-12 07:31:08 发布在  Phasmophobia 恐鬼症


说点好听的...
收藏
0
0