


如何在《孤狼》极难生存难度(及以下)中存活
An in-depth general strategy guide for the hardest difficulty in the game, with many concepts and tips applicable to lower difficulties. Preface This guide was last updated to Update #11 (v 0.19.9). It has not been updated to Update #12. I am not sure when or whether it will be updated further, so be aware that some aspects of this guide may be outdated. Find new changes by searching "0.19.9" with Ctrl+F and looking under the "Update #11 Notes" section. This guide is not a beginner tutorial. It assumes you understand most of the basic mechanics of the game and how many things work. If you find this guide useful, please rate it so others are more likely to see it. Welcome. This guide mainly explains strategies for surviving Lone Wolf on the hardest difficulty setting (Very Hard Survival) with zero settler losses. However, there are many concepts and tips in this guide that apply to any difficulty, and though easier difficulties or non-Lone-Wolf starts may play a little differently, applying the same concepts can strengthen your play. Survival makes enemy raids happen far more frequently and tech advance consistently. New settlers will often come with risk of a raid, and you will rarely gain settlers without a fight. Enemy technology will advance regardless of your own technology, so if you do not keep up you will fall behind. Very Hard changes a few things (in relative order of importance): Raids are 3x larger Plants and mining yields 80% as much Animals spawn 70% as often Settlers are default unhappier (base mood is 30% instead of 50%) Wounds are 20% more severe Trading value is 80% as strong Animals retaliate 20% more often Weather and Blight events are worsened The only ones particularly worth mentioning are the first 4. Raids are much larger, you'll collect a bit less resources on average, and your settlers are unhappier. Map type Valley Easy surviving, difficult defending. Severe lack of defensible natural terrain, but the easiest map type to create moats. Food is abundant. Hillside A healthy mix of Mountain and Valley, and in my opinion the most balanced/entertaining. Mountain Difficult surviving, easy defending. Very defensible natural terrain. Easy to construct bottlenecks and defensible positions. Food is scarce. Marsh Fish are abundant, though farming space is rare. An extraordinarily painful map to build on. Only choose this map if you are explicitly looking for a challenge. Set Map Size to large, as there is no reason not to. Attacks take longer to reach your base, trebuchets have more difficulty reaching your buildings, and you have more base-location and terrain-defense options. I would recommend picking a seed that puts your starting locale near the center of the map, as it will likely increase the amount of settlements you can trade with that are within short range. Character creation (Skills) These examinations of character stats adhere to character creation only. As you collect more settlers you will generate a healthier spread of skills and fill in gaps in your townsfolk's expertise. Almost every skill is useful in some way and you will want to have them later, but this is what you should prioritize with your first settler. (Those playing on starts other than Lone Wolf can adhere loosely to these guidelines, as more settlers means prioritizing these particular traits isn't as important as targeting a healthier skill spread). Skills and Passion Stars (improved v 0.19.9; consolidated some info, hopefully this should be simpler and more straightforward) Skills and stars come from 4 sources: Pseudonyms, Backstories, Backgrounds, and point allocation. Think of skills and stars in terms of how much EXP they save you. In this sense, skill points are NOT made equal. Lower levels cost less EXP, so 1-9 is a "dead zone" of mediocre skill allocation, as you aren’t actually saving much EXP and the skill is too low to be desirable. 0 points means you aren’t wasting any character creation points on a bad skill. Passion stars are far more valuable than skill points. Passion stars boost EXP gain, resulting in more EXP long-term than skill points themselves. A settler with low skill but high passion is usually better than high skill and low passion. Stars also give large mood boosts to settlers just for doing work (one star +3/+6, two stars +6/+12 (v 0.19.9)) , which can add an insane amount of happiness. Red stars mean that settler will be useless for a particular task. Their EXP gain gets nuked and they grow quite unhappy (one star -2/-4, two stars -4/-8) doing the task. Never task a settler with something they dislike. (v 0.19.9) Prioritize skills that are useful earlier.* Animal Handling Useful midgame (working Skeps) and mid/lategame (for training an army of hauling animals). Art Useful lategame (for the production of high-quality art to boost room quality). *Botany Very useful early, mid, and late game (for harvesting of all kinds). Poor Botany means less food and wood per harvest, which wastes labor and resources. Carpentry Useful lategame (for the production of high-quality heavy crossbows). *Construction Very useful early and mid game (for building structures). Culinary Negligibly useful early (affects mealmaking and butchering yield) and lategame (lavish meals for happiness). *Intellectual Very useful early/mid game (research speed and Textbook Int requirement) and lategame (producing Theses for trading and strong healing kits for wounds). *Marksman Absolutely necessary early, mid, and late game (for defending against attacks). You need a Marksman skill of at least 10 to survive early attacks comfortably. Also makes Hunting easier. Medicine Not useful. Wounds in this game are a joke and healing bonuses from high Medicine are outclassed by those from healing kits, and your settlers should rarely get injured enough for healing rates to matter. It is worth noting you need very high Medicine to make good Healing Kits, but it is entirely possible to just trade for them. Melee Completely useless. Melee combat is unusable on high difficulties. You will always be severely outnumbered and melee settlers will get destroyed without extremely good armor/shields. A merlon-protected archer almost always has more range and takes less damage. Melee does do more damage than ranged, but safety and reliability are far more important. Any points in melee are points wasted. Mining Useful if you are building underground towns or are on Hillside/Mountain maps. Smithing Useful lategame (for the production of mechanical components and high quality armor). Speechcraft Not very useful. Discounts aren’t valuable lategame (your economy should be strong) but you can’t level this skill until lategame (when you’re trading a lot). Tailoring Somewhat useful lategame (for the production of high quality clothing to boost happiness). Character creation (Perks) Perks "Productivity" is a settler's work efficiency. This comes from Global Work Speed (speeds up task time), Motor Function (speeds up task time), and Movement Speed (speeds up travel time). The more you have of these, the more your settler can do in less time. Anything with a creation point cost of 0 usually only affects mood and is more or less negligible, so they are not included. Settlers gain perks as they age. Positive Perks Austere (4) Not very useful. Does significantly decrease food intake. Benevolent (5) Not very useful. Speechcraft and Art are not great skills. Brawler (4) Not useful. Melee is useless. Brawny (15) Extremely useful, and your main stat priority. Extreme boost to productivity. Congenial (6) Not very useful. Settler will be happier. Not worth the points. Erudite (11) Useful. +5 and 1 star in Intellectual and extra XP gain. Fair (9) Not very useful. Speechcraft and Art are not great skills. Fleet Footed (7) Very useful. Boosts productivity. Somewhat cheap as well. Forty Winks (6) Useful. Early Bird but without negatives, though these negatives are minimal and Early Bird will save you 6 points. Lets your settler work more and sleep less. Gobbler (10) Useless. Ungodly waste of points. Gourmet (6) Not very useful. Culinary is not a great skill. Green Thumb (20) Extremely useful. +3 and 1 star to Botany and numerous harvest bonuses. Roughly equivalent to 20 points in Botany. Hedonist (6) Unfavorable. 2 red stars to Unskilled Labor. Hefty (11) Not very useful. Mostly melee or negligible skills. Industrious (3) Extremely useful. Boosts productivity. I have no idea why this trait is so cheap. Iron Stomach (8) Useless, just like Gobbler. Waste of points. Lightweight (6) Not useful. Waste of points. Night Owl (8) Very useful. A better Forty Winks. Lets your settler work more and sleep less. Provides +25% Work Speed during nighttime, so you may want to shift scheduling forward a few hours so a settler with this perk sleeps only when it's not in effect. Outgoing (3) Not very useful. Settler will be happier. Ravishing (11) Not very useful. Speechcraft is not a great skill. Robust (15) Somewhat useful. Motor function boosts productivity. Not worth the points, though, as healing rates aren't good. Focus on injury prevention before injury recovery. Ruthless (1) Not useful. Vigorous (10) Not very useful. Focus on injury prevention before injury recovery. Whirlwind (8) Very useful. Boosts productivity. Wicche (3) Marginally useful. +3 to Animal Handling and slight boost to Train chance. Winsome (5) Not useful. Speechcraft is not a great skill. Wise (7) Useful. A worse Erudite. Neutral Perks Bloodlust (0) Very useful. 2 stars in Marksman for free. Callous (0) Unfavorable. 2 red stars in Art and nothing else. Dainty (0) Useful. 10 points and 2 stars in Art for free, though 1 red star in Unskilled Labor. Early Bird (0) Useful. Lets your settler work more and sleep less with proper scheduling. Gluttonous (0) Useless. Precious (0) Unfavorable. Red star in Marksman. Points in Art is not worth it. Somnolent (0) Useful. Nearly identical to Early Bird. Lets your settler work more and sleep less with proper scheduling. Strapping (0) Not useful. Melee is useless. Negative Perks Churl (-6) Unfavorable, but not unmanageable. Settler is more prone to unhappiness. Contemplative (-7) Unfavorable. Settler is very prone to unhappiness and will probably never be Merry. Disfigured (-5) Ignorable. Speechcraft is not a great skill. Dullard (-15) Unfavorable. -5 points and 1 red star to Intellectual, less XP, and higher chance to fail tasks. Elf Shot (-3) Unfavorable, but not unmanageable. Lowers productivity. Ill-favoured (-3) Ignorable. Speechcraft is not a great skill. Infirm (-10) Unfavorable, but ignorable. Slightly lowers productivity. Potentially worth the points. Laggardly (-9) Extremely unfavorable. Avoid at all costs. Severely reduces productivity. Listless (-5) Ignorable. Speechcraft is not a great skill. Moribund (-18) Unfavorable for the motor function loss. Infirm but worse. Avoid if you can, but the point gain may be worth it. Punch Drunk (-8) Free points. Sluggardly (-7) Extremely unfavorable. Avoid at all costs. Severely reduces productivity. Stout (-4) Ignorable. Slightly lowers productivity and increases food intake. Vulnerable (-6) Ignorable. Slightly lowers productivity. Character creation (Misc.) Religious alignment Ignorable. All this really affects is how often a settler needs to pray to be happy. Weight Large (high weight) characters have lower movement speed and motor function, only gaining melee stats in return. Avoid this. Thin (low weight) characters have higher movement speed and motor function but less melee effectiveness. Such is favorable. Height Tall characters gain a little movement speed but lose a lot of evade chance. Short characters lose a little movement speed but gain a lot of evade chance. These trade-offs are relatively balanced, though I would personally choose the bonus evade chance (15% is a lot). Age Settlers can be one of a few types: Young, Adult, Middle-aged, or Senior. Young: Usually around age 25 or lower. Notable benefits include +10% work speed, +20% motor function, +5% movement speed, and +20% XP gain. Notable downsides include +50% clumsiness (chance to fail. Really only matters for harvesters) and -25% XP cap (daily skill XP gain soft cap). Adult: Around age 25-50. Notable benefits: +10% motor function. Notable downsides: -20% XP cap. Middle-aged: Around age 50-70. No notable benefits or downsides. Senior: Around age 70+. Notable benefits: -20% clumsiness, +10% inspiration, +20% research speed, and +20% XP cap. Notable downsides: -10% motor function and movement speed.Young settlers are optimal. Senior settlers are very useful for research or crafting items. Any other age of settler is effectively neutral. Recommended Starting Character Stats Your optimal starting settler should have a few things: Necessary Perk: Brawny Makes your settler do nearly everything 25% faster, which makes everything easier. Can sometimes be substituted with Whirlwind or Industrious, though I would only recommend it if other crucial stats are very strong. Marksman 8+ Needed to comfortably repel the first attack(s). Construction 10+ Needed to create a Research Table for Textbooks. You can get away with 8 or 9 (given your first settler constructs a lot) or even less if you have passion stars. Intellectual 15+ Needed to create Textbooks. Fast research is also invaluable early on to unlock crucial technologies before the first attack. You can sometimes get away with less than 15 if you have passion stars or are close to 15. Nice to have Botany Botany is a very good skill. I would almost not recommend a settler below Botany 10, but you can get away with it. Animal Handling Animal Handling becomes very useful mid and late game, and you will want to transition to Skeps as a food source as fast as possible. Perk: Fleet-Footed, Industrious, Whirlwind Makes your settler do things faster, though not nearly as much as Brawny. Perk: Somnolent, Early Bird, Night Owl, Forty Winks Allows your settler to work an hour or two more in a day with proper scheduling. Perk: Green Thumb Green Thumb is roughly equivalent to 20 levels in Botany when it comes to harvest chance/quantity, which can make early resource collection an absolute breeze. Low age More work speed, motor function, and movement speed, which results in more productivity. Low weight More motor function and movement speed, which results in more productivity. If you feel like customization is cheating, the necessaries should be achievable by just rerolling your starting settler until you see Brawny and then checking for high Int/Marksman stats, though you may need some patience. If you aren't bothered by customization, save yourself some time. Starting out When you load into your map, here is what you should do:Set your settler's schedule to 100% work. You want them to do nothing but follow commands until they have a place to sleep. This is very important on Lone Wolf's winter starts, as sleeping outside will not only make them unhappy but also make them cold. Immediately open the Animals tab and set your dog to follow your settler and Haul. It will haul a few things with relative frequency, though its carry capacity is limited and it will eat your food. Try to have your settler haul as little as possible, as your dog can do it instead. It is very helpful to have your dog haul stray materials (Limestone, Clay, Sticks, Wood, etc.) that spawn around the map back to your base for use. Uncheck the Forbid for the Packaged Meals, equip the bow, and equip the cap. Ignore the shield and spear. Figure out where to situate your base. (See below) Search the map for dead deer carcasses. Uncheck the Forbid for all of them, and set them all to Urgent Haul. Disable Urgent Hauling on your settler and have them do more important tasks. Your dog will haul these instead. (If you find no carcasses, harvest all mature mushrooms nearby instead. If no mushrooms, fish nearby. If no fish nearby, hunt an animal). Harvest some nearby tall grass or reeds for hay (~100-200). You will need these for skeps later on. Set them to Urgent Haul and have your dog carry them back. Harvest any close-by herbs, but set them to forbidden and do not use them unless absolutely necessary. The actual bonus herbs alone provide for healing is extremely slim--use tallow or nothing at all instead, and save these herbs for early trading. Where to put a base (Improved v 0.19.9) The Now How much effort it takes to isolate your buildings from attackers is your biggest concern for the first attack. Consider moating, walling, or underground building. Enemies currently have no way over gaps or over walls, and will path straight to the nearest entrance. If you only make one entrance to your base, enemies will always end up attacking it. Put your defenses here. Natural defenses will help minimize the time you spend preparing: Pits are your greatest ally. Removing all of the entrance ramps and building a staircase out is all you need to bottleneck enemies where you please. Build inside the pit as you see fit. Pits are also easy to expand on non-rocky maps. Peninsulas are your second greatest ally. You only need to wall/moat one side. Natural terraces are your third greatest ally. You only need to wall/moat two sides.The less time you spend making defenses, the more time you spend kickstarting your infrastructure. The sooner your infrastructure and production picks up, the faster you progress. The Later Your general base location and how it can be expanded will greatly impact you down the line. Take the above tips as a means to get you through the first attack or two, and the below tips as a means to get you through the rest of the game. There are three components of a good base location, in order of importance: The capability to build underground Located as close as possible to a corner The highest ground on the map, or nearly Underground towns Underground towns are the strongest form of defense in the game. An underground town consists of the necessary farms, skeps, and a single entrance above ground with everything else built a few layers underground beneath them. Underground towns offer many important advantages: You only have to wall the bare minimum, and are not wasting materials nor space on walling things that could go below ground. You save many resources, as you are digging rooms and not building them. Below ground is almost infinitely expandable once you are deep enough, and building space ceases to be a concern. Below ground is very temperature-stable, and you will rarely ever have to heat or cool rooms. Trebuchets will not focus structures underground. This makes their targeting very predictable, as they will only ever focus what little you have above ground, which is easy to wall off. Corner building
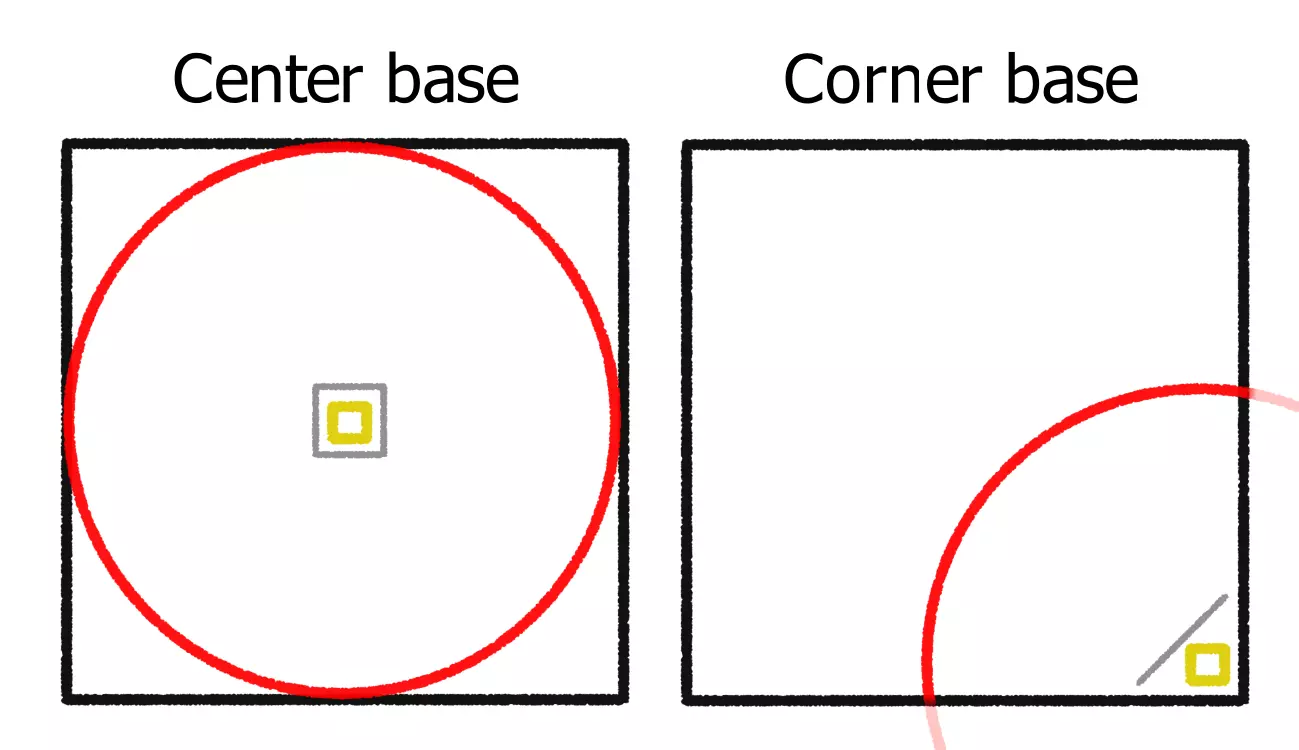
在角落建造基地会使地图上近四分之三的区域距离比在中心建造时更远。这种距离会让大多数攻击到达你的时间更长,显著降低 trebuchet( trebuchet )能够攻击到你的可能性,并在你与 trebuchet 生成点之间形成最大程度的地形阻隔。 由于攻击会在地图边缘生成,那些在你角落附近生成的 trebuchet 可以立即用防御工事内的弓箭手进行处理。这也意味着你可以将大部分反 trebuchet 防御集中面向中心,而不是全方位布置。如果你在角落建造一道对角线墙壁来实现这一点,所需的反 trebuchet 墙壁长度大约只有中心基地的三分之一。后期进阶玩家会沿着地图边缘建造反投石机箭塔,以便弓箭手在敌方进攻时安全地摧毁投石机。若将基地建在角落,只需在地图的两侧建造这类箭塔,而非像中心基地那样需要四面建造,因为地图对面两侧的大多数投石机将很难打到你。 这种布局的唯一问题是,有些敌人可能会在离基地很近的地方生成,让你几乎没有准备时间。如果你的基地布局紧凑,这通常不成问题;只有当你的殖民者因某种原因离基地很远时,才会有危险。不过有时这反而是个优势,因为你可以在敌人发起进攻前就开始攻击他们。 高地 投石机的射程高度有限。建造得足够高,最好的情况下能让你完全免疫 trebuchet(投石机)的攻击,最坏也能减少对高墙的需求。有时你可以选择在陡峭的悬崖或其他能阻挡大部分 trebuchet(投石机)火力的自然地形后方建造。(要记住,自然地形并非对 trebuchet(投石机)的攻击免疫)。 该怎么做 在完成初始资源采集和基地选址后,按以下顺序依次进行。按需砍伐树木和收集食物,但不要浪费时间收集超出需求的资源。 在基地位置建造一个通用储物区。禁用人类尸体和废弃物的存放。 建造一个临时住房。优先使用周围的资源(比如石灰石)以节省劳动力。目前不必在意质量,因为你的首要任务是避免因睡在室外而受到心情惩罚。卧室也能很好地抵消寒冷带来的惩罚,因为殖民者会经常回到卧室——在你的卧室里放一个火盆。你现在也可以将睡眠重新安排进殖民者的日程表。关于日程安排的信息,可以在本指南后面的“通用提示”部分找到,但在你实际拥有可供使用的休闲建筑之前,不要安排休闲时间。 在你的住房侧面建造一个有遮蔽且铺有地板的食物储存区。将这个储存区设置为只存放食物和动物尸体,并移除兴奋剂和骨头。在冬季(孤狼模式),这样做的效果和地窖一样好。在其他非冬季开始的难度下,这样做也仍然足够实用,能提供帮助。这个储存点容易受到饥饿动物的侵扰,不过吃掉你食物的动物很容易被杀死以获取免费的肉,因此为了这个原因,不保护储存点是值得的。
建造一个屠宰台并处理你的动物尸体。如果你找不到尸体,可以跳过屠宰台,直接使用蘑菇或鱼类。 生一堆篝火。禁用煤炭和木材作为燃料。在你的包装食品耗尽之前开始制作食物,这样你的定居者就不会因为吃生食而变得不开心。 地形改造防御。用墙或护城河隔开区域,隔离你的基地范围,并只留一个入口。这将确保敌人100%被瓶颈限制在一个位置,让你可以在那里建造防御工事。(注意:建造墙壁比挖掘石头更快)。 适当的防御。建造一个小塔楼来守卫你唯一的入口。它应该包括一个小型单层弓箭手塔楼(带有垛口),俯瞰一组通往外部的门,并将提供大量的高地伤害加成。确保墙壁不会阻挡弓箭手对门的视野,否则弓箭手将无法攻击那些正在破门的敌人。敌人会优先攻击门,并试图通过入口进入。城垛后方的弓箭手可以安全地将他们击倒。确保门仅能从一个格子被触及,否则多个敌人可能会同时攻击它。尽管存在一个可能导致这种情况发生的漏洞,但正常情况下一个格子内只能有一个敌人进行攻击,这意味着仅能从一个格子触及的门通常只会有一个敌人攻击它。
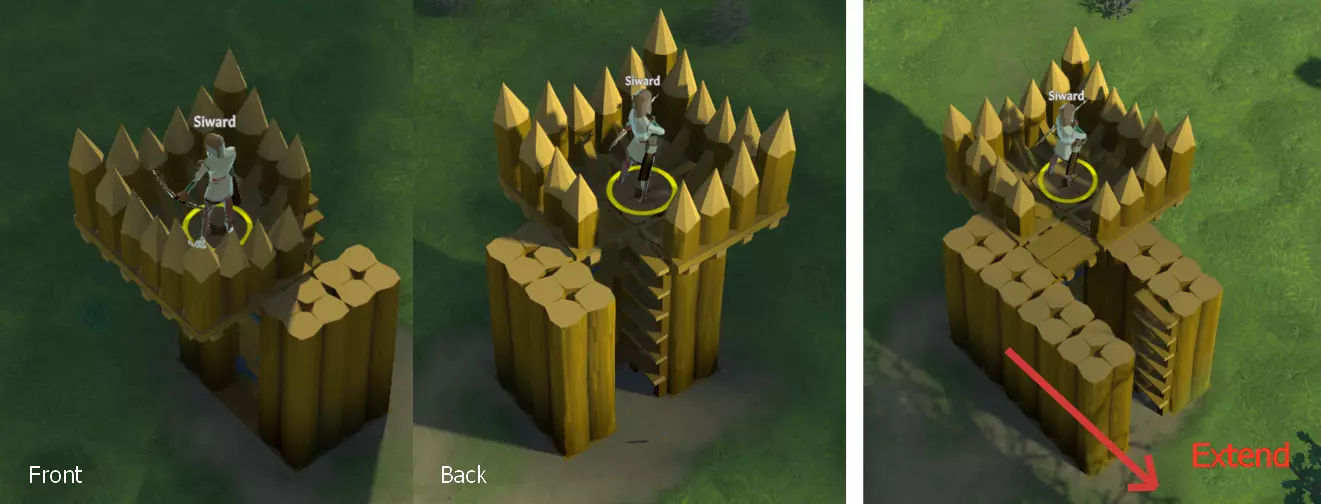
这是你能建造的最小型早期防御。如果你不是非常资深的建造者,建造一个稍大且简单的防御完全没问题,但仍要尽量减少材料消耗。如果你对只有一扇门的防御不够自信,可以延伸入口增加更多门(建议设置三扇)。开放的后侧(带梯子的部分)应连接到你独立的基地内部。 你可以利用悬崖,并在攻击者始终可见的位置设置门。
(You can technically repel attacks by walling/moating every entrance off. Enemies cannot get through walls without trebuchets and will loiter with nothing to do until they leave. This is mostly just an abuse of unfinished raid mechanics, though, and ruins all the fun at bare minimum). Build a research table. Shelter it with wicker floors the same way you sheltered your food, except on a different wall. This keeps its production speed at 100%. Optionally, you can just build housing for a third or fourth settler and keep it in there instead, which qualifies as a spare room (boosting its production speed to 110%) and minimizes wasted resources. Build a small table and stool. This gives mood bonuses every time settlers eat. Cheap happiness. Build backgammon. Is not limited to a specific religion and is cheaper than a shrine. Build housing for a second settler. Copy the first, and use the first's walls to reduce cost. Keeping all housing in one area is generally a good idea. Research straight to Wooden Weaponry. Build a Bowyer's table and make a shortbow for your second settler. Spend the rest of your time researching towards Beekeeping (and cooking as necessary). If you run out of food, look for more carcasses; if none, search for nearby fish; if none, hunt an animal. Around day 4, a lone trader will arrive. Herbs, tallow, and leather are dispensable and should be traded--trade meals as well if going for animals. Animals like goats, cattle, or dogs are particularly expensive but invaluable for hauling power if you can get your hands on enough goods to trade for them. Trade for alcohol if your settler needs the happiness. Around day 6, your first settler will arrive. This is guaranteed to be a Runaway event, which will spawn a negotiator (detailed below). First attack The first attack will inevitably come after your second settler arrives. This attack will be nearly impossible to negotiate, as you will not have enough value to pay the ransom. However, do not turn him away! Even if you don't pay the ransom, negotiators will sit there and waste a lot of time that you can use to prepare for the ensuing attack. You could even put off building defenses altogether until the negotiator shows up. (modified v 0.19.9) You should have a shortbow on both settlers (since you researched Wooden Weaponry). Before you start, however, you should know about animation cancelling. You can increase the fire rate of an archer by pausing the moment after they fire and then targeting them off and back onto your target. The latter 1/3 or so of the attack animation will get cancelled by the command and the attack animation will reset to 0, allowing you to bypass the wind-down archers have. This greatly boosts your damage output and is easily the most important mechanic to know for surviving max difficulty. You can do this with multiple settlers at a time. With that in mind, here is how you should defend: Send both settlers to your merlon-protected tower. Focus enemy archers first, as they are the only ones who can immediately harm you. Melee enemies with certain weapons (e.g. axes) will do high damage to your doors. Prioritize them if necessary. This becomes urgent if the enemies bug out and stack onto each other to attack a single door. If there are no archers or door-busters, kill indiscriminately.This should be enough to repel the attack. If you are still having trouble repelling attacks, adding more wooden doors to your entrance is always a cheap and effective solution that will buy you a lot of time. I would recommend three wooden doors, though it is possible to do it with just one. Stick traps are also a cheap and effective way to boost damage output and slow enemies. Here is also a good time to mention body dumping. It is faster and cheaper to simply dump dead bodies in a enemy-corpse-only stockpile somewhere outside your base (where settlers will not come within 10 or so tiles of it) than it is to build pyres or graves. Once attacks are done, select a worker or two and have them prioritize nothing but hauling bodies until they are all cleared out. Beyond attack #1 If you are here, you have survived attack number one. Congratulations! Now what? Food The next research you should pursue is Beekeeping. Optimally, you should have this tech by early Spring--until then, continue hunting/fishing/foraging for food. Beekeeping is a little unbalanced at the moment, and is superior in many ways: A single skep produces a whopping ~10 to ~15 food/day under optimal conditions, which dwarfs even the best crops by a factor of 3x-5x. (modified v 0.19.9; skep output no longer scales with Husbandry skill and always produces 35 Honey and 20 Wax) A skep in good conditions should produce in 3 to 4 days, which is faster than most every crop. Skeps train Animal Handling (which is important later). Honey spoils very slowly. You almost don't need to put it in a cellar. Honey can be used for Mead.You should have specifically chosen a settler with 15+ Intellectual so you can beeline (haha) to this technology and skip crops altogether. You need Construction 10 to build a skep. Build around 6-8 of them. More housing Expand housing for a third settler if you haven't already. Build a fourth room if you're feeling comfortable. Remember, expanding vertically saves valuable space.
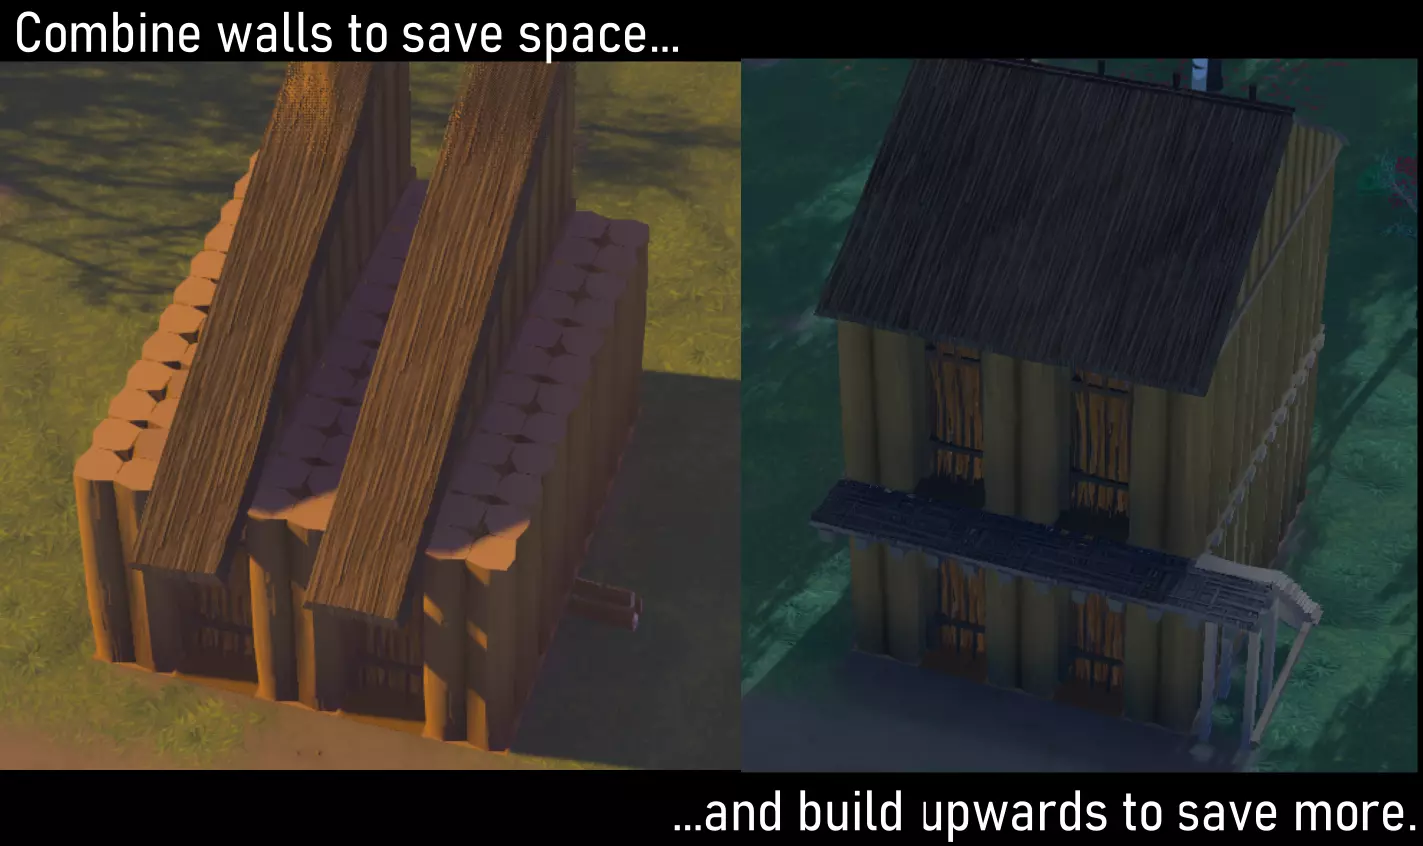
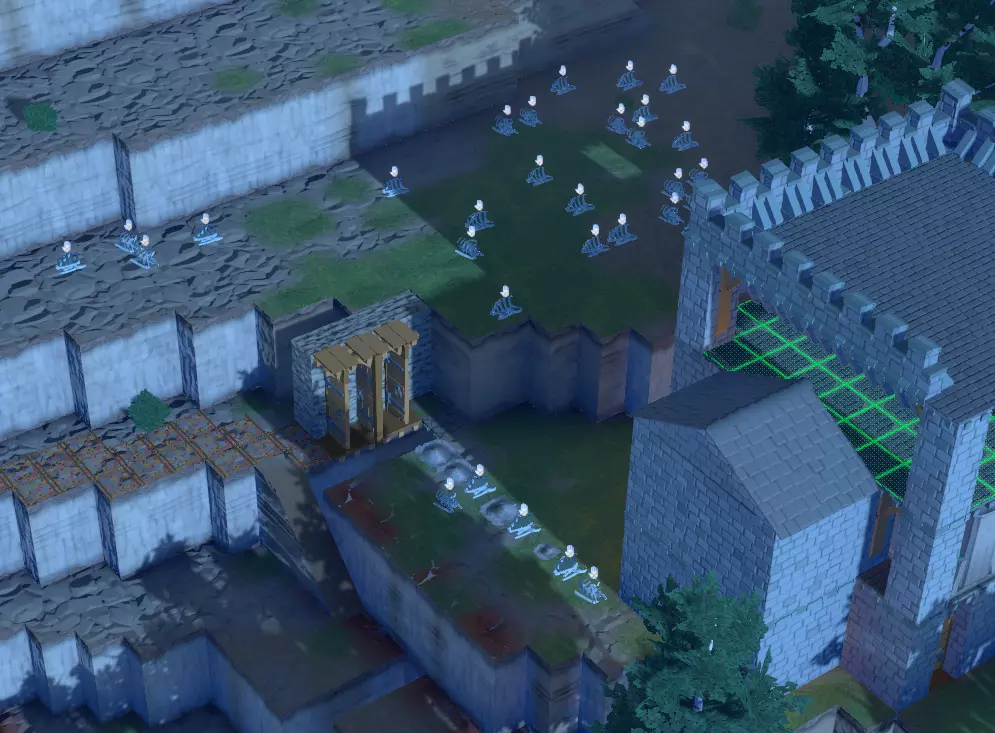
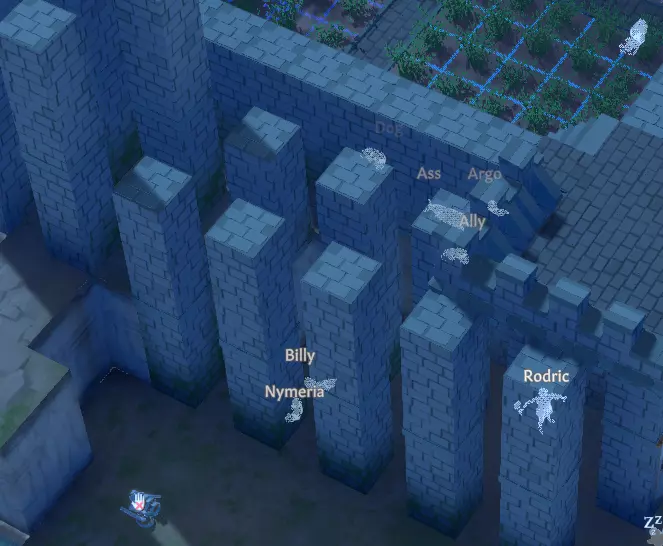
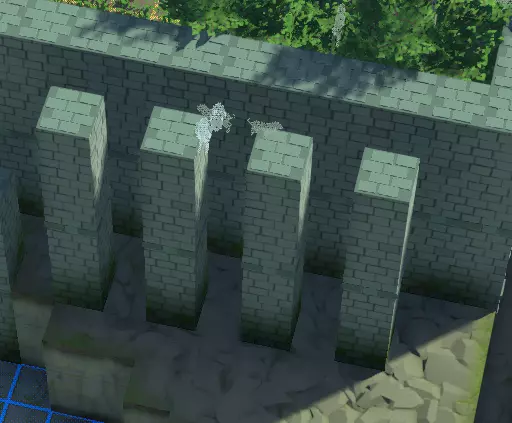
Spare room Build a large spare room. Put any and all stray workstations in this room for a moderate production speed bonus. Plan ahead and determine what it will end up being later before you build--a library? more housing? Your choice, just avoid having to tear down/rebuild as much as possible. Efficiency is key, and time is not to be squandered. On that note, plan ahead and minimize travel time between buildings. Find layout tips below in "General Tips"; a strong infrastructure is built off of maximizing production and minimizing everything else. Upgrading defenses Somewhat optional. It is possible to survive another one or two attacks with your initial defense, but you will have to upgrade eventually. Follow the same premise (archer tower overlooking doors) for simple success. Some notes: Aside from your previous tower, archer towers should always be one story tall. This provides high ground damage bonuses but minimizes severe accuracy penalties that come with distance. Protect this tower from trebuchets with exterior walls; optimally, raiders should be able to reach your entrance tower but trebuchets should not. Archers should always be protected with merlons. Don't obstruct your archers' line of fire with walls/floors. An archer should always be able to see your entrance to fire upon attackers besieging it. It is sometimes helpful to make the tower's ground floor an enclosed "safe box" for gravely-injured archers to hide in. Stick traps and wicker/stone fences in front of your doors are cheap and can severely slow down melee attackers to buy you valuable time during defenses. Consider abusing moats to create long, winding paths that attackers must travel over to reach your defenses. When in doubt, stall with more doors. Cellar Not particularly urgent (as honey spoils slowly), though you will probably want one eventually. You can make a deep cellar very easily with ladders, though you will want a stairwell eventually so hauling animals can access it. You do not need them right away, but you can research Preserving Food after Beekeeping for shelves which will make cellars space efficient. You can store stimulants or carcasses on the ground. Cellars are generally colder when bigger, clay-walled, floored, and deeper underground (in order of priority). This guide is a great place to learn more about optimizing cellar temperature: https://steamcommunity.com/sharedfiles/filedetails/?id=2992452919 Your third settler will show up in early spring. It is guaranteed to be a non-raid event, so you have ample time to adjust your defenses if you desire. Midgame and beyond Congratulations, the hardest part is over. You should now have a stable infrastructure--farming, food preservation, housing, the like. Due to the variance of each player and each map, this is unfortunately where the hand-holding ends. You are somewhat on your own from here, but there are a number of general concepts that will help you succeed: Plan ahead Building, expanding, it doesn't matter. Make every decision only after thinking "will I have to revert this later?" The less time you spend rebuilding, rearranging, or reverting is more time spent progressing. Technology is king Do not neglect research. You should never have idle settlers; an idle settler can always be researching. The faster you unlock tech, the more tools you have to progress. On Survival, enemy tech does not wait for you--you have to match them. If they have crossbows and you don't, why not? Don't lag behind, or you may find yourself too unprepared to defend lategame attacks. You should be able to complete the tech tree in 80-120 days. Trade for intermediate resources (modified v 0.19.9) If a trader is offering good deals or is overvaluing your proffer, abuse it. Especially metals and mechanical components, which may require lots of labor or skills you don't have. Every good trade saves time and effort, whether it be mining ore, crafting mechanical components, or otherwise. If you see something you think you could use and you know you're getting away with a good deal, never refuse. Chronicles, Textbooks, and Theses are the strongest trading items. Books cost nothing to make and they maximize value and minimize weight. These become stronger as the game continues as your researchers only get better, accessing more valuable books and making them faster. As mentioned above, you should never have idle settlers, as they can always be researching. Books are important for trading even after you have unlocked all technologies. Never send out more than one settler in a caravan, as settlers are your defensive firepower. Send hauling animals instead. Animals are important (improved v 0.19.9) Trained animals can haul, and an abundance of them can completely remove your need for hauler settlers as a whole, drastically increasing productivity. You want to train an army of hauling animals ASAP, making Animal Handling a valuable skill. It is possible to phase out settler hauling entirely before you reach half a dozen settlers. In general, one hauling animal per settler is more than enough. It is easiest to start with dogs, as they are easy to acquire and effective. However, Asses (Donkeys) have the best hauling capacity in the game and you should upgrade to them eventually. Goats/Sheep are usable in a pinch, but everything else is either too uncommon, difficult to train, or not effective enough to be useful haulers. Note that trained animals will breed more trained animals. Do not tame animals unless you are desperate. Taming wild animals wastes insane amounts of time (traveling, taming, and poor tame chances). Trade for animals instead; a few hundred gold for an animal is far easier to acquire. Animals should never be used for combat. Their stats are too low, they cannot be armored, and your defenses should be entirely ranged. Focus the right enemies Here is the order in which you should kill enemies. An attack ends sooner the faster you can kill. Archers. The only enemies that can still hurt you, and the easiest to kill. Focus skillful archers first (Master > Adept > Normal). When attacks are built of nearly all archers, you can sometimes focus melee instead. Archers won't attack doors, so killing all the melee attackers means you can turtle with no risk and the attack will eventually cease. Melee enemies with no shields. Easier to kill than the below. Melee enemies with bucklers or poor armor. Easier to kill than the below. Everyone else. Trebuchets (modified v 0.19.9) Virtually the only thing that can stop you now. If you (aforementioned in "Where to put a base") built your town high, underground, and in a corner, there is very little you need to do other than wall off your above-ground goods. A wall two layers high is buildable from ground-level and will defend against most trebuchet projectiles unless the trebuchets have significant high ground. A one layer high wall will defend against most trebuchets that have low ground. Build durable walls out of bricks or blocks. Double-layer walls if you have to, especially lategame. Keep one space between layers to avoid splash damage and so settlers can easily access them for repairs. Staggered walls are an excellent way to avoid trebuchet splash damage and keep trebuchet shots at bay, but let enemies through. Even just a single layer of pillars every other tile will block the majority of trebuchet projectiles. (added v 0.19.9)
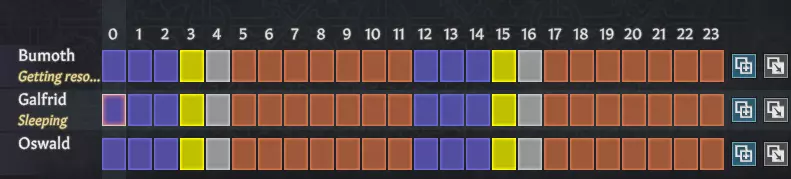
掠夺者会持续操控投石机。你击杀他们步兵的速度越快,掠夺(以及投石机的攻击)就会结束得越快。 有时你可以引诱投石机攻击一些无关紧要的建筑。一个中等大小、内置一两个工作台的房间有时能吸引投石机的火力,不过这方法有点不稳定。不要建造门,否则步兵也会将其作为目标,这样就失去意义了(你需要在投石机被牵制时击杀步兵来阻止进攻)。这种策略在极长时间的游戏进程中最为有用,因为反复的投石机攻击可能会对你的地形造成无法修复的破坏。 如果你的主要防御足够坚固,有时值得建造地下隧道系统,连接到地图边缘的塔楼(这些塔楼没有外部入口),这样你就能派遣弓箭手抵达投石机所在位置。训练射击技巧 你可以批量进行: 征召所有定居者。他们都应该配备弓箭。 将一名你不需要训练的定居者移到墙边或能阻挡所有投射物的坚固物体边缘,让他们可以躲在后面。 将其他所有定居者聚集在第一名定居者附近,使他们能够瞄准该定居者。 让这些定居者向那名单个定居者射击。当他们开始瞄准的瞬间,将那名单个定居者移到墙后,这样他们就不会被任何投射物击中。正在瞄准的定居者如果在瞄准时看到目标,无论是否有掩护都会开火。 当其他所有人都射击完毕后,将那名单个定居者移回来。通过移动命令取消/重置弓箭手队伍。重复此步骤和上一步骤。需要时频繁暂停,以确保此过程万无一失。每天进行这样的训练能快速积累神射手点数。你需要将每个定居者至少训练到神射手10级,这样他们就能使用长弓,之后还能使用高品质的重弩。最理想的情况是,你每天都进行训练,直到所有定居者都达到每日经验上限。 幸福度毫无用处 除了“欢乐”和“叛乱”状态外,幸福度实际上没有任何作用。因此,它在游戏前期(避免叛乱)和后期(获得欢乐状态)较为重要,但在中期完全无用。前期应追求永久性幸福度提升(如建造神庙、床铺、高品质卧室和大厅)以防止叛乱。只有当永久性幸福度(通常在后期)加上消耗性幸福度(如奢华膳食和高品质酒类)能让你达到“喜悦”(欢乐)状态时,才需要追求消耗性幸福度。 农场(版本0.19.虽然蜂箱能解决你的食物和酒类问题,但后期种植亚麻或草药是必要的。你可能已经注意到,在“基地选址”中并未提及农作物种植地的问题。这是因为存在地形改造功能。在可耕地较少的地图上,你可能需要在定居点附近建造土壤地块来进行耕种。这些是你在建造地下基地时,少数需要用墙壁围起来的地面设施之一。 通用提示 日程安排 这一点非常重要。无论你做什么,糟糕的日程安排都会让你的市民感到不满。 以下是我发现的效果最佳的日程安排模式。
Your base needs to be built compactly for this to work. All housing you build should have leisure of all types (Entertainment, Religion, and [if not unreasonable] Food & Drink) very close, and your work stations should not be far away from your housing. If your base is not compact enough, settlers will spend too much time running and fall behind schedule on sleep and/or leisure. Here is how this layout works:3 hours of sleep. If your settler has sleep recovery perks, you can sometimes bump this down to 2. 1 hour of Leisure. If settlers are low on sleep, they will use this time to sleep more. Other settlers who don't need extra sleep will wake up and simply do Leisure, which should be next to your housing. 1 hour of "Anything." This is so settlers who spend Leisure time sleeping can still fulfill their Leisure. Any other settlers will simply start doing work. Work until 11. Repeat for the latter half of the day. This setup results in a whopping ~15h of work a day for each settler. Sleep/Leisure is split in two like this so mood bonuses (full sleep, full leisure, not cold, full aesthetics, full comfort, etc.) refresh twice as often, lowering the chance a settler becomes unhappy/rebellious. Lategame, these bonuses (detailed in "Triggering Merry") and chance to trigger Merry are thus twice as often (and optimally spaced). If your settlers aren't getting enough sleep or Leisure, your base is not compact/optimized enough or your settlers may be dawdling. Condense your base or build faster paths. If you are still having trouble, you can concede the 5 and 17 time slots for Anything. Haulers Haulers are just as important as skilled workers, as haulers maximize the time skilled workers spend working; workers hauling to a stockpile also carry all they can whereas a worker hauling to a station carries only as much as they need to work. Earlygame your haulers should be settlers with poor skill values or ones that frequently idle. Replace settler haulers with animal haulers (and disable settler hauling) ASAP. Eventually all your haulers should be animals. This maximizes the time settlers spend producing things. The faster you train Animal Handling, the faster you can substitute hauling manpower for hauling animals. Green Thumb and harvesting Only have your best Botanist(s) harvest crops. Any settler with Green Thumb (+35% harvest quantity and -50% harvest ruin chance) should always play this role and be Botany-trained. Disable harvesting on all other settlers. Harvesting this way may seem slow, but it is far more efficient as it results in greater yield, which is directly affected by Green Thumb and Botany. Things to avoid There are a number of virtually useless items you should be wary of: Packaged meals. Exclusively for trade value. A proper cellar eliminates most need for packaging. Cheese. Not good for mass-production trading and you lose half your milk by making it. Waste of food. Beer and Ale. These require two different crops (Barley and Herbs) to make, Barley of which is the lowest-yield crop in the game by twenty miles, and Herbs of which have better uses (Medicine, Tapestries, Meals). Your alcohol should be Mead, which is labor intensive but uses honey instead of crops and trains Animal Handling. Aged Wine. Despite using Currants instead of Barley, it is also worse than Mead as it needs to age/ferment twice (virtually an entire year) to match the quality of Mead. Currants. Currants are inferior to Carrots/Cabbages for food and Wine is inferior to Mead. Only grow these if you are struggling for food. Beets. An inferior crop in yield and versatility. Pickled Vegetables and Smoked Meats. These are nearly useless if your cellar is optimized. A waste of resources and time. This means Smokehouses are useless as well. Ice. A well-made cellar should void the need for ice, but hey, it's easy and free to make. Beeswax. Not useful for anything except candles. You will have a LOT of beeswax later on once you start producing Mead. It is great fodder for proffers/trading, but useless everywhere else. Can be used as medicine for laughable effectiveness. Candles/torches. Only useful for decor or as a requirement for a Great Hall. You should be using Braziers for heat. Gold and Silver. Not great for trading due to weight, books are better. Useless for armor and weapons, as you should just be using steel. Shields and Melee weapons. You shouldn't be using these. Deconstruct them for free resources and EXP. This means Woodworking benches are useless as well. Graves and pyres. Mentioned in "First Attack", it's better to just dump bodies in a stockpile away from your base to rot. Dogs will actually eat these bodies, so don't waste free pet feed by burning or burying them. Statues. Not particularly more valuable than other decor (tapestries, paintings, etc.) and takes up more spaciousness. Use other decor. Firepits. Effectively a Brazier that takes up more space. Just use Braziers. (v 0.19.9) Summer clothes. Heatwaves don't occur enough for these to be worth it. Just use Winter clothes 24/7. And a few situational items:Some crossbows. Crossbows have low stats compared to Longbows/Shortbows, but gain damage with quality level where Longbows/Shortbows do not. Do not use/make Crossbows or Heavy Crossbows unless you have the Carpentry to achieve Superior or Flawless quality, as they will not outdamage Longbows. However, Light Crossbows almost always outdamage Shortbows, but rarely outdamage Longbows. Superior/Flawless Heavy Crossbows > Longbows > Light Crossbows > Shortbows. Barley. Barley is the worst crop in the game and should only be grown for the hay it provides or for Bread for Sermons. Lavish meals and drinking alcohol. Largely useless outside of lategame. This is mentioned above in "Happiness is useless". General tips (cont.) Minimize travel time Build pathways out of floors. Default ground movement speed is usually around 85%. Building paths can bump this up to 110%. Build stairwells, not ladders. Stairwells are faster to travel down. Housing next to Great Hall. Maximizes the efficacy of post-sleep Leisure time by minimizing the time settlers spend moving from housing to leisure. Great Hall, Farms, and Kitchens next to cellar. Great Hall minimizes time settlers spend going from food to table. Often means it will be underground. Farms minimizes hauling, and can otherwise become labor nightmares for your haulers. Kitchens also minimizes travel times. Workstations next to general storage and housing. Stonecutting, Tailoring, Blacksmithing, Woodworking, etc. all heavily utilizes your general materials storage (unless you're optimizing small-stockpiling. See below). Housing nearby allows your workers to quickly go from work hours to sleeping. Never build workstations huge distances away from housing, as losing sleep can make settlers extremely unhappy. Libraries and Brewing Stations can go anywhere. Researchers will not haul (given proper prioritization) and your bookshelves should probably be in the same room anyways in order to create a Library, so travel times are never an issue. Brewing stations can also go anywhere, and do not have special room bonuses. You should only be brewing with Honey (Mead), which spoils to temperature over years, so put shelves of it in the same room instead of in your Cellar.
Small-stockpile Oftentimes it is worth building very small high-priority stockpiles of raw materials next to relevant workstations (like a tile or two of Limestone storage next to a Stonemason's bench). This can boost productivity not only because the raw materials are closer, but because workers hauling to a stockpile carry all they can whereas a worker hauling to a station carries only as much as they need to work. With proper haulers, these stockpiles will be filled more often than not. This applies even moreso the lighter the resource is, as haulers can carry more en masse. Hauling a bundle of sticks to a Kitchen for fuel is probably the best example of this. A single hauler can haul 200 sticks, which will save you what would otherwise be 200 trips (since cooking fuel is used one at a time). Other potential considerations are metal/fuel to blacksmithing, textiles to tailors (shelves!), limestone to stone block cutting, clay/fuel to clay brick making, etc. Prioritize passionate skills It may seem counterintuitive to put priority #1 on a low-point skill, but you should if it has passion stars. The EXP multiplier for passionate skills is 2.5x (1 star) or 4x (2 star), allowing extremely rapid EXP gain. Anyone with passion in a skill should almost always have priority over other settlers without passion no matter what their existing skill value is. The EXP difference adds up quickly over time. The only exceptions to this rule are: Skills that don't receive a lot of use, like Tending or Hunting. These skills may not get used/trained enough for the EXP bonus to make a measurable difference, and you may prefer someone already competent in the skill perform the task for efficiency's and efficacy's sake. Getting someone without passion stars to a useful threshold (like level 20 smithing to craft mechanical components) if they are very close. Skills that affect yields, like Botany or Cooking. Always have your highest-level Botanists harvest--the others can plant. Minor exceptions where you may prefer a more even job distribution. Settlers with passion in skills also gain significant mood boosts when they work those skills. Smithing and Carpentry are the most important of them all, as skills in these jobs directly translate to armor and weapon quality. You will suffer lategame if you do not have skilled Smiths and Carpenters, as you will still be stuck with low-quality gear and/or damaged enemy hand-me-downs. Mass-deconstructing enemy gear drops should give you plenty of work for citizens to gain EXP fast. You will almost never reach max skill value (50) on anyone without passion stars. Food crops tier list If for any reason you wish to grow crops for food (possibly for animal feed), here are the best ones: Carrots are the best crop at 2 food per day. These require Botany 10. Cabbage is the second best at 1.8 food per day. Does not require Botany skill. Currants are the third best at ~1.71 food per day, but the first harvest takes a long time. Beets take the highest Botany (20) and have the worst output of the vegetables at 1.66. Do not grow these. Barley has a disastrous output of 0.57 food per day. Do not grow these except for hay. (Lategame) Triggering Merry Triggering Merry If settlers have mood of over 85%, they will be considered Joyful and have a chance to gain the Merry buff. This buff gives +10% Global Work Speed, +15% EXP gain, and +10% Inspiration (chance to craft higher quality items). This buff is why happiness is important lategame. Any duration you can retain this buff puts your settlers and productivity farther ahead than where they would otherwise be. It is effectively free progression. Merry is very hard to achieve, as you need nearly every universal positive mood bonus in the game when on Very Hard difficulty. Merry is also not a guaranteed trigger, and requires 3 things: Joyful (85%+ mood) A new positive mood bonus to be acquired If the above two conditions are met, a 50% chance is rolled and must succeed. The "Merry" buff lasts ~10 hours, so high mood is not a constant necessity. As such, it is better to acquire as many mood buffs as possible at once to trigger the above conditions rather than to spread them out. This is why Leisure is scheduled right after Sleep, and why it is not worth making rooms that aren't bedrooms/leisure Aesthetic. Your settlers should be getting your bedroom mood buffs, then use Leisure time for Great Hall and Temple/Chapel related mood buffs straight after. This amasses a huge amount of strong mood bonuses at once. A list of bonuses you should have at minimum: Entered Superior Temple/Chapel (+4) Religious needs fulfilled (+5) Entertainment needs fulfilled (+5) Stepped into Superior Temple/Chapel (+4) Ate at a table (+2) Ate in Superior Great Hall (+4) Ate a nice meal (+4, can stack to +12.8 at a Feast) Drank good beer (+2) Slept in Superior Quarters (+6) Very comfortable (+4) Pleasant surroundings (+4) Other optional bonuses: Worked Eagerly x2 (+6) or Worked Passionately x2 (+12) Event mood bonuses (+6 for "Enjoyable" or higher) (v 0.19.9) Ate in Luxurious Great Hall Slept in Luxurious Quarters Beautiful Surroundings (+8) Room Quality Once in lategame, Bedrooms, Chapels/Temples, and Great Halls will be a primary source of positive mood, Comfort, and Aesthetics, as they are frequently visited and replenish these stats reliably. This will be your ticket to Merry. The mood bonuses you gain from these rooms depend on room quality, which depends on Spaciousness (open tiles) and Value. Higher qualities of these rooms give bigger mood bonuses. To raise a room's quality, make it more spacious and/or raise its value. Some notes: A room will inflict the "Walls are closing in" mood debuff around <10 spaciousness, so ensure Leisure rooms (especially bedrooms) are larger than that. (added v 0.19.9) Bedrooms should have a Royal Bed for maximal comfort and a brazier to get rid of cold debuffs. Individual chambers are far superior to shared chambers. Room Value should primarily come from tapestries, paintings, wall reliefs, and mirrors, as these all raise Aesthetics, don't reduce Spaciousness, and are particularly valuable. Rugs are also usable but do not have Aesthetic value. Other items like Banners or Torches/Candles aren't valuable or Aesthetic enough to keep up. It is not generally worth making rooms other than Bedrooms, Great Halls, and Temples/Chapels Aesthetic for reasons detailed above. Settlers will get unhappy walking through a temple/chapel that is opposite to their religion. Build temples/chapels in a way that they cannot be accidentally entered. (added v 0.19.9) Recommended tech path Here is a suggested tech path if you are struggling with what to research. It is not a necessity, and every individual settlement's needs may demand slight changes to this order. Early Game Architecture + Wooden Weaponry (before first attack) Agriculture + Research II + Beekeeping (will replace most of your crops as a food source and spoils very slowly. Trains Animal Handling) Preserving Food (for space-efficient cellars) Furniture (beds for happiness, bookshelves for library) Approaching Midgame Clay Brick Making or Stone Block Cutting (higher-grade building materials. Obtaining these sooner means rebuilding less structures) Decorative Structures (specialized rooms for productivity boosts, Great Hall for happiness boost) Tailoring -> Armourer (for deconstructing enemy gear) Fletching II (for more powerful bows) Defensive Structures (Reinforced doors are very useful) Midgame Cartography (for trading) Smelting -> Blacksmithing (for mechanical components) Crossbows I Endgame Research III Crossbows II Armourer II -> Armourer III [+ Steel] (for endgame armor) Infirmary Bed + Chemistry -> Distilling (high-tier healing kits and Infirmary rooms) Cooking (unlocks Lavish meals for Merry, otherwise useless. A required precursor for Brewing) Brewing (for Mead, which is also for Merry) Rugmaking -> Tapestry and/or Furniture II, III, IV and/or Painting (for Merry) All others are not particularly useful. Research them after the listed techs are done. Not hard enough? Is your Professional Gamer™ brain too big? If you want a spicier experience, you have two main options: crank up the difficulty, or start on a custom scenario with literally nothing. I've had quite some fun with these and recommend them both. Detailed below are tips on braving either option if you wish to. Do not attempt these until you can manage (and preferably master) traditional Lone Wolf Very Hard Survival. Starting with nothing There are a handful of major differences on zero-starts that make your life harder: No clothing Since it is Winter, no clothing is a serious risk. Moderate hypothermia is almost unavoidable on your beginning settler, but not entirely inevitable. It is generally acceptable to contract hypothermia once, as you can heal it relatively quickly and it is not an immense setback, but it is a setback nonetheless. Avoiding it requires prioritization. Immediately begin constructing a small room with a brazier. Build it no larger than 3x4 and use terrain where you can--this will maximize temperature and minimize time taken. Use minimal roofing. If you are quick, you should have this "warm room" up before your settler suffers hypothermia. Construction 10+ is virtually a necessity to pull this off. Your second settler will arrive with clothing. Swap it to the settler that spends the most time outdoors. No food Currently, the most optimal way to circumvent this is with spawned corpses. On map generation, there will be some pristine animal carcasses lying around--find the deer carcass closest to your base location and butcher it ASAP. Your settler tanks a whopping -20 mood for starving, so this is your highest priority outside of a warm room. I am not certain whether these corpses are a bug or not, or if they will eventually be removed. In a world without deer carcasses (or ones close enough to grab), your next option is fish or wild crops. If you have neither nearby, your map is not worth starting on. This makes some Mountain maps virtually unplayable. You will need around 50 raw food to make 6-8 meals, which should buy yourself plenty of time to make a bow. Over time, animals will naturally die and leave corpses behind which you can butcher. No shortbow Researching Woodworking before the first attack is now not optional. You cannot hunt well nor defend your base without a bow. Force your settler to research in your "warm room" when they have the "Cold" debuff and do outside tasks when they don't. This should avoid all hypothermia. It takes a notable amount of time for a cold settler to contract hypothermia, letting you cut some corners. Without a bow, it is harder to kill animals that may eat your food. You can punch small animals like Foxes, Rats, or young Wolves to death as they eat your food, but mature Wolves will annihilate you if they retaliate. No dog You will need to do all early hauling manually. You never appreciate that dog until it's not there. The rest should play the same--just watch your settlers' hypothermia. You have roughly seven days until the first attack hits. Perfect play is not necessary, but optimized play is. Max+ Difficulty Here is a recommended setup for a more engaging experience if you want a true challenge. Many of these values go above the customizable difficulty setting caps, so you will need to dig around in the game files for the GameDifficulty JSON and adjust the settings for Very Hard difficulty there. I would recommend making a backup of the file for if you want to revert later. Max+ 500% Event Strength - [Default (Very Hard) 300%] 200% Wound Severity - [Default (Very Hard) 120%] Wounds in this game are a joke. They never last more than a few days and tending them is overpowered, and only severe wounds notably affect your settler's capabilities. Unfortunately you can't modify their duration, but drastically increasing this makes wounds noticeable and makes convalescing an actually notable priority. Turn this even higher if you're feeling spicy. 70% Animal Spawn Rate - [Default (Very Hard) 70%] Another healthy default. Turn it lower if you don't value your sanity. 80% Plant Yield - [Default (Very Hard) 80%] Another healthy default. Turn it lower if you don't value your sanity. 80% Mining Yield - [Default (Very Hard) 80%] Another healthy default. Turn it lower if you don't value your sanity. 60% Settler Mood - [Default (Very Hard) 60%] This one is actually very tricky. Turning it lower makes rebellion more likely, but if you read the "Triggering Merry" section you might see that lowering this at all makes Merry virtually impossible. It is already at a poor position on Very Hard, and you often need almost every positive mood bonus in the game. I would not lower this at all, as Merry being unachievable means all happiness is useless outside of preventing rebellion, which makes lategame extraordinarily boring. 120% Enemy Hitpoints - [Default (Very Hard) 100%] Another extra inch. 120% HP means that actually training Marksmanship is often the difference between archer volleys one-shotting enemies or not later on. You will also often never completely clear raids--you will almost always win by tooth and nail. 50% Hitpoints Recovery - [Default (Very Hard) 100%] Settlers rarely get injured enough for healing rates to ever matter. This changes that, and can put genuine importance on convalescing. I would almost recommend lowering this even further. 300% Rotting Speed - [Default (Very Hard) 100%] Makes preservation solutions an actual necessity and priority. A simple cellar obviously still negates all of this, but this makes that cellar more valuable and important. 500% Decomposition Speed - [Default (Very Hard) 100%] Makes roofed storage an actual necessity and priority. Makes seed/sapling preservation a genuine concern. Makes clothes not last a million years and Tailoring becomes a more meaningful skill. Makes weapon and armor storage (when not in use) worth paying attention to. 80% Barter Value - [Default (Very Hard) 80%] Bartering is only difficult earlygame. Making this worse mostly just makes early bartering impossible. 120% Chance Quarry Retaliates - [Default (Very Hard) 120%] Retaliation is a stinky mechanic, as it kind of just makes your settler attack the animal and thus reset all tame/train progress. Otherwise, you just have the settler run away until it stops chasing you. It doesn't really do much, it's just annoying. 100% Global Work Speed - [Default (Very Hard) 100%] Healthy mechanic that needs no changing. Only lower this if you're masochistic. ON Thunderstorm - [Default (Very Hard) ON] ON Blight - [Default (Very Hard) ON] ON Hostile Animals - [Default (Very Hard) ON] OFF Domestic Animal Event - [Default (Very Hard) ON] Don't get me wrong, these are fun when they show up. Turning them off puts more emphasis on trading midgame (and caravans) for animal acquisition, or taming as a last resort. But I fully condone keeping this toggled on for the free dopamine, as it's rare it'll actually make a massive difference. ON Hailstorm - [Default (Very Hard) ON] ON Cold Snap - [Default (Very Hard) ON] ON Heatwave - [Default (Very Hard) ON] ON Enemy Raids - [Default (Very Hard) ON] Yes, these are enabled. ON Use Seeds - [Default (Very Hard) ON] A legacy setting for people who hate the seeds mechanic. Only turn off if you're still living in Update #3. ON Spawn Trebuchets - [Default (Very Hard) ON] Yes, these are enabled, too. You should play this functionally the same, but your micromanaging and decision-making skills will need to be in shape. You have less room for mistakes, and you cannot squander time. Update #11 Notes (v 0.19.9) There are four major topics in this update. Events The primary result of Events (Feasts, Sermons, Rituals) is a long-lasting happiness boost to participating settlers. As mentioned above in "Happiness is useless", happiness does nothing to a settler if they aren't either Rebellious or Merry. If you can keep a settler above Rebellion but can't reach Merry, Events are completely useless to you and you should not waste your time nor resources on them. However, if you are in lategame and are pursuing Merry, Events become valuable tools. Feasts are the best, as they are not bound by religiosity and can also stack the "Ate a Nice Meal" buff (depending on Feast food offerings) up to 4 times for nearly +13 mood. Participant count and Roles are valued very highly and you can hold a decent event even without expending many foods/resources. A feast for five people with literally one meal and a bard can still end up "Enjoyable" (+6 mood). Virtually the only cost is the time an event takes (usually around 2 hours). However, getting an event up to "Excellent" quality is optimal, as it will provide an insane +8 mood for 8 days and will also temporarily lock either Entertainment (Feast) or Religious (Sermon/Ritual) needs to max for several days. This prevents settlers from needing to spend time fulfilling that stat, which ends up in less Leisure and more time working. You need an event quality around 600-700+ to achieve "Excellent". It is fairly advantageous to host events when visitors are present, as participants or extra Roles add a lot to event quality. Lategame (when pursuing Merry) you want to hold an Excellent feast every time you run out of either the Entertainment lock or the +8 mood buff. Roles Roles are special titles you can assign settlers who meet certain criteria. These settlers can be assigned "Role duties" which provide a happiness boost to settlers using certain rooms. Bard: Performs in a Great Hall to give +2 to +4 mood to nearby settlers. Chaplain: Preaches in a Restitutionist chapel to give mood to nearby settlers. Druid: Preaches in a Oak Bretheren temple to give mood to nearby settlers. Role-assigned settlers also gain a permanent +4 mood. You can exploit this and assign a role to a settler and just never assign role duties, effectively resulting in free mood (though they gain distaste for unskilled labor). However, role-assigned settlers will grow unhappy if they do not have the proper venue (Great Hall, Temple, Chapel) to do their job even if they are not assigned role duties. Settlers who are assigned Role Duties should have their schedules offset so they can perform role duties during normal settlers' Leisure. This is what allows the performance mood boosts to take effect.

我有时会发现我的定居者在“任意时段”里磨磨蹭蹭,导致他们无法准时到岗。这种情况下,只需将“任意时段”替换为“角色职责”,他们就能提前一小时到岗。 你需要尽快将角色等级提升至最高,以获得最大的心情加成。 平衡性调整 许多系统似乎都进行了平衡性调整。 现在的作物产量变得合理了。就蔬菜而言,所需的植物学等级越高,每日产量就越好。尽量种植你能种植的植物学等级最高的作物。大麦依然没什么用,它是一种功能性作物(用于制作干草和/或谷物,而谷物可用于制作面包,供神殿举办活动时使用)。作物生长速度也得到了显著提升,大多数作物最多只需一周就能成熟。然而,斯凯普(Skeps)仍然是远超其他的食物生产者:大多数作物每天约产3单位食物,而斯凯普仍能产出10-15单位。 我确信交易(或交易价值)已得到增强或重新平衡。即使没有较高的口才技能,我也见过一些高得离谱的价格,极少见到极差的价格,而且有些物品明显比以前便宜了。交易很可能变得更强了。 许多心情增益的数值已被调整,不过主要变化在于职业星级加成。二星职业现在最多提供+12心情,一星职业提供+6心情。职业星级比以前更有价值了。 我很确定伤口愈合时间被延长了。 长弓的射程被削弱到与短弓一致。 谈判 谈判会在(大多数)攻击前触发。敌人会陈兵边境,你可以通过交易来阻止他们进攻。他们通常会耐心等待一天多一点的时间,之后便会自动发起攻击。 第一次进攻几乎无法通过谈判解决,你没有足够的价值来支付赎金。 永远不要赶走谈判者。即使你不支付赎金,他们也会在那里停留,浪费大量时间,而你可以利用这段时间为即将到来的攻击做准备。 口才技能可以提升物品的感知价值,并降低谈判者的赎金要求。派遣你最擅长谈判的人可能会为你节省数百金币。 总的来说,谈判并不值得你花费时间。弓箭手加堵门策略的强度过高,使得大多数进攻都变得轻而易举。而选择谈判赎金则意味着你会失去支付的物品,失去未来不可谈判进攻中潜在的弓箭手经验值,失去所有从敌人尸体上获得的战利品,有时还会有降低定居者心情的风险。唯一可能值得谈判赎金的情况是,进攻方主要由高等级弓箭手组成(即最危险的进攻类型),或者你因某些原因极度缺乏准备。
2026-02-13 09:03:45 发布在  Going Medieval ( 前往中世纪 )


说点好听的...
收藏
0
0