


FSD v2 花式状态显示指南
介绍“花式状态显示”脚本以及FSD v2版本的更新内容 免责声明 是的, 我知道, 这份指南内容很多。 抱歉, 但FSD v2目前已集成了众多功能,因此篇幅不可避免。 撰写这份指南花费了我好几天时间, 从早到晚。 而且英语并非我的母语, 所以如果您在其中发现任何疏漏,请多多包涵。 当然,对于您指出的任何错误,我都会尽力修正。 此致 Ekuah 初始设置 放置一个可编程方块(此后简称PB)。 在终端界面中选择该方块,点击“编辑”,然后点击“浏览脚本”来加载脚本。 如果您已订阅,“花式状态显示 v2”脚本应该会出现在列表中。选择它,点击“复制到编辑器”,然后点击“确定”。 单个运行“花式状态显示V2(Fancy Status Displays v2)”的可编程方块(PB)可以支持多个已连接的网格。 运行多个“花式状态显示V2”实例时请注意: - 位于不同且未连接的网格上时,运行正常。 - 位于单个网格上时,会导致问题。请勿这样做。单个“花式状态显示(FSD)”实例可以控制数十个屏幕。 - 位于不同但已连接的网格上时,必须采取特殊预防措施。
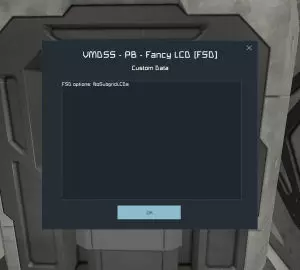
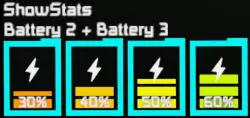
(重新开始的解决方案)在所有运行FSD的可编程方块的“自定义数据”字段中插入以下行: “FSD options:nosubgridLCDs” 或者将脚本中的FSD触发词从“ShowStats”更改为其他不同的词语。 这样每个FSD实例都将响应其他触发词。 (注意:这可能会导致脚本出错!) 用途 本脚本用于在任意屏幕上显示各种方块的特定信息。 要定义显示哪些信息,需在提供屏幕的方块的“自定义数据”字段中输入一个列表(即数据集)。 提供屏幕的方块可以是任何带有屏幕的方块: 液晶显示屏(LCDs) 文本面板 可编程方块 任何驾驶舱 飞行座椅 控制台 在“自定义数据”中,“ShowStats”表示数据集的开始。此关键字用于告知脚本对当前区块的屏幕进行操作。其后需换行。 注意: 其后需换行。ShowStats 必须单独成行。 同时注意 ShowStats 中的两个大写字母“S”。 这是少数区分大小写的关键字之一。 ShowStats 上方的任何内容都将被忽略,可用于其他用途。 在接下来的行中,你可以输入要在此屏幕上显示的列表内容。 列表之后,你可以使用 EndStats 来关闭数据集。 添加此功能是为了让 FSD 能够兼容其他脚本。 注意: “ShowStats”的规则同样适用于“EndStats”。 EndStats 必须单独成行。 注意 EndStats 中的大写字母“E”和“S”。区块的CustomData字段中的基本数据集将如下所示: ShowStats 待显示内容 ... 或与其他脚本配合使用时: 不同脚本的内容 ... ShowStats 待显示内容 其他待显示内容 等等 ... EndStats (可选) 另一个脚本的内容 ... 如何定义显示内容 在包含ShowStats关键字的行之后,您可以在下一行开始列表,定义要在此屏幕上显示的内容。 您可以使用区块组的全名: (部分组名无法识别) MyGroup显示名为“MyGroup”的组中包含的所有区块。 或者您可以使用区块名称的一部分。 (脚本会搜索所有包含给定字符串的区块:) Battery显示所有包含“Battery”的区块(例如(电池 1、电池 2、采矿机电池) 脚本将首先尝试在所有已连接的网格中查找名称匹配的方块组。 如果未找到任何匹配项,它将尝试查找名称中包含该字符串的方块(同样在所有已连接的网格中)。 你也可以使用“+”号将不同名称组合在一起(脚本会对包含不同字符串的所有方块执行多次搜索): 电池 2 + 电池 3 显示所有包含“电池 2”或“电池 3”的方块 示例 假设有六个电池。 第 1、第 2 和第 5 个电池组合成一个同样名为“电池”的组。 第 1、第 3、第 5 和第 6 个电池与可编程方块(PB)位于同一网格上。 第 2 和第 4 个电池与可编程方块(PB)位于不同的网格上。
çľćą
由于脚本首先会查找名为“电池”的组,因此只会显示第1、第2和第5个的状态。(其他电池不属于“电池”组)电池2
仅显示第3和第4电池的状态。电池3
仅显示第5和第6电池的状态。 (“电池3”是“电池32”的一部分) 电池2 + 电池3
Only the the status of the 3rd, 4th, 5th and 6th battery will be displayed. ('Battery 3' is a part of 'Battery 32') Currently these types of blocks are supported.Air VentsAssemblers *Batteries *Beds *BenchesCargo ContainersCockpits *CollectorsConnectorCryo ChambersDoorsDrillsEjectorsGatesGatling GunsGrindersHangar DoorsHingesHydrogen EnginesHydrogen Tanks *Jump DrivesMissile LaunchersO2/H2 Generators *Oxygen Tanks *Parachute CratesPistonsProjectorsReactors *Refineries *RotorsSeats *SensorsSolar PanelsSortersThrustersToiletsTurretsWeldersWind Turbines(* these blocks offer a second data source) Modifiers or using the option keywords You can refine the search or modify the way something is displayed by using several modifier keywords. These keywords must be separated from the Block/Group name(s) by a special character (lets call it the Separator). This can be ether a comma ',' or a colon ':' Upper / lower case of the keywords will be ignored. Battery ,widebar Battery :WideBar(both work equally) You only need the separator once. There is no need to separate the keywords other than with a single space. Battery, Optional WideBar Battery, Optional, WideBar(both work equally) Only the keywords after the Separator are recognized. Keywords before the Separator will be ignored. So you can use Blocks/Groups whose names match a keyword. WideBar, widebar(Shows a Block/Group with the name "WideBar" with the modifier WideBar) Only Blocks/Groups names containing the Separator will pose a problem. like: "Thrustergroup:up" "Reactor 17,5" Here are the Keywords that are recognized by FSD v2 AddInfo AddSize AltCalc AltInfo= AltSymbol= AnalogBar BarColor center Clone: DigitalBar EndLine EndStats fastmode Filter( Fontsize= FrameColor Framerate= FSD options: Gap gfxEnd gfxStart Health IconColor IconCount= InfoColor Invert Layoutrate= left Length= NoCR NoGroups NoHeadline noIcons NoLineBreak NoNames NoPercentage NoScrolling NoStatus nosubgridLCDs NoSubGrids OnlySubGrids Optional Panel PercentColor Position Reference= right Scale= ScrollSpeed= sequence ShortBar ShowStats SingleIcon SmallBar SolidBar Sprite: SymbolColor TallBar Text: TextColor verbatim WideBar The different modifiers will explained later. Refining the selection process You can narrow down the search by several methods. By putting the block name in quotation marks you will limit the search to block with exact name matches. "Battery"Will only show blocks with the name "Battery" (but not: Battery 1, Battery 2, Miner Battery) There will also skips the search for groups. (since those require an exact name match anyway) Adding the NoSubGrids keywords to prevent the search on subgrids Battery, NoSubGridsThe keyword NoSubGrids will restrict the search to those blocks which are on the same grid as the programmable block running FSD v2 (PB). Adding the OnlySubGrids keywords to restrict the search only on subgrids Battery, OnlySubGridsThe keyword OnlySubGrids will restrict the search to those blocks which are not on the same grid as the programmable block running FSD v2 (PB). Adding the NoGroups keywords to skip the search for groups Battery, NoGroupsThe keyword NoGroups will ignore all groups in the search. Examples Using the situation from before, given are the six batteries. The 1st, 2nd and 5th battery are combined into a group also named 'Battery'. The 1st, 3rd, 5th and 6th are located on the same grid as the PB. The 2nd and 4th are located on a different grid than the PB.
çľćą 3
只有名称完全匹配的方块才会显示。在这种情况下,仅显示第5个电池。“电池”
仅显示名称完全匹配的模块。 在这种情况下,仅显示第1和第2电池。 电池,无子网格
由于脚本首先查找名为“电池”的组,并仅显示与可编程方块(PB)位于同一子网格上的模块,在这种情况下即第1个和第5个电池。(其他电池既不属于“电池”组,也不与可编程方块(PB)位于同一子网格上)电池,无组
将跳过群组搜索,仅查找名称中包含“电池”的单个模块。 (由于所有电池的名称中都包含“电池”,因此所有电池都将显示) 电池,无子网格 无群组
将跳过群组搜索,仅查找名称包含“电池”且与可编程方块在同一网格上的独立方块。 (在这种情况下为第1、3、5和6号电池) 电池2,无子网格 或 电池2,无子网格 无群组
仅显示第3个电池的状态。 (由于不存在名为“Battery 2”的组,且第4个电池位于不同的网格上) 电池3,无子网格 电池3,无组 电池3,无子网格 无组
情况相同。将显示第5和第6炮台的状态。 不存在名为“炮台3”的小组。 第5和第6炮台与PB位于同一网格。 并且“炮台3”是“炮台32”的一部分。 “炮台”,无小组。
将显示1号和2号电池的状态。 “NoGroups”是不必要的。 (由于引号的使用会自动搜索组) “Battery”,NoSubGrids
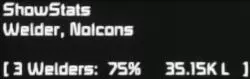
仅显示第一个电池的状态。 (其他所有电池要么位于不同的网格,要么名称不完全匹配) 多屏幕方块 如果一个方块有多个屏幕,你可以定义每个屏幕显示哪些信息。 通过使用关键词“Panel”,你可以为特定屏幕分配后续命令。 (在其后进行换行) Panel 0 something在第一个屏幕显示某些内容。 Panel 1 something different在第二个屏幕显示不同内容,以此类推——你懂的。 如果不使用此功能,所有内容将显示在第一个屏幕上。 因此,如果该方块只有一个屏幕,可以跳过此步骤。不同的显示模式 FSD v2 支持七种不同的显示模式,可改变信息的显示方式 这些不同的模式也可通过关键词触发。与“优化选择流程”中类似,这些关键词必须通过分隔符与区块/组名称分开。关键词的大小写将被忽略。 (默认)多图标视图 焊接工
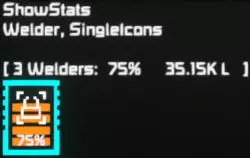
默认视图。显示一行图标,每个图标分别代表一个单独的方块。根据需要显示的方块数量,图标可能会占用多行。单图标视图 焊接器,单图标
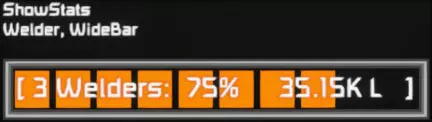
仅显示单个图标作为摘要,而非每个区块单独显示。宽条视图 焊接器,宽条
以单个宽条形显示摘要,而非单独显示每个区块。 窄条形视图 焊接器,窄条形
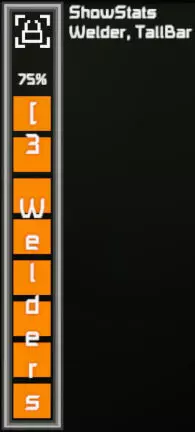
以单个小条形图作为摘要显示,而非单独显示每个区块。 高条形图视图 焊接工,高条形图
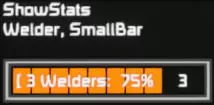
以单个垂直条作为摘要显示,而非单独显示每个方块。短条视图 焊接器,短条
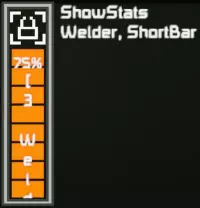
以单个较短的垂直条作为摘要显示,而非逐个显示每个方块。无图标视图 焊接工,无图标
仅以单行文本形式显示信息,不包含图标。 柱状图显示模式的修改器 柱状图显示模式(单图标、宽条、小条、高条、短条和多图标视图)通常将柱状图分为多个条形。 有三种方式可以修改此行为:
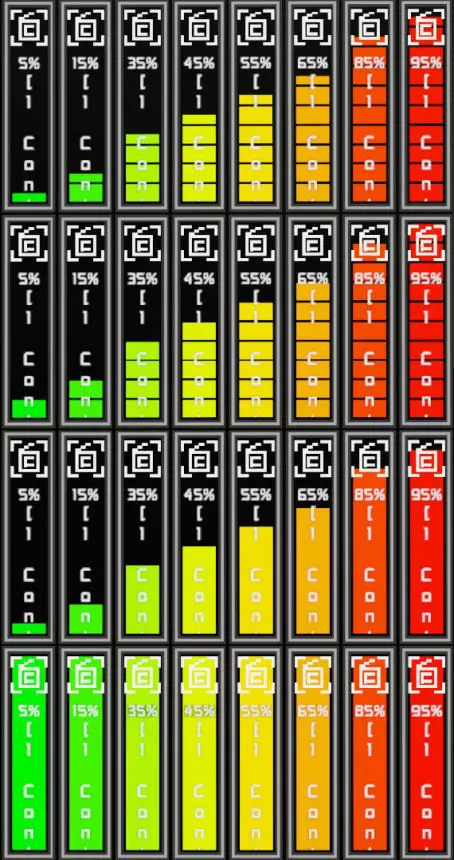
默认柱状图 每个单条表示10%的数值(在单图标和多图标视图中为20%)。剩余的数值将以部分条形显示。 容器,短条形 数字柱状图 每个单条表示10%的数值(在单图标和多图标视图中为20%)。剩余数值将进行四舍五入,以决定是否显示额外的完整条形。 容器,短条形 数字条形 模拟柱状图 柱状图不会被分割。而是显示单个条形。其大小和颜色将与数值成比例。 容器,短条形 模拟条形 完整条形 没有实际的柱状图。而是用单个条形填充该区域。仅通过其颜色来表示数值。容器、短条 实体条 反转选项 柱状图本身的颜色通常从绿色经黄色变为红色。 对于具有临界低值的模块,进度条会从0%的红色开始,到100%变为绿色(例如电池的充电状态) 对于具有临界高值的模块,进度条会从0%的绿色开始,到100%变为红色(例如反应堆的功率负载) 使用“反转”关键词会翻转此着色方案。 垂直柱状图的外观还可以通过“NoPercentage”和“AltSymbol=”关键词进行修改
无百分比 在多图标视图中,您可以使用关键词“nopercentage”隐藏百分比显示。此功能在高栏视图和短栏视图中同样适用。 替代符号= 使用“altsymbol=”命令,您可以将当前使用的符号替换为KeenSWH提供的原版纹理精灵之一。 注意:所用精灵的名称需用引号“"”括起。 这两个修饰符不适用于水平柱状图,因为水平柱状图既不显示单独的百分比数字,也不显示符号。 以下是KeenSWH目前提供的部分原版纹理精灵。
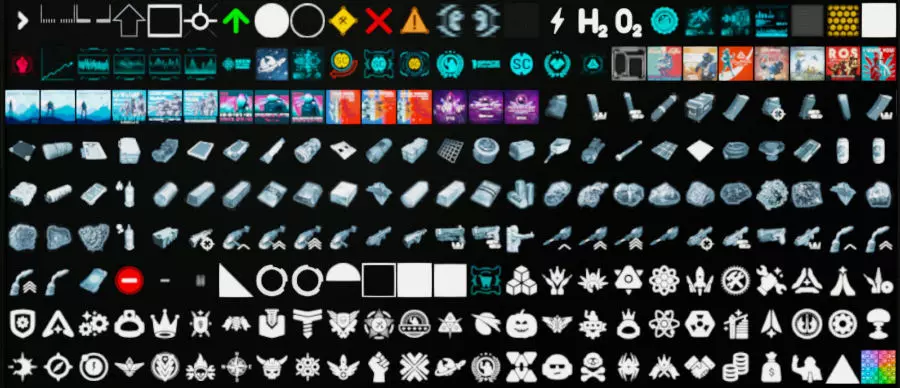
You can find the listing of the vanilla sprites here: github.com/malware-dev/MDK-SE/wiki/Sprite-Listing Selecting which types of items should be counted In blocks with regular inventories you can refine the counting process by the usage of the filter option. It's function have been expanded with the FSD subversion v37x. The respective keyword is 'Filter('. There are two different syntax version of this option. One with only one filter condition: Container, Filter(+Ore)And one with multiple filter conditions: Connector, Filter(or,+component,*ium)In the latter case, the first parameter must be the boolean operation that links the all filter conditions. These can be: and (all filter conditions have to be met before the item is counted) & (same as 'and') or (one of the filter conditions have to be met before the item is counted) The filter conditions are compared to the item types / namespaces. You can find a list of the vanilla item types / namespaces here: https://github.com/malware-dev/MDK-SE/wiki/Type-Definition-Listing#components There are several available comparisons variants: +thingy (Item.Type must contain "thingy") -thingy (Item.Type must not contain "thingy") =thingy (Item.Type must be identical to "thingy") -=thingy (Item.Type must not be identical with "thingy") *thingy (Item.Type must end with "thingy") -*thingy (Item.Type must not end with "thingy") thingy* (Item.Type must start with "thingy") -thingy* (Item.Type must not start with "thingy") *thingy* (Item.Type must contain "thingy")You have to choose one variant for each filter condition, but each condition can have a different variant. Examples: Container, Filter(+Ore)Counts only the volume of the ores in the blocks named Container Connector, Filter(and,+ingot,-Stone)counts the volume all ingots except the stone-ingots (a.k.a. Gravel) in the blocks named Connector Refinery, Filter(or,+ingot,+ore)counts the volume all ingots and all ores in the blocks named Refinery The filter option string have be closed with a closing parentheses. Modifying how the values are calculated Normally the individual percentage values and bar sizes in the bar graphs refer to the maximum value of the displayed unit. After that the average of the percentage values and the bar sizes are calculated. ((Value 1 / Max_Value 1) + (Value 2 / Max_Value 2) +...+ (Value n / Max_Value n)) / n This (old) calculation method can result in misleading bar sizes and values when using it on blocks with different maximum values. (a 10% filled small reactor plus a 90% filled large reactor would result in a false combined 50% fill rate) The AltCalc option The old (legacy) method to calculate the average bar sizes and values should only be used on identical blocks. When averaging blocks with different maximum values the AltCalc keyword should be used. This will change the method of calculation to: (Value 1 + Value 2 +...+ Value n) / (Max_Value 1 + Max_Value 2 +...+ Max_Value n) Now even averaging blocks with vastly different maximum values will result in correct values and sizes. The old calculation method is only left in for legacy reasons. The Reference= option With Reference= you can change the reference value for any block. (Caution: only values > 0 are accepted) This reference value has to given ether in liters, watts or watt-hours, depending on the used unit. Optional data sources. The Optional option Some types of blocks have two different output modes displaying alternative data sources. Batteries - Reactors - Hydrogen Engines - Refineries - Assemblers - Doors - Gates By adding Optional to second data source will be shown. Batteries, Reactors and Hydrogen Engines will switch from the 'power' load to the 'Fuel / Charge'. Refineries and Assemblers will switch from the input inventories to the output inventories. Doors and Gates will switch from the opening rate to the closing rate. Block typenormal data displayed Blocknameoptional data displayed Blockname,optinalBatteriesCharge state of the batteryPower input and output (% power load)ReactorsFill rate of the fuel inventoryRelative power output (% power load)Hydrogen EnginesFill rate of the fuel inventoryRelative power output (% power load)Oxygen TanksO2 gas fill rateFill rate of the tank inventoryHydrogen TanksH2 gas fill rateFill rate of the tank inventoryRefineriesFill rate of the ore (input) inventoryFill rate of the ingot (output) inventoryAssemblersFill rate of the ingot (input) inventory and number of items in the production queueFill rate of the item (output) inventory and completion rate of the current item in queueDoors / GatesThe opening rate of the Door / GateThe closing rate of the Door / GateRotors / HingesHow much the rotor / hinge is to the leftHow much the rotor / hinge is to the rightCockpits / SeatsThe fill rate of the inventory. Only if the block has a inventoryShows if the cockpit / seat is empty or occupiedConnectorsThe fill rate of the inventory.Shows the connection status 0% = not connectable 50% = ready to connect 100% = connected
AddInfo 选项 在旧版本的 FSD 中,你有时无法真正区分显示的是哪种模式。 在多图标(MultiIcon)视图模式和单图标(SingleIcon)视图模式下,你可以在分隔符后的选项中添加 AddInfo。 电池,AddInfo 这将通过在中心符号和百分比值之间放置以下小文本之一,帮助区分两种输出模式(替代数据源)。 默认信息文本为:充电/负载 燃料/负载 矿石/锭 锭/物品 打开/关闭 左/右 已填充/已占用/空 AltInfo= 选项 你可以通过使用 AltInfo= 后跟所需文本来定义替代信息文本。 容器,AltInfo=物品 在这种情况下,你无需使用 AddInfo 关键字。AddInfo 选项会自动激活。注意: 由于可用空间有限,信息文本应保持简洁。 座位占用情况 可选数据源的一个特点是存在多种可占用方块。 这些方块可能带有独立的物品栏: 床 驾驶舱 控制座椅 控制台 休眠舱 飞行座椅 乘客座椅 若不使用“Optional”(可选)关键词,将显示物品栏的填充率。 若使用“Optional”关键词,则会切换为占用率。方块被占用时显示100%,未被占用时显示0%。 此外还有一些不带物品栏的方块: 长凳 (带椅子的)书桌 厕所 浴室 若不使用“Optional”或“Health”(健康)关键词,这些方块将不会被列出或显示。 只有添加“Optional”关键词后,这些方块才会被列出/显示为驾驶舱。与其他可占用方块一样,100%表示该方块已被占用,0%则表示方块为空。 默认视图模式的格式选项 有多种选项可用于美化多图标视图模式。
如果项目数量超过显示屏宽度所能容纳的范围,FSD(默认设置下)会将项目分多行显示。可以通过两种方法抑制这种换行。 NoLineBreak选项 在分隔符(Separator)后添加NoLineBreak,FSD将在第一行末尾停止绘制图标。 noCR选项 (此选项同样适用于所有其他视图模式) 在分隔符后添加noCR,将抑制对行尾是否到达的检查,即使内容无法完全显示,也会继续绘制。 这是将原本会移至下一行的最后一个项目“挤入”当前行的好方法。 可通过两种方式调整要显示的图标数量。
传统方法是在模块名称后直接添加若干个#号,这样显示的图标数量将等于所使用的#号数量。#号必须位于分隔符(冒号“:”或逗号“,”)之前。在模块名称后直接使用#号在某些情况下会导致问题。(例如,当你有名称为“Thruster #1”和“Thruster #2”的模块,并希望用“Thruster #”来指代它们时)在这种情况下,请使用IconCount选项。
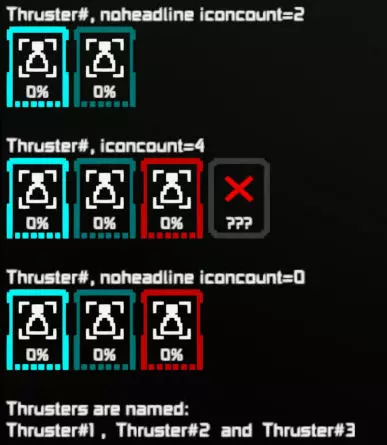
新方法使用IconCount=选项。它会覆盖旧方法并忽略区块名称中的任何#符号。等号后面的整数将直接设置要显示的图标数量。如果使用“IconCount=0”,图标数量将不会被修改,但区块名称中的任何#符号都会被忽略。注意:“IconCount”、等号“=”和数值之间不能有空格。如果要显示的图标数量多于可用区块数量,图标数量将用缺失的区块图标(灰色框架中的红色叉号)填充。这两种方法都是突出显示原本存在但现在缺失或已损坏区块的好方式。额外提示
柱状图周围边框的颜色表示所代表模块的状态 青色表示: 模块功能正常且正在运行 深青色表示: 模块功能正常但未运行 深红色表示: 模块功能异常/已损坏 带有红色十字的灰色表示: 模块已被摧毁或不存在 生命值选项
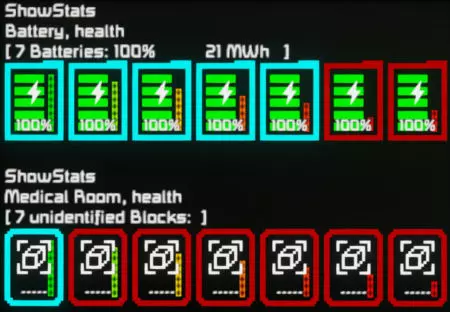
在选项中添加“,health”后,将显示额外的柱状图。此柱状图表示所显示方块的完整度。这适用于任何方块类型,无论该方块类型是否受支持或未知。AddSize选项
在默认视图模式下,你还可以显示一些小指示器,用于展示方块尺寸及其网格大小。网格大小显示在右上角和左下角。1个大正方形表示大型网格,4个小正方形表示小型网格。如果存在方块尺寸变体(针对给定的网格大小),左上角和右下角的小写字母会指示变体类型:L代表大型,M代表中型,S代表小型。柱状图视图模式的格式选项:如果柱状图未填满显示器宽度,且旁边能容纳一个相同的柱状图,FSD会将柱状图并排排列。EndLine 选项 在分隔符后添加 EndLine 将阻止下一个柱状图定位在当前柱状图旁边,而是在下方开始新的一行。 noCR 选项 如前所述,noCR 也会影响柱状图的视图模式。 在分隔符后添加 noCR 将抑制对行尾是否到达的检查,即使无法再显示,也会继续绘制。 定位和间距 自由定位: 您可以使用 Position(x,y) 关键字自由定位所有图标、条形图和文本。 X/Y 坐标必须用逗号分隔并用圆括号括起来。 注意:'Position' 和左括号 '(' 之间不能有空格。 这适用于所有不同的显示模式。关键词功能自定义数据示例位置(x,y)定义下一个对象将被绘制的位置。显示状态电池,位置(80,100)(显示列表中的下一个项目将再次位于屏幕左边界。)
图标间距: 您可以在使用“+”号链接在一起的图标或进度条之间留出间隙。 此功能仅在默认视图模式下生效。 关键词功能自定义数据示例:Gap x(创建长度为x的间隙,并将对象(组/块)链接在同一行中)。 显示统计信息示例:Gap 20 + 电池 + Gap 20 + 太阳能 缩放与调整大小: 除了更改字体大小外,您还可以在一定范围内调整图标的大小和柱状图的长度。
柱状图的长度可以通过“Length=(后跟一个十进制数)”来调整。所使用的数值将代表以像素为单位的长度。所有柱状图都有不同的最小长度,低于最小长度的数值将被忽略。当不使用“Length=”选项或使用错误时,柱状图将恢复为默认长度。这些长度如下:柱状图类型默认长度最小长度侧边栏501.12188.8小柱状图241.9283.04高柱状图501.12123.12短柱状图239.0489.04注意:“Length”、等号“=”和数值之间不得有空格。从脚本角度来看,长度值的最大值为3.4×10^38。
在多图标视图和单图标视图中,图标大小可以通过在分隔符后的选项集中添加“Scale=(后跟一个小数)”来更改。最小缩放比例为0.5,低于此值的设置将被忽略。强烈建议将缩放比例保持在1.0或以上,因为低于1.0时可读性会急剧下降。注意:“Scale”、等号“=”和数值之间不能有空格。从脚本角度而言,最大缩放值为3.4×10^38。此外,在多图标视图、单图标视图、无图标视图和纯文本模式下,你可以使用“Length=(后跟一个小数)”来设置文本行的可用宽度。文本行/标题:你可以更改文本行(标题)的显示方式。标题修饰符: 关键词功能自定义数据示例 NoScrolling即使标题过长无法完全显示,也不会滚动标题 显示统计数据 电池,NoScrolling NoHeadline显示组/区块时,不在图标上方显示标题或在柱状图内显示文本行 显示统计数据 电池,NoHeadline NoNames在图标上方的标题或柱状图内的文本行中,去除区块类型名称和组名称 显示统计数据 电池,NoNames Fontsize=更改标题或文本行中使用的字体大小 显示统计数据 电池,Fontsize=18左对齐 标题/文本行左对齐(不适用于高栏和短栏模式)显示统计数据 电池,左中对齐 标题/文本行居中对齐(不适用于高栏和短栏模式)显示统计数据 电池,居中右对齐 标题/文本行右对齐(不适用于高栏和短栏模式)显示统计数据 电池,右对齐注意:“Fontsize”、等号“=”和数值之间不得有空格。
所有修饰符可以相互组合。 居中(Center)和靠右(Right)仅适用于: 默认视图、单图标视图(SingleIcon)、宽条形视图(WideBar)、 小条形视图(SmallBar)和无图标视图(NoIcons)。 (垂直条形视图中没有左/中/右对齐选项) 其他所有修饰符适用于所有显示模式。 文本行/标题中的附加文本 附加文本:
你可以通过使用“Text:”关键词在文本行/标题中添加自定义文本。注意“Text:”末尾的冒号:“Text:”关键词必须是所使用关键词中的最后一个,因为“Text:”和行尾之间的所有内容都将被用作文本。这也可以与“NoHeadline”选项结合使用。然后,只有“Text:”后面的字符会显示在文本行/标题中。当仅使用“,Text:”而不使用任何块/组名称时,将只显示一个简单的文本行/标题。这也可以与“Fontsize”(字体大小)、“left”(左对齐)、“center”(居中对齐)、“right”(右对齐)、“Length=”(长度=)和单独的颜色设置结合使用。在这些情况下,修饰符/关键词必须放在分隔符和“Text:”之间。插入其他文本显示的内容:FSD可以克隆其他显示的文本内容。这些文本可以被修复,也可能由其他脚本生成(例如MMaster的Automatic LCDs 2或Isy's Inventory Manager)。要选择要克隆的文本表面,你需要通过名称指定显示方块,添加分隔符并使用关键词“Clone:”。(注意:只能克隆文本显示,不能克隆图像或精灵)如果该方块有多个显示表面,且你想从非0号表面克隆,可在冒号后直接添加显示编号。(注意:“Clone”、冒号“:”和数字之间不能有空格)(表面计数从0开始)位置、字体大小和文本颜色可通过各自的关键词单独调整。示例:LCD Panel, clone:0 position(100,50) fontsize=0。5 文本颜色(255,128,0) 这会将“LCD面板”模块第一屏的文本内容克隆到位置(x=100 y=50),颜色为橙色,字体大小为0.5。 提示:你甚至可以将FSD自身的运行状态显示克隆到任何其他显示器上。 插入图形 你可以插入使用Whips图像转换器创建的等宽图形:
图形部分以以下内容开始: ,gfxStart( X坐标, Y坐标, 字体大小 ) 坐标和字体大小必须用逗号分隔并放在圆括号内。 gfxEnd 表示图形部分的结束。 注意:'gfxStart' 和左括号 '(' 之间不能有空格。 此外,'gfxStart' 和 'gfxEnd' 前面必须有一个 ',' 或 ':'。 所有三个值都可以使用小数点 '.'。 'gfxStart' 和 'gfxEnd' 不区分大小写。 你可以在此处找到 Whips 图像转换器:https://github.com/Whiplash141/Whips-Image-Converter
你也可以使用KeenSWH提供的原生纹理精灵构建合成图像。 此功能的命令为: ,Sprite:"精灵名称" X坐标,Y坐标 宽度,高度 红,绿,蓝 旋转角度 注意:'Sprite'和冒号':'之间不能有空格。 此外,'Sprite'前面必须有一个','或':'。 精灵名称应放在引号'"'中。 位置、高度、宽度和旋转角度的值可以使用小数点'.'。 颜色分量必须指定为0到255之间的整数。 'Sprite'不区分大小写 关键字功能示例gfxStart(x,y,size) [图形] gfxEndx,y = 图形左上角的坐标 size = 像素大小(可选)ShowStats :gfxStart(10,10,0.gfxEnd,精灵:'名称 x,y w,h r,g,b rot名称 = 精灵的名称 x,y = 精灵中心的坐标 w,h = 精灵的宽度和高度 r,g,b = 红、绿、蓝颜色值 rot = 精灵的旋转角度(可选),精灵:LCD_Frozen_Poster01 500,250 100,100 255,255,255 0 以下是KeenSWH目前提供的部分基础材质精灵
你可以在此处找到原版精灵的列表:github.com/malware-dev/MDK-SE/wiki/Sprite-Listing 单独着色 你可以为屏幕上每个对象的每个元素定义单独的颜色。 每个颜色通道的值可以在0-255之间,因此有1670万种颜色可供选择。
在默认视图模式和单图标视图模式下,文本、图标、百分比数字、边框和柱状图可以为单个图标分别着色。通过在分隔符后的选项中添加一个或多个以下关键字,可覆盖正常颜色。TextColor(R,G,B)用于标题颜色,SymbolColor(R,G,B)用于小图标的颜色,InfoColor(R,G,B)用于小信息文本的颜色,PercentColor(R,G,B)用于百分比数字的颜色,FrameColor(R,G,B)用于边框的颜色,BarColor(R,G,B)用于柱状图的颜色。RGB值必须用逗号分隔并放在圆括号内,且必须是0到255之间的整数(即不允许使用浮点数)。注意:'...'之间不能有空格。“颜色”和左括号“(”
In the WideBar view mode and the SmallBar view mode only the Texts, Frames and Bargraphs can be colored separately, since there are no Icons or separate Percentage numbers are in these modes. By adding one or more of these keywords to the options behind the Separator character, the normal color will be overridden. TextColor(R,G,B)for the color of the HeadlineFrameColor(R,G,B)for the color of the FrameBarColor(R,G,B)for the color of the Bargraph The same rules about the RGB values, brackets, the missing pace between '...Color' and the opening bracket '(' etc. like for the default view mode and the SingleIcon view mode apply here too. In the NoIcons view mode there is only the Headline to be displayed. So logically only TextColor(R,G,B) shows any result. This also true when only using Text: after the Separator character without using any block/group name. (resulting in only a simple text line with the specified color) Assigning different display layouts to a single Screen/Panel You can assign several different display layouts to a single Screen and choose between them. This way you can ether reduce the number of LCD Panels needed or greatly enhance the amount of information you can display with a given set of screens/panels. To split the Data-Set into into different layouts, you encapsulate the relevant chunks each with ShowStats and EndStats. Adding a number directly to ShowStats (within the same line but separated with a space from ShowStats) will indicate which layout is defined. Example: ShowStats Battery ,Addinfo Reactor ,Addinfo Hydrogen Engine ,Optional Addinfo Solar Panel + Wind Turbine EndStats ShowStats 1 Container, AddSize NoLineBreak Connector + Collector + Ejector Grinder + Gap50+ Welder + Gap50+ Drill EndStats ShowStats 2 Oxygen Tank ,addsize Hydrogen Tank ,addsize O2/H2 Generator Vent EndStats ... Hint: 'ShowStats' and 'ShowStats 0' mean the same layout and will indicate to the default display layout. To change the display layouts, you have to define the sequence in which the layouts should be shown. For this purpose (and many others) you can add a special keyword line starting with 'FSD options:' into the Custom Data field of the PB (running FSD v2) itself. (you find more about this in the chapter Global Override Options) The sequence is set by adding Sequence(layout sequence) to the 'FSD options:' line. (since the PB has itself display panels, the 'FSD options:' line must be above any 'ShowStats' line) Example: FSD options: sequence(0 1 2 7 5 3) ShowStats (optional) Stuff to be displayed on the display of the PB itself This sequence will be valid for all displays controlled by this instance of FSD v2 If one of the layouts in the sequence is not defined in the Data-Set of a display, it will show the default layout (started by ShowStats or ShowStats 0). The display layouts usually change automatically but can also be switched manually. see the following chapter Manual change of display layouts and adjusting the change rate You can manipulating the sequencer by starting the PB running FSD v2 with arguments. (you find more about it in the chapter Controlling FSD v2 by running the PB with arguments) There are four arguments influencing the active screen layout and the sequencing. layoutrate=... Caution: There has to be no space between 'layoutrate' and the equals sign '='This will set the rate of changes for the screen layouts. (in changes per minute) It will also override the default change rate or the rate set via FSD options: A layout rate of 0 will stop the automatic change of layouts. layout=... Caution: There has to be no space between 'layout' and the equals sign '='This will set the which screen layout will be displayed. If this layout is not defined in a Data-Set the default layout will be shown. layout+ Caution: There has to be no space between 'layout' and the plus sign '+'This will switch to the next set of screen layouts. If the last set was already displayed the layout number will wrap around to the first. layout- Caution: There has to be no space between 'layout' and the minus sign '-'This will switch to the previous set of screen layouts. If the first set was already displayed the layout number will wrap around to the last. Optimizing the sequencing of screen layouts With a little trick, you can use one and the same layout on multiple positions of the sequence. To so, add a additional 'ShowStats' line (with a different number) after the first 'ShowStats' line. CustomData in 1st LCD panel blockCustomData in 2nd LCD panel blockCustomData in 3rd LCD panel blockShowStats ShowStats 1 ,Text:Layout AAA EndStats ShowStats 2 ShowStats 3 ,Text:Layout BBB EndStats ShowStats 4 ShowStats 5 ,Text:Layout CCC EndStats ShowStats 0 ShowStats 3 ,Text:Layout 111 EndStats ShowStats 1 ShowStats 4 ,Text:Layout 222 EndStats ShowStats 2 ShowStats 5 ,Text:Layout 333 EndStats ShowStats ShowStats 1 ShowStats 2 ,Text:Layout OOO EndStats ShowStats 3 ShowStats 4 ShowStats 5 ,Text:Layout ### EndStats This trick is especially handy when having different counts of layouts in different displays. FSD options: sequence(0 1 2 3 4 5) (CustomData in the PB running FSD v2) Resulting outputs of the displays #1st LCD panel2nd LCD panel3rd LCD panel0Layout AAALayout 111Layout OOO1Layout AAALayout 222Layout OOO2Layout BBBLayout 333Layout OOO3Layout BBBLayout 111Layout ###4Layout CCCLayout 222Layout ###5Layout CCCLayout 333Layout ### Global Override Options You can overide individual LCD/Cockpit screen settings by using a special keyword line starting with 'FSD options:' in the Custom Data field of the Programmable block itself. All keywords for this override options must be in a single line and this line must be located above an optional 'ShowStats' line or else the used keywords affect only the LCD panels of the Programmable block. Avaible overide option keywords Only 'FSD options:' is case sensitive. All other keywords for the overide options are not case sensitive. Different keyword can be strung together but must be seperated with ' ' , ',' or ':' KeywordFunctionCustom Data ExampleNoLineBreaksetting the NoLineBreak option on all controlled LCD screens (the icons in the default display mode will only occupy one line)FSD options: nolinebreakNoHeadlinesetting the NoHeadline option on all controlled LCD screens (Displays group/block/bars without the textline)FSD options: noheadline NoScrollingsetting the NoScrolling option on all controlled LCD screens (the textline will not scroll if it is too long)FSD options: noscrollingNoNamessetting the NoNames option on all controlled LCD screens (Cuts blocktype names and group names out of the textline)FSD options: nonamesRightsetting the Right alignment option on all controlled LCD screens (all text will be right aligned)FSD options: right Centersetting the Center alignment option on all controlled LCD screens (all text will be centered)FSD options: center Optionalsetting the Optional option on all controlled LCD screens (will show the optional data, where avaible)FSD options: optionalAddInfosetting the AddInfo option on all controlled LCD screens (will show the AddInfo tags, where avaible)FSD options: addinfoAddSizesetting the AddSize option on all controlled LCD screens (will show the AddSize icons, where avaible)FSD options: addsizeHealthsetting the Health option on all controlled LCD screens (will show the additional Health bargraph, where avaible)FSD options: healthNoSubgridssetting the NoSubgrids option on all controlled LCD screens (only blocks on the same grid as the programmable block running FSD will be shown)FSD options: nosubgridsNoGroupssetting the NoGroups option on all controlled LCD screens (skipping the search for matching group names)FSD options: nogroupsVerbatimnarrows down the block search only to exact name matches FSD options: verbatimNoSubgridLCDsFSD will only manage LCD screens on the same grid as the programmable block running FSD FSD options: nosubgridLCDsFramerate=This will set the rate the screen will be updated (in frames per minute)FSD options: framerate=45Layoutrate=This will set the rate the screen layouts will be changed (in changes per minute)FSD options: layoutrate=15FastmodeThis will activate the Fastmode of FSD The maximum framerate will change from 60 to 600 fpm but will result in a higher CPU loadFSD options: fastmodeSequenceThis indicates the start of the definition of the screen layout sequenceFSD options: sequence(0 1 2 3 5 7)Caution: There has to be no space between the equal sign and 'Layoutrate' or 'Framerate'. Options can be combined like in this example: FSD options:optional noheadline nolinebreak no groups nosubgrids nosubgridLCDs verbatim When using FSD options: the following keywords in the ShowStats section will act as toggle switches (a.k.a. inverting the setting again): optional addinfo addsize health noheadline nonames nolinebreak noscrolling nosubgrids nogroups Example: ShowStats Welder Grinder, NoNames Drill, AddInfo AddSize FSD options:FSD options:NoNames AddInfo AddSize
通过运行可编程方块(PB)并附带参数来控制FSD v2 运行FSD v2的可编程方块可通过参数进行控制: 打开终端界面,选择运行FSD v2的可编程方块,在名为“参数”的文本框中输入参数并点击“运行”。 选择按钮面板、传感器、定时器等设备,在其界面中点击“设置动作”,将运行FSD v2的可编程方块拖放到工具栏中并输入参数。 shutdown:这将关闭可编程方块,并将此FSD实例控制的所有屏幕切换为黑屏 powerup:这将打开可编程方块并重新开启所有相关屏幕 refresh:这会将所有相关屏幕暂时切换为黑屏,然后刷新它们 这可用于解决潜在的多人游戏问题 framerate=...这将设置屏幕的更新速率(以每分钟帧数为单位)。它还将覆盖默认更新速率或通过FSD选项设置的速率:注意:'framerate'和等号'='之间不能有空格layoutrate=...这将设置屏幕布局的更改速率(以每分钟更改次数为单位)。它还将覆盖默认更改速率或通过FSD选项设置的速率:注意:'layoutrate'和等号'='之间不能有空格layout=...这将设置要显示的屏幕布局 注意:“layout”与等号“=”之间不能有空格“layout= 这将把要显示的屏幕布局切换到下一组 注意:“layout”与加号“+”之间不能有空格“layout+ 这将把要显示的屏幕布局切换到上一组 注意:“layout”与减号“-”之间不能有空格“layout- 修改脚本中的关键字和默认值 在脚本的配置部分,您可以更改一些设置。 通过“编辑”打开可编程方块,以便查看脚本的配置和代码。只有在以下情况时才应更改标签: 与其他脚本存在冲突 你不喜欢该名称并希望使用其他关键词 例如,如果你想将lcdtag从“ShowStats”更改为“DisplayStatus”,必须按如下方式修改该行: string lcdtag = "DisplayStatus"; 脚本更新 - 脚本运行速度 如果你想节省性能,可以更改此行: int FpM = 60; //显示器更新频率(以每分钟帧数为单位) 改为 int FpM = 30; //显示器更新频率(以每分钟帧数为单位) 这样脚本将仅每2秒更新一次你的屏幕。 显示布局更改的频率也是如此 你可以提高或降低该频率。但出于视觉原因,它应保持为FpM的一部分。int LpM = 12; //显示布局切换频率(次/分钟) 分隔符:这些字符用于在数据集(Data_sets)中将“名称”部分与“选项关键词”部分分隔开。修改这些字符需自行承担风险!!! char[] seperators = {' n' , ',' , ':'}; 默认颜色:您可以更改此处列出的所有颜色。在配置部分上方,我已为您提供了可用颜色列表。 如果您想将标题从白色更改为橙色,可将该行修改为: Color headlineColor = Color.Orange; 您也可以使用RGB值: Color headlineColor = new Color(255, 255, 255); 脚本链接:https://steamcommunity.com/sharedfiles/filedetails/?id=2353784231
2026-02-13 10:00:35 发布在  Space Engineers


说点好听的...
收藏
0
0