


总督手册
这是一份专为《风暴之地》玩家打造的简明指南。由于游戏仍在更新中,本指南尚在完善阶段,但希望目前已有的内容能对各位总督有所帮助。指南中的主题将按照游戏内的遭遇顺序进行排列。本指南默认您已熟悉游戏的基本机制,旨在提供适用于所有难度的实用信息。 ### 一、胜利与失败 #### 胜利条件 您通过获取声望来赢得胜利。左下角的蓝色条显示了达成胜利所需的声望值。通常,获取声望有三种途径:

1. **完成订单**; 2. **解开林间空地谜题和/或选择声望作为奖励**; 3. **提升村民的满意度(让他们达到“最大幸福感”)**; **注意事项**: 在较低难度下,完成订单并解开一两个谜题就足以获得胜利。在较高难度下,你必须运用所有方法,因此从你的第一场游戏开始,就应该练习如何满足村民的各种需求。 **提示**: 解开林间空地谜题所需的物品可以更换。只需点击物品,然后从轮盘中选择其他选项即可。

失败 当女王的不耐烦值达到最大值时,你将失败。右下角的红色条显示已积累的不耐烦值。一旦该条完全填满,游戏即结束。

I. 基本概念 II. 种族 共有七种种族可组成你的劳动力:蝙蝠、海狸、狐狸、青蛙、鹰身女妖、人类和蜥蜴。每张地图仅能选择三个种族进行游玩。 ----------------------------------------------------------------------------------------------------- 初始能力 每个种族都拥有一项能力,该能力在其加入游戏时(无论是初始加入还是后续加入你的聚落)即可使用。蝙蝠 - 解锁庄园法庭蓝图 海狸 - 每个邻近城镇额外提供1个贸易提议 狐狸 - 揭示一处附近雨水间歇泉的位置 青蛙 - 揭示一处附近遗迹的位置 鹰身女妖 - 获得50件外套 人类 - 揭示一处附近沃土的位置 蜥蜴 - 获得10件工具 ----------------------------------------------------------------------------------------------------- 火之守护者加成 为远古壁炉指派火之守护者后,将根据火之守护者的物种获得加成效果。 注:此独特加成效果仅适用于远古壁炉的火之守护者。蝙蝠:食物消耗降低25% 海狸:燃料消耗速度减慢20% 狐狸:开启的林间空地敌意降低2点 青蛙:新村民到达速度加快50% 鹰身女妖:每个村民的携带容量+5 人类:女王的不耐烦值增长速度减慢25% 蜥蜴人:全局决心+1 ### 饥饿耐受度 每个村民根据物种不同拥有一定的饥饿耐受度等级。该数值代表村民在饿死前能够承受的“饥饿层数”。当村民在最近的壁炉处休息却无法找到食物时,会获得1层饥饿。一旦饥饿层数超过村民的耐受阈值,村民将会死亡。例如,如果一只狐狸连续休息四次且未进食,那么这只狐狸将会死亡。 饥饿耐受度对每个村民的影响是独立的。 蝙蝠:4 海狸:6 狐狸:3 青蛙:8 鹰身女妖:4 人类:6 蜥蜴:12 ----------------------------------------------------------------------------------------------------- 特殊专长 除蝙蝠外,每个物种都拥有两项特殊专长。当它们被分配到与这些专长相匹配的工作场所时,将获得熟练度加成或舒适度加成。熟练度加成会带来10%的几率产出双倍资源……
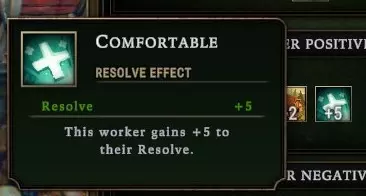
而舒适加成可为每位村民额外提供+5点决心值
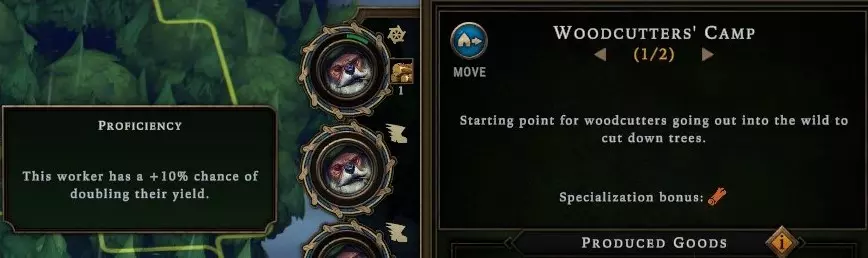
### 种族专长与加成 1. **蝙蝠** - 冶金学(熟练度),注:无舒适度加成 2. **海狸** - 木工(熟练度),工程学(舒适度) 3. **狐狸** - 侦查(熟练度),同类(舒适度) 4. **青蛙** - 石工(熟练度),雨水(舒适度) 5. **鹰身女妖** - 炼金术(熟练度),布料(舒适度) 6. **人类** - 农业(熟练度),酿造(舒适度) 7. **蜥蜴** - 肉类(熟练度),温暖(舒适度) 注:对于狐狸,其侦查专长意味着加快解决林间谜团的速度,而非产出双倍资源。当工作场所由同类占据时,它们会获得舒适度加成。 尽可能根据种族专长分配工作。可通过建筑信息界面上的符号来确定所需专长。

In the above example, the butcher building grants a bonus to meat specialization. You would do well to assign lizards to work here to produce more goods in the long run. Species Demands Your villagers have a base number of Resolve depending on specie. During the storm or certain events, your villagers will suffer penalties to their resolve. If their resolve drops to zero and/or below, they'll start to leave your settlement. Your villagers resolve can be increased by meeting their Demands. All villagers demand: Housing, Complex Food, and Services. Additionally, they may demand Coats, Boots, and/or Paste Satisfy enough of their demands and they'll begin generating reputation for you, their specie's icon on the top left glowing blue when they do so. How exactly do villagers satisfy their needs? Villagers will occasionally take breaks at any nearby hearth. Once there, they will check to see if housing, foods, services, and other items are available. If so, they will instantly consume the goods from the general stock regardless of their location and gain resolve. ----------------------------------------------------------------------------------------------------- ON HOUSING Villagers gain more resolve when species appropriate housing is provided. Eventually, common shelters will prove insufficient to increase resolve so don't forget to build Unique Houses(UH) according to villagers' species. Below are the material costs to unique houses: 1. Bats - 2 Planks, 2 Pipes 2. Beavers - 8 Planks 3. Foxes - 4 Planks, 2 Crystalized Dew 4. Frogs - 4 Bricks 5. Harpies - 4 Cloths 6. Humans - 4 Planks, 2 Bricks 7. Lizards - 2 Cloths, 2 Bricks Note: Building costs will be increased when playing Prestige 5 difficulty onwards. ----------------------------------------------------------------------------------------------------- ON COATS, BOOTS, and PASTE Not all species demand these items but those that do will benefit from additional bonuses if their demands are satisfied. Coats (Humans, Beavers, Harpies, Bats) - Grants a resolve bonus during storms Boots (Foxes, Frogs, Harpies, Lizards) - Grants a movement speed bonus Paste (Bats, Frogs, Harpies) - Grants increased chance for double yields ----------------------------------------------------------------------------------------------------- ON FOOD Villagers will consume raw food but will gain resolve when eating Complex Food. Complex foods are those produced from buildings and require more than one ingredient. Note that villagers will consume more than one unit of food if more than one of their preferred foods are available. They will still enjoy the bonus. There are five types of complex food you can produce: 1.Biscuits - Note: Requires Flour 2.Jerky - Note: Requires Fuel 3.Pie - Note: Requires Flour 4.Pickled Goods - Note: Requires Container 5.Porridge - Note: Requires Rainwater 6.Skewers - Note: Requires "Meat and Vegetable" Tip: When you have a production chain for complex foods going, it may be useful to ban the consumption of the raw foods you intend to use as ingredients so your villagers don't accidentally deplete your supplies. Note that the ability to restrict food consumption must first be unlocked. ---------------------------------------------------------------------------------------------------- ON SERVICES Services require the appropriate service building to be constructed and for the appropriate Luxury Good to be available. Below are the services you can provide and the luxury good the service requires: Brawling: Training Gear Education: Scroll Leisure: Ale Luxury: Wine Religion: Incense Treatment: Tea Species Demands Overview I Note on Definitions: Resilient - The rate at which resolve decays; Demanding - The initial amount of resolve to attain before gaining a point of resolve; Decadence - How much the next resolve threshold increases for gaining a point of reputation; 1. Bats Preferred FoodsBiscuits, SkewersBase Resolve5ServicesEducation, BrawlingResilientHighOther DemandsCoats, PasteDemanding12Break Interval1:40Decadence4 Strengths: Bats are very similar to harpies in that its easy to generate reputation points with them in the early years of the settlement. Their resilience means that they can stand low resolve penalties for much longer, provided it was very high to begin with. The real benefit of having bats is that they give access to the Manorial Court. This building allows you to banish villagers for a bonus to productivity for those who remain. This synergies well with cornerstones that grant benefits for removing villagers. Weaknesses: Constructing their unique shelter is an issue since it requires pipes. Bats are great for metalworking industry but you must commit to finding a source of copper or crystallized dew and working with it. Bats also have no comfort bonus and it can be very difficult to build up their resolve to weather the storms. 2. Beavers Preferred FoodsBiscuits, Pickled GoodsBase Resolve10ServicesEducation, Leisure, LuxuryResilientLowOther DemandsCoatsDemanding30Break Interval2:00Decadence2 Strengths: They have high base resolve and require less break time. While their initial demands are high, once you start meeting their demands, it's easy to keep the ball rolling with their low decadence score. Their specializations in woodworking and engineering means they're the best villagers to produce particularly useful goods like planks, pipes, and tools. You can create a strong industrial base with beavers. Every day is a beautiful day for mining and deforestation! Weaknesses: They require a lot of demands to be met before they begin generating reputation. Their preferred foods and service goods cannot be produced immediately from raw materials and require production chains which they don't specialize in. Obtaining blueprints for a plank producing building is recommended since you will need a lot of it. 3. Foxes Preferred FoodsPickled Goods, Porridge, SkewersBase Resolve5ServicesBrawling, Luxury, TreatmentResilientLowOther DemandsBootsDemanding15Break Interval2:00Decadence5 Strengths: Their specialty in forest scouting allows them to complete glade events very quickly, which is invaluable at higher difficulties. They're surprisingly resilient since a unique attribute of foxes is that they don't suffer resolve penalties from the hostility of the forest although they still suffer resolve penalties from the storm. Combine all this with their fire keeper bonus and you may find yourself free to explore more glades than usual. Weaknesses: They have the lowest hunger threshold out of all the species. Glade events which drain food supplies (Ex. living matter) are much more deadly. While they enjoy working at rainwater based buildings, they don't have a specialty which produces double yields. Their unique house requires crystallized dew specifically so you must secure a source of it. 4. Frogs Preferred FoodsPie, PorridgeBase Resolve10ServicesEducation, Leisure, LuxuryResilientMediumOther DemandsCoatsDemanding25Break Interval2:30Decadence5 Strengths: Frogs are mostly average but there is a notable exception. They have the highest break interval and are very productive. They spend most of their time working and since they make use of paste, they can produce extra goods. Masonry is not a bad specialty and buildings that cater to this specialty are very good ones. Weaknesses: Frogs are the second most decadent specie and you need to satisfy a lot of their demands to gain resolve points. Frogs are quite elitist and can't stand to be in the shelters with the rabble. Securing a source of bricks for their houses is recommended. Species Demands Overview II 5. Harpies Preferred FoodsJerkyBase Resolve5ServicesEducation, TreatmentResilientLowOther DemandsCoats, Boots, PasteDemanding15Break Interval1:40Decadence3 Strengths: Their unique house is relatively cheap and easy to build. They're probably the best specie for generating reputation. Keep satisfying their demands and they'll generate reputation for you quickly and constantly. Their specialize in the production of niche goods typically used in service buildings. Their fire keeper bonus possibly the most powerful in the game since it allows villagers to carry more goods. The more goods carried, the less trips needed to deliver them. Since they use both boots and paste, they can be surprisingly productive workers. Weaknesses: They have low base resolve and it will be a struggle to keep them around for the first few storm cycles, so you must start catering to them fast or else they'll leave. Their hunger threshold is low - only one point better than foxes. Glade events which drain food supplies (Ex. living matter) are much more deadly. They need to take breaks more often. Before the Frog Update, it used to be easier to meet Harpy demands. Now their list of demands is quite varied. While they can generate reputation very well, you will need diverse production chains. They only have one preferred food but demand all three extra goods - coats, boots, and paste. 6. Humans Preferred FoodsBiscuits, Pie, PorridgeBase Resolve15ServicesLeisure, ReligionResilientLowOther DemandsCoatsDemanding30Break Interval2:00Decadence4 Strengths: They have the highest base resolve of all species. Their specialties in agriculture and brewing are quite strong, affecting many production chains, and also feed into the production of their own preferred foods and service goods. They require less break time. Their fire keeper specialty is useful if you find your settlements take a long time to finish. Weaknesses: They're very demanding and require a lot of their demands to be met before they generate reputation. While their specialization in agriculture allow you to produce goods to satisfy their demands, you must lean in to their specialties heavily or else you're sabotaging yourself. You need to farm. Get a farming building blueprint and start plowing! 7. Lizards Preferred FoodsJerky, Pickled Goods, Pie, SkewersBase Resolve5ServicesBrawling, ReligionResilientHighOther DemandsBootsDemanding15Break Interval1:40Decadence7 Strengths: Lizards are not very demanding and are easy to please, at first anyway. Their specialty in food production fit them very well since they demand the widest variety of foods. They have the highest hunger threshold out of all the species and can go on for an astonishingly long time without food, but you wouldn't do that to them, would you? Weaknesses: They have low base resolve and it will be a struggle to keep them around for the first few storm cycles, so you must start catering to them fast or else they'll leave. While easy to please at first, they have the highest decadence. which means that if you aim to generate reputation from lizards, you must commit to their list of demands. Their fire keeper bonus becomes weaker in the long game. They also need to take breaks more often. IV. Seasons and Seasonal Conditions There are three seasons in the game: Drizzle, Clearance, and Storm. 1, Drizzle - Positive seasonal conditions will be active at this time. Crops are planted only in this season. 2. Clearance - Crops are harvested in this season. 3. Storm - All negative seasonal conditions will apply at this time. Conditions and their severity are tied to Hostility level. All unharvested crops are destroyed. At the start of every game, read the Forest Mysteries to see which seasonal conditions are in play. Take special note of the "Active from Hostility x" line. Adjust your strategy accordingly. Some conditions will require that the villagers' needs for Housing, Complex Food or Services to be met in order for them to apply (if positive) or to be prevented (if negative), In this example of a positive seasonal condition, villagers have a chance to double their yields but note the condition on the bottom. They can only gain this bonus if their need for housing is met.

在这种负面季节性状态的示例中,当风暴期间敌对等级为2且该状态生效时,村民有死亡的几率。但请注意,与之前的示例类似,这种危险可以通过提供住房来避免。确保每个村民都有一个避难所。
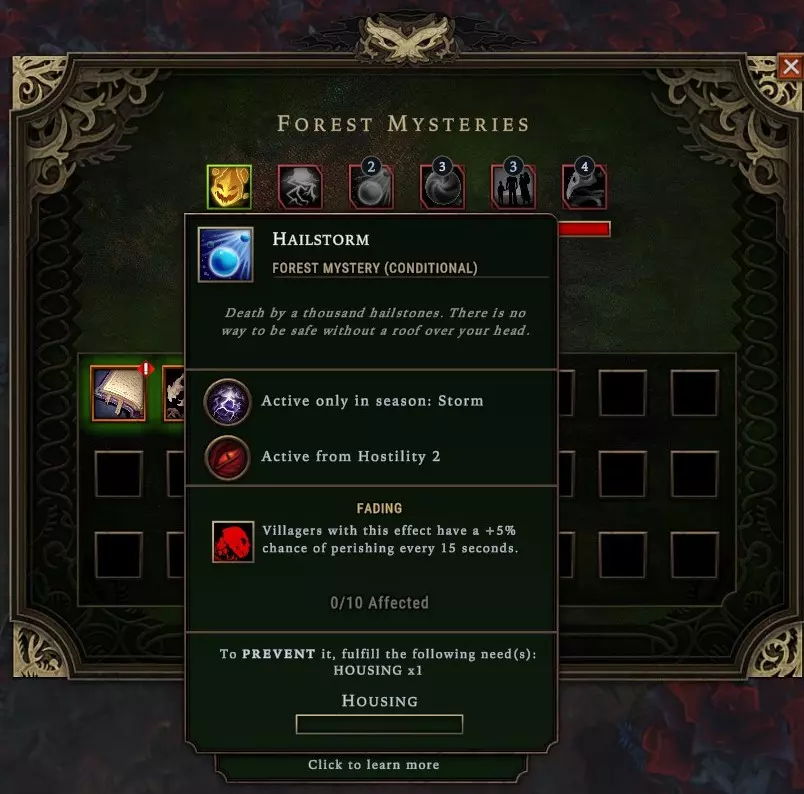
提示:由于负面季节状况与风暴期间的敌意等级相关,你可以通过将仇恨值降至可控水平来避免一些更糟糕的情况。你可以: 1. 暂时解除伐木工的任务分配; 2. 在古老壁炉中献祭木材或煤炭(风暴结束后别忘了停止献祭!); ### V. 敌意 **敌意**是森林对你的入侵和开发所产生的愤怒。在游戏中,敌意是一种持续增长的负面效果,会使游戏更难获胜。敌意等级由右上角的红色条显示。

敌对等级对我有什么影响? 首先,敌对等级会对决心造成全局惩罚,即使在小雨和晴朗季节也是如此。敌对等级越高,惩罚越严重。 其次,敌对等级决定了风暴季节的惩罚程度。风暴会使敌对等级带来的决心惩罚翻倍。更糟的是,如果满足了森林奥秘的敌对等级要求,那些施加负面季节条件的森林奥秘就会被激活。 哪些因素会增加敌对等级? 1. 已度过的年数; 2. 开拓的林地; 3. 村民数量; 4. 伐木工数量; 5. 其他来源,通常是林地奥秘; *它们对敌对等级的影响会根据难度而倍增*

如何降低敌意? 1. 建造额外的壁炉; 2. 保持女王的不耐烦值较高; 3. 选择降低敌意的基石; 4. 从商人处或林地奖励中获取“森林之道”物品; 5. 部分林地事件可以降低敌意。 森林之道

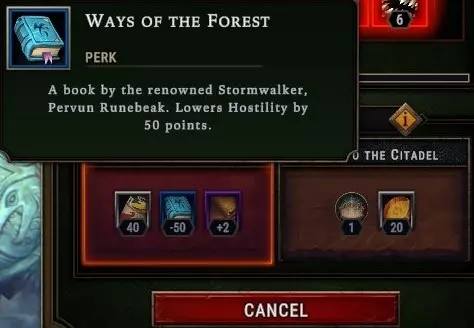
基石是降低敌意的一种特别可靠的方式,因此它们非常有价值。选择一个能够降低敌意并满足其条件的基石,其中一些效果相当强大。以下是一些例子:


### 生存要点: 将敌意控制在可管理的水平是关键,尤其是在较高难度下。例如,在威望15级时,风暴会额外持续两分钟。如果让敌意失控,这将是非常痛苦的。请记住以下简单规则: 1. **不要开启新的林地,除非你已准备好开发其资源并承担更多敌意**; 2. **不要接纳超出需求数量的村民**; 3. **有机会时获取降低敌意的基石**; 4. **留意“森林之道”物品并获取它**; 5. **解除伐木工的任务,最终转而生产木材以外的燃料**; ### 交易系统: 所有交易都始于建造贸易站。这一建筑是你所有交易活动的核心。

### 商人系统 随着交易站的建成,商人将定期抵达你的定居点。他们会停留有限时间进行交易,之后便会离开。存在多种不同类型的商人,每种商人都专门销售特定商品。同一商人不会连续到访两次。点击交易站可查看距离下一位商人抵达定居点的剩余时间。 **注意**:即使计时器结束,商人也无法在风暴季节抵达,而是会等待至下一个小雨季节。 当商人在定居点时,点击交易站即可打开交易窗口。交易流程简单直接——选择你想要的商品及数量,并将其拖入商人的报价窗口。然后,用你自己的物品报价来匹配所需商品的价值。

商人也会出售蓝图和基石,你可以在交易窗口的左下角看到它们。这些物品需要琥珀购买,价格不菲,但它们可能正是你增强策略、赢得游戏所需的东西。 你可以通过点击交易界面右下角那个不祥的发光红色剑图标来攻击商人,夺取他们的部分货物(甚至包括基石)。当然,这会带来一些非常负面的长期后果:部分村民可能会死亡,女王的不耐烦值会增加,而且不情愿的商人会更久才会到达你的定居点,有些特定商人甚至可能根本不会再来。 重要提示: 在声望等级10时,你的货物对商人来说价值会降低。依靠贸易作为弥补生产短缺的“拐杖”将变得更加困难。 **贸易路线(赚钱)** 除了允许商人抵达你的定居点外,贸易站还能让你建立贸易路线,将货物运往其他定居点以获取金钱。 要赚钱,你需要货物和补给包。补给包可通过特定建筑生产。 你可以先从临时驿站生产补给包来开启贸易。


点击屏幕右上角的贸易路线图标,或按默认快捷键[Y],即可打开贸易路线窗口。

右侧屏幕会显示所需商品、所需补给包数量、旅行时间以及贸易路线的琥珀价值。 一旦确定报价,点击“出售”按钮即可发货。货物一旦发出便无法召回,报酬将在旅行时间结束时到账。 与某个聚落持续交易将提升你与该聚落的关系等级。良好的关系能为你带来更优惠的交易,部分基石还会根据你达成的每个关系等级提供加成。 你可以点击聚落旁的绿色加号按钮,花费额外琥珀来增加该聚落可用的最大贸易报价数量。 小贴士: - 贸易路线的自动收集按钮非常实用。- 并非所有交易提议都是划算的。要注意不要用重要资源换取微不足道的回报。随着游戏进程的推进,尤其是在更高声望等级时,你会逐渐理解某些物品的价值。 - **作物包、建材包、贸易商品和奢侈品等打包物品通常能换取大量琥珀**,前提是有聚落需要它们。如果没有聚落需要,你也可以直接将其提供给商人。 - **你可以增加贸易路线中的货物数量**。只需使用货物图标旁的上下按钮即可操作。当然,这会需要更多的补给包,同时也会增加旅行时间。不过,如果这是一笔非常划算的交易,你就能赚取大量琥珀。

VII. 雨朋克 VIII. 枯萎病与腐化

枯萎腐菌是一种会感染聚落建筑的寄生虫。建筑物顶部出现巨大的亮蓝色囊泡是枯萎腐菌的典型特征。当枯萎腐菌“绽放”时,会导致古老壁炉的腐化值上升。当腐化值过高时,村民将会死亡。 枯萎腐菌的成因有哪些? 1. 雨朋克科技的使用; 2. 声望难度调整; 3. 林间空地事件; 雨朋克科技引发枯萎腐菌的示例:

关于威望难度修正的重要说明: - **威望等级2**:每第三个结算季节会出现10个枯萎病囊肿; - **威望等级10**:囊肿生成率提高100%,腐败率提高50%,且所有产生枯萎病囊肿的效果翻倍; - **威望等级15**:风暴持续时间延长,从而为枯萎病腐败提供了更多时间; 枯萎病腐败的机制如下: 在细雨季节和结算季节,囊肿处于良性状态。但在风暴季节或特定的林地事件期间,囊肿会爆发。每次爆发都会产生腐败值。预期的腐败率可在用户界面右下角的不耐烦图标旁以及古老壁炉上方的进度条处查看。当枯萎腐败率达到开花后必定导致死亡的程度时,你会收到警告。


花朵数量越多,腐败条填充速度就越快。腐败条一旦填满,将随机有三名村民死亡。随后腐败条会重置为零并重新开始填充,这一过程会持续到风暴或林地事件结束。 不用说,如果枯萎病持续杀死村民,你可能会陷入恶性循环:急躁值过高、生产线瘫痪,剩下的村民不足以让你摆脱困境。 如何对抗枯萎病? 第一步是建造枯萎病哨站(Blight Post)。

通过枯萎哨站,你可以消耗燃料来生产净化之火单位。被分配到枯萎哨站的村民将作为枯萎战士,使用净化之火以每个囊肿消耗1单位的速率摧毁枯萎腐殖囊肿。每摧毁一个囊肿,除了降低腐化速度外,还会从古老壁炉中清除少量腐化值。 需要记住的重要一点是,囊肿只有在绽放时才能被摧毁——通常是在风暴季节,或者在林间空地事件中(例如:感染的排水鼹鼠)。理想情况下,你应该在细雨季节和晴朗季节提前生产净化之火。枯萎战士会优先对抗枯萎病,而非进行生产工作。在花开期间,除疫者会使用库存中所有可用的净化之火,只有在所有库存耗尽后才会继续生产。 这些消防栓是什么? 当你的定居点分布较广,且除疫站距离感染点过远时,消防栓就派上用场了。与会产生囊肿的雨朋克建筑不同,林地事件可能导致囊肿出现在任何地方,而消防栓能让附近的除疫者无需前往除疫站,直接从库存中快速装备一份净化之火。 小贴士: 净化之火生产界面下方的进度条会显示你拥有的净化之火数量与感染定居点的囊肿数量之间的关系。尽量使这两个数量相匹配。

生成净化之火会大量消耗你的燃料储备。别忘了设置生产上限。如果可以,寻找更高效的燃料来源来制作净化之火。 鹰身女妖在生产净化之火时享有产量加成,因此应指派她们执行这项任务。 尽管微操可能有些繁琐,但当你的净化之火库存充足时,将疫病战士分配到其他任务,然后在风暴季节召回他们参与战斗,这是个不错的做法。 基石“烧得酥脆”能让每焚烧3个囊肿产出20个煤炭。由于1单位净化之火需要消耗3个煤炭,这实际上是净收益,焚烧囊肿将实现自给自足。 在较高难度下,对于会产生疫病囊肿的林地事件,你需要谨慎选择解决时机。记住,从威望等级2开始,每第三个清理季节会出现枯萎囊肿。避免积累过多囊肿,否则在风暴季节,腐化率将难以控制。 **火守者护甲基石**会增加摧毁枯萎囊肿时移除的腐化量。虽然并非必需,但该基石可作为额外保障,以防枯萎腐化意外激增。
2026-02-13 11:30:41 发布在  风暴之城 Against the Storm


说点好听的...
收藏
0
0