


《forts》地图编辑器
这是一份《forts》地图创建与编辑的综合指南。我们会在时间允许的情况下添加截图和视频,以便让内容更清晰易懂。 警告:请勿向创意工坊上传包含版权材料的地图,例如来自其他游戏或电影的音乐、音效及图片。此类行为将导致账号被封禁。 本指南的法语版本:https://steamcommunity.com/sharedfiles/filedetails/?id=927525825 ### 开始使用 《forts》的地图编辑器直接内置在游戏中,方便所有人创建关卡!目前编辑器在用户友好性方面还有待改进,欢迎提出功能建议。以下是基础操作步骤: 1. 首先从主菜单中选择“地图编辑器”。 2. 在编辑器菜单中,你可以创建具有特定名称的新地图,也可以选择编辑或复制现有地图。有可供复制的模板地图,助你快速上手。
The Map Folder, Mission Script, and Display Name When the map is created or copied, a new folder is created under data/maps to contain it. That folder contains a script, which specifies basic properties of the map, such as enabled mods, where it should appear in the game, and is it symmetrical, as well as any custom logic to make an interesting mission. This is where the campaign missions do their work. It can contain dialogue between characters, player instruction, AI configuration, disabling of items, custom HUD elements, special events and custom win conditions. The rest of this guide will refer to this as the 'mission script', so you should know how to find it, as well as other files related to the map. Right click on Forts in Steam, then properties, then the local files tab. Browse local files, then navigate to data/maps and then find the folder for the map you are creating. It will either have the name you gave it at creation, or something like playermap1 if you used non-ANSI characters or other problematic characters such as slashes and periods. In there will be a .lua file with the same name. That's the mission script. You will also see a displayname.lua, which can be edited to change what people see, including in non-English languages. The map itself is made of an .spr file, which contains all structures and devices, and a .fwe file which contains the environment setting, ground and props. A few preview jpg images are used to show the map in the menu. If you have scripted an AI for the map they will appear here as .lua files starting with "fort". If you have already uploaded your map you will see publishedfileid.lua which just tells the game which Workshop item this map relates to. Enabling Mods and DLCs When you create a new map you are asked to select the mods you want to force on, including the built-in mods for the DLCs, and player made Workshop mods. If you select any of these the player must have access to the DLC or subscribe to the Workshop mod. If you are not giving the starting forts items from these mods, or in some other way need them, you should not select them, since it will limit the players able to use your map. Additional mods can always be selected at runtime, so don't force them on just because you like them. The selected mods are written into the initial mission script's Mods table. Without any mods selected the table will be empty. Mods = {} If you change your mind after creating the map the mission script can be edited. You can see some of the mods that are available in the data/mods folder. Some of these are special use mods, starting with language-, commander-, keyboard-, and faction-. The others can be enabled on a map-by-map basis. For example, to supply unlimited resources, change the line to: Mods = { "unlimited-metal", "unlimited-energy" } Any number of mods can be added to this list. If you have made a map which starts with weapons or tech buildings from Tons of Guns, you will need to add the weapon_pack mod to your Mods list. This forces Tons of Guns on. You could otherwise be missing items if it wasn't manually activated. The DLC mods are hidden inside pack files. The important DLC mods are: "weapon_pack": Tons of Guns (free DLC available to everyone) "dlc1": Moonshot blastdoor material "dlc1_capture_high": Increases the points required to open capture mode blastdoors by 50% "dlc1_capture_low": Reduces the points required to open capture mode blastdoors by 50% "dlc1_portal": Moonshot portal material "dlc1_weapons": Moonshot weapons "dlc2": High Seas materials, devices and weapons "dlc2_ammo_control": High Seas control ammo To force on Workshop mods you will need to discover their published file id, which is a long number found in the mod's URL, visible when you use the Workshop Share button. It can also be found in Steam's workshop directory for Forts (C: Program Files (x86) Steam steamapps workshop content 410900 by default). For example, to make sure Large Sandbags are available in your map: Mods = { "1293804859" } To make it easier to understand, you could write it like this instead: sandbags_large = "1293804859" Mods = { sandbags_large } Keyboard Layout and the Console All key bindings listed in this guide are for the QWERTY keyboard layout. On other keyboard layouts the key will be in the same physical position as on QWERTY. For example on the QWERTZ layout Undo is Ctrl + Y and Redo is Ctrl + Z. You can query the actual key bindings in the game using the proflist and keylist console commands listed below. Keys can be rebound in Options menu -> Input tab -> All Keys tab. Some functions require issuing commants into the console. Drop the console by using the ~/` (tilde/grave) key, usually left of the 1 key, or F3. Commands start with a backslash. Tab will autocomplete the current contents. A few useful commands are: cmdlist => shows a list of commands proflist => shows a list of key profiles keylist [id] => shows a list of keys in key profile [id] taken from proflist cvarlist => shows a list of console variables Undo/Redo There is unlimited undo/redo functionality so don't be worried about making mistakes. Ctrl + Z => Undo Ctrl + Y => Redo Remember that key bindings given in this guide is for QWERTY keyboards. On QWERTZ keyboards these keys are swapped. Editor Modes There are five editing modes: Structure Device/Weapon Terrain Surfaces PropsThe tabs on the HUD will switch to the appropriate mode. In some situations you can switch to structure and device/weapon mode by left clicking on items in the world. Z, X, and V can still used to cycle between materials, devices and weapons respectively. C doesn't cycle technology since this tab is disabled in the map editor for space reason. Technology items are included in the device tab instead. Terrain Mode This mode allows you to create and manipulate ground 'blocks' and set properties of the world. These are the polygons that the players build on and projectiles can hit. The texture can be changed in the Terrain tab, but for now there is only one useful texture. The other is for special blocks. Selection of Blocks You can select a single block by right clicking on it, or using [ and ] to cycle between them. Single block selection is necessary to manipulate the nodes (vertices) of a block. Multiple blocks can be selected to copy or manipulate many blocks at once. Right click in open space will deselect all blocks. Right mouse => select block under mouse or deselect all (in empty space) Ctrl + Right mouse => add or remove the block under the mouse to/from the selection Alt + Right mouse => remove block under the mouse from the selection Shift + Left mouse + drag => add area selected blocks to the selection * Alt + Left mouse + drag => remove area selected blocks from the selection * when a single block is already selected this will select the block's nodes instead Each block is made up of a number of 'nodes', or vertices. With a single block selected you can left click on nodes to select them individually. Ctrl + A will select all nodes, and Ctrl + D will select none. Ctrl + Left Mouse allows you to add nodes to a selection. Shift+Left Mouse Drag allows you to add nodes in a rectangular region to the selection. Alt + Left Mouse Drag allows you to subtract nodes from the selection under a region. With one or more nodes selected you can left click on one and drag them all. The one you dragged will snap to nodes and edges of other blocks. Creation of Blocks Lose any selection by right clicking in open space, and then left click to start placing new nodes in a clockwise order. The white lines in the middle of each edge should point outwards, these are the normals of the surface. If you get it wrong, just press Shift + F to flip the normals. You can left click on an edge to add a new node any time after the block is made. Manipulation of Blocks There are several keyboard and mouse shortcuts for manipulating blocks. Remember that you can use Ctrl+Z to undo anything. Ctrl + A => select all nodes Left mouse => select node under mouse (with block already selected) Left mouse + drag => move the selected nodes Alt + Arrow Keys => nudge selected nodes Shift + Left mouse => add single node to selection Shift + Left mouse + drag => add area selected nodes to selection Alt + Left mouse => remove single node from selection Alt + Left mouse + drag => remove area selected nodes from selection Ctrl + C => copy the currently selected block Ctrl + V => paste copied block at the mouse position H => mirror selected block horizontally Shift + V => mirror selected block vertically Page Up => adjust the render order of the block up (toward the background) Page Down => adjust the render order of the block down (toward the foreground) Backspace/Delete => delete selected nodes Alt + X => Split a group between two selected non-adjacent nodes J + Left mouse => Join the group under the mouse at two selected nodes. Selected nodes must be adjacent and correspond to adjacent nodes in the merge target. Deletion of Blocks Ctrl + Backspace => delete the currently selected block. Ctrl + Delete => delete all blocks. Be careful! Remember Ctrl+Z. The Environment & Terrain Style To make environments feel distinct, we have made our official maps with a certain style, consistent for each environment. Maps that use the fields environment all have rolling hills, for example. You can improve the quality of your maps by following the same style, described in the Map Editor Style Guide. Optimisation for Collisions When a block is selected you can see a faint orange circle surrounding it. This is the bounding circle. When the game is looking for collisions with a projectile, beam, or structure, it is used to quickly disregard blocks which are not nearby. Ideally, the size and shape of the block will closely match that of the bounding circle. Put another way, you want to minimise the amount of empty space which projectiles and beams can pass through before hitting the block. This is because once the object is inside the bounding circle, the game must check each edge of the block to see if there is a collision. To reduce the work the game must do and make your map faster to play, avoid making long blocks, especially if the surface has many nodes. Instead it's better to break them into smaller blocks placed next to each other. If the bounding circle overlaps other blocks or space where colliding objects can't exist (e.g. under the ground surface) then it's not a problem. World Extents In Terrain mode you can adjust the size of the visible world. Regions Inaccessible to the camera are shaded in green. Placing the mouse to the desired location, and pressing Ctrl + an arrow key corresponding to the desired extent. Blocks should extend a little beyond the world extents so that when the camera shakes you don't see cracks. You can also use Ctrl + Home to set the extents based on the current view. There is also an easy way to expand and contract the extents and all the contents of the world horizontally to make the map wider or narrower. Place the cursor where you would like the expansion or contraction to take place, and press the following key combinations. Avoid placing the cursor in the middle of a structure. Alt + Minus => contract world at cursor Alt + Plus => expand world at cursor Screen Positions The initial view of players is set using the following keys while the Terrain tab is selected: Ctrl + 1 (numpad) for team 1 Ctrl + 2 (numpad) for team 2 Ctrl + 3 (numpad) will save the overview perspective (full map) from the current view. The map preview images are taken using these screen positions when it is saved. They must be set properly for the map to be presented well and for players to not be disoriented. Block Ownership You can allocate ground blocks to specific teams, or otherwise, using the following keys: 1 => Team 1 2 => Team 2 3 => Any team 4 => No team (unbuildable) 5 => Background (unbuildable) In order to allow ropes to be pegged to non-foundation blocks, you should set the owner to Any team, but disable foundations and mines (see next). Ground Properties The following keys allow you to set various properties of a ground group: Alt + F => Toggle allow foundations Alt + M => Toggle allow mines Alt + W => Toggle wind floor (used to determine efficiency of wind turbines) Alt + V => Toggle view floor (used to determine size of weapon aiming circles) Alt + D => Toggle no draw Alt + E => Toggle no draw edges Alt + P => Toggle pass projectiles Alt + B => Toggle pass beams Alt + H => Toggle hazard Alt + N => Toggle no splash damage Alt + C => Toggle no build Alt + O => Toggle can build over Alt + L => Toggle sets water level (High Seas only) Alt + I => Toggle draw edge with fill Wind floors and view floors are typically have their Background and No-Draw properties set. Surfaces Mode This is really a sub-mode of the Terrain editor. Each surface of a block can have a different 'edge set' applied. Each node in a block controls the surface in the clockwise direction. To change a node's edge set, select the node and then hit the desired edge set graphic on the HUD. You can select multiple nodes to change them all at once. Edge-sets can have some rules about what's drawn depending on the orientation of the surface (e.g. grass on top, rocky crags on the under surface). Or they can be all the same. The scripts that set the rules are found in data/environment/<theme>/surfaces/surfaces.lua. The convention for the game is that surfaces that can be built on use the light brown rocky edge set, while non-buildable surfaces use the grassy/craggy set. When the surface is buried underground and adjacent to other blocks then there should be no edge set applied, applied with the blank, left-most button on the HUD. Making Water Maps for High Seas The High Seas DLC, released in March 2022, added buoyancy physics, dynamic terrain, splash effects, backgrounds and more, to allow rich ocean based environments. Creating maps which take advantage of water requires a little more care than regular Forts maps. We have provided a template map to make starting your own High Seas maps easy. Just open the Map Editor menu, go to the Edit tab, check the 'Copy' box, and scroll down to find the map 'dlc2_template (-template-)', and select it. Enter a name for your new map, and then press the Copy button. You will see two ships facing each other on water.
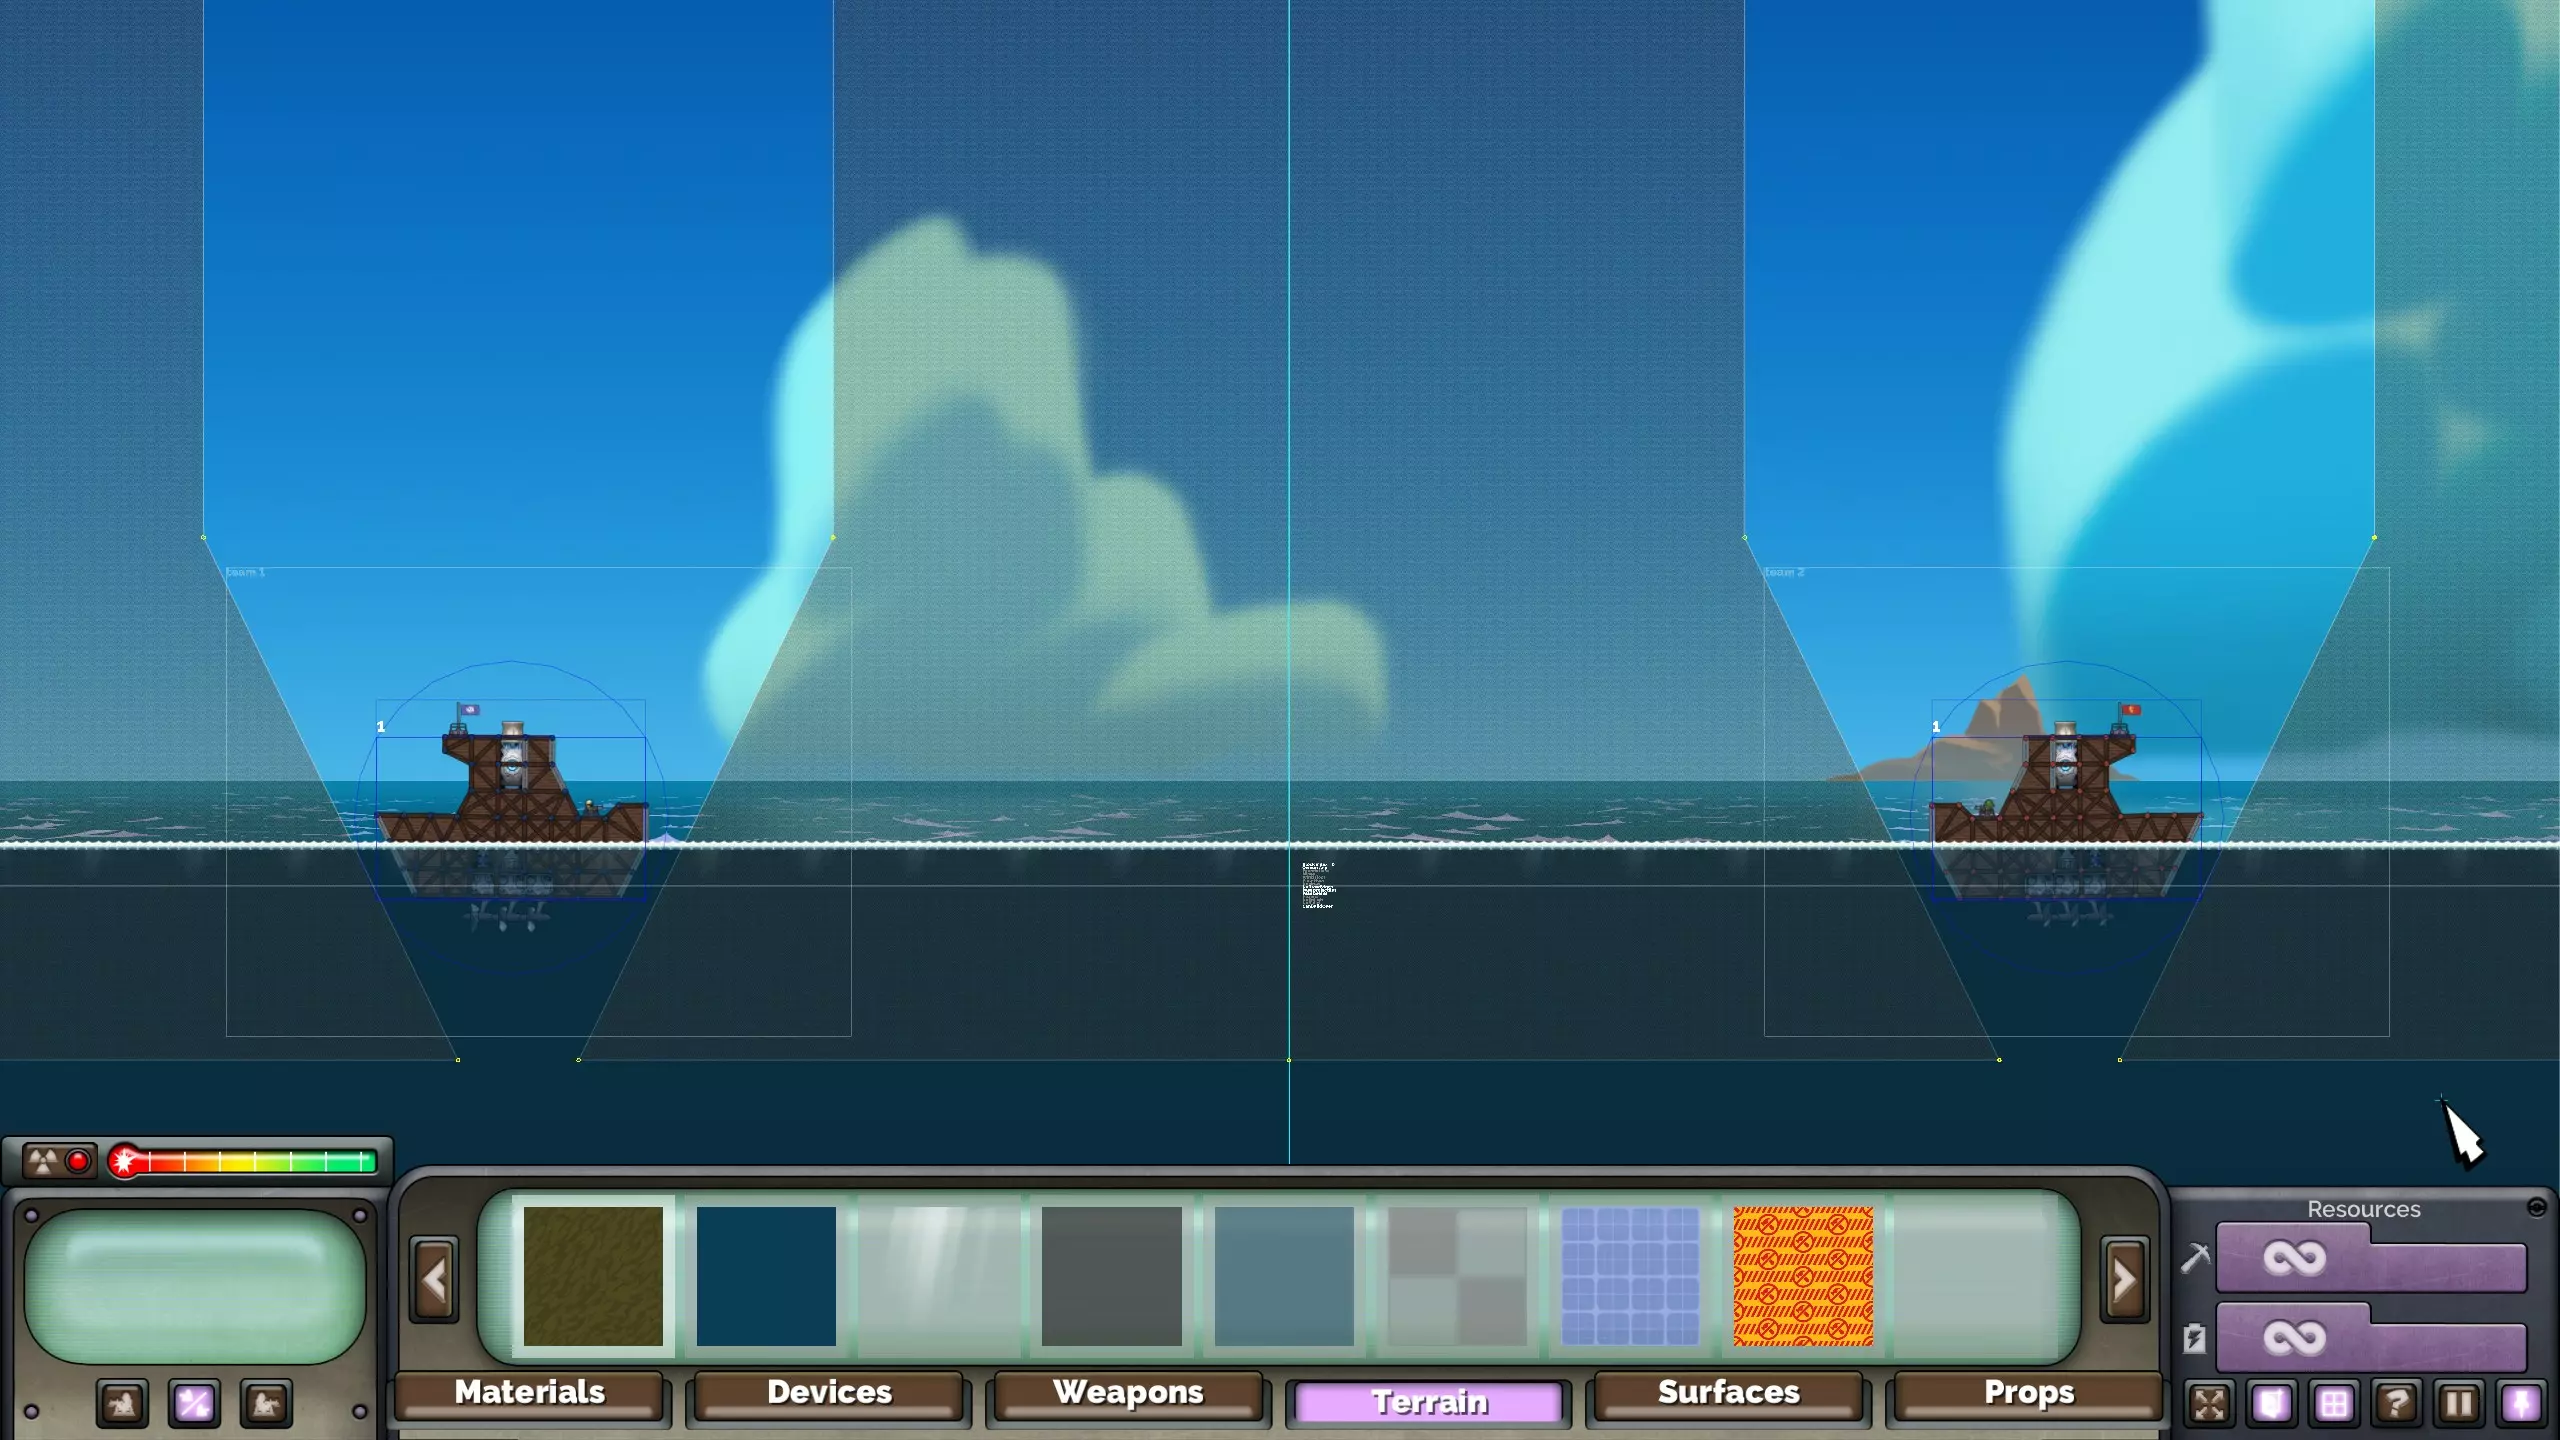
你可以随意编辑新复制的模板,添加陆地、额外的船只和堡垒,以及更改背景。若要了解水体的配置方式,请继续阅读。 **多层水体物理效果** 新增了名为“设置水位”的方块属性,默认可通过Alt + L键切换。你可以将此属性应用于不同高度的任意方块,以改变水位,从而推动结构上浮以模拟浮力效果。该水位由一条紫色线条标识。“dlc2_WaterLevel”已被弃用。 **视觉与游戏玩法图层** 水体地图由4个地形图层构成。当所有这些图层都存在,且图层1-3的上边缘重合时,地图的视觉效果和游戏体验最佳,但作为地图制作者,你可以自由选择排除或移动任何图层。只有上述提到的物理水位是结构实际漂浮所必需的。 1. 覆盖层和表面 2. 阳光光束 3. 背景 4. 禁止建造区域
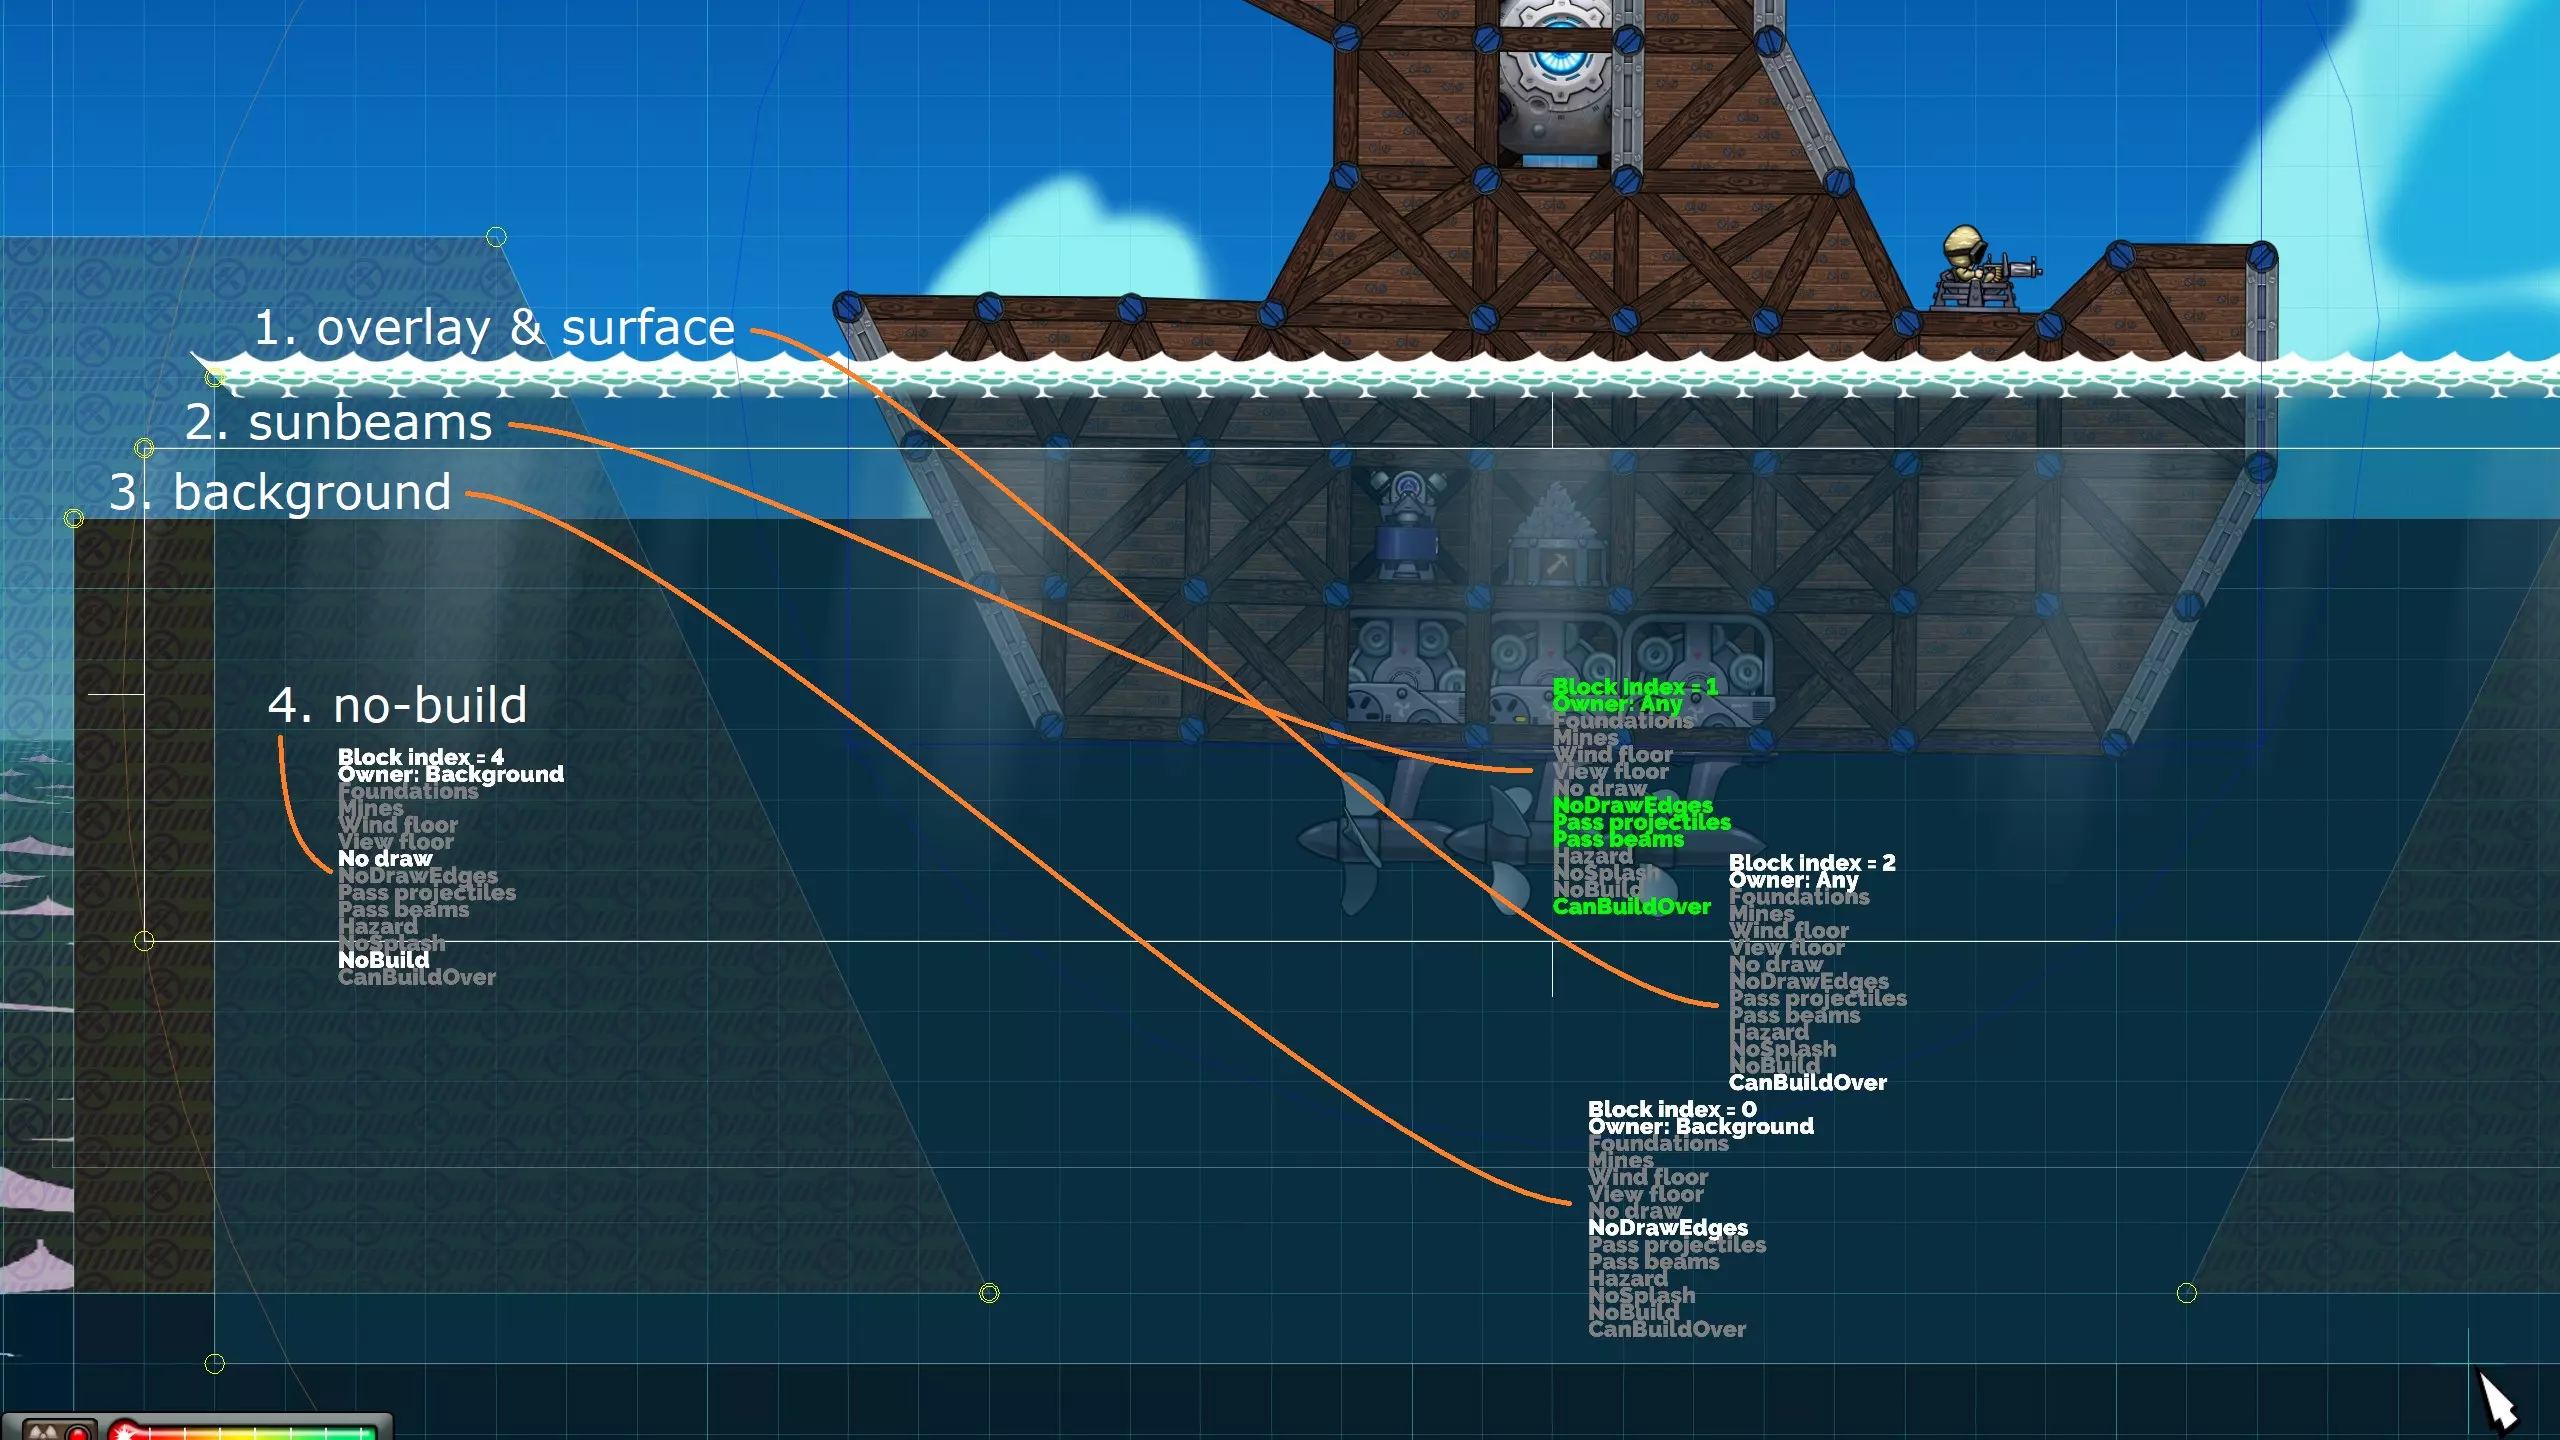
1. **覆盖层与水面** 这是水的顶层视觉图层。它绘制在建筑、投射物和固体地形之上,营造出它们处于水下的视觉效果。为其指定提供的半透明灰色或蓝色纹理。 顶层边缘应应用下方所示的“白浪”水面效果。这会自动细分边缘并使其动画化,呈现出水的动态外观。投射物和光束会与此碰撞,产生水花效果并逐渐消失。请注意,动画水效果不会在地图编辑器中显示。
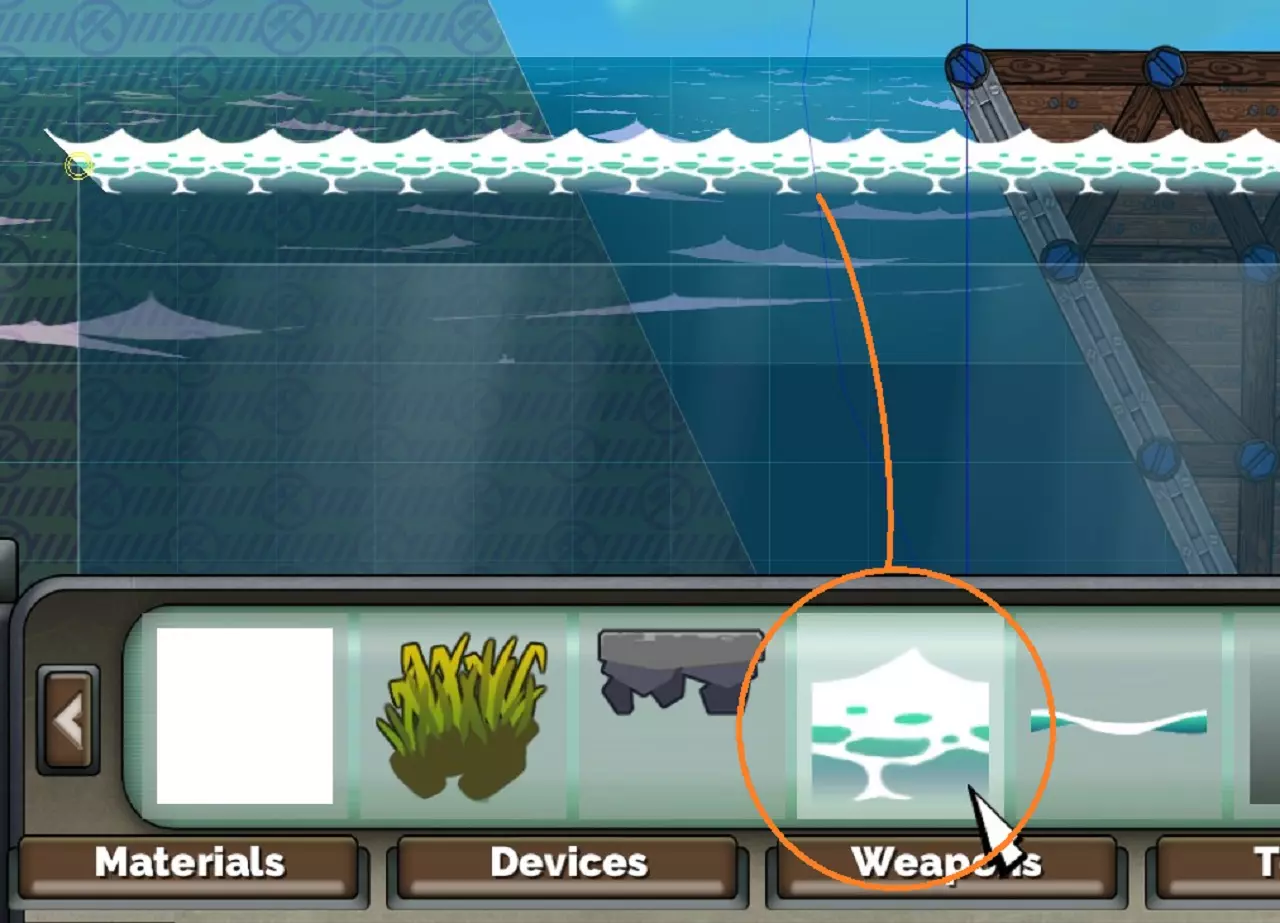
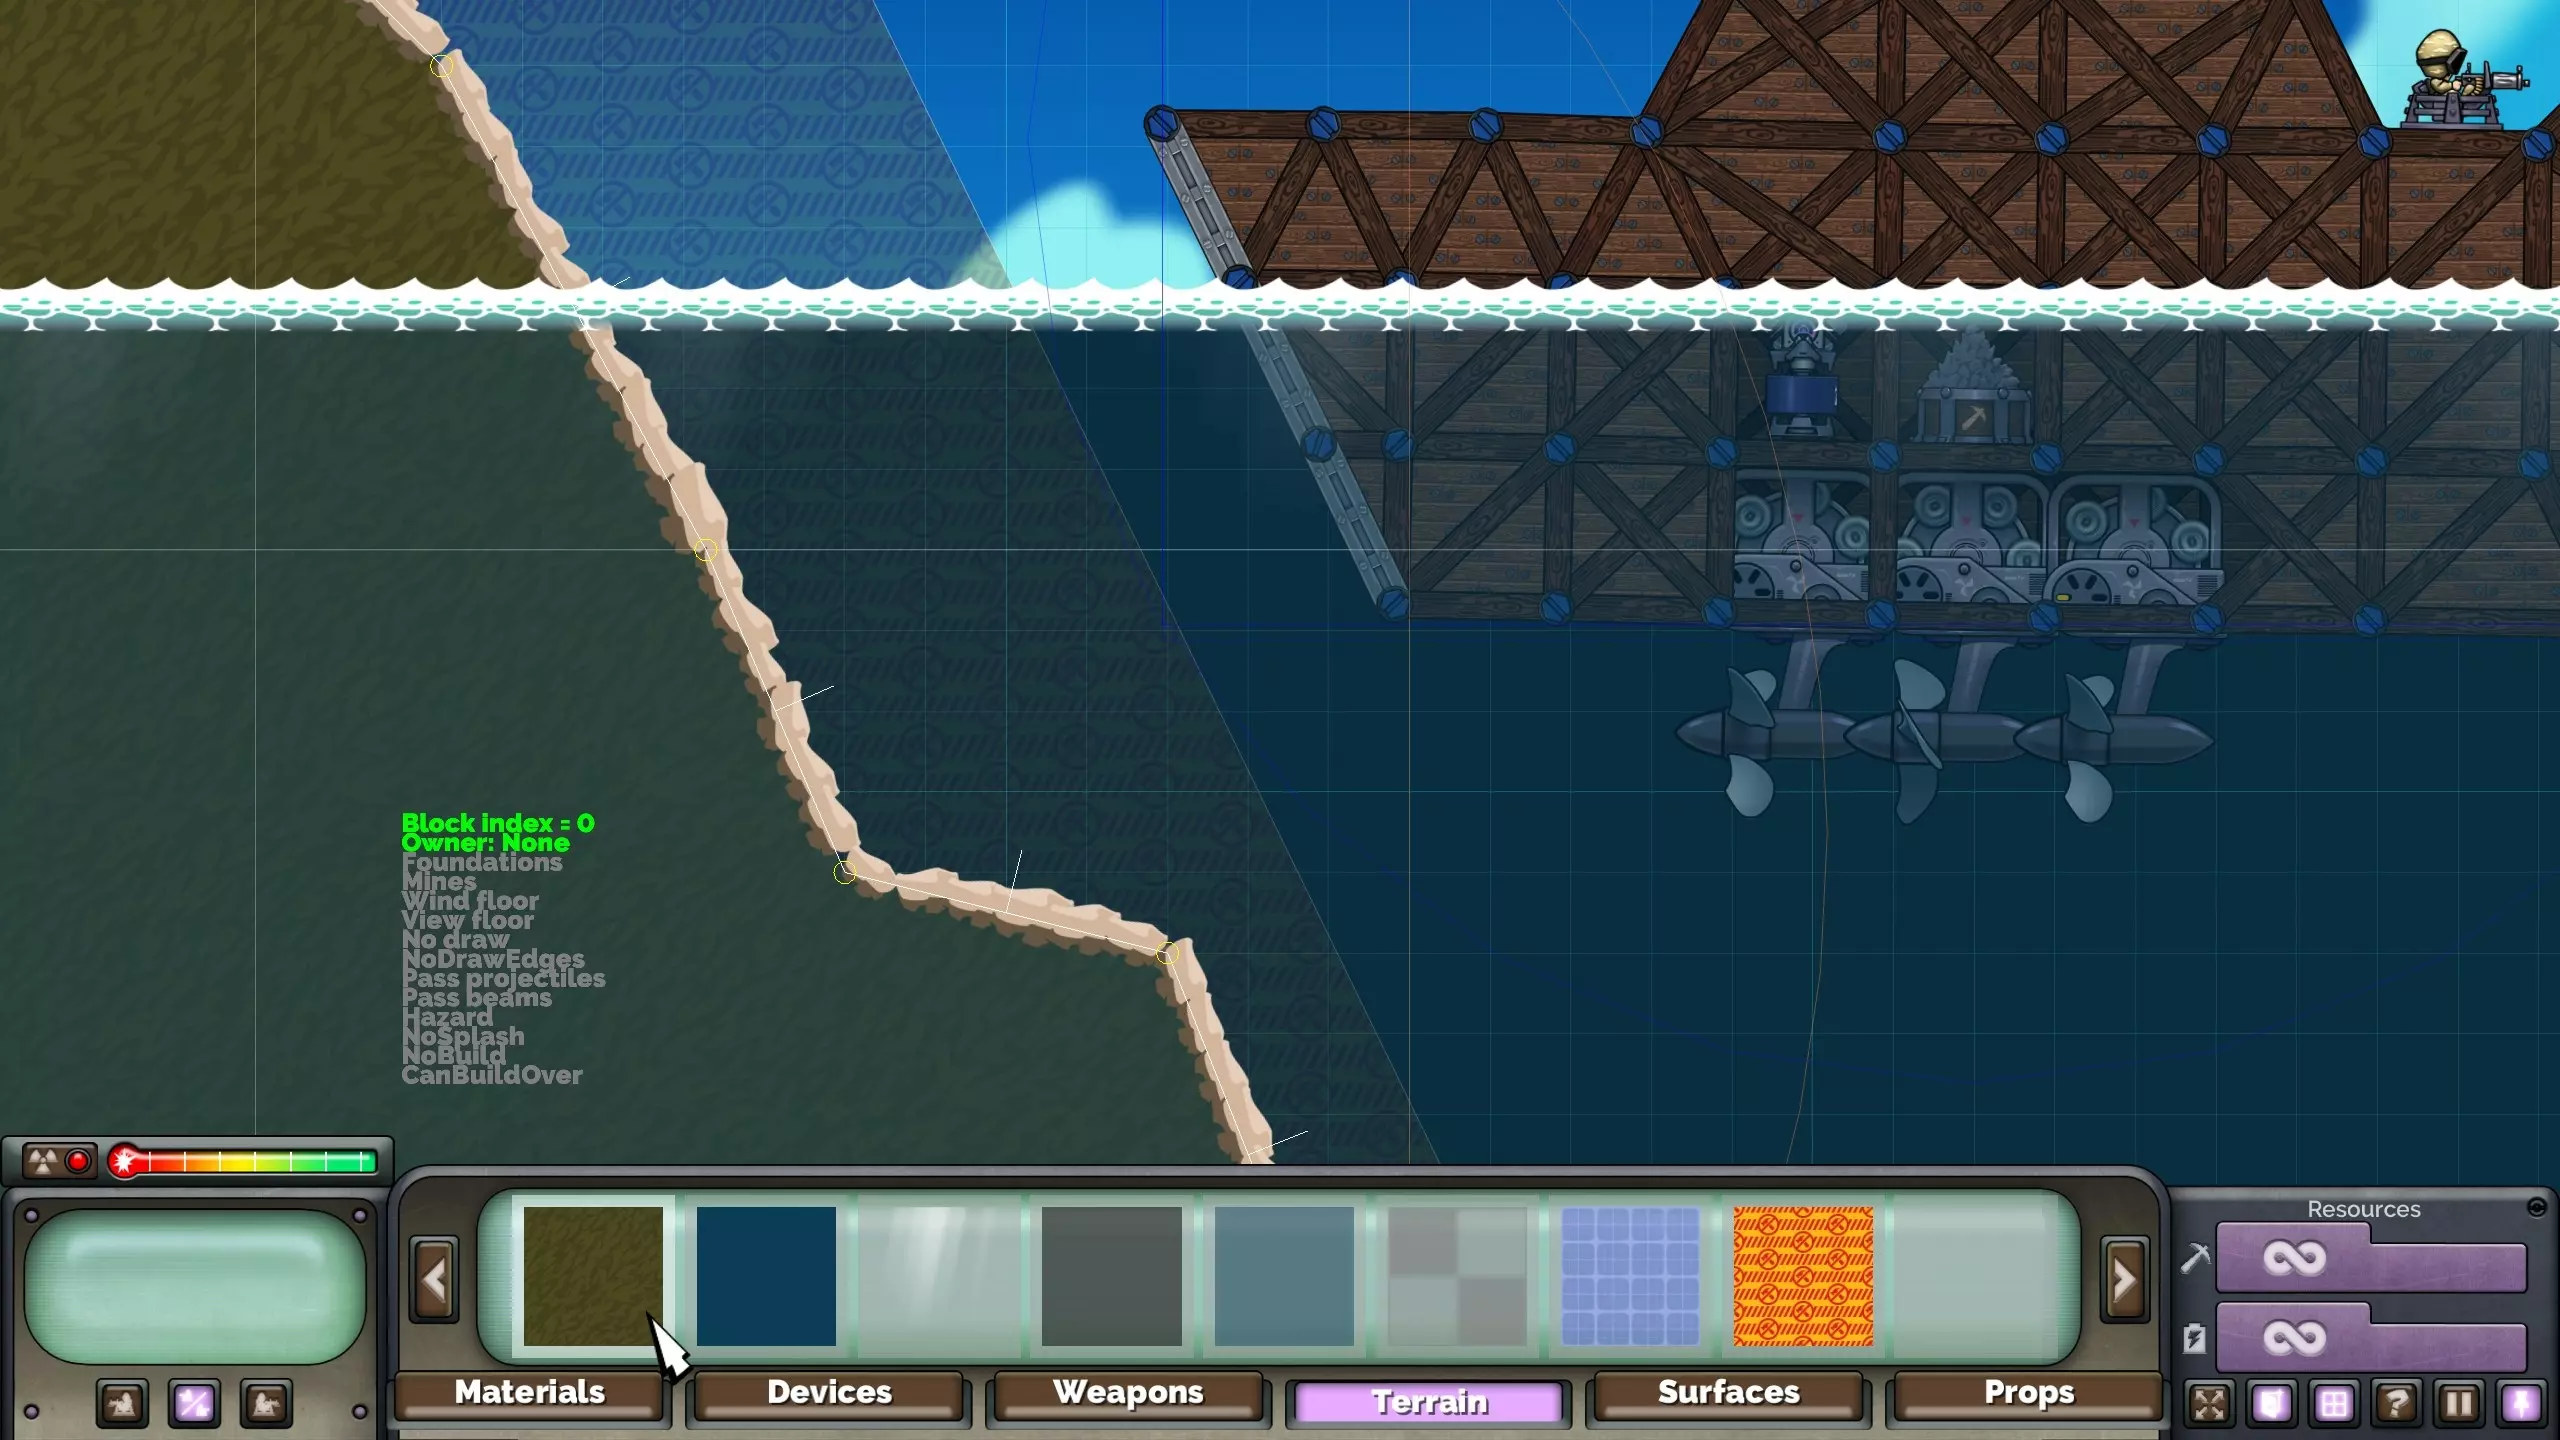
其他边缘应设为空白。方块必须设置“可在上方建造”(CanBuildOver)标志,以免干扰建筑结构或建造过程。 2. 阳光光束 此图层仅用于为靠近水面的水域增添一些趣味。指定合适的纹理,并为顶部边缘赋予“白浪”(whitecaps)表面效果。设置“无绘制边缘”(NoDrawEdges)标志可防止边缘可见,但会使方块产生动画效果以正确匹配波浪。 同时设置“穿过投射物”(Pass projectiles)和“穿过光束”(Pass beams)标志,以忽略与投射物的碰撞(这是图层1的功能)。“可在上方建造”(CanBuildOver)标志也需设置。 根据你希望阳光光束的亮度,此图层可位于图层1上方或下方。 你也可以调整高度来改变阳光光束的长度,但要确保纹理不会在方块内重复显示。这将限制你的水位设置范围。 3. 背景层 这是一个绘制在第1层和第2层下方的不透明图层,用于遮挡地图背景,营造广阔海洋的感觉。为顶部边缘添加“白浪”表面以匹配上方的图层,但需设置“无绘制边缘”(NoDrawEdges)。 将“背景层”(Background)指定为所有者,使其绘制在建筑下方。这会自动使其变暗。如果想要调整,可在控制台中使用“set_ground_colour R G B A”命令。以下示例将其设置为90%不透明度的灰色: set_ground_colour 0.9 0.9 0.9 1 4. 禁止建造区域 这些区域会限制玩家建造船只的大小。当然,它们是可选的,但如果没有这些区域,你可能会发现比赛持续很长时间或陷入僵局。通常我们会提供足够的横向空间来建造约12个螺旋桨,但对于小型1v1地图可能会更少。 为其指定黄色和红色的“禁止建造”纹理,将所有者设置为“背景”,并勾选“无绘制”和“禁止建造”标志。设置“无绘制”标志后,该区域在玩家光标足够接近前将保持不可见状态,当光标靠近时,区域会在光标周围显示。 目前,可视化功能无法处理拐角或复杂形状,它只会找到最近的边缘并假设附近区域是平坦的。我们建议将区域设计得简单一些,采用较大的垂直边缘或倾斜边缘。
如果将格子实用纹理应用于不可建造方块,它将永远不可见,就像《月球射击》DLC中的占领地图那样处理。在“公海”场景中,这可能会造成混淆。 **坚实地面** - 你可以像正常情况一样添加地面方块,以阻止建造、阻挡投射物,并为玩家提供可建造的坚实地面。 - 调整方块顺序,使其位于水层下方。如果水的背景层(3)设置为“背景所有者”,它将自动绘制在此坚实地面后方。 - 请记住,如果地面的所有者设置为“任意”,玩家将能够在水下连接绳索,这可能会导致深水螺旋桨漏洞。
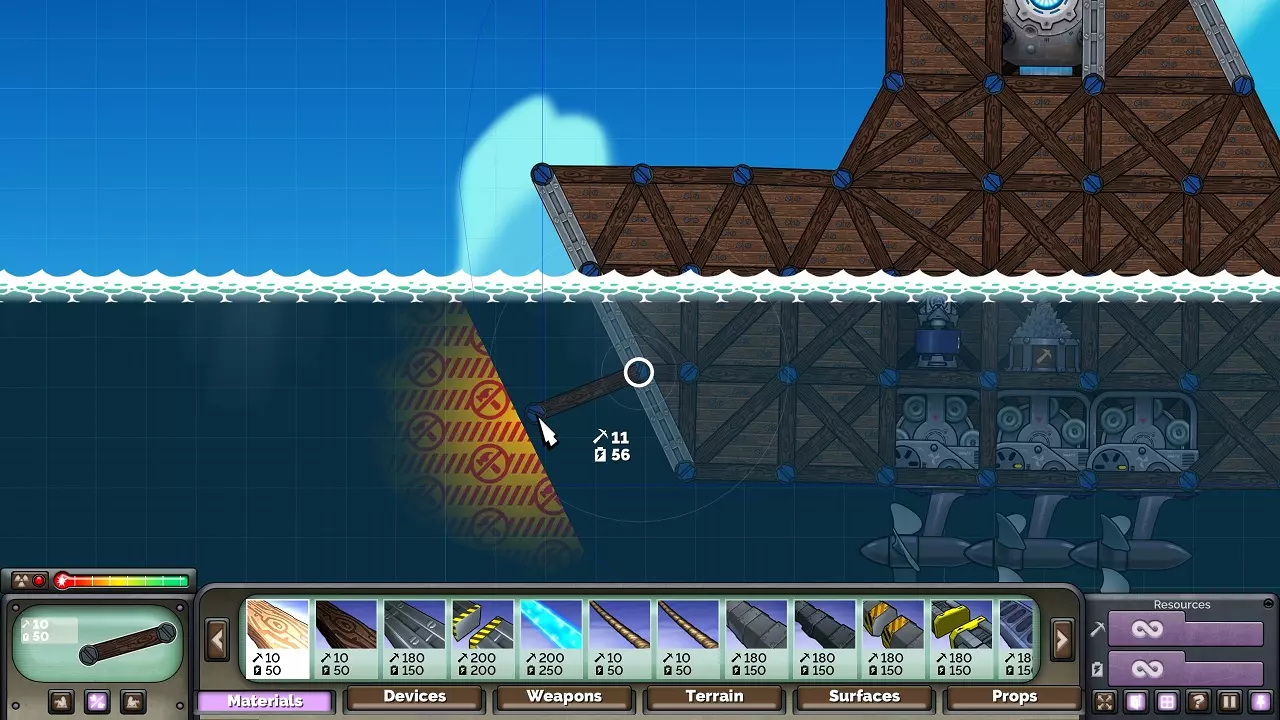
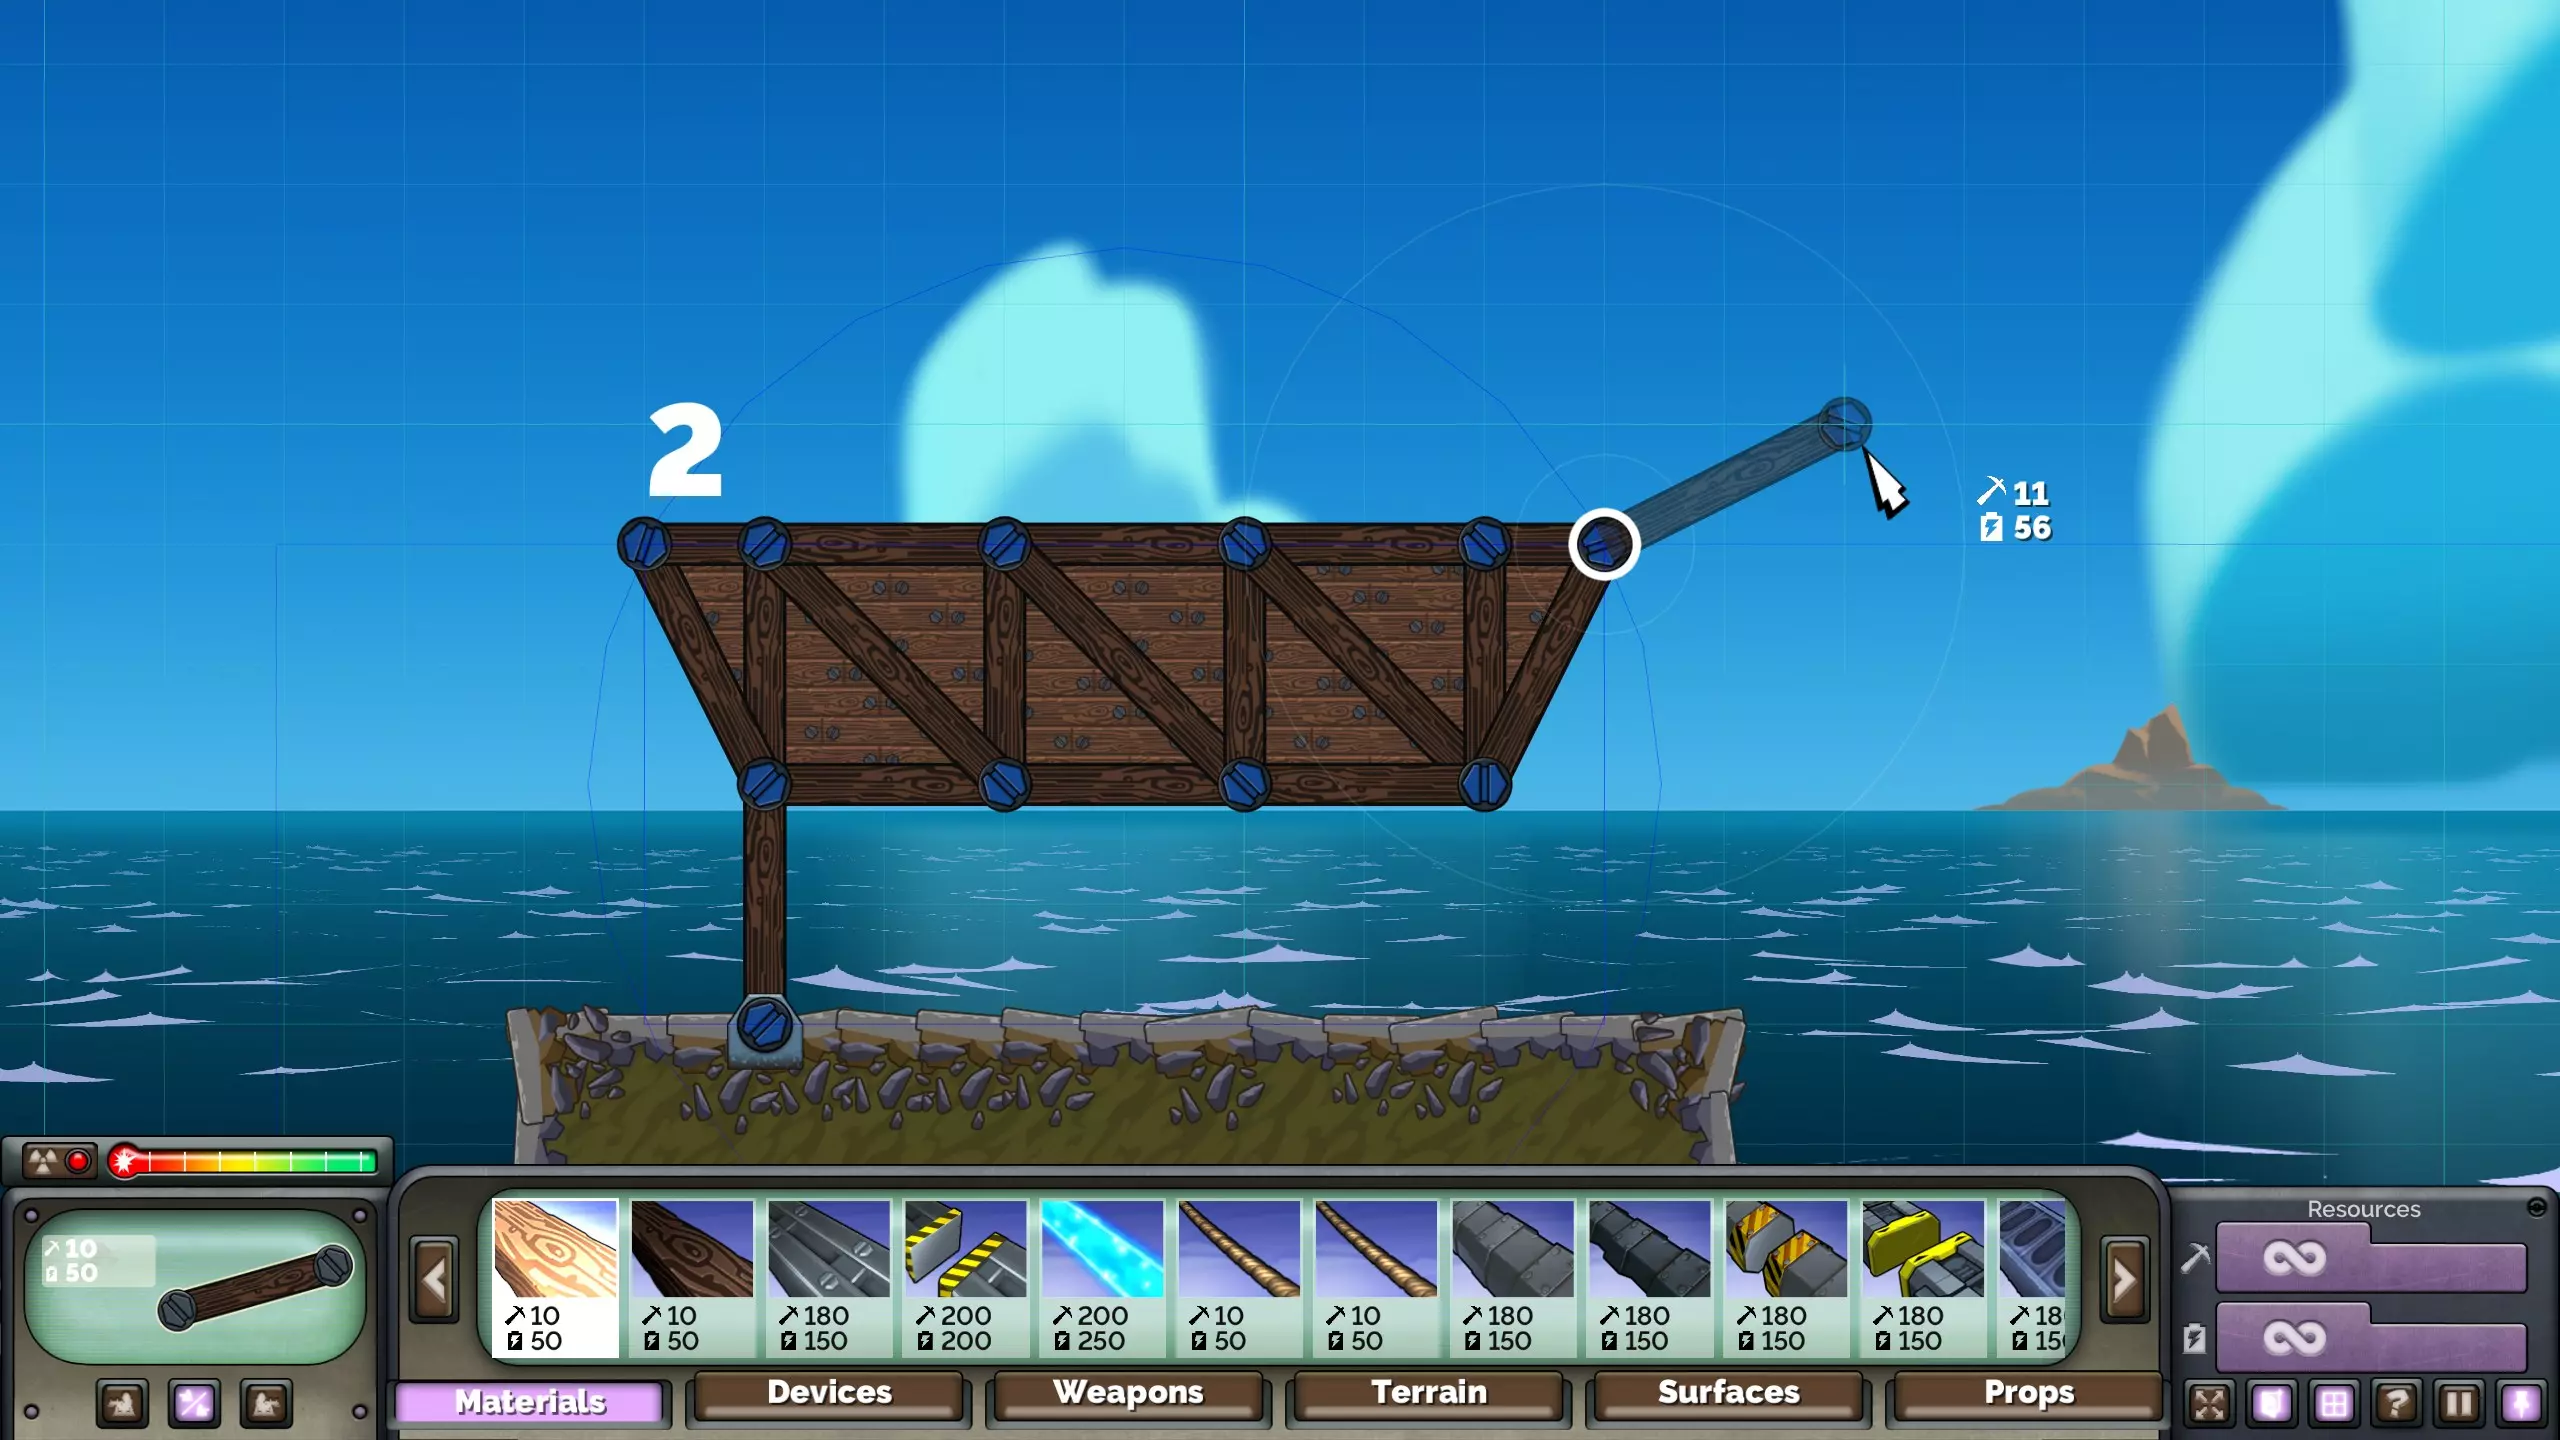
开始建造新船只 由于无法在空中(或水中)创建新的连接点,因此开始建造全新的船只会有些棘手。一种实现方法是:创建一个用于支撑地基的方块,搭建地基,然后以此为基础进行扩展以塑造船只形状。一旦船只开始建造,你就可以删除地基和方块了。
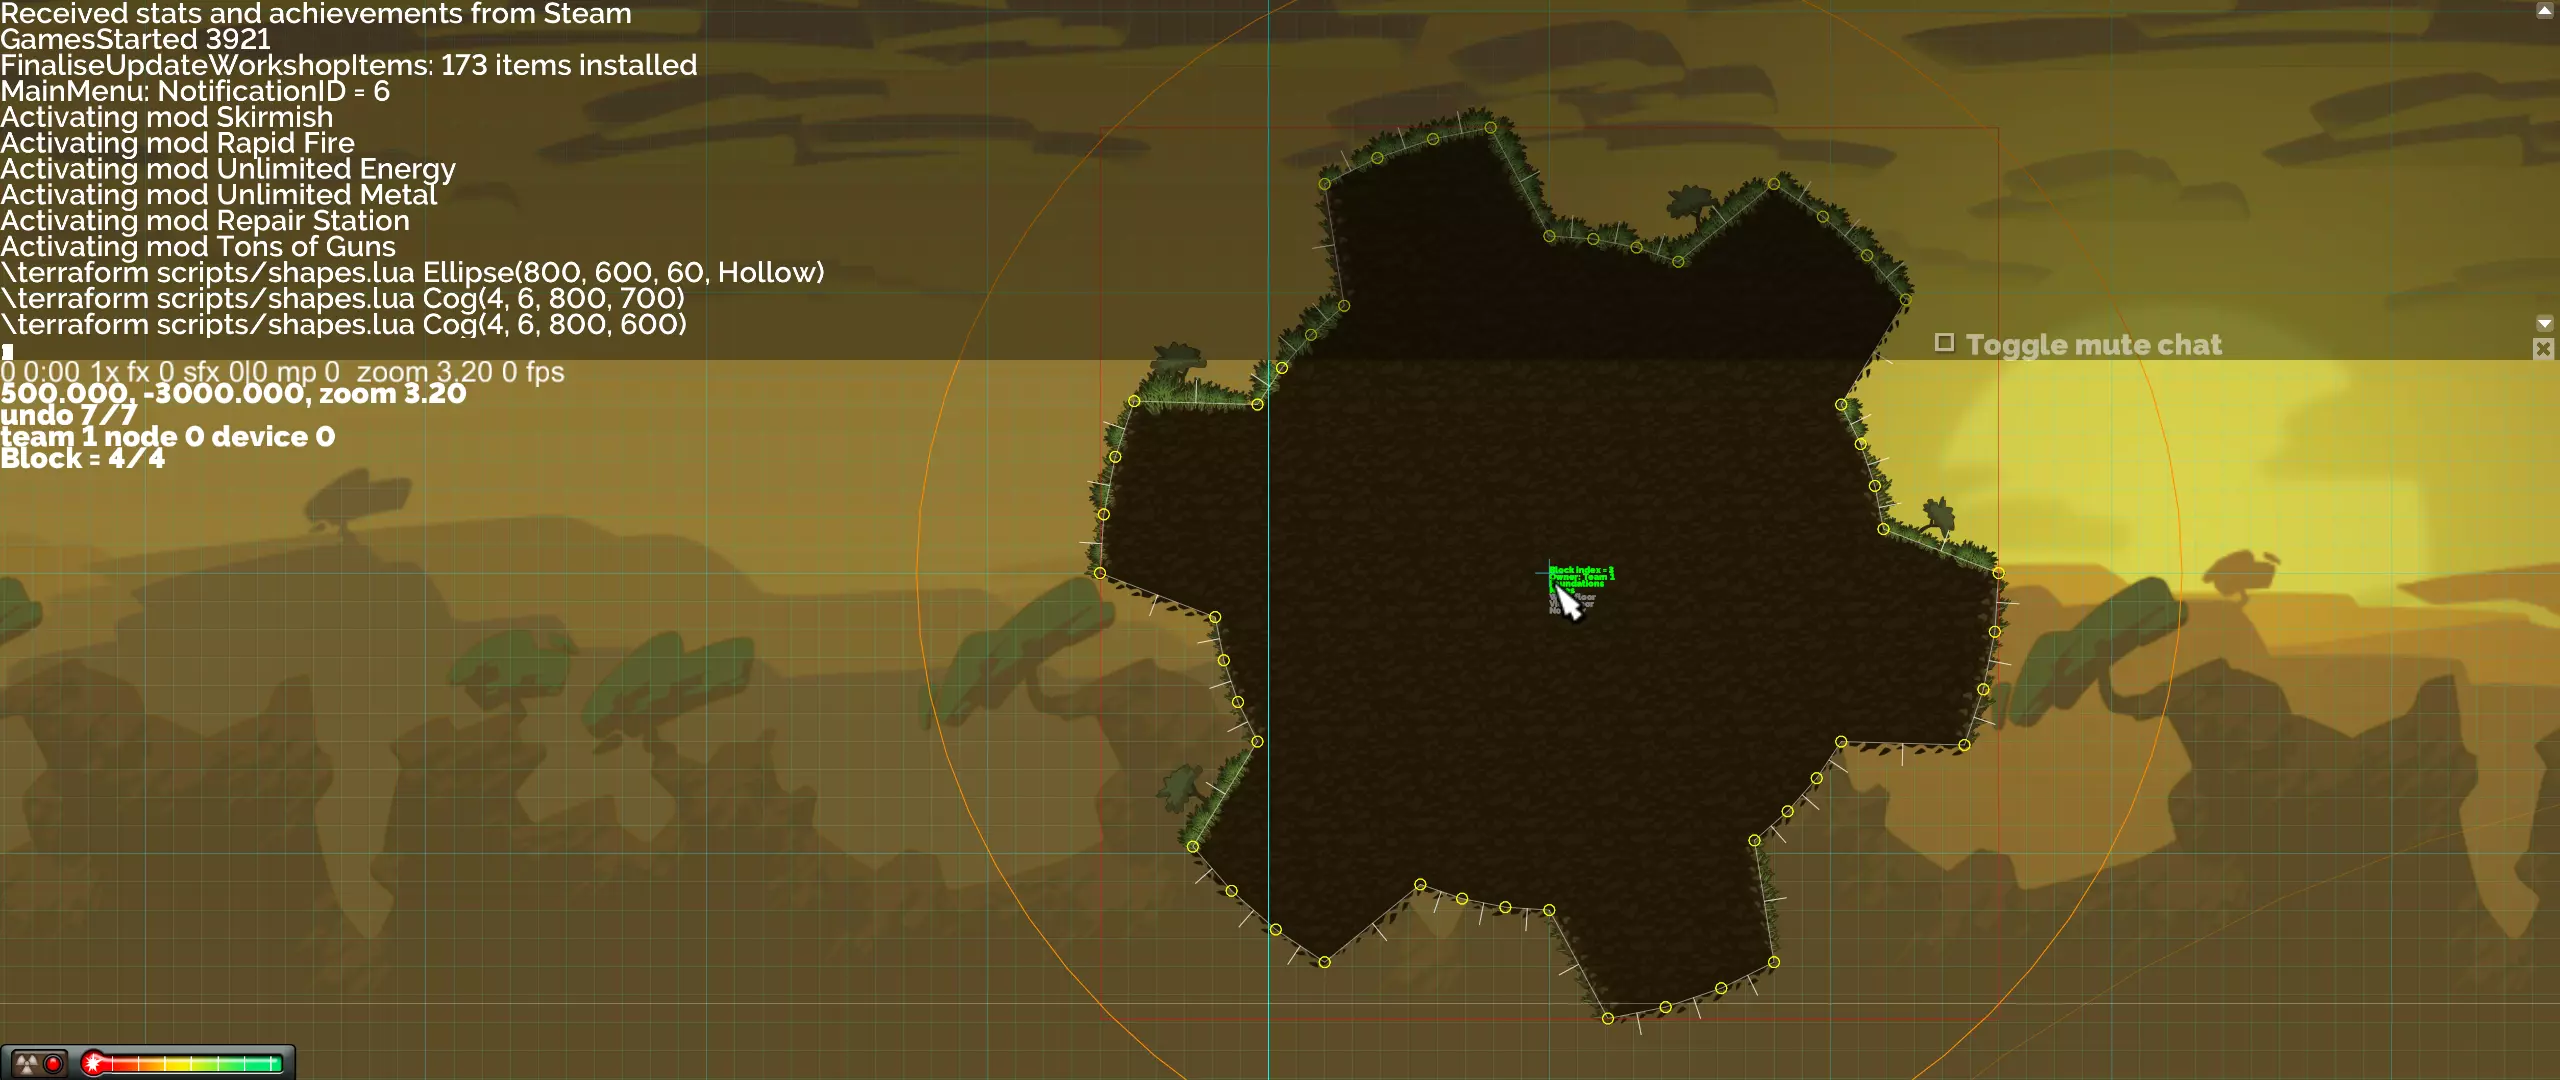
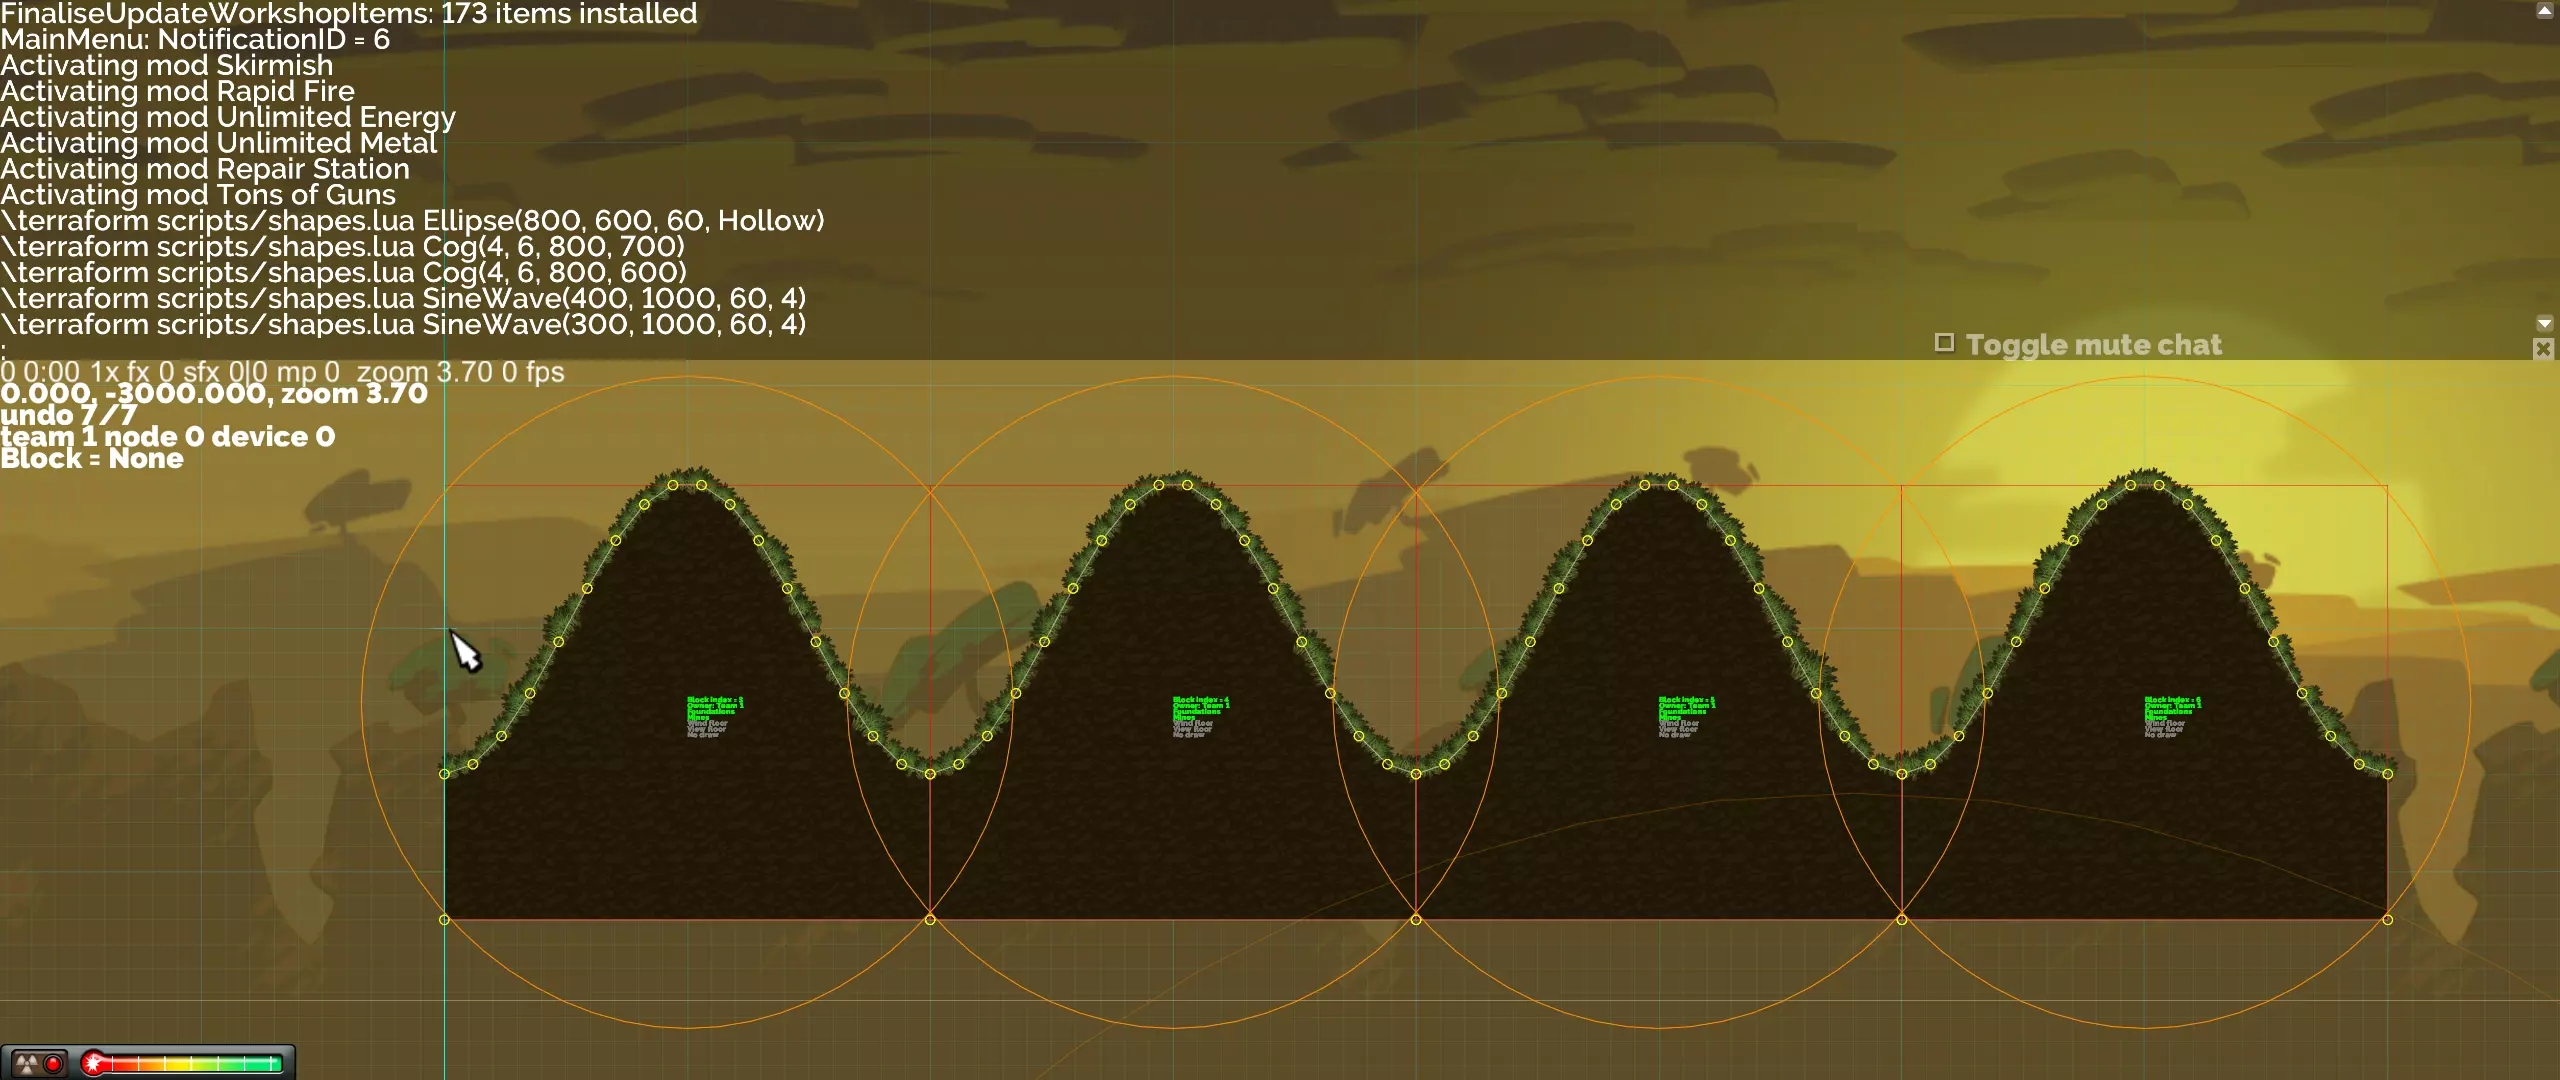
另一种方法是复制并删除现有船只的部分结构,将其改造成新的船只。如果该船只已进行过模拟运行,那么新结构会带有一定的形变。 请参阅“公海标准船只”部分,了解如何使用我们已建造的船只。 完成新船只的建造后,你可以通过选择一个连接点并按住 M 键,将其移动到大致位置。然后使用 Ctrl + Space 启用模拟,使其正常沉降到位。 **船只移动**:我们在开发过程中发现,开火时船只会因后坐力而后退。这会导致船只撞到地图边缘、其他船只或进入禁建区,造成问题。为应对此问题,“公海”模组(dlc2)会自动对每个反应堆的平台施加一个小的重新居中力,使其回到比赛开始时的初始位置。 如果出于某种原因,你不希望你的地图出现这种行为,可以对其进行覆盖。若要完全移除该功能,只需在任务脚本中执行以下命令: ExecuteInScript("mods/dlc2/script.lua", -1, "data.reactors = nil") 要使舰船移动,可使用dlc2的script.lua中的SetReactorPos(id, pos, maxDelta)函数。pos参数为目标位置,maxDelta用于限制到目标位置的有效距离,从而限制力的大小。如果你知道或找到了reactorId,可按以下方式调用该函数,例如将其向左移动: local scriptCall = "SetReactorPos(" ..tostring(reactorId) .. ", Vec3(-100000, 0), 250)" ExecuteInScript("mods/dlc2/script.lua", -1, scriptCall) **公海依赖** 一旦你使用 dlc2_WaterLevel 变量、使用任一 dlc2_oceans_* 环境,或在 Mods 表中添加“dlc2”,你的地图将依赖于公海。为使创意工坊上传成功,你需要在任务脚本中设置以下变量: RequiresHighSeas = true **程序化地形与变形** 无需精确点击每个顶点,即可创建多种形状和图案。为此,请使用地形改造控制台命令。该命令的第一个参数是脚本路径,第二个参数(该行的其余部分)是要在该脚本中执行的任意 Lua 代码。系统包含一个名为 shapes 的脚本。Lua 内置了文档,可通过以下方式访问: terraform scripts/shapes.lua Help() 执行该命令将显示可用于创建和操作形状的函数名称,这些函数名可传递给 Help 函数以获取更多详细信息。例如,Help("Circle")。每个函数都有默认参数,因此你可以了解其功能以及合理的参数设置。如果执行命令后结果不符合预期,可以撤销操作。 形状和波形会在光标位置创建新的地形块。变换函数将相对于光标位置对当前选择区域进行操作。 形状 Rectangle(width, height) 在光标位置创建一个矩形。如果未指定高度,则创建一个正方形。 Circle(radius, step, solid) 在光标位置创建一个圆形。step 参数用于设置使用的顶点数量(数值越低,顶点越多)。若将 solid 参数设为 Hollow,将生成指定大小的洞穴。 Ellipse(a, b, step, solid) 在光标位置创建一个椭圆,其中 a 为水平范围,b 为垂直范围。step 参数用于设置使用的顶点数量(数值越低,顶点越多)。若将 solid 参数设为 Hollow,将生成指定大小的洞穴。 terraform scripts/shapes.lua Ellipse(800, 600, 60, Hollow)

Polygon(边数, 半径) 创建具有指定边数和半径的正多边形。 Star(点数, 外半径, 内半径) 创建具有指定点数以及内、外半径值的正星形。 Cog(每个齿的顶点数, 齿数, 外半径, 内半径) 创建一个齿轮形状。每个齿的顶点数用于定义分辨率高低。 terraform scripts/shapes.lua Cog(4, 6, 800, 600)
波浪 正弦波(振幅,波长,步长,周期) 创建分段的正弦波。步长参数设置使用的顶点数量(值越低表示顶点越多)。分段数量由周期参数设定。 地形脚本/shapes.lua 正弦波(300, 1000, 60, 4)
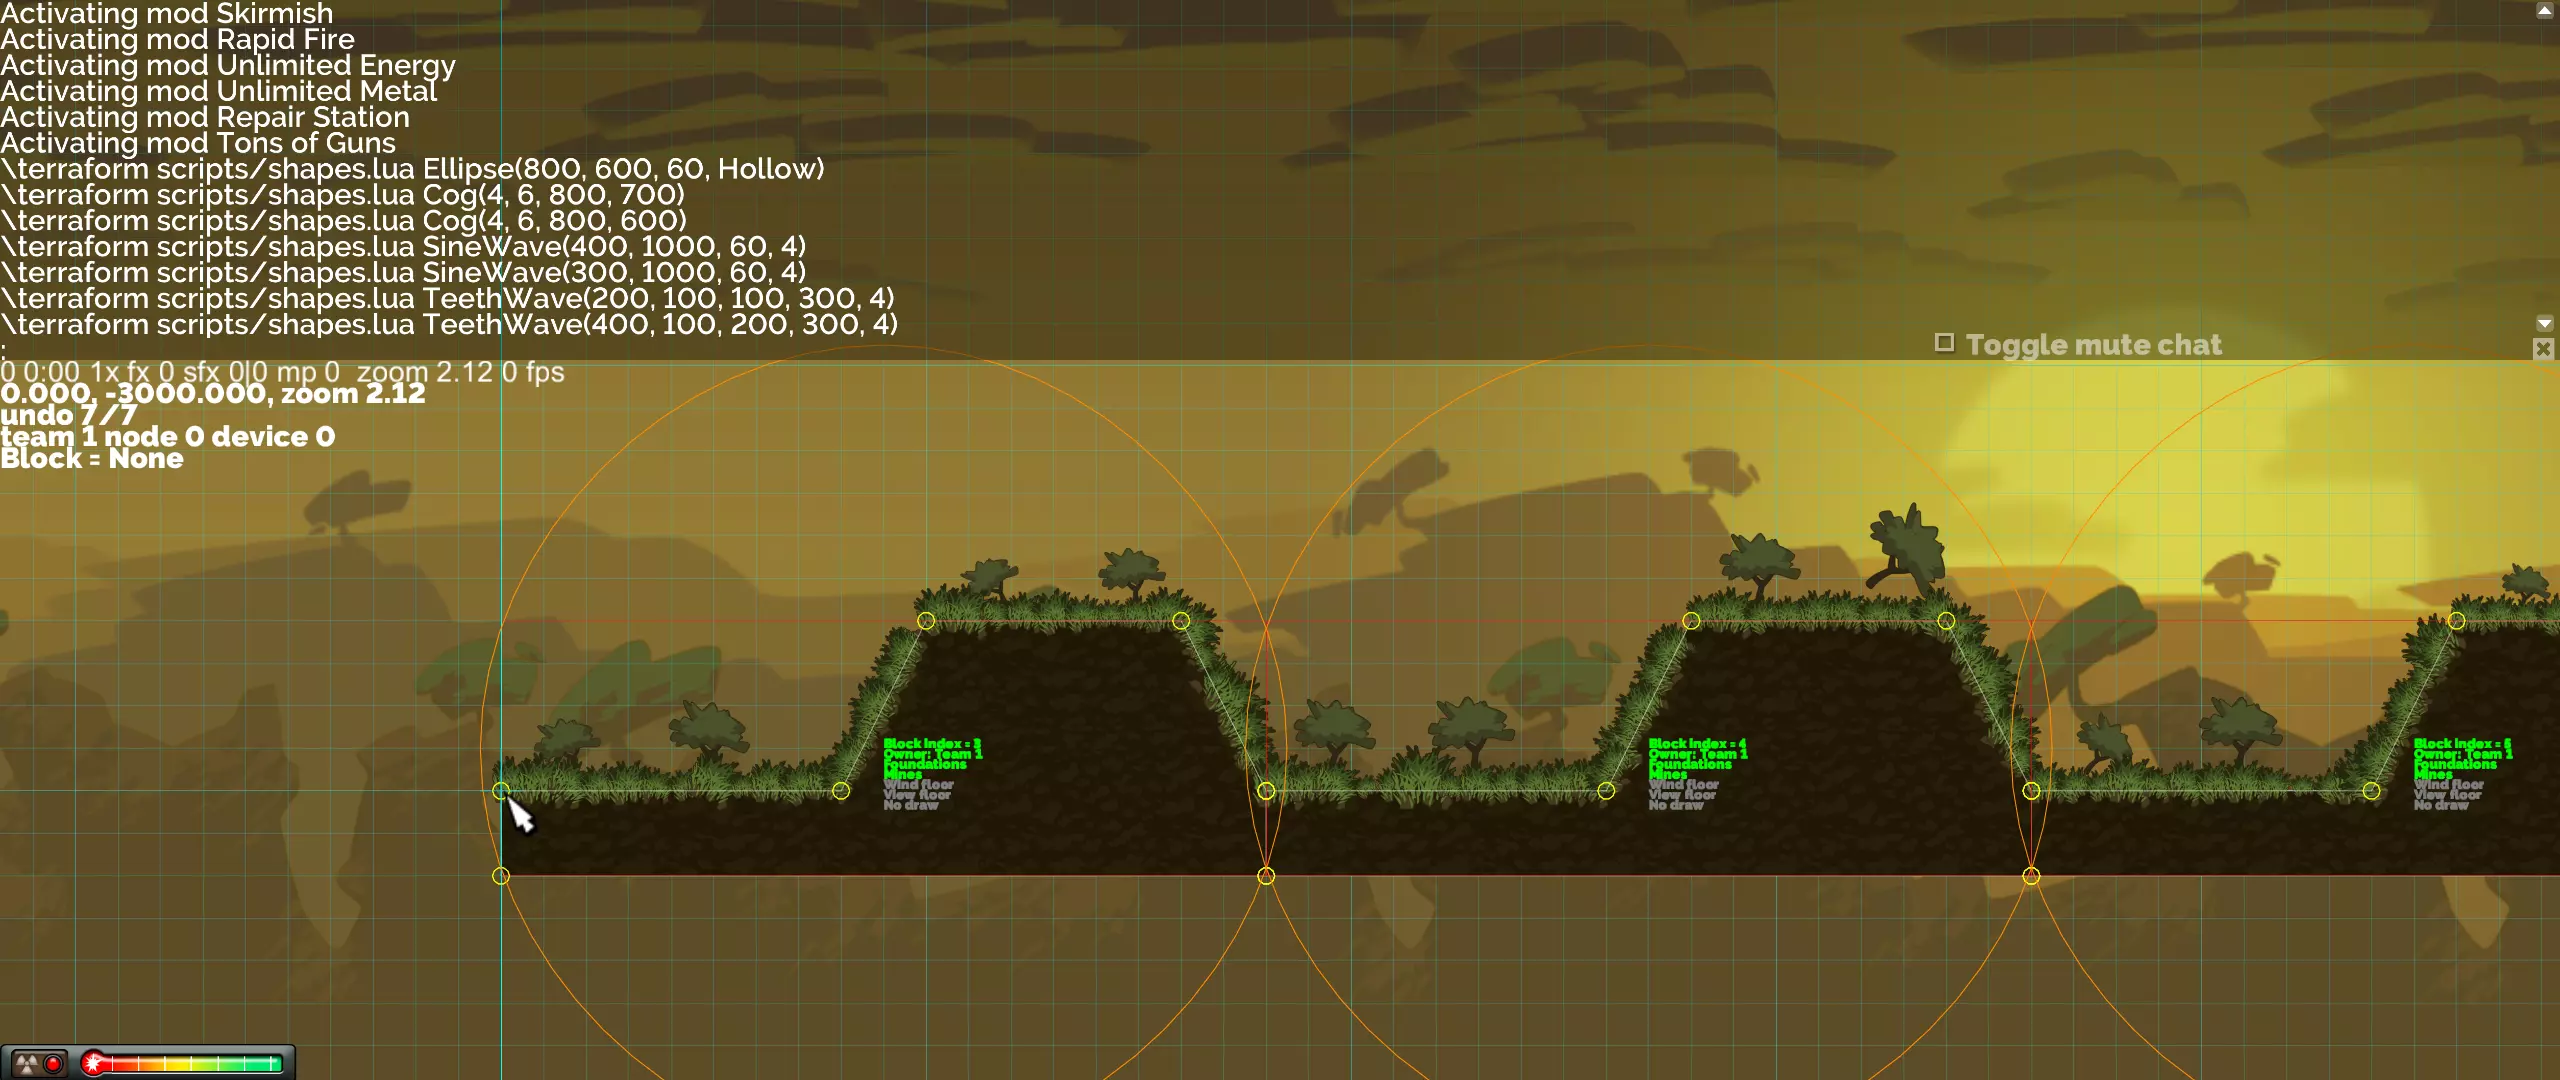
StepWave(步长,步高,层级,周期) 创建分段的渐进式阶梯波(台阶)。分段数量由周期参数设定。 TeethWave(平坦长度1,步长,步高,平坦长度2,周期) 创建分段的重复斜角齿图案。分段数量由周期参数设定。 地形脚本/shapes.lua TeethWave(400, 100, 200, 300, 4)
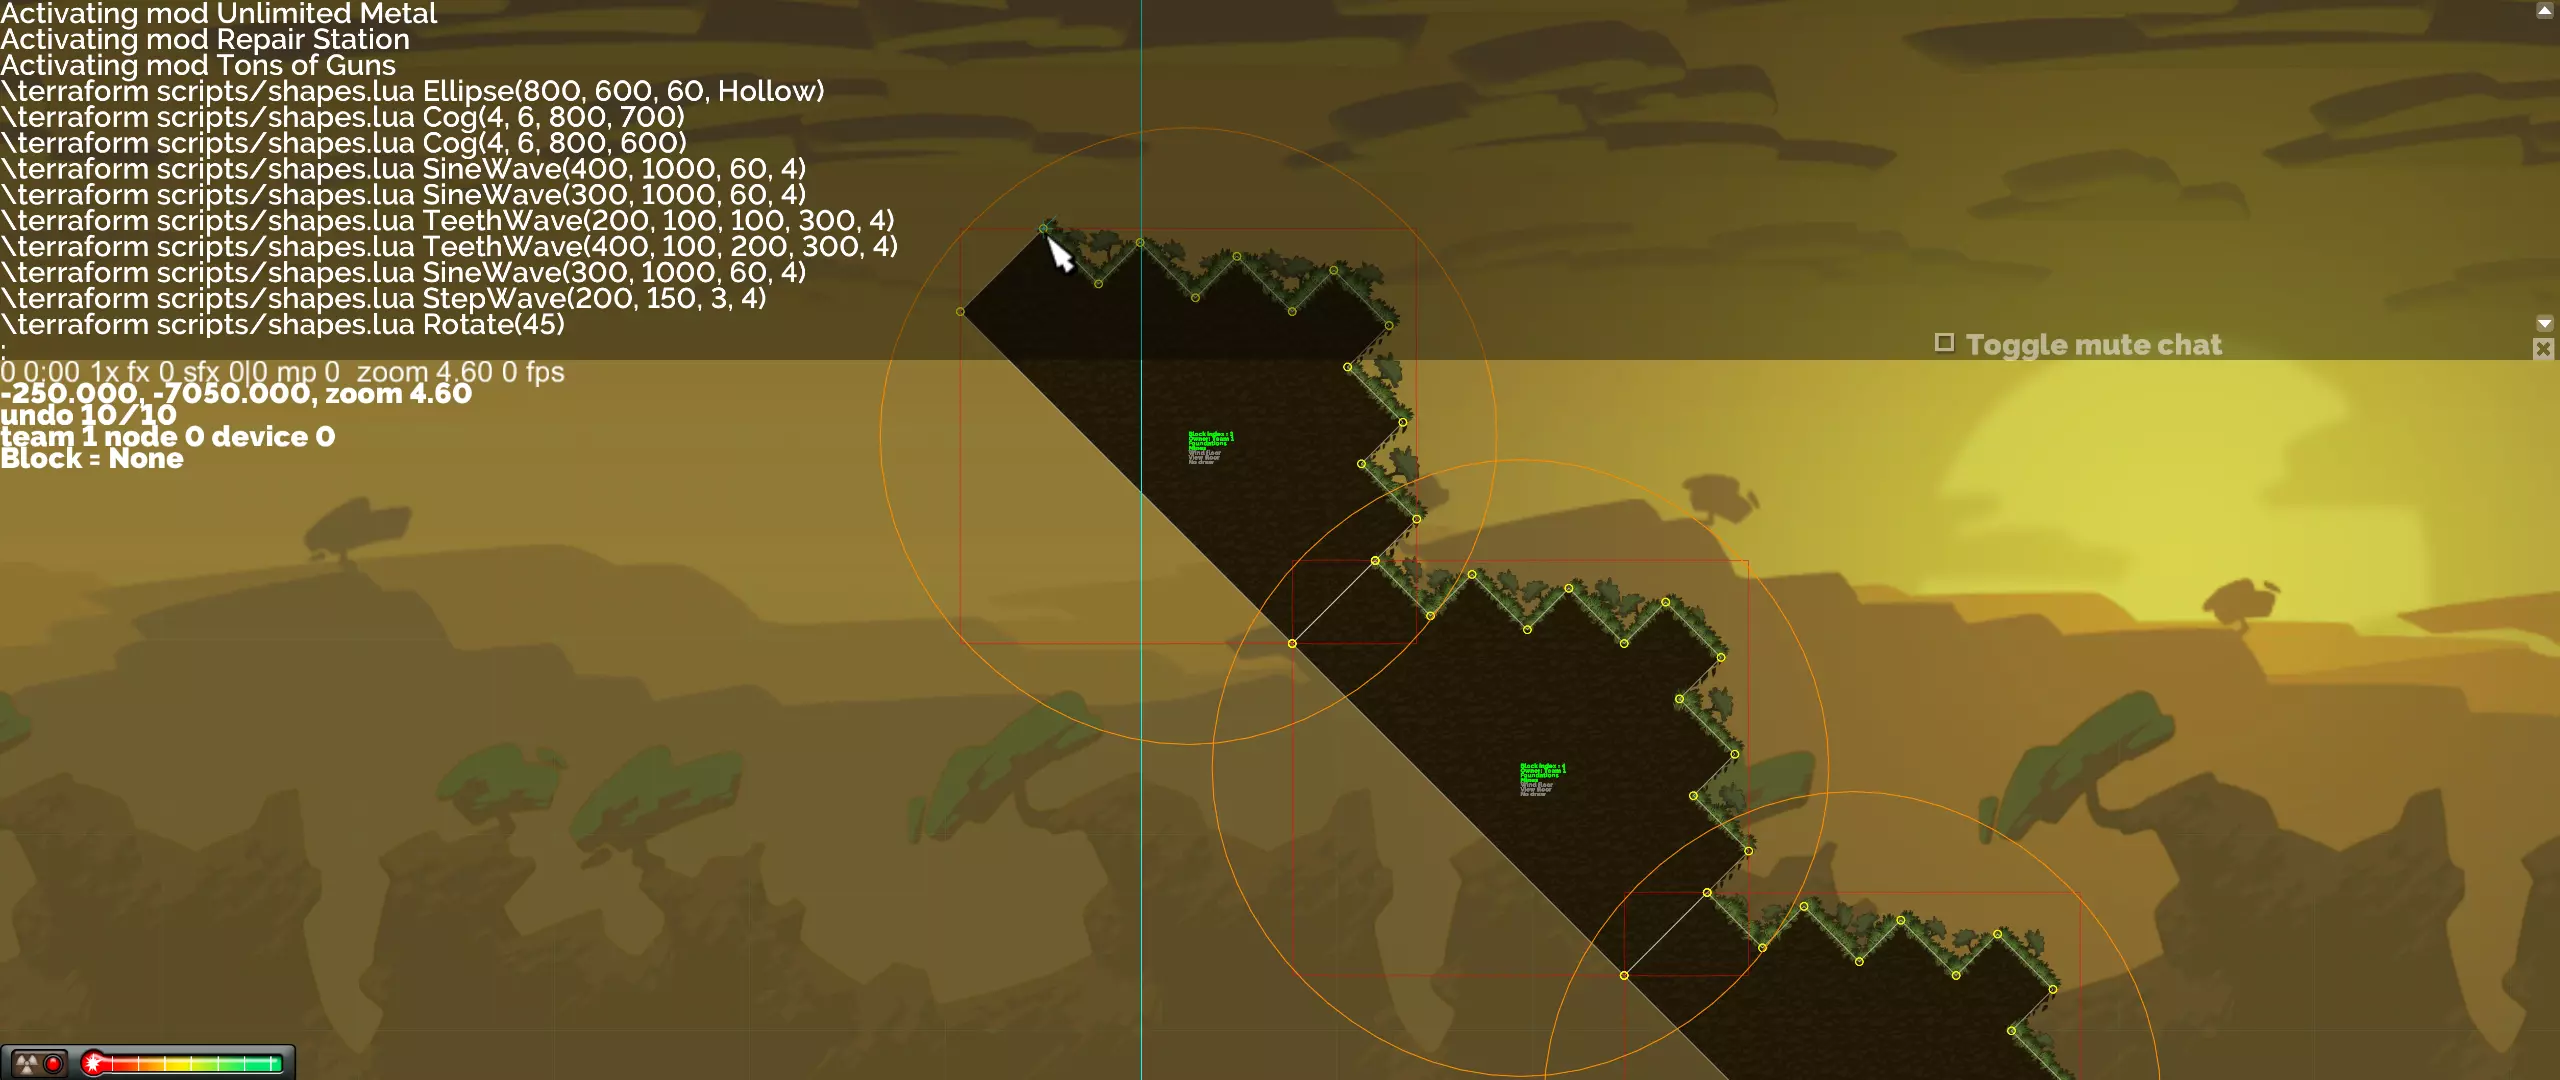
变换 旋转(角度度数) 将当前选中的方块围绕光标旋转指定角度度数。 地形生成脚本/shapes.lua 阶梯波(200,150,3,4) 地形生成脚本/shapes.lua 旋转(45)
Scale(x, y) Scale the current selection of blocks around the cursor by x horizontally, and y vertically. Translate(x, y) Translate the current selection of blocks by x units horizontally, and y units vertically. Prop Mode The prop mode is for placing detail in the world, such as metal ore deposits, trees, rocks, grass, and dinosaur bones. Texture selection is done by the HUD. These do not interact with anything during the game, but can be turned on and off by the mission script. PlacementLeft click in open space to create a new prop using the current texture. Left click on it again to select it. Once selected you can left click anywhere to move it. Left click selects other props, and right click deselects. Layer and Render OrderThere are three layers which control when props are rendered relative to background blocks, foreground blocks and structures. 1 = Background, 2 = Midground, 3 = Foreground. Within these layers the props can be ordered with the Ctrl+, (comma) and Ctrl+. (period) keys. Tile Mode (currently broken)To allow rapid placement of grass, rocks, etc. Use the T key to toggle tile mode. In this mode, you can click a sequence to create the props. You can snap to ground nodes to fix it to the surface. Right click will end the sequence. ManipulationRotate prop => Hold the R key and move the mouse cursor. Resize prop => Hold the Ctrl+X key and move the mouse cursor. Remove prop => The Delete key will delete the current prop. Structure and Device Modes Building structures, and devices (which includes weapons), is the same as in the normal game, with the following additions: Alt + 0 => Create for Team None (the neutral team) Alt + 1 => Create for Team 1 Alt + 2 => Create for Team 2 Ctrl + Space => Toggle the simulation Ctrl + Delete => Delete all structures Once a joint is selected you can perform operations on the structure connected to that node: Backspace => Delete selected structure H => Mirror selected structure horizontally Ctrl + C => Copy selected structure to clipboard Ctrl + V => Paste clipboard to mouse position M (hold) => Move selected structure to mouse position Changing the Environment You can change the environmental theme for a map after creation by using the following command in the console (for example): set_background alpine The available environments are currently: alpine canyon desert fields midwest Polluted TrainingGround You can use a Workshop environment mod in the same way. Just use the published Workshop id of the mod instead of one of the above built-in environments. For example: set_background 1308302446 Some props may be broken by this command, if a texture with the same name is not found in the new background. The Moonshot DLC added several new environments that are hidden within pack files. These can be set in the same way using the names below. Using them will make your map Moonshot dependent, showing a blue icon and requiring the player or host to own the DLC. dlc1_indo dlc1_japan dlc1_newzealand dlc1_oz dlc1_oznight The High Seas DLC includes a large number of ocean based environments. These are also in pack files, and can be set using the names below. Using them will make your map High Seas dependent, showing a dark blue icon with a yellow anchor, and requiring the player or host to own it. dlc2_oceans_battleskies dlc2_oceans_clear dlc2_oceans_hazy dlc2_oceans_hazystorm dlc2_oceans_island dlc2_oceans_islets dlc2_oceans_oilfields dlc2_oceans_ominousskies dlc2_oceans_rain dlc2_oceans_sepia dlc2_oceans_smokestack dlc2_oceans_storm dlc2_oceans_stormhorizon dlc2_oceans_sunbeam dlc2_oceans_sunset dlc2_oceans_sunsetorange dlc2_oceans_volcano Setting map details By default a map will show up in sandbox, skirmish and multiplayer. To show up in skirmish mode, however, you must record at least one AI fort for at least one side - see the section below. If you want to restrict the map to only certain modes, open the maps mission Lua script and edit the following flags to false as appropriate. Sandbox = true Skirmish = true Multiplayer = true You can also give the map a different display name using wide characters by setting the DisplayName value in the displayname.lua script as below. Beware that map names may not display correctly depending on the characters used and the language loaded. Ordinary alpha-numeric characters will always display correctly. DisplayName = L"Vanilla" If you want to give the map names for different languages, you can set the variable like below. Supported languages can be found in the data/mods folder with the language- prefix. DisplayName = { ['English'] = L"Vanilla", ['Chinese'] = L"香草", } An author and description can be be specified using the following variables. These will show up in the map selection screen. Author = L"[DEV] BeeMan" DescLine1 = L"A fast and frantic 3v3" DescLine2 = L"There are extra mines in a difficult position" Supporting Skirmish & Multiplayer Recording AI Forts The AI follows a pattern you record while building a fort. To record a new AI fort for a custom map, go to the main menu and select Sandbox. Select the map and start, then follow these steps: For Co-op (records a script to control all forts) Left click on a joint owned by the team you want to make the fort for Make sure nothing is selected by right clicking in space Drop the console by using the ~ (tilde) key, usually left of the 1 key, or F3 Type record and hit enter. This will start a new AI fort and assign it an unused number. Build your fort as you like, in a sensible order. Quit out of Sandbox For Team Death Match (records a script to control one fort) Follow the same instructions except have a joint of the fort you want to build for selected when you type record. Set up the FortGroups table in the map's mission script if there is more than one fort configuration. By putting identical forts in the same group they will randomly select their shared AI fort scripts. See Stalactites 4v4 for an example (below). The first parameter to TeamFort is the team, the second is the fort number shown at the top left of each fort in the map editor. FortGroups = { { TeamFort(1, 1), -- low forts team 1 TeamFort(1, 2), TeamFort(2, 1), -- low forts team 2 TeamFort(2, 2), }, { TeamFort(1, 3), -- high forts team 1 TeamFort(1, 4), TeamFort(2, 3), -- high forts team 2 TeamFort(2, 4), }, } You can test it by going to Skirmish and putting the player on the other side. Better yet, restart Sandbox, select a joint of the same fort, and enter build_fort [name] into the console, where [name] is the number or name assigned to the fort on record. Typically build_fort 1, if it's the first fort, for example. Here are some tips for making good AI forts: Build as if you are playing a battle Defend the reactor against AP snipers immediately if necessary Be more defensive than usual (sniper and mg nests early) Try to keep the structure stable at all times Avoid making anything that falls off Put cross braces in low and early There is no time pressure, so don't rush, but... Remember to build enough resource generation Use Ctrl + KeyPadPlus, Ctrl + KeyPadMinus to speed up/slow down time Supporting Both the Classic Game and Tons of Guns Tons of Guns is implemented as a mod to the classic game, called weapon_pack. Because of the many differences, we have made the AI fort scripts work only for the mode they were recorded in (classic or Tons of Guns). If you want the AI to work in both the classic game, and with the Tons of Guns mod enabled, you'll need to record fort scripts with weapon_pack on and off. You can do this by setting or clearing the Tons of Guns mod when entering Sandbox. The game will write RequiredMods = { "weapon_pack" }; into the AI fort script to indicate that it only works when Tons of Guns is enabled. Map and AI Fort Refinement Once you have recorded an AI fort, deleting any joints or devices referenced by that fort will cause problems for it. Additions are usually fine, except that new devices can obstruct the AI during play. If you want to change part of the AI fort after recording you can run it in Sandbox mode by selecting the appropriate team and using build_fort [name]. [name] is the alphanumeric string given to the recording. This can just be an auto-assigned number (e.g. 1). When you get to the point you want to intervene, use the record command again and start building where the AI left off. Quit the Sandbox to save the changes. Ctrl+KeyPadPlus/Minus can be used to speed up and slow down time. Renaming and Deleting AI Forts When you use the record command a Lua file will be created or overwritten in the map's folder. If you make a mistake you can delete the files you created, or rename the suffix (the last part of the filename). Using record with the same name (suffix) will overwite the old file. As an example, if I use record in Sandbox with a fort selected, a file such as this will appear when I quit: fort-t1f1-Ledge Grab-1.lua The second part tells the game which team it was recorded for, and which specific fort, the third part is the mission name, and the suffix is the script name. This last part can be renamed to something that means something to you, perhaps a description of which weapons it uses: fort-t1f1-Ledge Grab-2Cannon1Laser.lua Symmetrical Maps If your map and structures are pretty much symmetrical, you can make your AI forts mirror automatically. You need to navigate to the data/maps folder and edit the mission lua file in the map's directory. For example maps/data/Vanilla/Vanilla.lua. add the following line: Symmetrical = true If you now save the map and it's not symmetrical it will tell you if it's not, and what's causing the problem. You can also use check_symmetric in the console to do the same without saving. It will list up to 10 differences and highlight all suspect positions briefly. To make sure ground devices and weapons are symmetrical you can create them all for one side, then select each one and press Ctrl+M to create a mirror for the other side. Importing Standard Forts and AI fort scripts Making a variety of AI fort scripts for your unique starting forts can be quite a lot of work. If you do not need or want to design your own, you can use the ones we included with the game. This will give your forts one or more AI patterns in both the classic game, and Tons of Guns. When we add new fort scripts, they'll automatically be used by your map. This is the process: Use the import console command to copy in the prefabricated forts that you want Set the pasted ground texture to make it conform, if necessary Arrange the map as usual, copying, moving, mirroring, and changing the team of the imported forts as appropriate. Do not edit the imported forts! Group the identical forts using the FortGroups table in the mission script (see above) In each sub-table of the FortGroup table, add the relative paths to the shared AI fort scripts that you want to use The available forts that can be imported are the subfolders found in the ai/forts folder. Each folder has a preview image of fort's design. For example import ai/forts/vanilla will paste the common standing fort used in Vanilla 4v4 and many others, plus the surrounding ground. Try not to add ground close to the fort, as this may block the AI as it's building. An example FortGroup table can be seen below. This is from the Meat Shield 3v3 Workshop map where there are three different standard forts imported in a symmetrical map. You'll notice the path added includes a subdirectory of the fort with a category based on range. There are mid and long categories. This is so, for example, in a long range map you don't have the AI building mortars that can't reach. In mid range maps you can typically add both the mid and long categories, since the weapons in the long forts are still useful at midrange. FortGroups = { { TeamFort(1, 1), -- ledge forts team 1 TeamFort(2, 1), -- ledge forts team 2 "ai/forts/ledge/long", }, { TeamFort(1, 2), -- hanging forts team 1 TeamFort(2, 2), -- hanging forts team 2 "ai/forts/hanging/long", }, { TeamFort(1, 3), -- vanilla forts team 1 TeamFort(2, 3), -- vanilla forts team 2 "ai/forts/vanilla/long", }, } Fort Order in Team Death Match When there are more forts than players in team death match the surplus forts will be deleted. You can determine which by setting up a FortOrder table in the mission script. This basically tells the game which forts to put players and AI into first. FortOrder = { { 1, 4, 3, 2 }, -- team 1 fort order { 1, 4, 3, 2 }, -- team 2 fort order } Standard Ships for High Seas If you would like to use the ships we have built for the High Seas campaign and skirmish maps, you can use the import console command. For example: import mods/dlc2/ai/forts/Battleship The following paths are accepted: mods/dlc2/ai/forts/Battleship mods/dlc2/ai/forts/Carrier mods/dlc2/ai/forts/DefenceTug mods/dlc2/ai/forts/Dreadnought mods/dlc2/ai/forts/FortMid mods/dlc2/ai/forts/FortShafts mods/dlc2/ai/forts/Gunboat mods/dlc2/ai/forts/MissileShipYou are also able to apply the AI scripts we have made for these, using the following paths within the appropriate FortGroups table. mods/dlc2/ai/forts/Battleship/long/easy/fort-t1f5-dlc2Template-Battleship-easy.lua mods/dlc2/ai/forts/Battleship/long/fort-t1f5-dlc2Template-Battleship.lua mods/dlc2/ai/forts/Battleship/long/fort-t1f5-dlc2Template-Battleship2.lua mods/dlc2/ai/forts/Battleship/long/fort-t1f5-dlc2Template-Battleship3.lua mods/dlc2/ai/forts/Battleship/runway/fort-t1f1-dlc2 Skirmish 16-1.lua mods/dlc2/ai/forts/Carrier/long/easy/fort-t1f4-dlc2Template-Carrier-easy.lua mods/dlc2/ai/forts/Carrier/long/fort-t1f4-dlc2Template-Carrier.lua mods/dlc2/ai/forts/DefenceTug/long/easy/fort-t1f4-DefenceTug-Easy.lua mods/dlc2/ai/forts/DefenceTug/long/hard/fort-t1f4-DefenceTug-Hard.lua mods/dlc2/ai/forts/DefenceTug/long/normal/fort-t1f4-DefenceTug-Normal.lua mods/dlc2/ai/forts/DefenceTug/mid/fort-t1f2-dlc2Template-DefenceTug.lua mods/dlc2/ai/forts/Dreadnought/long/easy/fort-t1f6-dlc2Template-Dreadnought-easy.lua mods/dlc2/ai/forts/Dreadnought/long/fort-t1f6-dlc2Template-Dreadnought.lua mods/dlc2/ai/forts/FortMid/long/easy/fort-t1f4-dlc2 Skirmish 14-Munitions-easy.lua mods/dlc2/ai/forts/FortMid/long/fort-t1f4-dlc2 Skirmish 14-Factory.lua mods/dlc2/ai/forts/FortMid/long/fort-t1f4-dlc2 Skirmish 14-Munitions.lua mods/dlc2/ai/forts/FortMid/low/easy/fort-t1f2-dlc2Template-firebeam-easy.lua mods/dlc2/ai/forts/FortMid/low/fort-t1f1-dlc2Template-cannon.lua mods/dlc2/ai/forts/FortMid/low/fort-t1f1-dlc2Template-cannon20mm.lua mods/dlc2/ai/forts/FortMid/low/fort-t1f2-dlc2Template-firebeam.lua mods/dlc2/ai/forts/FortShafts/long/easy/fort-t1f1-dlc2 Skirmish 12-DG-easy.lua mods/dlc2/ai/forts/FortShafts/long/fort-t1f1-dlc2 Skirmish 12-DG.lua mods/dlc2/ai/forts/FortShafts/long/fort-t1f1-dlc2 Skirmish 12-OL.lua mods/dlc2/ai/forts/Gunboat/long/easy/fort-t1f3-dlc2Template-Gunboat-easy.lua mods/dlc2/ai/forts/Gunboat/long/fort-t1f3-dlc2Template-Gunboat.lua mods/dlc2/ai/forts/Gunboat/long/fort-t1f4-dlc2Template-20mm.lua mods/dlc2/ai/forts/Gunboat/long/fort-t1f4-dlc2Template-Cannon.lua mods/dlc2/ai/forts/Gunboat/long/fort-t1f4-dlc2Template-Deckgun.lua mods/dlc2/ai/forts/MissileShip/mid/fort-t1f1-dlc2Template-1.lua These AI scripts can now be randomly selected within a difficulty folder, like this: FortGroups = { { TeamFort(1, 1), TeamFort(2, 1), { "mods/dlc2/ai/forts/DefenceTug/long/easy", "mods/dlc2/ai/forts/DefenceTug/long/normal", "mods/dlc2/ai/forts/DefenceTug/long/hard", }, }, }
2026-02-13 16:00:20 发布在  Forts
Forts

说点好听的...
收藏
0
0