


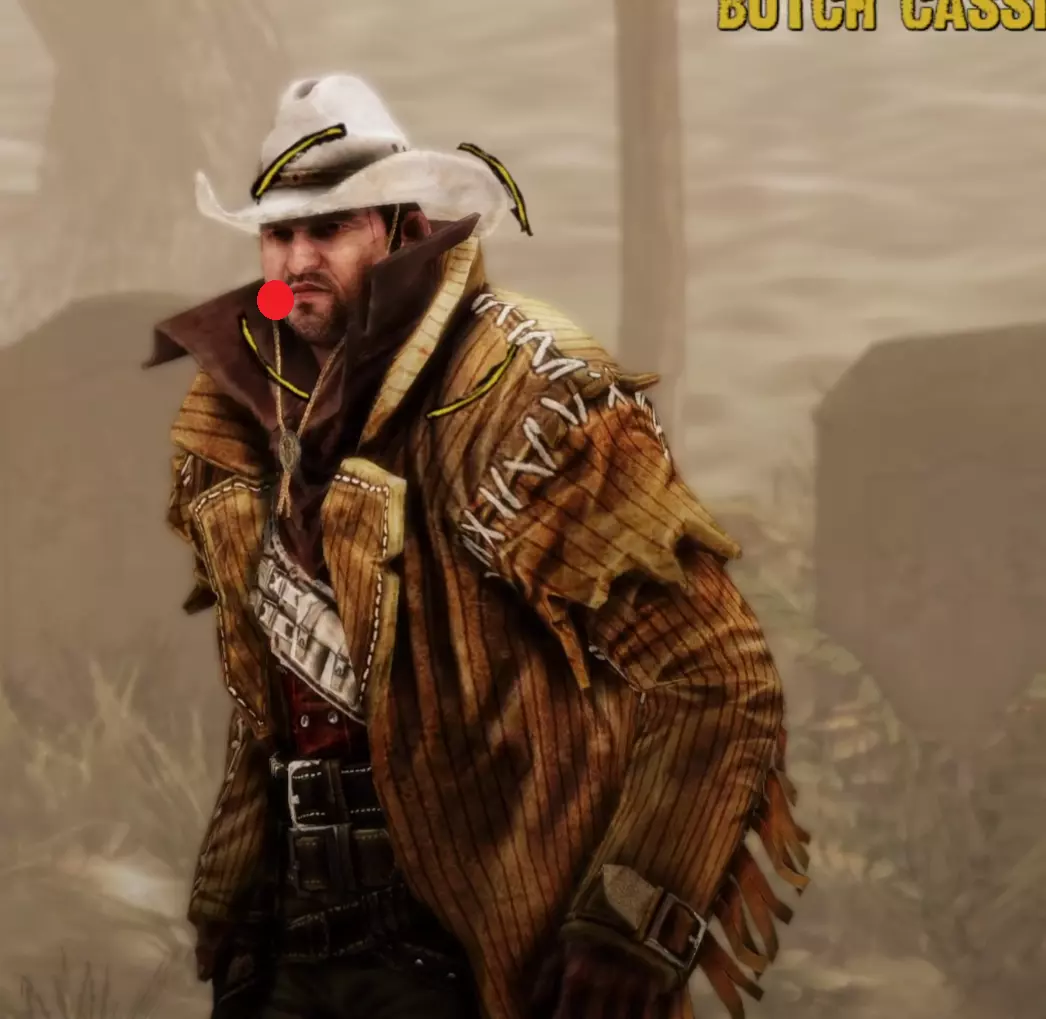
高阶决斗
决斗高级技巧指南:如何获取尽可能高的分数 对手 此游戏模式共有15场决斗。我通常将它们分为3组。
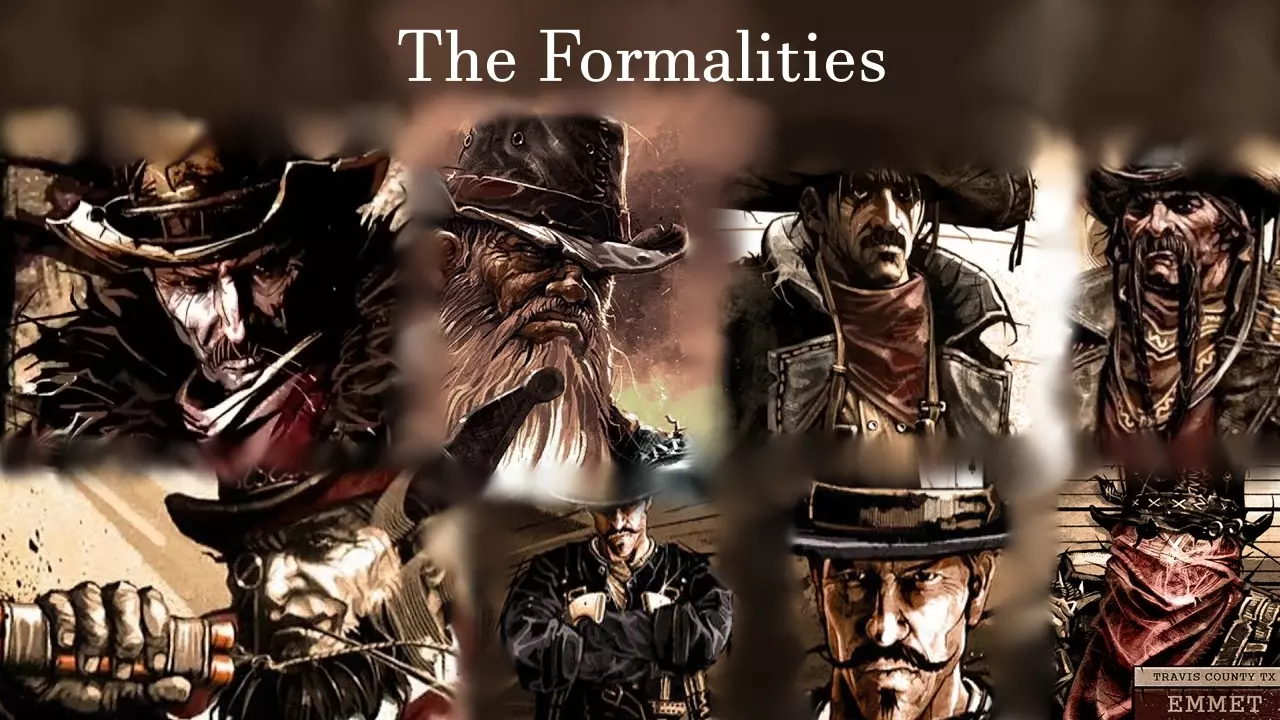
这些流程包括在与鲍勃和格拉特·多尔顿对决前的每一场决斗,因为它们都非常相似且基础。除了一些细微差别外,这些决斗给人的感觉几乎都一样。 老克兰顿: 他有两种移动模式,因此往往会让新手感到棘手。 亨利·普卢默: 他只是站着不动,快速拔枪。通常应对起来不算太难,但这就是他的特点。
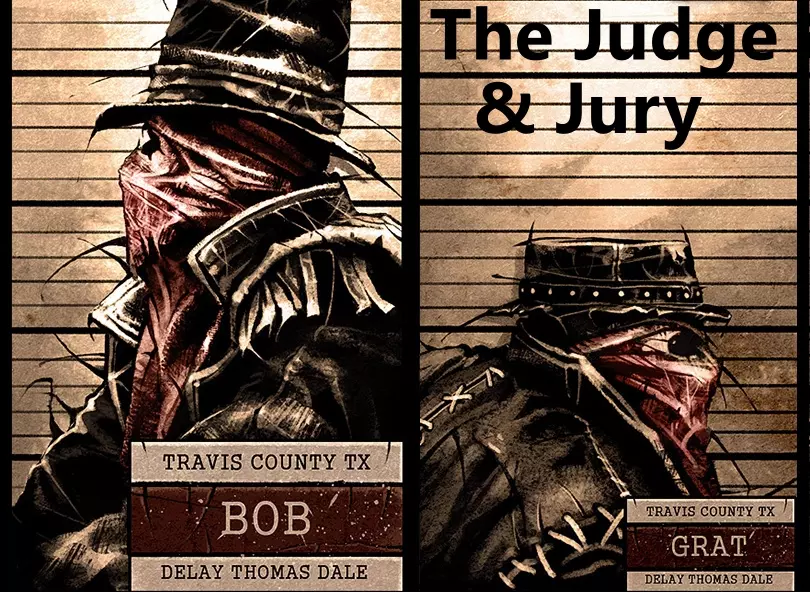
鲍勃与格拉特的对决是高水平对决流程中最关键的一场。这场对决可能会让你增减数百分。到了某个阶段后,你的个人最佳成绩(PB)将完全取决于这场对决。只有当鲍勃与格拉特被击败后,整个流程才算真正顺利进行。我目前在鲍勃与格拉特对决中的最佳得分是-85。
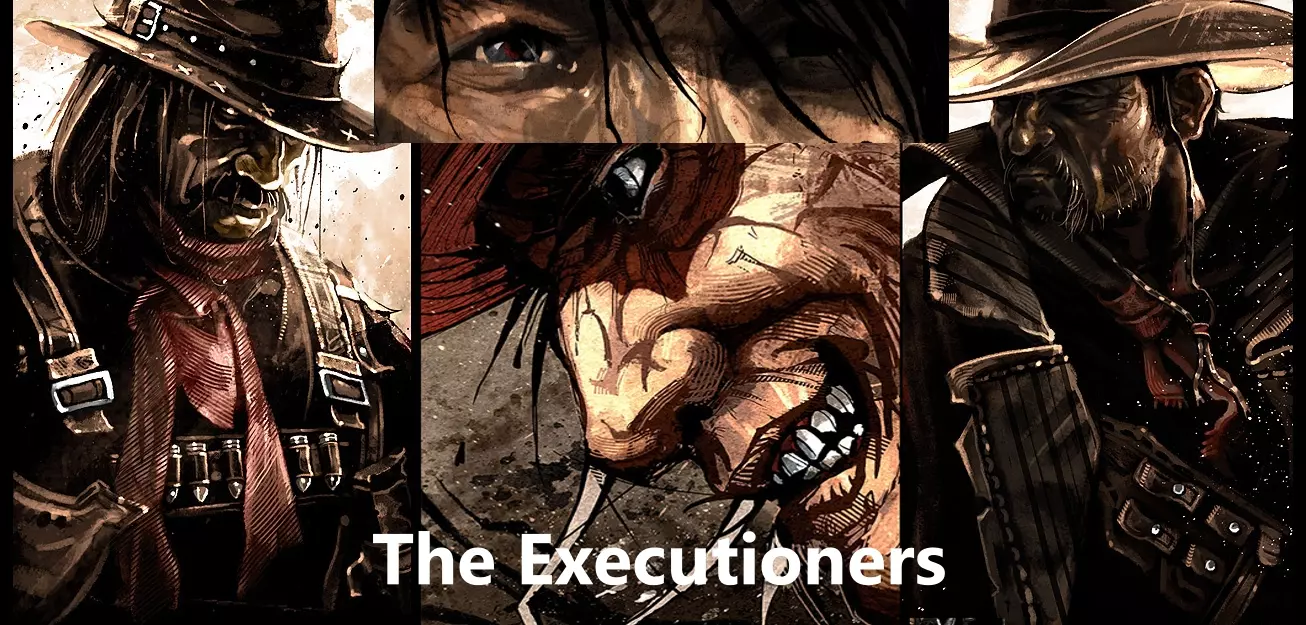
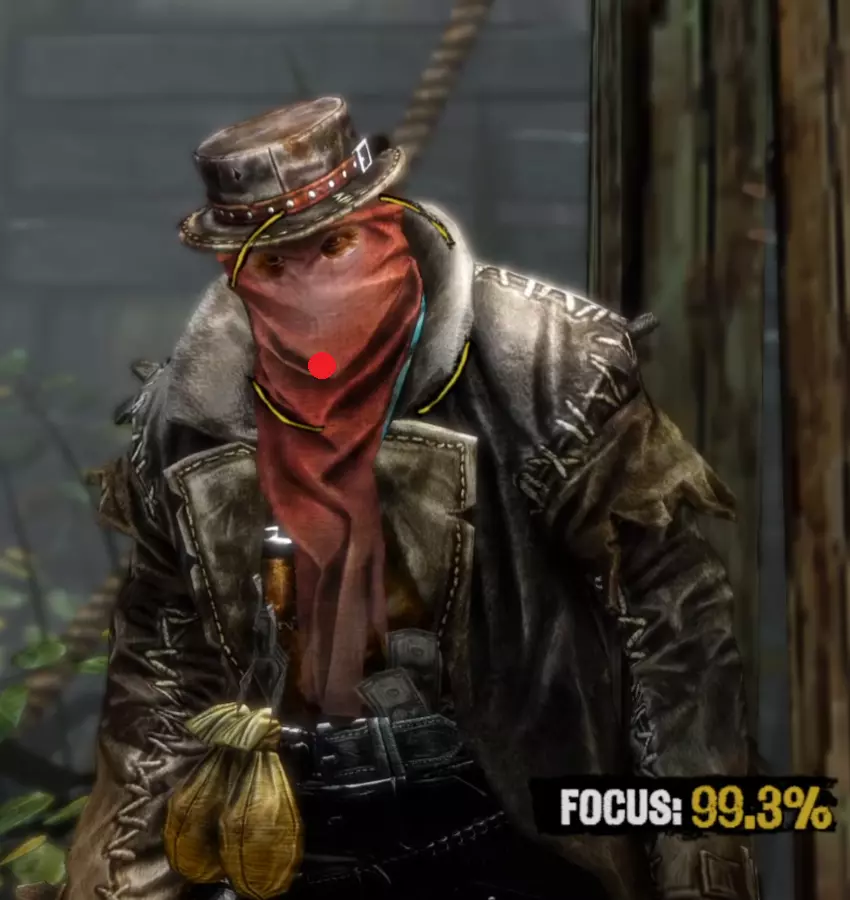
行刑者阶段包含鲍勃与格拉特之后的所有对决。 说真的,扁鼻子和吉姆·里德的对决就像是走个过场。而杰西和比利则很容易打乱玩家的节奏并导致失败。这两人的难度会有明显提升,需要玩家格外留意,尤其是比利。经过练习后,桑德斯和布奇通常会变得非常简单。有时他们会长时间对视,让你难以积攒专注力,不过这几乎就是他们最大的威胁了。他们通常需要很长时间才会拔枪,所以你有充足的时间准备,只要保持冷静,得分就不会有问题。 专注力 对决模式: 专注力是获得高分的关键要素。要获得专注效果,你需要将准星圆圈调整为黄色并对准对手身体或头部的中心,然后快速左右晃动鼠标,就像在对手身上画图案一样。我们称之为“决斗模式”。
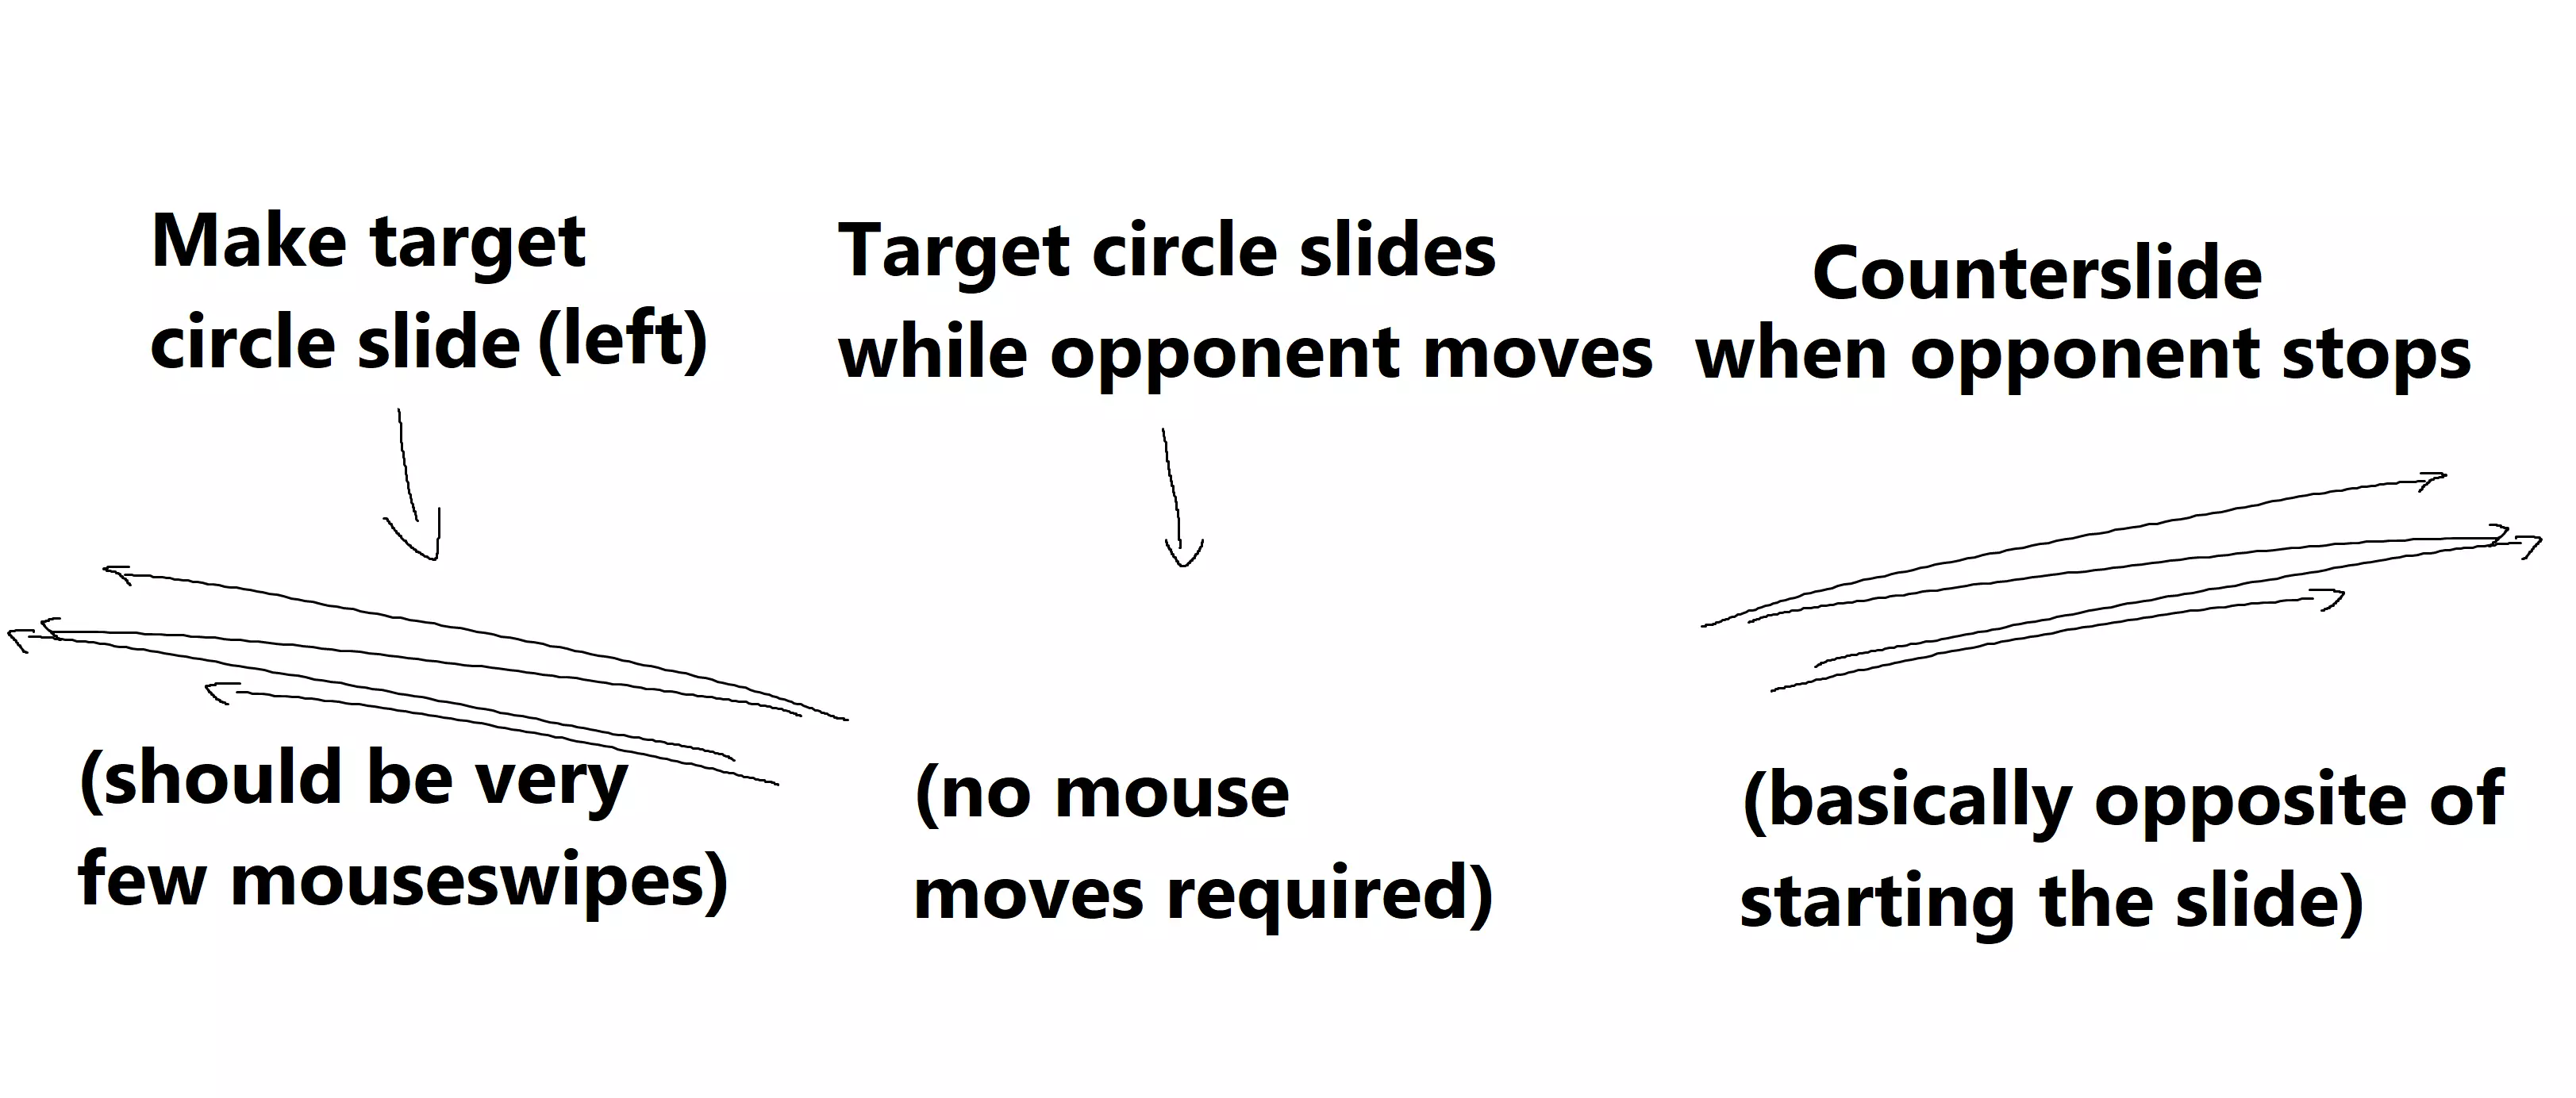
滑动与反滑动: 当对手移动时,你必须迫使目标圈随其滑动,并继续以较低强度对其执行对决模式,这样你仍能获得专注值,但目标圈不会停止滑动。当对手停止移动时,你必须从相反方向开始加快对决模式的强度,以使其停止并继续获得专注值。以下是你应如何进行滑动和反滑动的示例,这是在较弱对决模式基础上的额外操作。理想情况下,你无需停止对决模式来进行滑动,只需减慢其速度即可。
这是我在《帕特·加勒特》中达到100%专注度的视频,可作为鼠标移动方式的示例。
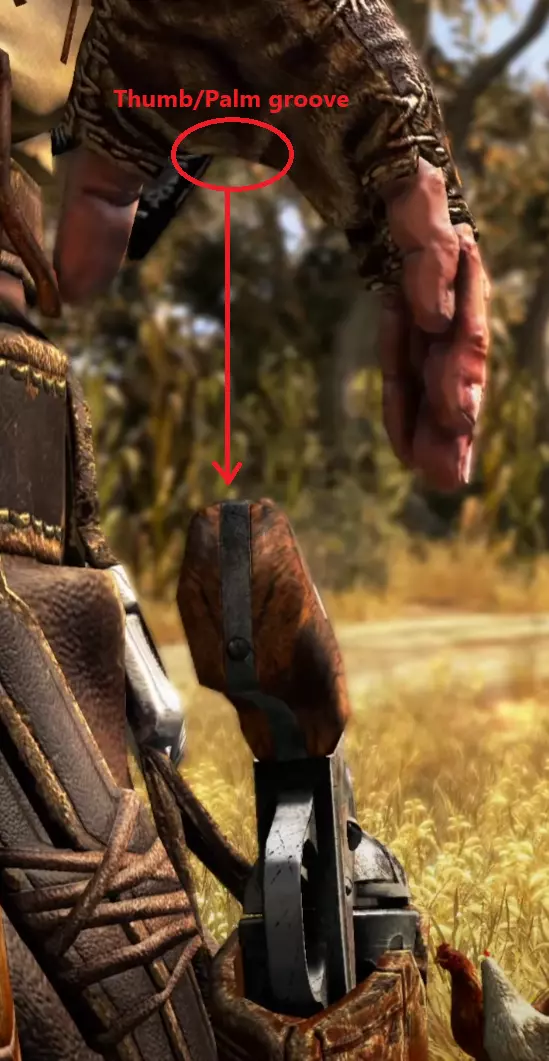
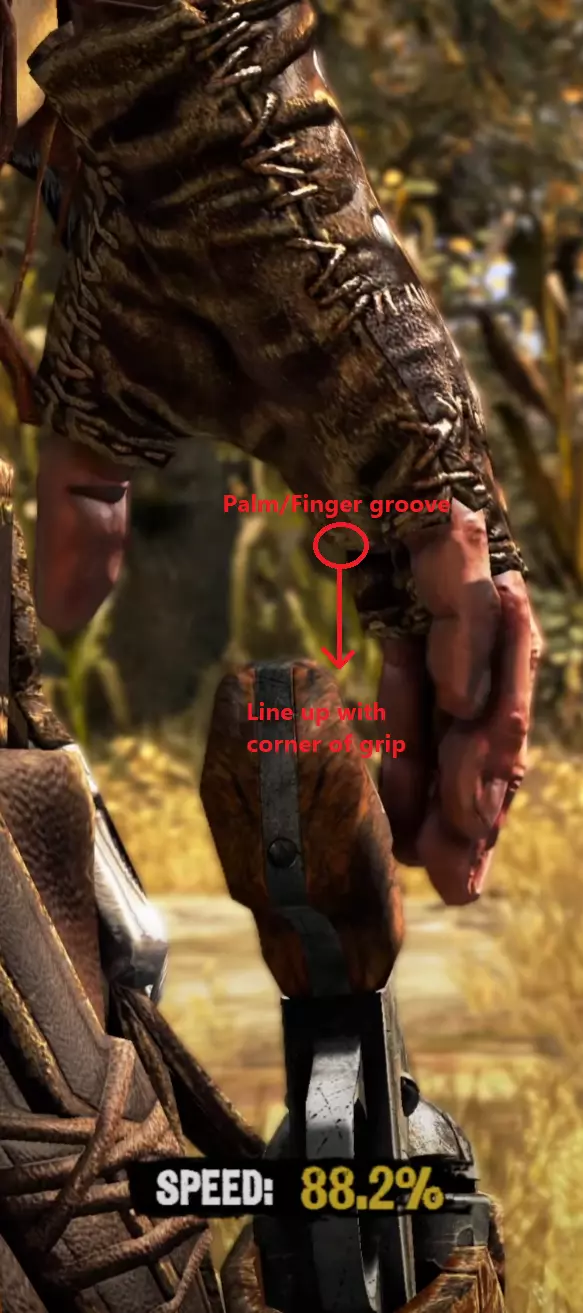
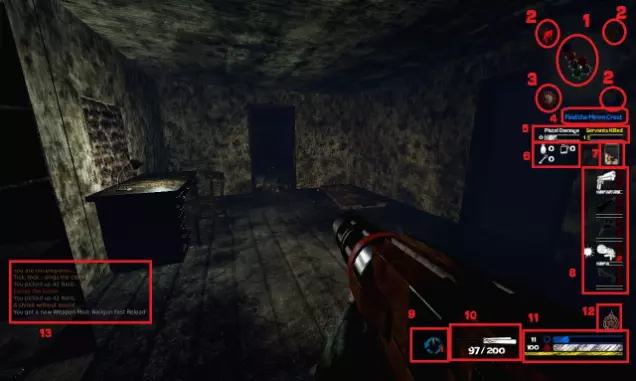
速度 速度虽然不如专注力重要,但对于获得高于1/12的评分仍然至关重要。速度是两者中更容易掌控的一项。你应该始终能看到赛拉斯(Silas)食指和中指的指尖,但不要太靠左。你要尽可能让赛拉斯食指和中指的内侧贴近枪支,同时又不降低速度。我发现,通常你只需将赛拉斯拇指和其他手指之间的凹槽直接对准枪支握把上方,然后以特定节奏点击A键,通常就能达到100%的速度或接近这个数值。我还注意到,在决斗后期,利用赛拉斯手指和手掌其余部分之间的凹槽与握把角落对齐会很有帮助。经过足够的练习,决斗中的这一要素几乎可以完全置于你的余光之中。 早期决斗姿势:
后期决斗位置:
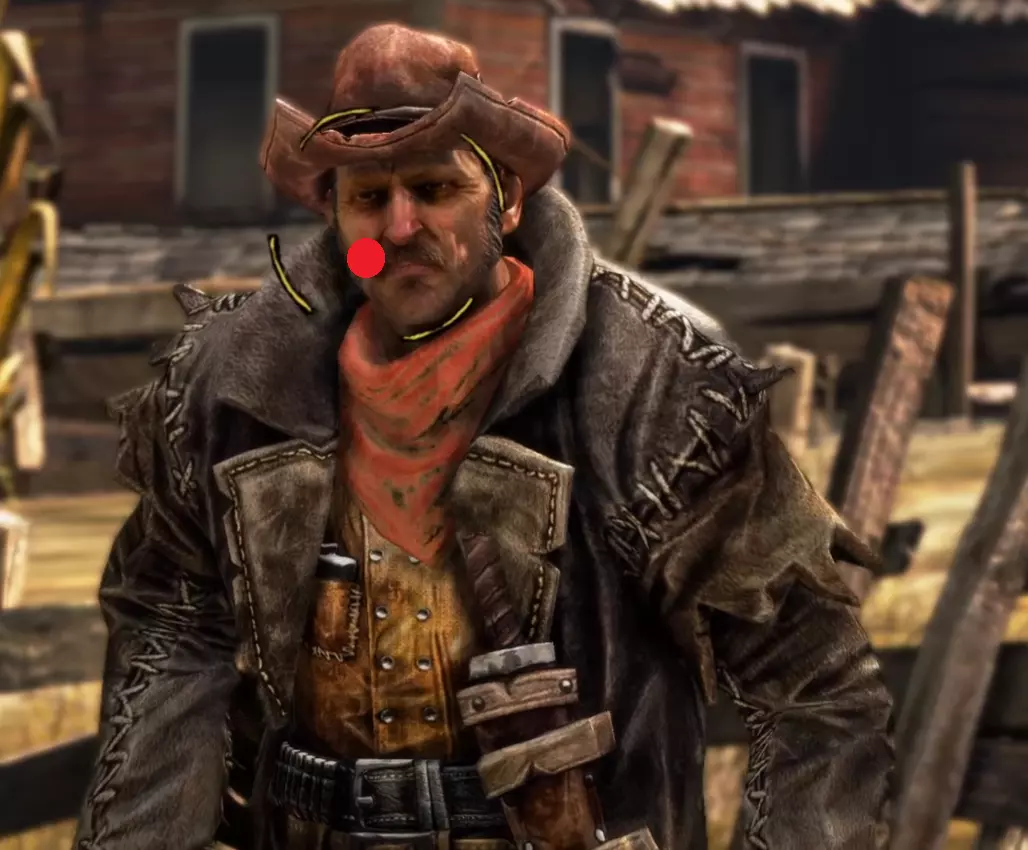
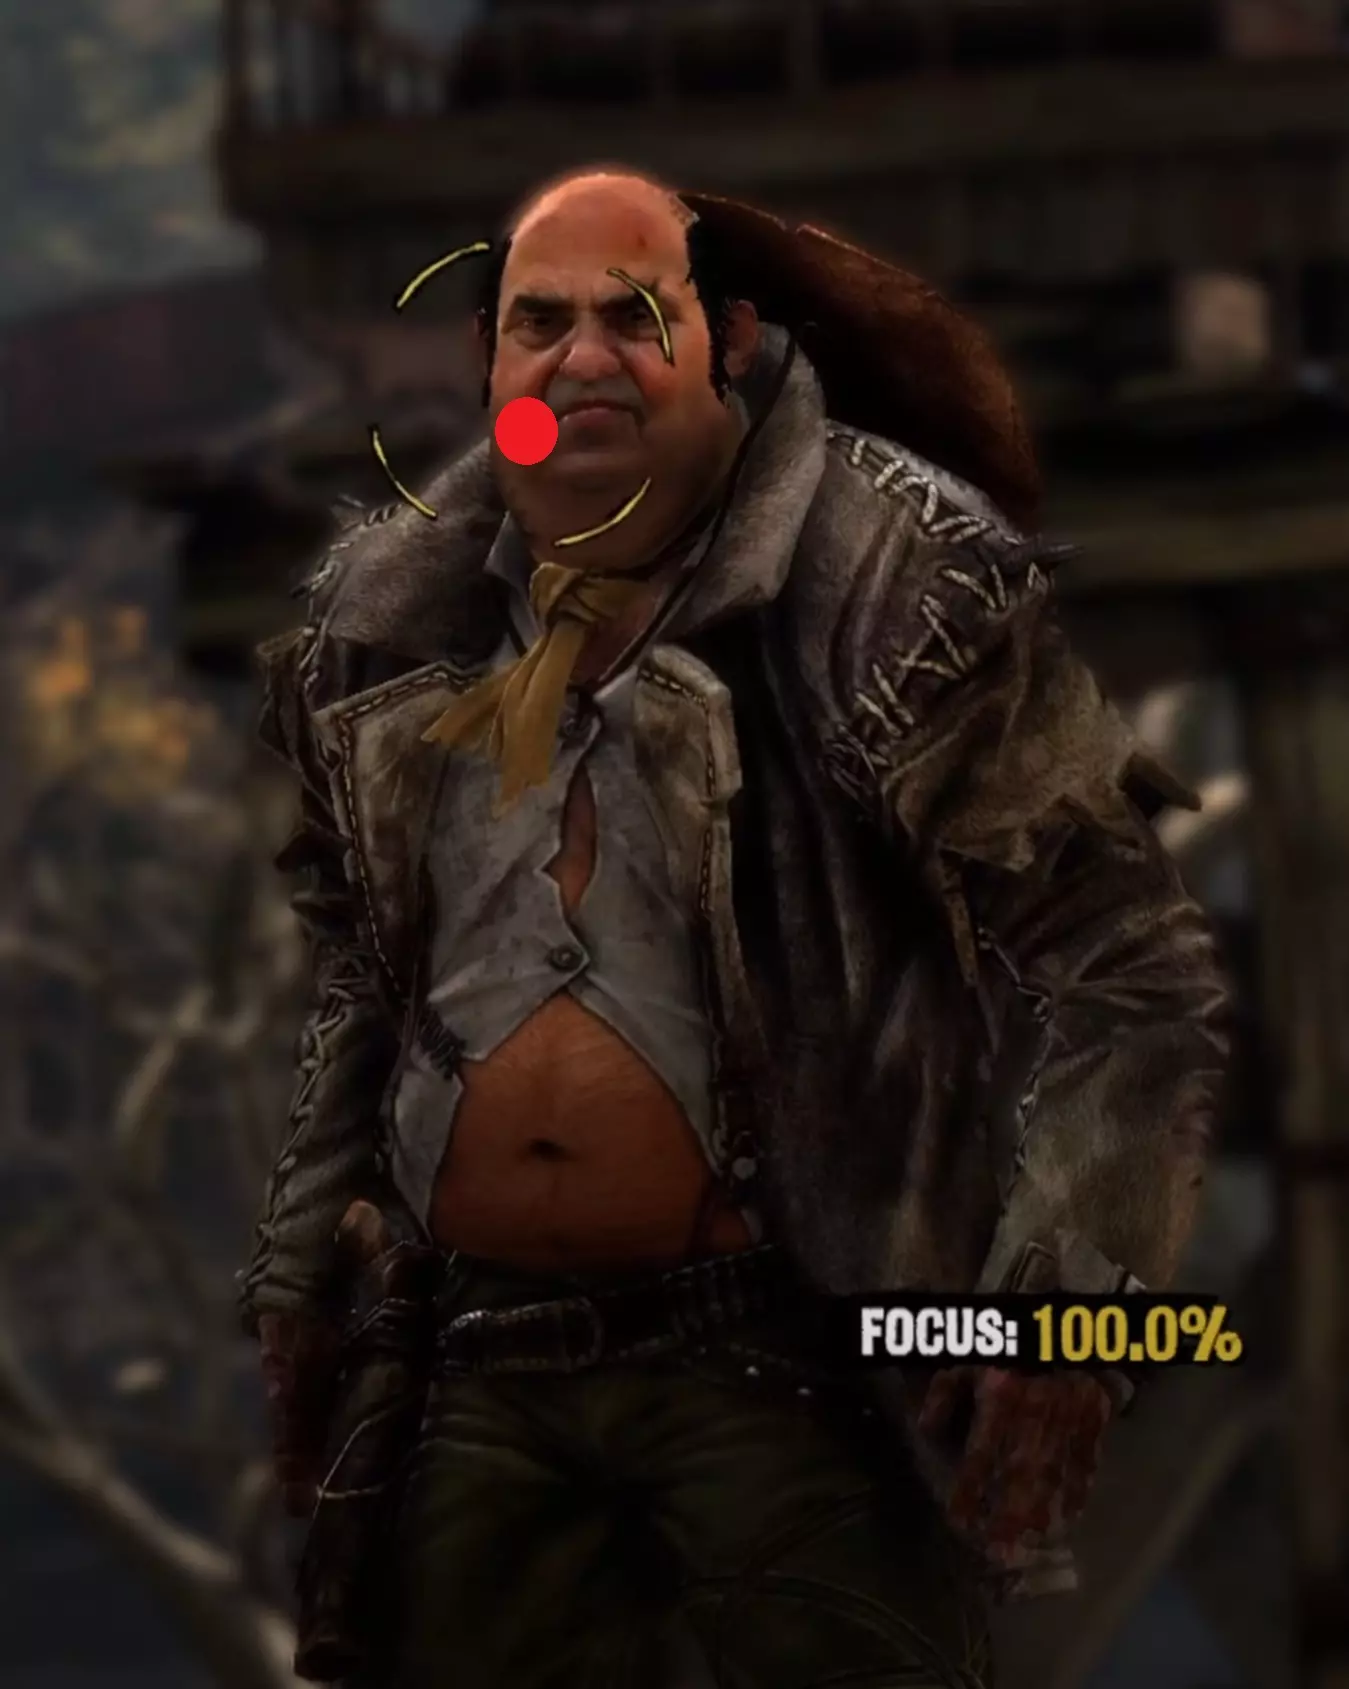
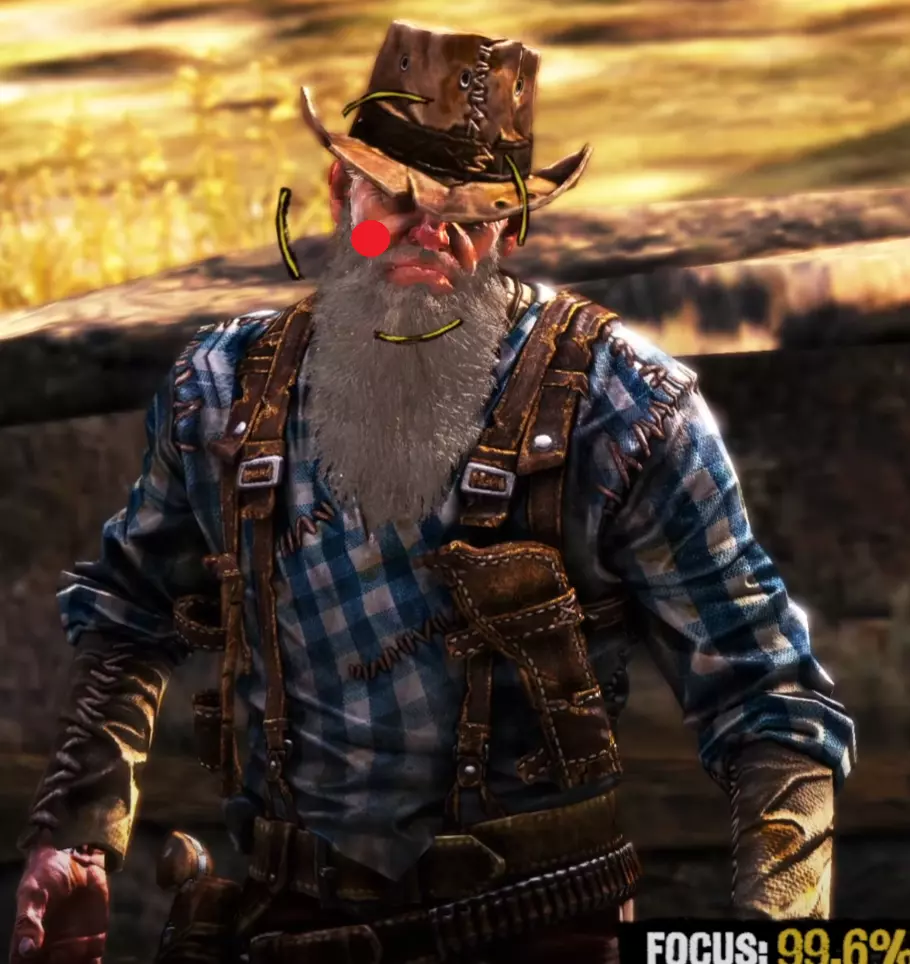
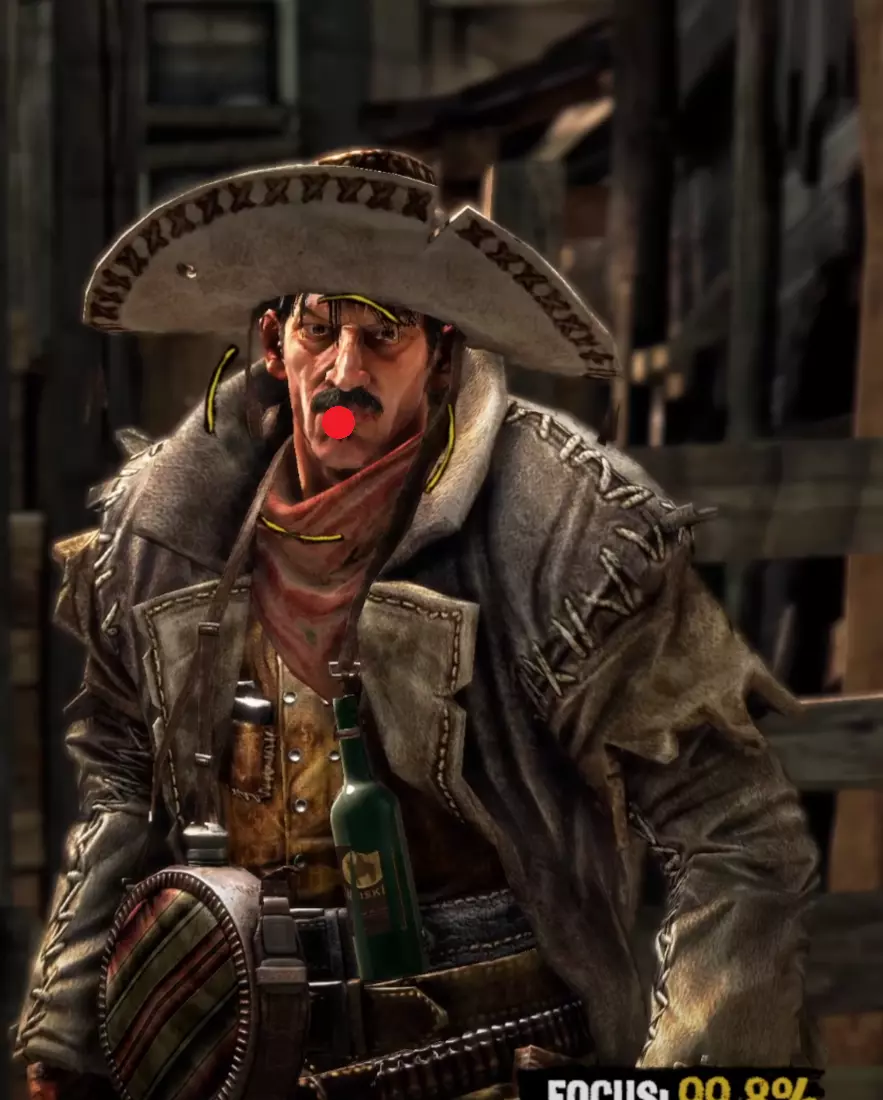
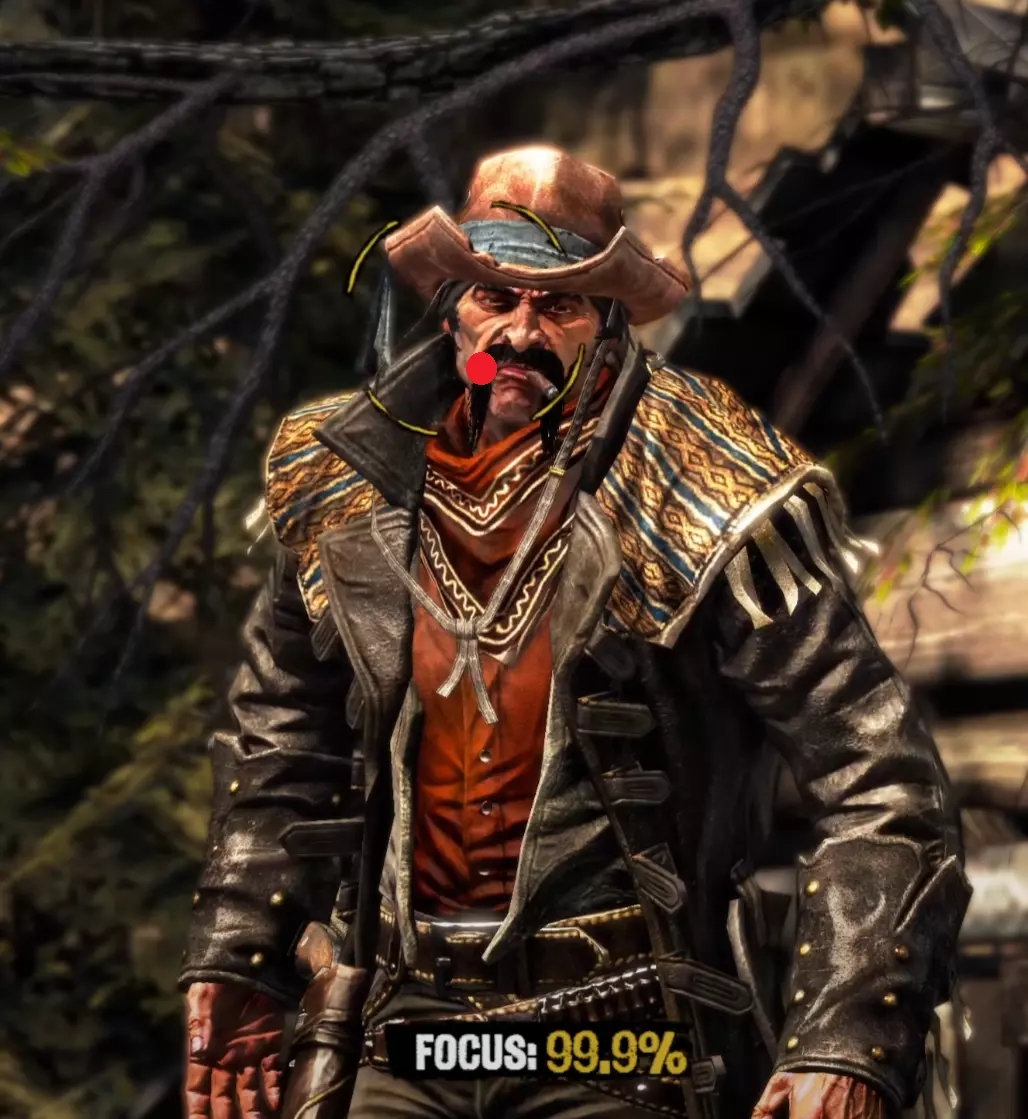
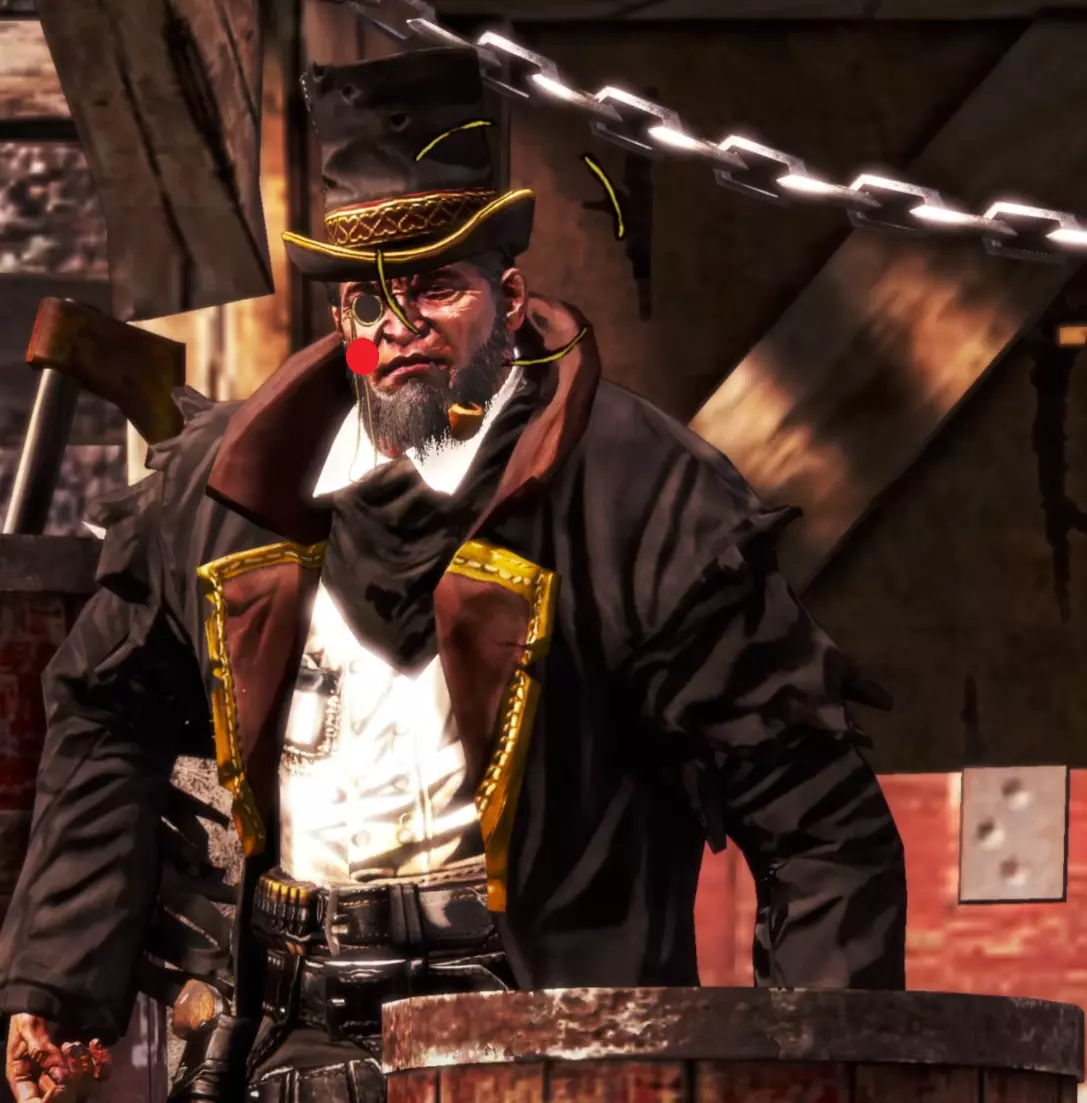
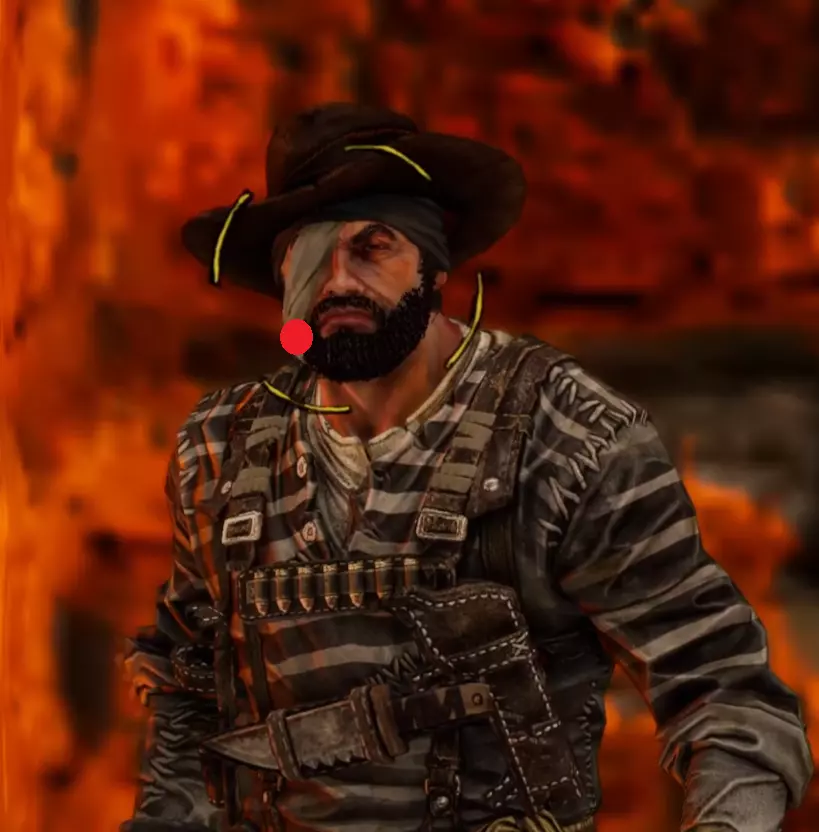
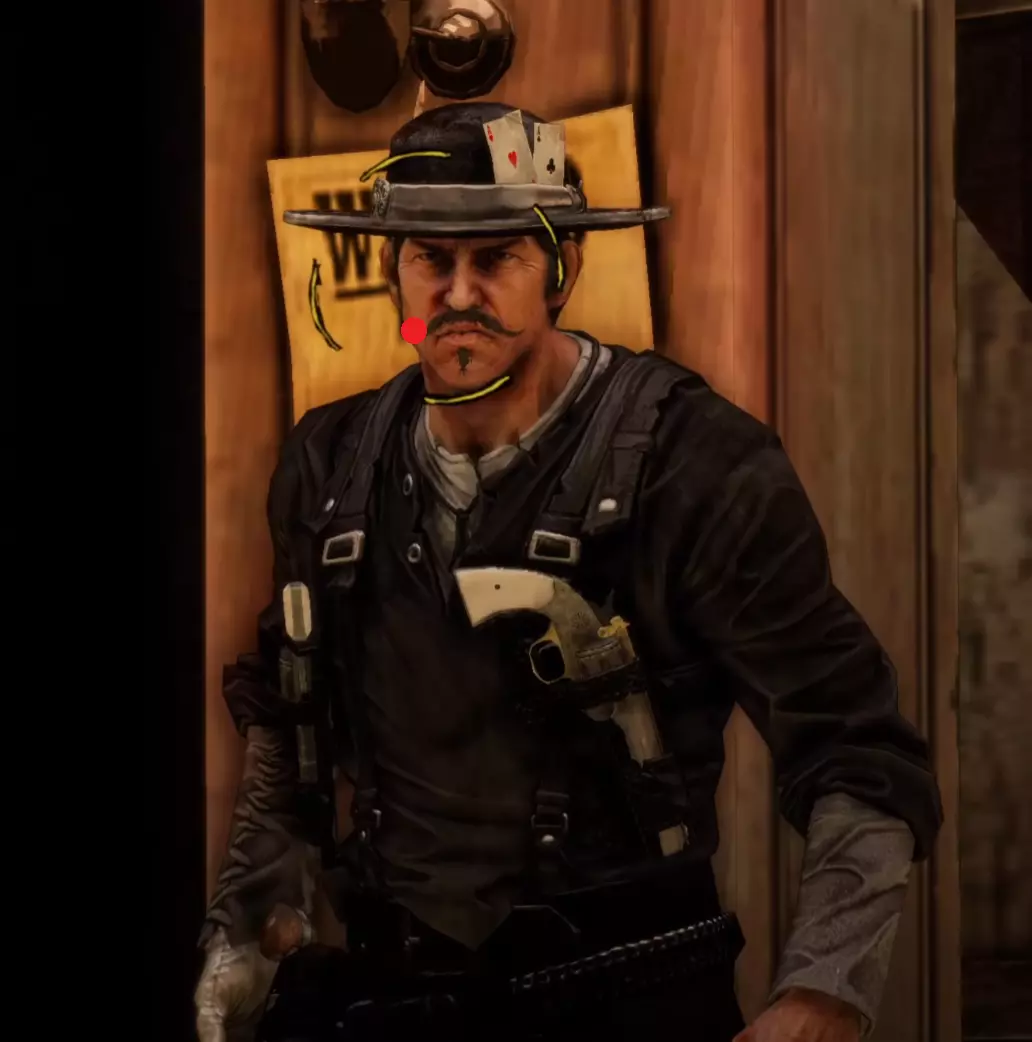
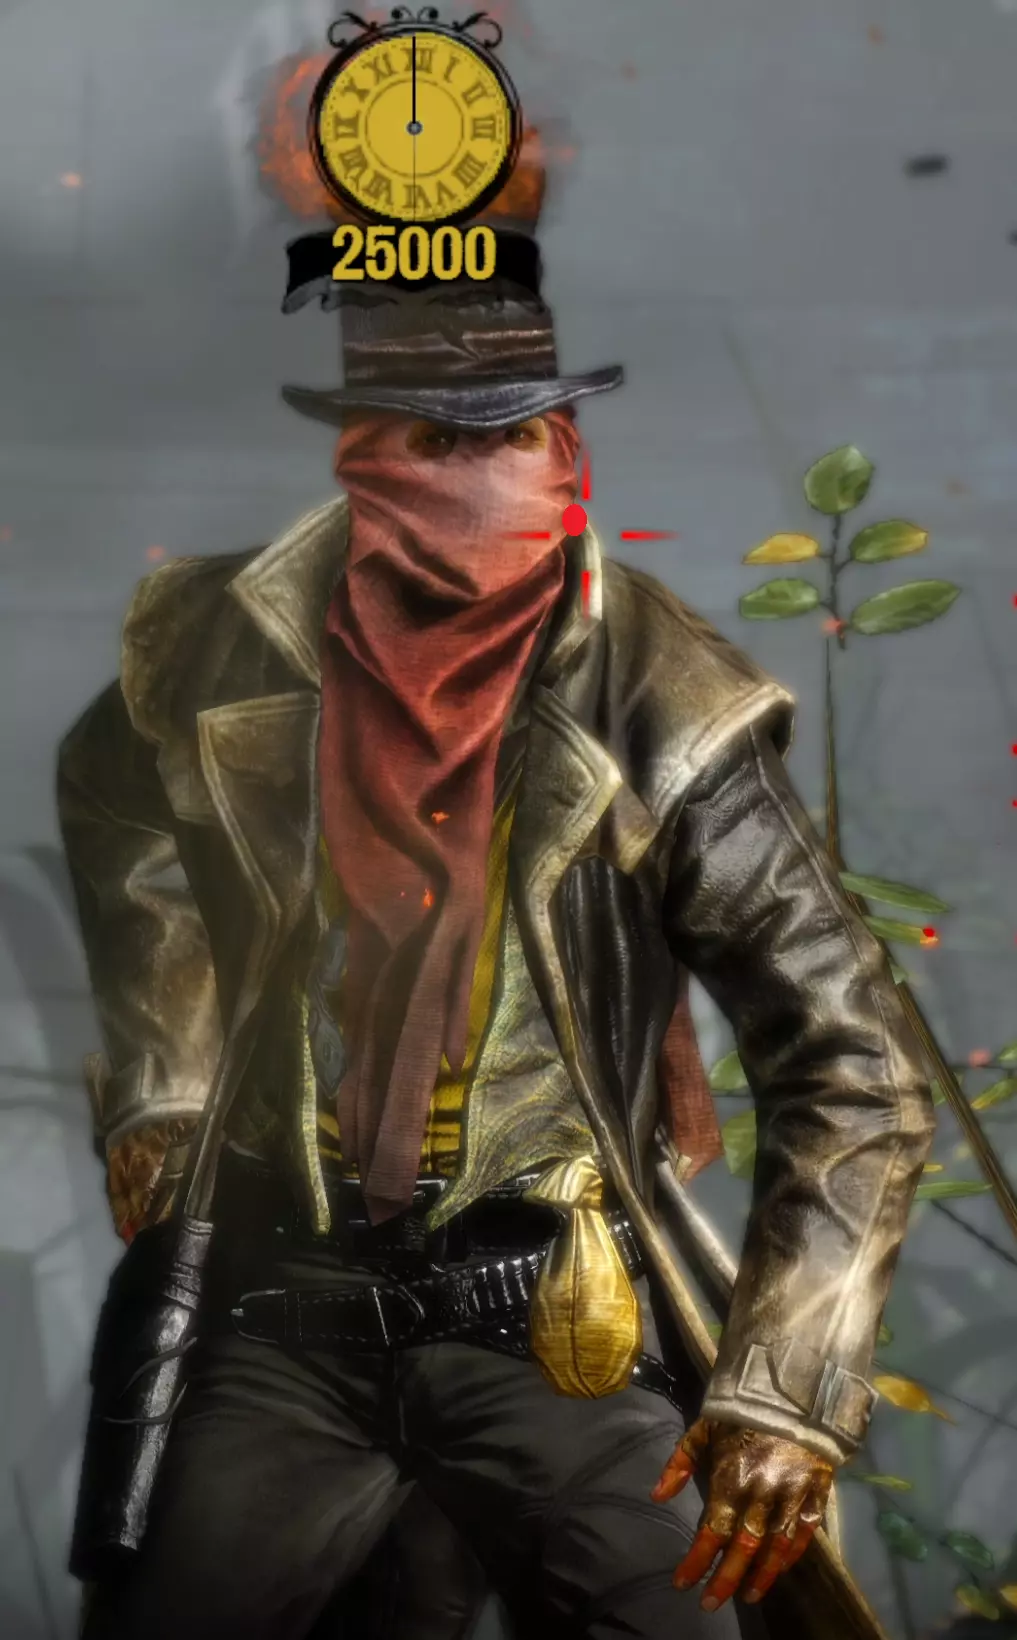
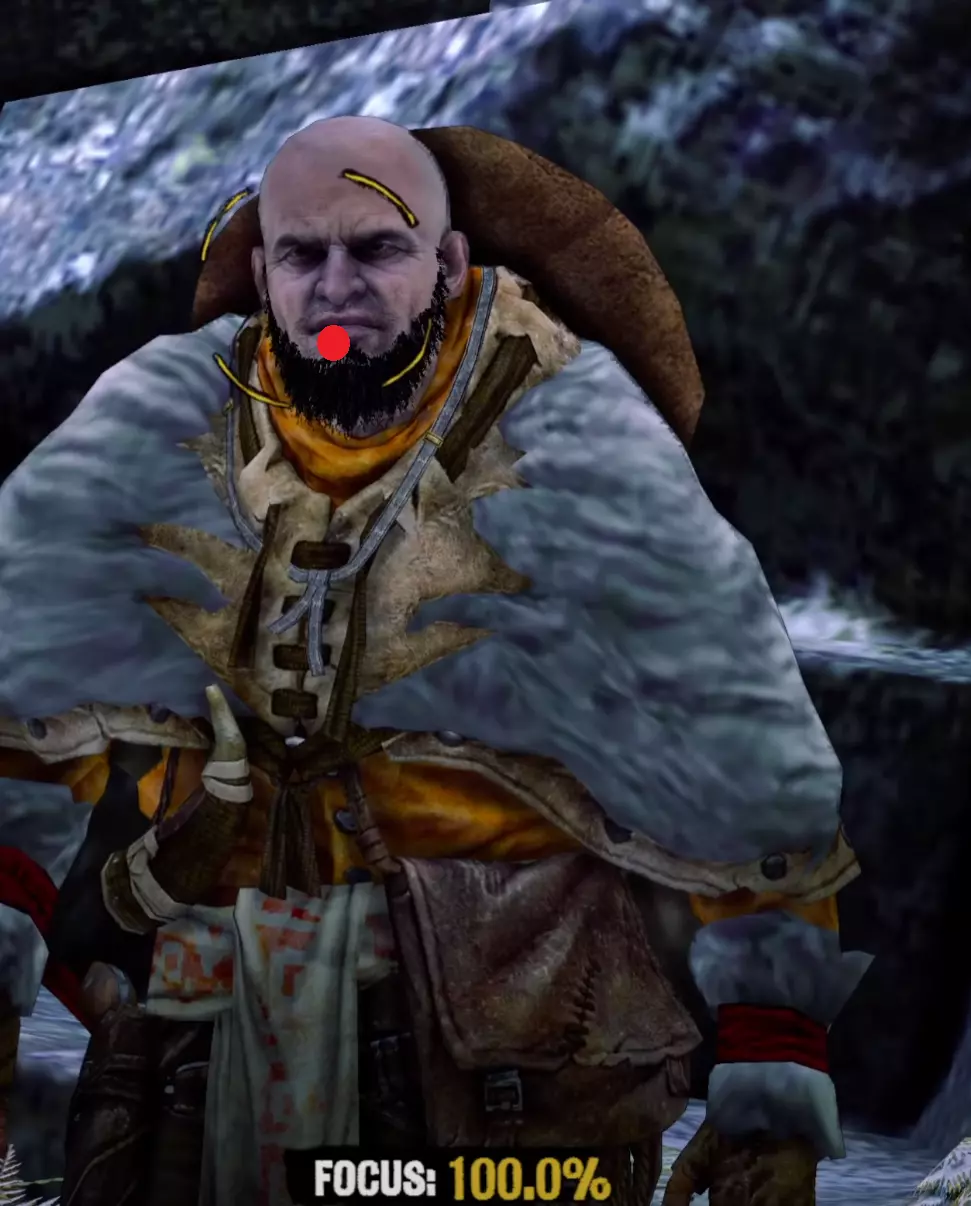
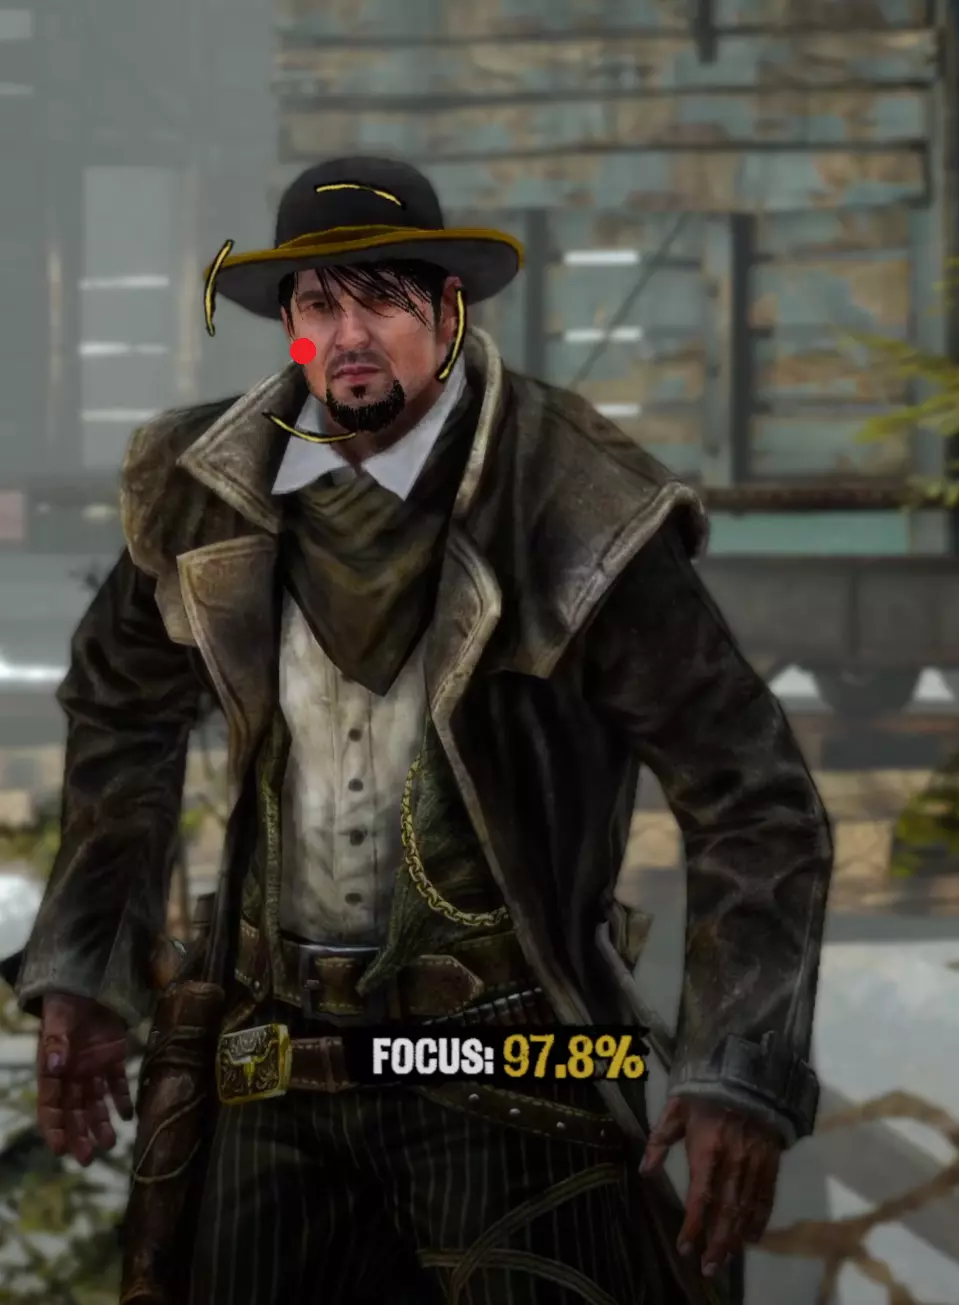
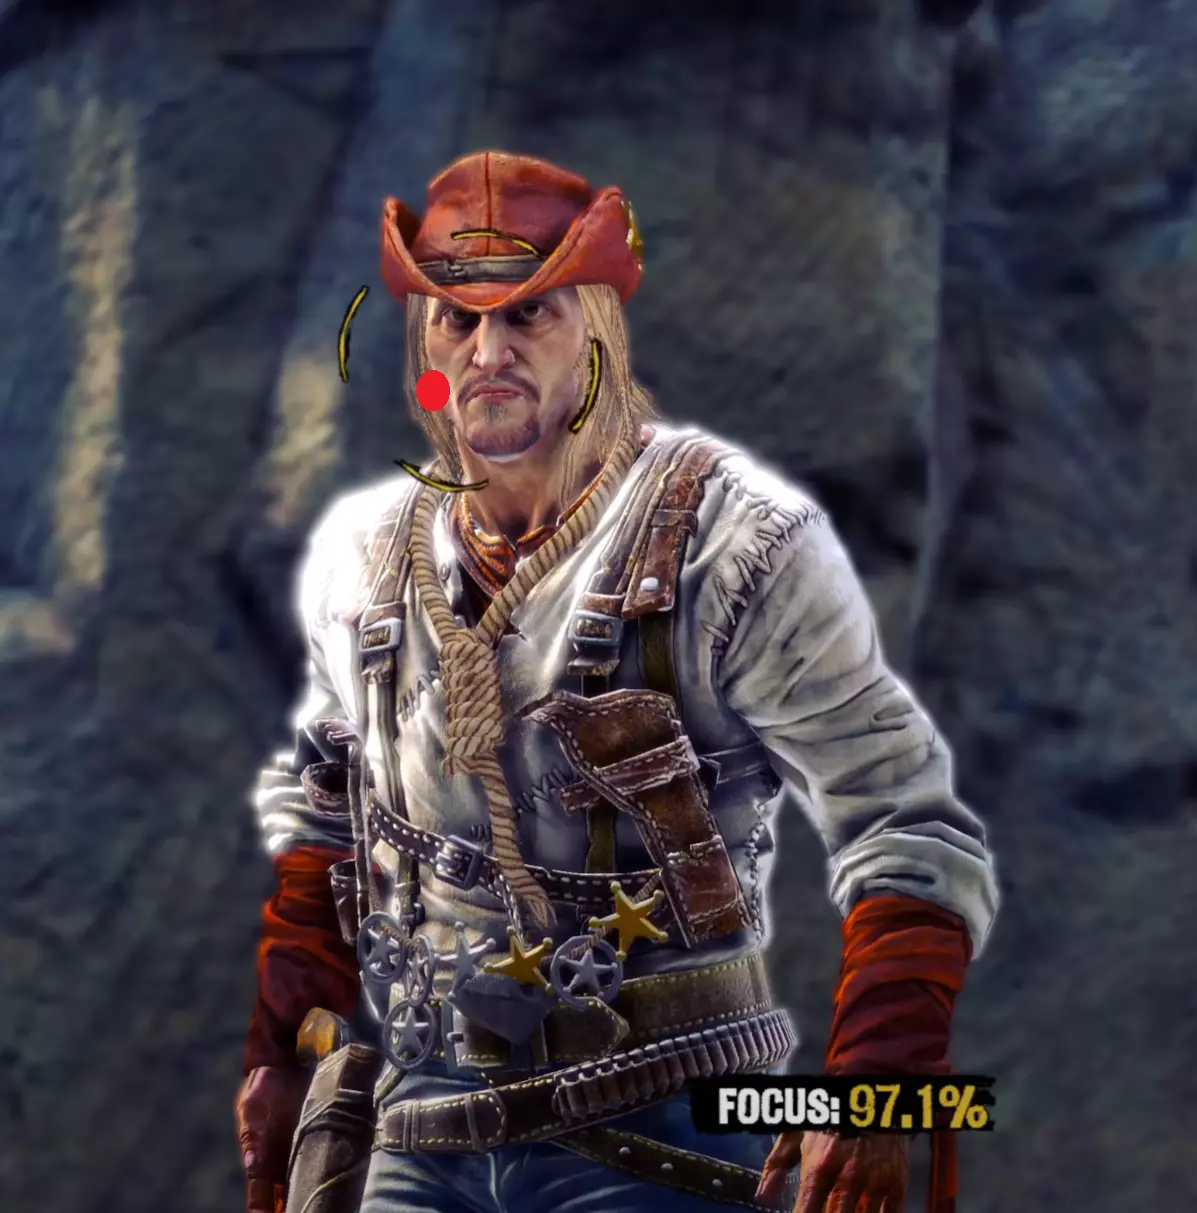
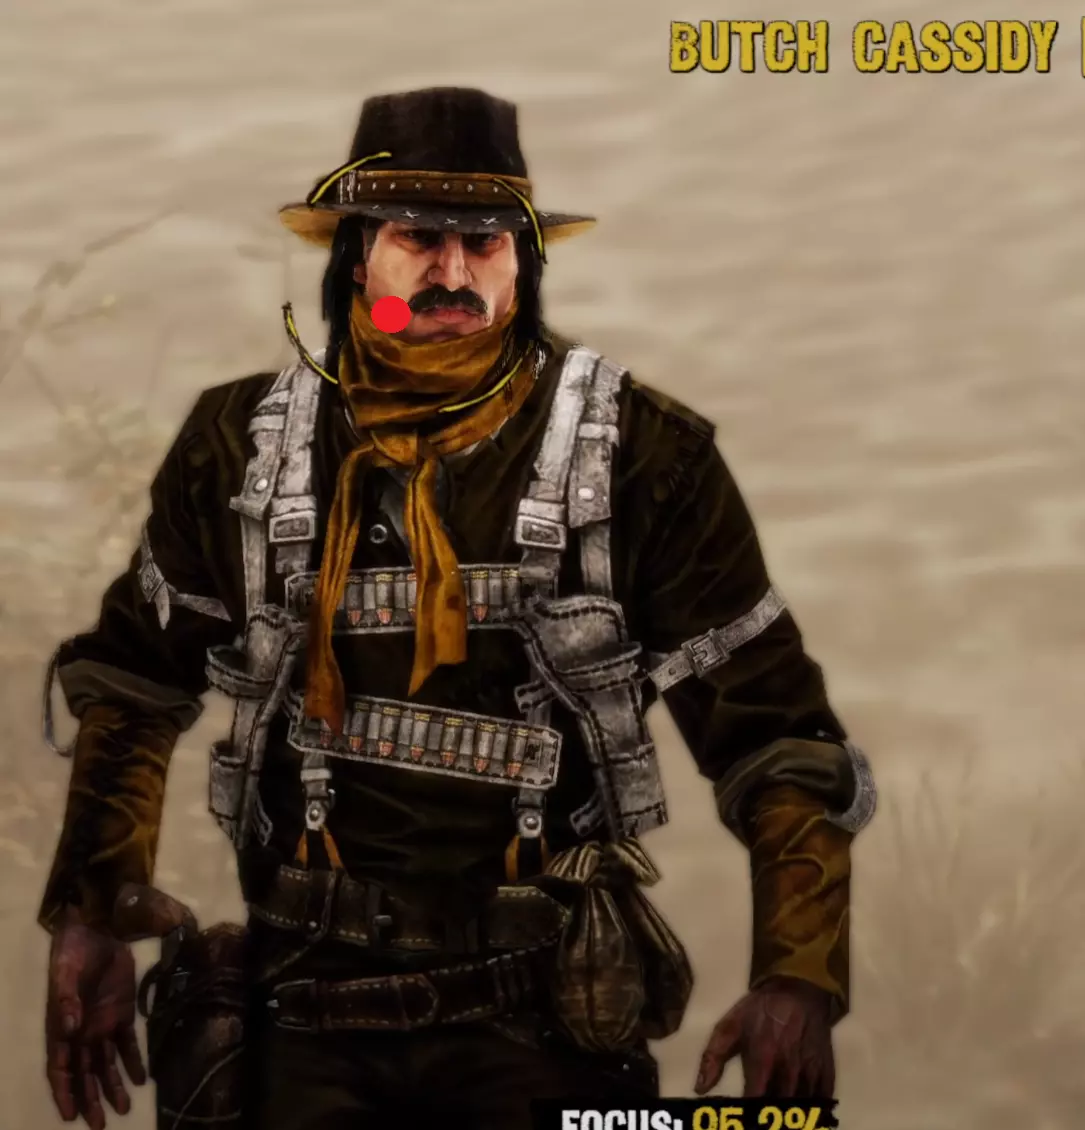
Aim Generally you want to keep your aim (center of the target circle) over the body of your opponent until he is done with his movement pattern, then move it up to his head. I find it is also generally better to be closer to the very left side of the cheek than closer to the middle of the head when you draw because of the way drawing moves your screen. It's annoying but doing this will often stop giving you focus right before you draw, so try to keep your target circle fully yellow yet as close to the left as possible. I am fairly certain that pre-draw target circle yellowness is a factor in whether you get a headshot or not. Having your target circle less yellow also makes the draw animation move much faster and thus makes it harder to manage. For Henry Plummer, the two Daltons, and the Sundance Kid and Butch Cassidy fight, use the body to get to 85%+ focus then move to the head. Most opponents only have one movement pattern, so you can definitely memorize the way each opponent walks and take advantage of that. Old man Clanton is an example of an enemy with two movement patterns. After enough practice, you'll be able to tell which one he is using by the time it matters, and muscle memory it out. Other opponents with two movement patterns may be more tricky as the differences are subtle. Bob Ollinger/Jim Reed: I think these two are the only opponents where it is optimal to keep your target circle in the middle of their head as opposed to left. Their heads move slightly to the right when they draw, so it more or less balances with the way the screen moves. Old Man Clanton: He tends to draw relatively fast after he stops moving, so it's best to have your target circle tracing his head before he stands still. Curly Bill: I don't think it's really worth it to go for the left side of his face because of how screwy his hitbox is and how aiming over the left side of his head makes you lose focus. It's better in my experience to aim around the chin/lips. Henry Plummer: Henry's hat counts as part of his hitbox. This is actually huge and gives you way more to aim at. If you want to, you can aim a little higher, around the monocle. I don't really do this out of habit because my spot works just fine almost always, but it definitely gives you a lot of room for error. Bob & Grat Dalton: Grat's draw pushes his head down slightly. You can account for this by putting your target circle a little closer to his chest. You can then dodge left and very quickly hit Bob in the very right side of the head. The best score I've gotten on this fight is -85. Faster IS possible, but -85 is about as good as you can reasonably expect without exploiting some hitbox jank. Here I found out that you can actually aim OFF Bob's head. Idk how reliable or viable this is but it's happened to me once. Here's an example: Sundance Kid and Butch Cassidy: For this fight it is as if you're fighting two Henry Plummers. You can draw on which ever one ends up being the one looking at you, fire and instantly hit the switch target key and take a short moment to aim for the other opponent. You do not need to wait at all between clicking and pressing q/e. If you had a good draw, you timed your crosshair, and your aim was right, the bullet will go where it needs to go and the first opponent will die offscreen. When one opponent looks away, the other opponent is guaranteed to look at you next. If one looks away, look at the other opponent and hold it until he looks at you then looks away, then switch again and repeat until draw. If you're feeling lucky and need to go for a particularly high score to beat your PB, hit the switch enemy key and slide your mouse and click almost instantly right after the camera stops, but not instantly - just within a couple milliseconds. This is a VERY slight mouse movement. Your crosshair will drag across the second opponent's head but you will not really be able to gauge it yourself, you'll probably just have to trust where your crosshair is, and not micro-correct it yourself because that usually ends with a miss and a ruined run. You will need to drag to the right no matter which opponent you're switching to, because no matter who you're switching to, your crosshair will end up on the left of their head. The timing between the two is slightly different, but you'll always be dragging right. I have examples for each: Here's an example of a dragshot switching to Butch: In these videos, I'm pretty sure the mouse movement happens during the switch, which is why it looks like I stop directly on their heads. This actually SHOULDN'T be necessary if you're getting a good reaction time (under 0.225). In this clip I get perfect even though I overshoot the dragshot and re-adjust. The dragshot is a nice tech but I think it's only making you go faster than necessary and not gaining you more points, unless you know you got a slow reaction time. Here are images of where I generally try to keep the center of my target circle on each opponent:
非预判 - 潜力值0,反应时间180毫秒
标准个人最佳成绩提升元数据,以及预测元数据
Drawing Drawing is the most self explanatory part of this guide. When you start hearing heartbeats, your target circle should be on your opponent's head, and he will not be moving. You can both watch and listen. If you see your opponent make a sudden move and/or hear a noise, you can safely draw. When you draw, your screen moves to the right and up slightly. There is not really much you can do to get better at this part. It pretty much comes down to reaction time. Henry Plummer: Henry Plummer is the opponent with the quickest draw in the game. He stands completely still. This makes it pretty easy to get 100/100 on him, but still not always guaranteed because of how fast he actually draws. You can time his draw with the heartbeat. He always draws after 1 and a half heartbeats. Example: Firing Firing is probably the most delicate part of dueling. You have to draw, and be patient enough to wait for your crosshair to show up. You can fire confidently only when your crosshair shows up on screen, not a milisecond before. If you fire before your crosshair appears, your bullet will go in the ground and you will lose a lot of points. I do not have confirmation for this, but it feels like, if there is a great enough percentage of the crosshair filled up with the opponent's head hitbox, you're guaranteed a headshot. This makes firing feel and seem much easier than it otherwise would be. Sometimes I still get unlucky, but that's really not something that can be compensated for. It's best to just have the left side of the enemy's head in the exact middle of the target circle before you draw, then draw, wait until the exact moment you see your crosshair, then fire. I would say with this strategy, you get perfect, fast headshots 99% of the time, as long as you execute it properly. You really should not be moving your mouse after you draw, except on Bob & Grat and Sundance & Butch for obvious reasons. Only move your mouse if you know you're off target and need to get back on. Remember, even keeping your mouse perfectly still, drawing alone will move your screen slightly up and to the right, which includes your crosshair. The best tip I can give about firing is to remember that this gamemode is designed in such a way that if you react fast you can get a -0 consistently. The few miliseconds between you recognizing your crosshair is up and you clicking isn't going to make a difference, so don't bother trying to go fast for the sake of going fast, because it probably won't give you any higher of a score. Dodging You really, REALLY should not get to the point where you're dodging. The only time you should be dodging is in the Bob & Grat fight, and you should only be dodging left as a movement mechanic, not to actually dodge. If you have to actually dodge, you're not getting a high score and might as well reset. Opponent Movement Patterns Patt Garret: Patt Garret takes one step to the left. That's it. Bob Ollinger: Bob Ollinger takes: One step to the right Two steps to the left Old man Clanton: Pattern 1 - Two steps to the left Three steps to the right Pattern 2 - Two steps to the right Two steps to the left Always ends up to the right of the vulture Curly Bill: One step to the right Two steps to the left Johnny Ringo: One step to the right Two steps to the left Henry Plummer: Never moves. Stands still for the entire duel. Always draws after 1 and a half heartbeats. John Wesley Hardin: One step to the left Two steps to the right Always ends up in front of the wanted poster Kid Curry: One step to the left Two steps to the right One step to the left Always ends up to the left of the tree Emmett Dalton: One step to the right Two steps to the left Two steps to the right Bob & Grat Dalton: Never moves. Stands still for the entire duel. Grat draws first. Killing Grat first is the optimal strat. George "Flat-Nose" Curry: One step to the right Two steps to the left Two steps to the right Jim Reed: Pattern 1- One step to the right Two steps to the left One step to the right Pattern 2- One step to the right One step to the left Short pause One step to the left Two steps to the right Jesse James: Pattern 1- One step to the left Two steps to the right Two steps to the left Pattern 2- One step to the left Two steps to the right One step to the left Short pause One step to the left Billy the Kid: Pattern 1- One step to the right One step to the left Short pause One step to the left Unusually fast direction change Two steps to the right Always ends up in the bushes Pattern 2- (this pattern can definitely trip you up, so watch out for it) One step to the right One step to the left Short pause One step to the left Unusually fast direction change One step to the right One step to the left Sundance Kid & Butch Cassidy: Both stand still for the entire duel. First opponent to draw on you will always be the one looking at you. First opponent to draw is randomized. When one opponent looks away, the other opponent is guaranteed to look at you next. If one looks away, look at the other opponent and hold it until he looks at you then looks away, then switch again and repeat until draw. Heartbeat Patterns Some of the opponents have a predictable draw timing. This is great for being able to predict instead of react, or react better because you are expecting it to happen at a specific time. Here is what I've found so far. Patt Garret: 3-5, usually 3-4 Bob Ollinger: 3-5, usually 3-4 Old Man Clanton: 3-5, usually 3 Curly Bill: 3-5 Johnny Ringo: 3-6, usually 4-5.5 Henry Plummer: Always 1.5, but the audio on the heartbeat is always so unclear I don't recommend trying to time it. It's better to just react and miss 1-2 points unless you need them for PB. John Wesley Hardin: 2-5, usually 4-5 Kid Curry: 2-6, usually 3-4 Emmett Dalton: 3-6 Bob & Grat Dalton: 2, 3, 4, 5, 6, 6.5 or 7 A clean feeling draw right after the heartbeat. No real way to time this unfortunately aside from getting lucky with 7 heartbeats and predicting it. George "Flat-Nose" Curry: 2-7 Jim Reed: 2-7 Jesse James: 2-7 Billy the Kid: 2-7 Sundance Kid & Butch Cassidy: 10-14 (Uncertain, but this gives so much time it shouldn't matter) Scoring and the importance of 100/100
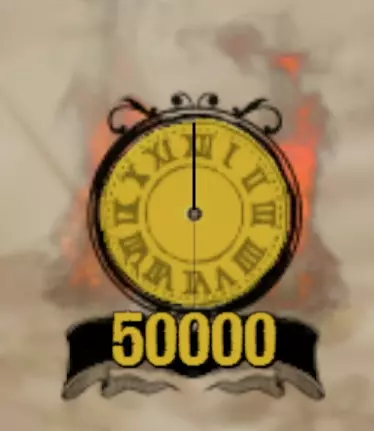
时钟机制: 我非常确定,时钟要等到对决总时间达到0.500时才会开始计时。开始计时后,它起初的变化并不明显。我认为,时钟开始后会立即扣除1点,然后在0.530时再扣除1点,之后便会快速减少。这意味着,如果你能将对手的起手完美预判到0.000,你将有长达500毫秒的时间来出手,并且仍能获得满分。如果能做到完美预判,这对《Bob & Grat》来说将是极大的优势。这些数据是在假设你拥有100%速度和100%专注力的情况下得出的。 《Bob & Grat》与《Sundance & Butch》: 我不太确定时钟开始计时的具体节点,但可以肯定的是,它比普通对决要长得多。我认为它大约在0.645,在0.660后获得第二个点数,随后迅速下降。
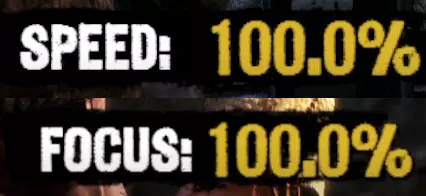
当你的个人最佳成绩(PB)越来越高时,保持100点专注力和100点速度变得愈发重要。我注意到,如果达到双100,持续获得-1分(即决斗中仅丢失1分的成绩)会变得明显更容易。这里存在约0.6%的浮动空间,但实际上你仍应追求100%,尤其是速度方面。决斗中的最后一分通常取决于210毫秒以内的反应时间。要获得-1分,你的反应时间无需快于240-235毫秒,这比210毫秒以内要容易得多。1v1对决在我看来有了明确的评判标准: 100/100且分数为-0:完美执行 100/100且分数为-1:完美执行,但反应略有迟缓 分数低于-1:仍有提升空间 “Formalities”的完美-1速通成绩为155,991。 以下是前9场对决完美100/100执行的片段: (在JWH处失误1次,但在Curly Bill和Emmett Dalton处弥补了回来。) 除了Bob & Grat之外,所有对决的理论最佳分数均为-0,其中包括Sundance & Butch。目前,不进行预判的情况下,Bob & Grat的理论最佳分数约为-85(我的个人最佳成绩为-85)。 这意味着当前整个模式的理论最佳总分为532,915。 如果所有分数都按-1计算,总分会进一步降至532,900。Bob & Grat 预测: 从技术角度而言,若能准确预测 Grat 的出刀时机,在 Bob & Grat 环节有可能达成 -0 的成绩。只要你的攻击能以最快速度命中且状态为 100/100,即使误差约 100 毫秒,仍可获得完美评价。以下是我在 Grat 出刀后 99 毫秒内出刀并获得满分的示例: 通过 Bob & Grat 预测,理论上你最高可获得 533,000 分的完美成绩。假设你在 Bob & Grat 环节预测准确,且除 Sundance & Butch 之外的其他所有对决均为 -1,那么最高得分将是 532,987 分。 分辨率与帧率的重要性 这一点或许显而易见,但采用较低分辨率并搭配较高帧率无疑能带来显著优势,其中包括获得超出显示器刷新率的额外帧数。不知为何,它竟然能将我的反应时间缩短数毫秒,让我更容易获得-0分。我以前完全没意识到分辨率对我的影响有多大,还以为将显示器刷新率调到最高就足够了。但事实并非如此,你必须榨干每一秒能获得的帧数。不幸的是,这也意味着低端显卡更难与之竞争。在我将分辨率降至1080p并获得300-500帧后,第一次尝试就立刻发现自己能稳定获得-0分,而且操作起来轻松多了。我打破了自己的个人最佳纪录,完成了曾经有望达成的完美 runs,即便期间还错失了两发子弹。如果我没有错失那两发子弹,并且在那两场对决中都获得-1的成绩,我的得分应该能达到532812分,这都是因为我获得了太多-0的对决成绩。 展示
2026-02-13 19:00:15 发布在  Call of Juarez: Gunslinger


说点好听的...
收藏
0
0