


《鬼泣4:特别版》紧凑S级任务指南
A compact breakdown of all the info needed to S-Rank every mission in DMC4 Special Edition. Introduction Having fully S-ranked all other Devil May Cry games, I finally decided to knock “Get an S-Rank on all missions, on all difficulties, with all characters in DMC4:SE” off my bucket list. However, when I went to search for score requirements, the information I needed was either spread out across multiple guides, or had the world's worst formatting. This drove me nuts, so I copied or retyped the information into something more compact. On a whim, instead of letting these notes languish away in a dark corner of my hard drive, I decided to make them public in order to help anyone else attempting this feat in the future. This is also my first steam guide, so I might be editing it rather heavily if I notice some things that need touching up. General Guide Notes: The “Overall S-Rank Style Requirement” is NOT the style required for an S-rank on the style section of the mission score screen. It is the approximate score needed to achieve an S-Rank for the mission overall when the following is assumed: An S-Rank in Both "Clear Time" & "Red Orbs Collected" is achieved (x5.0 Devil Hunter Rank Point Multiplier) A “No Items” Bonus is achieved (x1.2 Devil Hunter Rank Point Multiplier) No Devil Hunter Rank Point Penalties for Dying, Continuing, Using Gold Orbs, or Using Super Characters are applied Heaven or Hell, Hell and Hell, & Legendary Dark Knight all mirror “Son of Sparda” score requirements in every category. I am convinced Heaven or Hell has some missions where an overall S-Rank is completely or nearly impossible (Especially with Virgil). Thankfully, S-Ranks in Heaven or Hell aren’t tracked in Total Results, and aren’t required for any achievements or in-game unlocks. Most style requirements were sourced from https://www.trueachievements.com/game/Devil-May-Cry-4/walkthrough/5 as well as several Gamefaqs forum posts and guides (which I sadly forgot to bookmark). Some guides, such as the one linked above, also provided alternative style point requirements for some scenarios (like not having the no items bonus), and I have pasted the ones I thought would be most useful here. However, some style point requirements provided for some missions were slightly off or contradictory between guides. I did my best to correct these numbers as I was playing, and split the different requirements for “Easy” (Human & Devil Hunter) and “Hard” (Son of Sparda & Dante Must Die) difficulties where applicable. I almost certainly missed some. If you notice any numbers that need touching up, please let me know in the comments and I’ll update this guide. “Easily Missable Red Orbs” includes MOST orbs found in a stage, but excludes orbs that are in plain sight or are incredibly obvious. Gather all stray red orbs and break ALL breakable objects EVEN IF THEY DON’T GIVE RED ORBS, and you are almost guaranteed an S-Rank in “Red orbs Collected”. Red orb crystals and combat adjudicators do NOT appear to contribute towards "red orbs collected" mission rank. “Overall S-Rank Difficulty” is just based on the general feeling I got after completing each mission. There is no in-depth reasoning behind it, and was added just for fun. For Lady/Trish, you can subtract 1 from my rating, and add 1 to my rating for Vergil. Key: (H) = Human Difficulty (DH) = Devil Hunter Difficulty (SoS) = Son of Sparda Difficulty (DMD) = Dante Must Die Difficulty (HoH) = Heaven or Hell Difficulty (H&H) = Hell & Hell Difficulty Mission 1 - Birds of a Feather Overall S-Rank Style Requirement: ~350 Characters: Nero / Lady / Vergil Devil Hunter Rank Requirement: 5,100 (H) / 6,000 (DH) / 10,800 (SoS) / 18,000 (DMD) S-Rank Time Requirement: 0:45 (H) / 1:00 (DH) / 1:15 (SoS) / 1:25 (DMD) S-Rank Style Requirements: 500 (All Difficulties) Hidden Red Orb Caches: None Easily Missable Red Orb Locations: Make sure to break ALL of the benches before finishing the fight (800 Orbs Total) Stage Gimmick: Boss-Only Level / Basic Gameplay Tutorial (Turn of tutorial in options, to skip straight to boss fight) Boss: Dante (Tutorial) Overall S-Rank Difficulty: Variable 3/5 (Medium) to 5/5 (Very Hard) Depending on Character and Difficulty Mission 2 - La Porte de l'Enfer Overall S-Rank Style Requirement: ~ 5,500 Characters: Nero / Lady / Vergil Devil Hunter Rank Requirement: 42,500 (H) / 50,000 (DH) / 108,000 (SoS) / 180000 (DMD) S-Rank Time Requirement: 11:00 (H) / 15:00 (DH) / 21:00 (SoS) / 26:00 (DMD) S-Rank Style Requirements: 6,500 (H & DH) / 9,250 (SoS & DMD) Hidden Red Orb Caches: (x2) Residential District - Immediately after the street with the large red orb crystal stand on BOTH the middle AND the tippy top platforms of the thin tower.
容易错过的红魔晶位置: - **歌剧院广场**:垃圾桶和长椅处 - **仓库**:底层的木箱,以及顶层的木箱和货架 - **大教堂**:“恶魔之手”升级点附近的长椅,二楼空中高处有两个大型红魔晶(使用“空中冲刺”+“抓取”/“钢丝射击”/“召唤剑”收集) - **住宅区**:各处散落的杂物堆 - **凯鲁拉港**:进入后空中随机漂浮的大型红魔晶,前往警卫室路上的1个红魔晶,以及离开时的2个垃圾桶处第一矿区 - 水中随机出现大型红色魔魂石 关卡机制:无 Boss:贝利亚(Berial) S级综合难度:3/5(中等) 任务3 - 白色羽翼 S级综合风格评分要求:约8850 可操作角色:尼禄 / 蕾蒂 / 维吉尔 恶魔猎人等级分数要求:55250(H难度)/ 65000(DH难度)/ 117000(SoS难度)/ 195000(DMD难度) S级时间要求:13分30秒(H难度)/ 18分00秒(DH难度)/ 20分00秒(SoS难度)/ 25分00秒(DMD难度) S级风格评分要求:10000(所有难度) 隐藏红色魔魂石宝箱: (x2)弗杜那城堡大门 - 两根柱子顶端
(x1)大厅 - 圣像左侧平台顶部(需尼禄达到3级EX High Roller)

(x1)图书馆 - 通往神性雕像的其中一根柱子的第二层台阶上(进入图书馆前)
容易错过的红魔晶位置: - 福尔图娜城堡大门 - 进入位置左侧平台顶部的随机大型魔晶。 - 大厅 - 一楼的所有椅子、长凳和围栏。 - 大殿 - 东南方向锁着的大门后方的可破坏物体(必要时使用抓取、召唤剑或钢丝射击),大厅各处的烛台,以及最靠近东南方旋转装置的可破坏镜子后方的2个大型红魔晶。 - 画廊 - 各处的杂物。不要错过旋转装置附近与背景融为一体的两个木箱。 - 图书馆 - 与天使战斗后的上层有3个长凳,一楼有各种杂物。关卡机制:无 综合S级难度:4/5(困难) 任务4 - 冷血 综合S级风格评分要求:约6500 可使用角色:尼禄 / 蕾蒂 / 维吉尔 恶魔猎人等级要求:42500(H难度)/ 50000(DH难度)/ 117000(SoS难度)/ 195000(DMD难度) S级时间要求:13分30秒(H难度)/ 18分00秒(DH难度)/ 21分00秒(SoS难度)/ 33分00秒(DMD难度) S级风格评分要求:6500(H难度和DH难度)/ 9250(SoS难度和DMD难度) 隐藏红魔魂石宝箱: (x1)图书馆 - 在通往女神像的其中一根柱子的第二层平台上 与任务3的宝箱位置相同
(x1)大厅 - 圣像左侧平台顶部(需尼禄达到3级EX High Roller) 与任务3藏匿处位置相同
容易错过的红魔晶位置: 图书馆(再次进入)- 与天使(angelo)战斗后,上层有3个长椅,底层有各种杂物。 画廊 - 到处都是杂物。不要错过陀螺(beyblade)附近两个与背景融为一体的木箱。 大厅(再次进入)- 底层所有的椅子、长椅和围栏。 餐厅 - 桌上的各种杂物。 大厅(再次进入)- 整个大厅内的椅子和烛台,以及东南侧陀螺(beyblade)最近处的可破坏镜子后方有2个大型红魔晶。关卡机制:陀螺(Beyblades) 首领:拜勒(Bael) S级综合难度:2/5(简单) 任务5 - 三圣颂(Trisagion) S级综合风格评分要求:约4100分/约5200分(“通关时间”需达到A级) 可操作角色:尼禄 / 蕾蒂 / 维吉尔 恶魔猎人等级要求:34,000(H难度)/ 40,000(DH难度)/ 90,000(SoS难度)/ 150,000(DMD难度) S级时间要求:9分00秒(H难度)/ 12分00秒(DH难度)/ 18分00秒(SoS难度)/ 21分30秒(DMD难度) S级风格评分要求:6,000分(H难度和DH难度)/ 7,750分(SoS难度和DMD难度) 隐藏红魔魂石缓存: (x2)士兵墓地 - 在区域东侧,跳至中间和右侧平台上。
(x1)螺旋井 - 位于红球水晶平台上方的中间平台上。
(x1)大厅 - 圣像左侧平台顶部(需要尼禄达到3级EX High Roller),与任务3的藏匿处位置相同
容易错过的红魂位置: - **士兵墓地**:地面上有大量可破坏的杂物 + 楼梯上的两座雕像 + 喷泉顶部的雕像 + 房梁上的大型红魂 - **大师房间**:床周围的各种家具 - **螺旋井**:弹跳垫的正上方和正下方 + 中间平台上的红魂水晶 - **大厅(再次进入)**:大厅各处的椅子和烛台 + 靠近东南端“ beyblade ”的可破坏镜子后方有 2 个大型红魂大厅(再次)- 一楼所有椅子、长凳和栅栏 舞台机关:无 综合S级难度:4/5(困难) 任务6 - 复活 综合S级风格评分要求:约8,600 / 约10,800(不含“不使用道具”奖励) 可操作角色:尼禄 / 蕾蒂 / 维吉尔 恶魔猎人等级要求:68,000(H难度)/ 80,000(DH难度)/ 144,000(SoS难度)/ 240,000(DMD难度) S级时间要求:16分30秒(H难度)/ 22分00秒(DH难度)/ 25分00秒(SoS难度)/ 30分00秒(DMD难度) S级风格评分要求:12,500(所有难度) 隐藏红魔魂石宝箱: (x1)收容室 - 位于阎魔刀曾被悬挂的平台上。
(x1)天使创造——在该房间最后一波敌人的战斗区域内,站到靠近集装箱角落的小方形区域上
(x1)大厅 - 圣像左侧平台顶部(需尼禄达到3级EX High Roller) 与任务3藏匿处位置相同
容易错过的红魔魂石位置: - **地下实验室**:跳下前的上层平台有1个桶 + 小心跳下后可打破的8个桶 - **红色权限区域**:墙边有3处可破坏的碎片 - **游戏室**:侧边有1个小红魔魂石。它很容易被看到,但如果玩骰子游戏时专注于计数,就很容易忘记 - **收容室**:2把椅子,分别位于阎魔刀隐藏魂石箱的两侧 - **福里斯瀑布**:底层有6个桶,顶层有2个桶 - **天使创造室**:房间内底层两个战斗区域各有1个桶 - **地下实验室**:如果之前错过了桶,现在还有第二次机会获取它们大厅(再次)- 一楼所有椅子、长凳和栅栏 舞台机制:骰子游戏(1-4-2-6-3-5)和收容室 中期 Boss 战 Boss:收容室 S 级总体难度:4/5(困难),但如果在骰子游戏中滥用紫色节点则为 2/5(简单)。 任务 7 - 毒蛇女 S 级总体风格要求:约 4,500 / 约 5,800(无“不使用道具”奖励) 可操作角色: Nero / Lady / Vergil 恶魔猎人等级要求:42,500(H)/ 50,000(DH)/ 90,000(SoS)/ 150,000(DMD) S 级时间要求:15:00(H)/ 20:00(DH)/ 23:00(SoS)/ 28:00(DMD) S 级风格要求:7,000(所有难度) 隐藏红魂宝箱: - 废墟低地 - 在废墟山谷的消失平台区域故意坠落。缓存将位于地图的最西北区域。
容易错过的红魂球位置: 森林入口 - 初始位置有2个蛋,空心树干内有大量蛋,红魂球水晶附近的墙上有3个蛋 风蚀山谷 - 跳下前左侧有1个蛋,跳下过程中中途有1个蛋,底层地面有许多蛋,以及喷泉后方 废弃教堂 - 各处分布着许多蛋,请仔细搜索 废弃山谷 - 无红魂球,但需故意掉落至此以抵达废弃低地 废弃低地 - 散落着数个蛋,**不要忘记隐藏的魂球缓存!**拉皮斯河 - 每个普通出口前有一窝蛋,桥下有几窝,一根桥柱上有一个大蛋,看似空无一物的角落附近有一窝蛋。 远古广场 - 遍地都是蛋,务必仔细搜索,有些蛋附着在墙上。 风扫山谷(返回) - 每个陀螺墙附近有一簇蛋。 废墟山谷追逐序列 - 奔跑时桥上有几窝蛋。 遗忘废墟 - 3窝蛋。 母蛇巢穴 - 3窝蛋。一窝在西北方,一窝在东南方,一窝在西南方。关卡机制:陀螺、消失平台及艾奇德娜追逐战 Boss:艾奇德娜 综合S评价难度:1/5(极易) 任务8 - 信仰宣言 综合S评价风格点数要求:约5,000 / 约6,300(不含“不使用道具”奖励) 可操作角色: Nero / Lady / Vergil 恶魔猎人等级分数要求:42,500(H难度)/ 50,000(DH难度)/ 90,000(SoS难度)/ 150,000(DMD难度) S评价时间要求:11:00(H难度)/ 15:00(DH难度)/ 17:00(SoS难度)/ 21:00(DMD难度) S评价风格要求:6,500(所有难度) 隐藏红魔魂宝箱:无 易遗漏红魔魂位置: - 古代训练场 - 隧道前2组蛋群,隧道内2组蛋群,隧道后1组蛋群 - 青金石河 - 每个普通出口前1组蛋群,桥下若干蛋群,桥柱上1个大型蛋,附近1组蛋群角落里似乎什么都没有 古老广场——到处都是蛋,要仔细搜查,有些蛋附着在墙上 风蚀山谷——跳下前左侧有1个蛋,跳下过程中中途有1个蛋,底层有许多蛋,每个陀螺屏障附近有一批,喷泉后面也有 废弃教堂——到处都是蛋,要仔细搜查 迷失森林——每条路上都有一批蛋,故意走错路会带你到一个可选的竞技场,那里可以找到更多批蛋。遗忘遗迹 - 顶部有2个魔魂石(从技术上讲,下方还有更多魔魂石,但不收集它们也能达到S级评价,且收集会浪费大量时间) 古代训练场(上层)- 2个魔魂石 关卡机关:迷失森林光影谜题(朝着光源奔跑) Boss:克雷多 总S级难度:2/5(简单) 任务9 - 为了你 总S级风格评价要求:约6,800 / 约8,500(无“不使用道具”奖励) 可操作角色:尼禄 / 蕾蒂 / 维吉尔 恶魔猎人等级要求:51,000(人类难度)/ 60,000(恶魔猎人难度)/ 153,000(斯巴达之子难度)/ 255,000(但丁必死难度) S级时间要求:9分30秒(人类难度)/ 13分00秒(恶魔猎人难度)/ 23分00秒(斯巴达之子难度)/ 28分00秒(但丁必死难度) S级风格评价要求:10,000(人类难度和恶魔猎人难度)/ 13,750(斯巴达之子难度和但丁必死难度) 隐藏红魔魂石缓存: (1个)大厅(魔剑教团H.站在大厅的东北角。
The Gauntlet - 呼叫电梯前,站在电梯将要降下的中间位置。
容易错过的红魔晶位置: - **格兰德Album桥** - 小房间两侧的隔板和家具 - **大圣堂(魔剑教团总部)** - 6张长椅、门旁2个罐子,别忘了隐藏的红魔晶点 - **钥匙密室** - 每个入口旁各2个隔板(战斗时容易意外破坏) - **试炼场** - 无红魔晶,但别忘了电梯下方的隐藏红魔晶缓存 - **阿格纳斯的房间** - 战斗前的各类家具(注意不要走得太远!),战斗中的3个笼子关卡机制:时空切割者(时间减缓) Boss:阿格纳斯 S级综合难度:3/5(中等) 任务10 - 荣耀加身 S级综合风格评分要求:约8000 / 约10500(“红魂收集”需达到A级) 可操作角色:尼禄 / 蕾蒂 / 维吉尔 恶魔猎人等级要求:59500(H难度)/ 70000(DH难度)/ 135000(SoS难度)/ 225000(DMD难度) S级时间要求:15:00(H难度)/ 20:00(DH难度)/ 25:00(SoS难度)/ 30:00(DMD难度) S级风格评分要求:10000(H与DH难度)/ 11000(SoS与DMD难度) 隐藏红魂宝箱: (x1)试炼场 - 呼叫电梯前,站在电梯将要下降位置的中间。 与任务9的宝箱位置相同
(x1)大厅(魔剑教团总部)- 站在大厅的东北角。与第九关藏匿点位置相同
容易错过的红魔晶位置: - 阿格纳斯的房间:杂项家具,以及在之前的 boss 战前后打破的 3 个笼子。 - 试炼场:无,但不要忘记电梯下方隐藏的红魔晶缓存。 - 钥匙密室:每个入口处各有 2 个分隔板(在战斗中容易意外破坏)。 - 大圣堂(魔剑教团总部):6 个长椅,门旁 2 个罐子,不要忘记秘密红魔晶点。 - 安全走廊:激光前的 2 个长椅,激光后的 1 个栅栏,以及旋转刀片竖井底部的 3 个木箱。 - 实验处理区:乘坐电梯上去前的 4 个石像,顶部的 2 个石像和 1 个栅栏。 - 会议室:在该房间战斗结束后可获取的 4 个烛台。飞升之厅 - 战斗开始时,绕房间边缘跑动,击碎所有可见的杂项可破坏物。 关卡机制:时空切割者(时间减缓) Boss:但丁 综合S评价难度:4/5(困难) 任务11 - 第九层 综合S评价风格要求:约8,600 可用角色:尼禄 / 蕾蒂 / 维吉尔 恶魔猎人等级要求:68,000(H难度)/ 80,000(DH难度)/ 144,000(SoS难度)/ 240,000(DMD难度) S评价时间要求:11:00(H难度)/ 15:00(DH难度)/ 17:00(SoS难度)/ 21:00(DMD难度) S评价风格要求:11,500(所有难度) 隐藏红魔魂石缓存: (x1)降临之厅(第一部电梯)- 呼叫最后一部电梯前,站在它将要下降的中间位置。
(x1)冒险密室(冷酷之握区域)——在三个冷酷之握之后,站在你着陆的墙壁后方附近。
容易错过的红魔石位置: 在“Grim Grip”区域之后,一直向右走到底,然后跳上最远处的墙壁,即可找到一个隐藏的大型红魔石。 关卡机制:无 Boss: Sanctus 总体S评价难度:3/5(中等),若在最终电梯前刷取风格点数则为1/5 任务12 - 新的开始 总体S评价风格点数要求:约5250 / 约6500(若“通关时间”为A评价) 可操作角色:但丁 / 翠西 / 维吉尔 恶魔猎人等级要求:38250(H难度)/ 45000(DH难度)/ 81000(SoS难度)/ 135000(DMD难度) S评价时间要求:07:30(H难度)/ 10:00(DH难度)/ 11:30(SoS难度)/ 14:00(DMD难度) S评价风格点数要求:7000(所有难度) 隐藏红魔石缓存: (x1)大厅(魔剑教团总部)- 站在大厅的东北角。与任务9藏匿点位置相同
容易错过的红魂石位置: - **飞升室**:沿着房间边缘跑动,打碎所有能看到的可破坏杂物。 - **会议室**:4个烛台 - **实验处理室**:顶部有2座雕像和1个栅栏,乘坐电梯下楼后有4座石雕像 - **安全走廊**:旋转刀片竖井底部有3个木箱,激光室入口处有1个栅栏,激光室出口附近有2个长椅 - **大厅(魔剑教团总部)**- 6张长椅,门旁2个罐子,别忘了隐藏的魔魂石位置 大相册桥 - 小房间两侧的分隔物和家具 关卡机制:角色切换( Nero切换为Dante / Lady切换为Trish)及时间切片器(时间减缓) 综合S评价难度:2/5(简单) 任务13 - 恶魔归来 综合S评价风格要求:约5,000 / 约7,200(不含“不使用道具”奖励) 可用角色:Dante / Trish / Vergil 恶魔猎人等级要求:42,500(H难度)/ 50,000(DH难度)/ 99,000(SoS难度)/ 165,000(DMD难度) S评价时间要求:13分30秒(H难度)/ 18分00秒(DH难度)/ 23分00秒(SoS难度)/ 29分00秒(DMD难度) S评价风格要求:7,000(H及DH难度)/ 8,250(SoS及DMD难度) 隐藏红魔魂石缓存:无 易遗漏红魔魂石位置:古老训练场 - 跳下后在隧道前找到2组蛋群,2个隧道内有一批蛋,1个蛋在隧道前方,1个蛋在隧道另一方向的前方。 遗忘废墟 - 跳下前有2个蛋,隧道两侧各有1个蛋。 风扫山谷 - 跳下前左侧有1个蛋,跳下过程中中途有1个蛋,底层地面有许多蛋,每个陀螺屏障附近各有一批蛋。 远古广场 - 各处分布着许多蛋,请仔细搜索,部分蛋附着在墙上。 青金石河 - 每个普通出口前方各有一批蛋,桥下有若干蛋,一个大桥柱上有1个大蛋,看似空无一物的角落附近有一批蛋。在此任务中,桥下的蛋堆可能较难命中,若遇到困难,可尝试从两侧射击。风扫谷(废弃教堂附近)- 喷泉附近有2个蛋 废弃教堂 - 到处都有很多蛋,请仔细搜索 迷失森林 - 每条路径上各有1批蛋,故意走错路会带你进入一个可选竞技场,那里可以找到更多蛋批 遗忘废墟(巢穴附近)- 2个蛋 母蛇巢穴 - 三批蛋。一批在西北方向,一批在东南方向,一批在西南方向。关卡机关:会将玩家传送到固定位置的传送迷雾,会封锁所有门,并且出现在部分房间的中央 / 迷失森林灯光谜题(**朝着光源奔跑**) Boss:艾奇德娜 S级综合难度:5/5(极难) 任务14 - 废墟森林 S级综合风格评分要求:约4,400至约5,500 可操作角色:但丁 / 翠西 / 维吉尔 恶魔猎人等级要求:36,125(H难度)/ 42,500(DH难度)/ 90,000(SoS难度)/ 150,000(DMD难度) S级时间要求:13分30秒(H难度)/ 18分00秒(DH难度)/ 24分00秒(SoS难度)/ 29分00秒(DMD难度) S级风格评分要求:6,000(H难度和DH难度)/ 7,400(SoS难度和DMD难度) 隐藏红魔魂石缓存: (x1)废弃低地 - 故意被断层吞噬。缓存位于地图最西北侧。
# 易错过的红色宝珠位置 - **远古训练场**:隧道前3个宝珠,隧道内2个宝珠,桥顶2个宝珠(现在可以跳上去),隧道后1个宝珠。 - **荒废低地**:在本次任务中,被任意裂隙吞噬即可进入该区域。这里散落着多个宝珠,**不要忘记隐藏的宝珠宝箱**! - **青金石河**:每个普通出口前有一批宝珠,桥下有多个宝珠,桥柱上有1个大宝珠,看似空无一物的角落附近有一批宝珠。古老广场 - 遍地都是蛋,务必仔细搜索,部分蛋附着在墙壁上。 风蚀山谷 - 跳下前左侧有1个蛋,跳下过程中途有1个蛋,底层地面有许多蛋,每个陀螺屏障附近各有一批,喷泉后方也有。 森林入口 - 红色宝珠水晶附近的墙上有3个蛋,空心树干里有一大堆蛋,前往出口的路上有2个蛋。 关卡机制:故障怪(若被其吞噬,会重置房间进度的怪物) 总体S级难度:5/5(极难) 任务15 - 福图纳城堡 总体S级风格评分要求:约6700分 / 约8100分(“红色宝珠收集”需达到A级) 可操作角色:但丁 / 翠西 / 维吉尔 恶魔猎人等级分数要求:59500分(H难度)/ 70000分(DH难度)/ 153000分(SoS难度)/ 255000分(DMD难度) S级通关时间要求:21:00(人类难度)/28:00(恶魔猎人难度)/34:00(Son of Sparda难度)/41:00(但丁必须死难度) S级评价风格要求:11500(人类难度和恶魔猎人难度)/12250(Son of Sparda难度和但丁必须死难度) 隐藏红魔魂石宝箱:(x1)大厅 - 在 Sanctus 肖像左侧的平台顶部(但丁需要恶魔触发+三段空中冲刺 / 翠西需要高压电+墙踢) 与任务3的宝箱位置相同
(x1)图书馆 - 在通往神性雕像的其中一根柱子的第二层台阶上 与第三章藏匿点位置相同
(x2)士兵墓地 - 在区域东侧,跳至中间和右侧平台。 与任务5藏匿点位置相同
(x1)螺旋井 - 位于红色宝珠水晶平台上方的中间平台。与第5章任务的藏匿点位置相同。
容易错过的红魂位置: - **大厅**:一楼所有的椅子、长凳和围栏。 - **画廊**:到处都是杂物。不要错过陀螺附近与背景融为一体的两个木箱。 - **图书馆(再次探索)**:与安杰罗战斗后,上层有3个长凳;一楼有一些花瓶。 - **大厅1**:尼禄打开的大门附近的椅子和烛台。 - **餐厅**:桌子上的杂物。 - **大厅2**:放置四个陀螺的开放区域附近有4个烛台;出口附近有2个烛台;大厅尽头最后一面镜子后面有2个红魂。 - **螺旋井**:弹跳垫的正上方和正下方,以及中间平台上的红魂水晶。 - **大师的房间**:杂物。床周围的家具 士兵墓地 - 地面上有大量可破坏的杂物 + 楼梯上有两座雕像 + 喷泉顶部有一座雕像 + 椽子上有大型红魔魂石 关卡机制:无 Boss:达贡(Dagon) S级综合难度:2/5(简单) 任务16 - 地狱(Inferno) S级综合风格评分要求:约6,700 / 约9,500(不含“不使用道具”奖励) 可用角色:但丁 / 翠西 / 维吉尔 恶魔猎人等级要求:59,500(H难度)/ 70,000(DH难度)/ 135,000(SoS难度)/ 225,000(DMD难度) S级时间要求:18分30秒(H难度)/ 25分00秒(DH难度)/ 30分00秒(SoS难度)/ 37分00秒(DMD难度) S级风格评分要求:10,000(H难度和DH难度)/ 10,650(SoS难度和DMD难度) 隐藏红魔魂石缓存: (x1)收容室 - 位于阎魔刀(Yamato)曾悬挂的平台上 与任务6的缓存位置相同
(x1)天使创造——在该房间最后一波敌人的战斗区域,站在靠近集装箱角落的小方形区域上。 与第六关藏匿点位置相同。
(x1)大厅 - 圣像左侧平台顶部(但丁需使用恶魔触发+三段空中冲刺 / 翠西需使用高压电击+墙壁蹬踏) 与第三章宝物位置相同
(x2)福尔图娜城堡大门 - 两根柱子顶部 与第三章藏匿点位置相同
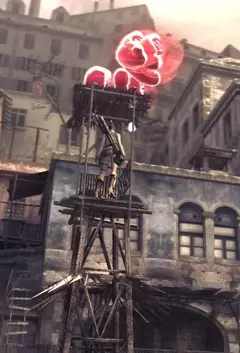
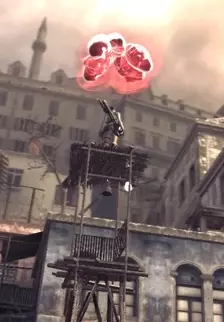
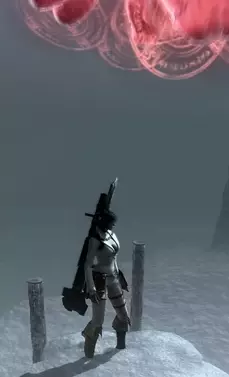
容易错过的红魔魂石位置: 游戏室 - 1个小型红魔魂石在侧边。虽然很容易看到,但也很容易忘记。 收容室 - 2把椅子,分别位于阎魔刀隐藏魂石箱的两侧。 弗里斯瀑布 - 底层有6个木桶,顶层有2个木桶。 天使造物间 - 2个木桶,分别位于房间底层的两个战斗区域。 大厅(再次进入) - 底层所有的椅子、长凳和围栏。 弗图纳城堡大门 - 通往秘密任务的路上有一些零散的小型红魔魂石,出口附近的一些平台顶部有1个随机的大型魂石。 第二矿区 - 下行途中有1个随机的大型魂石,以及1个藏在可破坏木板后的红魔魂石水晶。关卡机关:毒气会在大约半个关卡内持续消耗生命值 头目:贝利亚(Berial) 综合S级难度:5/5(极难) 任务17 - 弦乐柔板 综合S级风格评分要求:约11,400 / 约14,200(不含“不使用道具”奖励) 可操作角色:但丁 / 翠西 / 维吉尔 恶魔猎人等级要求:85,000(H难度)/ 100,000(DH难度)/ 180,000(SoS难度)/ 300,000(DMD难度) S级时间要求:13分30秒(H难度)/ 18分00秒(DH难度)/ 21分00秒(SoS难度)/ 25分00秒(DMD难度) S级风格评分要求:17,000(所有难度) 隐藏红魔魂石缓存: (x2)住宅区 - 在街道之后,立即前往细塔的中层平台和顶层平台,两处均有大型红魔魂石水晶柱 与任务2的缓存位置相同
Easily Missable Red Orb Locations: First Mining Area - Random large red orbs in the water Port Caerula - x2 Waste bins as you enter, x1 random orb on the path leading towards the gatehouse, and x1 random large red orb floating in the air as you exit to the residential district. Residential District - Tons of misc. stuff near the Red Orb Crystal Business District - Several trash cans & benches all along both sides of the road + a single random red orb on top of a shop door covering. Opera House Plaza - Trash cans Stage Gimmick: None Boss: Agnus Overall S-Rank Difficulty: 3/5 (Medium) Mission 18 - The Destroyer Overall S-Rank Style Requirement: ~ 3,800 / 4,800 (w/ an A-Rank in “Clear Time”) Characters: Dante / Trish / Vergil Devil Hunter Rank Requirement: 32,300 (H) / 38,000 (DH) / 68,400 (SoS) / 114,000 (DMD) S-Rank Time Requirement: 07:30 (H) / 10:00 (DH) / 11:30 (SoS) / 14:00 (DMD) S-Rank Style Requirements: 5,000 (All Difficulties) Hidden Red Orb Caches: None Easily Missable Red Orb Locations: None (Free S-Rank) Stage Gimmick: Simultaneously bores you to tears & drives you into a frothing rage due to the whole stage being this a BS gimmick Boss. Boss: The Savior Overall S-Rank Difficulty: 3/5 (Medium) Mission 19 - The Successor Overall S-Rank Style Requirement: ~ 9,000 (H/DH) / ~14,000 (SoS/DMD) / ~ 17,300 (SoS/DMD - w/o “No Items” Bonus) Characters: Nero / Lady / Vergil Devil Hunter Rank Requirement: 76,500 (H) / 90,000 (DH) / 225,000 (SoS) / 375,000 (DMD) S-Rank Time Requirement: 22:30 (H) / 30:00 (DH) / 50:00 (SoS) / 60:00 (DMD) S-Rank Style Requirements: 12,500 (H & DH) / 20,000 (SoS & DMD) Hidden Red Orb Caches: None Easily Missable Red Orb Locations: x3 Three batches of eggs. One batch is northwest, one batch is southeast, and one batch is southwest. x3 Cages in Agnus’s room x4 Columns at very end of the level after Agnus Stage Gimmick: Dice Game (1-4-2-6-3-5) & Boss Rush Bosses: Berial, Dagon, Echidna, Agnus Overall S-Rank Difficulty: 1/5 (Very Easy) Mission 20 - La Vita Nuova Overall S-Rank Style Requirement: ~ 3,600 / ~ 4,500 (w/ an A-Rank in “Clear Time”) Characters: Nero / Lady / Vergil Devil Hunter Rank Requirement: 28,050 (H) / 33,000 (DH) / 59,400 (SoS) / 99,000 (DMD) S-Rank Time Requirement: 02:30 (H) / 03:15 (DH) / 03:45 (SoS) / 04:30 (DMD) S-Rank Style Requirements: 5,500 (All Difficulties) Hidden Red Orb Caches: None Easily Missable Red Orb Locations: None (Free S-Rank) Stage Gimmick: Boss-Only Level, Post-Boss Savior Parry Finisher If Playing As Nero Boss: Sanctus Diabolica Overall S-Rank Difficulty: 3/5 (Medium) General Tips Lady’s missions are the most free S-Ranks of all time. Just fully charge shotgun and blast enemies at point-blank range, and if you get an opening, do a level 2 or 3 charged rocket. That’s literally all you need to do with her except for charged handgun shots in the Dante fight and against mephistos/fausts. Space out your buster’s as Nero, so you can keep building style with them. Opening with Dante’s Dance Macabre or a fully charged Overdrive is a great way to jumpstart your style meter at the start of a fight. Use Round Trip on Dante and Virgil to keep enemies off of you (also makes cutlasses & Bael/Dagon’s figure skater tendrils WAY less obnoxious) Aside from human difficulty, the time requirements on all non-boss missions are VERY generous (if you use turbo mode), so take the time to be stylish. If you’re having trouble gaining style as Vergil, try to open fights with Yamato Combo C (attack-attack-attack-pause-MASH attack) and weave it in whenever you can. It’s worth around one whole letter on the style meter when fully landed. Do NOT use spiral swords as Vergil against angelo enemies unless you like being shield bashed constantly. (DO use blistering swords though, it works great against them) Do NOT open fights with Judgment Cut End as Vergil. As it does not raise the style meter very much, but will greatly reduce the enemy health you have to work with. Whenever a mission takes you through Fortuna Castle’s “Grand Hall” be sure you break ALL gates, chairs, and benches on both sides, as well as grab the hidden orb cache. I’ve ruined at waaaaay too many runs of missions 6 and 16 because I get in a hurry and forget to do this. Your rolls during the Dice Game are not random. The dice always spins in the same sequence (1-4-2-6-3-5). In order to move a specific number of spaces, wait for the dice to have the number of spaces you want to move on its top face, then hit it with a single basic melee weapon attack. If done correctly it will always land on the number shown when you hit it. This method works for ALL characters. Intentionally landing on purple spaces during dice game can be risky, but if you’re having trouble meeting style thresholds it is possible to use these spaces to help you out quite a bit. If you see 3+ angelo enemies charging up their big energy ball, it can easily be reflected with a pistol charge shot (Nero/Lady), Pandora bow mode shot (Dante/Trish), or Rapid Slash (Vergil) for a HUGE boost in style rank AND points. Generally it is recommended that you abuse this whenever possible. Some enemies actually respawn after you clear their room, and you can return to grind out a few more style points if you’re ahead on time. No, it’s not just you. Everyone thinks the forest levels suck. Especially when it comes to S-ranking orbs collected. The best advice I can give you is to try and memorize where the eggs are as you play the missions. You’ll be restarting these missions so much, it won’t be too long before you do. The Savior is the biggest pain in the butt boss fight in the game. At the start of the fight he’ll spam blue balls at you until you move from the starting platform. You can shoot these for a TON of free devil trigger, and style rating (but not points). Farm up to at least an A-rank style before downing him. To easily down him, use Pandora's laser shot with Dante/Trish or Storm Swords with Virgil. Use the angelo’s around the boss while he’s down to meet the style thresholds. Try not to jump off a bridge from how boring this boss is. REBIND YOUR RANGED ATTACK BUTTONS TO A TRIGGER OR BUMPER AND KEEP THEM CONSISTENT BETWEEN CHARACTERS! I also find it helpful to bind Lock-On to the trigger opposite of my ranged attack button. When playing as Nero or Lady on the steam version, I strongly recommend setting up an activator for an unused button (There should be at least one free button on both of those characters) that is bound to your shoot button, set to toggle instead of press, with interruptible status turned on. This will let you push the button once and charge up shots between rooms without needing to hold the button. This won’t let you auto-charge in combat, but will save you from needing to keep the trigger held down while you're just running between rooms. You can probably set up some really complex action layers to achieve an auto-charge effect even in combat... but that kinda feels... not very stylish... so I didn’t bother setting something that complicated up. Dice Rotation Order 1-4-2-6-3-5 Yes, this gets repeated here in it's own section. If you're like me, you'll want an easy spot to scroll to to find it, so here it is.
2026-02-13 19:00:15 发布在  Devil May Cry 4 Special Edition


说点好听的...
收藏
0
0