换一换
换一换 


提升收益完全指南 核心职业 大多数角色基本都需要待在实验室中,以获取实验室提供的丰厚加成。你的进度和收益将围绕以下4个角色展开: **Bubonic Conjurer(瘟疫召唤师)**:这将是你的主要主动 farming 角色。他负责获取现金、雕像和掉落物。 **Maestro(乐师)**:这是你的次要主动 farming 角色。他也能获取现金/雕像,但更重要的是,由于乐师能获得更高的总掉落率,他将负责击杀 Boss/小 Boss。 **Bowman(弓箭手)**:弓箭手将为你的死亡笔记积累击杀数,并通过击杀绿蘑菇来提升实验室的金钱加成。这将为你的瘟疫召唤师提供支持。 **Blood Berserker(血腥狂战士)**:狂战士将负责烹饪。他每天能生产大量的勺子,为你带来可观的烹饪加成。 瘟疫召唤师 你的瘟疫召唤师会运用其“复活死者”技能,高效主动地刷怪。 ~~~~~~~~~~~~~~~~~~~~~~~~~~~~~~~~~~~~~ 配置 天赋:将“复活死者”“化学战”“屁灵”“触手眼”和“颅骨烹饪”的天赋上限提升至160点。你还需要将“水晶4日”星级天赋点满。你需要按以下顺序将这些技能拖到技能栏上。不要放置其他战斗天赋,它们会干扰这些技能的最佳施法。

CardsYou want the genie card and poop card maxed and using the card doubler chips (250% extra crystal spawn chance). For the other cards, you want drop rate, money or XP while active, depending on current goal Star Signs 15% Class EXP when fighting actively 4% Mob Respawn 15% Total Damage/-7% AFK OR 2% respawnPost Office Non-Predatory Loot Box capped for drop rate and crystal spawn chance Potion Package capped for Cranium Cooking time increase Magician Starterpack to reduce cooldowns Utilitarian Capsule for cash from mobsShrines Clover CrescentLab Chips Chocolatey Chip Potato Chip Omega Nanochip Omega Motherboard Silkrode Nanochip Silkrode Processor Silkrode Motherboard (if you have Beach Bro)OtherDrop rate and money obols. Beach Bro trophy if you have it. Don't forget to equip all speed potions. If you have enough damage to insta-kill everything with poison, use the spear so your char moves around picking up items to help reduce lag. ~~~~~~~~~~~~~~~~~~~~~~~~~~~~~~~~~~~~~ Active Farming Money & AlchemyThe ideal spot to farm money is Flomberges in world 4. You will get the most money from crystals there, as well as fastest proc of Raise Dead and Cranium Cooking thanks to Tenteyecle and the large amount of Flomberges on a small map. World 1 StatuesThere is a lack of good maps with a lot of mobs in Raise Dead range to farm statues. You are likely better off using Maestro for this. The ideal map is likely Rats or Giga Frogs. World 2 StatuesSand Castles is the best place to farm, although you could also try Sandy Pots for glass shards to improve the capacity stamp. World 3 StatuesMammooths is a small map with relatively high mob count. It is perfect to farm statues in World 4, although the only statue of interest not in other worlds is the skill experience one. Maestro Your Maestro will farm the bosses/minibosses, as well as statues on maps with rare drops where your Bubonic Conjurer cannot effectively use Raise Dead. Your Maestro will also boost the skill efficiency of all your other characters. Only get enough skill levels to equip the best tools on your other chars. This will help keep your Maestro ahead. ~~~~~~~~~~~~~~~~~~~~~~~~~~~~~~~~~~~~~ Setup TalentsYou want Cmon Out Crystals, Gimme Gimme, Rares Everywhere!, Crystal Countdown, Printer Go Brrr, and Right Hand of Action capped. All the rest doesn't need to be capped but more damage is better. Level the talent Curse of Mr Looty Booty as much as you can while still one-hitting the crystals. CardsYou want the genie card and poop card maxed and using the card doubler chips (250% extra crystal spawn chance). For the other cards, you want drop rate, money or XP while active, depending on current goal. Star Signs 15% Class EXP when fighting actively OR 5% Drop Chance 4% Mob Respawn 15% Total Damage/-7% AFKPost Office Non-Predatory Loot Box capped for drop rate and crystal spawn chance Magician Starterpack to reduce cooldowns Any of the boxes that help with damage/skill gainsShrines Clover CrescentPrayers Midas Minded while killing bosses/minibosses. Also for crystals you can 1-hit with the prayer active.Lab Chips Chocolatey Chip Potato Chip Omega Nanochip Omega Motherboard Silkrode Nanochip Silkrode Processor Silkrode Motherboard (if you have Beach Bro)OtherDrop rate and money obols. Beach Bro trophy if you have it. Don't forget to equip all speed potions. ~~~~~~~~~~~~~~~~~~~~~~~~~~~~~~~~~~~~~ Active Farming MoneyThe ideal spot to farm money is Clammies in world 4. They give good money but most importantly you will be needing Pealer Shells for various tools/bags. World 1 StatuesSlimes is the best map, although if you don't have full POP obols, farm Giga Frogs. The imporant part is never being idle waiting for mobs to respawn. World 2 StatuesSand Castles is the best place to farm, although you could also try Sandy Pots for glass shards to improve the capacity stamp. Moonmoons are also good if you need ghosts. World 3 StatuesA lot of maps will work here. You can go for any maps where you don't end up idling, if you need materials/rares from that specific mob. Bosses & MinibossesFarm them on Maestro with the Midas Minded prayer and capped Curse of Mr Looty Booty. Switch to full drop rate cards. Be sure to have your obol boards completed with all drop rate obols. You want to maximize rare/candy drops. Maestro has talents which allows to reach highest drop rate possible in the game. Bowman Your Bowman is the AFK MVP. He'll be using your candies on perfecting your Death Note and amassing Green Mushroom kills. ~~~~~~~~~~~~~~~~~~~~~~~~~~~~~~~~~~~~~ Setup TalentsYou want Featherweight, Idle Shooting, Broken Time, Robbinghood, Smeltin' Erryday, ACME Anvil, SpeeDNA capped. For the rest, go for as much damage talents as possible. CardsYou want Chaotic Amarok, Boop and Clammie cards. For the rest you want damage/drop rate. Star Signs 6% AFK / -50% - 80% HP 4% Fight AFK 4% Mob RespawnAlchemy Bubbles Hammer Hammer (will net you lots of anvil materials when using candy) Mr Massacre (very strong) Kill per Kill (minor help)Post Office Civil War Memory Box for fight AFK Utilitarian Capsule for multikill per tier Blacksmith Box for more production while using candy Carepack From Mum cause you'll be using lots of speed potions Bug Hunting Supplies for sampling bugs Any of the other boxes that help with damage/skill gains Non-Predatory Loot Box for drop rateShrines Woodular Clover UndeadPrayers Balance of Pain for the multikillLab Chips 15% Fight AFK Conductive Processor Omega Nanochip Omega Motherboard Silkrode Nanochip 2x Wood Chips (Respawn chips or Silkrode Processor with respawn pendant otherwise)OtherPut all speed potions on your bowman as he gets damage from movement speed. Bowman's damage talent can scale indefinitely unlike other classes. Just keep working on speed statues and feasty to enhance your speed potions. ~~~~~~~~~~~~~~~~~~~~~~~~~~~~~~~~~~~~~ AFK Farming World 1You'll mostly get stuck in World 1 at all time. Work up your Death Note to the highest tier on all mobs and improve your gear/damage. Then use candy on Green Mushrooms. With the laboratory's Fungi Finger Pocketer and the gem boosting it, each 1 million Green Mushroom kills will add 3.5% to your money gains. It's possible to exceed 500k kills per hour, so your Bowman will be working on supporting your Bubonic Conjurer's money gains. You will also generate a lot of bars from the forge thanks to the Smelting talent, and anvil items thanks to Hammer Hammer bubble. Don't forget to regularly claim your anvil materials while using up candy. Blood Berserker Your blood berserker cooks. That's it. ~~~~~~~~~~~~~~~~~~~~~~~~~~~~~~~~~~~~~ Setup TalentsIncrease the caps on his cooking/skill efficiency talents. Cards Amarok and Bunny cards for AFK Gains Chaotic Troll for skill efficiency Chaotic Efaunt and Mutated Mush for cooking EXPStar Signs OG Skiller 2% Skill AFK 4% Skill AFKPost Office Chefs Essentials Myriad CratePrayers Skilled DimwitLab Chips Omega Nanochip Omega Motherboard Conductive Processor Silkrode Nanochip Silkrode Processor 2x Galvanic MotherboardOtherPersephone's bouquet of course is a must, which is doubled to 30% AFK gains with the Silkrode Processor. You'll also want the upgraded Chef Hat Shoes and 2x Chef Ring. If you don't have those, farm them with your Maestro or Bubonic Conjurer. Don't forget to chow all the mobs first. Other Characters Your other characters will be stuck in the lab, and sample materials for the 3D printer. If they need more points to cap all their skill talents, take them out a bit for some progression and active crystal farming in world 4. Only get enough skill levels to equip the best tools on your other chars. Then stop leveling and only sample. This will help keep your Maestro ahead. You want their obols board to be filled with obols for their main skill. Use Royal Sampler prayer on all your chars. Sampling caps at 90% so only level your prayer to about 30% sampling gains. Those characters are there to keep the strong lab bonuses active for your main characters and sample materials for your alchemy/gear/stamps. That's their only purpose. It's good since that's less stuff to manage. Stamps Stamps are good for you, but the costs get prohibitive. Your Bubonic Conjurer will make sure you earn plenty of money for upgrading them. Obols You can reroll up to +1 misc value on your obols. When combining obols, the resulting obols will keep the reroll bonus of the obol in the left slot. So reroll +1% drop rate/money on your obols before merging. You don't need to reroll your merged obols. The reroll value isn't added to base stats, so rerolling the merged obol will just delete your reroll bonus and roll a new one. You reroll once before merges since it's cheaper to reroll on the lowest obol. Peak performance:

炼金术 使用该职业时,专注于让同色气泡增殖被动气泡,同时这些气泡还能为坩埚气泡提供折扣。升级气泡时不要忘记使用对应职业的角色,因为增殖气泡也会作用于折扣气泡,所以需要正确的职业才能从增殖气泡中获益。需要重点关注的气泡: - 每个坩埚中的两个倍率气泡 - 折扣气泡(与倍率气泡叠加后最高可达95%) - 用于提升弓箭手离线收益的“大屠杀先生” - 用于提升活跃状态下“腺鼠疫召唤者”的“烹饪路杀” - 提升弓箭手(及其他所有角色)糖果使用效率的“锤子锤子” - 基础属性气泡 - 用于技能采样的可装备技能气泡 - 技能增益气泡 - 钻石厨师 - 金钱增益气泡 建筑方面: 你需要将一名乡绅放置在正方形区域的中心,周围所有建筑都指向该乡绅。通过行/列齿轮指向乡绅,形成类似十字的布局。所有增益齿轮都应提供“+% 玩家建筑经验值”加成。其他所有齿轮则应专注于“建筑经验值加成”属性。你的建造速度主要取决于侍从的建造等级,而非齿轮,因此你应专注于最大化侍从的经验值获取。 我的(配置)尚未完成,但所有这些增益齿轮都应指向侍从。
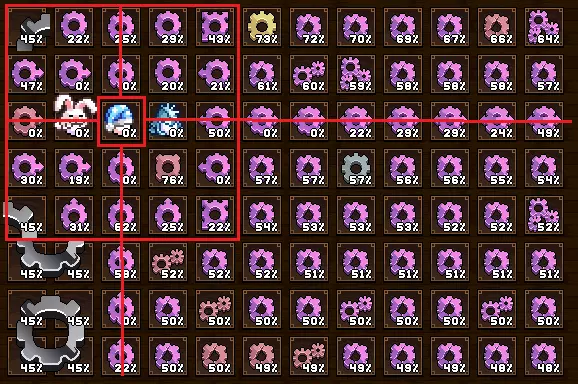
实验室 当你获得连接范围宝石后,将其与病毒连接节点和探宝者冥府金币节点组合,就能获得相当不错的连接范围。记住,线条宽度代表角色之间的连接范围。对节点和宝石的连接范围加成会明确标记为“连接范围”。 这是典型的终局实验室配置,需要6个角色:
你通常会让以下角色离开实验室: - 激活**腺鼠疫召唤师**或**艺术大师** - **弓箭手**负责对付怪物 - **血腥狂战士**进行烹饪 第四个离开实验室的角色可自选,通常是第二个厨师或弓箭手。如果激活了腺鼠疫召唤师,必要时第四个角色也可以是艺术大师,以维持其技能在右手天赋中处于最高水平。