


[剧透警告] 诅咒模式:新手入门指南
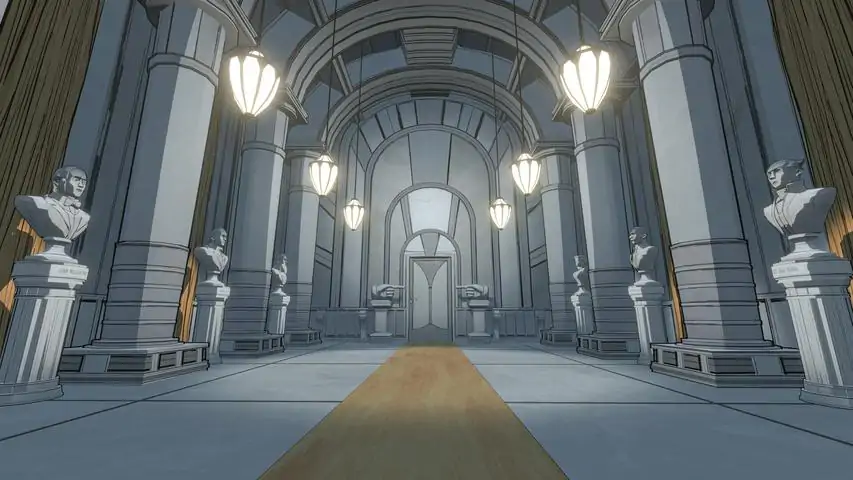
《蓝色王子》诅咒模式初步指南——这绝非一份完整的技巧与策略清单,但希望能为你提供一个起点。欢迎在评论区分享个人经验! 我希望你能写出比我更好的指南 ### 引言 旧路将引你至地狱,但在那万丈深渊之中,我们将寻得救赎。 在撰写本文时,目前尚无针对那些试图挑战《蓝色王子》诅咒模式的受诅灵魂的指南。因此,我郑重地将自己在这趟受诅旅程开始时所寻求的帮助,分享给其他玩家。 请注意! 本指南包含大量剧透,如果你尚未完成房间目录,现在可能还不是阅读它的时候。虽然在完成大部分谜题之前就有可能通关诅咒模式,但这并不适合胆小的人。 不过,如果你有足够的勇气和毅力去挑战最艰难的霍利山,那么我会尽我所能为你做好准备。 然而,我只是一名普通的探索者,因此强烈建议你与社区中的其他玩家交流,可以在评论区、论坛或我本该考虑到的Reddit上进行讨论。 此外,我想特别提及能力出众的Whaleton,他所撰写的《霍利山殿堂指南》非常出色。在我的游戏过程中,这份指南对我来说是极其宝贵的资源。 https://steamcommunity.com/sharedfiles/filedetails/?id=3471025835 诅咒模式:基础机制 好奇、兴趣与痴迷——通往诅咒之路的里程碑。
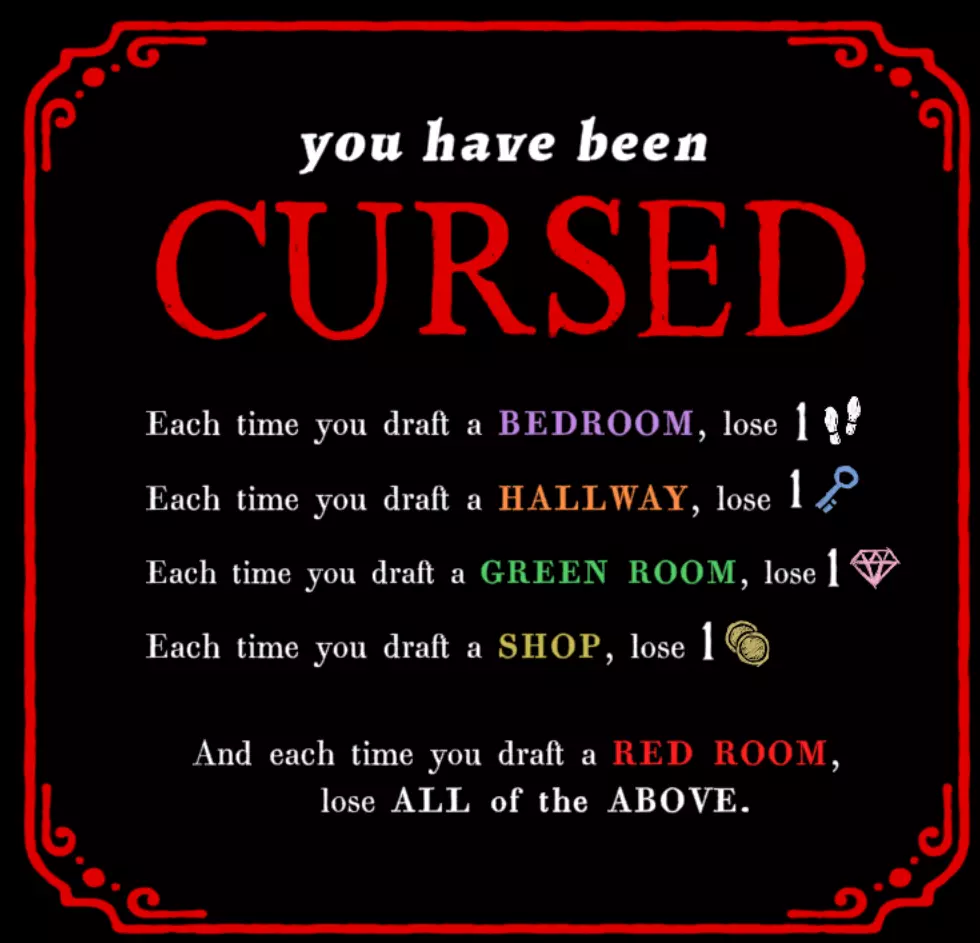
Playing Blue Prince in Curse Mode is a trial in temperance, patience, luck and vexation all. Several limitations are placed upon the Player when embarking upon Curse Mode, as detailed in the picture above, but transcribed below for ease and repetition: Each Day, you start with 13 Steps Placing down a Purple Room costs -1 Step Placing down an Orange Room costs -1 Key Placing down a Green Room costs -1 Gem Placing down a Yellow Room costs -1 Coin Placing down a RED ROOM costs -1 Step, -1 Key, -1 Gem and -1 Coin Blueprints and Blackprints are both safe to draft. Please note that you do not lose ALL of your steps, keys, gems and coins when drafting a Red Room - only one of each. While Red Rooms are very difficult to manage, they are not necessarily run ending and may be utilised with great care. HOWEVER! Know that Prismatic Rooms take a cost for EVERY colour that they are composed of. As such, rooms such as the Aquarium and the Maid's Chamber become a lot more difficult to handle, Aquarium especially. Additionally, these costs also apply to Outer Rooms. Furthermore, beyond what is stated explicitly, two more things are important to know for your cursed forrays. One, that ALL Blessings are unavailable for the entirety of the run. And Two, that the Orchard upgrade which otherwise would give +20 Steps has been made useless. Those are, to my knowledge, all the changes made in Curse Mode. If you have any further additions, I ask that you leave them in the comments! The Importance of Rooms This sprawling estate, a Mecca of madness and morbidity. Your work begins... Curse Mode actively drains anyone of their resources and as such how you draft rooms are, even moreso than in the standard manner of gameplay, crucial for success. Some, I have found, are incredibly important - at some point or other - for a Curse Run. These will be detailed below, going into which rooms are important for creating more permanent progress that will last you through all of your runs, what rooms make for excellent foundational rooms in a Curse Run, and how to approach access to the Antechamber. - Building Permanence Beacons in the darkness, stars in the emptiness of the void. Curse Mode is best tackled like an endurance run, of patience and of the slow accumulation of enduring resources. As such, this will likely end up being the longest section of this guide. There are your standard permanent upgrades, the Gemstone Cavern, the Western Gate, Blackbridge Grotto and the Satellite - all of which are well worth acquiring when possible. Of these, I would argue that Gemstone Cavern is the most generally useful, but all of them serve a purpose and all of them came into play in my own final run. And of course. 01 - Foundation - the first of the rooms we will talk about, and the last of the Permanent Upgrades in the "activate once" style. There are different schools of thought with regards to where to put Foundation in the standard mode of play, either close to the entrance or close to the Antechamber. However for the purposes of Curse Mode, I would favour closer towards the Antechamber. That said, the run IS completely doable without Foundation. In fact, in my own one, I ended up drafting Foundation twice over 50 runs, and not before day 40+ - neither of which were in a good position. In my estimate, the absolute IDEAL positions for Foundation is either B8 or D8 on the grid, diagonally across from the Antechamber with an opening towards South and either West or East door - thus maximising the possibility of a direct access. Then comes the more stacking buffs - these will be what most of your runs will go for, if you aren't able to acquire a Permanent Upgrade. 42 - Observatory - Gives +1 Star on drafting, activates your stars when you draw the constellations, and is where you find Planetarium. Overall, fantastic room. Planetarium - Speaking of stars, gives +2 Stars on ending the day here. Extremely helpful in Curse Runs, especially as you're unlikely to have many options for where to end your day. Can also be upgraded further with the Telescope! 36 - Laboratory - Your main source of Allowance Tokens. Gets even more useful with the Satellite operational, especially your lockpicking skills. After getting access to Blackbridge, may be accessed remotely through any of the other terminals. Can provide access to the Antechamber if you're lucky - that's how I got in on my final run! Conservatory - A fantastic room and definitely one that I actively hunted for. At the cost of -1 Gem (plus placing it in a corner), you may permanently adjust the rarity of three random rooms. INCREDIBLE if you can practically eliminate certain Redprints from appearing in your draft pool, such as Lavatory, as well as make great Blueprints much more available. 30 - Drafting Studio - A solid room that allows you to expand your pool. Kennel especially is a phenomenal pick, but there are uses for all the Blueprints, as well as Solarium and to a lesser extent, Dormitory. And Vestibule, I guess. Maybe. 28 - Chamber of Mirrors - Difficult to utilise and somewhat random as to the potential reward, but being able to duplicate helpful Blueprints or certain key rooms can be very helpful. Treasure Trove - Gets stronger the more you draft it and, as a Blackprint, doesn't have any downsides. Pretty good room, but a pain to get. Armoury - Likewise an utter pain to get, but IF you can get it, and IF you can get the required coins for it, then Axing high gem costs of certain rooms is incredibly good. Especially useful on Cloister and Throne Room. And, though it does not technically fit in this format... 35 - Workshop + 38 - Coat Check - As we all know, items from the Workshop may permanently unlock new routes, doorways and even the permanent Satellite upgrade. Though they don't fit the same format as the other two, functionally they can sometimes act like a stacking upgrade when used together, especially in the pursuit of Burning Glass and Power Hammer. We also want to consider the buffs gained from Upgrade Discs. These are variable, and I won't go over all of them, but here are a few that I think are especially strong or some which I think you should absolutely avoid if they come up: Spare Room is one that I was thankful never got upgraded for me. Being required to turn your safe Blueprint into a hazardous room is not one that I am fond of. However, if you must, then I would choose either Spare Bedroom (preferably into one of the three further upgrades, but all three there have their uses) or the Spare Green Room, where my recommendation is Spare Veranda, but I could see an argument for Spare Terrace. Parlour has a terrible upgrade in Funeral Parlour, but the +3 gems is great. Billiard Room's upgrade into Break Room is the obvious winner - a guaranteed keycard can be a lifesaver, and if you already have a high amount of stars, it bears a much higher value. Nook can upgrade into the Breakfast Nook which, in my opinion, is one of the best rooms to get for Curse Mode. Consistent access to a fantastic tomorrow room (and today room, tbh) in the Breakfast Room, AND +10 extra steps (+11 with salt) makes it a fantastic upgrade. Reading Nook is nice, but not as valuable in Curse Mode I do not think. Mail Room has two that could really be considered: Priority Shipping and Freight Shipping. Due to the length of Cursed runs, I am partial to Priority Shipping, but both are good. Aquarium is a -painful- one to receive an upgrade for, but if you must, I suggest the Electric Eel if you have yet to get power to the Laboratory, otherwise, take Starfish. It doesn't make up for the pain of drafting this monstrosity, but it puts a star-shaped band-aid on the wound. Boudoir getting +2 dice is, in my opinion, the absolute winner. +1 Gem is nice, but a Green room might snatch that just as fast. Bet you wish you coulda rerolled that room, huh? Guest Bedroom into Geist Bedroom is an obvious one, but there's some VERY niche use for Quest Bedroom if you can get to Antechamber but not underground consistently. Nursery has several options and truthfully, they're all decent. Nurse's Station allows you to keep your steps relatively healthy, at the cost of a ton of backtracking and +8 steps when drafting bedrooms is really good. I am sceptical about Indoor Nursery though, as this is one of your main step generators, and I would not want to sacrifice that. Hallway getting +1 Key is the only consistently Okay option. Plus, if you draft Hallway before getting any keys, it's a rare positive! Courtyard +1 Gem or 5 Digspots are okay, but avoid Corriyard like the plague (it CAN be situationally useful but I don't like it) Cloister has a LOT of options and it's down to luck which you get. However, a few stand out. Notably, avoid Draxus like your life depends on it. Joya, Dauja and Lydia make it into a situationally good stacking room, whereas Rynna and Mila can be very good for helping out your current run. Veia is situational and Orinda is kinda mid.Once more, a thanks to Whaleton for their guide on rooms, it was extremely useful for referencing all the upgrades. - Building Blocks for Success Room by room, hall by hall, we reclaim what is ours. In addition to the long-term rooms that are meant to slowly build up your resources, there are a few key rooms to consider for your run -today-! These are the building blocks for a successful run and the foundation (no relation) to getting beyond your thirteen steps. For the sake of ease, I have parted these up into helpful Today Rooms and helpful Tomorrow Rooms! Today Rooms Nursery - This is, in my experience, your primary source of steps. While technically possible without it, I found that most days I did not draft Nursery early, I usually struggled. 41 - Dining Room - And this is your second and, in my experience, weaker source of steps. Requires you to get to rank 8 on the day and only gives +20 Steps (or sometimes +30 Steps if you luck out on the right room combo). Still, an extremely useful T-junction. Kitchen - Unlike Commissary, which is undisputed in its usefulness, Kitchen sometimes receives a bad reputation. However, low cost bananas and the stacking step count from Tomato Soup or the Salad are both really good in a pinch - provided you have the coin for them. Secret Garden - The final room for Step generation (other than the normal bedrooms) and, in my opinion, the weakest of them. Spreading fruit is good, but that is not what you're drafting it for and it is only really reliable in conjunction with... 43 - Conference Room - A multi-purpose room, it draws in all spreads and places them within the Conference Room. Not only good for the sake of ease, but may also actively cut down your step loss from backtracking. Terrace - Removes the Gem cost from Greenprints. Even if you will still take a -1 Gem from drafting one of them, now you can do it when out of Gems! Enables some fun strategies. Veranda - Phenomenal room to get. Items are crucial and increasing the likelyhood of getting them is fantastic! 20 - Ballroom - The final "Today" room I want to talk about, the Ballroom is somewhat situational, potentially damaging and potentially a run saver. Given how gem draining Curse runs can be, having a way to consistently set your gem count to two is very good, in the right circumstance. Tomorrow Rooms Morning Room - Adds +2 Gems to your start the next morning. Also had +2 Gems itself, which makes it a bit of a Today room too, as well as an Upgrade Disc on the first go or otherwise a useful item. Extremely handy room and one of my favourites. 38 - Coat Check - Useful for Workshop upgrades as detailed elsewhere, but also just a nice way to retain items. Pocketing a Lucky Rabbit's Foot for later will never not hurt - nor will saving an expensive Showroom item, if you manage to get one. 39 - Mail Room - Just a solid room for tomorrow, really. Not as strong as some others unless upgraded, but still, pretty useful dead end. 40 - Freezer - Situationally good, but be careful with this one. Can be good for stacking the odds on a next day if you don't think the current run has a chance to get any big upgrades. Also has an Upgrade Disc, if you can get it. Clocktower - Extra keys is nice, but it's a bit of a pain to get. Also, Tomorrow Rooms are fairly rare, so not super strong. Showroom - Not really a traditional Tomorrow Room, but the Moon Pendant for 20 Coins is a really strong item. If you have even more money, then the Master Key or the Emerald Bracelet are both incredible, but VERY expensive. 37 - Sauna - Not personally tested, as I never managed to draft this bad boy, but the other Tomorrow rooms work so I have no reason to think this one does not. +20 Steps tomorrow is really nice, but please, do tell me if this acts Weird in Curse Mode. Master Bedroom, Her Ladyship's Quarters and Servant's Quarters - All only function as unofficial Tomorrow Rooms when you end your day there, and I haven't been able to test any of them personally - so I can neither deny nor confirm if they work. Of the lot, only the Master Bedroom is really worth considering - the -10 Steps or the Halving Steps are both REALLY steep costs for a single die or a single star. +10 Steps from Master Bedroom, if functional, is REALLY good though. Starfish Aquarium, if you happen to have it, also gives an additional +1 Star if you end your day there. I haven't tested if Goldfish or Electric Eel ones give any upon sleeping there. - Four Corners: Antechamber Access Pace out the halls of your lineage, once familiar, now foreign. In this briefer section, we shall discuss each Antechamber Access - how viable they are and how they might best be used. Secret Garden - West (and East) I think this is the strongest and most consistent Antechamber Access, once you have broken down the extra wall to the additional lever. It allows you to open two side doors, literally opening up your options. Additionally, the room itself is a T-junction with an entirely decent effect. The only downside is the availability of the Secret Garden Key. Unless you have this saved, you have to hope for a bit of luck - usually from either the Music Room, Locksmith or the Billiard Room, etc. Or digging. Still, a solid option. Great Hall - East If you have an abundance in Keys, a Lockpicking Kit, have previously gotten the Drafting Studio or better yet, the Foyer, then this is a very decent option. However, it will steal a key from you when you draft it, just from being a Hallway, so keep that in mind. Greenhouse - South The last of the three "Official" entrances, the Greenhouse is a slightly luck based access, depending on getting a Broken Lever. Still, it's not the rarest item, and as a room itself if supplied with water, it may be a nice source of gems. Mechanarium - West A moderately difficult room to acquire, the Mechanarium is inconsistent but not a bad option, if you have drafted a lot of Mechanical rooms already. Nothing special. Weight Room - South Oh, Weight Room. How I hate you so. Halving your Step Count is a NASTY effect, regardless of when it comes into play - and as a Red Room, it is also going to take one of every resource you own. ADDITIONALLY it requires Power Hammer support in order to open it up so you have to do it possibly twice! Worst access, but if you have no other options, be sure to count your steps well. North The Final Antechamber Lever is also the most troublesome to get - not only in terms of access, but potentially also in simple step count. The simplest is opening up access to the Basement with a Powerhammer or setting up the Pump Room with power in order to dip into the Well and cross the Reservoir on boat. Alternatively, if you manage to get a Burning Glass, the Reservoir may be accessed through the Precipice. Technically, you do not ever need to acquire the basement key before entering into the Antechamber and Room 46. However, doing so honestly sounds like a major pain in the ass. That is, of course, unless you get lucky. Or rich. Throne Room This is the other way to open the North lever. It comes at a massive Gem cost, but if you can afford it, it saves you that entire trip - the Power Hammer Troubles, the Basement Key Problems, the Pump Room Shenanigans - all of it. But there is one more way to open the Antechamber. And it's one of my favourites. Laboratory - Round-House Roulette Upon gaining access to the Satellite, you will be able to craft your own Experiment packets. One of these options, is opening a random Antechamber door. Is it consistent? No. Is it fun? HELL YEAH! It is also really useful when it does come up, ESPECIALLY if it comes up with a common trigger, as it might just be able to open all four doors by itself. The Importance of Items Leave nothing unchecked, there is much to be found in forgotten places. Before we talk strategy proper, I want to highlight a few immensely useful items to keep in mind. Powerhammer You know her, you love her, she's remarkably consistent and extremely useful. Can open up several permanent paths, and also just a good sledgehammer. Difficult to make, though. Burning Glass / Torch They serve the same function, but Burning Glass is easier to get, unless you luck into Armoury. Required for unlocking the Satellite, the Precipice-Underground connection. Also useful for lighting the Tomb candles and, if possible, blowing the fuse in the Trading Post. And threatening the darned pig. Telescope Onto the less useful items, but the last Permanent one, the Telescope. I'll be honest, I'm not sure I ever have actually been able to use this one properly, but I have it from multiple sources that if used in the Planetarium, it upgrades it a little each time. Don't come for me if it is not! Moon Pendant This item allows you to bring over Two Special Items from your inventory into the next day (including, potentially, itself!). This is even better if you can whittle down the amount of items you have, especially the less useful ones, as to increase the likelihood of something good carrying over. Sleeping Mask This, other than Nursery, is the most consistent way of getting Steps. While both the Salt Shaker and the Running Sneakers are GOOD, the Sleep Mask is the most consistent of the three. Can make the basis of a good run. And finally, I want to talk a little about Shovels and Jackhammers. If you are in possession of a Shovel and are currently considering maybe upgrading to a Jackhammer, provided you have the other resources, you need to ask yourself the following question. Do you like Turnips? Or, said less coyly, do you have a consistent method of Step generation that means you do not need to rely on Turnips? If so - Jackhammer away! Otherwise, it is as you might expect. Coupon Book isn't that great, Coin Purse is situational, Lucky Rabbit's Foot is phenomenal, etc etc. Strategy Part I: Building Up Do not ruminate on this fleeting failure - the campaign is long, and victory will come.

现在我们已经涵盖了所有不同的细节,那些琐碎的事情。让我们来谈谈前期游戏策略。 首先,最初的几天应该专注于建立永久资源。解锁宝石洞穴和西城门都特别有帮助,同时获取天文馆和温室也很重要——后者需要你先获得一把铲子。 如果你有铲子,并且可以进入西区,我建议你在那里挖掘微芯片。这应该不会有太大麻烦。 在某个阶段,你可能会想要进行一次“动力锤”行动——尽可能清理区域,但至少要打通地下室的通道。一旦你拥有了(相关物品),就可以使用衣帽间来尝试获取诸如燃烧玻璃之类的物品——或者,如果你已经完成了纵火行为?那就获取陈列室物品或幸运兔脚。 进行燃烧玻璃/自燃火炬的流程是个不错的选择,尽管并非绝对必要。卫星接入会非常有帮助,而如果能做到的话,从坟墓获得的额外资源也很不错。但最好在一轮游戏即将结束时进行,此时你恰好拥有足够的资源来执行。 实验室应始终作为优先事项,尤其是为其接通电源。我发现在我的游戏过程中,这非常困难,直到我碰巧获得了一次非常顺利的游戏流程,所有条件都完美契合,然后却立即阻碍了进入房屋更深处的任何进展。不过我认为,在诅咒模式中获得永久性升级比在标准模式中更有价值。 要知道,这一切可能需要一段时间。收集资源并期待“幸运之旅”正是其核心所在。 ### 策略第二部分:第46号房间 一丝希望,无论多么渺茫,都绝非毫无价值。 人们如何知道这一次,就是那一次?就是最终成功的那一次? 就我个人而言,直到我站在接待室门外,拥有3个“步骤”时,我才确定。 因此,我的建议是以灵活的心态对待每一次游戏。这一次可能成功,也可能再经历20次都无法成功。当你探索庄园时,尽量保持所有选择的开放性。 尤其有帮助的是,让自己根据手头的物品来做决定。它们都有各自的用途(没错,即便那本优惠券手册,我也勉强承认),应该成为你构筑阵容时的指路明灯。 不过,如果你处于3级,只有六个步骤,没有道具也没有资源,那么专注于为次日创造优势才是更明智的选择。 50星奖励可能会特别强大,因为拥有无限重抽的能力,对于有潜力的一局来说或许是天赐良机。 事实上,正是凭借这个奖励、电钻、王座室,再加上一次幸运的实验室轮盘,我才终于进入了第46房间。 没有哪一局的进程会完全相同。但也许,只要有一点点运气,你也能战胜诅咒,赢得胜利。
最后的话 巨大的逆境自有其魅力——它是淬炼意志的烈火。 希望本指南能对大家有所帮助。 事实上,我一直想把自己的想法写下来——或者说,敲到键盘上——并且希望能为这个日益壮大的友好社区贡献自己的一份力量。 我绝不声称自己是“诅咒模式”的大师,如果未来有幸出现更好的指南,我会为此感到由衷的高兴。 但在那之前,希望本指南能对所有“男爵”们有所帮助。 祝你好运,朋友,愿你昂首面对逆境。
2026-02-14 04:00:06 发布在  蓝途王子
蓝途王子


说点好听的...
收藏
0
0