


使用游戏服务器管理器创建和管理服务器
本指南将带您了解如何使用游戏服务器管理器(Game Server Manager)搭建《星界边境》服务器——该工具可实现自动化操作,并提供大量实用工具与功能,让服务器的搭建和运行过程更加简便。 概述 本指南与您可能阅读过的其他指南存在一个重要区别:游戏服务器管理器程序。该程序能为服务器管理员实现自动化操作,并提供大量实用工具与功能,极大简化服务器的搭建和运行流程。游戏服务器管理器功能概述 - **通过SteamCMD自动检查并应用更新**(可配置延迟和服务器警告消息) - **玩家在线图表** - **内置Telnet和RCON客户端**,可手动使用或设置为自动向服务器发送消息和命令(如关闭服务器及关闭通知) - **服务器宕机时自动重启** - **消息/命令广播系统** - **服务器状态和玩家变动的Discord消息广播** - **显示所有在线玩家的列表**,包括 ping 值、分数、队伍和在线时间 - **INI文件解析器**,可显示多个文件中的所有INI文件设置列表,支持排序、筛选、编辑、导入和导出- CPU和内存使用情况显示(含图表) - 网络带宽监控(含图表) - 可将状态、在线玩家数及服务器名称输出至文件(支持自定义格式) - 一键访问配置功能 - 详细服务器信息 - 显示内外网IP地址 - 服务器运行时长显示 - 可选定时每日服务器重启功能 - 定时增量备份:每日将游戏数据备份为ZIP文件 - 游戏自动更新:支持在重启期间运行维护/更新程序(例如通过SteamCMD自动执行每日更新),程序完成后服务器将自动重启以减少停机时间 - 定时重启延迟选项,即服务器将关闭,程序将等待X秒后尝试重启。 - 远程登录服务器 - 一键备份与维护 - 远程命令,可启动、停止、备份、更新服务器及向服务器发送指令 - 游戏配置文件 - 可运行程序的多个实例,每个实例对应不同配置 - 设计为“通用型”,可与多种游戏配合使用 初始设置 下载游戏服务器管理器 前往[www.jimbobslimbob.com]网站下载我的游戏服务器管理器程序。 将压缩文件解压到您选择的位置并运行程序。 下载SteamCMD 如果您尚未安装,请前往该网站下载并解压SteamCMD。安装Avorion服务器文件 打开GSM(游戏服务器管理器),进入“设置/工具 > 定时重启与维护”。点击“程序位置”下方的“...”按钮,选择你的SteamCMD可执行文件位置。这将设置GSM使用SteamCMD进行更新。
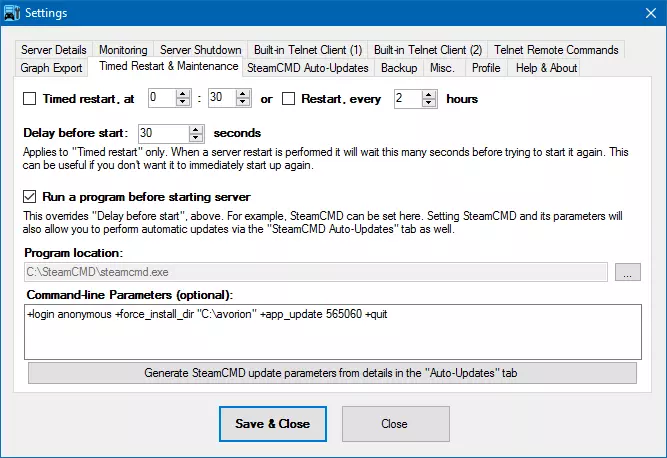
在屏幕底部的命令行参数框中添加以下命令: +login anonymous +force_install_dir "C: Avorion" +app_update 565060 +quit 将“C: Avorion”替换为你想要安装的路径。 通过“工具”选项卡运行维护程序,让SteamCMD为你更新并安装游戏。 端口转发与防火墙 你需要将以下端口(通常在路由器管理页面中操作)转发到你托管服务器的机器上: 27000 TCP和UDP(游戏流量) 27003 UDP(查询) 27020(Steam查询端口) 27021(Steam端口) 这些是默认端口。如果你修改了端口,别忘了同时修改端口转发规则。 记住,如果你仅在局域网内托管游戏,则无需进行端口转发。若希望其他用户通过互联网加入,则需要执行此操作。 你还必须确保可执行文件“AvorionServer.exe”(位于主安装文件夹下的“bin”子文件夹中)能够通过你启用的任何防火墙。 ### 设置GSM 现在我们需要告诉GSM一些关于服务器的信息。前往设置界面中的“服务器详情”,并选择你的《星界边境》“server.bat”文件。确保在对话框右下角选择“.bat”文件以查看它。该文件通常位于“C: Program Files (x86) Steam steamapps common Avorion”。如果你将游戏安装到了不同位置,只需从该位置找到所需文件即可。

为了让GSM能够安全关闭服务器,请前往“服务器关闭”选项卡,勾选“发送按键以关闭服务器”和“向其他可执行文件发送按键”复选框,然后在命令框中输入以下内容: /save /stop
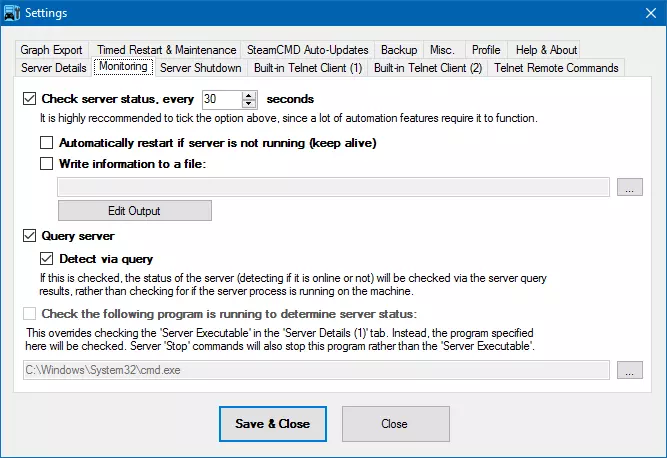
你可能还需要为“关闭命令后延迟”添加约5秒的延迟(可根据你的服务器情况调整),以确保GSM在尝试其他操作前等待服务器正常关闭。 要让程序正确查询服务器,请在相关字段中输入服务器的IP地址和查询端口。如果你运行自己的服务器,通常应为“127.0.0.1:27020”。如果你修改了默认端口,可能也需要在此处进行相应调整。默认查询端口为27020。 如果你希望通过服务器查询来检测服务器状态,而非仅查看程序是否运行(推荐用于《星界边境》),请在“监控”选项卡中勾选“通过查询检测”。重要提示: 为确保GSM能够正确查询您的服务器并获取其信息,您必须在配置文件中将以下设置设为“true”: isPublic=true isListed=true isAuthenticated=true useSteam=true 有关如何执行上述操作的更多信息,请参见(服务器配置)部分。 然后,前往“监控”选项卡,在“检查以下程序是否运行以确定服务器状态”下选择“C: windows system32 cmd.exe”作为程序,但不要勾选相关复选框,因为我们希望通过服务器查询来确定其状态。 **监控与重启** 建议您在设置下的“监控”选项卡中勾选“每隔一段时间检查服务器状态”。如果你的服务器需要更长时间才能“就绪”,你可能需要增加执行检查的间隔时间。这会主动监控服务器并更新“主页面”和“在线玩家”标签,同时为你提供以下功能: - 服务器宕机/崩溃时自动重启 - 在线玩家图表 - 性能(内存和CPU)图表 - 网络带宽图表 - 将状态输出到文件的功能(例如用于共享或嵌入) **服务器配置** 服务器的进一步配置,如服务器名称、密码、最大玩家数等,位于“server.ini”文件中,你可以使用记事本等程序进行编辑。该文件通常位于“C: Users *** AppData Roaming Avorion galaxies avorion_galaxy”(其中***是你的Windows用户名)。提示:在程序设置中,通过“服务器详情 > 服务器配置文件(可选)”来设置服务器配置文件会很方便,这样你就可以通过游戏服务器管理器快速访问它。 你也可以在文本编辑器中编辑“server.bat”文件,以更改或添加其他设置。官方维基页面[avorion.gamepedia.com]上有更多关于额外命令行参数的信息。 重要事项: 为了让GSM能够正确查询你的服务器并检索其上的信息,你必须确保配置文件中的以下设置设为“true”: isPublic=true isListed=true isAuthenticated=true useSteam=true 完成上述设置后,你就可以正常使用了。 常规使用 要启动服务器,只需在“主”选项卡上点击“启动服务器”即可。要停止服务器,请使用“启动”按钮旁边的按钮。 主屏幕分为多个标签页,显示服务器的不同信息。在这里,你可以查看在线玩家数量、运行时间、服务器状态、性能和带宽详情、图表,以及访问各种工具和功能。 游戏服务器管理器设计为高度可配置,你可以用它完成许多操作。下面的章节将讨论其中一些功能。 备份游戏数据[可选] 该程序内置了游戏文件的增量备份系统。要使用此功能,你必须先设置备份位置。

前往“设置/工具”并点击“程序设置”。进入“备份”选项卡。点击“要备份的文件夹”右侧的“...”按钮,以浏览《星界边境》游戏数据文件夹。 游戏数据的默认文件夹通常位于“C: Users *** AppData Roaming Avorion galaxies avorion_galaxy”(其中***是你的Windows用户名)。 注意:如果你在配置文件中更改过名称,子文件夹“avorion_galaxy”可能会有所不同——请确保你正在备份正确的文件夹! 接下来,在下方的框中设置你希望保存备份的位置。 可选操作:如果你希望程序每天自动备份游戏数据,可以在此界面中设置相关选项。只需勾选“在指定时间备份数据”并输入时间(24小时制)。然后,您可以通过点击“设置/工具”选项卡下的“备份游戏数据”手动执行备份。 更新和定时重启 [可选] 该程序内置了在一天中特定时间重启服务器的功能。此功能可在程序设置的“定时重启”选项卡中找到。
Set up the time you want this to be performed and tick the "Timed restart, at" tickbox if you want to do this. Even if you do not wish to set a timed restart, you can still make use of this screen. By selecting a program and entering any optional command line parameters in the "Run a program before starting server" section, you can enable updating the server - either manually or automatically. For example, if you use SteamCMD to update your game, select the SteamCMD executable here and enter any command line details in the relevant box (see Initial Setup section). Once this is set, you now have the option to perform this action on timed restarts. It will do it all for you! You can then also use "Run Maintenance Program" under the "Settings/Tools" tab to run this program manually at any time. Additional tip: if you have also set a backup location you can use "Perform Maintenance Now" under the "Settings/Tools" tab to perform the following sequence: 1. Back up game data 2. Stop Server 3. Run the "maintenance" program 4. Start the server back up again. Remote Commands [Optional] Pseudo Remote Commands Via FTP/VPN (or other similar means)This will allow you to start, stop, backup and run maintenance (update) your server remotely (regardless of any built in features a game has). To do this you will need to have access to the folder that the program is running in via VPN, FTP or some other means. I will not cover how to do that here, since that is really another topic altogether. I will assume that for this guide, you already have access to the folder. How to do it The program periodically looks to see if any of the files listed below are sitting in the folder with it. If it sees any of them it will perform the corresponding actions (and remove the file). So, to perform any of the actions listed below all you have to do is create/copy a file into the Game Server Manager folder with the corresponding name (contents of file makes no difference). The program will see the file and perform the action. Simple as that! Start the server File: start.txt Stop the server File: stop.txt Perform a backup File: backup.txt Full maintenance cycle (backup, stop server, run maintenance program, start server) File: update.txt Restart the server File: restart.txt NOTE: Ensure you have set a sufficient delay in the "Server Shutdown" tab or else the server may attempt to restart before it has properly shut down. Restart the server with command-line parameter set #1 File: parm1.txt The command-line parameter for this is set in the "Telnet Commands" tab. You can also access this feature via the "Quick Tasks" dropdown button on the "Main" tab. NOTE: Ensure you have set a sufficient delay in the "Server Shutdown" tab or else the server may attempt to restart before it has properly shut down. Restart the server with command-line parameter set #2 File: parm2.txt The command-line parameter for this is set in the "Telnet Commands" tab. You can also access this feature via the "Quick Tasks" dropdown button on the "Main" tab. NOTE: Ensure you have set a sufficient delay in the "Server Shutdown" tab or else the server may attempt to restart before it has properly shut down. Send command(s) to the server File: telnetsend.txt The program will read all text in this file and send it to the server console (provided you set this up under "Initial Setup > Setting Up GSM") Basic Port Forwarding Guide [Reference] Basic (Generic) Guide NOTE:You only need to perform port forwarding if your server is going to be accessed over the internet. If you are hosting a LAN game then it is not required. 1. Find your hosting machine's LAN (internal) - displayed on the "Main" tab of GSM. 2. Log into your router's admin page in a web browser. This is variable - but most router's by standard, have the details written on the device itself somewhere (a sticker). It will be something like 192.168.0.1 or 192.168.0.255... or whatever. You will undoubtedly require a password, which is no doubt also on the sticker. If there is nothing on the router itself then you may have to get in contact with your ISP (if it's an ISP's router) or Google for the default login details of your specific router model. 3. Once you are into the router's admin pages, search for something called "port forwarding" amongst the menus. Difficult to say exactly where it would be, since all routers are different. Again, Google may be your friend here. 4. Set up a "rule" under the port forwarding screen to direct UDP and TCP traffic from the required ports to the LAN address you found in #1. 5. Save the rules and you should be good go go. Final Note: If your hosting machine is set up to dynamically retrieve a LAN address on your network then it is possible that subsequent boots will alter your LAN address and cause port forwards to be pointing to the wrong machine. If this happens, you can either alter the port forwards again, or, even better, change your LAN address to static (and set an address manually). Another Google[www.google.co.uk] can help you with this. Port Forwarding Example Scenarios (Further Reading) Friend (F) wants to connect to your server (S). To do this (since they are at another location other than your internal LAN) they have to "talk" to your server machine. Your router (R) is the first point of contact for anyone outside your LAN. So the router needs to know where the request from (F) is meant to go to. That's where port forwarding comes in. It's a rule, set on your router that tells it to route/forward all communication (on the specified ports) from (F) to (S). Without it, the router does not know where to send it and the data is "lost" - hence - no connection. With port forwarding: (F) Requests to join your server ----> (R) Tells it to forward data to (S) [Connection established] Without port forwarding: (F) Requests to join your server ----> (R) Has no idea where to send the data [Connection fails] With port forwarding pointing to the wrong place: (F) Requests to join your server ----> (R) Sends data to the wrong computer (not your server) [Connection fails] Connecting via LAN (no port forwarding required): Y = You (over LAN) (Y) Requests to join your server with a LOCAL (LAN) IP address ----> (R) Knows where it should go straight away (you provided info) [Connection established] Legend (Y) = You (F) = Friend (S) = Your server (R) = Your router Troubleshooting My friends cannot join the game If you can connect locally but your friends cannot, it is almost always a firewall, Anti-Virus or port forwarding issue. Ensure all is configured as it should be. Things to check: 1. Have you let the server executable through any firewalls you have (Windows, router etc.)? Remember that Windows firewall has 3 different "profiles" (Domain, Private and Public), so ensure you have the correct ones ticked - or tick them all. Also ensure it is allowed through in both directions (incoming and outgoing). 2. Have you port forwarded all the required ports to the correct local (internal/LAN) IP address of the server? 3. Is your server's local (internal/LAN) IP static? If not, it is liable to change on reboots and mess up your port forwarding rules. You should ideally set it to static to prevent any further changes. Either way, check to ensure your local IP has not altered and subsequently nullified your port forward rules. 4. Do you have any other software (Anti-virus or VLAN software like Hamachi) that could be interfering with network communication for the server? 5. Are you hosting on the same machine you are trying to join the game from? If so you may have a router incapable of "hairpinning"[en.wikipedia.org]. In such a case, connect to it via local IP, rather than external IP. There could also be a port conflict, so changing the game's ports is another worthwhile thing to try. 6. Is IPv6 disabled? Leaving it enabled can sometimes cause hosting problems. Game Server Manager says my server is "Offline" when it is not Ensure you have entered the correct IP address and port under Server Details (1) for the IP:Port of server to query. This should be "127.0.0.1:27020" by default, but if you have altered ports or are hosting on another IP address then you will need to change this. Final Words I hope this guide and the Game Server Manager was useful to you. It may interest you to know that the program has been tried and tested not only with Avorion - it also works with Empyrion, 7 Days to Die, GRAV, Medieval Engineers and Space Engineers too. Infact, any game that uses the standard querying language should work with it. I have also used it to a lesser capacity in hosting servers for Project Zomboid, Neverwinter Nights, Evochron Mercenary, Planet Explorers, Void Expanse and many more that I am sure I have forgotten. Hopefully now you have read the guide, you will have a good understanding as to how it works if you want to try it out on other games. The Game Server Manager program is being updated regularly by myself. It has all been done in my spare time, to aid server hosters. I hope you enjoy your Avorion server!
2026-02-14 07:00:21 发布在  Avorion


说点好听的...
收藏
0
0