换一换
换一换 


页数:28 | 难度:从新手到高手 您将获得: - 完整的进阶框架,包含3种经过测试的构建路线 - 掠食者战斗精通——以一半的伤害击杀任何敌人 - 任务执行方案,每次运行节省15-20分钟 - 天赋树深度解析及构建优化示例 - 资源收集效率技巧 - 多人游戏团队组成与协作系统 - 10个关键错误及确切解决方案 - 特定生物群系优化指南 - 快速参考表,便于即时查阅 包含所有DLC和最新内容的32页更新游戏指南 折扣价:4.99美元(原价6.99美元)### 介绍与游戏概述 什么是《翼星求生》? 《翼星求生》是一款基于任务的生存游戏,你将扮演一名勘探者被派往一颗外星行星,目的是开采资源、完成合同任务,并拓展人类在太空中的势力范围。与传统生存游戏不同,《翼星求生》将限时任务的挑战与角色的永久进度系统相结合,打造出一个独特的游戏循环,奖励高效行动与周密规划。 主要特点: - 基于任务的游戏玩法:任务有时间限制。你需要空降行星、完成目标,并在计时器结束前撤离。 - 非永久世界:建筑和物品不会在任务间保留,但你的天赋和蓝图会保留。 - 合作导向:可单人游玩,或与最多7名其他玩家进行纯PvE合作。- 基于技能的战斗:捕食者遵循AI模式。掌握潜行、走位和时机把控至关重要。 - 深度制作系统:通过探索、战斗和建造可解锁250多种天赋以提升进度。 为什么选择本指南? 大多数指南只关注零散的技巧和窍门。本指南将教你游戏的底层机制,让你理解每种策略背后的原理。你将学会适应不同的任务、生物群系和游玩风格,而不是死记硬背单一的流程。 2. 入门指南:前5小时 现实情况 你的第一个任务会让你感到压力重重。这是有意设计的。你资源有限,周围有充满敌意的野生动物,还有时间限制。本节内容将帮你消除恐慌。任务1-2:新手任务 你将做什么: - 仅携带石斧和燧石登陆星球 - 收集基础资源:树枝、石头、浆果、氧石(氧气矿石) - 制作基础镐子和小刀 - 建立小型庇护所 - 生存并撤离 关键初始步骤(按顺序): 1. 寻找水源:立即查看地图。首要任务是找到水源并在附近安顿。反复往返取水会浪费耐力。 2. 收集氧石和石头:这些是必需品。氧石熔炼后可提供氧气。石头用于制作基础工具。开始时你大约需要各20-30个。 3. 建造精炼站:你应该制作的第一个工作站。它能将氧石熔炼为氧气,而氧气会在你工作时消耗。始终保持一定量的已熔炼氧气。 4.制作你的第一把斧头和镐子:不要跳过这一步。石斧和骨斧相比,砍伐树木时能节省大量时间。MXC镐(早期解锁)至关重要,它能比石制工具多产出3倍资源。 5. 建造基础庇护所:一个3x3的房间,配备木门、睡凳和储物箱。你需要休息状态(睡眠)来恢复非主动休息时的耐力再生。 氧气小贴士:不要对氧气耗尽感到恐慌。你的角色会自然缓慢地恢复氧气。保持氧气条在50%以上,你就能安然无恙。早期阶段,专注于收集资源,而不是一直盯着熔炉。 了解你的角色属性 - 生命值:会因战斗和坠落受到伤害。随时间缓慢恢复。 - 耐力值:用于 sprinting、收集资源和挥舞工具。闲置或睡眠时恢复速度较快。 - 氧气:持续消耗。 sprinting时消耗更快。熔炼oxite可补充氧气。 - 饥饿/口渴:通过进食和饮水来维持。浆果是前期免费的食物;可从任何水体获取水。 天赋点系统 每次升级(通过采集、制作、战斗),你将获得1点天赋点。不要随意消耗这些点数。提前规划。
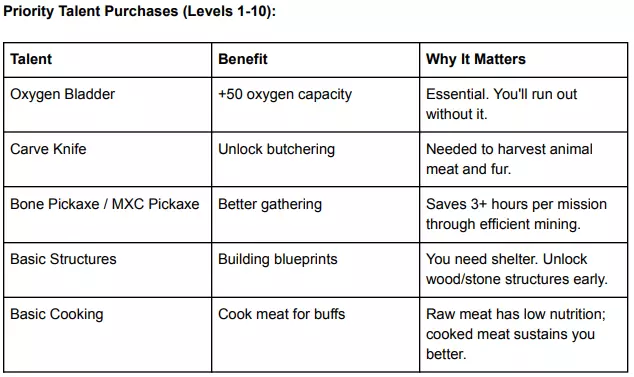
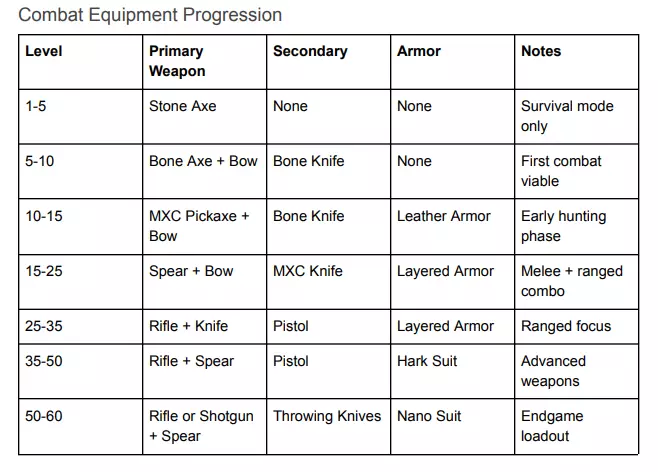
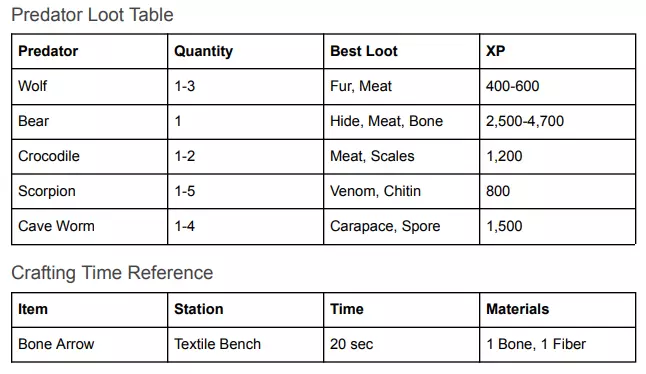
Don't Buy Yet: - High-tier weapon talents - Electronics or late-game crafting - Specialized talents for biomes you haven't reached 3. PROGRESSION FRAMEWORK (LEVELS 1-60) The Three Phases Icarus progression is best viewed in three distinct phases. Understanding this framework prevents wasted talent points and keeps you efficient. Phase 1:Survival Basics (Levels 1-15) Goal: Unlock core tools and survive hostile environments. What You Should Have: - MXC Pickaxe and Axe (best stone/bone tier tools) - Bow and 50+ bone arrows - Basic wooden/stone shelter with bed and storage - Ability to hunt small and medium predators (wolves, crocodiles) What NOT to Rush: - Electronics, firearms, or advanced armor - Massive bases (you'll waste time building) - Specialized crafting stations beyond basics Leveling Strategy: - First 20 minutes: Gather sticks and stones while moving toward water. - Next 40 minutes: Mine oxite, craft refining station, get oxygen stable. - Next 1 hour: Craft basic shelter (3x3 minimum). - Remaining time: Hunt small animals for XP and meat. Hunting is the fastest XP source once you have a bow. A single stealth kill on a wolf nets 400-600 XP; on a bear, 2,500-4,700 XP. You can level from 5 to 12 in one mission just by hunting. Phase 2:Operational Advancement (Levels 15-40) Goal: Build specialized bases for mission objectives, access mid-tier technology, and dominate combat. What You Should Have: - Shendong (Dong) Pickaxe (3x yield improvement over MXC) - Hark Environmental Suit (massive stat boosts) - Stone or Reinforced Wood structures - Herbalism bench and crop plots (agriculture) - Multiple crafting stations (smelter, cooking, textile) - Reliable predator hunting strats (can solo most wildlife) What NOT to Rush: - Glass or Concrete structures (expensive, only needed late) - Electronics or fabricators - High-end firearms before level 35+ Where You'll Spend Time: - Building mission bases: Set up hunting outposts in deserts, farming outposts in temperate zones. - Hunting expeditions: Gather rare materials (bear fur, cave spores, ore deposits). - Agriculture: Set up crop plots and harvest cycles for food sustainability. Key Realization at Level 20-25: You can now move between biomes effectively. The desert is hotter but has better ore. The arctic is cold but has unique resources. The lava zone is dangerous but has late-game materials. Biome selection for missions matters—pick the one aligned with your current build. Phase 3:Endgame Specialization (Levels 40-60) Goal: Specialize in a playstyle (combat, construction, farming) and optimize for late-game missions. What You Should Have: - Tier-4 armor (Nano suit or specialized combat gear) - Electronics and Fabricators unlocked - Concrete or reinforced structures - Full crop cycle (soybeans, wheat, carrots, hemp) - Specialized weapons (rifles, shotguns, or bow mastery) - Advanced workstations (fabricator, electronics bench) The Specialization Choice: By level 40, you've gathered enough talent points to specialize. Choose one: 1. Combat Specialist: Rifles, armor, predator hunting, cave exploration 2. Builder/Constructor: Concrete structures, advanced architecture, efficient building layouts 3. Farmer/Biologist: Crops, bees, livestock, food preservation 4. Technician: Electronics, fabricators, advanced equipment Your specialization doesn't lock you out of other skills—it just means you're more efficient in your chosen area. 4. TALENT TREES & BUILD OPTIMIZATION The Talent System Explained You earn 1 talent point per level (60 levels = 60 points for general talents). Additionally, solo players earn 30 "Solo Talent" points by level 60 that work differently (these don't apply to multiplayer). Talent Tiers: - Tier 1 (0 points required): Basic skills - Tier 2 (4 points in tree required): Intermediate upgrades - Tier 3 (8 points in tree required): Advanced techniques - Tier 4 (12 points in tree required): Specialized expertise You can respec your talents, so don't panic about permanent choices. But planning ahead saves you respecs. The Six Talent Trees 1. Exploration Focus: Movement, health, detecting enemies Key Talents: - Health Boost: +50 health (buy early if you struggle with damage) - Oxygen Bladder: Essential - Animal Outlines: See predators through fog (Level 15+ game changer) - Climbing Gear: Reduces climbing damage - Tracker Talent: See animal footprints Why It Matters: Most players over-invest here. Health is nice, but avoidance (detection) is better than raw health. Prioritize Animal Outlines. 2. Hunting Focus: Damage, animal-specific bonuses, specialized weapons Key Talents: - Basic Bow & Arrow: Your first ranged weapon - Spear Mastery: Melee combat improvement - Health Bars: See exact health of predators (essential info) - Animal Weaknesses: +50% damage to specific creatures - Predator Armor: Combine animal drops for armor pieces Why It Matters: This is your damage scaling. Without Hunting talents, combat takes 3x longer. Invest heavily (15-20 points) by level 30 if you plan to hunt frequently. 3. Crafting Focus: Unlocking blueprints for tools and weapons Key Talents: - Stone & Bone Tools: Basic crafting - Metal Tools (Copper): Mid-tier gathering - MXC & Shendong Tools: Superior gathering - Rifles & Shotguns: Late-game weapons - Armor Crafting: Full sets of protective gear Why It Matters: Each tool or weapon you unlock saves time or enables new playstyles. Plan your purchases here carefully. You don't need every rifle—pick the ones that fit your mission goals. 4. Cooking & Sustenance Focus: Food preparation, stat buffs, preservation Key Talents: - Basic Cooking: Cook meat for better nutrition - Flatbread & Pickled Vegetables: Stamina regen buffs - Food Preservation: Keep food fresh longer - Alcohol Brewing: Various stat buffs Why It Matters: Food buffs are multiplicative. A stamina regen buff stacks with natural regeneration and your rested status. Late game, you'll craft 20+ flatbread for missions. Plan this early. 5. Building & Construction Focus: Structures, design, material efficiency Key Talents: - Wooden Structures: Basic shelter - Stone Structures: Durable walls - Reinforced Wood: Better durability - Glass & Concrete: Late-game construction - Furniture & Decorations: Comfort bonuses - Advanced Shelters: Environmental protection (heat/cold resistance) Why It Matters: Building is necessary but time-consuming. Don't min-max this early. Unlock what you need for missions (e.g., unlock stone before taking a desert mission). Later, specialized shelters matter for extreme biomes. 6. Electronics & Technology Focus: Advanced crafting stations, fabricators, high-tech items Key Talents: - Basic Electronics: Unlock benches - Fabricators: Create exotic items - Power Generation: Solar panels, biofuel generators - Cooling & Heating: Environmental control Why It Matters: Don't unlock this until level 35+. It's expensive and only becomes valuable late game when you're tackling extreme biome missions or speed-running with optimal equipment. Sample Build Paths Build Path 1: The Hunter (Best for Solo, Levels 1-60) - Levels 1-10: Oxygen Bladder, MXC Pickaxe, Stone Tools, Basic Shelter - Levels 10-20: Bow & Arrow, Spear, Health, Carve Knife, Stone Structures - Levels 20-35: Animal Outlines, Health Bars, Predator Armor, Rifle, Shotgun, 10 Hunting talents - Levels 35-50: Hark Suit, Nano Armor, Cave Exploration talents, Advanced Combat - Levels 50-60: Specialized weapon talents, final armor upgrades, remaining exploration buffs Results: You can solo high-difficulty predator hunts, handle caves, and extract rare materials. You're weaker at farming and building but excel at resource gathering in dangerous zones. Build Path 2: The Constructor (Best for Multiplayer Base Camps) - Levels 1-10: Oxygen Bladder, MXC Pickaxe, Stone Tools, Basic Shelter, Basic Cooking - Levels 10-25: Stone & Reinforced Wood, 5 Building talents, Flatbread, Furniture, Comfort bonuses - Levels 25-40: Concrete structures, Glass blueprints, 10+ Building talents, Advanced Shelters, Crop Plots - Levels 40-60: Electronics, Fabricators, specialized equipment for your chosen biome, power generation Results: You build optimized bases that run efficiently. In multiplayer, your team benefits from organized storage and fast respawning crafting stations. You're slower at combat but bring massive utility. Build Path 3: The Balanced Prospector (Best for Long-Term Play) - Levels 1-10: Oxygen Bladder, MXC Pickaxe, Basic Crafting, Basic Shelter - Levels 10-25: Health, Bow, Spear, Stone Structures, 5 Building talents, Basic Hunting talents - Levels 25-40: Shendong Pickaxe, Rifle, Animal Outlines, Health Bars, 8 Hunting talents, Reinforced Wood - Levels 40-60: Specialized talents based on mission needs. Flexibility to pivot. Results: You're competent at everything, master of nothing. Perfect for varied missions where you never know what's required. You adapt faster than specialists but can't outperform them in their domain. 5. MISSION STRATEGY & EXECUTION Mission Types Overview Icarus features distinct mission categories. Understanding them shapes your build and strategy. 1. Outpost Missions (Most Common) Objective: Build a functional base with specific workstations, then extract. Examples: Pyramid (Hunting Outpost), Life Line (Medical Facility), Influx (Arctic Barracks) Strategy: - Land, collect resources for 45 minutes - Identify base location (near water, defensible, accessible) - Build structures in order: Bedroll → Workstations → Storage - Complete final objective (gather specific items or defend) - Extract Time Allocation: 60-minute mission → 20 min gathering, 30 min building, 10 min buffer Pro Tip: Premake your building blueprint on paper. Know exactly where each structure goes before placing the first wall. Saves 15-20 minutes. 2. Survey Missions Objective: Deploy geo-stations or sensors, gather data, defend positions. Strategy: - Locate deployment zones on map - Gather materials for shelters and defenses - Deploy stations in sequence - Defend from predator waves (hardest part) - Defend final uplink Skill Required: Combat. You'll face 20+ predators attacking your position. Stock weapons, food, and stamina items. Pro Tip: Build towers or elevated positions. Predators struggle with verticality. You can pick them off from high ground safely. 3. Salvage & Collection Missions Objective: Locate specific items scattered around the map and return them. Strategy: - Map routes to all item locations - Gather basic resources en route - Create waypoints on your map - Return to drop pod before timer expires Speed Running: These missions favor pure gathering speed. Minimal building. Unlock fast tools first. 4. Exotic Material Expeditions (Endgame) Objective: Find exotic ore, rare fauna, or scientific samples in extreme biomes. Strategy: - Come prepared with high-tier equipment - Scout dangerous zones - Combat-heavy missions requiring rifle + armor - Return with specific material quantities Skill Required: Advanced combat, biome navigation, efficient resource processing. Mission Execution Framework Minute 0-3: Landing - Check mission objectives in detail - Identify water on map - Plan shelter location - Note biome hazards (cold, heat, predators) Minute 3-20: Initial Gathering - Gather oxite, stones, sticks, berries in that order - Move toward water - Establish refining station if needed - Don't over-gather. Gather only what's needed for next phase. Minute 20-45: Base Development - Build shelter structure - Add necessary workstations - Organize storage with labels - Ensure crafting stations are running (furnaces, textile benches, etc.) Minute 45-55: Mission Completion - Gather final objective items - Defend if survey mission requires it - Prepare extraction Minute 55-60: Buffer & Extraction - Check you have everything needed - Make path to drop pod clear - Extract 2 minutes early (safety margin) Common Mistake: Running to the timer. Aim for 2-minute extraction buffer minimum. You'll encounter unexpected delays (predators, broken paths, inventory management) 6. COMBAT MASTERY The Combat Philosophy Icarus combat isn't about reflexes—it's about positioning, patience, and understanding AI patterns. Most predators have exploitable behaviors. Stealth Attack System Your single most powerful combat tool is the stealth attack. How It Works: 1. Crouch (default: C key) 2. Approach predator without detection 3. Attack before it sees you 4. Deals 2.5x damage (often one-shot on weak creatures) Why It's Overpowered: A stealth attack kills a wolf instantly. A bear takes 2-3 stealth attacks. Compare that to 10+ normal attacks. Stealth attacks are always superior. How to Use: - Always crouch when approaching animals - Attack from behind or sides (harder for AI to detect) - If detected, break line of sight and re-crouch before re-engaging - Use tall grass and rocks as cover Predator-Specific Strategies Wolves (Forest, XP: 400-600) - Behavior: Aggressive, fast, swarm - Weakness: Easily kited, vulnerable to stealth - Strategy: Stealth attack from behind. If detected, run backward and attack when they approach. Don't stand your ground. Bears (Forest, XP: 2,500+) - Behavior: Charge attack, very high damage, slow turn - Weakness: Slow turning, vulnerable to side positioning - Strategy: Stealth attack first. If detected, side-step their charge (press A/D as they charge), counterattack. The "toro" technique: bait charges and sidestep repeatedly. Crocodiles (Swamp, XP: 1,200) - Behavior: Snap attack, moderate damage, territorial - Weakness: Limited reach, poor backward movement - Strategy: Walk backward while attacking with knife. Crocodile can't chase effectively backward. Cave Worms (Underground, XP: 1,500+) - Behavior: Spit projectiles, melee bite, spawn from ground - Weakness: Melee attack has short range, spit can be jumped - Strategy: Sprint directly at them, jump over their spit, knife them in the face while they recover. The close-range approach prevents them from spitting effectively. Scorpions (Desert, XP: 800) - Behavior: Fast, deadly poison, small target - Weakness: Hard to hit, vulnerable to crowd control - Strategy: Bow and arrow from distance. If forced to melee, quick stabs and backing away. Never let them close the distance.
Pro Tip: Equip only 2-3 items on your hotbar during combat. More options = slower switching. Master one loadout and execute perfectly. Advanced Positioning The Tower Strategy (Effective, Exploitative) - Build 3 wooden pillars stacked vertically - Stand on the highest platform - Shoot/attack predators from above - They can't reach you if you avoid climbable terrain Why It Works: Predator AI targets directly below you. They struggle with verticality. Ethical Consideration: This trivializes combat difficulty. Use it strategically (cave defenses) rather than for every fight. The Kiting Technique (Skill-Based, Repeatable) - Engage predator normally - When it attacks, dodge sideways or backward - Counter-attack immediately after dodge - Repeat until dead Why It Works: You avoid damage while dealing consistent damage. Difficulty: Requires timing and positioning awareness. Practice on wolves before bears. 7. RESOURCE MANAGEMENT & GATHERING The Resource Economy Every mission has finite resources. Efficient gathering separates expert players from novices. Gathering Priority System Critical Resources (Always prioritize): - Oxite (oxygen sustenance) - Fiber (crafting, ropes, textiles) - Stones (structures, tools) - Sticks (torches, structures, fuel) Secondary Resources (Gather after critical): - Metal ore (copper, iron, for tools) - Berries (food, immediate energy) - Animal parts (meat, fur, bones) Tertiary Resources (Gather if time permits): - Alchemy ingredients (potions) - Seeds (farming) - Rare materials (mission objectives) The Gathering Efficiency Formula Optimal gathering process: 1. Use the correct tool for the job - Pickaxe for stone/ore (higher yield) - Axe for wood (faster than knife) - Knife for plants and skinning - Don't use axe on stone—waste of durability 2. Hold F while moving (constant gathering) - Automatically gathers nearby resources while walking - Nets XP without slowing down - Accumulate 100+ sticks just by moving through forest 3. Gather 3-4x your actual need (reduce trips) - If mission requires 100 stone, gather 300-400 - Prevents multiple trips to same zone - Extra materials become stockpile for future missions 4. Process resources immediately (keep inventory flowing) - Smelt oxite while gathering - Cook food while building - Craft tools while exploring - Never have idle production stations Biome-Specific Gathering Forest Biome - Best for: Sticks, fiber, berries, wolves for hunting XP - Hazards: Wolves, bears, weather - Optimization: Set up refinery near water source; gather in circuits through trees Desert Biome - Best for: Stone, copper ore, scorpions, rare hides - Hazards: Heat damage, scorpions, heat storms - Optimization: Wear appropriate suit; position base near ore deposits; schedule caves for cool periods Arctic Biome - Best for: Ice ore, rare pelts, cave materials - Hazards: Cold damage, polar bears, blizzards - Optimization: Stock food for warmth; avoid nighttime; use caves as shelter Lava Zone (Endgame) - Best for: Exotic ore, lava creatures, geothermal energy - Hazards: Extreme heat, toxic creatures, environmental damage - Optimization: Specialized suit required; short expeditions; focus on specific high-value materials Inventory Management Pro Tips: - Ctrl+Click: Split stacks (drag 50/100 items out) - Shift+Click: Move items between containers quickly - Ctrl+Right-Click: Grab all of one item type from a container - Label containers: "Ore," "Stone," "Fiber," etc. Clear organization saves minutes 8. BASE BUILDING & STRUCTURAL DESIGN The Efficiency Principle Every base should serve a purpose. Build with intent, not aesthetics (at least in timed missions). Base Layout Fundamentals Rule 1: Vertical Space Don't build super tall structures (above 3 stories). The game's load calculations struggle with height. Buildings bug out or become difficult to manage. Rule 2: Spread Out A 5x5 footprint with 2 stories beats a 3x3 with 5 stories. Horizontal space is easier to navigate and manage. Rule 3: 2-3 Walls High Minimum Foundries and smelters need vertical space. Build with ceiling height in mind. A 2-wall room + attic space optimizes usage. Optimal Room Configurations The Functional Base (For Timed Missions) - Entry Room: Bedroll, storage cabinets, 2x crafting stations - Smelting Room: Furnace, refineries, material processors - Crafting Room: Textile bench, cooking station, tool crafting - Greenhouse: Crop plots, bee boxes (if farming) - Storage: 20+ labeled cabinets Footprint: 5x5 (entry) + 5x6 (smelting/crafting) + 5x5 (greenhouse) + outdoor storage ≈ 75 floor tiles total Build Time: 45-90 minutes depending on mission difficulty The Compact Forward Base (For Resource Expeditions) - Size: 4x4 total - Contents: Bedroll, 1 furnace (essential), 4 storage cabinets, 2 workbenches - Purpose: Minimal overhead, maximum efficiency - Build Time: 20-30 minutes - Use Case: When you're gathering specific items in dangerous zones and need a safe sleeping point

Pro Tip: Don't over-build. Concrete bases are permanent between sessions, but most missions reset structures anyway. Save concrete for bases you'll return to repeatedly. Common Building Mistakes Mistake 1: Over-building early - Problem: Spending 45 minutes building a mega-base when you only need 20 - Solution: Build minimal, functional bases during timed missions. Expand during freeform exploration sessions. Mistake 2: Poor workstation placement - Problem: Furnaces blocking pathways; benches scattered everywhere - Solution: Designate a dedicated crafting room. Arrange benches in assembly-line fashion. Put storage behind or adjacent to benches. Mistake 3: Forgetting shelter from storms - Problem: Caught outside during storm without structure - Solution: Always have a storm shelter nearby (covered structure, doesn't need walls). During harsh weather events, retreat inside. Mistake 4: Building without water access - Problem: Constant trips to get water for cooking/drinking - Solution: Always build within 2-minute walk of water source. 9. ADVANCED MULTIPLAYER STRATEGIES The Team Composition Advantage Ideal 4-Player Team: 1. Combat Specialist: High hunting talents, rifles, predator defense 2. Constructor: Building talents, structure efficiency, layout optimization 3. Farmer/Resource Manager: Crop expertise, food production, inventory organization 4. Generalist: Balanced talents, problem-solver, fills gaps Why It Works: Each role handles their expertise. While one player hunts, another builds. While another farms, the generalist handles emergencies. Role-Specific Responsibilities Combat Role: - Lead dangerous expeditions (caves, predator zones) - Defend base from wildlife attacks - Gather rare combat-locked materials - Communication: Call out predator locations, warn teammates of attacks Builder Role: - Design and construct base efficiently - Manage material workflow - Optimize furniture placement (comfort bonuses) - Communication: Request material types, coordinate placement Farmer Role: - Establish and maintain crop cycles - Manage animal pens - Produce food and preservation materials - Communication: Forecast food production, request specific seeds Generalist Role: - Handle unexpected tasks - Support all three roles - Gather supplementary materials - Communication: Report resource levels, ask what's needed Base Coordination in Multiplayer Storage Organization: - Label every cabinet: "Ore," "Wood," "Copper," "Iron," "Seeds," etc. - Create a "dump" chest at entrance where players unload supplies - Dedicate one player to regular organization (reduces team chaos) Crafting Queues: - Establish which benches are producing what - Furnace 1 → Smelting ore - Furnace 2 → Cooking meat - Textile Bench → Making rope - No idle production stations Communication Protocol: - Use voice chat (Discord, game voice) - Simple callouts: "I have 200 stone, moving to crafting" - Signal major milestones: "Base structurally complete" - Warning calls: "Bears inbound, defend position" Multiplayer Mission Types Outpost Missions (Best for teamwork) - Divide tasks: 1 hunts, 1 builds, 1 gathers, 1 manages - Parallelized work completes missions in half the solo time - Requires clear role assignment Survey Missions (Defense-heavy) - All players converge on defense point - Combat specialist handles primary threats - Others support with ranged attacks from elevated positions - Requires coordination during predator waves Salvage Missions (Parallel gathering) - Split into 2 teams exploring different map zones - Cover more ground faster - Regroup at extraction point - Requires map awareness from all players 10. COMMON MISTAKES & HOW TO AVOID THEM Mistake #1: Rushing Building in Timed Missions The Problem: Players spend 45 of 60 minutes building an elaborate base, then fail the mission objective. The Fix: Build minimum viable base (bedroll, refinery, storage) in 15 minutes. Spend remaining time on mission objectives. Template: 3x3 starting room with door takes 5 minutes. Add 2-3 dedicated crafting rooms (10 min). You're done. Expand only if mission requires specific workstations. Mistake #2: Not Using Stealth in Combat The Problem: Fighting predators face-to-face wastes weapons and health. The Fix: Always approach crouched. Always stealth attack first. If detected, break line of sight and re-crouch. Result: 70-80% fewer hits needed to kill any predator. Mistake #3: Ignoring Biome Hazards The Problem: Getting caught in heat/cold damage without proper gear. The Fix: Check biome requirements before missions. Equip appropriate suit. Stock heat/cold resistance food. Arctic missions require different prep than desert. Mistake #4: Scattered Talent Investment The Problem: Spending points across 6 talent trees creates a weak generalist character. The Fix: Commit to a build (hunter/builder/farmer). Specialize 70% of talents in primary tree, 20% in secondary, 10% flexibility. Mistake #5: Over-gathering Low-Value Resources The Problem: Spending time gathering 500 fiber when you only need 100, missing mission time. The Fix: Calculate exact requirements. Gather only what's needed + 20% buffer. In timed missions, time = resources. Wasted time = failed mission. Mistake #6: Not Sleeping for Rested Buff The Problem: Stamina regeneration is 2x when rested. Ignoring sleep wastes this. The Fix: Sleep at start of mission (5 min sleep cycle) to activate rested buff for entire session. This multiplicative buff makes building/gathering dramatically faster. Mistake #7: Tool Degradation Ignored The Problem: Tools break mid-mission, forcing emergency crafting. The Fix: Carry 2 of each primary tool. Repair at workbench before mission end. Never drop below 50% tool durability. Mistake #8: Inventory Management Paralysis The Problem: Spending 10 minutes organizing inventory instead of gathering. The Fix: Quick organization (5 min) during base setup. Use Ctrl+Click to split stacks. Label containers clearly. Don't perfectionize—"good enough" is faster. 11. END-GAME CONTENT & OPTIMIZATION Post-Level 50: What's Left? Once you hit level 50, most mission content is repeatable. Your focus shifts to: 1. Speed-Running Known Missions: Complete in optimal time 2. Exploring New Biome Combinations: Try extreme environments 3. Perfecting Builds: Test different talent allocations 4. Mastering Advanced Combat: Solo high-difficulty predators 5. Community Challenges: Compete with other players on specific missions Speed-Running Framework Goal: Complete mission objectives in 40 minutes instead of 60. How: 1. Pre-plan everything: Know base layout before landing 2. Minimal gathering: Gather only essentials (100 stone, 50 fiber, etc.) 3. Efficient routing: Shortest path to all objectives 4. Hotbar optimization: 8 frequently used items, 0 inventory fumbling 5. No "nice to have": Skip comfort furniture, skip aesthetic building Result: Veteran players complete routine missions in 35-45 minutes consistently. Extreme Biome Challenges Arctic Expeditions (Post-Level 40) - Objective: Gather exotic ice ore, rare arctic fauna - Hazard: Extreme cold, polar bears, blizzards - Prep: Hark suit, heat-generating food, rifle + ammo - Challenge: Limiting exposure time while gathering - Reward: Materials unavailable elsewhere, bragging rights Lava Zone Ventures (Post-Level 50) - Objective: Exotic ore, geothermal materials - Hazard: Extreme heat, toxic creatures, environmental damage - Prep: Specialized heat suit, advanced armor, high-end weapons - Challenge: Thermal damage even with suit; creatures very dangerous - Reward: Endgame crafting materials, unique equipment Community Challenges Many Icarus communities run: - Speedrun Competitions: Fastest completion time - Solo Challenges: Hardest mission, solo, no deaths - Farming Competitions: Most efficient crop production - Building Competitions: Best-designed base layout Participation keeps the game fresh and pushes skill development. FINAL SUMMARY: THE PROSPECTOR'S CREED Icarus isn't about grinding or memorizing. It's about understanding systems and adapting efficiently. Master These Principles: 1. Prioritization: Always know what matters most this moment 2. Efficiency: Fast execution beats perfect execution 3. Adaptation: Each mission is different; flexibility beats rigid plans 4. Specialization: Deep expertise in one area beats surface-level knowledge everywhere 5. Teamwork: Multiplayer missions reward communication and role clarity Follow this guide, practice consistently, and you'll progress from novice survivor to elite Prospector faster than 95% of players. The planet Icarus awaits. Make your drop count. APPENDIX: QUICK REFERENCE TABLES

指南结束 关于本指南 本综合指南适用于以下玩家: - 新手玩家(1-15级)建立基础知识 - 中级玩家(15-40级)优化配装和策略 - 高级玩家(40-60级)掌握专业技巧 无论你是 solo 游玩还是与朋友组队,无论是首次任务还是第一百次任务,本指南都能提供战略框架,助你在伊卡洛斯星球生存、发展并脱颖而出。 最后更新时间:2025年12月