换一换
换一换 


In this guide i will explain in detail how to get the most out of Assetto Corsa Competizione in terms of VR Performance. This guide is aimed at users with headsets that can run SteamVR natively, other headsets might want to use OpenXR instead of VRPerfToolkit, but for headsets that can run SteamVR natively, there is no reason to use OpenXR (Valve Index, Vive, Pimax etc) If you have a headset that does not support SteamVR natively, you can still follow the guide and find useful information. This guide is up to date with 1.8, as i am not 100% happy with the VR performance introduced in 1.8. This guide should be a good starting point or baseline for anyone looking to improve their performance in VR significantly. You can find this guide on this blog: https://blog.lynxsec.se/acc-vr-the-definitive-vr-performance-guide It is a tiny bit more detailed and it's properly formatted. Want to discuss this guide? Use Steam or Racedepartment. Steam: https://steamcommunity.com/sharedfiles/filedetails/?id=2606988229 Racedepartment: https://www.racedepartment.com/threads/acc-vr-the-definitive-vr-performance-guide.209237/ Last Update: 2022-12-02 Introduction Before You Get Started Check Your Hardware Expectations SteamVR Settings Nvidia Control Panel Settings (Same should apply to AMD's control panel) Stop the game from showing on the screen (Optional) Engine.ini (Optional, not needed) VR Performance Toolkit OpenVR_FSR V2.0 (Legacy, do not use) In-game Graphics Settings Video of improved performance Summary Introduction This guide is aimed towards all users, but specifically those users that have high-end rigs but cannot get the performance that they desire from the current VR implementation. This guide is curently up to date with v1.8.19 Before you start going down the hole in order to improve your VR performance, let's state some obvious stuff. There is multiple ways to gain performance in VR, this guide is aimed at the way i think works the best, this will probably change with time. Stuff will be added here and or changed as i learn more, both from VR users and from my own testing. What i found was that the DLSS and FSR implementation in the game is great for screen/pancake gaming, however that was not the case for me in VR. Objects overall tend to get blurrier in exchange for a higher framerate. Although this is great, it seems that there is no inbetween (atleast for me) sweetspot for resolution/framerate. Therefore, i have decided to resort to the OpenVR_FSR plugin along with a modified engine.ini file, again. In my experience and with the tests i have done in 1.8, i find that there is overall a crisper picture and higher framerate as a result. So, with that out of the way, lets move on to the guide. What will this guide do for me?In this guide you will learn how to set your SteamVR settings, Nvidia Control Panel settings, edit your Engine.ini file, disable on-screen rendering and set the in-game video settings. This guide is based on Valve Index but will work with any SteamVR headset. You will have to tweak some of the settings to be fitted for your specific headset though. For example, the G2 VR Headset has a higher resolution compared to the Index, (what i am using for a baseline) so you will need to have that in consideration while you configure your settings, so that it will be according to that of what you have. Comment down below if you are stuck and need help with that. This guide is intended for Valve Index, Vive and other SteamVR headsets, it's not tested for Oculus (OpenVR_FSR is probably only supported with SteamVR) This is not tested nor will ever be with Oculus headsets, however most of the settings (except for steamvr specifics and OpenVR_FSR apply to Oculus headsets to. Please notify me if you have found good settings for your specific setup and headset. Comment with what hardware you are using and what headset you have so we can add it to the guide. Before you get started So you want to improve your performance in ACC VR right? If you have a setup currently, there are many things that you probably have configured already. Before you start making changes with the help of this guide, make sure you backup everything. Here is a list of what you need to backup (in order): Your computer's bios/uefi, create a profile and save your current configuration if you plan to overclock your ram. SteamVR Settings (Take a printscreen of these and save to a folder) Nvidia/AMD GPU Settings (Take a printscreen of these and save to a folder) ACC Ingame configs (Located at: User Documents Assetto Corsa Competizione Customs VideoSettings) Your Engine.Ini file (Located at: C: Users User AppData Local AC2 Saved Config WindowsNoEditor) Your GameUserSettings.Ini file (Located at: C: Users User AppData Local AC2 Saved Config WindowsNoEditor) Any other file/setting that you could think of, that is related to ACC VR, either save by printscreen or save the actual configuration file. There is no guarantee that this guide will work for you, so make it easier for yourself and back everything up, so you can roll back to your previous setup with eaze. When you are confident with your backups, move on to the next section of the guide! Check your hardware Make sure you have your PC setup correctly, this could dramatically increase performance So before writing this guide, i tried ACC on multiple setups and did benchmarks to get an overall understanding of the current performance situation. I found out that ram clock speed made huge difference in VR. When i was running my ram at 2100mhz, i got stuttering ingame, both in VR and on pancake display. Most of the stuttering occured when turning the car into a corner or when there was a complex scene of multiple cars moving. After that i tried 3200mhz and the difference was staggering, no more stuttering or lag when turning into corners and i could run a fairly high amount of AI cars in the grid without any issue at all. Have in mind that the rig i tested this with, is fairly high-end. However, most users out there that are having issues with fps-consistency, have fairly good hardware. READ THIS BEFORE GOING ANY FURTHERYES, XMP (Intel) or DOCP (Amd) can be a way to get a bit more fps/speed out of your computer, especially when gaming. But in many cases the XMP/DOCP rated speed of your ram will not actually run stably with your motherboard and integrated memory controller on your cpu Now when that's out of the way, lets have a look at an example of how i would do it. So to sum it up: Make a backup of your current bios/uefi profile before changing anything, so you can go back to your stable profile easily. Make sure you are running your ram at the highest possible frequency without causing instability (Usually when you install ram, you need to manually set XMP to ON in bios/uefi, otherwise they run at default speed eg. 2100mhz or 2000mhz for example) If the XMP 1 profile introduces instability to your system, try the XMP 2 profile. This requires a fair amount of knowledge, please do not attempt this if you have no idea of what you are doing and what the possible implications could be. So, how do you check your ramspeed?First of all, find out what ram you got and what the rated speed of the specific ones you got are. If you bought the parts and built the computer yourself this shouldn't be to hard. If you got a prebuilt one, check the specifications of that. When you know what speed your ram is rated at, you can check in Windows, what speed they are actually running at.

预期表现 使用此配置,在16辆AI车辆的比赛中,我几乎能稳定达到120帧,但偶尔会出现帧率下降的情况,所以不要期望它能与《神力科莎》等游戏的VR性能相媲美,但确实比默认设置下好太多了。 独自练习时效果更佳。 我的硬件配置如下: CPU:i7 9700K @ 5.0GHz GPU:RTX 3070 内存:复仇者LPX黑色 32GB / 3200MHz 如果你的硬件配置比这更好,或许可以尝试更高的设置;如果配置较低,则可能需要降低一些设置。 不过,建议先将这些设置作为你的基准配置,在开始调整设置前先尝试找出问题所在。请留言告诉我你的设备运行情况,记得留下配置信息并说明遇到的问题。 SteamVR设置【已更新至1.8版本】 本部分取决于你使用的头显,以下将以Valve Index的设置作为基准。 120Hz的刷新率非常流畅,但如果你的帧率不足,可以将其降低至90Hz甚至80Hz。 在本指南的修订版中,出于性能考虑,我决定在SteamVR中而非游戏内设置分辨率缩放。不知为何,这对我来说效果更好。但这可能并不适用于所有人。如果是这种情况,请将SteamVR中的渲染分辨率设为100%,然后在游戏内调整分辨率缩放。 视频设置:
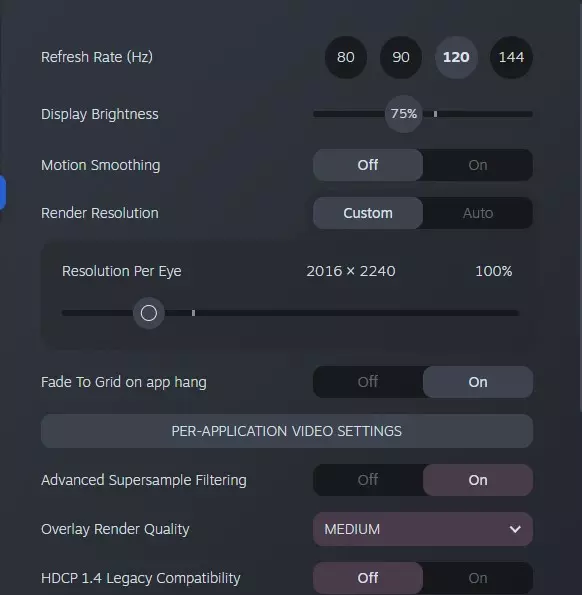
刷新率:120Hz(Valve Index专用,根据您的VR头显支持情况设置,建议优先尝试最高值) 运动平滑:关闭 渲染分辨率:自定义 - 设置为100% 游戏专属设置:
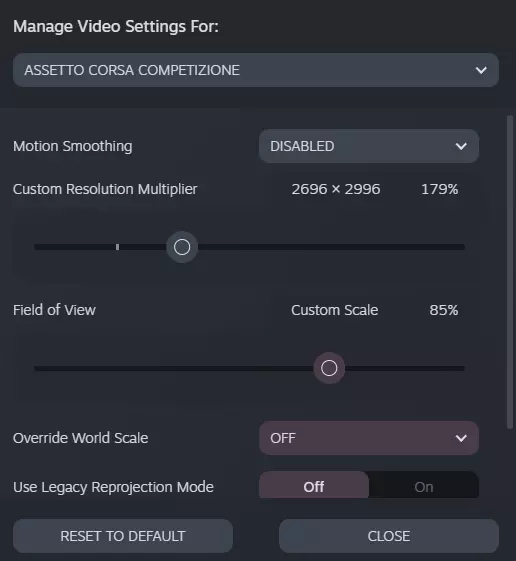
每个游戏的设置 2
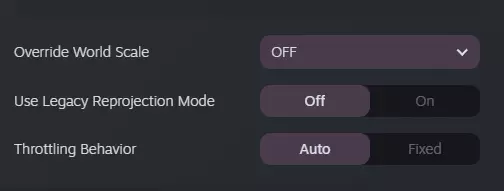
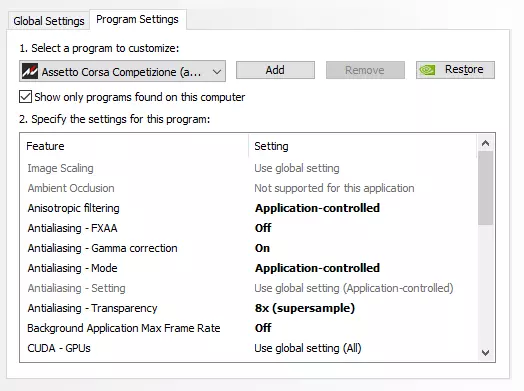
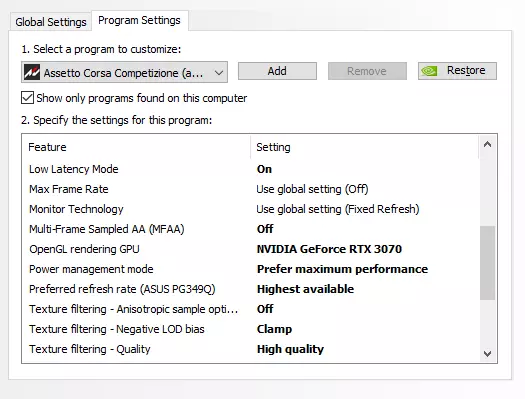
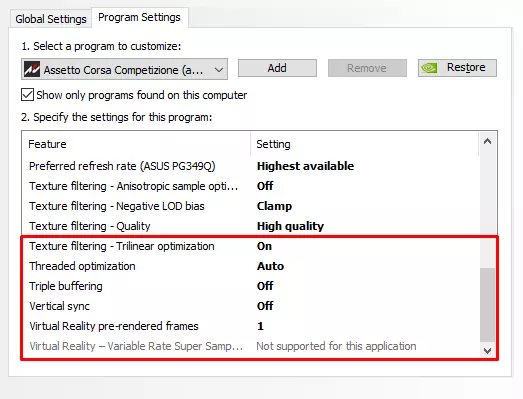
运动平滑:已禁用 自定义分辨率倍率:170-180%【这是我正在使用的设置,例如如果你使用G2头显,应将其保持在100%;如果你使用初代Vive,则可以进一步提高。在进行更改前,你需要理解这一点。】 这也取决于你的GPU/CPU组合,请相应设置。 视野:85%【这个设置可以提升性能,如果你难以获得足够的帧率,可以调整它。我将其设为85%,这会带来一种独眼巨人视角的感觉,我对此没有问题,但你可能会介意,所以请相应设置。】 附:这有时适用于G2头显,但有时会完全破坏画面。请注意。覆盖世界缩放:关闭 使用传统重投影模式:关闭 节流行为:自动 英伟达控制面板设置【针对1.8版本更新】 AMD用户的设置应与此相同,仅存在细微差异。 建议将这些设置作为你个人配置的基准,从这些设置开始调整。 - 选择程序设置 - 在下拉菜单中选择神力科莎:竞速 配置: 各向异性过滤:应用程序控制 抗锯齿 - FXAA:关闭 抗锯齿 - 伽马校正:开启 抗锯齿 - 模式:应用程序控制 抗锯齿 - 透明度:8倍(超级采样) 后台应用程序最大帧率:关闭 CUDA - GPU:全部 低延迟模式:开启【如果遇到帧率损失,请将此项设置为关闭】最大帧率:关闭 显示器技术:固定刷新率 多帧采样抗锯齿(MFAA):关闭 OpenGL渲染GPU:自动选择 电源管理模式:优先最高性能 首选刷新率:最高可用 纹理过滤 - 各向异性采样优化:关闭 纹理过滤 - 负LOD偏移: clamp 纹理过滤 - 质量:高质量 纹理过滤 - 三线性优化:开启 线程优化:自动 三重缓冲:关闭 垂直同步:关闭 虚拟现实预渲染帧数:1 - 这可能会增加渲染延迟。如果1不适合你,将其降低到0。如果你有高端GPU和CPU,可以尝试将此设置调高一些。
Stop the game from showing on the screen (Optional) ACC Doesn't have an option to disable screen rendering in-game. So you have to edit another file to disable the normal window while in VR. Go to C: Users User Documents Assetto Corsa Competizione Config and open the file called vrSettings.json Change "spectatorScreenMode": 5, to "spectatorScreenMode": 0, This will not necessarily increase your performance, just a convenient setting if you want to disable the game from also showing up on the screen. Engine.ini (Optional, not needed) What is Engine.ini?Engine.ini is a file that allows you to edit the default values for Unreal Engine Console Commands. Since we don't have direct access to the console, this is the only way we can access those parameters. The config below is what I'm using and found that it works the best in VR. Let me know if you know any better settings, either for you, with your hardware or with your specific headset. Editing your engine.ini file or using a custom file may create unwanted issues, and beyond unintended graphical appearance it may also result in software or hardware crashes. ALSO: Beware that these settings are only made with VR optimization in mind (Although shadows could be lowered for more performance), these settings will render the photo-mode depth of field turned off, so if you wanna use the photo-mode, you have to remove the parameters in the Engine.ini file. Example: r.Streaming.FullyLoadUsedTextures 1 This is an alternative to disabling textures all together, streaming the textures at full resolution could give you a better visual experience if you have the overhead available. ______________________________________________ Editing the file We need to edit Engine.ini, this file can be found at: user AppData Local AC2 Saved Config WindowsNoEditor I'm not gonna go into detail to any of these settings, but if you feel like it, try to tinker with them in order to find the best settings for your rig. If you want to find out for yourself what these rendering related parameters do, you can do so here. FIRST and foremost, create a backup of your current "Engine.ini" file, for example you can rename it to "bak.Engine.ini". Then, you can copy the backup file and rename it to "Engine.ini" and paste the following config there, replacing the old config. Config file: [Core.System] Paths=../../../Engine/Content Paths=%GAMEDIR%Content Paths=../../../AC2/Plugins/FMODStudio/Content Paths=../../../Engine/Plugins/Runtime/Steam/SteamVR/Content Paths=../../../Engine/Plugins/Runtime/Oculus/OculusVR/Content Paths=../../../AC2/Plugins/ACShaders/Content Paths=../../../Engine/Plugins/2D/Paper2D/Content Paths=../../../Engine/Plugins/Developer/AnimationSharing/Content Paths=../../../Engine/Plugins/Editor/CryptoKeys/Content Paths=../../../Engine/Plugins/Enterprise/DatasmithContent/Content Paths=../../../Engine/Plugins/Media/MediaCompositing/Content [ConsoleVariables] r.Streaming.FullyLoadUsedTextures=1 r.PostProcessAAQuality=4 r.TemporalAACurrentFrameWeight=0.1 r.TemporalAASamples=8 r.TemporalAASharpness=1.0 r.Tonemapper.Sharpen=4 r.VolumetricFog=0 r.RenderTargetPoolMin=350 r.BloomQuality=1 r.AOquality=0 r.LensFlareQuality=0 r.SceneColorFormat=3 r.SceneColorFringeQuality=0 r.EyeAdaptationQuality=1 r.AmbientOcclusionLevels=1 r.AmbientOcclusionRadiusScale=1.7 r.TranslucencyLightingVolumeDim=24 r.ShadowQuality=4 R.DFshadowquality=1 r.Shadow.MaxResolution=512 r.DepthOfFieldQuality=0 r.MipMapLODBias=-0.8 r.HZBOcclusion=0 r.SSR.quality=0 r.SSR.MaxRoughness=0.1 r.RHICmdBypass=0 r.Shadow.CSM.MaxCascades=2 r.LightShaftDownSampleFactor=4 r.TiledDeferredShading.MinimumCount=10 FX.AllowGPUSorting=0 vr.InstancedStereo=1 vr.RoundRobinOcclusion=1 r.MaxAnisotropy=8 [/script/engine.renderersettings] a.URO.ForceAnimRate=2 a.URO.ForceInterpolation=1 r.OptimizeForUAVPerformance=1 r.Streaming.Boost=0 r.Streaming.DefragDynamicBounds=1 r.Streaming.FramesForFullUpdate=1 r.Streaming.FullyLoadUsedTextures=1 r.Streaming.HLODStrategy=2 r.Streaming.LimitPoolSizeToVRAM=1 r.Streaming.PoolSize=0 r.UseShaderCaching=1 r.UseShaderPredraw=1 r.bForceCPUAccessToGPUSkinVerts=True VR Performance Toolkit VR Performance Toolkit PS: This is the new method. You have to remove OpenVR_FSR2.0 if you have it installed, before you install this. To do that, remove this file from the following folder: Remove "openvr_api.dll" in Steam steamapps common Assetto Corsa Competizione Engine Binaries ThirdParty OpenVR OpenVRv1_5_17 Win64 and verify the game on Steam. Alright, lets get on with the new stuff! This is the new method to gain extra performance in ACC. This mod will work with Direct3D 11 graphics APIs, is supported by OpenVR and Oculus. I found that it is better then OpenVR_FSR as it adds additional functionality, such as Foveated Rendering and Variable Rate Shading (The latter is only avaliable for Nvidia RTX or GTX 16xx cards) You cannot use the in-game DLSS and FSR settings when you are running with this modified version. You can find the toolkit here: https://github.com/fholger/vrperfkit Download the latest version, at the time of writing it's V0.3 https://github.com/fholger/vrperfkit/releases/download/v0.3/vrperfkit_v0.3.zip Installation Instructions The installation of this mod is fairly straight forward. Go to the following folder, unpack dxgi.dll and vrperfkit.yml in the same folder as AC2-Win64-Shipping You should find the AC2-Win64-Shipping in the following folder: C: Program Files (x86) Steam steamapps common Assetto Corsa Competizione AC2 Binaries Win64 Now we need to tinker with the settings to get the most out of it. The following example is what i used to achieve a balance between smooth fps and sharpness. PS: This here is the full config i use with my specs, it works great with my GPU, CPU and VR headset. That does not mean it will work perfectly for you, you need to learn the meaning of these parameters and tinker on your own if you are having issues, this should be a good starting point for most users though. # Upscaling: render the game at a lower resolution (thus saving performance), # then upscale the image to the target resolution to regain some of the lost # visual fidelity. upscaling: # enable (true) or disable (false) upscaling enabled: true # method to use for upscaling. Available options (all of them work on all GPUs): # - fsr (AMD FidelityFX Super Resolution) # - nis (NVIDIA Image Scaling) # - cas (AMD FidelityFX Contrast Adaptive Sharpening) method: fsr # control how much the render resolution is lowered. The renderScale factor is # applied to both width and height. So if renderScale is set to 0.5 and you # have a resolution of 2000x2000 configured in SteamVR, the resulting render # resolution is 1000x1000. # NOTE: this is different from how render scale works in SteamVR! A SteamVR # render scale of 0.5 would be equivalent to renderScale 0.707 in this mod! renderScale: 0.85 # configure how much the image is sharpened during upscaling. # This parameter works differently for each of the upscaling methods, so you # will have to tweak it after you have chosen your preferred upscaling method. sharpness: 1.0 # Performance optimization: only apply the (more expensive) upscaling method # to an inner area of the rendered image and use cheaper bilinear sampling on # the rest of the image. The radius parameter determines how large the area # with the more expensive upscaling is. Upscaling happens within a circle # centered at the projection centre of the eyes. You can use debugMode (below) # to visualize the size of the circle. # Note: to disable this optimization entirely, choose an arbitrary high value # (e.g. 100) for the radius. radius: 0.6 # when enables, applies a MIP bias to texture sampling in the game. This will # make the game treat texture lookups as if it were rendering at the higher # target resolution, which can improve image quality a little bit. However, # it can also cause render artifacts in rare circumstances. So if you experience # issues, you may want to turn this off. applyMipBias: true # Fixed foveated rendering: continue rendering the center of the image at full # resolution, but drop the resolution when going to the edges of the image. # There are four rings whose radii you can configure below. The inner ring/circle # is the area that's rendered at full resolution and reaches from the center to innerRadius. # The second ring reaches from innerRadius to midRadius and is rendered at half resolution. # The third ring reaches from midRadius to outerRadius and is rendered at 1/4th resolution. # The final fourth ring reaches from outerRadius to the edges of the image and is rendered # at 1/16th resolution. # Fixed foveated rendering is achieved with Variable Rate Shading. This technique is only # available on NVIDIA RTX and GTX 16xx cards. fixedFoveated: # enable (true) or disable (false) fixed foveated rendering enabled: true # configure the end of the inner circle, which is the area that will be rendered at full resolution innerRadius: 0.6 # configure the end of the second ring, which will be rendered at half resolution midRadius: 0.8 # configure the end of the third ring, which will be rendered at 1/4th resolution outerRadius: 1.0 # the remainder of the image will be rendered at 1/16th resolution # when reducing resolution, prefer to keep horizontal (true) or vertical (false) resolution? favorHorizontal: true # when applying fixed foveated rendering, vrperfkit will do its best to guess when the game # is rendering which eye to apply a proper foveation mask. # However, for some games the default guess may be wrong. In such instances, you can uncomment # and use the following option to change the order of rendering. # Use letters L (left), R (right) or S (skip) to mark the order in which the game renders to the # left or right eye, or skip a render target entirely. #overrideSingleEyeOrder: LRLRLR # Enabling debugMode will visualize the radius to which upscaling is applied (see above). # It will also output additional log messages and regularly report how much GPU frame time # the post-processing costs. debugMode: false # Hotkeys allow you to modify certain settings of the mod on the fly, which is useful # for direct comparsions inside the headset. Note that any changes you make via hotkeys # are not currently persisted in the config file and will reset to the values in the # config file when you next launch the game. hotkeys: # enable or disable hotkeys; if they cause conflicts with ingame hotkeys, you can either # configure them to different keys or just turn them off enabled: false # toggles debugMode toggleDebugMode: ["ctrl", "f1"] # cycle through the available upscaling methods cycleUpscalingMethod: ["ctrl", "f2"] # increase the upscaling circle's radius (see above) by 0.05 increaseUpscalingRadius: ["ctrl", "f3"] # decrease the upscaling circle's radius (see above) by 0.05 decreaseUpscalingRadius: ["ctrl", "f4"] # increase the upscaling sharpness (see above) by 0.05 increaseUpscalingSharpness: ["ctrl", "f5"] # decrease the upscaling sharpness (see above) by 0.05 decreaseUpscalingSharpness: ["ctrl", "f6"] # toggle the application of MIP bias (see above) toggleUpscalingApplyMipBias: ["ctrl", "f7"] # take a screen grab of the final (post-processed, upscaled) image. # The screen grab is stored as a dds file next to the DLL. captureOutput: ["ctrl", "f8"] # toggle fixed foveated rendering toggleFixedFoveated: ["alt", "f1"] # toggle if you want to prefer horizontal or vertical resolution toggleFFRFavorHorizontal: ["alt", "f2"] Here you can play with some settings to suite your needs. Refer to this section of the guide to get a better understanding of the settings: https://blog.lynxsec.se/acc-vr-the-definitive-vr-performance-guide#h_79180736721801666945826405 OpenVR_FSR V2.0 [OLD METHOD, DON'T USE] THIS METHOD IS OBSOLETE AND REPLACED WITH VRPERFKIT I found that this is still better then the ingame options for DLSS and FSR for VR. It's pretty obvious, but you cannot use the ingame DLSS and FSR settings when you are running with this modified version. This modified version of openvr_api.dll works with ACC, this is what made the game playable for me (Together will the correct configurations overall) You can find the modified dll here: https://github.com/fholger/openvr_fsr Go to Releases: https://github.com/fholger/openvr_fsr/releases/ Download the latest version, at the time of writing this, it's V2.0 Direct download: https://github.com/fholger/openvr_fsr/releases/download/fsr_v2.0/openvr_fsr_v2.0.zip Installation instructionsBackup your old "openvr_api.dll" so you can go back to the original one, just in case. Rename it to "bak.openvr_api.dll" or zip it into an archive. Replace "openvr_api.dll" in Steam steamapps common Assetto Corsa Competizione Engine Binaries ThirdParty OpenVR OpenVRv1_5_17 Win64 with the one provided from github. Make sure you include openvr_mod.cfg in the same folder as the modified openvr_api.dll. You can tinker with the settings a bit, but i would suggest not to at first, if needed later on you can check out openvr_mod.cfg, it looks like this. { "fsr": { // enable image upscaling through AMD's FSR or NVIDIA's NIS "enabled": true, // if enabled, uses NVIDIA's Image Scaling instead of the default // AMD FidelityFX SuperResolution. Both algorithms work similarly, but produce // somewhat different results. You may want to experiment switching between the // two to determine which one you like better for a particular game. "useNIS": false, // Per-dimension render scale. If <1, will lower the game's render resolution // accordingly and afterwards upscale to the "native" resolution set in SteamVR. // If >1, the game will render at its "native" resolution, and afterwards the // image is upscaled to a higher resolution as per the given value. // If =1, effectively disables upsampling, but you'll still get the sharpening stage. // AMD presets: // Ultra Quality => 0.77 // Quality => 0.67 // Balanced => 0.59 // Performance => 0.50 "renderScale": 0.77, // tune sharpness, values range from 0 to 1 "sharpness": 1.0, // Only apply FSR/NIS to the given radius around the center of the image. // Anything outside this radius is upscaled by simple bilinear filtering, // which is cheaper and thus saves a bit of performance. Due to the design // of current HMD lenses, you can experiment with fairly small radii and may // still not see a noticeable difference. // Sensible values probably lie somewhere between [0.2, 1.0]. However, note // that, since the image is not spheric, even a value of 1.0 technically still // skips some pixels in the corner of the image, so if you want to completely // disable this optimization, you can choose a value of 2. // IMPORTANT: if you face issues like the view appearing offset or mismatched // between the eyes, turn this optimization off by setting the value to 2.0 "radius": 0.5, // if enabled, applies a negative LOD bias to texture MIP levels // should theoretically improve texture detail in the upscaled image // IMPORTANT: if you experience issues with rendering like disappearing // textures or strange patterns in the rendering, try turning this off // by setting the value to false. "applyMIPBias": true, // If enabled, will visualize the radius to which FSR/NIS is applied. // Will also periodically log the GPU cost for applying FSR/NIS in the // current configuration. "debugMode": false } } Here you can play with some settings to suite your needs. "useNIS" - Set this to True if you want to try Nvidia's Image Scaling instead of AMD's FSR that is the default. I find this less crips compared to AMD's FSR, but it might render a different result for you depending on your headset. "renderScale" - Set the renderscale, a lower number will render the game at a lower resolution and upscale to the native resolution set in SteamVR. Try different values here to fit your headset. "sharpness" - If set this to 1.0 as it worked best for me, however try lowering this and compare the results. Start with this at 1 though. "radius" - This one is important, this will set how big of an area should be "sharp", default is 0.5. If you want a larger sweetspot, increase this. If you want a smaller sweetspot, lower this. Lower means better performance, higher means worse performance. 0.5 is a good starting point. Ingame Graphics Settings [UPDATED FOR 1.8] In this section we will cover the ingame graphics settings for ACC These settings will highly depend on what computer you have, use these settings as a baseline and make your own small tweaks. Tip: ACC has a great feature that allows you to save multiple graphics settings and load them back when needed. Start off with saving your current settings, give it a name and save it. Go to Put this file in Documents Assetto Corsa Competizione Customs VideoSettings Here you can copy the file that already exists, and rename it to "VR Main Settings" for example. Then you can edit the file and replace the contents with the following: { "resolutionQuality": 60, "viewDistanceQuality": 1, "antiAliasingQuality": 3, "shadowQuality": 1, "postProcessQuality": 1, "textureQuality": 2, "effectsQuality": 1, "foliageQuality": 1, "mirrorQualityLevel": 1, "mirrorFramerateCap": 45, "maxCarsVisible": 11, "isAATemporal": true, "aACustom": 0, "pixelDensity": 1.3500000238418579, "mirrorDistance": 10000, "advancedSharpenFilter": true, "materialsQuality": 0, "temporalUpsampling": true, "volumetricFog": 0, "bloomLevel": 0.30000001192092896, "bloomQuality": 1, "mirrorsResolution": 0, "foliageLodQuality": 2, "carLODSet": 100, "hLODEnabled": true, "shadowDistanceQuality": 0, "frameLimit": 120, "isMBlurEnabled": 0, "colorSaturation": 1.059999942779541, "sharpen": 3, "cameraDirtLevel": 1, "whiteBalance": 9300, "imageExposureGain": 0.48999997973442078, "imageContrast": 0.48999997973442078, "hmdWorldToMeters": 100, "fpsCapUI": true, "useLegacyTonemapper": false, "hDRColorGamut": 2, "hDRUILevel": 1, "contactShadows": 1, "dLSSEnable": false, "dLSSQuality": 0, "dLSSSharpness": 0, "tAAGen5": false, "aMDFSREnable": false, "aMDFSRQuality": 2, "aMDFSRSharpness": 0.20000004768371582 } If you don't want to go the config editing way, here is some screenshots for you Ingame Settings:This is the same config as the config file above Let's do this right from the beginning, step by step. Step 1: Begin with clicking "Manage Custom Video Presets"
步骤2: 创建你的预设,通常建议为普通电脑屏幕和VR分别创建一个。 如果你已经有VR预设,保存并命名它,这样在你不喜欢我们即将配置的新预设时,可以回到该预设。 注意:从桌面模式切换到VR模式时,需要重新设置VR像素密度,每次切换都会重置该设置。
步骤3: 既然我们已经保存了旧配置,现在可以着手创建新配置了。 让我们从头开始: A:

分辨率:无关紧要,反正游戏只会以VR模式渲染。 垂直同步:禁用 帧率限制:设置为略高于VR头显刷新率,如果电脑配置较高,可适当提高以获得更流畅的体验。 菜单帧率限制器:启用 三屏显示:禁用 HDR:禁用
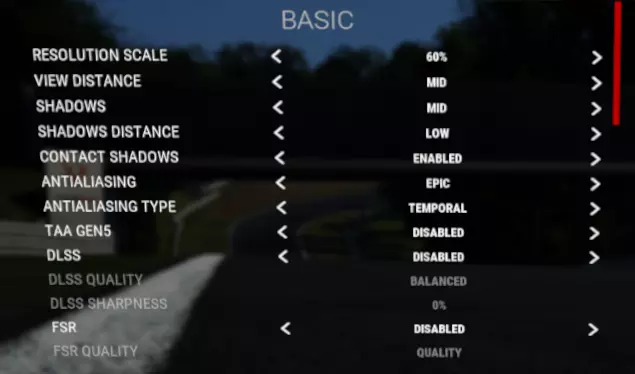
分辨率缩放:60%(这会让画面更清晰一些,如果你的电脑配置较高,可以尝试稍微调高一点;如果遇到性能问题,可降至55%或50%) 视野距离:中(低配电脑建议设为低) 阴影:中 阴影距离:低 接触阴影:开启 抗锯齿:史诗 抗锯齿类型:时间性抗锯齿(TAA)(如果没有其他选项,可尝试KTAA) 第五代时间性抗锯齿(TAA Gen5):禁用 深度学习超级采样(DLSS):禁用 FidelityFX超级分辨率(FSR):禁用
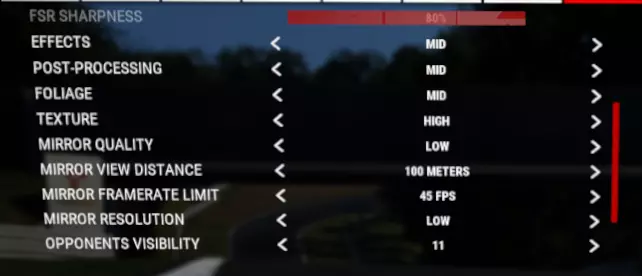
效果:中等 后期处理:中等<----如果想要更高帧率,可设为低 foliage:中等 纹理:高 后视镜质量:低 后视镜视野距离:100米(对在线竞速有用,若想减少性能影响可设低) 后视镜帧率限制:45或60 FPS(设为45可提升性能) 后视镜分辨率:低 对手可见数量:11(对在线竞速有用,若需看到更多对手或提升性能,可设高/低)
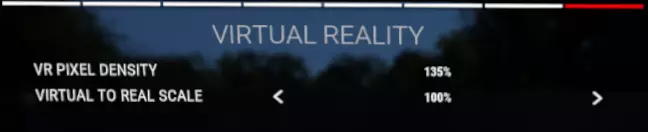
VR像素密度:135% 虚拟与现实比例:100%【提高此数值可缩小世界比例,更容易看清弯心,可能会对性能产生影响,但不确定】 E:
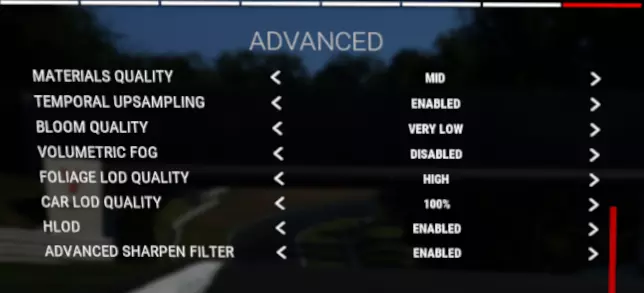
材质质量:中等 时间性上采样:开启 bloom 质量:极低 体积雾:禁用(这是VR性能杀手,建议始终关闭) foliage 细节层次质量:高 车辆细节层次质量:100% HLOD:开启 高级锐化滤镜:开启
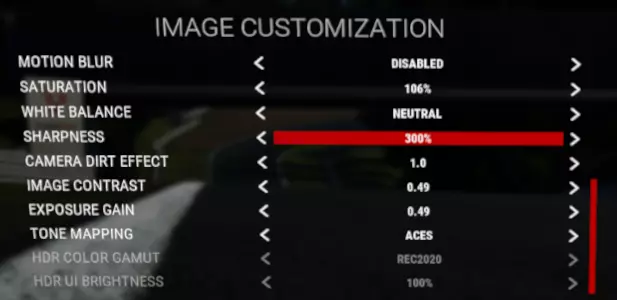
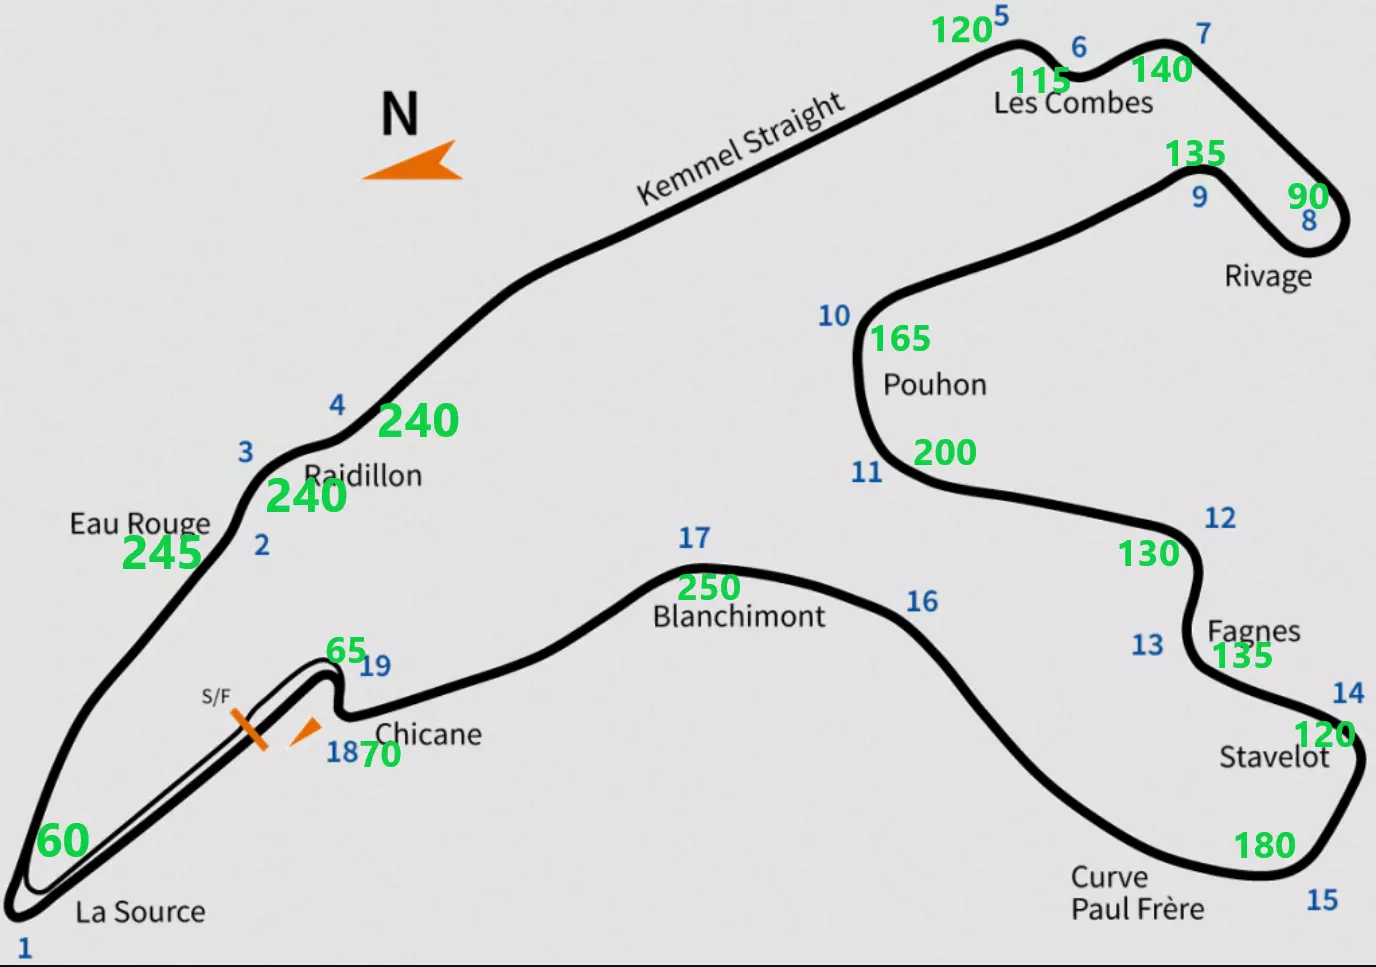
此部分设置取决于个人偏好,但【锐度】选项除外。 动态模糊:禁用 饱和度:106%(如果不想要更鲜艳的色彩,可设为100%) 白平衡:暖色(如果需要,可设为中性,此选项取决于个人偏好) 锐度:300% 镜头脏污效果:1.0 图像对比度:0.49 曝光增益:0.49 色调映射:Aces(可根据个人喜好设置) 伊莫拉飞驰圈
在雨天以及发车格上有29辆AI赛车的情况下(我雨天技术很差): 跟随AI——发车格上有29辆赛车: 《神力科莎:争锋》与现实赛车的对比: 总结 现在你应该已掌握所有提升《神力科莎:争锋》表现所需的工具,但即使进行了这些调整,配置较低的电脑可能仍会遇到困难。