换一换
换一换 


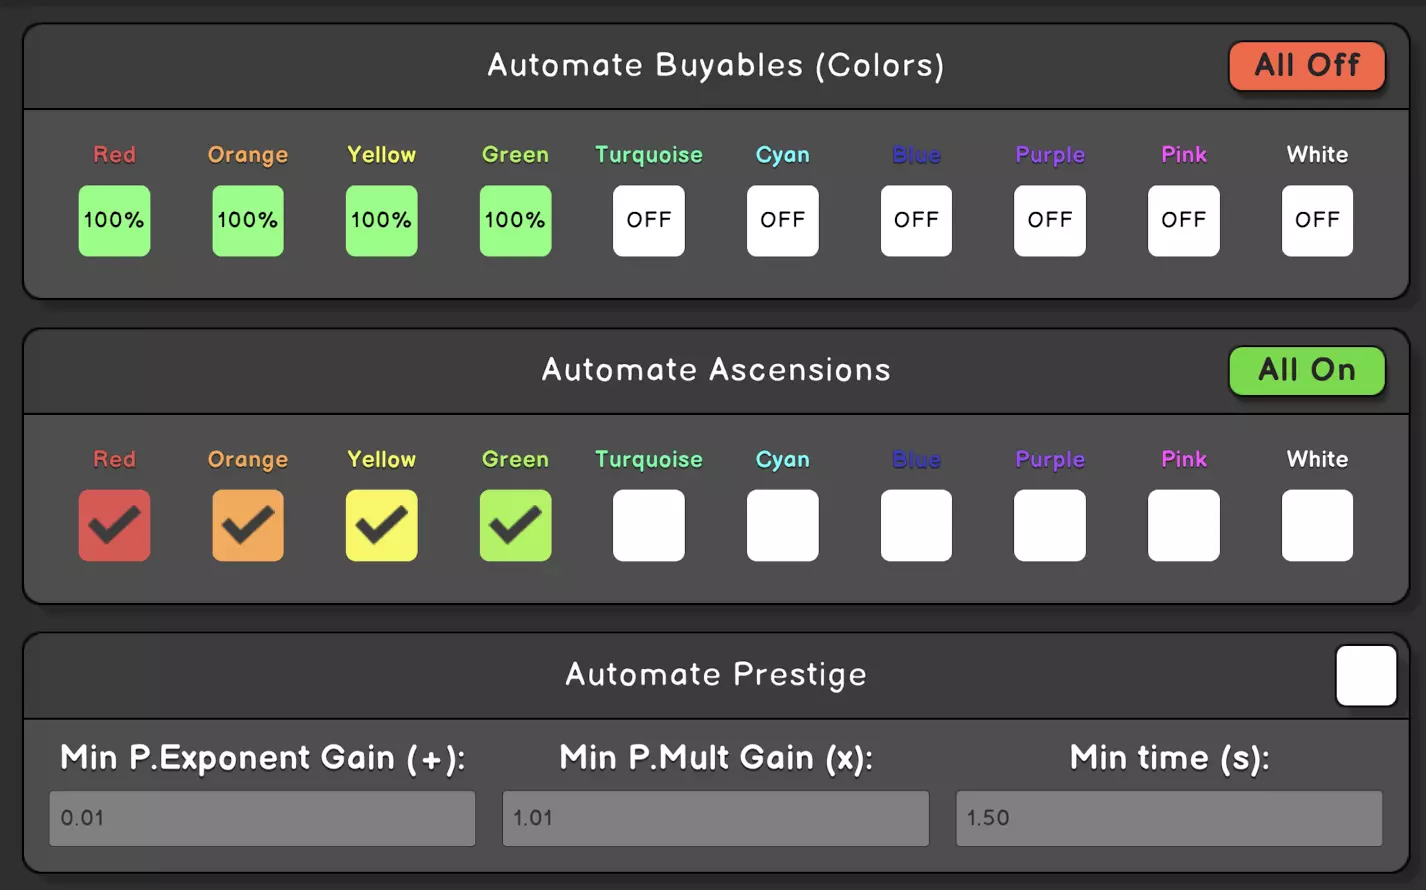
From Start to Finish guide current game version #1.046 Introduction This guide is NOT meant to give you the most optimal way to do absolutely everything (there are too many variables along the way). What it is meant to do, is to provide some helpful tips to get from the beginning of the game to the current end while allowing the player to make adjustments for what works for them at each stage of progress. There is a Help option available in game that will give you the basics of gameplay, read that each time you unlock a new section or sub-section for the basics. *A Note about ACHIEVEMENTS: They give a Multiplier bonus to your main multiplier and Generators, so they are good to get, but don't waste time specifically to achieve them as the individual bonus isn't worth any extra time spent. Most achievements will be obtained just by playing and while you may get them in order, this doesn't always happen and doesn't mean you missed it. If there is an achievement that requires more than normal play, I do cover those in the guide. Most achievements are very easy and there is no reason to turn them into challenges. Secret Achievements: There are other guides for those linked in the Appendix section. Infinity BRIEF OVERVIEW: Revolution Tab: The main playing area. Time Flux Tab: Accumulates while offline and from Daily Rewards. You can use it to speed up the game, but some things like auto infinity don't seem to work very well with it active and/or when using Time Warp. The most efficient use is the x2 speed. I rarely use it but it can be very useful when you are in a long grind. I have never used Offline Flux, so can't say much more about it. Statistics Tab: You can see various game data here which becomes extremely useful as you progress. Achievements, Options, Help, Shop, Credits Tabs: Should be self explanatory. Colors / Revolutions: Hotkey "B". The foundation of everything. Buy these with your Income. Ascensions: Hotkey "A". Resets color level to 5, but increases the revolution multiplier initially by x10. Also increases max level. Prestige: Hotkey "P" Gives a prestige multiplier and exponent bonus at the cost of resetting all colors and ascensions. Promotions: Hotkeys "1- 4". Resets all colors, ascensions, and prestige but gives multiplier to the specific promotion you bought. #1 Multiplier, #2 Lap speed, #3 Ascensions, #4 Increases power of the other promotions. Promotions do not reset until infinity is reached. ***A game update since this was written gave a slight boost to Infinities, so my reference values may be off a bit. *** FIRST INFINITY: Not hard, but slow and tedious especially at the start. Buy colors and ascensions as they become available. I do recommend using at least hotkey "B", otherwise you will be doing a LOT of clicking. The hotkeys listed are the game defaults, you can change them in "Options". *Note: For this guide, I bought nothing in the shop (not even with daily rewards). I also use Scientific notation (changeable in Options). Also just purely based on how long the first infinity takes compared to the second, I don't think the achievement bonuses obtained get applied until after Infinity. Grab Achievement #005 "Check the Dev". Simple. Hit the "Credits" tab on the right. Because Prestige and Promotions cause a reset, you want the bonuses to be worth the penalty of the reset. But you also don't want to wait too long to get the bonus. Some generalized recommendations: First Prestige: The ingame "Help" recommends when the multiplier is x10. I use this x10 increase up to 1 million. (10 > 100 > 1000 > 10,000 > 100,000 > 1 million). From there you generally want the multiplier bonus to be at least x1000 of your previous amount (1 million > 1 trillion.....1e12 > 1e15 > etc). As your promotions get stronger, it will start to speed up and your prestige after promotions will be much higher and it will increase much faster. First Promotion: The ingame "Help" recommends #1 Multiplier gain at x6 which would be level 3. This will be when your P. Mult is at about x13k so be patient and wait for it. After that there is some flexibility, you just want the bonus to be worth the reset. I do #1 again at lvl 8 followed by #2 at lvl 10, then back to #1 again at lvl 20 and lvl 30. Starting to speed up now, #3 at 30, #2 at 40, #1 and #4 at 50. Just promote what you want at this point. It should be no less than a 10 level increase and you'll get to the end before long. My final lvls: #1 at 80, #2 at 40, #3 at 70, and #4 at 50 and just ride it out to the end. Probably not the fastest, but it will get you there. *Note: While it's not hard to get some of Achievement #'s 021, 025, 026, 029 during your first Infinity, I prefer just to get through this Infinity as they are much easier in the future with less clicking. Congrats! First Infinity complete. **Checkpoint: Not important but for reference: My first Infinity time was 12 hrs 7 min. A new Infinity tab unlocks with Upgrades and Generator subtabs. You received your first Infinity and an Infinity Point (IP). Yes, they are different and some upgrades provide bonuses based on the number of Infinities, others provide bonuses based on the number of current IP. All upgrades and generators are bought with IP. Now you can buy the first upgrade which allows automation for buying colors. Save your fingers, go into the new Automations tab on the right, and turn all colors on at 100%. I recommend turning Off Infinity animations in Options so when complete it will immediately start the next run. Continue doing the Infinities and buying more upgrades and generators when you can afford them. Your second infinity you should notice that it goes much faster and you can do fewer prestiges and promotions, which saves considerable time. If you haven't done them already, now is a good time to start getting the achievements that require a little more than normal gameplay. I just do one of these achievements per Infinity, but that's up to you. You can also do them later if you choose. #021 "You don't need it. Promote without Prestiging". Leave promo #4 at lvl 1 otherwise play the Infinity as normal (including prestige). When Infinity progress is around 50% do any #1-3 promotion followed by promotion #4 without prestiging in between them. #025 "Only three, Prestige with only 3 colors". Same strategy as #021. Play as normal until progress bar is around 70-90%. Turn OFF autobuyers and don't use Hotkey "B". Promote any #, then only buy first three colors, Prestige as soon as available. #026 "Easy Prestige. Promote without Prestiging and Ascensions" Same strategy as achievement #021 above. When you're ready, turn OFF Ascension autobuyer (if you have it), do any #1-3 promotion, buy colors but don't prestige or ascend, do promotion #4 when available. **Note: Achievement #029 is very important later, so be sure to do it.** #029 "Backwards, Make White mult > Pink mult >Purple mult, etc." The colored numbers at the top of the screen are the multipliers referred to. White needs to be the biggest, and Red the smallest. When you are getting close to the end of the Infinity, turn OFF all color and ascension autobuyers except White. Prestige (not promote) to reset the colors and keep the high P .multi, then quickly unlock each color. When you get to White work your way back up buying decreasing amounts for each color. Don't buy Red at all. Check the numbers at the top and buy more of whatever is needed. You may even need to Ascend some colors. You can mouse over the colors to see what the multiplier is per revolution as well. This helps determine if you need to buy more of a certain color. It's actually easy to do, but don't feel bad if it takes a couple times to get the hang of it. If you feel you messed it up or it's taking too long, just finish the Infinity and try again on the next run or buy more upgrades to help before the next try. Some important upgrades to note: Upgrade 2:2 unlocks Automation for Ascensions so go ahead and turn them all on. Upgrade 5:3 unlocks Automation for Prestige. I always set Min P. Exponent gain to 0, so can't really say if it might be useful. I set Min P. Mult Gain to 1000. The Time is how long it will run after it reaches the target amount which can be useful, but not really right now. So for now I set it to 0-1000-0. It will get the job done but you still need to do promotions and probably a few prestige before you want the auto x1000. At this stage in the game, it is more efficient doing them yourself, so setting it On or Off is up to you. Upgrade 7:1 unlocks Infinity Challenges. Infinity Challenges Infinity Challenges: These improve your IP gain per Infinity. Each completed challenge adds a +1 Multiplier to your IP gain per Infinity up to x10 when all challenges are completed. Once all challenges have been completed, several upgrades also provide bonuses based on your total challenges time. For this reason, you will want to reduce these times as much as possible as you buy more upgrades and generators. Once all challenges have been completed at least once, you will also be able to break Infinity which will enable much, much better IP gains. *Note that until all challenges have been completed at least once, the Challenges time sum in statistics is meaningless. You can also exit a challenge by clicking on it x3. *Using Time Flux during the longer challenges can really be helpful to speed them up. But you should probably turn it off when you are getting close to the end so that it finishes correctly. Not saying that it won't finish correctly, but why risk it? Challenges #1-2: Not much to say, Due to the penalties, they will be a little slower than normal Infinity but not a whole lot. Buy the 10 IP Generator Challenge #3: This will be slower than the first two. Use Time Flux if you want to speed it up. Buy upgrades 8:1-3 at a minimum before continuing with challenge #4. At this point you should be doing Infinities in 3-5 mins for 8 IP so it doesn't take that long. I prefer to spend extra time to get the next set of generators (100 IP each) but that's up to you. Challenge #4: Nothing really to say here, except it's even slower. Time Flux if you want. If you haven't already, buy either upgrade 9:1 or 9:2, and 10:1 which unlocks automation for Promotions. Finally! Set up automation so you can take a break. This setup should get you an infinity approx. every 1 min 10 secs. Feel free to make it faster. ***NOTE: I do not use promotion automation during challenges, so any automations listed are not designed for challenges. Automate Prestige 0 - 1000 - 0 Automate Promote #1 +6 Lv 0 s #2 +22 Lv 0 s #3 +35 Lv 0 s #4 (or any) +500 Lv 0 s (This is to stop it from repeating and let the prestige carry it to the finish).
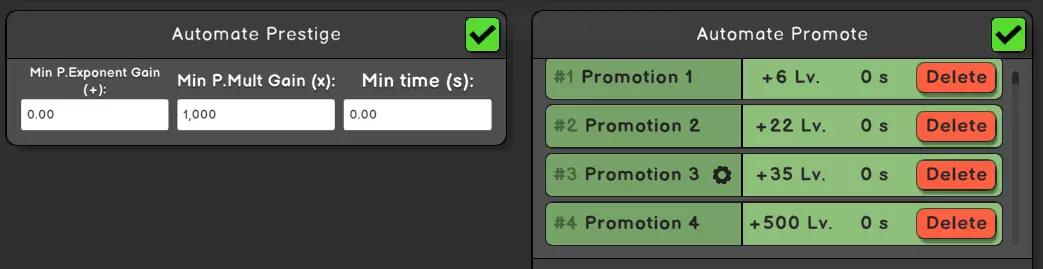
我喜欢在这里刷大约一个小时,然后购买升级9:1-2(如果你跳过了其中任何一个的话)和11:1-2。这些升级的威力会根据当前的IP值提升。 挑战#5:晋升的效果极其微弱,基本上没什么用。关闭你的晋升功能,让自动 prestige 完成整个挑战。和之前的挑战相比,这个既简单又快速。 挑战#6:如果你之前花时间刷过资源,这个挑战会很轻松。如果没有,开局可能会非常缓慢。 挑战#7:开局比较慢。到最后,晋升的效果应该能轻松克服惩罚。 是时候再刷一些升级了,直到14:1-2和生成器。现在应该能达到大约1 IP/秒。第15列的升级都没什么帮助,所以暂时不需要购买。 挑战#8:不能进行飞升。晋升#3没有任何作用,所以不要使用它。完成其他晋升的大约100个等级应该就能达成。 挑战#9:一场漫长而缓慢的磨砺。完成所有晋升的大约110个等级并坚持下去。 挑战完成! 参考:目前仍然不是很重要。我的总挑战时间:8小时22分钟 无限突破 挑战标签底部出现了一个新的【突破无限】选项。突破无限允许你超越无限,这会为你的IP获取添加一个乘数。每一个超越无限的进度条会逐渐增加,填满时可达10倍。50%填满的进度条仍会提供5倍乘数。在进度条上方,你会看到一个新的条,点击它可以领取相应数量的IP并重置当前回合。遗憾的是,它目前还不是特别有用,但很快就会变得非常有用。欢迎体验。目前,我仍然推荐连续无限模式,因为它能提供大致相同的每秒无限点数(IP/s),同时还能增加无限次数(用于那些以该属性作为加成的升级)。我使用这个配置来购买15:1-4的升级,从15:2开始。 声望 0 - 1000 - 0 晋升 1号 +7个0 2号 +18个0 3号 +500个0 提供约2.5 IP/s(大约需要一小时购买所有4个升级)
现在你已经拥有了这些,是时候重新运行所有挑战来减少总时间了。你的时间越快,就越能提升【15:3-4】,这是【破碎无限】流程的关键部分,同时还有其他基于挑战时间的升级,这些升级你很快就会获得。 注意:从现在开始,任何时候你想减少挑战时间,都要关闭【 prestige】和【 promotions】的自动功能,它们几乎肯定会拖慢你的速度(目前【#9】仍然比较困难,所以自动功能暂时可以开启)。确保【无限】没有被破碎(如果破碎了,挑战将无法完成),然后把时间降下来。完成这些后,就可以真正开始破碎无限了。 检查点:新挑战的时间总和应该在1小时左右。 参考:我的是1小时5分钟。《Infinity》崩溃问题的自动化设置: 重置阶段 0 - 1000 -(时间范围 0 - 0.10)设置延迟的原因是为了留出额外时间一次性购买更多内容。这能减少重置总次数,从而节省部分时间。我个人使用 0.00,但你可以自行尝试并选择喜欢的数值。 晋升: 2号 +10 1秒(我优先选择圈速,但可能影响不大) 1号 +10 1秒 3号 +10 1秒 4号 +10 1秒
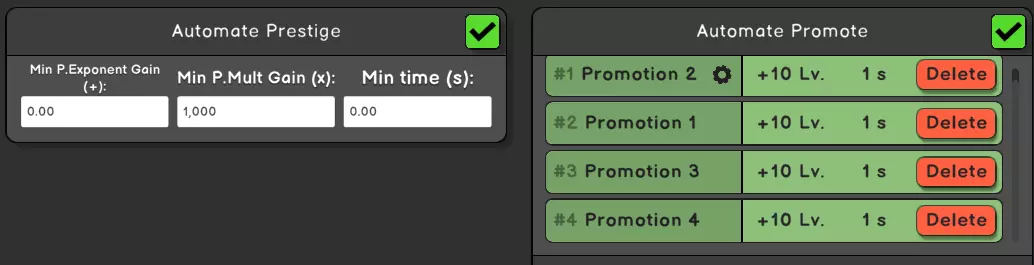
The 1 second delay here IS important. It keeps them about the same level. Without it, you can have one promotion that's 50+ levels above the others and that's not good. You want balance. Automate Infinity: (unlocked with 15:1 upgrade only works with Broken Infinity) This is where you will make most adjustments from now on. "Min IP": This is the IP amount set where it will automatically claim and restart. "Time": This is how often it checks to see if the Min IP value has been reached.... I just leave it at the default .05 (longer times were kind of buggy or didn't seem to work correctly. This could have been changed or fixed in later patches. But as far as I know this is how the time works). For your first Broken Infinity run leave Automate Infinity OFF. You want to watch it until Auto prestige and promotions basically stop going full speed. Click on the "Infinite for xx IP" and note the amount or check statistics for the total claimed as well as IP/s. The total IP claimed is the number you should put into automate Infinity and now turn it ON and let it farm. *Reference: Mine at this point was 700 IP in 1:50 for 6.41 IP/s ***Common Mistake*** Don't let it run for hours thinking it will be a huge IP reward. It's a complete waste of time right now. Buy the next set of Upgrades starting with 16:1-3. Each time you buy an upgrade, see if you can improve on the IP gains the same way as above. Very quickly you should see a big difference. Buy the Generators for 10k each. Run the Challenges again to further reduce the time. *Reference: My time is now 15 min 33 sec (a nice improvement) You should again check to see what to set auto Infinity to. Set it and farm IP to buy the generators for 100k each and.... Re-run the challenges. At this point you should try to get Challenge times under 10 mins. If you have trouble with that, build up your reserve IP to boost Upgrades 11:1-2. *Reference: My Challenge time sum now 6 mins. Infinity Broken Instead of checking your IP gains like previously, this time just go ahead and set your auto Infinity amount to 1.1e6, which just so happens to be the cost of the next upgrade, plus a little extra. In about 20-30 mins check on it and see where it's at. If it didn't auto claim yet, use your own judgement if you want to claim it and reset or let it auto finish out. Once you buy one upgrade, you can increase the amount about x2 and repeat. Buy upgrades 17:1-3 followed by the generators. And WOW! That's a high inflation to the next set of upgrades. Better try to get your challenge times under 3 mins. Buy the next sets of generators on the way to the upgrades. Probably the "correct" way to reach the next set of upgrades is either turn OFF auto Infinity or Set it very high and do a run for 30-40 mins (set a timer or something) then claim IP. Do next run for 50-60 mins and compare the IP/s. If the 50-60 min run had higher IP/s, then do an even longer run and compare that IP/s. Keep doing this until you find the "optimal" spot. Set your auto Infinity to that amount. Or set a timer for a specific time. It would be really nice if the time on auto Infinity worked for this purpose, but it doesn't seem to, or if it does I never could get it to work that way consistently. If you go with a specific time, you will notice your claimed IP and IP/s increasing each run. If you set a specific target amount, you will notice your Time decreasing and IP/s increasing each run. I find that about 60-90 mins is a decent time for a while both for IP/s and stopping to buy more stuff. Whatever method you choose, it's a little bit of a grind for upgrades 18:1-3 but shouldn't be too bad if you get your challenge times under 1 minute. Continue to use the same process to keep buying upgrades and generators. After several upgrades/generator purchases do the challenges again. Rinse and repeat. When you buy the final upgrade, a new Infinity sub-tab unlocks for... Stars: Simply produces Stardust. Stardust: Multiplies Generators and can be used to buy Stardust Upgrades. Stardust resets when you claim IP so try to buy upgrades before the reset. There's really nothing different from what you've already been doing, keep buying stars and stardust upgrades and generators. When you reach 1.79e308 IP, you can "eternate". When it's available it will appear above the "Infinite for xx IP" bar (You probably will have have to first claim the IP for the Eternity to appear). If your prestige is still going you may see it blinking, if you have trouble clicking it, turn off the automation. Congratulations! You have just received your first Eternity and Eternity Point (EP). Just like Infinity and Infinity Points, these are two separate things. *Reference: Not important but my first Eternity time was 3 days 20 hrs Eternity Beginner and Zoo First Eternity: Each Eternity provides passive Eternity Bonuses which are permanent and can be viewed in the Eternity Milestones tab. Eternity Points will be used to buy Laboratory and Animal Points when they become available a little later. The bad news with your first Eternity is that everything else gets reset and you will need to go through it all again for your next Eternity. However, with the Eternity Bonus and all your achievements it will be faster (although it will still feel slow). You can now see Eternity Milestones and how many Eternities are needed for each perk or additional feature. For now you need.... Eternity Milestones #1-2: Self explanatory Eternity Milestone #3: Unlocks Eternity Zoo Animals: Each animal provides a bonus and is bought with Animal Points (AP). Animal Points can be purchased with Eternity Points, current run Score, or current run IP. There is also an Animal Milestones sub-tab. *NOTE: When Infinity or Eternity resets, so does your current Score and IP, meaning you need to buy AP when they are available before reset. To get higher Score/IP you will need to break Eternity with Milestone #10. Animal Milestone #1: unlocks slowdown. Slowdown: Basically reduces lap speed in exchange for an Ascension. Can only be used when all colors are solid. When you first get it, you need to be careful not to slow down too much. If you use the slowdown too much and prestige or a promotion resets colors, the slowdown remains in effect, which can be a real drag. You can "speedup" again, but it's better just to not overuse it. Having said that, it is very much worth using when you get into the longer IP runs. With a couple animals, Eternities should be going much faster now. You won't be able to do too much more with animals for now, so the next goal is to keep unlocking Eternity Milestones, but keep buying AP when you can. Eternity Milestone #4: Buying colors (revolutions) now costs nothing. Nice! Eternity Milestone #5: Unlocks Auto IP Adjuster Auto IP Adjuster: When IP is claimed (either manually or by using Auto Infinity value), the adjuster multiplies your Auto Infinity value by the Auto IP Adjuster value increasing the Auto Infinity value so you don't have to. You then only really need to buy upgrades and generators. Example: Automate Infinity value 1e110 x Auto IP Adjuster 1e10 = 1e120 New Auto Infinity Value (The number after the "e" is how many places are after the first number, so 1000 = 1e3) Eternity Milestone #6: Unlocks Eternity Challenges Each challenge provides an immediate bonus when completed. In addition, there are also Challenge Milestones for completing a combined total number of any challenges. Each challenge also has 5 levels of difficulty. Each difficulty provides completion bonus and adds to the Challenge Milestone count. Unlike Infinity Challenges, once completed there is no reason to run a challenge again (you only get the bonus once). Completion time does not matter. You do not need to complete challenges when they first become available. In many instances it would take far longer than you would want. If a challenge is going to take longer than 30 mins, in most cases there are better things to do with that amount of time. Animal Milestone #2: Unlocks Auto Slowdown. Nice you don't need to do it manually anymore, but with auto active, it can definitely slow you down too much. I do not understand the math of it, but for now, if you set it to 1000, it should be about right for gains vs. speed loss. Eternity Milestones #'s 7-9: Unlocks Auto Eternity (set it to 1), Auto buy Infinity upgrades, stars/stardust, generators (turn them all On with Generators to Max buy setting). Eternity Milestone #10: Breaks Eternity When you can break Eternity, you can get a few more Animal Points with Score and IP, but not a whole lot yet. Once you buy the AP that you can with broken Eternity, I recommend just auto Eternate at 1 Min EP for now. When you have 11-13 AP, buy or respec to animals 1:1-2, 2:1-4 (If you have enough AP to buy 2:5 even better) for focus on lap speed and go into the Eternity Challenges and complete Challenge #1, difficulties 1-3 for the first Challenge Milestone.
一开始这些会比较慢,但完成第一次无限之后就会变得非常容易。在下一次永恒之前,尽量降低你的无限挑战难度,因为挑战里程碑1允许你保留最佳时间。 永恒实验室和更多动物园 注意:本文撰写后游戏进行了一次更新,提供了小幅游戏增益,因此此处给出的参考数值可能略有偏差。这次更新使游戏变得稍微简单了一些。 此时购买或重新分配动物,使你拥有至少7只动物以达成下一个动物里程碑。 动物里程碑3:解锁实验室 花费永恒点数(EP)生成实验室点数来填充烧杯。每次烧杯填满,你将获得1个研究点(RP),用于升级6种加成中的1种。目前只有4个值得投入: 1. IP获取,4. EP获取,5. 世代功率指数,6. 普通指数。 现在,你的力量不足以深入破碎永恒,这意味着你的EP获取可能每次运行最多3或4(如你所见,你需要比这多得多)。你需要启动实验室以获取更多EP。我强烈建议你前6个RP用于4. EP获取,然后投入1. IP获取,使1. IP获取大约多2倍(2:1的比例,在EP达到16点后全部投入IP)。这个比例可以随着EP投入的减少而改变。 注意:以上是我使用的方法。有些人说全部投入IP总是更好,所以找到适合你的方法。我也强烈建议关闭自动永恒,因为它的数值波动很大(在相同设置下,我曾获得过30到118之间的永恒点数)。当进度停滞时,直接领取永恒点数即可。 如果你确实想使用自动永恒,确保设置一个足够低的数值,保证自己能够达到,避免陷入停滞不前的刷取状态,同时设置10到15秒的计时器,这样它也能超过该数值触发。购买实验室升级后,重新评估自动永恒的设置仍然是个好主意。 不久之后,你应该就能购买总共10只动物了。我选择的是1:1-5和2:1-5的组合,但这完全取决于你自己的喜好。
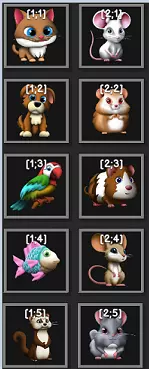
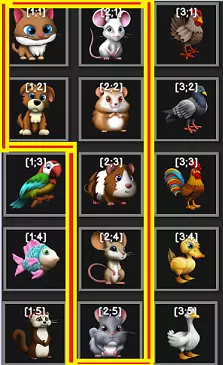
动物里程碑4:晋升不会重置任何内容。很好! 进入你的自动化设置,将所有晋升设置为+1和0秒,然后观察其效果。 挑战检查点:现在是完成挑战1以获取下一个挑战里程碑的好时机。将你的实验室重新分配为1:4的比例到升级5和升级6。比例会发生变化,所以要检查。对我来说,1:4的比例一直用到膨胀阶段都有效,但可能存在很多变量,所以找到最适合你的比例。 注意:要快速找到实验室的最佳比例,在自动永恒中设置一个大约需要1-3分钟才能达到的目标数量。当达到目标时,切换到你想要检查的比例并比较永恒点每秒(EP/s)。在获得动物里程碑5后,这种方法效果更好。 挑战里程碑2: prestige不会重置任何内容。太棒了。现在你可以将声望倍率设置为任意低的数值(我用的是2倍,但具体取决于你)。 你现在也应该可以进行2倍的挑战#2和1倍的挑战#3。 挑战里程碑#3:解锁超新星。尽可能触发超新星以获得更多加成。 【注意:这是我最后一次提醒挑战相关内容,你可以随时进行挑战,但记住不要在挑战上花费过多时间。更重要的是保持其他内容的进展,当你能力足够时,挑战通常只需几秒钟或几分钟就能完成。】 既然声望和晋升不会重置任何内容,你也可以将自动减速设置调整为10。这是能发挥最大效果的理想设置。 目前继续专注于实验室和动物的升级。偶尔在IP/EP实验室设置(用于获取EP)和通用能量/通用指数设置之间切换,比例为1:4(用于获取购买AP和超新星的分数)。再次说明,请自行确认这是否是适合你的比例。 在IP/EP设置中开启自动永恒,时间可能在3-10秒之间(你可以将数值设为1)。 进行分数/超新星运行时关闭自动永恒。 【注意】你可以重新分配动物属性点,以更专注于IP/EP或分数/超新星。我觉得这太麻烦了,所以就保持了它们的初始状态,完全没有重新分配。 要获取的动物:目前的目标是收集20只动物以达成下一个里程碑。我建议获取第1组1-5号到第4组1-5号的所有动物。你可以按任意顺序获取,但IP和EP增益动物应优先考虑。这20个将作为你维持里程碑激活状态的基础,其他所有内容都将以此为基础构建。 在图表中: 黄色是基础动物(保留这些) 红色用于提升IP/EP收益 绿色用于提升分数/超新星 当你拥有所有这些后,其余部分可根据你的选择进行填充(我通常会购买最便宜的)。
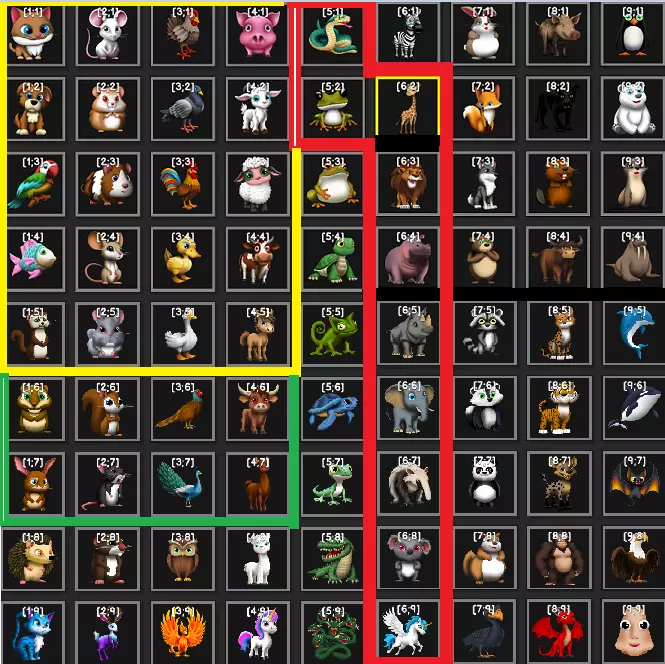
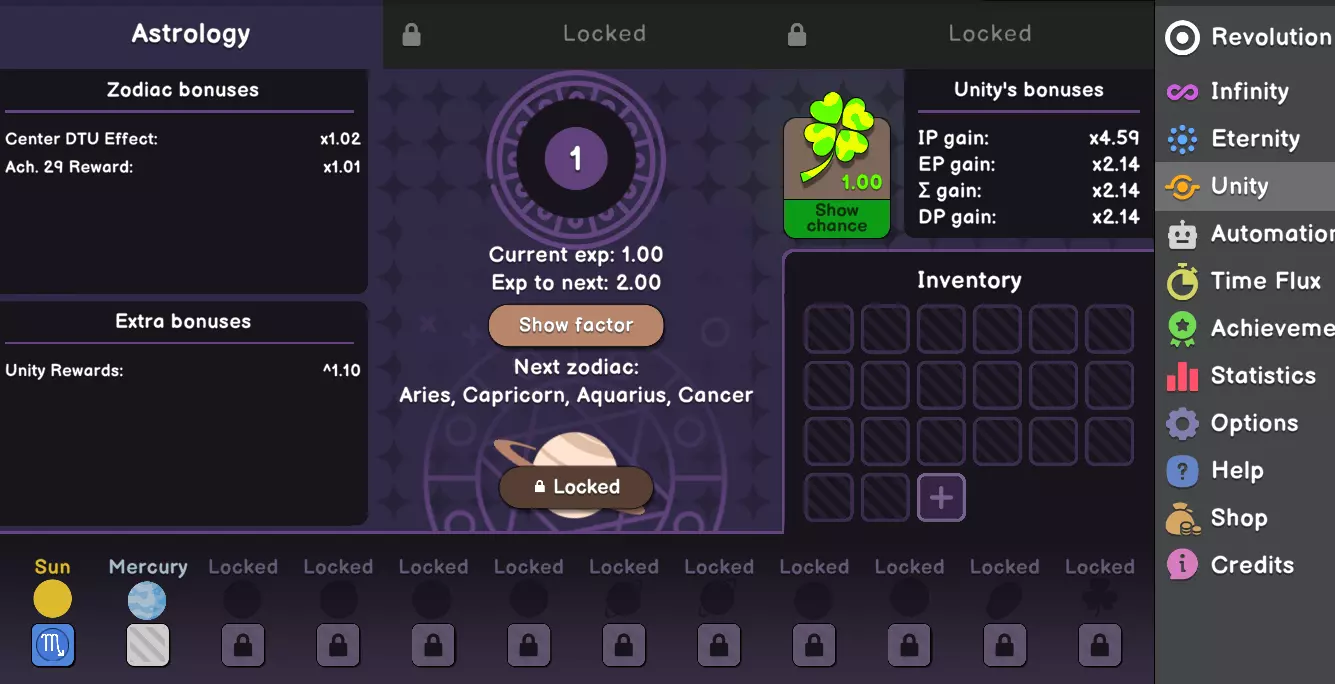
Animal Milestone #5: Get 100% of IP you would get from Infinity per second. This is excellent! Now you can grind out EP points and set a more precise target value for Auto Eternity. Keep checking your EP/sec. I find that very short times are best. You should be able to turn Auto Infinity OFF for even better gains and Auto Eternity time can probably be set to about 0.5 secs in IP/EP setup ***Achievements: If you haven't already done this and have 60 RP, respec the lab and put 10 points into each upgrade. Achievement #'s 089, 090, and 093 complete. Next Animals goal: 5:2 (Frog) then 6:2-9 (Giraffe down through Pegasus) to boost IP. You should be able to get a Supernova about every 10-20 Lab Research points. Remember to turn off auto Eternity and switch lab focus to 1:4 ratio between #5 Generator: #6 Common or what works best for you, and also check to see if any Challenges can be quickly finished. Buy Score AP before switching back to IP/EP setup. After you have Animals 6:2-9, I recommend the cheapest which would be 1-4:6 and 1-4:7. These are for boosting Score/Supernova. **Checkpoint** You should now have Supernova 20 or 21, Laboratory about lvl 410, and 28 or 29 challenges completed. At this point your Score/Supernova Lab setup should be getting about the same results for EP gains as the IP/EP setup and you should now be able to do longer runs with better results. If not it will before long so look for it. When It does, either set a target value for EP or claim it when you want. You want a balance between gaining EP and keeping the lab growing. Keep upgrading the lab, buying Animals, getting Supernovas and occasionally checking in on Challenges. From this point forward, Lab points should always be in #5 and #6. The only thing that changes is the ratio. For now 1:4 seemed to be the best for me. I highly encourage you to find what works best for you since there are many variables. Animal Milestone #6: +10 free levels to all RP upgrades (a very nice boost). Challenge Milestone #6: More free Research upgrades. Finishing Animals will go much faster now. **NOTE: for Eternity Challenge #9 put all lab points into #6, since generators are useless. Challenge Milestone #7: More free Research upgrades. Challenge Milestones complete! Animal Milestone #7: Unlocks Dilation. Animal Milestones Complete! Dilation In order to progress in Dilation, you need to first Enter Dilation (with extreme penalties). The higher your score is in dilation, the more Dilation Point (DP) Income you will receive when you Exit Dilation mode. Income will generate at a constant rate based on your Dilation Score. Buy Dilation Upgrades with the DP Income. ***NOTE: A game update since this was written made it a little easier, so the reference values may be off a bit. General principles should still apply.*** ***Note: You can continue to buy AP points. Right now they don't do anything, but will later on. So you can buy them, or ignore them for now. ***Tip: Before you "Go Dilation" reset the lab for all points into #6 Common Exponent. Generators won't be much good there for a while yet. For your first Dilation run, I recommend letting it go until your current max score is about 1e30. This will give you an Income of 2.00 and gives you something to slowly work with. Immediately go back into dilation to improve the score to around 1e60. Income will continue to generate while in Dilation. Buy the #1 dilation upgrades when available to slightly reduce the dilation penalty. By this time your lab production has probably slowed so do a normal run for EP to keep the lab moving. You could probably change your lab ratio to 1:3, but again verify what works for you. Check this occasionally, as it will gradually become a 1:2 ratio and then 1:1 towards the end of Dilation but can also fluctuate back and forth. The only tricky part about Dilation is striking a balance. As you noticed, while in Dilation it slows down quickly so I don't recommend staying in dilation for more than 30-60 mins. Cycle between being in Dilation to raise income and being out of Dilation to keep the lab moving, and get Supernova. You want enough upgrades outside of dilation to make substantial push while inside of dilation so you don't waste a lot of time. Until you have a high enough income to buy more of the dilation upgrades, the lab is really the only way to do this so you want to keep it moving. ***TIP: When you first enter dilation you have 0 Infinity, so when you reach Infinity in Dilation, claim the IP. You get an achievement but more importantly this will kick start your generators. You will need to do this each dilation run until you can easily buy Infinity upgrade 18:1 to get the few generators you have moving. I don't really know of a good way to speed this up. Just keep the lab growing and try to get better score in Dilation. Since you get 0 EP in dilation, I spend more time increasing lab production. I also prioritize EP spending on lab production in the order of "Power" > "Mult" > "Base" and usually try to get enough EP in one run to upgrade all of them at least once. Challenge #10: When you have maybe about 150 - 170 levels of Dilation Upgrade #1, and other upgrades in the same price range, put all lab points into Common Exponent for the challenge. Upon completion this will give a much needed boost to DP Income (x10). If you want to do it earlier and spend more time to complete it, I would say it's worth it, as it will end up saving a lot of time in buying upgrades. Wish I had done it sooner for myself. For Reference: I did Challenge #10 with 180 levels of Dilation Upgrade #1 and it took about 35 minutes. I would consider it worthwhile even if it took several hours without time flux. When you can reach Infinity Upgrade 20:2 while in Dilation, you can start using the same lab setup ratio for both in and out of dilation. I was using 1:3 ratio but verify what works for you. ***Caution: Do not change this while in dilation as this will force a reset. Challenge #10 difficulty 2: I started this with Dilation #1 at level 225 and lab level 1140 (all in Common). Took just under an hour to complete. So now you have a better idea when you want to start it. After this Challenge, my lab ratio started to fluctuate between 1:1 and 1:2. This continued back and forth into the Dilation Tree so I won't be noting these changes. Use whatever works for you. That should keep things moving smoothly for a while. Challenge #10 difficulty 3: I started with Dilation Upgrade #1 at level 325 and lab 1450 (all in common exp). Completed in 53 mins. Challenge #10 difficulty 4: I was making good gains so didn't start this one until Dilation Upgrade #1 was level 390 and Lab level 1805 (all in Common exp). Completed in 3 mins. Challenge #10 difficulty 5: I started with Dilation Upgrade #1 at level 440 and Lab level 2050 (all in common exp). I turned on auto infinity to claim the amount I could get quickly in order to buy Infinity upgrades and bought up to 16:1-3 and about 3k extra to boost 11:1-2 although the extra probably didn't do much. The upgrades significantly reduced the time. Completed in about 15 mins. All Challenges complete: Dilation Tree unlocked. First Dilation Tree Point (DTP) requires 1e27 DP. **If you have been ignoring buying AP, now is a good time to start buying them when you can. Final run to get DTP 1, my income 5.27e22 and Supernova 44. Stop buying Dilation Upgrades when you are ready to wait. About 5 hrs to first DTP without using Time Flux. Dilation Tree ***IMPORTANT*** Since the Unity update, some things have changed so that the later stages are a lot smoother and easier. As far as I can tell, all of the tree builds are still accurate. Thanks At some point since this guide was written, they added an in-game guide to the Tree. Click on the Lightbulb icon for basically a step by step guide in game. ========================================================================== My goal is to lay out point distribution builds that allow progress, but expect to grind for a day or more in one build as you get closer to the end. This may not be the most optimal, but it will get you to the current last achievement end game. There are 5 permanent upgrades that will always provide some sort of bonus and never get reset which allows for progress. Adding points to Dilation Tree should ALWAYS be improving at least one of these permanent upgrades, they are: Eternities (boost Eternity milestone bonuses), Supernova, Dilation Tree Points (DTP), Dilation Upgrades (#4-9), and Animal Points (AP). *Note that when you are boosting one of these, most likely there is little or no progress in the others. You need to switch focus to improve each aspect by changing DTP from one setup to another. You can also save up to 3 free setups to make changing builds easier and I recommend using one each for Dilation, Supernova, and AP builds. There is a penalty cost for changing Dilation Points of 5% of Dilation upgrades #1-3 and DP score and Income is reset. For this reason, you should always do a Dilation Point build between other builds to offset this penalty and not let it become a worse penalty (losing 5% + 5% is worse than just 5%). ***VERY IMPORTANT*** When you have 13 DTP get Achievement #140. Also, if you haven't already, turn Off Eternity Automation (unless trying to get lower Eternity time), it has the potential to severely slow you down especially when trying to buy Animal Points. While it's not absolutely necessary at this stage, I do recommend your first goal is to increase Eternities (with 3 DTP) which will boost all other aspects through Milestones Eternity bonus. Doing this now, will make the next stages of progress much easier and faster. BUILDS: DTP Levels 1-3: (C) 1 - (M) 1-1-0-0 Once you have all three DTP and passively generating Eternities, your only goal is to increase Eternities so you can turn ON Auto Eternity to 1 and 0 secs. You may also be able to reduce eternity time this way, which boosts M2. The fastest Eternity time that I got at this point was 14 ms. Almost all will be 17 ms, but you can get a "lucky" trigger. Some suggestions that may help to get it down to 10ms is resizing the screen or "switching the resolution down to 1280x720". Don't know for certain if either does anything but worth a try. Possibly changing monitor refresh rate to 60hz could also work. Do this anytime you do Eternity build and hope for 10 ms (it's nice but not absolutely necessary). Get around 2 million Eternities, turn OFF Auto Eternity, then respec to: (C) 1, (T) 1-1-0-0 General build cycle order (not absolute): Dilation> Supernova> Dilation> Animal> repeat...(Add in Eternity Point Build when things slow down too much or you want to go afk for hours). The goal for Eternities is about 4e10+ by DTP 39 and it will take a long while. But I don't recommend spending a lot of time with Eternity build until you have at least 13 DTP for maximum passive eternities. When you get your 4th DTP point, continue below to the first Dilation Upgrade Build. ETERNITY POINT BUILD: Apply points in the order given (example: Max M2, before single M3). =================== DTP Levels 3-40 (C) 1, (M) 1-5-1-5 (extra points can go basically anywhere as they won't do much of anything). As far as I know, the fastest possible Eternity is 10 ms for 3,046,350 per/s. *Becomes obsolete at DTP 41. Get Eternities with Animal Point Build* DILATION UPGRADE BUILDS: Apply points in the order given (Achievement #140 at DTP 13). ======================= Before 120 Supernova: DTP Levels 4-16+ : (C) 1, (B) 1-1-3-0, (T) 1-1-0-0, (C) 5, (M) 2-0-0-0, (Finish B3 and T2 if needed for another DTP point to help get you to 120 Supernova for the next Dilation build) **Note: If it seems slow getting to Supernova 120, most likely you need AP and/or didn't get Achievement #140 (I made both mistakes and is why I'm making this note). With 120+ Supernova: DTP Levels 13-17 : (I have not verified, but this could work before 120 Supernova's) (C) 1, (M) 1-1-5-5, (C) 5 DTP Levels 18-39: Keep the above then continue (C) 5, (M) 5-1-5-5, (B) 1-1-5-0, (T) 1-1-1-5 (Then max T2) DTP 39+ and with approximately 4e10+ Eternities (more eternities makes this better): (C) 5, (M) 5-1-5-5, (T) 1-4-1-5, (B) 1-1-1-5 (Finish B3 then T2 and finally B2) *(If you have 1.1e11+ Eternities, finish T2 then B3) NOTE: It's been reported that this build is better as long as you have 39 DTP and that you don't need that many Eternities (possibly due to a game update). I can not verify this. SUPERNOVA BUILDS: Apply points in the order given ================= *Early DTP levels, claim AP before switching back to Dilation Build* DTP Levels 4-16 : (C) 1, (T) 1-1-5-0, (B) 1-1-1-5 DTP Levels 17-41+: Keep the above then (C) 1, (T) 1-1-5-5, (M) 1-1-5-5, (B) 5-5-1-5, (Then max M2 for more eternities) *Becomes obsolete at DTP 45 as it merges into Animal Point Build.* *Supernova 155 at about mid to late DTP 41 *Supernova 156 at about mid to late DTP 44 ANIMAL POINT BUILD: Apply points in the order given. =================== DTP Levels 13-41+: (You shouldn't need this build early. Get AP with early Supernova build) (C) 1, (M) 1-1-5-5, (B) 5-5-0-0, (T) 1-1-1-5 (then max B4 and M2 then T3) *Extra points don't really do anything since primary things are maxed. Late game these runs can take several hours or even a day or more before any new points can be bought. Since you need to manually buy the AP, make sure Eternity Automation is OFF so it doesn't reset without buying any AP and wasting time. And since it can take so long just to get these points, make it worthwhile. Rough estimate of a minimum of 5000 AP each run (unless it slows down too much). Another method that seems to work is to farm AP the same amount of time that it takes to get where you left off. If it took 12 hrs just to get to the point where you can start buying them again, spend 12 hrs minimum actually buying them. ***NOTE: This is much easier since the Unity update so these times are outdated.*** LAB POINTS: No special build needed. You will get lab points during Dilation and AP builds. Lab points might vary on how you apply them for optimization, The only place worth using points is #5 (Gen Power Exponent) and #6 (Common Exponent). At the beginning of Dilation Tree 1:1 ratio was better for me but shifted to a 1:2 ratio part way through. In the later stages it moved all the way to everything in #6 Common Exponent. There are too many variables to say when the ratio change happens but all in #6 probably no later than DTP 37 and Supernova 152 (possibly much earlier). Once that happens, it never changes again. Expect things to slow down drastically at about Supernova 153 and DTP 40. This really starts the end game grind where you will need much longer runs to make any gains, specifically for AP. Reaching Unity, Previously End of Content: Game Version #0.226 ***I'm keeping this section for nostalgic purposes*** ======================================= Final Achievements (as of game version #0.226) ***May contain Spoilers*** Continue grinding away to get DTP 45 (Supernova and Animal Point Builds should be the same at DTP 45). When you reach Supernova 157, you have a choice to make. Option #1: Do NOT claim the Supernova. This allows you to keep moving in your current run and you can grind it out to reach Unity. Option #2: Claim Supernova 157 which will cause Eternity reset so might as well go back to Dilation buildup for final run. If you want to get more AP or Eternities before the reset hold off on going Supernova. My first playthrough I chose to claim SN 157 since that run had already run 2 days+ and slowed down a lot. I also felt that my Eternities and other upgrades were still kind of low. Second playthrough I chose not to claim SN 157. Whichever option you choose, when you do reach the final EP goal, be sure to let it overrun the EP amount needed, you don't want to spend all that time only to miss it because of some number rounding issue. Probably about 30 minutes to be safe. Claim the EP and claim the Unity. Congratulations! First playthrough (Pre-Unity) Reference: I started final run with DTP 46, Supernova 157, Lab lvl 16,340 (all in Common Exponent) , AP 467k, Eternities 1.48e12 and it took 2 days 2 hours (actual play time). A few other stats: Total playtime 36 days, Fastest Infinity 33 ms, Challenges time sum 618 ms, Fastest Eternity 16 ms 2nd playthrough (Pre-Unity) Reference: Started final run with DTP 45, Supernova 156, Lab Level 16,245, AP 452,220, Eternities 1.95e12 and it took 2 days 2 hrs to reach score for SN 157 (did not claim). Final run total time 3 days 12 hrs. Other stats: Total playtime 24 days 10 hrs, Fastest Infinity 33 ms, Challenges time sum 604 ms, Fastest Eternity 10 ms Unity Start and Easy Trials When you claim the 1.08e2466 EP another claim button will show to claim 1 Unity. Unity resets most of the game but automations and achievements remain. You are given 4 Zodiac signs to pick from and they each have 2 bonuses out of 4 possible, so two players with the same zodiac could have different bonuses. You can also re-roll zodiacs at the cost of Souls (not worth the souls). Aries is the best for your 1st choice, since for the first Unity it has a bonus to Level and Rarity that you normally can't get at that point. I chose Scorpio just to see how it would play out (not great at first). After choosing your zodiac, it appears in the Inventory screen of the Unity tab. Drag and drop to equip it to the Sun (which unlocks Mercury) or Mercury spots at the bottom. Check the additional planetary bonus to decide where it would be best. ***CAUTIONS: If you move your zodiac sign from one planet to another, it will cause a Unity reset so only switch at the beginning of a Unity. Also avoid "Game Speed" bonus until after you have completed Medium trials. They will slow down fastest Infinity and Eternity times which ultimately is a handicap. ***NOTE: Refer to the "Appendix" section for more Zodiac and Planet bonus info.
Make adjustments to automations that you want and start the grind all over again.... When you complete the 3rd Unity and equip 3 Zodiacs, the Unity- Trials tab will unlock. TRIALS - (Easy) Goal: Reach Infinity with various restrictions. Do trials at the begining of a Unity run since starting a trial will reset Unity. Once a trial is completed, the bonus is permanent. If you want to do more than 1 trial per Unity, you can reset all trials except those already completed. For every Trial completed, two Eternity Challenges will auto complete for future runs, so that if you have three total Trials complete, all difficulties of EC1 will be complete and the first difficulty of EC2, for six total (2 per trial). Due to how the zodiacs can be somewhat random with their bonuses, I'm not going to say "use this or that" zodiac, but some bonuses will help while others may not help at all. Also pay attention to planetary bonuses which depend on the zodiac season. Even a zodiac without useful natural bonuses may be useful for the planetary bonus. Since the goal for all "Easy" challenges is to reach infinity, early game bonuses on Fire Element zodiacs will be the most useful. ***CAUTION: It is possible to fill all inventory slots with zodiacs that don't help with the trials. You will need to complete Easy Trial #6 to be able to sell zodiacs and free up slots. For this reason, until the shop is unlocked, I highly recommend you claim only Fire Element zodiacs since they will be the most helpful for all easy trials. Multi Gain and Slowdown are probably the best bonus options for the Easy Trials if you can can get them (Aries, Sagittarius). Easy Trial #2: I recommend that this is your first trial and can probably be completed when it's first unlocked. It actually is the easiest (the others seem to go in order of difficulty 1, 3-6). Also use the trial "Lock" so that you don't accidentally fail it by breaking the trial restrictions. If you do, just hit the reset button. Remember to unlock upon completion so that you can use whatever was restricted afterward. *Note: There was a bug with trial #2 that may or may not be fixed. To avoid this, disable ALL auto Promotions and only manually promote #1 and #2. Upon completion of your first trial, achievement #166 will unlock the Moon. . Zodiac Factor: Trials give experience so that new zodiacs start at a higher level. There are many things that will be unlocked that contribute to "Factor", all of which increase factor experience which determines the level of zodiac when you claim it. Easy Trial #1: This can probably be completed between Unity 3-6. The more Unities you have the easier the trials are. With 5th Unity, Animal and AP auto buyers unlock. Animal Autobuy: Probably not super useful when you first get it. It will autobuy whatever animals you have selected (highlighted green), with priority to the top. If it can't buy the top, it will go down the list until it can buy something. It does not save the order, so....kind of not great early on. Before too long, order becomes irrelevant. AP Autobuy: Handy, but I kind of like to see how much I'm buying sometimes. Probably not a good idea to spend autobuy EP since you want to upgrade the lab. A little later you can buy all. Slowdown unlocked with the purchase of first animal Milestone #1. Very useful for the next trials. Easy Trial #3: Slowdown worked great for me here. With it, it went from an extreme grind to complete within minutes. I did this after Unity 6 or 7. Easy Trial #4: I did this right after #3. Slowdown was great again. Completion unlocks planet Mars, which is nice for another zodiac spot. I got a couple more Unities (9 total) before the next trials. More Unities will help if needed. Probably the most useful Animals for these trials are 1:1-2 and 2:1-2 Easy Trial #5: Slowdown was great again. Completion unlocks "Max Score factor": Go beyond Unity for Score to increase the Zodiac level. Very useful when you have more power and see a zodiac with good bonus that you want. Keep increasing score to power up the zodiac to a higher level before claiming if you can within a reasonable time. Trial #6: Did this right after #5. Again slowdown (Sagittarius) was huge for me here. Unlocks Planet Shop, and Medium Trials. With all Easy Trials complete Planet shop is unlocked. Planet Shop: This provides most of your progress to better zodiacs. Sell unwanted or excess zodiacs for Astrodust. Level, Quality, and Rarity affect sell value. Use the Astrodust to buy upgrades. Donut Upgrades: - Game Speed: Increases game speed. Good for Attacks. Not recommended until you have completed Medium Trial #6. - Luck: Increases your chance that a new zodiac will have a higher Rarity. - Quality: Increases the bonus amounts on the zodiac. - Zodiac exp. Factor: Increases the "Factor" multiplier which increases zodiac level. Astrodust Unlocks - Merging: Unlock with Astrodust. Merge 3 zodiacs of same element and Rarity to receive 1 of a higher Rarity. Very useful to get higher Rarity zodiacs earlier. - Enhancing: Unlock with Astrodust. Costs Astrodust to increase the quality of a zodiac. (my opinion, it's not worth the cost) - Redistribution: Unlock with Astrodust. Costs Astrodust to reroll stats. (my opinion not worth the cost, but you might get lucky. Can be good for Divine/Immortal Rarity to get a bonus you want) - Sacrifice: Unlock with Astrodust. Sacrifice a zodiac to receive the top listed zodiac bonus at a reduced rate. This is a permanent stat boost. Probably not worth it until you have all equipped zodiacs at high level and quality. View total "sacrifice stats" below where zodiacs are sold. Unity Medium Trials TRIALS - (Medium): Goal: Reach Eternity with various restrictions. For the most part, the same zodiac bonuses that worked for the easy trials will work here, although now you should be getting higher level ones to add to or replace lower leveled ones. Doing more Unities for the extra bonuses is also very helpful. Other useful zodiac bonuses especially for #5 and #6: - Supernova Requirements (I used about 4 or 5 of these for Trial #5). Medium Trials #1 and #2: I Completed right after easy #6. Slowdown was still a big help for me. Completion permanently sets Infinity Challenges and Fastest Infinity to 0.001s which is very nice indeed. Achievement #157 unlocks planet Jupiter, very nice. Also Unity #10 achievement unlocks lab automation and RP distribution which is nice indeed. At this point you can probably set everything into #6 common Exponent for the lab permanently (if not, very soon). Not real efficient at first, but you should be speeding through animals, and even Dilation is quick compared to how it was previously. Medium Trial #3: I used the same zodiacs as previously just did a few more Unities before starting for the extra bonuses. Medium Trial #4: Completed immediately after Trial #3 with the same setup. Still just using mostly Fire Element Zodiacs (although now with levels 4-10). **Note: Do not claim 2nd IP until you have enough for the goal to Eternate. Turn OFF Auto buyers for Infinity Upgrades, Generators, Stars, and AP. If you claim the IP, and it gets spent spent buying stuff you won't be able to Eternate to complete the trial. Remember to turn them back on again afterwards. Medium Trial #6: This one was probably easier than #5, since you're not limited on claiming IP. This went very quickly with the same setup as #5 below. Slowdown is useless here since you don't have all colors. Medium Trial #5: Most useful zodiac bonus for me was Supernova Requirement. This gives you AP to buy the cheap animals for the 20 Animal milestone. Very easy after that. Unity Hard Trials and Attacks TRIALS - (Hard): Goal is to reach Unity with various restrictions. Since the goal is to reach Unity, early game bonuses won't help a whole lot. Most useful bonuses include: - DP Gain (This seems to be required in large amounts for Trials 1 - 4) - EP Gain - Supernova Requirement - Free Lab Levels Hard Trial #1: Not too bad, even though you are limited on DTP, you can still reassign them as needed. Hard Trial #2: The hardest part of this trial is getting to Dilation. To do this, having several zodiacs that give Free Lab Levels makes it much easier. Highly recommend getting Achievement #188 to unlock planet Neptune before the next trial. Hard Trial #3: Supernova boosting zodiacs are useless. This also affects DTP upgrades, as some are useless here (T3, B3). DP Gains along with Star Cost and Unity Rewards seemed helpful. Attacks: Unlocked with Achievement #191. Attacks work similar to normal color circles. Base Damage is calculated using your current score and Multiplier at the top (formula shown on the relics tab). Attacks and damage reset with Unity, however Multipliers and bought upgrades do NOT reset. You get a small amount of gold for every enemy defeated (Attack level), collected upon Unity. Relics: Unlocked along with Attacks. Requires gold from defeated enemies to buy. Most likely there is not much you can do with attacks at the moment and they require a lot of zodiac farming to make time spent attacking worthwhile. At this point I highly recommend you do a lot of zodiac farming. Increase the Rarity, Quality and levels through upgrades and merging. You will need a lot of DP Gain for the next challenge. While you are farming get achievement #189 for faster runs and #190 to unlock planet Pluto. Hard Trial #4: Kind of easy if you have the total DP gain value from zodiacs about ^4.00+. If not...good luck. If you thought you already did a lot of zodiac farming, prepare for a lot more. Next thing to work on is getting Attacks up and running. *Note: I'm not sure what the best method is, this is just what I did, since nothing else really seemed to work very well. Since you are limited on Inventory space, it's easier to focus on 1 or 2 zodiac elements at a time. Initially keep farming zodiacs, upgrading, and merging to get at least Godly Rarity, but Divine is preferred for the extra bonus. The DP Gain bonus is good for high score and factor level and Luck is good for better Rarity for less merging and better sell value. Quality of course increases bonus and sell value as well. With enough factor upgrades and rarity/quality, you should be able to get a level 50 zodiac for Achievement #205 to unlock Planet Chiron. Once Planet Chiron was unlocked, I started to focus primarily on Game speed bonus (water element). Even though they don't give the best score, it increases the revolution rate of attacks, which makes up for the lower score/damage at least at first so you probably want 5+ Divine zodiacs that boost game speed or at least Godly Rarity. Recommend minimum of x30 - x50 Game speed as shown in Statistics tab. Sometimes it's easier to use the "Redistribution" skill to get what you want. *Note: For the other planet spots, I see multiple people suggest going with Fire Element to boost score for attacks. I had better score with DP Gain from Wind element at least at this point. So, all I can say is use what works for you. With 10 Gold (about 9 enemies defeated), buy your first Relic. After buying two relics, I did give up some DP Gain zodiacs in favor of Fire Element. Specifically, Aries on Uranus, and Sagittarius on Chiron. This did help with attack power, but lost some on Factor level. I think it was a worthwhile tradeoff at this point. Attacks improve a lot when you can buy Attack #2. Keep buying Relics and upgrades, etc. At this point you are probably ready for Achievement #200. This explanation worked for me. Thanks Kristallator! Confirming that i got ach #200. what i did was turn off lab upgrade and supernova automation, then i bought one lab base and one multiplier upgrade, then i bought a bunch of exponent upgrades along with a bunch of dilation #9 upgrades and got the achievement after making a few tweaks (you might go below 0.01 lab pts/s but you can make up for it by buying some more base upgrades) Alternative explanation from Private Kawaii: Turn off lab automation, Turn off supernova automation. Buy 1 lab base and one at a time lab power since 0.2^X is always gonna lower it. You will easily get to 0.05 lab points in no time The following was my general or all purpose zodiac lineup for a while. I'm sure it could have been better for planet bonuses, but this was easy for me to remember where I had them. It offered some of what I wanted rather than focusing solely on one thing at the expense of losing too much of others. The quality was not very good on most of these, but of course I upgraded when I had better. Divine Rarity was definitely good enough since the main thing was all four bonuses. -(Water, Dark Blue): All with Game Speed and Zodiac Quality to increase attack rate and Quality. -(Wind, Light Blue) All with DP Gain for better factor zodiac levels. -(Fire, Red): To boost attack damage.

我利用这一点升级了遗物,并专注于提升黄道十二宫的品质和等级。购买第10号遗物,如果能合理获取第11号遗物就更好了。 困难试炼5:只需使用全火元素,因为其他元素在这里效果不大。同样,我放置的行星加成可能不是最佳的。黄道十二宫等级从55级提升到78级,品质在255到550之间。大约20-30分钟就完成了。

注意:其他人会将少量EP获取、超新星需求(风属性)与火属性组合使用。我同意Hacksocto的观点,为了这个试炼,你应该将遗物升级到大约1e9的成本。 完成奖励会降低遗物的成本,这确实非常不错。 有了完成奖励,使用通用build应该很容易购买更多遗物并提升黄道十二宫的等级。你获取成就#219(100级黄道十二宫)应该不会有太大困难,该成就会解锁命运帕尔斯星球。花点时间购买更多遗物升级,包括此时你应该已拥有的#11。你也可以考虑替换更多火元素以获得更高的攻击伤害,或者根据当前的 farming 需求进行调整。困难试炼#6:我使用了与试炼#5完全相同的黄道星座,现在给命运解析器额外添加了一个火属性。借助新增的遗物加成,这次同样在大约20-30分钟内完成了挑战。完成奖励会解锁能量因子并打破统一限制,让你能够超越能量上限。 随着所有困难试炼的完成,是时候转换策略了。 困难试炼之后 着手为所有星球打造完整的双鱼座配置是非常有益的。这主要是为了提升黄道星座品质、运气以及游戏速度。首先用双鱼座填满所有星球,然后用更高品质的双鱼座替换低品质的,以持续提升属性。继续出售和升级所有物品。如果还没开始,也可以开始进行献祭以获取永久加成。为解锁Achievement #230,当新黄道星座的品质达到50k-70k左右时,开始收集12个火元素(优先选择白羊座和射手座),但如果有品质更好的双鱼座,应优先选择双鱼座。当所有12个火象星座都达到良好品质时,你应该就能解锁Achievement #230。之后切换回全双鱼座配置,继续提升各项属性,同时开始收集12个土元素,优先选择金牛座。 对于Achievement #231,目前不确定所需的品质/稀有度。我是用品质200k+的土象星座混合一些不朽稀有度+的星座完成的(我觉得可能不需要这么高,因为很快就完成了,但当时我在刷资源)。根据评论,可能需要所有金牛座达到不朽+2。 Achievement #232的思路与其他成就相同。优先选择双子座和天秤座。同样,我不确定需要什么品质/稀有度,因为我的已经超出需求了。 成就#233 持续强化所有双鱼座的建造。我的所有双鱼座建造都达到了不朽+4稀有度,平均品质约为550k。不朽的100%概率所需的幸运值为1650。获取任何不朽+5稀有度的黄道十二宫。完成最后的元素成就后,你还将获得成就#237。非常不错。 我认为在这个阶段,继续使用全双鱼座建造来刷黄道十二宫以进行升级、献祭和出售是个好主意。当你对升级等内容满意后,切换到用于攻击的黄道十二宫来升级遗物。当你升级了遗物,并使用金币购买/提升了革命后,再回到全双鱼座建造并重复这个过程。对于攻击型星座构筑,经过大量实验后,我想出了这套最佳阵容。你的结果可能会因已献祭的内容而有所不同。 注:更多构筑可在本指南的【矿物部分】中找到。

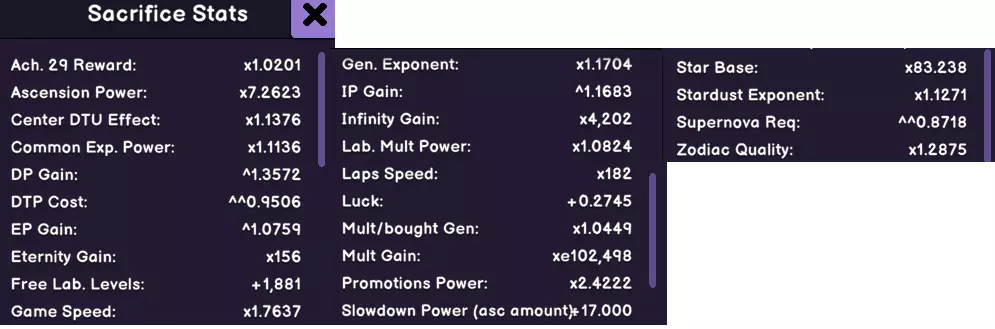
不要低估通过献祭提升全属性的重要性。部分属性的软上限会比其他属性快得多,需要更高稀有度/品质才能继续提升。为一些更基础的属性进行献祭效果相当不错(如【无限增益】、【永恒增益】、【倍数增益】、【星星基础值】、【免费实验室等级】)。 黄道十二宫优先级顺序: 1. 已使用且可提升的黄道十二宫 2. 最高稀有度 3. 检查献祭是否对你有益,若有益则进行献祭 4. 若收益甚微或无收益,则出售 关于献祭的注意事项:虽然属性存在软上限,但提升品质/稀有度仍能继续增强献祭效果。因此,持续检查它们是否有提升空间并无坏处(【减速】就是一个很好的例子)。尽管在献祭界面可能没有显示提升,但你可以通过前后对比,通常能发现确实有所提升。在最近的一次更新中,小数位数现已扩展,因此更容易看出是否有提升。 成就#238(Immortal +7):我达到了2581级幸运值才解锁。 将攻击等级提升至1000级,以解锁下一个遗物(不错),并获得成就#239(也很不错)。 解锁所有遗物后,等到攻击等级增长放缓时,再使用上一轮的金币购买遗物,这样可以以更低的成本购买,从而推动当前这一轮的进度。 优先选择遗物#14、#20、#16、#19、#9,然后是其他提升攻击的遗物。最后升级攻击革命。这往往会产生滚雪球效应,所以你应该能够进行多次攻击回合并持续购买遗物。 成就#240实际上比我预期的要容易得多,并且会解锁【矿物】标签页。 【矿物:初始阶段】 仅供基本参考:在矿物阶段开始时,我有615次黄道十二宫献祭和2315个总统一值。我几乎所有的黄道十二宫都达到了121级不朽+12。我献祭统计数据的截图就是我的起点,同样仅供参考(图片有点难看,但也没办法)。
在《矿物》游戏开始时,首先要做的是点击【生成】按钮,以1.00e110金币的基础成本生成一个矿物。生成的矿物等级始终与【生成等级】框中显示的等级一致。 矿物:产出价值点数(VP)。矿物等级越高,产出的VP越多。两个相同等级的矿物可以合并为下一个等级。合并是有益的。基础价值的2级矿物比1级矿物多产出3倍VP,3级矿物比2级多产出3倍,以此类推。 下一个矿物成本:xxxx:当前生成下一个矿物所需的金币成本。该成本会随时间下降(成本衰减),直至达到基础成本。为节省金币,请等待成本下降。成本受游戏速度和时间通量影响。矿物基础成本:当前所选生成等级的最低金币成本。生成等级越高,基础成本越高。随着时间推移,下一次矿物成本会降至该数值,但不会更低。 每次生成的成本增量:决定下一次矿物成本开始下降前的初始值。 成本下降:下一次矿物成本下降直至达到基础成本的速率。 价值点(VP):用于购买升级,并根据获得的最大VP值被动提升攻击倍率增益和攻击升华之力。游戏速度和时间通量均会影响VP的生成。请注意,花费VP时,最大VP值不会重置或减少,因此攻击增益也不会重置或减少。 价值点升级:初始有8项升级。这些功能应该不言自明。【等级上限】会使矿物生成等级+1。你需要在【生成】按钮上方的框中手动设置生成等级。如果遇到金币问题,可以将生成等级设置为你能负担的数值,然后进行合并。如果你不需要额外空间,就不必购买【网格高度/宽度】。我通常是有钱就买(不推荐),但你需要根据自己的需求判断是否值得现在花费VP,还是可以等到以后VP恢复速度更快时再买(关于VP花费的更多内容详见下文)。 很可能在矿物生成等级5-10左右,你可能会开始遇到金币问题,而VP则是一个持续存在的问题。以下是我现阶段使用的黄道十二宫流派及其优缺点。 注意:我既没有足够的背包空间,也没有意愿去测试所有可能的流派。这些流派都是我实际使用过的。很可能存在更好的流派,所以如果你发现了更好的,就用它。在我看来,这些流派中的任何一个都足够好用,不同变体之间的差异很小。 速刷流派:

变体:天蝎座在海王星进一步提升速度,但降低品质和出售价值。 优点: - 快速获取统一值和黄道十二宫。 - 较快的游戏速度提升胜利点产出并降低矿物成本。 - 黄道十二宫品质和运气较高,有利于升级黄道十二宫或进行献祭/出售。 缺点: - 攻击等级和金币较低。 - 黄道十二宫等级较低(除少数成就外,我甚至不确定这是否重要)。 攻击流派:
变体1:全白羊座 变体2:太阳和金星为射手座,其他均为白羊座(个人未测试) 变体3:土星和海王星为狮子座,其余如图所示 优点: - 高攻击等级 - 有利于冲击新遗物和/或基于攻击等级的成就 - 高黄道十二宫等级(同样不确定这是否真的重要) 缺点: - 速度非常慢 - 黄道十二宫稀有度/品质以及献祭/出售价值极低 - 其他流派在金币和黄道十二宫养成方面表现更佳 - 虚拟点数生成速度慢,矿物成本下降速度慢 金币流派:

Variation 1: All Scorpio (Personally not tested) Variation 2: Leo on Saturn the rest as pictured. Pros: - Faster than attack build. - High attack level (just a few stages short of attack build) - Fast gold gain rate (extra speed more than makes up for the lower attack level). Cons: - Other builds are better at everything other than gold gain. The Speed and Gold builds are the most useful to build up your minerals and VP, as well as Relics. The Attack build is rarely needed except when pushing those few extra stages to unlock the next relic. Speed most of the time, but switching to Gold to primarily buy relics. And don't forget to still buy upgrades in the donut shop (might as well spend that astrodust on something). *Note: As you progress more, Speed build will be better than the others all the time, and you will only need to use other builds for Trials. At this stage of the game, your sacrifice stats should be basically maxed for now (where sacrificing gains are next to nothing). So your main goal is increasing Max VP. The Max VP boosts to attacks along with increasing Unity count bonuses will be your primary source for gaining attack levels. Your attack levels may increase several stages just by farming Max VP and Unities using a Speed build for several hours even without using Time Flux. For this reason, I do not recommend buying any unnecessary VP upgrades, including Spawn levels, that cost more than 1e12 VP. Even the 1e10 range is questionable but could be worth it for "Fall Speed". Wait until after you have unlocked Relic #23 (attack level 1500). In my opinion it is better to keep growing the Max VP attack bonuses as much as possible rather than spend VP that will set you back hours just to recover. Be a little stingy with your VP. After you have Relic #23 then buy Max Level, Fall Speed, and Gold Gain when you can afford them. Don't be stingy at this point. You're main goal is reaching Mineral level 30 and each of those will get you there sooner. Buy other upgrades when they are "cheap" and you can easily recover the cost or when you need the upgrade (like more grid space). Achievements at this point will happen naturally so as usual I won't cover those, but to answer a common question; 10k Luck is needed for Immortal +15 (Achievement #247) Minerals: Polish / Insane Trials / Refinement When a Relic reaches level 301 you will be able to Sacrifice that Relic... However, most likely at about that time, your attack levels should start growing quickly and snowballing. So before sacrificing any relics, I recommend pushing Attack levels and upgrading all the relics that you can. This should also boost your VP gains a lot, so buy more VP upgrades as well especially Max Level, Fall Speed, and Gold Gain. ***NOTE: While it is not absolutely necessary, it is recommended to reach Mineral level 30 to unlock Polish before sacrificing. This will help to regain the sacrificed relic levels faster. If you do sacrifice before then, it's not a major problem but it will take longer to regain the sacrificed levels. If you do not have Mineral level 30 yet, this would probably be a good time to upgrade zodiacs. When you are ready Sacrifice Relics before Polish, then spend your polish points on Sword to maximize VP. Relic Sacrifice: Available when a Relic reaches level 301+ "Sacrifice" appears on the relic itself. The level at which it was sacrificed will appear in purple, and the top green colored level amount will reset to level 1 as well as the bonus. This does make the relic slightly stronger but by how much is not known at this time. You can sacrifice all of them at once as long as they meet the level requirement and they will all regain levels at the same time. Sacrificing multiple relics can initially slow you down in recovery especially if they are gold or attack boosting ones, but should be more efficient than one at a time. Just be sure you have a good supply of gold to buy Minerals so you don't run out before the relics recover. You can basically do this anytime you've increased the max level for a very small boost. The sacrificed relic levels are regained in two ways up to the level that they were sacrificed at, after which you need to spend gold again. #1: Every 1000 total attack levels will grant 1 relic level. These carry over, so that two runs of 1500 attack levels results in 3000 total attack levels = 3 Relic levels regained. #2: Every 10 total levels of Mineral spawns gives 1 relic level. These carry over, so that a level 4 spawn + 7 spawn + 9 spawn = 20 total Mineral spawn levels = 2 Relic levels regained. Polish: The Polish tab is unlocked when you reach Mineral level 30 and appears next to the Spawn button. Selecting "Polish Prestige" in the new window will reset ALL Minerals and ALL VP upgrades. However this will give you Polish Points (PP) based on your highest Mineral level. Use the PP to upgrade different weapons. It is highly, highly recommended to first upgrade the Sword, at least up to level 10 for a large boost in VP production . This will allow you to regain your minerals much more quickly and push for higher Mineral levels. *Note: It's probably best to get Sword to level 20-25 before moving to other weapons. More for the base VP gain, rather than the level 25 Milestone. See Appendix: Minerals for Polish cost chart. You will also hit Attack level 2025 for Achievement #251 which unlocks Attacks Prestige. It is recommended that you wait until Achievement #259 before actually doing this. Attack Prestige resets your attack levels and you will need to re-buy them with gold. Similar to normal Prestige, you just want the gains to be worth the reset. Not much really to say other than to keep increasing your mineral level and buying polish upgrades in addition to relics. Probably around mineral level 50, you should see an increase in Polish points that makes buying the earlier weapon levels a bit easier. Insane Trial #1: Unlocked with Knuckles level 25. You shouldn't need to do anything special. I used zodiac Gold gain build (pictured previously) with zodiacs +80-83. You could also try all Cancer zodiacs. You will probably be getting Immortal +100 soon (achievement #266) and if you haven't been sacrificing, it's probably a good time to catch up on that as well as upgrading your current zodiacs. Auto-sacrifice/sell toggle makes this easy to do. You can do fast Unities just for the purpose of selling/sacrificing and increasing Unity count. ***Reminder to lock (double click) zodiacs you want to keep. Be very careful with sell automation. Before starting any Trial, it's a good idea to do an Attack prestige and sacrifice all Relics that you can to maximize your boosts especially if you haven't done that in a while. Note that you can use Hotkeys (default "A" and "B") to buy attack levels. Insane Trial #2: Unlocked with Spear level 50. Shouldn't need to do anything special. I used the zodiac Attack build (pictured previously) Immortal +108-109. Quality around 4e10. Refine: Refine tab is unlocked with Mineral level 70. "Refine Prestige" to gain Refine Points (RfP) based on highest Mineral level which are used to upgrade the Refine Tree. When you Refine Prestige, all minerals and all weapon polish are reset, but note that you will keep Max VP and any Weapon Milestones you have already achieved. For the most part, just buy the cheapest upgrade nodes. If they are the same cost, prioritize nodes 1, 4, 10. You also may want to grab node 6 early for the QoL. Most of the Refine nodes are self explanatory, but there are some that may not be clear, so hopefully this helps. Node #1: Increases the base VP value of all minerals. Without this upgrade, the base VP value of any level mineral is 3x more than the previous level. With one point here, base VP value is now 4x more than the previous mineral level, etc... Node #2: Bulk buy Attacks. Basically makes going through the Attack levels 10x faster. Note that if you were using Attack levels to auto Unity, this may cause Unity before you actually want to, so you may need to change macros and/or auto Unity settings. Node #5: Unlocks Merge levels. Every time you merge minerals, the merge bar will fill (+1 per merge, mineral level does not matter). Each level of merge bar is a VP multiplier of that amount (merge bar level 3 = VP multiplier x3). The merge bar resets with a Refine Prestige. Node #6: Auto merge minerals. A very welcome QoL. You will need to enable this in the Automations tab (just below the Zodiac Choice for auto Unity). When the timer fills up, it will merge all minerals that can be merged. Very useful combined with Auto Spawn. Early stages of Refining it is most beneficial to active play just to get a level 70 Mineral as quickly as possible for the refine point. Polish several times or as needed with PP max to Sword as priority until you can quickly get a level 70 Mineral for the Refinement point (Yes, this is extremely tedious). If you want to go afk for long periods or want to be less active, get all weapons polish levels as high as you can reasonably get them as well as VP upgrades, then set auto spawn and auto merge and let it do the work for you (this is NOT as efficient as doing faster active runs for RfP). I'm not advocating this, but you could probably set a timed auto clicker on the Spawn button to save on gold. NOTE: Refer to the Appendix: Minerals charts for Refine Points based on Mineral levels. Starting with Mineral level 90, every 10th mineral level is a big increase in Refine Points. Minerals: Insane Trials / Refine Continued Insane Trial #3: Unlocked with Knuckles level 50 milestone. I used 6 Libra and 6 Taurus (In that order). I did a very long mineral buildup so that the VP upgrade "Common Exponent Mult" was as high as I could afford which does make a difference. Zodiacs were level 146, Rarity +140-141 and Quality 2.62e13. The Taurus are for getting to Eternity. If you can get to Eternity with only 5 switch one out for another Libra or possibly Aquarius or Gemini. I did have to turn on Auto Eternity for about two minutes at the end to get the last bit of EP needed. I did not use Astrodust to Enhance zodiac quality, but others report using Enhance a lot for the extra quality boost. Also just for reference; my max attack level was 3027 and Unity count at 95,600. Refine tree nodes had purchased all below the cost of 64 RfP. (Others report doing this with all around lower stats than mine and only taking a few more minutes). It should basically be doable when you unlock it. In the Refine Tree, work your way left to Node #12 (VP upgrades no longer spend VP), and then across to the right side for Node #16 (Merge level bonus).
合并等级加成:提升VP倍率。提升等级所需的合并次数不变,但VP倍率会增加。你可以将生成等级和自动生成设置为极低等级的矿物,以更快提升合并等级。合并等级在进行精炼重置前不会重置。 当你购买了所有花费低于1k的节点升级后,你应该有足够资源将剑等级提升至100级,达成里程碑,这会显著提升你的遗物。达成该里程碑后,也是牺牲遗物、进行攻击重置以及升级黄道十二宫的好时机。 继续购买精炼节点,直至解锁最右侧的节点#18以获取磁铁。 磁铁:解锁新的磁铁升级。你可以将生成等级和自动生成设置为极低等级的矿物,以更快获取磁铁。磁铁和磁铁升级在你进行精炼 prestige 之前不会重置。 一旦解锁了磁铁,你就可以更轻松地进行放置游玩。基本上,你开始游戏时像往常一样通过多次打磨来提升矿物等级(这有助于提高 VP 产量和成本下降速度)。然后将生成等级切换到大约 1-15 级之间的任意等级,并开启自动生成。这样做的目的是最大化生成数量,以收集更多磁铁并提高合并倍数。你只需要确保在自动合并和重新生成填满所有可用库存空间之前,成本下降到基准值。 对于【自动购买矿物升级】,将花费金币的前 10 项保持开启状态。磁铁升级要么全部关闭(手动购买),要么只选择当前想要花费磁铁的项目。我建议你先购买【更多磁铁】,大概升到3倍左右。然后切换到【虚拟点数获取倍率】。你的目标应该是达到120级以上的矿物,以便购买更多精炼升级。很难确切说什么时候磁铁升级“足够了”,因为还有其他变量,所以你可能需要多尝试来找到适合自己的方式。 注意:这段时间我经常离线挂机,所以没有确切的使用数值,我只是让它自动 farming。也许有人可以在评论中分享他们在这个阶段的有效方法。持续精炼120级以上的矿物,直到这些节点达到以下等级: -节点1(5级) -节点10(10级/满级) -节点16(6级或7级) -节点19和节点20均已购买 完成上述操作后,就可以开始冲击矿物等级130级和斧头抛光等级100级。使用与之前相同的策略,将【更多磁铁】提升至5-6倍(也可以少一些,但获取其他升级所需的磁铁会花费更长时间,因此个人建议最好先花时间提升这里)。再次切换到【VP获取倍率】,直到至少购买了200磁铁成本的升级(越多越好)。此时你的合并等级应该在30级左右。然后开始生成最高等级的矿物并按常规进行合并。你可能需要再次抛光,以将所有武器提升到尽可能高的等级。当你能自然生成117级矿物时,最好继续积累,直到拥有升级100级斧头所需的PP。这一步对我来说并非必需,但你也可以在最终抛光冲刺前购买几级【PP获取倍率】。当你拥有升级100级斧头所需的抛光点数(矿物等级125-130级)时,进行抛光并购买该等级斧头,以解锁【疯狂试炼#4】。 【疯狂试炼#4】:由于你刚刚完成抛光,务必将矿物升级大部分恢复,以获取通用指数倍率。我自己没能找到这个解决方案,因此感谢评论区的Mag提供思路。按照这个配置,我瞬间就完成了试炼,但你可能需要进行更多时间膨胀,甚至完成【永恒挑战#10】来提升AP以进行时间膨胀。

参考数据:黄道等级163,稀有度+171,品质5.5e19,统一值122,150,攻击等级3,150。 完成疯狂试炼#4后,你现在还可以将所有永恒挑战的难度等级提升至6级。感谢评论区多位玩家提供的黄道阵容建议。这些挑战在解锁后都应能立即完成,若无法完成,你可能需要更高的品质或更多的虚空点数升级通用指数倍率。有玩家反馈在能够完成挑战#1:6之前就已达到长矛100级。 永恒挑战1:6(最难达成,建议先完成其他挑战)

永恒挑战 2-10 难度 6

需要注意的是,有报告称在木星上再放置一个白羊座可能会更好。 完成上述步骤后,应该能相对容易地将矿物等级提升到130,并精炼节点21、22和23,这些节点都很有用。 对于矿物等级140,建议拥有以下精炼节点及等级: - 节点1(等级6) - 节点16(等级9) - 节点22和23均已购买 你将需要大量磁铁,主要用于VP增益。当你能生成127级矿物时,就可以通过刷级达到140级。用RfP至少购买节点24(等级1)、25和26。你可能还需要获取节点27,它或许能让你生成高一级的矿物。 下一个目标是长矛等级100:你需要141-142级的矿物,以及大量磁铁(再增加5-7个磁铁)来提升VP增益倍率,至少还要提升一些PP增益倍率。进行这种速通的一个潜在难点是,由于没有足够的黄金,你可能无法生成127级或128级以上的矿物,因此可能会比预期花费更长时间。可能最好的方法是先将矿物等级提升到142级,然后升级PP获取倍率,直到拥有抛光所需的PP(约8.76e71 PP)。如果你只能达到141级,那么需要接近2.5k的PP获取倍率,这需要大量的磁铁。无论哪种方式,都需要大量刷取。 一旦达成Spear 100里程碑,你将能够升级遗物、黄道十二宫,并生成略高等级的矿物,因此很快就能回到140级以上的矿物等级以进行RfP。你可以继续当前的速通,将矿物等级提升到146级,这足够购买节点29,或者精炼并开始新的速通。如果你要继续游戏,建议购买一些【生成/合并概率+等级】的矿物(如果还没买的话),这会对你有所帮助。 矿物类型:精炼矿物、符文矿物、特殊矿物
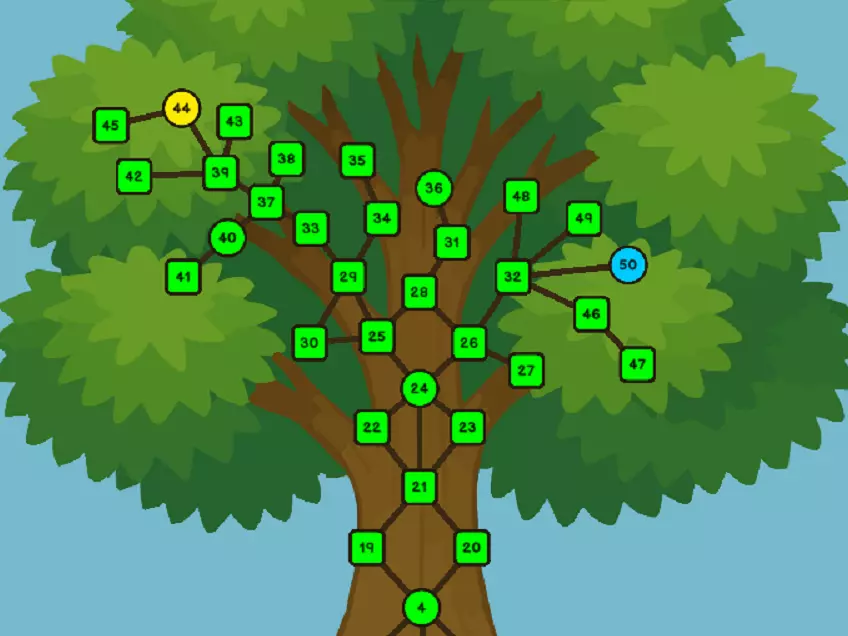
At this point there are many things that can be upgraded with Mineral 140+ runs. I highly recommend the following as being worth saving RfP to get as quickly as possible. - Node 27: Helps spawn a higher level mineral. If you don't already have this, get it. - Node 34: Buying magnet upgrades no longer spend magnets. Really improves magnet efficiency. - Node 33: No longer need to Unity to receive gold. Very nice. Once you have this, the only reason to do a Unity is to upgrade zodiacs. Keeping the minerals at max speed is more important than Unity bonus and selling or sacrificing zodiacs at this point, although you still will want to do that once in a while. - Node 37: Increases Knuckles bonus. This is really good. Result is roughly doubling mineral speed (based on Knuckles Polish level) which affects VP gain and spawn rate. Once you have this, getting to Mineral level 150 in a longer run is a good option and probably preferable depending on other upgrades you may have at this point. You can do mineral 150 before having this, it just takes longer but is doable if you prefer to be more idle and/or want to use Time Flux. - Node 38: More refine points. Approximately double RfP when first unlocked based on Knuckles level. You should definitely be doing mineral 150+ runs after getting this (Knuckles 80+). - Node 35: Unlocks Runes (located below Refine Prestige button). I don't feel these are as important as the above, but still worth getting started on early since they take time to generate. Upgrades that increase Nodes 1 & 7 are very helpful early as well as Magnet amount x2. Try not to overspend since Runes are needed to spawn Special Minerals, so you will want to save up for more generation amount. Other nodes provide bonuses that are good, but in my opinion are not as valuable as the above. You may want to get at least some of them early, especially cheaper ones since they can make runs a little faster. *Note: Don't forget about Nodes 1, 16 and 24 which can also still be upgraded. - Node 28: Polishing Enhance (located below Refine Prestige Button). Not all that great when you first unlock. Enhancing costs additional RfP which is better spent elsewhere. Initially unlock just to get to the nodes past it. Enhance when you have spare points and the price is right (probably after you have Node 38). - Nodes 31 & 36: Both help to lower base cost of Minerals allowing for a higher spawn level (may take more than one purchase of #36 to increase the spawn level by +1. - Node 40: Increased Magnet VP / PP Multipliers. Not as strong as I hoped, but still can help some with gold and polish levels. - Nodes 41 & 46: Special Minerals. Costs Runes to spawn. It is recommended that you have Node 46 and a higher Rune generation amount before spawning special minerals. - Node 45: Increases PP gain from Trials. You will want this by the time you are going for Bow 100. Bow 100 and Fifth Trial: There are probably a variety of combinations to get to Bow 100. I do not know "the best" way. What I do know is that it was not feasible for me until I bought Rune upgrades (Increased nodes 1 and 7) and you will probably need some of nodes 36 and 40 and node 45. Insane Trial #5: Simply just use all Cancer Zodiacs (I forgot to record my quality level, but whatever your quality level is, it's probably more than enough). After completion, you no longer need to enter Dilation and this will be a nice and most welcome boost for Attacks and Relics as well as more gold for a higher spawn level. Very nice indeed. At this point, you should be doing at least mineral 150 runs. Continue to buy and upgrade the remaining Refine Nodes and some Refine Enhancing as well as Relics and it shouldn't take too long before mineral level 160 becomes easy to reach. Buying all refine nodes will also give you Achievement #137 for some free Runes. It's worth mentioning that Refine Node #50 is x2 refine points, so it is worth saving for. Special Minerals: To spawn Special Minerals, switch the tab directly above the mineral grid from "Normal" to "Special". Initial cost is 10 of both Sun and Moon runes. Spawn is similar to regular minerals in that they have a base cost and increasing cost as well as a fall rate. You will get a random Level 1 Special mineral that provides a small bonus depending on the mineral spawned (Bonuses listed in Appendix: Minerals section). Due to the high Rune cost, you really want to increase Rune Generation time and amount before doing this much, if at all yet. You will need to turn off auto spawn to spawn special mineral. Special Minerals persist through polish and refine prestige. Merging the SM, gives experience to that mineral and reaching level 2 is what is needed for Achievement #320. All other Achievements should happen naturally. Note that merging SM does not increase the bonus, it just saves space and increases mineral experience. The base cost will also increase, I think it's in relation to how many total you have spawned, but not sure. Knuckles level 100: You will want to have refine nodes 24, 36, and 40 all maxed. Node #1 probably level 9 or 10 as well as Node #16 probably level 16 or 17 and some of the Polish Enhancing upgrades. You will probably need mineral level 166-168 (more or less depending on magnet upgrade PP gain and some relic levels). You need about 1.58e131 PP. Insane Trial #6: The basic Attack build should work fine (3 Aquarius, 3 Libra, 6 Aries). Alternative is Leo on both Saturn and Neptune instead of Aries. Reference: My zodiacs were level 179, Rarity +195, Quality 1.5e22. Alternative mentioned in Comments: All Pisces +192, level 174 and e21 quality Also mentioned, Recommended VP between e995 to e1020 *Note that you should get Relic #35 probably on your way or shortly after completing the Trial with the rewards. It is worth staying in the current run with the Trial rewards to increase attack and Relic levels and pushing to mineral level 170 before Refining, but that's up to you since it's still a bit of a grind. If you haven't already reached Merge level 100 for achievement #293, now is a good time for it. All that really should be left is the last several achievements. Merging the Special Minerals gives experience to that mineral and reaching level 2 is what is needed for Achievement #320. All other Achievements should happen naturally. Note that merging SM does not increase the bonus, it just saves space and increases mineral experience. Elements *Note/Checkpoint: Before the Elements update was added to the game, I used that time to get a Level 2 Special Minerals for Achievement #320 so I was very much ahead of "normal" play. You should have Runes Generation Rate Amount somewhere between 3 -7 (level 5 is probably the most cost efficient for a long time), as well as several of the Runes boost to Refine Nodes 1 & 7 (up to at least the 256 cost), and several of both Magnet upgrades. *NOTE: It's been reported that if you are at a bottleneck, upgrading Moon Rune for RN7 seems to be the most important to push through, since Gold is what is causing the bottleneck. (Thanks for figuring that out James) In the Refine Tree, buy Node #54 and then read below before buying #55 to unlock Elements. Otherwise just buy what you can afford including Nodes 1 and 16 and as a lesser priority Polish Enhancements and Special Minerals Upgrades. **IMPORTANT: On your final run when you will get enough RfP to buy Node #55 for Elements, take the time before Refine Prestige (when VP Quality Bonus is at it's peak) to do some Zodiac farming using all Pisces build. (I'm not sure what triggers it, but at some point you will be rewarded with extra inventory slots so you should have enough space for all the zodiacs.) The following builds are considered optimal by many people. Also, if you haven't used the planetary loadout slots, now is a good time to create one for each element. The Planetary loadout button is at the top left of the Inventory with the Planet shop screen closed. FIRE ELEMENT: Score Sagittarius, Aries, Sagittarius, Libra Aries, Libra, Leo, Aries Leo, Aries, Aries, Aries *Note: When you unlock Ethereal Zodiacs, replace the 2 Libras for 2 more Leo. EARTH ELEMENT: Infinities Virgo, Taurus, Virgo, Virgo Taurus, Virgo, Taurus, Virgo Taurus, Taurus, Virgo, Taurus *This takes advantage of planetary bonuses for slightly better production, but you can use all Taurus or a random mix if that's easier for you since they both have Infinity Gain. WIND ELEMENT: Eternities All Gemini WATER ELEMENT: Luck More game speed is more important early on since that will help generate Runes faster, later it doesn't matter much. If you prefer just to use all Pisces it works and makes new zodiac upgrades a little easier and fewer. Or start with more speed and switch to all Pisces later. Up to you... Cancer, Pisces, Pisces, Pisces Pisces, Pisces, Pisces, Pisces Scorpio, Scorpio, Pisces, Pisces Now that you have all that setup, Refine Prestige and buy Node #55 to unlock Elements Tab. Gaining Elements is as easy as matching the zodiac builds to the Element selection screen. *NOTE: You must select an element in order to gain that element. You do not receive elements that are not selected, so you must earn them one element at a time. When first starting, it is likely that Fire and maybe Earth are the only elements that you will gain anything with. Wind and Water take more to get them started. If you are not gaining anything with one build, then don't waste your time with it, focus on elements you can get. Time Warp can be useful to help it along when you are making tiny gains. *Tip: Even though you probably won't gain Water Elements initially, you can and should still use the water zodiacs at times to speed up Rune production and you can still select an Element other than Water to make at least some smaller gains so it's not a complete waste. The Element Tree is where you spend the elements to buy upgrades. Many of the upgrades are based on the current amount of that element, so initially they may not make much of a difference, but get stronger over time. Node #1 of all elements increase the generation amount of that element, so buy it as soon as you can. You may want to overrun the costs of the upgrades so you have some in reserve for their bonus affects, but I didn't see that as being a real issue since the bonus is usually worth getting as soon as possible. Continue to use/upgrade Special Minerals, Polish Enhancing, and Refine nodes (priority #60 and #1) as well as upgrading the zodiacs (sacrificing/selling as well), until you are making gains with all four elements. Refine Nodes are basically buy what you can afford at this stage since everything is useful and you shouldn't need to be constantly saving just to buy something. Max mineral level should start to climb somewhat steadily. Don't forget to Attack Prestige approximately +x e100
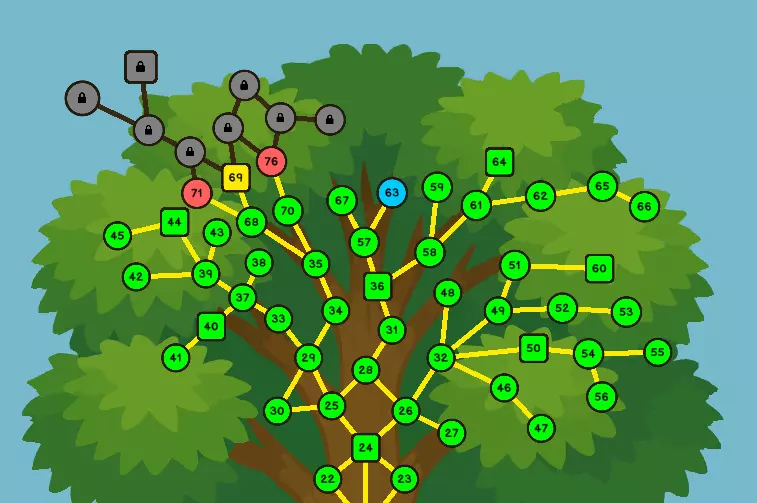
现阶段的元素系统相当简单。你基本上可以让每个元素构建运行10-20分钟(或更长时间),最后以水元素结束(以获得符文加速生产加成),直到你准备好进行精炼。黄道十二宫可以频繁升级(大概每2-4次精炼运行升级一次)。 另一种方案:每次精炼运行严格使用一种元素(火>土>风>水)。当你运行到水元素时,升级黄道十二宫并重复此过程。 成就#326解锁特殊矿物自动化。 图片仅供说明,具体数值可自行设定: 最大成本:(这真的有意义吗?) 最大成本(+基础值):0 仅在基础成本时生成。(任何高于此值的都是浪费符文) 最大基础成本:当基础成本高于此值时停止生成。最大生成系数:达到此系数水平时停止生成。建议设置为7500,因为超过此值后,成本会迅速变得非常高昂。 自动删除矿物:(本次游戏更新新增功能,因此之前未出现) 最大等级:(此设置有实际用途吗?) 最大等级(相对于当前矿物等级):值为1时,将删除所有低于最大生成等级的普通矿物(不包括特殊矿物)。如果已解锁精炼节点#68,并且正在使用1秒单位(只需开启)来降低SMS系数,建议将此值设置为2-6,以免每秒浪费少量低等级矿物。
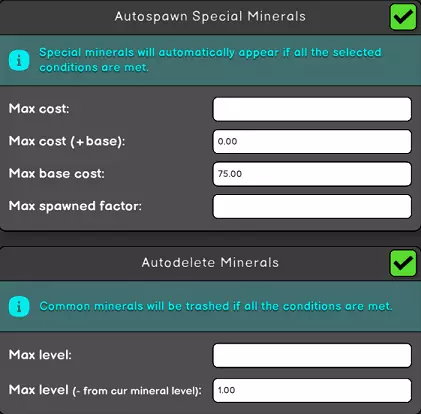
Achievement #338 unlocks Relic autobuyer automation, but you still need to manually sacrifice Relics until you buy Refine Node #66. As you continue to progress you will notice that Rune production is getting increasingly faster, so buy some of those Rune upgrades that were previously overpriced. This also means you can spawn many more Special Minerals which provide a significant boost. Refine Node #63: Not sure when you can buy this, but when you do you never need to run a macro for Unity again. Oh happy day! At about when Refine Node #60 is level 6 - 8, you should be able to get +1000 zodiacs. Merge 3 of them for Achievement #342 which unlocks Ethereal Rarity zodiacs which are much stronger. So upgrade all zodiacs with Ethereals, and there is a lot of sacrificing that can be done. **Also with Ethereals for the Fire element planetary loadout, replace the 2 Libras for 2 Leo. Progress is really linear at this point so I won't go into details. Keep buying Refine Nodes, Elements and other upgrades (Polish, Special Minerals, Planet Shop Donuts) as you can afford them and everything else you have already been doing. Also keep spawning Special Minerals since they will provide a lot of boosts to help get to Node #70 and Tarot. *Note: Achievement #356 Have 7500 SM Spawn Factor. It's ok to get this, but really try not to go above this factor level since the Base Cost will start to increase quickly. When you can buy Refine Node #68, you can set Auto Unity so it triggers every 1 second (affected by TF) to gradually reduce SM factor. When doing this, the game sometimes will spawn a few level lower minerals than your max, so you may want to set Auto Delete minerals "Max level (- from current level) to 2 - 6 so they are not completely wasted. Node #70 unlocks Tarot and Black Special Minerals as well as a one time reduction in SMS Factor. Tarot With Node #70 purchased, Black Special Minerals have a small chance of spawning. It's a good idea to allow the Black minerals to merge a few times (level 5-7+) before trashing them so that they gain experience (later you will want 10-15+ levels). Trashing Black Gems is what gives you points for tarot card draws. Your first 5 Tarot cards are predetermined. #1. Ace of Swords: Tarot Swords generation and Attack Mult Gain from VP. #2. Ace of Wands: Tarot Wands generation and Increase to Fire Element generation. #3. Ace of Pentacles: Tarot Pentacles Generation and increase Gold gain. #4. Ace of Cups: Tarot Cups generation and increase to Zodiac Quality. #5. Chariot (Arcane / Useable): Decrease SMS factor by 1,000 each use. Cooldown 12:00:00 (affected by minerals local speed and Time Flux). *NOTE: Tarot resources initially don't do anything. They will be used when you get Achievement #390 (1 million of each resource) for Tarot upgrades. Achievement #372 requires having a level 5 Black Gem in your inventory grid and 0 SMS Factor at the same time. Not hard to do, just mentioning since you may not get it naturally. ***(more info in Appendix: Tarot section)***. The more new tarot cards you get, the less likely you will get additional new cards and more likely to get a duplicate (% shown on Tarot screen). New common cards will not skip but will be in order (Ace > King). It can be tedious trying to get that last one that you are missing. Achievement #370: Draw 20 tarot cards to unlock the chance to draw Arcana cards. Arcana cards are Re-usable cards with cooldown periods between uses. Some have an instant effect, others have a time based duration. Some are good, others are ok, and some can be bad (but not always). Unlike the common cards, new Arcana cards are random and you might get good or bad cards right in the beginning. *NOTE: Some cards may not be obviously good, so I want to mention them here. "Devil": Can be abused with a 66% chance to permanently increase tarot resource production. Takes many castings, but over time is a huge increase. This far outweighs any of the potential negative affects which are mostly just annoying. Just as an example: I went from natural production of 56/sec to over 10k+/sec production ONLY using Devil card in less than a day and without any additional tarot draws (even took a nap for several hours). This seems to be required to be able to buy the tarot upgrades within any reasonable time frame. (There are also 3 Secret achievements associated with Devil as well) "Star" + "Temperance" Combo: If you have both of these cards, use these to upgrade all your Pisces, since this will always give better Pisces than you could normally get. It's even better with "Hermit" active. **Be sure to turn off Auto sell/sacrifice first** "Tower": More of an endgame card (you definitely don't want to use this early as it can set you back significantly). Can increase SM progression experience by large amounts (including black gems which you will get the draws for) based on Gem level destroyed. Risky, but probably overall good when you have Lvl 17+ SM. You can limit it's options by trashing gems to help "force" it towards what you want. (Can also be used when SM grid is full to maybe get a boost and free up space) Achievement #385: This is a trap. I don't recommend even attempting this until you have Achievement #420 (allows bulk spawning) combined with Arcane "Justice". Attempting this without the bulk spawning will cost you Millions of runes for no good reason. Achievement #396: Potentially the only achievement that you may never get since it's purely luck based. Best to try for it when losing many card draws isn't horrible. Achievement #390: Have 1M+ of each tarot resource unlocks Tarot upgrades. (button is next to the Arcana tarot cooldown timer) At some point your SM grid will fill completely. When that happens, throw away lower levels of Green, White, and Blue (NOT light blue) since at this stage they don't matter that much. (Example: if your highest level is 15, throw away anything below 10 of those colors). You might want to see if spawning just one of those will trigger a big merge that will free up space naturally. When you finally draw the "King" of each suit, it unlocks a 2nd Element factor. Depending on what zodiacs you may be using, they may not be contributing to the 2nd factor (Water should be using all Pisces for the Quality factor). When doing Earth you can also change your Lab to all in #5 to boost Generator factor, but be sure to switch it back when not using Earth. Progression is still very linear and mainly revolves around managing/spawning Special Minerals, drawing/using Tarot, and getting upgrades when you can. Refine Tree Node #71 automatically generates PP and upgrades weapons, so you don't need to polish prestige. Finally (that was really getting annoying) Refine Tree Node #72 Finally increases mineral grid space. Achievement #408: Unlocks the option to draw all available tarot cards at once. This will be a roughly balanced draw with all cards given equal amounts (+/- 1 or 2). Up to you whether you want to use this method or the slower random method. Draw all should make it easier to get Achievement #417. Use the Hermit + Star + Temperance combo to increase all your Pisces up to +1000, after that, upgrade your other zodiacs by placing the one you want upgraded on Fortune Pars (keep all the others as Pisces). The longest part of getting all zodiacs at +1000 is waiting on the Arcane cooldown timer for Hermit. *NOTE: When using Temperance for other zodiacs besides Pisces, the quality will be lower, so I prefer not to use it for those after getting +1000 (which is the current max). At this point "Moon" becomes more useful since the only thing you can increase is Quality. The downside is that it's one zodiac at a time and it has a longer cooldown, but it does give a large boost to Quality. *Reference: Approximately when you have all the Pisces maxed, you should also have or be close to, Element nodes bought up to 8 (water) and 9 (all others). Tarot upgrades should be around level 3 for all nodes, and Refine Tree pushing towards Node 78, Special minerals Spawn level 5. This is just where I was at for a comparison reference. Everything is really still straightforward and linear. I've now bought all Refine Tree nodes and am only missing last two achievements, and so I'm going to stop playing here so that I can have a "normal" play when the next update drops instead of starting with bloated stats. Thanks all! Sorry that I don't have time to update this guide now and maybe not for a long time (if ever). Now working on it when I can... but If someone else would like to take it over, I can give editing privileges. Appendix: Zodiac and Planets Info Bonuses: ***I could be wrong about some of these, but as far as I know, this is what they do. I do not know if a specific bonus is better than others, although for example, it seems like Fire Elements are generally better than Earth Elements. Most should be self explanatory. Some can have a secondary affect. Example: Lap Speed Increase can also increase slowdown since it's based on lap speed. Be aware that bonus values are always greater when they are at the top and lowest at the bottom. Example assuming equal Quality/Rarity: If multi gain is the first bonus (top), it will always be a higher value than if it was the fourth bonus (bottom). - Achievement 29 Reward: Increases power of Achievement 29 reward. - Ascensions Power: Increases the bonus from Ascensions. - Center DTU Effect: Increases the power of Center Dilation Tree Upgrade. - Common Exponent Power: Increases the Power of Score exponent (like lab upgrade #6). - DP Gain: Increases amount of Dilation Points/Income gain. - DTP Cost: Reduces the cost of Dilation Tree Points. - EP Gain: Increases the rate at which EP is gained. - Eternity Gain: Increases the amount of Eternities gained per Eternity and Eternities per second. - Free Lab Levels: Bonus free lab levels for all lab upgrades. - Game Speed: Increases the Game speed (like a free version of Time Flux). - Gen Exponent: Increases the generator exponent (like lab upgrade #5). - Infinity Gain: Increases the amount of Infinities gained and Infinities gained per second. - IP Gain: Increases the rate of IP gain. - Lab Mult Power: (Not sure) I think it boosts the rate of Research Points gain (top "mult" upgrade). - Lap Speed: Increases lap speed. - Luck: Increases the Luck value for next zodiac Rarity. - Mult/bought Gen: Increases the power of purchased/bought generators. - Multi Gain: Increases the Multi gain of colors (as seen at top of main revolutions screen). - Promotions Power: Increases the power of all promotions including Promotion #4. - Slowdown Power: Increases the number or Ascensions per Slowdown level. - Star Base: Increases the starting base value of stars (like the star upgrade). - Stardust Exponent: Increases the value of stardust Exponent (like the star upgrade). - Supernova Requirement: Reduces the score needed for next Supernova. - Zodiac Quality: Increases the quality which increases the bonus values on zodiacs. ZODIAC SIGNS: ============= Sorted by Element, Name- Season: four potential bonuses. underlined potential bonus appears exclusively on that Zodiac sign. Higher "Rarity" can have all four bonuses. Rarity Garbage to Epic: 2 Zodiac Bonuses Legendary to Godly: 3 Zodiac Bonuses Divine and Immortal: 4 Zodiac Bonuses Fire Element: Red Aries- Spring: Multi Gain, Promotions Power, Ascension Power, Common Exp. Power Leo- Summer: Lap Speed, Promotions Power, Ascension Power, Common Exp. Power Sagittarius- Winter: Lap Speed, Slowdown Power, Ascension Power, Common Exp. Power Earth Element: Green Taurus- Spring: IP Gain, Infinity Gain, Gen. Exponent, Mult/bought Gen Virgo- Autumn: Star Base, Infinity Gain, Gen. Exponent, Mult/bought Gen Capricorn- Winter: Star Base, Stardust Exponent, Gen. Exponent, Mult/bought Gen Wind Element: Light Blue Gemini- Summer: Eternity Gain, EP Gain, Supernova Requirement, Lab Mult Power Libra- Autumn: DP Gain, EP Gain, Supernova Requirement, Lab Mult Power Aquarius- Winter: DP Gain, Free Lab Levels, Supernova Requirement, Lab Mult Power Water Element: Dark Blue Cancer- Summer: DTP Cost, Center DTU Effect, Achievement 29 Reward, Game Speed Scorpio- Autumn: Luck, Center DTU Effect, Achievement 29 reward, Game Speed Pisces- Spring: Luck, Zodiac Quality, Achievement 29 Reward, Game Speed ===================================================================== PLANETS / CELESTIAL BODIES: Bonus received for equipping zodiac sign ========= Sun: Spring: Zodiac Quality x1.5 (Aries, Taurus, Pisces) Summer: Luck Mult x1.15 (Gemini, Cancer, Leo) Autumn: Unity Rewards ^1.100 (Virgo, Libra, Scorpio) Winter: Eternity Reward ^1.2 (Sagittarius, Capricorn, Aquarius) Mercury: Spring: Eternity Gain x2 (Aries, Taurus, Pisces) Summer: Infinity Gain x10 (Gemini, Cancer, Leo) Autumn: DP Mult x2 (Virgo, Libra, Scorpio) Winter: Stars Cost ^0.9 (Sagittarius, Capricorn, Aquarius) Venus: Spring: Game speed x1.2 (Aries, Taurus, Pisces) Summer: Lap Speed x3 (Gemini, Cancer, Leo) Autumn: Supernova Rewards ^1.02 (Virgo, Libra, Scorpio) Winter: Dilation Upgrade x1.05 (Sagittarius, Capricorn, Aquarius) Moon: Spring: Luck Mult x1.2 (Aries, Taurus, Pisces) Summer: Unity Rewards ^1.15 (Gemini, Cancer, Leo) Autumn: Eternity Rewards ^1.15 (Virgo, Libra, Scorpio) Winter: Zodiac Quality x1.3 (Sagittarius, Capricorn, Aquarius) Mars: Spring: Infinity Gain x5 (Aries, Taurus, Pisces) Summer: Dilation Points x1.8 (Gemini, Cancer, Leo) Autumn: Star Cost ^0.85 (Virgo, Libra, Scorpio) Winter: Eternity Gain x2 (Sagittarius, Capricorn, Aquarius) Jupiter: Spring: Lap Speed x2 (Aries, Taurus, Pisces) Summer: Supernova Rewards ^1.03 (Gemini, Cancer, Leo) Autumn: Dilation Upgrade Power x1.03 (Virgo, Libra, Scorpio) Winter: Game Speed x1.1 (Sagittarius, Capricorn, Aquarius) Saturn Spring: Unity Rewards ^1.1 (Aries, Taurus, Pisces) Summer: Eternity Rewards ^1.1 (Gemini, Cancer, Leo) Autumn: Zodiac Quality x1.2 (Virgo, Libra, Scorpio) Winter: Luck Mult x1.1 (Sagittarius, Capricorn, Aquarius) Uranus Spring: Dilation Point Mult x5 (Aries, Taurus, Pisces) Summer: Star Cost ^0.93 (Gemini, Cancer, Leo) Autumn: Eternity Gain x3 (Virgo, Libra, Scorpio) Winter: Infinity Gain x3 (Sagittarius, Capricorn, Aquarius) Neptune Spring: Supernova Rewards ^1.04 (Aries, Taurus, Pisces) Summer: Dilation Upgrades Power x1.06 (Gemini, Cancer, Leo) Autumn: Game Speed x1.4 (Virgo, Libra, Scorpio) Winter: Lap Speed x10 (Sagittarius, Capricorn, Aquarius) Pluto Spring: Eternity Rewards ^1.15 (Aries, Taurus, Pisces) Summer: Zodiac Quality x1.25 (Gemini, Cancer, Leo) Autumn: Luck Mult x1.25 (Virgo, Libra, Scorpio) Winter: Unity Rewards ^1.15 (Sagittarius, Capricorn, Aquarius) Chiron Spring: Star Cost ^0.9 (Aries, Taurus, Pisces) Summer: Eternity Gain x2 (Gemini, Cancer, Leo) Autumn: Infinity Gain x100 (Virgo, Libra, Scorpio) Winter: Dilation Point Mult x2.5 (Sagittarius, Capricorn, Aquarius) Fortune Pars Spring: Luck Mult x1.5 Summer: Luck Mult x1.5 Autumn: Luck Mult x1.5 Winter: Luck Mult x1.5 Appendix: Minerals Charts Weapon Polish Chart Cost made by Discord user Gwierol and used here with permission.

优化图表由Discord用户perekatip0le制作,此处经许可使用。
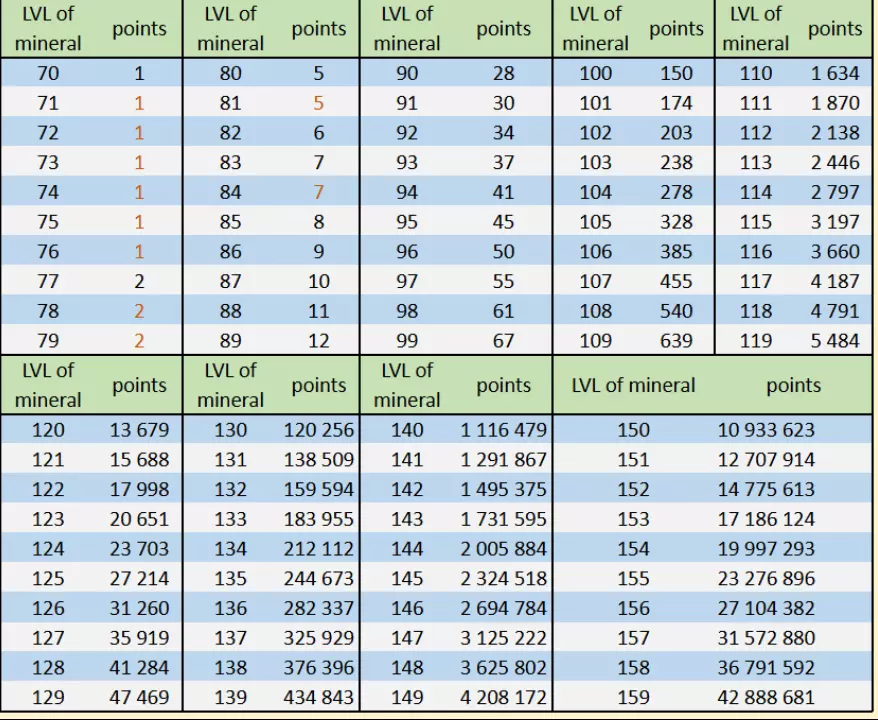
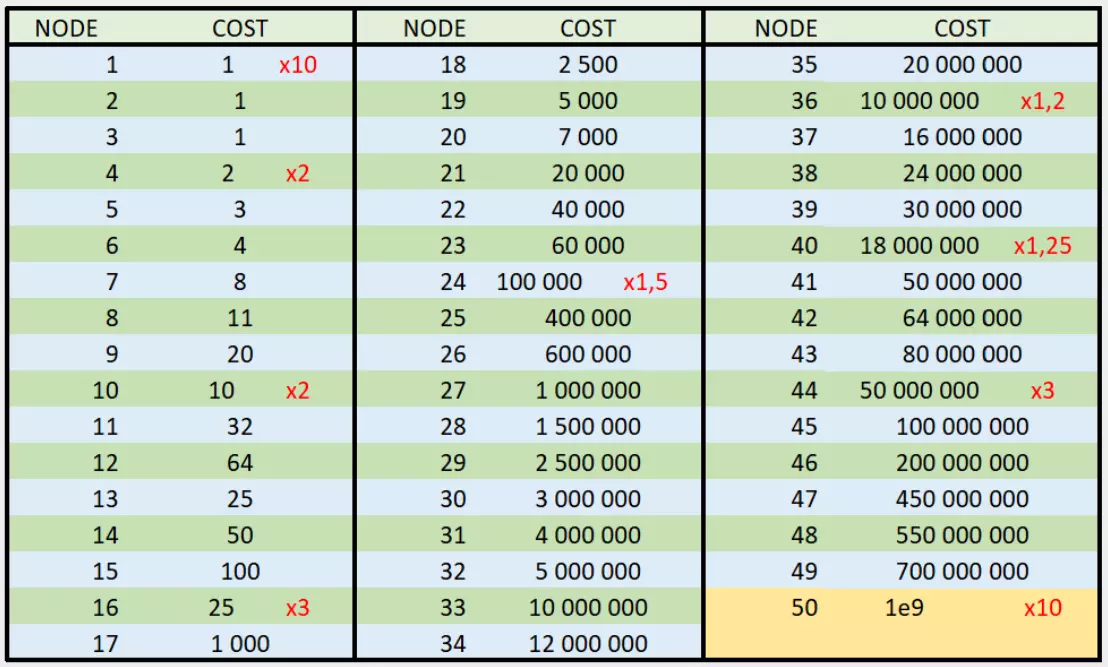
**NOTE: Unless someone else makes a chart that includes the expanded tree node info, this won't be updated here. Special Minerals Base Bonuses Red: VP x3 Blue: Cost Increase ^0.99 Green: Cost Fall ^1.01 Pink: Luck & Quality +0.05 Yellow: Gold x10 Orange: Magnet Chance x1.01 Dark Purple: Polish Points x1.5 Light Blue: Refine Points +x0.05 White: Game Speed +x0.05 Black: Tarot card draw 0.10 (Must have Refine Node #70 purchased) Appendix: Tarot Cards (Common) All of the Common Tarot cards have 2 effects. The first effect genererates that tarot's resource (Ace of Cups generates Cups, etc). Elder cards (two, three, etc) increase the generation rate of the previous card at a base value of x1.010. Since this is the same for each card, I will not be listing this base value for each card. The second effect varies and will be what is listed here. Both values increase with duplicate cards. These are all positive (good) effects. SWORDS: Level 1 Base Values ACE: Swords Generation 1.01/s Attack Mult Gain from VP: +^1,000 TWO: Attacks Ascend Power from VP +^0.050 THREE: Attacks Prestige Power +^0.020 FOUR: Relic 3 (Zodiac level sum boost Damage mult) Power +^20.00 FIVE: Relic 13 (Base Damage exponent) Power +x100 SIX: Relic 20 Effect (Boosts Relic 16 and 18) +x25.00 SEVEN: Refine Node 4 (Polish Sword Efficiency) Effect +x2.00 EIGHT: Polish Sword Effect +^2.000 NINE: DTU Mid-2 (passive Eternities) is +x10.00 stronger TEN: Increase Attack Exponent +0.030 PAGE: First 10 Swords tarot cards effects are +x0.100 stronger KNIGHT: Common Exp Mult +x0.100 QUEEN: Achievement 232 (Relics and Wind zodiacs better) multiplied by +x0.100 KING: Unlocks 2nd Wind factor (Supernova) and multiply 1st factor for all elements by x1,000 (after e308 softcap) WANDS: Level 1 Base Values ACE: Wands Generation 1.01/s Fire Factor 1 +^0.050 TWO: Earth Factor 1 +^0.050 THREE: Wind Factor 1 +^0.030 FOUR: Water Factor 1 +^0.070 FIVE: All Elements Factor 1 +^0.010 SIX: Fire Node 3 (Attack lvls boost Fire Gen) Effect +^0.300 SEVEN: Water Node 1 Effect +^1.000 EIGHT: Elements Local Speed +^0.050 NINE: Infinity Upgrade (2:1) is +x.500 stronger TEN: First Nodes of each element +x0.100 stronger PAGE: First 10 Wands tarot cards effects are +^0.100 stronger KNIGHT: Tarot Arcans Cooldowns +/0.100 QUEEN: Achievement #230 (Relics and Fire zodiacs better) multiplied by +x0.100 KING: Unlocks 2nd Fire factor (Exponent) and multiply 1st factor for all elements by x1,000 (after e308 softcap) PENTACLES: Level 1 Base Values ACE: Pentacles Generation 1.01/s Gold Gain +^0.025 TWO: Zodiac Sell Cost x10.00 THREE: Relic 36 (Earth Element Generation) effect +^.500 FOUR: Luck Donut Power +^0.020 FIVE: Zodiac Sacrifice Power +^0.200 SIX: Relic 28 (More Merge Experience) Effect +^0.010 SEVEN: Relic 31 (Mineral cost) Softcap is +x0.100 weaker EIGHT: Post 300 Mineral Cost Scaling is +x0.100 weaker NINE: Relic 17 (Relic 9 gold gain) is +x0.050 stronger TEN: Makes Pentacles 8 2nd effect +x0.500 stronger PAGE: First 10 Pentacles tarot cards effects are +x0.100 stronger KNIGHT: Relic 41 (Black Gem efficiency) mult +x0.200 QUEEN: Achievement 31 (Relics and Earth zodiacs better) multiplied by +x0.100 KING: Unlocks 2nd Earth factor (Gen Exponent) and multiply 1st factor for all elements by x1,000 (after e308 softcap) CUPS: Level 1 Base Values ACE: Cups Generation 1.01/s Zodiac Quality +^0.020 TWO: Relic 37 (Global Element Mult) Effect +^0.651 THREE: Relic 33 (RfP Gain) effect x2.000 FOUR: Relic 14 (Decrease Relics/Minerals cost) power +^10.00 FIVE: Refine Node 16 (Merge level bonus) Effect +x0.250 SIX: Polish Spear Effect +^20.00 SEVEN: Refine Node 52 (All Polish Enhance effects) Effect +x0.010 EIGHT: Runes Generation +x1.000 (rounded total) NINE: Basically divides the exponent of base mineral cost by +/0.100 TEN: Post 100 Polish Upgrades cost scaling is +x0.200 weaker PAGE: First 10 tarot cups cards effects are +x0.100 stronger KNIGHT:Special Minerals Merge Factor +0.010 QUEEN: Achievement 233 (Relics and Water zodiacs better) multiplied by +x0.100 KING: Unlocks 2nd Water factor (Quality) and multiply 1st factor for all elements by x1,000 (after e308 softcap) Appendix: Tarot Cards (Major Arcana) Basically three card usage types. Instant: Effect happens instantly with no duration. Timed: Effect happens for specified duration without variation. Cycle: Timed effect starts by increasing, then decreases towards the end of duration. *Note: Cooldown is affected by Mineral local speed and TF. *Card level affects cooldown and/or strength of effects. 0: FOOL: (Instant) Spawns black gem level 3.00 Cooldown 3:00:00 Free Black Gems are good, use often. It's possible for Hermit to increase the level. I: MAGICIAN: (Instant) Gives 3,600 seconds of Element you are currently generating. Cooldown: (Estimated) 4:00:00 Probably best used with Water Element and better boosted with Hermit and Star. Use often. II: HIGH PRIESTESS: (Timed) Increase Refine Node 1 effect x2.000 Duration 30s. Cooldown: 2:00:00 Good if you get it early. Later it's not that noticeable, but no downside to using. III: EMPRESS: (Cycle) Slowly Increases and Decreases zodiac sell cost by x10.00 Duration 1:00 Cooldown (Estimated) 4:00:00 Useful for selling zodiacs for a higher price. Can give lots of donut upgrades over time. IV: EMPEROR: (Cycle) Slowly Increases and Decreases Mineral Cost Exp by 0.200 Duration 30s. Cooldown 4:00:00 Good if you don't have the gold to spawn higher level minerals since this reduces gold cost. Useless if your spawn max level is capped by the VP upgrade. V: HIEROPHANT: (Instant) Levels up all common minerals currently in your grid by +1 level (but not more than max spawn level +50) Cooldown (estimated) 6:30:00 With the click of a button, instant mineral level increase. A great card to push mineral levels for RfP. VI: LOVERS: (Cycle) Increases and Decreases Relic 28 (Merge exp) by 0.100 Duration 40s. Cooldown (Estimate) 4:00:00 Surprisingly strong for several castings. A big boost to merge levels that's better combined with Hermit. Use often. VII: CHARIOT: (Instant) Decrease Special Minerals Spawn (SPM) Factor by 1,000. Cooldown Time: 12:00:00 If you don't need this, then you're not spawning enough minerals. Use often. VIII: JUSTICE: (Timed) Keep the lowest cost for spawning next Special Minerals Duration 4s. Cooldown 3:30:00 Spawns Special Minerals at 0 Rune cost, but does increase spawn factor. Limited usefulness. IX: HERMIT: (Timed) Make other Tarot Arcans x1.050 more effective. Duration 3:00 Cooldown (estimated) 10:00:00 Boosts most other Arcana so best used immediately before others. A long duration can allow multiple castings of other cards. Good combo with basically everything. (Haven't seen it boost Hierophant yet, but I think it could). X: WHEEL of FORTUNE: (Instant) Gambling 50% win/lose 10 tarot draws. Must have draws to use. Cooldown (Estimated) 26:00 Can be good or very bad. Recommend using when you have less than 10 draws or wait until getting large quantities of draws is easy. Used to get Achievements #395 and #396, but after that kind of pointless. XI: STRENGTH: (Cycle) Slowly increases and decreases Attack Exponent by 0.100 Duration 20s. Cooldown 5:00:00 During the increase, it might get you an extra Attack level. No downside to using. XII: HANGED MAN: (Timed) Makes Polish Knuckles +40.00 levels Duration 30s. Cooldown 5:30:00 Increases the minerals local speed exponent. Due to softcaps, it's not a big boost, but no downside. XIII: DEATH: (Timed) While active, will randomly perform Refine Prestige with x10.00 more RfP. Duration 1:00 Cooldown (Estimated) 3:00:00 Good at the end of a long run especially when mineral levels were boosted with multiple Hierophants. Combine with Hermit when you are ready to Refine Prestige and wait for it to trigger. XIV: TEMPERANCE: (Instant) Add 3 zodiacs of the type in Fortune Pars Planet slot, but with stats you would get on Unity. Cooldown (Estimated) 2:00:00 Basically makes upgrading zodiacs slightly less time consuming. Example: You have all Pisces build and since Pisces is on Fortune Pars; when Temperance is activated you will instantly get 3 new Pisces with the Rarity, Level, and Quality of claiming them individually through Unity. Best used with "Hermit + "Star" active for better Pisces. A great combo to get +1000 Pisces much sooner than you normally could. XV: DEVIL: (Instant) Various Effects: (66% Chance) Boost 1st effect of all common tarot cards by +x0.007 (permanent) (no icon) (33% Chance) will apply one of 5 debuffs "Shadow Self": Reduces game speed to ^0.666 for 66 sec. (man/shadow icon) "Attachment": Removes 6.66% of your Tarot resources and draws (attachment/chain icon) "Addiction": Adds 66 to Special Minerals Spawn factor (syringe icon) "Restriction": Prevents using Arcana cards for 6 minutes (prohibition/slashed circle icon) "Secret Garden": Displays a moving red-shaded chadium on your screen for 66 secs (1% Chance): "Take your soul": You lose 1 soul but get Secret Achievement #49. Cooldown (Estimated) 10:00 Can give permanent tarot resource scaling if you use it often. "Addiction" is probably the worst outcome, the others are minor annoyances. If you have gambled with Wheel and lost into the negatives, getting "Attachment" can actually improve your tarot draws. (Example: -7.99 draws x 6.66% = -7.46 which is still negative, but an improvement) You also get Secret Achievement #50 for doing this. Secret Achievement #51: click on the floating chadium that flies around the screen when you get "Secret Garden". XVI: TOWER: (Instant) Will destroy random special gem granting 1.812^[Gem Lv] SMP to that gem. Cooldown (Estimated) 7:00:00 Can give large amount of progression experience, but can be a big setback if it destroys an important high level gem. Not recommended to use early. XVII: STAR:(Timed) Multiplies Luck by amount of stars you have powered to ^0.460 Duration 1:00 Cooldown (Estimated) 2:00:00 Good for pushing Water Element (with Hermit and Magician). Also useful with "Temperance" for better Pisces. It's been reported that it may cause issues with zodiacs above e1000. XVIII: MOON: (Instant) Upgrades zodiac in Moon position x1,004 quality. Weaker above e1000. Cooldown (Estimated) 4:00:00 It's ok but only boosts quality. Hermit + Star + Temperance is much better. XIX: SUN: (Instant) Gives 1 level to random card. Cooldown (Estimated) 10:00:00 Free cards with every use. Use often. XX: JUDGEMENT: (Instant) Makes Tarot resources equal and increases their values by ^.800 of their value. Cooldown 10:00:00 You might lose some from your highest resource, but will increase overall resources. If they are all similar amounts, they will all increase. Not a bad thing to use often. **CAUTION: If you buy a tarot upgrade with your highest resource, but don't quite have enough for the other upgrades, using this in between will lose a lot of resources. Either use this before buying any upgrade or after all of the same level are bought so that the resource amounts are close to the same. Otherwise you can lose a lot of resources when it "makes them equal" before the increase is applied. Hope that makes sense. XXI: WORLD: (Instant) Decrease cooldowns of all previous arcana by 4k sec. Cooldown 24:00:00 Allows you to use other cards more often. No downside to that. Appendix: Macros I don't really like the Macro system, but will try to include some here when I get around to it... **NOTE: The "Go To Macro" block is very useful, and in my opinion is worth the soul cost of 7500. The additional block space is 1 block for 1k souls and really isn't worth it since the further you progress the less blocks you need. I never bought any other blocks, and didn't need them either, so can't really say about any others. INFINITY CHALLENGES: This can be useful for lowering your challenge times without going through them individually. Screenshot only shows the beginning and end, just put the other challenges in between. Really only useful once you no longer need to Prestige or Promote to finish them.
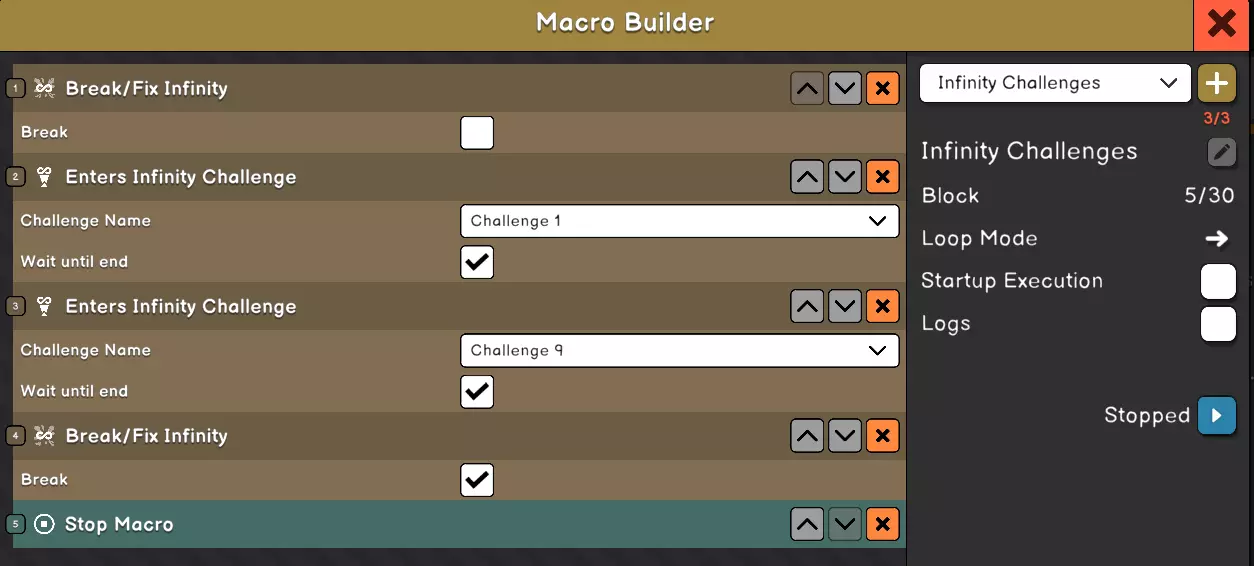
永恒挑战/时间膨胀:与无限挑战的机制相同。我会在启动宏之前手动领取一到两次永恒点数,但你可以根据需要在开始时添加无限/永恒指令。在两张截图之间的开始部分包含你需要的尽可能多的挑战。我在宏的末尾用灵魂购买了【前往宏】功能,只是为了让速度更快。根据需要调整数值。
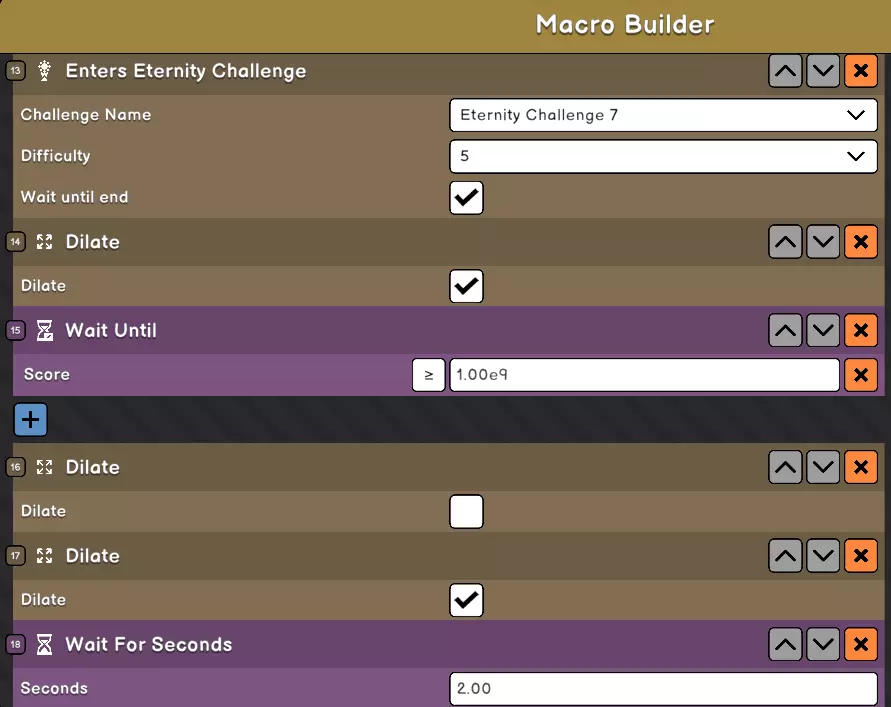
添加所有其他挑战。
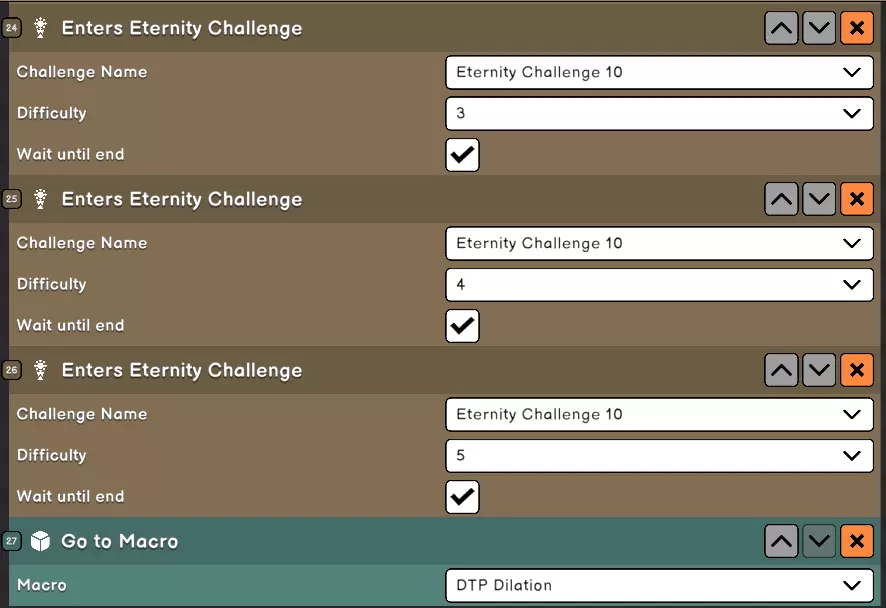
膨胀树购买器:这是我的EC挑战宏在最后链接到的内容。在你能够轻松购买几乎所有DTP(膨胀树点数)而无需切换build(配装)之前,它实际上无法正常工作。
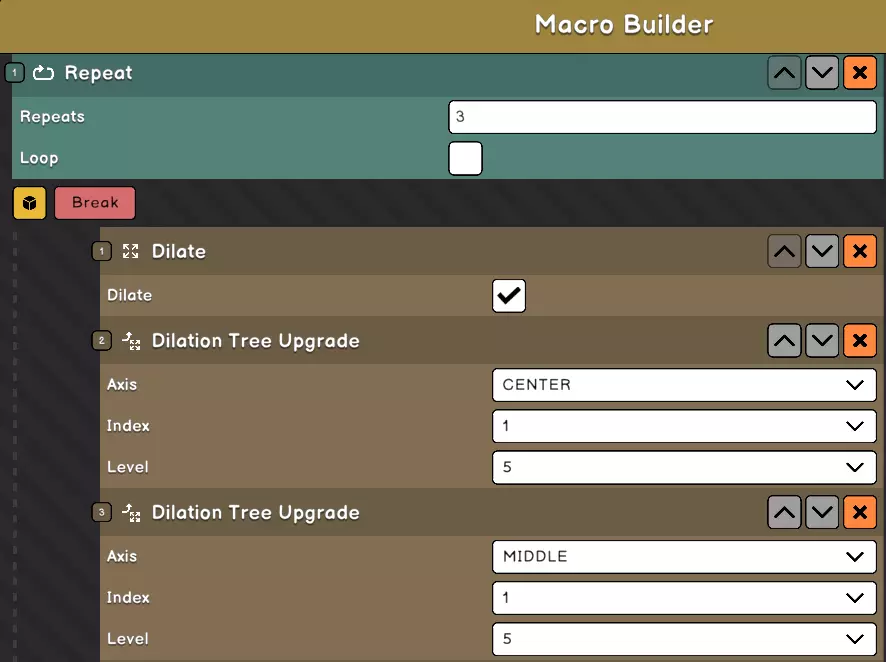
我将除T1之外的所有其他DTP节点都添加在这些图片之间,并升级到最高等级(T1先加1点,最后再将其升满)。
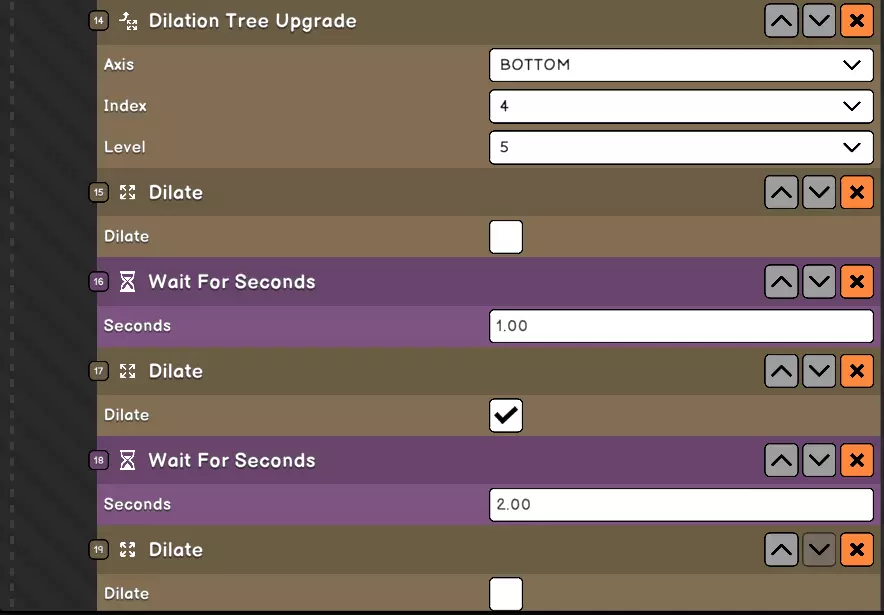
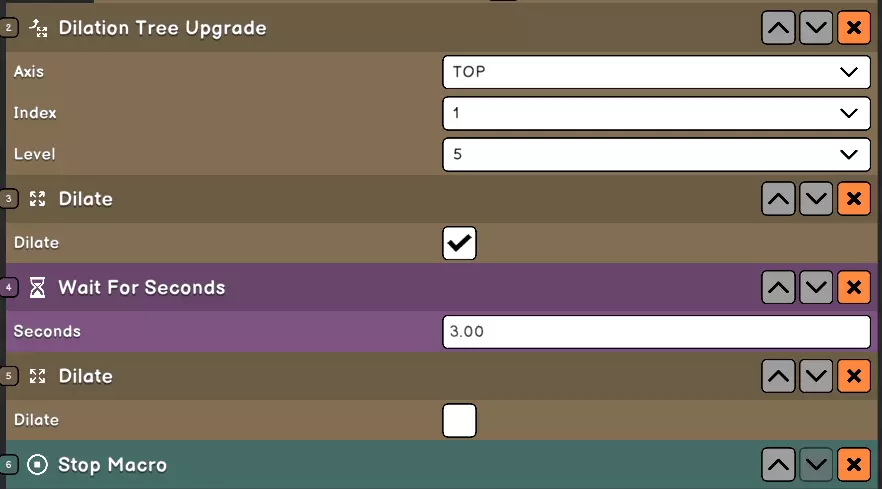
这应该能让你进入Unity。准备好后就去领取。或者将其循环回上一个宏,而不是用等待直到EP<1并结合自动Unity功能来自动刷取/出售的方式停止。 以下是两个来回循环以实现自动Unity的宏。如果你不想自己创建,可以直接复制并导入到你的宏槽位中。如果你已完成所有困难试炼,这些宏应该可以直接使用。 请注意,你需要确保宏的名称与“转到宏”模块的名称相匹配,以便它们能正确链接。这些宏的等待时间设置得比较长,你可以根据需要进行调整。请注意,宏等待时间为实时时间,不受游戏速度或时间流逝影响。 宏1 等待秒数(2.0) 无限循环() 循环() 等待秒数(1.0) 循环() 进入EC(8, 2, 真) 进入EC(8, 3, 真) 进入EC(9, 1, 真) 进入EC(9, 2, 真) 进入EC(9, 3, 真) 进入EC(8, 4, 真) 进入EC(8, 5, 真) 进入EC(7, 3, 真) 进入EC(7, 4, 真) 进入EC(7, 5, 真) 加速(真) 等待直到(分数 >= 1.00e9) 加速(假) 加速(真) 等待秒数(2.无法识别或无法翻译,已删除。注意:我知道大家会建议这样做、那样修改,或者觉得怎样会更好等等。当然,你完全可以按照自己的喜好进行修改,或者创建属于你自己的方案。我不喜欢使用宏,也无意对此处内容做额外修改。如果宏不是几乎必须的,我根本不会用它们。 附录:其他指南链接 感谢史蒂文! 感谢! 感谢许多提供提示、技巧和设置的朋友们,你们的帮助非常大。一路上有很多人,我无法一一记住,所以特别感谢所有人:s1borg、arronax06、Thanatos、DiMono、Kyouko Tsukino、fractalgem、Elementus、roboticaust和zeysoft。没有你们的帮助,我可能早就放弃这款游戏了。还要感谢Discord社区的Rosa Laminae和Stayven,他们提供了大部分黄道十二宫/行星的信息。另外,Gwierol和perekatip0le提供了矿物图表。