换一换
换一换 


破碎领主经济胜利指南:涵盖核心概念与达成方法。尘归尘,土归土。 简介
无视食物,将尘埃转化为更多尘埃,直到它变成一个势不可挡的尘埃球,这种感觉令人满足。正因如此,我一直对破碎领主情有独钟。 我将本指南分为若干主题,随后针对游戏的不同阶段提供更具体的游戏计划。 免责声明 本指南并非针对高水平多人游戏。其中一些概念适用于多人游戏,但策略未必适用。我的经验主要来自与无尽AI对战、数据计算以及从其他玩家(包括一些优秀的在线玩家)那里学到的知识。 本指南也并非基于ELCP社区平衡补丁编写。不过,指南中的大部分内容仍应适用。破碎领主获得增强,但经济胜利更难达成(这使得第六时代的研究更具相关性)。不过,经济胜利仍然是可以实现的。欢迎提出修正、不同意见和其他任何形式的反馈。1.01 尘埃与工业及收购效率


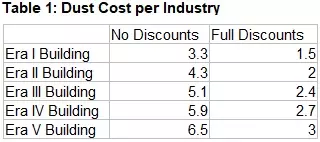
工业即尘埃。 好吧……严格来说并非如此。但这样理解或许会有所帮助:尘埃能做到工业所能做到的一切,而工业只能做到尘埃能做到的部分事情。工业可以被视为一种购买力更强,但更受限制且灵活性更低的尘埃类型。 工业的优势 购买力。单位和建筑的买断成本远高于其工业成本(尤其是在你获得二级经济帝国计划以及“囚犯、奴隶与志愿者”之前,即便在此之后也是如此)。这就是为什么在游戏初期你应该更关注工业而非尘埃。尘埃的优势 可用于人口、英雄、战略及奢侈资源、储备物资、军事与英雄维护费用、尘埃治疗、舰船改装、雇佣兵等方面。 特定城市生产的尘埃可在任意地点使用。 易于储存积累。 产量更为丰富(每回合可通过工作获取更多,进入第三时代后,尘埃改良设施的产出超过工业改良设施,且尘埃改良设施之间能相互协同增效等)。 买断成本的计算方式 很遗憾,我无法给出买断成本计算的确切答案。维基上提到其计算公式为(工业成本)^1.2,或在涉及折扣时为(降低的买断成本减免)×(建筑成本 - 建筑成本减免)^1.2,但据我观察,这与游戏中的实际数值并不相符。我能说的是:物品的工业值成本越高,其买断成本中单位工业值对应的尘埃值就越高。这意味着工业值与尘埃值之间的购买力差距会随着工业值成本的增加而扩大。参见表1(注:“时代I建筑”指的是时代I建筑的典型成本,以此类推,部分物品如采集器、独特建筑和传奇建筑的成本会有所不同)。
收购价格低廉或部分完工的建筑比收购昂贵建筑更具成本效益。这并不意味着你不应该收购昂贵建筑——很多时候,你会希望尽快完成它们。但这一点值得牢记。 引导你的工业 无论你的城市是否有工人,它们都会持续产生工业值,而这些工业值需要有去处。如果你在游戏中主要依靠收购建筑,那么工业值将流向队列中收购项目之前的任何内容。在这个阶段,我喜欢将工业值引导到单位上,因为单位的收购折扣比建筑更低。 1.02 选择尘埃还是工业值?
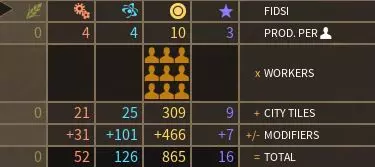
(Note this is only discussing the workers who are not on Influence or Science. This is not meant to imply Dust and Industry are the only things you should be working.) Turn 1 up to Empire Plan 2 You generally want to be working Industry over Dust in the early game, unless you need the Dust for something specific. You shouldn't be buying anything out if you can help it at this phase of the game. Empire Plan 2 up to Dust Refineries It makes more sense to put workers on Dust at this stage of the game than it does at the beginning, because (assuming you've got the Econ Tier 2 and Science Tier 2 Empire Plans and Prisoners, Slaves & Volunteers) buying out buildings is suddenly much more cost efficient. But that doesn't mean it's always optimal. You should lean toward putting workers on Industry when a City is producing something that is high priority, especially it's a unit, Era II building, Legendary building or Altar. You should lean toward putting workers on Dust when you don't have high priority production or you want to save up for higher cost buyouts (Museum of Auriga, Dust Transmuter, Dust Refineries). Try to use buyouts on cheap, important buildings or partially finished, important buildings. Or just save your Dust for Era III. Museum of Auriga If Museum of Auriga is still available , put all workers on Industry on the City building it and all workers on Dust on every other City. Then buy it out as soon as you can. Once you start getting close to Era III, start moving more workers to Dust and begin saving up for Dust Refineries. Dust Refineries and Depositories Dust Refineries make working Dust more efficient, because they give a 30% City Dust bonus. Putting a worker on Dust doesn't just add the Dust per worker value to your income, it also increases the Dust bonus. Note this also applies to the Museum of Auriga bonus. Dust Depositories make working Dust more efficient for obvious reasons. Once you have Dust Refinery and Dust Depository on a City lean toward working Dust unless you have a good reason not to. You don't need to get Dust Depository on every City (you'll probably want to spec one for Influence and one for Industry with Canal Locks). However, there still may be times where you'll want to work Industry on a Dust-focused City: see below. How to Evaluate Relative Buying Power Case 1: Let's say you're working on producing a high priority building. You can't afford to buy it out this turn, but you intend to buy it out once you can. Should your workers on this city be on Industry or Dust? First divide the buyout cost of the building by the Industry cost. Let's call this value X, and let's say X = 2.5. This means that each Industry is costing you 2.5 Dust. Now check how much Dust per turn your workers give per turn vs how much Industry they give per turn. You can't check this merely by looking at the "Prod Per Pop" value because that doesn't factor in percentage bonuses. Check by seeing how much your City's "= Total" value increases when adding a worker to Dust or Industry. Divide the worker Dust increase by the worker Industry increase. Let's call this value Y and let's say Y = 2. This means you get 2x more Dust from putting a worker on Dust than the Industry you'd get from putting that worker on Industry. if X is bigger than Y, put the workers on Industry. Here X = 2.5 > Y = 2, so you'd put your workers on Industry. If Y is bigger than X, put the workers on Dust. This rule assumes that the building is high priority and it does not take into account needs for Dust you might have outside of this City. Case 2: Let's say you've just unlocked Benevolent Emperor and you want to get it on several of your Cities as quickly as possible, but you don't have enough Dust to buy any of them out. It may be the case that you evaluated each City's production independently, and on each you'd conclude that you should put the workers on Industry. However, that is not necessarily the case with multiple cities involved. Instead you may want to focus on getting one Benevolent Emperor up followed by the next, and so on. Do do this, you would: 1. Put it at the top of your production queue on all cities. 2. On your highest Dust City (because Benevolent Emperor gives a percentage bonus), put your workers on Industry. On the other Cities, work Dust. 3. Buyout your highest priority Benevolent Emperor as soon as you can, then switch workers back to Dust on that City and switch workers to Industry on your second highest priority City's BE until you can buy that one out. And so on. The advantage of this is you get some improvements up very quickly and can benefit from them right away. 1.03 InDUSTry and Units
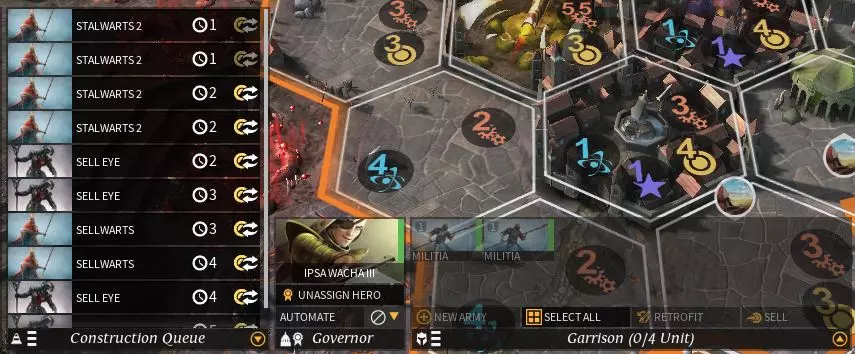
出售单位 建造单位用于出售可以成为【尘埃】的良好来源。制作待售单位时,为其配备全套装备会更高效,且应使用【铁3级】装备(或当前可用的最高等级铁制装备)。记得加上移动配件,这样它们在被出售前可以用于采集珍珠、探索神庙或进行侦查。需要注意的是,出售价格可能会波动,而且出售单位可能会降低未来的售价。因此,最好混合出售不同类型的单位。 在生产用于出售的单位时,城市应该专注于【尘埃】还是【工业】产出?一般来说,如果城市是【工业】特化的(例如拥有【运河水闸】、【工业英雄】),那么应该专注于【工业】产出;否则,应专注于【尘埃】产出。若想确认,可令X=(单位售价)/(单位工业成本),Y=(工人在尘埃上的尘埃产出增幅)/(工人在工业上的工业产出增幅)。若X>Y,将工人分配至工业;若Y>X,将工人分配至尘埃。 单位的买断折扣比建筑差,因此除非确实需要,否则尽量不要买断单位。 改造: 如果确实需要立即获得某个单位并打算买断,那么以最低装备配置买断后再进行改造会更便宜。如果通过工业生产单位,那么以全装备配置生产则更为高效。 1.04帝国计划
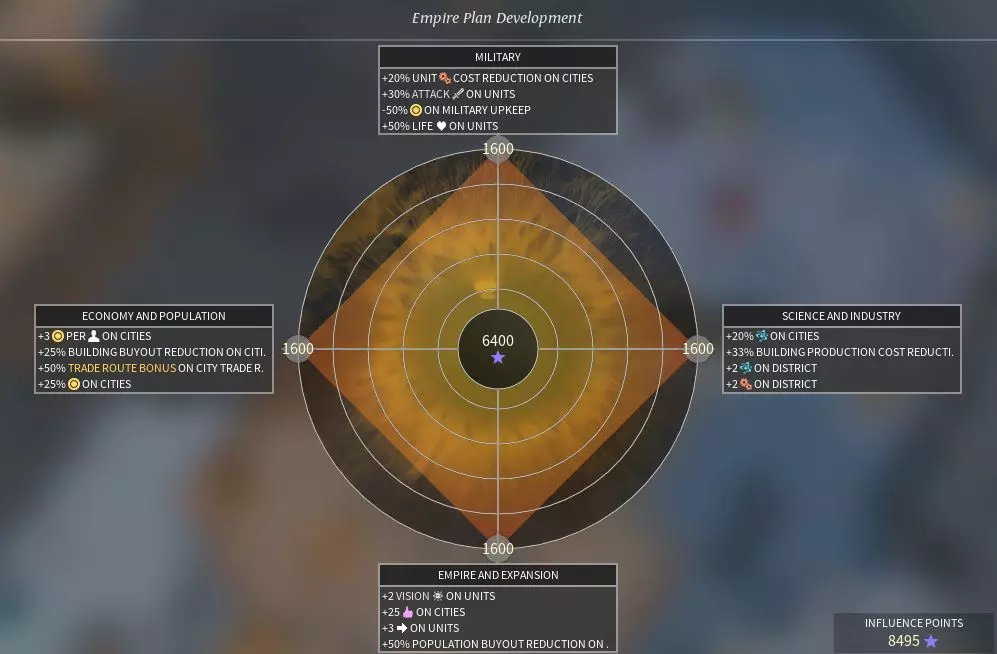
帝国计划至关重要。你应该提前规划好下一个帝国计划。你需要哪些计划,以及获取这些计划需要多少影响力?你可以通过(目标影响力 - 当前影响力)/(距离下一个帝国计划的回合数)并向上取整,来计算每回合需要的影响力。经济与人口 一级 - 从你的第二个帝国计划开始至关重要,第一个计划可以跳过 二级 - 至关重要(目标在第二个或第三个帝国计划及以后拥有) 三级 - 在后期拥有良好贸易路线时表现不错 - 中期并非必需 四级 - 非常好 科技与工业 一级 - 至关重要(第一个帝国计划及以后) 二级 - 至关重要(目标在第二个帝国计划及以后拥有) 三级 - 尚可,但除非确实需要科技,否则不必强求 四级 - 很少值得投入 帝国与扩张 一级 - 良好 二级 - 非常好 三级 - 良好/视情况而定 四级 - 至关重要(一旦能够获取) 军事 一级 - 良好 二级 - 良好/视情况而定 三级 - 尚可 四级 - 非常好/视情况而定 一旦你建立了尘埃精炼厂和尘埃转化器建议专注于一个城市来提升影响力。1.05 城市尘埃与工业改进
奥里加博物馆(传奇建筑) 这是非常优秀的建筑。获取后表现出色,在游戏后期每回合能为你带来数千尘埃收益。获得该加成需要帝国满意度达到“愉悦”或更高等级,因此要优先维持高满意度。如果你初始工业值较高,并且能够获取钛和玻璃钢资源,那么可以尝试建造它。如果有机会立即购买完成,务必马上行动。 磨坊铸造厂 早期非常实用,所有城市都值得尽快建造。 帝国铸币厂 除奥里加博物馆外,游戏中尘埃产出效率最高的改良建筑。所有新城市都应立即建造。 工业巨塔(传奇建筑) 该建筑不错,但过早投入过多资源建造可能会拖慢发展进度。如果你拥有战略资源且有合适的机会(例如一个高工业值的城市已完成其高优先级建筑),那么值得去追求。 中央市场 提供少量取决于满意度的尘埃加成,同时提升满意度。我通常会在建造完帝国荣耀和炼金工坊后再考虑建造它。如果你需要它来获得奥里加博物馆的加成,那么就优先建造。 通行权 贸易路线的价值部分由人口决定,并且在游戏后期会显著提高。当你刚获得通行权时,它在尘埃和科技方面的影响并不那么大。然而,道路对机动性非常有帮助,而且随着游戏的进行,尘埃和科技的收益会变得更强。我建议尽早获取它们(在“帝国荣耀”之后,可能还要在“中央市场”之后),但不要仅仅为了尘埃而急于求成。 运河水闸(独特) 非常不错,将其用于你要专门发展工业的城市。 尘埃转化器(独特) 极其重要。尽快获取。(尝试在研究完成前积攒尘埃,以便直接购买解锁)。你只能获得一个,所以务必将其建造在拥有大量尘埃地形且有足够空间扩建行政区的区域。确保在这座城市频繁建造行政区。 尘埃精炼厂 能显著提升尘埃产量。在拥有尘埃转化器后,尽快在尘埃产量最高的城市建造它们。其他所有城市也都要建造,但对于尘埃产量较低的城市不必急于建造。尝试在研究完成前积攒尘埃,然后开始全部购买。 尘埃仓库 尘埃工人越多,这个建筑效果越好。大约12个工人时,它的表现开始超过尘埃精炼厂。不过,尘埃精炼厂在初期要好得多。建议在某个城市拥有约6个尘埃工人后再建造尘埃仓库。 商队驿站 效果随贸易路线数量提升。当人口达到8-10左右时开始全部购买。 仁慈皇帝(通过“光荣之父”功绩获得) 如果可以的话尽量获取。在后期非常有用,中期也不错。优先级低于尘埃精炼厂和尘埃转化器,但高于尘埃仓库。 奥里加之圣物箱(传奇建筑) 成本效益很低,加成也不太好。只有在你正全力冲刺胜利且已在各处部署了城镇传令官时,才建议获取它。 城镇传令官:能大幅增加粉尘产量。和粉尘精炼厂一样,你需要尽快建造它们。 海关部(独特建筑):造价高昂,但一旦你拥有较高的人口和足够多的城市来利用额外的贸易路线,它就能发挥强大作用。尤其适合搭配流浪 clans 总督和草丝。 科学特使:假设你能使用额外的贸易路线,它在游戏后期能带来不错的粉尘增长。在建造完城镇传令官后再考虑获取它。 粉尘活化器:性价比不高。虽然你在富含粉尘的地形上扩建城市时,它的效果会提升,但即使有很多行政区,它的表现也不算出色。你应该在你的【尘埃转化器城市】上建造它,该城市应拥有最多的【行政区】,但无需急于在其他地方建造。 帝国新闻网 虽然成本效益不高,但一旦你拥有非常高的人口(25+),在大多数城市中它比【尘埃再生器】更好。 1.06城市影响力改进

下水道系统 +1影响力在游戏初期比听起来更有用。它能让你初始拥有的影响力翻倍。再结合民众支持度,这是一个相当不错的提升。 帝国荣耀 在解锁它的游戏阶段非常必要。一旦研究完成,尽快让你所有的城市都获得它。 国家博物馆 非常优秀。让一个专注于影响力的城市拥有它就足够了。只有帝国光环能提供比它更多的影响力,但它在游戏中出现得早得多。一旦你建造了尘埃精炼厂和尘埃转化器,它就是优先事项。 国家竞技场 国家博物馆要好得多,但它仍然值得在你的影响力城市建造。 奥里格长老 战略资源成本高得离谱,所以我建议跳过它。帝国光环 提供大量影响力,是所有改良设施中最多的,但要到第五时代才能解锁。届时评估你的影响力情况,以及是否能在下一个帝国计划前获胜,如果需要就建造它。 冠军竞技场 是性价比最低的影响力改良设施,但仍能提供不少影响力。你可能不太需要它,但还是要根据自身影响力情况来决定是否建造。 1.07 研究 以下是我认为相关的科技,包括最重要的那些,但这并不意味着我没提到的科技就不好。这只是一个大致指南——你具体游戏中的情况需求应该决定你的研究优先级。 时代一

通常,我会先从语言广场开始,然后是磨坊铸造厂,或者反过来。如果初始科研值很低,就把人口分配到科研上,速出公共图书馆。你应该优先发展工业,但也要兼顾科研,这需要通过游戏实践来找到感觉。 一个选择是在语言广场之后,或者如果初始科研值不错的话在磨坊铸造厂之后,获取搜索队。搜索队能将探索遗迹时一无所获的概率从20%降低到10%,这一点很重要。 我通常要等到研发出一些第二时代科技后才会选择雇佣兵市场,但如果需要出售单位的话,可以早点获取。语言广场 - 重要/优先建造 磨坊铸造厂 - 重要/优先建造 下水道系统 - 重要/尽早建造 公共图书馆 - 重要/尽早建造 水力学 - 通常重要/无需优先 露天矿场 - 重要/必要时优先建造 炼金炉 - 重要/任务需要时优先建造 地形学 - 重要/尽早建造 雇佣兵市场 - 重要/视情况而定(如需出售单位则尽快建造,否则可延后) 搜索队 - 良好/视情况而定 军事学 - 良好/视情况而定 时代二

我通常会先获取帝国铸币、PSV、帝国荣耀、中央市场和通行权,然后再完成派系任务要求的12项时代一科技。帝国铸币——重要/如需财富收集者、绥靖任务或奥里加囚犯、奴隶与志愿者博物馆则优先(重要/视情况而定,若计划很快使用买断功能则优先) 帝国荣耀——重要/优先(我喜欢尽快提升这些以助力帝国计划3) 水文学——重要/尽早获取(用于将城市专注于工业发展) 中央市场——重要/尽早获取(若需要“光荣之父”的100%支持度版本或奥里加博物馆加成则优先) 通行权——重要/尽早获取 炼金工坊——重要/若需要科技则尽早获取 炼金护甲——良好/无需优先(提供总督附件【每人口+2尘埃】以及护甲和军事附件) 精英晋升——非常良好情境性尘埃主教 - 良好 情境性本土区域 - 良好 情境性(显然取决于可用的同化)炼金合金 - 良好 情境性(如果你有大量1级战略资源和/或即将开战,可能会很有用)时代III

首先优先研发尘埃炼金术以尽快解锁尘埃转化器,然后再建造尘埃精炼厂。不过也有例外情况(例如你即将进入战争状态,并且拥有一些帕拉迪安合金或阿达曼汀合金,这种情况下你可能需要立即研发稀有合金)。尘埃精炼厂 - 重要/优先建造 尘埃炼金术 - 重要/优先建造 公共工程 - 重要/优先建造(用于将一座城市专注发展影响力) 面包与马戏 - 重要/尽早获取 熔炼站 - 重要/尽早获取 公路前哨站 - 重要/无需优先 收割站 - 良好/尽早获取(若有优质奢侈品可用) 自治政府 - 尚可/视情况(用于防御) 统计方法 - 可选/若需在下个帝国计划前解锁四级帝国计划则优先 稀有合金 - 良好/视情况(若即将开战则优先) 稀有护甲 - 良好(我喜欢低语手镯饰品带来的英雄经验值加成) 第四时代

这是对你经济影响最小的时代,但它包含一些非常强大的军事和工业科技,以及获取新战略资源和奢侈资源的途径。【钻探者行会】允许你通过采矿权来提高战略资源收入,如果你所在区域有大量战略资源,这会很有用。研究优先级取决于你的需求,但你几乎总是希望尽快启动你的【星铁】和【超铀】提取器。如果你需要为【城镇传令官】节省【玻璃钢】,那么在建造奢侈资源提取器时要小心。 如果你拥有【尘水】,就启动尘水提取器;如果能腾出玻璃钢,就启动【尘兰花】和/或【赤血藤】提取器。不必急于获取【蜜酒】或【精灵之血】。稀有金属铸造厂 - 重要 / 提前获取高级采集器 - 重要 / 情境旅级系统 - 非常好 / 情境(战时优先)信号兵部队 - 非常好 / 情境(战时优先)公民教育 - 良好 / 情境(若需要军事单位,对工业城市有益)钻探者行会 - 良好 / 情境(用于提升战略资源产量并增强工业城市)文化灌输 - 良好 / 情境(若存在拥有2个及以上村庄的第三个友好小型派系,则非常有用)工业加工 - 良好 / 情境(工业城市的生产线和国家工艺厂将取决于你获取奢侈品资源的途径)有组织劳工 - 良好 / 情境无尽机械装置 - 良好 / 情境地球守护者 - 良好 / 情境(如果你的单位)火焰守护者 - 良好/视情况而定(如果你的单位正被反击)时代五

在第五时代,你需要努力达成经济胜利。尽快获取城镇传令官,然后选择现代化管理或开明贸易。如果需要更多影响力,要注意帝国光环比冠军竞技场更好。接下来获取改良型尘埃炼金术,并在你的尘埃转化者城市上建造尘埃活化器。之后是帝国新闻网络,假设你已将人口提升到25以上,在大多数城市中,你会希望优先建造帝国新闻网络而非尘埃活化器。如果你陷入军事困境,可以在获取城镇传令官后根据需求选择一项军事科技。城镇公告员 - 重要/优先获取 现代化管理 - 优秀/尽早获取(贸易/粉尘相关的海关部和影响力相关的帝国光环) 开明贸易 - 优秀/尽早获取 改良粉尘炼金术 - 尚可/尽早获取 帝国新闻网络 - 优秀/尽早获取 粉尘强化建筑 - 尚可/无需优先 时代六

你应该争取在抵达【尘埃驱动酿酒厂】前获胜。但如果做不到,那么这项科技显然是帮助你突破困境的选择。如果你正处于艰难的战争中,无法达成经济胜利,那就获取【伊特鲁血清】。 1.08 英雄 经常查看英雄市场。但要注意,在你的【尘埃精炼厂】和【尘埃转化器】建成之前,不要在英雄身上花费大量尘埃。早期优先招募将军而非总督,因为总督在你的城市拥有更多工人时才会变得更有用。 尘埃专家总督


需要注意的事项: 流浪氏族技能树(后期最佳技能树) 信徒技能树(早中期最佳技能树) 破碎领主技能树(早中期次佳技能树) 尘埃效率(最佳特性——尘埃效率2优于尘埃效率3) 尘埃加成(次佳特性——选择尘埃加成3而非尘埃效率1) 值得注意的英雄: 佩顿·奎因勋爵(尘埃效率3/破碎领主) 乔斯林·戴瓦尔男爵(尘埃效率2/破碎领主) 贾萨·穆达普(尘埃效率3/流浪氏族) 西里·阿拉斯特拉(尘埃效率2/流浪氏族) 昂温·韦布里奇公爵(尘埃加成3/破碎领主) “暗影”约翰·波特(尘埃加成3/破碎领主) 尘埃总督的技能树优先级(视情况而定) 破碎领主 1. 尘埃诡计* 2.冷酷操作员 3. 采矿管理局(除非你已非常接近胜利) 4. 鼓舞人心的领袖 5. 尘埃占卜师* 6. 水生尘埃(如适用) *尘埃诡计需要一段时间才能生效,所以如果你认为现在比以后更需要尘埃,可能需要先升级尘埃占卜师。 流浪部族尘埃总督: 1. 快速商人 2. 安全通行 3. 黑市商人(仅在你能利用它时) 4. 冷酷操作员 5. 鼓舞人心的领袖 6. 旅行推销员(如适用) 信徒尘埃总督 1. 敌人的工具 2. 冷酷操作员 3. 热情的传教士 4.鼓舞人心的领袖 如果上述英雄都无法获取,你可以选择任何信徒、破碎领主或流浪氏族的英雄来利用他们的技能树,或者选择【遗忘者】的萨布尔欺诈者纳波格·杜阿达,他拥有尘埃效率2,但技能树不算出色。 1 影响力专家总督


需要注意的事项: - 教派信徒技能树(最佳技能树) - 龙族技能树(不是很好,但至少能提供一些影响力加成) - 影响力效率(最佳特性,但通常不会与优秀技能树搭配出现) - 影响力提升(次佳特性) 值得注意的英雄: - 天选者奥泽克(首选 - 影响力提升3 / 教派信徒) - 先知安多姆(次选 - 影响力提升2 / 教派信徒) - 任何教派信徒 - 博学者贾亚瓦德纳(影响力提升3 / 龙族) - 1级城市工业总督


这里的思路是将一座城市专门发展工业,并利用它来生产单位。可以与运河水闸搭配使用。 需要关注的内容: - 奴隶制 - 工业效率 - 工业加成 - 信徒技能树 - 食尸者技能树 - 流浪 clans 技能树 - 野行者技能树 值得注意的英雄: - 天选者埃克西德(工业效率2 / 信徒) - 食骨者(奴隶制 / 食尸者) - 长牙(奴隶制 / 食尸者) - 弑后者(奴隶制 / 食尸者) - 远击者(工业加成2 / 食尸者) - 伊斯帕·瓦查(工业效率2 / 野行者) - 瓦伊拉·西戈(工业加成3 / 野行者) - 阿霍特·扎尔塔纳(工业加成3 / 野行者) - 特化息肉2D(工业效率2 / 迈卡拉) 1名科学专家总督(可选)


关于以科技为核心规划城市(结合矿物学中心,必要时可加上高级炼金实验室)。思路如下: A. 在制定下一个帝国计划前进入第四时代,以解锁探索第四级帝国计划(确保拥有足够的影响力)。如果前期游戏进展顺利,可能在第五个帝国计划时就能实现。不过,此过程可能不需要英雄,因此若没必要,请勿浪费资金。 B. 快速进入第五时代以获取城镇传令官。 要使此规划有价值,你需要大量的玻璃钢和相当数量的星银。需要注意的事项: - 技能树: 【教派信徒】技能树(最佳技能树) 【狂热法师】技能树(次佳技能树) 【 Vault 族】技能树 【 Kapaku 族】技能树 - 特性: 【科学效率】(最佳特性) 【科学加成】(次佳特性) - 值得注意的英雄: 指挥官 Irjsko(科学效率 3 / Vault 族) Petrov Judit(科学效率 2 / Vault 族) Argbadh Bose Falhala(科学加成 3 / 狂热法师) Pecs Kerre(科学加成 3 / Vault 族) 首席工兵 Liszt Ajandek(科学加成 3 / Vault 族) 高阶审判官 Asalah Arca(科学加成 2 / 狂热法师) 任意教派信徒英雄 军事英雄


寻找优秀的全军加成。尤其是生命值强化3、伤害强化3、攻击强化3和防御强化3。我个人偏爱里奥弗里克·白教堂公爵三世以及其他破碎领主将领,因为我喜欢我的英雄能和军队一起进行尘埃治疗。我也偏爱档案管理员纳尚帕塞萨、档案管理员穆康贡以及其他龙裔将领。知名英雄: 利奥弗里克·白教堂公爵(军队防御加成3 / 步兵 / 破碎领主) 档案管理员纳尚帕塞萨(军队生命加成3 / 支援 / 卓耿) 埃法洛·泰格雷特(军队伤害加成3 / 步兵 / 遗忘者) 高阶守护者托特·伊斯特万卡(军队防御加成3 / 远程 / Vaults) 里尔·卡塔(军队攻击加成3 / 远程 / Vaults) 阿吉·金扎克(军队攻击加成3 / 远程 / Vaults) 英雄装备 对于尘埃总督,获取玻璃钢典籍,以及颤栗头环(若为破碎领主)或低语手镯(若可获取)。 科技总督使用钛金典籍,影响力总督若有条件则使用超氢典籍。 军事英雄应选择全军加成,例如军队伤害加成和军队生命加成。09 传奇伟业 我不会逐一介绍每个伟业,但以下是一些值得留意的: 财富收割者
如果奖励是染料或葡萄酒,你应该高度重视获取它们。你可以优先发展【帝国铸币】来尝试率先获得这些奖励。市场上的资源并不总是充足的,但值得一试。 文明建设者
奥里加博物馆非常值得一去,但如果别人抢先一步,一开始可能很难获得。如果你有钛和玻璃钢,就开始向它投入工业值,并在有机会时寻求买断(如果触发买断折扣,价格会便宜很多)。 工业男爵

如果能在不牺牲太多资源的情况下获得它,那就去争取吧。不过,我不建议花费大量【尘晶】去优先获取它。尽量在【工业】属性的城市上,通过【工业】功能来建造它。 光荣之父

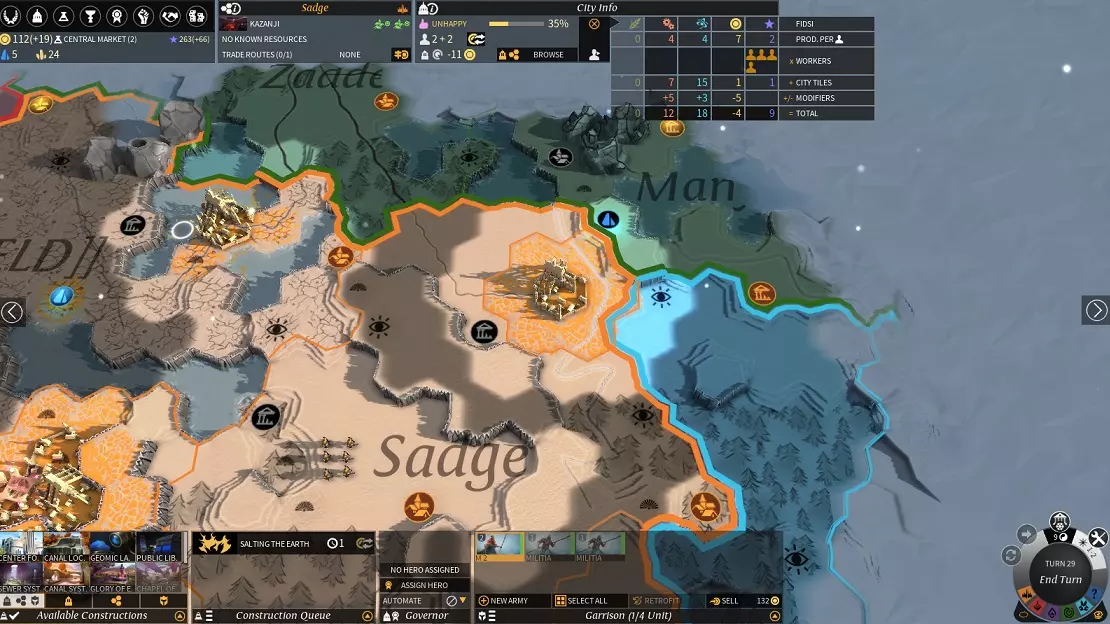
此成就价值极高。【仁慈的皇帝】将为你所有城市提供显著的尘埃加成。 若要求为100%支持率,需注意当任意主要势力进入第四时代时,你即可解锁此成就。如果你面对的是无尽难度的AI,在快速游戏速度下,这通常会在30-35回合左右发生,因此尽量在29回合前后达到并维持100%支持率。 若要求为每种战略资源各50个,尝试储备一些战略资源和尘埃,并在可能的情况下,通过市场来获取此成就。 1.10 战略资源


所有战略资源都十分珍贵。不过,其中一些资源(尤其是【玻璃钢】和【秘银】)比其他资源更为重要。 你需要大量的【玻璃钢】。大多数主要的【尘埃】改良设施都需要消耗【玻璃钢】:【尘埃精炼厂】需要10个,【尘埃仓库】需要5个,【城镇公告员】需要25个,【尘埃活化器】需要30个。此外,还有【玻璃钢卷轴】以及高级【奢侈品资源】提取器也需要【玻璃钢】。如果市场上有充足的【玻璃钢】供应,那你就无需担心。如果供应不足,你就得注意避免浪费【玻璃钢】:不要制造不需要的【玻璃钢】装备,不要把【玻璃钢】用在普通【奢侈品资源】的提取器上,诸如此类。你可以通过扩张到含有琉璃钢的区域、在第四时代研究“钻探者行会”并获得采矿权,以及利用特定英雄和次要派系的加成来提高琉璃钢的收入。 你不需要那么多钛,但为了建造炼金工坊,你需要比琉璃钢更早地获取钛。 秘银很重要,因为它是建造城镇传令官所必需的。 如果你有很多未使用的战略资源,想办法利用它们。考虑研究一项能利用这些资源的武器科技。未使用的资源对你没有任何好处。可以考虑将它们用于装备、守护者或传奇建筑。 1.11 奢侈资源 请记住,即使是较差的奢侈资源,如果能提高城市的满意度,也是值得使用的。 第一时代

染料 非常好用,尤其在游戏早中期——你在整个游戏过程中都需要大量影响力。 葡萄酒 如果你需要提升满意度,它很有用。 黄金 效果一般,但如果你有的话,使用它绝对值得。 绿宝石 视情况而定,但能在你面临压力时争取一点时间。 香料 我曾尝试以开放的心态品尝它们。我甚至让最优秀的博斯厨师来烹饪。它们就是不好吃。还是坚持吃尘埃吧。 时代三

泰坦之骨:在游戏初期是最佳奢侈品,但后期依然表现出色。需要注意的是,这会使工人在工业生产上的效率更高。 月叶:非常优秀。 草丝:在游戏后期,当贸易路线能产生大量尘埃时效果极佳,但在早中期表现一般。 血晶:对战斗有帮助。 水银:在生产大量单位时效果良好。注意其经验值加成还会影响售价。 第四纪元
尘埃之水 非常优秀,尤其在游戏中后期。是提升尘埃产量的最佳奢侈资源(在游戏极后期可能被草丝略微超越) 尘埃兰 非常优秀,尤其在游戏早中期。 赤桑 如果你拥有多名英雄,它会很有用。 蜜酒 效果平平,不必特意追求。 精灵之血 不要使用它,原因有二:(1)它对破碎领主单位没有帮助;(2)为了获取血液而猎杀精灵是不道德的。这听起来可能很虚伪,毕竟我是一个以无辜者灵魂为食的破碎领主玩家,但事实并非如此。破碎领主需要吸食人们的灵魂才能生存,就像狮子需要捕杀斑马一样。你会因为狮子捕食而称其不道德吗?而精灵之血并非生存所必需。抵制精灵之血。 1.12 次要种族


要考虑村庄的数量,而不仅仅是加成。通常情况下,我会选择拥有3个村庄的不错加成,而不是只有1个村庄的更好加成。 探索者:中后期表现非常出色,前期影响力相对较弱。 乌尔塞斯:非常优秀。可能是前期和中期最棒的加成。它能降低建筑的工业成本,同时也会降低买断成本。众所周知,建筑是很有用的。 卡赞吉:非常出色。影响力至关重要,所以卡赞吉也十分重要。 西利克斯:如果你拥有相当数量的资源 deposits,那它就很不错。战略资源总是有用的,而且往往是急需的。 幽魂:不错。科技有助于你获取技术,技术有助于你获得尘埃,尘埃有助于你获得更多尘埃。 多格西:如果你能获取相当数量的优质奢侈资源 deposits,那它就很不错。无眼者:效果不错,但在某些情况下可能显得多余。 艾瑞西斯:在战斗外移动时表现良好,战斗中则不一定能充分利用其加成。 塞拉坦/高兰/盖尔迪鲁斯/赫尔纳斯:这些在战斗时都可能有不错的效果(尤其是塞拉坦),但显然它们比其他加成更具情境性。 妮迪亚:只有当 Initiative( initiative)提升能让你超越对手的 Initiative 时,这种提升才有意义。当 Initiative 的增加确实能带来改变时(例如在某些情况下,这会是最佳的军事加成),提升 Initiative 非常有用;但在其他情况下则毫无帮助。有时当你只是龟缩在你的 Dust Bishops( dust bishops)周围并保持阵地时,Initiative 就不是很有用了。玛格泰:不算太糟,但考虑到我们最大的弱点之一就是突如其来的入侵,情况本可能更糟。 慈悲姐妹会:加成对破碎领主单位无效。 博斯:他们给你的“食物”甚至都不是用尘埃做的。真恶心。 1.13战斗


组建纯坚毅者部队,或坚毅者与尘埃主教混合部队(坚毅者与尘埃主教的比例为2:1)。 如果使用尘埃主教,需要用坚毅者保护它们,同时保护你的增援点以及所有远程或辅助英雄。若需保持部队阵型,可采用坚守姿态。如果因敌人单位速度过快和/或具备飞行能力而无法保护尘埃主教,那么建造它们可能得不偿失。 另一种选择是,如果你认为可行(每支军队不超过几支骑兵),可以派遣莱德骑兵或次要派系骑兵单位去封锁敌人的增援点。注意敌人的 initiative 数值,因为如果敌人的 initiative 高于你,此方法将无效。你可能会考虑建造的一些不错的次要派系单位包括:硅族的和谐者(造价高昂但实力强大的步兵单位, initiative 为 0)、多格西族的布尔德基(造价低廉且 initiative 极高的骑兵)以及幽魂族的终结者(飞行单位)。 使用你的坚毅者单位时,除非面对远程单位,否则应装备双手剑;若面对远程单位,则使用剑和盾。 记住,如果你没有发起攻击,战斗结束后可以通过尘埃治疗立即治疗破碎领主的单位。这在围攻敌方城市时尤其有效。 在你担心可能会受到攻击的城市中驻守一些较弱的单位。 考虑招募一些守护者,例如斯科罗斯、福蒂奥斯和/或吉奥斯,将他们用作援军。 1.14 盐碱化/临时城市
In this strategy I recommend starting with 1 expansion per Empire Plan for the early parts of the game. However, this only applies to permanent Cities. You can get any number of temporary Cities in the meantime by building a City and then using Salting the Earth afterward, assuming you don't hurt your Approval too badly. One Turn Cities Let's say it's turn 15 and you just finished a Settler intended for a to expand in region X on turn 20. Send your Setter toward the desired expansion spot. Now if it's outside of a region you control after using its movement points, you can lay down a City. Use Salting on the earth on the city. Next turn it will be a Settler again. Now you can move it closer to the expansion spot, put down a City again and repeat the process. The advantage is that you will exploit all the FIDS around the City for that turn, in addition to having one pop that can work anything (usually Influence, sometimes Dust or Science). If you have pacified the Minor Faction in this region, you will have even more workers on the City for that turn. Several Turn Cities If you have several turns, you can use a Temporary City to produce a unit, before salting it. Ten Turn Cities You can develop a temporary City and even get it up to 2-3 population if it's going to be around for a full Empire Plan. You can then rebuild after the next Empire Plan starts. Just make sure you aren't investing too much into it- it should be building cheap improvements, and then units. It's generally better to have good Empire Plans and rebuild a couple of these Cities than to leave them up. 2.00 Strategy This section will talk about ways to approach the various stages of the game. Overall Game Plan Summary -Expand steadily, but not too fast (temporary cities are fine). -Develop cities efficiently -Maintain good Empire Plans -Play defensively and conservatively in the early game -Get Dust Refineries and Dust Transmuter, then reevaluate game plan -Snowball to Economic Victory in Era V 2.01 Turn 1 to Empire Plan 1 Your First City For your first city prioritize Industry > Dust > Science. Some balance between the three is ideal. You won't necessarily have access to a high Industry spot for your first city, as your starting regions bias more toward Dust, but you should still be able to get by without it. Default your workers to Industry, moving them to other things as needed. If you have very low starting Science, you can get by by putting workers on Science and getting Public Library up quickly. Pops Buy one pop immediately, and a second one when you can. Pops have diminishing cost effectiveness, so don't go overboard -- once you've gotten a couple, you need to make sure you leave yourself enough Dust for your faction quest, healing, potential minor faction quests, etc). Build pops when you can spare the Dust. Influence / Empire Plan Goals Target Influence: 10-30 Target Empire Plans: Science Tier 1, Exploration Tier 1 (optional), Economy Tier 1 (optional) Research Language Square - I get this first or second and may put workers on Science to get it done more quickly. Mill Foundry - I typically get this first or second. Build it immediately after Founder's Memorial if you get it first. You may need to put a worker or two on research to have this finish in time with Founder's Memorial. After this you won't be quite as rushed with your science, because you'll usually be building Empire Mint, a Settler and a Stalwart. Empire Mint can be delayed if needed. Search Party (Optional) - If you have good starting Science you could consider grabbing this before Sewer System and Public Library Public Library - If you have Science on every tile around your city then get Topography here instead. Sewer System - Approval helps your Industry and the +1 Influence helps more than you might think. Consider getting before Public Library if your starting Science isn't low. Topography (You could get Alchemist's Furnace and/or Open Pit-Mine before this, depending on your needs) Production Founders Memorial Order can very after this. You may want to get a Settler right away so that you can put up a temporary City before expanding. You may want to get Mill Foundry if your Industry is low. Settler - you want to be expanding right after the first empire plan, but also if you get the Settler out early you can Salt in the mean time. Aim to get 2-3 Settlers before your first expansion for the purpose of Temporary Cities and future expansions. But generally only get one before Mill Foundry (or get Mill Foundry before all of them if you research it first). Mill Foundry - Important for getting the rest of the production out. Empire Mint - Can make before or after Stalwart, or even before Mill Foundry if you have very high Industry and low Dust. Stalwart - needed for the first Faction Quest. If your first faction quest is delayed (let's say you decide to follow a Lust for Loot quest, for example), or if you don't want to prioritize doing it early (which is fine) you can put this on hold. Public Library and Sewer System (order optional) You may want to get Public Library earlier than this if your starting Science is very low. You can get it after Sewer System if your starting Science is quite high. (Note I'm not suggesting you should expect to finish all of these by the first Empire Plan. Just carry the building order over to the next phase.) Expansion 1 Look for Industry > Dust > Science again. Other considerations: Glassteel, Titanium (especially if you don't have Titanium in your starting region), Approval from anomalies, good Minor Factions, Dye. Troops Split up your troops and begin looking for good areas to expand / parleying / searching ruins. Pacify Minor Factions with quests when you can (but not with bribes at this point), especially if they're in regions you occupy or intend to expand into soon. Once you've scoped out some nearby regions, send your troops toward the location for your first Faction Quest, along with the additional Stalwart you've produced. Keep in mind you can explore far and wide with your Hero (prior to roaming armies), because you can teleport your Hero to your other units when needed by unassigning and reassigning him. Once you've completed the Faction Quest, assign your Hero to your city (unless you have Minor Faction Quest/s that require a hero). Try to position your Settler so that you'll be ready to expand on the turn that begins your first Empire Plan. 2.02 Empire Plan 1 to Empire Plan 2 Influence / Empire Plan Goals A. Target Influence: 120-160 Target Plans: Econ Level 2, Science Level 2, Military 1 (optional) Or B. Target Influence: 80-100 Target Plans: Econ Level 1, Science Level 2, Military 1 (optional) Take A if you'll want to do a fair amount of buying out buildings. This may be necessary the Industry on your first two cities are low. You'll need to put a lot of workers on Influence for this, so plan ahead. Try to sync up the plan with Prisoners, Slaves and Volunteers. Take B if you want to rely more on Industry and save up your Dust for Dust Refineries. Research (order may vary depending on your needs) Alchemist's Furnace Open Pit-Mine Mercenary Market (allows you to sell units) Imperial Coinage Prisoners, Slaves & Volunteers Glory of Empire Production Get your Public Library, Sewer System and Extractors up. Get a Settler timed for expanding at the start of the next EP. Put spare production into more Stallwarts. Troops Work on pacifying Minor Faction villages in the regions you occupy. Retrofit as needed. Continue exploring and searching ruins. 2.03 - Empire Plan 2 to Empire Plan 3 Influence Target Influence: 180+ Target Plans: Econ Level 2, Science Level 2, Military 1 (optional), Exploration 2 (optional) Research (Judge research priorities depending on your needs): Glory of Empire Hydrology Central Market Imperial Highways Finish 12 Era I Techs for Faction Quest Alchemy Workshop Optional: (Meritocratic Promotion, Alchemical Armor, Alchemical Alloys, Native District, or Dust Bishop) Dust Alchemy (Era III) Dust Refinery (Era III) Production Keep in mind your buyout discount doesn't start till turn 21. Empire Plans don't kick in on the same turn that you select them. See the "InDUSTry vs Dust" section earlier in the guide for advice on when to put workers on Dust vs Industry at this stage in the game. Museum of Auriga - Prioritize getting this very highly Glory of Empire - try to get this on all your cities quickly to situate yourself for Empire Plan 3. Settler - timed for expanding at the start of the next Empire Plan. Alchemy Workshops Central Markets Put any otherwise idle Industry into units. Stalwarts and possibly Dust Bishops - Get around 2:1 Stalwarts to Dust Bishops. Units to sell - These should have the highest possible tier Iron equipment. Mix these up between your Broken Lords units and available Minor Faction units, because selling too many of the same unit lowers the price. 2.04 Era III - Transition to Mid Game Get a Dust Transmuter in a region with good terrain (lots of Dust terrain and room for Boroughs) Get Dust Refineries on all your cities. Pick one of your lower Dust regions to specialize in Influence. Get National Museum and National Arena there (National Museum is much better, so get that first). Look for good Governor and Military Heroes 2.05 Mid Game Once you've got your Dust Refineries and Dust Transmuter going you have a number of options. General Priorities: Get Expansions (start expanding more rapidly now unless it will prevent you from getting a Tier 4 Empire Plan) If possible try to set yourself up for the Exploration Tier 4 Empire Plan, while maintaining Economy Tier 2, Science Tier 2 and maybe Military Tier 1 Get Heroes, both Governors and Generals Specialize a City on Influence (National Museum, National Arena, Influence Hero) Specialize a City on Industry (Canal Locks, Industry Governor) unless you think you can get away with low Military production. Get defensive buildings, Watchtowers and Units Get Dust Depositories at around 5 workers on Dust. Raise populations to 6 Get Benevolent Emperors if you have them Get Trade Routes Get Boroughs Raise populations to 8-10 Get Caravanserai Going for a Tier 4 Empire Plan by Empire Plan 5 If you get all your Dust Refineries up by around turn the start of Empire Plan 4, this can be doable. You'll need both lots of Influence and lots of Science (the Influence is generally the more difficult part). 1. Expand once (at the beginning of Empire Plan 4). 2. Get National Museum and National Arena and specialize a City for Influence. Get National Museum, National Arena, and if possible get a good Influence Governor. 3. Specialize a City on Science: Get Center for Mineralogy on a City in one of your lower Dust / higher Science regions, then switch workers to Science. 4. If needed, get a Science Hero with Titanium Tome and/or Advanced Alchemy lab on your Science City 5. Use Dye and Moonleaf boosters if at all possible (check the market) 6. If needed put workers in other cities on Science and/or Influence. Get National Museum on other Cities if needed. Make sure you have a good shot at actually hitting your targets, before committing to this. Once you hit Era IV and Empire Plan 5: 1. Get the Science Tier 2, Economy Tier 2 and Exploration Tier 4 Empire Plans. 2. Get 2 expansions (if possible) and buyout improvements on your new Cities (Empire Mint > Mill Foundry > Dust Refinery > Sewer System > Strategic Resource Extractors and good Luxury Resource Extractors > Benevolent Emperor, etc). 3. Make a decision on either keeping your Science City on Science and shooting for a faster Town Criers, or switching it back to Dust. 4. Build population on all your Cities, get Dust Depositories at around 5 workers, and Benevolent Emperor (if you have it) around 6 pop, Caravanserai around 8-10 pop, and Negotiation Tactics (if you have it). 5. Don't spend too much Dust on Boroughs. Instead, direct Industry toward them and maybe just buyout the ones on your Dust Transmuter City. 6. Continue raising your populations. Take advantage of the discount. They scale your Glassteel Tomes, they scale your Dust Depositories, they scale your Trade Routes and they scale all of your percentage Dust bonuses. You want as many as you can get, provided the Dust isn't needed elsewhere. At this point you can either continue with the Science City and shoot for Era V or switch it back to Dust (switch back to Dust if Glassteel and/or Mithrite are scarse). Invasion Look to invade if: You are getting squeezed out of areas to expand You have a neighbor you believe is vulnerable Someone is performing very well and you're worried about them hitting their victory condition first Spec a city on Industry with Canal Locks and an Industry Governor if you haven't already. Aim for fewer elite units rather than many mediocre units- get a strategic resource weapon tech if you can use it. Get some Generals. Research Meritocratic Promotion. Get a ratio of around 2:1 Stalwarts (1h sword if up against ranged units, otherwise 2h sword) to Dust Bishops. If your units don't match up well against the enemy, try to get Guardians once you can. Try to activate some combat-relevant boosters right before the fighting begins. If you can't overpower them, you need to use guerilla tactics (it helps a lot to have the Exploration Tier 3 Empire Plan). Capture poorly defended Cities before they can react. If you can go toe-to-toe with their military, one tactic is to siege a City and then use Dust Healing to instantly heal your army after each time they attack you. If you have Guardians, position them as reinforcements to your main armies. 2.06 Era V / Late Game This is where you dustball to victory. You should have your Tier 4 Economy and Tier 4 Expansion Empire Plans (the latter being the more important of the two) going as soon as you can if you don't already. Or tier 4 Military if you need it. Priorities: Town Criers Aura of Empire (unless you have more than enough Influence already or think you can win by the next Empire Plan) Customs Ministry Scientific Envoy Imperial News Network Reliquary of Auriga (if available) Dust Revitalizer Continue growing your populations and try to build a Borough per turn on most of your cities when you can spare the Dust. If you have a city specialized on Science, put your workers back on Dust. If you think you can win before the next Empire Plan then ignore Aura of Empire and put all your workers on Dust. If not, calculate how much Influence you need per turn and put any excess Influence workers on Dust. As soon as you get your Town Criers (and possibly Aura of Empire) up, try to take as many expansions as possible as quickly as possible (unless it'll bump you off your Tier 4 Empire plans within 5 or less turns). If there aren't many expansions available, look into capturing Cities (if viable). Spend all of your Dust each turn. Buy Dust Water, Grassilk, Dust Orchid, Red Sang, and any other Luxury Resource that will help. Keep the boosts going as much as you can. You should be able to win before getting to Dust-Driven Distillery, but if you don't think you'll be able to then get it as quickly as possible. 3.00 Outro Thank you for reading! A Word of Caution on Guides Do not take anything in this guide (or any guide) as gospel. Think things out for and test things for yourself. Guides can be great as a helpful starting point, but when you unthinkingly follow their advice for too long, you stunt yourself and also (IMO) make the game less fun. A good mindset to have when reading advice in guides is to ask yourself "Is that really true?" / "Does that really make sense?" / "What about this alternative they didn't mention?" Do give the advice a chance and try it, but then question it. Look for a better way. If you approach a guideline skeptically and then find you wind up agreeing with it, then you will wind up with a much better understanding of why it's good, which will make you a better player. If you conclude it's wrong, then maybe you've avoided a pitfall and also wind up better for it. Want to go Deeper? If you want more strategy content, I highly recommend Jojo_FR's guide: https://steamcommunity.com/sharedfiles/filedetails/?id=635764665&searchtext=jojo It's a general guide geared toward Multiplayer, and it's packed with a lot of good information and interesting ideas. (He's also a much better player than me). The Broken Lords section is short, but much of the general information is applicable to Broken Lords. I learned the very useful Temporary Cities strategy from Jojo, for example.