换一换
换一换 


A detailed walkthrough of up until the first boss, along with and FAQ of questions commonly asked on the discord along with some other helpful game mechanics. Introduction This guide is a collection of commonly asked questions from Discord, combined with insights I've gained from playing the demo, betas, and now the early access version of Soulmask. It focuses on the basics and getting started, as my experience only extends to the first boss encounter so far. Soulmask isn't just a survival game; it also incorporates elements of automation and even has some roguelike features. In Soulmask, you may think you're playing as your Initial Character (IC), but you're actually playing as the mask. In the opening cinematic, when you bond with the mask, your consciousness gets uploaded to the mask. From that point onwards, your IC is effectively just a meat puppet for you to control when you aren't controlling your followers. That is why when you control a follower, your IC just sits on the ground and can't be given orders like every other follower; they are effectively braindead until you control them again. The developers have confirmed that the game is balanced around the assumption that you're controlling a follower during combat. You can definitely defeat the first boss using just your IC, but camps, barracks, and bosses in the other regions are going to be a struggle if you aren't controlling a follower. From the Developers: As a sacrifice who escaped the tribal ritual, the initial character was simply lucky enough to obtain the mask. After uploading their awarenesses, they transcended them original self. The mask bestowed its powers upon the character. This is why the initial character in Soulmask is unimportant, serving more as an "ultimate safeguard" when you're stripped of everything. Initial physical form remains the ideal vessel for fusing with the mask, granting them the ability that they can be revived at any time and instantly be summoned at bonfires and resurrection devices. Your Initial Character has their skills capped at 50, a level 1 outcast follower will have significantly higher skill caps than this, and rarer followers will have even better caps and traits. Until you have defeated the first boss, any followers that die are dead permanently. Hence the roguelike comparison; after the first boss, there is a way to get them back, though. At which point the game becomes more similar to a soulslike where if they die they simply lose XP and progression back until the last point you "uploaded" their body. The automation comes from the AI commands you can give your followers. You can assign any follower to harvest, mine, chop wood, farm, make items, etc., with some pretty advanced configurations if you delve into it. This is similar to some dedicated automation games, and I go into more detail further down the guide. FAQ I respawned as a tribe member, how can I play as my IC (Initial Character) again? It is possible, though currently not very obvious. If you go to a campfire or bonfire and select "Remodel Initial Character," your IC will respawn sitting beside that fire. "Remodel" in this context means the mask is literally recreating the body of your IC from thin air using the power of the mask, hence the odd wording. My tribe members say "Too far away" when I ask them to do a task The maximum distance a tribe member can travel for a task is 150 meters. If you need to ferry resources over larger distances, place chests approximately 140 meters apart (leaving some room for error) and set up a follower to carry the items from one chest to another. How do I recruit lots of followers at once? Carrying them back to beds in my base is slow and boring. You don't need to place a follower in a bed to convert them. They can convert just fine on the ground, albeit more slowly (I think). What I normally do when I need more followers is go to a barracks with a stack of 20 broth. Deter as many as you can. Once they are on the ground, open their inventory and force-feed them a single broth, then leave them. Go clear the rest of the base, doing the same for anyone else you deter. By the time you have cleared the whole base, the first person you deterred should be ready, or close to being ready to be recruited (depending on your difficulty). Recruit them, then check their traits. If you like them, then deploy them and get them to follow you back to base using your mount. Set them to passive and follow me, then dash through the jungle on your mount, and they will teleport to follow you when they get too far away. This is much faster than carrying their unconscious body. If you dislike their traits, then just dismiss them on the spot, or even better, kill them for some XP. Do the same for each person you deterred until your tribe is full. How can I move all my tribe members from my old base to my new base? The simplest way is to deploy them and move them one at a time. If you have a mount, set them to passive and follow me, and then just sprint through the jungle. They will teleport every 50 meters or so to your location. Make sure they are passive, otherwise they might fight stuff and die. They might still take some damage in passive, but should normally teleport again before dying (this is difficulty dependent). This is a bit annoying, but it seems to be a deliberate design choice by the developers. If you could make your whole tribe follow you, it would make barracks and other combat situations very easy and give you an almost unlimited carrying weight. Other, more complicated ways of moving them involve using patrol routes or taking advantage of map markers and AI commands to move them larger distances. Be warned that using these methods can be buggy and can easily lead to them being eaten by a jaguar on the way. The easiest option is to just dismiss all of them, except for red quality tribe members or ones whose traits you really like. It's generally faster to recruit new ones than it is to move them all one at a time. Also, don't hire a ton of tribe members if you aren't planning for that spot to be a permanent base. With only 3-4 tribe members, you can get logging, mining, and harvesting automated with your basic workbenches too. You need a really big base with lots of crafting to actually keep 10+ tribe members busy all the time. Check my walkthrough below if you want a more detailed guide on base building. Death & Respawning If you die, you will first enter a near-death state. In this state, your health will rapidly decline, and your enemies can still see and attack you. If you remain inactive for about 5 seconds during this state, you will enter a feign death state. While feigning death, hostile entities will cease their attacks, and you will slowly recover health instead of losing it. However, any movement or use of items while in the feign death state will revert you back to the near-death state, where you will start losing health and become visible to enemies again. The best strategy to survive after entering the near-death state is to apply a single bandage, then stop, take your hands off the keyboard, and hope you aren't killed before entering the feign death state. Once in feign death, wait until your bandage finishes. If enemies are still nearby, wait for them to move far enough away before applying another bandage, as applying a bandage will put you back into near-death state for 5 seconds, making you visible again. Continue applying bandages until you fill up your near-death HP, at which point you will revive with a quarter of your health. If you actually die, you can choose to respawn at any active bonfire or campfire (if it's still alight), the starting spawn points at the far southeast of the map, or at ruins you discover which have eternal campfires. What this means is if your are about to take on a barracks, or a dungeon. Make a campfire or bonfire outside first, it only takes a minute to gather the resources for a campfire and you don't even need any tools, if your worried about rain then it only takes a few more minutes to gather enough resources build a thatch wall and roof to cover it with. This will give you a respawn point for you IC to respawn at if you die, and you can run back in and try to grab your deathbag. Alternatively, you can choose to spawn as a follower. You can even spawn as your companion, I've had a few times where I have died fighting a boss, but my companion has survived and I have quickly respawned as them to then go on and defeat the boss. Death-porting You can also take advantage of respawning to teleport around your bases and campfires before you get access to portal technology (from the third boss). I call this "death-porting." At any time, you can hit escape and click the respawn button, which will kill your currently controlled character and bring up the respawn menu. This obviously isn't great if you're playing as a follower or have tons of loot. But if you're controlling your IC and have dumped all your gear in a chest first, then it's a free teleport to any of your bonfires or other spawn points. Now, obviously, you can't bring anything with you when you death-port, but it's useful to know about and can be handy in certain situations. The map in this game is big, and you're definitely going to end up with multiple bases. By having a set of tools, weapons, and armor in each base, you can death-port between them. This is especially useful if you are moving bases or need to move multiple mounts. You can ride your mount to your new base, dump your gear, death-port to the old base, and repeat. Another use for is if you die while controlling a follower in a dungeon, or barracks. As long as you put a campfire outside the dungeon you can death-port your IC to it, and then run in and try to recover your deathbag and mount, without having to bring a new follower all the way from your base. Getting Awareness XP You earn Awareness XP for any activity your currently controlled character is doing, whether that's your IC or a follower. Simply standing in the base issuing orders or assigning jobs on your desks won't actually earn you any XP, so get involved! At the end of the day, this is a game, so engaging in activities you find most enjoyable is truly the best way to earn XP. However, if you want to know some efficient ways to spend your time, read on. Please note that any numbers I mention here are based on the difficulty level I'm playing at and the settings I've adjusted. These numbers will differ in your game depending on your settings, so use them just for comparison. One of the first things you can do is calculate the XP per second (XP/s) ratio for crafting or performing tasks. It's easy to figure out: if you look at crafting a plank, for example, it takes 1.53 seconds and gives you 12 XP. Divide the XP by the time (12 / 1.53) to get the XP/s of that item, which in this case is 7.84 XP/s, or 470 XP per minute. In my game, killing a level 15ish outcast gives me around 500 XP, so unless you can find an outcast to kill every minute, you're actually better off turning stacks of logs into planks for XP. The XP/s ratio improves with more advanced items. For example, crafting a copper ingot yields 15.8 XP/s and a bronze ingot gives 18.95 XP/s. An effective way to level up is to automate your copper and tin ingot production but craft the bronze bars yourself. In my game, this ends up being 1137 XP per minute, which far surpasses the XP gain from killing barbarians over time. If I'm crafting large quantities of armor or weapons for my followers, I'll have them craft the leather and other components, but I'll do the final assembly of the armor myself to maximize XP gains. Here's a small table I made for some of the common things I craft for XP: Item XP Craft Time Xp per Second Xp per Minute Plank 12 1.53 7.8 470 Hardwood Plank 30 3.05 9.8 590 Splints 80 6.1 13.11 786.88 Tin/Copper Bar 200 12.66 15.80 947.87 Bronze 240 12.66 18.96 1,137.44 Speaking of mining, it's another excellent way to gain XP. I went from level 22 to 23 in Awareness just by mining every copper ore in a single mine. So if you need a few levels for your next research, consider going on a mining expedition. Mines are usually teeming with enemies too, so you'll earn additional XP from defeating them. When engaging in crafting, consider doing it with a character other than your IC. It's also an excellent way to increase their character level, so pick someone you want to develop as a fighter or who you want to act as your bodyguard. Automation The AI for the followers can initially be a bit overwhelming, but here's how I generally set up my base automation. I like to keep my orders simple. In my first small base with only three followers, I assign each a single harvesting job—typically, two of them logging and the third handling both harvesting and mining. Then, I distribute my benches among them. Initially, you might be inclined to give them individual orders, such as "craft 1 handaxe from crafting bench," but that approach can become very messy. Trust me, assigning crafters to a bench is much easier in the long run, especially once you start implementing recurring orders (which we'll cover below). After assigning your bench, go into each tribe member's orders and prioritize the "Maintain Crafting Bench" order above the harvesting order. This setup ensures that if there's anything for them to craft at the benches, they will return from harvesting to complete it, and only harvest during their downtime. So, now that you have some benches with assigned followers, how do you get them to craft stuff? There are two ways: standard orders and recurring orders. We'll cover standard orders first, as these are straightforward. Pick an item you want crafted and press 'D' to schedule it. Once it's scheduled, you can modify the quantity. Your assigned follower will head to the bench to craft it, as long as the required parts can be found in nearby chests. If they can’t find the items, you can hover over the icon in the crafting queue, and it will tell you what's missing. Then head to the crafting bench for the missing resource and repeat the process. You'll quickly find there are some common items you always need, such as planks, handles, ropes, etc. For these, it's best to set up recurring orders. Start with a standard order, then click the cogwheel beside it to change it to a recurring order. Check the "Switch the crafting mode of this queue to circulating craft" box, and it becomes a recurring order. While that’s technically all you need to do, I recommend exploring the other options available.
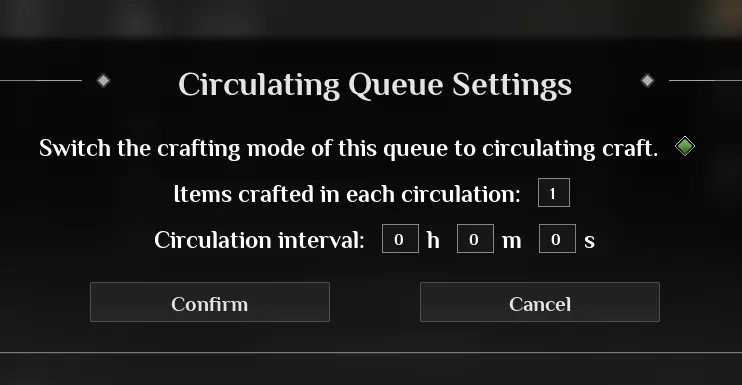
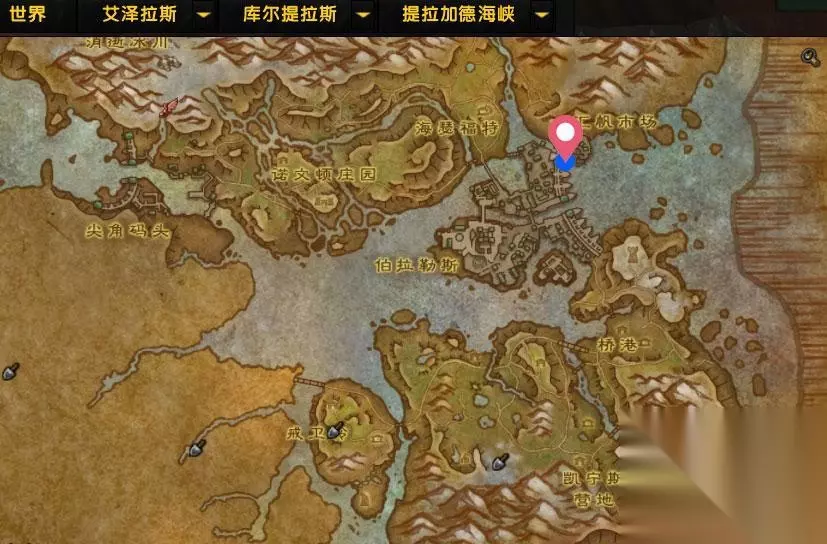
“每次循环制作的物品”含义很明确,但循环间隔的设置则更为复杂。我们以木板为例,如果你设置一个循环订单为制作5块木板,循环间隔1分钟,那么被分配的工匠会先制作5块木板,之后该制作订单会从队列中移除1分钟,让工匠可以去处理下一个物品。如果你将制作间隔设为0,工匠就会持续制作该物品,不会继续处理队列中的下一个订单。因此,我建议循环间隔至少设置为1分钟。 设置多个循环订单时,请注意完成一个订单所需的时间(在齿轮图标旁显示)。例如,如果你设置制作40块木板,耗时1分钟,并将制作间隔设为1分钟,然后可以再设置一个制作40个木柄的订单(同样耗时1分钟),制作间隔也设为1分钟。这样设置能让你的工匠交替制作40块木板和40个木柄,中间不会有空闲时间。 我通常会给专门的工匠留出一些休息时间,让他们能休息、吃饭和喝水,但这取决于你自己的安排。 巧妙利用重复订单,再加上一些追随者进行采集,最终可以实现近乎全时段的自动化生产。到那时,你的工作就是收集那些无法自动采集的材料,比如矿石。一旦你有了兽栏,甚至骨头和毛皮也能实现自动化获取。这种程度的自动化并非必需,但作为一名自动化游戏的忠实爱好者,这正是我如此喜爱《灵魂面具》的原因之一。 攻略 这是一款沙盒游戏,因此没有唯一的最佳玩法,但在本节中,我将介绍我通常如何开始新游戏,直至击败第一个 boss。 首先,我强烈建议跟随游戏内教程,即使你像我一样已经玩过三四遍。完成教程的每个部分都能获得感知 XP。教程还会引导你了解游戏中所有能让你更轻松的内容,比如自动化系统以及关键的 boss 和地下城。 感知 1 - 15 级与你的第一个临时基地 现在你已开始游戏,并在雨林中的某个位置出生。教程会很快引导你开始建造,这意味着你要搭建自己的第一个基地。选择一个好的基地位置能让你后续的游戏体验轻松不少。 这个初始基地通常只是临时的。我会一直用到制作出骨制装备和获得羊驼为止,届时我就有足够的能力在更理想的位置建造一个更永久的基地了。 考虑到这一点,第一个基地的位置其实不是特别重要。不过,靠近某些事物确实能让初期生活更便利。首先,我喜欢把基地建在某个神秘遗迹附近。地图上从一开始就会显示出三处金色遗迹。这些地方是教程会引导你解锁面具上控制节点的位置,同时也是早期获取面具升级材料、宝箱和流亡者掉落物的好来源,而流亡者本身也是你第一批追随者的理想目标。 我希望基地靠近的第二个条件是水源。水源附近通常有黏土,这是你建造一些工作台所需要的材料,如果你想制作更多食物,黏土也能用来制作碗。水源附近还会刷新水豚和火鸡,而且周围通常没有直接的攻击性掠食者,这意味着你的追随者在采集时被袭击的几率更小。 综合考虑以上两点,我建议这个高亮区域是你第一个基地的绝佳位置。
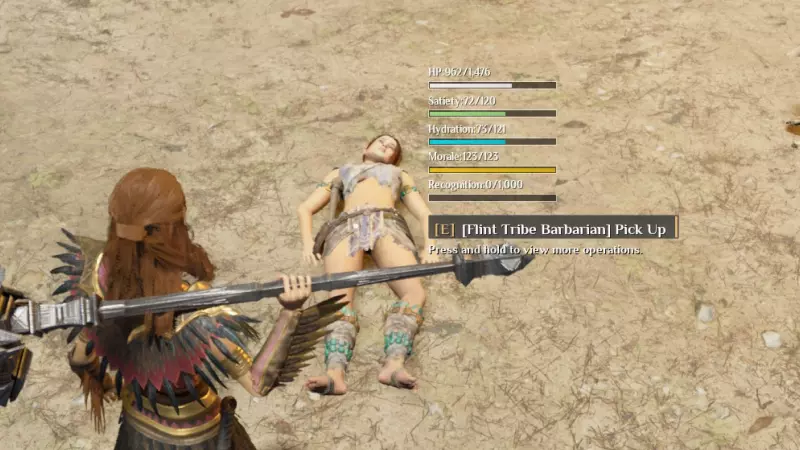
Now that you've picked a base, it's time to get building. As this is a temporary base, I don't focus on it being pretty. I build a platform made up of thatch foundations, about 5 x 5 should be big enough. It doesn't need walls, except on one edge, build a single wall with two roofs above it. Underneath this, put your bonfire; the roof pieces will protect it from the rain. Put your workbenches around the edges and a couple of chests in the middle. Using the chest filtering will make your life a lot easier. Put two chests with a filter for "plants," a single chest with a "semi-finished products" filter, and then 2 to 3 chests with no filters. Your followers generally prefer to put stuff in filtered chests first, so they should naturally start filling up the filtered chests first. Don't do this by yourself, get a few followers ASAP and get them to help you. I find the default tribe limit of three is enough to get a decently automated initial base. I've covered this in other sections already, but for each follower, you want to set them up with two orders. The top order should be a "maintain workbench" order. Below that, put a harvesting order. By doing it in this order, it means they will always prioritize crafting anything you have ordered at one of your benches, and then if they are finished (or can't find the ingredients) then they will use their free time harvesting. Also pick one follower and give them the maintain bonfire order, and put it at the the top, they will then repair anything that gets damaged and top up your bonfire with fuel. I generally set up two of my followers as loggers, and then the third I give both mining and harvesting orders. You will need a lot of logs. In terms of splitting them between crafting benches your carpenter, loom, and building benches will probably be the busiest so it's best to give each of them to a different follower. Then split the rest up amongst them evenly. Setup recurring orders for anything renewable (that your harvesters are gathering), so things like planks, handles, rope, linen etc. Anything that isn't renewable yet (leather, thin rope, clay, etc) instead put in a few bulk orders, but order more than you need so you have leftover for future stuff you want to build. Remember to get involved in the harvesting and crafting as much as possible to get awareness XP. Also, for the tutorial objective that ask you to craft or build something, only things you have crafted yourself count towards ticking them off. An easy way to get some early XP is turning logs into planks at your carpenter bench, and have your followers out chopping wood. If your followers run out of nearby wood, you can make map markers and then assign them to cut wood at those areas. Just scout out the area yourself first to make sure it's not full of bush dogs. Keep following the tutorial and building the benches you unlock with a focus on unlocking everything you need to build bone tools, weapons, and armor. As this is a temporary base, I would suggest avoiding building any farming and animal-related buildings. Animals in particular are only a renewable source of meat, hide, and feces. You should get more than enough meat and hide from killing nearby animals, and feces is only really needed once you start farming. Moving animals is a real pain until you unlock the Llama (which is found in another biome), and even then you can only move one at a time. So don't set up farming until you make a permanent base (which will be soon if you keep following this guide). Awareness 15 - 25 So you have hit awareness 15, this unlock bone gear, and the alpaca saddle. Craft yourself a set of bone gear. Now your geared up its time to get exploring and find a few things that will make your life a lot easier. First things first is to unlock more of the map, the tutorial will prompt you to do this at some point, but go to the two different scouting camps marked on the map. These will have a few barbarians and a barbarian scout. Get their health low but dont kill them. When their health is low enough they will have an option similar to deter that lets you interrogate them. This will reveal the map around them. Their camp will have a chest and might even have an Alpaca. If you find an Alpaca on your travel, you could slowly walk it all the way back to your base, but the easier thing is to just drop it somewhere safe. Give it a stack of thatch, and a waterskin, and then just leave it and continue exploring. Its location will be marked on your map, and it won't be attacked by wild animals or barbarians. It will just just start growing to be an adult. Once its fully grown come back to it and deploy it. This is different to deploying a follower, as you can have one deployed follower and one deployed animal at any one point. You Alpaca will now follow you about and is great as a moving item storage. Once you get a saddle for it you can even ride it. However to craft the saddle you will need cotton. After unlocking both the scout camps you will now have fully revealed the rainforest, which is the first biome and where you will spend your time until defeating the first boss. Revisiting these scout camps after the scout has respawn you will find you can interogate them again. Each time you interogate them, they will reveal one or two locations of interest on your map that you haven't found yet, so its handy to go back to them. Now that your in full exploration mode, your definetly going to run into some of the more dangerous wild animals. The main one that kills most new players is the Jaguar. If you spot a jaguar before they spot you, you can hide from them, however they do have a large sight range so this can be difficult. If you are spotted the most important thing is do not run away from them. They are incredibly fast, and if you turn your back to them they have a special attack that will potentially one hit kill you even in full bone armour. Fighting them isn't actually very hard once you learn how, and is actually very good practice for the first boss. Strafe them, and then when they pounce at your roll to the left or right. Do not roll backwards, their attack will still get you. After rolling dash in and get one or two attack on them. Then back off and repeat until they are dead. There is a second slightly more riskier way to kill them that is much faster, the hitbox for the jaguars attacks comes from the mouth / claws. So rolling fowards into them and getting behind or beside them means they can't actually hit you, and they can't turn very fast. Turn when they turn and stay beside / behind them, using a weapon with a fast attack (basically any weapon other than great sword, or hammer), do a single attack, and then move to stay behind them again. Once you get the hang of this, you can kill them really easily without taking damage, however if you make a mistake or get stuck on some scenery then they might still be able to hit you. Blocking (with or without a shield) will help to reduce the damage. The other things to watch out for are snakes, these are very slow, but if they catch you can potentially stun lock you until you die. So keep an eye out for them and avoid them. Crocodiles can also be a nuisance, but unlike jaguars you can usually run away from these, if you do fight them, watch out for their tail attack, it has a wide hitbox and they will do it if you attack them from behind or their side. It's generally better to stay in front of them, dodge their attacks and then attack them between their animations. You now have a few goals at this point. The tutorial will want to kill the boss of the flint tribe barracks. You will want to find some cotton to make your alpaca saddle. You want to find an Alpaca if you haven't yet, and finally you want to find a spot for your next base. You can actually find cotton and an Alpaca at the flint barracks, so head here once you have the tutorial for it. Outside the southern entrance to the barracks are some fields, there is a chance one of these fields has cotton in it. Either way clear the enemies nearly and harvest the fields, for the food and seeds. They will respawn after a day and have another chance of spawning cotton. You can also find cotton or cotton seeds in the supply chests you will find in the barracks too. The Alpaca pen in the Flint Tribe is just before the boss, so you have to fight through the whole base to get too it. If you don't want to do this, the Claw Tribe barrack has a much easier to reach Alpaca pen at their western entrance. However given that you need to kill the flint tribe boss as a tutorial objective, its probably still better head there anyways. Your First Permanent Base The other thing you need to do is find a new base spot. My second base I make as a more permanent base for completing the first biome and as a staging point for the other biomes, so location is much more important this time and there are a few different things you want to be close to. Each biome has a portal in it that allows you to teleport yourself, your companion, and your mount to any other discovered portal. There is one of these in each biome. Being close to this portal makes traveling around much easier. Once you reach awareness level 20, you can start making bronze. To make bronze, you need both copper and tin ore. So being close enough to mines for each of these is handy. Being close to a source of followers is also good when you want to grow your tribe and recruit the best (red rarity) followers. The two barracks are your best source of followers. Being close to turkeys, capybaras, and monkeys makes farming them easier. Also, being close to jaguar paw prints will make it easier to get a jaguar mount.
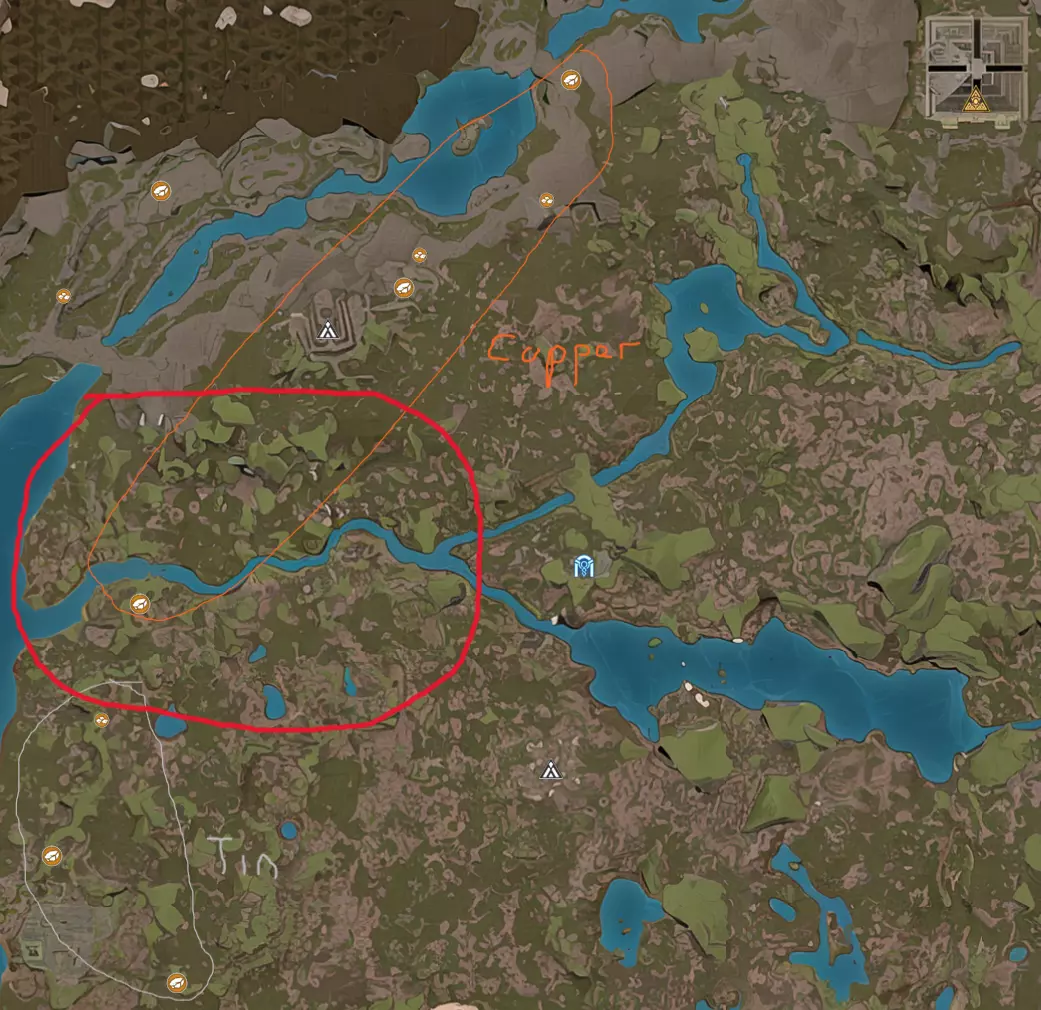
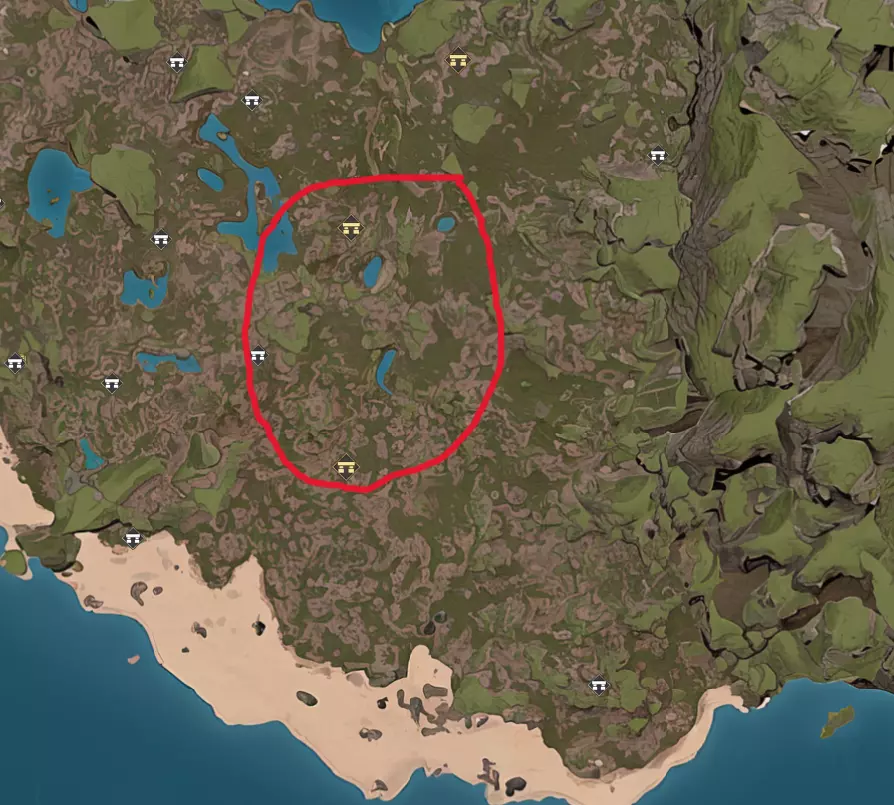
综合考虑以上因素,我建议你将基地建在红色高亮区域。那条河边有很多可供捕捉的动物,还有美洲豹的爪印。作为水源地,这里也有丰富的黏土资源。它到锡矿区域和铜矿区域的距离相等,并且靠近兵营和传送门。此外,它还有一个额外优势,那就是位于雨林的最西北端,这使得它成为距离你接下来要探索的周边生物群系最近的区域,同时也靠近一些重要的地下城。 你可以随时搬到这里,不过有一只羊驼会让搬基地变得容易得多。到了这个阶段,你的感知等级应该已经足够高,可以解锁增加部落容量的面具节点了。解锁后,从兵营招募一些新追随者,将他们带到你选择的地点。放置一个篝火、一些箱子、一个木工台和建筑工台。你的新基地将用木材建造,所以你需要大量木板。让新追随者自动生产木板和绳索,然后批量制作一些木地板、柱子、墙壁、屋顶等。同时,至少每种制作台都批量制作一个。 当你离开期间,只要你设置了一些循环订单,你的旧基地应该已经生产了一些物品,所以回去访问旧基地,从半成品箱子里尽可能多地拿取物资。你应该会有大量木板、绳索和硬木,非常适合建造新基地。还要带上稀有物品,比如优质硬木和种子。不要携带石头或原木等原材料,除非你还有剩余的负重空间。从最初的三个追随者中选择你最喜欢的那个,为他们制作一些骨甲,然后让他们和你的羊驼都装满战利品。 另外两个初始追随者,我通常会直接解雇,除非他们的属性特别好。如果你确实想让他们加入你的新基地,也可以等到拥有美洲虎坐骑后再转移他们。美洲虎速度很快,能让转移追随者变得容易得多。 按照你喜欢的方式搭建新基地,你需要一个大区域来进行制作。至少为每种物品类型准备一个箱子,植物类则需要两到三个箱子。由于这将是一个永久性基地,你还可以设置田地和动物养殖场。虽然我通常会等到解锁能让信徒自动耕种的建筑后再行动。 当你的觉醒值达到25时,就可以制作青铜盔甲和美洲虎鞍具了。美洲虎是目前游戏中速度最快的坐骑,能极大改善地图移动体验,所以要尽快获取。我通常会捕捉几只,以防坐骑意外死亡。捕捉美洲虎幼崽比捕捉其他动物要复杂一些。
如果你想要一份关于捕捉美洲豹以及其他所有坐骑和动物的详细文字指南,Permadecked 已撰写了一份出色的相关指南。 到目前为止,你应该已经为游戏后续内容做好了充分准备。继续跟随教程,努力制作青铜装备并建设你的基地,一旦拥有全套青铜装备,就去金字塔挑战第一个 boss 吧。 其他有用资源: Permadecked 撰写了一些非常棒的 Steam 指南,如果你还没看过,可以去查看: - farming Guide: Do This Before Bronze Age - Finding 120+ Tribesmen - Taming Guide: The Mounts & Animals 该游戏的官方维基百科在 Fandom 上。开发者已在Steam上发布了一些问答内容:问答1、问答2、问答3、问答4。官方Discord是提问或提供游戏反馈的好去处,开发者会定期在线。