换一换
换一换 


How to set up Ark: Survival Ascended Server for PC using Command Line interface for people who don't prefer a GUI. Introduction Who This Guide is ForThis guide is designed for players and server hosts of ARK: Survival Ascended who want to set up a dedicated server on Windows PCs, with or without custom mods. It’s perfect for: Solo hosts managing small private servers. Players setting up servers for friends or LAN parties. Those struggling to install mods or troubleshoot server issues with the latest game updates. HEY ITS YOUR GIRL BACK WITH ANOTHER LIKE AND SUBSCRIBE TO TURNING ON NOTIFICATIONS TO JOIN MY MAILING LIST People who hate video tutorials. People who prefer detailed, written guides. People who like using the search function and text-based instructionals. Why I wrote this guide:When I attempted to set up my server, I found that the information for ARK: Survival Ascended (ASA) was vague, non-existent, or relied on outdated instructions for ARK: Survival Evolved (ASE). These instructions weren’t compatible with ASA’s Unreal Engine 5 structure, which caused confusion and errors. On top of that, I had to cobble together bits and pieces of information from multiple sources scattered across the internet. Much of it wasn’t obvious, and finding the right answers took far longer than it should have. I also found a lot of lengthy videos with no transcripts that I had to scrub through just to find relevant points. Other guides had blurry screenshots that made copying and pasting text almost impossible. So I created this guide to make things easier, with text and visuals that show you exactly what to do. I hope this will provide you with clear, step-by-step instructions to get your server running! Preparation First things first. Here are the basic things you'll need. If you don't know what I'm talking about in this section, like, I dunno, maybe don't try doing this till you brush up on basic PC knowledge before diving in—it’ll make the process much easier! System Requirements:Surprisingly, not any outrageous requirements. Many people have run a server on spare/obsolete PCs. Keep in mind that the server doesn't use the GPU so feel free to dust off that old tower you have sitting in the closet as long as it meets these bare bones specs: Storage Space: As of 10 December 2024, One server installation is approximately 10 GB. Try to have about 200 GB worth of storage available to account for mod installations, multiple maps, and future updates. Use an SSD for faster speeds. CPU: Have 4 logical cores available on your processor for each server instance you plan to run. Some people have had success running with 2 cores per map, which might work for smaller setups. GPU: The server does not rely on the GPU, so you can use an older or integrated graphics card. All the heavy lifting is done by the CPU and RAM. RAM: Each map uses approximately 10 GB of RAM. 32 GB seems to be the preferred number but you can get away with 16 GB if you only need to run one server. Network Requirements: Make sure your internet connection is stable and fast enough for hosting. You’ll also need to set up port forwarding for others to connect to your server. Operating System Requirements: This guide is designed for Windows 64 bit machines. Tools:Mandatory:These are the tools you’ll need to successfully set up and run your ARK: Survival Ascended server: SteamCMD: The Steam Console Client (SteamCMD) is a command-line version of the Steam Client. It is used to install and update dedicated servers available on Steam. This tool is required for setting up your ARK server. Download SteamCMD: https://developer.valvesoftware.com/wiki/SteamCMD Optional:These tools can make your life easier, but they’re not strictly required to run the server: Notepad++:Download Notepad++ if you haven't already. Notepad++ makes editing .ini and .bat files way easier with features like syntax highlighting and line numbering, which can save you a lot of headaches. You can stick with regular Notepad or Wordpad if you'd like that level of suffering. Notepad++ can be obtained here: Website with installer packs: https://notepad-plus-plus.org/ GitHub for the nerds (you know who you are): https://github.com/notepad-plus-plus/notepad-plus-plus Installing SteamCMD I know many people have multiple hard drives, but for simplicity, let's use the C: drive in this guide. Feel free to tailor any drive or directory names to your own preferences where specifically noted. Let's get started. Installing SteamCMD on WindowsSo, you’ve already downloaded SteamCMD, right? If not, go to the developer's page at: https://developer.valvesoftware.com/wiki/SteamCMD and grab it. I’ll wait... 1. Create a Home for SteamCMD: First, let’s give SteamCMD a cozy little folder to live in. Go to the drive where you want to install it (e.g., C: or D:). Create a folder named steamcmd. Example: C: steamcmd D: steamcmd 2. Unpack SteamCMD: Take the steamcmd.zip file you downloaded earlier and extract it into the steamcmd folder you just created. Use your favorite tool for this—WinRAR, 7-Zip, or just the built-in extractor if you’re feeling basic. 3. Fire Up SteamCMD: Navigate to the steamcmd folder. Double-click on steamcmd.exe.SteamCMD will update itself and set up everything it needs. 4. Set a Destination for Your ARK Server: In the SteamCMD prompt, tell it where to install the ARK server files. Use the following command and replace <install_dir> with the folder path of your choice: force_install_dir <install_dir> Example: force_install_dir C: ArkAscendedServer 5. Log in: No Steam account needed here, this is just basic protocol for their server. Just type: login anonymous 6. Download the ARK: Survival Ascended Server: Use the App ID 2430930 for ARK: Survival Ascended and run this command: app_update 2430930 validate This ensures all the files download correctly and are ready to go. Once everything is downloaded, type: exit SteamCMD will close, and you’re ready to move on to the next steps! Server Installation 1. Set Up a Folder for the Server Files Create a folder where your server files will live. Name it whatever you want. For this guide we're going to call it ArkAscendedServer C: ArkAscendedServer 2. Download the Server Files Go to the folder where you installed steam CMD and run the steamcmd.exe file. It'll open a window like this:
使用《方舟:飞升》的应用ID 2430930运行以下命令: force_install_dir C: ArkAscendedServer login anonymous app_update 2430930 validate exit 如果自定义了文件夹,只需将C: ArkAscendedServer替换为你在步骤2中创建的文件夹的完整路径。格式类似如下:
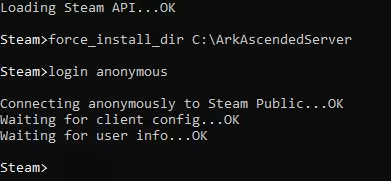
它将经历整个验证流程,具体如下:

等待进度数字增加到100,这可能需要一些时间,但完成后会显示成这样,你可以退出命令行。

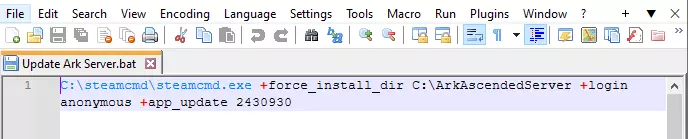
实用技巧: 创建批处理文件!你可以通过系统命令行将这些命令作为单个指令运行。这是在因补丁更新或其他原因需要更新服务器时实现自动化的好方法。只需打开Notebook++并输入以下命令行(假设你使用了与示例相同的steamcmd.exe安装文件夹,若不同则修改为你的实际路径): C: steamcmd steamcmd.exe +force_install_dir C: ArkAscendedServer +login anonymous +app_update 2430930 将其保存为.bat文件,取一个简单易记的名称,例如Server_Update.bat,并放在你能记得点击的位置。文件内容大致就是这样。
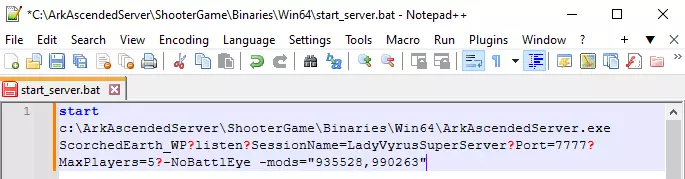
注意:我没有添加+quit命令只是因为我喜欢自己关闭窗口,这部分取决于你自己的偏好。 3. 创建启动脚本 现在你需要一个脚本来使用你选择的设置启动服务器。 打开Notepad++并创建一个新文件,输入以下脚本行,你可以根据自己的服务器进行自定义: start c: ArkAscendedServer ShooterGame Binaries Win64 ArkAscendedServer.exe ScorchedEarth_WP?listen?SessionName=LadyVyrusSuperServer?Port=7777?MaxPlayers=5? 我会为你分解这个示例。 通过可执行文件的路径启动服务器本身start c: ArkAscendedServer ShooterGame Binaries Win64 ArkAscendedServer.exe 使用焦土作为地图。目前可用的四张地图如下: TheIsland_WP TheCenter_WP ScorchedEarth_WP Aberration_WP 它们似乎遵循相同的命名规则,因此我预计其他所有地图也会照此命名。会话名称LadyVyrusSuperServer可以替换为你想要公开的服务器名称。服务器使用的默认端口地址为7777。玩家最大数量设置为5人,我认为默认值是70人,你可以根据预期的玩家数量进行设置。 将此脚本保存为start_server.bat,并放在你下载服务器文件的同一文件夹中。例如,我们使用的路径是:c: ArkAscendedServer ShooterGame Binaries Win64。它看起来会像这样:
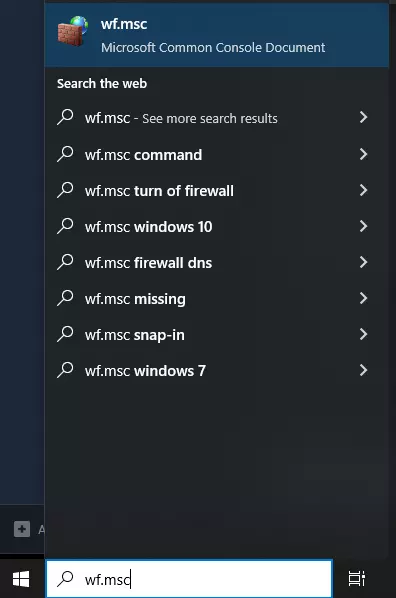
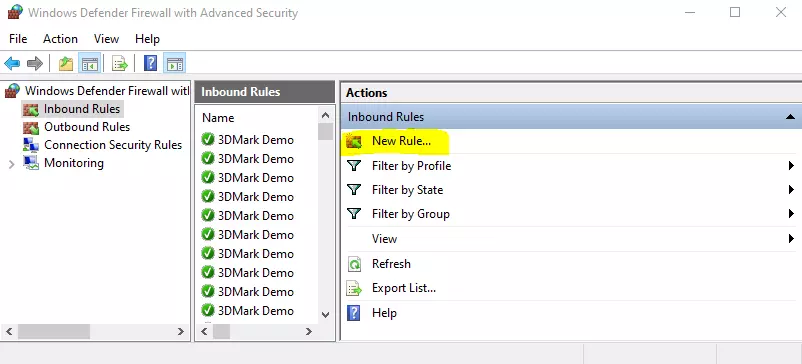
专业提示: 我看到很多指南和帖子建议你像这样设置命令行格式: ShooterGameServer.exe SomeMap?SessionName=<服务器名称>?ServerPassword=<加入密码>?Port=<端口>?QueryPort=<查询端口>?MaxPlayers=<最大玩家数>?ServerAdminPassword=<管理员密码> 出于安全考虑,最佳做法是避免在启动脚本中包含密码。我认为这是虚幻5引擎相较于ASE处理方式的一项改动。我们将在下一部分安全地配置这些内容。让我们避免在启动命令中以明文形式保存密码,这样就不会意外让所有人都知道如何对我们的服务器造成破坏。小贴士: 如需了解更高级的服务器设置和命令行选项列表,请查阅方舟维基的服务器配置部分。我们这里只介绍基础知识。 让我们继续配置服务器。 网络设置 好了,现在你的服务器已经安装完成,接下来要确保它能被外部网络发现。这是关键步骤——如果做不到这一点,任何人(包括你自己)都无法连接到服务器。如果跳过这一步或操作失误,服务器将不会出现在服务器列表中。可别让这种情况发生! 端口转发 端口转发用于确保来自互联网的传入连接能够到达你的服务器。这需要配置路由器以允许特定端口的流量通过。ASA服务器功能使用以下端口: 游戏端口:7777(UDP)——玩家连接所必需。 RCON端口:27020(TCP)——可选,用于远程服务器管理。 注意:如果您是之前的ASE服务器管理员,想了解查询端口(27015)或对等端口(即游戏端口+1),请不必费心!与ASE不同,ASA不使用这些端口或Steam查询端口,因为服务器不使用Steam网络。对等端口在ASE中历史上用于游戏内Steam浏览器广告,但此功能不适用于ASA。直接发现依赖于通过游戏端口可见的游戏服务器。太好了!需要配置的东西更少了! 小贴士:如果您运行多个服务器或地图,需要为每个服务器或地图分配不同的端口。语法遵循游戏端口和RCON的顺序。例如: 服务器1:游戏端口7777(UDP),RCON端口27020(TCP) 服务器2:游戏端口7778(UDP),RCON端口27021(TCP) 服务器3:游戏端口7779(UDP),RCON端口27022(TCP) 你可以指定一个外部端口范围,一次性覆盖所有服务器实例。例如,如果我们使用这三个服务器,设置如下: 外部端口范围:7777-7779,27020-27022 这可确保多个地图或服务器实例的流量被正确路由。只需确保每个服务器实例使用其自己的唯一端口,以避免冲突。 如何设置端口转发: 1. 打开网页浏览器,输入路由器的IP地址(通常为192.168.1.1或192.168.0.1),访问路由器设置。 2.使用管理员凭据登录。(通常可在物理路由器的贴纸找到。) 3. 找到端口转发部分:查找“端口转发”“NAT”或“虚拟服务器”等设置。 4. 创建端口转发规则: 协议:UDP 外部端口范围:7777-7778(或您所需的范围) 内部端口范围:与外部相同 内部IP:输入托管服务器的计算机的私有IP地址。 5. 保存更改,必要时重启路由器。 如果需要针对您特定路由器的更详细步骤,请参考其用户手册。 防火墙设置(Windows) 默认情况下,Windows防火墙可能会阻止与服务器的连接。您需要允许通过刚才转发的相同端口的流量。设置防火墙规则: 1. 点击开始,搜索wf.msc,然后按回车键。
2. 在左侧面板中选择【入站规则】。

3. 点击右侧面板中的【新建规则】。
4. 选择【端口】并点击下一步。
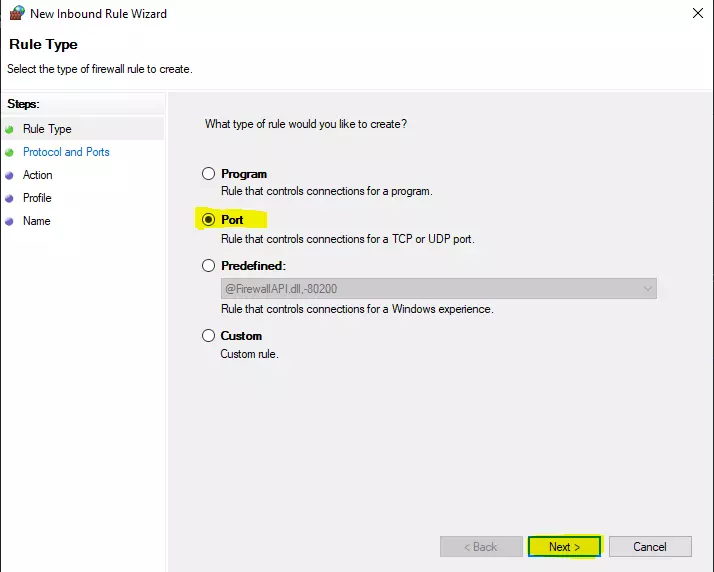
5. 选择UDP并指定端口(例如7777-7779)。点击下一步。
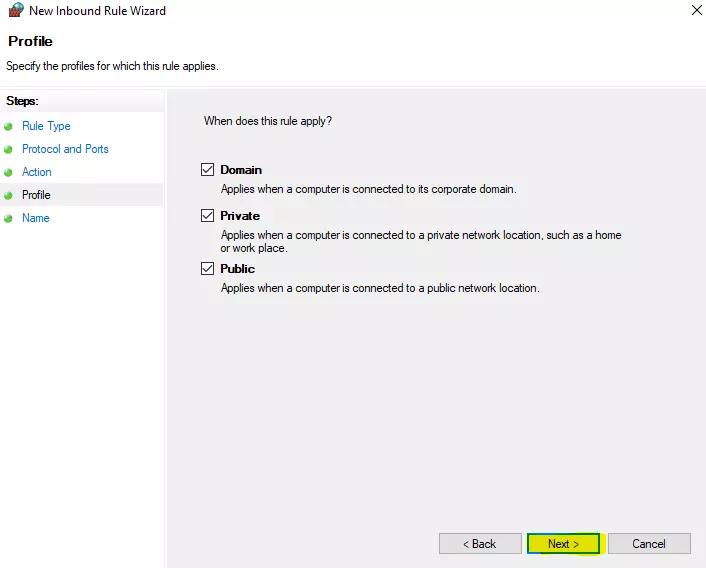
6. 选择【允许连接】并继续。

7. 点击下一步。
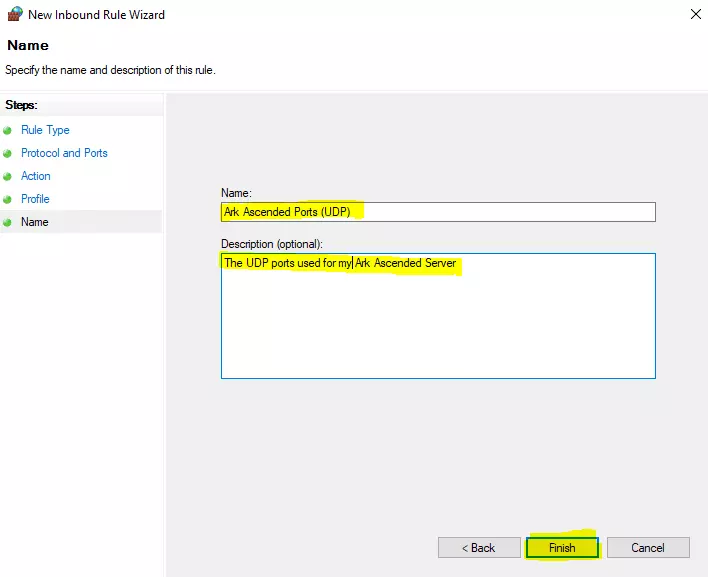
8. 为你的规则命名并添加描述(例如“ARK服务器端口(UDP)”)。将协议名称UDP添加到规则中是最佳做法,便于日后查找该规则。点击完成。
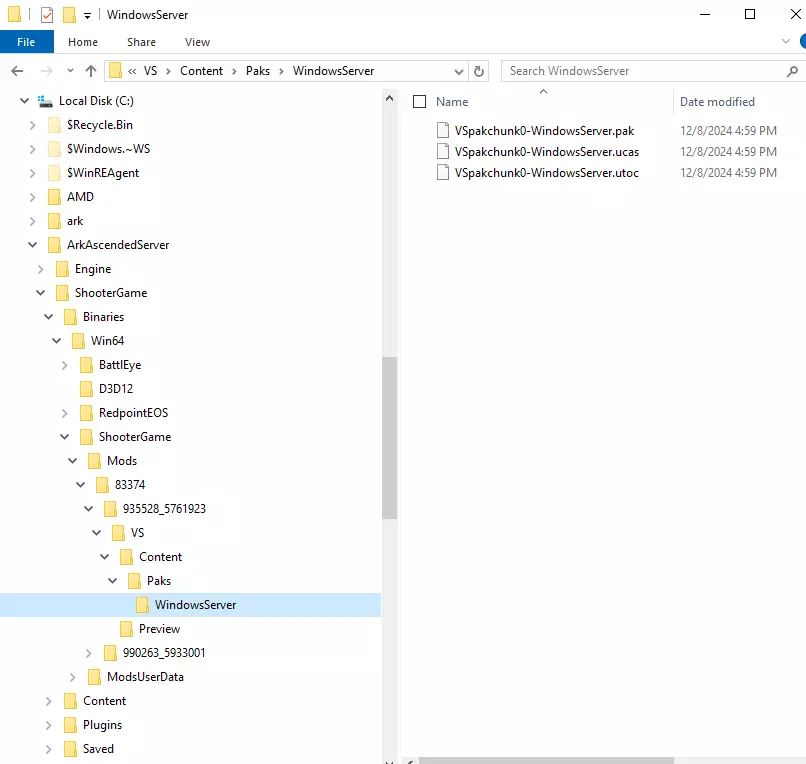
Optional: Create RCON Rule:Repeat the steps above, but choose TCP and specify the RCON port (e.g., 27020). You should now see your rules listed under "Inbound Rules." No need to configure "Outbound Rules" unless you’ve altered your Windows Firewall’s default settings. 📌Protip: RCON: To Use or Not to Use? RCON (Remote Console) is a protocol that allows server administrators to manage their ARK server remotely out-of-game. With RCON, you can: Execute server commands (e.g., spawn items, adjust settings). View logs and player activity. Manage server settings without direct access to the server machine.When is RCON Useful? RCON shines in scenarios where: You don’t have physical or remote desktop access to the server machine. You’re managing the server from a completely different location. You’re hosting a public server with multiple admins who need remote management access. Automation or real-time monitoring tools are needed.When is RCON Unnecessary? RCON might be overkill (or even a security risk) if: You’re running the server and client on the same PC. You already have direct access to the server console. You’re hosting for friends on the same local network. Local access allows you to manage the server directly without RCON. You’re concerned about security risks. If not properly configured, RCON can expose your server to unauthorized access, especially if ports are left open or passwords are weak.Security Concerns with RCON If enabled, RCON opens an additional network port (default: 27020). This can be exploited if: The port is improperly secured or left open to the internet. The RCON password is weak or shared with others. Unauthorized users gain access, allowing them to execute commands on your server.My recommendation? For most local setups or small private servers whom this guide is geared towards: Just skip enabling RCON. It adds unnecessary complexity and potential security risks. Instead, manage server settings and commands directly from the machine hosting the server. If you are looking for a way to enable cheats, admin or creative mode, RCON is unnecessary because those admin commands like enablecheats [adminpassword] are handled directly by the game client once connected to the server. These commands do not rely on the RCON protocol. They are sent from the client to the server via the game port (e.g., 7777) that is already open for player connections. If you still decide to use RCON, ensure you: Use a strong, unique password. Limit RCON access to specific IPs (if supported by your router or firewall). Monitor logs for unauthorized access attempts. Verify Your SetupTo test if your ports are open: Start your server and see if it appears in the ARK server list or can be connected to directly using its IP. Use an online tool like CanYouSeeMe.org to check if your forwarded ports are accessible. - Start your server. - Visit CanYouSeeMe.org (or a similar port-checking tool of your choice). - Enter your Game Port (e.g., 7777) and click "Check." If it says "Success," your setup is correct. Server Configuration Now that your server is up and running, it’s time to tweak the settings to suit your play style. Below, I’ll list some of the most commonly configured options in the GameUserSettings.ini and Game.ini files. These examples illustrate how some of the parameters are set. For instance, taming speed multipliers are typically whole numbers greater than 1, while day cycle speeds use decimals. Pay close attention to these distinctions since each multiplier is configured differently for some reason (thanks, ARK logic!). Also, keep gameplay mechanics in mind. Sure, it’s great to breeze through the dark by setting the night cycle to 10 (making it pass 10 times faster), but some creatures are only active or gain unique abilities at night (Troodons and Megalosaurus). You might unintentionally limit certain gameplay features if you're not careful. Be sure to consider how your settings might impact your gameplay experience before diving in. All server settings are stored in: C: ArkAscendedServer ShooterGame Saved Config WindowsServer Basic Configuration (GameUserSettings.ini)Here are some of the most popular settings to configure in the [ServerSettings] section of GameUserSettings.ini: [ServerSettings] XPMultiplier=2.0 ; Players gain experience at double the normal rate HarvestAmountMultiplier=5.0 ; Resource gathering yields 5x the normal amount TamingSpeedMultiplier=10.0 ; Taming creatures is 10x faster MatingIntervalMultiplier=0.25 ; Creatures can mate 4x more frequently EggHatchSpeedMultiplier=10.0 ; Eggs hatch 10x faster BabyMatureSpeedMultiplier=10.0 ; Baby dinos grow up 10x faster DayCycleSpeedScale=0.5 ; A full day lasts twice as long NightTimeSpeedScale=3.0 ; Nights pass three times faster ServerPassword=YourServerPassword ; Password to join the server ServerAdminPassword=YourAdminPassword ; Admin commands password Advanced Configuration (Game.ini)For more detailed customization, edit the Game.ini file. Here’s how to set up advanced options: Player and Dino Stats Multipliers: Adjust stats like health, stamina, oxygen, and weight for players and dinos. PerLevelStatsMultiplier_Player[0]=1.5 ; Player health increases 1.5x per level PerLevelStatsMultiplier_DinoTamed[0]=2.0 ; Tamed dino health increases 2x per level Player and Dino Level Caps: Set the maximum level for players and dinos. OverrideMaxExperiencePointsPlayer=300000 ; Max XP for players OverrideMaxExperiencePointsDino=150000 ; Max XP for dinos Engram Points and Auto Unlock: Customize engram availability and unlocks. OverridePlayerLevelEngramPoints=20 ; Grants 20 engram points per level bAutoUnlockAllEngrams=True ; Automatically unlocks engrams upon reaching the required level Difficulty Settings: Control wild dino levels. DifficultyOffset=1.0 OverrideOfficialDifficulty=5.0 ; Wild dinos spawn up to level 150 Structure and Resource Settings: Manage structure decay and resource respawn rates. StructureDecayPeriodMultiplier=2.0 ; Structures take twice as long to decay ResourceNoReplenishRadiusStructures=0.5 ; Resources respawn closer to player structures Weather and Environment: Customize weather and environmental effects. bDisableWeatherFog=True ; Disables fog bUseSingleplayerSettings=True ; Optimizes settings for solo play How to Apply Your ChangesSave your changes to both files. Restart your server to apply the new settings. 📌ProTip: Back up your GameUserSettings.ini and Game.ini files before you go messing with them so that you have a clean version saved somewhere incase you REALLY mess things up. For example, if you set the 💩 interval too short... it's gonna get real ridiculous real fast. Even More Advanced SettingsIf somehow you absolutely need more settings and customization, you're gonna have to check out other sources of information. The Ark Wiki[http//url%3Dhttps] has a huge list of settings for the ini files as well a some more command line parameters. I don't know if the information is up to date or not on those sites, so good luck to you. I'm just here to help you get the server running, tweaking isn't quite my thing. Mod Installation There are two options for adding mods to the server. You can use the newer server-driven mod download functionality or manually place the mods. Option A: Set Up Your Batch File Locate your start_server.bat file. Using our guide directory structure it will be here: C: ArkAscendedServer ShooterGame Binaries Win64 Update the batch file to include the -mods parameter with your desired mod IDs in quotes with a comma between each mod: start C: ArkAscendedServer ShooterGame Binaries Win64 ArkAscendedServer.exe ScorchedEarth_WP?listen?SessionName=LadyVyrusSuperServer?Port=7777?MaxPlayers=5? -mods="935528,990263" 935528 and 990263 are some random Mod IDs I picked. Replace those if you want or add whatever Mod IDs you want to install. The order doesn't really matter. That's it. 🤔Confused? There is no need to edit the GameUserSettings.ini anymore with regards to mods.The -mods argument should be used in the server launch batch file, not the ActiveMods line in the GameUserSettings.ini file. The ?GameModIds inline argument in the command-line launch string is explicitly marked as obsolete for ASA. Once you've ensured your start_server.bat includes the -mods="MODID1,MODID2" parameters. Start your server using the batch file. The server will automatically:Download the mods directly from CurseForge. Extract them. Place them in the correct directory: C: ArkAscendedServer ShooterGame Binaries Win64 ShooterGame Mods MODID Check the directory to make sure they are there. The structure will look something like this:
Alternatively, you can verify the logs to confirm successful mod downloads: C: ArkAscendedServer ShooterGame Binaries Win64 ShooterGame ModsUserData logs Mod valid: Visual Storage (935528) Mod valid: B+ Structures (990263) Option B: Manual Mod PlacementThis is highly unnecessary extra work and only advisable if you are a more advanced user doing things such as testing mods or where you would want to roll-back versions. If you don't know what I mean, then don't do it this way. Step 1. Download the mod files from CurseForge or another trusted source. Each mod typically includes .pak, .utoc, and .ucas files. Step 2. Place the files into a properly nested folder structure: Example: For Mod ID 935528, the folder should be: C: ArkAscendedServer ShooterGame Binaries Win64 ShooterGame Mods 935528 Step 3: Start the Server Launch the server using the updated start_server.bat. Verify that the mods are loaded by checking the logs for entries like: Mod valid: Visual Storage (935528) EventsSeasonal events like Fear Evolved, Turkey Trial, and Winter Wonderland bring exclusive in-game activities, items, and creatures, such as the elusive DodoRex and giant super turkeys. Installing event mods uses the same process as regular mods! Here's how to add event mods:Find the Mod ID for the event on the ARK Wiki or CurseForge. Add it to your server's batch file under the -mods parameter. For example, to activate Fear Ascended, https://www.curseforge.com/ark-survival-ascended/mods/fear-ascended, add 877752. start C: ArkAscendedServer ShooterGame Binaries Win64 ArkAscendedServer.exe ScorchedEarth_WP?listen?SessionName=LadyVyrusSuperServer?Port=7777?MaxPlayers=5 -mods="935528,990263,877752" Restart your server. 📌Protip: If you’re running multiple event mods simultaneously, separate Mod IDs with commas, just like with regular mods. TroubleshootingMissing Mods in Logs:Ensure your -mods syntax includes quotes around the Mod IDs. Verify that the Mod IDs match the ones listed on CurseForge.Manually Placed Mods Not Loading:Confirm the file structure: C: ArkAscendedServer ShooterGame Binaries Win64 ShooterGame Mods MODID Check for correct file extensions (.pak, .utoc, .ucas). Force Re-Download Mods: Run the following admin command in-game: Press the ~ (tilde) key to bring up the admin console and type in: cheat RedownloadModsOnServerRestartRestart the server to trigger a fresh download. Additional Resources This section consolidates key information from the guide and adds helpful links for advanced server setup and troubleshooting. Bonus Tips1. Batch File Script for Updates Save this script as a .bat file to automate updates for your server: steamcmd +force_install_dir C: <YOURDIRECTORYNAME> +login anonymous +app_update 2430930 validate +quit Running this file ensures your server stays updated with the latest patches. 2. Launch Script Template Use this example to create your start_server.bat file: start c: <YOURDIRECTORYNAME> ShooterGame Binaries Win64 ArkAscendedServer.exe ScorchedEarth_WP?listen?SessionName=LadyVyrusSuperServer?Port=7777?QueryPort=27015?MaxPlayers=5 Replace ScorchedEarth_WP with your chosen map. Customize the session name and player settings to your liking. 3. Advanced Server Settings Explore more command-line options and server configurations: Ark Wiki Server Configuration Guide[ark.wiki.gg] 4. Port Forwarding Ensure your ports are open for others to connect to your server. Typical ports include: Game Port: 7777 You may need to refer to your router's user manual or manufacturer’s website for specific setup instructions. For more general information on port forwarding check out: https://lazyadmin.nl/home-network/port-forwarding/ or https://learn.g2.com/port-forwarding 5. Free up Drive Space: Recover approximately 13Gig of drive space by removing removing pre-rendered cutscenes from: C: <YOURDIRECTORYNAME> ShooterGame Content 6. Backup your files: Reload or save your backups of the game files stored at: C: <YOURDIRECTORYNAME> ShooterGame Saved SavedArks <MAPNAME>_WP 7. Disable BattleEye: Why would you or your friends need to cheat when you have access to the actual in game cheats? BattleEye is an anti-cheat system designed to detect and prevent cheating in online games and can consume system resources because actively monitors for suspicious activity. Disabling it can free up a bit of performance, which might be valuable if you're running both the server and client on the same machine or if your hardware is uh....modest. Just add -NoBattleye to your start_server.bat file. Remember, you can always kick, or ban players using the in-game admin console commands. c: ArkAscendedServer ShooterGame Binaries Win64 ArkAscendedServer.exe ScorchedEarth_WP?listen?SessionName=LadyVyrusSuperServer?Port=7777?MaxPlayers=5? -NoBattlEye -mods="935528,990263"
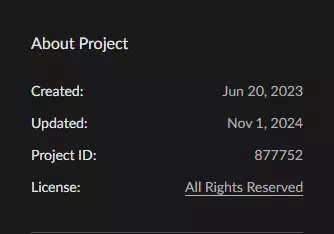
故障排除 遇到问题?以下是快速解决提示: 1. 模组无法加载: 验证文件结构并在批处理文件中使用-mods参数。 2. 服务器无法启动: 检查start_server.bat脚本中的拼写错误或查看日志以获取具体错误。 3. 验证循环: 使用validate参数重新运行app_update命令。 4. 模组无法加载: 确保输入了正确的MoID编号。可在CurseForge的相应模组页面上找到,位于页面右侧的【项目ID】下方。
检查语法!确保在ModId编号前后使用引号"。用逗号,分隔编号,不要使用任何空格。确保使用更新后的Mod语法。 以下是ASE和ASA的区别对比: ASE: ShooterGameServer.exe TheIsland?listen?SessionName=MyServer?ModIds=123456,654321?Port=7777?QueryPort=27015?MaxPlayers=10 ASA: ShooterGameServer.exe ScorchedEarth_WP?listen?SessionName=MyServer?Port=7777?QueryPort=27015?MaxPlayers=10 -game -server -log -mods="123456,654321" 主要区别: 位置: ?ModIds=语法与其他设置(如SessionName和Port)内联嵌入在命令行中。 -mods=语法现在作为单独的参数附加在命令行的末尾。 标点符号: ?ModIds=使用问号?要内联定义设置。 -mods= 使用连字符 - 来将模组指定为一个独立命令。 引号:-mods= 要求模组ID用引号括起来(例如,"123456,654321")。 ?ModIds= 不需要引号。 灵活性:-mods= 语法更适合虚幻引擎5,因为它更容易修改,并且能将模组与地图和服务器特定设置分开。 5. 服务器无法下载/更新: 确保你使用的是应用ID 2430930 最后说明 自行设置Ascended服务器一开始可能会让人觉得复杂,但完全是可以做到的。无论你是为朋友托管服务器、运行私人服务器,还是试验模组和设置,希望本指南能帮你节省我当初整理这些内容时所花费的时间和避免遇到的麻烦。记住,《方舟:生存进化》真正的乐趣不仅仅在于初始设置——更在于你和朋友们一起创造的那些时刻:探索地图、驯服恐龙、共同征服挑战。还有死亡。频繁地。无休止地。跑尸。尸体遍布世界各地。可能还卡在地图模型下面。就是这么多死亡。 如果你遇到任何问题,随时回顾本指南或查看文中链接的资源。 祝你好运,幸存者们! ——LadyVyrus