换一换
换一换 


一份为解锁成就而“了结此生”的方法清单! 简介 显然,不少玩家在游戏中难以找到25种不同的死亡方式来解锁“身经百战”成就。所以我来为社区贡献一份“死亡指南”,告诉你如何结束自己的游戏生涯!没错,这确实是一份实用的“死亡教学”。 我从一些比较明显的方式开始列举,方便你按顺序尝试。 你可能会注意到这里列出了超过25种方法(确切地说是64种)。其中有些目前尚未证实,但这份清单仍不算完整——如果你知道其他已确认能计入成就的死亡方式,请告诉我。不过,有这么多方法可供选择,你完全可以挑着来。我强烈建议你自己尝试这些内容,而不是在公开游戏中进行。除非你喜欢惹恼队友或者被公开羞辱,当然,我不会(过多地)评判! 本指南中指定的所有方法均基于个人测试和来自SteamDB的信息。特别感谢ASRD开发团队的Ben Lubar指出这一点!
Also thanks to the RD team for considering this snark-filled guide worthy of a medal! I think that's the greatest endorsement this guide could ever get. Note that this guide is intended to point out possible causes of death that are available in official content. Non-official (Workshop) campaigns may feature some "generic" damage types that resemble/are functionally identical to methods described in this guide, but will nonetheless count towards the achievement. These are not listed in this guide. Section A: Aliens This section lists various ways to get killed by the Swarm. A1. Get killed by a drone Pretty self-explanatory, really. If you need to find a drone, you probably won't have to look very far. A2. Get stung by a Buzzer one too many times Buzzers are those flying little buggers (pun most definitely intended), and they don't do much damage by themselves. As such, you'll likely need to kill all of the tougher aliens in the vicinity so that they won't "steal" the kill (that's you). A3. Get Shieldbugged Shieldbugs are big, tough, and more than capable of stomping you into the dirt by themselves. Odds are you have been already killed by one already, but if you're not sure, just walk up to one and don't resist. One is guaranteed to spawn in Jacob's Rest - Deima Surface Bridge, but they can be found in most campaigns as well. A4. Get blown up by a Boomer projectile Boomers are the three-legged, yellowish creatures that inflate their pouch when sufficiently annoyed. When it does, give it a few seconds to reach full size and then kill it - this ensures that the maximum amount of projectiles is spawned when it dies. Then just try to catch as many as you can; for best results, kill the Boomer in a narrow corridor. A5. Fail to roll under Ranger projectile Rangers are another alien type that appears very frequently. This is very straight-forward; instead of rolling out of the way like a sensible person, try to catch as many of the green spit projectiles as possible. You may wish to kill other aliens in the vicinity beforehand, if possible. A6. Attempt to catch a Mortarbug projectile Mortarbugs are not very common, but getting killed by them is fairly easy. I recommend Jacob's Rest - Timor Station for this: at one point, you must activate a console to turn a rotating bridge. A Mortarbug spawns on a inaccessible walkway to the north (on Normal and above): you can let it do its thing, as there should be very few other aliens to deal with. A7. Succumb to parasitic infestation This is another one you most likely already have. If you're not sure, load up Jacob's Rest - SynTek Residential and go find an egg, wait for it to hatch and meet your new companion. Your time together will be brief, though. A8. Die due to contact with biomass This is a little less obvious than the ones before. While not particularly damaging, touching biomass can indeed kill you. When you find some, deal with any nearby space bugs and go give it a hug! A9. Get Xenomites all over yourself Xenomites are the small aliens that Harvesters release, although they do spawn by themselves on occassion. However, Xenomites do not deal that much damage and die as they burst all over your face, so you'll likely need to find a Harvester - it comes with an endless supply of them. A10. Get kicked out of the way by a Boomer Before they inflate, Boomers are able to attack you by sweeping kick with one of their legs. You'll want to find an uninflated one and then stay right next to it. You may need to eliminate some other aliens as you stand there, as they rarely come alone. A11. Die due to contact with Harvester Like biomass, Harvesters have corrosive skin. Dying of skin contact with one is pretty hard, though, as they prefer to get away from you while laying down Xenomites. I honestly don't recommend going for this if you can help it. A12. Die due to contact with Mortarbug Ditto. Find a Mortarbug and get a little too close to comfort, all while you avoid the projectiles and keep the smaller bugs off your back. A13. Get whacked by a crossover creature, the Antlion Guard These repurposed assets visitors from another universe only appear in a handful of maps, such as Paranoia - Hostile Places and Accident 32 - Lab Ruins. It is an above-average opponent (depending on difficulty and level), so getting killed by one shouldn't be too difficult. They come in two flavors: normal "Guard" (reddish brown) and "Guardian" (glowing green). These are two separate NPC types, so you can do this with both variants and they'll count towards the achievement twice. The Guard has two attacks: shove and charge. Once you've found a creature matching the above description, deal with any other nearby swarm (if possible) and then get close to it. It should perform an "uppercut" of sorts and send you flying. Repeat until you have been thoroughly tenderized. A14. Get rammed by an Antlion Guard Same as above, with one key difference: instead of getting close to it, let it come to you. When you're not too close, the guard(ian) will charge towards you. This attack will also knock you down, so it's important to make sure other bugs won't get you and that you have enough space to get up and put some distance between yourself and the big guy. If you get stuck, it's likely that it'll just run up to you and finish you off with a shove attack. As such, being at low health before attempting this might make this easier. A15. Get spat on by the Queen There are two Alien Queens in vanilla maps: one in Research 7 - Jericho Mines and another in the IAF Academy. This one is only possible in Jericho Mines: you first need to progress through the mission until you open a large gate to the north, then run to the south into a room with the laser. Once the Queen catches up with you, it will periodically spit green acid at you. Drones will trickle in during this part, so you need to deal with them as you're trying to get corroded. A16. Get close and personal with the Queen's tentacles This one is only possible in the IAF Academy. One of the zones involves fighting the Queen, but instead of that, you must stay out of her reach while fending off Drones and Buzzers. She will periodically attack you with tentacles that come out of the ground, so hold your position and wait...you weirdo. A17. Get whacked by the Queen Also possible only in the IAF Academy. Same place as the previous one, only now you need to get close the Queen and let her beat you to submission. A18. Die due to contact with an parasite egg (unconfirmed) Due to the fact that the first thing you do when you see an parasite egg is to put a lot of bullets into it, not many know that it also has corrosive skin. In theory, this should work just like with every other creature with deadly touch - only that the eggs tend to hatch when you get close. You might want to already be at low health before you attempt this, since you may not otherwise have enough time before the egg pops. But hey, if that happens, you can do #7 instead! Section B: Weapons Whether by accident or sheer stupidity, there are also a couple of ways to use your weapons against yourself. B1. Blow yourself up with a rifle grenade Splash damage: the #1 cause of death in video games involving explosives! This one is easy to do due to the assault rifle being always available, so just walk to a wall, aim at it and pop goes the marine! B2. Blow yourself up with the grenade launcher Let's face it: sometimes you end up being collateral damage yourself. So why not save the trouble and get it out of the way right now? Just aim at somewhere/something dangerously close to you and go wild. B3. Blow yourself up with rockets Blast off into the afterlife by hugging a wall and using either the Hornet Barrage (level 6 required) or the Smart Bomb (level 26 required). Remember to look towards the wall to ensure you catch every rocket. B4. Attempt to fumigate yourself There are right ways to deal with a parasite infestation, there are wrong ways, and then there's the special kind of stupid described here. You'll need to unlock gas grenades by reaching level 32, but once that's taken care of, just throw one of these suckers at your feet and watch as both parasites and life all leave your body for good! Definitely don't do this in a public game, because you will lose all credibility as a medic in the process. B5. Blow yourself up with a laser trip mine The ML30 Laser Trip Mines are often overlooked due to their lack of level requirement, but they can be quite potent if used right. What you're going to do with them is the exact opposite of that: place them on a vertical surface by facing it and pressing the off-hand equipment key, get as close as you can and wait. Because you cannot trigger the mines yourself, you'll have to wait for aliens to do that for you. Not to be confused with the mines in Lana's Bridge! B6. Self-cremate with an incendiary mine (unconfirmed) A smart person would not stand in a wall of fire...unless it was for an achievement, right? You'll need to play as an officer (Sarge or Jaeger) and be at least level 16 to choose the mines in question (alternatively, you can find a box of them in Area 9800 - Landing Area; find them just south of the bridge). After that just plop one or more of them down, wait for an alien to trigger them and walk into the fire. B7. Step on a Vindicator grenade This sounds far easier than it actually is. While highly effective against the swarm when used right, it is far less effective against marines due to much of its power coming from the afterburn damage - which will not happen to marines. As such, you need to be at very low health before attempting this. Section C: Level Specific (pt. 1) Much like how Europeans go to Switzerland for euthanasia and Americans knock on stranger's doors, you too can find an exotic place to end your existence! Disclaimer: This list is based on information from SteamDB and testing. Some "generic" damage types are shared between various environmental hazards - for example, falling into a different pit doesn't count more than once. This list is incomplete; there are some other "unique" hazards in various levels which are not listed here. In these cases I don't either know where exactly they point to, or haven't been able to confirm that they are actually doable. I will update the guide if I figure those out, but you should have plenty to work with by now. C1. Fall into a toxic pit (Jacob's Rest - Cargo Elevator)(unconfirmed) On your way to the elevator you'll come across a small, dark pit with green fumes rising out of it. Normally you'd shoot the barrel to the east to make the metal plate fall on it, but instead of that you're going to jump right in! C2. Walk into a shredder (Jacob's Rest - Sewer Junction B5) This is pretty straightforward: there are three spinning shredders near the end of the level. A sensible person would shoot the barrel near the control console to stop them, but since sensibility has nothing to do with this achievement...You get the point. Just get within touching distance of them and wait.

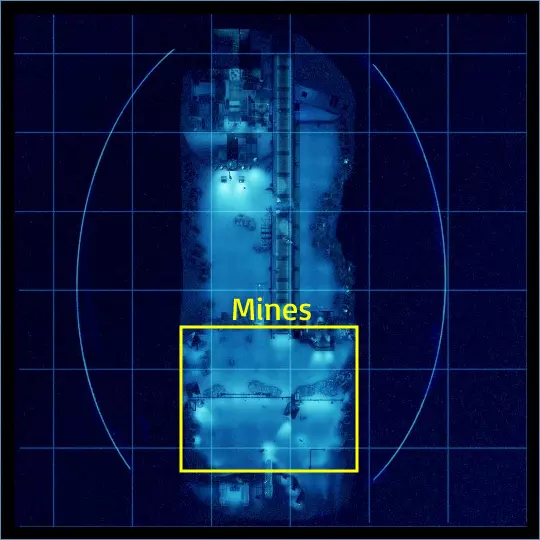
C3. Get nuked(雅各布的安息地-帝汶站) 这个成就相当简单:触发倒计时后,不要冲向着陆平台,待在原地即可。抵御可能出现的太空虫子,大约两分钟后,你就会在巨大的核火球中爆炸。 C4. Step on a landmine(拉娜的逃亡-拉娜之桥) 地雷——与恋足癖完全相反!拉娜之桥的起点有一大片雷区,那里的地雷足够把你炸上天。当然,地雷是埋在地下的——你会周期性地看到雪下有红灯短暂闪烁,这标志着一个适合“踢踏舞”的绝佳地点。你离爆炸点越近,受到的伤害就越大。如果定位地雷太麻烦,那就像无头苍蝇一样在指定区域到处跑吧。爆炸由名为【环境爆炸】(env_explosion)的实体处理;其他一些利用该实体导致的死亡方式不会多次增加成就计数(例外情况如下)。
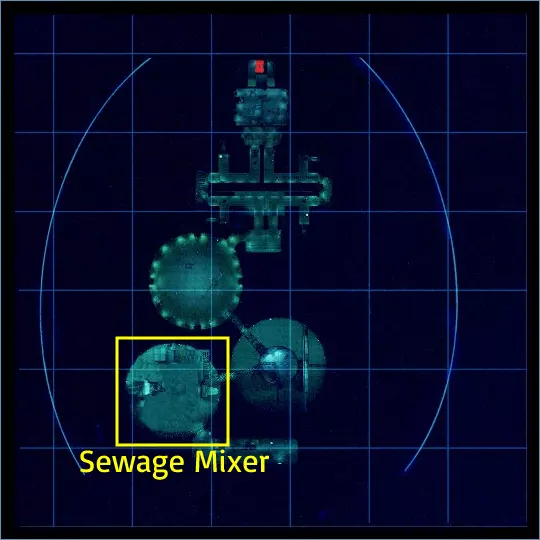
C5. 被巨型污水搅拌机卷入(拉娜的逃亡 - 拉娜的下水道) 下水道和大型旋转死亡装置是怎么回事?不管了——重要的是这张地图提供了另一种被“屎”对待的方式……字面意思! 一旦你到达旋转刀片处,只需待在它们的路径上。简单得很。
C6. 被活塞压碎(拉娜的逃亡 - 拉娜的复杂区域) 你会问为什么通风系统里会有大型活塞?因为就是这样。 通常你会射击它们另一侧的桶来阻止它们,但这次不行!只需走进去,你就会变成地板/天花板上的一大块红色污迹。 C7. 再次被核弹炸(拉娜的逃亡 - 拉娜的复杂区域) 任何涉及大规模爆炸的事情都值得再来一次,对吧?这个和帝汶站的版本几乎一样;一旦你启动了倒计时,在炸弹爆炸前保持自己活着。利用等待的时间思考存在的意义……或者思考如果你掐住蓝精灵,它会变成什么颜色。随你便。 C8.【花式死亡】(Research 7 - Research 7) 当你在任务中推进到足够远的地方时,会在北方遇到一个大型旋转风扇叶片。你需要按下三个按钮使其过载——先按位于一根大管道后面的那个按钮,然后按靠近风扇的另外两个按钮。按下第三个按钮后,跑到风扇处等待。不过爆炸造成的伤害相当小,所以你需要处于极低生命值状态才能死于这次爆炸。 【C9. 死于矿难】(Research 7 - Illyn Forest) 在关卡开始时,有一次塌方挡住了你的去路,可以用位于塌方南边不远处找到的炸药清除。放置炸药前,确保你的生命值在一半或以下——否则爆炸可能无法杀死你。完成后,在岩石旁按下你的使用键,然后就和爆炸包(还有你的屁股)说再见吧! C10. 尝试在熔岩中游泳(Research 7 - Jericho) 相信我,不会有事的!那些叫你不要在熔岩里游泳的人,肯定是想把那些美味的岩浆都据为己有。所以大胆跳下去游一会儿,让他们瞧瞧! C11. 走进发电机能量束(Tears for Tarnor - Abandoned Maintenance Tunnels) 这个成就需要多走一段路。你得在任务中推进相当远的距离才能到达发电机。打开开关,等几秒钟让机器启动,你会看到一道能量束挡住了你刚走过的通道。别像个聪明人一样绕路走,直接走进去!保证立竿见影。

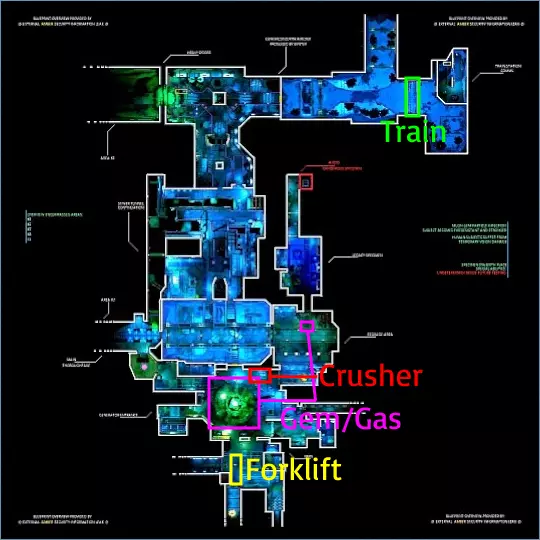
C12. 被燃烧的叉车碾压(事故32 - 实验室废墟) 此地图有四种独特的死亡方式!我已按从近到远的顺序列出。查看下方地图获取确切位置。 第一种涉及一种特殊的违规操作——被一辆超速且燃烧的无人驾驶叉车碾压。从关卡开始处,向左跑直到被撞。或许下次过马路前你会左右看看。 C13. 被怪异的宝石附身(事故32 - 实验室废墟) 叉车正北方的一个大 crater 里,有一块巨大的绿色水晶。触摸它会被附身并攻击队友——他们肯定会“喜欢”的。 水晶东侧,靠近铁丝网门处还有一股气流。死于它也会被算作附身(同时达成这两种情况不会对成就进度有额外提升)。 不确定被附身的陆战队员杀死是否计入。如果你能确认这一点,请告知。 C14. 被移动的墙壁夹死(Accident 32 - Lab Ruins) 虽然一个位于地面、没有扶手的垃圾压实机的确切用途仍然是个谜,但它还是为你提供了一种以成就之名被压扁的方式。只需在水晶坑的东北方向找到一个长方形的地板洞口,跳进去等待被压扁即可。 C15. 被火车碾过(Accident 32 - Lab Ruins) 在关卡的末尾,你必须呼叫一辆火车来带你前往安全区域。但你要反过来利用它,让它彻底终结你!一旦你呼叫了火车,只需跑到铁轨上,在成功成为本可避免的交通“事故”前,阻止太空虫子靠近。
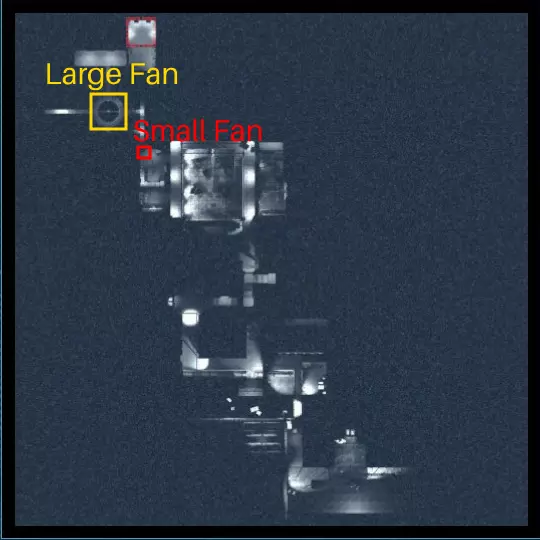
C16. Get nuked once more(Nam Humanum - Groundwork Labs) 没错,你要第三次这么做了!像往常一样,启动倒计时,然后等待显而易见的结果。 C17. Try to swim in lava, again(IAF Marine Academy) 在杰里科矿场这么做有用吗?没有?别担心,也许IAF海军学院会教这个!要进入有熔岩的区域,你需要至少完成所有其他区域一次(通过存活足够长时间以通过传送器逃脱)。一旦到达相关位置,直接跳进去。 C18.与桥梁一同被炸飞(区域9800 - 荒地) 你的首要目标是打开通往一座桥梁的大门。不幸的是,一旦你踏入大门,一只盾牌虫就会引爆一些炸药桶——这会摧毁盾牌虫、桥梁以及任何不幸站在桥上的人。因此,打开大门后,你需要在桥梁爆炸前尽可能跑到桥上。 C19. 站在旋转的风扇叶片上(生物基因公司 - 隐形威胁) 想知道在搅拌机里是什么感觉吗?现在你可以体验了! 在关卡接近尾声时,你需要多次按下按钮来加速风扇(然后入侵它两次使其爆炸)。但你应该站到风扇上——据说由此产生的“陆战队员冰沙”非常致命。查看下方图片获取位置信息。 C20. 跳入大型风扇(未确认)(生物基因公司 - 无形威胁) 如果你看到前文中提到的小型风扇并觉得“这通风设备真差劲”,那你可以释怀了——在前一个风扇前方不远处,有一个更大更厉害的风扇!只需跳到这个巨大的风扇上,就能确保殖民者永远无法摆脱通风管道里的异味。 注意:通风管道内有寄生虫,请谨慎前进!
C21. See if you're immune to neurotoxin (Tilarus 5 - SynTek Hospital) Spoiler: you're not. Once you've turned on the neurotoxin delivery system, don't run for the teleportation platform; instead, run back inside the hospital to see why you can't stay inside a building when it's being fumigated for bugs. Section D: Friendly Fire Here's a reason to forgive your teammate for putting you full of bullet holes: they are (inadvertently) helping you get this achievement! Note that I cannot 100% guarantee which weapons count towards each unique death (see the details for each method). Also note that you should not attempt any of these by trying to get your teammate to kill you by accident. Nobody likes people who run into their line of fire, so either politely ask them to help you or play the game as normal: you will most likely become a victim of accidental friendly fire sooner or later. Having hardcore friendly fire on will certainly help here. Just remember to keep track of how you've died! All of these methods were deduced from SteamDB API data. D1. Get shot with a bullet-based weapon In this context, "bullet-based" presumably means anything that fires a single conventional bullet at a time (such as assault rifles, marksman rifle, autogun, etc.). Odds are that you'll end up getting shot by a bloodthirsty Special Weapons with a Minigun (source: I play SW most of the time). D2. Get a faceful of buckshot As the name implies, this one calls for a shotgun. These include the Vindicator (always available, Officer only), the Pump-Action Shotgun (level 3), the Devastator (level 29, Special Weapons only) and the 22A4-2 Combat Rifle (level 30) alt-fire. D3. Pretend you're a tree Why? Because you need to get killed with a chainsaw for this, duh. The chainsaw is available at level 23 onward, but you can also find one in Jacob's Rest - Rydberg Reactor (room with welded door to the west) and Jacob's Rest - Sewer Junction B5 (next to an ammo stash south of the tunnel you need to collapse). D4. Get burned alive by a flamethrower Someone once said that it's always the ♥♥♥♥♥♥♥ with the flamethrower killing teammates. That may not be the case, except now when it's precisely the case. Mmm, smells like chicken. D5. Get blasted with a grenade launcher Yup, you can use the grenade launcher twice for the achievement by getting blown up by someone else along with yourself. Just convince your accomplice to drop a whole lot of boom on your head and you're good to go. D6. Have someone blow up an explosive red barrel next to you Like the previous one, this one can also be done twice: by yourself and with help. You'll probably need more than one barrel for this, so plan accordingly. Check method E2 for details (in "Other"). D6. Have someone blow up an explosive yellow barrel next to you Same as above, but different color! Check method E3 (in "Other" chapter) for details. D7. Get rail(gunn)ed Despite being a single-projectile weapon that fires a physical bullet, the Rail Rifle counts separately towards this achievement. It's available at level 7, but it can also be found in Tears for Tarnor - Abandoned Maintenance Tunnels. D8. Attempt LASIK eye surgery with a Mining Laser Since the Mining Laser can not be selected on briefing like most other items, you'll need to find one during a mission. Only a couple of missions have them, and I recommend Jacob's Rest - Timor Station for this. The first laser can be found fairly early into the mission, and the bugs shouldn't bother you too much while you're busy getting a hole burned into you. Section E: Other This section includes everything that doesn't fit into any of the previous categories. None of these are technically level specific, but many of them require a level feature. Check each description for recommended levels. E1. Fall to your death While Reactive Drop does not have fall damage in technical sense, you can still walk off a high place and leave a crater below. There are too many locations to list here, so I'll just give a few examples: Jacob's Rest - Cargo Elevator: The icy cliff west of the ammo and medkits Accident 32 - Research Center: The part with the wide metal walkways and obnoxious blur Tears for Tarnor - Insertion Point: In the caves near the start E2. Blow yourself up with an explosive red barrel In Half-Life 2, the Civil Protection officers made a habit of standing right next to highly explosive barrels. Follow their example by finding some, getting close and then shooting them! You may need to do this twice, since one barrel may not be enough to kill you. You can find these barrels just about everywhere, but I recommend Jacob's Rest - Sewer Junction B5 for this. E3. Blow yourself up with an explosive yellow barrel Technically, this includes any exploding physics prop that isn't a red or green barrel, but I'm using the barrels here as example since they're easiest to find and pack a mean punch. This works just like with the red barrels - you'll just need to find some first. A good place for that is Jacob's Rest - SynTek Residential, where you can find two; one near each fire on the way to the vents. You may need to use both barrels: a single barrel will not kill you outright if you're above half health (this "health gate" mechanic prevents instant deaths due to stray bullets). E4. Irradiate yourself with a green barrel Radiation poisoning - the ultimate gruesome way to go! Instead of superpowers, you will get hair loss, nonstop vomiting and fever, and then you'll probably die from having your own innards fall out of your arse. Fortunately it's a hell of a lot cleaner and faster in video games than real life, so you don't need to wait 2-3 weeks for death. Green barrels are much rarer than red explosive ones, but you can reliably find one in Jacob's Rest - Sewer Junction B5. E5. Go die in a fire Fire is great for cooking meat, fish, vegetables and careless marines. In this case, you need to roast yourself in an "environmental" fire. Here are a few examples: Jacob's Rest - Rydberg Reactor Jacob's Rest - SynTek Residential Tears for Tarnor - Abandoned Maintenance Tunnels Nam Humanum - Platform XVII E6. Get flattened by a falling door (unconfirmed) You may have already gotten unlucky at some point: you just happened to be underneath a sealed door that space bugs beat down, and you got squashed. If not, there is a good place to do that in Jacob's Rest - Landing Bay. The door just before the finish line is welded, and the aliens will start pounding on it once the hack has been started. Just position yourself in front of it while keeping the aliens on your side away, and wait for gravity to do its thing. E7. Die in a sentry explosion You may not have known it before, but sentries can be destroyed by aliens. When that happens, they sentry explodes, dealing a modest amount of damage to nearby marines. Dying from this is difficult to achieve, as you need to be at fairly low health already and then lure the bugs into attacking the sentry while keeping them off yourself. You might want to try something else on this list instead. E8. Get crushed by a physics prop (unconfirmed) This one is also very difficult to pull off. Due to the fact that your ability to manipulate the various physics objects found in the game is limited to shooting or kicking them, you'll either have to be extremely unlucky or manage to put yourself somewhere you really shouldn't be. I honestly can't think of a reliable way to pull this off. E9. Use the console to off yourself They say that sticks and stones may break your bones, but words will never hurt you. Prepare to be corrected: by typing "asw_suicide" (without quotes) into the console, you will drop dead on the spot. Think of it as a keyboard-induced aneurysm! Closing Hopefully this guide helped you get the achievement! As stated several times before, let me know of any additional methods and/or details you can confirm.