换一换
换一换 


This intermediate guide focuses on strategy behind match openers, using the map as a resource, effective recon, how to push and harrass, and general advice for some tough situations. Introduction Hello, and welcome to my guide (which I apparently had to transcribe over from the test branch). Feel free to get comfortable and grab the beverage of your choosing cause this will be a long one. So to start things off and set expectations, this is intended to be an intermediate guide focusing on overall gameplay strategy, game theory, and unit use cases in playing Broken Arrow. What I won’t be covering is beginner or more advanced stuff; I will be assuming you’ve played at least a couple of matches, have a deck built you’re mostly comfortable with, you mostly don’t need core mechanics explained to you, but I’m also not really going to be saying much on how to make tiny optimizations to your micro or build the absolute bestest, sweatiest deck or the like either. The goal here is to take a critical look at the tools available to us and where they fit in the big picture, also what that big picture actually is. Since some may care that I mention it, I am a player that’s been with Broken Arrow since the first closed beta test. In that time I’ve been able to determine pretty firmly that I have an aggressive playstyle that shapes how I talk about playing the game. These are my opinions, how I play is not how I expect or am trying to force others to play, we can theorize differently and both be right, yadda yadda yadda. However, if winning by breaking the back of the enemy team, getting comments from teammates that you’re playing like a maniac and it’s working, or just shooting HIMARS and S-300s in the face are things that sound appealing to you, then hopefully this guide helps you, or maybe at least gives a glimpse into the mind of that kind of player. Finally, let's leave preconceptions from Broken Arrow's spiritual ancestors like World in Conflict and Wargame at the door; they have a lot in common but the difference is in the details and not everything's transferable. Playing and Actually Winning First and foremost, let’s ask the rhetorical question: how do we win? Either we earn the most points at the end of the three phases through map control and efficient unit destruction, or we cap all points and run out the sudden death timer. The enemy team surrendering or rage quitting is the secret third option. So at face value, one might say that all that matters is carefully winning trades and either deleting enemies from a point or bum-rushing them last-minute to capture them. One can approach thinking about the game in this way, but that's not quite how we're going to. Instead, we're going to think in terms of fronts, battle lines, and flanks, and the map itself as the resource we're fighting for instead of just specific points. Every game players from opposite sides meet in the middle and fight over smaller zones on the map; when the two teams' units clash, the winner usually gets favorable destruction points but ideally they also gain more ground on the map to consolidate their units and continue pushing from and just that map presence is a lot of what players spend the whole game fighting for more of. The game’s rubber band economy is built entirely around this, too. When you lose units, your income will bump up from the reduced upkeep relative to your opponent and eventually you'll naturally return to parity with roughly the same amount of fielded units as them. With how the availability respawn timer works, one can temporarily run their opponent out of a certain unit, but unlike in games like Wargame they will always get access to it back eventually. So, one can passively accumulate destruction without losing anything and contribute towards match points but if those destroyed units wouldn't impact subsequent fights much and are allowed to be replaced without consequence that just allows the opponent to always keep fighting you with their full power and initiative and have the whole 45 minutes to turn the tables; in other words, despite the existence of destruction points, attrition just for its own sake is not a decisive winning strategy and unit destruction needs to lead to further map control and capitalizing on temporary advantages before they vanish. The process of taking apart an opponent's ability to actually fight back can be a gradual, tit-for-tat process involving just drones, artillery, and air strikes, yes, but through frontline fighting and flanking there’s also the possibility of a total collapse; if the player on the backfoot loses more than a typical amount of units in an engagement or they find themselves without any of something vital like recon or AA, the player in advantage can descend upon them and finish off as much as they can to allow them to swallow up win-determinative amounts of map and destruction points or go for the sudden death victory and leave the opponent simply without enough time left in the match to rubber-band back their losses. This is inherently risky with potentially a lot to lose if it goes wrong, but calculating that risk and taking that decisive win is why we're here. Openers (P1) Openers in Broken Arrow are an odd beast; broadly speaking, it's likely a lot units in general are going to die and be replaced relatively quickly but there is a lot of early map control to play for. There are a lot of ways to go about it; there’s not really one right way to do it (and that’s the beauty of it), but there are certainly wrong ways to do it, which we'll get in to. I don't want to give the impression though that a rough start throws a whole game, cause a lot can happen in 45 minutes and the game naturally encourages comebacks; rage-quitting the second minute in cause "there's no point" is not only the usual 'bad player with no friends' behavior of any game but is also just factually wrong in BA and putting on clown makeup. Keep in mind that these openers are broad concepts, not strict builds; the exact units used will vary from person to person and team to team and they'll mix and match in a team of 5. Unless the strat in question is following a strict gameplan there is room to be creative and it pays to hedge one's bets rather than make assumptions about what the opponent's going to do. Ground Focus The most likely thing a brand new player might be expected to focus on in their first game. With a good mix of recon, armor, infantry, and AA, the point here is to come in with one's main fighting force right from the jump and be ready to push the front line before the front line's even been established. It tends to cover its bases and something like a pair of tanks with recon and AA backup with good execution can run over the light assets they're likely to first run into. Maybe it goes for something lighter itself to be the first one to a zone in the first place (unless cargo helis got there first). However, there is one key problem with going all-in on this opening: you didn’t pay your air tax. I’ll be giving the compelling reasons for why as we talk more, but for now the short version is you're completely giving up the air, and the air is really important especially early. Sometimes you can bring out SAMs right away to try to get some cheeky unexpected kills; some people swear by it but stuff like SU-57s and F-15EXs do often carry SEAD even when used as ASFs that can get you and even then there's a lot of air openers it won't actually counter. Paradrop This is probably the second thing most new players think to do after their first match after seeing all the plane stuff and thinking they've discovered something new and clever, usually in the form of cramming their whole initial 1000pts into an airbus and sending it out hoping for the best. Some experienced players also do this as a tired, unoriginal meme because being rewarded for hubris that one time out of five through red team incompetence is funny, or something. Either way, the result of an unprepared paradrop is usually just a 1000pt crater, and although I said it's really hard to throw at the start of the match, that's about as close as one can get. Actually pulling a starting paradrop off reliably is usually a team effort and done once the air's already been won; it's pretty much never a good idea to send the airbus out right away with no knowledge of what it's getting into. Since RTBed planes give refunds, winning the air with ASFs then using refunds to help pay for the paradrop is a natural play pattern which tends to be the safest but the downside is that usually enough time by then has passed that you're not really getting a significant head-start over the helis or trucks; also 200-250pts just for the plane is a lot for an initial budget of 1000 so the risk kind of also isn't worth it if you only actually plan to drop 2-3 units, a cargo heli could do that cheaper and safer. Another issue is that it is very loudly telegraphed where your units will be and there's a real chance they eat artillery, bombs, or ground fire at their LZ even if they manage to make it out of the plane. I know my words are going to fall on deaf ears, but I've made my case; unless your goal is to buy yourself 5min to go make yourself a sandwich, open with paradrops carefully or not at all.
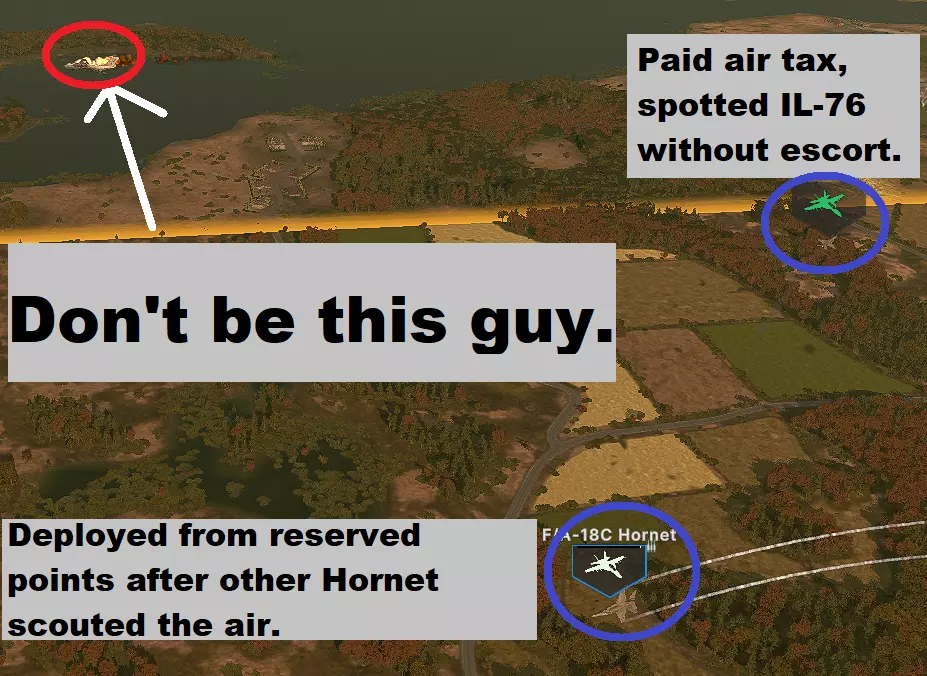
Air Superiority FightersAh yes, the air tax. Pay the air tax, or get audited. At the start of the match, map control means air control, and that starts with having the planes up to see what the opponent's up to. The loadouts and dogfighting strategies can vary but the most important factors are mostly just how much investment in ASFs each team antes and the timings with which they're rolled out; a fresh new plane can come in and sweep multiple planes that have spent their payloads and flares and can get right on the 6 of one that goes too far forward then starts turning around. The dogfight can lead to playing out in different ways where it can be a zero-sum of everyone investing heavily and losing all their fighters or just the air staying quiet in general. Sometimes a single sacrificial plane in a 5-stack can bait the enemy team into overextending into a trap. At a minimum, though, there should always be at least something in the air so the team has its vision and everyone should at least hold in reserve the points for an ASF if they see something like an over-eager airbus coming. What both teams would ideally like of course would be to have ASFs up while the other team does not because that means that they can intercept cargo helis uncontested, do some multirole strikes on targets of opportunity, provide a buffer of safety for paradrops vs SAMs, etc. The main trap that can be fallen into is throwing away the advantage one has; the whole point of coming out with more leftover points in a dogfight is so they can turn into more value or refund for something else, not suicide into SAMs or AA gunships. And again, just pitch in if you've not planned your opener out with a stack; it's embarrassing seeing a team lose one of its home points to a paradrop cause everyone thought they were slick and had the same idea to have the other guys do it. Now, I know there's a bunch of people reading this and thinking "whatever, I brought a SAM which is the same thing". I promise you it isn't. Are SAMs a nice supplement to ASFs in the opener? Yes. Are they a substitute? No. ASFs use their vision to provide the SAMs with their maximum range and as often as not a paradrop will be flying low so they'll be able to get their drop off before they come into low-alt range. Getting paradropped sucks, don't be why it happened, just put a plane up. Openers (P2) Cargo HelisThis is another way to get troops and sometimes a light vehicle to the front before the actual ground forces. It's safer than a paradrop, but that's speaking in relative terms. That fully-loaded Mi-26 at low-altitude is less likely to be spotted but there's still a large chance that it is and it eats a buzzing or guided bomb, especially if it's sent out right away. If one is investing heavily into this it can often be better to split the cargo across more transports to soften the blow of losing one, but that's at the cost of paying for more transports that won't be contributing to the early fights. Sometimes for that reason people favor stuff like Hinds to have a transport that can fight, but keep in mind they probably shouldn't be looking for a fight while guys are still on board. Other times people go for bringing an actual gunship or two as escorts, and I think I'm partial to this over the former cause the gunship can also be proactive and find targets of its own while the transports do their thing. It's important to remember that helis are more likely to meet prepared enemies in the middle than an early paradrop even if they're sent out right away, so it's at times prudent to stop them somewhat short of where you actually want your troops to be; even if you unload right into combat and push through the losses to take the early point, it won't matter if you're too spent afterwards to hold it. GunshipsThese guys can do a lot of similar things that planes do at the start of the match, though how they're used differs. Generally if they're speced for AA then they tend to take longer to get stuck in; on the one hand this means that they usually really need to rush if they want to shoot down enemy airlifts in time, but on the other they tend to inherently get to the middle of the map by the time the ASF dogfight's wrapping up and the stragglers are spent; they very often end up finishing off fighters that get too greedy, and even if it's a trade then the points are still almost always in the heli's favor. Personally, a pair of Vipers with Sidewinders is one of my favorite openers and they've gotten away with some filthy things. An anti-ground rush of several gunships can be scary if the enemy team's not prepared, but if they are the helis can get rinsed real quick so it's inherently high-risk high-reward. They need to take advantage of their good optics and gauge whether they can take the fight when they find enemies. As such, I think I'd recommend new players to steer away from trying this until they get some practice with managing time-to-kill and LoS blockers. To avoid falling prey to this, have that vision in the air up so you can see it coming and make sure your starting ground forces never leave home without one or ideally a few SHORADs or MANPADs. BombersThe option for those that think they're comedians. By now you can probably guess the problems here: all the drawbacks of a paradrop but you also need to worry about hitting something to get value. Frankly, a multirole plane will probably do anything a bomber could that would be practical in the first few minutes of the match, so it's safe to assume the plan is instead to blindly carpet or nuke the road the early ground enemies will come down or something. Power to the gambling addicts that pull the seal clubbing off when they do I guess, but for those just trying to learn the game I'd recommend just making sure they're not the one getting clubbed. Just understand that an opener nuke gambit might make Reddit clips but doesn't make actually fun or interesting matches, including for you; either your 1000pt investment gets intercepted and your team does nothing nice for you for the next 44 minutes, or you get the unicorn blowout you wanted and your reward is a win that's just anticlimactic and tedious. Recon (P1) Recon and stealth are not new concepts in historical and modern war RTS, and in Broken Arrow a lot of the basic concepts apply: if you can see it you can shoot it, you can never have too much vision only not enough, smoke is the most broken thing to ever be consistently underused, etc. However, this needs to be applied to the context of the game’s map/range scale and general lethality. Broken Arrow’s designed with a compressed scale compared to reality and other games; vision and weapon ranges are shorter, units get around quicker, and nowhere is beyond reasonable reach of a determined opponent. This is not a game where the only thing artillery has to fear is aircraft and other artillery, and engagements can happen anywhere overland, not just along major roads and towns because traveling overland isn’t so slow and far to go that it’s impractical. Also keep in mind that ground vehicles have no concern for running out of fuel either so they stop when they want to stop or something else stops them. For the compressed scale, maps do generally remain expansive; there are many directions a player can push, flank, and hide, and a unit that manages to go unnoticed along an uncovered flank can get very, very far. As for lethality, it’s a bit of a paradox; as a soft rule the game is balanced around few ways to 1-shot units, but at the same time even expensive, relatively durable units can die if in a bad spot very quickly. This all comes together to mean that, in Broken Arrow in particular, having a healthy amount of both passive recon and active scouting is essential. Assuming a tank’s not going to pop out of a thick patch of forest because driving through it would take 10 minutes is not a thing. Backline units like artillery and long-range SAMs being mostly safe simply by being deep in your territory is not a thing. Recon (P2) So, what do we actually do with this information, past the obvious of just having some recon units around? First of all, you need to decide whether a piece of recon’s job is to be active or passive.
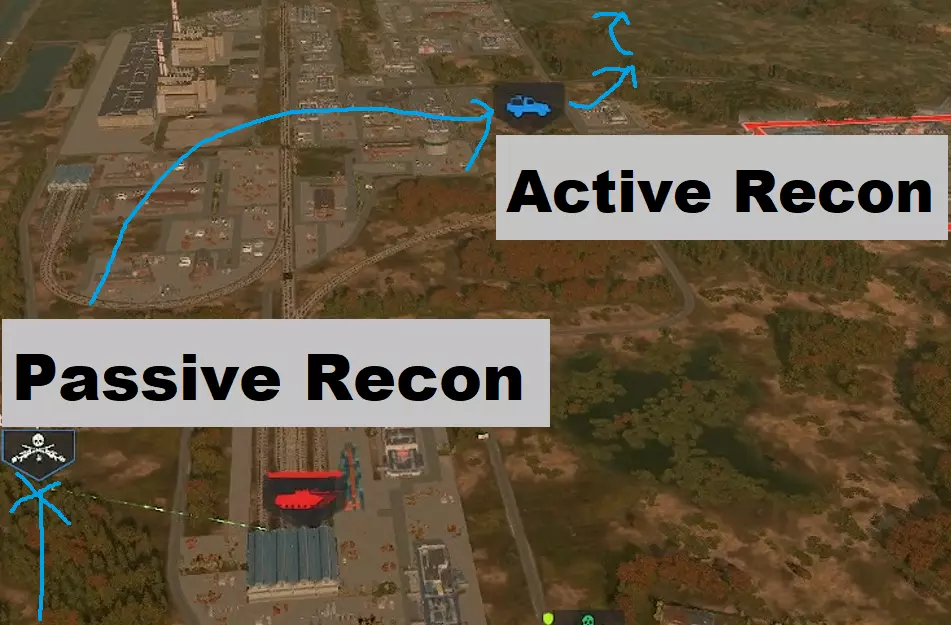
被动侦察的任务是在相对安全的位置徘徊观察,通常应尽量避免直接参与战斗(常包括切换为停火状态以不暴露自身位置)。这样可以在推进的敌人构成威胁前发现并轻松应对他们,或者至少能让你知道何时需要将部队从可能不利的战斗中撤回,因为侦察的关键在于按你的条件进行战斗。有时侦察单位可以自主对发现的目标进行战斗或伏击,而另一些侦察单位则纯粹用于提供超出敌人反侦察范围的视野,或者作为可消耗的绊发式预警装置部署在道路和侧翼,以便在敌人对主力部队造成威胁前提前发出警报。隐蔽性、视野范围以及作为可消耗预警装置所需的低成本都至关重要,因此侦察步兵、2400视野的观察员车辆和吉普车是最常见的选择。
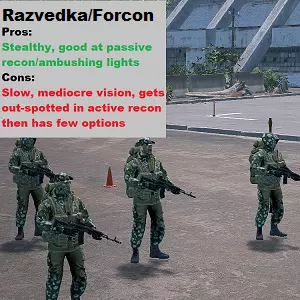
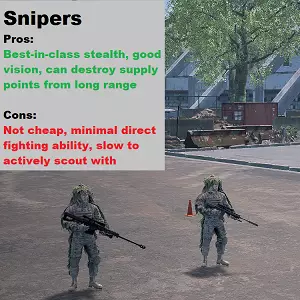
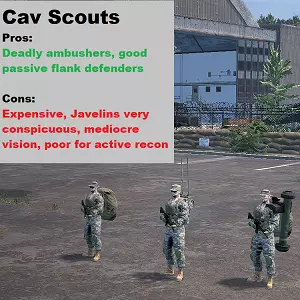
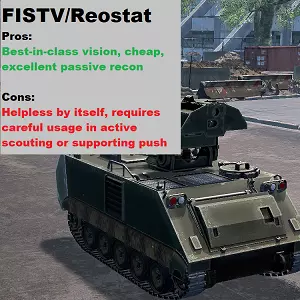
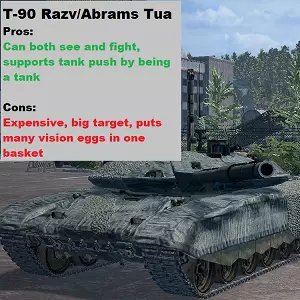
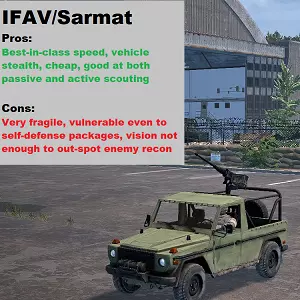
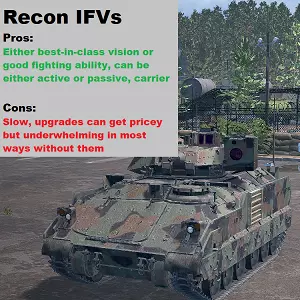
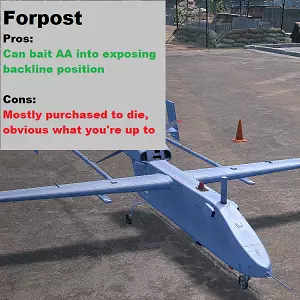
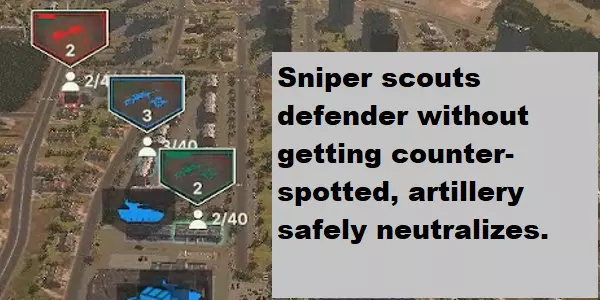
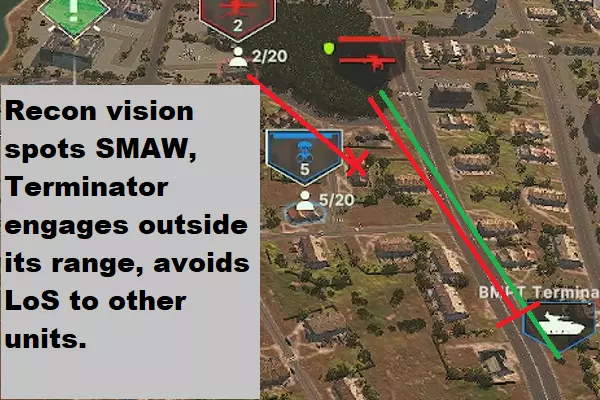
主动侦察是确保占领无争议区域的第一步,它能让你了解己方其他单位是否可以安全进入该区域,同时也是你在准备推进时评估对手情况、确定火炮和空袭最佳打击位置的手段。由于这项任务本身具有危险性,因此最好交给以下几类单位执行:成本低且可消耗的单位,如吉普车;成本低或拥有超远视野、几乎能实现地图全开功能的无人机;潜行能力和视野极佳、往往能避开敌方侦察的狙击手;以及专门用于伴随常规单位推进的装甲侦察车(主要用于为射击提供目标指引,而非初始的区域侦察)。当你发现地图上安静且未被争夺的区域时,派遣一个被动侦察单位跟在你的主动侦察兵后面是值得的。这样可以持续监视该区域,并可能伏击对手可能派往该方向的任何象征性侦察单位。换句话说,让他们知道那部分地图是你的,并迫使他们做出选择:要么放弃该区域,要么从远离前线支援的地方派遣实际作战单位。
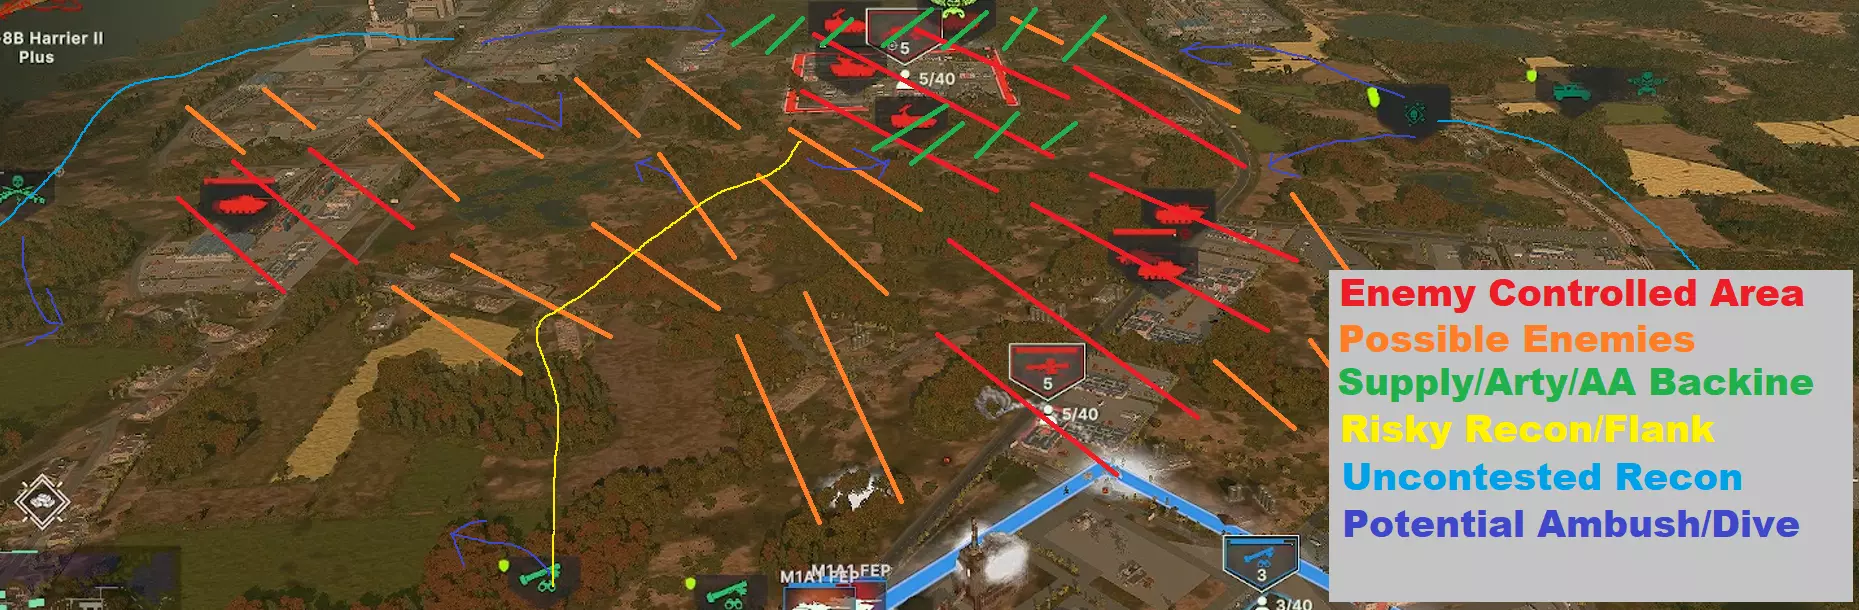
一般来说,始终要积极侦查或规划下一步的侦查地点;我们的策略不是在前线磨蹭等待小规模战斗顺利进行,而是要尽可能多地占据未被占领的地图区域,从这个集结点寻找脆弱的敌人,然后消灭他们。正如我们在这个前后对比的例子中所看到的,我们从一开始就能大致知道大多数敌人可能会在哪里,但需要根据敌人实际出现的位置以及你亲眼确认没有敌人的位置进行调整;在此基础上,你要制定出在哪里以及如何交战的计划。
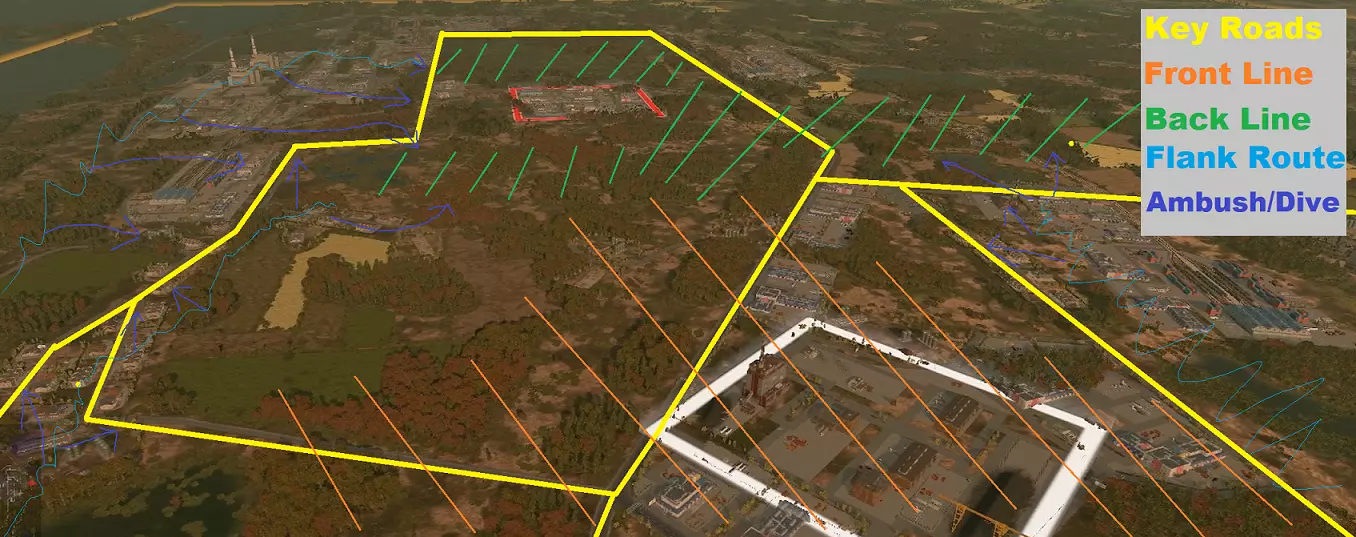
推进 所以,你已经进行了一些侦察,在地图上占据了一个可以部署单位的位置,并且大致了解了敌人的位置和兵力。很好。现在你需要将这些转化为消灭敌方单位并控制更多地图区域。 不过,首先你要确保自己的防御也没问题。假设一切都会出错,你派出的所有单位都会损失,因为这种情况确实有可能发生;如果你没有剩余单位来阻止对手的反击,那可能是你投入的单位太多了,或者你目前还不适合发起推进。
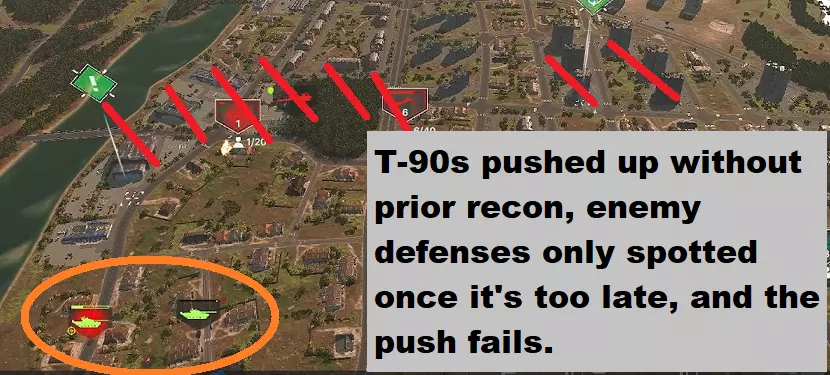
假设你已经为前线防御准备好了高射炮和反坦克导弹,并且觉得自己有足够强大的部队来采取行动。现在你需要决定从哪里发起进攻:要攻击敌人的薄弱之处,而非其坚固之地,如果可以绕过去,就不要正面突破。这正是侦察发挥作用的地方。如果敌人前线部署了一组反坦克导弹和两辆坦克,而你有四辆坦克和一门迫击炮,那么就用你的坦克去对抗敌人的坦克,避免与反坦克导弹纠缠——那些反坦克导弹应该留给迫击炮来处理(无论是用高爆弹实际削弱它们,还是用烟雾弹阻挡它们对我方坦克的视线)。一旦敌人的坦克被消灭,那些反坦克导弹也就不那么可怕了,之后再依次解决它们。如果你选择首先攻击反坦克导弹(ATGM)单位,敌方坦克可能会趁机重新部署,与反坦克导弹单位协同攻击你的坦克,这是非常不利的。再次强调,永远不要低估侦察的作用:侦察能让你发现敌方单位并安全地逐个消灭它们,还能让己方单位在仅依靠自身视野无法作战的情况下参与战斗,其作用远不止于此。
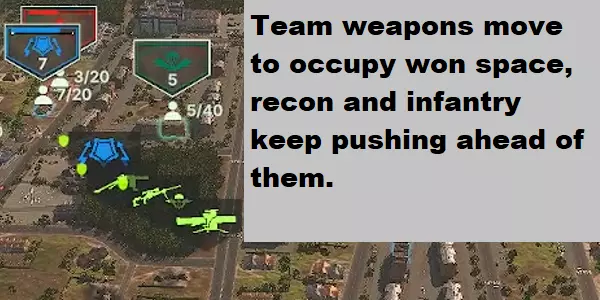
A lot of that has to do with concentration of force, basically just how much 'stuff' is thrown at a single point at once. If you have a lot of stuff in one place and only a couple of enemy stuff in that place, whatever other enemy stuff that may be around theoretically isn't there to help, which is good and you profit. Obviously more is better, but understand that this also has diminishing returns; you can reach a point where your units can only kill as fast as they can spot, but the opponent will always be able to punish you more if you concentrate more forces in the same place. You also need to make sure you have the essentials like AA and vision moving with your push; there's not much point in having an AA piece keeping enemy gunships at bay if you move your tanks beyond its protection bubble. Basically, strike a balance between making sure you're concentrating enough to score those kills on enemies before they can retreat, but also spread your units out enough and cover your bases so that the opponent has more than one place they need to concentrate their defense and not have opportunities to overly punish you. This is also a word of warning to saving up a bunch of points and just sending a spam of units down the road, especially one type of unit without support; you may overpower whatever spread-out defenders they come across with a spam's sheer volume of fire, but if you don't do enough to preserve them they'll quickly start dying before they earn their points back, and that's assuming one bombing run doesn't just make them disappear. And make no mistake, there will be a bombing run to make them disappear. When it comes to units trading blows, you often have a chance to disengage or force the fight until one of them dies, or the only way for an enemy unit to die in that fight is to sacrifice a unit so it can get one last shot off. In the ideal, fictional case, you never have to trade, you only kill without losing in return. But, if you're considering trading then make sure to trade up; a Patton for a SEP v3 is just good math. Another important thing, and this can be hard, is to not be overly optimistic or desperate for the trade to go how you want it to; if you're trying to get that shot off but you were ignoring that another unit has just showed up to kill your unit first, you should have just popped smoke and reversed. Better to cut your losses and get repairs for next time than throw away units for nothing to show for it, much less to the point where you're running out of a certain unit on your front. Also know that your opponents have repairs to worry about, too; if you can see what direction their damaged units seem to be retreating to, you may be able to catch them out and finish them off, or maybe blow up the supplies they were looking for, which may delay them getting back into the fight. Every small edge that may get your opponent to lose units or give up ground matters, and a lot of it can simply come down to timing. Then there's the use of artillery and air strikes. Basically, any kills with them you can get away with are nice, but at their most helpful they are a means to an end and that end is supporting the units doing the main fighting. Let's go back to the earlier example of tanks and ATGMs: why was nullifying the ATGMs useful? Between nullifying them quickly with smoke or slowly wearing them down while they're still shooting, which would keep the tanks alive better? If hypothetically there were other enemy units besides the ATGMs and tanks, would those be more important to focus on first? Those are the sorts of questions and decisions that mean the difference between winning and losing a fight. Now let's say things have gone well; you were able to kill more than you lost and some occupied ground is now yours for the taking. The time is now to consolidate; move your defensive line into a new position further up so you now keep that ground your opponent gave up and start getting some supplies closer up as well so your damaged and spent units can keep up their rate of resupply. If your pushing units are in good shape, though, you may want to press your advantage and see what more kills you can find, and keep that train going; just don't bite off more than you can chew or else you may soon end up giving up what you've just gained or more.
最后还有一点需要牢记,我发现即使是经验丰富的玩家也常常因此吃亏,那就是【过度专注于争夺点位】可能会让你全军覆没。记住,整个地图都是资源。虽然一直控制点位固然不错,但实际上你只需要在每个阶段结束时控制点位来得分;要攻击敌人的薄弱之处,而点位本身很少是他们的弱点。因此,很多时候,更好的策略是尝试夺取点位周围的区域,在守军被夹击后顺势占领点位;如果敌人有时间重新夺回点位,与其为了微不足道的收益牺牲部队,不如让你的部队撤离点位。你会惊讶地发现,在不占领据点的情况下,让步兵埋伏在据点的敌方一侧,能摧毁多少无掩护的运输载具。看到据点仍然是蓝色(未被占领)的状态,似乎会让敌人变得麻痹大意,或者说,即使据点周围的所有防御者和视野单位最近都已被消灭,且明显不安全,他们还是会不顾一切地直奔据点。 包抄后方(第一部分) 侦察、接战、获胜、推进,如此循环往复,这本身不失为一个不错的策略。但在进行全面地图侦察的过程中,你很可能会发现自己绕到了敌人主力部队的后方,并且在地图上某个被遗忘的区域几乎没有遇到任何抵抗。此时,侧翼已被你掌控,或者至少你已经找到了敌人防线的缺口。真正的战斗现在才开始:骚扰乃至摧毁敌方后排,也就是所谓的“搞事”艺术。 在讨论具体行动之前,我们先明确一下可能的目标:补给点、运输载具以及火炮/远程防空单位。补给点是最脆弱的目标,毕竟它们大多无法移动,只需轻轻一击就会爆炸,并波及周围所有物体。如果能在敌方单位补给时(尤其是发现火炮/防空单位长期停留在补给点时)将其摧毁,那绝对是大获全胜。但如果摧毁补给点无法带来额外收益,那么仅仅为了它们而放弃突袭的突然性是不值得的。运输载具(无论是卡车、装甲运兵车还是直升机)往往会沿着从出生点到前线的常规路线往返行驶,因此它们的位置相当容易预测,但要记住,大多数新生成的作战单位很可能会走与它们相似的路线。最后是火炮/防空单位,它们的部署位置以及通常由其他单位进行的守卫情况会因地图而有很大差异;一般来说,这些是理想的攻击目标,但如果对手察觉到你的意图,它们也会是对方最顽强防守的目标。 接下来,让我们谈谈我们选择的工具。我们主要追求的特性是速度、隐蔽性和低成本,因为他们依赖伏击,而且很可能是一次单程行动。考虑到我们要对付的目标大多防护薄弱,通常一把简单的重机枪、转管机枪或自动榴弹发射器就足够了。自动加农炮虽然不错,但往往威力过剩;而反坦克导弹则常常是个累赘,因为保持移动并在目标撤退前将其消灭至关重要。
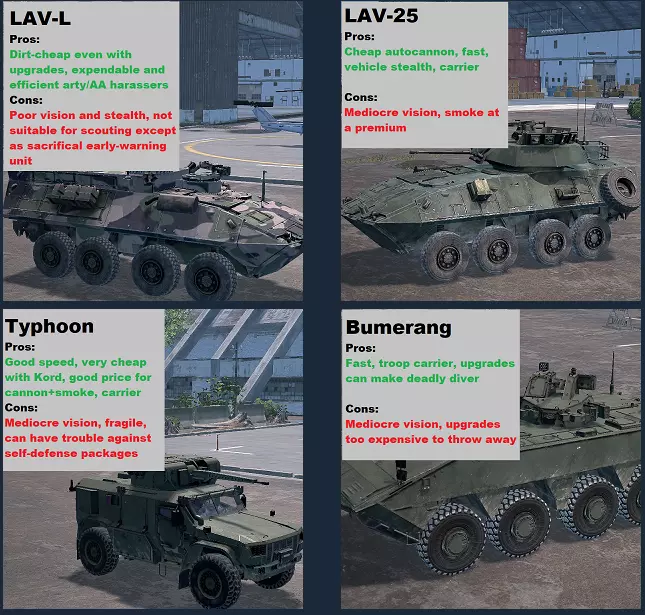
因此,吉普车是突袭无防备的火炮和地对空导弹单位的绝对王者,它们还能成群击落运输直升机;不过,即便是不起眼的B套件装甲也能减缓单个吉普车的攻击速度,这在分秒必争的紧张局势中可能会产生影响,而且防御武器确实对它们构成了实实在在的威胁(尽管自动榴弹发射器通常能提供足够的压制火力来确保这场死亡竞赛的胜利)。像LAV和回旋镖这类快速装甲运兵车(APC)可能相当有效,但它们在某种程度上是用锤子代替手术刀;它们能轻松压制遇到的任何自卫火力,并且有很大机会独自击落无武装直升机,但由于视野、隐蔽性和速度较差,它们可能会过早被发现,在找到目标之前就被反应部队消灭,不过释放烟雾可以帮助争取时间。具体到LAV,我实际上推荐LAV-L型而非标准型号;你放弃了通常威力过剩的自动炮,换来价格约为一半的车辆,这样你就能用相同的点数派出更多数量。狙击手在没有载具的情况下能悄无声息地渗透到敌后,凭借其出色的隐蔽能力,这种行动相当安全。在被发现之前,他们能制造不少麻烦;或者,如果己方间接火力覆盖范围足够,他们也可以充当被动观察员,引导炮火和补给(记得切换到还击模式)。有些人还喜欢用大量狙击手(或骑兵侦察兵)组成集群,分别伏击直升机或坦克。理论上这是可行的,但行动缓慢,容易被反制单位消灭,损失后补充起来也非常耗时,而且成本几乎与他们能摧毁的目标相当。考虑到这种战术曾经的流行度以及如今的没落,大众的看法似乎也是如此。然而,一名孤身狙击手在敌方战线后方深处,武器虽已禁用却时刻准备炸毁补给点,其威力依旧不容小觑。
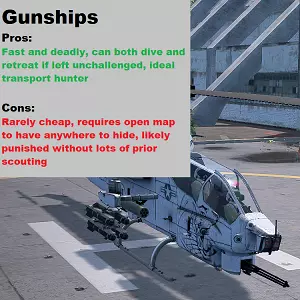
然后是派遣一两架廉价炮艇机;这种战术难度高且风险与回报并存。我强烈建议进行彻底的侦察,确保它们的飞行走廊畅通无阻(并且在发起攻击前务必始终保持低空飞行),但如果飞行走廊安全,炮艇机就能在被击落前迅速摧毁所能发现的目标。原因在于:远程地对空导弹通常无法击落直升机,而近程防空系统(SHORADs)很多时候背后有树林遮挡,不重新部署就无法向后射击;即便有近程防空系统直接部署在远程地对空导弹旁进行护卫,其防空范围也很可能无法覆盖前往投放点的运输机,这使得运输机仍然是可行的目标。真正的问题在于敌方空优战机和武装直升机不可避免的反击,这意味着出其不意是关键。通常情况下,敌方队伍甚至不会意识到你们击落了一架运输直升机,直到他们开始疑惑自己的补给到底去了哪里——因为你的单位只有在接近敌方出生点且不在其视野范围内时才会被发现。但如果你的武装直升机只是在高空无脑地向前攻击移动,它们就会早早被发现,并在完成任务前被摧毁。 另一个技巧是,如果你使用的武装直升机配备有SEAD导弹(防空压制导弹),可以在深入敌后之前禁用它们。这不仅可以作为一种侦察手段来寻找地空导弹阵地本身,而且由于攻击来自意想不到的拦截方向,实际取得防空压制击杀的几率也更高。 【后方入侵(第二部分)】

And then, there’s the actual process of taking out your targets, which I’ve already somewhat alluded to. Against some opponents you can get away with just sending a jeep down the road until it finds something to kill, but it’s better to assume that if the opponent sees your units they immediately know what you’re up to and won’t hesitate to put a stop to it, which will warrant more of an ambush approach. A lot of it’s just common sense and intuition, but basically you want to get as close as you can without getting spotted, recognize when you’ve been spotted, and keep one step ahead of whatever reaction is coming your way. So, use whatever vision and stealth advantage you have to spot without being spotted, always keep in cover or behind LoS blockers until it’s time to go for it, and so on; once you're discovered, though, it's time to either retreat or take your shot. Once the chase is on, that’s when it’s time to start getting creative, especially if you have multiple units; you can send out one sacrificial unit in one direction as a diversion to lure tanks and gunships away while the others keep trying to get closer within cover, or you can fan them out and capitalize on whichever one manages to slip through the net. If you have smoke, use it to give yourself time to slip between LoS blockers. Remember that minimum ranges exist and if the way to survive against an ATGM team is to hug it then do that. If you have a lucky break and pick off a few isolated units you’ve been able to find, whether it’s to retreat or keep looking for more always keep moving. Finally, depending on your micro abilities and ability to communicate with your team, there are fewer better opportunities to buy planes, launch missile strikes, or push the front line than when the enemy backline units are too busy running for their lives. And so now, whether you’ve been successful or not you’ve caused a big fuss for the enemy team; how they react to it can vary and you’ll need a combination of scouting and good old intuition to gauge it. Sometimes, whether they’re too busy trying to replace what they lost or just don’t think you’ll try it again they leave their flank as wide open as before (maybe even more, if you took out a token early warning unit); if that’s the case, second verse, same as the first. However, chances are they’re going to try putting up more recon, more ATGMs, more AA in that backline and make a repeat performance harder. If it’s still mostly a token defense, you may still be able to pull it off, more likely with a unit type that you didn’t use before to throw off their attempted counter. If it’s something more substantial though you need to assess how badly they’re hurting and how the actual front line is doing. If they were able to mostly repel you last time and are only more prepared then just let those units sit there and eat upkeep; even in failure you’ve succeeded on some level. If they lost a lot of units and are spending their points afterwards on defense, that means it’s time to start putting more pressure on the front line without so many of those HIMARS and Patriots to worry about. Maybe they’ll even sally out with their own retaliatory force along the flank to see how you like it; hopefully you’ve already got your passive recon set up to spot them a mile away and if so then take them apart with a tank ambush or air strike at your leisure. The main thing is to make sure to keep the opponent playing your game and, at risk of sounding like a broken record, hit them where they’re weak, not where they’re strong. Dealing With Problems "They keep finding and picking off my units even when they hide, I can't seem to keep anything alive!"This almost always means you're getting out-reconed, often the result of an enemy sniper that's been able to find a good spot to hide and watch you without being seen. The first thing you need to check is whether you actually have a good recon net to start with yourself; this means having multiple recon units spread out, and at least some of them should be vision 2400 if possible so the enemy stealth can be detected; the margins for detection range between even 1750 vs 2400 is a ~40% increase. For flushing out enemy recon, one thing you can try is to keep track of where your units are actually getting bombed to narrow down the possibilities where the enemy recon might be spotting you from. And if you're trying to locate a deeply hidden sniper specifically, better done with a vehicle or light drone than infantry; time is a precious resource when your units are dying, you need that full 2400 vision and infantry are slow. "I'm getting run over by tanks with APS, who cares what you're saying if I'm just spammed to death!"So first of all, short of hacking your opponent should have a similar amount of total invested points as you and APS tanks are expensive for what they do with mediocre vision and speed at best; so, you actually have an easier time deep-striking their SHORAD (fewer tripwires and QRF to stop you) then feasting with your gunships (Apache variants with 16 Hellfires especially are unimpressed by APS). This whole guide is about being the guy that takes apart the arty and AA in the back that deals with what the tanks can't. Or, just have your own non-APS tanks that are more cost-effective in the peer-to-peer fight. Secondly, simply getting ganged up on exists; have your custom player colors set in your Settings so you know when 2-3 people are bearing down on your lonesome and as soon as your forward recon spots that column coming down the road from their spawn you need to be in turn pinging your own team and saying "tank push, what have we got for it" and y'all will have several minutes to reposition if you did spot them early. The challenge in dealing with APS tank pushes is not in countering them for the same amount of points or cheaper but rather in giving not just you but the team the time to answer it on your terms, rather than being caught with your pants down and allowing them to run over defenders that cost less than a quarter that they do and are isolated from one another. And if you can't be bothered, just bring the cluster bomb run to make them disappear. "The enemy's AA is just insurmountable, my planes and missiles can't get anything done!"This is why I endorse and put so much time into talking about diving the backline rather than being ♥♥♥♥ out of luck when there's a nail that support just isn't hammering. Like I said, attack where they're weak, not where they're strong. To try to mitigate it, though, the best hope for missiles is to combine them with SEAD to punish the interception, but as for planes it’s often best just to save them for defense against enemy pushes to minimize exposure to AA if it's just too much. Remember that low-altitude greatly reduces the effective SAM range, so high-drag bombs and ATGMs that are lazed rather than strafed may find more success. "I'm just getting buried by artillery spam!"More often than not this is a result of playing passively and letting it happen, and passively waiting to be handed a comeback won't save you. They are counting on slowly beating your army back and taking your map with little resistance and the way you beat that is to do the exact opposite: double down on the aggression; go for their jugular like you’re the third tiger in line for Noah’s ark and it’s starting to rain. If they’ve spent that many points on artillery and planes, they’ve had to make concessions somewhere; either their frontline is flimsier than it appears to be or all of their precious toys are exposed along the flanks. Scout aggressively, find where they’re weak, and hit them with everything you’ve got before they can build up adequate defenses. If you're trying to make the frontline push happen rather than a deep strike on the flank then the group needs to be predominantly vehicles to move quickly and keep its fighting and support pieces in cohesion, and remember that artillery smoke is a critical tool to negate the threat of units that you can't immediately deal with so you can focus on the things you can. Eye on the prize, you're after those expensive support pieces and the supplies keeping the enemy frontline in the fight. "I'm trying to use recon but keep getting punished for pushing!"Have you truly scouted enough? Despite your scouting, are you attacking where they're strongest? The point of it is so that you lessen your likelihood of losing important units to the ever-present cycle of ♥♥♥♥♥♥♥ around and finding out, and in the worst case making sure you’re at least only losing 40pts if the worst happens rather than 300pts. If your jeep drives somewhere and then explodes, you should take note of what made it explode so you can take the necessary steps to make sure it fails to make your tank explode. If you knowingly can't prevent your tank from exploding when it goes there, it probably should go somewhere else. "I'm sending units that should counter the enemy's but I'm still losing!"It's not enough to win the rock-paper-scissors; Broken Arrow's micro has more in common with Company of Heroes than with Starcraft. Getting the first shot off is a big deal and suppression can ruin the effectiveness of even elite units. So, gotta use and abuse LoS and vision advantage to the best of one's ability and use a unit within their ideal range bracket while denying it to the opponent; even for units like Pararescue vs Sturmoviki the difference between fighting in the same house or separate is determining who gets to swing the fight with their flashbangs/HE rockets. Unfortunately there's no special trick I can provide for this, it will just come with time as you accumulate unit knowledge and micro practice. "I have been completely wiped out! I have literally zero units left, it's over!"Never say never; in BA even that is surmountable. If it gets that bad, the thing that is probably needed first is not a new wave of units but a mental reset. You'll have a few minutes to tick your points back up with no upkeep and assess how things are going outside the zone you've been playing in; weigh how worth it you think keeping your opponent tied up even if you're losing is versus shifting to fill in an unmet need your teammates have elsewhere to aid in their progress, the right call there changes depending on the game. If you're on your own and you choose to go for giving it another try against your side's opponent, always begin anew with the recon first; the silver lining of the position you're in is that the opponent is inherently overextended, cracks will be forming somewhere in their defenses and your way back into the game starts with finding them. "I've tried to apply everything you said but the opponent shut down everything I tried to do!"Sometimes that sort of thing just happens, especially if you’re still learning, and that’s fine. Just keep your cool and if there’s something going right then roll with that and see how far it gets you. If something doesn’t work out, try to give the time after the game to ask why so you’ll maybe have a better shot next time. Everybody's had their time being new to this game anyway, so try stuff. Make mistakes. Learn from them. Little by little, improve. To the quitters reading this and saying "nah", I don't know why you bothered reading this whole guide then but your tears are delicious. And finally, cause I was asked to say it, just follow the Golden Rule: don't be a ♥♥♥♥. Just don dewit.