换一换
换一换 


我将为你详细介绍在《星界边境》中创建自定义种族的方方面面。(W.I.P.) 简介 你决定创建自己的种族,却不知从何入手。本指南旨在详细说明让你的种族顺利起步所需了解的一切。 目前仍在制作中(W.I.P.)。如果你希望我涉及任何主题,请留言告知。
Put your race mod into your 'mods' folder when you are ready to test it. This guide is current as of March 2025 !Important change to template! The templates have been updated objects protectorate objects protectorateship.animation Not needed. Should be removed. Fixed the treasurepools.patch file Removed the items that are found in the starter treasure, and replaced it with the line {"pool" : "starterTreasure"}, This allows for other mods to tweak the vanilla starter treasure, and have it apply to the custom race. I am sorry for aaaaaaaaaaaaaaaaaaaall of the race mods that have my error in them >_> Thank you to RicoWan for pointing out and helping me fix this problem. Removed some files from Basic Removed boosterflame.animation and boosterflame.lua They were removed the advanced template a long time ago but I forgot to remove them from basic. Cheat Sheet So you are confused as all hell and want me to give you the gist of it. First, grab yourself a graphics program and a word editor. Download the template of your choice and extract it (you can use https://www.7-zip.org/download.html ) into your mods folder. Read the read me and do as instructed Choose a name for your race. USE ONLY LOWERCASE (no capital letters) WHEN NAMING YOUR RACE IN THE BAT FILE. You can find the sprites for your race humanoid YOURRACENAME Handy Dandy Programs Good news! Starbound modding only requires any basic graphics editor (that can create transparent pixels and save in .png) and any text editor. Free Graphic Programs:GIMP[www.gimp.org] paint dot NET[www.getpaint.net] Libresprite[libresprite.github.io] - Cheers emeraldquark Great Graphic Editor (if you are willing to spend $15)Aseprite[www.aseprite.org] - Or you can compile for free from the open source code https://github.com/aseprite/aseprite https://www.aseprite.org/older-versions/ - Cheers Azure Fang Free Word EditorsNotepad++[notepad-plus-plus.org] Atom[atom.io] Sublime Text[sublimetext.com] Browser Based EditorsPiskel[www.piskelapp.com] Editpad[www.editpad.org] Photopea[photopea.com] File CompressingPNGGauntlet[pnggauntlet.com] - Shrinks .png file sizes. 7Zip[www.7-zip.org] - To unpack and pack any file in general. PAKit[pakit.ibraheemrodrigues.com] - To pak and unpak starbound mods. (Note, do not pak a mod if you are uploading it to steam, it will do it for you). Free Audio EditorAudacity[www.audacityteam.org] Tenacity [tenacityaudio.org] Making GifsScreenToGif[www.screentogif.com] The Template I have currently created 2 templates for race making. One basic and one advanced. Note objects protectorate objects protectorateship.animation Not needed. Should be removed. Basic includes:[github.com] S.A.I.L. Respawn Cinematic Teleport Codex Hair and Body parts Interface Outfits Basic Sword Ship and Ship assets Recipes Sfx Hurt sounds Shiplocker Treasure Pool Dialog Npc stuff Advanced includes[github.com] All Tier armours - various races Race Spawner Custom ship pet - Fennix Penguin Merchant (craft at inventors table) A simple particle effect. Hat with the effect added to it. (purchase at merchant) Race Spawner (purchase at merchant) Blank banners (purchase at merchant) Basic furniture with your race's colony tag (purchase at merchant) +All what is in the basic version Stripped Back includes[github.com] Hair and body parts Interface Shiplocker Treasure Pool Dialog NPC patches Uses Glitch ship Uses human respawn cinematic Prefer Steam? Basic Advanced Stripped Back Prefer Chucklefish Forums? Basic[community.playstarbound.com] Advanced[community.playstarbound.com] Stripped Back[community.playstarbound.com] Prefer nexus mods? Basic[www.nexusmods.com] Advanced[www.nexusmods.com] Stripped Back[www.nexusmods.com] Sprite Templateshttps://github.com/DrPvtSkittles/Skittles-Template-Goodies/releases/tag/starbound Character ExtenderYou can't see your custom race without one. I prefer to use Kawa's xbawks-mode character [community.playstarbound.com] Naming your race For the purpose of this guide, I will stick to using the advanced template throughout. Once you have downloaded it from the website of your choice you will notice its in .7z format. This format compresses the file to a smaller size than standard .zip which is why I've chosen it. To extract this file you will need 7zip[www.7-zip.org], its free, open source and can open many different compressed files. After extraction, place the folder in your 'mods' folder, that is located in your 'Starbound' folder. Chucklefish doesn't like bat files: To turn the ADVANCED_RACE_TEMPLATE_EASY_SETUP.txt into a bat file open it up in your word editor, go Save As, then Save As Type, change that to All Files. Then change the name to BASIC_RACE_TEMPLATE_EASY_SETUP.bat Tada! Now double click to run it. Now double click on the file called ADVANCED_RACE_TEMPLATE_EASY_SETUP.bat The .bat file (short for batch) is Windows only, and will not work for Linux and Mac users. You will need to source a program that will allow you to change 'skadvtest' to your race name. Picking a nameThe .bat file will ask you to choose a name longer than 3 characters. Bare in mind this name is NOT visible to the public, its for the use of Starbound, so it MUST be unique. Avoid using names like Mouse or Robot, that might be something someone else may pick. Since this name is not seen, you could pick the name 'asjuajdh', for the 'proper' then in game the race shows up as being called the Teletubbies. Do NOT use uppercase (capital letters), spaces, or any character either than the standard a-z english alphabet. Not adhering to this standard may make your race not show up in character select. For this example I will use the name 'myfirstrace'. After picking your name, press enter and wait for the .bat to finish.
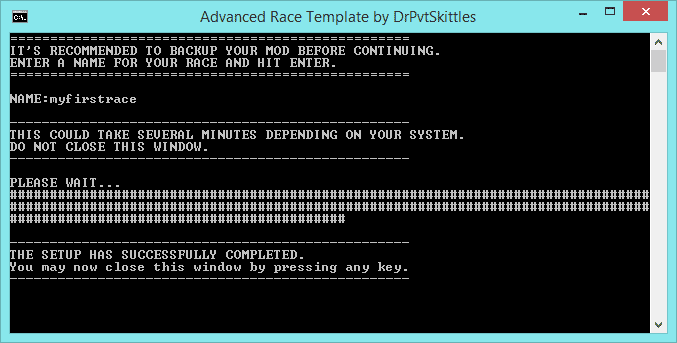
按任意键或关闭窗口。 现在我们来正式命名种族。 我的种族名称会显示在哪里? 导航至你的物种文件夹,然后找到myfirstrace.species文件【注意:本指南中使用“myfirstrace”时,你需要替换为运行.bat文件时选择的名称。此外,截图中显示的文本程序是记事本++】。
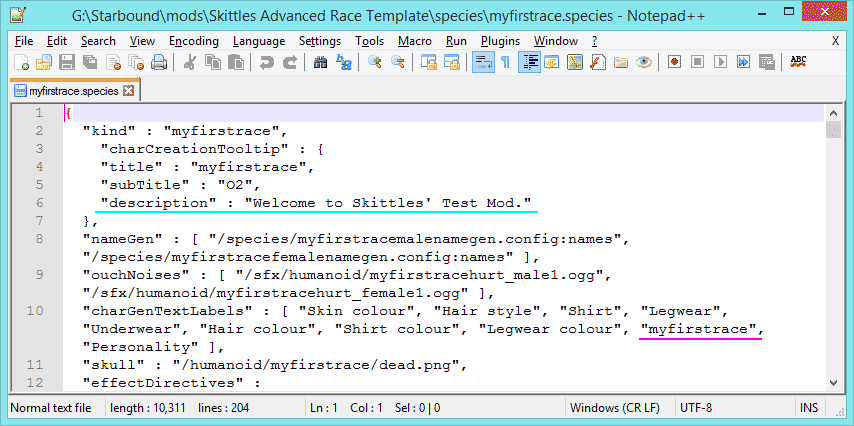
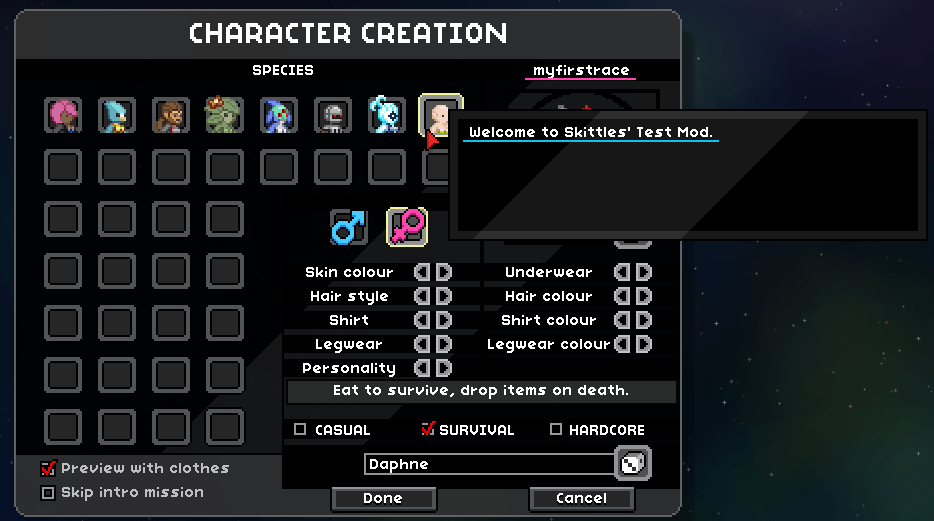
如你所见,在这里我们可以选择角色选择界面中种族的描述内容和名称。
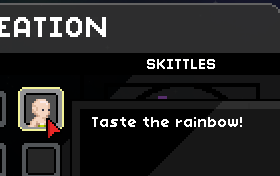
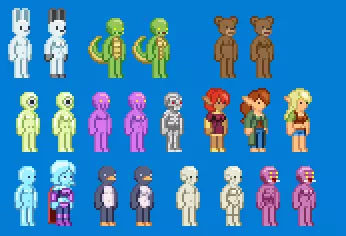
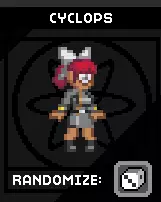
Note: Write your name in uppercase as that is what the vanilla races use. For this race, I will label them Cyclops, however the file name will remain as myfirstrace. This is to illustrate where you can put the "real" name of the race, vs where it needs to be its unique file name. Dissecting the species file This is the most important file in your race, and chances are, if your character icon in race select doesn't show, you've mucked up something here. (don't ask me why this happens :P I think its just a coding quirk) "kind" : "myfirstrace", - this needs to be the name you used in the batch file. "title" : "myfirstrace", - not sure where this shows, but it can be capitalized unlike "kind" "subTitle" : "O2", - I think this is unused now "description" : "Taste the rainbow!" -as shown above, it's the description of your race, in the character creator. "nameGen" : [ "/species/myfirstracemalenamegen.config:names", "/species/myfirstracefemalenamegen.config:names" ], - the file(s) that will be used to generate your names "ouchNoises" : [ "/sfx/humanoid/myfirstracehurt_male1.ogg", "/sfx/humanoid/myfirstracehurt_female1.ogg" ], - the location of the file your race uses when it takes damage "charGenTextLabels" : [ "Eye colour", "Hair style", "Shirt", "Legwear", "Skin Colour", "Hair colour", "Shirt colour", "Legwear colour", "CYCLOPS", "Personality" ], - straight forward. Note that the race is always in UPPERCASE "skull" : "/humanoid/myfirstrace/dead.png", - used when people play hardcore, its the death icon. "effectDirectives" : "?replace=FEFFFFFF=FFFFFFFF?replace=9bd4ffFF=ffea63FF?replace=31a6ffFF=f5bc00FF", - the most over looked item here. The start of the beam up, and the end, the colour is defined here. Change the last colour value, the one before the question mark. "defaultBlueprints" : { - This goes from Anvil to Special. These are the recipes that will be exclusive to your race. No other race can craft them. Unless you patch them into 'player.config.patch'. Tricky StuffThey MUST be written as they are, with the capitals where they stand. If included they have either a true or false value. Back up your mod before tinkering with this, as your mod may not start with the wrong line included. altColorAsFacialMaskSubColor Avian. Needs “altOptionAsUndyColor” enabled. Makes the facial mask use the undy colour. altOptionAsUndyColor Apex, Floran, Glitch, Humans, Hylotl. The alternate slider changes the colour of the undies (red bits). altOptionAsHairColor Floran, Glitch and Hylotl. Needs “headOptionAsHairColor” enabled. The alternate slider changes the 'undy colour', commonly seen as the red colour on the sprites. It allows for the hair sprites to utilise the red/undy colour as an additional colour for the hair. altOptionAsFacialMask Avian. Alternate slider changes facial mask image. bodyColorAsFacialMaskSubColor Avian. Facial mask will use the colours listed in the body section of the specie file. hairColorAsBodySubColor Glitch, Hylotl. The body will use colours listed in the hair section of the specie file. headOptionAsHairColor Floran. Glitch. Humans, Hylotl. The head slider will change the hair colour. If this is not included, then the hair colour will use the same colour of the body. headOptionAsFacialhair Apex, Avians. The head slider changes 'facial hair'. Genders For simplicity I will just talk about the male (as I will just end up repeating myself). "name" : "male", - I don't know if you can change the name of this, and I've not tried. "image" : "/interface/title/myfirstracemaleico.png", - the image that represents the male gender in the character creator. "characterImage" : "/interface/title/myfirstracemale.png", - the neat little portrait of your male race. "hair" : [ "m0", "m1", "m2", "m3", "m4", "m5" ], - you can name your hairs whatever you want, they are listed here. "shirt" : [ "myfirstraceoutfit1chest", "myfirstraceoutfit2chest", "myfirstraceoutfit3chest", "myfirstraceoutfit4chest" ], - the tops you can choose from in character select. "pants" : [ "myfirstraceoutfit1legs", "myfirstraceoutfit2legs", "myfirstraceoutfit3legs", "myfirstraceoutfit4legs" ], - the pants you can choose from in character select. "facialHairGroup" : "", "facialHair" : [ ], "facialMaskGroup" : "", "facialMask" : [ ] This is used by Apex and Avians for their beards n facial fluff. If you want to tinker with facial stuff, see the above with the 'Tricky stuff'. I encourage you to unpack the assets (see below) and check out the Avians and Apex to see how they work. For information about 'bodyColor' hex codes and what not, see below. Sprite Guide Where to start? Skittles' Template Goodies[community.playstarbound.com] Download the .7z file on the first post. In it are .psd files AND .png files that should cover all of your race making and armour making needs. Colour mapping Note, colour highlight effect is not found in notepad++, I have made this in my image editor
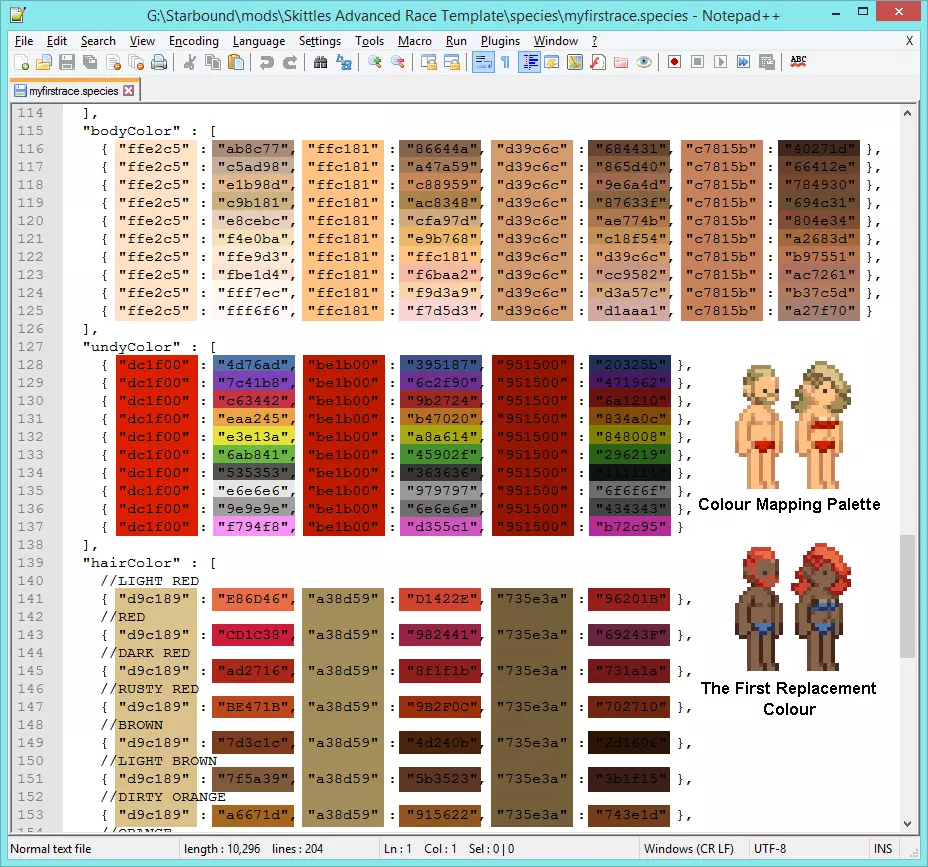
我已标出每个代码对应的颜色。第一种颜色是精灵上的颜色,第二种是将要更改为的颜色。 大多数图形程序都能提供你想要使用的颜色的十六进制代码,如果不能,你可以使用HTML颜色代码。 在本指南中,我将把一个被否决的测试版种族付诸实践。
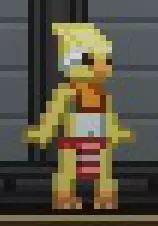
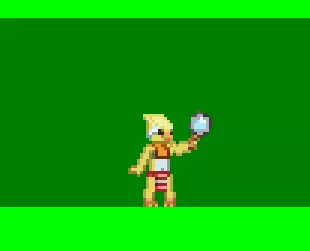
那个大眼睛种族看起来很有趣!
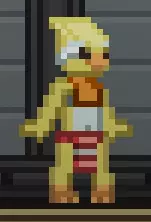
将头部颜色调整为与人体调色板相同后,新头部的外观如下。
游戏中。真有趣! 现在,在我们深入研究之前,先解压一些资源文件吧。 解压资源文件 研究原版种族有助于你按照自己的意愿创建种族。例如,如果你希望你的种族发光,可以研究诺瓦克人的种族文件来了解实现方法。 "statusEffects" : [ "novakidglow" ], "humanoidOverrides" : { "bodyFullbright" : true } 大致步骤是在你的《星界边境》文件夹中,将以下内容保存为.bat文件: @ECHO OFF ECHO STUFF "G: SteamLibrary steamapps common Starbound win32 asset_unpacker.exe" "G: SteamLibrary steamapps common Starbound assets packed.pak "G: SteamLibrary steamapps common 星界边境 assets unpacked" PAUSE 将目录位置替换为你的文件所在位置。
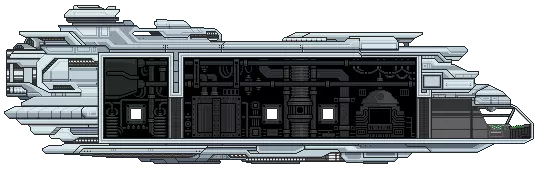
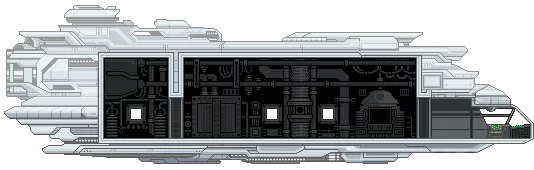
飞船 飞船的精灵图可在3个位置找到。 cinematics/story/smallship - 这是游戏开头逃离地球时的飞船。 objects protectorate objects protectorateship - 这是在保护者教程关卡结尾看到的飞船。 ships myfirstrace - 这里是你的1级到8级飞船精灵图所在位置。 每个等级都有3张对应的图像。 myfirstraceT3blocks这部分决定了飞船的物理空间和生成物品。(此处为清晰起见已放大)
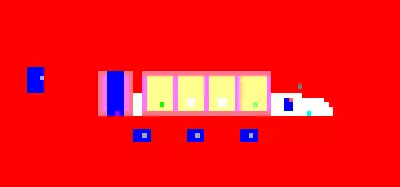
每种颜色代表一个方块或物体,这在你的blockKey.config中定义。这个彩色方块地图的大小是你的飞船的1/8。如果我们看一下blockkey中第4项,它涉及飞船墙壁、储物柜和初始宝藏。 "value" : [0, 255, 0, 255],这是颜色,[红色、绿色、蓝色和不透明度]。 "foregroundBlock" : false, "backgroundBlock" : true, 我认为这是在说明该物体或方块是位于前景、背景还是两者都有。说实话,我不知道为什么两者都列出来了,因为我不记得有任何项同时将两者设为true或同时设为false。 "backgroundMat" : "apexshipwall",这是背景中使用的材质。 "flags" : [ "shipLockerPosition" ],目前我还不清楚这是什么意思。 "level" : 0。“坚不可摧”:是,你能打破它吗?能还是不能? “物体残留”:是,不清楚 我的第一场T3级比赛 飞船的精灵
相同的精灵图,但不透明部分会比透明部分更暗。
每个等级都有一个结构文件。该文件包含船员数量、功能(如“传送”“行星航行”“星系航行”)以及所使用的图像。 需要注意一些重要事项:如果你查看飞船的扩展方式,会发现它们总是在现有飞船基础上进行添加,绝不会替换任何内容。如果采用其他方式,将会导致问题。 我不知道原因(不过我有个推测),当你认为有空间而移动飞船物品时,它们可能不会显示出来。我的推测是,虽然物品有视觉空间,但也有实际使用空间,所以如果你把椅子放得离飞船燃料指示器太近,其中一个可能就不会显示……但这只是猜测。机甲 - 【来源】:Flypotato "/recipes/mech/body" 最容易理解,其作用与护甲完全相同。 "/items/generic/mechparts/body" 也与护甲相同,只是文件中有内容告知游戏这是机甲。 "player.config.patch" 决定你的默认机甲。 "/quests/outpost" 包含给予你升级机甲的任务。 每个原版种族都有基础机甲和高级机甲。任务“Test Drive”会给你原型机甲,任务“Advanced Test Drive”会给你原型机甲的强化版本。 "/vehicles" 部分比较有趣,在其深处你会找到6张图片,每个机甲3张。每个都是不同的图层: 后方图层 - 位于玩家身后 前方图层 - 位于玩家身前 全亮图层 - 黑暗中可见的霓虹图层 每个图层都有5帧动画,构成了玩家进出机甲时的启动动画! 例如,在我的【Flypotato】模组中,机甲是一部手机,当你进出机甲时,手机手柄会挂断!

最左侧的画面是你离开机甲时的状态,最右侧的画面是你进入机甲时的状态。你可能会疑惑“为什么颜色这么难看?”,这是一种色调偏移调色板,其工作方式与装甲调色板类似!在“mechparts_body.config.patch”文件中,你可以找到决定默认调色板的变量。

不过,和盔甲不同……你无法选择每个配色方案【原词:palette】:( 游戏总会改变橙色部分。

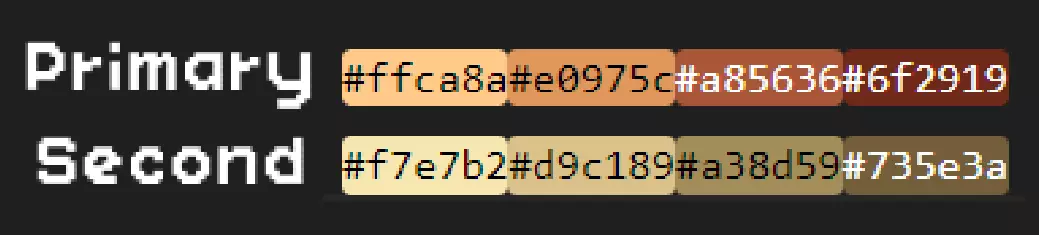
颜色1为橙色部分,【默认主色调】 颜色2为黄色部分,【默认次色调】
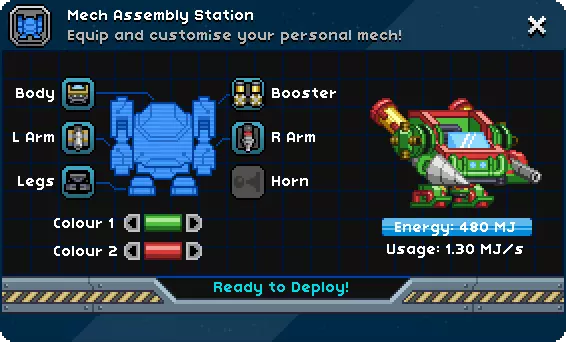
测试机甲的最佳方法是什么? 好问题! 通过输入/admin开启管理员模式,然后使用以下指令: /startquest '"mechunlock"' /completequest mechunlock 这将启动并完成机甲解锁任务。 /startquest '"mechupgrade2"' /completequest mechupgrade2 这将启动并完成高级机甲解锁任务。 之后当然要生成这些物品来制作机甲部件,将它们装配好并启动你的机甲! /spawnitem mechcraftingtable /spawnitem mechassemblystation /spawnitem mechplatform 记得再次输入/admin关闭管理员模式,这样你就能测试非管理员是否能使用你的机甲了。 在一个模组中添加多个种族 具体如何操作取决于你自己。 我建议: 使用各自的模板分别制作种族。(便于排查任何问题。) 合并前备份所有种族 合并1个种族,然后修复以下列出的文件以添加额外种族 如果要合并另一个种族,当被问及是否要覆盖文件时选择“否” 每次合并后定期测试你的模组,这一点我再怎么强调都不为过 :P 这些文件需要包含你所有的种族: ai.config.patch【ai】 charcreation.config.patch【界面窗口配置】 player.config.patch【主文件夹中】 protectorateship.object.patch【objects protectorate objects protectorateship】 quests.config.patch【任务】 shiplocker.treasurepools.patch【宝藏】 universe_server.config.patch【主文件夹中】 所有。对话框文件夹中的补丁文件 编辑种族扫描描述 看来你决定给自己找点事做: 在首次发布前我应该做些什么? 在首次发布你的模组前,有一些事情需要准备好,因为之后再添加或修改它们可能会有些麻烦。 PNGGauntlet - 这是一款用于压缩.png文件大小的优秀程序。我必须强调它的效果有多好,我的一些模组大小因此减少了一半。 其中最重要的是你在.bat文件中选择的名称。如果在首次发布后更改该名称,星界边境会将你的更新视为与之前版本不同的种族。 飞船。之后修改此内容可能会导致玩家的飞船出现故障并损坏,除非只是简单的精灵图像更改,且不改变飞船的物理结构。 故障排除 出现问题!如何修复?第一步是检查日志。你可以在星界边境文件夹的【storage】目录中找到日志。共有6个日志文件,编号1-5的是旧日志。我们需要的是顶部那个未编号的日志。
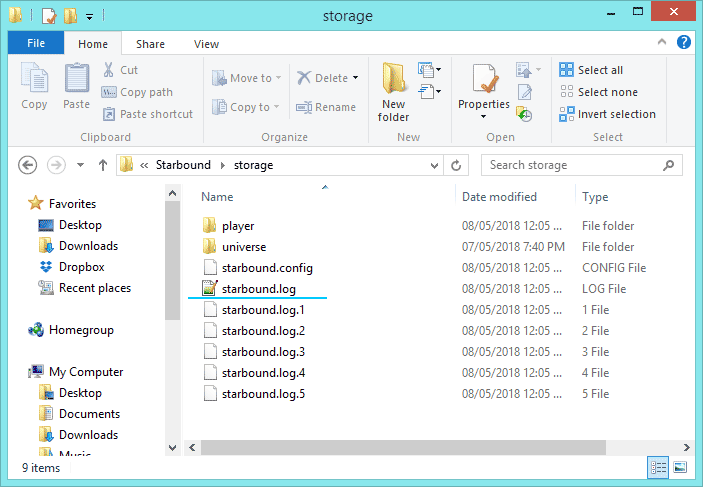
打开它,然后搜索“error”这个词,太简单了! 需要注意的事项: 我看不到我的种族!- 你是否安装了角色扩展器? 我的种族图标不见了!- 这很可能不是你的图标或图标文件夹的问题。检查你的日志,并尝试回顾在图标消失前你最后操作的内容。最常见的问题是你在使用bat文件命名种族时使用了大写字母。你的文件结构应该是“Starbound mods YOURMOD”。如果你把模组放进了额外的文件夹,星界边境将无法找到它需要的文件。如果这不起作用,可能是你在种族文件中进行了某些操作导致的。[错误] 应用程序:抛出异常,正在关闭:——这行通常位于日志底部,往往是导致游戏崩溃的原因。 [错误] 无法加载配方/recipes/anvil1/armor/tier1/myfancyclothing:(物品异常)不存在物品“wovenfabric”——哎呀,看起来你的配方中列出了一个不存在的物品。也许你想说的是“fabric”。 [错误] 对象myfancybed被定义了两次,第二次来自/objects/beds/myfancybed.object——哎呀,有两个物品具有相同的物品名称。必须修改其中一个。 [错误] 加载资源时捕获异常:/recipes/yummyfood/yumbikkie.recipe,(资源异常)无法读取JSON资源/recipes/yummyfood/yumbikkie。配方 错误原因:(Json解析异常)解析JSON时出错:数组格式错误,在9:50位置应使用逗号或右括号 - 这表示在你的配方中,第9行第50个字符处存在错误,此处应使用逗号或括号。 检查那些容易出错的逗号。 前往objects/myfirstface/myfirstracemerchant/myfirstracemerchant.object文件。 查看物品列表: "items" : [ { "item" : ["bomb", 5] }, { "item" : "myfirstracekittyhead" }, { "item" : "myfirstracebannerlarge" }, { "item" : "myfirstracebannersmall" }, { "item" : "myfirstracewoodchair" }, { "item" : "myfirstracewooddoor" }, { "item" : "myfirstracewoodenbed" }, { "item" : "myfirstracewoodendesk" }, { "item" : "spawnermyfirstrace" } ] 注意最后一项没有逗号,这一点很重要。如果在那里添加逗号,游戏将无法启动。如果从上述某一项中删除逗号,游戏也将无法启动。 上传至Steam: 双击游戏列表中的【星界边境】。
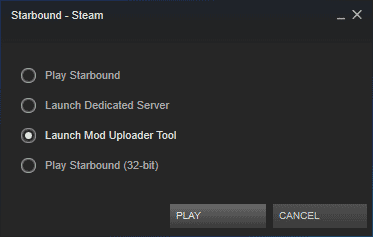
选择【启动模组上传工具】。 点击【选择模组目录】,导航至你的模组所在位置并选择该文件夹。 将此处显示的信息替换为你自己的内容。如果你的描述内容不够完善也无需担心,因为第二阶段我们将优化模组列表。
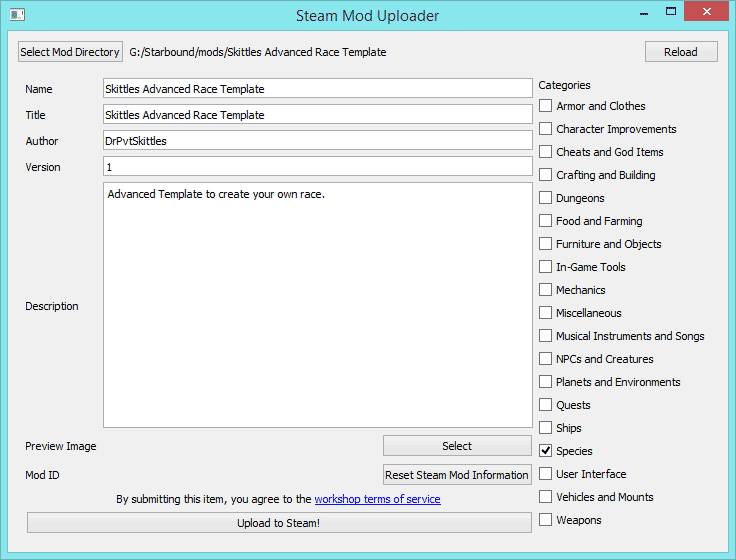
勾选右侧与你的模组相关的选项。选择模组的预览图片(图标),这是唯一可以设置的地方。为你的模组撰写简短描述,你可以在提交后、公开模组前修改该描述。从那里你可以: 编辑标题和描述 添加/编辑图片和视频 添加/移除贡献者(注意,你需要与该人成为好友) 编辑链接 允许评论 删除 添加/移除必要项目(添加你的模组所需的模组,对于种族来说,这可能是角色扩展器) 添加/移除必要DLC(对《星界边境》无用) 更改可见性(初始状态为隐藏,你可以将其设为不公开、仅好友可见或公开) 在其他地方上传 如果你选择在其他地方上传你的模组,你需要手动编辑元数据文件。 此文件位于你的模组主文件夹中,名为metadata。 它应包含: { "tags" : "Species", "author" : "DrPvtSkittles", "description" : "创建你自己种族的高级模板。"标签:通常无需修改,因为你的模组应归类到“species”(物种)类别中。 作者:你的名字 描述:模组的简要说明 友好名称:模组名称,无需唯一。 链接:通常是模组的Steam链接。不确定是否可以填写其他链接。 名称:此名称需唯一。 路径:我……不清楚。哈哈。 Steam内容ID:由Steam使用,每个Steam模组都有其唯一编号。 版本:可在此填写任意内容,字母或数字均可。我喜欢从0.1版本开始。 通常,你需要将模组压缩或打包后再上传。我倾向于使用压缩文件,这样其他人可以轻松借鉴我的作品(或者万一我退出模组制作领域,我的模组也不会被锁定在特定的《星界边境》版本中)。如果你希望将模组打包为PAK格式,我推荐使用PAKit。更多信息请阅读相关指南。 截图 建议使用PNG格式截图,因为JPEG的压缩 artifacts 在像素艺术上会非常明显。
讨厌!在Steam中,进入【设置】,然后选择【游戏中】,勾选【[截图时]保存未压缩副本】。系统会提示你选择一个截图文件夹(该文件夹将与其他截图保存位置不同)。在此新文件夹中,将保存.png格式的截图。
啊,这样好多了! “但是斯基特尔斯,我怎么在描述里插入图片呢?”我听到你问了。 让我们来获取一些模组吧。 绿幕方块 可以让你的操作轻松一点。查看模组描述了解使用方法。 额外缩放等级 这样我们就能缩放到1倍了。 在《星界边境》中,在聊天框输入: /admin(按回车) /fullbright(按回车) /spawnitem greenscreenblock 600(按回车) 搭建你的绿色平台并截图(我更喜欢用1倍缩放,之后再调整大小)。
在图像编辑器中打开它,选择绿色并将其删除。

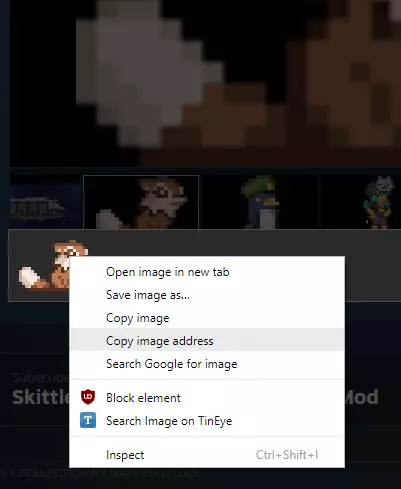
砰! 将图片上传至你的模组。 点击展示区中的图片,然后点击放大后的图片以显示原始文件,接着右键点击并选择【复制图片地址】。
在你的模组描述中,将图片链接粘贴到[img][/img]之间。 示例如下: [img]图片链接[/img] 如果链接正确,图片将以嵌入式方式显示。 你可以参考以下示例: 进阶模板 如何制作GIF? ScreenToGif[www.screentogif.com] 制作体型更小或更高的种族 Woggles是一个体型较小的种族。他们的种族文件夹中有一个自定义配置文件,用于替代原版的humanoid.config。只需在种族文件中添加"humanoidConfig" : "/species/woggle.config"这一行即可启用该配置。人形/摇摆生物文件夹包含自定义框架文件。 我自己还没尝试过制作体型更小的种族,所以无法详细说明具体操作步骤。我的建议是先添加我列出的内容,然后再进行调整。 烦人的猫咪帽 我在模组中加入了一顶有趣的小猫咪帽,作为属性和粒子效果的示例。不过,如果你删除了它使用的部分文件而非全部,可能会导致模组崩溃。 若要完全移除这顶帽子及其相关内容,你必须删除以下文件夹: 动画 粒子 属性 以及盔甲文件夹中的猫咪帽文件。假设你还没有向这些文件夹中添加任何内容,你应该可以直接删除整个文件夹。 其他有用信息 这里我会列出一些可能与种族创建无关,但对任何有抱负的模组制作者都有用的资源。 种族描述工具 非官方模组制作电子书2.0(适用于星界边境v1.05) 已占用方块ID列表 星界边境Paint.net调色板。将内容复制到记事本中,并保存为Starbound_Palette.txt【 credits:Nebulox】 ; paint.net调色板文件 ; 以分号开头的行是注释 ; 颜色以8位十六进制数字表示:aarrggbb ; 例如,以下代码表示绿色:FF00FF00 ; alpha('aa')值指定颜色的透明度。FF表示完全不透明,00表示完全透明。 ; 一个调色板必须包含九十六(96)种颜色。如果颜色数量少于此,剩余的颜色槽将被设置为白色(FFFFFFFF)。如果颜色数量多于此,多余的颜色将被忽略。无法识别内容,已删除。《星界边境》色板 包含.aco(适用于Photoshop)和.ase(适用于其他Adobe产品)格式。 待办事项 本指南目前仍在开发中。现有内容足以帮助你入门。 需要扩展的内容 头部物品的mask.png文件用于决定头发/面部部件的显示或隐藏。完全不透明表示显示全部,零不透明表示隐藏。