换一换
换一换 


一份帮助冒险者征服荒地的综合指南。不包含跳跃操作说明,概不退款。 本指南是什么,适合谁?

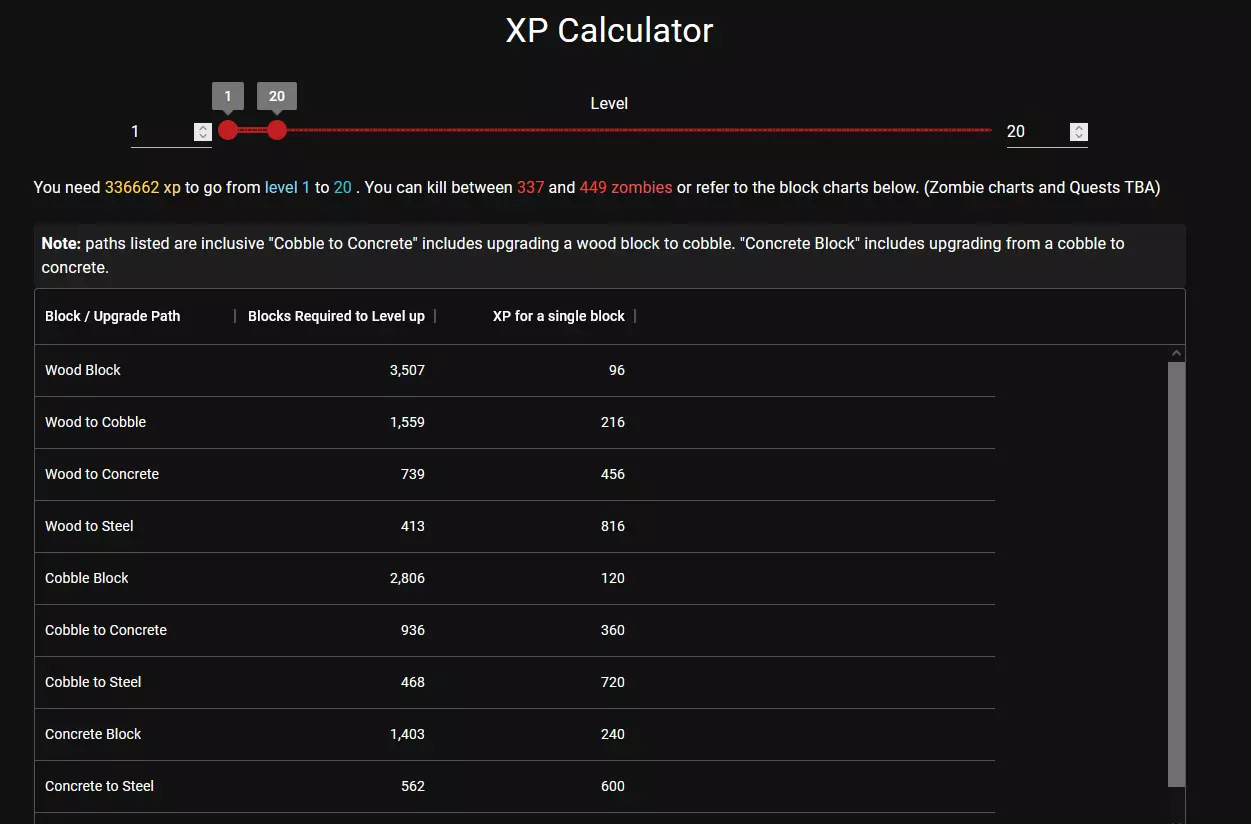
The guide started as a small compilation of quest info that I wanted to use to help me plan my "route" through the game. I since added some reference material for other things and a few work in progress quick guides. So, you want to be an adventurer?Pretty much anyone can find something useful here, but the people who will find the most use, are speedrunners, adventurers (questers), and anyone who likes to plan ahead or find optimal strategies. The build guides are good for newer players who want to make use of the Intellect perk tree. Quest Rewards —Basic Quest Types and Their Rewards—Most quests have two guaranteed reward types based on the type of quest, and the rest are randomly selected if you have points in daring adventure. Note that Tier 1 is random except for buried supplies which gives medical supplies. The guaranteed rewards table apply for Tier 2 and up. Quest Type Guaranteed Rewards Random Rewards Fetch Tools, Armor/Meds Ammo, Weapons, Schematics, Mods Buried Supplies Medical, Weapons/Armor Ammo, Tools, Schematics, Mods Clear Weapons, Armor/Meds Ammo, Tools, Schematics, Mods Fetch Clear Weapons, Armor/Meds Ammo, Tools, Schematics, Mods Restore Power Weapons, Armor/Meds Ammo, Tools, Schematics, Mods —Tier Completion Rewards—After 7 quests of a tier, you can choose a one time reward for that tier. All choices are randomly selected besides the bicycle at the end of tier 1. T1 T2 T3 T4 T5 Bicycle (guaranteed reward) Minibike Bundle (not all parts guaranteed) Motorcycle Bundle (not all parts guaranteed) 4x4 Truck Bundle (not all parts guaranteed) Gyrocopter parts (not all parts guaranteed) 2500 Dukes (as a choice not the main duke reward) 5000 Dukes (as a choice not the main duke reward) 7500 Dukes (as a choice not the main duke reward) 10k Dukes (as a choice not the main duke reward) 13k Dukes (as a choice not the main duke reward) Helmet Light Schematic Mining Helmet Night vision goggles Battery Bank Bundle Solar Bank bundle Forge 3 Farm Plots and Seeds Farm plots and seeds Military Armor Bundle (quality 3 set) Military Armor Set bonus (quality 5-6) Farm plots and seeds x3 Gun + Ammo Leather Armor Bundle (quality 3 set) Steel Armor Bundle (quality 3 set) Steel armor set bonus (quality 5-6) Ammo crafting bundle Workbench Iron Armor Bundle (quality 3 set) Gun Bundle (gun + some ammo) Shotgun Turret Bundle Gun + Ammo Nailgun Dart Trap Bundle Concrete Blocks x500 Auto Turret Bundle Cloth Armor Cloth Armor Bundle Security System Bundle (sirens and tripwires) Blade trap bundle (10 blade traps and wire relays) Forged Steel x100 Scrap Armor Scrap Armor Bundle Generator Bank Bundle Food Bundle (10 meals) Legendary gun (quality 6 gun i.e. m60, deagle, etc) Wood Blocks x500 Traps Bundle (5 of each: iron spikes, barbwire, mines) Gun Bundle (gun + some ammo) Melee Mods Steel Blocks x500 Wrench Forged Iron Timed Charges Ranged Mods Melee Mods Food Lock Picks Chem Station Ranged Mods Books Cooked Meals x10 Melee Mods Ammo Crafting Bundle (100 gunpowder, buckshot, tips, casings, paper) Traps Bundle (5 of each: iron spikes, barbwire, mines) Cobblestone Blocks x500 Ranged Mods Melee Mods Melee Mods Ranged Mods Ranged Mods Dealing with Being UnluckyThroughout the guide I tend to make it sound like you're guaranteed to get great rewards, but you can definitely get very unlucky. I've maxed daring adventure early on and still managed to not get the tier rewards I wanted along with not getting the items I wanted from finishing T5 quests. With that in mind, if you're dependent on a specific tier reward, plan to finish the tier for at least 2 traders or invest in alternatives such as lucky looter, alongside daring adventure. Looting A quick overview of common loot containers to aid in deciding where you need to loot. Use in conjunction with the POI list below this section. Loot Container Loot of Interest Description Sedan Tools, Weapons, Car Parts Most of the time it'll be junk, but definitely worth checking cars Garage Box Acid, Car Parts The wiki says an auger can be found in them but I think that's outdated Construction Crate Tools, Acid, Crucible Schematic, Electrical Devices Always worth searching Small Safes Weapons, all mods, all schematics, Safe Books, ammo, gems Safe Books: Lucky Looter, Great Heist, Night Stalker Gun Safe Weapons (obviously), Book Collections: Lucky Looter, Great Heist, Night Stalker Definitely loot safes if you're interested in weapons and those books (who isn't?) Mo Electric Crate Everything related to the INT perk; robots, mods, schematics, batons, tech junkie, etc Worth raiding the electric store if you want to build electric things but don't want the perk Crack-a-Book Crate, Bookshelves/Book Piles Every schematic, and perk book Crates are your best chance at books, but the large number of bookcases at stores are better than the tower if you're after books. Pass-N-Gas Crate Tools, Vehicle parts, Tool/Workstation Schematics, Wheels Good for all things vehicles, working stiff has better chances at tools Working Stiff Crate Tools, Crafting/Building Supplies, Mining Books, Wasteland Treasures, Fireman's Almanac The tools are obvious, but knowing that you can also finish your book collection here is useful Pop-N-Pills Crate Medical Supplies, Beakers, Bar Brawler book All drunks report to the hospital please Savage Country Crate Clothes/Armor and parts, glasses, melee weapons, sewing kits, Books for: archery, spears, hunting, and clubs If you still need glasses, go to the savage country store. Shamway Foods Crate Food, Drinks Turns out you won't be finding an m60 in the food crates... Shotgun Messiah Weapons/Ammo, Book Collections: Pistol Pete, Magnum Enforcer, Shotguns, Sniper, Automatic, Urban Combat, Another great place for perk books Loot Stage TL;DR If you're using lucky looter or focusing on looting, aim for a loot stage of at least 101, and 191 towards the end game, up to a max of 290. Loot Stage Key Levels When leveling lucky looter, keep these loot stages in mind: (view your character stats to see your current loot stage) The start is when you begin seeing loot of that tier, the peak is when you'll most often find loot of that tier, the falloff is when you find very little to none of it (you'll still find unique items like books even if you pass the falloff) Note: The biome and POI you're in makes a huge difference for your loot stage, if you want the best loot stage, go to the wasteland. If you want something in-between, head to the snow biome or desert. Early in the game I prefer wherever I can find books (since loot is bad anyway), mid game I want the best loot bonus, and late game doesn't really matter since with lucky looter and a good biome you can get the best loot around level 40, which I'm calling the mid game here. Loot Tier Loot Stage Start-peak-falloff 0 - Starting Trash Items, basic schematics 1-30-60 1 - Iron gear, better schematics 41-85-130 2 - Steel, best schematics 101-170-236 3 - best items, no difference for schematics 191-290-N/A Read more about Loot Stage here[7daystodie.fandom.com]. POIs WIP list Tier 5 POI / Quest Name Length Notables factory_03 - Pop n Pills Factory Maze-like (many button activated doors), but learnable Mushrooms, medicine, lots of chem sets, acid, misc plants Skyscraper_03 - Higashi Pharmaceutical A little bit maze like and lots of running around on the outside, but not as many floors as Dishong tower Typical office loot, medicine / chemistry sets, broken vending machines Skyscraper_02 - Crack a book tower Medium (3-4 floors and a basement), can be done quickly once you know what you're doing Books crates, one high tier chest in basement Skyscraper_01 - Dishong tower Absurdly Long (many floors and you'll probably have to backtrack to get missed zombies) Desks, lots of coffee, more bookshelves than crack-a-book tower, food, construction site with concrete, cobble Hospital_01 - The Hospital Longer than crack-a-book, but it was shorter or about the same as the factory for me. Enemies were easy until top floor and far fewer than crack-a-book. Lots of working vending machines, medicine Tier 4 POI / Quest Name Notables parking_garage_02 Just a parking garage, has an army truck and a few cars. Beware of getting trapped in the end part, it's one of the few POIs I almost died in the first time. Tier 3 POI / Quest Name Notables house_old_gambrel_03 - Carl's Corn, Bob's Boars Super Corn, boars store_book_02 - Crack-a-book store Has a lot more books than the crack-a-book tower, not much different than the t2 crack-a-book Tier 2Might've just been chance, but most of the Tier 2 quests had a broken workbench. (meaning you can farm them for a schematic or wrenching). Tier 2 also has a lot of the best stores; book stores, hardware stores, electronics, etc. POI / Quest Name Notables house_old_victorian_02 Good amount of garage boxes, construction boxes, broken workbench, cobble, cement house_old_bungalow_08 Destroyed workbench motel_01 I tend to think of this quest as a resource gathering one. There are few zombies and Lots of things to wrench, nightstands/clothing piles to find glasses/clothing, and sinks/cars for acid. Doors give brass doorknobs with the book perk, 28 total. Contains a zombie dog, vulture, and bathtubs with flesh making this place great all around for resources. store_book_01 - Crack-a-book store Has a lot more books than the crack-a-book tower store_hardware_01 - Working Stiff store Good for farming tools/mining books/motor tool parts. This particular one also has a garden section with flowers, rock piles, and cement. Also has a couple bookcases office_03 Generic office with 2 cars, broken vendings, and other wrenchables Tier 1 POI / Quest Name Notables house_old_modular_08 - Greenhouse Has a small variety of plants, so it's good for starting a farm, 2 vultures for feathers / farm meat... house_old_modular_05 2 Landmines and 2 dogs at entrance house_old_victorian_05 A few garage boxes, gun store box, shamway boxes, savage country box. Lots of corpses, a destroyed generator bank, and 2 strong zombies in basement with military tents Exp Calculator / Perk Planner I'm working on some tools that you can use here[sonata26.github.io] for planning or quick calculations while in-game. Updates for the tools are on hold until A21 since perks are being reworked. Early version of the XP tool
冒险者技能、装备配置与规划 这里提供通用的规划和技巧。

When should you level the Daring Adventure perk?Basically, just refer to the tier completion rewards list above and plan according to your playstyle. Here's how I would plan when to level it: T1 - No levels in daring adventure needed. I always finish T1 way before I could max out daring adventure for the 2 reward picks. The best choices here are: bicycle (guaranteed choice), forge, gun + ammo bundle, or a wrench. 99% of the time I go with the bicycle. But if you need a forge and don't want to build it, consider doing another trader's T1 after leveling daring adventure. T2 - Maybe a point or two into DA to roll the dice for a workbench. Best choices: Minibike bundle (for the wheels to make a motorcycle), gun + ammo, nailgun, 10 cooked meals, workbench. T3 - No additional points. I'd say motorcycle bundle, chem station, gun bundle, and timed charges are the main picks for me. T4, T5 - Max daring adventure. The rewards for T4 and T5 are amazing, and you'll want to choose two of them from each. For T4, I'd probably prioritize 500 concrete blocks along with whatever I needed. T5 I'd go for an armor set, solar bank, 500 steel blocks. At this point I probably have weapons and/or can purchase them, so I'd go for the top tier armor sets and base building sets. If you're at risk of finishing T4 before maxing daring adventure for the 2 reward picks, then go to another trader and finish their tiers to get anything you wanted but didn't get. How much time do you have?Sometimes you're in a hurry to return to the trader before they close or you're rushing to build defenses before a blood moon starts and you need to know how many minutes you have left. At default settings (18 hours of sunlight, 60 minutes days) every in-game hour is about 2 and a half minutes. The trader opens at 06:05. For other times, just add or subtract 25 seconds per 10 minutes (see table below). Day Length in Minutes Time Per in-game Hour MM:SS 120 05:00 90 03:45 60 02:30 50 02:05 40 01:40 30 01:15 20 00:50 10 00:25 How many resources to build a base?Assume you'll need around 200 blocks for a small horde base, and 500 for medium sized projects. Adjust the estimates to your build style and multiply by the 100 blocks column to get your resources needed. I don't know about you, but I'd much rather quest for a chance to get the 500 tier reward blocks and purchase cobblestones/concrete from traders. Block Recipe Resources for 100 blocks Resources for 500 blocks Wood Block 10 Wood 1000 Wood 5000 Wood Cobblestone Block 10 Cobblestone Rocks (10 clay + 10 stones) 1000 Cobblestone Rocks (1000 clay + 1000 stones) 5000 Cobblestone Rocks (5000 clay + 5000 stones) Concrete Block 10 Concrete Mix (10 sand, 10 stone, 10 cement)(120 stones total) 1000 Concrete Mix (1000 sand, 1000 stone, 1000 cement)(12,000 stones total) 5000 Concrete Mix (5000 sand, 5000 stone, 5000 cement)(60,000 stones total) Steel Block 10 Forged Steel (200 iron, 100 clay) 1000 Forged Steel (20,000 iron, 10,000 clay) 5000 Forged Steel (100,000 iron, 50,000 clay) How to Quickly Obtain a Motorcycle Detailed guide TBA but here's a quick overview of what you need. — Motorcycle Rush via crafting —Remember to check traders for things you need. Finishing T3 will give you a chance for the parts and guaranteed wheels. You'll need to invest points into int/grease monkey for this method of obtaining a motorcycle. Requirements: Workbench - Check garages, hardware stores for a working one or a schematic. Alternatively try to get it from the T2 completion reward (do every traders T2 and have points in daring adventurer) or level up 2 more times for the perk if you have the parts (the tools can be obtained from T1 fetch). Wrench - Do fetch quests for guaranteed tool reward choice, check trader shops Wheel x2 Check gas stations, garages, get one of the vehicle box rewards for tier completion (it always has wheels), or craft them, only acid is hard to get. Engine Wrench sedans/armytruck/bus, kill lumberjacks, loot working stiff Battery Wrench same blocks as Engine Chasis/Handlebars 30 Forged Steel: Wrench light poles, safes, or obtain from trader 20 Mechanical Parts: Wrench file cabinets, office chairs, etc 20 Duct Tape: Purchase from trader or stab corpses for 140 bones 9 Electrical Parts: Wrench Electronics, not hard to get 10 Leather: Break or scrap leather chairs/couches 1 Headlight: Wrench cars or loot garages How to Reach Quest T5 by Day 3-4 Detailed walkthrough TBA but you can find the latest speedruns here[www.speedrun.com]. Horde Night Aside Here's an "Adventurers Handbook for Questing in the Apocalypse" exclusive secret for determining if it's horde night with 99% less steps for the low price of freeeee. It's time to play, "is it divisible by seven!?"

How to Determine if it's Horde Night (divisible by seven)Here are the steps to determine if a number is divisible by 7 faster than your friends can look at the guidebook for dummies, our leading competitor on wasteland survival... Example 1: For this first example we'll pretend we're on day 315. Step 1: Take the last digit of the number, multiply it by 2 and subtract it from the left side (the 31) --> We take 5 out, multiply it by 2 and get 10. --> Then subtract 31 - 10 = 21 Step 2: If the resulting number (21) is 0 or divisible by 7 then the original number (315) is divisible by 7. If you still don't know, then repeat the steps on the new number. --> 21 is divisible by 7, therefore 315 is divisible by 7 and you're about to die because it's horde night. Example 2: Day 86 --> 6 * 2 = 12 --> 8 - 12 = -4 --> 86 is not divisible by 7 Example 3: Day 4865 --> 5 * 2 = 10 --> 486 - 10 = 476 (don't know so repeat the steps again) --> 6 * 2 = 12 --> 47 - 12 = 35 (divisible by 7) --> Day 4865 is horde night Choosing a Weapon Keep in mind what other abilities your perk tree of choice has that helps with survival and also note that if you're playing on a low difficulty (<= nomad), then any weapon is easily viable. The point of this list is to aid in making an efficient choice for your perk build. - Perception -TL;DR Great ranged weapon tree, expensive, not many benefits besides combat. Ranged weapons and explosives are fantastic from this tree, but can be costly and difficult to use effectively. A rocket launcher with rocket frags, and maxed demolitions can do 1,050 damage (~2000 with atom junkies or headshots). Being able to explode safes with timed charges is fun and allows you to quickly get in and out. Sniper rifles are good, but you can easily be overrun if you take too long to aim. Spears I haven't used since their release but I assume they're still not the best choices (although still usable, so go for it if you like spears). Besides range weapons and explosives, the other perks to get here are Penetrator (allows you to headshot zombies in a line with AP ammo), salvage op if you're doing lots of harvesting, and lucky looter (best maxed around level 40). - Strength -TL;DR Easiest to use, has a nice balance of combat and utility. The strength tree is tempting to always take, but you might not need it if you're focusing on quests. Three of the strongest weapon types are in this tree, shotguns, clubs, and sledge hammers. Shotguns will one-hit most zombies in the head and they're worth investing into if you're going down this tree anyway. Clubs/Sledges outperform other melee types on higher difficulties and are the main choice of melee for most players. Clubs vs Sledgehammer - For me the quick answer is, "do you want to invest in Sexual Tyrannosaurus?". If you're going sledge, you'll need more points into it. A club can do with just one or two point. You might want to invest in sexrex if you're using lots of non-motorized tools e.g. mining with a pickaxe and base building. Late game and doing T5 quests, melee becomes a lot less viable even with these strong melee weapons, so keep that in mind. Utility - The main reason strength is so tempting, is because every perk within it is useful and top tier. You can be the best fighter, and the best miner, and the best cook, and the tankiest. When to Skip Strength? - If you're rushing for T5 quests you'll get motorized tools and a choice of 500 blocks to build a base with anyway and may want to consider not going into the strength tree at all. Then you can focus on a tree with your preferred ranged weapon / utility perks (such as fortitude). Another example would be a Perception based salvager or any kind of build that generates lots of dukes, since you could buy everything you need. - Fortitude -TL;DR Difficult to use from level 1, very strong late game, great for farming. Machine guns - are great but eat through lots of ammo. Not much else to say here. Brawling - It's very difficult to use low level knuckles and you may want to wait until you have some of the bar brawling books, and a farm setup. Late game with beer, heavy armor, and all the books, you'll be unstoppable. Farming - The living off the land perk is practically a necessity if you want to do any kind of farming, and you'll need 5 levels of fortitude for it (3 with glasses and chowder). The huntsman perk also aids in gathering rotten flesh for farms. Healing and Buffs - Healing factor is great for brawling but it supposedly makes you burn way more calories, so you'll need a farm setup for it. - Iron Gut I often put a point or two into just for longer coffee/food/candy buffs, but it also helps when playing as a nomad/quester or if you're using Healing Factor. - Cardio is sometimes worth putting a point into for speedrunning quests or if you sprint through pois but iron gut is always better IMO - Pain Tolerance I think is only for reducing max hp loss and not damage taken. So it's not worth it for me personally. - Agility -TL;DR Extremely strong for stealth, good for non-stealth with smgs, blades are useful at lower game stages but require more tactics to use effectively. Blades - The main feature of blades is that they cause bleeding damage over time. So to use them effectively, you need to know how many hits you need to do on a zombie for it to die from bleeding, then you can focus on other zombies while it dies. I'd recommend going into a creative/debug mode world and testing if you want to use blades optimally, or just experiment while clearing POIs. Blades are often used over clubs/sledge hammers for speedruns (see 100 zombies speedruns)[www.speedrun.com] but fall off late game. The lack of any ability to stun/knockdown zombies means you'll have a hard time dealing with ferals. And once you reach radiated zombies, your bleed damage is almost totally negated unless you have the rad remover mod for your weapon. Bows/Stealth - If you can remain hidden, then you can output the most damage in the game using a crossbow with the hidden strike perk. And sneaking around doesn't have to be slow, it might take some practice, but you can very quickly one-shot every zombie (even radiated cops!) and clear POIs faster than other perk trees. The problem is some POIs will trigger a group of zombies even if you're completely hidden and this negates your stealth bonuses. It's great for early and late game, but mid game loud builds can gather and clear zombies faster or at the same speed (at the cost of lots of ammo if it's late game). Explosive arrows are good (amazing if you hit a stealth headshot) but not as good as rocket frags. Pistols / SMGs - I haven't tested these much but a pistol can be used for faster stealth missions with a silencer (just switch to a crossbow for tough enemies), SMGs are on par with machine guns if not better, revolvers/deagle can't be used effectively with a silencer, but can act somewhat like a sniper rifle? Moving Quickly - The rest of the perks aid in being quick and synergize with other trees. - Parkour allows you to jump 3 blocks and this is good for unique base designs, getting away from zombies, taking shortcuts in POIs etc. - Flurry of Blows & Run and Gun improve combat capabilities with melee/guns - Light armor I'm not sure if it's worth taking but you probably shouldn't be wearing heavy armor if you go with a stealth build - Intellect -TL;DR Best utility, gimmicky melee, usually used with another perk tree. Stun Baton - It does very little damage and is best used defensively or to setup zombies for turrets or another weapon / explosive. With perks, mods, and maybe the candy, it can be very strong for stunning groups of zombies, but you'll need something else to finish them off. Robotics - Fantastic for horde night or plopping down in a POI for extra firepower, and the new drone which is basically a flying storage chest. Utility - Since I do quests often, intellect is my favorite tree. I don't think anything really needs explaining... 2 quest rewards, better prices, more items in shop, more healing, best base building, and the ability to build vehicles way before you're at the game stage to loot the recipes for them. T5 Clear Quest Scenario - Let's just imagine you were doing the Crack-a-Book tower quest and only had int. You could setup two turrets by the door (if you want to use a stun baton then maybe two gun turrets, or if you want to use a gun, then two sledge turrets to keep them back), lure the zombies out and clear them pretty quickly and safely. If you get caught off guard, the stun baton will buy you time to setup. Int Builds Since this guide's primary focus is questing, it'd make sense to talk about potential intellect focused builds and how it can synergize with every perk tree. Note: These builds are for the difficulty of "Warrior" and below, they can be used on higher but you'll have to adjust for your preferences. They're also very flexible, some points are situational and not meant to be followed 1:1. All builds are playtested in a vanilla (for the most part) multiplayer server, while playing mostly solo. I believe this setup covers most player's playstyles. 5-3 Rule The 5-3 rule is when you put 5 points into an attribute and that's enough to get 3 points in most perks. Any higher than 5 into the attribute and it costs more than one point. So, to remain flexible, most of the builds use 5 into an attribute and 3 into perks. I think this covers most needs since 3 into a combat is enough unless you're on Insane difficulty, 3 pts into farming for the full bonuses, etc. Basic Adventurer Core Perks For the intellect builds we'll use these perks in all of them which require around level 10 to get max daring adventure: Intellect level 7 (8 with nerdy glasses) Barter 4 (optional but highly recommended, get Daring Adventurer first) Daring Adventurer 4 (gives 2 rewards, requires 8 intellect) Perception + Int (The Wealthy Raider) Perception is probably my favorite for multiplayer, but it can take some time to get used to explosives (if you choose to do so), if you've never used them before. You can get filthy rich from either scrapping things, lucky looting, or just questing. There's also great PVP potential with long range sniper rifles and all kinds of explosives. Core Build Perception 5 Dead eye 3 - can try swapping for spears or demo only if you plan on using a different ranged weapon. Personally, I went with 3 pts late game intending to craft a rifle and forgot about it. Demolitions 3 (optional but recommend trying) Lucky Looter 4 (looter 4 and salvage 4 don't even need more pts into perception!) Salvage 4 Int 7 (8 with glasses) Barter 4 Daring Adventure 4 Early Game: My main focus early game was getting a workbench (explosives, vehicle crafting), a vehicle, and locating the T5 POIs (any large buildings). For melee weapons I started with a club/bone knife, then used a pipe baton, found or got an iron sledge as a quest reward, and finally ending on a steel sledge from quest rewards. For range I used a bow, then whatever guns I got from quests, and especially explosives. For perks I focused solely on Int until I had daring adventure maxed (this was important to get the workbench from T2). There were a few key levels where the choice was situational and I saved points until I knew which route I was going to take. Intellect level 5 - can get the first level of secret stash, or motorcycle mechanic with nerdy glasses. Intellect level 6 - Motorcycle mechanic Intellect level 7 - 2nd secret stash, and max daring adventurer with nerdy glasses Intellect level 8 - maxed daring adventurer For me, I decided to gamble on barter and found a motorcycle + nerdy glasses which I promptly bought just to avoid having to invest points into grease monkey and the 8th level of int which saved me 5 points! From there I invested into salvage, demolitions, and the situational perks mentioned below. I didn't get Dead Eye or lucky looter until later on. Actually, I haven't even used a sniper rifle by the level 40 mark because I wasn't lucky to get one, but the points are there for me to craft one when I feel like it. The explosives and whatever other guns I had were enough. Level 43: So besides the core build, every other perk was situational or preference based. For this build I was playing in a mostly vanilla (it had ServerTools, and minor things like bigger stacks) multiplayer server, and because the server just reset, I was able to quickly become the wealthiest trader on the server by making use of Lucky Looter, Salvage, Barter, and Daring Adventurer. I hardly wrenched anything but I still had several stacks of every part, a chest full of engines, batteries, etc. You can of course sell those parts to the trader, but I just hoarded them and instead traded books/gear with players. Because of lucky looter I was able to get schematics and books no one else had, along with high tier items from questing, netting me around 300-500k dukes by this level (server has about 20 players on average). Strength 2 (3 with cigar) Sexy-T 1 - Used this early on because I got an iron sledge, then a steel sledge from quest rewards, and it helped with some early tool usage. Heavy Armor 1 - Decided to go with heavy armor because that's what I found good quality of first, and it goes well with explosives. Miner 69er 1 - again to help with solo building the shop I wanted, avoided putting more since an auger + mining book completion is good enough Mother Lode 3 - Honestly didn't really need it because I can buy concrete mix from joel, have found/bought enough gun powder or can suffer through mining it. There's also the chance of 500 blocks for quest reward but I've been unlucky. But because I intend to build for fun I put pts into it. Fortitude 1 Healing Factor 1 - Grabbed this at lvl 43 because I broke my arm and wanted to heal faster. Worth grabbing if you're investing into fortitude and hit yourself with explosives or take damage often. Iron Gut 1 - I use a lot of coffee and vitamins when questing early on and I enjoy the longer buffs. The reduced food/water also helps when playing nomadic. Int 7 (same as core) Robotics 3 - I found a T6 turret pretty early so I've been investing into this because there's nothing else I really need. Some things I would consider: Going into farming instead of mining. Since you can easily afford to buy materials either by selling scrap parts or lucky loot, there's little need to mine yourself. Farming would allow more healing perks, easy food. The downside is you lose incentive to invest into strength/heavy armor Grease Monkey at Intellect 6 - Part of my main focus early on was getting a motorcycle, I ended up gambling points into barter and found a motorcycle at the trader for around 20k (less if you have other barter buffs). You'll get rich faster if you go with barter, buy a motorcycle, and start wrenching things. Agility - I like parkour but I finished "The Great Heist" book series and have the mod for my shoes so it's not needed for fall damage at least. I will probably invest into it for the jump height later on. Advanced Engineering - I found all the schematics I needed, the only consideration is if I want trap xp... I do like traps but can do without the little bit of xp Lockpicking - I found the schematic but have plenty of lockpicks without crafting just from finding them and a quest reward that gave 50. I also always buy candy from the trader and have plenty of the one that gives you a 100% lockpick chance. Going Forward For me, I would invest into fortitude level 2-4 for farming with glasses/chowder + healing, more int for better barter + turrets, parkour for the +1 jump height, more mining perks, and perception for the Penetrator perk and another loot boost + damage increase. I like to spread pts around like this for solo play, but it's all situational and depends on your playstyle, so you get whatever you want at this point. Trading for Fame and Profit Just to give you an idea of how much money a perception build can make, here's some data... these prices are with level 4 barter and no other bonuses. Most items you can sell 3 stacks to a trader. - Wrenchables - Mechanical Parts $7.68 ea, $7,680 for a stack of 1000 Electrical parts $7.68 ea, $7,680 for a stack of 1000 Scrap Polymers: $3.84 ea, $3,840 for a stack of 1000 Springs: $5.28 ea, $2640 for a stack of 500 Short Iron Pipe: $2.88 ea, $1,440 for a stack of 500 Headlight: $57.58 ea, $2,879 for a stack of 50 - Craftables - Minibike Handlebars: $432 ea, $21,600 for a stack of 50 4x4 Truck Accessories: $2,160 ea, $108,000 for a stack of 50 Gyrocopter Accessories: $3,600 ea, $180,000 for a stack of 50 - Craftables that Require more iron - Robotic Turret Ammo: $2.16 ea, $2,160 for a stack of 1,000 (3k iron) Drawbridge: $6,624 ea, max 3 Gear Mods With lucky looter or just questing, you'll obtain lots of equipment and the parts to make equipment. If you install mods (price of the mod irrelevant) into the gear, you can double the selling price. So, make use of all the parts you find, and craft mods before selling them. If you prefer to mine and craft™, you could sell iron tools. A T5 iron pickaxe with 3 mods installed goes for $2,430 and you can sell 3 of them for a total of $7,290 (with max barter, magnum. cigar, and a sugar butt), then do the same with other types of tools. To start a tool empire, you'll probably want a super corn farm for glue, coffee farm for mining, and of course powered tools for all the iron. - Becoming a millionaire -Now that we broke down the prices and explored some crafting options, let's see if we could become a millionaire salvage op tycoon lord... We can get max salvage op by level 8 + glasses, we'll also want max barter before we sell, but all we need to start is salvage op. Let's take a closer look at gyrocopter accessories and minibike handlebars: * Gyro accessories * without grease monkey - 49 electrical - 8 headlight - 75 iron pipe - 15 mechanical parts - 6 springs With Grease Monkey: - 33 Electrical - 8 Headlight - 50 iron pipe - 10 mechanical - 4 spring * Minbike Handlebars (with grease monkey)* - 4 Mechanical parts - 2 spring - 1 headlight - 2 electrical - 6 iron pipe Since headlights are going to be our bottleneck, grease monkey is less than useful, but feel free to get it if you have the points to spare. Price Breakdown The plan is to gain stacks of our desired goods and sell them with maxed barter. Maxed barter being: the perk maxed, awesome sauce, sugar butts, magnum book, cigar, and pumpkin cheesecake if you intend to farm some xp after. If you manage to sell 50 gyro parts, you can also sell/buy 1000 electrical parts repeatedly for up to an extra ~200k exp at the expense of your dukes. With the max barter bonus, we get these prices: - Gyro accessories sell for $5,100 each, $255,000 for a stack. - Minibike handlebars: $612 ea, $30,600 for a stack, $4,896 for 8 of them (8 headlights for a gyro) Obtaining Headlights If you do the math, all the parts needed for a stack of accessories isn't that hard to obtain... except for one thing, headlights. The only way to obtain them is to wrench vehicles, and POI spotlights. So keep a lookout for those while questing. The only place I can think of that has both is Red Mesa, a T4 mission in the desert, which also has other wrenchables and I got around 10 headlights. They're all located at the start, meaning you could wrench them then reset the mission if you wanted. So either run that mission a bunch of times or wrench every car/spotlight you find while playing normally. You could also buy the headlights at a cut to your profit. With all barter bonuses except for awesome sauce, and pumpkin cheesecake, you'll lose about half your profit on minibike handles. Traders can sell up to 20 headlights at a time at a 60% chance. But a millionaire?... We'd need 1,634 headlights for minibikes, or 1,568 for gyros to hit one million dukes... not impossible by any means—especially if you combine it with another strategy like selling iron tools—but I'd rather play normally and enjoy a little extra income from every headlight I find. A Note on Vending Machines One cheesy strategy I left out here but is very useful to know, is using the *rentable* vending machines at traders, even if you play single player. You can put items in for full price without any points into barter and every 2-3 days an item or two will be bought by an NPC. Note that the buying happens when you open the vending machine, so you have to close it and open it again for the dukes to appear. You don't need to collect it everyday either... if you leave it for say 24 days (log off a server for 24 hours for example), then the next time you open it a bunch of items will be bought. It can be a bit slow, and buggy (I've had items not sell for their full value or just disappear, item stacks are especially buggy), but you sell items for their full price making this great with items like drawbridges (~27k dukes) or the accessories discussed previously. If you're leveling Miner 69er, then another great option is stone axes which sell for ~1k dukes at quality level 4 and can be made constantly in bulk for a little extra income. If you happen to be playing "Darkness Falls" mod, then clay bowls are best early on. Also, note that selling items below full price has no effect on buying speed, and items marked up above the default 100% price will be bought at the normal price anyways due to a bug in the code. A minimum of 5 (IIRC) items have to be in the machine or nothing will be bought otherwise (just load it up with stone axes or whatever you can craft). Strength + Int Build (Casual, Long-Term Build) TBA Wrenchables Here's a list I compiled of all wrenchable (harvestable with a wrench-like tool) resources. You can use it to find forged steel for example, which can be obtained from insecure safes and light poles without having to craft it. Note: Steam can't handle large tables or lists so it's split up into smaller lists and the names are based on the ones in XML so a little bit of guess work is required. — ammoGasCan — cntArmyTruckOpen cntBusSchool cntCar03SedanDamage1Master cntCar03SedanDamage2Master— carBattery — cntArmyTruckOpen cntBusSchool cntCar03SedanDamage1Master— casinoCoin — parkingMeter— oldCash — cntCashRegisterEmpty couchModernArm restaurantBooth sectionalLeatherCouchSofaArm sectionalPlaidCouchSofaMiddle— resourceCloth — bunkBedMade— resourceElectricParts — airConditionVentFan airConditionVentFanDouble airConditioner autoTurret batterybank breakerBoxClosed cashRegisterConveyorMiddle ceilingLight07 chandelierLight cntArmyTruckOpen cntBeerCooler cntBusSchool cntCar03SedanDamage0Master cntCar03SedanDamage1Master cntCar03SedanDamage2Master cntCashRegisterEmpty cntCoffeeMaker List compiled by @Sonata on Steam cntCollapsedBatterybank cntCollapsedGeneratorbank cntCollapsedSolarbank cntFreezerMaster cntGasPumpRandomLootHelper cntIceMachine cntMicrowaveOvenVer1Open cntRetroFridgeVer1Closed cntStoreElectronicsBookShelfSpeaker cntStoreElectronicsPalletTvFallen cntStoveOldVer1Closed cntToaster cntTrashCompactor cntVendingMachine2Broken cntWasherOpen conduit01 controlPanelBase01 dartTrap decoComputerDeskTopPC decoHoistMagnet decoTreadmill electricfencepost electrictimerrelay electricwirerelay escalatorBottom factoryConveyorBelt fusebox generatorbank hospitalBed industrialLight01 loudspeaker motionsensor motionsensorPOI parkingMeter porchLight01 powerSwitch01 pressureplate pressureplateLong pushButtonSwitch01 questGeneratorSmall satelliteDish satelliteDishSmall signShopBookStore signShopGas signShopGrocery signShopGunStore signShopOpen signShopPharmacy signShopToolStore speaker spotlightNailedDownPOI spotlightPlayer streetLight01 streetLightClassic tv wallClock xRayDisplayLight1 xRayDisplayLight2— resourceForgedIron — batterybank cementMixer chemistryStation cntATMInsecure cntCollapsedBatterybank cntCollapsedCementMixer cntCollapsedChemistryStation cntCollapsedGeneratorbank cntCollapsedSolarbank cntCollapsedWorkbench cntGunSafeInsecure cntHardenedChestInsecure cntMunitionsBox cntMunitionsBoxArmy cntVendingMachine2Broken cntWallSafeInsecure decoWeightBar garageDoorHouse generatorbank questGeneratorSmall workbench— resourceForgedSteel — chandelierLight cntATMInsecure cntGunSafeInsecure cntHardenedChestInsecure cntMunitionsBox cntMunitionsBoxArmy cntVendingMachine2Broken streetLight01 utilityTransformer— resourceHeadlight — cntArmyTruckOpen cntBusSchool cntCar03SedanDamage0Master cntCar03SedanDamage2Master spotlightNailedDownPOI— resourceLeather — cntCar03SedanDamage0Master— resourceMechanicalParts — airConditionVentFan airConditionVentFanDouble airConditioner autoTurret cashRegisterConveyorMiddle ceilingFanLight cementMixer cntATMInsecure cntArmyTruckOpen cntBusSchool cntCar03SedanDamage0Master cntCar03SedanDamage1Master cntCar03SedanDamage2Master cntCharcoalGrillRandomLootHelper cntCollapsedCementMixer cntCollapsedGeneratorbank cntCollapsedWorkbench cntFileCabinetShortRandomLootHelper cntGasGrillRandomLootHelper cntGasPumpRandomLootHelper cntGunSafeInsecure cntHardenedChestInsecure cntIceMachine cntMicrowaveOvenVer1Open cntPostMailbox cntRetroFridgeVer1Closed cntRollingToolBoxOpen cntShoppingCart cntShoppingCartEmpty cntTiltTruckEmpty cntToolBoxOffsetOpen cntToolBoxOpen cntTrashCompactor cntUtilityCartEmpty cntVendingMachine2Broken cntWallOven cntWallSafeInsecure cntWasherOpen dartTrap decoCarMotorFlat decoClawFootBathTub decoHandTruck decoHoistHook decoMetalSlide decoStationaryBike decoSwingSet decoTreadmill doorDamageMockup doorRotatingMockup fireHydrant garageDoorHouse garageDoorHouseBrown garageDoorIndustrial generatorbank hospitalBed jailDoorStatic jailDoorStaticCentered laundryCartEmpty manholeHatch metalPipeValve metalReinforcedWoodDrawBridge metalReinforcedWoodDrawBridgeDouble officeChair01 parkingMeter pipeSmallValve pressureplate pressureplateLong questGeneratorSmall rollUpDoor3x3White rollUpDoor5x4White rollUpDoor7x4White semiFlatbedBack semiFlatbedFront semiFlatbedMiddleWheels utilityTransformer workbench— resourceMetalPipe — airConditionVentFan airConditionVentFanDouble airConditioner bed02 breakerBoxClosed bunkBedFrame chemistryStation cntBeerCooler cntBusSchool cntCar03SedanDamage2Master cntCollapsedChemistryStation cntFreezerMaster cntRetroFridgeVer1Closed cntTiltTruckEmpty cntWallOven cntWasherOpen controlPanelBase01 decoCarMotorFlat drinkingfountainSingle escalatorBottom factoryConveyorBelt fireHydrant flagPoleAmerican flagPoleWhiteRiver gurneyBed hospitalBed metalPipeStraight pipeSmall1x1— resourceMilitaryFiber — barracksChair— resourceOil — cntArmyTruckOpen cntBusSchool cntCar03SedanDamage2Master— resourceRadiator — airConditioner cntArmyTruckOpen cntBusSchool cntCar03SedanDamage1Master radiatorHouse01— resourceScrapBrass — candelabraLight churchBell churchBell1x2x1 churchBellHanging1x2x1 keyRackWood01 pipeSmallValve pipeSmallWallValve— resourceScrapIron — bathroomStallWall cntBin cntDomedTrashCanCornerEmpty cntDomedTrashCanEmpty cntFancyGarbageCan cntLockersShortOpen cntToilet01 conduit01 keyRackBoxMetal01 laundryCartEmpty parkingMeter powerSwitch01 pushButtonSwitch01— resourceScrapPolymers — batterybank ceilingLight07 cntBruteStyleTrashCanEmpty cntBusSchool cntCar03SedanDamage2Master cntCollapsedBatterybank cntCollapsedSolarbank cntLaundryBasketVer1Empty cntLuggageMediumOpen cntMicrowaveOvenVer1Open cntRetroFridgeVer1Closed cntSuitcase cntTiltTruckEmpty cntWaterCoolerFull decoComputerDeskTopPC industrialLight01 satelliteDish satelliteDishSmall signShopBookStore signShopGas signShopGrocery signShopGunStore signShopOpen signShopPharmacy signShopToolStore tv wallClock xRayDisplayLight1 xRayDisplayLight2 Wrenchables Pt 2 — resourceSpring — bed02 breakerBoxClosed bunkBedFrame cementMixer cntATMInsecure cntBusSchool cntCar03SedanDamage2Master cntCollapsedCementMixer cntGunSafeInsecure cntHardenedChestInsecure cntWallSafeInsecure controlPanelBase01 doorDamageMockup doorRotatingMockup escalatorBottom factoryConveyorBelt garageDoorHouse garageDoorHouseBrown garageDoorIndustrial jailDoorStatic jailDoorStaticCentered manholeHatch metalReinforcedWoodDrawBridge metalReinforcedWoodDrawBridgeDouble rollUpDoor3x3White rollUpDoor5x4White rollUpDoor7x4White semiFlatbedBack semiFlatbedMiddleWheels— resourceWood — chemistryStation cntCollapsedChemistryStation cntCollapsedWorkbench keyRackWood01 workbench— smallEngine — cntArmyTruckOpen cntBusSchool cntCar03SedanDamage1Master decoCarMotorFlat Backup for this Guide Just in case anything happens to this guide you can access a backup on the Wayback Machine[web.archive.org]. This guide is only published to the Guides section on Steam and is written and maintained by Sonata. if you're reading it somewhere else, (such as one of the many sketchy websites that scrape guides off Steam, publish them as their own, and put ads all over it) then please consider finding the original source on Steam instead. Thank You! Congratulations you made it to the bottom... RIP mouse wheel. Thank you for checking out the guide, and if you have any suggestions or ideas just comment below. Credits & Attribution Ape picture - @PublicDomainPictures on Pixabay Random creepy things - provided by the demons that live in my closet Cat at the top with the hat - @Pipoya Speech bubble by @Kicked-in-Teeth (modified by me) Fresh soul - provided by you, the reader of this guide Typos - My cat Everything else - @Sonata on Steam