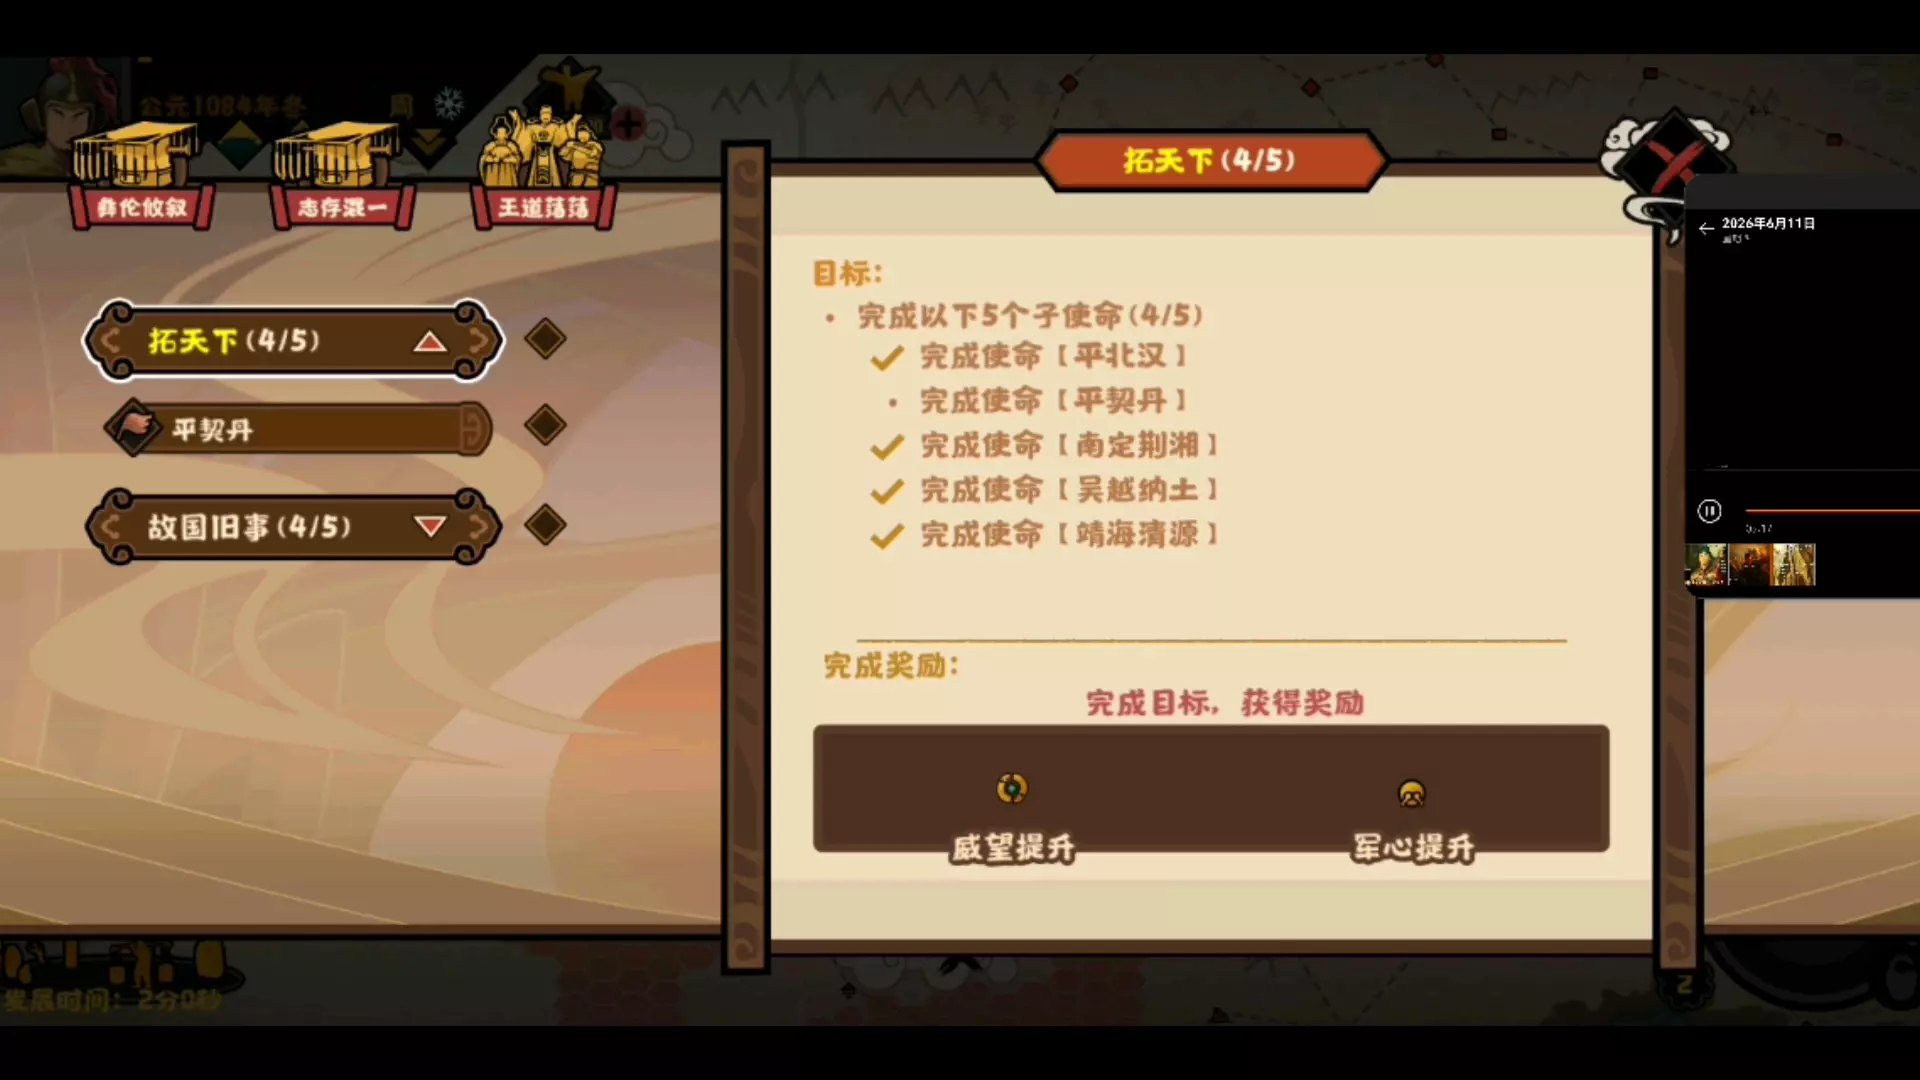
换一换
换一换 


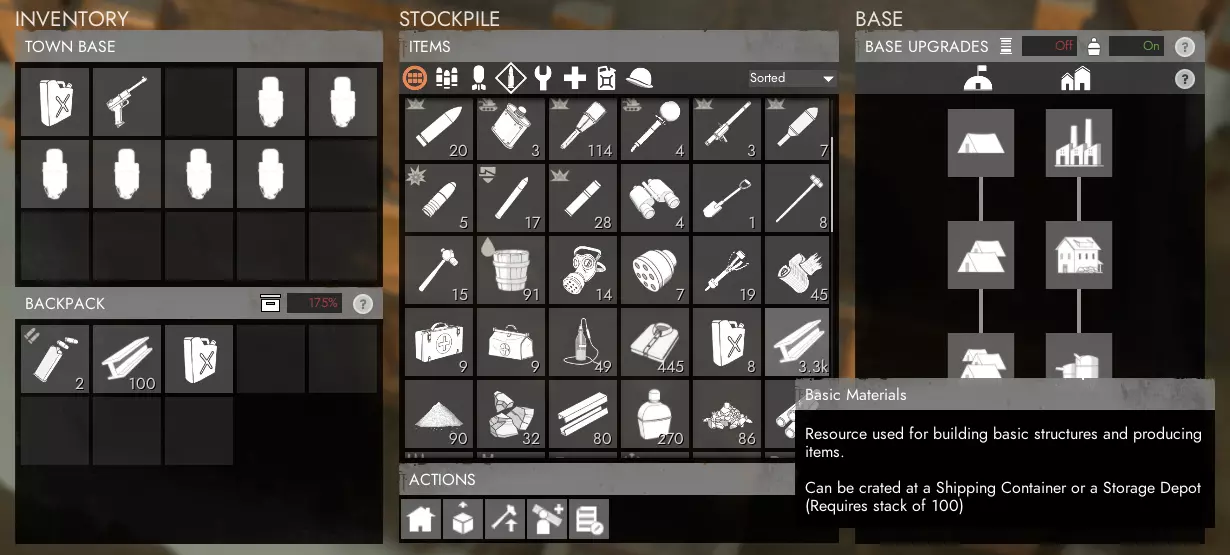
Being updated for 1.0 Inferno! An overview and explanation of the role of a Logistics player along with steps to get started and be effective with what you spend your time doing and how you spend your resources to supply the front lines. Overview If you're a new player to Foxhole, welcome! This guide is designed to provide a source of reference for everything related to logistics, and to lay out some of the basic tasks you'll need to do when doing logistics. Feel free to skip through this guide, especially as returning player, to view the portions of the guide which you need. Towards the bottom of this guide, there is a section titled "=== Roles of a Logistics Player and Getting Started ===" (Work in Progress), which you're welcome to skip to in order to get playing. I would highly recommend reading through the individual sections related to other logistics knowledge, structures, and vehicles, as I will go further in depth in those sections about each thing. As always, leave a comment if there's anything that I'm missing, needs clarified or corrected, or needs to be updated from an older version (I'm still working on updating a few portions of some sections, but if I've missed something smaller, that would still need mentioned). === Useful Logistics Knowledge === These are things in which aren't necessary for you to play, but primarily are things in which you'll learn through mistakes and experience playing the game over time. I would highly recommend reading and implementing these things sooner rather than later, as it'll help you be safer, more successful, and better off in the long run. Legend of Abbreviated Structure & Resource Names Below is a list of the different abbreviations commonly used by players during the game, which will also be abbreviated in this guide. While not mandatory for everyone to use these abbreviations, it does make typing and describing them quicker and easier, so it would be beneficial to know these well enough to tell what others are referring to. Resources Bmats = Basic Materials (Refined from Salvage at Refinery) Rmats = Refined Materials (Refined from Components at Refinery) Emats = Explosive Materials (Refined from Salvage at Refinery) HEmats = Heavy Explosive Materials (Refined from Sulfur at Refinery) Cmats = Concrete Materials (Made from Components at Concrete Mixer)For more information on collecting and refining, see the Resource and Refinery sections below. Production SS or shirts = Soldier Supplies (Produced at Factory) GS or gsupplies = Garrison Supplies (Produced at Factory)For more information on production, see the Factory section below. Structures TH = Town Hall FOB = Forward Operating Base VF = Vehicle Factory SH = Safehouse Fort = Relic Base BB or BoB = Bunker Base or Bunker FOBFor more information on a specific structure, see the Structure section below (Only for logistics structures). Understanding and Utilizing Your Map Using Your MapTo open and close the world map, press 'M' (default). When viewing the world map, you can click and drag to pan around, and use the mouse scroll wheel to zoom in and out. To the left side of your screen, there's the Map Legend, which has toggles allowing you to turn on and off different groups of features displayed on your map. Down in the bottom left, you're able to see the region that you're in, the day (in-game time), the time of day (1430 == 2:30 pm), and when the map intelligence was last updated (in-game time). For reference, the day begins around 0600, and the night begins around 1800. On your map, you can see which faction owns which bases, and the locations where structures and resource fields are. Structures such as the watchtower and observation tower can be built to provide map intelligence over their surroundings (Their partially transparent white circle indicates range), which will reveal both friendly and enemy infantry, vehicles, and defenses. Some structures such as Town Halls, Safehouses, FOB's, and forts have an upgrade, which will allow them also to provide map intelligence. Familiarizing Yourself With The RegionsThe best way to learn your way around is by traveling around regularly. There are 37 regions for you to play in, but over time you'll get used to the roads to get from one place to another, the layouts of towns and logistics centers, and the resource fields and mine locations (Resource field/mines positions remain between wars, but the type of resource is randomized for each). Be sure to ask around for help or directions if you're lost or can't find places that are mentioned by others. Updating Map IntelAll of the intel that displays on your region map that can change position (i.e., infantry, vehicles, new/destroyed structures) will only be changed from what was last seen with a map intelligence update. To get a map update, you can access structures such as the TH, FOB, Fort, or Safehouse, or to get automatic updates every few seconds, you'll have to have a radio or radio backpack equipped. When viewing your map, you can check in the bottom left corner and compare what the current in-game day/time is with the last time it was updated. Threat AnalysisAlways use the map to continually identify the best and safest routes. There's no reason not to if you can. If you don't have a radio, spend a bit of time at a TH, SH, Relic Base, or FOB and keep refreshing your map intel while keeping an eye on friendly and enemy activity to identify where might be vulnerable. I suggest to always have a radio on you, as it's the most effective defense you can have, but it can only be useful if you're using it. Identify the situations in which you can't identify possible threats, such as along roads without watchtower and defensive coverage, or risky frontlines. It is always better to ask if it is safe first before going, and I might even suggest in some cases where there has been known contact recently to refuse to travel until it has been explicitly stated to you that it is clear. The front line might want supplies, but it is rarely worth the risk of those supplies being lost to the enemy if there is a high probability of enemies being in that area. Both sides can use each others equipment (excluding uniforms), so anything lost can be directly used against you! Map Markers that can be placed down by players don't require map intelligence updates, so be sure to be reading those if anyone's placed any down near where you're traveling. Logistics Information For Key StructuresIf you hover your mouse over a structure marker, it'll bring up a list of supplies (sorted by quantity, most to least) and base upgrades for that structure. This allows you to observe what Town Halls, FOB's , Relic Bases, and Safehouses have and need supplies without having to drive there yourself. You can also check Refineries and Factories to see what can be refined and produced there, and also see the progress of the base upgrades. You can also hover your mouse over resource fields and mines to check how many resource nodes are left and how many resources are stored inside, respectively. Technology (Engineering Center) You can view the current level of technology in any friendly owned Engineering Center which is found in any major logistics town. The Engineering Center is also where you submit Iron and Aluminum to a technology in order to increase its progress, which will give you prototype kits in return for any successful research attempt. Prototype kits can be taken to any Mass Production Factory (MPF) to produce their respective item when right-clicking on it in the inventory.
地图图标 科技树分为载具和装备两个类别。载具科技树仅通过提交钢铁来升级,装备科技树仅通过提交铝材来升级。 每个科技树分为不同的等级,每个等级为独立一行,从顶部(1级)到底部(顶级)。你必须完成每个等级的一项科技,才能开始升级下一个等级。完成最后一个等级后,你将从顶部行开始再次重复此过程,逐步向下推进,但需要在剩余选项中选择一项科技进行研发。 每行在垂直线分隔符的左侧和右侧均分布有图标。当你的阵营在科技树中推进时,你可以从左侧的所有选项中选择1项科技。一旦完成,右侧的所有内容将立即自动解锁,完全免费。 在首次浏览完载具科技树的所有层级后,每行中的第二个和第三个选项将达到老手等级,这会提升载具的多项属性。例如,若某一行左侧有3个载具,其中一个是坦克。如果在首次浏览科技树时选择该坦克,它将是普通坦克。第二次选择时,它将是一级升级(图标上会显示1个黄色V形标志,并且载具会有迷彩涂装),若第三次选择,它将是二级升级(图标上显示2个黄色V形标志,并有不同的迷彩涂装) === 建筑 === 精炼厂
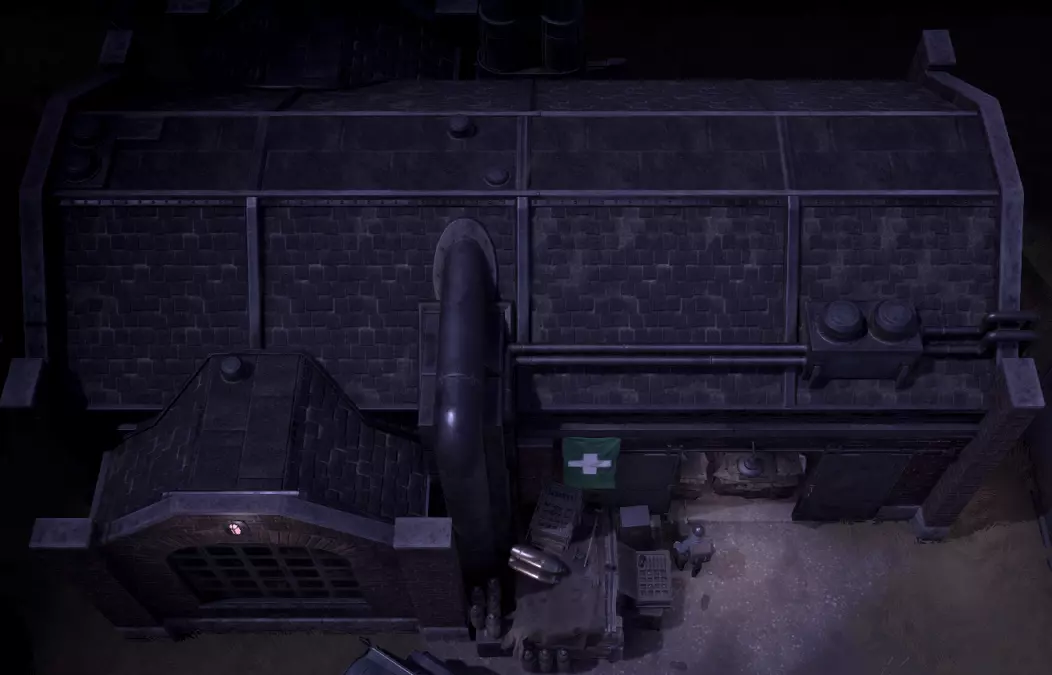
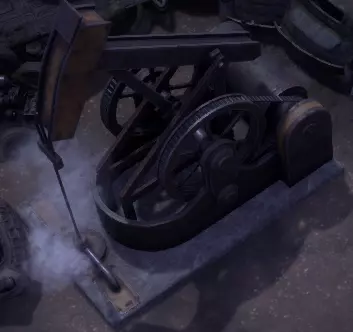
炼油厂是你可以将 salvage(废料)和 components(零部件)等原材料提炼成 bmats(基础材料)和 rmats(高级材料)等更有用资源的地方,也是将原油提炼成汽油的场所。你还必须将铁和铝提炼成合金,然后将其提交到工程中心以提升科技水平。
地图图标 精炼选项 分解---------->基础材料 分解---------->柴油 分解---------->爆炸材料 组件---------->精炼材料 硫磺---------->重型爆炸材料 煤炭---------->碎石 原油---------->汽油 铁------------>铁合金 铜------------>铜合金 铝------------>铝合金 关于精炼厂,有几点重要事项需要注意: 1. 精炼厂订单可以设置为个人订单或公共订单。 2. 个人订单会显示在精炼部分,而公共订单完成后会自动添加到精炼厂的库存中。个人订单只有在敌方玩家摧毁精炼厂本身时才能被终止,这会清除所有人的所有订单(精炼厂重建后订单也不会恢复)。 精炼厂即使在你不在线时也会持续运行。因此,在登出前开始大量需要数小时精炼的资源(例如硫磺)会带来巨大差异,这些资源在你重新上线后即可取回。 每个精炼厂的订单相互独立,例如,你可以将订单平均分配到两个精炼厂,从而在一小时内完成两小时的硫磺精炼量。 每个玩家的个人订单或公共订单可以与其他玩家的订单同时运行,这意味着你的订单无需等待其他玩家的订单完成即可开始。
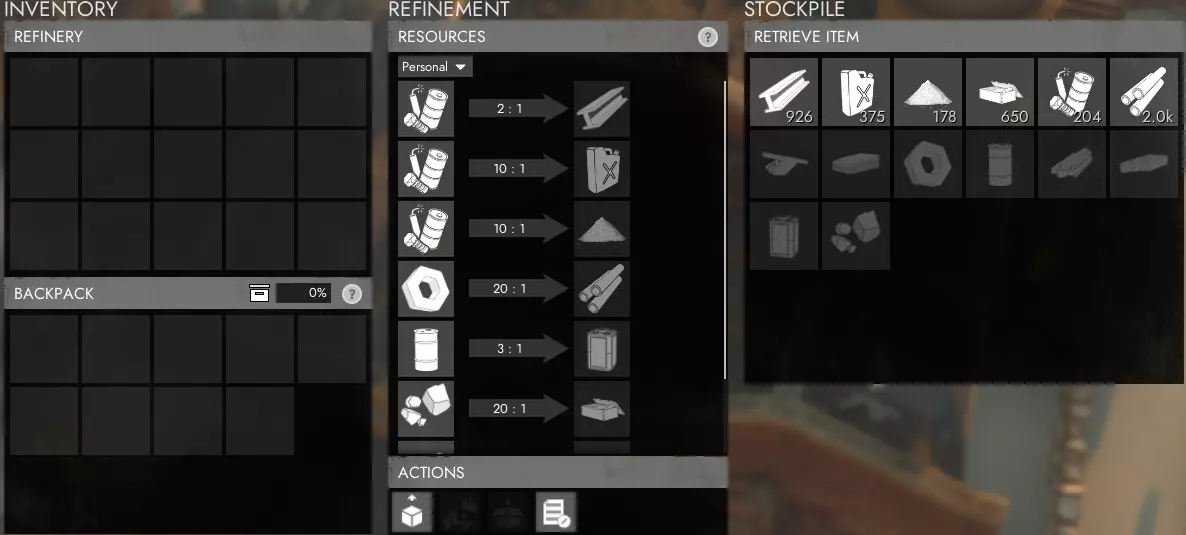
当你与精炼厂互动时,会弹出菜单(如右侧图片所示)。你可以在此处精炼各种资源。 每个精炼厂的私人队列中最多可存储10000单位基础材料(bmats)和5000单位其他资源,且无需取出。若约48-50小时未向队列中添加新资源,这些私人存储的资源将自动转入公共库存。 获取可存入小队仓库的资源 要获得可存入仓储站/海港小队仓库的资源箱(如基础材料),唯一方法是精炼私人资源队列。精炼完成后,右键点击已完成的资源,将其提取为资源箱。这些板条箱可存入小队仓库,而从精炼厂公共库存中取出的板条箱只能存入公共仓库。除此之外别无他法,若你未将资源装箱就取出,则无法撤销此操作。 资源容器 将资源容器放在精炼厂的斜坡地面上,可直接将其卸载到精炼厂库存中。此时会弹出一个菜单,你可以右键点击资源,将其直接提交到库存。或者,你也可以点击精炼厂菜单中的【提交车道设备】按钮。 精炼厂建造要求 精炼厂以及工厂等其他后勤建筑,只有在城镇大厅完成【工业升级】后,才能在城镇中建造。建造完成后,精炼厂可以精炼所有类型的资源。工厂
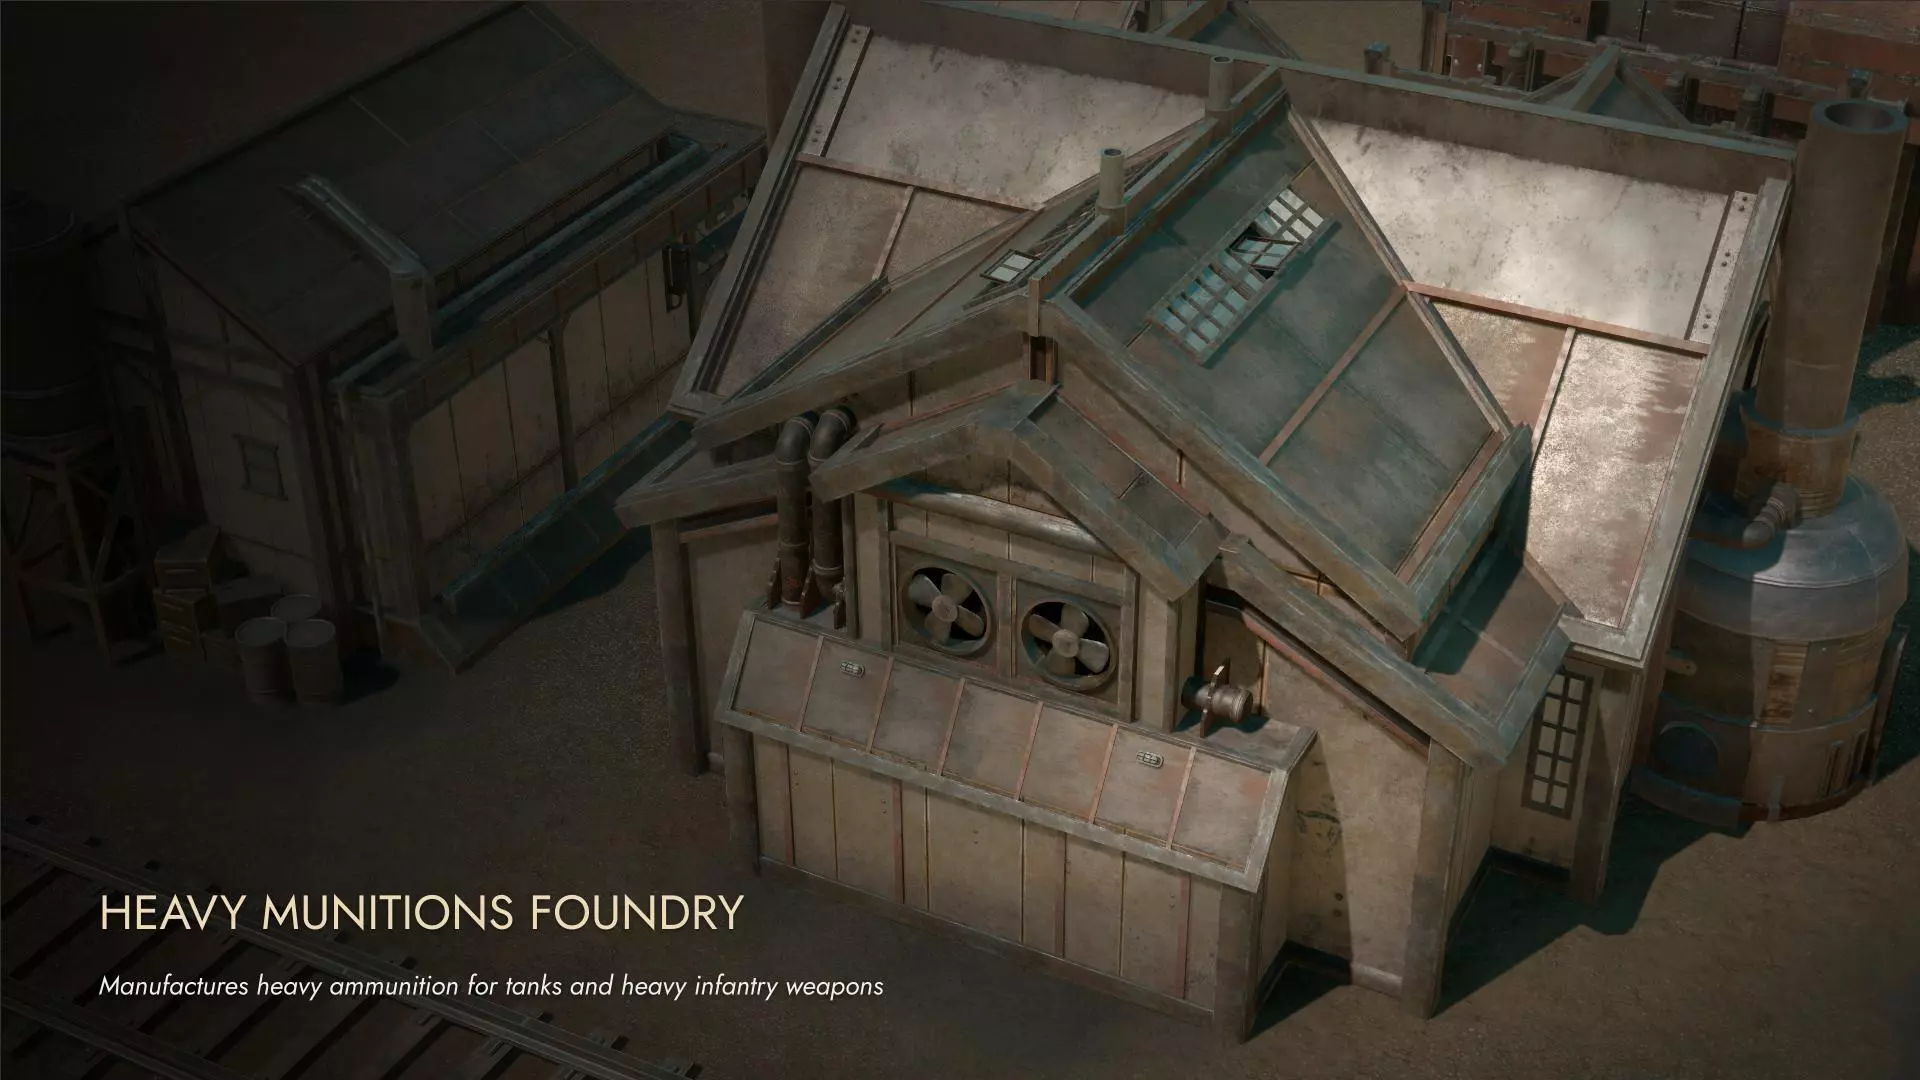
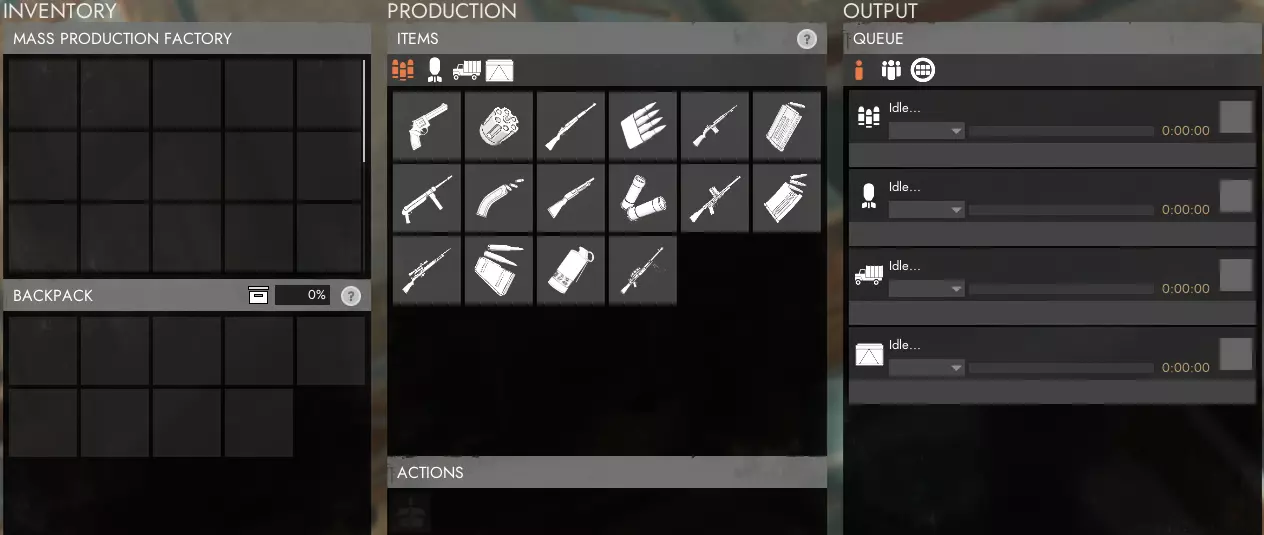
工厂是你生产武器、弹药以及其他有用工具和装备的地方,例如扳手、收音机和防毒面具。在繁忙的生产地点,这些通常是生产的瓶颈,因为每个玩家都必须等待其他玩家之前开始的所有订单完成。
地图图标 可生产的补给类别 小型武器(基础武器和弹药) 重型武器(先进武器、爆炸物和炮弹) 实用工具(工具和设备) 医疗物资(SS、绷带、急救包和创伤包) 补给品(驻军补给和地堡补给) 制服
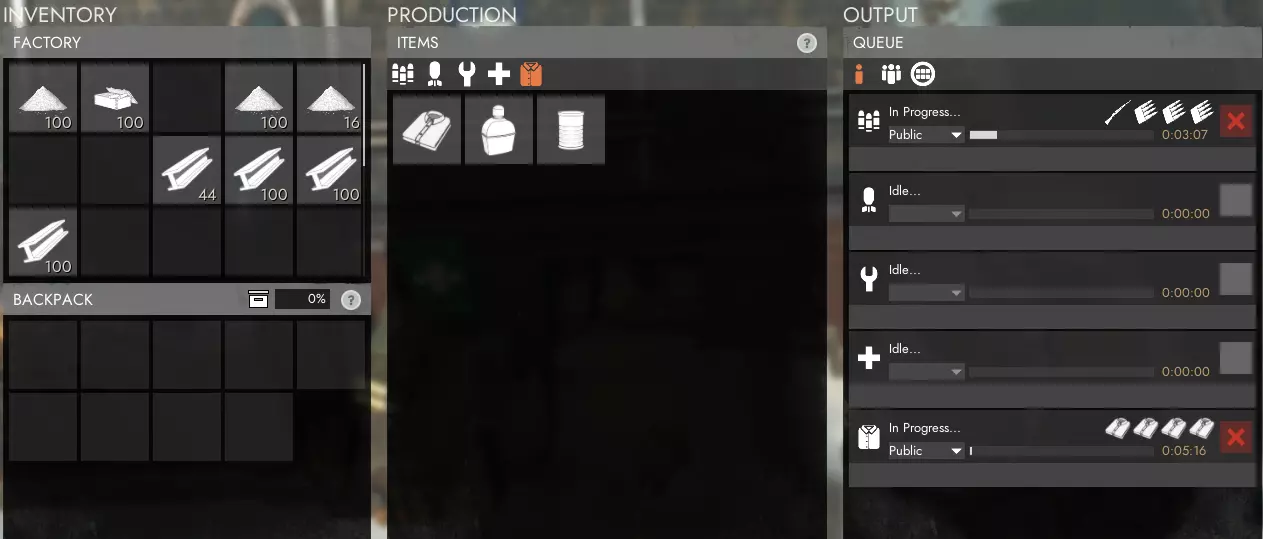
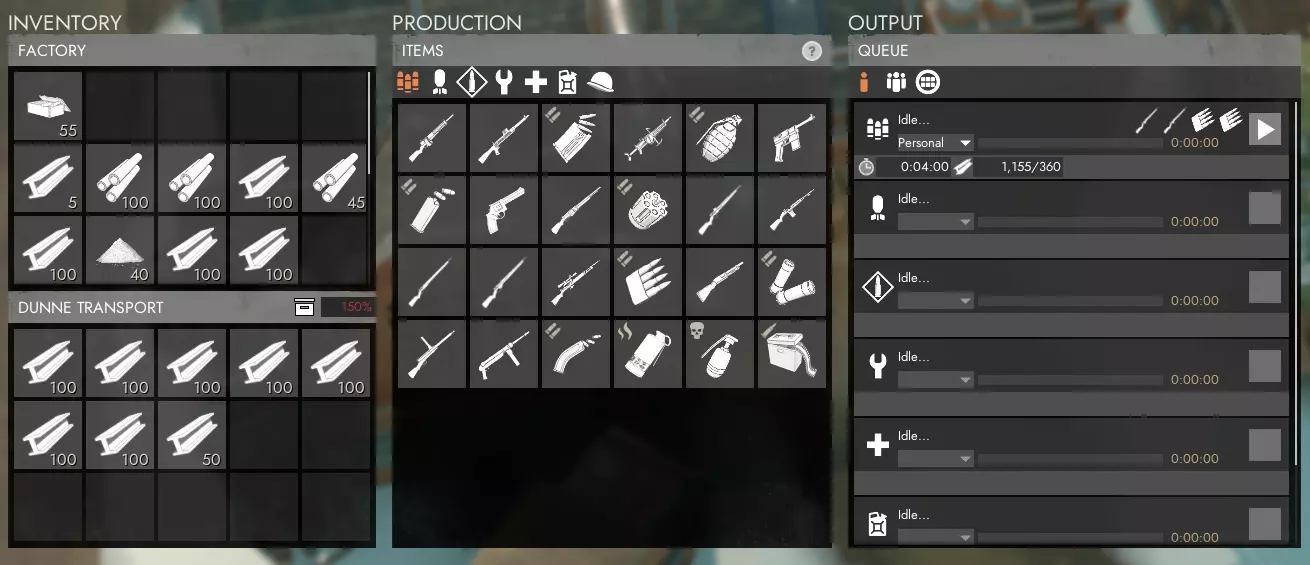
工厂建造要求 与精炼厂类似,工厂需要市政厅完成工业升级后才能建造。建成后,你可以立即生产任何类别的补给品。 订单与队列
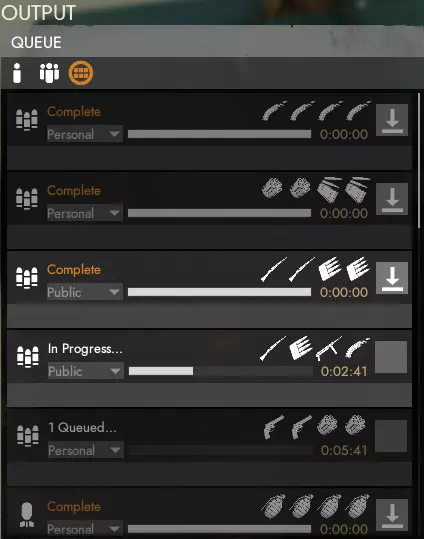
当你从工厂生产物品时,队列时间是公开的。这意味着如果有人和你在同一类别下下了订单,你必须等他们的订单完成后,你的订单才会开始。每个类别一次最多只能排队四个订单,这可能会导致你无法下达想要的订单。 你可以将订单设置为私人、小队或公开,以决定订单完成后谁可以领取。如果你切换队列标签,可以在查看自己的订单、小队订单和公开订单之间进行切换,这些订单完成后都可以领取。如果你正在生产诸如士兵补给(SS)或驻军补给(GS)这类物资,它们的重点在于生产出来,而不是由谁具体将其送到需要的地方,那么你或许应该将订单设为公开。这样一来,在需要时,有人可以直接领取,无需你亲自去取,也不必让他们自己重新下订单。如果你在订单完成后不打算立即领取,这是一种你应该遵循的基本礼仪,因为前线经常出现士兵补给耗尽的情况,而后勤人员却不得不重新开始生产衬衫,同时无法领取他人已完成的私人士兵补给订单。无论订单是私人、小队还是公共订单,若完成后约45分钟内未被领取,将会自动放入工厂的公共库存。如果公共库存中没有足够空间存放这些箱子,它们将丢失且无法找回,因此不要让工厂的库存一直处于完全满的状态。 驻军补给
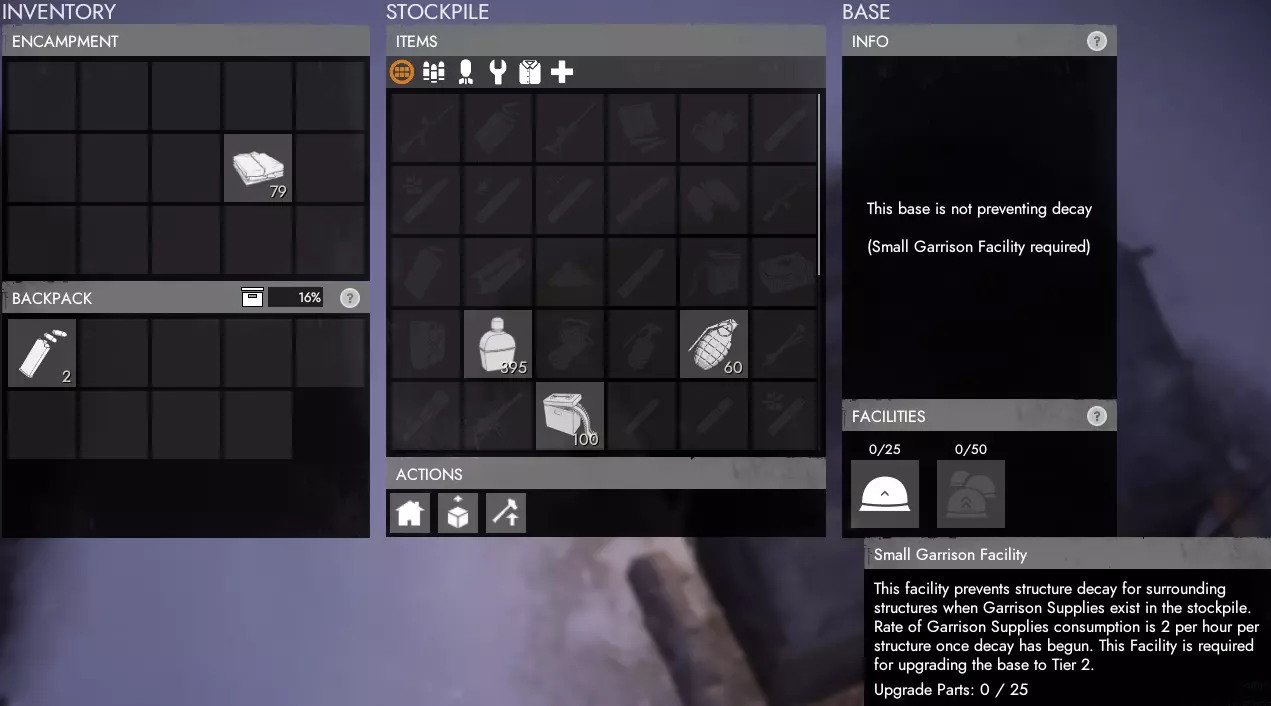
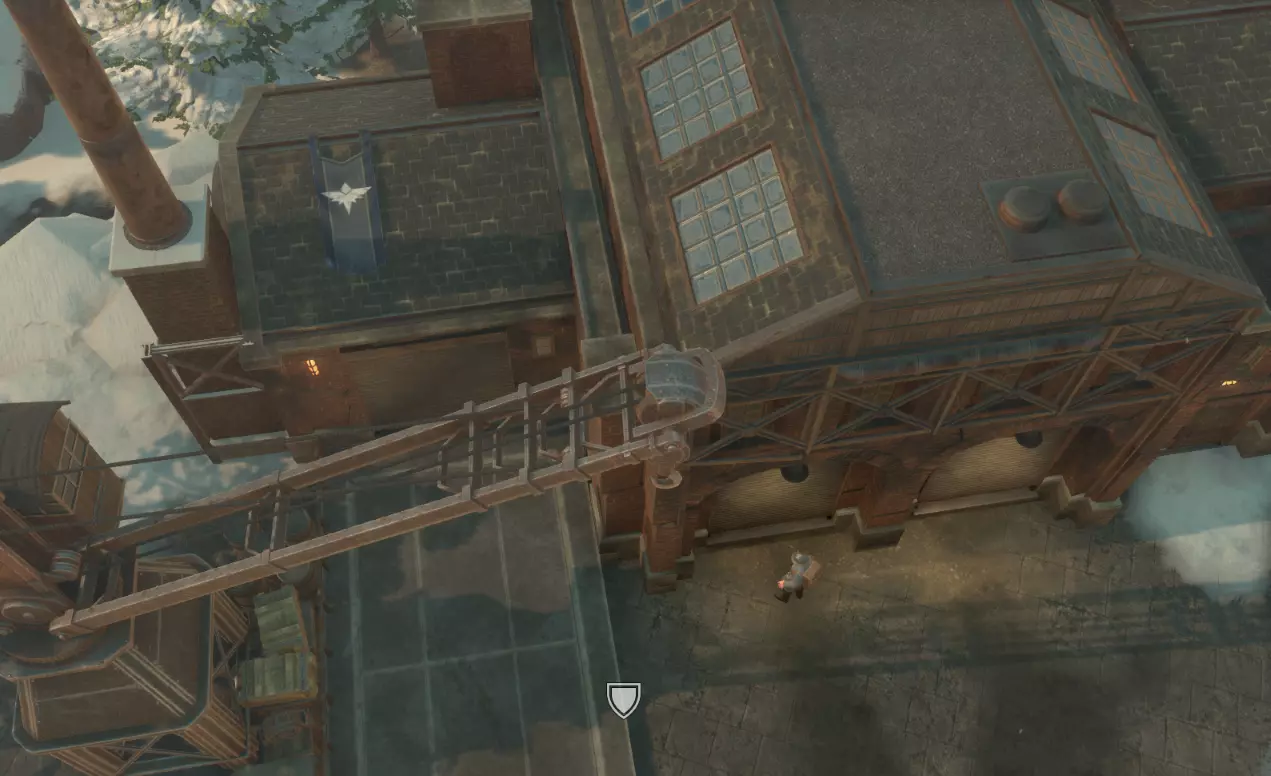
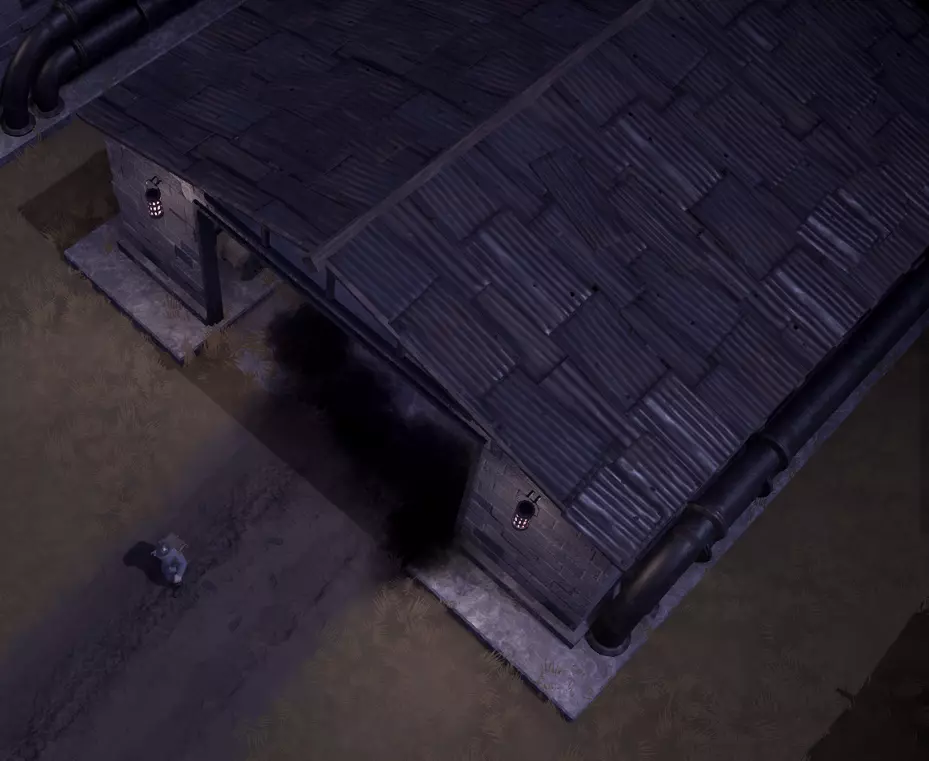
另一个需要生产并四处供应的关键资源是【驻军补给】。将这些补给储存在【战区总部(TH)】、【前沿作战基地(FOB)】和【遗迹基地】中,能够防止防御建筑不可避免的自然损耗(建筑随时间受到损伤是服务器清除玩家认定为未使用的建筑以减轻服务器负载的方式)。 不过,除非完成至少【小型驻军】升级,否则驻军补给无法防止建筑损耗。一旦建筑开始损耗(时间不定,但至少需要数小时),对于已完成【小型驻军】升级的建筑,每个正在损耗的防御建筑(包括沙袋和墙壁等)每小时会自动消耗2个驻军补给。在TH、FOB或遗迹基地范围内的任何会衰减的物品,以及大型驻军设施每小时每座会衰减的防御建筑各产生1个。大规模生产工厂
大规模生产工厂的功能与普通工厂类似,但允许你在更长时间内以折扣价生产更大批量的订单。这类工厂仅在部分物流城镇中出现。 可生产的物资类别: 小型武器(基础武器和弹药) 重型武器(先进武器、爆炸物和炮弹) 制服 载具 可运输物品
大规模生产工厂建造要求 与其他后勤建筑一样,大规模生产工厂需要市政厅完成工业升级后才能建造。建成后,你可以立即生产任何类别的补给品。 订单与队列 大规模生产工厂的独特之处在于订单系统。每个订单只能生产一种物品,但小型武器和重型武器最多可生产9个,载具和可运输物品最多可生产5个。每向订单中添加一个箱子,订单的最终成本就会额外降低10%,添加5个或更多箱子时最多可降低50%。这使得大规模生产工厂能够以相同的成本产出两倍的补给品,非常划算。另一个需要注意的是排队时间。每个订单完成所需的时间明显更长,但其他人添加到队列中的每个订单都会减少批量生产工厂完成订单的时间。 它的运作方式仍然与普通工厂类似,你必须等待排在你前面的订单完成后,你的订单才能开始。但通常情况下,如果有足够多的订单在运行,你的订单最终可能会比原本更快完成。 车库(载具工厂) 生产
车库,通常也被称为载具工厂,是生产除了指挥车和起重机之外所有地面载具的地方,而指挥车和起重机可以在指挥中心和遗迹基地周围建造。
地图图标 下图显示了载具工厂的库存以及可建造载具列表。部分载具可能因尚未完成相关科技研究而无法建造。
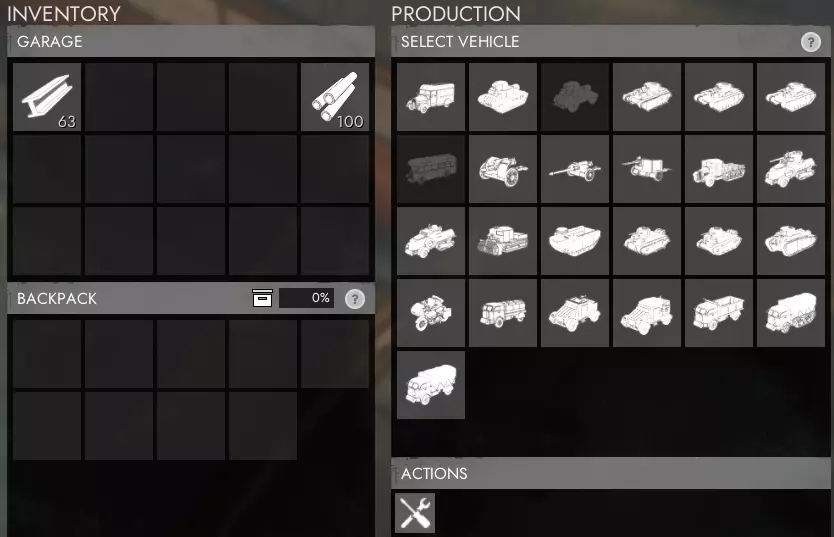
车库归阵营所有,只能建造该阵营已解锁的相应载具。如果你拥有原型套件或载具箱,需要将其带到大规模生产工厂(右键点击物品栏中的物品以加入建造队列)进行建造。 你还可以对车库内的任何载具执行全面维修。这会完全修复载具,并补充隐藏的【装甲值】,该值会增加装甲载具弹开炮弹的几率,而装甲值会因承受伤害而降低。 建造场
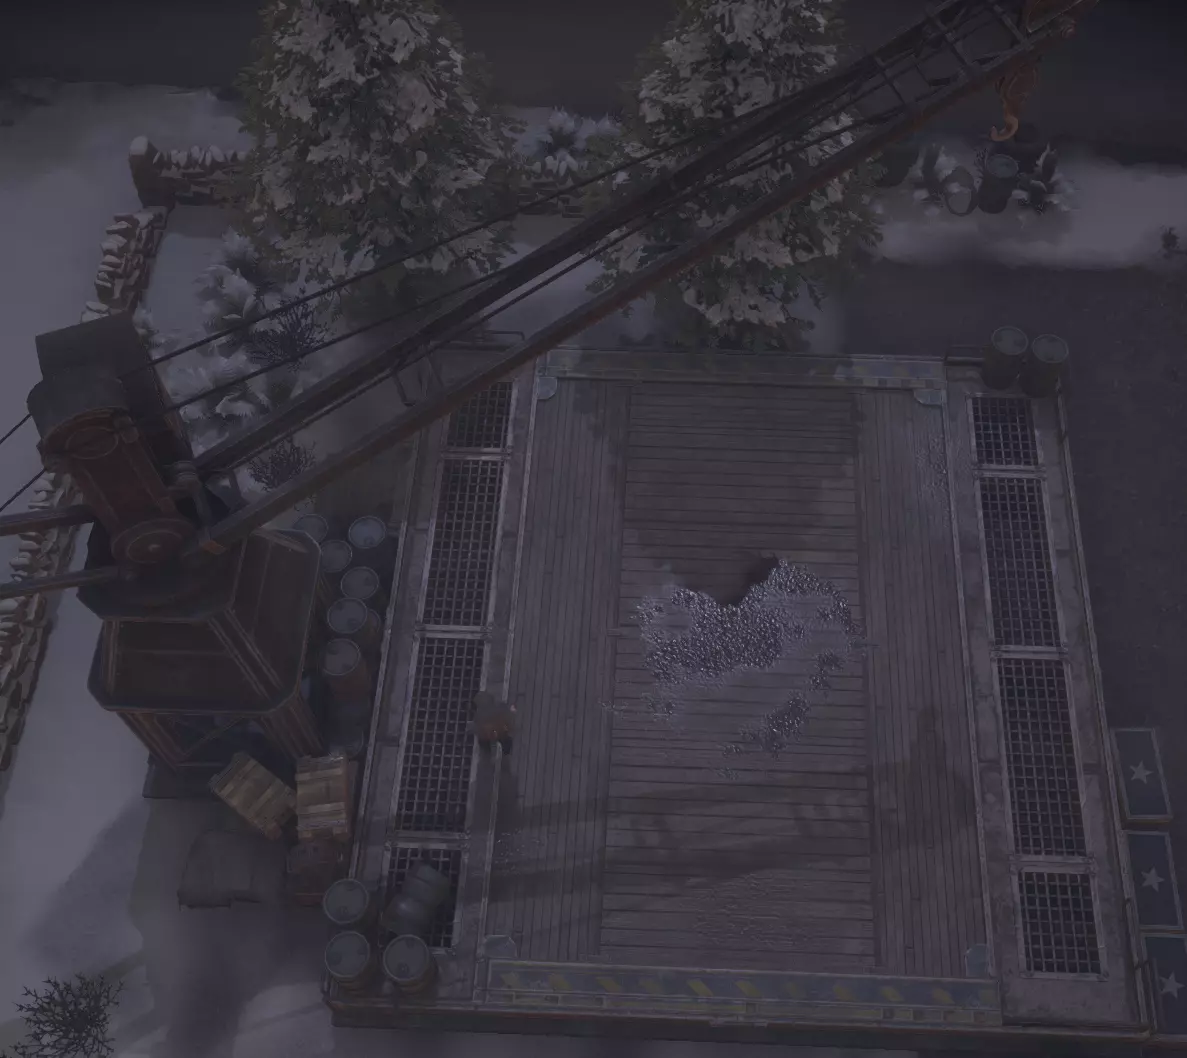
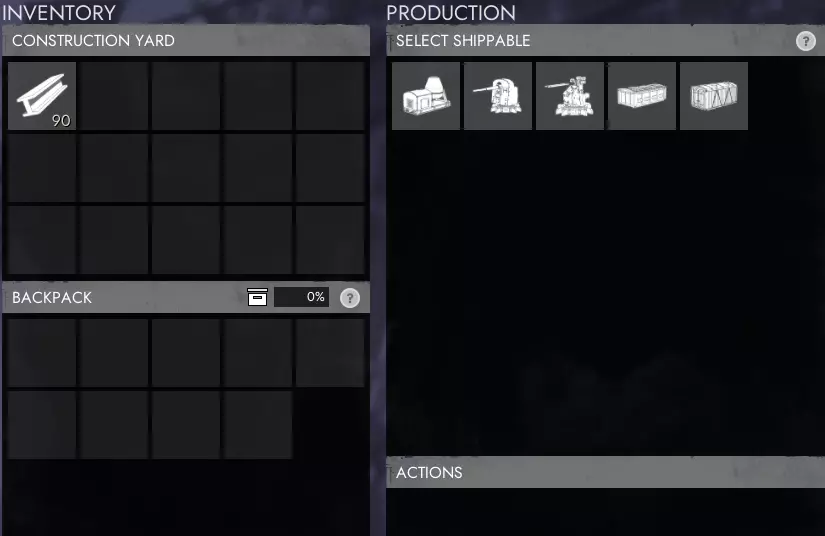
建造场是你生产货运集装箱、资源集装箱、混凝土搅拌机、沙袋托盘、带刺铁丝网以及阵地工事的地方。请注意,建造场生产的所有物品均为可运输物品,需要起重机进行移动。
地图图标 建造完成可运输物品后,你需要与它们互动进行打包,以便用起重机吊起。对于资源/运输集装箱或其他任何载具,当你与之互动时会出现【打包】按钮;如果站在附近互动未能自动打包,可使用该按钮。
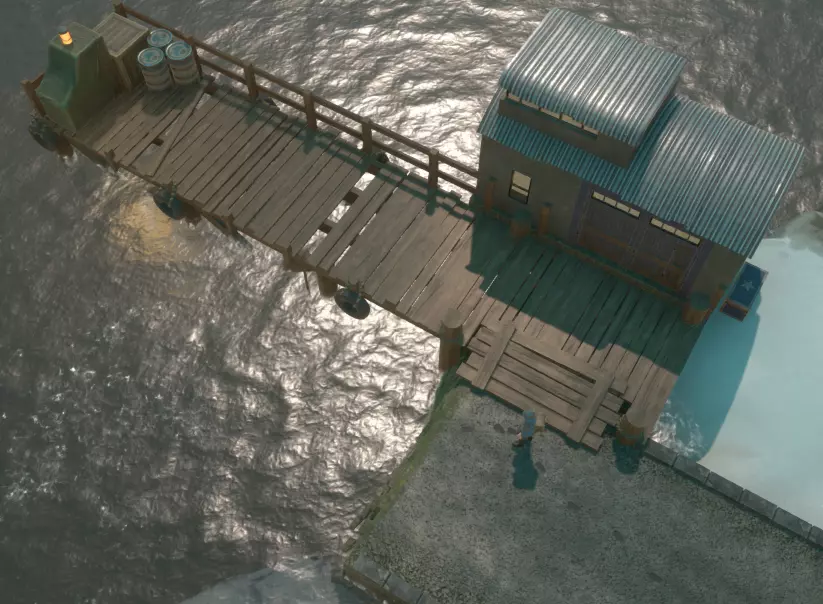
存储仓库与海港 存储仓库和海港的功能几乎相同。主要区别在于,存储仓库仅存储陆地载具,且配备一个装卸坡道和一台起重机;而海港可同时存储陆地和海上载具,并设有两个装卸坡道和两台起重机。许多城镇,尤其是物流枢纽,会用海港替代常规的存储仓库。 存储仓库/海港库存及用途
仓储站/海港对后勤玩家而言是一种极具优势的建筑。其库存机制与市政厅、前线基地或安全屋等建筑类似,但仅用于储存物品箱或载具。当你提交一个物品箱时,它会以箱子形式储存在仓储站/海港中,取出时同样为箱子,而非单个物品。载具存入后也可直接取出。
地图图标(仓库)
存储仓库/海港的主要用途是在资源快速生产但并非立即运往前线的情况下使用,例如榴弹炮弹或额外的【SS】。你可能会有数十个板条箱在任何地方需要它们之前就已完成,这会占用大量的板条箱存储空间。 存储仓库/海港现在允许将可能数千个板条箱更有条理地存储在仅一个建筑的空间内。特别是在它们最常使用的关键后勤城镇,额外的弹药、医疗用品和炮弹板条箱被生产出来并存储在存储仓库中,无需等待生产即可运往前线。
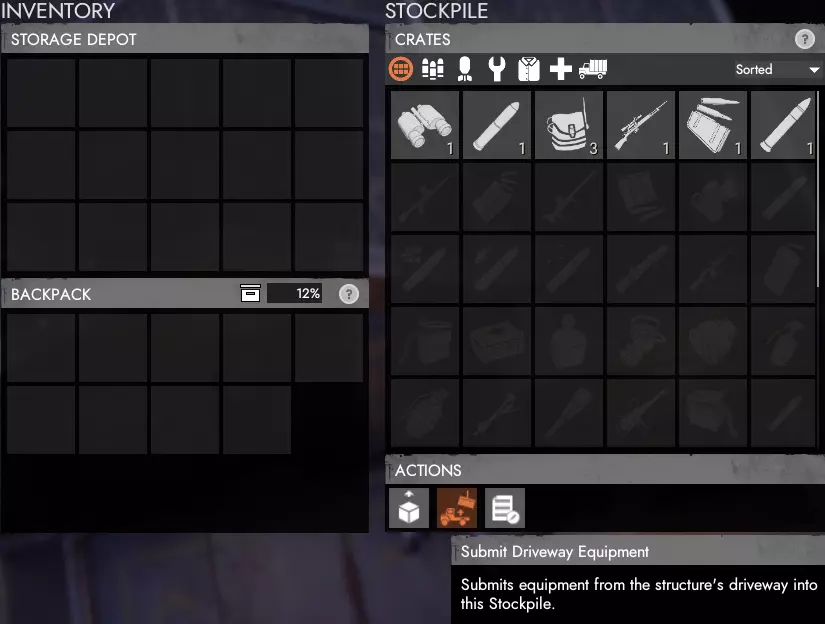
你会发现,某些物品类型一旦提交到前线市政厅和前线作战基地(FOB),例如任何步兵武器,就无法堆叠,因此在提交后用卡车运输它们会非常不切实际。因此,你应当注意不要在单个地点过度储备这类物品(如步枪),超出其在可预见未来的实际需求,应将这些箱子存放在仓库/海港中,直到其他地方需要它们。将单个武器从基地中取出并转移到新的活跃前线,几乎不值得任何人花费时间。 仓库/海港斜坡用途 仓库/海港斜坡有两种用途:提交载具和已装满的货运集装箱。在这两种情况下,你需要将载具停放在坡道上或将货运集装箱放置在坡道上,然后在仓储站/海港中选择【提交车道设备】按钮。对于货运集装箱,它会自动清空,而集装箱会留在坡道上供再次使用。 小队存储 如果你在小队中,仓储站/海港的库存允许你为小队的每位成员存储50个可存储的小队板条箱和3辆载具。如果在约48小时内没有添加新的板条箱或载具,小队存储的内容将变为公共资源。 备用存储 你还可以创建多个备用库存。这些库存最多可存储100箱大多数物品,某些特定物品允许存储更多数量。你可以授予或获取其他玩家的储备仓库访问权限,以便向其中存入或从中取出物品。 造船厂 生产
造船厂是你可以生产除摩托艇外所有海军载具的地方,摩托艇可在任何海滩建造。
地图图标 造船厂是派系拥有的建筑,只能生产已研究其技术的载具类型。
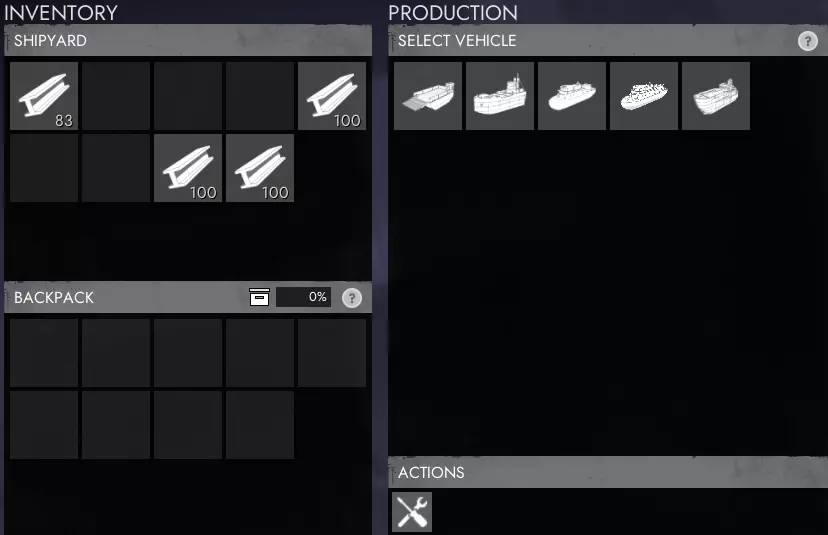
右侧图像显示了造船厂的库存以及可建造的海军载具列表。你还可以对任何载具执行全面维修。这会完全修复载具并补充隐藏的【装甲】值,该值会增加装甲载具弹开炮弹的几率,而该值会因承受伤害而降低。回收地雷
与组件矿场、硫磺矿场和油井类似,打捞矿场是一种可建造的建筑,在提供燃料的情况下能自动生产打捞物。对于后勤玩家来说,它们非常实用,启动后即可自行运转,让你能去做其他事情。打捞矿场的优势在于,它不像打捞区域那样会耗尽打捞物,也无需补充资源。
地图图标 和其他载具一样,你可以亲自为其加油或使用油罐车加油。亲自加油时,需将柴油或汽油装备在你的第三个物品栏槽位,然后在 salvage mine(废料矿场)旁的任意位置按住鼠标左键。使用油罐车加油时,需将油罐车停放在附近,且油罐车物品栏中要有柴油或汽油,然后在 salvage mine(废料矿场)菜单的“操作”部分按下对应燃料的按钮。
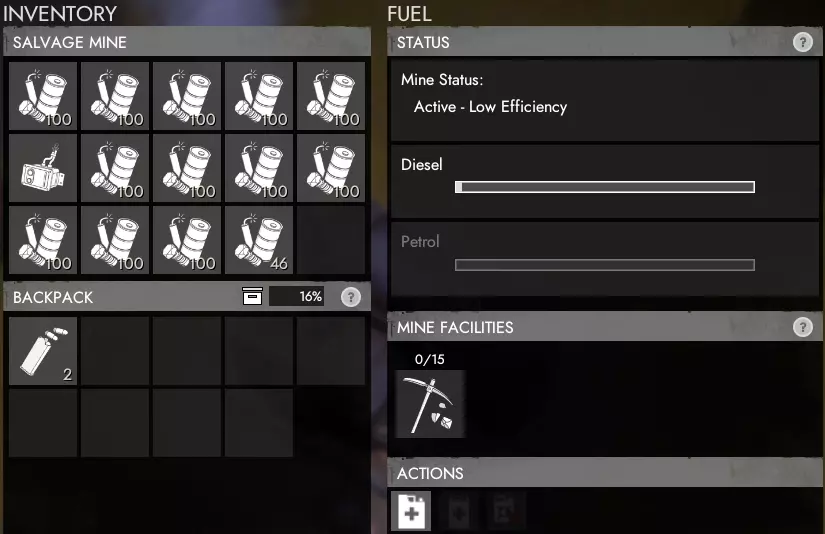
所有产出的废料将放入公共资源库。你可以使用柴油或汽油来运行矿场。如果两种燃料都已添加,矿场会优先使用汽油,然后再使用柴油。用汽油运行废料矿场并不划算,因为略微提升的资源采集速度并不值得为廉价材料消耗更贵的汽油。 建议在矿场附近储备额外的燃料,以便在燃料不足时能快速轻松地补充。 零件矿场

与打捞矿场、硫磺矿场和油井类似,零件矿场是一种可建造的建筑,在提供燃料的情况下能自动生产零件。对于后勤玩家来说,它们非常实用,启动后即可自行运转,让你能去做其他事情。零件矿场的优势在于它不会像零件矿脉那样耗尽零件。
地图图标 和其他载具一样,你可以亲自为其加油或使用油罐车加油。亲自加油时,需将柴油或汽油装备在你的第三个物品栏槽位,然后在零件矿机旁的任意位置按住鼠标左键。使用油罐车加油时,将油罐车停在附近并确保其库存中有柴油或汽油,然后在零件矿机菜单的【操作】部分按下对应燃料的按钮。
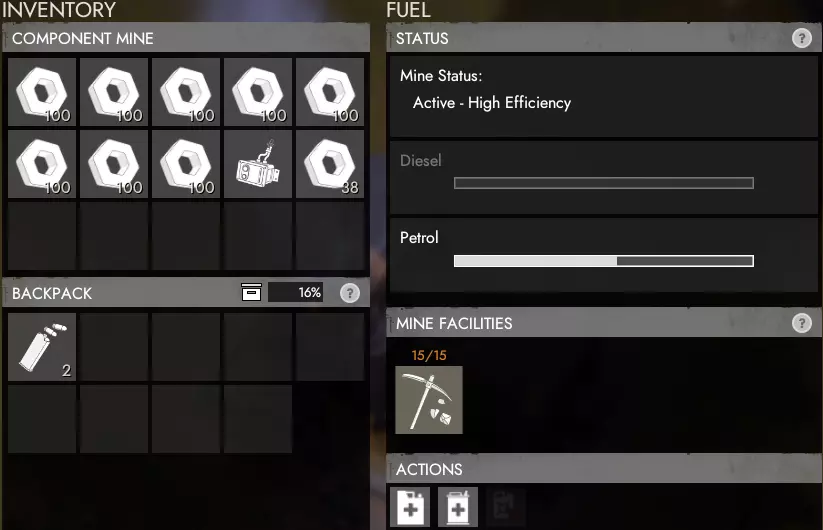
所有生产的组件和技术零件将放入公共可访问的库存中。你可以使用柴油或汽油来运行矿场。如果两种燃料都已添加,矿场会优先使用汽油,然后再使用柴油。 建议在矿场附近储备额外的燃料,以便在燃料不足时能够快速轻松地补充。 硫磺矿场
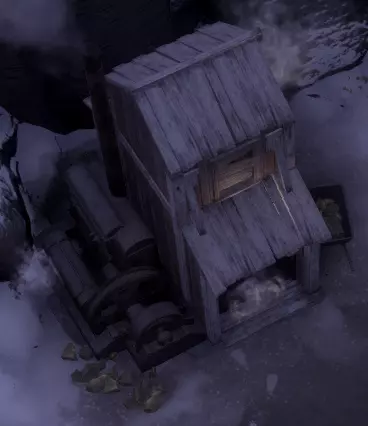
与打捞矿场、零件矿场和油井类似,硫磺矿场是一种可建造的建筑,在提供燃料的情况下能自动生产硫磺。对于后勤玩家来说,它们非常实用,启动后即可自行运转,让你能去做其他事情。硫磺矿场有一个优势,即它不会像硫磺田那样耗尽硫磺。
地图图标 和其他载具一样,你可以亲自为其加油或使用油罐车加油。亲自加油时,需将柴油或汽油装备在你的第三个物品栏槽位,然后在硫磺矿附近任意位置按住鼠标左键。使用油罐车加油时,需将油罐车停在附近且其物品栏内有柴油或汽油,然后在硫磺矿菜单的【操作】部分按下对应燃料的按钮。
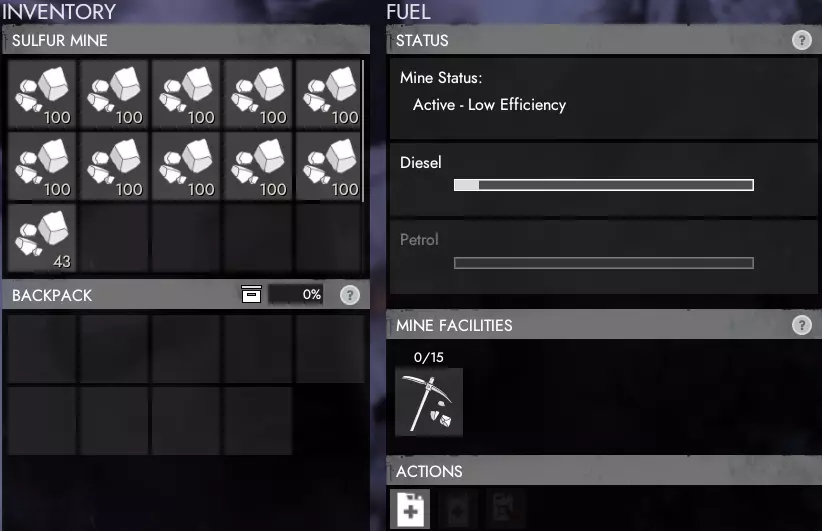
所有产出的硫磺将放入公共可访问的库存中。你可以使用柴油或汽油来运行矿场。如果两种燃料都已添加,矿场会优先使用汽油,之后再使用柴油。 建议在矿场附近储备额外的燃料,以便在燃料不足时能够快速轻松地补充。 【油井】
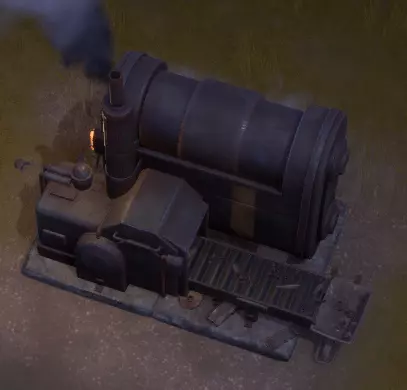
与打捞矿场、零件矿场和硫磺矿场类似,油井是一种可建造的建筑,在提供燃料的情况下能自动生产原油。对于后勤玩家来说,油井非常实用,启动后即可自行运转,让你能去做其他事情。油井是获取原油的唯一途径,原油随后可在炼油厂精炼成汽油。
地图图标 和其他载具一样,你可以亲自为其加油或使用油罐车加油。亲自加油时,需将柴油或汽油装备在你的第三个物品栏槽位,然后在油井旁的任意位置按住鼠标左键。使用油罐车加油时,需将油罐车停在附近,且油罐车物品栏中要有柴油或汽油,然后在油井菜单的【操作】部分按下对应燃料的按钮。
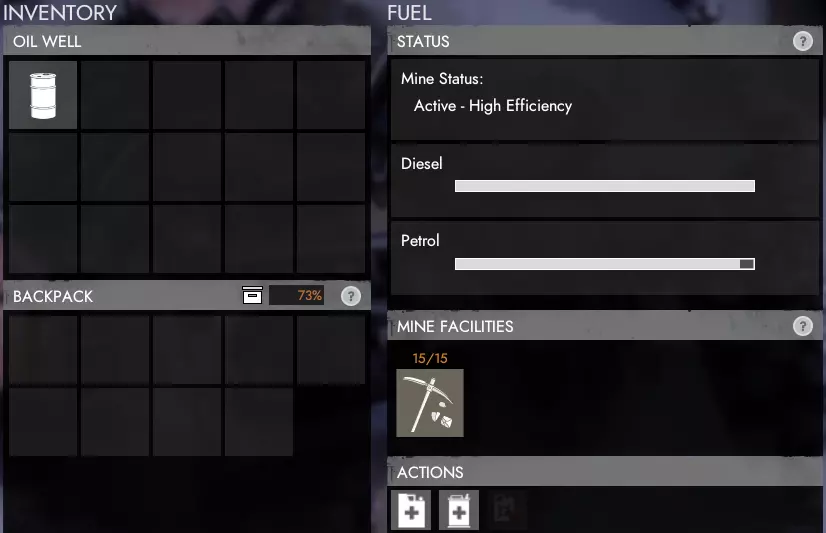
All Crude Oil produced will be put in the publicly accessible inventory. You are able to run the mine off of both Diesel or Petrol. If both have been added, it will use the Petrol before using the Diesel. It would be a good idea to keep extra fuel nearby so it can be quickly and easily refueled should it run low. === Vehicles === Vehicle List This guide only contains logistic related vehicles, but for now won't cover each specific modification for each. You can view a more complete list of vehicles on the Foxhole Wiki: https://foxhole.gamepedia.com/Vehicles. Faction Specific Vehicles There are now faction specific vehicles which the other faction is not able to research and directly build. For logistics, there are no major differences for the gameplay, though there are a few vehicles which may have worthwhile advantages over others. Switching Fuels Every vehicle runs off of Diesel by default, but can be run off Petrol for slightly higher speed and more efficient fuel consumption by accessing the vehicle and pressing the button to siphon fuel out to allow the other to be added. Transport Truck OverviewThe Transport Truck is your cheap, go-to vehicle when running logistics that can fill many roles. As with every vehicle except the Construction Vehicle, it is built at the Vehicle Factory for 100 bmats. It should be used over the Flatbed Truck with a Shipping Container for any short supply runs, or when there won't be a Crane to unload at your destination. Stats Crew Size Build Cost Fuel Tank Size Inventory Slots 6 (1 driver, 5 passengers) 100 bmats 100 15 Vehicle ModificationsThere are specific modifications of the Transport Truck, which have advantages and disadvantages but will only briefly be touched on here. Resource Hauler Stores a larger amount of unrefined resources, ideal for regularly transporting large loads back from Resource Fields. Unable to store regular items, such as bmats, weapons, ammo, etc. Tracked Truck (Warden Only) Has 13 Inventory slots Does not get slowed down further off-road when carrying a heavy load. Speartip Truck (Colonial Only) Has a front-mounted machine gun, which requires a second person to use. Still has 15 Inventory slots, but one would need to store the ammunition for the mounted machine gun. Fuel Tanker OverviewThe Fuel Tanker is the best way to transport large quantities of fuel or refuel allied vehicles. It has two inventory slots, one for both Diesel and Petrol, but can carry two stacks of either instead. If you want to refuel a vehicle, you'll need to have the Fuel Tanker parked nearby, and then press either the Refuel Diesel or Refuel Petrol button when interacting with the vehicle you want to refuel. This will automatically connect a hose that fills the fuel tank from one of the stacks of fuel in the inventory of the Tanker. You are also able to fuel all four types of Mines (Salvage, Components, etc.) directly from the Fuel Tanker using either the Refuel Diesel or Refuel Petrol buttons from within the Mines inventory. Stats Crew Size Build Cost Fuel Tank Size Inventory Slots 2 (1 driver, 1 passenger) 100 bmats 100 2 (1 Stack of Diesel and 1 Stack of Petrol, or 2 Stacks of either Diesel or Petrol) Light Utility Vehicle (LUV) OverviewThe Light Utility Vehicle, or LUV, is another decent option for logistics player but has its pros and cons compared to the standard Transport Truck. Pros: Faster off road speed Scouts targets on the mapCons: Costs more expensive rmats 9 slot inventory compared to 15 The off-road speed is by far the best and most used benefit allowing it to quickly reach off-road resource locations, make supply runs to areas which aren't safe to get to by road, and significantly improve your chances to escape harm or death if ambushed. Stats Crew Size Build Cost Fuel Tank Size Inventory Slots 4 (1 driver, 3 passengers) 10 rmats 100 9 Vehicle ModificationsThere are specific modifications of the LUV, which have advantages and disadvantages but will not be touched on here, as none of them are suited for logistics over the default. Flatbed Truck OverviewThe Flatbed Truck is intended for long-distance supply runs or vehicle transport, and likely should not be used as your go-to vehicle when running logistics. While it does have the advantage over the Transport Truck for carrying capacity with a Shipping Container or vehicles on its bed, it does require a Crane to lift them on and off of the flatbed, thus requiring a Crane where you load and then unload your shipment. It would likely be best to supply to logistics based towns near your intended delivery location, unload with a Crane there, and then send supplies to the front via the Transport Truck. If you're transporting using a Shipping Container, you'll need to drop it off at a Storage Depot Ramp to unload it, which is then can be pulled out into a Transport Truck. Stats Crew Size Build Cost Fuel Tank Size Inventory Slots 2 (1 driver, 1 passenger) 30 rmats 100 1 Shippable Crate Crane OverviewThe Crane is essential for several key logistics operations. The primary use is with the Construction Yard, as everything it produces are Shippables, which only a Crane can lift and move them. If you want to load or unload any packaged vehicles or Shipping Containers on a Flatbed Truck, then you'll need a Crane for that too. Stats Crew Size Build Cost Fuel Tank Size Inventory Slots 2 (1 driver, 1 passenger) 125 bmats 100 4 Harvester OverviewThe Harvester is ideal for increasing mining efficiency of resource fields and dismantling buildings and defenses without weapons and explosives. It also has the unique ability to split resource nodes at a resource field for an increased spawn rate of the nodes for faster overall resource collection rate. Left Mouse Button ----> Harvest Resources Left Mouse Button ----> Dismantle Buildings/Defenses To harvest resources from fields, hold down the left mouse button while the grinder on the front of the Harvester is over one of the resource nodes. It will automatically start harvesting and put the resources collected inside its inventory. This is ~50% faster than a sledgehammer. To dismantle buildings/defenses, hold down the left mouse button while the grinder is against the structure you want to dismantle. It will break it down into 1/4 the original cost in Salvage or Components and store those in your inventory. Buildings you're unable to dismantle are Town Halls, Garrison Houses, Watch Towers, and Forward Operating Bases. Splitting resource nodes happens automatically when harvesting resources from Resource Fields. This will spawn a second node from the number of remaining nodes the resource field can spawn, which does double the amount of nodes that can be collected at once, which is ideal for groups of players harvesting the same field and collecting resources quicker. Stats Crew Size Build Cost Fuel Tank Size Inventory Slots 2 (1 driver, 1 passenger) 120 rmats 200 15 Barge OverviewThe Barge is a naval vehicle used for transporting vehicles and supplies across bodies of water. This is your primary means for water logistics early on in the war until other vehicles like the Freighter have been researched. The Barge is often used for supporting naval invasions with support vehicles, resupplying towns which are cut off by land, and ferrying resources and personnel between islands. The 15 inventory slots can be paired well with a truck full of supplies, doubling the potential supply quantity which can be held each load. Stats Crew Size Build Cost Fuel Tank Size Inventory Slots 1 + Anyone who fits on deck (1 driver + others) 150 bmats 200 15 Freighter OverviewThe Freighter is the naval version of the Flatbed Truck. It is designed for long-distance, high volume supply runs, or transportation of light or heavy vehicles. It can store up to 5 Shippables (Shipping Containers, Packaged Vehicles, etc.) in its lower decks. You'll need a Crane in order to load and unload the Shippables. Stats Crew Size Build Cost Fuel Tank Size Inventory Slots 2 (1 driver, 1 passenger) 300 bmats 300 5 Shippables === Resource Fields === Salvage Field
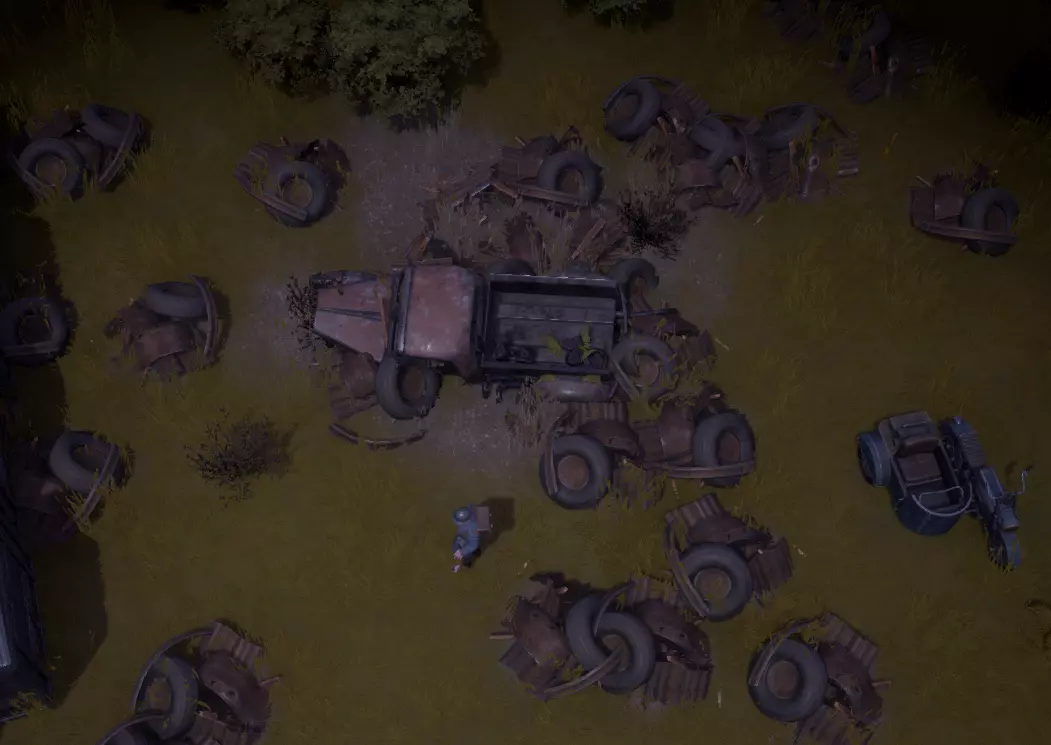
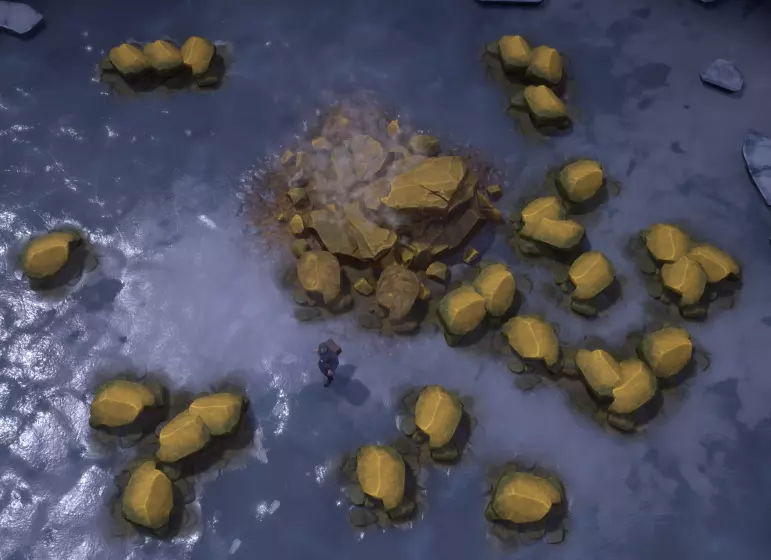
打捞场是一个存在大量打捞节点的区域。单个打捞场的打捞资源数量可达数千,但一旦被采集,这些节点大约需要3小时才能再生。采集这些资源时有一种紧迫感,因为获取它们非常重要,你不希望敌人有机会采集,而且开始采集得越早,节点就能越早开始重生。 你可以在中央节点旁按下【E】键,以了解该区域剩余的节点数量,或者查看地图上的区域标记来获取剩余节点的数量。每个节点大约包含200单位的打捞资源。 组件场
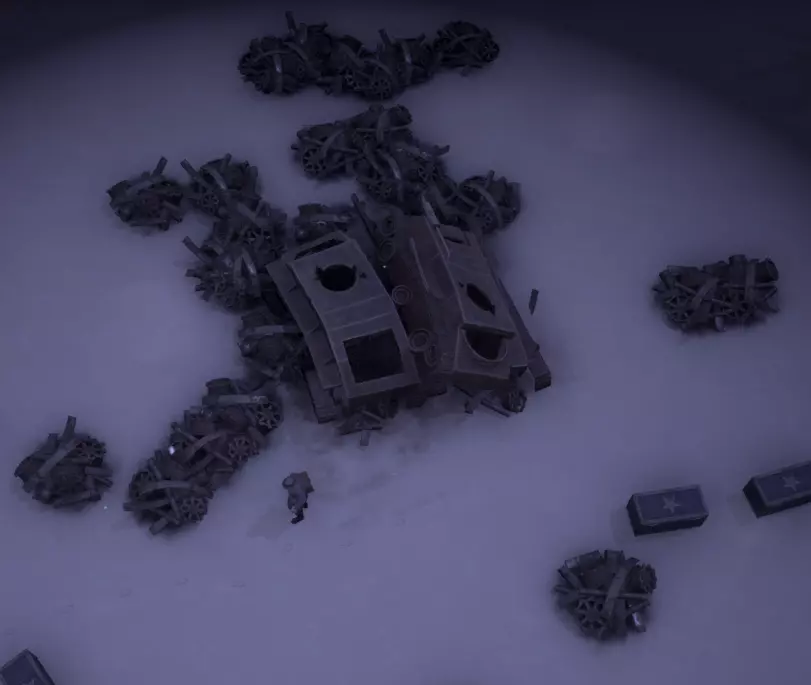
零件区域是一个存在大量零件节点的地点。单个零件区域最多有数千个零件,但一旦被采集,这些节点大约需要6小时才能再生。采集这些资源时有一种紧迫感,因为获取它们非常重要,你不希望敌人有机会采集,而且你开始采集得越早,它们就能越早开始重生。 零件只能用大锤或采集器采集,但在拥有大锤或采集器之前,可以从零件矿中收集。靠近中央节点时按下E键,可查看区域内剩余节点数量,或通过地图上的区域标记获取剩余节点数量。每个节点包含约200个零件。 硫磺区域
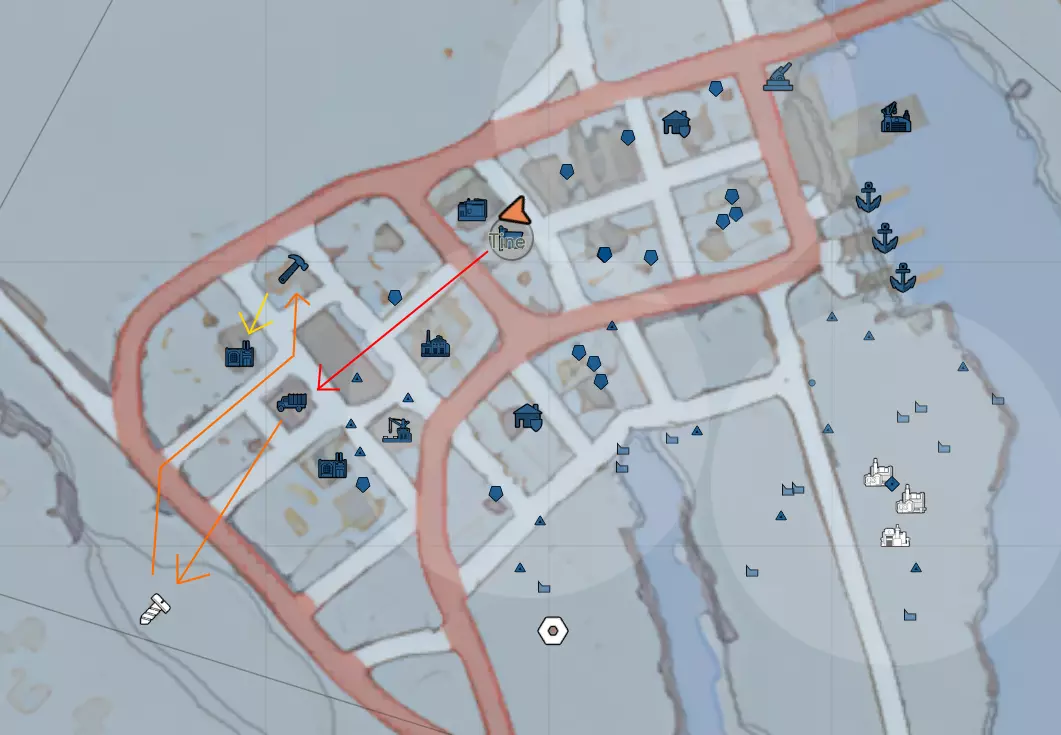
硫磺矿区是一个存在大量硫磺矿石节点的区域。单个硫磺矿区的硫磺储量可达数千单位,但一旦被开采,这些节点需要数小时才能再生。开采这些资源具有一定的紧迫性,因为获取它们非常重要,你不希望敌人有机会开采,而且开始开采得越早,节点就能越早开始重生。 硫磺只能用大锤或采矿机开采,但在拥有大锤或采矿机之前,也可以从硫磺矿场收集。 你可以在中央节点旁按【E】键,了解矿区剩余的节点数量,或者查看地图上的矿区标记来获取剩余节点数量。每个节点大约含有200单位硫磺。 === 后勤玩家的职责与入门 === 以下章节旨在为新玩家提供后勤工作和前线补给的入门指导。游戏玩法多样,你可以承担多种特定职责,因此本文仅作为你开展这些工作的参考指南。 在介绍过程中,我只会涵盖关于建筑和载具的必要知识,如需更多细节,请参考上文内容。 接下来几节中,你将进行的工作概述如下。红色箭头:你需要一辆卡车来运输重型资源,因此很可能需要制造一辆。制造卡车需获取100个基础材料,然后前往载具工厂【卡车图标】。 橙色箭头:有了卡车后,你需要收集一些废金属,因此要前往最近的废料场【螺丝图标】,用锤子开采。废料可以精炼成多种资源,最常见的是基础材料(bmats),这一过程在精炼厂【锤子图标】进行。 黄色箭头:基础材料有多种用途,在本环节中,你需将其送到工厂【带有两个烟囱的小型工厂图标】,以制造基础武器和弹药。 之后,你就可以驾驶卡车将这些物资运送到任何需要的地方了!
选择出生点
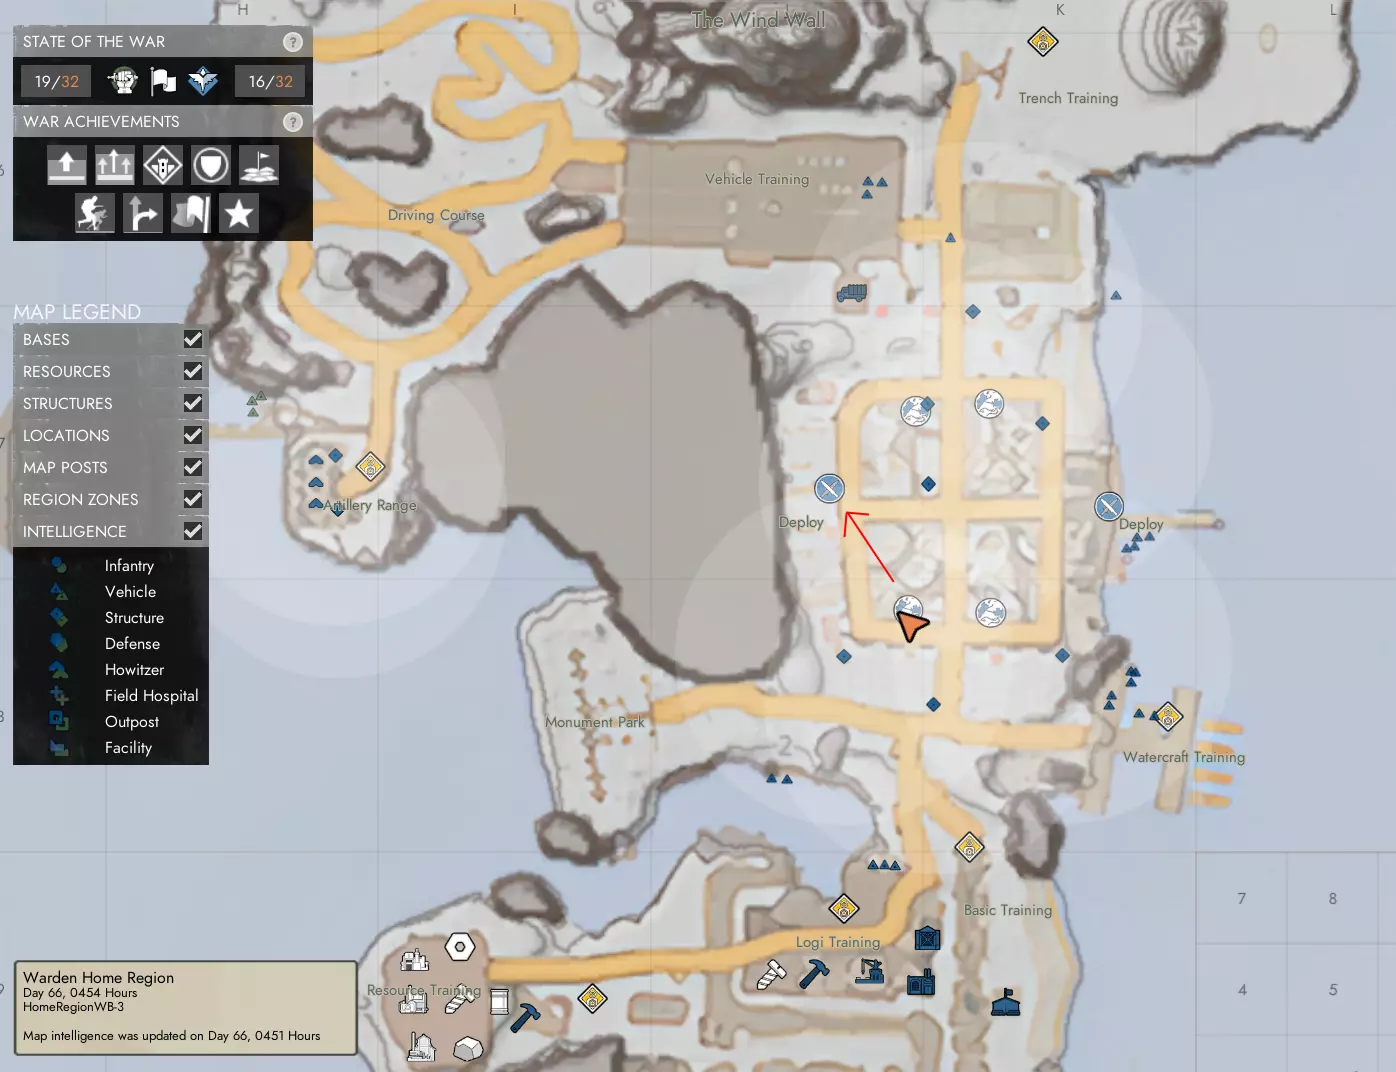
后勤玩家的角色需要使用多种建筑来采集、精炼和生产所需的一切物资。最后方的区域几乎总是包含每种建筑各一个,而更靠前的中部或前线区域则只会有一到两种。当你初次启动《狐狸hole》时,你会加载进入家乡区域,这里是一个枢纽,包含玩家驱动的训练课程、显示当前世界征服地图的战争展台,以及将你传送到所选区域的部署点。 在家乡区域内,前往战争展台(地图上的地球仪图标)查看各个城镇,特别留意那些拥有车库(载具工厂)、精炼厂和工厂的城镇。如果没有可用的公共闲置卡车,你需要建造一个【车库(载具工厂)】来制造卡车;需要建造一个【精炼厂】来提炼你收集的原材料;然后建造【工厂】来生产你所需的各种武器、弹药和装备。
你距离这些关键后勤建筑的出生点越远,开局就越困难,往返跑动或驾驶所需的时间自然也越长。 找到城镇后,前往部署点(地图上的交叉剑图标)在那里重生。 建造卡车
现在你已经在市政厅(TH)出生,需要获取100个基础材料(bmats)和1罐柴油,这样才能在车库(载具工厂)建造并为卡车加油。一些后方后勤城镇可能有公共停车场,停放着未使用或预先建造好的卡车,如果有的话,你可以跳过这一步。但要确保你没有开走别人只是暂时离开的卡车,有些人会因为物品被盗而非常生气,你甚至可能被投票踢出。 你很可能可以在市政厅、炼油厂,有时甚至在车库/载具工厂找到基础材料和柴油。以我为例,我可以从市政厅提取100个基础材料(每次提取20个,共点击5次)和1罐柴油。
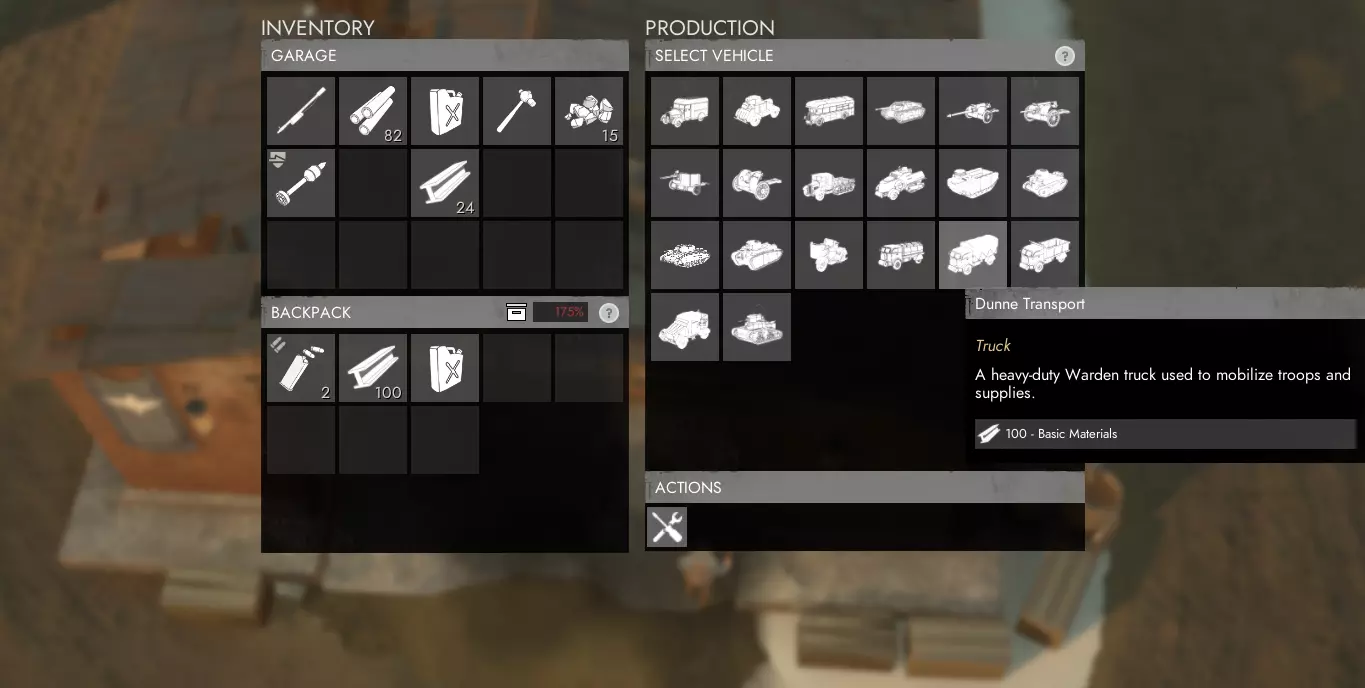
现在你需要带着这些沉重的材料慢慢走向车库/载具工厂。与载具工厂互动会显示你当前已解锁科技的所有载具选项,你需要选择阵营的基础运输卡车,它的成本正好是100个基础材料。
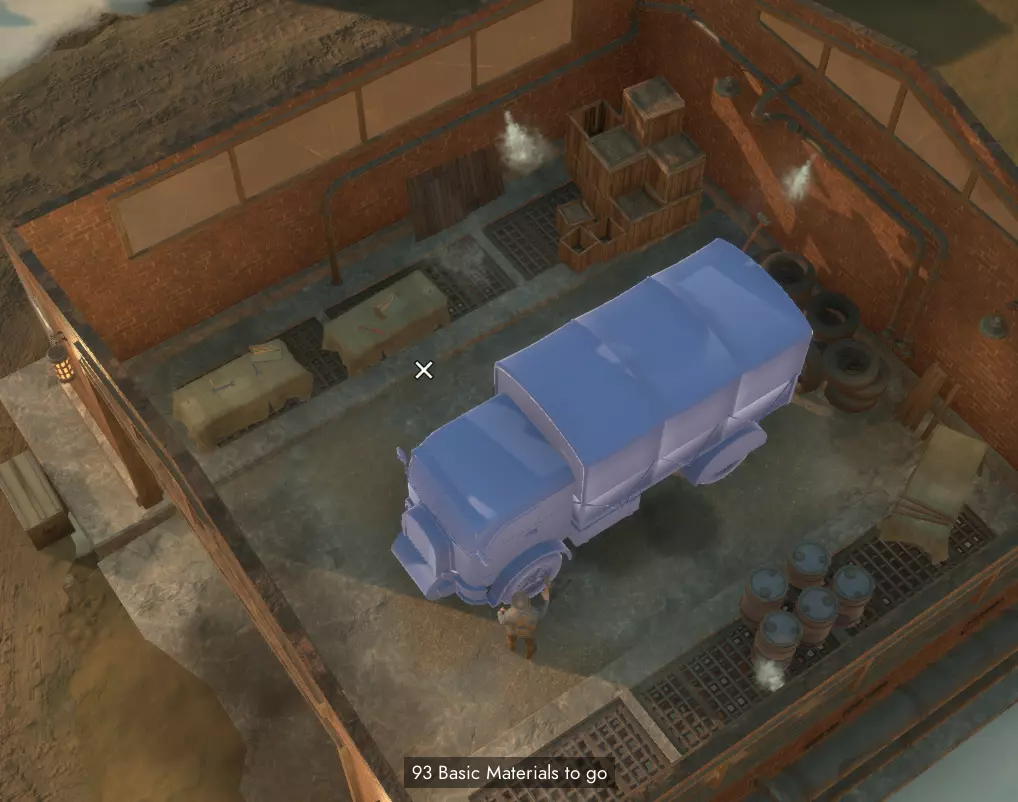
选择它会自动放置卡车的蓝图,你可以拿出锤子并按住左键挥动来建造它。最多三名玩家可以同时锤击建造,这会加快建造速度,但每位玩家的背包中都必须有基础材料才能参与建造。
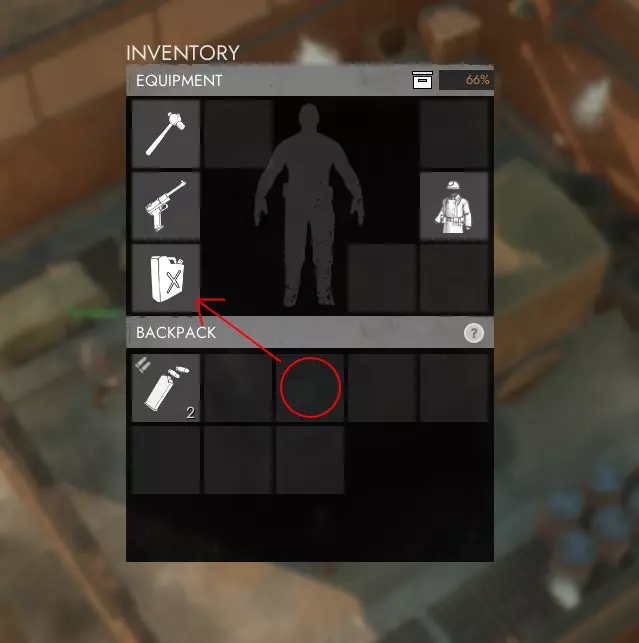
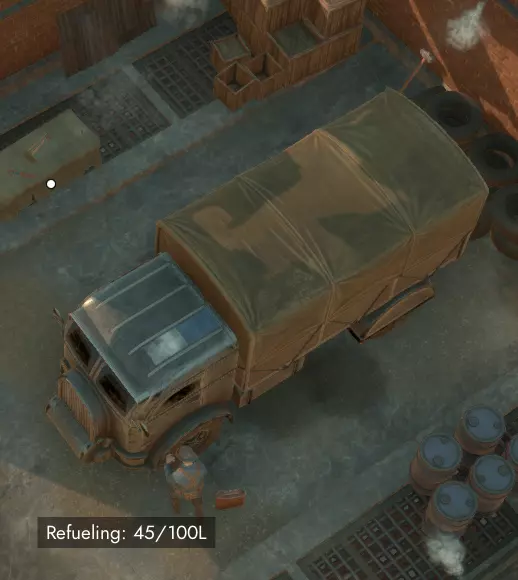
卡车组装完成后,你需要为其加油。新制造的载具初始燃油量很少,这里是5/100,仅够开出工厂,无法行驶更远。确保你的柴油罐装备在第三个装备栏,而非背包中(在背包内左键点击柴油罐可将其移至装备栏)。然后按默认按键“3”拿出油桶,在卡车旁长按左键即可加油。
锁定你的卡车 你应当始终锁定你的载具,以防止友方和敌方玩家进入或访问其库存。按L键可切换锁定状态。这会将载具永久锁定给你,但5分钟后,任何友方玩家都可以使用扳手将其解锁(敌方始终可以立即用扳手解锁任何载具)。如果你在小队中,可以访问卡车的库存并按下其中一个按钮,将其保留给你当前的小队。这允许所有小队成员进入载具并访问其库存。如果载具被友方用扳手解锁,非小队玩家将无法从库存中取出任何物品。 资源采集与提炼
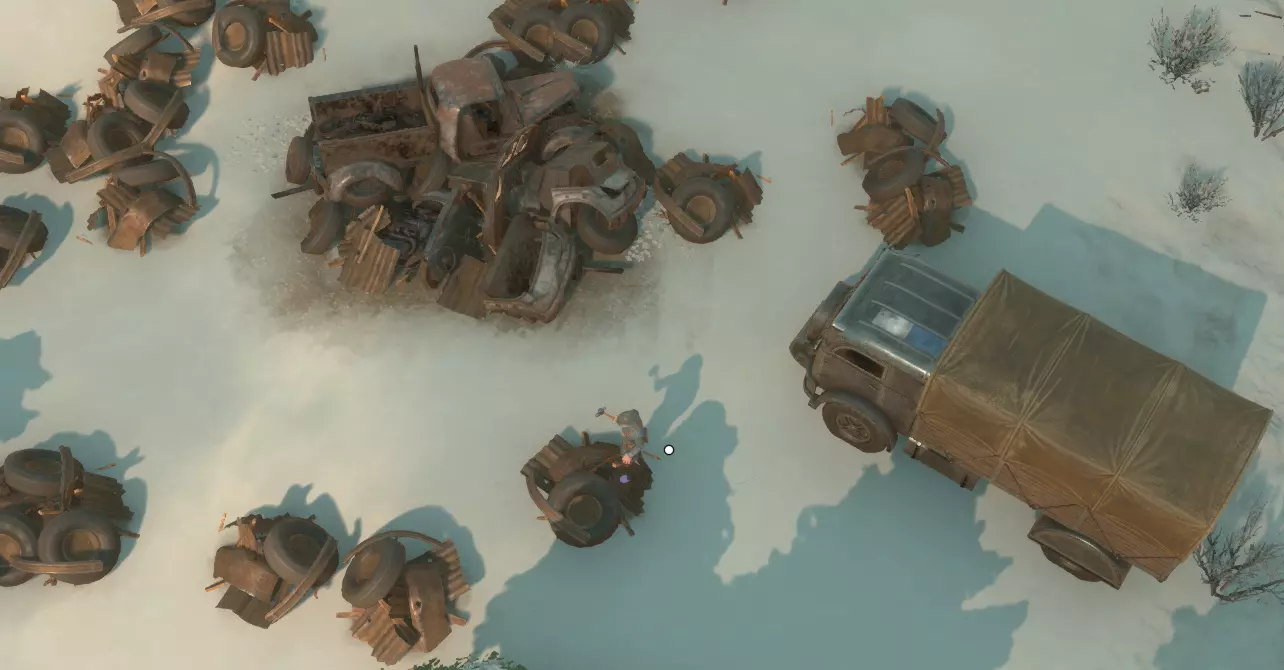
你可以驾驶卡车前往最近的废料场开采废金属。这是最常见的基础资源,可被精炼成多种不同资源。废料场中央的大型物体无法采集,但周围的小型节点可以。使用锤子(后期科技解锁的大锤每次敲击可获得更多废料)击打这些节点来收集废料。记得将卡车的货舱装满,你总是会需要更多的废料。 如果拾取的物品过多,因背包重量过重而无法回到卡车里,你可以打开背包,按住【Alt】键并点击想要丢弃的物品来将其扔掉。只有当负重低于100%时,你才能进入载具。
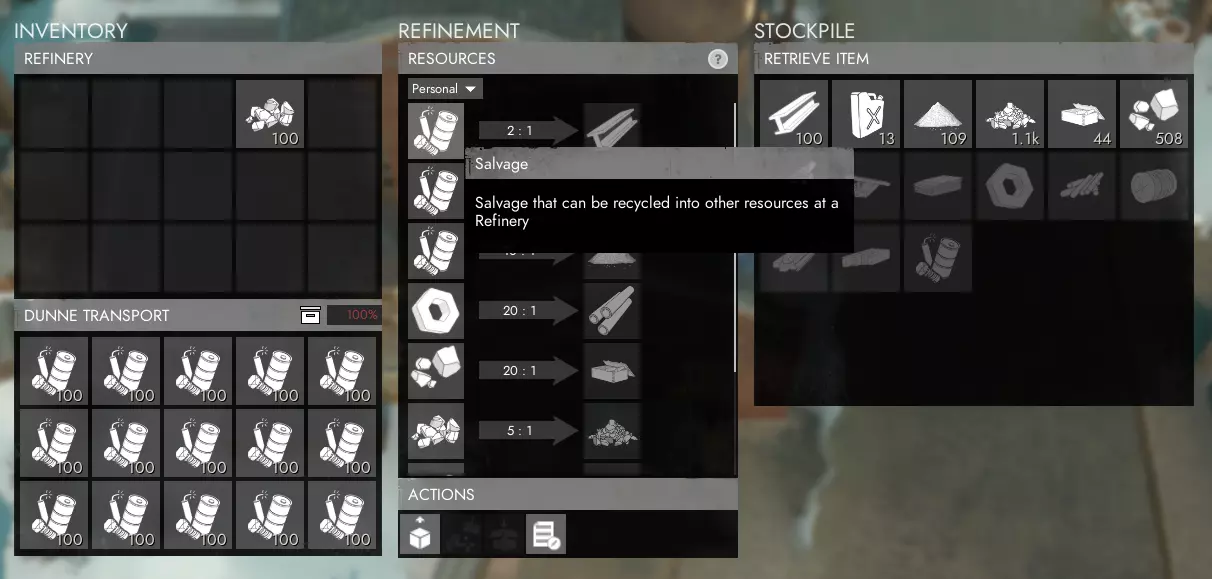
当你装满一卡车废料后,这些废料目前还无法直接使用,所以你需要开车前往精炼厂。在精炼厂,你可以将废料转化为多种不同的资源,但现在你需要先制作基础材料。操作方法是:作为司机留在卡车里,然后与精炼厂交互,接着点击箭头左侧用于制作基础材料的回收图标。若要自动提交卡车中的所有物品进行精炼,可使用“Shift+点击”。 在该图标正上方,你可以选择精炼产出的资源是进入右侧的公共库存,还是进入箭头右侧的个人库存。除非你愿意让其他玩家取用这些资源用于他们的生产或运输,否则建议选择个人库存。
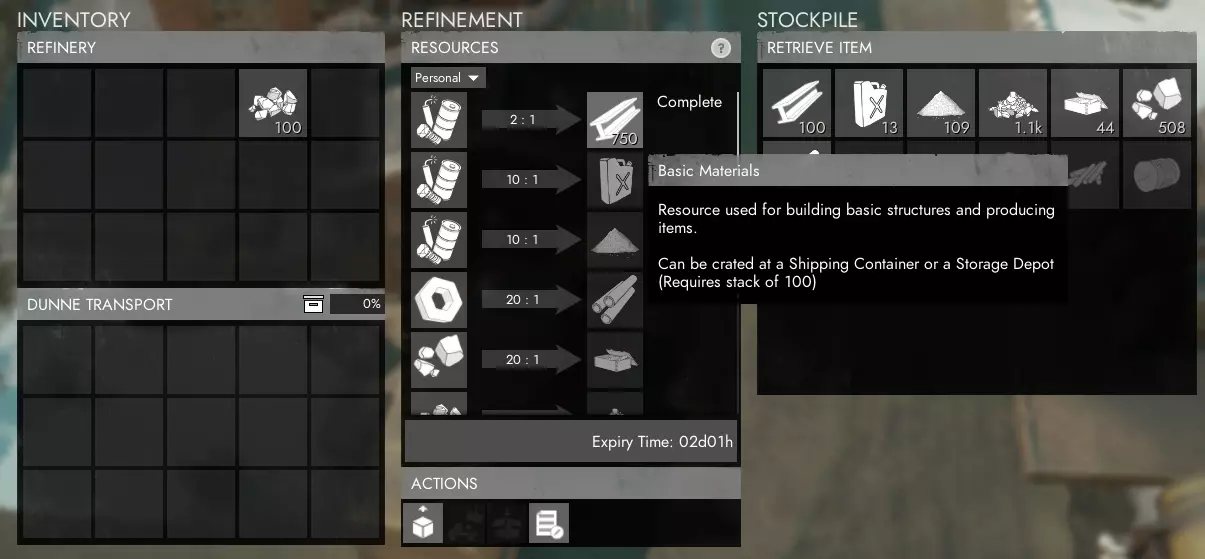
你需要等待几分钟让你的回收物完成精炼,在此期间你可以选择继续收集更多回收物,或者就在精炼厂旁等待精炼完成。在精炼过程中的任何时候,你都可以将已完成精炼的部分资源提取回你的卡车库存中。 铁和铝:你有机会从回收场获得铁和铝。当你获得这些资源后,需要将它们送到精炼厂进行精炼,之后才能提交到工程中心的科技树中。 每个回收场在被完全清理前,只能产出铁或铝中的一种,而不是两种都有。一旦回收场重新生成,它就可能开始产出另一种资源。 工厂的物资生产:基础材料有多种用途,甚至在前线和后方的建造中都能用到。现在你需要使用这些材料在工厂中制造一些武器、弹药和其他装备。和炼油厂一样,你需要坐在卡车驾驶座上才能进入工厂。可生产的不同物品按类别划分,显示在中间区域的不同标签页中。某些物品,例如基础步枪和弹药,只需基础材料即可生产,而其他更高级的物品,例如炮弹,则需要爆炸物或重型爆炸物等不同资源。
从同一类别中最多选择4个仅需基础材料的物品,例如步枪及其弹药(请再次确认弹药与武器兼容)。你可以选择订单类型为个人、小队或公共,这仅表示生产完成后谁可以领取。点击所选物品右侧的箭头开始生产。工厂不像精炼厂那样同时处理不同玩家的订单,因此你的订单可能需要等待其他多个玩家的订单生产完成后才能开始。

订单完成后,点击绿色对勾即可领取。你的补给箱会被放入卡车中,准备好运往你想要补给的任何地点!当你驾车前往市政厅、安全屋、遗迹基地或地堡基地时,与该建筑互动即可查看其库存,然后点击提交物品按钮。你也可以右键点击自己 inventory 中的特定物品,仅向该地点提交某些物品。提交后,补给箱会自动拆分为单独的物品,以便其他玩家可以从该基地的库存中取出这些单独的物品。 运输资源和补给 如果你不知道需要向哪里或谁提供补给,可以询问周围是否有人需要特定补给,例如【SS】或武器弹药。前线步兵往往在基本补给耗尽后才发出告急信号,这种情况屡见不鲜。明智的做法是,即便没有收到补给请求,也要充分利用时间和存储仓库,以便在需要时能轻松调取物资。 永远不会错的额外储备物资包括:步枪、步枪弹药、重机枪、重机枪弹药、破片手榴弹和高爆手榴弹、防毒面具、各类榴弹炮/迫击炮/火炮/坦克炮弹、急救包、创伤包以及【SS】。请记住,弹药的需求量通常大于枪支本身,因为弹药不像枪支那样可以无限重复使用,因此请相应地进行生产(例如,)武器与弹药的比例约为1/2到1/3。 你需要供应的关键地点包括市政厅、前线作战基地、安全屋和遗迹基地,所有这些地点都需要【补给站】才能生成物资。 当你提交补给箱时,要注意这些补给无法再次装箱以便运输。这意味着提交像武器这类无法堆叠的物品,少量多次地重新安置会非常不切实际。由于提交后的补给不易运输,而且这些建筑可能会连同其库存中的补给一起落入敌人手中,因此最好不要给任何地点过度囤货。只携带所需的物资,且数量要足够他们在几小时内全部用完。这为在资源耗尽前再运送一批物资提供了充足时间,同时又不会在单一地点囤积超出其合理使用量的资源。 对于后勤玩家而言,如果可能的话,配备无线电并充分利用地图情报更新至关重要,尤其是在外出移动时。如果只是简单询问是否安全,或者选择一条防御完善的较长路线,就很可能避免因不知情地穿越危险边境或未被哨塔覆盖的道路而直接闯入敌军阵地,从而损失一卡车的基础材料。如果你必须前往一个新的、受到威胁的前线FOB(前线作战基地)或TH(战区总部),而通往那里的道路没有防御工事,不要害怕召集一些步兵护送你,甚至可以请求前线的部队前来护送。有关使用地图的更多详细说明和优势,请参考【了解和利用地图】部分。 当你运输大量(超过50个,通常都应该如此)基础材料或稀有材料时,多花几秒钟时间将它们存放在TH或FOB附近的箱子里。如果没有箱子或空间不足,就再建造一个。虽然你完全可以将基础材料和稀有材料存放在TH或FOB中,但每次只能取出20个(或使用卡车右键点击取出60个),且每次取出之间有几秒钟的延迟。如果材料在箱子里,你可以一键获取100个堆叠,且无需组装延迟。还有一种情况是你试图修复正在受损的TH或FOB。如果里面有大量基础材料(bmats),一旦它们被摧毁,这些材料就会被困在里面,直到重建后才能取出。如果你把所有材料都放在外面的箱子里,就可以继续建造防御工事,带着它们撤退到更安全的地方,甚至重建TH或FOB。 结论 关于后勤方面的众多事务如何运作以支援前线,一直存在很多疑问。因此,我整理了这些信息,旨在让新玩家能够轻松获取和理解,同时也足够详细,对经验丰富的玩家也有帮助。我的目标是确保本指南全面涵盖后勤玩家需要理解和管理的各种任务与概念,同时以简单易懂的方式进行解释,让任何人都能掌握必要的知识,无需数十小时的游戏时长就能胜任这个关键且能影响战局的角色。 本指南尚未完成,因为总有改进和补充的空间,还不包括每次游戏更新带来的变化。不过,我会不断完善它,并尽力使其与最新更新保持同步。如果你认为本指南中需要添加、修改或更正任何内容,或者有不理解的地方,又或者觉得某些解释需要改进,请在下方留言。关于《狐狸洞》的其他方面已有许多指南,但如果有任何主题需要更新的指南,也请留言,我很乐意为此撰写一篇。