
Foxhole


后勤人员的职业操守:如何避免让后方成为新手的噩梦 职业操守 为了确保后勤工作的高效,同时避免引发队友的不满,每位后勤人员都必须遵守基本的职业操守。以下是相关规则以及因忽视这些规则而可能引发的冲突示例: 遵守秩序。 尊重其他玩家的劳动成果——不要在装载点、矿场资源采集点等处插队。如果你排第一个却被人抢走了位置,那肯定不好受。 例子:在废料场有人正在采集资源,突然来了个“急性子”,直接钻进采集机、资源矿井,把没固定好的东西都拿走了,这种情况很常见。结果就是聊天频道里骂声一片,还会有人想拿着扳手“不小心”出现在这人的工厂附近。 排队了就好好排,大家都能轮到。未经允许,请勿拿取他人资源。 如果你看到其他后勤人员留下的物资或装备,并不意味着这些东西是被丢弃的。在拿取之前,请先在聊天频道中确认。 从他人正在从矿井中提取资源的容器里拿取资源是极其无礼的行为,最好在聊天频道中询问这些资源的情况,如果你忍不住这么做,就要为占有这些资源承担责任。 请遵守右侧通行规则。这能减少道路上的混乱,有助于避免碰撞。 如果需要停车,请靠右行驶到路肩! 靠右行驶能让周围的人保持心情舒畅,还能保护你的载具免受损坏。 为你使用的场所补充物资。 如果你在使用矿井、工厂建筑,请运送燃料、材料和资源。不要做“索取者”,要成为后方的支柱!毕竟如果几名后勤人员把矿场的所有硫磺都采光后就离开了,那么当其他人过来时,就没有燃料了,矿场也会因此停工。 不要把后勤载具丢弃在前线。 后勤载具应该留在后方。被丢弃的载具会造成阻碍,而且往往不会被再次使用。请将载具返回至仓库基地或安全区域。否则就得重新生产它们,这会消耗那些本可以用于前线的资源,而且前线可不是“弗莱彻垃圾场”。 不要阻塞运输路线。 除非工厂或生产建筑属于敌方,否则绝不要把载具停在道路上以及工厂或生产建筑的入口处。 帮助其他后勤人员。 修理载具、为载具加油、分享工具或帮忙装载物资——这些对每个人来说都是小事,但后方正是靠这些小事维持运转的。只运输需要的物资。 不要随意携带资源。 不要过度供应——过多的物资会造成阻碍,而且当前线向某一方向推进时,这些资源可能会被闲置甚至完全损失。 记住:你是军队的心脏。 没有你,就没有火炮、没有燃料,更没有胜利。但要成为一名真正的后勤人员,不仅需要物资,还需要智慧。

FOXHOLE_UA 本地化工具 这是大家期待已久的乌克兰语本地化! 要安装它,需要将本地化文件添加到游戏中。 套装包含: - 本地化文件; - 安装说明; - 作者致谢。 使用乌克兰语进行游戏。 说明: 下载游戏 下载本地化文件 War-WindowsNoEditor_UA.pak前往游戏文件位置 快速打开游戏文件位置的方法:通过Steam库>右键点击游戏【Foxhole】>管理>浏览本地文件 游戏路径示例:C:>Program Files (x86)>Steam>steamapps>common>Foxhole 打开文件>War>Content>Paks>放入下载的本地化文件War-WindowsNoEditor_UA.pak 完成。使用乌克兰语游玩 感谢作者 支持更新本地化工具的捐赠为每月75美元 加密货币钱包地址 BNB (BEP-20) 0x5ab4ebd762619a7b86ed26dbf4832fb16b561a7a USDT (BEP-20) 0x2D7Ba4d3A497A71D15ECEd43c48885310DCf6d67


Basic information for medics. This is the English version of the guide "[Медик] Базовый курс". Clothes and tools. - First aid kit is used to treat soldiers and quickly stop bleeding. First aid kit requires bandages. One bandage is enough to heal one seriously wounded soldier. It is not recommended to bring more than five bandages with you. Attention! You cannot heal yourself with a first aid kit, medic cannot move while healing. To heal a player, hold down the left mouse button. - Trauma kit being used to resuscitate dying soldiers. Trauma kit requires plasma. For resuscitation, hold down the left mouse button. Attention! The patient may die during resuscitation. Medic unable to move during resuscitation. If your patient is taken away from you during resuscitation, then resuscitation will not work and you will also lose the plasma bottle. - A bandage is used to stop bleeding. The bandage is used only on yourself you cannot stop another player from bleeding. To use a bandage, take it to the third slot and hold down the left mouse button. - Medical Uniforms can reduce the weight of medicines and medical instruments. It also allows multiple medicines to occupy the same slot instead of several. Attention! While carrying the wounded in his arms, the mobility of the medic decreases. The Medic Uniform allows the medic to move faster while carrying an injured person because it reduces the weight of the medicines. Degrees of bleeding. Degrees of damage. Zones. [Bleeding] Bleeding in the Foxhole is a condition in which blood flows from the body of a soldier in drops. In this case, the character loses health. The higher the degree of bleeding, the larger the size of the drops of blood and the faster the character loses health. The number of drops of blood also depends on the degree of bleeding. 1) Low bleeding. In this condition, one or two small drops of blood flow from the soldier's body. Without a bandage, such a soldier will last a minute or more. Time depends on the amount of health. Sometimes the soldier does not even notice such bleeding. 2) Medium bleeding. In this state, one or more medium-sized drops of blood flow from the soldier's body. Without a bandage, such a soldier will last less than a minute. Time depends on the amount of health. This bleeding is hard to miss. 3) High bleeding. In this state, one or more large drops of blood flow from the soldier's body. This bleeding is similar to arterial bleeding. Without a bandage, such a soldier will last from 15 seconds or less. This bleeding is usually the result of a serious injury. [Degrees of damage] 1) Minor injury. With such a wound, several small spots of blood are visible on the body of a soldier. May be accompanied by low bleeding. Medic Priority: Low. 2) Average injury. With such an injury, several medium-sized blood stains are visible on the body of a soldier. The treatment will take less than one bandage. May be accompanied by medium to high bleeding. Medic Priority: Over first case. 3) Severe injury. With such a wound, almost the entire body of a soldier has blood stains. They always stand out from other players. Have the highest medical priority because they are very vulnerable. The wound may be accompanied by bleeding of high and medium severity. [Zones] 1) Red zone. Area in which it is not necessary to resuscitate the patient because they will kill you there together with the patient. These areas include: The position where the soldier was put in critical condition, the trench that the enemy storms, trench into which grenades are thrown and similar places. 2) Yellow zone. Still the same war zone, but you and the patient are already protected. You can do resuscitation here. These areas include: wood, standing tank or car, bushes, the body of your teammate, safe trench and similar places. 3) Green zone. Zone where there is no fire contact with the enemy. The only threat in such a zone is allied vehicles whose driver can run you over. I advise you not to do it. 1) Walk with the wounded in your arms along the line of fire of a machine gunner, soldier, tank and other technical equipment. I once killed a patient because of such a decision. 2) Swiming with the wounded in your arms. The character can't swim with him. 3) Trying to climb onto something with a wounded man in his arms. The character cannot climb somewhere with him. 4) Reanimate on the road in the green zone. You can be run over by a car. 5) Mindlessly run to the wounded in critical condition. Enemy can throw a grenade at them that will kill you too. 6) Take a lot of items because they reduce the mobility of the medic. With low speed, it will be more difficult for you to carry the wounded into the yellow zone. 7) Go alone along the front zone unknown to you. It will be too stupid death. Any infantryman is stronger than a medic. 8) Healing the patient in front of or to the side of the patient. Always stand behind him. This is only relevant during combat. 9) Resuscitate a patient of another doctor if he has a trauma kit. If he does not have plasma, then he himself asks you to resuscitate. 10) Standing too close to teammates. You will create an obstacle for them with your body. FAQ. - Does the medic need a weapon? It depends on the number of your comrades. Medics do not take part in the battle, but if there are a lot of enemies and there is no one to protect you, then you should carry weapons. - Does the medic need a gas mask? In the event that enemies use green gas. Most soldiers don't wear gas masks and this causes them to die. They do not have time to get out of the gas cloud. If a medic treats such a soldier, then the soldier has our chance to survive. - What is a critical condition? This is when a bloody player lies on the ground and raises his hand to the sky. The medic has more than 20 seconds to save him. - What additional tasks do doctors perform? Take a direct part in the battle, driving on a field machine gun along with its crew, helping with repairs, collecting equipment from corpses, saving important equipment. - How to put the wounded? Press 1. - How to take a seriously wounded soldier? (This is not a live player) Press v. - What is more in demand from plasma and bandages? Bandages because there are fewer patients in critical condition. - If the patient is treated by two physicians, will the treatment be faster? Yes. - If two doctors resuscitate the wounded, will both of them lose their plasma? Yes. - How often do medics have to shoot? Depends on the number of your comrades and their combat skills. If there are few of them, then there is no one to protect the physician. If they don’t know how to play and they are all quickly killed, then there is no one to protect the medic. Additionally. Types of doctors: 1) Classic medick. These players often do not carry weapons. They always carry a first aid kit, med uniform and trauma kit. They do not take direct part in the battle. 2) Combat medick. They always carry weapons and take a direct part in the battle. Otherwise, they do not differ from the first option. 3) Paramedic. These players only heal. They carry a first aid kit with them. They may or may not carry weapons. Participation in the battle they can also be either accepted or not accepted. They don't wear medical uniforms. 4) Medick-logist. Often this is a combat or classic medic who decided to supply medical supplies. Often they ride in an ambulance. Bicycle use. The luggage compartment of the bike fits from 50 to 100 bandages. It will help you and your colleagues a lot. If you are driving into the yellow zone, find a safe place to park. The bike is not very durable. Basic communication of a physician with Russian speakers. - Мне нужны бинты (mne nuzhny binty) - I need bandages - Мне нужна плазма (mne nuzhna plazma) - I need plasma - У меня закончились бинты (u menya zakonchilis' binty) - I'm out of bandages - У меня закончилась плазма (u menya zakonchilas' plazma) - I'm out of plasma - Я не могу тебе помочь (ya ne mogu tebe pomoch') - I can't help you - Брось его (bros' yego) - Drop him - Нажми один (nazhmi odin) - Press one - Назад (nazad) - Keep off - Враг тут (vrag tut) - The enemy is here - Враг слева|справа (vrag sleva|sprava) - Enemy on the left|right - Враг сзади (vrag szadi) - Enemy from behind You were probably waiting for the Russian mate? He won't be


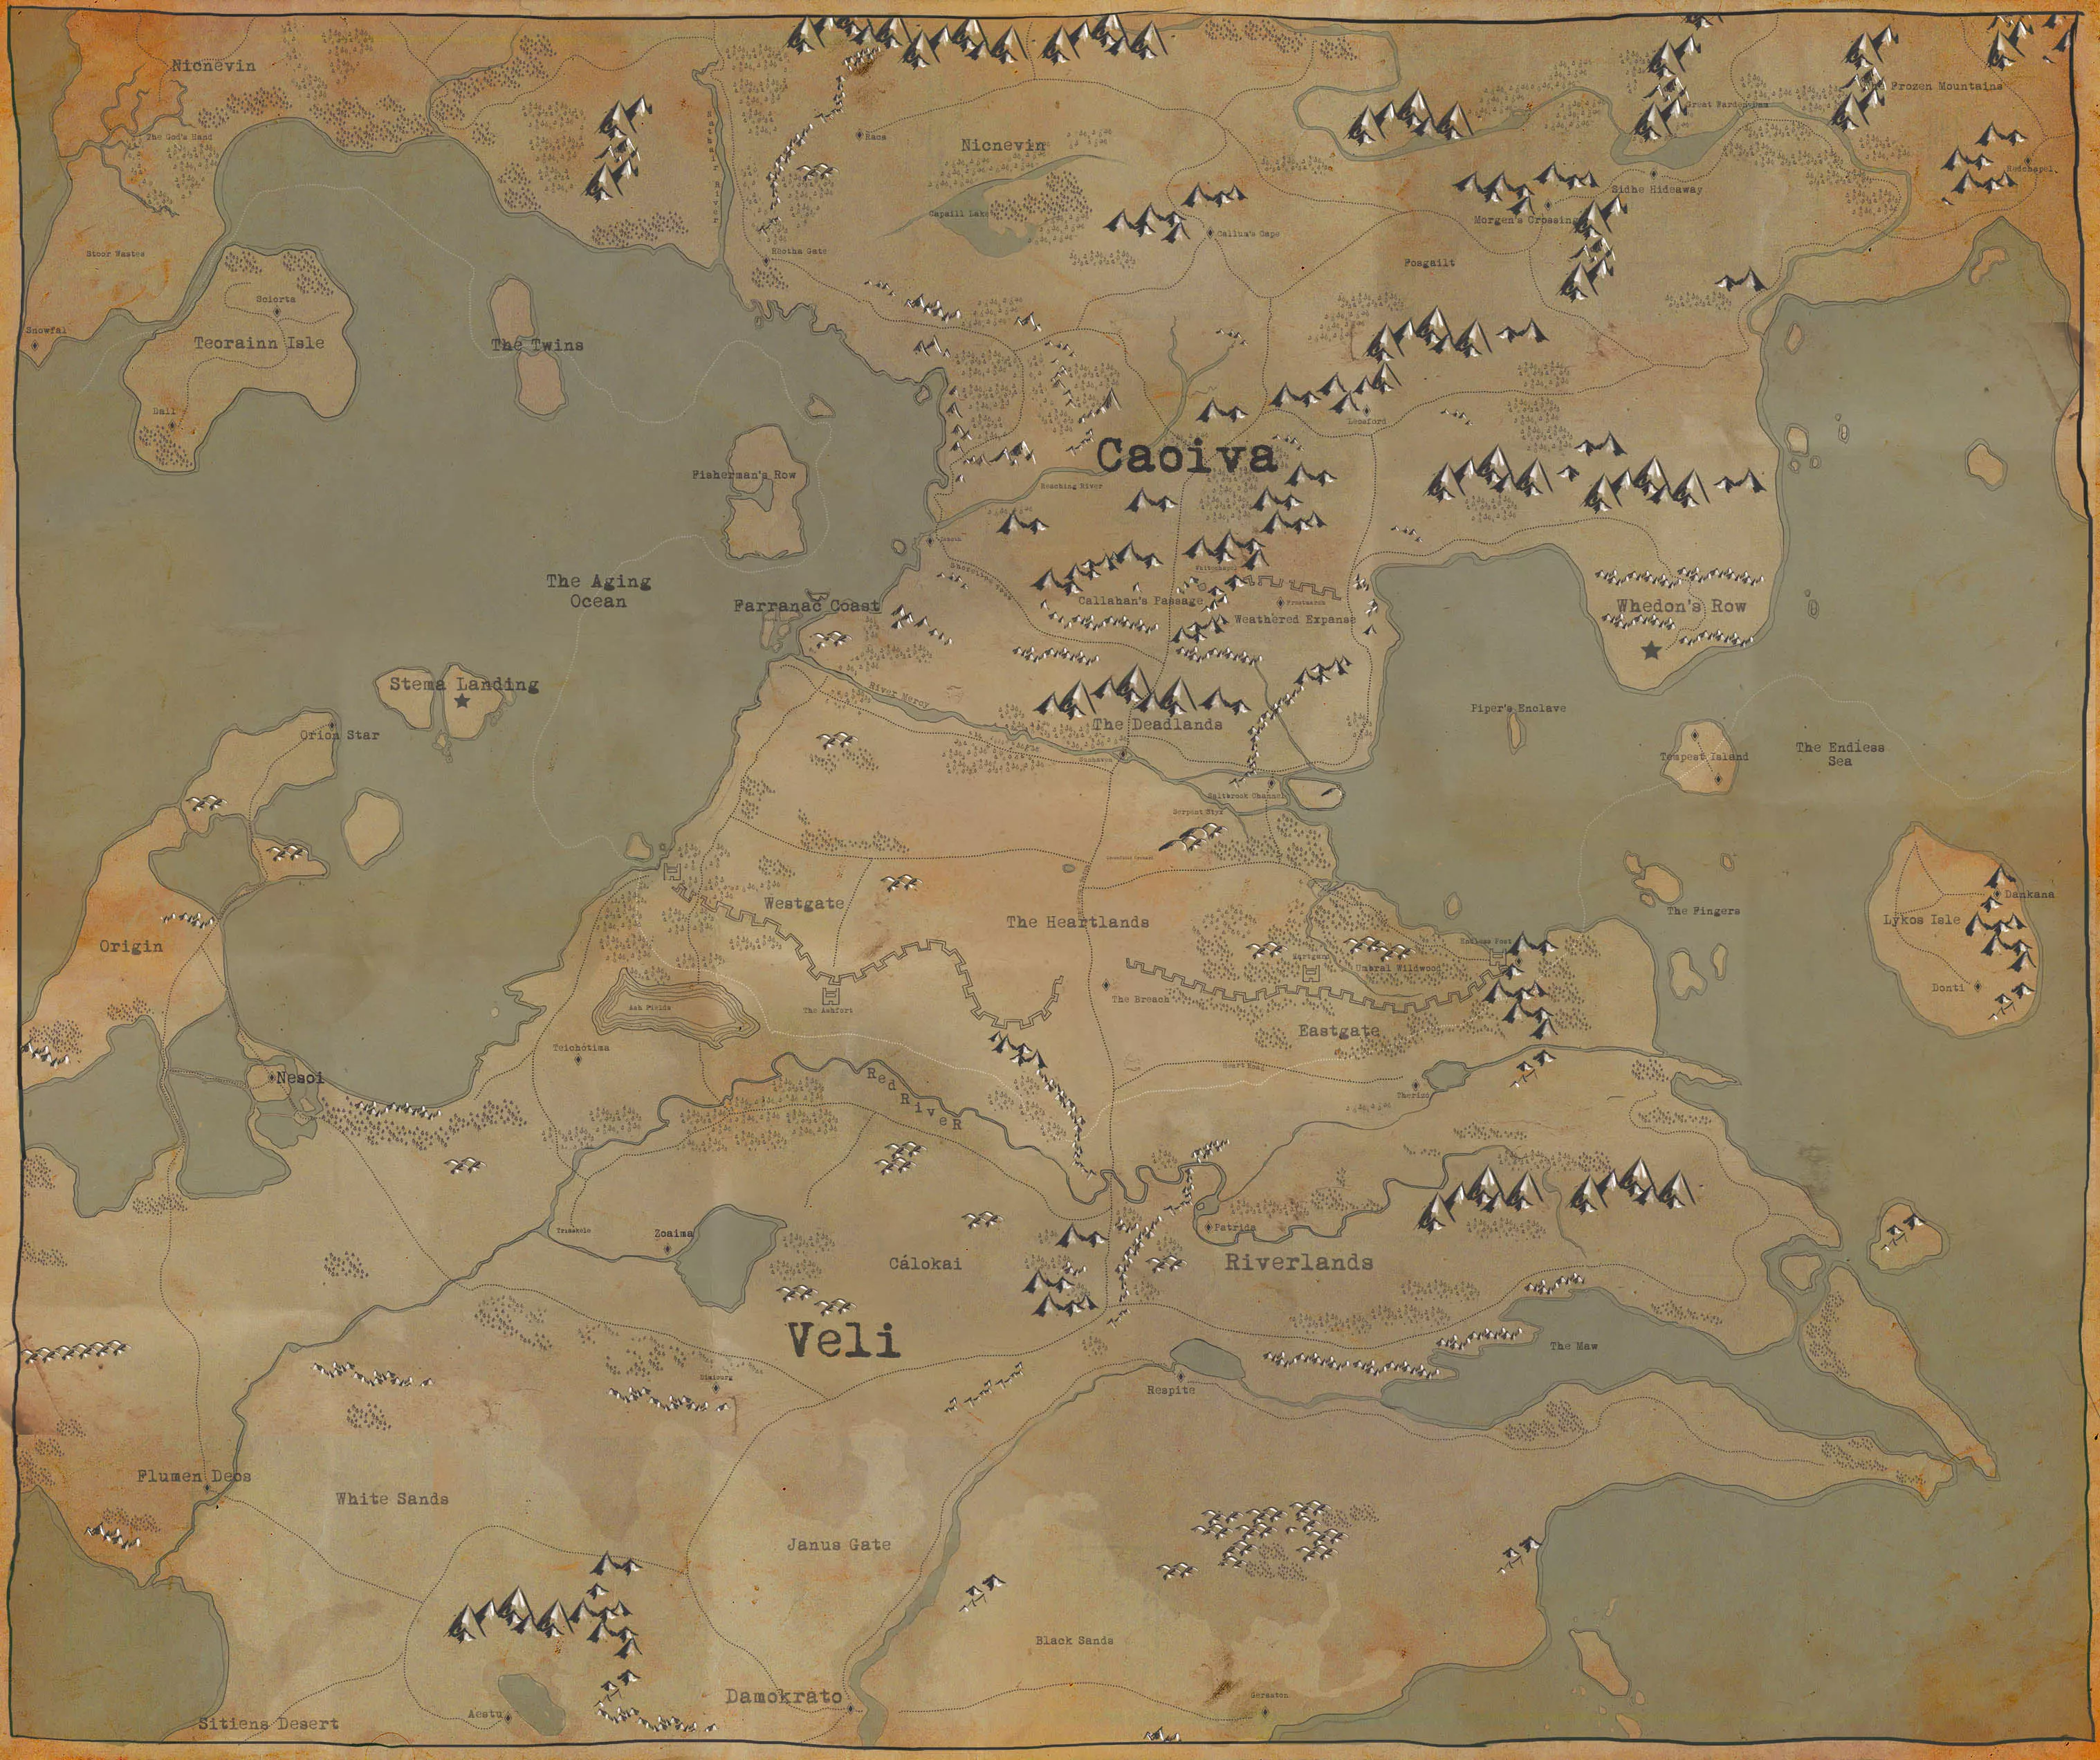
When communicating information via text, clear and concise messages are key. To a new player, the influx of requests that use a slew of abbreviations can seem a little overwhelming. This (ongoing) guide is to help players, new and old, with understanding what's what in Foxhole. A AC - Armored Car: Small, wheeled vehicle with an enclosed turret. Moderate speed on roads, very slow off road. Has a crew of two and one inventory slot. Ex: "Collie ACs moving down the road!" AI - Artificial Intelligence: Defensive structures (for example foxholes, bunker garrisons) that are powered by AI can shoot enemies automatically when they come too close. Towns and bases with the AI upgrade provide AI for defenses in a certain radius. ALUV - Amphibious Light Utility Vehicle: Warden-exclusive LUV variant which can make short trips across water. 7 slots and uses significantly more fuel when in water than on land. APC - Armored Personnel Carrier: Tracked, amphibious vehicle that can carry several infantry in the back. Fast on water, slow on land. Ex: "Enemy APC just landed on the coast, it's got infantry." ARCRPG: Indirect-fire Rocket Propelled Grenade that travels in an arc. Used by certain launchers such as Bonesaws and their variants. Very high chance to penetrate armor on vehicles. ATRPG - Anti-Tank Rocket Propelled Grenade: Direct-fire (straight-line) RPG used in rocket launchers such as the Venom or Bane. ATR AC - Anti-Tank Rifle Armored Car: Colonial-exclusive armored car with a 20mm anti-tank rifle instead of machine guns. AT Garrison: Bunker-based AI defense structure that only targets vehicles and some tripod weapons, ignoring infantry completely. Armor: A layer of protection for armored vehicles that make it possible to deflect incoming projectiles. After the armor of the vehicle is depleted, you have to drive it to a vehicle factory and spend 100 BMATs to replenish it again. Sometimes armor is used as a catchall term for armored vehicles including tanks, armored cars, and halftracks. Arty: A catchall term for indirect fire. They include Light, Heavy, Mortars, and Gunboat cannons. For greatest effectiveness, binoculars should be used. AT - Anti-tank: There are several variants of AT in the game including the AT Gun (a defensive structure which fires only on vehicles) and AT weapons (such as AT rifles, sticky bombs, RPGs, and the AT mine). ATAC - Anti-Tank Armored Car: Colonial-exclusive armored car variant with an 20mm anti-tank rifle in place of the normal machine guns. ATHT - Anti-tank Halftrack: Warden-exclusive HT variant with a 68mm gun. B Baby Ballista: Warden-exclusive Field Mortar, a two-person wheeled gun which fires 250mm shells (the same as the Colonial-exclusive Ballista tank, hence the name). Sometimes also called "wheelchair". BB - Bunker Base: A base built from upgraded bunkers, similar in use to a FOB but allows various bunker garrison upgrades to be constructed if upgraded. BB - Border Base: A base that can be claimed only at specific locations on a contested border. A border is contested when there are only neutral or friendly towns in one hex and only neutral or enemy towns in the bordering hex. Border bases spawn automatically and can be claimed by either faction by simply pressing the Use key (E by default) next to them. They also spawn with a large amount of free supplies for whichever side claims them. A destroyed border base can be claimed again after "some time" as long as the border is still contested. BCON - Basic Construction (material): Scrap-based material made in a Materials Factory used for both construction and as an ingredient for more advanced materials. BEAT - Bonesaw Emplaced Anti-Tank: Colonial-exclusive indirect RPG emplaced gun that is built at construction yards and requires a crane to be deployed. It is very effective against armored vehicles and rotates more quickly and has additional health when placed into an emplacement trench. Must be manned by a player. Blueberry: Wardens. BMAT - Basic Material: The blood that drives any team, Basic Materials are refined from salvage and are used in almost every structure, weapon, and vehicle. They look like I-beams and are vital to a team's success. They also stack (up to 100). BoB - Bunker Base: Portmanteau of "Bunker" and "FOB," see above entry for more info. Bonewagon: Warden-exclusive AC variant armed with Bonesaws instead of machine guns. BP - Blueprint: An unfinished structure or vehicle, blue in color. Unlike structures, they do not decay but do not act as AI either. WARNING: Shooting friendly structure blueprints, including your own, counts as friendly fire against you. Builder: Player who constructs defenses to help hold ground taken, stabilize a front, or fortify positions. Their primary weapon is a hammer and their ammo is BMATs. Ex: "Builders in Farranac are running low on BMATs." Burn: Using or destroying supplies so the enemy cannot capture them. Ex: "Burn all those tank shells ASAP." C CG - Callahan's Gate: Town in Deadlands. GH - Garrison House: Defense world structure in towns that must be built with a CV after unlocking an upgrade at the associated TH. In addition to the windows which are AI powered (distinguished by the blue or green cloth), players may enter them similar to other defenses such as pillboxes and garrisons. They can also be upgraded through various tiers linked to the TH's tier level. Collie - Colonial: Green. Cooking: When you have an order at a factory currently in progress. Ex: "I'm cooking shirts for the new FOB." Cmats/Conc - Concrete: Material used to upgrade bunkers (and walls) to T3, concrete fortifications. These must set for 24 hours to be at full effectiveness and are VERY weak while setting. CP - Callahans Passage: A Warden home region in the north. CV - Construction Vehicle: Orange vehicle on treads with a construction arm, used to make pre-existing structures, FOBs, gates, etc. They can also be used to make build pillboxes when a specific technology is unlocked. CWS - Critically Wounded Soldier(s): Dead soldiers which can be picked up and taken to hospitals or field hospitals for "treatment" into shirts. CWS can be distinguished from regular dead bodies by ALWAYS being in fetal position and not rag-dolling They can only be transported in ambulances or over the shoulder. D Decay: The deterioration of defense health over time. The time until complete destruction varies between structures with more solid, concrete structures generally having a longer decay period. They can be protected from decay if they are within range of a town, relic base, FOB or BoB which is 1) upgraded to protect from decay and 2) is stocked with Garrison Supplies, or Bunker Supplies to only stop decay for bunkers and trenches. DGB - Dual/Double (artillery) Gunboat: Warden-exclusive GB with two artillery pieces in place of the usual MG. DL - Deadlands: A region located in the middle of the world. Doru: colonial-exclusive APC variant with a mounted 12.7mm MG gun. Duck - See ALUV. E EAT - Emplaced Anti-Tank: Warden-exclusive 68mm gun that is built at construction yards and requires a crane to be deployed. It is very effective against armored vehicles and rotates more quickly and has additional health when placed into an emplacement trench. Must be manned by a player. EC - Engineering Center: Building in every logi town that is used to interact with the tech tree. By spending aluminum, copper, or iron alloy, a player can get a prototype which also progresses the corresponding tech. EMAT - Explosive Material: Refined resource made from salvage, used in less powerful explosives such as fragmentation grenades. EMG - Emplaced Machine Gun: 12.7mm emplacement which is good against infantry and unarmored vehicles. Like the EAT, it receives various buffs when inside of an emplacement trench. Built at construction yards. ES - Endless Shore: Eastern region. ETA - Estimated Time of Arrival: Self-explanatory, used as both an inquiry ("Logi, ETA on supplies?") and as an answer ("ETA three minutes"). F FA - Field Artillery: Colonial exclusive, light artillery that is mobile at the expense of lower range than its Warden counterpart. Fires 120mm shells. Moving (and aiming properly) requires two people (a driver and gunner). Falchion: See MPT. FAT - Field Anti-Tank: Two-person wheeled gun which fires 68mm shells. FB - Foebreaker: Warden-exclusive, mounted, double-tubed RPG which fires normal RPG shells. FC - Farranac Coast FC - Field Cannon: Warden-exclusive, two-person wheeled gun which fires 40mm shells, often called "40mm gun" or "wheelchair". Flak gun - See EMG. Flask: White Ash Flask Grenade, Warden-exclusive anti-tank grenade with longer range than a sticky but lower damage. FM - Field Mortar: The infantry-portable mortar. FMG - Field Machine Gun: Twin-barrel push gun firing 12.7mm ammunition. Excellent at suppressing AI structures but very susceptible to being flanked due to its poor turn radius. Moving it requires two people and it can be transported on flatbeds. Foxhole: The game you are playing and a basic defensive structure dug with a shovel. Is not an AI defense but provides limited cover to soldiers inside of it. FOB - Forward Operating Base: Encampments, FOBs are constructed with CVs, can power AI defenses, and act as a spawn point (provided you have the Shirts needed). They are large, square tents that are VERY fragile. Upgrades (in order) are Provisional Garrison, Small Garrison, and Large Garrison (see Garrison section for more). FOD - Foxhole Official Discord: Discord server for Foxhole, accessible via the Esc menu or clicking the Discord icon by the chat window. Fuel: Resource used to power mines and vehicles. There are two types, Diesel and Petrol. Vehicles can use both types of fuel, with Petrol giving some advantages but also being harder to acquire. Switching the fuel type will return the unused fuel in the vehicle to the player's inventory. G Gen - Generator (Engine) Room: Bunker room that, if connected appropriately, can power other garrisons, observations bunkers, etc. GH - Garrison House: Pre-placed structures found in and around towns which act as AI defenses and allow players to enter them for added protection and stability. They generally have at least one side which doesn't have windows that shoot (indicated by a piece of cloth on the window). They can be upgraded into three tiers that are more and more powerful. GB - Gunboat: Naval vessel equipped with a 12.7mm machine gun and a light artillery cannon. Four-person crew and moderate speed (but slower than an APC). GL - Grenade Launcher: There are two types, the Warden-exclusive rifle-mounted launcher that can fire a variety of grenades and the Colonial-exclusive Tremola dedicated grenade launcher. Goblin: slang for colonial Green Ash: Also called gas, Green Ash is an anti-infantry cloud that hurts (and eventually kills) and one caught without a gas mask and/or enough filters (think mustard gas). WARNING: Vehicles do not protect the crew inside from green ash. GS/Gsupp - Garrison Supplies: Used to protect nearby structures from decaying when in a town, FOB or relic base which has been upgraded enough to do so. WARNING: Large amounts of structures will consume GS at a terrifying rate. H HAC - Heavy Armored Car: Warden-exclusive AC variant with mounting 40mm cannon instead of MGs at the cost of speed. HE - High Explosive: Refers to both HE grenades, throwable anti-structure bombs used by infantry. HEMAT - Heavy Explosive Material: Refined sulfur used in the more advanced explosives such as howizter and mortar shells. Hex: Individual map region (which are shaped as hexagons). HH - Huskhollow or Handsome Hideaway: Huskhollow is a town located in Farranac Coast on the center island. Handsome Hideaway is an island in Westgate with low strategic value apart from its Observation Tower. Context usually will make the location meant clear (people in Farranac will generally not be asking for supplies to be taken to Handsome Hideaway). HMG - Heavy Machine Gun: Usually refers to MGs firing 12.7mm (as opposed to 7.92mm) There are a variety of types that use this caliber, from infantry-portable to tripod-mounted (and sometimes vehicle mounted). HOI4: Usually used as a verb, to encircle an enemy position to starve them into submission (referencing Hearts of Iron IV). Howi - Howizter: Either emplaced, player-operated artillery pieces or howizter garrisons which only fire back at incoming artillery. HT - Halftrack: Armored vehicle which can be equipped with a variety of mounted weapons, such as the 12.7mm MGs, Foebreaker rocket launcher, or Infantry Support Gun. They also come in a few different types, usually trading more armor for slower speed. Ex: "HT just crossed the border!" HTD - Heavy Tank Destroyer: Warden-exclusive vehicle equipped with a 68mm cannon. Husk: Remnants of a bunker, FOB, BB, trench that remain after the structure has been destroyed. They will eventually disappear (depending on GS/BS of nearby bases for FOBs and BBs) but can also be removed with explosives. HVFAT - High velocity field anti-tank: Colonial-exclusive upgraded version of the Field AT Gun (see FAT) with a high velocity 68mm cannon. HVFC - High velocity field cannon: Warden-exclusive upgraded version of the 40mm Field Cannon (see FC) with a high velocity 40mm cannon. HWM - Highwayman: Warden-exclusive medium tank based on an Outlaw chassis, with twin 20mm cannons in place of the main turret. I IC - Intelligence Center: Large bunker structure with the same upgrade requirements as a SC, but used to intercept enemy intel sources at extremely long range. ISG - Infantry Support Gun: Colonial-exclusive, deployable cannon that fires 30mm shells. They must be placed on a deployed tripod and have a limited firing arc and ammo must be carried by the gunner. IST - Infantry Support Tank: Colonial-exclusive vehicle armed with two machine guns and heavy armor. It also shows intel around it in a limited range. J Jade Cove: A town perched on top of a mountain in Farranac Coast. Infamously destroyed by the Wardens in War 19. Jeep: The Light Utility Vehicle and its variants. K Kran/Krannie - H8 Kranesca: Colonial-exclusive light tank which can boost speed but at massively increased fuel consumption, smaller fuel tank, and increased RMAT cost than the H5 Hatchet. L LK - Listening Kit: Tripod-mounted item that intercepts enemy intel sources when placed with 80m. They make extremely quiet beeping sounds. Logi - Logistics (team): A catchall term for anyone involved in gathering and refining resources, turning the resources into weapons and supplies, and delivering the finished products to the front lines. They are the arteries and veins keeping a team fighting. There are many guides for anyone interested in logi. LS - Landing ship: Large boat that can be stockpiled like a FOB or TH and deployed at a beach to act as a spawn point. Warning: They cannot be undeployed so choose your landing site carefully (it must be a beach). They also do not have any defenses, so patrolling the waters behind it is advised. LT - Light Tank: Three-person tank with one inventory slot and a 40mm cannon. There is no machine gun but is generally faster and more maneuverable than larger tanks. Like all other vehicles, it is susceptible to Green Ash if the crew aren't wearing Gas Masks. Several different variants for each faction. LTD - Light Tank Destroyer: Colonial exclusive vehicle armed with a 68mm cannon and 45m of range. Because it is open-topped, the crew is very vulnerable to explosives. In addition, the fuel is tank is located on the front and the vehicle has very light armor. LUV - Light Utility Vehicle: A small, fast, Jeep-like vehicle with good off-road speed and excellent maneuverability. Colonials and Wardens each have their own varieties with different inventories, passenger capacities, etc. M MATR - Mounted AT Rifle: Colonial-exclusive tripod-mounted ATR with longer range and increased stability at the cost of all the downsides relying on a tripod brings. MBS - Mounted Bonesaw: Warden-exclusive Bonesaw variant which must be placed on tripods. Longer range at the cost of all the downsides relying on a tripod brings. MBT - Main (or Medium) Battle Tank: See BT. MG - Machine Gun: Rapid-firing, fully-automatic gun. Many different types firing many different calibers. Some can be carried by infantry, some must be mounted, some are integral parts of vehicles, the list goes on. MG Garrison: Bunker type that fires in a (very) limited arc. MH - Mortar House: Defensive-structure found in towns, can be loaded with mortar shells and then operated by infantry to fire at enemies. Longer range than handheld mortars. MHT - Mortar Halftrack (Colonial-exclusive) MLT - Mortar Light Tank (Warden-exclusive) Mine: Not to be confused with AT mines. Mines work semi-autonomously, harvesting either scrap or sulfur, depending on the mine. They are powered by diesel or petrol (if upgraded to do so) which have a higher scrap yield per order. MPF - Mass Production Factory: An additional factory located in the most important logi towns that is used to mass produce item and vehicles crates. An order in this factory can include up to 9 item crates or 5 vehicles crates, with one vehicle crate always consisting of three vehicles. Orders in this factory usually take a long time to finish, but every new order that is added to the queue reduces the time of the previous orders by a substantial amount. MPT - Mass Produced Tank: Colonial-exclusive medium tank armed with a 40mm turret (actual name Falchion). Decent armor and health but under-powered gun for a medium tank. Its greatest strength is its low cost when made in the MPF (see above), allowing it to be, as the name suggest, mass-produced. N Node: Usually preceded by the type of resource that can be gathered (ex: fuel node, sulfur node, etc). Noob: A new player, generally being blamed for anything that has gone wrong whether justified or not. Nuke: Ballistic missile. It permanently destroys anything caught in the blast (for the remainder of the war). Very time consuming and expensive to launch. O Obs bunker - Observation Bunker: Bunker upgrade type that acts as an intel source with a larger radius than standard watch towers. Obs Tower - Observation Tower: A pre-existing structure built by a CV with a 240m radius range (as opposed to a WT's 80m range). OP: Operation (or over-powered if it's used as a complaint). Outlaw: Warden medium tank with a 45m range 40mm main cannon and a 7.92mm MG on the front. P Partisan: Soldier operating behind enemy lines sabotaging logistics routes, destroying undefended towns, and generally being a nuisance to the enemies. PB/Pill - Pillbox: Defensive structure which players may enter for increased stability and cover from the enemy. Three variants as of writing; Rifle, MG, and AT. The rifle pillbox can fire in 360 degrees but is relatively weak and vulnerable to 12.7mm weapons. The MG pillbox fires rapidly and is only able to be damaged by explosive-type damage (frags and Bomastones won't hurt them) but has a VERY limited arc of fire and has a habit of firing at dead bodies instead of switching targets properly. AT pillboxes also have 360 degree firing but will ONLY fire at vehicles, completely ignoring infantry standing next to it. All pillbox types require a nearby base for their AI to work, though infantry may always enter them for cover. Proto - Prototype: A prototype kit can be acquired at the engineering center for a certain amount of iron, copper (for vehicles), or aluminium (for infantry weapons) alloy. It enables the player to build a vehicle or weapon that isn't fully unlocked. Proto-vehicles can be distinguished from their finished counterparts by the shiny, unpainted exterior. PvE - Player versus Environment: In the context of Foxhole, when players fight structures built by other players, rather than against other players themselves. This can occur due to several factors, such as one side outnumbering the other or players not going to the area under attack quickly enough to fight back. Ex: "Enemies are PvEing defenses to the north!" Q QM - Quarter Master: QMs were used historically to streamline logistics for a team, when factories were very different. Currently there are "tech QMs" who manage the contribution of tech materials (iron and aluminium) to the tech tree. Usually there is only one tech QM active at a time, located in the main logi hub, who receives tech materials from multiple tech runners/tech maids collecting the materials from other friendly towns. QRF - Quick Response/Reaction Force: Players that rapidly-respond to enemy attacks or partisan incursions. Sometimes used as a verb. Ex: "Enemies attacking Scurvyshire, need QRF ASAP!" Ex: "Can anyone QRF those partisans by Blemish?" Quadiche: Colonial-exclusive heavy tank based on the Bardiche but with four RPG tubes instead of a cannon, along with a 12.7mm machine gun. R RDZ - Rapid-Decay Zone: Area extending ~120m from the borders where any structure built decays at a MUCH higher rate and cannot be protected from decay by Maintenance Supplies. Refining: The process of converting raw resources into useful materials. The length of time varies between the resource being refined and refineries (indicated by the hammer on the map) can have as many resources being refined as one can put in so long as the process hasn't been completed. This can result in a time until completion of several days. Region: A single map and everything involved. Relic Base: Fixed bases (similar to towns) that are only a fort. Reset: Also called tapping, it describes starting the blueprint of a destroyed enemy town or base to reset its upgrades and facilities. The town or base has to be unclaimed and a CV must be used to start the blueprint, though no materials are needed. Resetting reduces the contained supplies to 25% of their original amount and removes all soldier supplies, GS, and BS. RG - Rifle Garrison: Bunker-based defense which functions in a similar manner to its pillbox counterpart, but must be connected to a bunker base with the appropriate unlocks. RMAT - Refined Material: Like EMATs and BMATs, Refined Materials must be processed from a raw material at a refinery (in this case, Components). They are used to create armored vehicles and more powerful shells and also to upgrade gates to tier three. S SC - Storm Cannon: A large artillery piece that can only be built on top of a 3x3 bunker complex and requires a connected BB to have the corresponding storm cannon upgrade. It needs to be powered by connected Engine Rooms. Fire 300mm shells that can be stored in ammunition rooms for faster access. Shooting and turning the storm cannon consumes large amounts of power, but can be fired into neighboring regions with near-impunity. Scraps: Original name for Salvage, still commonly used. A raw material gathered from scrap/salvage mines or from scrap piles. Scrap/salvage piles are indicated on the map as a screw/bolt. Scrap can then be turned into BMATs, EMATs, or diesel fuel. Scrapper: Someone primarily engaged in gathering resources from resource nodes (typically scrap nodes) for logistics to pick up and deliver to refineries. Ex: "Scrapper at H7, I'm heading to you to pickup" SD - Storage depot: Town structures where crates of unassembled items, vehicle crates, and vehicles can be stored Seaport: Similar to the storage depot but located at the coast, the seaport can also store boats like freighters and gunboats. It is protected by coastal guns. SH - Safehouse: Town structure that acts like a garrison house, in addition to providing a spawn point. Can be upgraded to power AI defenses and be immune to external damage past a certain threshold. Sometimes used to refer to Silverhand tanks (see below). ST - Scout Tank: Warden-exclusive light tank armed with an MG turret. Though it lacks enough armor and firepower to last against actual tanks, its high speed off-road, massive fuel capacity, and ability to broadcast map intel like an LUV make up for it. STD - Silverhand Tank Destroyer: Warden-exclusive open-topped vehicle, armed with a 94.5mm cannon and based on the Silverhand tank. As with all open-topped vehicle, the crew is vulnerable to being hit by plunging fire or enemies firing from above them. Four crew slots. SVH - Silverhand: Warden-exclusive medium tank armed with 68mm and 40mm cannons. Shirt: Spawn Supplies (see below), named due to the icon depicting a neatly folded shirt. SS - Spawn Supplies: Commonly known as Shirts, THs, FOBs, and Cargo Ships must have these in order for players to respawn there. Stickies - Sticky Bombs, anti-vehicle explosive which can only be thrown a short way but are highly effective against armored vehicles. Stockpiling: The act of submitting materials and supplies into a base. Once stockpiled at anything besides a Depot (see below), items cannot be taken out in crate form; they must now be assembled not their final product. T T1/T2/T3 - Tier 1/2/3: Tiers can refer to many different things, usually obvious through context. FOBs, BBs, SHs, GHs, and even vehicles have different tiers, with higher tiers being stronger. A chevron indicates a higher tier vehicle (see also: vetted). Tapping: Using a CV to start building a destroyed enemy base. This wipes out all upgrades the base had (see Resetting). TD - Tank Destroyer: vehicle specialized in fighting tanks (or armor), usually equipped with a 68mm cannon. Colonials and Wardens each have unique designs. Tech QM/Maid: Player role who coordinates and directs the team's tech progress, usually by picking up aluminum/iron from various locations and submitting them in a central engineering center. Tech Runner/Maid: Players who retrieve tech materials (copper, iron, aluminum) and bring to a central location to the Tech QM, where they are used to research new technology. Teching: Researching something in the technology tree, which can be done at the Engineering Center in every bigger logi town. Their: Possessive. There: A place. They're: They are. TH - Town Hall: Former name for Town Base. TMATs: See "Tech." TM - Tech Maid: See Tech QM/Maid U Uniforms: Faction-locked equipment that, when worn, offer various benefits and drawbacks. Only one type of uniform can be worn at a time and all players will spawn with a default "soldier" uniform. Other uniforms must be manufactured at factories and then submitted like other items. Differences between uniforms include inventory size, whether ammo can stack in slots, weather protection, etc. V Vetted: Upgraded vehicle, with increased health and/or armor and specialized camouflage. These are unlocked by teching them on the second or third pass through the tech tree. See also "Tiers" VF - Vehicle Factory: Large building indicated by a truck on the map where all ground-based vehicles are constructed (see also Garage). Vote - The system to upgrade towns and bases requires players to cast their vote towards the desired upgrade. For a player's vote to count, he or she must set a spawn at the base and then set their vote in the right panel of the town menu. VP - Victory Point: Towns that contribute to the faction's overall score, indicated by a white circle behind the town icon on the map. The town must have the first AI upgrade (tier one upgrade) to count as a victory point. W Warden: Blue. WC - World Conquest: The main war where many regions are connected. Wheelchair: Any push-gun, such as the FMG, FAT, HVFAT, 40mm Field Cannon, 250mm push mortar, etc. WT - Watch Tower: Structures that provide map intel on friendly and enemy movement and structures within and 80m radius. Radios or Radio Backpacks are required to receive updated information, though the map intel is also updated upon accessing a base WW - White Whale: See LS (Landing Ship). X Y You're: You are. Your: Possessive. Z Zoo: Intentionally NOT killing the last relic base/TH in a region so that border bases do not spawn. This is generally seen when one side is trying to position forces to capture as many border bases as possible so as to get the free supplies/spawns in them, as well as to prevent the opposing faction from acquiring them. See border bases for more info on them.

Foxhole is a game that has a lot of depth and breadth. It tries to cover the complexity of modern war: from combined arms combat on land and sea (and soon the air!), to industrial scale military production, to military engineering, to supply and logistics. As a result, it attracts a wide variety of players based on their interests. The obvious extremes of this are players who spend most of their time at the front lines feeding the meat grinder and those who happily spend most of their time at the rear focused on optimizing production efficiency; then there are the players in between these extremes that do a varying mix of everything. The beauty of this game, no matter how you choose to play it, is it makes you feel like you belong to a bigger whole, a larger purpose. Even though the opening screen in the game bluntly declares that “you are not a hero”, I firmly believe that “we are all heroes”. It’s the collective endeavor to all do our part for the war effort that has the potential to bring out the best in each one of us as individuals! So how will studying military theory add to our enjoyment of this game? I think getting at least a basic understanding of it can help us better appreciate all the “moving parts” individually and as a whole. Also, it may also encourage us to cooperate and collaborate in more creative and fulfilling ways during the course of each war. I. The Essence of War: Attack and Defense What is the essence of war? There are a whole lot of political and philosophical answers to this question. We’re not going to go into those. For our purposes, we’re going to focus on its “essence” or what defines it as an activity different from others. The essential principle of war (or, honestly, any type of combat) is: “To destroy the enemy and preserve yourself” Simply put, it’s all about understanding the relationship between attack (“destroying the enemy”) and defense (“preserving yourself”). “Destroying the enemy” doesn’t necessarily mean physically destroying each and every individual enemy soldier, it means depriving them of the capacity and will to fight. True, this is primarily accomplished by wounding or killing the enemy; but their capacity and will to fight also depend on other factors such as supply and morale. The goal is to do everything in your power to place the enemy in a situation of complete hopelessness so that they are no longer able or willing to continue fighting. It’s not all about kills, okay? Since ancient times, this universal truth has always been reflected in the tools and methods of war. The sword and the shield are prime examples of this. While the sword was primarily used to cut and stab (attack), it was also used to block and parry (defense). The shield, on the other hand, was used for protection against thrusts and swings (defense); but could also be used to push or knock your opponent down (attack). In the context of “modern warfare” which Foxhole seeks to model: Infantry must not only know how to shoot accurately and effectively (attack), but should also be adept at using cover and concealment while shooting (defense). Their advance toward enemy positions (attack) should ideally take covered and concealed routes, and be supported by suppressing fire and the use of smoke (defense). The tank is an amazing machine of war that combines attack and defense in one powerful package because of its mobility, guns and armor, but it should make sure that it is always within range and should never move far too forward from its supporting infantry and logistics (defense). Commanders must not only know how to gain ground and secure objectives (attack); but must also know how to consolidate and defend these victories against counterattacks (defense). They should also know how to maximize the combat power at their disposal (attack); but must ensure that it is not wasted needlessly and preserved and maintained for where and when it is needed (defense). To use sports as an example: ever wonder how your favorite team or MMA fighter would do if they only focused on offense and didn’t bother about defense, or the other way around? Offense (attack) and defense are essentially bound together; like hot and cold or day and night. This is the way. What exactly do we mean by understanding the relationship between attack and defense? Like everything else in the world, their relation to one another is never equal and is always changing. Just like it can’t be hot and cold or day and night at the same time, a commander must know how to decide whether it’s time to attack or defend based on the situation of the battlefield. This doesn’t mean just focusing on one and totally forgetting about the other; this means identifying which is the priority and which is secondary at any given time. So how do we actually decide if it’s time to attack or defend? II. Using Strength Against Weakness Sun Zi, the ancient Chinese military strategist, said it best in his book “The Art of War”: “When troops take action, the impact must be that of a whetstone flung against an egg. It is a matter of asymmetrical force.” This simply means that we should use a stronger force to defeat a weaker force. As much as possible, we want to be the “whetstone” while the enemy is the “egg”. How can we tell if a force is strong or weak? The strength or weakness of a force can only be determined relative to its opposing force; they need to be objectively compared. “When one understands the condition of the opposition and the condition of one’s own side, one fights a hundred battles without ever facing defeat. When one does not understand the condition of the opposition, but does understand the condition of one’s own side, one loses one battle for every battle won. When one understands neither the condition of the opposition nor the condition of one’s own side, one faces defeat in every battle.” - Sun Zi, The Art of War What factors do we look at when comparing forces? Numbers - which side has more people Weapons - their quality, quantity, destructiveness, and range Mobility - their ability to cover distances and change direction Supply - their capacity to preserve and sustain their force Communication - their capacity to relay orders and exchange information Leadership - the level of knowledge and skill of their commanders Training - the level of knowledge and skill of their soldiers Morale - their will to fight and endure hardship and sacrifice These factors can be grouped into the Physical (Numbers, Weapons, Mobility, Supply, Communication) and Mental (Leadership, Training, Morale). Between the two, the Mental factors play a decisive role while the Physical factors play a supporting role. Before anyone gets their panties in a twist, just because something plays a supporting role doesn’t mean it’s unimportant, okay? What use are Numbers, Weapons, Mobility and Supply if your commanders and soldiers are inept or don’t want to fight? Conversely, even if your force is highly motivated and well-trained, the lack of Numbers, Weapons, Mobility or Supply will have a negative effect on the effectiveness of your Leadership, Training and Morale. Two other physical factors that also need to be considered: Terrain - determine whether a force is located on or is moving through terrain that will provide it with an advantage or disadvantage in attack or defense. Example: Fighting in wide open spaces is different from fighting in an urban setting. Weather - operations during different weather conditions can provide advantages or disadvantages to each force. Examples: Heavy rains and the resulting mud can severely affect the mobility of motorized or mechanized forces. Fighting at night limits visibility and situational awareness. Among all these factors, the most basic is Numbers. People are the actors in the theater of war. All other factors being equal, it’s a foregone conclusion that ten will easily subdue one. What use are the other factors then? A fancy military word for them is force multiplier. An advantage in any of the other Physical or Mental/Moral factors can have a “multiplying effect” on your Numbers. This means that it’s possible for a smaller force to defeat a larger one if it has or creates certain advantages over the other (ex. Better weapons, supply, leadership, training, morale, terrain). To summarize, if your force is stronger, attack; if your force is weaker, defend. It’s a total waste of time and resources to continuously push an attack when your force is up against a stronger and well positioned defense. Not only will it be fruitless, your force will be weakened and your position will become vulnerable to a counter attack by the enemy. It’s better to take a defensive posture until such time that you are able to gather a superior force to defeat the enemy. III. The 3 Levels of Modern War In Foxhole, both forces start out with relatively equal numbers, territory and resources on the strategic level. So how exactly do we use a stronger force to attack a weaker one? This is done by using local superiority at the operational and tactical levels. So what do these fancy military words mean? Strategic - The war situation taken as a whole, meaning the balance of forces across the entire Foxhole map. Operational - The overall situation or balance of forces within a particular hex or group of adjacent hexes on the map. Tactical - The situation or balance of forces in a particular encounter, engagement or battle inside a hex. Given that, as a whole (ie. on the Strategic level) and for most of the war, both sides are relatively equal, it is crucial to achieve local superiority at the Operational and Tactical Levels. How do we achieve this? By using what is called economy of force. IV. Economy of Force or “Just Flank, Bro!” What is Economy of Force? Simply put, it is the principle of massing the majority of your combat power or main effort to strike at the weak point of the enemy while using only minimal forces for supporting efforts. What then is the weak point of the enemy? At the tactical level, the weak point of the enemy is their flank or rear. Why? Because the combat power of an enemy force is concentrated at its front. Attacking it at its flank or rear gives us the chance of inflicting the most damage to the enemy while minimizing the risk to ourselves. At the operational level (and in some cases, the tactical level), the weak point of the enemy is a portion of their force that is separated or isolated from the rest of their force. What needs to be done to ensure that we are able to launch a successful attack on the flank, rear or isolated part of the enemy force? This is where the cooperation between the main effort and supporting effort comes into play. It’s the job of the supporting effort to gain and retain the attention of the main force of the enemy while the main effort attacks the weak and isolated part of their force using secrecy, surprise and speed. This is a very old principle that has been applied throughout the history of warfare. Sun Zi refers to the main and supporting efforts as the Chi and Cheng forces. The Wardens…ehem…I mean the German Wehrmacht during World War 2 referred to them as the Schwerpunkt and Nebenpunkte. “Now, while we determine the dispositions of the opposing forces, our own dispositions cannot be discerned. This allows us to concentrate while the enemy remains dispersed. We converge as one while the enemy is spread across ten locations. It means we have overwhelming numerical superiority, attacking with a ten-to-one advantage. Our numerical superiority, going into battle, renders our adversary helpless.” - Sun Zi, The Art of War In other words, use one portion of your force to distract, deceive or pin down the rest of the enemy force while concentrating another more powerful force to decisively attack their weak point. Once that weak point has been destroyed, find the next weak point, concentrate a superior force against it, rinse and repeat until you have defeated your enemy piece by piece. In military terms this is what is called defeat in detail. Take note that this can work both ways. It is very important that you find the enemy’s weak points without revealing your own. Essentially, we want the freedom to concentrate our forces to destroy the enemy piece by piece while denying the enemy that freedom. As much as possible, we want to be the "whetstone" while the enemy is the "egg". “An accomplished campaigner imposes his will on the opponent rather than being imposed upon.” - Sun Zi, The Art of War In modern military parlance, this is referred to as having the initiative. It is our ultimate goal to possess the initiative while denying it to our enemy. V. Conclusion How is all of this relevant to Foxhole? As mentioned earlier, the game models the strategic, operational and tactical levels of modern war. Hopefully, the principles I just discussed get people’s minds churning and encourage them to reevaluate how they play the game. I also hope this sparks open and intelligent discussion on how getting grounded in military theory can help us get the most out of the depth and breadth of this game. Looking forward to everyone’s constructive feedback and eager to learn from all of you! Shameless plug: if you are a like-minded individual or group who would like to explore how we can use these theories to enhance your Foxhole experience, I encourage you to join or ally yourself with my regiment, The Colonial Dragoons[discord.gg]. See you out on the battlefield!
Brief guide on my personally used Logistics tactics, in an order that may or may not make sense. Open to critique, will be updated as more experience is gained. Brief Introduction This guide is text-only and incomplete as of the posting date 1/1/2022. This guide is not meant to be a "definitive" guide, or any sort of official guide to Logistics within Foxhole, but rather how I've come to be successful in Logistics both as a Solo Logistics player, and within a Squad. It is meant to educate those new and old, who might find value in it. If no value is derived from it, then it simply might not match your style and does not constitute a failure of the guide itself. Since this guide is derived from my personal experience, some information may be lacking, or inaccurate due to updates altering the game itself. I will do my best to update this guide as new content is released, or changes are made. If any inaccuracies are noticed, please contact me through commenting on this guide and pointing out the inaccuracies, and I will change them to fit the latest game updates. Note: This guide will not mention boats and boating, as I've never touched on this subject within the game proper. It will only cover land-based, basic logistics. Starting Out - A Solo Player Beginnings... So you want to start Logistics but have no clue where to start. Well, the good news is starting out is actually very simple to do. Here's a guide of how I do it: Before booting up the game, I check FoxholeStats to get a basic idea of where the most combat is. Areas heavy with fighting are going to the ones most desperate for resources. As Logistics, you are in fact the most praised, and abused, member of the team. The entire war effort rests on your shoulders, and your ability to bring what is needed to where it's needed, in the shortest amount of time possible. Efficiency is key to Logistics. Once I have an idea of where I'll be operating, I go into the game and check the in-game map before deploying. Deployment When choosing an area to deploy at, I always make sure to see if there are three things readily available, and within a decent range: 1 - Seaport and/or Garage 2 - Refinery 3 - Factory These are the basics of what you'll be using during your time as Logi. So having these three things close by is a massive step up in efficiency. Logistics is all about efficiency. Getting the most out there, as quickly as possible. Once I've selected a zone that looks good, I look for resource nodes. This is important as what you need to bring to the front line depends on different resource nodes. Basic materials like B-Mats, Shirts, Medical Supplies, certain weapons and ammunition pretty much rely on salvage. But when you get into the more advanced stuff, sometimes other components are needed. So be sure to note where each resource is, and try to map out in your head the most efficient route to get from Resource Node -> Refinery -> Factory -> Where you are delivering. NOTE: If you are unsure where you'd be needed most, ask in chat. Logi Chat is very helpful, and is more informed then one person could ever be on their own. They'll tell you what is needed and where, before you even deploy. It never hurts asking for opinions. Deployed Once you are deployed, there are a few items you'll need right off the start, luckily you spawn with two: 1 - Hammer 2 - Pistol Others you'll need to acquire: 1 - Mechanic Outfit (The one with a Wrench) 2 - Sledgehammer 3 - Radio MOST Logi starting zones will have these items readily available, though not all. If you happen to deploy to an area missing these, take a look around at near by Bunker Bases and Towns. I'm sure one will have what you need. On top of these, I also like to gather 1 Gas Mask, 1 Filter. This is mostly just a defensive measure but it isn't needed. You can never be too safe as Logistics in my opinion, so anything that helps defend you better isn't a waste. NOTE: It helps to keep your phone, or alternative means of accessing the web nearby. Whenever I Logi, I keep my phone handy in case I need to look up what materials are required for certain items. It's a lot easier to just Google it then constantly needing to check back with the Factory, thus saving you valuable time in the process. Your First Vehicle This is a point of contention in many Logi yards across Foxhole. How to acquire your first Vehicle. Ideally, as a solo player, you want to go for the basic hauler. For Colonials this is the R-1 Hauler, though if you're feeling brave you can upgrade to the R-5b if available. For Wardens, you pretty much just have the Dunne Transport. There is also the Dunne 2a, which has more armor, but... The speed decrease for minimal armor upgrade was always more a burden to me, personally? But for you, it might be different. So I recommend experimenting with these vehicles, until you find one that works for you. In any event, ALL base logi vehicles will be known collectively as "Truck" for the rest of this guide. Once you are equipped with your gear, the easiest way is to find a Sea Port first. Most Seaports in the backlines will already have plenty of Trucks available to use. If there is not the truck you need, find that Garage. The cost to build a truck is B-Mats and the amount varies depending on the Faction, and the Truck. So check at the Garage to see how much you will need. Once an amount has been determined, head over to the refinery. If there are 1K+ B-Mats available, take what you need. Many people might complain about this, but the amount needed to secure a truck is not only trivial, but easily replaced in your first run. Don't worry about the haters. Once you've secured a truck via the Sea Port, or Garage. Lock it, and find your nearest fuel truck. Refuel your truck, and you're ready to go! Basics - Gathering, Refining and Manufacture - Solo Player I've Got My Truck, Now What? Well, it's easy from here. Find a place to park it, ideally out of the way and off on the side of the road. From here, open your map. Remember the lines you picked to deliver to? Check them on the map. Chances are you'll see player made icons on the map I like to call "pips". There's plenty that mark different things but the two you'll most be concerned with are any marked "Logi List", or "Partisans". Logi Lists are just that, it's like a shopping list. They are lists of what is needed at that base, made by people who are fighting in that area. So if you see LOGI LIST, hover over it. If you see "Shirts, B-Mats, Mammons, ect." Then they need Shirts, B-Mats, Mammons and whatever else they posted. Two things to check here: The time it was posted, and chat. Make notice of the time it was posted, if a request for shirts was posted 0 - 5 minutes ago? Chances are they still need those. But if it was posted 30 minutes ago, they might have gotten the delivery and other things are needed, the list might not have been updated. Check the chat if you're unsure. Again, the Logi channel is god. Make mention in chat of where you are delivering to, and ask if it's still required. Example: Blackwatch in Godcrofts posted: LOGI LIST -> Shirts, but it was made 15 minutes ago. Head to chat, ask in Logi Chanel: Blackwatch: Do you still need those shirts? Anything else you need? Chances are you'll be answered by someone in Blackwatch, or Logi who are responding to Blackwatch. Once you have your list gathered, it's time to pick routes. First, find the fastest route from the factory you selected to operate from, to those front lines. In this case, we'll use Blackwatch as a continued example. A few things to look out for: 1 - Does your Route have friendly towers along the way? 2 - Are there any pips pointing out Partisans? Partisans are the quickest way to end your run, and not in a good way! These are enemy players who sneak behind enemy lines with the intention to disrupt the Logistics chain. They will ambush your vehicle, and most likely kill you and take your supplies. So be vigilant! Watchtowers are important. They have a radius which detects enemy players, this radius is viewable when you have your Radio equipped. This radius gets updated every 5 seconds. If your route does not have adequate watchtowers, or if there's mention of partisan activity? Chances are, you'll want to change the route. Try to find a balance of Safety and Speed. Once you've found your route, it's time for the next step: Material Gathering This is the most exciting part of Logistics! Just kidding, it's awful. But it is needed. Check online, or at a Factory, to find out what materials you'll be needing for whatever you need. Shirts need B-Mats. B-Mats are made from Salvage. So that's easy enough, you just need to gather all the salvage you can muster and refine it into B-Mats at the Refinery to turn into Shirts at the Factory. But what if you need Components? Luckily, refinery queues can handle multiple materials, and will continue the refining process even if you're offline! Take note of your Resource nodes and head out to the ones you need most. From here, it's easy as pie. All the hard parts are sorted out: You've got your gear, your truck and objective. Now you've just got to go and mine resources. These are easy, at nodes it's always best to check if there is a base constructed at the node. This base will likely have already mined materials for you to grab, even if the node itself is empty. So check there first. If not? You can mine what you need. There are two ideal ways to do this: First, there are vehicles made strictly for mining. If you see these? Hop in one if it's not being used, and mine away. One full load should be enough to fill your truck. If you need more? Continue mining and filling your truck. If there's still some left over when you're done, do other Logi a courtesy and add the rest to either nearby Storage Containers, or back into the Base I just mentioned. This simple action can go a long way to helping the rest of the team out. You might need to resort to manual labor to get the materials you need, in this case? The sledgehammer is golden. Some resources require the use of sledgehammer to mine, and you won't be able to mine them with your basic hammer. Resources that do allow you to mine them with your hammer, are more efficiently mined using a sledgehammer. So if you need to do some manual labor, always use your sledgehammer. NOTE: Sometimes when gathering resources you'll come across Iron, Aluminium or Copper. The best thing to do is gather this, and submit these resources as-is to the Refinery Stockpile. These resources are used in the tech-process and upgrading the tech-tier. Trust me, there are groups of people who are using and need this stuff that know exactly what to do with it. Handing it off to the public stock-pile as is, is the safest move to make with these items and it is a MASSIVE help to your team to do so. Truck is Full! Now what? Bring that material to the refinery, of course! If you paid attention to the note in the last segment, any special materials simply right click them -> Submit to Stockpile. With that out of the way, you'll see three windows. In the middle window is your refinery window. You'll see various inputs and outputs. The outputs are what you'll focus on, find the output materials you'll need for the factory, then right click the needed inputs and "submit" your materials to refine them. NOTE I: There is a public way to submit these. By default, the refining process is Private. So all those resources and materials you've submitted will not be accessible to others. If you choose to refine Publicly, pretty much any mention of Public will be available to all. Upon refining, those materials become transitioned into the Stockpile for any to use. NOTE I-A: Some Logi simply focus on filling the Public Stockpile, this is the easiest and lowest risk contribution to the team, but is also incredibly monotonous as you're just gathering resources, and refining them into materials for the public stockpile. This can be very well needed depending on what the stockpile reserves are at, if they're low enough this would be a massive contribution to the team. So don't knock just doing this, known as "Scrapping". NOTE II: If you took materials to make your truck? It's simply courteous to return those materials you had taken to the public stockpile at this point. Okay, I've began refining my Resources into Materials... But I don't have Materials to make into things yet. Your first resource run will be like this. You could just wait around until enough of your Resources are refined to make what you need... But you'd be taking up space, and really, this is inefficient. Remember: Logistics is all about efficiency. What I do during "down time" is turn that into "up time" by gathering more resources. Make a few trips back and fourth, gather resources, submit them to the refinery. Once you've refined enough materials, now comes the manufacture. Manufacturing As a rule of thumb, I don't focus on things that can easily be mass-produced like outfits. I simply focus on the things that would be needed right then and there: Shirts, certain Weapons, Ammo, Medical Equipment. Pretty much the things that can be made quickly, and are said to be needed where I've picked. Gather the materials you will need from the Refinery, and head on over to the Factory. Here you can submit your Materials to turn into what you'll need. This will take time. How much time depends on the item you're manufacturing, and how much of it. This will lead to more down time. You can easily make another resource run, and by the time you get back? Your items should be waiting, ready to be shipped out in crates. Basics - Delivery - Solo Player Time to Deliver! The reason you exist as a Logistics player: All this work, finally paying off. It's time to bring your delievery. Take those items you've made, and any B-Mats that were left over. Put that juicy cargo into your truck and... Check your map. Chances are in this time the battlefield has changed. Check and re-check that route you had planned out. Are there partisans? Have any towers gone down? Have any towers been put up that make alternate routes safer? Make sure you're selecting the safest AND fastest route to your destination. Make sure that sidearm you have is loaded, your truck is fueled up. It would behoove you at this point to grab a tank of Diesel to carry on your third slot. Players are pretty good at making sure there are refueling stations along the way. But sometimes the trucks are stolen and not replaced, some routes won't have them. So it's always good to grab a can of Diesel just in case you need to refuel along the way, and you can't find a station or maybe you skipped a station thinking you'd be fine, and you're not fine. Proceed along your selected route, checking up on that map from time to time to make sure you don't need to alter the route due to partisan activity. Even if no one has marked partisans, you can generally tell by looking out for enemy markers, but also not-so-obvious changes: Enemy towers appearing where previously there were none, or your own towers suddenly going offline. These are signs to look out for. Delivery Has Arrived If all goes well? You've arrived at location. Head to the nearest Town Base, Bunker Base, or where ever the stuff is needed. Don't be surprised if those items are requested to be dropped someplace specific. This is pretty common. Go to where ever they're needed, and ram that truck right into it. That's right, just run into the building. Don't worry, your truck and the building will be fine. I just hope no friendlies were in the way. Once you've "parked" the vehicle, while still inside the vehicle, enter the menu for the base. Here you will see the normal menu, but also your truck inventory as long as you're still inside your truck when you accessed this menu. From here, simply right click anything in your inventory, and select "Submit All To Stockpile". Instantly your haul will be transferred into the base stockpile, and watch as those juicy commends pile on. If they don't? Eh, we'll get them next time, and the items probably weren't needed anymore just, nobody told you. Don't stress it. Instead, search the base for any unrefined Resources you need, and don't be afraid to ask if they need anything your next run. Now you can talk directly with people over voice. You'll probably get a few responses from people that look busy enough. With that information, and maybe some resources, head back to base. And do it all over again... And again... And again. By following this basic guide, you'll quickly get the hang of Solo Logistics, and you'll become a Logistics GOD! If I've left anything out, don't be afraid to comment down below. I'll be sure to get around to adding it in. This, again, isn't a definitive guide, and is more like the basics, starting out. Some helpful tips along the way that I personally use, but you might not. So don't take everything in this guide as "you need to do x, y or z". Just what I've found to be the most efficient use of my time as a solo logistics player. o7 Foxhole fam, I hope this guide has helped you out in any way! Comments are always appreciated and I hope to see you, out on that battlefield. Starting Out - Squad Logi Introduction Alright. So you've got the Solo logi basics down, what about as a Squad? This guide is just what me and my squad do. Like the above guide, it isn't "official" or "the meta" or anything, just what we do. That being said, this is ideally made for 3 or more members in a squad. I will include duos side by side with this guide, clearly written so you can tell which is which. The Start Alright. You've got your Squad of 3. How are you setting up? First things first: Assigning jobs. Each member of your team will hold a job, and it's all important: 1 - Scrapper 2 - Manufacture 3 - Delivery If you noticed, the three players take the individual steps of the above guide. Instead of one player doing all the steps, each player does one step. But there's a very clear way we use that makes this easier, though set up time is a bit high. Again, this guide isn't for everyone, this is just how my squad finds success. The Scrapper: Your job is to mine resources, and drop them into the refiner. Whatever the team needs. For Duos, you take both the Scrapper and Manufacturer roles. The Manufacturer: Your job is to grab the refined materials, and bring them to the factory to manufacture the items needed. For Duos, you take both the Scrapper and Manufacturer roles. The Deliverer: You are the "boots on the ground" of the whole operation, as such you should be the leader of the operation, and should be the most skilled Logi among your team. You will be responsible for finding out what's needed, and relaying that back to your squad to make. If all goes smoothly, you'll have a shipment ready to roll by the time you get back from your first delivery. What you'll need: The things you'll need are related to the job, you already know the basics from earlier. So use discretion on what you need based on your role in the squadron. I do recommend for the deliverer to carry a hammer, in case you need to make repairs. But being that you won't need a sledge, or mine resources, you can actually weapon up a little now. Give yourself more a fighting edge in case of partisan attack. Your team WILL need 3 trucks for this to work though. I did say it would take a while to setup, didn't I? Planning Phase On top of the standard, pick a front line, pick a back line planning from earlier, you're going to want to plan out the "swap point". Essentially, this is a point where the manufacturer and deliverer will swap trucks out. It'll make sense later on, but it's best if this is out of the way, somewhat hidden. Even though you can lock vehicles, it doesn't take much for someone to come in and steal them. So you want it someplace only y'all can really guess at. With that, you're ready for the mining, refining, manufacture and delivery plan. Mining, Refining, Manufacture and Delivery - Squad The Scrapper You're the miner and the refiner. In duos you're also the manufacture. Your job is to grab orders from the manufacturer, who will tell you what resources you must acquire to fill the next shipment, and go and collect those resources. Once your truck is filled, meet up with the manufacturer at the "swap point" mentioned earlier, swap your full truck with their empty truck, and repeat the process. It's that easy, and because it is such, it's best reserved for new to logi players, or the lowest logi skill within your squad. If the manufacturer is not at the swap point when you arrive with a full truck, wait there until they arrive. It shouldn't be long. NOTE: In duos, you will be taking on the Manufacturer role as well, so having a bit more skill then newbie is recommended, as you'll either need to know what resources you'll need for certain items already, or at least have that information readily available. Again, having your phone nearby might help with this. Ain't the internet great? All the information you could ever hope for at the tip of your fingers. Manufacturer: You're going to be relaying information and taking orders. So you, hopefully, will be a bit more experienced. You're going to need to have the information already known, or have it readily available. When the deliverer gives you an item order, you'll need to know what resources, and how many, will be needed to fill that order. You will be spending time waiting at the "swap point" in one of several trucks. For simplicity sake, we'll start with an empty truck. You'll wait there for the scrapper to arrive with a truck full of resources. You'll swap trucks with them, and give them their orders. Once done, you'll take your truck full of resources to the refinery, drop those resources into the refinery to be refined into materials, and head back to the swap point. You'll repeat this exact process until you can manufacture your order, when you'll load up on materials and head over to the factory to begin the manufacture process. It would behoove you at this time to go to the swap point to swap trucks with the scrapper and give them orders once more. This will keep the factory ways clear for other players, and also make good use of downtime. If you do this, empty the resources into the refinery and check with the now empty truck at the factory. Take your truck of manufactured items to the swap point, and wait for the deliverer. When they arrive, you swap it out and receive new orders from the deliverer. The deliverer goes on their merry way, and you wait for the scrapper, thus repeating the process. Just remember: Even though the deliverer is technically the squad lead? This whole operation rests on your shoulders. You're technically coordinating the whole thing. Deliverer: Your job, like the scrapper, is simple. But can be the longest, depending on where you're operating from, and where you're headed to. Your job is to coordinate with the troops on the ground at your target location, find out what they need, and relay that information to your manufacturer. You will start out in your empty truck, waiting at the Swap Point until the first shipment arrives and is ready to go. You can fill this downtime several ways, but I use this time to stay in communication with my target zone, and also to anyone along the way that might need some assistance. Who says you only need to provide to one drop zone, eh? Why not hit up several along the way. Once the manufacturer arrives with the first delivery, give them new orders. Swap trucks, send them off to it, and you go drop your drops. When you come back, if the manufacturer is not ready at the swap point, wait for them to arrive, and repeat. It's a simple job, really. And should be nice and smooth assuming you're keeping up to date planning your routes and avoiding partisan activity. Plan of Action Reiterated - Squad Going over the details, again, simplified Scrapper: Least experienced squad mate. Gets orders from Manufacturer, fills orders. Takes full truck to Swap Point, swaps truck with Manufacturer, gets new orders. Repeat. Manufacturer: Moderately to Expert experience. Gets orders from Deliverer, relays orders to Scrapper. Waits at Swap Point for Scrapper, swaps trucks. Brings Resource Truck to Refinery, Refines Materials. Brings Materials to Factory, makes Items. Brings Items to Swap Point, waits for Deliverer. Swaps trucks with Deliverer, gets new orders. Repeat process. Deliverer: Expert experience. Gets orders from the front line, relays that to the Manufacturer. Waits at the Swap Point with empty truck until Manufacturer arrives with Delivery Truck. Swap trucks, take Delivery to the Drop Zone. Return, repeat process. A FEW LAST NOTES: When all starting out for the first start, the Manufacturer and Deliverer should wait at the swap point. The only one working at very first should be the Scrapper until they give the first pass off to the Manufacturer, and the Deliverer waits for the first pass off from the Manufacturer. This way nothing gets out of hand. If you've a full truck, but your pass off partner isn't there, wait for them to show up. Don't go and make your own decisions, it's easier to just wait for them to show, and proceed with the swap. It's always best to wait inside your truck, so nobody can come along and steal it from your squad. It really, REALLY sets you back if you're 2 hours in and a truck full of materials goes missing. Trust me. Take only what you'll really need with you for your task, lighter weight means faster times. It might only be "nths of a second" but still, it adds up over time. Deliverer can afford the weapon weight here, so it's advised to grab a better weapon. Something you're good at, but also is versatile. I personally love to bring an SMG or Assault Rifle if possible, but really it's your preference. This guide was intended for 3 squad mates, but it can ideally handle up to 6: Just add in each new player from Deliverer, Scrapper, Manufacturer. I.E. 2D, 1M, 1S 2D, 1M, 2S 2D, 2M, 2S And with that, this be the guide of Squad Logi. Hope it helps! If you find any value in it, please leave that thumbs up <3
