换一换
换一换 


这不是一份“专业”指南,更像是我从零开始培养马丁的经验,以及了解他的一些小特性,比如地雷放置和安全穿过陷阱,尽管在快节奏的游戏中这没那么有用。我会尽可能提供深入的信息,所以尽量不要感到太困惑。 2021年3月3日 - 修复了部分语法错误。我为什么又写了这么多? 想更新的时候我会更新的 ¯ _(ツ)_/¯ 总结
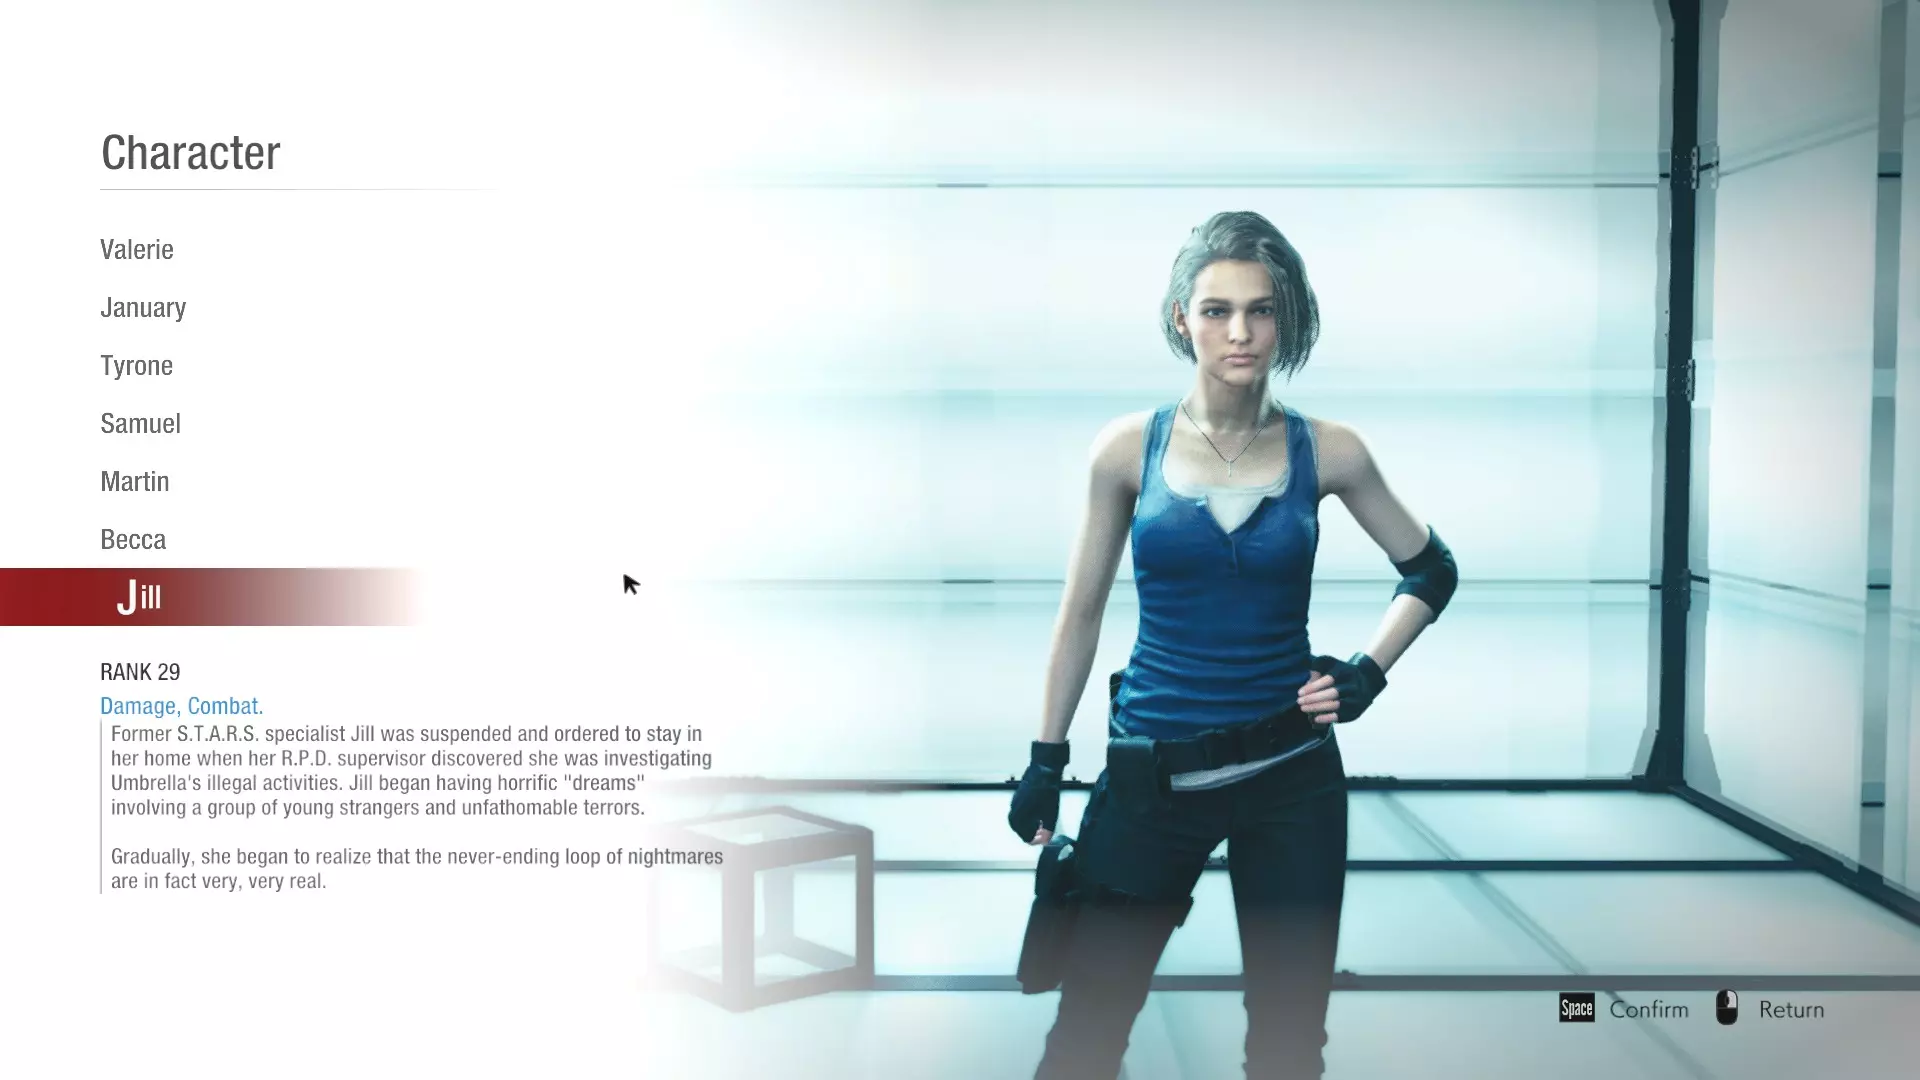
我已经将马丁练到了50级(同时还有简、瓦莱丽、贝卡和吉尔),她们几个加起来我投入了400多小时,说实话,在这四个人里,马丁是单排时最难带动团队的。 马丁有很多种灵活的Build,包括纯辅助、近战输出和远程输出。不过他的输出Build被其他更擅长输出的角色比了下去。他不像山姆那样耐揍,也没有吉尔或山姆那样短冷却的逃生技能。但他确实有很多群体控制技能来阻挡尸潮,还能在关键时刻救下濒死的队友。我主要把他当作辅助来玩,不过在需要的时候也会提供一些额外输出。 凭借他的个人技能【临时地雷】和狂热技能【闪光 Baton】,他在1区作为一名还不错的跑图角色表现亮眼。麻痹僵尸并在它们醒来前带着目标物逃脱,完全避免正面冲突。他的被动技能【工兵】能让你更容易发现陷阱,即使在没有灯光的情况下,游戏也会提示你附近陷阱的位置。如果你愿意,马丁还可以安全地走过或跑过陷阱。马丁拥有额外2个 inventory 空间,这意味着他能更好地携带 puzzle pieces,不像其他角色可能需要决定留下哪些物品。 在区域2,他仍然是一个不错的侦察兵,你可以通过在门和走廊放置【简易地雷】来阻止持有钥匙的守卫“约里克”不断逃离队伍,从而增加幕后黑手控制他的难度。你也可以使用闪光 Baton(原词)麻痹他,帮助队友更快将其击杀。但要注意,如果你没有闪光 Baton 且独自侦查时,当操纵者(Mastermind)在本阶段最终召唤出生物武器,一个隐蔽的陷阱或不幸的僵尸咬伤都可能让你丧命。 到达3号区域后,他最好紧跟团队行动。控制从地面涌出的僵尸群,或者在输出角色攻击生物核心时关闭摄像头。当操纵者召唤生物武器时,使用闪光 Baton 为团队争取逃跑时间。接近尾声时,闪光 Baton 能帮助你和团队摆脱阻碍你们逃生的僵尸群和生物武器。唯一阻碍马丁的是他的生命值比其他幸存者低,并且是速度最慢的角色(和瓦莱丽一样),还没有闪避技能。不过,他拥有独特的群体控制能力,可以让攻击者远离自己并借此逃脱。 如果你还不能适应他那些明显的缺点,可以选择紧跟团队,利用马丁出色的群体控制能力为队友提供支援。只是要注意不要落得太远,以免变成“马丁三明治”。优点:拥有群体控制和策划者技能禁用能力 10格物品栏空间(比其他角色多2格额外物品栏空间) 体型更矮小纤细的男性模型(相比泰隆或山姆),策划者尝试射击时受击判定区域更小 【防弹】特性使其比其他幸存者更能承受枪击 【防毒面具】特性使其比其他幸存者对感染的抵抗力更强 能提升近战武器的耐用度,可构建不错的近战伤害流派,或在近战伤害队伍中担任近战武器修理者【优点】 - 强化后可提升暴击率,适合伤害型build - 可安全穿过陷阱 - 能将策划者的陷阱转化为友方陷阱 - 为团队拆除陷阱可防止队友后续意外踩中 【缺点】 - 生存能力较弱,总生命值仅1100,低于其他幸存者 - 无法移动且没有闪避技能 - 部分技能有风险较高的动画硬直(简易地雷、闪光 Baton、拆除陷阱) - 作为辅助角色无法为团队提供治疗增益 - 为团队拆除陷阱比直接射击陷阱更危险 注:我很久没玩了,但根据我的理解,伤害型马丁比纯辅助型马丁更强。我会尽量保持本指南的更新。如果你想了解每个地图上物品的刷新位置,例如安布雷拉 credits 的刷新点,可以查看我的物品位置指南。数据和技能组合
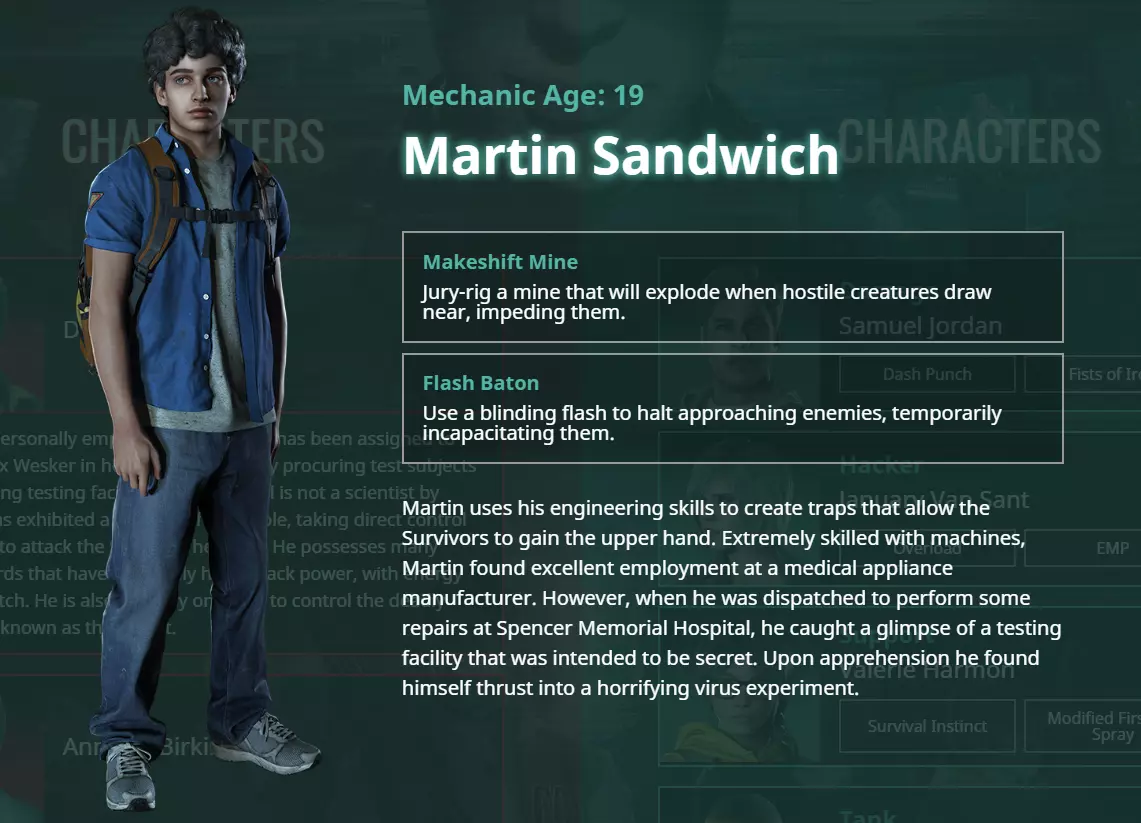
角色定位:辅助或输出(使用强化技能时) 基础生命值:1100 基础移动速度:最低(与瓦莱丽相同)。比泰隆和詹妮弗慢1秒,比贝卡、塞缪尔和吉尔慢2秒。 基础开门伤害:1级锁2次攻击,2级锁3次攻击,3级锁4次攻击

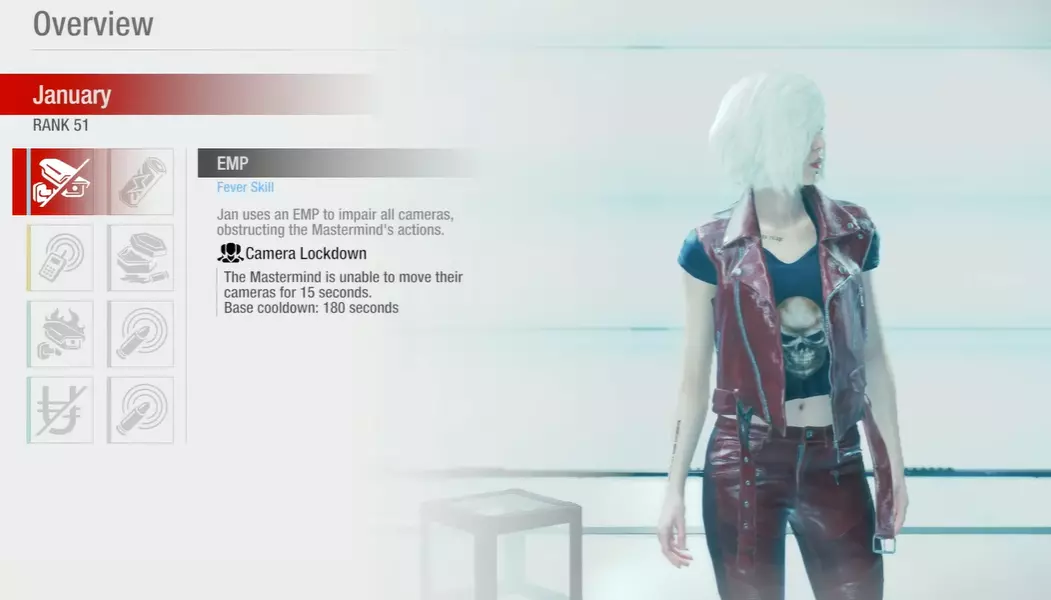
狂热技能:闪光 Baton(闪光 Baton)- 释放致盲闪光,可打断附近敌人并使其暂时瘫痪(约2秒动画时间)。 变体1:强化 - 延长敌人瘫痪持续时间(约15秒控制时长)。基础冷却时间:120秒 变体2:快速冷却 - 缩短基础冷却时间(约9秒控制时长)。基础冷却时间:90秒 变体3:冲击波 - 同时致盲摄像头并摧毁范围内陷阱(约10秒控制时长)。基础冷却时间:120秒 随着新更新,我更喜欢冲击波变体,因为它比其他两种更具通用性。 使用闪光 Baton 时需注意,其动画时间较慢且可被打断。尽量不要在近距离使用,否则容易被抓取或打断。不过,如果你确实被打断了,技能不会进入冷却。时机必须精准,否则你会浪费一个重要的群体控制冷却技能。如果你足够大胆且不想错过狂热技能,可以进入房间内使用它。尽管有时即使门在你身后关上,警棍仍可能留在房间内,并仍能麻痹里面的僵尸。但我不会依赖这种情况,因为它时灵时不灵。 该技能拥有可观的范围和作用区域,并且需要视线才能麻痹僵尸(可以穿透小型掩体,但无法穿透大型掩体和墙壁)。不过,它有时确实能麻痹安全室门缝外的僵尸,但这并不可靠。X先生也很难被此技能眩晕,所以当他出现时,尽量不要过早使用这个技能。闪光 Baton 无法打断 Yateveo,所以不要在这种植物身上浪费它。

个人技能:临时地雷 - 马丁可以放置临时地雷来阻碍附近的敌人(约2秒动画时间)。 变体1:电击 - 放置电击地雷,对靠近的生物造成轻微伤害并导致短暂麻痹(约10秒麻痹效果)。基础冷却时间:45秒。 变体2:火焰 - 放置火焰地雷,爆炸后燃烧敌人,造成中等伤害(可短暂击退僵尸和生物武器)。基础冷却时间:45秒。 变体3:信号干扰器 - 放置信号干扰器,阻止策划者在有效范围内使用生物、陷阱及其终极技能(约15秒阻止效果)。基础冷却时间:45秒。现在我更喜欢使用火焰变体而非电击变体,原因很简单,复仇女神是极具威胁的生物武器,短暂击退它能让你更容易逃脱。火焰变体对僵尸仍能造成足够的中等伤害,并且可以打断生物武器的处决抓取。 如果你使用电击变体,它不会击退生物武器,但能使僵尸麻痹约10秒,方便你的团队躲避或更轻松地击杀。现在这只是个人偏好问题,不像尼古拉出现之前,电击变体总体上是更好的选择。 至于新的信号干扰器变体,它的范围很小,能使一片区域失效约15秒。它不如另外两种变体好用,而且过于依赖特定情境。

被动技能:生活技巧——马丁可以凭借其独特的创造力改装武器和服装。 变体1:强化——提高暴击率(总暴击率约30%)。同时增加修复近战武器时的耐久度加成。 变体2:防毒面具——大幅提升感染抗性。 变体3:防弹——大幅减少受到的枪械配件伤害。 变体4:闪光装置——使用闪光手榴弹或闪光 Baton 时可抵消4个生物增益效果。 我更喜欢第一个变体“强化”。它不仅能提供一定的暴击率,还能让火炬道具在马丁身上成为高效且更耐用的选择,因为他能为团队带来更多廉价伤害和群体控制。马丁大约每3次攻击就能触发一次暴击。你也可以利用强化被动技能成为团队的近战武器修理员,具体操作是捡起队友的近战武器,手动修理以增加额外500点耐久度,然后再扔回给他们。这在单排中较难实现,但在组队游戏中值得考虑。 使用胶带装备时,一级胶带增加90点耐久度,二级增加170点,三级增加240点。同时装备三个胶带可为近战武器总共增加500点耐久度,若再装备生活技巧-强化技能,修理后的武器将拥有2000点耐久度。 防毒面具变体的适用场景非常有限,无法对抗枪械流派或非感染型的策划者流派。 而新的防弹变体则能让马丁在面对枪械流派时变得更加耐打。如果你打算将他更多地当作辅助来玩,那就选这个而不是强化。

Passive Skill: Sapper - Martin's extensive knowledge of explosives allows him to approach and disarm traps without triggering them. (Variant 1): Nimble - Allows you to disarm traps faster (2 second disarm animation) (Variant 2): Switcheroo - Allows you to spawn a Makeshift Mine in place of disarmed traps (3 second disarm animation) (Variant 3): Minesweeper - Traps will not trigger even when running (3 second disarm animation) (Variant 4): EOD Suit - Greatly reduces damage taken when disarming traps and placing mines. Increases movement speed for a set duration afterwards. I prefer the Nimble variation compared to Switcheroo. The animation lock Martin does puts you in a more dangerous spot. It's even worse if the Mastermind used an equipment to make you disarm traps much slower. The mine that you converted may also not even touch a zombie in the future. Converted Shock mines could be useful if it did stun the bioweapons but nevertheless it simply puts you in a more awkward animation that can make or break your survival. Converted traps also damages other traps close to it when triggered. Making it less viable sometimes. Martin's Sapper passive also enables you to walk over traps without triggering them while using Sapper - Minesweeper makes it also safe for Martin to run through traps. Consider this if you don't want to do the mash disarm button to avoid traps technique. It also lets you see traps near doors/walls that other character's can't do. If you tap your disarm key constantly (A button for me) while running, Martin will start the disarm animation immediately once you get near a trap. You can cancel this animation without finishing it. If you do cancel, be careful as you can still set it off if the animation puts you behind the trap when you start running again. Try to do this when going down stairs or your running around corners. Equipment Martin's equipment choices is much wider than other characters as he can be played as a support or damage dealer. You can also alleviate his weakness by boosting his health and movement speed. You can also make his fever skill have a much shorter cooldown with the new items in the Jill update. Example builds: Shore Up Defenses Equipment (Survival) Bulletproof Vest III 7 pts.) - Greatly increases maximum health (Combat) Army Boots (5 pts.) - Slightly increases movement speed (Combat) EMP Rounds II (3 pts.) - Greatly increases damage to cameras (Resource) First Aid Spray+ (3 pts) - Start with a First Aid Spray in your inventory Equipping Bulletproof Vest III boosts Martin's low health and Army Boots helps you become more elusive as you are slightly faster to avoid danger easier. Equipping Army Boots puts your movement speed to Tyrone and January's movement speed. The last 8 points could be a mix of anything that might be useful for your team such as EMP Rounds if your team does not have a January and needs a camera disabler, and/or First Aid Spray+ for an AoE heal and quick revive that Martin doesn't have. You can also just add more Bulletproof Vests. Flash Baton Focus Equipment (Mastery) Mixtape III (6 pts.) - Greatly decreases Fever Skill cooldown (Mastery) Mixtape II (4 pts.) - Moderately decreases Fever Skill cooldown (Mastery) Mixtape I (2 pts.) - Slightly decreases Fever Skill cooldown (Mastery) Book of Wisdom (3 pts) - Moderately decreases Personal Skill cooldown, and slightly decreases Fever Skill cooldown Equipping all the Fever Skill reduction equipment lowers Flash Baton - Enhance variant's cooldown to ~78 seconds from 120 seconds (-42 seconds) and Flash Baton - Rapid Cooldown variant's cooldown to ~58 seconds from 90 seconds (-32 seconds). First, let's touch upon the difference between the paralysis duration between the two variants. The Enhance variant paralyzes for around 15 seconds while Rapid Cooldown paralyzes for around 10 seconds. The difference in cooldown between the two is 20 seconds (30 seconds without mixtape). I would still go Flash Baton - Rapid Cooldown variant to use it more often and lose 6 second of paralysis. Zombies should usually die by then and/or it's also ample enough time to avoid them so the extra 6 seconds of paralysis is not worth the 20 second difference with this shortened cooldown. However, stacking Mixtapes makes your build less versatile as Flash Baton is useless against Nicholai's gun or gun builds in general. You'll probably will only get to use Flash Baton against Yorrick (the security guard holding the keycard) and Nemesis in this case. Makeshift Mine Focus Equipment(Mastery) Energy Drink III (6 pts.) - Greatly decreases Personal Skill cooldown (Mastery) Energy Drink II (4 pts.) - Moderately decreases Personal Skill cooldown (Mastery) Energy Drink I (2 pts.) - Slightly decreases Personal Skill cooldown (Mastery) Book of Wisdom (3 pts) - Moderately decreases Personal Skill cooldown, and slightly decreases Fever Skill cooldown Equipping all Personal Skill reduction equipment puts Makeshift Mine's cooldown to ~20 seconds. It should be around ~18 seconds but the 2 second animation time brings it to ~20. Nevertheless, it gives you twice as much more mines to put out around the map. Try to separate them as the splash damage will trigger the other traps that are close to it. Using Switcheroo also adds more mines that you can put out in the map. Makeshift Mine - Flame is a better option here as it deals more damage and briefly staggers bioweapons. With Book of Wisdom, Flash Baton - Enhance's cooldown goes to ~114 seconds and Flash Baton - Rapid Cooldown's cooldown to ~85 seconds. Overall, it's something to consider over the Flash Baton variation build. Melee Damage Equipment (Combat) Iron Nails III (7 pts.) - Greatly increases the power of melee attacks (Combat) Iron Nails II (5 pts.) - Moderately increases the power of melee attacks (Combat) Leather Handle II (4 pts.) - Greatly increases the chance of landing a critical hit with melee attack (Combat) Hollow Point Rounds II (3 pts.) - Slightly increases critical damage Martin's Lifehack - Reinforce increases his critical chance while also making melee weapons much durable. You can boots his melee damage with Iron Nails, his critical chance even further with Leather Handle and his critical hit damage with Hollow Point Rounds (yes, it does work on melee weapons). With Martin's overall health, being in melee for so long puts him in too much danger. Try to build this if you know your team can back you up with camera disruptions (January), healing over time (Valerie), or crowd control and increased defense (Tyrone). You'll probably have to Flash Baton more selfishly or use your Makeshift Mine as an escape tool rather than a breaching tool. When starting fights in melee, try to study up with the zombies attack pattern. Either let them start their attack animation first and dodge backwards or try to flank them from the side or behind. You can add either more damage with Iron Nails, more critical chance with Leather Handle, or more Hollow Point Rounds if you want to boost critical damage. You can also add Duct Tape(s) if you want your weapon to last longer v.s. hit harder or Iron Sheet if you want decrease your weapon's durability depletion. Baseball Bat is more durable with a faster animation compared to the Sledgehammer but the Sledgehammer deals more damage. I suggest the Baseball Bat being better overall but both are ample enough to kill a bio core. Consider the new Psycho Drive/Reinforced Frame equipment however it's not as versatile against gun builds. It's also useless against bio cores. Range Damage Equipment (Combat) FMJ Rounds III (7 pts.) - Greatly increases the power of firearms (Combat) FMJ Rounds II (5 pts.) - Moderately increases the power of firearms (Combat) Long Barrel II (4 pts.) - Greatly increases the chances of landing a critical hit with firearms (Combat) Hollow Point Rounds II (3 pts.) - Moderately increases critical damage This is pretty much similar to his melee build instead we are focusing on boosting critical chance with firearms instead of melee weapons. Though with this build you are a bit safer since you are shooting at range instead of swinging at melee range. Running either melee or range damage build Martin makes his economy/inventory much better as you are only focusing on 1 type of weapon and the resources that helps them (Repair Kit for Melee; Ammo for Ranged). Instead of being versatile with both. Add more Hollow Point if you want more critical damage instead of another FMJ round. Consider the new Reinforced Frame equipment however it's not as versatile against gun builds. It's also useless against bio cores. Other good alternative equipments:Anti-Infection (with Gas Mask) - Gas Mask, NBC Suit, Cough Drop, Really Big Cough Drop, PPE Kit Resource Management - Decoder, Lucky Charm, Smart Watch, Pharmacy 101, Wallet, Ammo Pack, Survival Pack, Repair Kit+, Umbrella Credit Card Pack Mule - Hiking Bag, Sling Bag, Waist Pack Explosive Start - Molotov, Hand Grenade, Flash Grenade Miscellanious - Survival Kit, Novice Gear Role and Gameplay Mechanics Support CTCT - Control, Torch, Camera, TrapWith Martin, your role is to provide crowd control for your team whether it is from Makeshift Mine - Shock to Flash Baton or simply by having a more durable Torch with Life Hacks - Reinforce. Martin makes breaching a room that has the objective on it much easier and faster. You will mainly help shooting at cameras (with Matilda), and torching hordes that are paralyzed or about to spawn on the ground. You can also somewhat save someone from triggering a trap by disarming it while they are doing objectives in Area 2 and 3. Your priority is making sure that your teammates can move around the map safely and do keycards or bio cores without worrying about the zombies, the camera, or the mines. In Area 3, you can help with your knife when destroying the bio core once you have handled the situation. Try not to waste your Torch on the bio core. It is a resource you don't want to waste and its damage is negligible anyways. Only use it if you are running out of time. Trap PlacementsMakeshift Mine trap placements can get a bit weird. From my experience, it will either place it in front of Martin's model or bump it underneath him if you are too close to a door, wall, or an object. It's better to hug the area you want to trap v.s. trying to place it in front of him as you can't place it any further than where the game bumps it to. If you want to place it specifically underneath the door, you can open it so the game can place it in front of Martin's model instead of below him. Just make sure it's safe to do so. When a breach starts, (when your team is about to enter a room full of zombies) you can place your Makeshift Mine near the door just in case a zombie or controlled zombie tries to break in your team. You can also just instantly place this on small corridors, high traffic areas, or anywhere really as soon as it is available if you know you will not use it in the next 45 seconds. Trapping the exit gates is also ok to help your team move to the next area if many zombies are trying to stop you or the Mastermind is about to claw your team to death. Just a reminder however that your Makeshift Mine - Shock does not do any crowd control to the bioweapons so placing it near them to try and save someone is futile and puts you in more danger. Makeshift Mine - Flame however briefly staggers them so you have to decide if you want more overall crowd control or an execution grab denier. An okay technique to also do after using Flash Baton is to place a Makeshift Mine - Shock near them to chain the crowd control even further against zombies and controlled zombies with Makeshift Mine - Shock). Be wary however that the Mastermind can still let go of the controlled zombie and go back to the cameras. Lastly, be aware when placing Makeshift Mines as it puts Martin on a brief animation where he is vulnerable. You cannot cancel this animation. Disarming and Converting TrapsMartin's passive skill Sapper allows him to disarm traps without triggering them. The game gives you a button confirmation to hold to disarm the trap without triggering it. This is good at catching traps in the dark or behind doors so you can gauge to see if it's ok for you to enter the room or not. While you are disarming traps or converting them, it puts Martin in a grounded animation that makes it easier for the Mastermind to shoot at you. They can also trigger another trap next to you while you are too busy disarming them. You can however stop the animation unlike placing a Makeshift Mine. Sometimes it's better to just shoot at it if you know the Mastermind is watching than you being baited into disarming it. When you are disarming traps, your teammates can safely walk past you as long as you are still disarming it. If you are converting traps through Sapper - Switcheroo, it makes the animation much slower and more dangerous. Once it finishes however, it replaces the current trap with whatever Makeshift Mine variation you are using (Shock or Flame) for free. It is a high risk and little to moderate reward situation where you are relying on good trap placements or if there is any trap at all. It does help you clear horde based build better on Area 3 when the Mastermind is trying to place traps along with zombies inside the room with the bio core. Be mindful of converting traps though as it deals damage to the other traps around it if triggered. This makes it less viable at times. Damage Pew Pew or Whack Whack Martin can also be played as a damage dealer with Life Hacks - Reinforce increasing Martin's overall critical rate compared to other characters. This affects both ranged and melee build. Life Hacks - Reinforce also gives an extra 500 durability once a melee weapon are repaired if you are going for a melee Martin. Overall you would be doing less camera duty and focusing more on helping DPS and disarming/placing traps when you can. You just have to position more safely as Martin does not have a good movement speed and innate evasive tool compared to other DPS characters. Play around your Makeshift Mine - Shock if you need to escape a horde. Try to save Flash Baton for breaches if you can. Inventory and Gameplay Guide What my final inventory mostly look like in Area 3 Inventory: Matilda/MQ-11, Ammo, Ammo, Torch/Baseball Bat, Repair Kit, Green Herbs, First Aid Spray, Explosive, Special Weapon/Yellow Herb, Free Slot. Area 1Inventory: MUP/Matilda/Torch/Baseball/Explosive, Ammo, First Aid Spray, Green Herb There are 3 starts Martin can forgo. A Torch/Baseball Bat + Repair Kit, Matilda/Quickdraw, or an Explosive start. I usually get a Torch if it's available and a Repair Kit. A Matilda start is also okay but just be mindful with not to overcommit ammo on killing zombies. Annette: Torch/Baseball Bat + Repair Kit > Explosive > Matilda Daniel: Torch/Baseball Bat + Repair Kit or Explosive > Matilda Spencer: Matilda/Quickdraw > Explosive > Torch/Baseball Bat + Repair Kit Nicholai: Matilda/Quickdraw > Explosive If you started with Torch/Baseball Bat, try to bait the zombie's attack animation by going backwards, to the side or stagger them with a headshot first. If you are going for a melee damage build Baseball Bat is definitely better than the Torch. Try not to break your weapon when you don't have a repair kit in hand. If you started with Matilda/Quickdraw try not to overcommit ammo on killing zombies. When on camera duty, make sure you are in a blind spot/cover of the active camera and shoot it when a gun is armed. Managing your Ammo is important as you don't have much resources this early in the stage. If you went with the Explosive start you can use this to help your team clear a room and hopefully move to the next Area where you can get the weapons you are looking for. The MUP gun can still stagger a zombie or save a teammate from a zombie grab but try not to keep it for long. Consider a Quickdraw if your team is lacking January or with Tyrone and/or Sam against a gun build Mastermind. Area 2Inventory: Matilda/MQ-11 and/or Torch/Baseball Bat, Ammo, Repair Kit, Green Herb, First Aid Spray (if you haven't used it yet/opted into it), Explosive and/or a Yellow Herb (if you can afford one) Do a quick assessment to whether you need to trap and/or disrupt any zombies the Mastermind is trying to build near the shop and buy later if needed. Area 2 is when you get most of your core items and the rest of your buys are either Green Herbs for health, Blue Herbs for infection, Yellow Herbs for gun builds or for more defense, and Explosives for AoE crowd control, and Ammos when needed. Upgrade to MQ-11 (more camera disruption potential) or Matilda (if you still have the MUP) if you have ample umbrella credits for them. Follow the melee gameplay and support camera shoot-outs like in the previous area. If it's a gun build Mastermind, peek through corners first before busting out the starting zone. Do not grab the Security Card and start deactivating the Security Devices unless the Mastermind is preoccupied, there are no suitable teammates around you to do it, and/or you are not confident with your team to know what to do with it. You are too fragile to be stuck on the animation where the Mastermind can easy pick you off with a gun or worse a bioweapon spawn. You're better off shooting the cameras or disarming traps. If you are stuck on doing this then I suggest preemptively killing the nearby camera before deactivating the Security Device with your Matilda. Just have an escape route in mind such as loopable objects and starting zone as you watch the camera to turn red when it gets fixed. Flash Baton can also help you escape if you have it up. I find that it's somewhat useful to discard the Security Card if the Mastermind spawns the bioweapon as it gives your team an option to grab it and do the objectives while they are preoccupied on you or a specific survivor. It puts pressure on them to either halt the bioweapon spawn as the objectives get done somewhere else. Another reason to do is that if the card holder gets incapacitated, your team can't do the objectives while the holder is on the floor waiting to be saved. Area 3Inventory: Matilda/MQ-11 and/or Torch/Baseball, Ammo, Ammo, Repair Kit, Green Herb, First Aid Spray, Explosive and/or a Yellow Herb Upgrade to MQ-11 (more camera disruption potential) or Matilda (cheap camera disruptor) if you still haven't. Consider LE-5 or a Sledgehammer if your team is lacking damage to kill biocores. Try to have your Flash Baton up at the start of Area 3 to make it safer to control the early zombies the Mastermind might be setting up outside. Buy afterwards or buy in the chest zone along the way. This depends if your stocked up or not. You can also Flash Baton and throw a grenade out there or to simply throw one and immediately go back to the Safe Room if you feel like it's too dangerous to stick too long. You can opt into just stocking up if you are against a gun build Mastermind. The mastermind gets a boost in their bioenergy regeneration and you have to decide whether to kill the camera first or stop the horde from the floor first. This is why if you are teamed with January, it alleviates your job into doing both. Luckily, your fever skill Flash Baton gives you enough time paralyze the zombies, shoot the camera, and then start killing the horde while your teammates are doing the bio core. Hopefully all 3 bio cores are done by then while you and your group are almost out of resources. This is where your fever skill Flash Baton shine as it will paralyze the horde near the door so you can either open it or use the Fever Skill once it's opened to help your team get out safer. You can read more about Mastermind match ups below. Dealing with Annette and Daniel
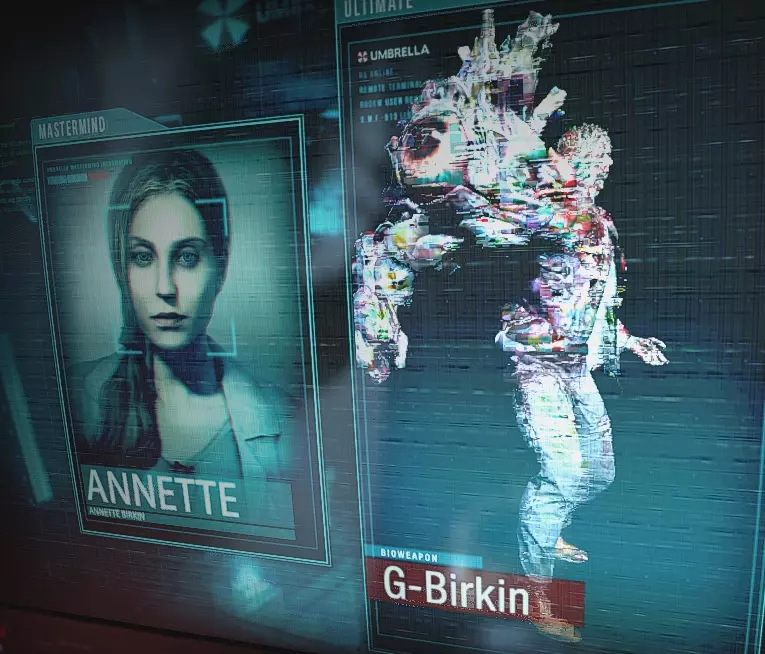
对局难度:简单-中等 安妮特作为操纵者时,大多使用以生物为核心的卡组,而马丁在对抗这类卡组时表现出色。**尽早购买火炬是必须的**,以便控制僵尸群和早期舔食者,防止队友被压制。**干扰摄像头是你的次要任务**,这能阻止更多僵尸在房间内生成,或防止安妮特控制被大幅强化的僵尸。 与其他操纵者相比,你可能需要购买更多炸药,或为火炬准备更多修理包,因为安妮特生成僵尸时享有折扣。但要注意不要在不必要的战斗中浪费炸药,应依靠临时地雷、闪光 Baton(电击棍)和火炬来阻碍她组建大规模军队的进程。安妮特的卡组往往会在区域结束时耗尽大多数幸存者的资源。马丁的被动技能“火力支援”、“临时地雷”和“闪光 Baton”有助于资源管理,因为与其他幸存者相比,你对弹药或爆炸物的依赖程度较低。我还发现她的构筑最令人困扰,因为这会使游戏的网络连接更加不稳定(尤其是在3号区域)。 安妮特的生物武器是G-柏金,她已故的丈夫。与X先生相比,用闪光 Baton更容易击晕他。因此,当他们最终召唤柏金时,你应该能更容易逃脱。他的攻击范围比X先生更广,所以如果你在近距离且没有穿着军用靴,可能会被击中。他的弱点是右肩张开的眼睛。3级武器造成足够伤害就能使他 stagger。与X先生相比,使用柏金(Birkin)时,特殊武器和爆炸物也更容易命中。使用火花射击(Spark Shot)对付他时要注意,一旦你陷入射击动画,他会更容易接近你,并打断武器的伤害/麻痹效果。建议在他被分散注意力或处于其身后时射击,并躲在掩体后面。当你不在他视野范围内时,伤害/麻痹效果仍会持续。 你可以利用较小的可循环区域来躲避柏金,或者让他在桌子周围无限循环。当他处于狂暴状态时,这绝对很有帮助,因为在近距离他会比你快得多,此时唯一的即时逃生方法就是利用环境或门。不过,一旦他的狂暴状态结束,威胁性就会降低,因此使用较小的分隔物体来循环躲避他会变得容易得多。
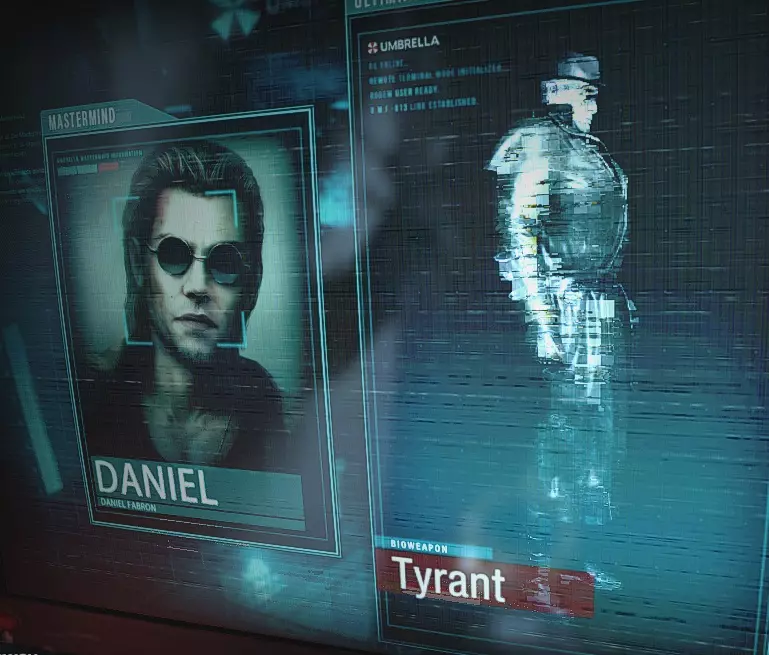
对局难度:简单-中等 丹尼尔·策划者与安妮特有些相似,他同样会生成僵尸群并为其提供增益。不过丹尼尔能让受控僵尸对团队造成更致命的威胁。马丁非常擅长对抗丹尼尔,因为他有两种群体控制手段,既能帮助团队躲避受控僵尸,也能更快将其消灭。这里开局选择火炬比玛蒂尔达更好,因为在射击摄像头时,你不希望迫使他去控制僵尸。火炬造成的持续燃烧伤害也能在一定程度上抵消受控僵尸获得的治疗效果。 你可能需要购买更多爆炸物(尤其是闪光手榴弹),主要是为了削弱他与团队的对抗能力,而不是用于清剿僵尸潮。如果他使用无击退构筑,当他试图控制危险僵尸或“约里克”时,闪光弹和破片手榴弹能补充你本就烦人的控制手段——闪光 Baton 接简易地雷的连招,因为这些效果算作麻痹而非击退。 丹尼尔的召唤物构筑对大多数幸存者来说也可能令人疲惫,你需要某种控制手段来阻止被控制的僵尸前进。幸运的是,相比不断购买炸药来阻止被控制的僵尸攻击你的队伍,你可以用闪光 Baton、简易地雷和火炬来缓解这个问题。火花射击也能阻碍他的僵尸控制。因此,四处侦查并专注于击杀补给僵尸,而不是急于推进关卡,或许是个不错的选择。丹尼尔的生物武器是暴君,也就是著名的X先生。由于其壁垒能力,他更难被击晕,唯一的弱点是头部,相较于他整体模型而言尺寸较小。与威廉·柏金相比,他的攻击范围较短,但攻击更致命、速度更快。除非你拥有军用靴和/或防弹背心,否则你可能无法存活。X先生还凭借其冲撞能力拥有更高的机动性,并通过潜行者技能造成更多伤害。他绝对能更快地消灭一支缺乏配合的队伍,尤其是在狭窄的房间里。 不过,他有一个开门动画,这让你通过他走出的门时会相对安全。当他试图冲撞过门时,你也可以对着他关门。我建议利用门快速逃脱,但如果可能的话不要离门太近。不要冒险卡门,最好继续前往下一扇门并在他身后关上。在较小的区域里,他也不太容易被绕圈,因为他的攻击速度比威廉·柏金快,或者能在较小的绕圈区域内使用冲撞技能。 应对亚历克斯和斯宾塞
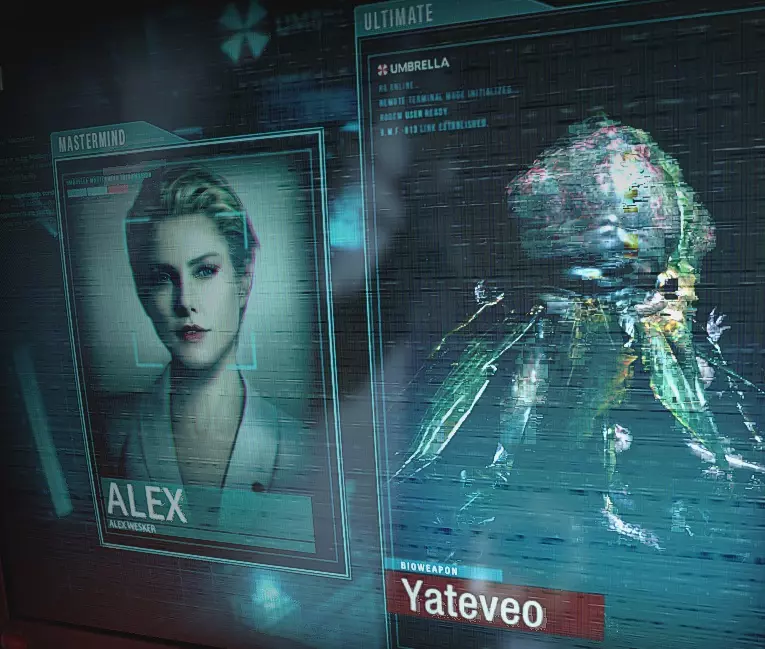
对局难度:简单 亚历克斯·策划者(Alex Mastermind)通常会使用感染僵尸流派或多重陷阱流派。早期购买火炬(Torch)或玛蒂尔达(Matilda)都是可行的,因为你要么需要快速消灭僵尸并远离感染 puddles,要么阻止亚历克斯放置更多陷阱以避免团队被瞬间团灭。这里建议以远程攻击为主,同时保留火炬来阻止亚提夫(Yateveo)吞噬队友。 你的【工兵】被动技能能让你看到靠近门的陷阱,并且可以行走/奔跑穿过它们。【闪光 Baton - 冲击波】能立即摧毁陷阱。【简易地雷 - 信号干扰器】放置后能使该区域内的陷阱失效。使用感染流build时,你需要比通常情况购买更多蓝色药草,并沿途收集更多感染治疗喷雾,以帮助队友清除感染。而使用陷阱流build时,则需要减少修理包的购买,增加弹药来射击陷阱或摄像头。在该build中购买更多绿色和黄色药草,也能帮助你在遭遇多个地雷时不至于立即死亡。 在这种情况下,射击摄像头比对付尸潮稍微重要一些,这样可以阻止她在目标区域放置多个陷阱或感染僵尸。你也可以尝试购买手雷或燃烧瓶,从远处立即触发她的雷区。燃烧瓶还能对艾历克斯的生物武器起到威慑作用,而且是更便宜的替代选择。尽量不要在靠近他人时使用它,因为它的弹道容错率不高。 亚历克斯的生物武器是亚蒂维奥,一种类似植物的僵尸变异体,它会固定在原地,能够阻挡关卡中的路径。它的威胁程度不如X先生或威廉·柏金,但确实能为亚历克斯争取一点时间来布置更多雷区,或者从远处对你们团队进行群体控制。不过,尽量不要靠得太近,因为与其他生物武器的致命抓取相比,它能更快地吞噬你。放置一枚简易地雷-火焰可以打断亚蒂维奥吞噬队友的动作。你对火炬的天生亲和力也非常有帮助,挥舞火炬可以阻止它的吞噬动画。但之后一定要尽快后退。Yateveo无法循环攻击,因为它是固定的,你可以简单地躲在墙壁或大型掩体后面,以防止它对你使用史莱姆射击。小型墙壁也可以防止你被拉到吞噬范围内,但仍会让你容易受到束缚藤蔓的攻击。如果你的队伍有很多时间,就直接忽略这种植物,去收集战利品、补充物资、放置地雷,并侦察在这段时间可能生成的补给僵尸。如果你的队伍有足够的火力继续完成任务,可以尝试击杀它,因为它比其他生物武器要脆弱得多。
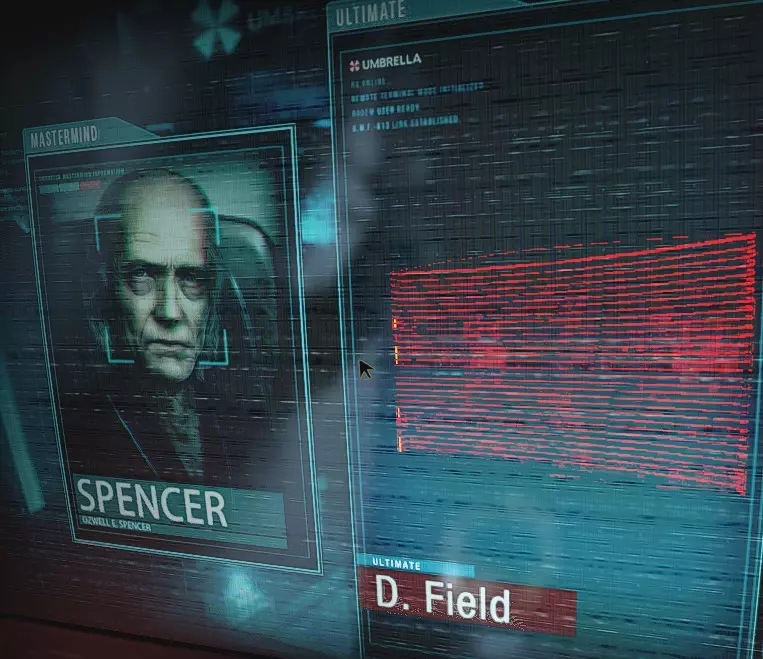
对局难度:中等(枪械/生物)- 中等(枪械) 斯宾塞通常使用枪械流、尸潮流或两者混合流派。这里可以放弃火炬,优先专注于干扰摄像头。如果队伍缺乏伤害,在区域3选择棒球棍或大锤是不错的选择。与其他主宰者相比,对抗枪械流斯宾塞时分散行动的可行性更低,一发 immobilize shot 就能轻松团灭分散的幸存者。不过马丁对付尸潮流表现出色,他可以用火炬和玛蒂尔达轻松控制尸潮和摄像头。对付斯宾塞时,保持团队集中行动更为必要。使用这个策划者角色时,你会比平时购买更多的弹药、修理包、绿色药草和黄色药草。与通常不怎么依赖枪械的安妮特或丹尼尔不同,该角色会削弱你本就廉价的近战武器资源管理能力。在区域3管理弹药资源至关重要,尤其是当你是唯一的摄像头干扰者时,因为你太脆弱了,无法承受一发定身弹加上后续的枪击。 我建议使用这个策划者角色时,更主动地留意摄像头的装弹声,一旦听到就立即射击摄像头,以长期节省弹药。如果摄像头没有装弹,威胁就会小很多,所以有时最好等它装弹后再处理。拥有【闪光警棍 - 冲击波】会对这个对局有所帮助。 斯宾塞的终极技能并非生物武器,而是【分解力场】。与 Birkin、X先生乃至 Yateveo 相比,它的即时威胁要小得多,只要你没有陷入动画硬直、被抓取、处于腿部陷阱束缚、被【定身射击】固定或静止站立,就可以躲避它。这使得你的【简易地雷】和拆除陷阱的动画变得更加危险,因为一旦你陷入这些动画,他们就能更容易地释放分解力场。 始终保持移动,减少放置陷阱、拆除陷阱甚至查看物品栏的停滞时间。如果你想协助处理生物核心,【棒球棍】或【大锤】就足够了。不过,在破坏核心之前一定要先关闭摄像头,然后在摄像头重新开启时后退。减少生物核心区域的人员数量比所有人都聚集在那里导致团灭要好。 应对尼古拉
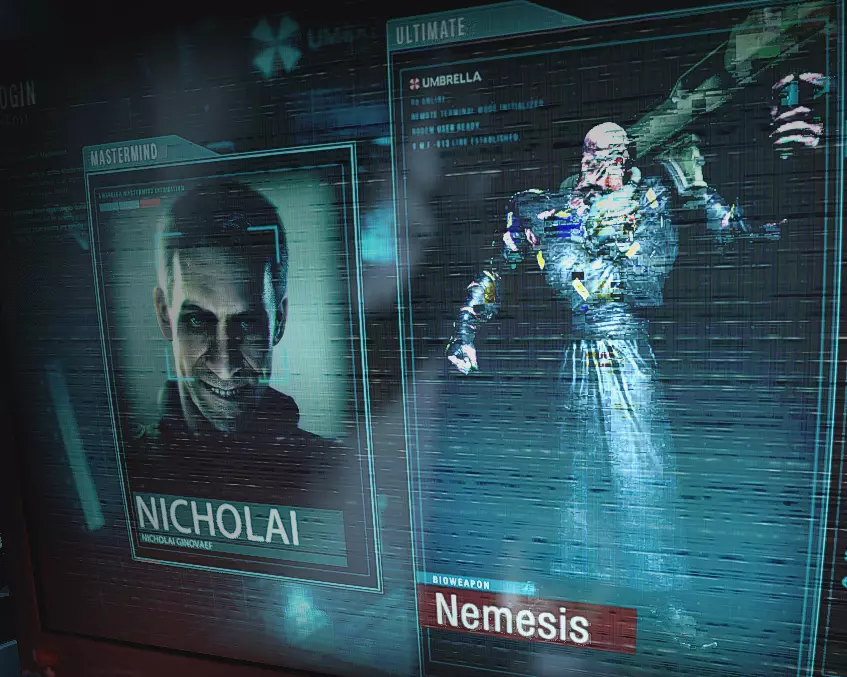
对局难度:困难 尼古拉的策略主要围绕枪械类卡组展开。马丁在这场对局中的作用较差,因为僵尸数量少会降低你的重要性。装备【闪光警棍-冲击波】和【生命黑客-防弹】能让这场对局轻松不少。不过与斯宾塞不同,尼古拉会对你的队伍召唤复仇女神,此时你的作用不再那么无关紧要,因为你仍能对这个生物兵器进行群体控制。 这里建议与队友保持在一起,你需要协助瘫痪摄像头,以防止策划者用子弹攻击你的队伍。当策划者召唤出复仇女神后,要分散开来,如果你被【肾上腺素】+【处决】击晕,会被一击秒杀。使用闪光警棍的冲击波(如果选择了该技能)时要注意时机,尽量在摄像头配备机枪时再使用。 在这里你会比平时购买更多弹药,因为你更可能专注于应对摄像头而非控制尸潮。购买黄色药草也能提供一些对枪械的防御能力,这一点也需要考虑。管理好你的弹药资源,并采用类似“枪手斯宾塞”的玩法,即比平时更多地利用掩护来瘫痪摄像头,并与团队保持协作。 尼古拉的生物武器是追踪者,它是《生化危机3》中的标志性敌人。与斯宾塞不同,追踪者相比瓦解力场是更直接的威胁。肾上腺素会使追踪者比其他生物武器快得多。它还移除了生物武器穿过门时的开门动画。虽然追踪者没有处决技能,但使用“灭绝”技能时会装备远程火箭筒。使用大型掩体躲避,或者如果处于近战范围内,当追踪者使用“灭绝”技能而静止时,你可以尝试绕到他身后躲避。 使用你的闪光警棍或简易火焰地雷使追踪者僵直,然后跑向最近的安全屋。一旦他的肾上腺素效果结束,就更容易通过绕圈和卡门来应对他。只要确保你不会被“灭绝”技能一击秒杀,所以逃跑时尽量回头看。你也可以在追踪者使用“灭绝”技能时用闪光警棍打断他。 市中心地图
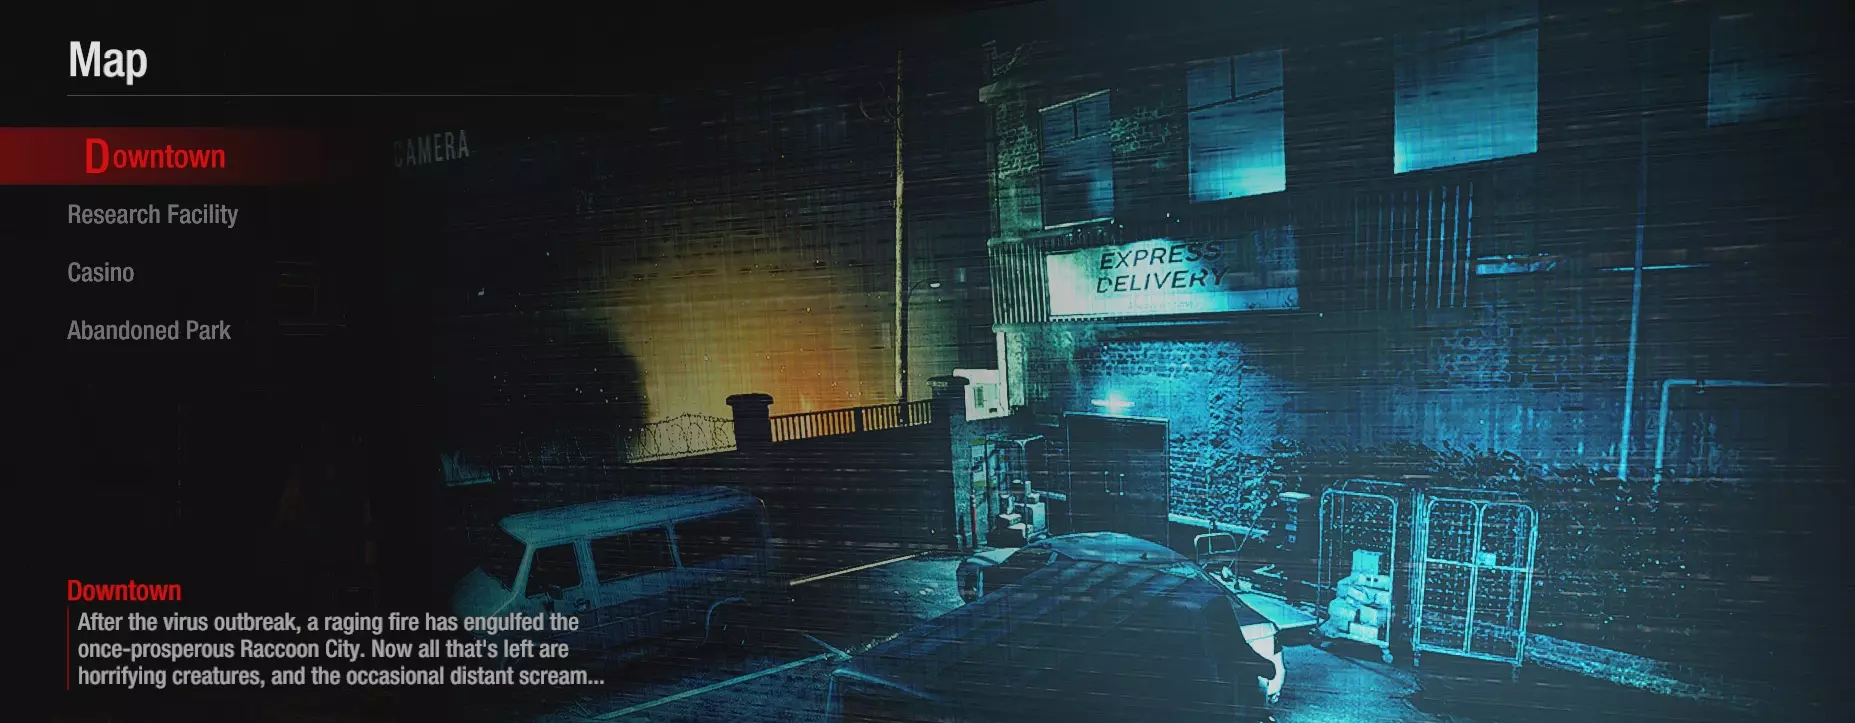
这应该是当前游戏中4张地图里最容易辨认的一张。它在封闭测试、开放测试以及教程中都有使用。区域1和区域2较短且呈线性,而区域3没有房间,有许多高地。这使其成为新手的理想初始关卡。 快速说明:急救喷雾的位置是我个人发现的。随着发现更多刷新点,我会更新这些信息。
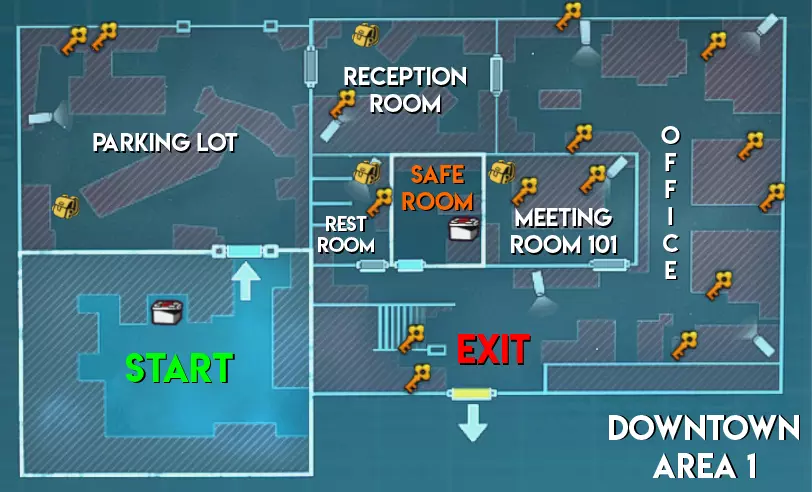
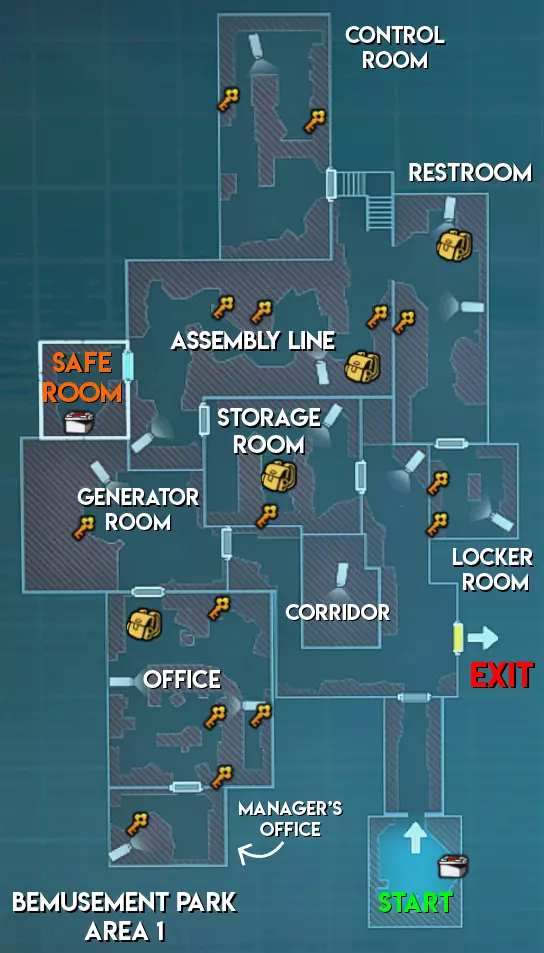
区域1 - 摄像机/补给僵尸/ puzzle碎片位置
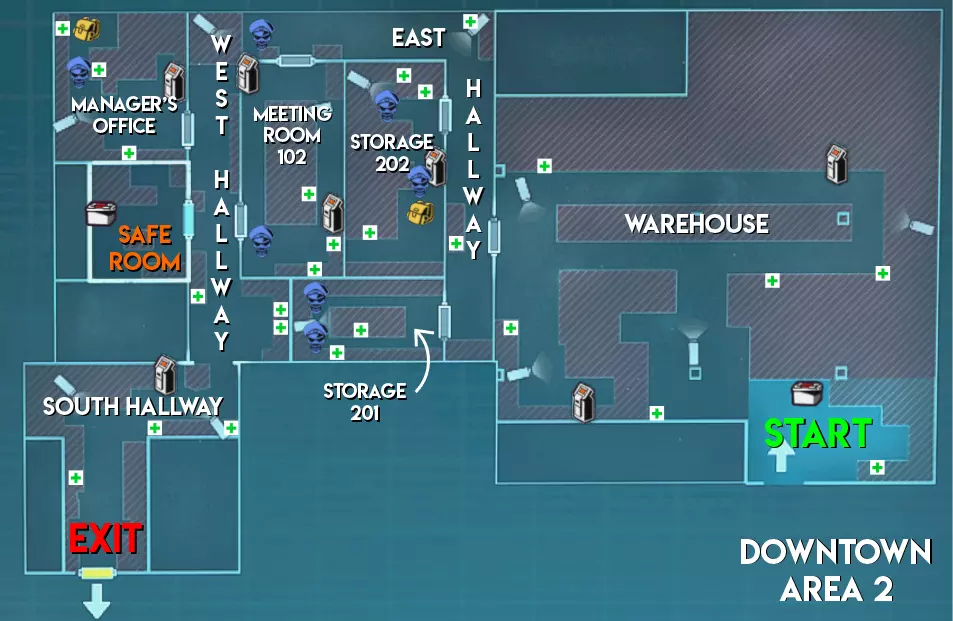
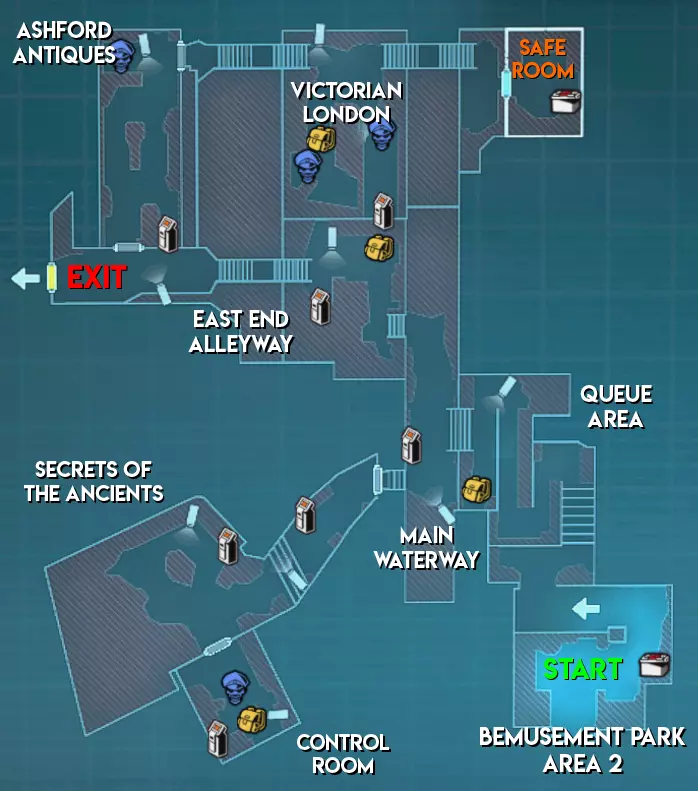
区域2 - 摄像机/急救喷雾/补给僵尸/“约里克”及安全装置位置
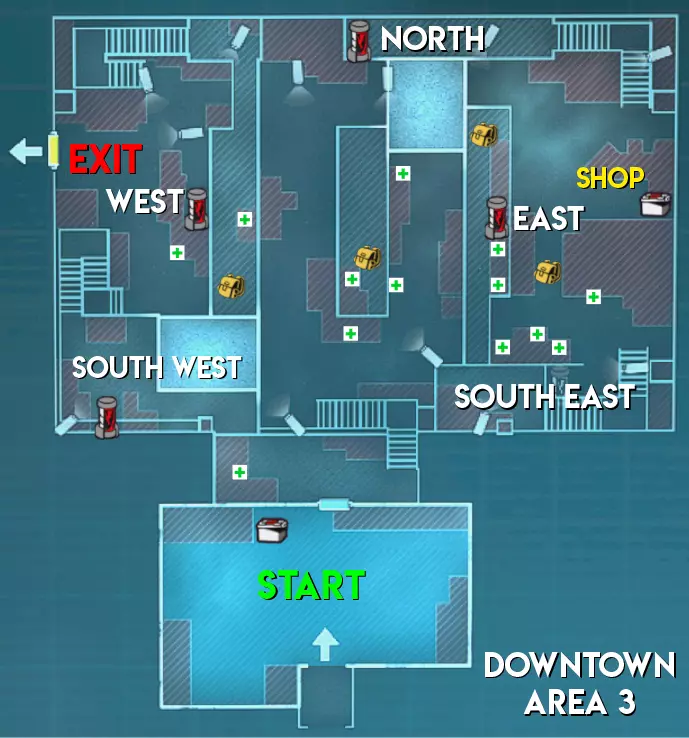
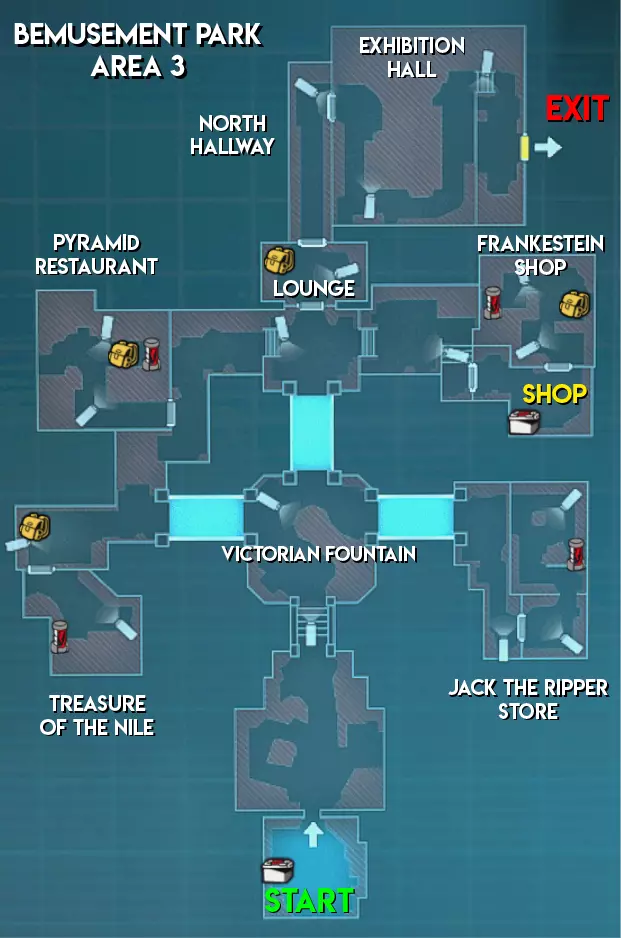
区域3 - 摄像机/补给僵尸/急救喷雾/生物核心位置 研究设施地图
研究设施内的区域布局大多为圆形,且大多数房间设有多个入口,便于玩家回溯或从其他方向进入房间。2号区域的安全装置仅有一个摄像头进行监控。3号区域面积较小,但被数据中心的电梯分隔为两层。

区域1 - 摄像机/急救喷雾/补给僵尸/ puzzle碎片位置
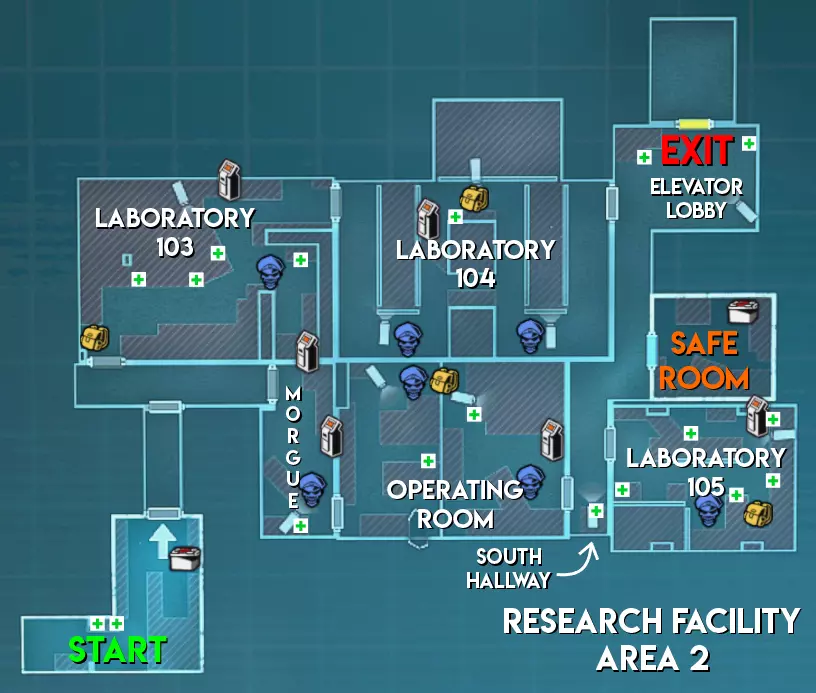
区域2 - 摄像机/急救喷雾/补给僵尸/“约里克”及安全装置位置
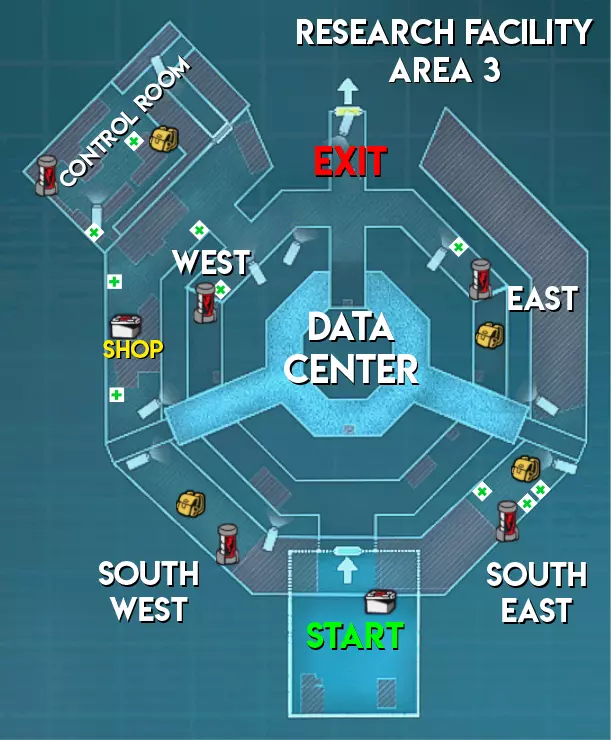
区域3 - 摄像机/补给僵尸/急救喷雾/生物核心位置 赌场地图
赌场的独特之处在于,区域1和区域2有许多电灯开关,可在整个游戏过程中让地图变暗。不过,当幸存者在赌场中穿行时,老虎机会提供一些光亮。在区域3,地图中央有一个大型老虎机,可为幸存者提供弹药、霰弹枪、榴弹发射器、火花枪等资源,偶尔还会出现火箭筒。操纵者也可以使用这个老虎机免费生成僵尸。
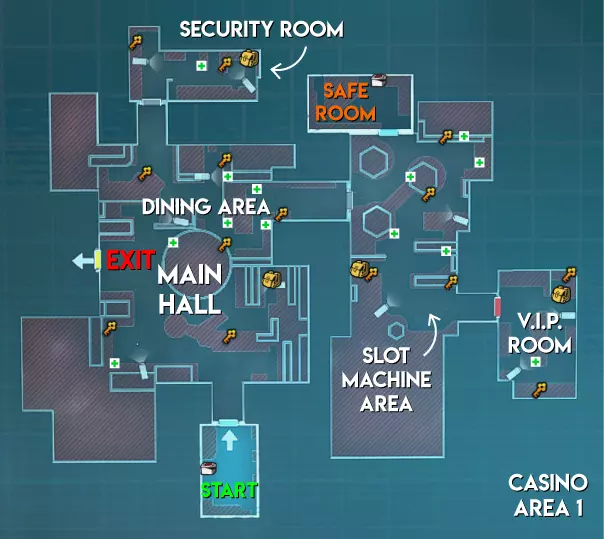
区域1 - 摄像机/急救喷雾/补给僵尸/ puzzle碎片位置
区域2 - 摄像机/急救喷雾/补给僵尸/“约里克”及安全装置位置

区域3 - 摄像头位置/生物核心位置/补给僵尸位置 废弃公园地图
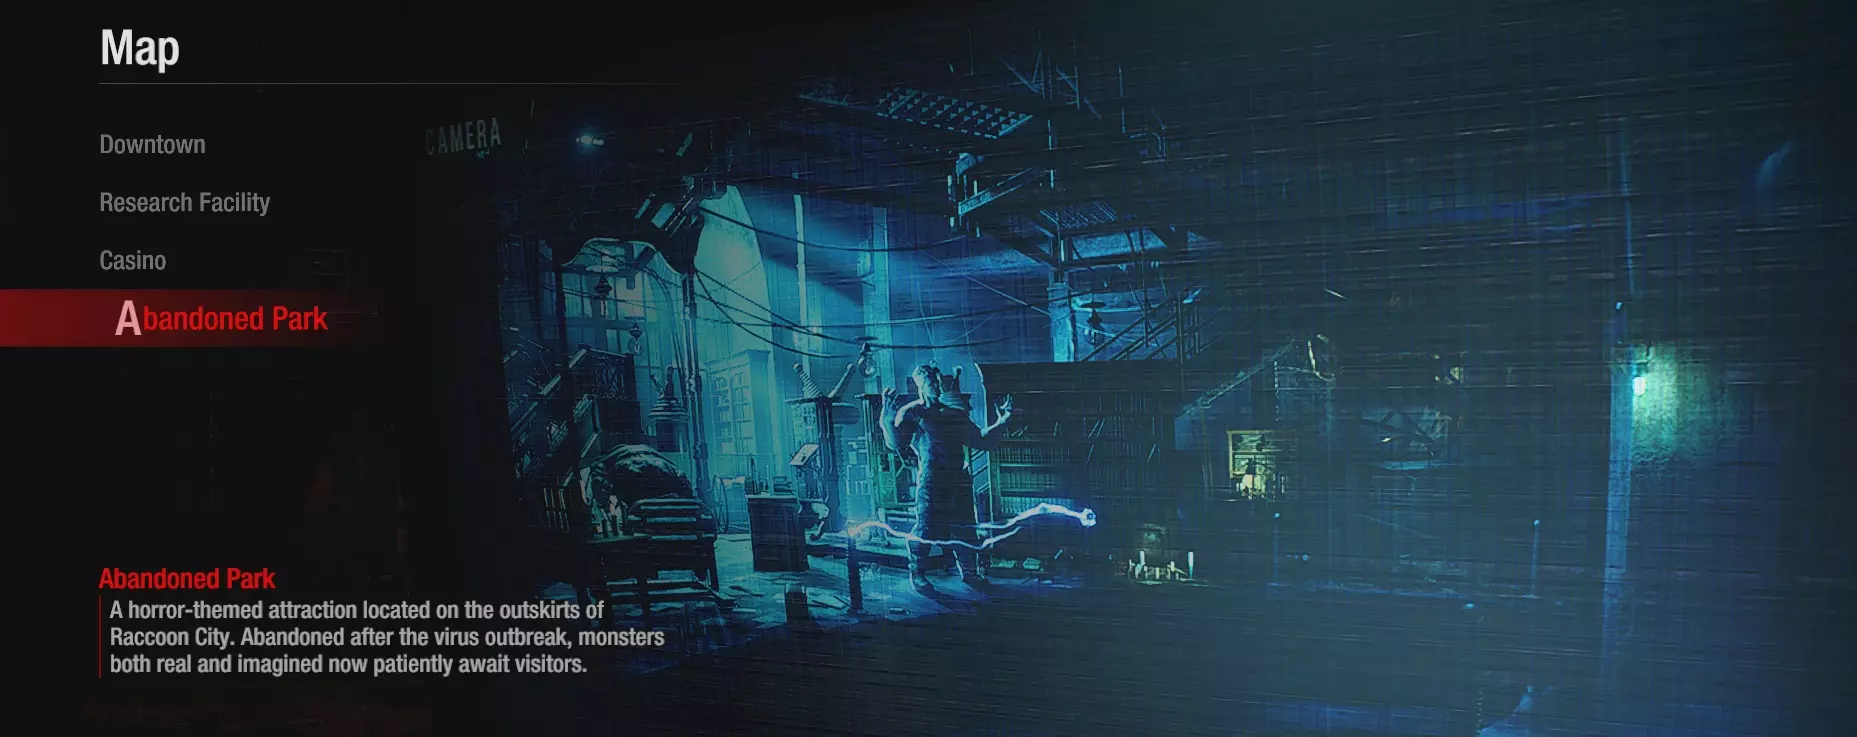
在我看来,【废弃公园】是目前四张地图中最难的关卡。区域1比其他地图的区域1更大,而且大部分区域很容易变暗。区域2的整体地图更长,起始区域和出口区域相距很远。区域3的生物核心分布在地图不同象限的不同房间里。
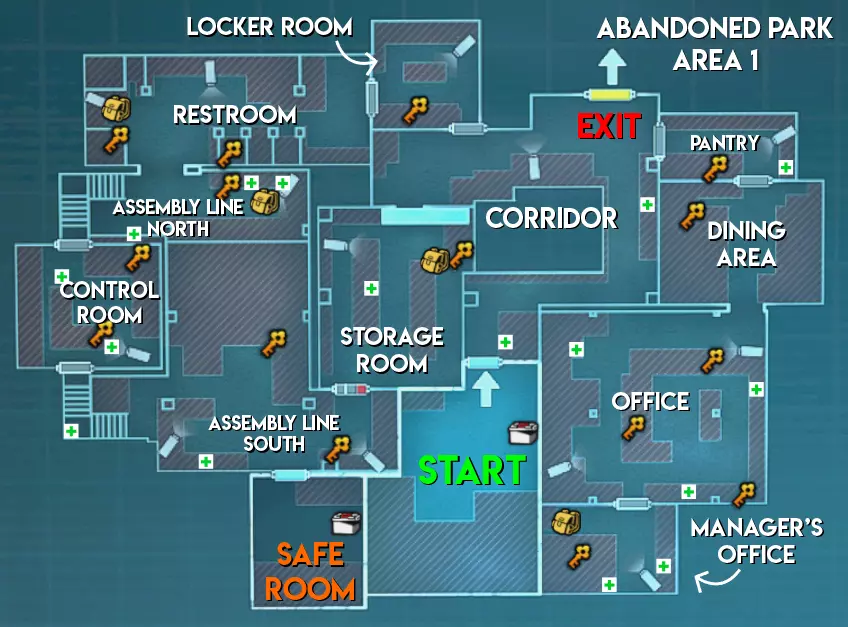
区域1 - 摄像机/急救喷雾/补给僵尸/ puzzle碎片位置
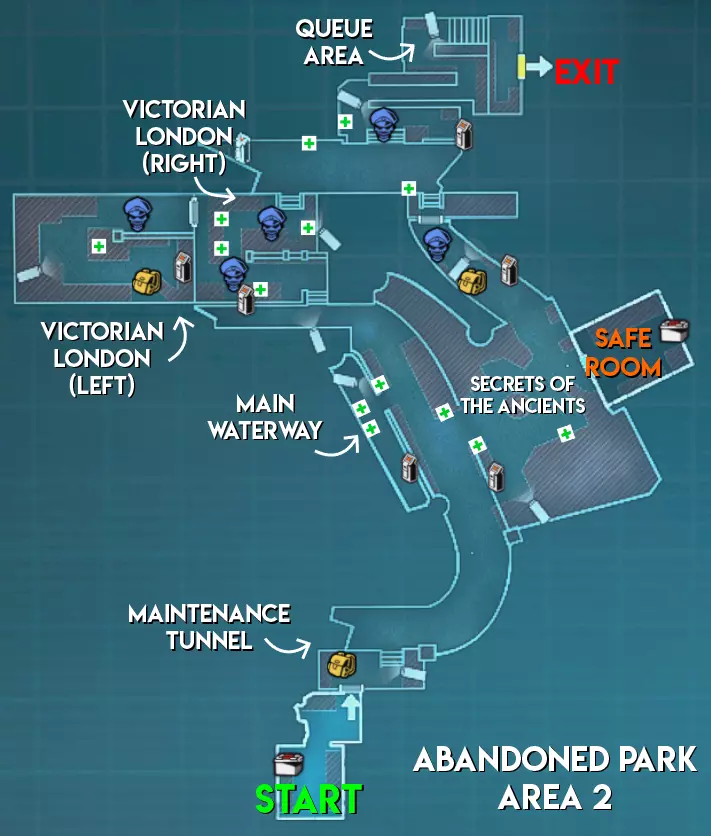
区域2 - 摄像头/急救喷雾/补给僵尸/【约里克】及安保装置位置
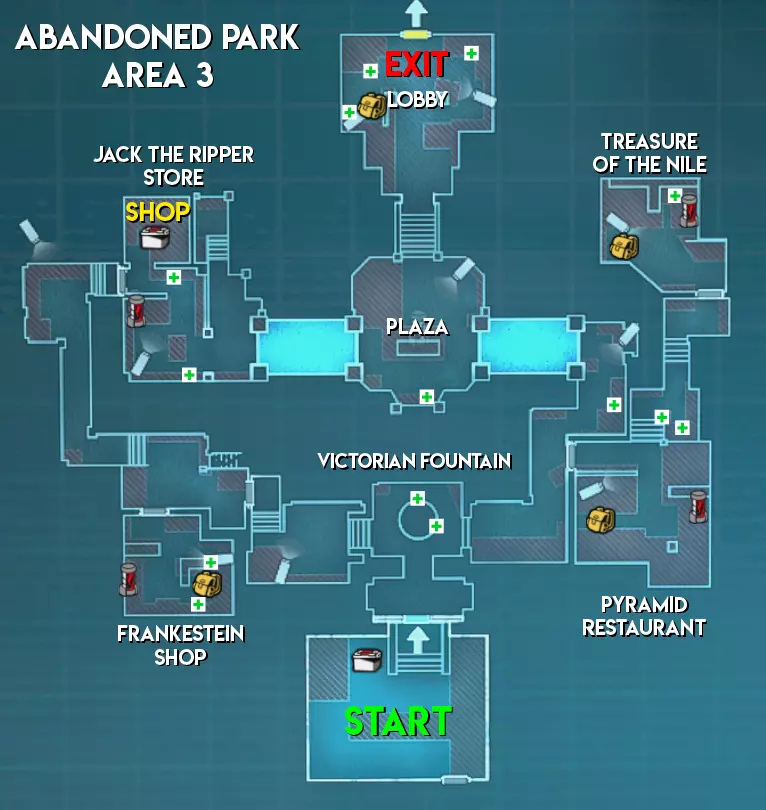
区域3 - 摄像机/补给僵尸/急救喷雾/生物核心位置 监狱地图
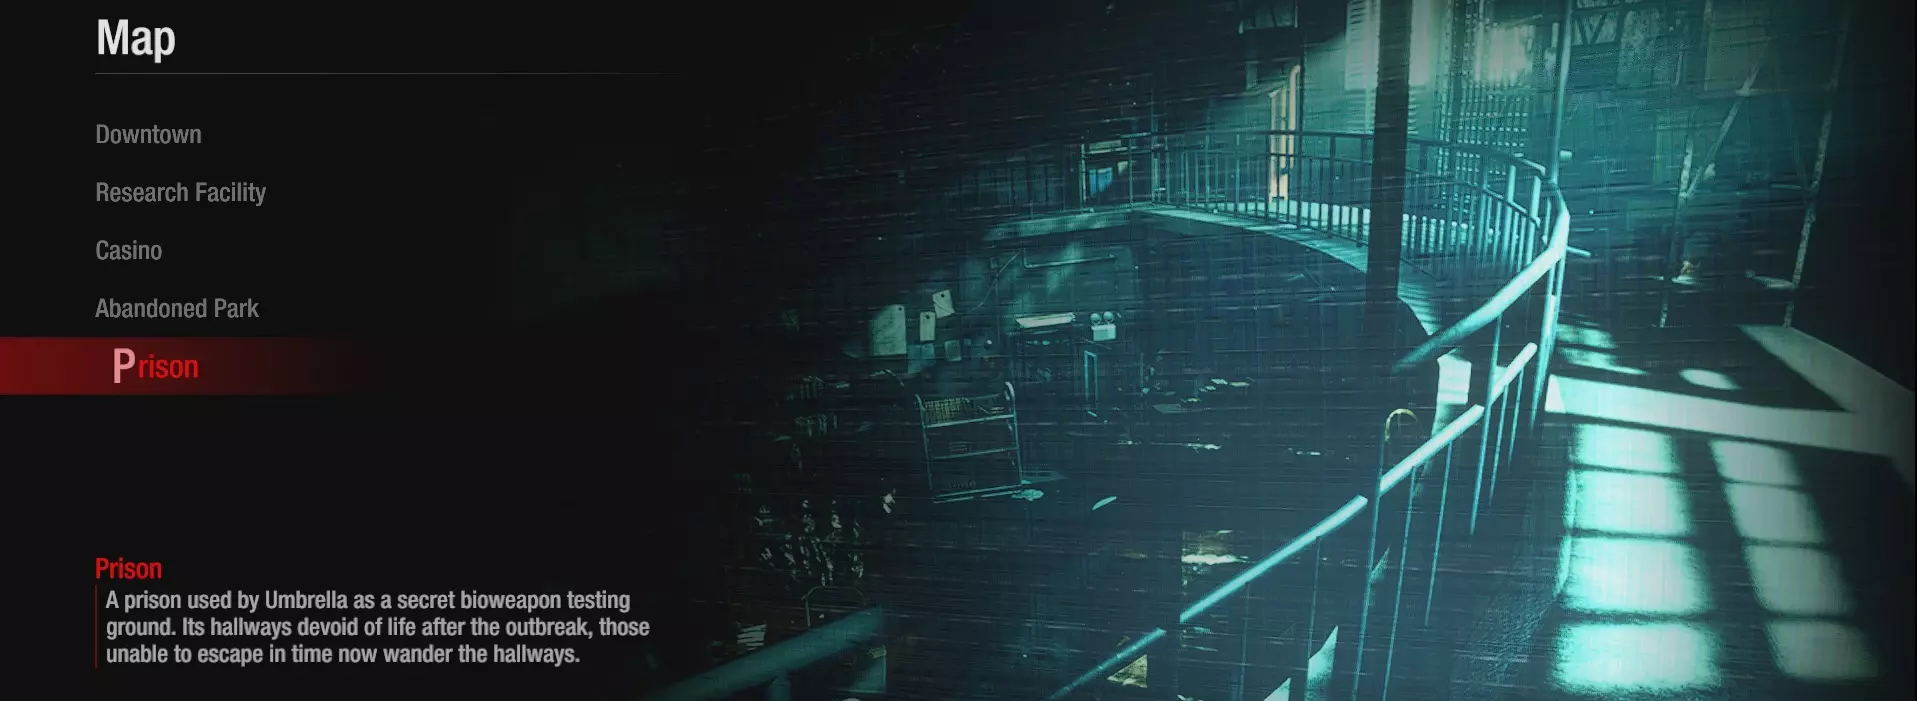
监狱区域拥有大量房间和走廊,使其比其他区域更像一座迷宫。区域1和区域2的房间不像研究设施那样彼此相连,因此重新集结和移动要困难得多。不过,区域3对幸存者来说会容易得多,因为他们可以从实验场地的高处进行侦查。到目前为止,这是唯一包含新机制的地图,该机制会保护生物核心免受伤害,并且地图布局可能会发生变化。
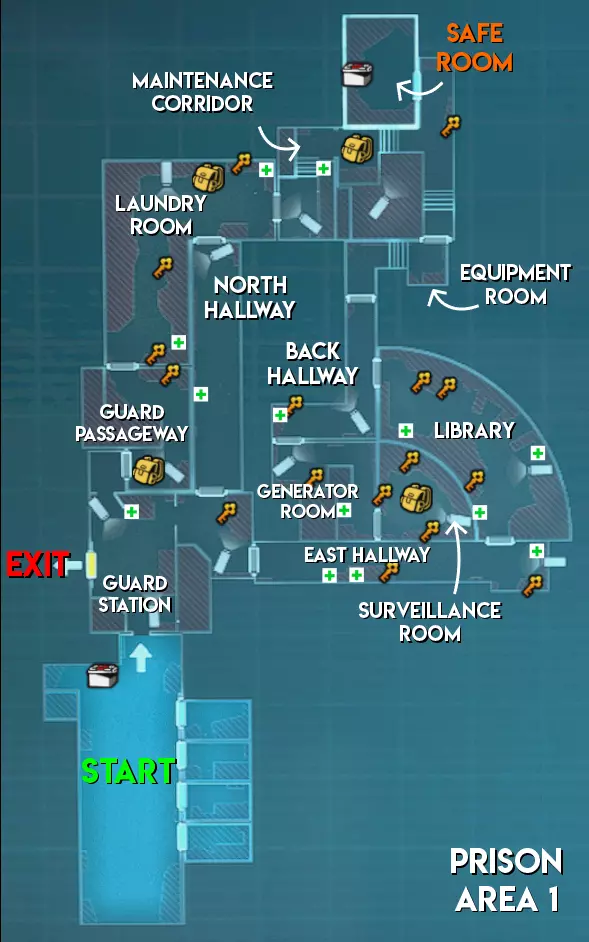
区域1 - 摄像机/急救喷雾/补给僵尸/ puzzle碎片位置

区域2 - 摄像机/急救喷雾/补给僵尸/“约里克”及安全装置位置
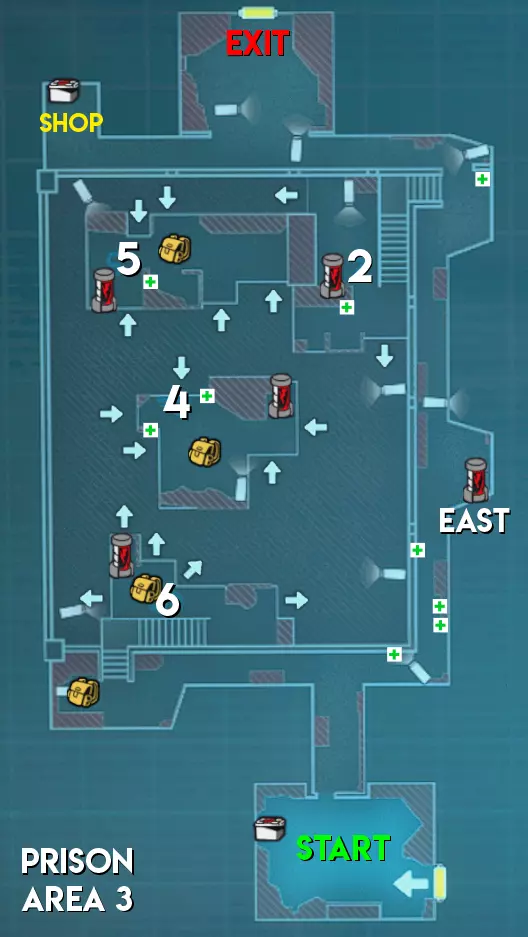
区域3 - 摄像头位置/生物核心位置/补给僵尸位置 上城地图
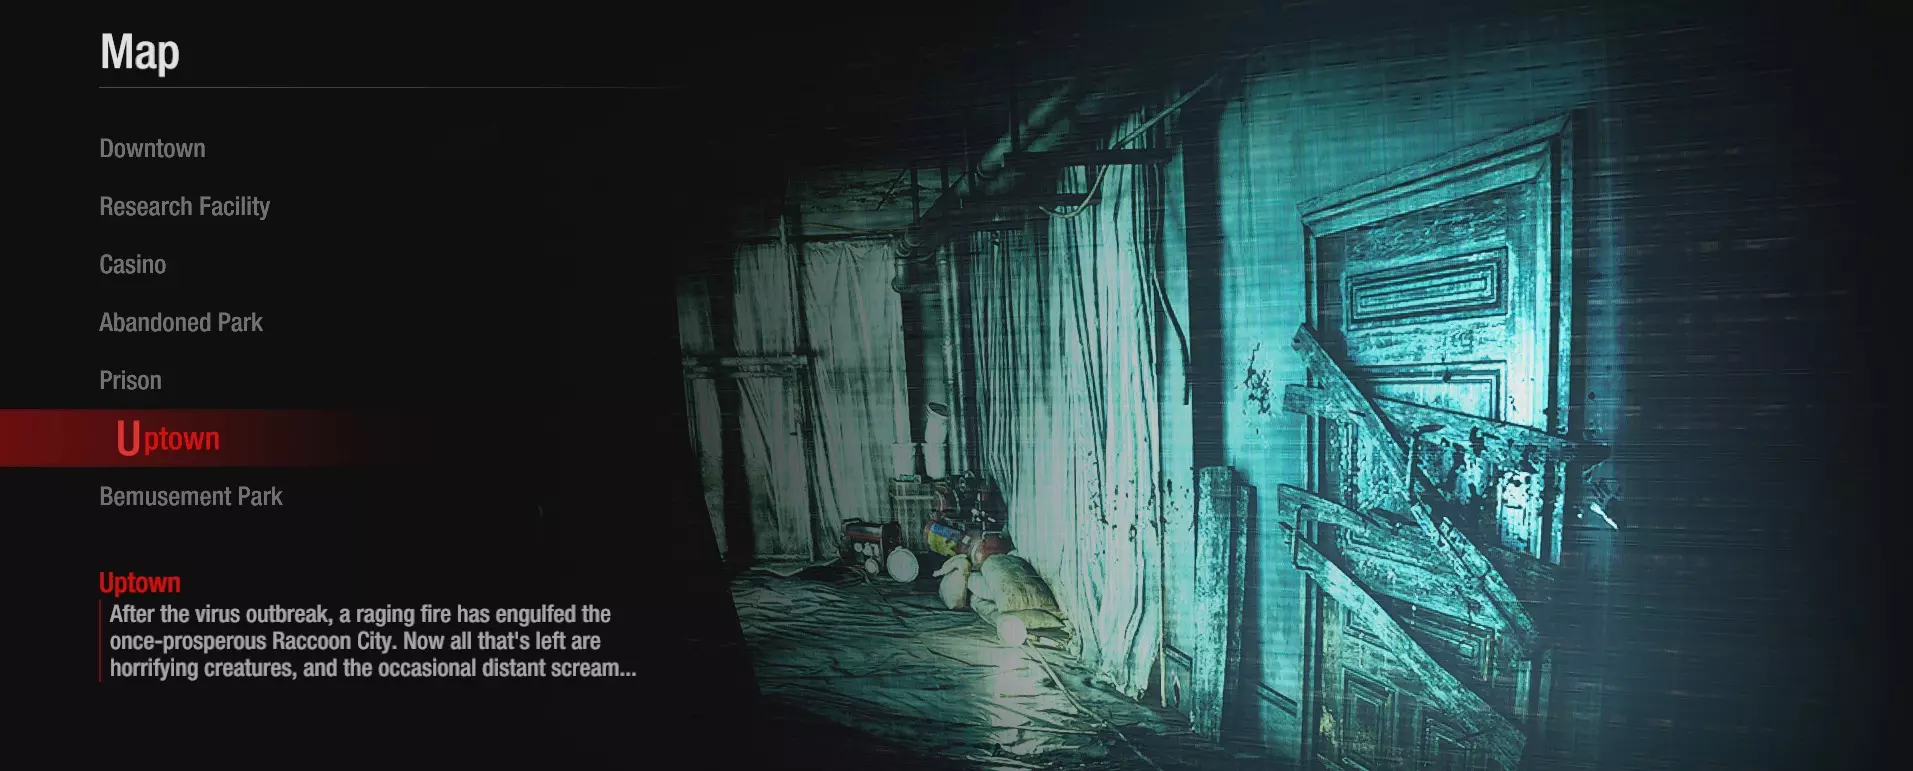
一张比原版市中心地图更黑暗、更复杂的版本。上城地图的起始区域与市中心的2号区域类似。1号区域依然较小,但现在线性程度降低。上城的2号区域与市中心的1号区域相似。同样,与市中心的2号区域相比,它更大且线性程度更低。上城的3号区域与市中心的3号区域类似。该地图的活动空间更小,生物核心也更隐蔽。
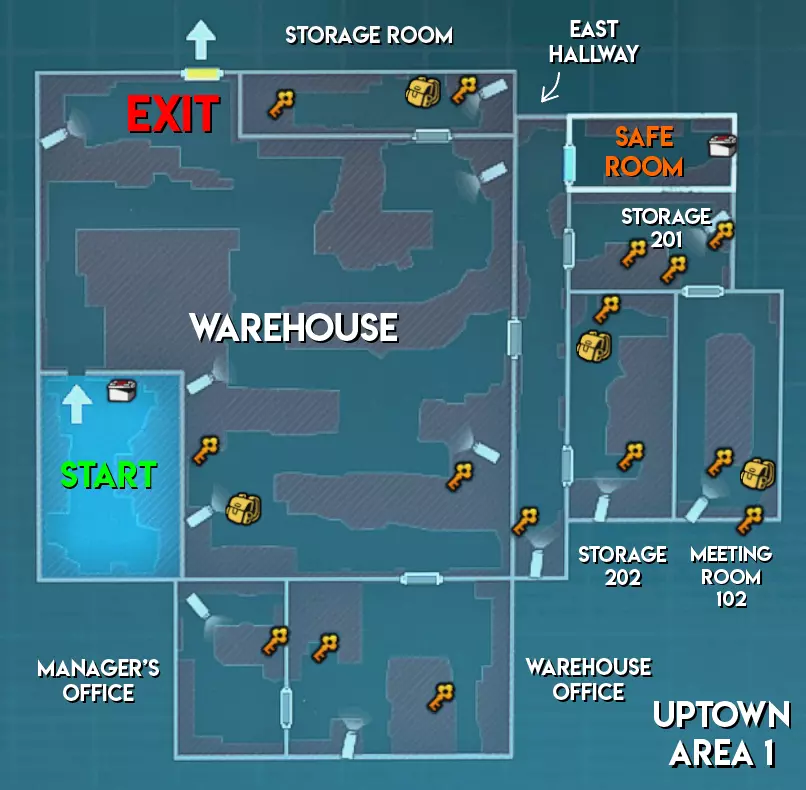
区域1 - 摄像机/补给僵尸/ puzzle碎片位置
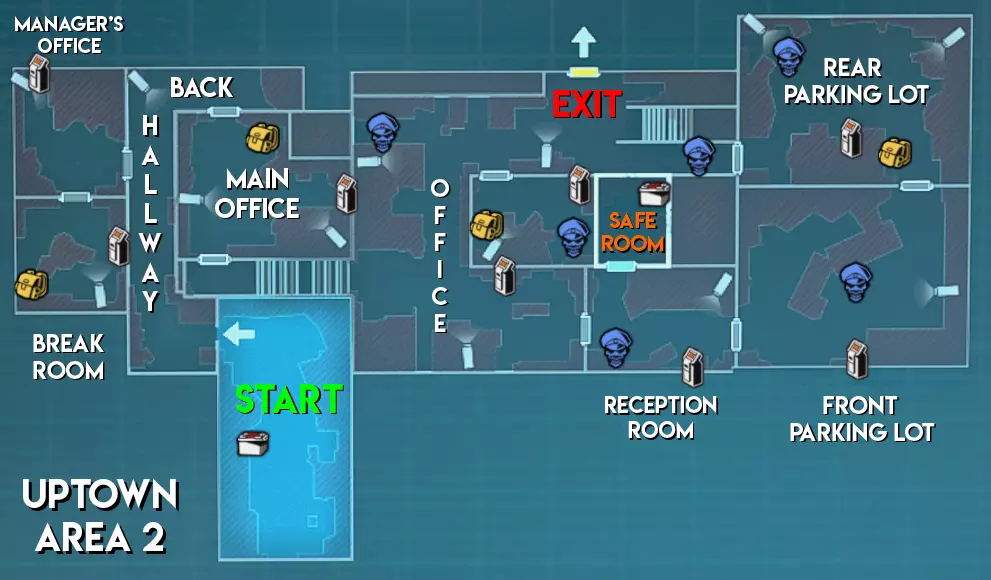
区域2 - 摄像机/急救喷雾/补给僵尸/“约里克”及安全装置位置
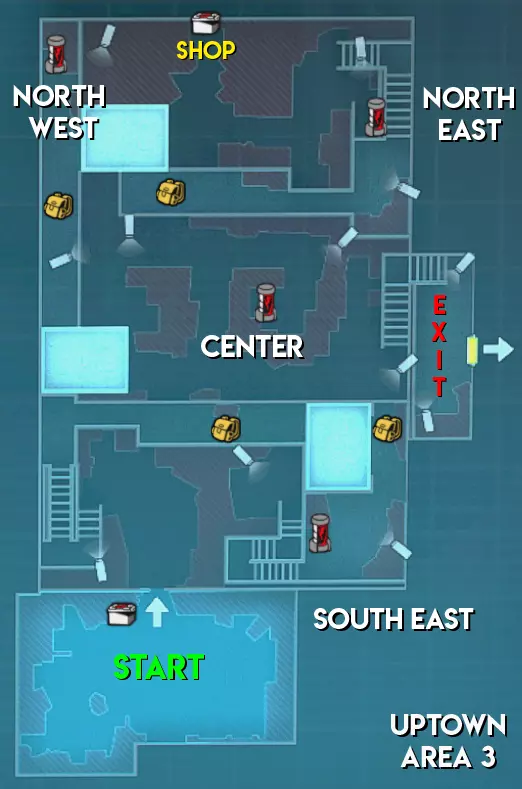
区域3 - 摄像机/补给僵尸/急救喷雾/生物核心位置 游乐园地图
废弃公园的一个更昏暗但更简单的版本。一旦你通过了游乐园难度更高的第一区域及其死胡同,第二和第三区域就是废弃公园的简化版。它更线性化,但对抗生物武器的活动空间更小。与其他地图相比,组队成为一个可行的选择。
区域1 - 摄像机/补给僵尸/ puzzle碎片位置
区域2 - 摄像机/急救喷雾/补给僵尸/“约里克”及安全装置位置
区域3 - 摄像机/补给僵尸/急救喷雾/生物核心位置 提示 马丁可以安全走过陷阱而不会触发它们。 马丁比其他角色多2个 inventory 空间。这让你更适合携带情境物品,比如 puzzle pieces 和蓝色药草,所以不必犹豫为团队收集它们。这能让队友不用丢弃重要资源,例如额外的弹药堆、修理包或绿色药草。 不要在近距离使用 makeshift mine 和闪光 Baton,因为它们有短暂的动画时间。尽量在中距离使用,否则你会被打断。 如果手中没有修理包,尽量不要弄坏你的火炬(或近战武器)。你的【强化】被动技能可使修复后的武器额外增加500点耐久度(总计1500点),这样做成本更低。 你也可以使用【强化】被动技能为队友手动修复武器,并赋予武器额外耐久度。这在团队游戏中比单排更有用。 如果你认为拐角处或视线外可能有陷阱,可以持续按下你的拆弹按键,这样马丁在靠近陷阱时就会立即尝试拆除它。 如果时机把握得当,当马丁处于【简易地雷】的动画状态时(此时角色处于低姿状态),可以躲避中距离发起的僵尸抓取/攻击、舔食者跳跃以及恶犬跳跃。但不要将此作为常规闪避手段,因为它非常依赖时机把控。【优雅忏悔】表情动作也能让幸存者进入倒地状态,这有助于躲避中距离发起的僵尸攻击。 使用马丁的被动技能【拆弹专家】时,当靠近可拆除的陷阱,游戏会给出提示,这样你就能直观地看到门和墙壁附近已设置好的陷阱。 当你负责监控摄像头时,如果使用像【玛蒂尔达】这类高射速武器,只需在操纵者靠近时缓慢射击并完成击杀,就能避免过度攻击和浪费弹药。 如果你发现操纵者在留意你的陷阱,可以尝试用深色喷漆隐藏你的【简易地雷】,或者在他识破你的小把戏时进行虚张声势。 【简易地雷】的实际作用范围比其圆形设计所示的要更大。你可以对多个彼此靠近的敌人造成影响。 当你使用狂热技能【闪光 Baton】时,马丁会略微向前移动,因此有时无需进入房间,技能就能越过门生效。你可以利用这一点在不完全暴露自身的情况下瘫痪僵尸。 如果时间紧迫,或者需要更安全地离开安全屋,使用【闪光 Baton】或【闪光手榴弹】通常能瘫痪安全屋门缝附近的僵尸或生物武器。 你可以用【闪光 Baton】延长【闪光手榴弹】的致盲持续时间,反之亦然。【简易地雷 - 电击】不会与群体控制效果叠加,但可以放置在僵尸附近,之后将其瘫痪。总结 总体而言,如果你的队伍在对抗尸潮时缺乏必要的群体控制能力,马丁是个不错的选择。他在依赖召唤僵尸或控制一个超级强化僵尸的策划者流派中表现出色。他的闪光 Baton 能提供范围群体控制效果,让清理房间变得更轻松、更安全。 房间清理完毕后,他可以通过协助监控摄像头或直接用火炬击杀僵尸来维持清场状态。 如果团队被迫速通关卡,马丁的闪光 Baton、简易地雷和“强化”被动技能使他不需要大量保护伞 credits 也能正常发挥作用。