换一换
换一换 


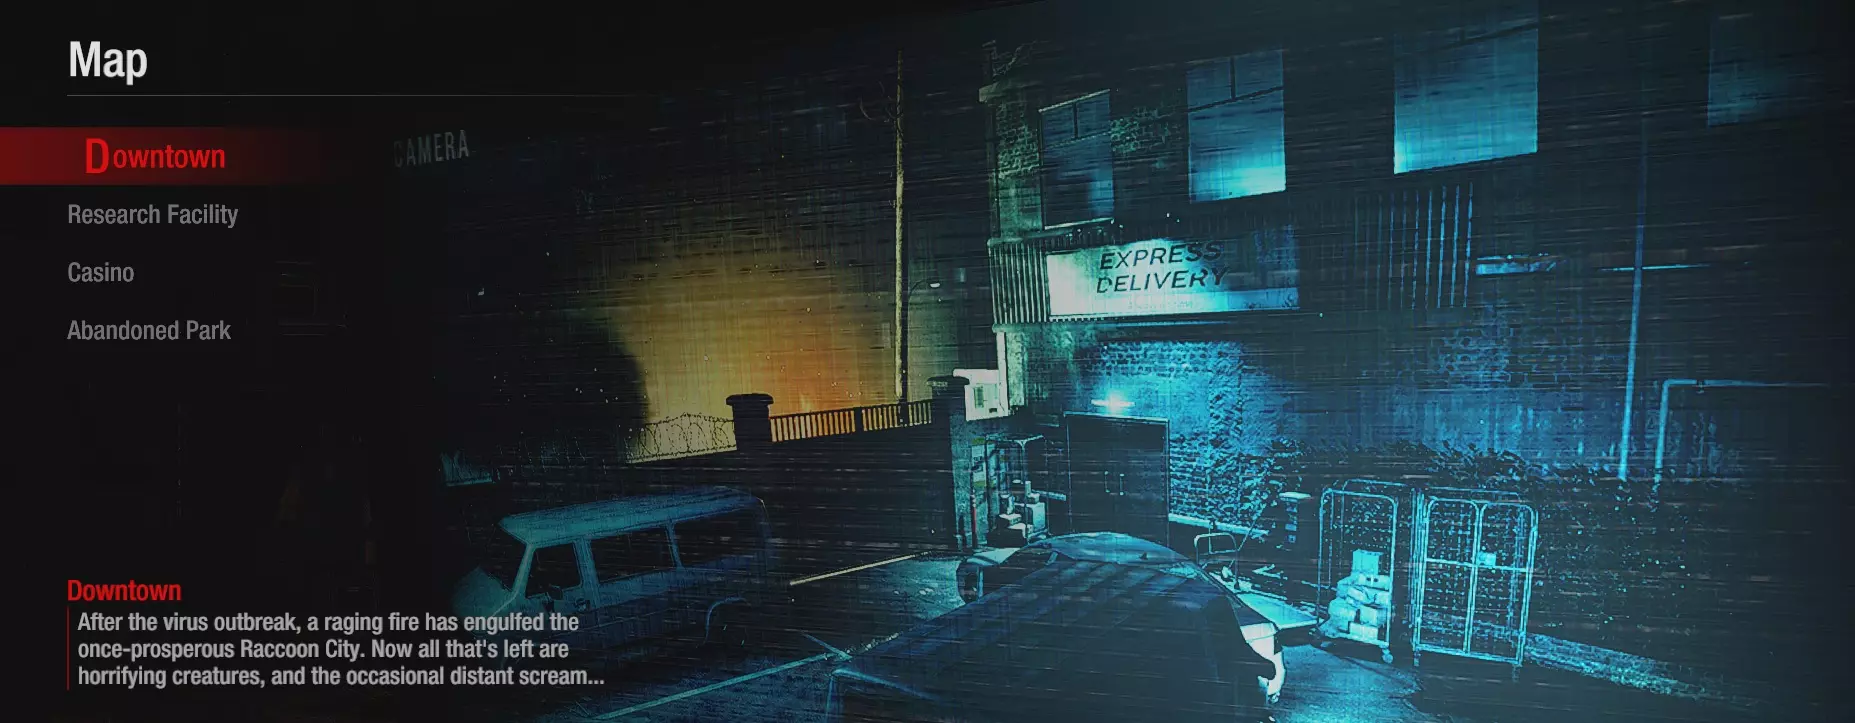
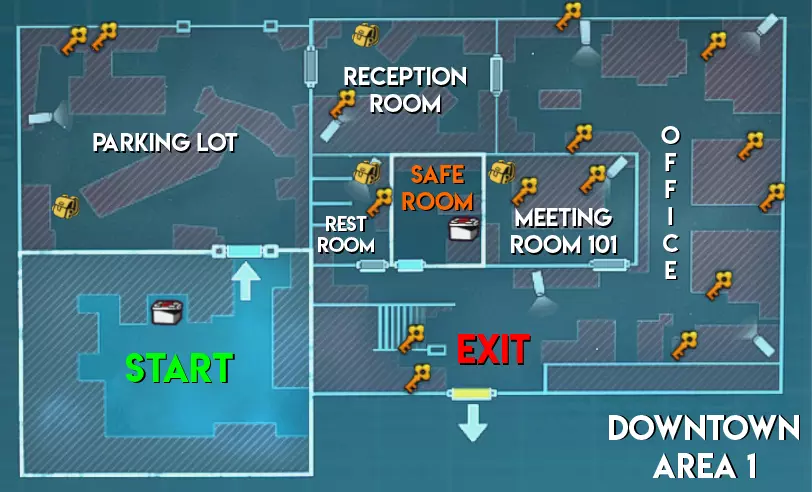
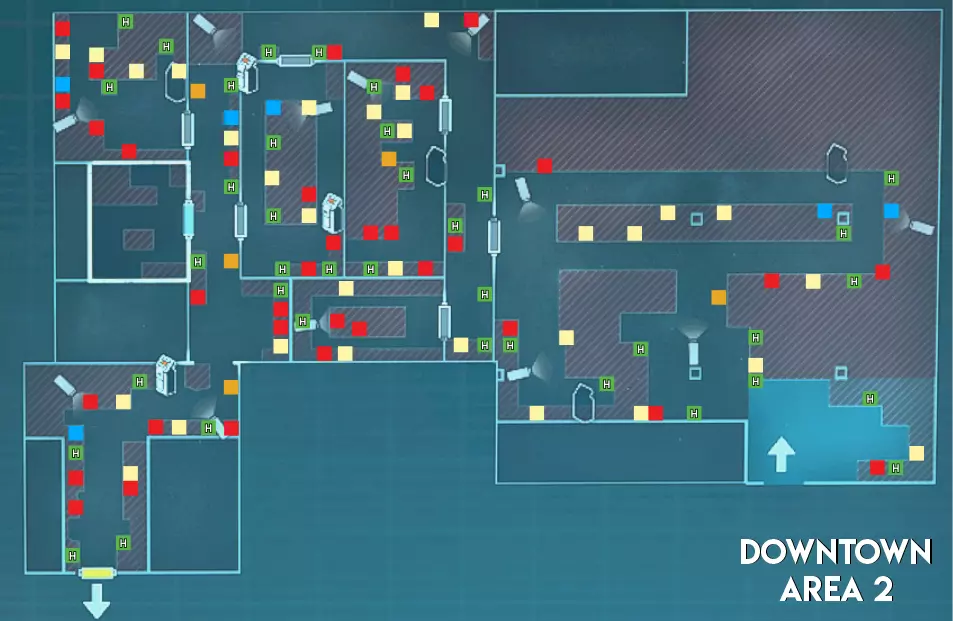
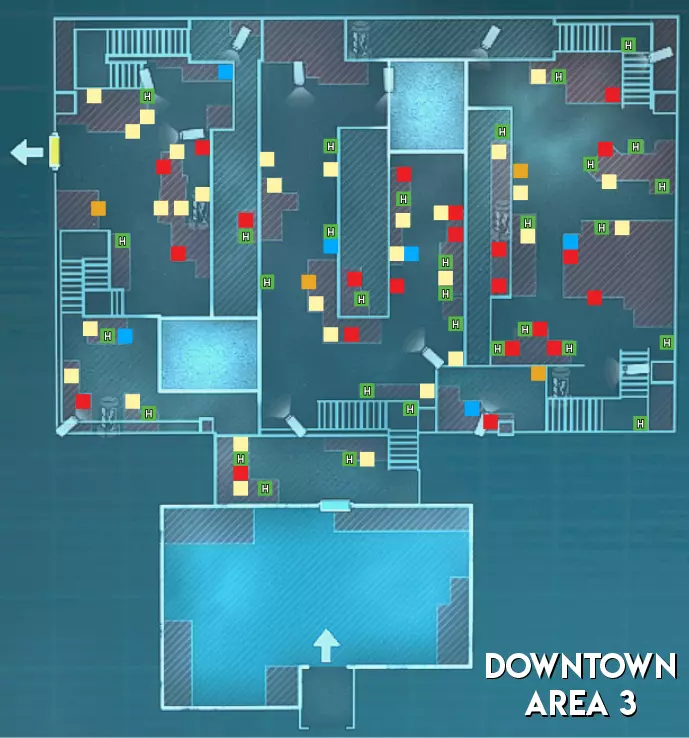
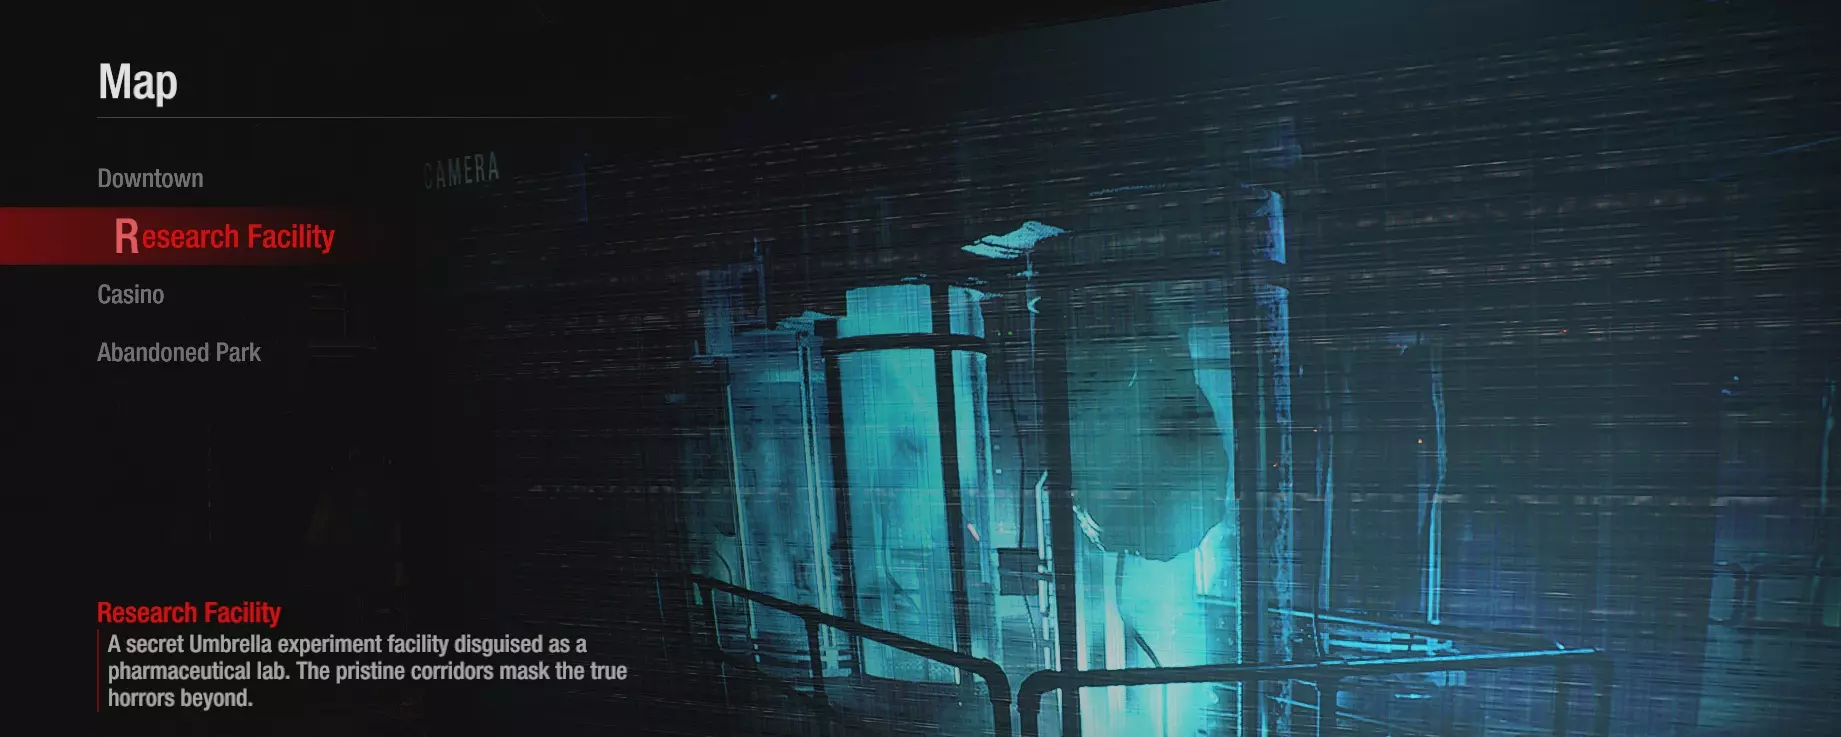
一份关于物品和任务目标可能刷新位置的可视化指南。如果你是游戏新手,想要了解每个区域的地图,或者想知道【Umbrella Credits】(保护伞 credits)的刷新位置以搭配你的【Lucky Charm】(幸运 charm)build(配装),都可以使用这份指南。我会更新地图,补充遗漏的刷新点。 目前我在PC版《生化危机:抵抗》上的游戏时长已超过400小时。最初制作这张地图是为了查找【First Aid Spray】(急救喷雾)的位置,以便更新我的【Martin Guide】(马丁指南)。后来我想,或许可以把每个物品的可能刷新位置都标注出来,希望能帮到其他人。我还针对幸运符装备进行了测试,如果你想使用本指南练习雨伞积分速通的话可以参考。指南中还包含了基础药学/智能手表的测试,如果你想了解草药掉落率,这部分会作为额外内容呈现,因为智能手表与幸运符build相关联。感谢查看本指南,以下是地图的阅读说明。
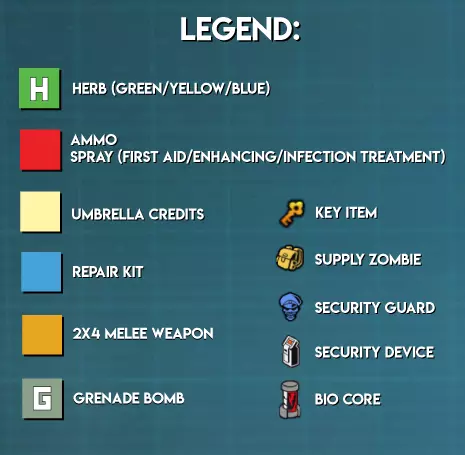
物品标记位置与其相对生成地点接近。有时标记点靠得较近,这可能是为了节省空间,也可能是因为物品本身生成位置就比较接近。 弹药和急救喷雾/强化喷雾/感染治疗喷雾会生成在同一区域。我目前仍在测试,在某些情况下,特定的弹药/喷雾生成点是否只会生成某一种特定物品。目前看来,同一生成点似乎会同时生成这两种物品。 在极少数情况下,物品可能会重叠生成。 在研究设施的2号区域,有1个无法获取的伞形学分生成点,因为有物体阻挡,导致无法到达。这可能是在游戏发布前的地图一部分,后来被封锁了。 检查物品和查看地图
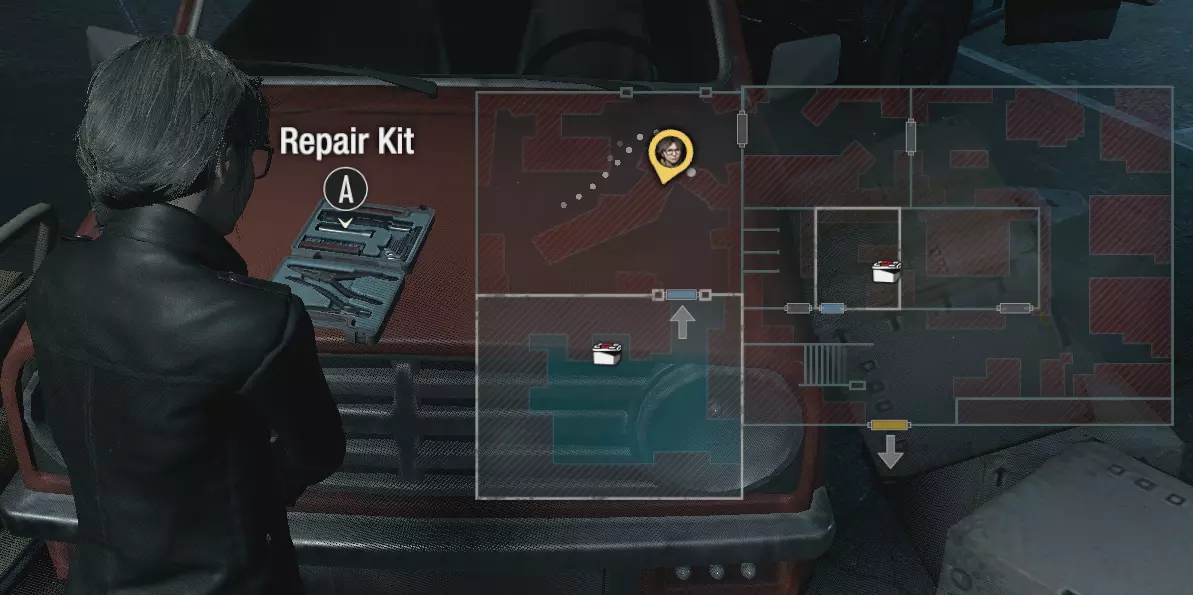
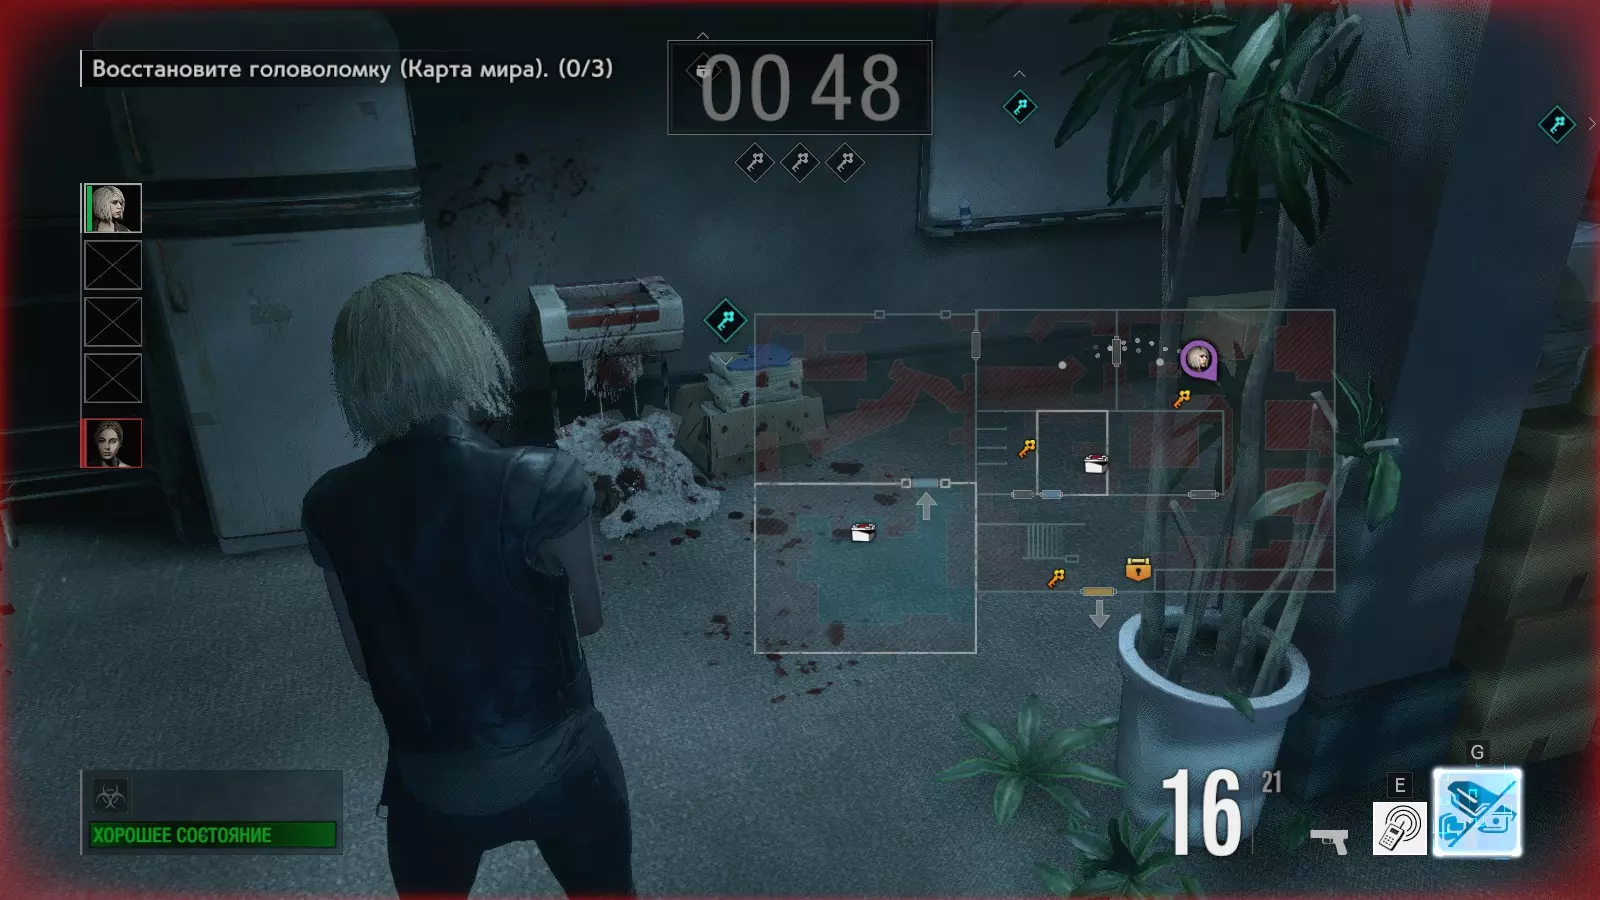
靠近物品到足够距离时,会出现抓取选项并显示物品名称(例如:修理工具箱、绿色药草、蓝色药草)。此时物品会被标记为已检查,游戏会在地图上添加一个圆点标记。拾取物品后,地图上的标记会消失。如果未先检查物品,即使从远处看到,地图上也不会标记该物品。 掉落物品和关键物品也会在地图上标记,方便你之后回溯寻找。
打开地图时,会显示已调查但未拾取的物品。不过这些标记不会显示具体是什么物品。你可以通过本指南了解物品的刷新位置,以便在未来的游戏中更好地掌握各类物品的常见刷新点。 这对于使用幸运魅力(Lucky Charm)流派的玩家,或是想收集地图中所有伞形币的玩家来说非常有用。你也可以专注于寻找高价值物品的刷新位置,比如手榴弹(Grenade Bomb)或急救喷雾(First Aid Sprays)。 丢弃物品
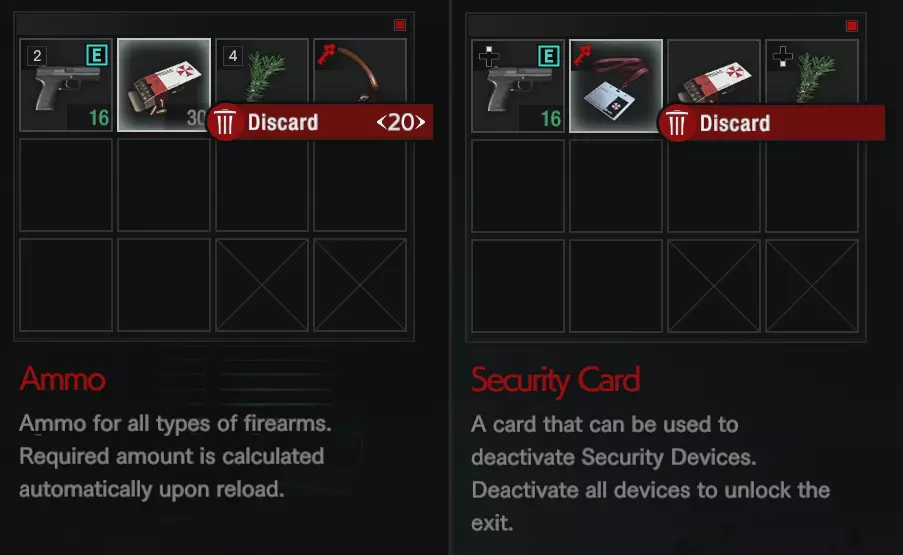
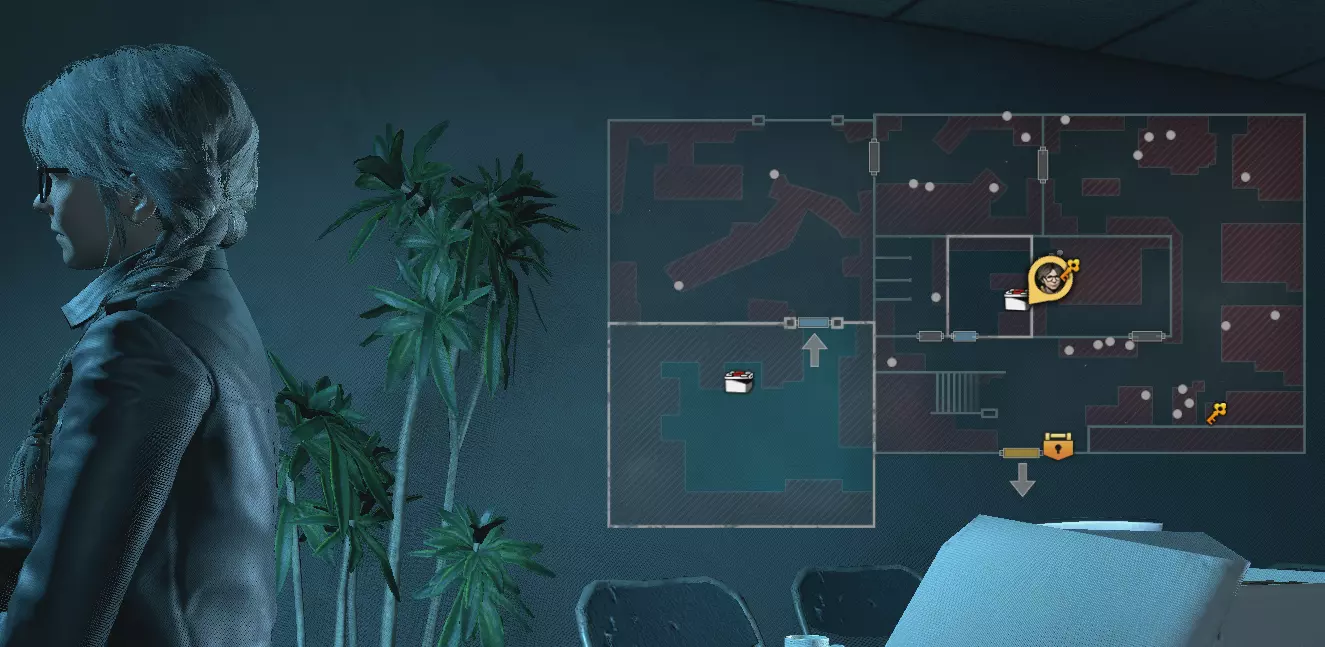
你可以通过以下步骤丢弃物品:打开背包,将鼠标悬停在想要丢弃的物品上,然后按左右键选择要丢弃的数量。 如果需要,你也可以丢弃关键物品,例如【拼图碎片】和【安全卡】。游戏会将物品放在地上,并在地图上标记位置。 检查装备
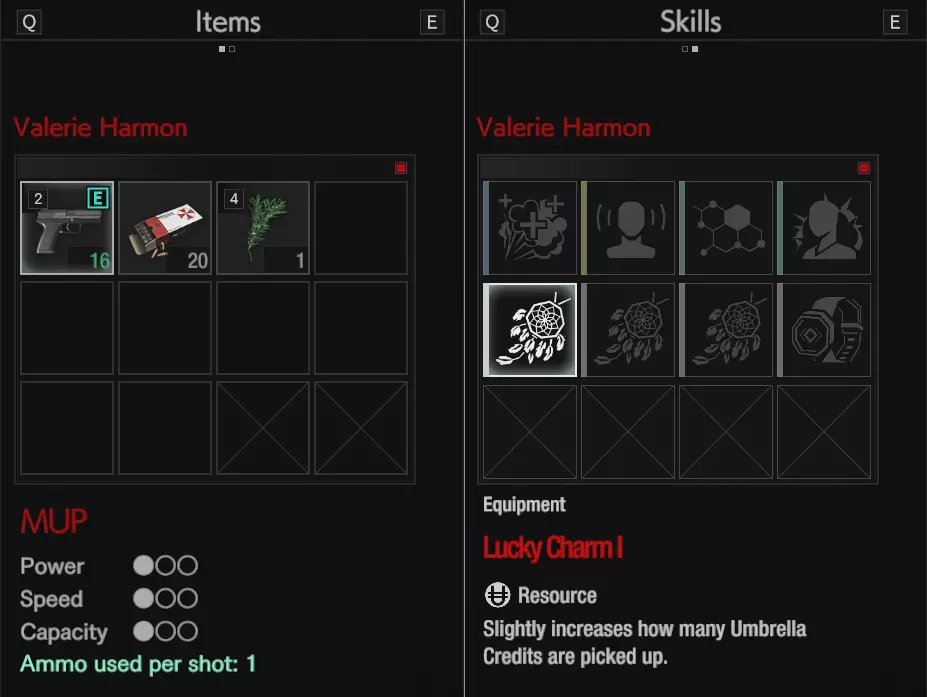
你也可以在游戏中通过打开背包,按Q键、E键或RB键进入技能标签页来查看已装备的技能。 草药
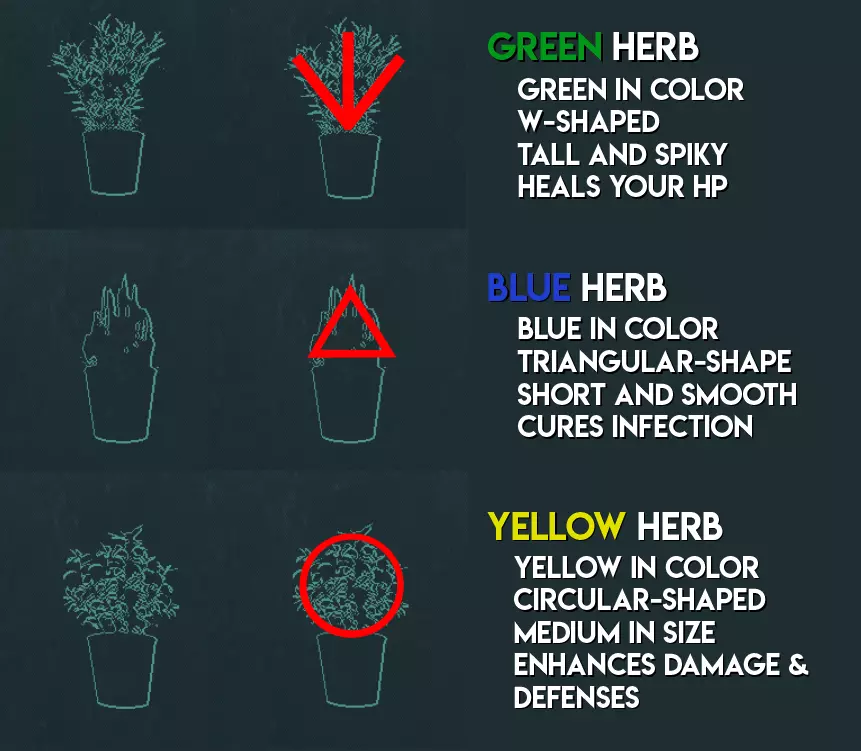
通过轮廓区分草药 僵尸死亡时,草药的掉落率为5% 喷漆
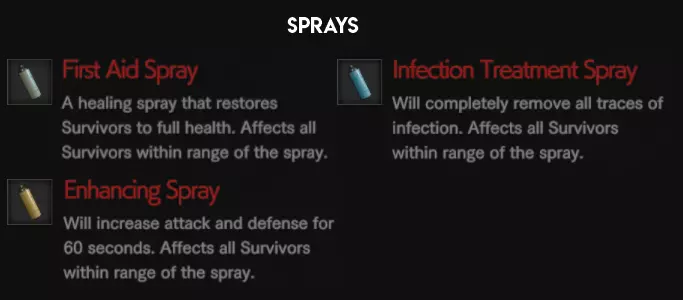
与草药类道具类似,喷雾具有相同效果,但作用对象为整个队伍而非单个玩家。 喷雾持续时间约为4秒。 你可以使用【一月网络星期一 - 药房】购买喷雾。 弹药
每次试炼中,游戏会在每个区域生成8个弹药刷新点,但【市中心-1号区域】只会生成4个弹药刷新点,而非通常的8个。 僵尸死亡时有5%的概率掉落弹药。 每个弹药刷新点提供10发弹药,供所有远程武器共享。不同的远程武器消耗的弹药量不同(例如,MUP每发消耗1发弹药,闪电鹰每发消耗4发弹药)。 RAI-DEN武器不消耗弹药。 特殊武器
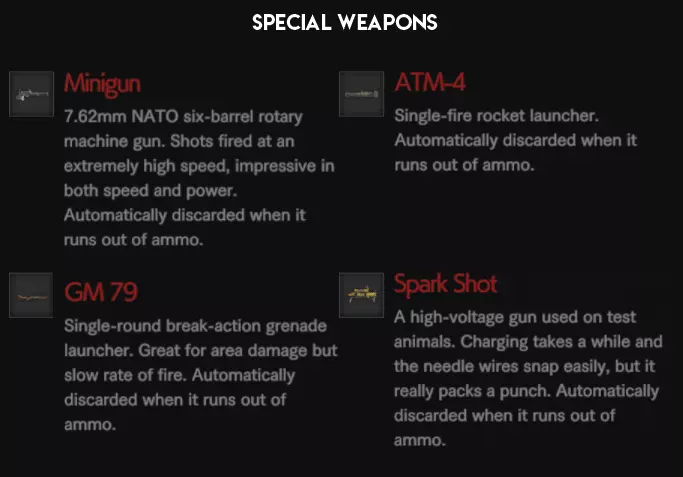
特殊武器可从补给僵尸身上掉落,或通过“一月”的“网络星期一 - 军火库”技能购买。它们不会消耗你的弹药,但各自拥有独立的弹药。修理包和近战武器:游戏在每个区域生成1个2x4近战武器和2个修理包。
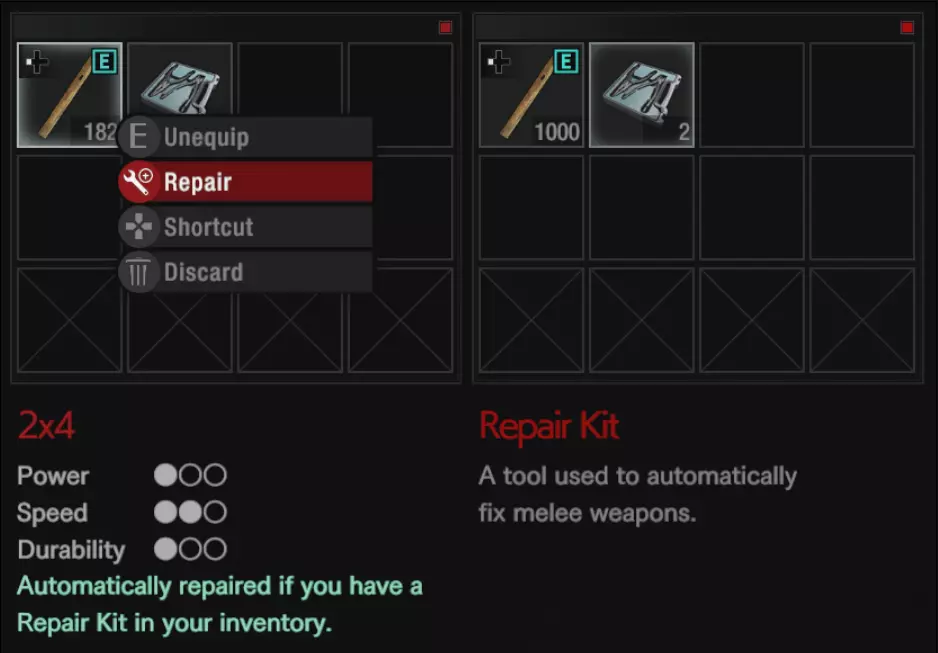
如果玩家的物品栏中至少有1个修理工具包,它会自动将损坏的武器修复至满耐久度。你也可以手动修复武器,方法是选择你想要修复的武器,然后选择修理工具包。
每种近战武器的最大耐久度均为1000点,但不同武器的耐久消耗速度有所不同(例如:火炬的消耗速度比棒球棒快)。爆炸物

可从物品箱购买,或通过瓦莱丽的【爆炸知识 - 过剩】技能从僵尸身上掉落。安布雷拉 credits
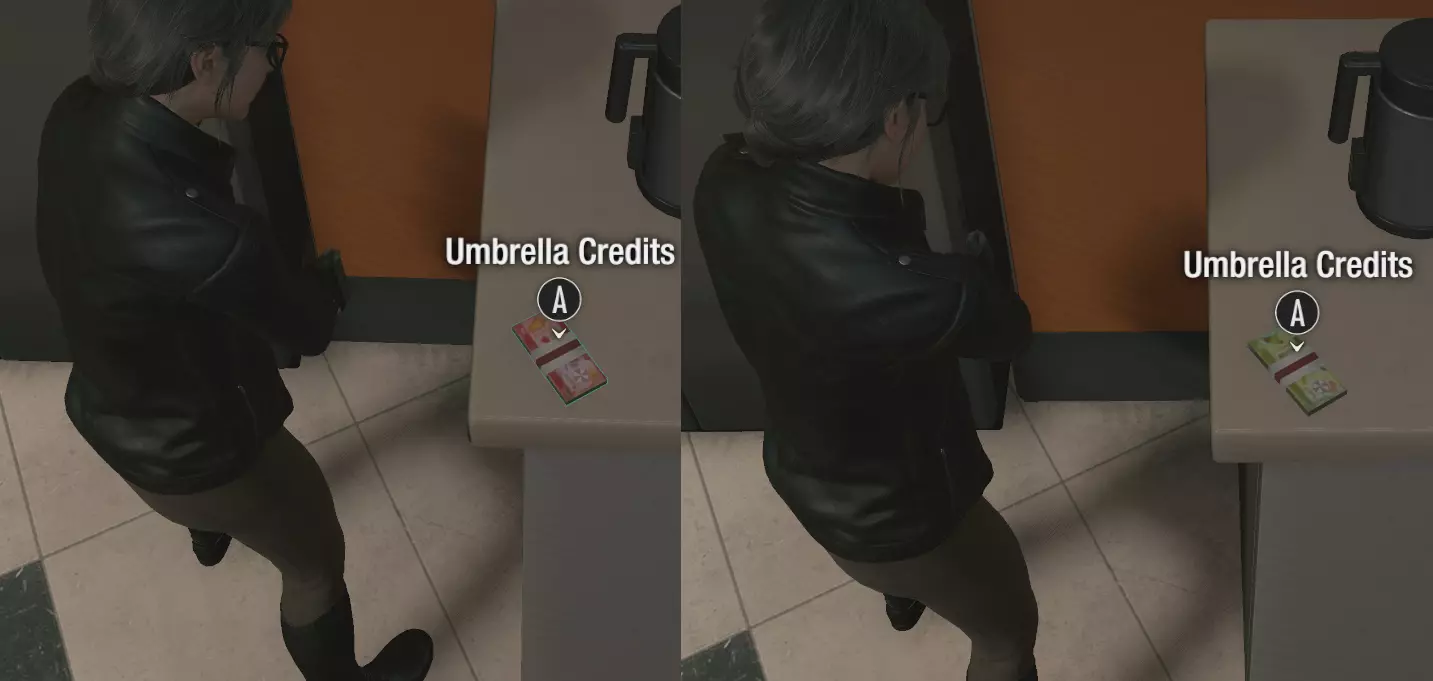
The game spawns two types of credits. A Red Umbrella Credits holds the base amount of credits that varies through each area. A Green Umbrella Credits holds twice the amount of credits in comparison to the Red Umbrella Credits. Area 1 Area 2 Area 3 Credits gained at start 250 120 180 Credits gained when destorying a Bio Core 100 In each area, the game spawns 12 umbrella credits in the map. The game then divides this into 7 Red Umbrella Credits and 5 Green Umbrella Credits in the map. Count Red Umbrella Credit Green Umbrella Credit Area 1 20 spawns 5 spawns Area 2 12 spawns 5 spawns Area 3 12 spawns 5 spawns Type Area 1 Area 2 Area 3 Base Red Umbrella Credit 9 18 21 Base Green Umbrella Credit 18 36 42 The game then adds a random value from a set of variable that is added to the base umbrella credit gain. Area 1 Variance Red Umbrella Credit +0 or 1 credits Green Umbrella Credit +0 or 2 credits Area 2 & 3 Variance Red Umbrella Credit +0 - 4 credits Green Umbrella Credit +0 - 8 credits Lucky Charm Data MethodI've run several tests using Valerie and running through all 12 of the umbrella credit spawn locations. Subtracting the initial value from the final value once I've collected all 12 of the umbrella credits. The tests included Valerie without Lucky Charm, with only Lucky Charm I, with only Lucky Charm II, with only Lucky Charm III, and with all of them equipped at least 10 times each. Gameplay MechanicsWhen a player picks up an umbrella credit spawn, the whole team gets the same umbrella credit gain. The credit gained is only boosted for the player with Lucky Charm(s) equipped. This mean your other teammates gets the normal umbrella credit gain and then the game spreads it to the whole team while you picking up the umbrella credit spawn gets the boosted increase in umbrella credit gain before spreading it to your whole team. Player A picks up Red Umbrella Credit spawn that contains 15 Umbrella Credits then the whole team gets 15 Umbrella Credits as well. Player B with Lucky Charm(s) equipped, picks up the same Red Umbrella Credit spawn that contains 25 Umbrella Credits instead then the whole team gets 25 Umbrella Credits as well. NoteThis data assumes that the player that has the Lucky Charm(s) equipment picks up the umbrella credit spawn(s). Average Total Umbrella Credit Gained Gathering all 12 UC spawns Area 1 Area 2 Area 3 Average of no equipment 290 340 390 Percent Increase Average with just Lucky Charm I 326 383 437 12% Average with just Lucky Charm II 339 398 454 17% Average with just Lucky Charm III 369 434 495 27% Average with all equipped 488 573 654 68% It's looking like Lucky Charm I increases UC gain by ~12%, ~Lucky Charm II by ~17%, Lucky Charm III by ~27%, Smartwatch by ~12% and all of them equipped gives ~68% increase in the total accumulated umbrella credits gain when picked up by you. Stacking all the equipment gives an additive increase to the umbrella credit gain. Smartwatch and Pharmacy 101 Data MethodI've also ran several tests with the herb drop rate percent with Smartwatch and Pharmacy 101. I've set up 7 normal zombies outside the starting zone of Downtown area 1 and killed them all using Jill's Rocket Launcher without any equipment, with only Smartwatch, with only Pharmacy 101, and with both equipped. I've done 70 tests on each variable killing a total of 490 zombies for each variable. I am not sure if each different type zombie have a different herb drop rates but here is what I found for normal zombies. Herb Count Drop Rate Without Equipment 24 5% Smartwatch 70 15% Pharmacy 101 71 15% Both equipped 119 25% Herbs of any color has a normal drop rate of 5% per zombie killed. Both Pharmacy 101 and Smartwatch increases the drop rate by ~10% bring it up to ~15%. The equipment's drop rate are additive and increases the drop rate of herbs to ~20% bringing it up to ~25% herb drop rate per zombie killed. TL;DR - Pharmacy 101 and Smartwatch increases herb drop rate by ~10% (~20% total) Downtown Map
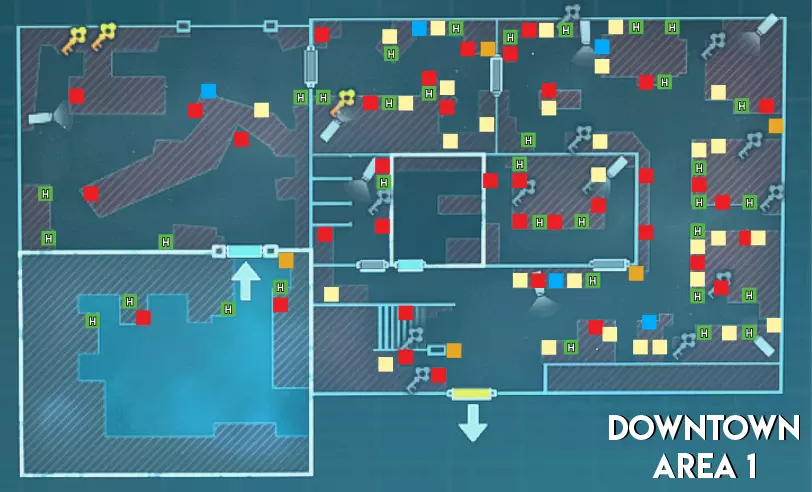
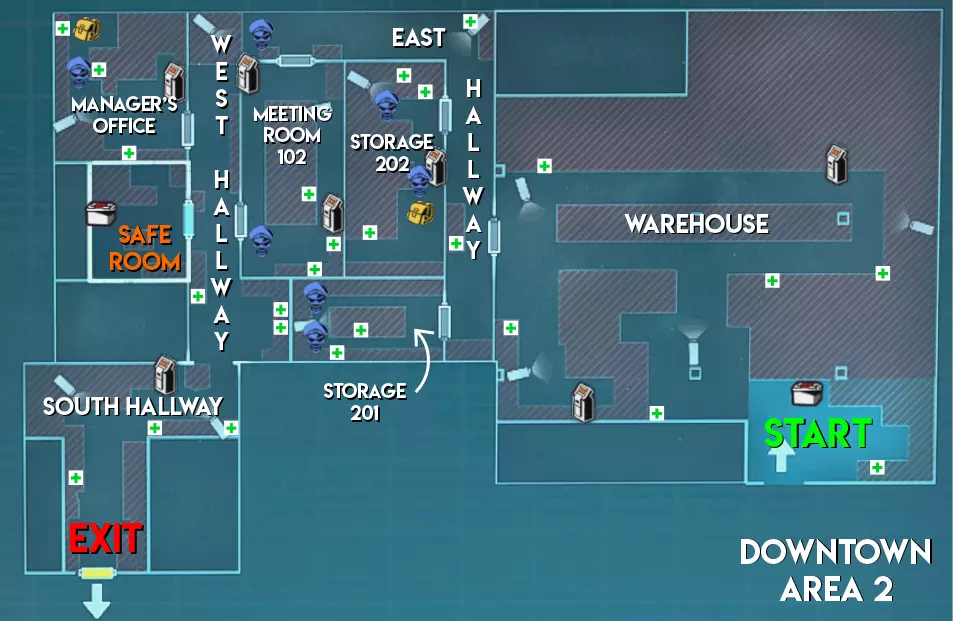
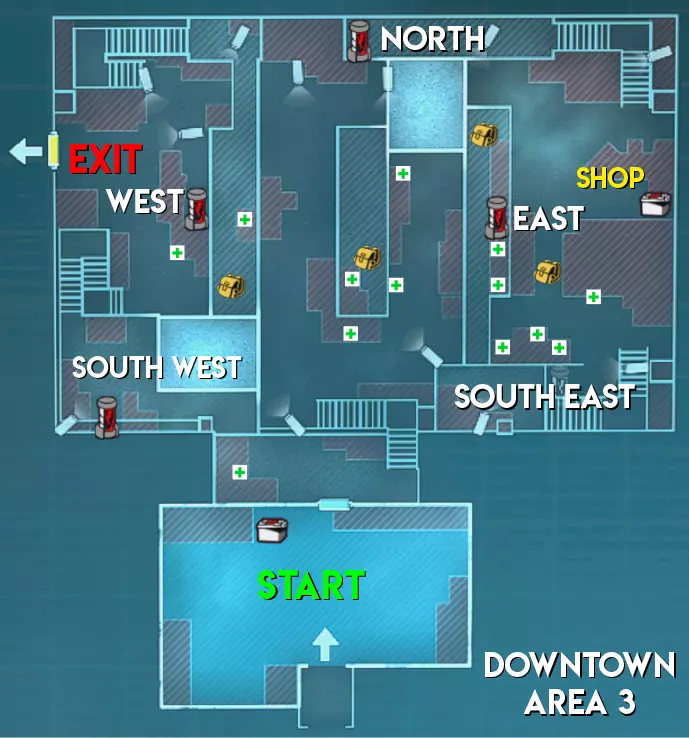
市中心地图的1区与其他地图的1区相比,绿色药草的刷新数量更少。市中心的1区也是唯一没有急救喷雾刷新点的地图。最后,与研究设施和赌场不同,市中心没有任何手雷刷新点。 难度(偏向幸存者) 1区 - ★简单(路线短且线性) 2区 - ★★中等(线性地图,有许多狭窄区域和小房间。部分安全装置上有多个摄像头) 3区 - ★简单(无房间且有高地优势)
研究设施地图
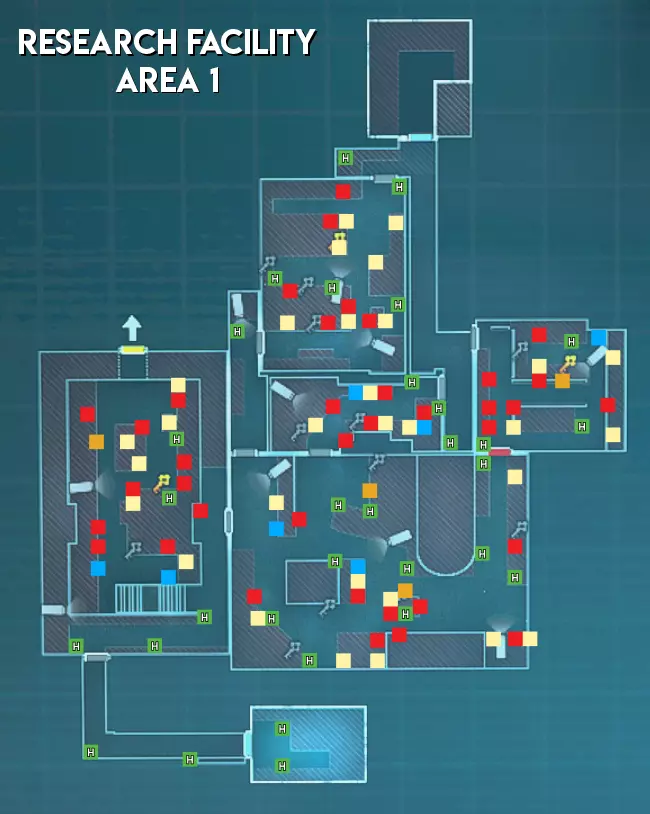
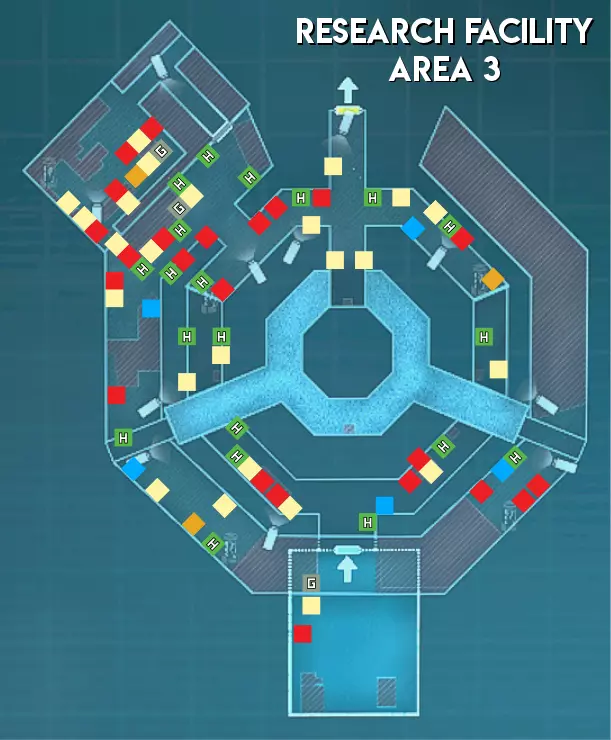
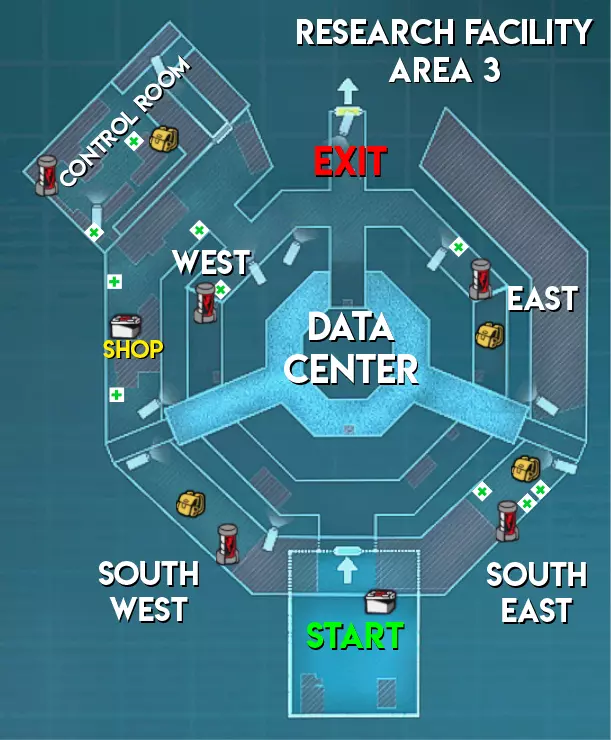
与市区地图不同,研究设施地图的1区额外刷新3个绿色药草、1个黄色药草和1个急救包,同时还多4个弹药刷新点;2区和3区各有2个手雷刷新点。 不过研究设施2区的2个黄色药草刷新点中,有时只会刷出1个。此外,该区域还有一个雨伞代币刷新点会被物体遮挡,导致无法拾取,这就是有时只能收集到12个雨伞代币中的11个的原因,不知为何只有这张地图存在这种情况。 2区的安全屋中有1个雨伞代币刷新点,记得及时去查看。难度(偏向幸存者) 区域1 - ★★中等(起始区域附近有摄像头,地图较大但大多数房间有不止一个入口) 区域2 - ★简单(房间有不止一种进入方式,且安全装置上只有1个摄像头) 区域3 - ★简单(大多数生物核心暴露在外,可从远处进行生物核心狙击)

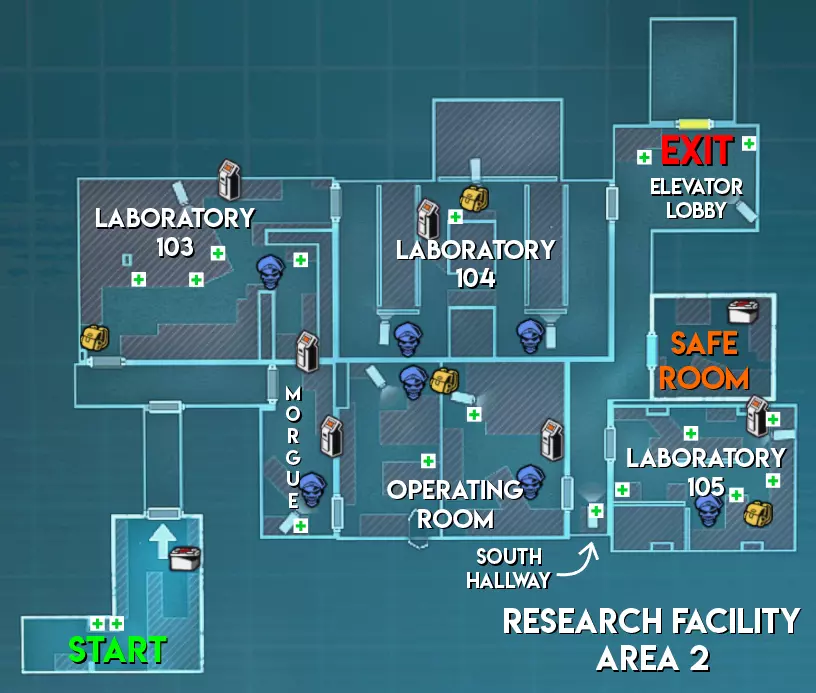
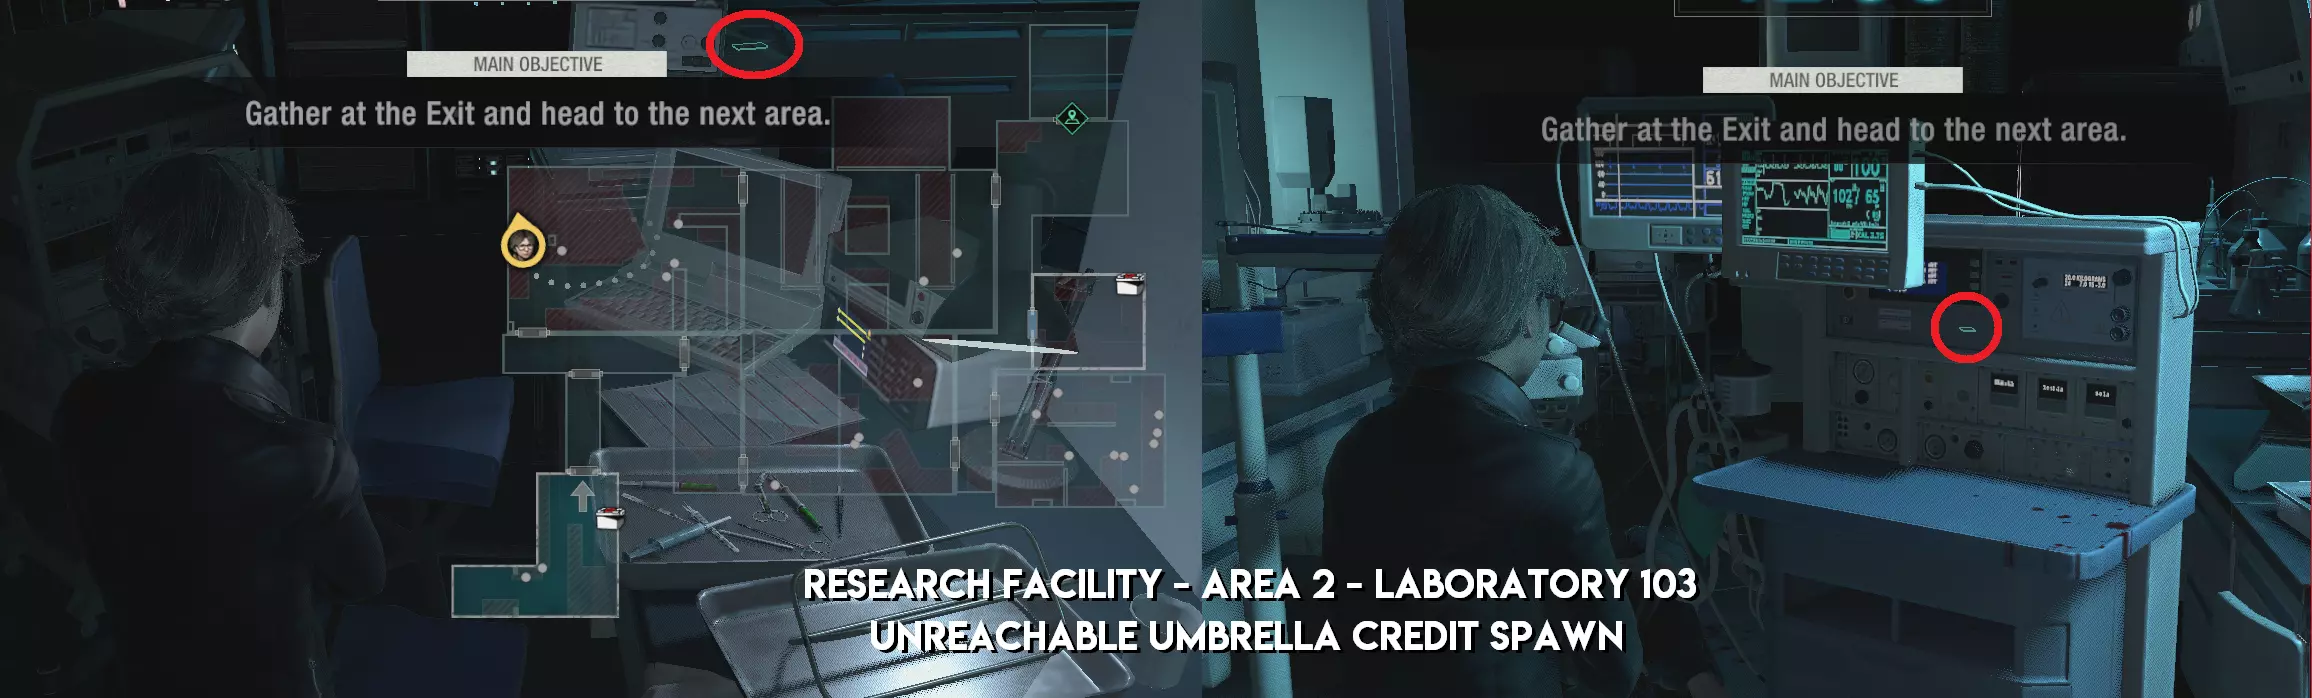
一个因有物体阻挡路径而无法获取的伞形信用点生成物
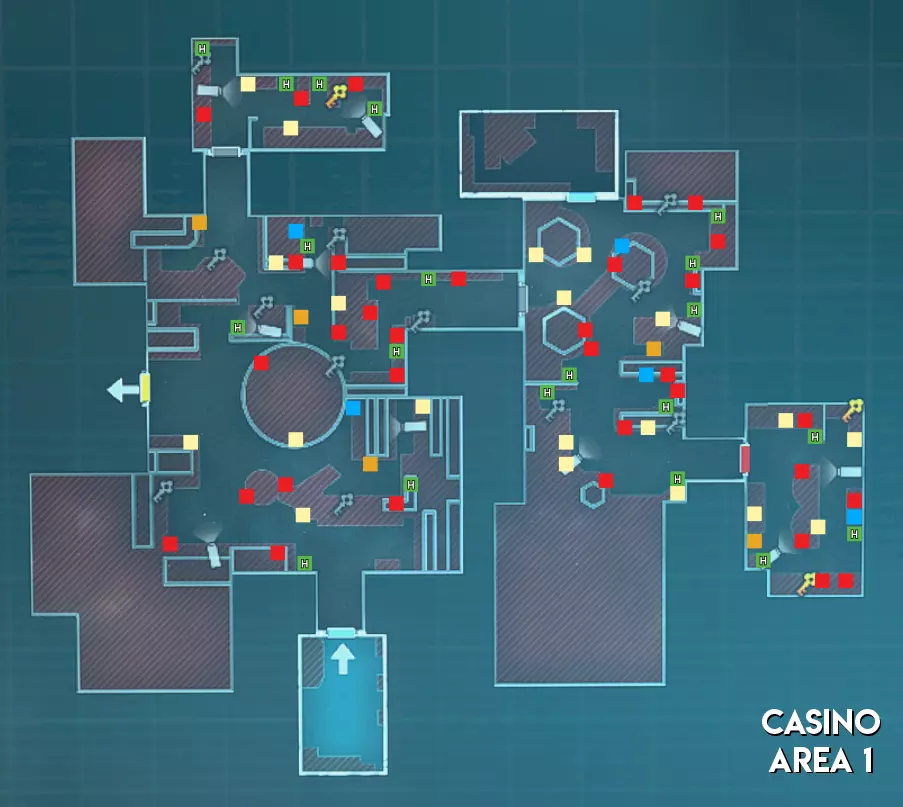
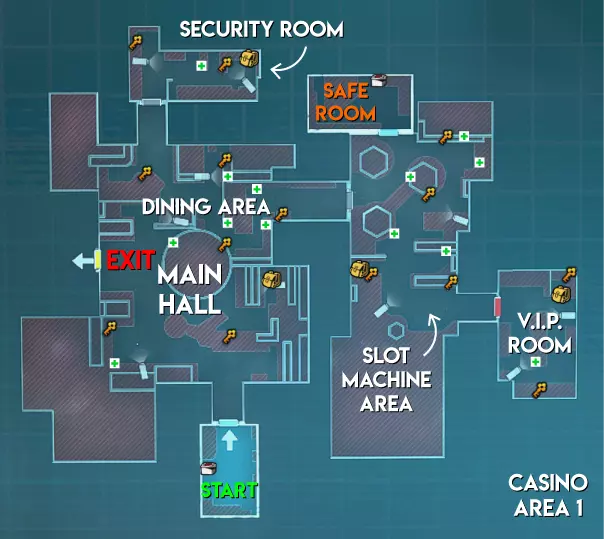
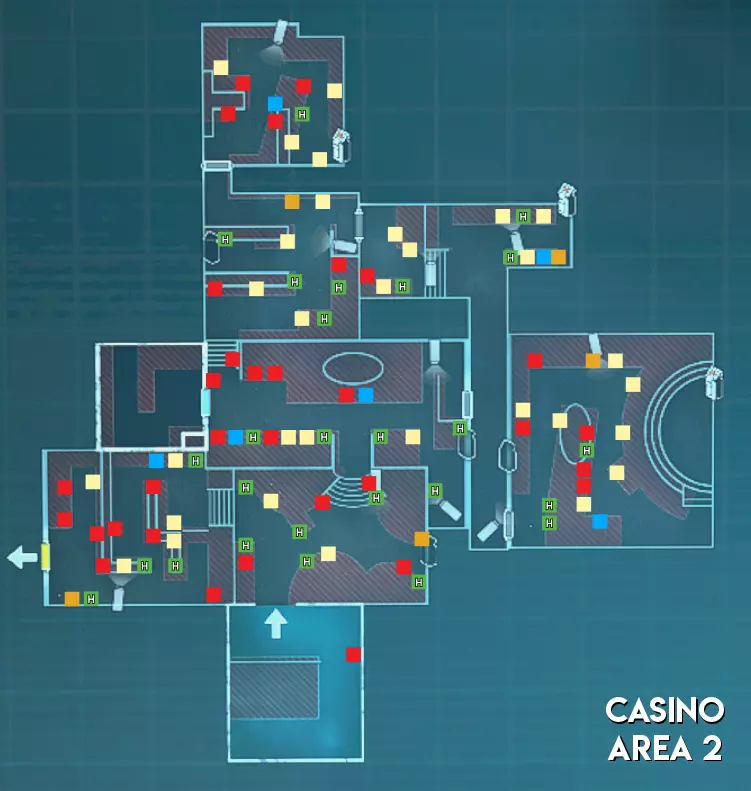
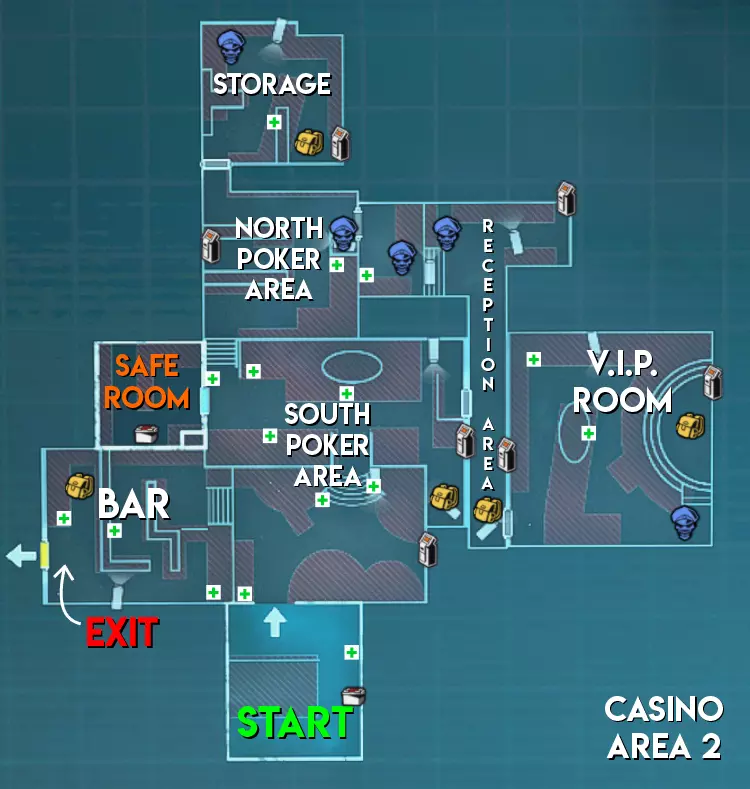
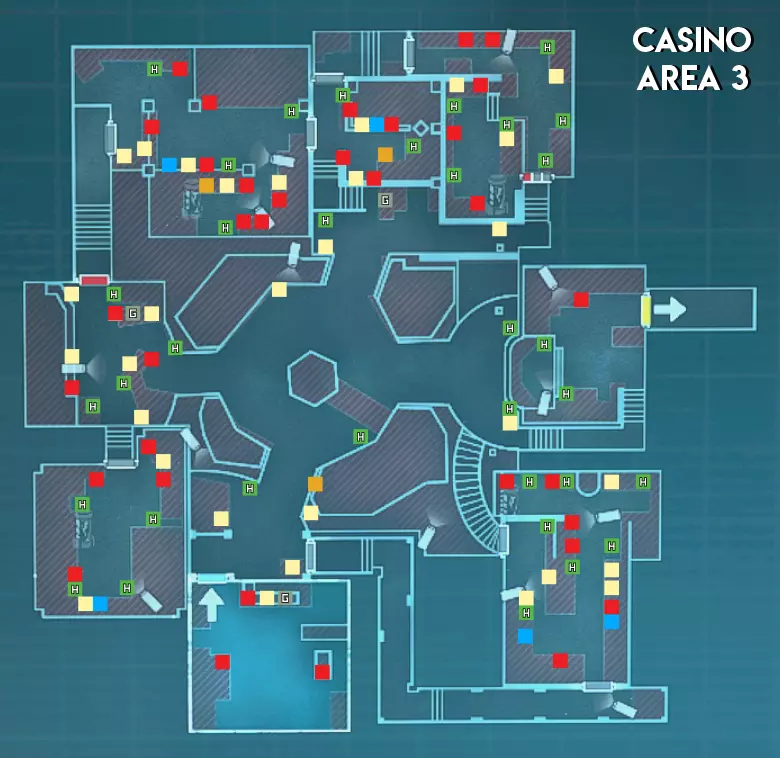
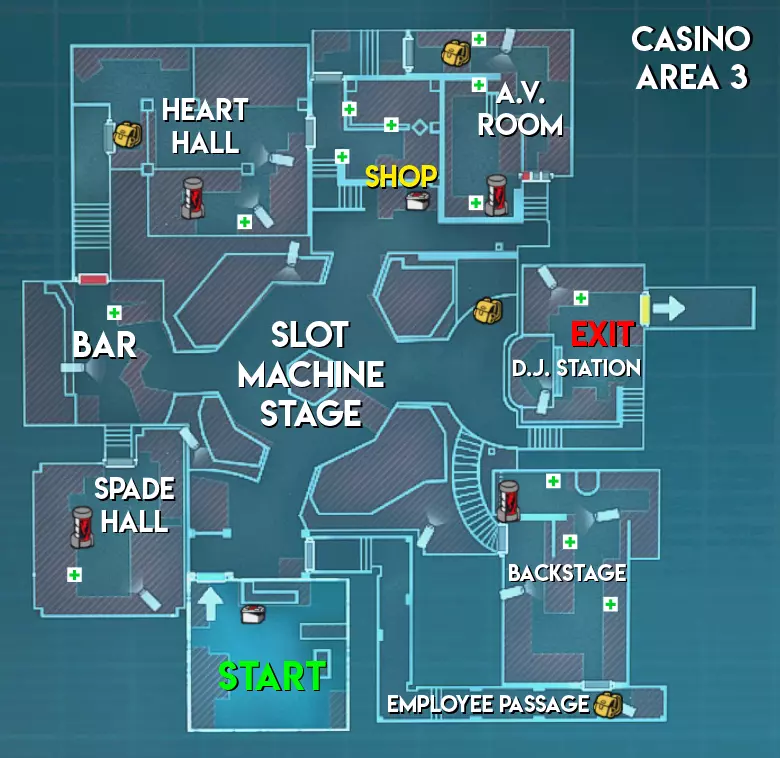
赌场地图
赌场地图的分布与研究设施类似,但区域2没有手雷刷新点,区域3的手雷刷新点比研究设施少1个。安全室也不像研究设施的区域2那样有伞形积分刷新点。 难度(中立) 区域1 - ★ 简单(线性地图,幸存者可以组队行动) 区域2 - ★★ 中等(区域狭窄,部分安保装置配备多个摄像头) 区域3 - ★★ 中等(生物核心位于房间内,但可从中心区域看到;老虎机、出口区域较小,且仅有1个进出点)
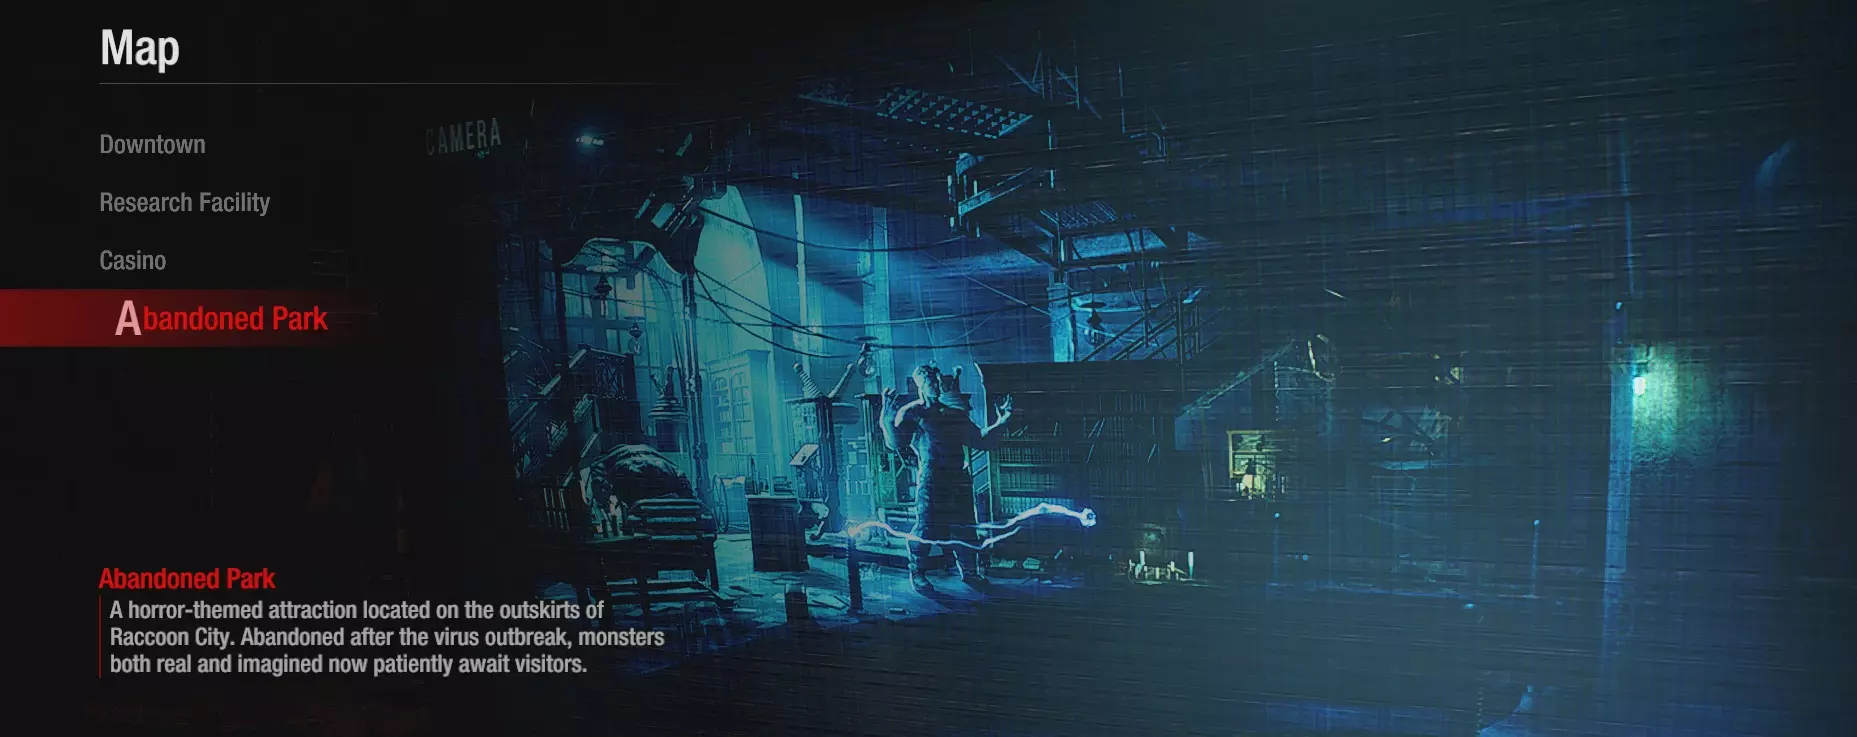
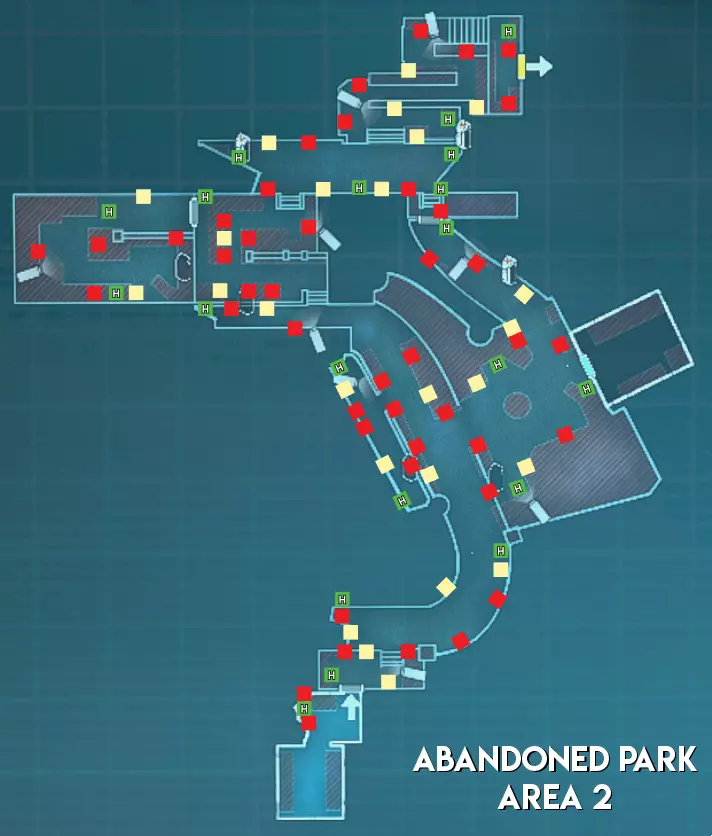
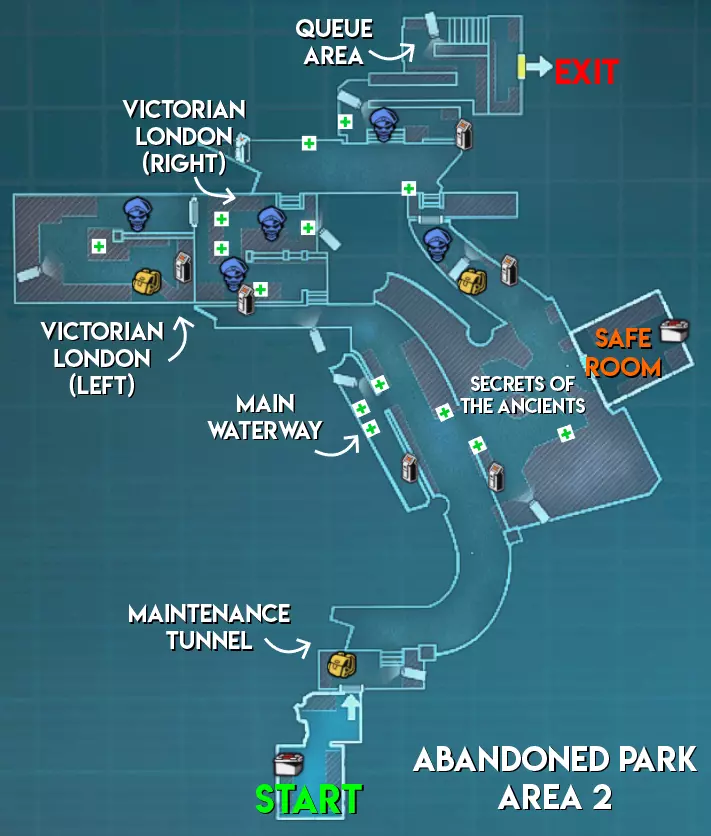
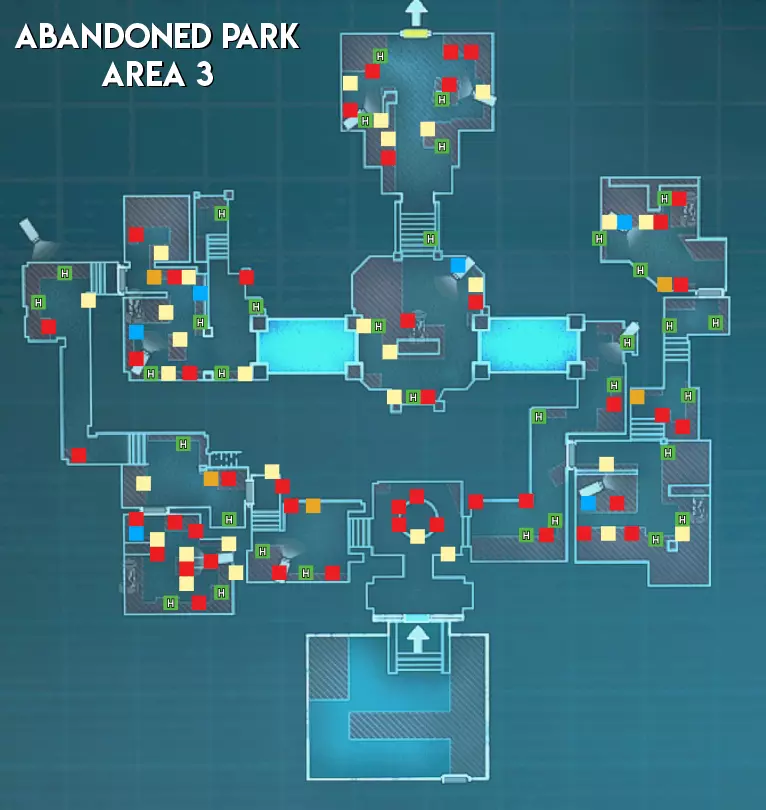
废弃公园地图
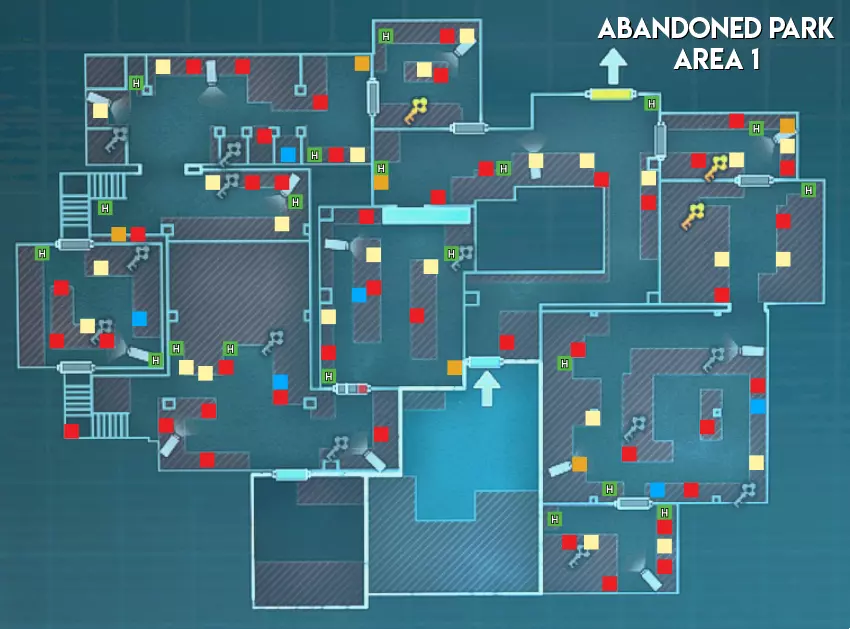
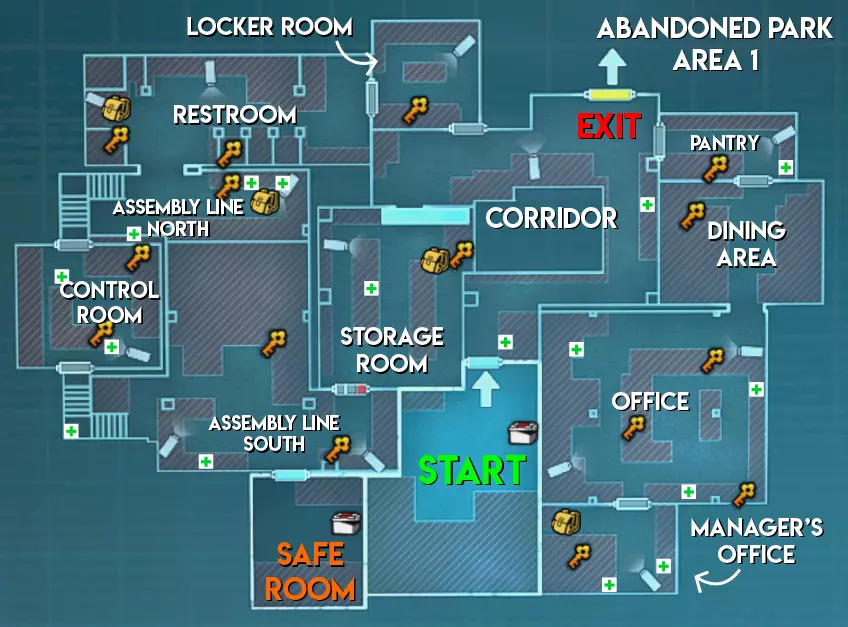
与研究设施和赌场不同,废弃公园地图中不会生成任何手雷。除此之外,其物品分布与大多数关卡类似,没有太多值得注意的地方。 难度(以主脑方视角) 区域1 - ★★★ 困难(大型地图,分为两个区域,有许多需要突破的房间) 区域2 - ★★ 中等(路径较长,部分安保装置配备多个摄像头) 区域3 - ★★★ 困难(生物核心位于地图不同角落的小房间内,有移动桥梁,摄像头可远距离攻击幸存者)

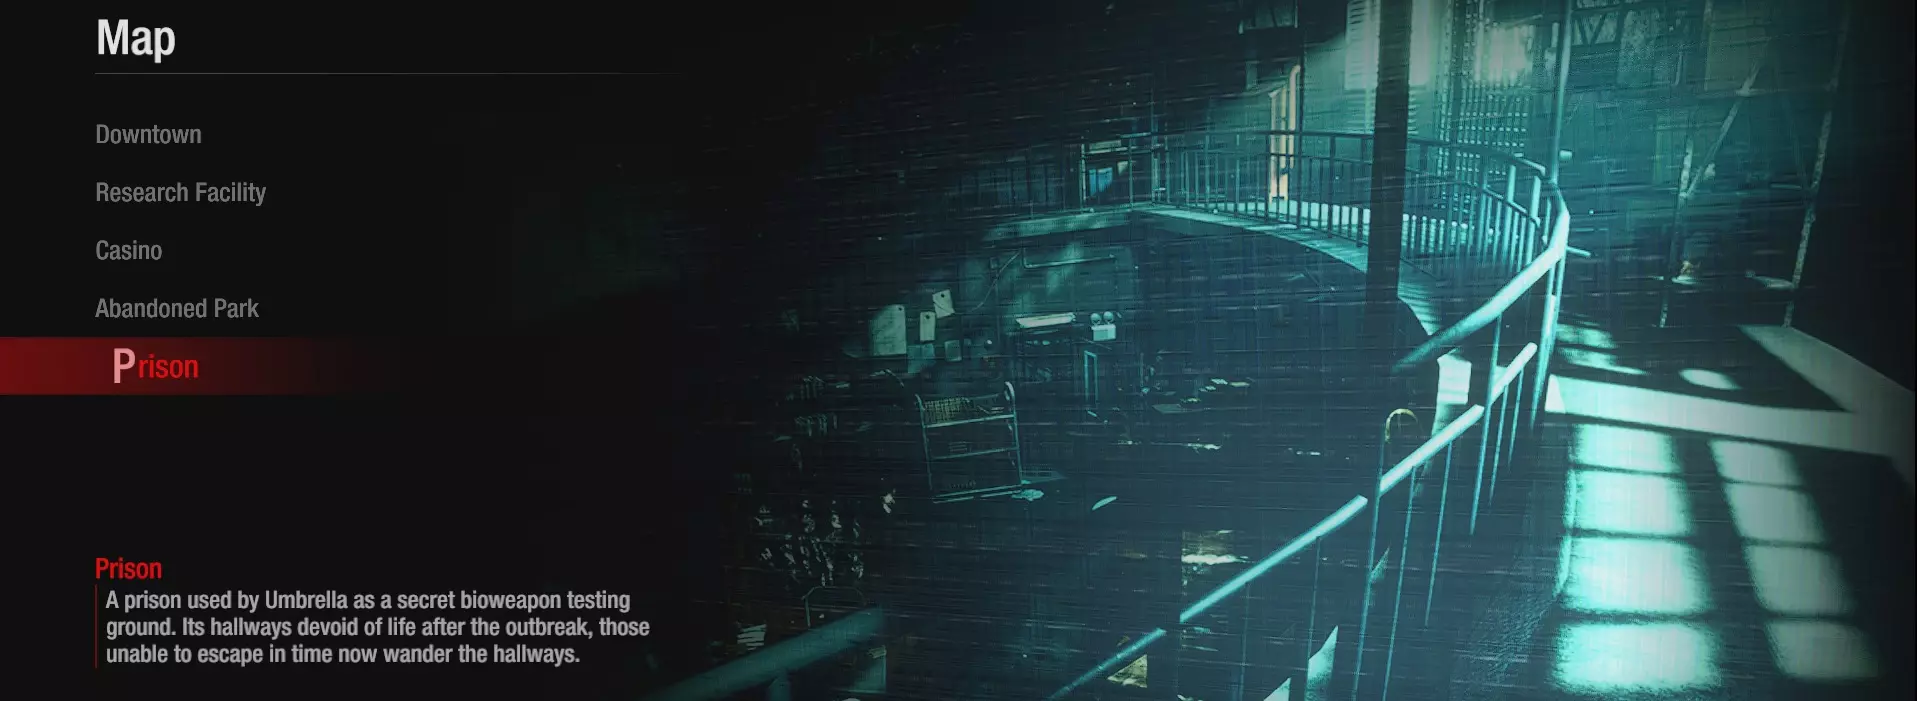
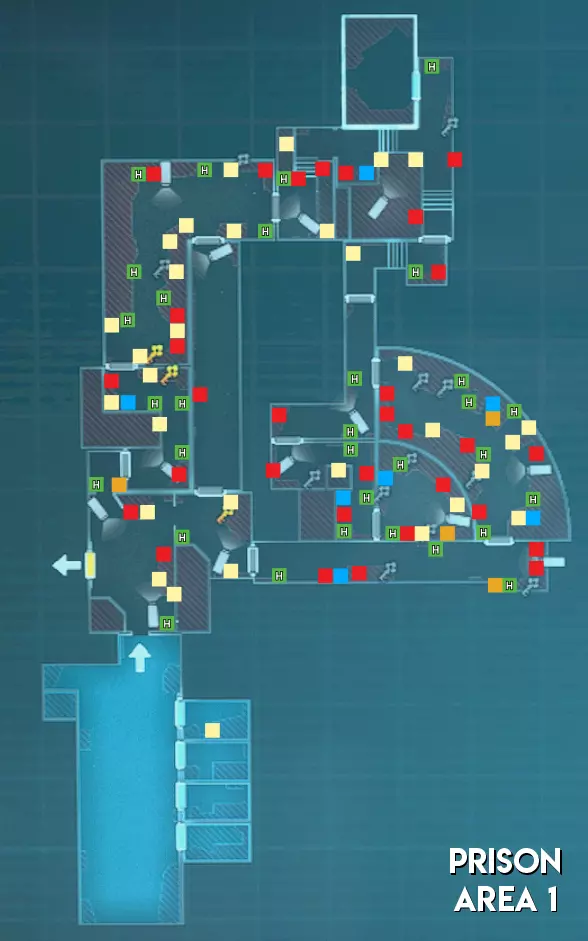
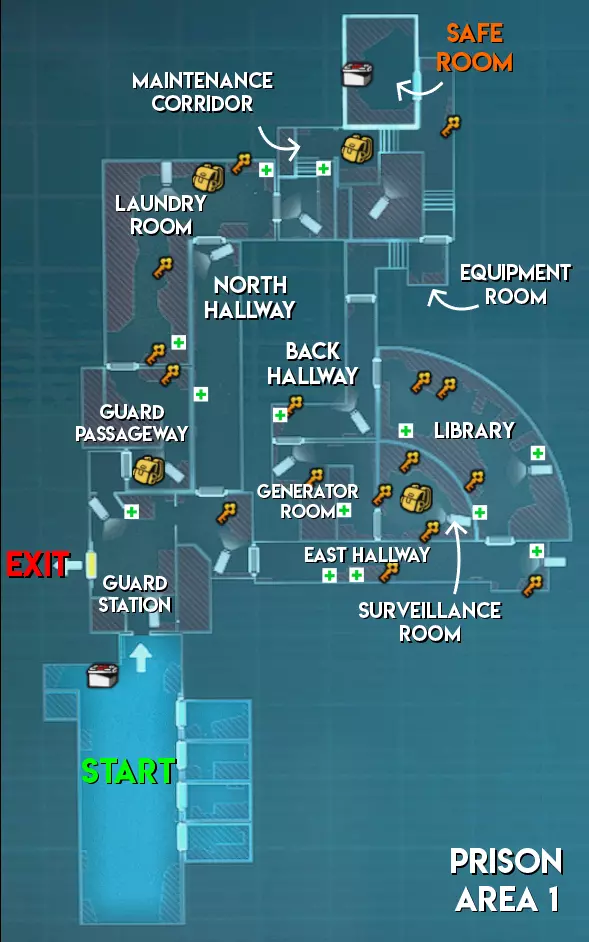
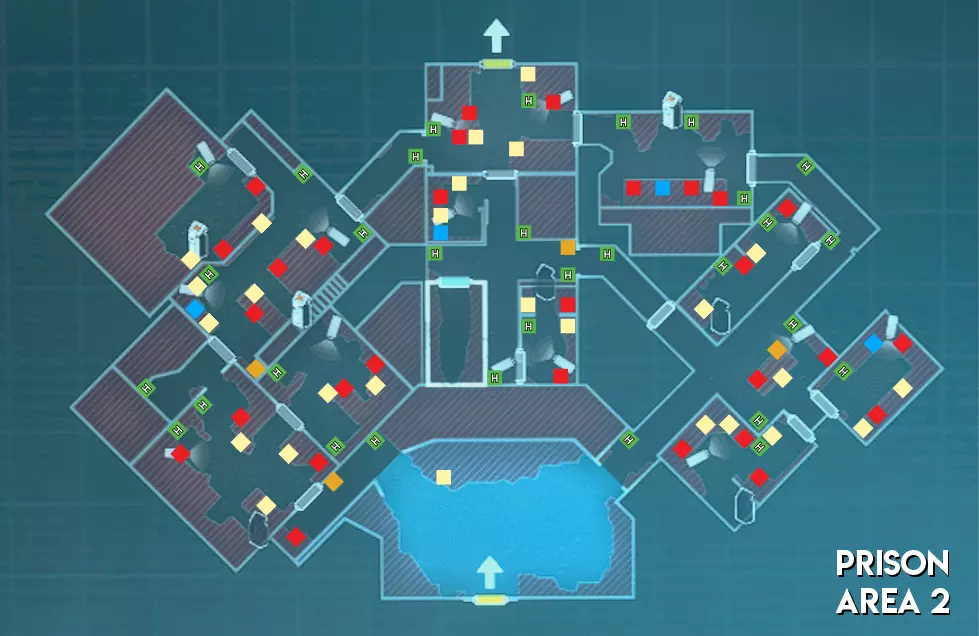
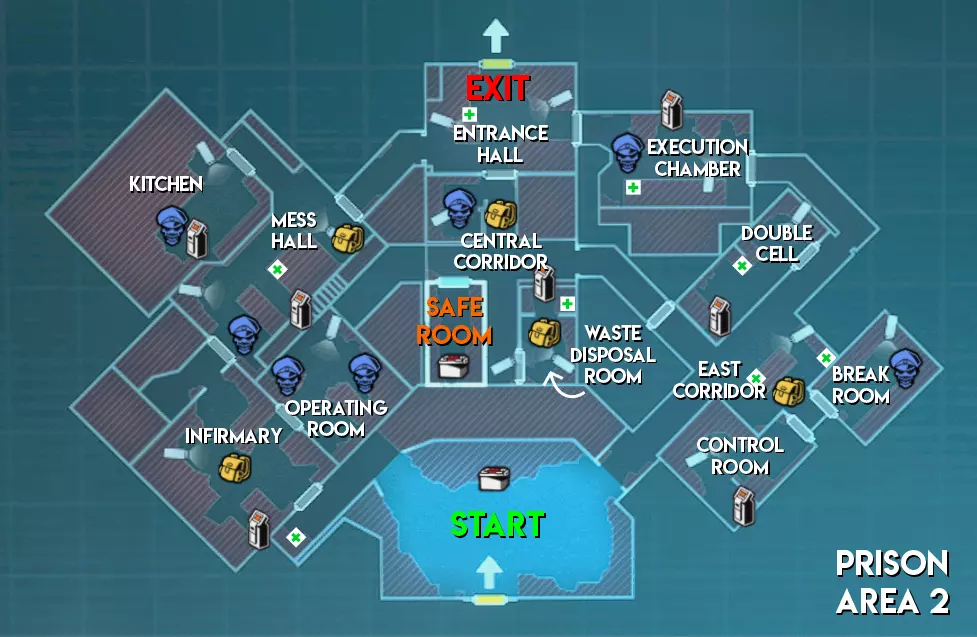
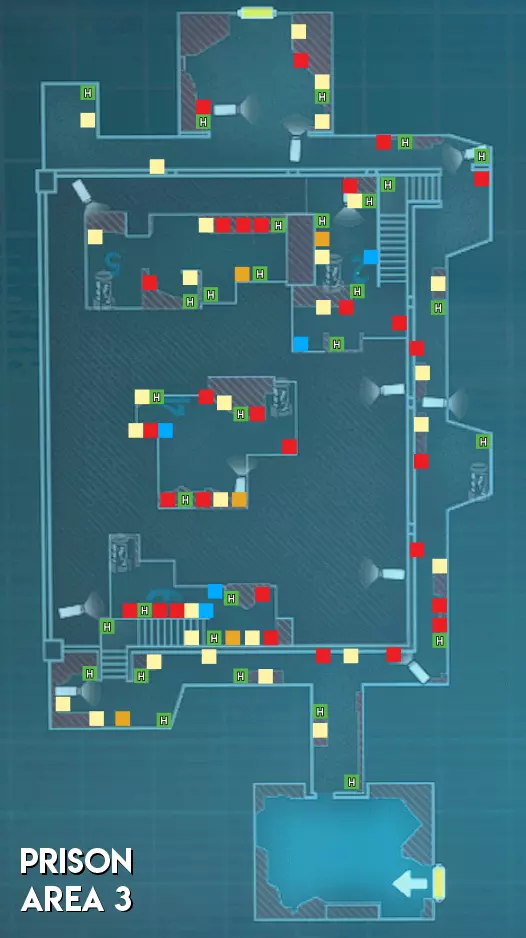
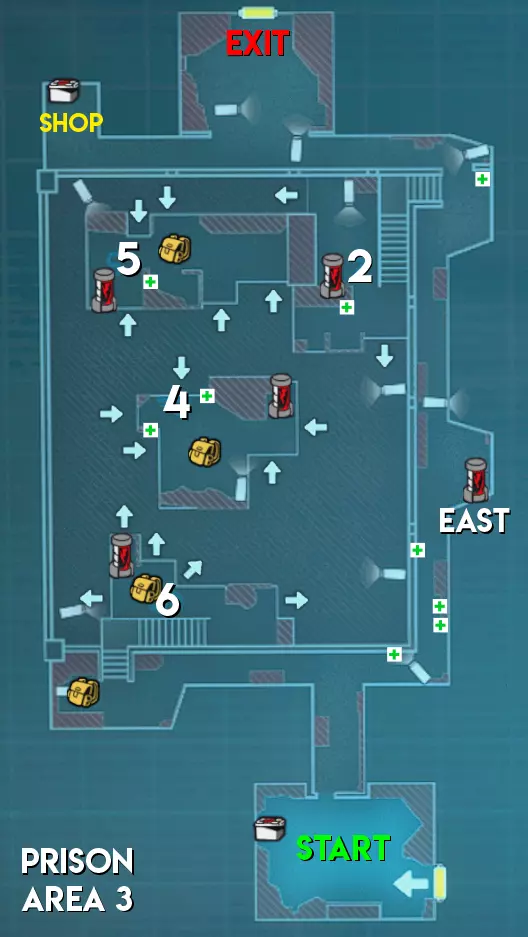
监狱地图
监狱地图的物品分布与废弃公园类似。不过在区域1中,第一个G2牢房可能会刷新雨伞信用点。区域3的地图布局也可能发生变化。 难度(以主谋方视角) 区域1 - ★★★ 困难(地图分为两个部分,有许多需要突破的房间) 区域2 - ★★★ 困难(地图较大,走廊较长且房间众多,导致移动困难,部分安全装置上装有多个摄像头) 区域3 - ★★ 中等(区域狭窄。大多数生物核心暴露在外,但被屏障封锁,地图布局可能会改变)
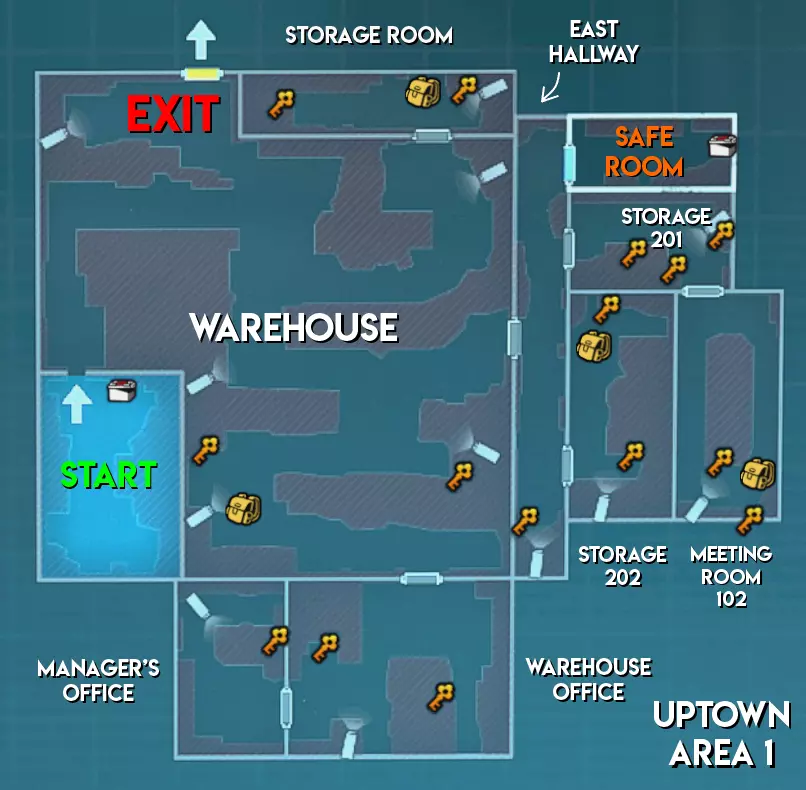
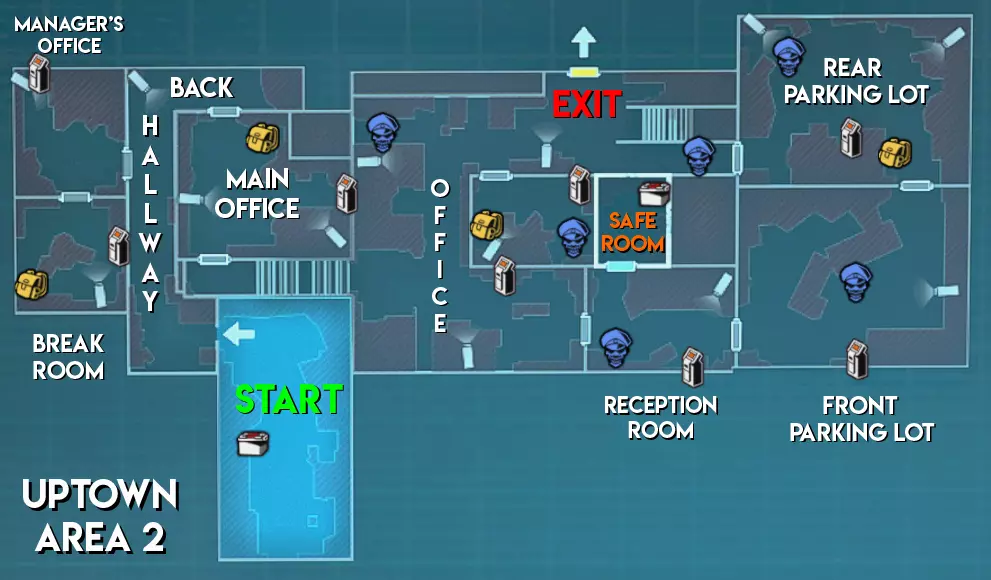
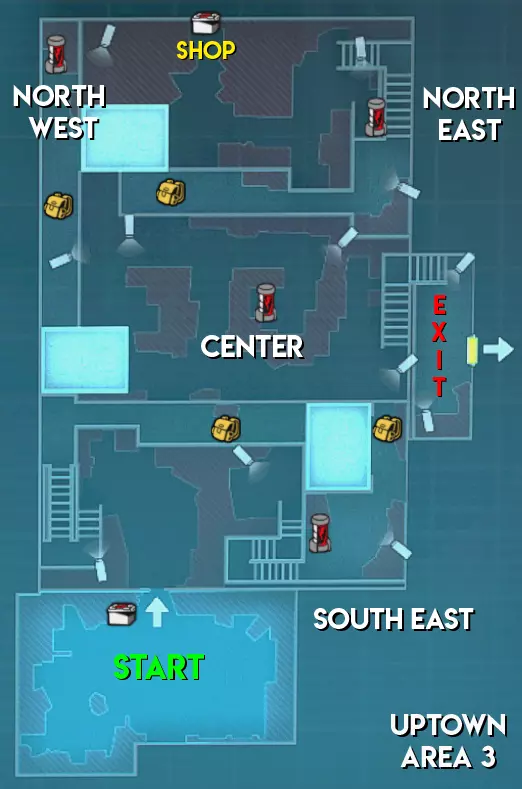
上城地图
难度(中立) 区域1 - ★★ 中等(地图较大,包含狭窄通道和需要突破的小房间) 区域2 - ★★★ 困难(地图更大但线性程度较低。部分安全装置配备多个摄像头) 区域3 - ★ 简单(无房间,高地优势有助于远距离发现补给僵尸/威胁)
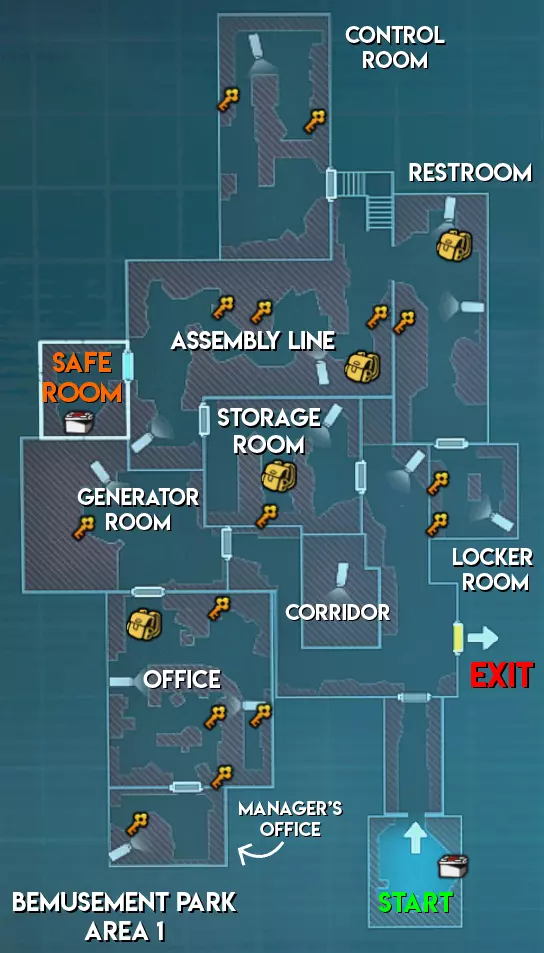
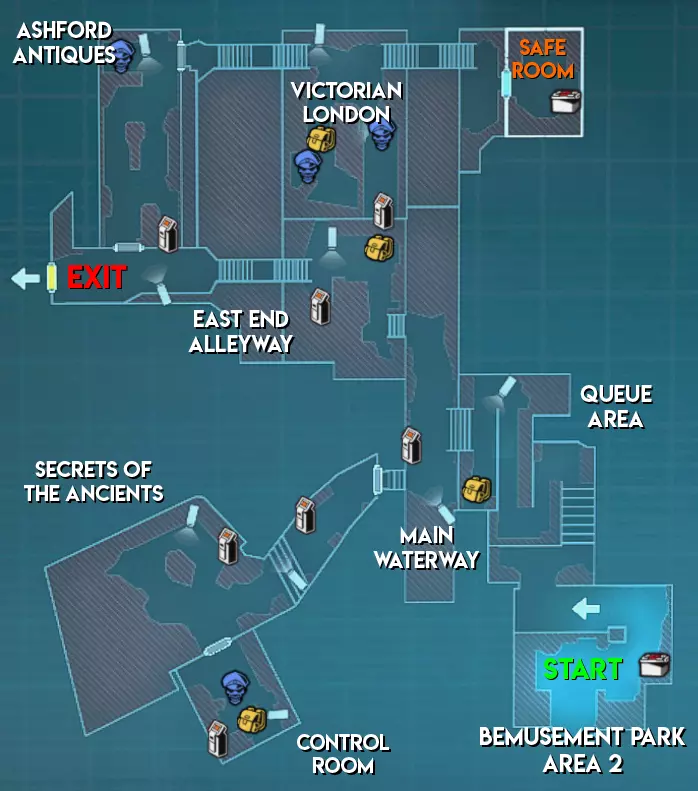
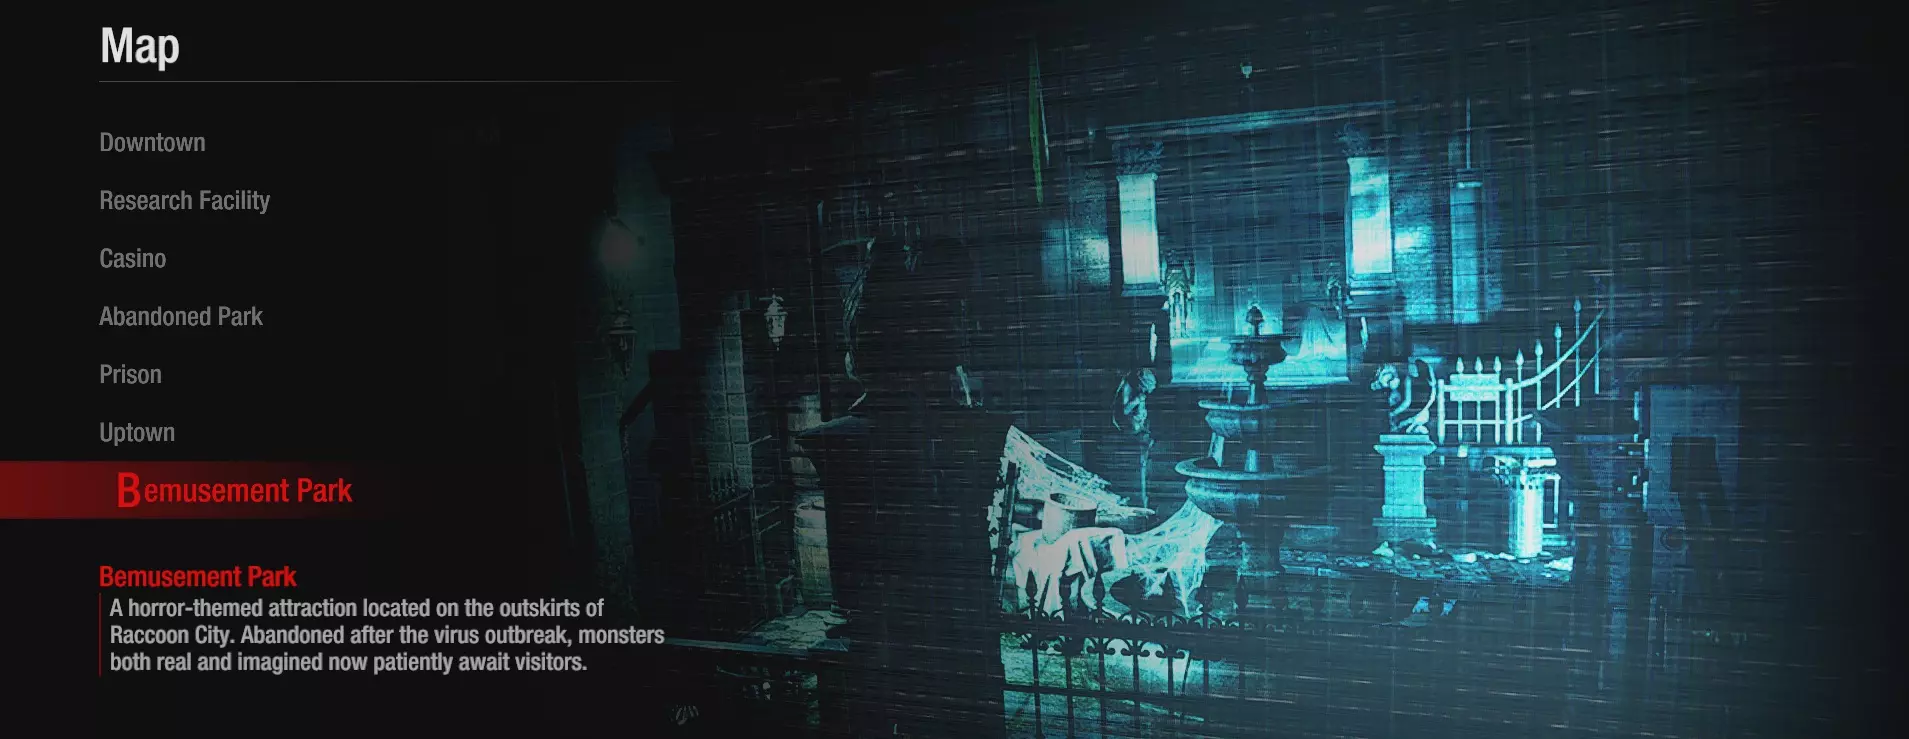
游乐园地图
难度(中立) 区域1 - ★★★ 困难(大型地图,分为两个区域,包含狭窄通道和多个需突破的房间) 区域2 - ★ 简单(部分安防设备配备不止1个摄像头。线性地图设计便于组队搜寻保安) 区域3 - ★★ 中等(生物核心位于地图不同角落的小房间内。地图较小,通道狭窄且呈线性布局)