换一换
换一换 


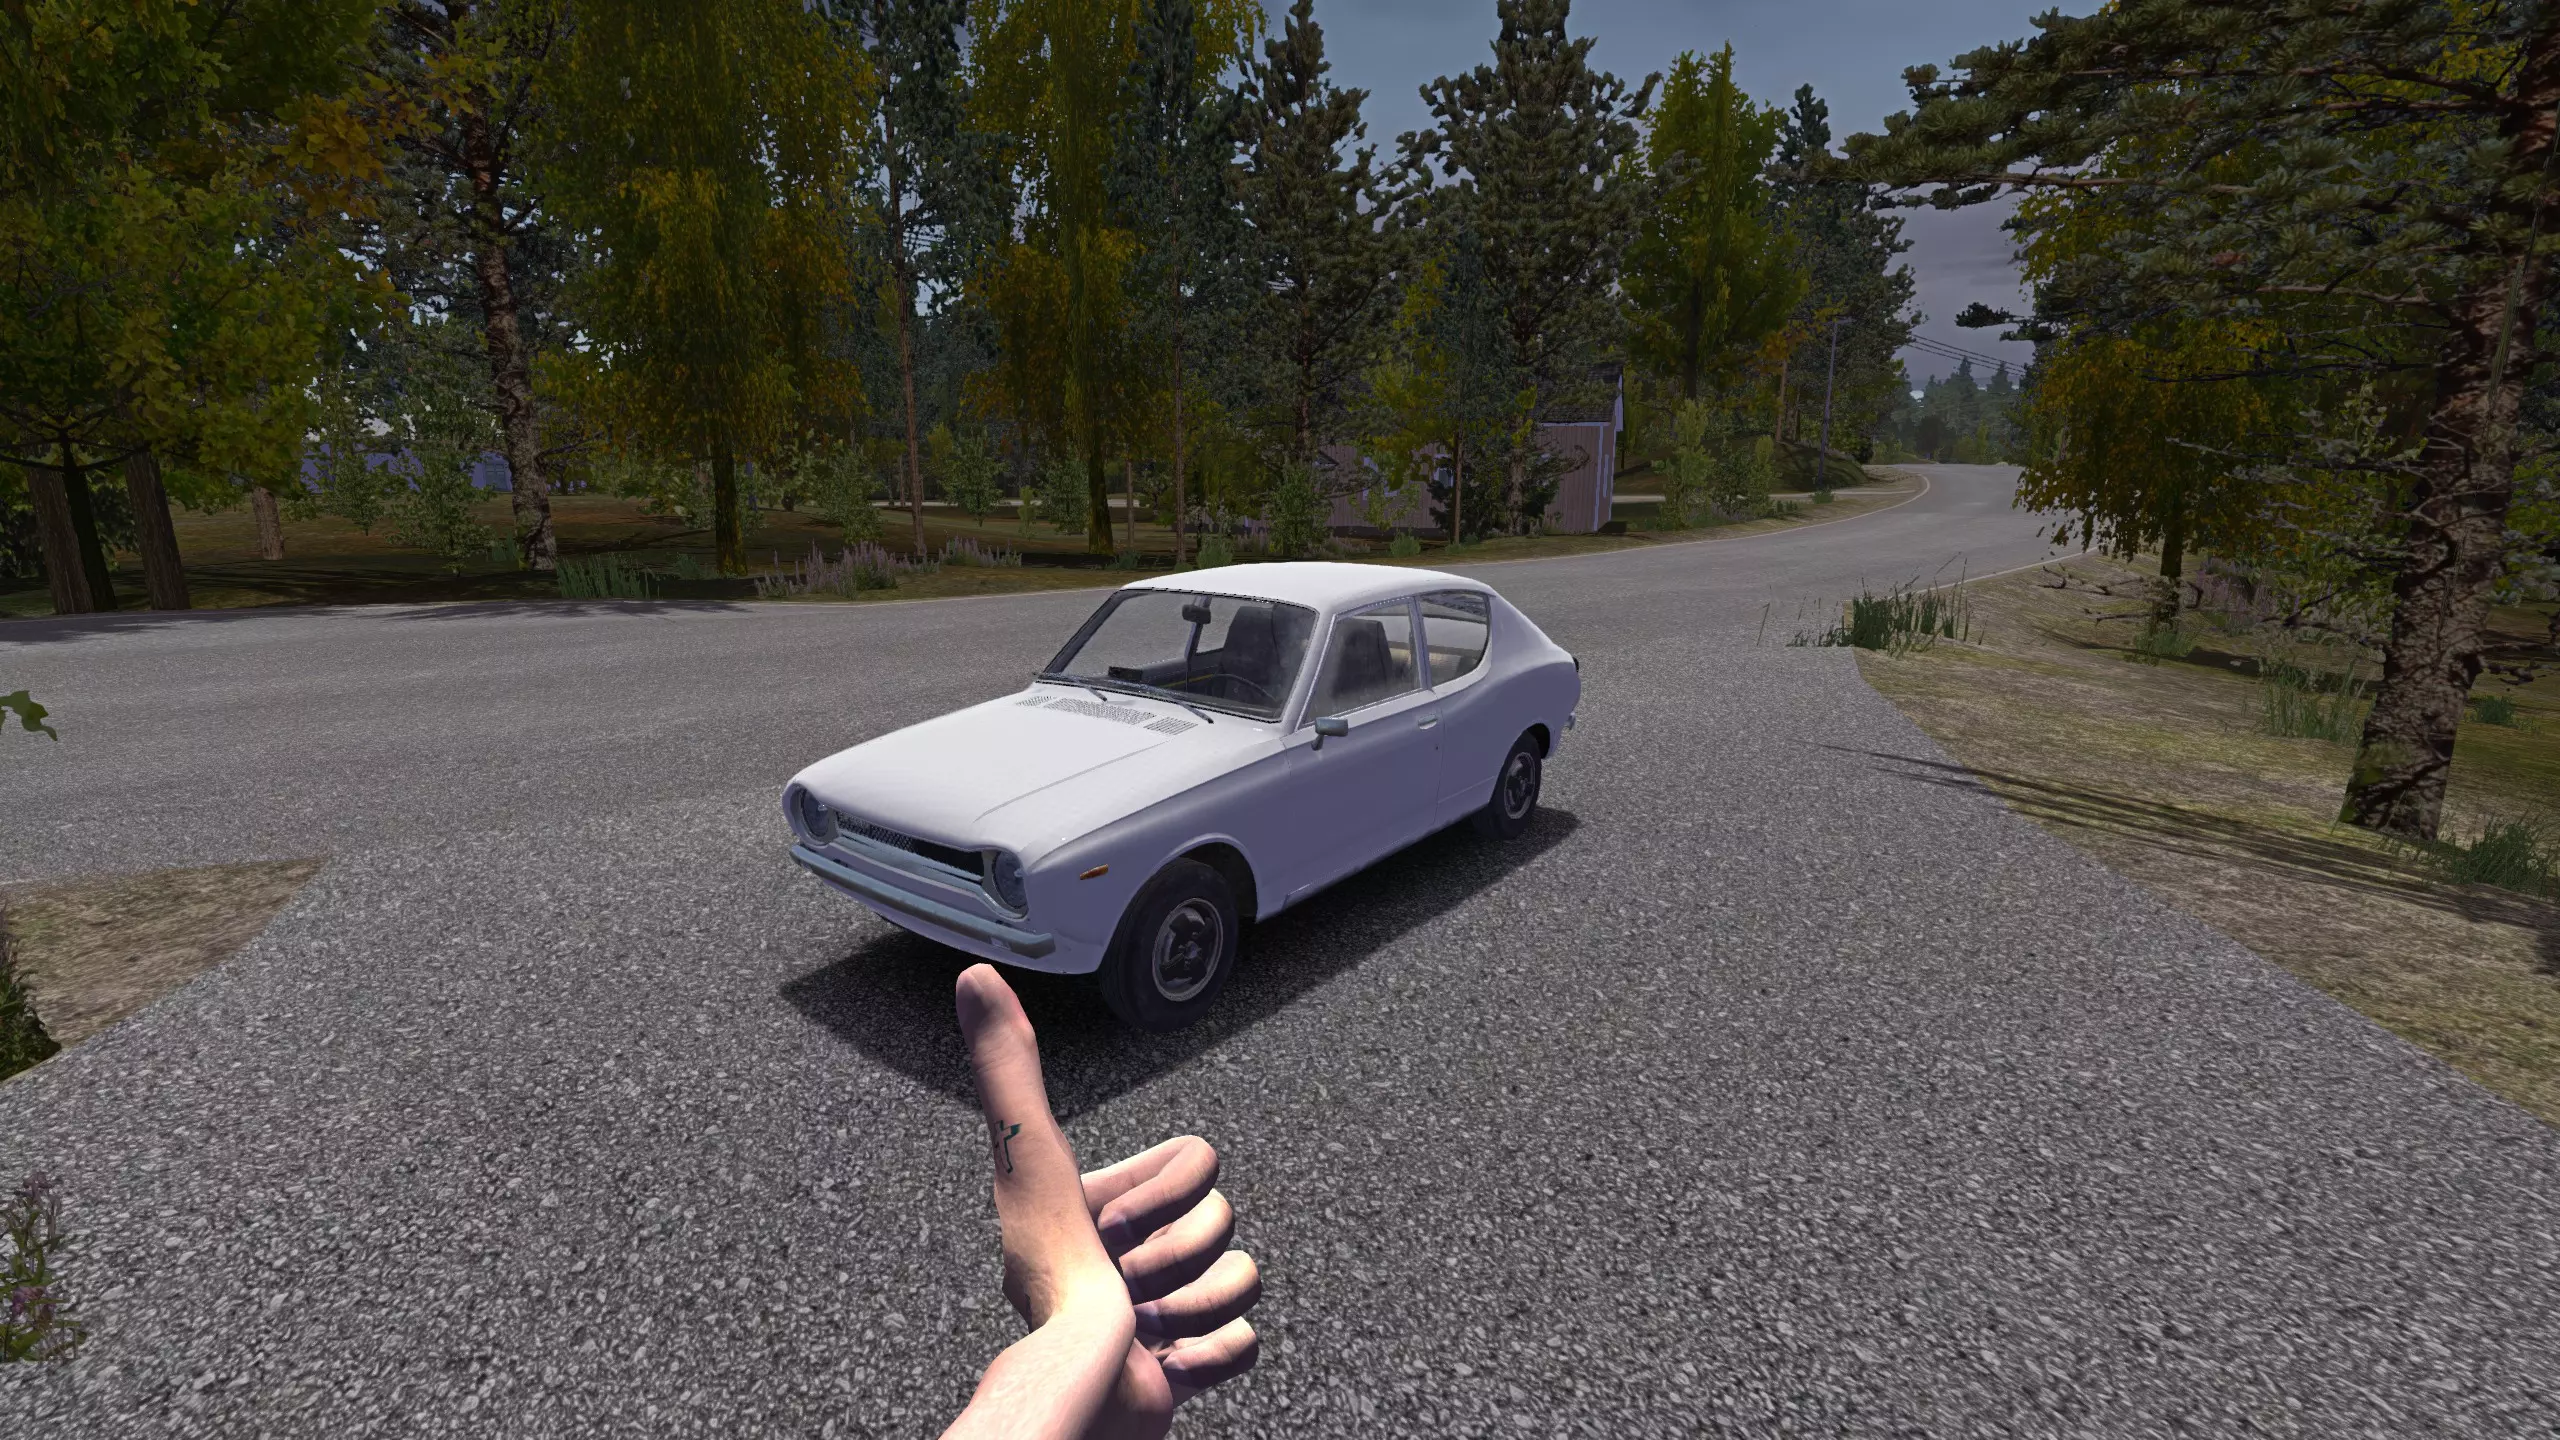
如标题所示,这是一份帮助你顺利进行游戏流程的文档,也可以称之为玩家手册。 本指南已有6年多历史,但我仍会不时更新内容。 希望新老玩家都能喜欢这份指南! 主菜单 开始新游戏:点击“新游戏”按钮,然后创建你的角色。

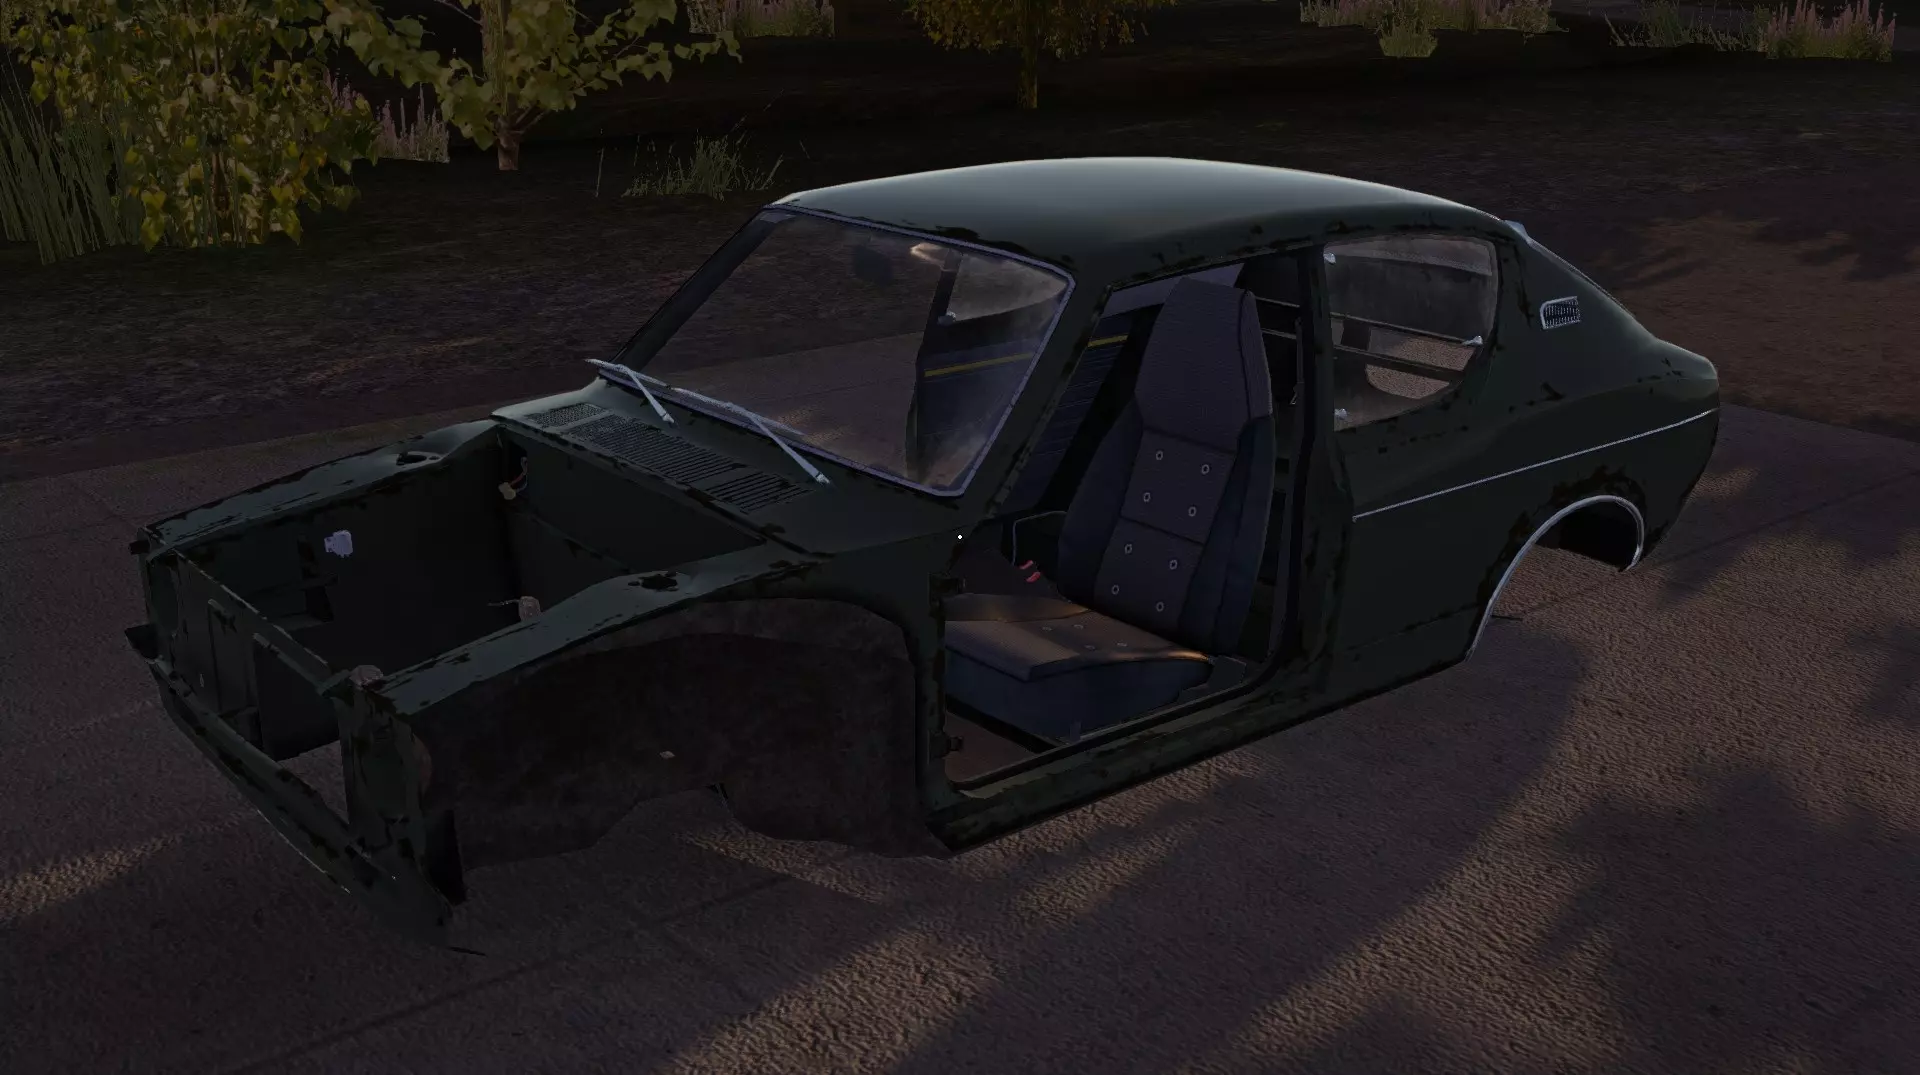
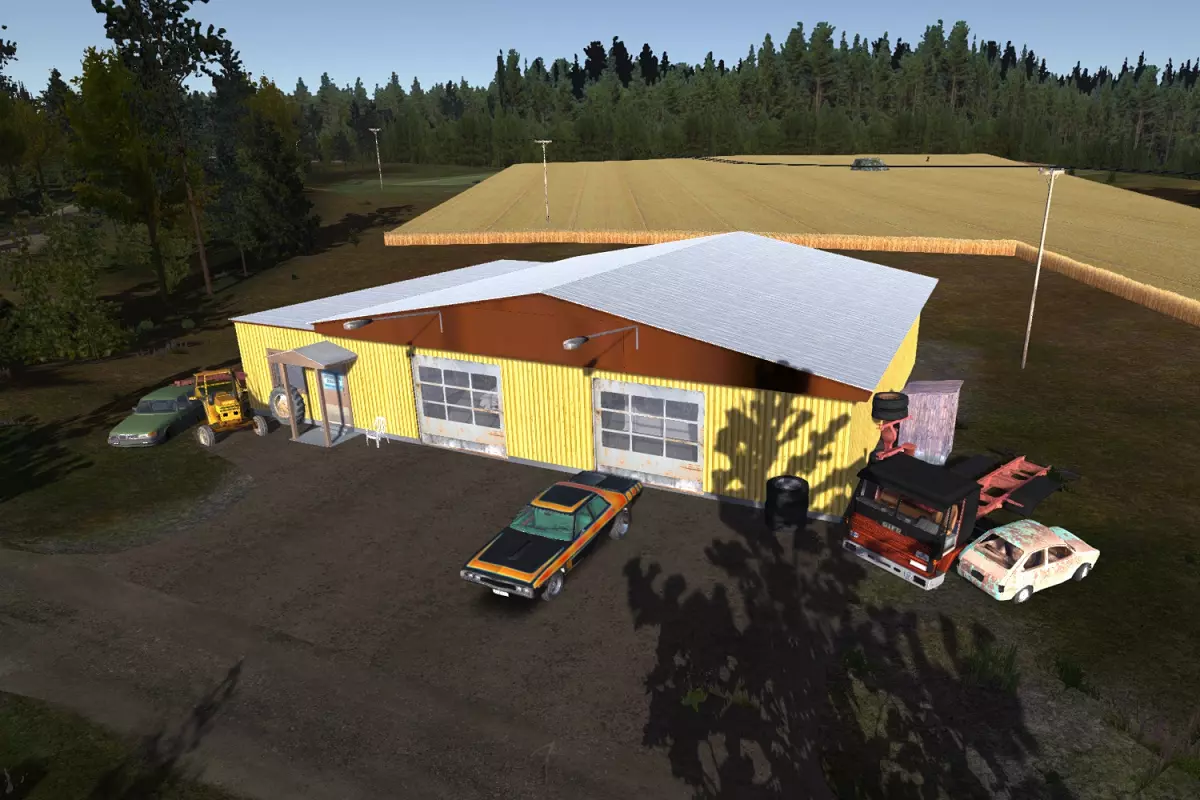
输入你的名字 关闭永久死亡模式(除非你有丰富的不死经验) 点击开始 第一步 开场过场动画从你父亲的萨托马AMP汽车后座开始,展示角色在高速公路上被送达的场景。随着《波里拉isten进行曲》响起,镜头拉远,屏幕上出现黄色文字: “芬兰 1976 [玩家名]出生” 序章结束后,游戏时间跳转到1995年,你将操控一名18至19岁的角色。游戏最初会将你置于卧室中。 花些时间探索房子。当你进入厨房时,注意你一开始会有一箱啤酒,冰箱里还有一些牛奶和食物。冰箱上有一张父母留下的便条,上面写着:“别偷懒。”修理好你爸爸的旧车。可以借你叔叔的蓝色面包车。不许喝酒!等我们觉得无聊了就回来。爱你的,爸爸妈妈。 他们永远不会“觉得无聊”。你只能靠自己了! 请注意: 香肠、通心粉、披萨和牛奶如果长时间放在冰箱外最终会变质。但它们在冰箱里可以永久保存。 香肠能完全恢复你的饥饿值,但如果还在包装里只能吃一次。烹饪香肠非常麻烦,而且没有额外好处。 酒精会让你喝醉。在车里备些啤酒,以便在路上口渴时饮用。 醉酒入睡会让你早上宿醉。缓解颤抖的最佳办法是再喝点酒,但这样做你会变成酒鬼。也许这不是最糟糕的事。如果你走出前门,左手边是你的车库。那里存放着你所有的汽车零件,而车身则停在车道上。
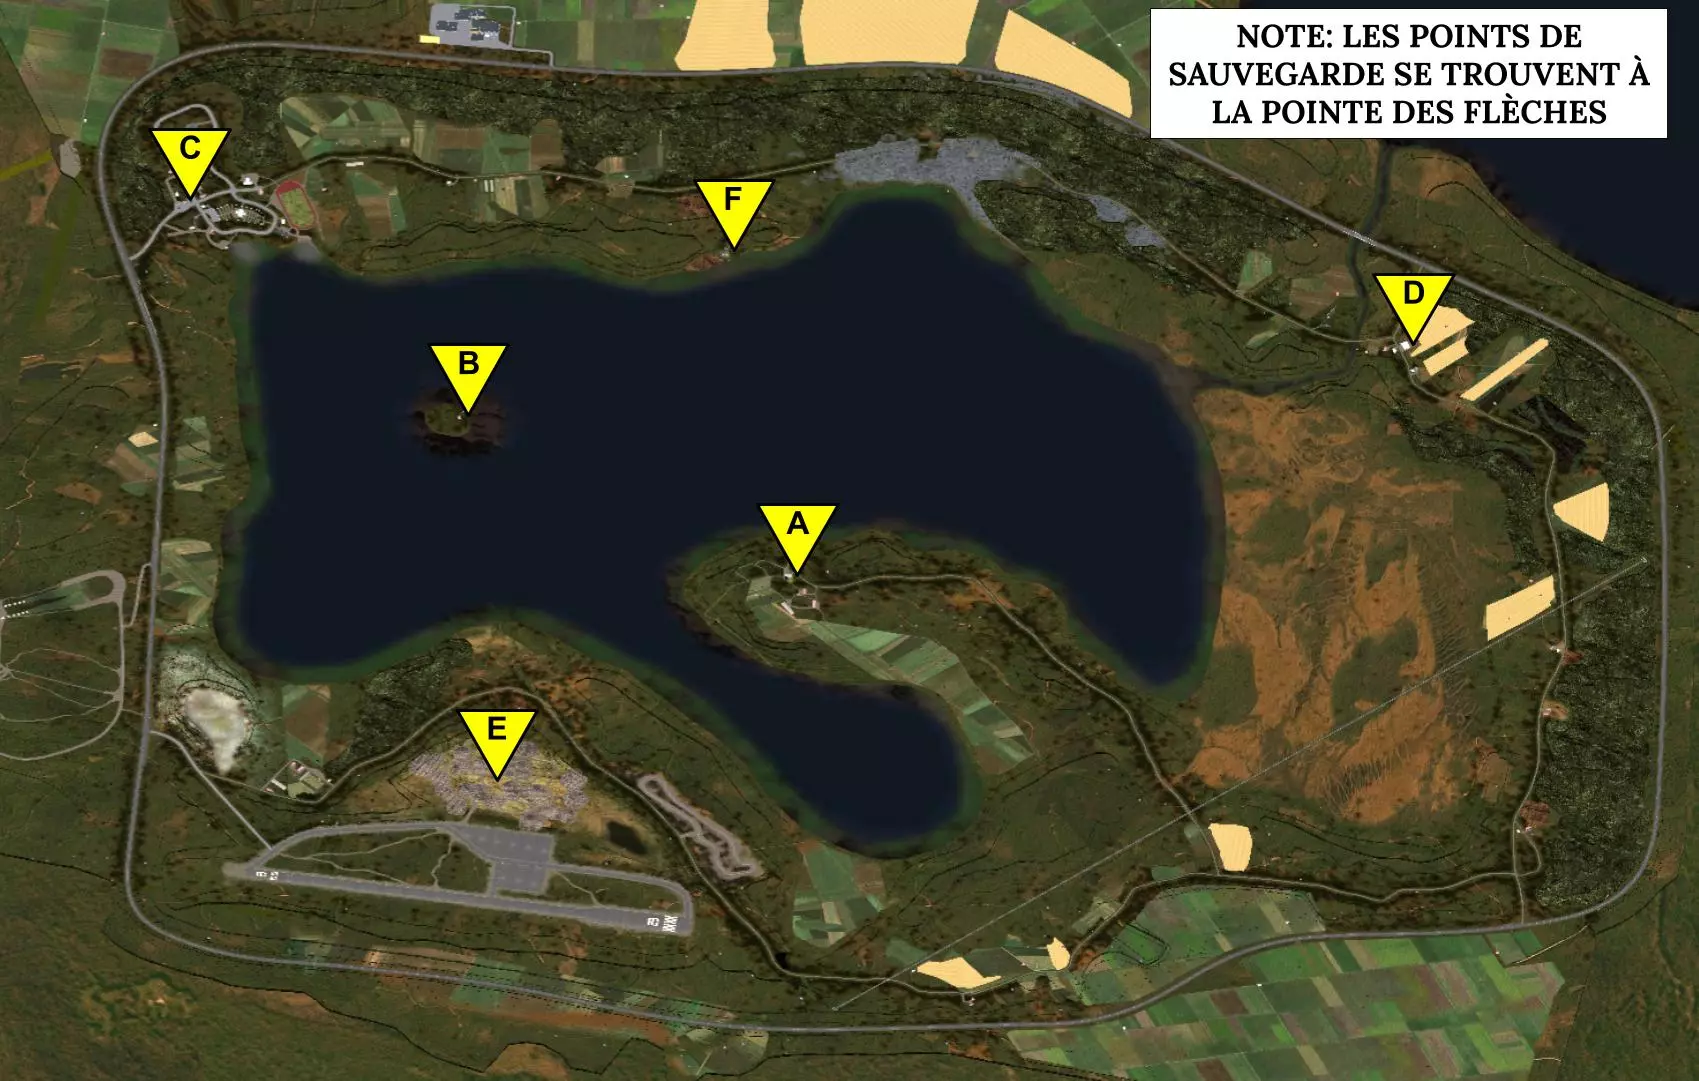
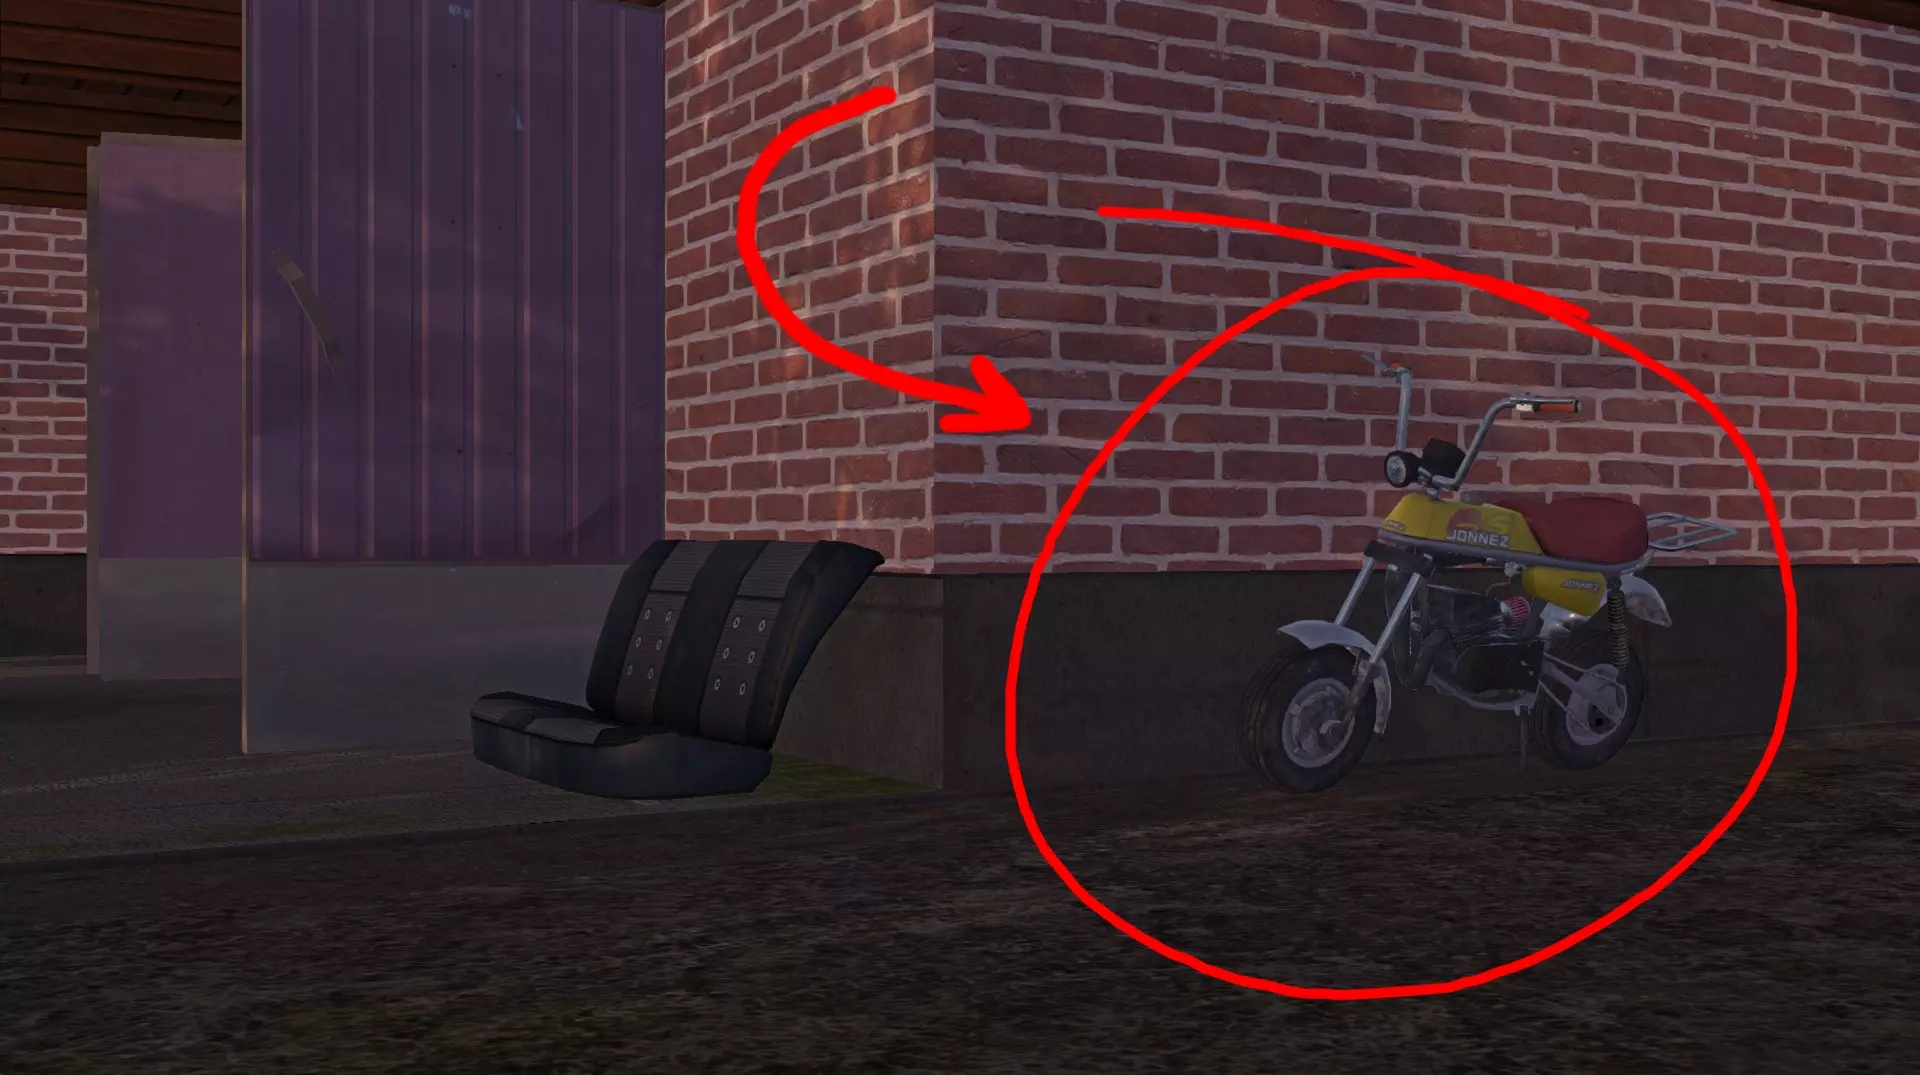
房子侧面有一辆迷你摩托车,通常被称为“Jonnez”。
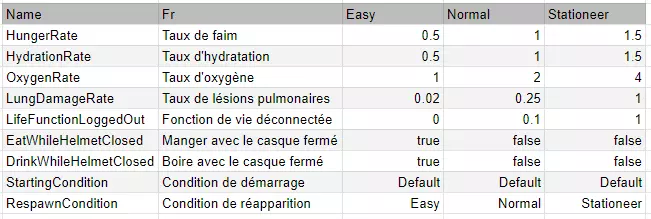
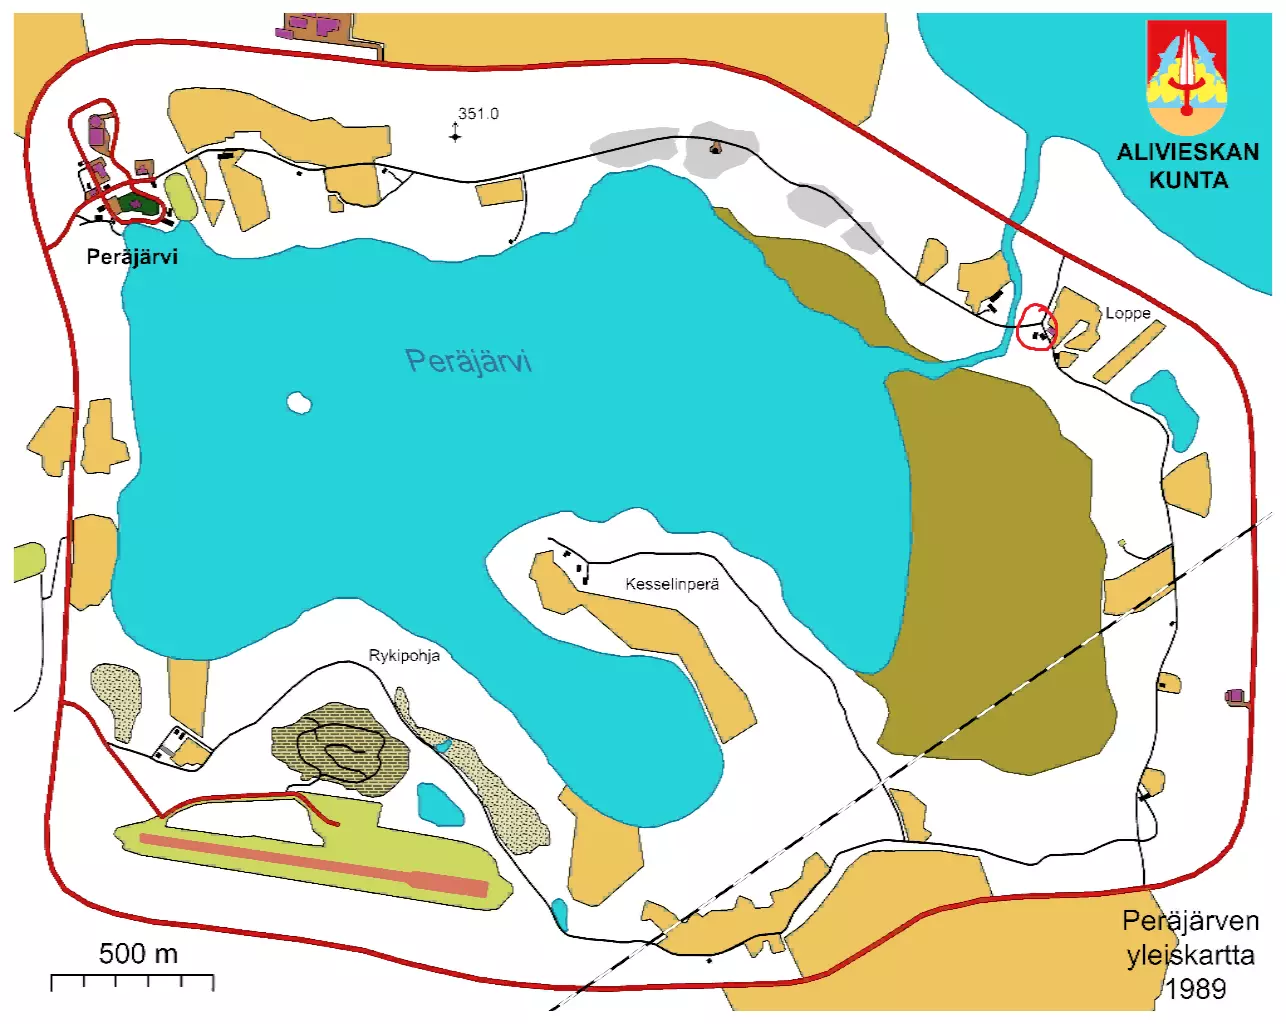
It is advisable to wear the crash helmet (found on the desk in the player's bedroom) to avoid the Intercontinental Ballistic Bumblebees that have a chance to fly into the player's eye, blinding them until the game is reloaded. The same applies when driving any vehicle without a windshield installed. How to survive Need barsYour need bars are in the top left corner of the screen, (they can be hidden with F2) and you need to pay attention to *most* of them. In this section I will cover each one of them and how to tend to them. UrineYour urine need increases when you drink. You can pee anywhere in the game, (you have a peepee). You can pee by pressing (default key is P). Don't let the bar get full or you'll get free bottom surgery. Don't pee on anywhere in the house that isn't tiled floor, (anywhere but the toilet, shower, and sauna) or else stains will accumulate on the floor. Or do, if you're into that sort of thing. HungerHunger is one of the needs that needs a specific item type to lower. You can eat any food item with the interact key. (default F) Juice is an impostor and will actually lower your hunger and increase your thirst. ThirstYou can drink any drink item with the interact key. (Default F) No drink item will cover a full meter of thirst in one chug. But one full case of beer will lower your thirst multiple times at the cost of making your screen all wobbly and distorted after 4 - 5 bottles. You can also stick your head under the kitchen faucet, shower tap, and wells to drink. (pressing Q helps with this) FatigueFatigue is one of the two needs that you cannot die from. When your fatigue meter is full, you will sporadically fall asleep for a few seconds. You need to shake your mouse to wake back up. As the time that your fatigue has been full gets longer, you will fall asleep more often, and you will need to shake your mouse more to wake up. StressOver time, the player's stress will increase. Once the stress bar reaches critical, the player will die of a heart attack. Smoking, drinking alcohol, chopping wood, the sauna, as well as swearing all lower the player's stress. It is advisable to pick up smoking, as it is the most effective way to lower stress. While the player can get addicted, cigarettes are cheap and the challenges posed by addiction are few. DirtinessDirtiness is one of the two needs that you cannot die from. Although dirtiness does LITERALLY NOTHING TO YOU. All that happens is you hear more fly sounds. Dirtiness can be lowered by swimming in the lake, by sitting in a sauna, or showering. Please note that; If you pee on the shopkeeper, (Teimo) he will tell you to p*ss off You can pee upwards to take care of *most* of your thirst but not all. Once a need bar goes red, do something about it QUICKLY A need bar going red means it is at 100%, and you will die at 200% (thanks to user Spee-Dee for telling me that!) Going out for more supplies Driving the boat to townTo get to town you will need the boat, which is down by the docks at the lake in front of the house. The boat has just enough fuel to get to the town, but not back. You should bring the Jonnez moped around the side of the house and put in in the boat. This will cause the boat to be slower and pull to a certain direction, and this can be balanced out with other items, but it is difficult. I also recommended to bring the crash helmet, because riding without it can result in the player being hit in the eye with a bee and dying, but in this case we are going at low speeds, and if you do die you will respawn very close at the church in town. To actually drive the boat, you need to get on the back seat next to the outboard motor and press (default key ENTER) to enter driving mode. To start the boat you grab the starter cable by holding left click on it and yanking it by moving the camera. It should take about 1-3 yanks to start. To switch the gears of the boat you need to left click or right click on the little gear selector on the motor. You should see that the little character in the corner changes as you fiddle with the lever. To get to town from the boat, go to the top left of the map from your dock. You should pass the island cottage and then be able to see the church tower, which you can use as a way point. If you want, you can pick up the kilju bucket from the cottage and put it in the boat. Once you get to the town docks, use the moped to go up to the store and buy all of your crap. If you put something on that little tray on the back of the moped, it will stay there unless you get some serious air. it might take a while to ferry everything back to the boat, so be patient. To drive the moped, lean left with [default key Q], find the fuel tap and left click. Then lean right [E] and left click on the kickstarter. After about 1-4 clicks, the moped should start up. If you tip the moped, hold down the clutch so it won't stall. Here is your shopping list. Things you absolutely need Car battery (the one in the garage is completely dead from the start) Alternator belt Spark Plug Box Two Headlight Bulbs Oil Coolant Brake Fluid x3 2-Stroke fuel some sausagesReccomended to get 2 - 3 extra oil filters. 1 or 2 cases of beer You can also get whatever you want here, but you start off with 3000 markka, so be careful not to spend too much. To get home, follow the same route back. Building your Satsuma https://my-summer-car.fandom.com/wiki/MY_SUMMER_CAR_GUIDE_2:_ELECTRIC_BOOGALOO#Building The colourful characters of Alievieska The town of Perajarvi and the surrounding lands have a fair few 'interesting' people to meet. An overview on the most relevant ones (sorry window guy!) This section is under construction, by the way. City-dwellers Teimo
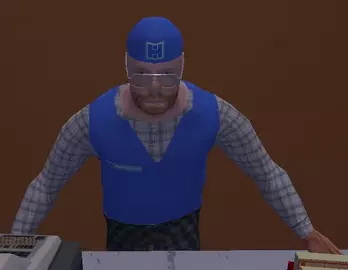
泰莫是当地的店主,同时经营着杂货店附带的酒吧。商店每周四补货。不要不小心撞到他的自行车,否则当天商店将无法营业,除非重新加载游戏。不要侮辱或对这个可怜的人做出不礼貌的行为!商店里还有一个邮箱,你订购的任何包裹都会送到这里。林德尔
林德尔在泰莫商店拐角处经营着一家车辆检测店。他看起来死气沉沉,“检测”萨苏玛时,只是用螺丝刀戳戳车底(!?)。弗利塔里非常讨厌他,甚至会打电话给你,用稀有酒水作为报酬,让你清空他停车场里的污水罐车。完成这个任务后,你将永久获得弗利塔里所有服务的40%折扣。关于如何给萨苏玛进行检测和上牌的说明,请参阅本指南的相应部分。【污水工】
他是污水处理厂的前台职员。在该厂倾倒污水时,你必须向他付费。他非常重要,你绝不能伤害他。苏斯基

她最初是亚尼(黄色汽车男)的女友。她的“任务”构成了《我的夏日汽车》的“故事”,不过这些任务都没有标记,大多数人都需要使用攻略(当然会有剧透)。周边地区,弗利塔里。
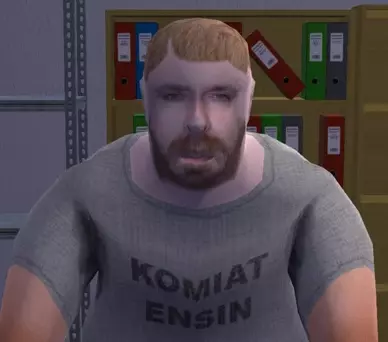
莱夫·弗利塔里是当地的机械师,在一个小村庄经营着自己的店铺。 当玩家的萨苏玛停在他的车道上时,他会对其冷嘲热讽,但仍会尽最大努力为其提供维修服务。我想这就是严厉的爱吧。 不知为何,他非常讨厌林德尔。他会打电话给你,提供稀有酒类作为报酬,让你清空他停车场里的污水罐车。完成这项任务后,你将永久获得他所有服务的40%折扣。 【托伊沃叔叔】(他有自己的章节)。 啊,是的,叔叔。叔叔有我们都想要的东西——哈约西科面包车和义夫(粪车)的钥匙。在他失去驾照之前,粪车工作(以及面包车)是无法使用的。该怎么办呢? 让驾照被吊销并获得面包车的简单步骤:1.在萨苏马车上安装驾驶座、发动机缸体或左拖臂。 2. 等待一段时间(不要重新加载!!)让货车生成。通常需要大约1-3小时的实际时间。 3. 当货车出现在叔叔的车道上时,敲叔叔的门,借钥匙。 4. 开一会儿货车。(不要加红色柴油。叔叔会非常生气) 5. 当你睡觉,或者把车停在某个地方太久,他会把车开回去。 6. 再等一段时间。从这个【检查点】开始,大约一小时不要重新加载。 7. 叔叔会丢失他的驾照,你可以发现他在他家门前抽烟,从一个无限啤酒箱里拿啤酒喝(我们永远不会知道他无限啤酒的秘密) 8. 成功 9.把货车装满你想要的免税柴油(别让警察知道) 叔叔是个臭烘烘的人(看看他就知道了)

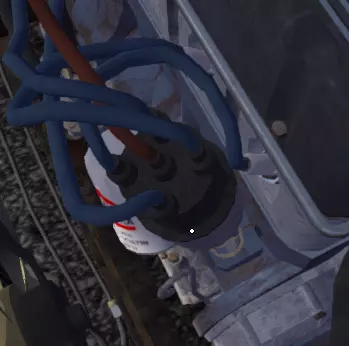
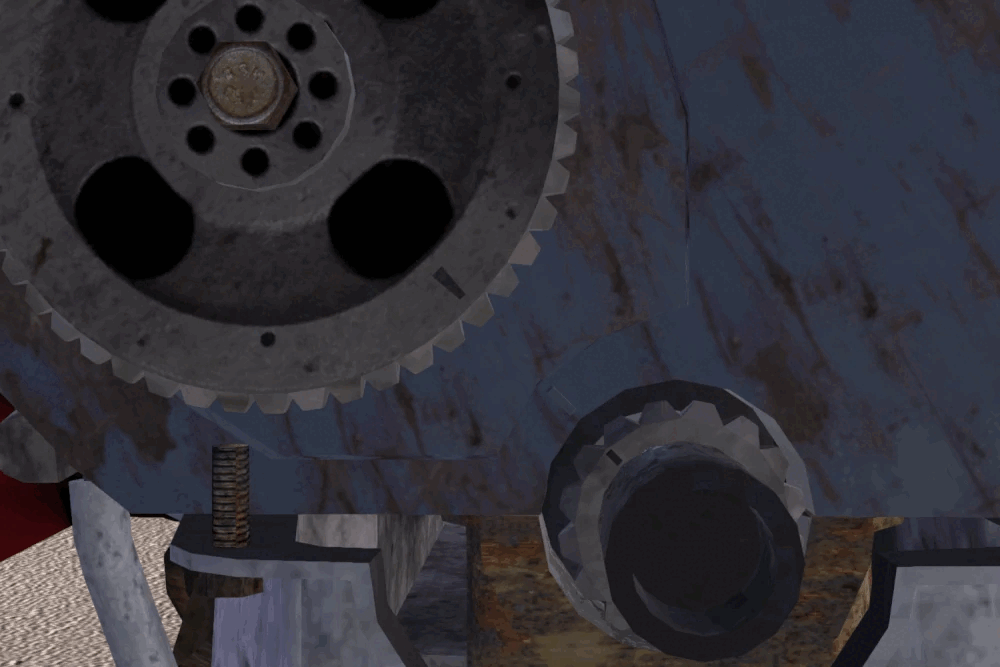
常见的萨托马问题 你的萨托马是不是出了什么怪事?可能是以下这些问题: 组装车辆时的问题 每次安装电线都会有火花声 这意味着电池已连接,而你在摆弄线路时不应该连接电池。你可能会触电身亡。 无法安装零件 这很可能意味着该零件需要先安装或不安装另一个零件才能安装。例如,半轴需要先松开前刹车上的14毫米螺栓才能安装。不过有些零件就是比较挑剔。 启动车辆时的问题 转动钥匙时车辆毫无反应 - 电池未安装/未拧紧,或者电池已没电,你需要去泰莫商店买个新的。- 起动机未接线/安装,或已损坏,需前往Fleetari处更换新起动机。 - 车辆其他部位接线不正确。 车辆能转动但无法启动- 确保燃油箱已完全固定且内有燃油。 - 火花塞未拧紧,使用火花塞扳手将其拧紧。 - 摇臂轴可能已损坏,这种情况下需前往Fleetari处更换新摇臂轴。 车辆能启动但无法持续运转- 火花塞未拧紧,使用火花塞扳手将其拧紧。 - 车辆未正确调校:将阻风门完全拉出,轻踩油门(不要红线!),等待温度表达到中间刻度,然后即可行驶。汽车启动后的问题 我听到高频的唧唧声——你的分电器未正确调校。调校说明: 松开分电器上的螺丝,在手持模式下向上滚动分电器,直到无法再向上滚动。启动汽车,向下滚动直到再次听到唧唧声。将分电器调整到刚好在听到唧唧声之前的最低位置。再次拧紧螺丝。 我听到尖叫声——你的交流发电机未正确调校。调校说明: 关闭汽车,完全拧下交流发电机螺丝。向下滚动鼠标滚轮直到无法滚动,然后向上滚动直到无法滚动。接着,向下滚动两次,然后拧入交流发电机螺丝。我听到咔嗒声——你的摇臂轴在启动汽车前被调整过(它是预调好的)。重置摇臂轴的说明:用螺丝刀将每个螺丝向下滚动20次以上,然后向上滚动8次。 我听到哐当声——你的凸轮轴没有正确调校。如果听到这种声音,请立即关闭汽车,否则可能会对发动机造成严重且昂贵的损坏。调校说明: 凸轮轴调校——拆下交流发电机、交流发电机皮带、曲轴皮带轮、水泵、水泵皮带轮、正时盖和正时链条。 - 拧松凸轮轴齿轮,但不要取下它。 - 使用滚轮将凸轮轴齿轮和曲轴上的凹口对齐,如下所示:
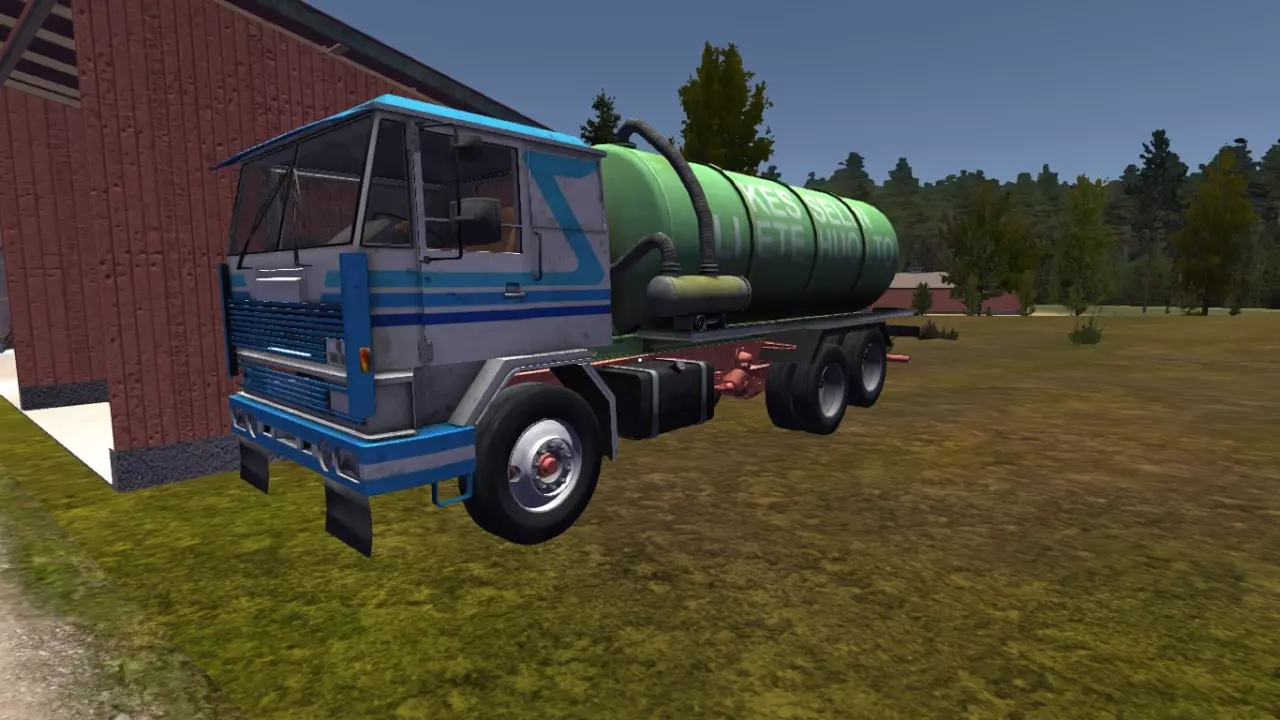
- 把所有东西装回去。 - 补充机油和冷却液,它们可能已经漏了。 车辆检查 为了参加拉力赛,并且不在每个警察检查站被开罚单,你必须对车辆进行检查和登记。 经过泰莫商店后左转,你就能找到检查站。它在工作日的上午8点到下午4点开放。车辆检查费用为325马克,给车辆上牌还需要额外支付500马克。这两项都可以在检查站办理。 我的车需要满足什么条件才能通过检查? 你需要: - 凯克梅特拖拉机上的警告三角牌必须放在萨苏马车内。 - 较新的轮胎 - 所有面板的车身损伤最小化。 - 没有损坏的部件。- 正确调校的化油器。 - 正确调校的摇臂轴。 - 正确调校的分电器。 - 良好的对齐(目测即可)。 - 工作正常的前灯(它们可能会烧坏)。 以下部件若安装将导致无法通过检查: - 钢制排气管头段 - 竞技排气管 - 竞技消音器 - 光头胎 - 拉力轮胎 - 氮气加速系统 - 竞技化油器(双化油器仍可使用) - 拉力方向盘 - 长螺旋弹簧 - 豪宅内的原厂轮胎(磨损过度无法通过) 通过检查无需安装以下部件: - 后面板或低音炮面板 - 后排座椅 - 副驾驶座椅 - 时钟仪表 - 挡泥板 - 轮毂盖 - 收音机 - 格栅 排放法规 确保使用原厂或双化油器时的空燃比为14。7分即可通过检查。你可以使用Fleetari的【引擎调整工厂规格】让他代劳,也可以自己免费调整。 如何调校车辆以通过检查: 拿一把螺丝刀,将化油器调校螺丝向上拧44圈,然后向下拧7圈。这样会将空燃比设定为14.7,不过如果你安装了空燃比表,它会显示14.9。通过检查后,你可以随意调校车辆,但再次检查时需要重新调回该设置。 重新检查 萨摩亚每28天需要重新检查一次。上次检查后的第21天,检查店的工作人员会寄信通知你再次前往。现在你有了车牌,只要具备其他所有必要条件,就有资格参加拉力赛,并且在警察检查时不会因车辆未注册而被开罚单。 金钱篇1:稳定工作 金钱是《我的夏日汽车》中必不可少的一部分(这还用说)。游戏中使用的货币是旧芬兰马克,其兑换比例约为3.68单位2002年芬兰马克兑换1单位2025年加拿大元。 工作是《我的夏日汽车》中除拉力赛和圣诞节礼金外唯一的赚钱方式。 可重复任务:这些任务可以无限次完成。 污水抽取:污水抽取就是……嗯……抽取污水。你需要那辆 poop truck(基富牌卡车),当你接到电话时,地图上会出现标记。前往那里,抽取他们的污水就能获得报酬。注意,粪便卡车有近程和远程两种模式,可通过默认按键R切换。你需要向叔叔借Gifu,这有点麻烦。只有当叔叔在家,或者叔叔的驾照被吊销时,你才会接到粪便运输的工作电话。向叔叔借到Gifu后,它会在镇上的废物处理厂生成(从现在开始我通常会称这个镇为“佩拉亚尔维”)。 要抽取污水,你需要绕到卡车后面,拿起软管。然后打开污水井的盖子(注意不要掉进去)。确保软管大部分都伸入井中,确保卡车引擎正在运转,打开仪表盘上的“液压泵”开关,然后等待污水抽完。当水井抽干后,收起水管就能拿到钱了。大概能有1200马克。
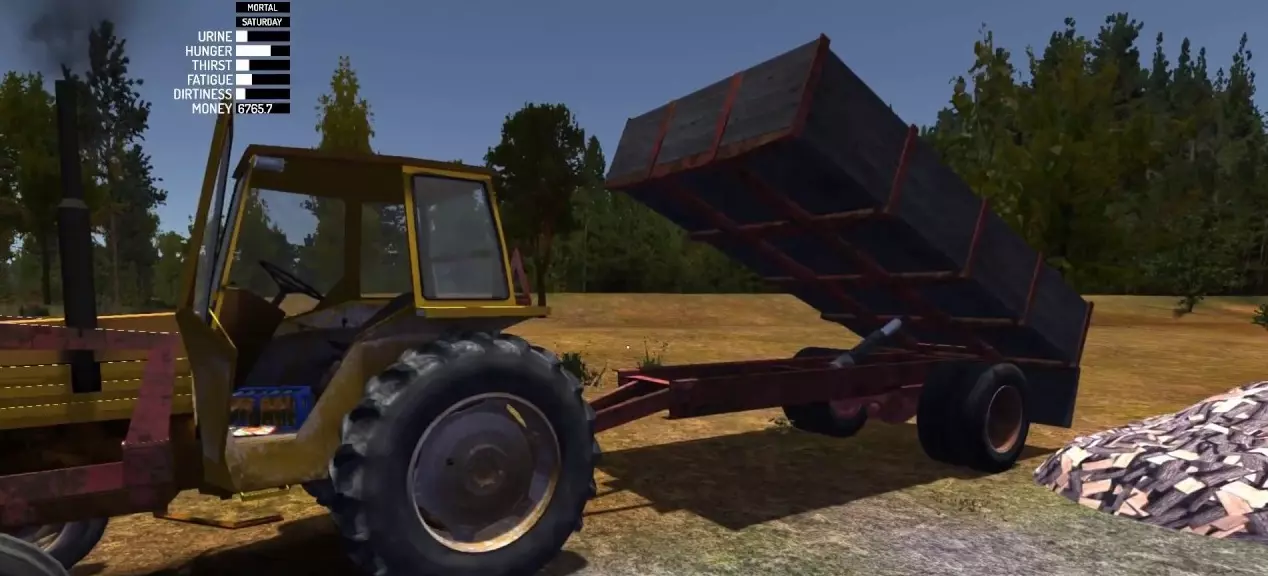
送柴任务 送柴任务非常简单但耗时较长。当你接到电话后,前往你家之后第一个车道旁的小谷仓,你会看到一辆名为【Kekmet】的拖拉机,以及一个可以挂在拖拉机上的拖车。那里还有一个劈柴站。 劈柴步骤:拿起斧头,按默认键F装备。瞄准木头时右键,然后左键点击木柴堆补充劈柴材料(如果劈柴台无法补充材料,可能是因为台上已有木柴块)。将劈好的木头放入拖车,直到完全装满。当木头堆的纹理不再升高但仍能继续放入木头时,就表示拖车已满(这需要一段时间)。然后将拖拉机倒向拖车。希望能成功连接,之后你就可以出发了。只有一户人家订购木柴,你可以通过以下路线到达: 1. 过了火车轨道后的十字路口左转。 2. 在四路交叉口再次左转。 3. 他在右侧的第二栋房子。 拖拉机有低速和高速档位,可通过【默认按键R】切换。而且它慢得... 要从拖车中倾倒木柴,需先点击打开后挡板,然后在座位左侧,紧挨着座位的地方有一个标有【后液压装置】的操纵杆,左键点击该操纵杆,并将拖拉机挂入空挡。接着将手动油门调至最大,拖车就会开始倾倒木柴。如果它没有上升,你可能需要尝试从下方推动它,抬头并按下(默认按键J)伸出推臂。完成这些后,右键点击后部液压按钮两次,然后再次踩油门。拖车应该会开始下降。完成后出去领取你的钱,大约是3200马克。
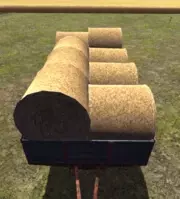
其他可重复任务(未详细列出) 任务 任务发布者 要求 报酬 帮奶奶购物 奶奶 任意汽车、香肠、糖、牛奶或鱼(生或烤) 最高1000马克 投递泰莫的广告 泰莫 一堆广告和一辆汽车 每投递1份广告25马克(共700马克) 送尤科回家 尤科 任意汽车(除了轻便摩托车、义夫和克梅特) 50-3000马克 开车送奶奶去教堂 奶奶 萨摩、鲁斯克或芬代尔 一个Steam成就,下次送餐额外500马克 摘草莓 草莓小贩 浆果盒 每满盒40马克 金钱部分2. 一次性任务 这些任务每个存档文件只能完成一次。 干草捆回收:托瓦卡会联系玩家,要求收集散落在游戏地图各处的所有干草捆并送到他的棚屋。此任务需使用拖拉机(凯克梅特)及其拖车完成。不能用凯克梅特的叉子叉干草捆,必须像放置托盘一样将其装载。有些干草捆用塑料包裹,有些则没有。将干草捆放入拖车是一项繁琐的任务,寻找它们更是如此。完成此任务时,一箱啤酒会帮上大忙。它不只是用来喝的,还能对干草捆施加巨大的力量,可轻松用于装载和调整干草捆。使用一整箱啤酒效果最佳。托瓦卡会在你送达后支付3500马克。 你可以在干草捆侧放时,按住【C】键蹲下,然后按【J】键伸出手推动干草捆来滚动它们。 这样拖车可以装下八个干草捆。
联合收割机取回任务:在向托赫瓦卡交付干草捆后,他现在信任你,并让你将他的拖拉机运回他的农场。要小心,因为拖拉机非常非常慢,高速公路上的汽车会把你撞下路(它们似乎不知道怎么刹车)。收割机位于地图上的这个位置,而他的农场与收割机的生成位置几乎在地图的两端。祝你好运,想办法启动拖拉机吧,我可不会。成功交付后,托赫瓦卡会支付你1500马克。
其他目前懒得添加到指南中的一次性任务: 【任务】——【发布者】——【要求】——【报酬】 倾倒废料至检查站前方——Fleetari——装有废料的Gifu——10瓶酒,Fleetari商店40%折扣 车辆残骸回收——Fleetari——Gifu——每辆车1200-4500马克(总计10900马克) 老虎机盗窃——自己(发生在Teimo商店)——带拖车钩的任意车辆、螺丝刀——1200-11000马克(需支付约3000马克赔偿破碎的窗户) 帮助Jokke搬家——Jokke——Hayosiko(面包车)最佳,Ruscko和Kekmet+拖车也可——4000-6000马克 金钱部分3. moonshining 厌倦了商店里买的劣质啤酒?别担心。你可以把自己酿的酒装进那些傻乎乎的青蛙汁容器里。你也可以把它卖给当地的两个酒鬼之一!(你是另一个)。 kilju是《我的夏日汽车》中可以酿造的一种自制糖酒。你可以通过卖给Jokke来赚钱。
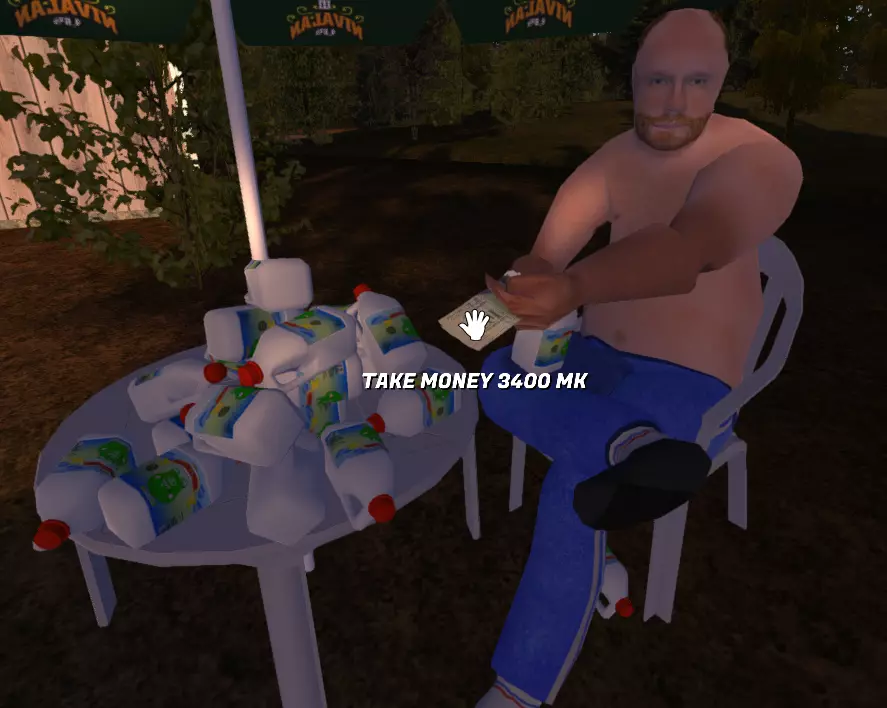
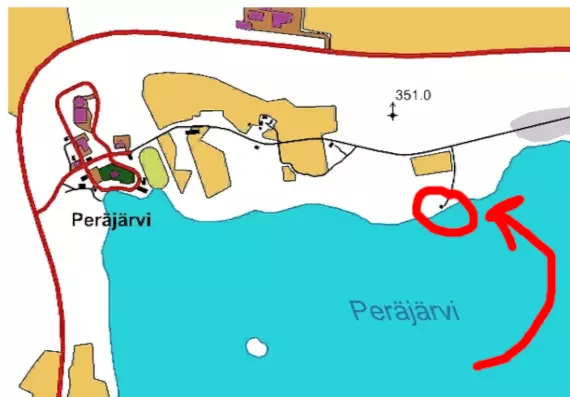
一桶完美的基尔朱正在出售 酿造基尔朱相对简单,只需要耐心。酿造基尔朱的步骤如下: 1. 乘船前往岛上的小屋(具体方向可参考“外出获取更多物资”部分),带回基尔朱桶。 2. 准备一些果汁瓶、糖和酵母。 3. 取下桶盖(就像拆卸汽车零件一样),将桶拿到淋浴处并打开水龙头,把桶放在流水下接满水。 4. 桶完全装满后关闭水龙头,此时加入原料:向桶中放入六袋糖和一包酵母。然后,像安装汽车零件一样把桶盖盖回桶上,等待基尔朱发酵。 趁基尔朱发酵的时间,把你所有的果汁都喝掉,把瓶子腾空。 定期打开桶盖检查基尔朱的发酵情况。发酵完成后,所有酵母会在桶底形成一层棕色沉淀,上面则是清澈的液体。那就是我们的宝贝! (检查时不要把桶盖开太久,否则会产生过多醋,影响口感,导致尤科出更低的价钱收购这种酒) 把你那非法的自酿月光酒装进那些果汁瓶里,然后带到尤科家去。 尤科的房子在地图上的位置在这里:
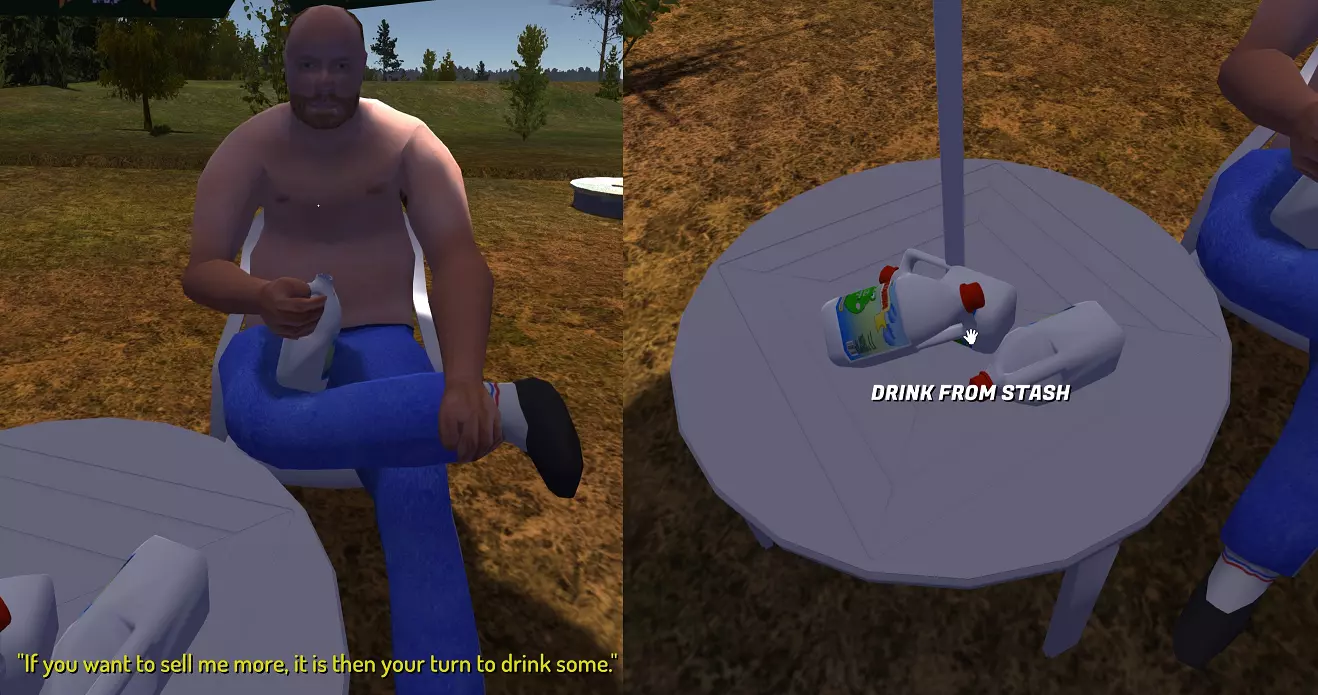
当你到达他家后,需要把所有要卖的基尔朱酒瓶放在桌子上。在最近几次更新后,约基现在会在你堆放更多待售酒水时,让你陪他一起喝。这就带来了一个问题:如果基尔朱酿造得当以实现价值最大化,它会是一种相当烈的酒。希望你擅长酒后驾驶,否则你就得步行或等堂兄佩纳来接你了。
看看乔克吧。我敢肯定他永远不会遇到什么坏事,尤其是不会栽在玩家手里。你肯定不会那么做的,对吧? 金钱第四部分:赌博成瘾 芬式二十一点 芬式二十一点是二十一点的芬兰变种。两者玩法非常相似,但有以下两点不同: 1. 每轮开始时发两张牌,而非一张。这使得在初始发牌阶段就可能分出胜负。 2. A牌的点数永远为1,而非14。这降低了在首轮就结束游戏的概率。 你可以在湖边他的小屋里和【芬式二十一点赌徒】一起玩这个游戏。
沿着小镇外的土路走,经过大农场后的第二栋房子就是。 玩芬式纸牌 要想玩芬式纸牌,需在20:00(晚上8点)至08:00(早上8点)之间前往小屋,坐在屋内的桌子旁。初始最大赌注为150马克,每赢一局增加50马克,最高上限为4500马克。输一局会增加压力值,赢一局则会降低压力值。建议带上香烟(或啤酒)来控制压力水平。 当赌注超过4500马克时,你就是在拿萨托马汽车(Satsuma)做赌注。如果输了,你将永久失去萨托马汽车的使用权。如果赢了,你将获得庄家的汽车(鲁斯科,Ruscko)。他的车相当有用,但车上有一个活跃的黄蜂巢需要处理。 如果你赢了汽车赌注,现在就可以拿你的房子来下注了。如果你输了,就会永久失去对自己房子的使用权,进而失去房子里的所有东西。如果你赢了,庄家会怒气冲冲地冲进湖里。获得小屋的使用权后,你现在可以在屋外厕所存档,也可以在那里劈柴。在长椅上睡觉也是一个选择。如果你赢了庄家的房子,就不能再玩芬兰特技扑克了。 虽然小屋的位置很好,但由于没有冰箱和电话,很难永久住在那里。此外,由于鲁斯科很容易被偷,建议还是选择赌钱。 小屋还没有: - 灯 - 电视 - 桑拿房 - 你的邮箱等 芬兰特技扑克策略 一张芬兰特技扑克策略表,展示了针对任何手牌的最佳策略。这并不是每一手都能保证赢,毕竟这是赌博。
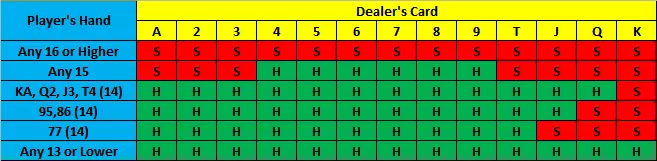
注意:实际上游戏对庄家有利。你很可能会输钱。最佳策略是: 存档 下注50马克,直到下注金额达到4500马克 存档 下注最大金额,直到赢取你想要的金额。如果破产就重新加载存档。 鲁斯科是庄家的车,可以通过玩芬式纸牌赢取。
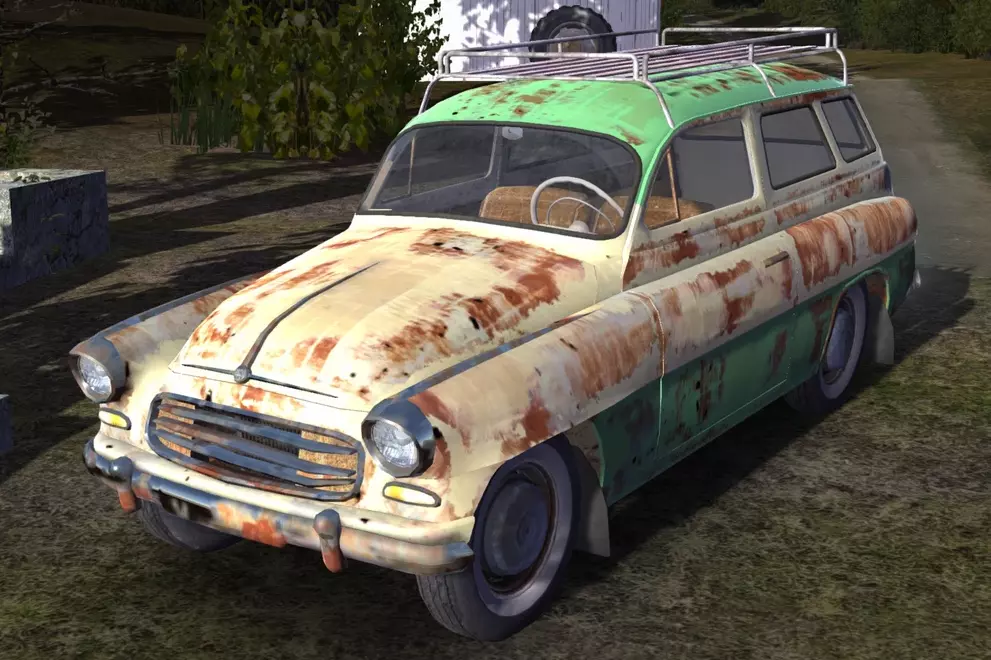
车内有一个活跃的黄蜂巢。若在黄蜂活跃时长时间待在车内,玩家将会死亡。 清除黄蜂的方法有两种: 1. 打开副驾驶车门(黄蜂位于副驾驶侧),尽快用灭火器向蜂巢喷射。为确保安全,可将灭火器内的灭火剂全部喷向它们。这样可以杀死黄蜂,使车辆恢复可用状态。 2. 使用大型车辆(如Kekmet或Gifu)将该车辆沉入湖中约30秒,然后再将其拖出。注意不要让车辆在湖中滑得太远,否则将无法找回。拖出后,车辆即可正常使用。偷取鲁斯科 所需工具: 大锤(在家中车库找到) 螺丝刀(在工具箱中找到) 灭火器(在泰莫商店购买)或大型车辆(沉入湖中)以清除黄蜂 偷窃步骤: 1. 开车到经销商家。 2. 用大锤砸开他家的车库门。 3. 消灭黄蜂(使用灭火器或将其开到湖里)。 4. 拿出螺丝刀并尝试启动汽车(这需要多次尝试,并非每次都能成功)。 5. 开着你的新车离开! 6. 立即加油(油量几乎为空)。 如果你是偷取鲁斯科而非从经销商处赢得它,你必须随身携带螺丝刀才能启动它(如果你赢了,他会给你一把钥匙)。不过偷东西并没有什么实际后果,因为警察和经销商似乎都不在意。 修理你的萨苏马 如果你开萨苏马有一段时间了,你可能已经注意到,它简直就是“破车”的代名词。幸运的是,游戏提供了多种方法来修理你的“破苏马”。 弗利塔里修理店 当地的机械师弗利塔里在洛普村有一家店。
Fleetari Repair Shop His shop is open Monday - Friday and from 0800 - 1600 game time. Fleetari's repair services Service Cost (mk) Wheel alignment 445,5 Brake check and repair 1107 Repair of broken engine parts* 2623,5 Engine adjustment factory spec 1161 Engine tuning 3658,5 Windshield replacement 1899 Suspension straightening 8280 *Fleetari will only repair engine parts that are detatched from the Satsuma and in his office. It is generally a better idea to fix the Satsuma yourself, as it is much cheaper. Although, some things like installing the roll cage and fitting tires to rims can only be done at Fleetari's. Buying new (stock) car partsIn order to purchase new stock parts from Fleetari, any part you would like to purchase must simply be detached from the car. (No more trying to find "piston3" that ejected itself to space on the highway). On the shelf to the left of the front door should be a new one available to buy. Click on the new car part, and a few seconds later it should appear on his desk for you to take home. New car parts are usually expensive, so a good idea would be to save some money just in case your Satsuma decides to blow up. The FerndaleIf the repair job requires your Satsuma to be at the shop (ie. bodywork), Fleetari will lend you his muscle car (the Ferndale). Be careful driving the Ferndale as it is rear-wheel-drive and has quite a bit of power. A good rule of thumb is to never floor it in the Ferndale. It also wobbles at speed like the van. If you do not return the Ferndale to Fleetari, after a while he will call you and say; "It's Fleetari here! You moron, bring back my car or I make sure your šhit bucket car doesn't see another day!" If you don't do anything about it, he will call you three more times. After the fourth call, upon sleeping in a bed Fleetari will dump the Satsuma in the swamp near his shop. In the last place the Satsuma was left before it was stolen, there will be a note that tells you to 'smell a long šhit.' Flattering. Once you have borrowed the Ferndale for the first time, you will always have the keys and can borrow it at any time. If the Satsuma is not being repaired by Fleetari, he will not call you to bring back his car. Generally, it's a good idea to return the Ferndale to Fleetari's shop once you are done with it. The Police, crime, jail The Police in this game will monitor every breath you take, every move you make, every bond you break, every step you take, they'll be watching you. Yeah, it's a very very mad world... and it's never gonna give you up. The Police often like to nest on these certain spots on the highway shown here: By the wheat fields near the grain processing plant. Between the Peräjärvi and Rykipohja turnoffs. On the stretch of the highway between Rykipohja and the dirt road. (Recently, lay-bys were added in these spots so that one does not have to risk blocking traffic and causing an accident with NPC cars). There is a 50% chance of the Police spawning (at any location) on the weekend (Friday through Sunday), and a 10% chance of the Police spawning (at any location) during the week, (Monday through Thursday). Also, the checkpoint will not move in the same game session. If there is no checkpoint at a location now, there will not be a checkpoint there for the rest of the session and you can speed through there all you want. When you come across a police checkpoint, stop and do the breathalyzer test, (it is possible to do through the window of the car), and wait a second. If he reaches behind him and pulls out a piece of paper, that means that you have received a fine. You can either pay now by clicking on the button, or press ESC (escape) to exit the fine menu and it will appear on the kitchen counter. Only if you don't have enough money to pay the fine, should you opt out of paying immediately. The game will give you about one in-game week to gather enough money to pay the fine, and then the police will come to arrest you. You can pay an unpaid fine on the counter by clicking on it. The way the fine amount is determined is through your "player net income" which you can find in MSCeditor under "player". So basically, (just like in real Finland), the more money you make, the bigger your fines will be. If you have a lot of money and then suddenly don't the fines will still be big right after. (sometimes). Even income from kilju and gambling is counted. Ways to get arrestedAs of the 29th of May, 2020 update, I've had to add this section because there are now a lot more things you can get arrested for. These are: - Running over a roaming NPC is manslaughter and results in a 10 day jail sentence if caught. - Running over a rally spectator is manslaughter, unless you are racing the rally. - Dipping out of the highway stop when you receive a fine and evading the cops will result in a 3 day jail sentence if caught. - Flipping off Pena resulting in a crash in which he dies nets you a 5 day sentence. - Leaving traffic fines unpaid for an extended period of time will result in a one day sentence for every three fines (minimum 3 days). The maximum sentence is 999 days. JailJail sucks. If you accidentally run someone over, that's a 10-day sentence. 10 in-game days is 20 hours of waiting around with the game open making sure you don't die. While it is possible to increase fatigue with the TV test screen, this is only available at night. Additionally, saving does not skip time while incarcerated.
监狱里唯一能让你自娱自乐的东西。 逃避监禁判决:当你犯罪后,下次在床上睡觉时,警察会出现在你家和泰莫的商店,如果你靠近他们就会被捕。你可以跳上Jonnez摩托车直接从他们中间开过去,因为他们没有碰撞体积。出于某种原因,他们无法在Jonnez摩托车上逮捕你,你仍然可以进入自己的房子,但使用泰莫的商店可能会遇到一些麻烦。
警察在泰莫商店的入口处看守。 如果你在接受警方判决后越狱,你的监禁天数将暂停计算,直到你返回监狱服完剩余刑期。可以使用MSCEditor来消除罚款和监禁天数,但在减少刑期时需要注意以下几点: 【监禁天数由MSCEditor中的变量“numberofbools”计数】 【在监狱中时将此变量设为0会导致存档出现错误,不建议这样做】 【最佳做法是将该变量设为1,并将疲劳值调至最大以睡过这一天】 作为逃犯,你可以在小屋里通过烤鱼和使用水井实现自给自足,因此理论上你可以住在那里,并通过与文特牌庄家赌博来支付罚款。不过,一旦警察出现,罚款就无法缴纳了。不建议以逃犯身份生存,因为游戏的大部分内容将无法访问。 注意:可以通过拿着外部物品然后在你家或泰莫家冲向警察,将物品带入牢房。当你在牢房中醒来时,你仍然会拿着该物品,这可能会导致此情况。 升级你的萨苏玛 就像任何优秀的汽车游戏一样,你可以为你的汽车安装许多提升性能的改装件,还有车身套件以及一些不太正规的零件。
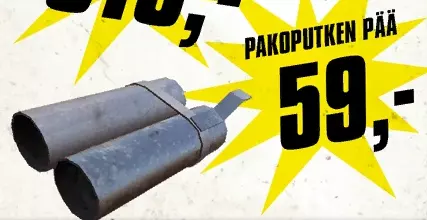
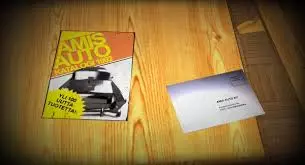
一个假的双出口排气管尾喉。 商品目录 商品目录在你车库的桌子上。这是一种为你的萨托马(Satsuma)邮购零件的方式。点击目录打开它,然后使用底部的箭头翻页。当你勾选完所需物品并退出目录后,一个信封会出现在你面前的桌子上。 你需要将这个信封带到泰莫(Teimo)的商店,放进门边的黄色箱子里。大约游戏内一周后,你会接到泰莫的电话,通知你订购的零件已经到货。泰莫商店的柜台上会出现一张支票。支付这张支票后,你的订单物品就会出现在商店侧面的楼梯上。
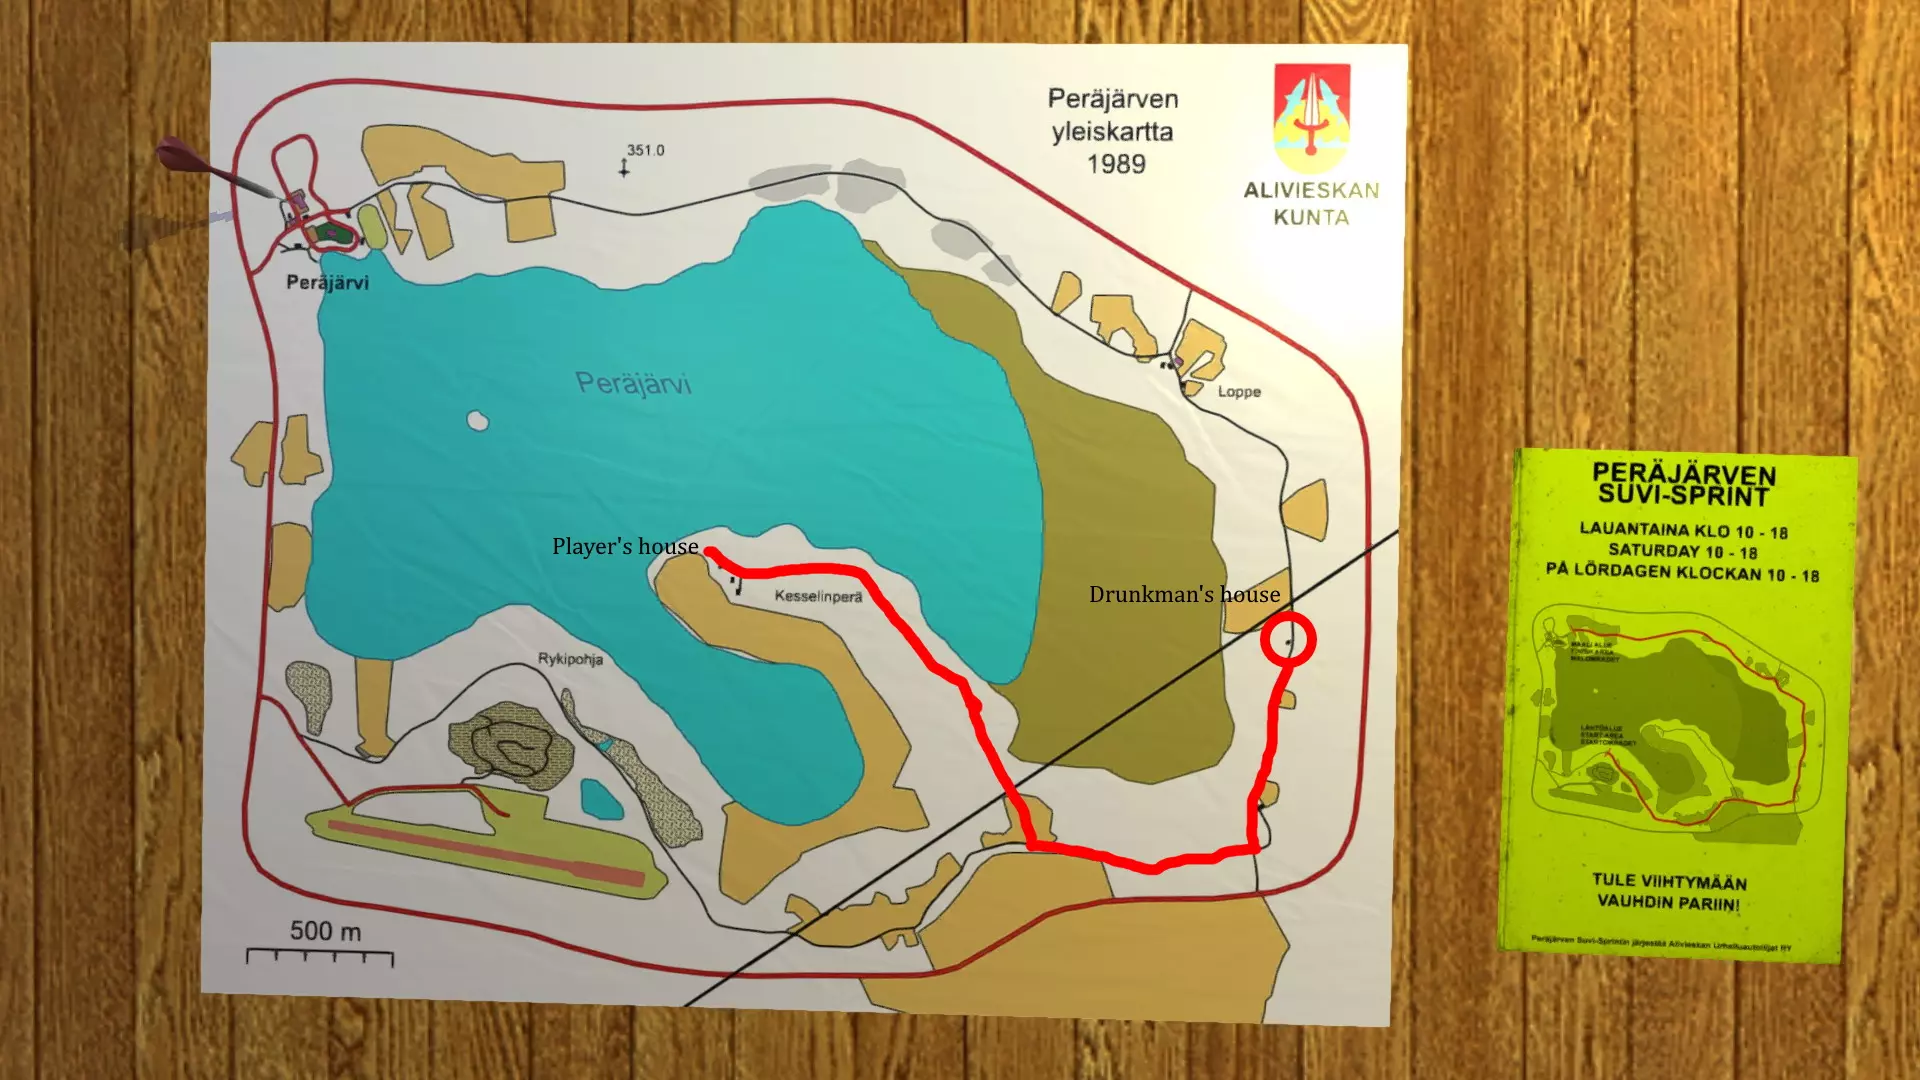
Some parts may need to be wired in, in this case always remember to remove the battery before messing with the wiring (unscrew the negative side (closest to the front of the car) first!). Fleetari's performance upgrades Upgrade Cost (mk) Roll cage install 4950 Roll cage removal 711 Final gear change* 1215 *Available gear ratios: - 4.286 (default) - 3.700 - 3.900 - 4.110 - 4.415 - 4.625 A higher number here means less top speed but more acceleration, and vice versa. Fleetari can also repair dents, paint your car, paint and polish your rims, as well as fit tires to rims. Rally (Peräjärvi Suvi-Sprint) The Peräjärvi Suvi-Sprint (Peräjärvi Summer-Sprint) is a rally consisting of two stages. To participate, show up at Fleetari's tent by the School, (a big brown building down the road from Teimo's) on Saturday from 8:00 to 18:00. Requirements for entry The roll cage is installed in the Satsuma The racing seats and harness are installed in the Satsuma You are wearing the racing helmet while registering (it can be taken off after registration for better visibility) The Satsuma does not have racing slicks installed. You are not drunk (you can get drunk after registration if you'd like) 500 mk for the registration fee. How to get all of the things listed above The roll cage can be installed by Fleetari for 5500 mk The racing seats can be bought from the catalog for 5095 mk, and are installed just like the normal seats with four 9mm bolts. The racing harness can be bought from the catalog for 645 mk, and are installed onto the driver's side of the roll cage just behind the racing seats with four 8mm bolts. The racing helmet can be found in your bedroom and is put on with (default key F), you can take it off by looking down and pressing (default key F) again. To not get drunk you must not drink beer, kilju, booze, or vodka. 500 mk can be gained by moving your ašš off of the couch. Doing the rallyThe first stage runs from the registration tent along the dirt roads to the strawberry field near the dump at Rykipohya, while the second stage is the first stage in reverse. After the first stage, head along the highway by going straight after finishing the stage, and rejoin the paved road and then turn right on the highway and head back to Peräjärvi. Park your car in the school parking lot, (the parc ferme area), and wait for Sunday to register at the tent for the second stage. Use the same route you used to get to Peräjärvi last night to get to the second stage tent, as it is at the finish line for the first stage. The second stage is the same as the first, but in reverse. Pro tips Use a wheel if you can, but don't use a controller, because the controller support sucks. Practice the track throughout the game week leading up to Saturday to get a feel for the track. Remove the helmet after registration for better visibility Save before starting the rally on Saturday, and once your car is in the parc ferme area at the end of the first stage. Bring food and drink with you, and the sofa/satsuma back seat/the gifu so you can sleep in the parc ferme area. This avoids having to go home with another vehicle and possibly missing registration time for the second stage. Get the shortest gear ratio from Fleetari's, (4.625), as it improves acceleration, and only use fourth gear on the straights. You won't need to worry about top speed. The rally tires can be fitted to wheels by Fleetari for 3200 mk, either leave your wheels in his office or leave the Satsuma in his garage with the wheels you'd like to fit them on. They are not required to enter, but they add grip on the dirt roads. The best ways to make your experience better Below are two things that you can do to improve the quality of life in the game: Get the wristwatchOn Saturdays, a man can be found behind the dance pavilion at night. This man is sporting a rather nice watch, which you can steal. Punch him with (default H) until he is knocked out. He will also drop a bottle of booze. If you get punched too many times, you will get knocked out. The wristwatch can be equipped by looking at it and pressing F. He will also appear in Pub Nappo (at Teimo's) and will fight you for it if you enter the pub. If you lose the watch, you can fight him for it at the pavilion again. The watch is quite nice to have, although definitely not a necessity. If you don't have the watch, there is a wall clock inside of Teimo's, and in the kitchen at home. Keep a vehicle at Teimo's and Fleetari'sThe Ferndale works best for keeping at Fleetari's as once you borrow it for the first time you will always have the keys. Any vehicle should do for keeping at Teimo's, although I reccomend the Gifu because if you die in a car crash it is close by for towing whatever vehicle you crashed back home. Ranking Each Car There are 8 drivable cars in My Summer Car. In this section I will give them each a score from 0 - 40. This is totally not just a ripoff DougScore. The safety rating is from the speed where you die in a crash. (with STOCK seatbelts ON.) SatsumaThe Satsuma is the car you build in the game. Handling - 7 Speed - 8 Safety - 5 Practicality - 5 (can sleep on the rear seat, but if you crash the car parts all fly off)Satsuma gets a score of 27/40. GifuThe Gifu is the poop truck. Handling - 3 Speed - 4 Safety - 9 (is immune to all traffic crashes) Practicality - 4 (has a bed in the back)Gifu gets a score of 20/40. HayosikoThe Hayosiko is the blue van that can be borrowed from Uncle. Handling - 6 Speed - 6 Safety - 3 (death wobble) Practicality - 10 (can hold the sofa, half the Satsuma parts, a bunch of beer, the Satsuma rear seat, a bunch of empty Kilju bottles, and the Jonnez (mini bike) all in the back.)Hayosiko gets a score of 23/40. JonnezThe Jonnez is the small mini-bike known as the "death bike" or the "f*ckboi bike". Handling - 3 (flips onto its side half the time) Speed - 4 (tops out around 80kph) Safety - 2 (have to wear a crash helmet now) Practicality - 3 (has a little tray on the back that can hold some stuff)The Jonnez gets a score of 10/40. KekmetThe Kekmet is the tractor/forklift. Handling - 4 Speed - 1 Safety - 6 (you're almost never going fast enough to have a crash) Practicality 6 - (you can flip the Gifu with it which is normally almost impossible by hand, and tow the trailer.) The Kekmet gets a score of 17/40. FerndaleThe Ferndale is Fleetari's muscle car that he will lend to you while the Satsuma is in the shop. Handling - 2 Speed - 5 Safety - 1 (it also has the death wobble, (thanks to user garfield[FIM] for telling me that!) It happens over around 110 mph in the Ferndale) Practicality - 7 (really big trunk that if you're careful you can fit the Jonnez in, automatic transmission, and large back seat for more BEER!) The Ferndale gets a score of 20/40 RusckoThe Ruscko is a car that can be won by playing ventti (see "Making Money" for more info) with the ventti pig. but be careful betting for it, you will lose the Satsuma. Or you can just break into his shed and steal it with the screwdriver. But be careful before driving it you have to get rid of a wasp's nest in the passenger side of the car, either by blasting it with the fire extinguisher, or submerging it in the lake for 15-20 seconds. Handling - 3 Speed - 4 Safety - 2 Practicality - 10 (there is a built-in bed in the back, huge wagon trunk with no back seats for lots of cargo, and a roof rack which is the perfect width for more BEER! The Ruscko gets a score of 19/40 Arvo-AlgotsonA combine harvester owned by a farmer named Tohvakka. Handling - 8 (rear wheel steering at low speeds). Speed - 1 (tops out at 11 kmh). Safety - 5 (you'll never be going fast enough to have a fatal crash, but beware of AI drivers rear-ending you on the highway). Practicality - 2 (can't hold much and is very slow and complicated to start). Changelog ChangelogAll changes since December 31st, 2020. [12.31.2020] - Added changelog. - Finished section on Kilju. - Added section on the Rally. - Added the Arvo-Algotson combine harvester to [Ranking Each Car]. [01.10.2021] - Fixed mistakes in the Rally section. 02.10.2021 - Fixed mistakes in the Ranking Each Vehicle section. - Added section on the combine harvester delivery. 08.18.2021 - Fixed some formatting issues. - Added section on getting your car inspected. 04.07.2022 - Added a few sentences under The Police. - Revised almost the whole guide and fixed some of my sloppy writing from three years ago. - Celebrated the guide's third birthday. 08.02.2022 - Revised some old sections - Added jobs to jobs section. 08.04.2022 - Split the Satsuma repairs/upgrades section into two sections - Re-wrote some things - Added some pictures 08.05.2022 - Added section on common Satsuma problems - Added some things - Took the guide out of 'Early Access' 11.18.2024 - Remembered the guide existed and did a few things, like revising my awful writing to less awful writing. Fun fact :PThe guide's thumbnail/profile picture is a stock photo of this bridge located in Arrowhead Provincial Park near Huntsville, Ontario. The photo below I took myself.
2024年11月18日