换一换
换一换 


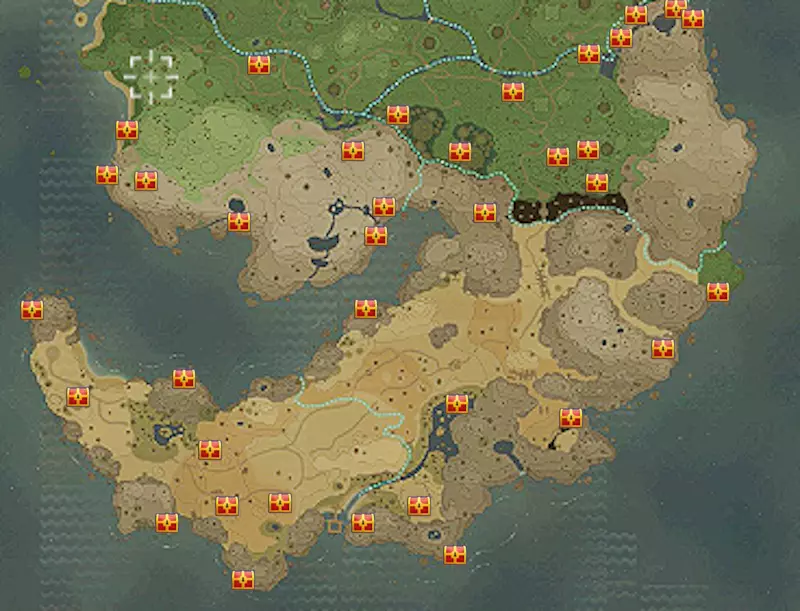
The endgame knowledge for all Lives! This guide contains: * General Life Tips * Best methods to grind EXP * Best equipment & skills * Best DPS moves * Damage Formula * Explanation to Elemental Damage * Reference for the "All Lives" skills Introduction This guide covers mostly the tips & tricks especially useful for late-game players. If you want to be fully prepared for the eventual DLC, or simply want to min-max at any point, you've come to the right place! General Life Tips Regardless if you are investing into all Lives, it is still recommended to obtain all the licenses as they allow you to fast-travel to Life Master via the Life menu You can skip some missions when ranking up to Apprentice, Adept, and Expert. Take Expert for example, you can skip a "big" mission or 2 "small" missions at most, so you can simply do all other ones, instead of checking in with your Master once every few missions For different Lives, benefits from reaching max ranks can vary. Most notably, all combat Lives would have access to their strongest moves, whereas Blacksmith and Carpenter can make the strongest weapons. However, the benefits are somewhat minimal for other Lives so I would give them lower priority Universal Tips Skill Board Advice I recommend prioritising skills in these orders: Skills not listed below can be learned whenever you want Combat: EXP -> ranking up -> Useful Moves -> Element DMG -> Charge DMG -> Charge Time -> ATK -> Crit DMG (only unlock the matching element for weapons you're using) Gathering: EXP -> ranking up -> Useful Moves -> Charge DMG -> Sweet Spot DMG -> Charge Time -> ATK -> Crit DMG -> SP Crafting EXP -> Extra Mats & Remake -> [Type] Crafter -> Action Speed -> Stats Instead of learning each skill one by one, you can press [ZR] to immediately unlock all other skills leading to it To reset Skill Board, go to the Guild Office (Eternia Village or Base Camp), then interact with the talking flower and have all the skill points previously spent be refunded It is recommended to reset the board for both Combat and Gathering Lives as soon as you hit Hero ranks, since half of the movesets are suboptimal IMO (see below) and I recommend reserving points for other more useful skills "Unlocked" skills stay unlocked after resetting the board. This means if you learn 50 less impactful skills first and unlock a powerful skill that requires 50 other skills, you can immediately reset the board and still retain access to said powerful skill Best Methods for EXP Before you start, make sure to equip Spec with two EXP Gain +10% on everyone! Besides the Flutter Charm (from Pre-order bonus), Specs are the only type of equipment to be able to have the "EXP Earned" skills. This means all you need to craft are at least 4 pairs of such Specs - 1 for yourself, and 3 are shared between your 3 followers or your 2 crafting helpers. (I crafted 2 extra pairs so I don't have to swap them as frequently) Recommended Methods for Endgame Semi-AFK Methods for all Lives Gate-hop between Viridia Plateau and the Wicked Mandrake in Spirit Road, then let your 3 farmer buddies do the farming. (You may sit back and watch TV while enjoy their unpaid labor) Go to Moltana Wastes and look for the Red Ore Deposits, then let your 3 miner buddies do the mining. Find a high-level Treasure Grove with farming plots, preferably near the entrance and contains Shadow Carrots (for Cashnuts), then let your 3 farmer buddies do the farming. Combat Lives All: Redo high-level Monster House, allowing you to grind for slate recipes as well - Be sure not to clear it by accident - People recommend planting at Year 800 instead of 900 for much easier enemies Gathering Lives Miner: Hunt the various Golden Crown boss resources in high-level Ginormosia region - This video showcases a good route (Link) Woodcutter: ^ Angler: ^ Farmer: Gate-hop between Viridia Plateau and the Wicked Mandrake in Spirit Road - Farming Shadow Carrots is also recommeded for the extra Cashnuts - I recommend leaving Farmer for last because you might reach lv100 without actively grinding if you regularly harvest 8 plots of Shadow Carrots like I do After the v1.4.0 update, certain Ginormosia events ("Evil Primeval", "Dragon Dare", "Lordly Shark?") spawn high-lv bosses that immediately respawns without the 5-minute timer, so long as you save and reload from title screen without fully completing the event. Not only are the loots valuable for being grove-exclusive prior to the update, they also give huge amount of EXP. The caveat is that these events are really rare, so I recommend not worrying about grinding Gathering Lives, and only start the process if you randomly stumble upon one such event. (See this guide on more about these Area Challenges) Crafting Lives Crafting Life Remake Bulk-Craft Auto-Craft Cook ----- Fruit Punch x99 Sneaky Supper x99 Blacksmith Light/Dark weapons (for matching element) Life Tools (for proficiencies) Divine set (for Item Drop Rate +) Colosseum rewards (for unique skills) Carpenter Light/Dark weapons (for matching element) Life Tools (for proficiencies) Palace Wall x10 Cursed Fence x10 Tailor Cape (for Item Drop Rate +) Black Magic Dress Alchemist Specs (for EXP Earned +) Accessories (for Item Drop Rate +) Crit Aid x99 Heal-All x66 Artist ----- Starry Night Streetlamp x10 Top option is often more recommended. So for Alchemist and you want to level up fast, I recommend bulk-crafting Crit Aid if you have the recipe. But even if you don't, Heal-All remains a decent option. Other Resources(copy-pasted from the compendium guide) Dosh: Bulk-craft White Woolie Sticker - Also recommended to sell weapons/tools from boss, use the Filter option! Redux Stone: Buy Long Cape (also in capital) to trade in Cashnut: The Wicked Mandrake behind Spirit Road's sealed gate converts to 55 nuts each Celestia's Gift: Visit others' island (keyword "flower"), for 1000 per day Buddy Affinity: Gift Magical Milkshake to everyone, it's a high-lv recipe that is easy to make - Currenly, favourite gifts doesn't not affect affinity gained, you only get extra dialogues Best in Slot Equipment Skills (w/ Aging) See this spreadsheet[docs.google.com] for all possible remaking skills. Equipment Type Best Remaking Skills Extra Mats Weapons <matching element> Damage +10% Mimic Sticker Gathering Tools Charge Attack Damage +10% *Sweet Spot Damage +10% Tunoco Sticker ----- Crafting Tools <specific type> Crafter ----- Head, Torso, Bottom, Dress, Hands, Feet Item Drop Rate +5% Trip Appliqué Cape, Accessories Item Drop Rate +10% Attack +10 Trip Appliqué ----- Specs EXP Earned +10% Item Drop Rate +10% Attack +10 ----- Trip Appliqué ----- Hero set Attack +10 ----- Forage King set (except Cape) Gathering +5 (+10 for body) ----- Artisan King set (except Cape) Crafting +5 (+10 for body) ----- * For tools, Charge Attack Damage is usually slightly stronger than Sweet Spot Damage, but Fishing Rod might prefer Sweet Spot due to how often you can use its Special Attack * Unless you only play as Magician, Attack+ is more preferrable than Magic Attack+ Equipment Type Best Aging Skills Weapons <matching element> Damage +10% - Fills the material meter to half instead of full Shield Guard +15% (?) Pickaxe & Axe Sweet Spot Damage +20% Fishing Rod & Hoe (1 of 3 types) Harvester +5% (?) Crafting Tools EXP Earned +10% (specific type) Crafter +20% * Skills from ♦♦♦ aging provide the same stats as ♦♦♦♦ * You can use Cross-Save to reroll aging skills without finding another Treasure Grove https://steamcommunity.com/sharedfiles/filedetails/?id=3510285845 Why Drop Rates are important Rare drops such as Elder Log become almost guaranteed to drop, making ranking up Miner and Woodcutter so much easier Lets you always retain seeds after harvesting, making farming Shadow Carrots for Cashnuts much more consistent Makes grinding Legendary Don Horn easier, since each Don is more likely to drop extra horns when you fight them at rank 5+ and 7 See this post for the explanation of the Drop Rate mechanics Best Weapons, Tools, & Armor (same spreadsheet) See this[docs.google.com] for all equipment stats at perfect quality. Equipment Type Best Equipment Choices Weapons <element weapons> - Light and Dark weapons are often the most preferred - See below for reference table Shield True Shield of Time Gathering Tools Crafting Tools True <tool> of Time Combat Armor Hero set (for Attack+) Divine set (for Drop Rate+) - swap with the Salamander/Holy Body & Legs pieces for extra drop rate - [Update] The 4 Dragon armor sets are direct upgrades to Divine set Gathering Armor Forage King set Crafting Armor Artisan King set Specs Adorable Eyepatch, Angler's Goggles Accessories Flutter Charm (for EXP, pre-order Bonus only) Mercenary's/Magician's Pride (for Attack) Black Onyx Ring, Diamond Ring, Durable Charm, Sea Necklace, ^ Blossom Corsage, Umbral Choker (for any remake skill) -- Diamond Ring can be purchased directly from shops -- [Update] Edward's Fob Watch is slightly better now that it can be remaked Most armor and shields are interchangeable with others in the same slot, with the only difference being the difference in Defense and Magic Defense. It's worth noting Specs and Accessories often provide so little defensive stats, that the "best" equipment isn't really much better than your starting options. The only excepttion to this are the colosseum rewards, which are the only 3 sets of armor capable of rolling their respective unique skills. Best Weapons for Each Element[Update] The new True Dark Dragon weapons are the strongest, but much harder to obtain Light Dark Fire Water Wind Earth Neutral Paladin Arcanite Sword Apocalypse Sword Dragoon's Sword Boreal Blade Verdant Blade Floral Sword True Sword of Time Mercenary Draconic Greatsword Dragon's Despair Scarlet Scourge Blizzard Buster Cobalt Dragonfang Wolf's Fang True Greatsword of Time Hunter Heavenly Aeroshot Tenebrion Phoenix Bow Poseidon's Bow Falconwing Suncatcher True Bow of Time Magician Luna Incanta Chaos Scepter Infernal Staff Cocytus Icewand Staff of the Oracle Harvest Scepter True Staff of Time Brand New Giant Stick Dragon Stick Fire Stick Water Stick Wind Stick Earth Stick Roasted Corn Light/Dark weapons are most preferrable due to higher attack stats, as well as being resisted mostly by only the enemies with the same element Any other element would usually be resisted by enemies from 2 other elements, usually being the same element, plus the one effective towards that - e.g. Earth weapons are resisted by all Fire & Earth type enemies See the element section for a more detailed breakdown You can easily tell what element a weapon is by looking at the ingredient - All the Legendary rank weapons require the Mana of a specific type to craft Crafting most elemental weapons at Legendary rank requires reaching the Hero rank in either Blacksmith or Carpenter. Alternatively, the Fire/Water/Wind/Earth weapons can be dropped from bosses too, so you may remake these instead Legendary Dark weapons in particular requires deciphering Mysterious Slates - Legendary Arcanite/Apocalypse Sword/Shield each has 1 in 300 chance in appearing - Other Legendary Dark weapons each has 1 in 150 chance in appearing Corresponding True Time recipes are obtained from talking to the Plundering Panther in any Ginormosia settlement after crafting your first Time-series equipment (... not that it matters because they are generally not as good) Roasted Corn are from defeating the lv99 Training Dummy next to the Hunter master Combat LifeGeneral Tips The general combat strategies are similar across each Combat Life Switch weapons before engaging, if your equipped element is being resisted - See the "Enemy Resistance" page for a full list of element weakness https://docs.google.com/spreadsheets/d/1BrBcKh3peA96u3EIj19QROujZLBC4d3ilW-KWyf7Anw/edit?gid=1727692650#gid=1727692650 Spam your strongest move Drink Hi-SP Potion when you're out of SP Use Special Attack if you are Paladin or Magician, otherwise don't bother Use food buffs. (see "Notable Buffs" below) I recommend keeping at least 50 of whatever Potions & Meals you might use, even if it means having to buy the necessary ingredients from shop, especially since money is easy to come by in this game Even if you are lacking behind in your Alchemist & Cook ranks, I would still recommend buying Power Aid, Crit Aid, & Campfire Roast directly from the Swolean Island shops If you are trying to rank up multiple Combat Lives at once, you can defeat the enemies needed for Master ranks when you're only at the Apprentice rank, so long as you can defeat said enemies. Doing so may reduce the amount of backtracking needed - See the "Monsters & Life Goals" page for the full list https://docs.google.com/spreadsheets/d/1BrBcKh3peA96u3EIj19QROujZLBC4d3ilW-KWyf7Anw/edit?gid=1994560931#gid=1994560931 Best Moves for Damage In general, you want to spam whatever moves with the highest DPS (damage-per-second) that you currently have access to. Certain moves might deal higher damage, but might take too long to execute, making them less preferrable IMO. Life Best Moves (best to worst) Paladin Special II > Light Charge III > Special I > Light Charge I Mercenary Heavy Charge III > Heavy Charge I > Light Charge I Hunter Heavy Charge III > Light Tap > Light Charge I Magician Heavy Charge III > Heavy Charge I > Light Tap/Light Charge I ... Brand New Unique Attack (R1 button) Miner Light Charge I; or Special II -> Light Charge -> Heavy Charge III x2 -> repeat Woodcutter ^ same Angler Heavy Charge I > Light Charge I; or Special II -> Heavy Charge III x3 -> repeat Farmer Light Charge I - Heavy Tap is actually better if you can hit all veggie in plot at once * For the 3 Gathering Lives, it's technically faster doing the special attack combo, BUT you kinda need to roll for Sweet Spot Damage (which doesn't have a sticker for), and you have to use more inputs for not even a substantial increase in damage. Maybe you think it's worth making the Sweet Spot change less often too? During combat, you can easily replenish SP with potions, so there is often little reason to use the suboptimal moves. Note that I haven't maxed out all combat Lives besides Mercenary, so my recommendations for other combat Lives might not be optimal. As for gathering, I still recommend spamming moves with best DPS despite the lower SP efficiency in general. And if you find yourself running out of SP, and are unable to chop a down boss tree for instance, I recommend investing into better tools instead of keep pushing, especially since you also want to get Excellent for more drops. Notable Buffs - Meals & Potions Magical Milkshake + - Easily renewable AND best source of +200 Gathering Smoothie + - Easily renewable source of +150 Crafting Southern Stew + - Easily renewable source of +100 Combat Power Monstroganoff + - Provides +200 Combat Power, but requires hunting Great Chimera Power Aid + - Easily craftable Magic Aid + - Easily craftable Crit Aid - Directly purchasable, also easily craftable with a islander recipe Note that Berserk Potions are really expensive to make, its normal version is not any better than Power Aid +, and does not even stack with it. I would not recommend using it under any circumstance. Damage Formula The mechanics is explained in a Japanese blog I stumbled upon, which this section heavily relies on. Give them a read if you are interested! - Damage Formula - https://note.com/p334/n/n432c8416b98f - More Testing Data - https://note.com/p334/n/n392cb7b0d560 Parameter Formula Base Damage (Player Attack) x (1 + Enemy Type + Element Modifier) x (Power Aid) - Enemy Defense Hidden Weakness (different between enemies) - Resist: 0.7 - Weak: 1.3 ~ 1.8 Motion Value (different between moves) Charge Multiplier Special Multiplier 1 + x Critical Multiplier 1.2 + y Variance Random between 0.95~1.05 You can calculate your final damage by multiplying each row, after plugging in the corresponding stats of course. For all the skill effects active on you, go to your your Equipment screen, then press into the right-stick to view them. Sadly there is a damage cap at 9999. Otherwise Mercenary would've been the best. ----- Enemy Type & Hidden Weakness This refers to the elemental weakness of each individual enemy. See the next section for details. Element Modifier This usually applies when you have the matching skill with your equipped weapons, and provide a substantial boost to your attack stats. Essentially, "Light Damage +20%" is "Power Aid, but only if you equip light-element weapons". It's worth noting that the True Time series weapons CANNOT be benefited from this, making them the inferior choice in most cases. In fact, a lv100 Mercenary will ALWAYS deal more damange with the legendary-rank light Greatsword than with True Greatsword of Time, even if light element is RESISTED by the enemy. Meal & Potion Buffs You can only have 1 meal effect active at a time. This means you cannot have Attack +200 and Combat Power +200 both active simultaneously. As for potions, only 1 of each type of buffs can be active, which also mean Power Aid and Berserk Potion overwrite each other as previously mentioned. I haven't looked into how buffs stack with each other yet, but a quick test seems to show that they are multiplied onto the your displayed Attack stat. Will do more testing later... (See the earlier section for recommend buffs) Motion Values Each move has a unique multiplier of how strong it is. For instance, the last hit of Mercenary's Heavy Charge is about 5 times as strong as the basic attack. (If someone can compile a list of all these values, LMK) ----- AnalysisThis effectively means the "Element damage" skill always provide a bigger boost than the displayed value, and gets better against enemy with higher defense. On the other hand, "Charge Attack damage" and "critical damage" often provide a smaller boost than the displayed value, and gets worse the more of similar skills you unlock in your skill board. Element damage >> Charge Attack damage > critical damage Elemental Damage Calculation
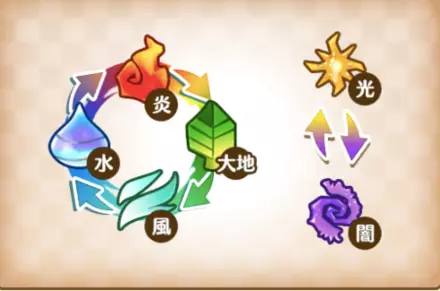
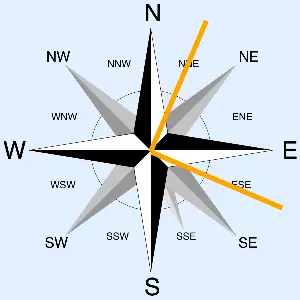
敌人拥有“属性弱点”,由其攻击类型指示。该效果会对您的攻击属性产生±20%的影响,类似于“火焰伤害+20%”的效果。光与暗属性的效果为0%或20%。属性克制关系如下:火<水<风<土<火;光<暗;暗<光。 敌人还拥有“隐藏弱点”,该效果直接乘以最终伤害。抗性:-30%;弱点:+30%至+80%(请参考底部的“敌人元素表”)。 以传说级唐·伍利为例,其攻击类型为风,因此弱于土,且对水有抗性。该敌人的隐藏弱点为暗(60%!!)。该敌人拥有隐藏属性【对光元素抗性】。武器效果:光元素<水元素<无属性、火元素、风元素<土元素<暗元素。武器元素对敌人的效果:极有效、有效、混合、无效、极对武器无效(5)土(1)火(12)土(1)光(8)水(12)火(1)水(7)水 水属性武器(11)火(3)火(1)水(15)水(14)风---风属性武器---(16)水---(14)风(17)土---土属性武器---(14)风---(14)火(17)土(1)土 光属性武器(22)暗(2)无属性(1)土---(2)风(6)光---暗属性武器(6)光(1)无属性(2)风---(1)无属性(22)暗---例如:16只水属性敌人弱于风属性武器 例如:22只暗属性敌人非常弱于光属性武器 当然,在与特定 Boss 战斗时,最好使用其弱点属性。不过,如果你不想频繁切换武器,请注意轻型武器对大多数敌人都非常有效,且受到的抗性最少。因此,它们是大多数玩家首选的【通用型】武器。 有关更详细的分析,请参见底部的参考部分。 采集者职业通用技巧 矿工、伐木工和渔夫的通用策略非常相似 偶尔变换位置,使用轻击或轻蓄力攻击 - 对于渔夫,或许可以改用【观察】来避免断线 连续使用你最强的技能——通常是轻蓄力,渔夫则是重蓄力 如果【最佳采集点】发生变化,请重复上述步骤 使用食物增益。【暴击辅助】对采集者同样有效!对钓鱼者来说,遗憾的是,这个增益效果的持续时间不会比鱼儿咬钩的时间长多少。 不过,嘿,或许在多人游戏中安排一个专门施加增益的角色会有效果!【物品掉落率+】装备技能对收集生命精华尤其有益,因为高掉落率几乎能保证稀有物品的出现,让你更快、更稳定地提升等级。 这也能让你在种植时获得近乎100%的种子返还。和伙伴一起时,你可以指派他们为你收集资源。这在钓鱼时特别有用,因为当你稍后加入时,可以立即开始攻击。这一点也适用于宝藏林,这使得分头行动成为一种可行的策略。 小贴士——两步找到鱼类的最佳钓点:你可以通过只指向两个方向来寻找最佳钓点,例如东北偏北和东南偏东。显然看到【!!【】表示甜蜜点在这里,但看到【】也意味着甜蜜点在完全相反的位置,这意味着从那里开始不需要再检查了。不过,对于矿工和伐木工来说,“检查”动作会花费太多时间,因为你的角色仍然需要一路走到另一边。我建议每走大约60度就轻触一下。
农场概述 你将在基地营地完成大部分生活目标。 每30分钟返回基地营地签到一次。这会启动下一个30分钟计时器,让蔬菜生长到下一阶段,如果不浇水它们可能会枯萎。 即使每10小时才签到一次,蔬菜也不会枯萎,但签到时必须浇水。 尽快开始种植,这样你在升级时就不会那么受时间限制。 当你持续种植和收获普通蔬菜时, boss蔬菜会随机出现。 通用策略: 充能你的【光能量】 当任何【挖掘探测器】从红色变为蓝色时释放 重复上述步骤 使用【重能量】作为最后一击 对于每个boss蔬菜,像往常一样获得【excellent】评价可以获得更多奖励,即虽然有些过头,但你只会获得8颗种子和8~10个非首领级蔬菜,而不是通常的9颗种子和18个非首领级蔬菜。通过击中探测器可以触发连击,这会提高你的伤害输出,但似乎不会影响奖励。连击等级依次为:“良好”→“非常好”→“优秀”→“太棒了”→“火力全开”。游戏内指南称连击计量条会影响奖励品质?目前尚不确定这意味着什么,也不清楚它会如何影响我的测试结果。不要害怕改变农场的蔬菜种类,这样可以更快完成目标。当不再需要其他蔬菜时,将所有地块都种上暗影胡萝卜,因为它们能卖出额外的坚果币,这是吉诺莫西亚中一种重要的货币。普通、 uncommon、稀有、首领变种的蔬菜售价各不相同——大多数蔬菜:每个1、3、5、10坚果币;暗影胡萝卜:每个5、10、15、20坚果币。每块满种的作物地块,至少能收获:普通蔬菜 首领蔬菜 大多数蔬菜种类 18坚果币 29坚果币 暗影胡萝卜 90坚果币 85坚果币 雨非常罕见,会影响基地营的作物。它们不再需要浇水,会跳过发芽阶段,并在播种后30分钟成熟。首领蔬菜不能雨天生成 不确定这是漏洞还是特性,有时玩了一段时间后睡觉,雨会完全停止。如果你想保持下雨(即恢复下雨状态),应该只在基地营的户外睡觉,因为这是唯一能在不触发自动保存的情况下改变时间的方法。

《工匠生活》通用技巧 1. 使用食物增益效果。 2. 你可以在选择伙伴的同一界面快速更改伙伴的装备。这在切换带有经验值加成技能的专精时最为有用。 3. 自1.4.0版本更新后,你也可以随时更改任何伙伴的装备。 4. 【快速连按】,即按住一个按钮会使游戏快速连续点击该按钮,在制作迷你游戏中特别有用,同时对于购买和交易Redux Stones也非常有帮助。有两种主要方法: 1. 使用内置该功能的手柄 2. 通过Steam大屏幕模式配置输入 我一直在将【L2】按钮设置为【确认】连发功能。精通技能在后期非常强大,因为每次触发都会应用于整个团队的综合制作属性。 当你和队友的工具上叠加几个【金属武器工匠】技能后,甚至可以在仅3个行动序列内重制终局装备。 【画廊(艺术家)】 要让岛民购买你的 artwork,需在他们盯着某件 artwork 时与其交谈。不过用这种方法确实赚不了多少钱,所以【白毛贴纸法】仍然是更优选择。 要提高画廊评分,只需在所有槽位都展示高质量艺术品,而且这些艺术品可以全部相同。 - 例如:4幅【魔法坩埚】和5幅【怀旧画作】 拆除画廊后,评分会重置,但只要把9件艺术品重新放回去,评分就会立刻回到最高。 我认为评分每现实一小时重置一次,重置后会更新评分,并且如果允许的话,岛民可以再次购买艺术品。 结束语 感谢阅读! 目前我能提供的就是这些了!也许之后我还会补充更多技巧,但无论如何,如果我在指南中有任何错误,欢迎指出。

https://steamcommunity.com/sharedfiles/filedetails/?id=3647344939 References My Compendium & Guides I have put together various other tips & tricks in this separate guide and the Compendium spreadsheet as well. You may find more useful information there, check it out! Google Sheet[docs.google.com] | HTML View Mode[docs.google.com] https://steamcommunity.com/sharedfiles/filedetails/?id=3484233912 Fantasy Life i Guides I've Created All Achievements Overview Life Tips, EXP Methods, Best Equipment, and more Islander Recipe Guide Rare Item Strategy Guide Time-Travel & Cross-Save Quick Guide Ginormosia 101 and Treasure Grove Overview Snoozaland Overview & Strategy Version Updates Summary Hero rank's "All Lives" skills Upon reach the Hero rank, each Life gain access to a unique skill that can benefit all Lives regardless of the equipped Life. Here is a reference table in case you want to prioritise some of them. Life Skill Effects Paladin +20 Defense/Magic Defense, +100 HP Mercenary -5% SP consumption Hunter +10% critical rate, +20% critical damage Magician +100% natural SP regeneration Miner -5% Charge-up time Woodcutter +5% Charge Attack damage Angler +10% Special Skill charge rate Farmer +5% Status Effect resistance Cook Improves potency of Meals: +20% healing and 50% effect duration Blacksmith +10 Attack/Magic Attack Carpenter +20 Gathering/Crafting Tailor +20 Defense/Magic Defense Alchemist +50% chance of obtaining an extra Potion after using it Artist Improves potency of Bombs: +100% damage Personal Tier List Useful - Hunter, Magician, Woodcutter, Cook Beneficial - Mercenary, Miner, Alchemist Situational - Angler, Farmer Unnoticeable - Paladin, Blacksmith, Carpenter, Tailor, Artist Quick Tip - Unlocked skills stay unlocked after resetting the board. This allows you to obtain even the Combat Life skills at lv70~75 with only a few resets, even though they are gated behind needing 50 other skills. Element Tables for Enemies "Hidden Resistance & Weakness"See this compendium page[docs.google.com] for all enemies' "hidden" resistance & weakness. Element Usually With Exceptions of Neutral Is neutral to all [-Dark] Main Story boss champion [-Light] Main Story final boss (DD* & GX) Fire Resists Fire Is weak to Water [-] Fiery Panther, Pyro Panther [-Fire/+Earth] Crimson Weedling [+Fire/+Water] Fortoise Water Resists Water Is weak to Fire [-] Snowflake Bunny [+Fire/+Water] Tortortoise, Splash Frog, Tropic Toad, Bitey Shark [+Fire/+Water] Greater Sea Beetle Baller, Stelleroid, Meteoroid Wind Resists Wind [-Dark/+Light] Legendary Don Woolie Earth Resists Earth [-Fire] Bloom Serpent, Pseudo Oak, Weedling, Killer Weedling, King Weedling [-Light] Bouldergeist Light Resists Light Is weak to Dark [-Fire] Pseudo Cherry Dark Resists Dark Is weak to Light - For DD, it's is resistant to all elements by default, only after weakened is it weak to Light Analysis Neutral enemies are not resistant or weak to any particular element Certain enemies do not have the hidden resistance to their own element - e.g. Against Pyro Panther, using Fire weapons is the same as using Light weapons Certain enemies are doubly weak to an element - Some Earth enemies, most Fire enemies, and ALL Light & Dark enemies are as such - e.g. Against shadow enemies, Light element gives Atk+20% AND x1.8 to final damage Certain enemies are doubly resistant to an element - Crimson Weedling, and some Water enemies are as such - e.g. Against Tortortoise, Fire element gives Atk-20% AND x0.7 to final damage Certain enemies have "mixed" resistance to an element - Fortoise, and some Water enemies are as such - e.g. Against Blizzbear, Fire element gives Atk-20% BUT x1.7 to final damage No enemy is resistant to both Light and Dark - I prefer using Light weapons inside Treasure Grove, and Dark weapons elsewhereEnemy Counts V. Weak to Weak to Mixed Resist against V. Resist against (39) Neutral --- (2) Light (1) Dark --- (1) Dark --- (15) Fire (11) Water (1) Fire (3) Water (1) Water (12) Fire (14) Earth (1) Earth (16) Water --- (16) Wind (8) Fire (1) Fire (15) Water (7) Fire (14) Wind --- (14) Earth (2) Dark --- (14) Water (14) Wind (2) Light --- (17) Earth (5) Fire (12) Fire (1) Light --- (17) Wind (17) Earth --- (6) Light (6) Dark (1) Fire --- (6) Light --- (22) Dark (22) Light --- --- (22) Dark ---