换一换
换一换 


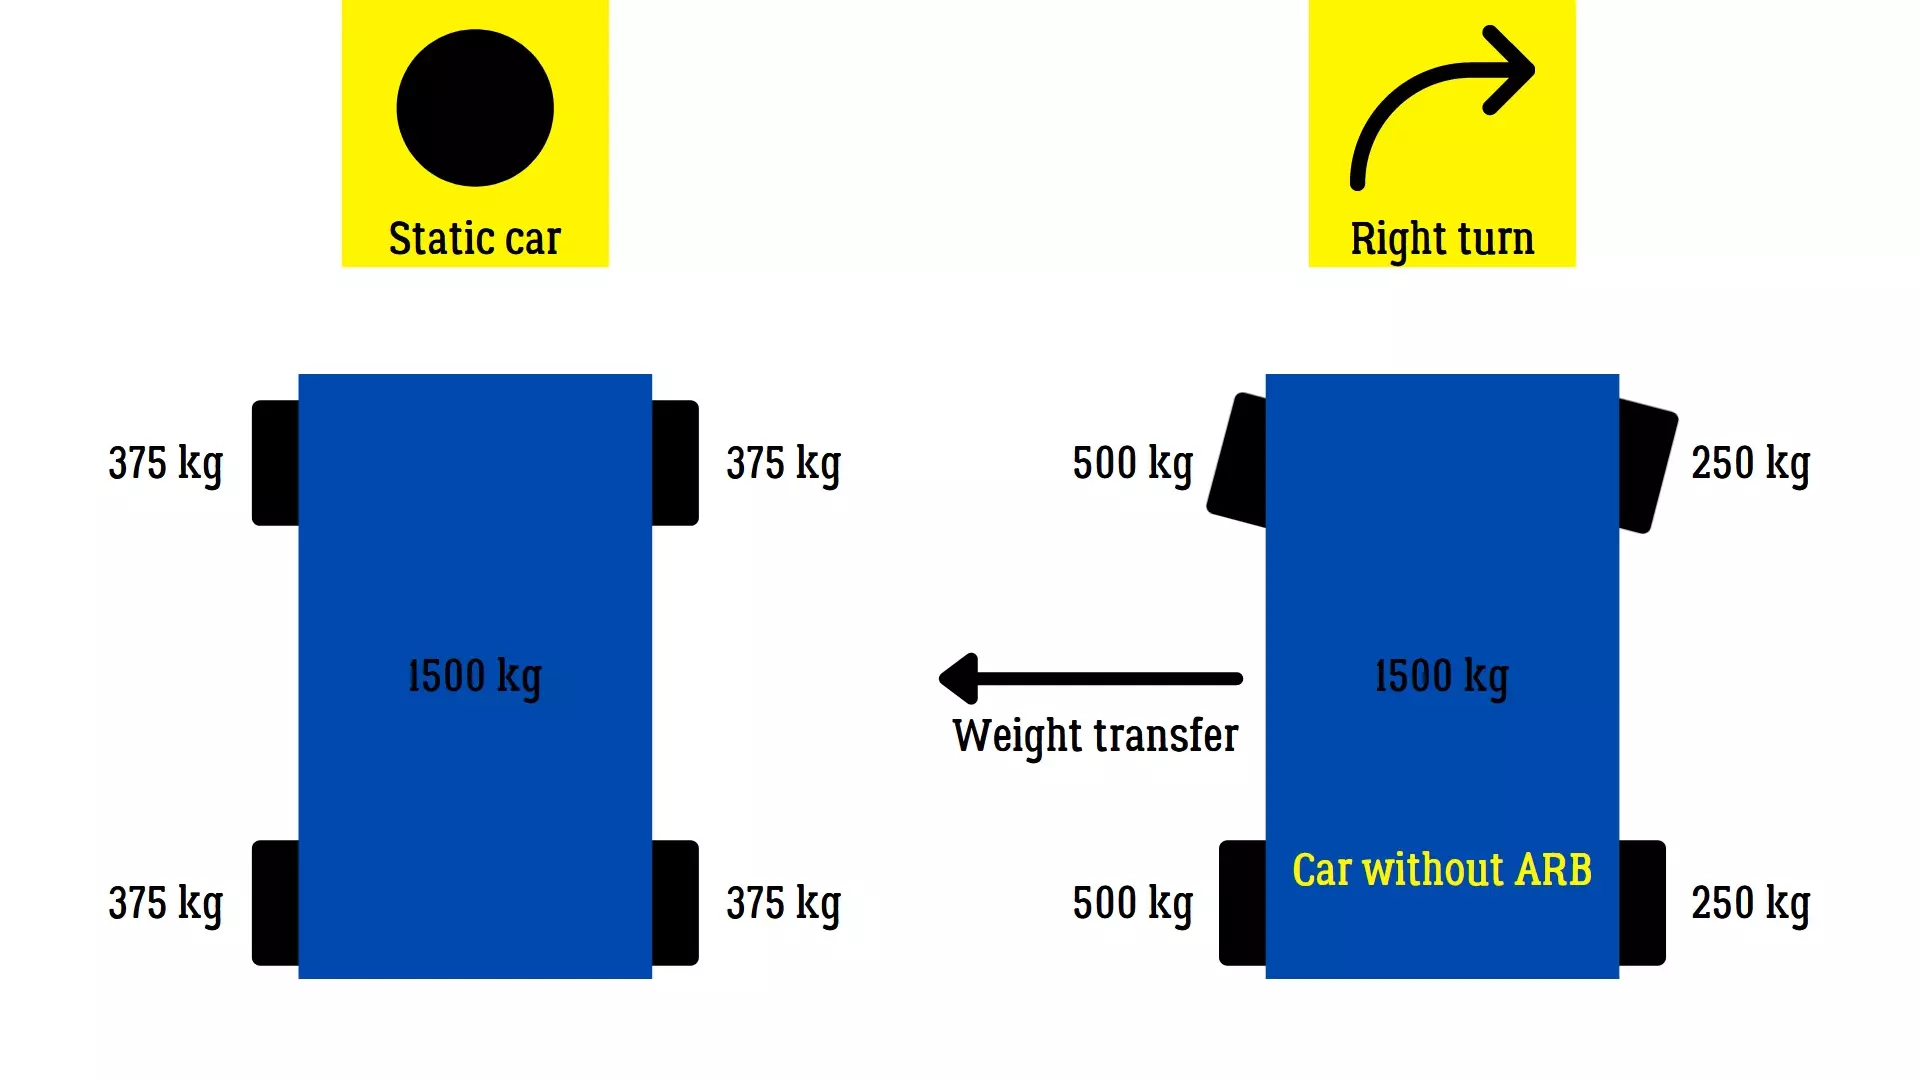
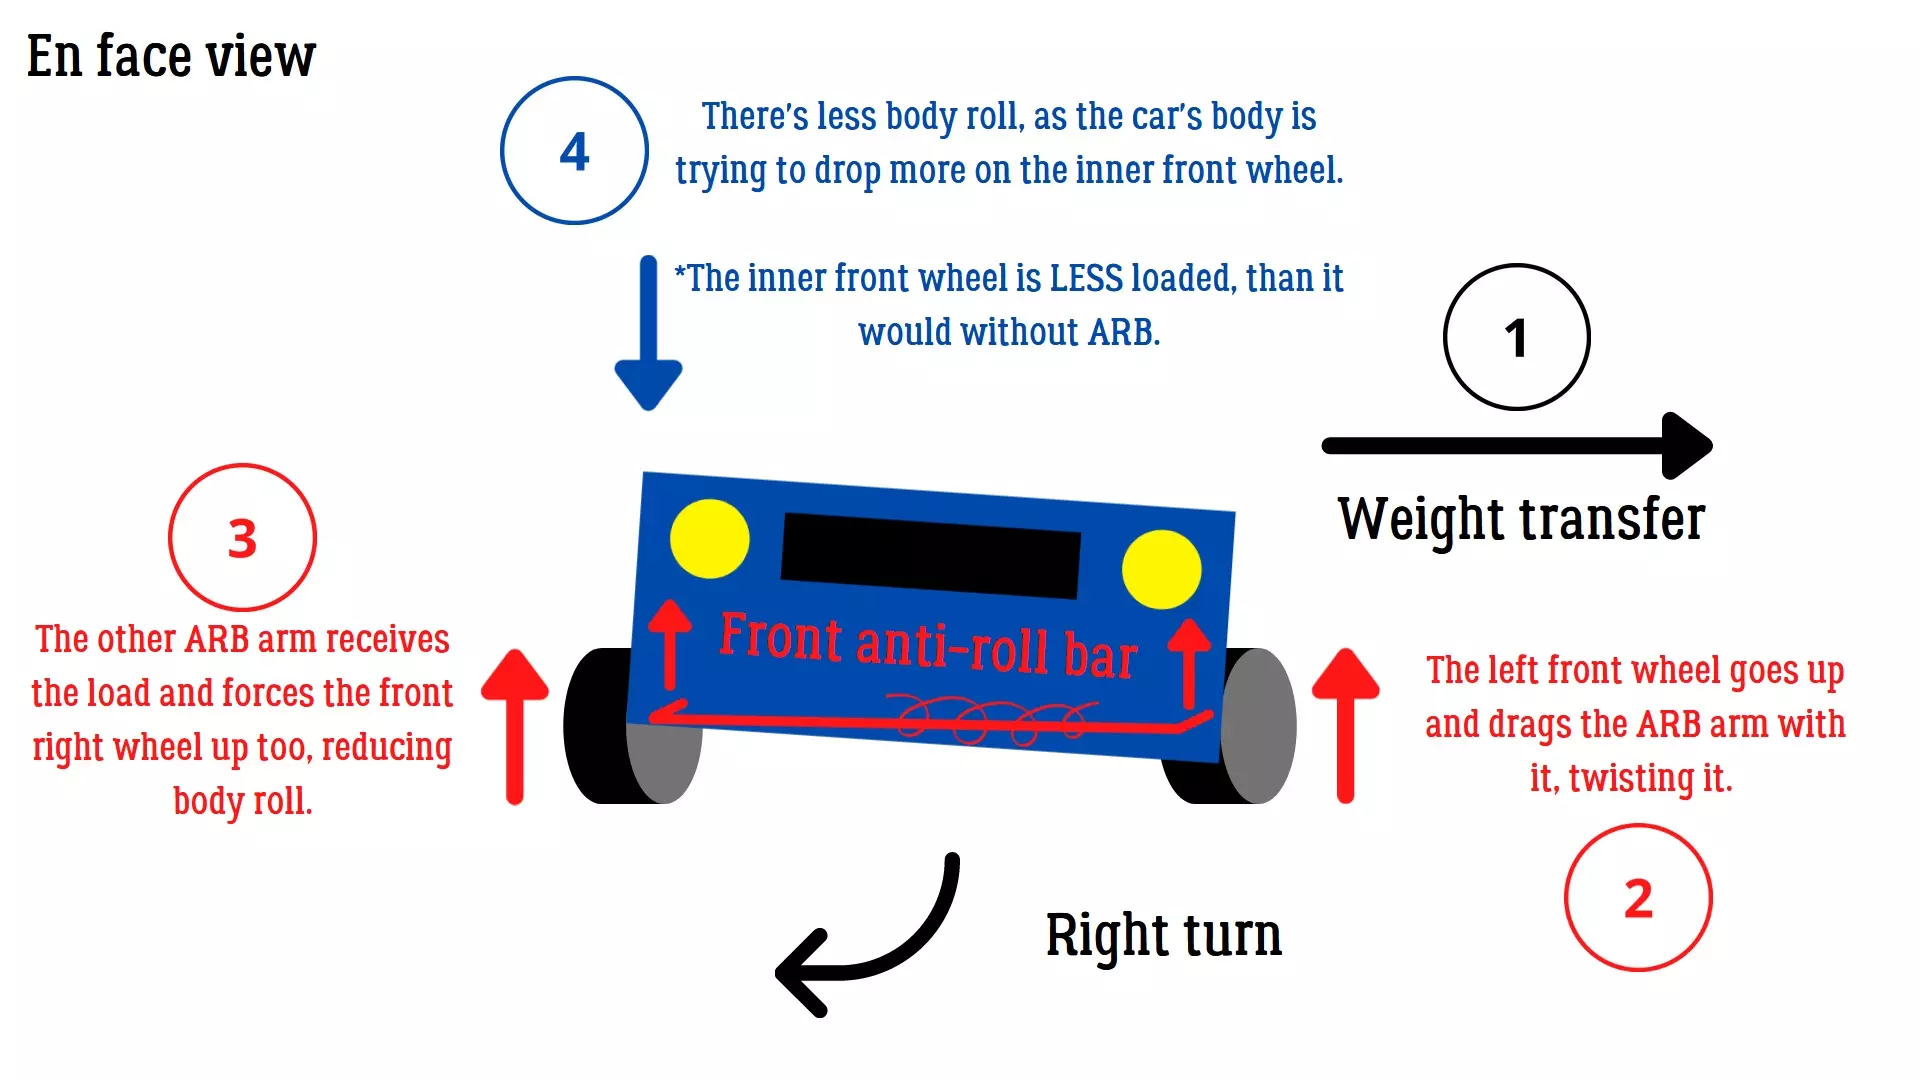
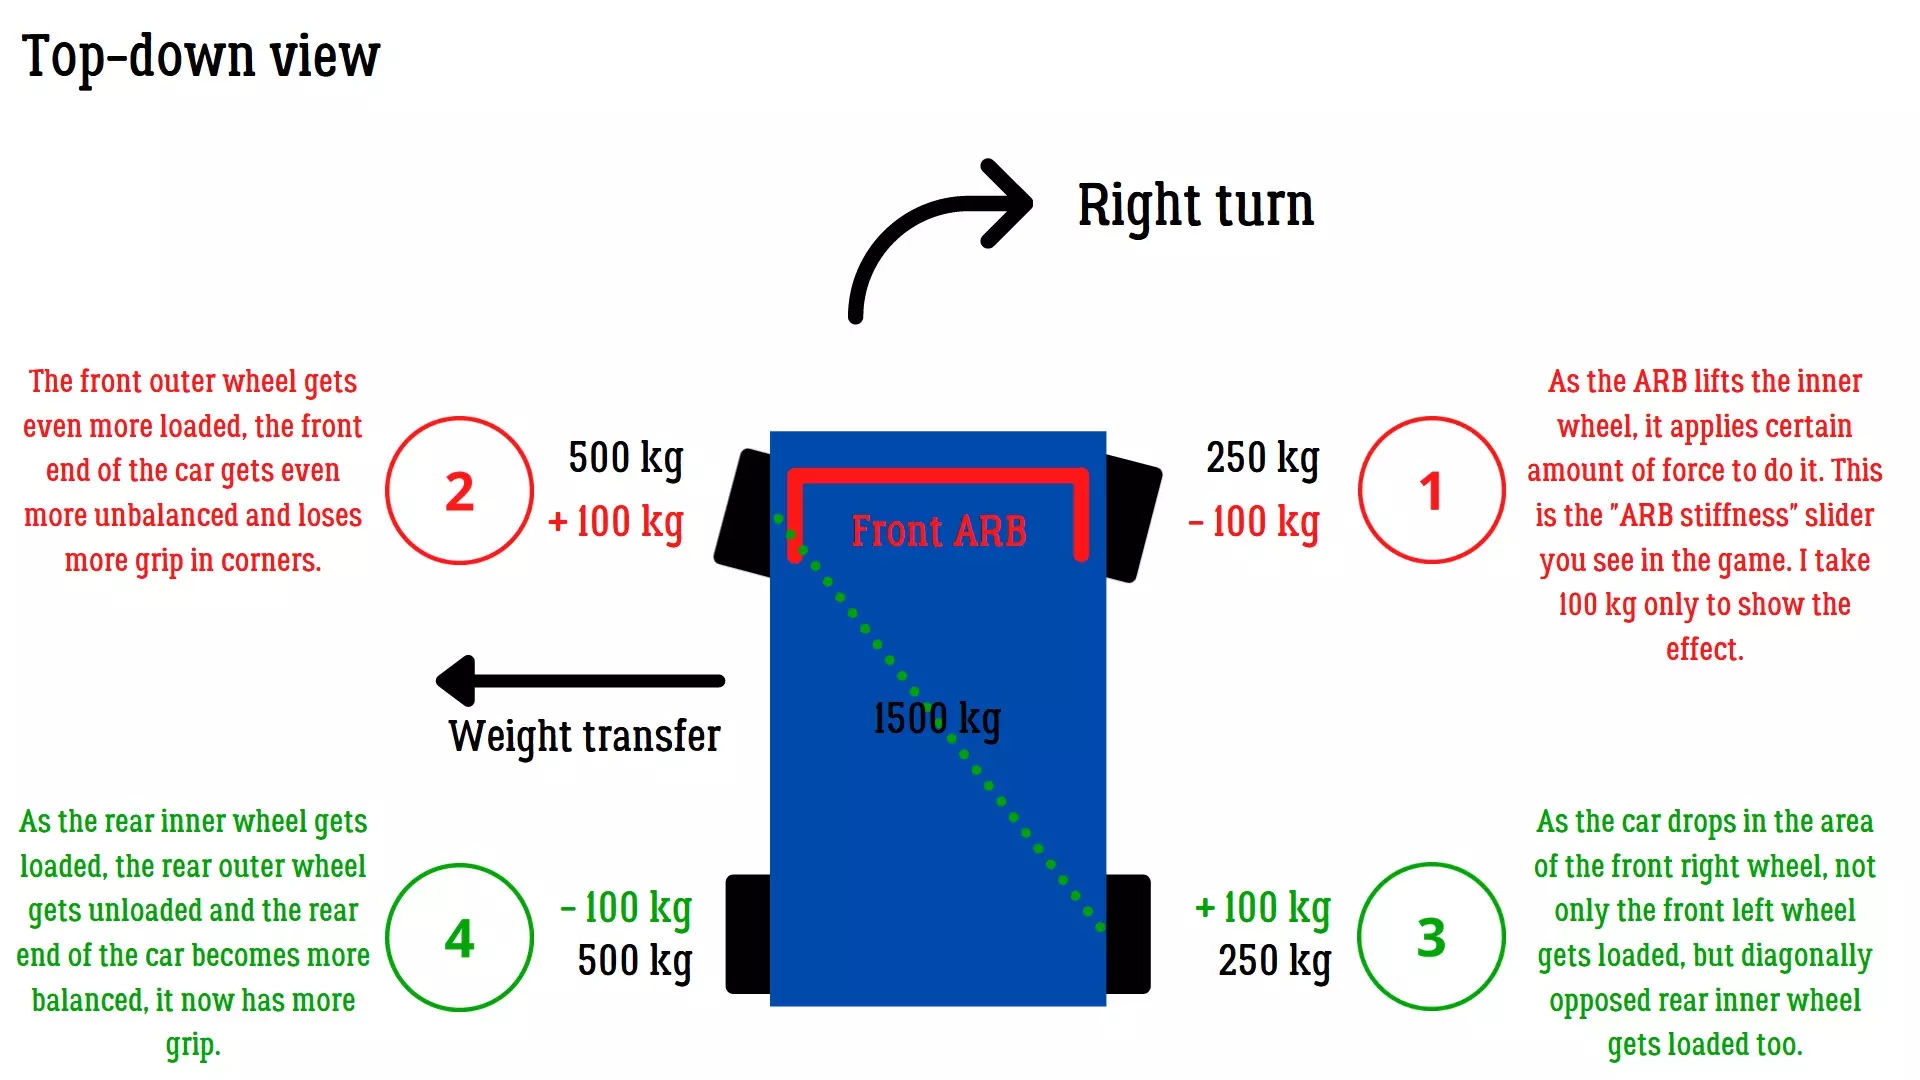
This guide aims to explain the tuning for the forgotten Time Attack mode in CarX Drift. Why Time Attack? The time attack mode is an overshadowed mode in CarX Drift Racing Online that was available from the start of this game but is almost never played. I think this is because of a popular belief that the physics of this game are not suitable for anything but drifting, but this is not the case. Following this guide will allow you to experience the time attack mode just like in any other racing game without excessive drifting and also prepare yourself for the upcoming CarX Street game, which won't be as focused on drifting as its predecessor. This guide is useful for keyboard, gamepad and wheel controllers without assists. In each section of this guide you will find a small spreadsheet with my settings for Voodoo (Viper) tuned for Time Attack mode. By the way, if you want to know how to adjust your car for drifting, check my other guide. https://steamcommunity.com/sharedfiles/filedetails/?id=1104486321 Setup: Racing vs Ultimate When preparing your car for time attack, your first thought is to compare the stats between the cars in Ultimate and Racing modes. Racing is better for grip and gives a more predictable handling without excessive sliding. Despite having less power than Ultimate mode, I believe this is actually its main advantage and partially explains why the car spins less. Racing mode also keeps the AWD (4WD) drivetrain for cars that have it by default (in stock mode). The Engine adjustments section is disabled in this mode. The Racing mode also allows you to make a smaller max. steering angle. I will tell why this is important later in the guide. The Ultimate mode gives consideraly more power and the ability to increase it even more with Engine tunes. Excessive power does harm performance in time attack mode, as there's no traction control (TC) and functional aerodynamics in the game to make enough use of it. So after comparing the two modes, it's obvious that you want Racing mode only when preparing your car for time attack. It's also cheaper and is accessible earlier in the game! Suspension pt. 1 In this section you will find the adjustments for the following components: Spring length Spring stiffness Damper: slow bump and rebound Damper: fast bump and rebound Spring lengthThe spring size determines how low your car is. Very low settings will not allow your suspension to work properly and you will lose control on weight transfers and when going over bumps. Very high settings will make your center of gravity higher and increase the body roll of the car in the corner. When adjusting spring length, you should lower your suspension but make sure that the suspension is still working. Your values will typically range from 7 to 15 cm. ParameterFront springs lengthRear springs lengthValue7 cm7 cm Spring stiffnessThe spring stiffness allows you to control how reactive the suspension will be. Higher values (stiffer springs) mean very fast response but higher chance of losing the car at the same time, this is because you need to be much more precise with your inputs. Lower values will make suspension’s response smoother and more forgiving. As the majority of cars in CarX have their engines on front, it's logical to make the front suspension slightly stiffer that the back one. I usually use something between 120 kN/m and 180 kN/m depending on the car. ⚠️ If your car oversteers, make the front suspension stiffer and/or the rear one softer. ⚠️ If your car understeers, make the front suspension softer and/or the rear one stiffer. ParameterFront stiffnessRear stiffnessValue150 kN/m130 kN/m Damper: slow bump and rebound"Slow" defines weight transfers from driver's input. This includes braking, accelerating, making transitions and so on. Bump determines how much resistance is applied on suspension’s compression. Rebound determines how much resistance is applied on suspension’s decompression. Higher values mean more resistance, slower reaction. Lower values mean less resistance and faster reaction. Extremely high values will not allow suspension to compress leading to a traction loss. Extremely low values will provide the same effect as above, the car body will simply fall down, losing traction. Generally, you want to find a sweet spot in which the car reacts fast enough to be controllable and smooth. Wrong setup will make it janky and unpredictable. You can easily test the work of bump and rebound settings (slow and fast) with the help of "Suspension stiffness" slider. Simply drag it back and forth. Slow movements with mouse will correspond to slow settings and fast movements to fast settings. Your goal is the reaction where the car's body remains at the same height and the wheel stays glued to the ground (no traction loss). ⚠️ If the body weight transfer is too fast and results in grip loss, increase the overall stiffness. ⚠️ If you lose grip because of a very slow weight transfer, decrease the overall stiffness. ParameterFront bumpRear bumpFront reboundRear reboundValue8000 N s/m8000 N s/m10000 N s/m10000 N s/m Damper: fast bump and reboundThe working principle is the same as for the "slow" parameters. The difference is that "fast" parameters work mainly for fast weight transfers, like hitting road bumps and other imperfections. ⚠️ If you drive on bumpy tracks, decrease the overall stiffness. ⚠️ If you find your car jumping around bumps too often, increase the overall resistance. ParameterFront fast bumpRear fast bumpFront fast reboundRear fast reboundValue15000 N s/m15000 N s/m17000 N s/m17000 N s/m Suspension pt. 2 In this section you will find the adjustments for the following components: Toe Camber Anti-roll bar Caster Ackerman angle Max. steering angleToeToe is the adjustment of the wheels according to the longitudinal axis of the vehicles. Negative toe means that the wheels are facing "outside" hence why it’s called toe-out, the positive one gives the opposite effect, thus the wheels are facing "inside", alternatively called toe-in. For time attacks, I would recommend to use zero toe on front and back for less resistance and more speed. Alternatively you can use a slightly negative toe on front wheels like -0.1 or -0.2 for easier turn-in. Never use positive values for rear wheels, as you will lose traction in every corner. ParameterFront toeRear toeValue-0.20.3 CamberContrary to drifting, grip racing (time attack) doesn't require you to use huge camber values. Zero values provide maximum grip on a straight line, while slightly negative values allow for more grip when cornering. ⚠️For the front wheels use values between -1 and -4 degrees. ⚠️For the back wheels use values between +0.3 and -3 degrees. ParameterFront camberRear camberValue-3-1 Anti-roll barDo not underestimate the effect of this setting, this is the first thing you want to tune if your car understeers or oversteers. The anti-roll bar loads the outer wheel more and takes off load from the inner wheel, while forcing the latter up. This allows the car to roll less and reduces the grip on the end of the car where the ARB is installed. Meanwhile, the other end of the car becomes more balanced and starts to have more grip. If you install a stiff ARB in front, you give more traction to the rear end. If you make your ARB in back is stiffer than in front, you will slide all over the place and the front will be grippier. As we don't want our car to slide, we will typically use stiff front ARB and no rear ARB. ⚠️If you experience understeer, make front softer and back stiffer. ⚠️If you experience oversteer, make front stiffer and back softer. ParameterFront ARBRear ARBValue70 kN/m0 kN/m
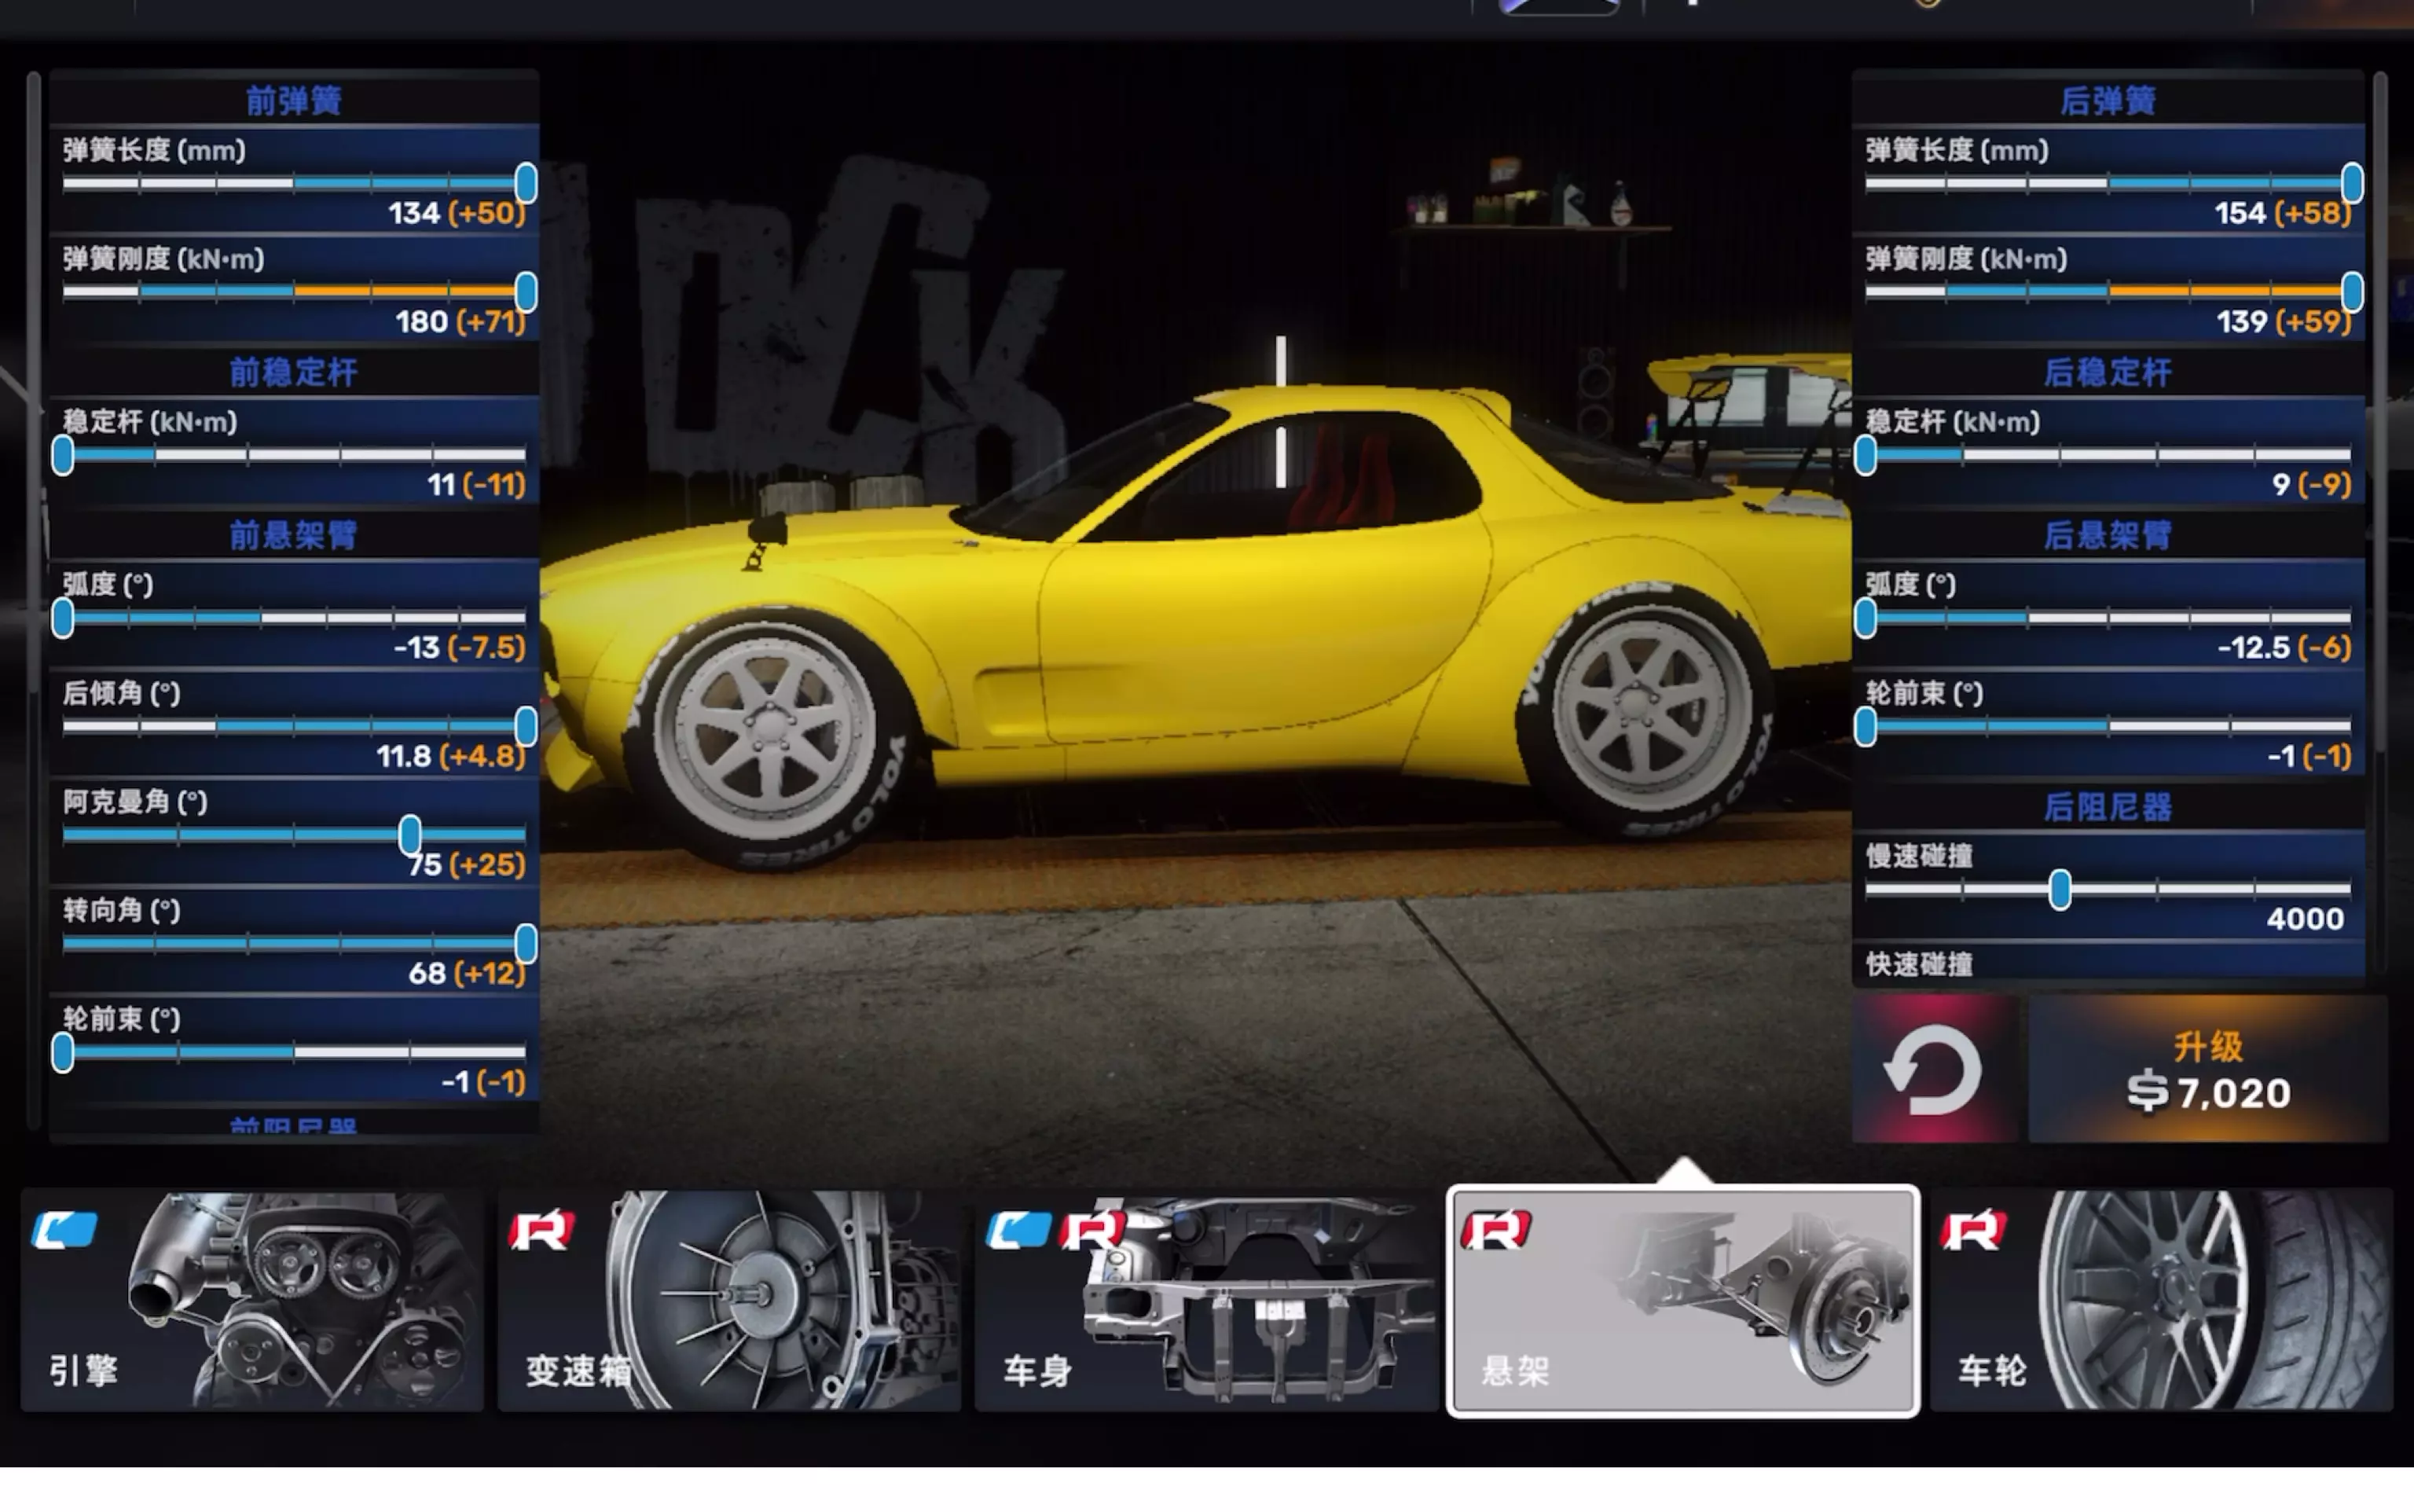
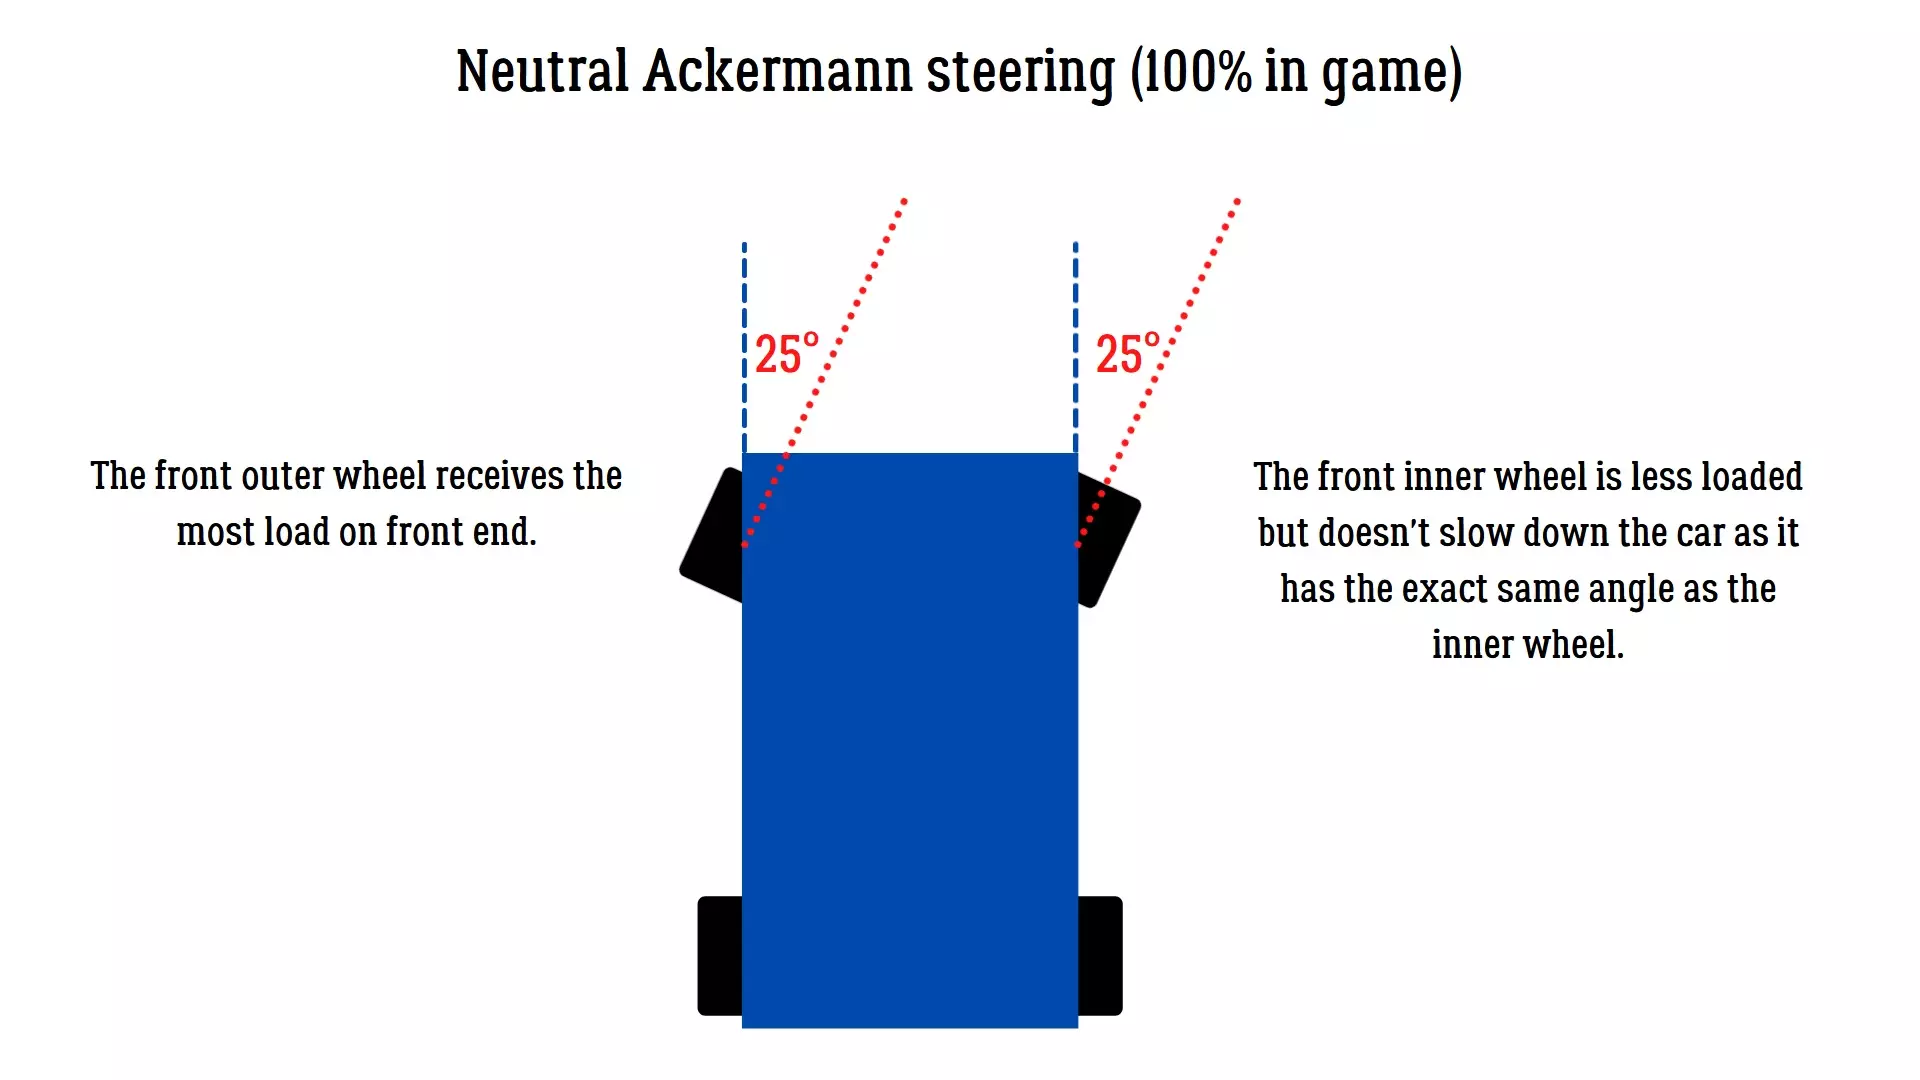
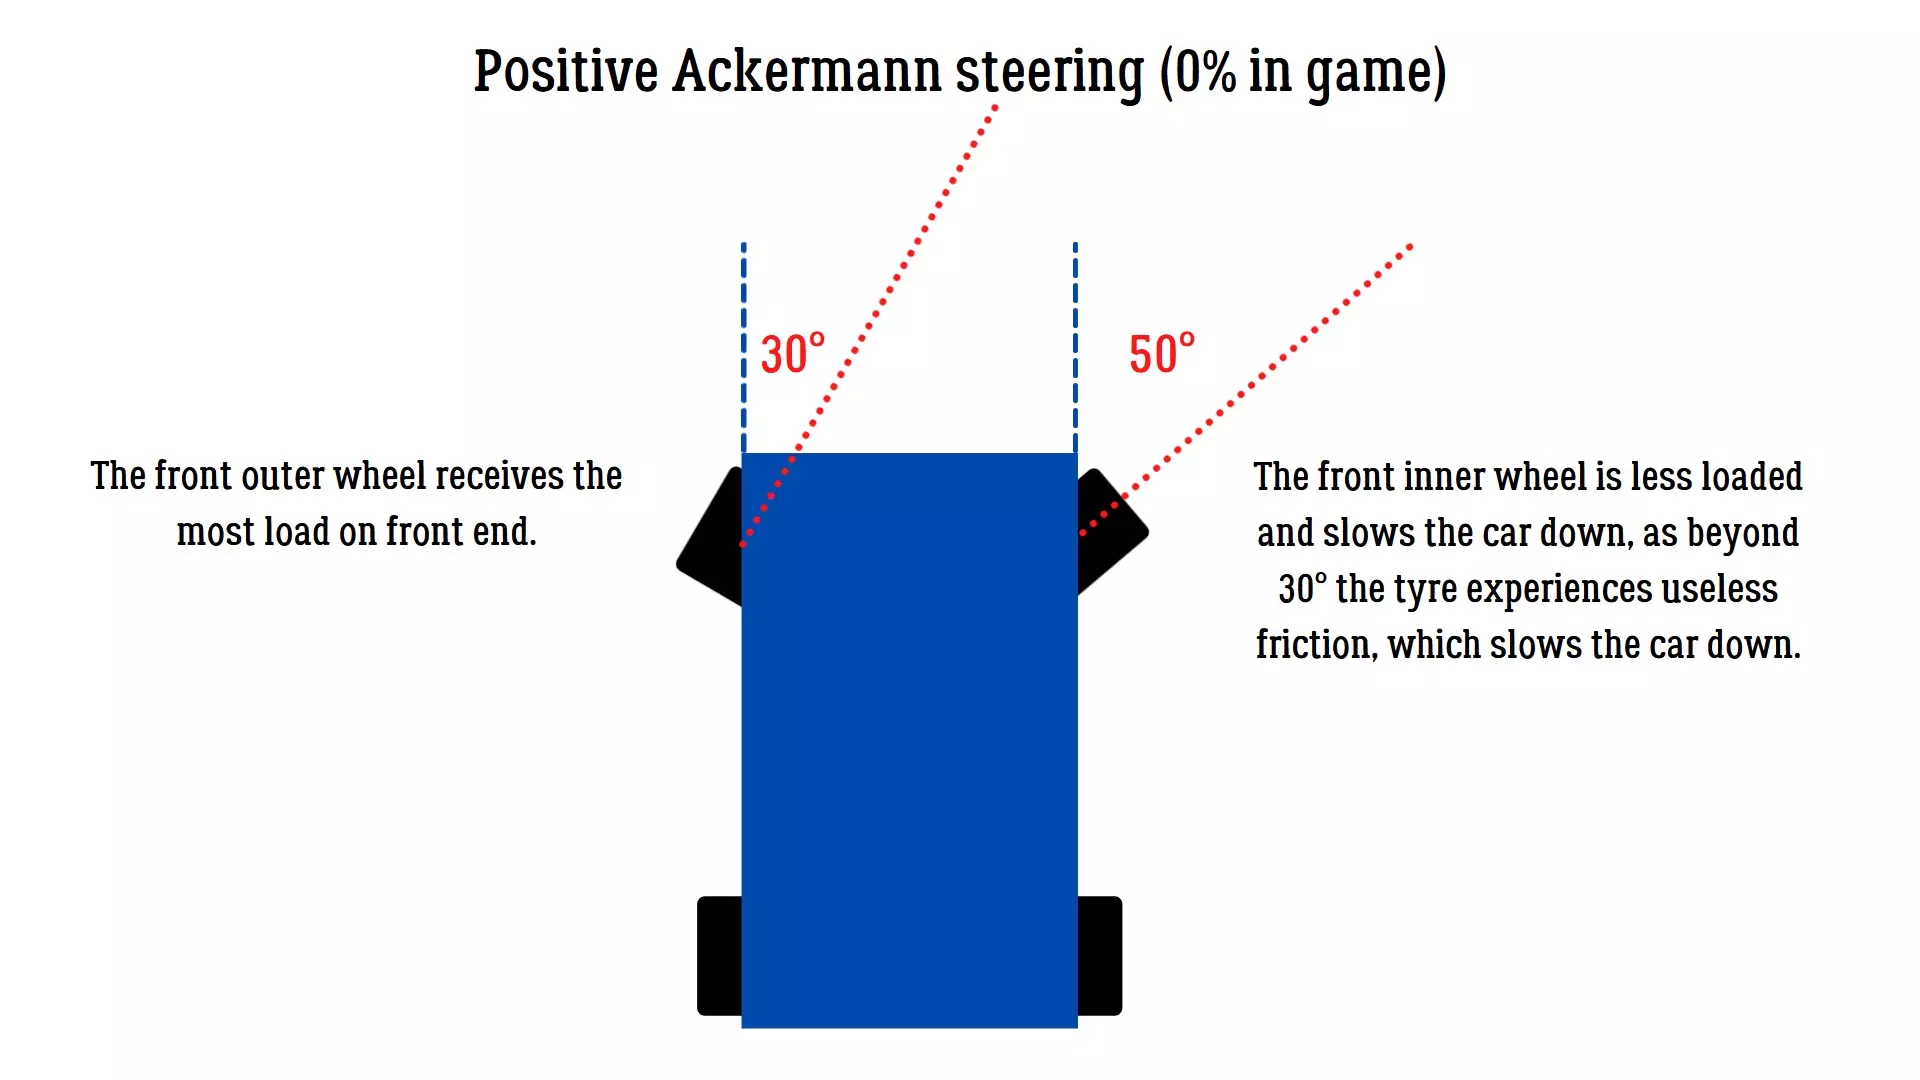
主销后倾角 主销后倾角有助于稳定车辆。 负主销后倾角(负值)下转向非常轻松,但车辆在高速行驶和制动时可能不稳定。游戏中无法使用此设置。 中性主销后倾角(0值)转向轻松,能让你在弯道中更清晰地感受到轮胎抓地力反馈,但高速时车轮稳定性较差。 正主销后倾角(正值)可提升高速弯道的稳定性,且由于前轮产生的负外倾角效应,能在弯道中提供额外抓地力。主销后倾角越大,转向时的阻力越大。我通常将车辆的主销后倾角设置为5-7。 参数 主销后倾角 数值6 阿克曼角 此设置取决于个人偏好。0%为最大正阿克曼设置(标准模式);100%为平行阿克曼设置(零值)。50%以下的数值会因无用的轮胎摩擦导致车辆变慢。50%至100%之间的数值可提供最佳性能。平行设置(100%)效果良好,尤其在急弯中,因为车辆大部分重量会转移到外侧车轮。参数:阿克曼角度,数值:50%
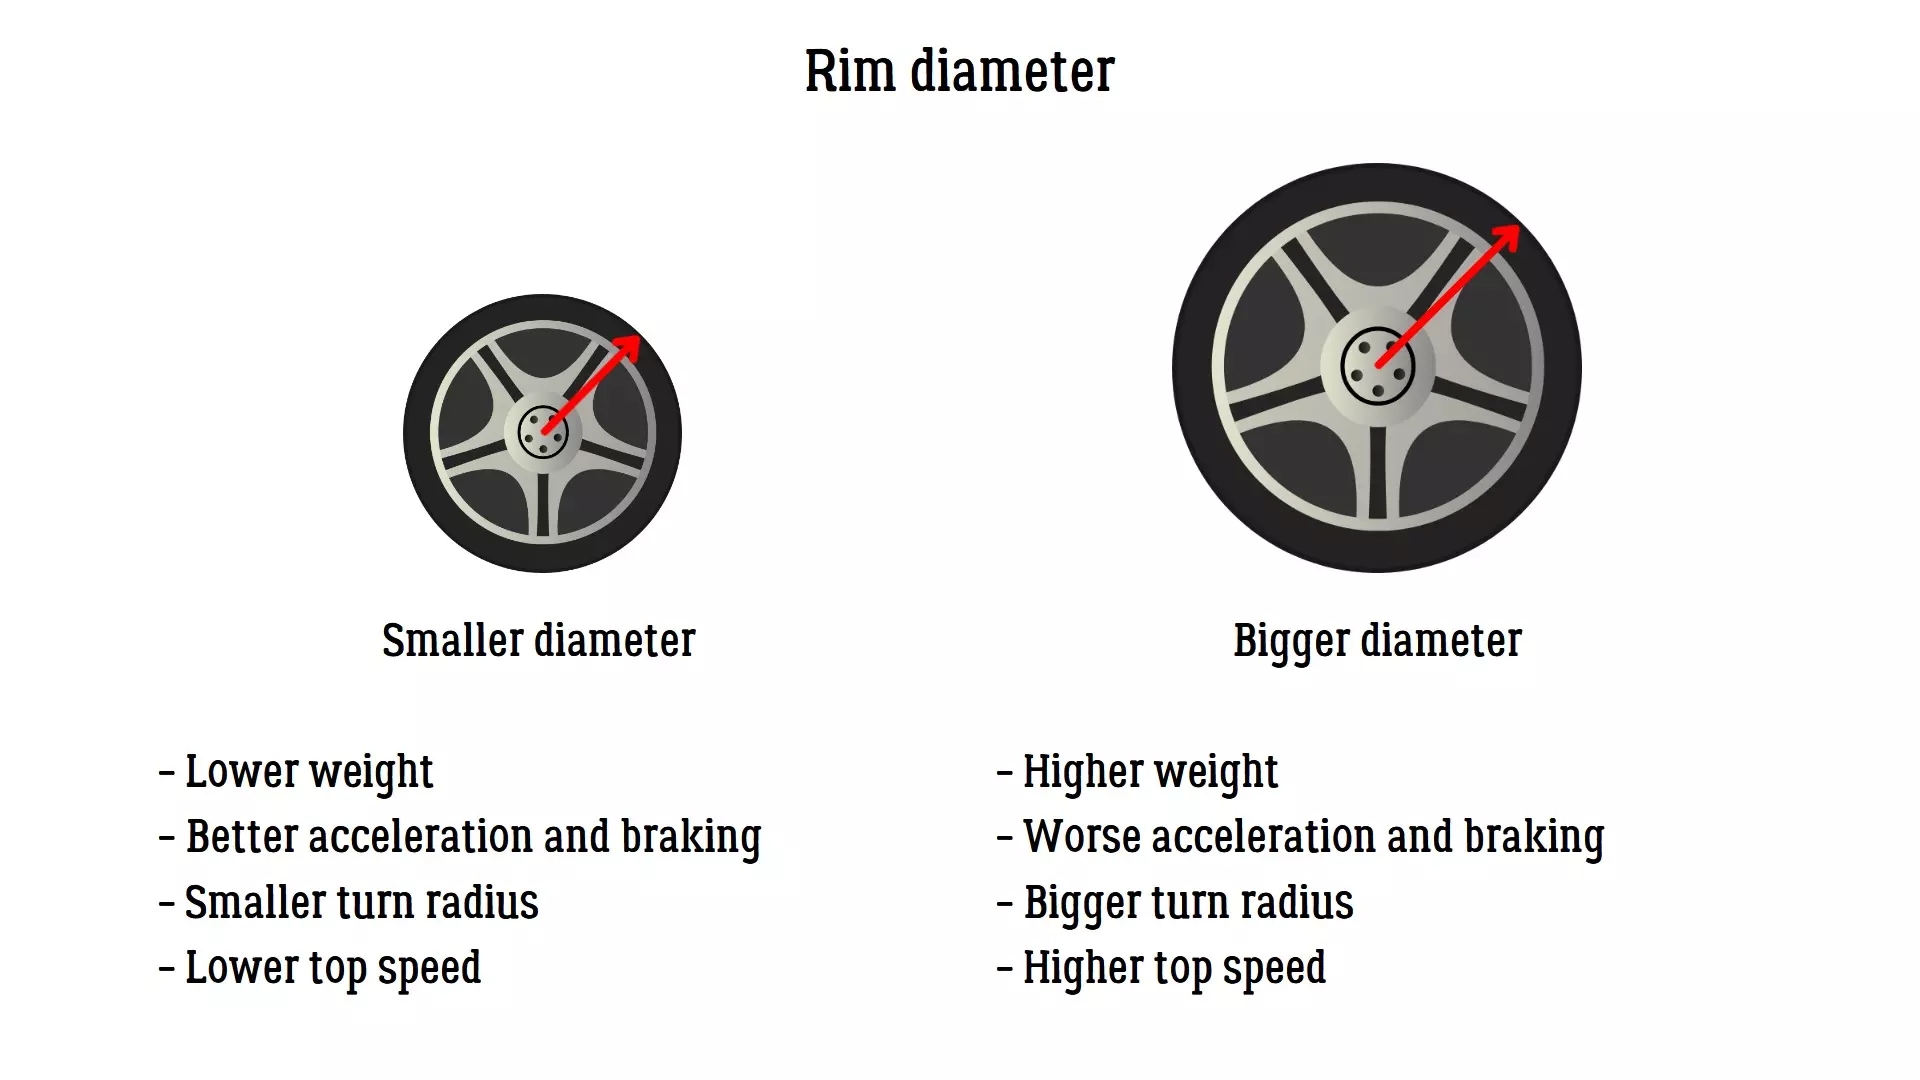
最大转向角度 在本指南开头我提到过,竞赛模式允许更小的最大转向角度。在此模式下,你需要将其调整到游戏允许的最小值。原因是大多数赛车不会使用大转向角度,10到20度之间就已足够。不过在游戏中,车辆可调节至35度左右,这仍比60度要好。因为无论使用何种控制器,转向角度越小,转向输入的精度就越高。 参数 最大转向角度值34度 车轮 在本部分中,你可以对以下部件进行调整: 轮辋直径 轮胎宽度 轮胎气压 车轮附着力 轮距 轮胎扁平比 轮辋直径:较大的直径可以提供更多抓地力。较小的直径可以带来更好的加速和转向精度。注意不要调整成改装老爷车或卡丁车的尺寸,18至21英寸之间的值较为合适。 参数:前轮轮辋直径 后轮轮辋直径 数值:19英寸 19英寸
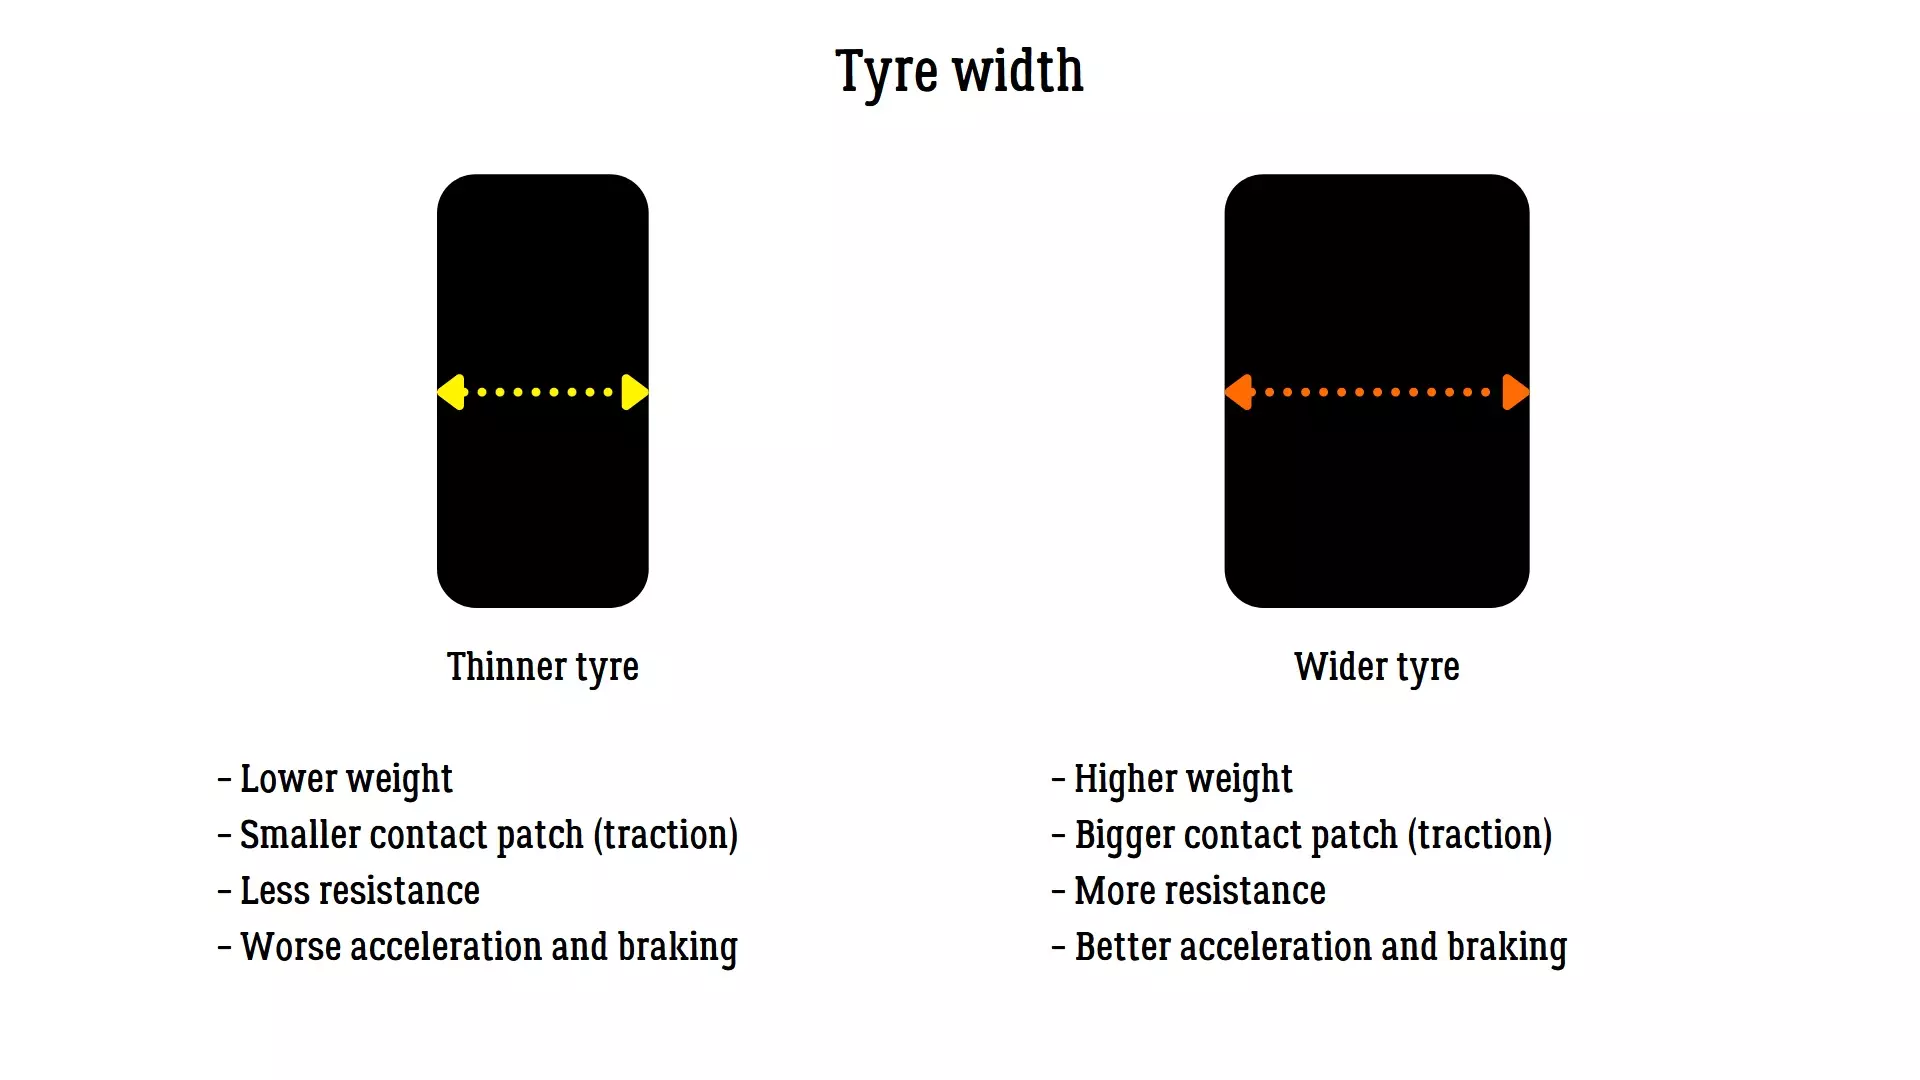
轮胎宽度 轮胎宽度越大,该轮胎获得的抓地力就越强。 通常你需要将前后轮胎的宽度都调至最大。有时使用稍窄一些的前轮胎也能有不错的效果。 参数 前轮胎宽度 后轮胎宽度 数值 325毫米 355毫米
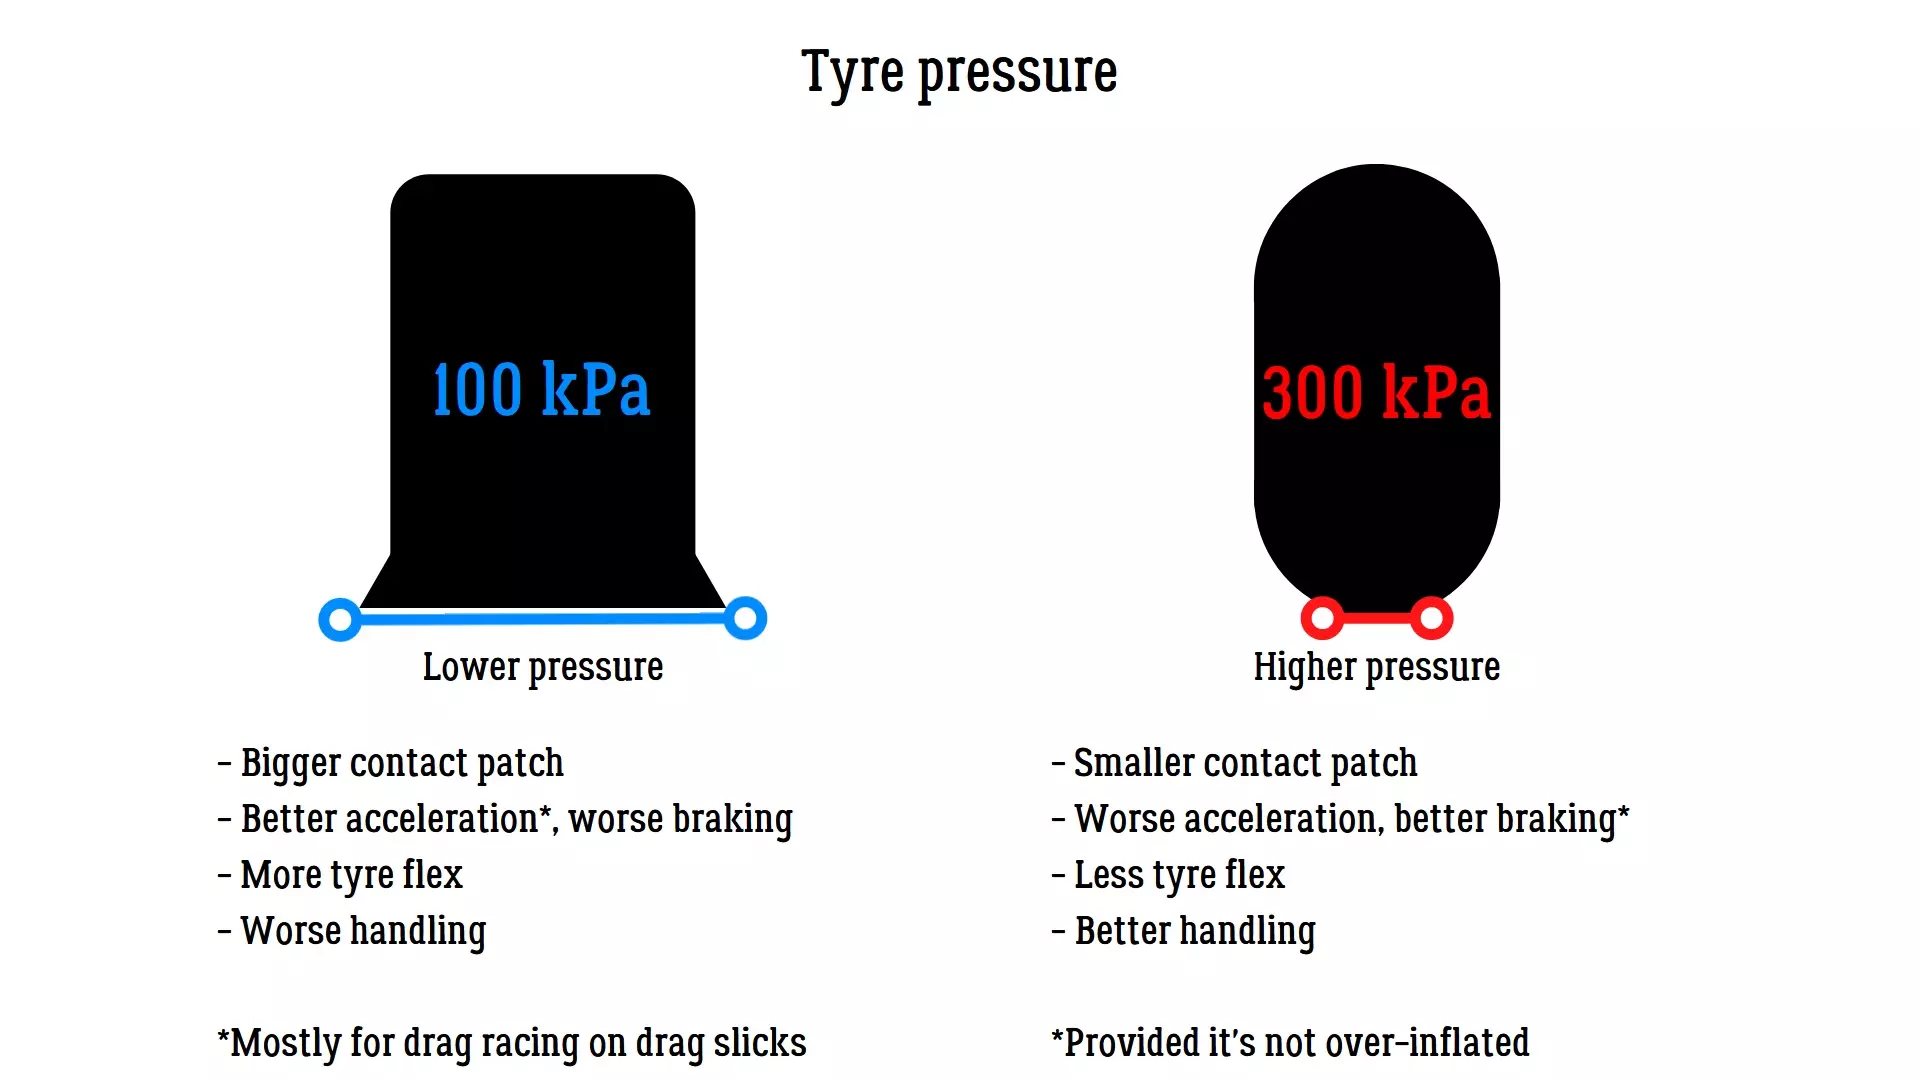
轮胎压力 轮胎压力决定了接地面积的大小(即抓地力的大小)。 胎压不足会产生过大的摩擦力,可能导致车速下降。 胎压过高会因接地面积过小而降低抓地力。 你需要找到能带来最佳效果的数值。建议将这些设置微调在170至240千帕之间。 参数 前轮压力 后轮压力 数值 190千帕 180千帕
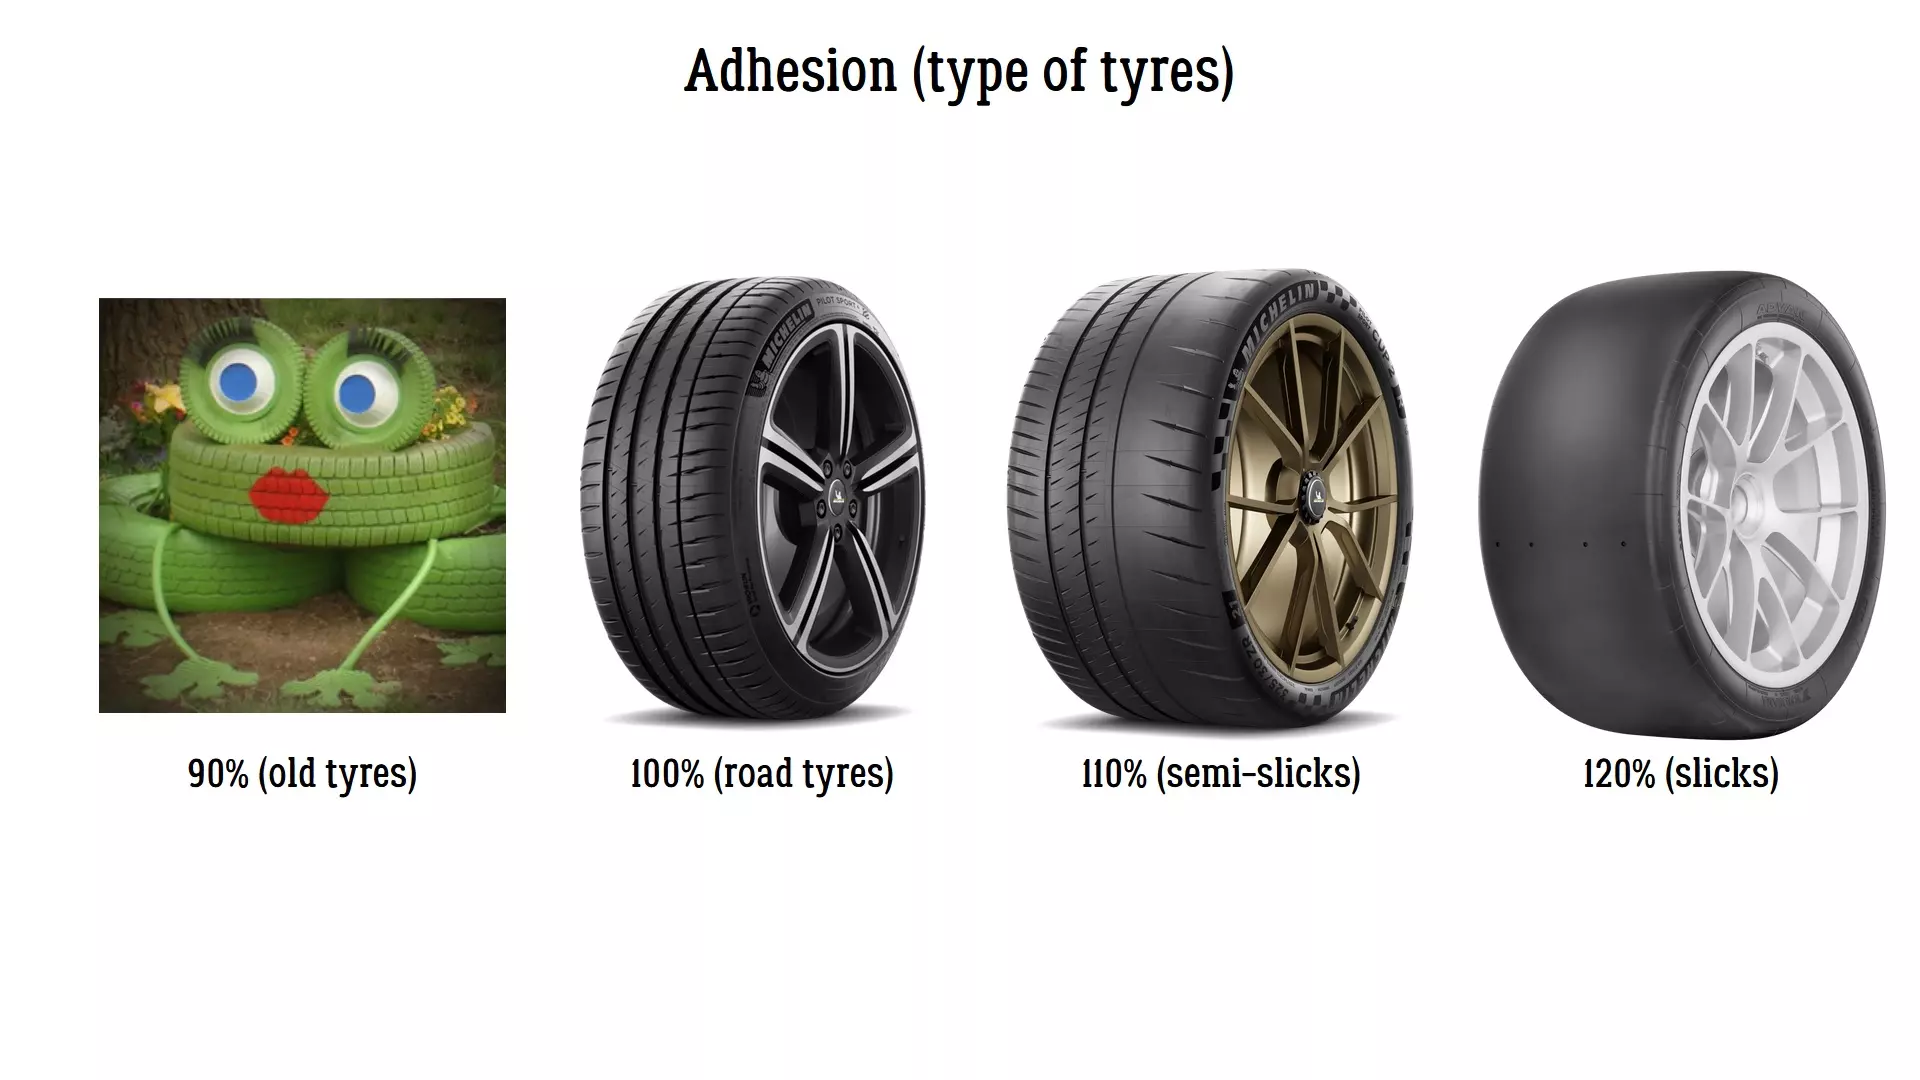
轮胎附着力 这是一个非常容易理解的设置,轮胎与路面的附着力越大,轮胎获得的抓地力和速度就越大。 附着力参数可表示如下: 90% - 复古(旧/二手)轮胎; 100% - 街道轮胎; 110% - 半热熔胎; 120% - 光头胎。 我们现在是在进行计时赛,所以使用光头胎(120%)。 参数 前轮附着力 后轮附着力 数值 120% 120%
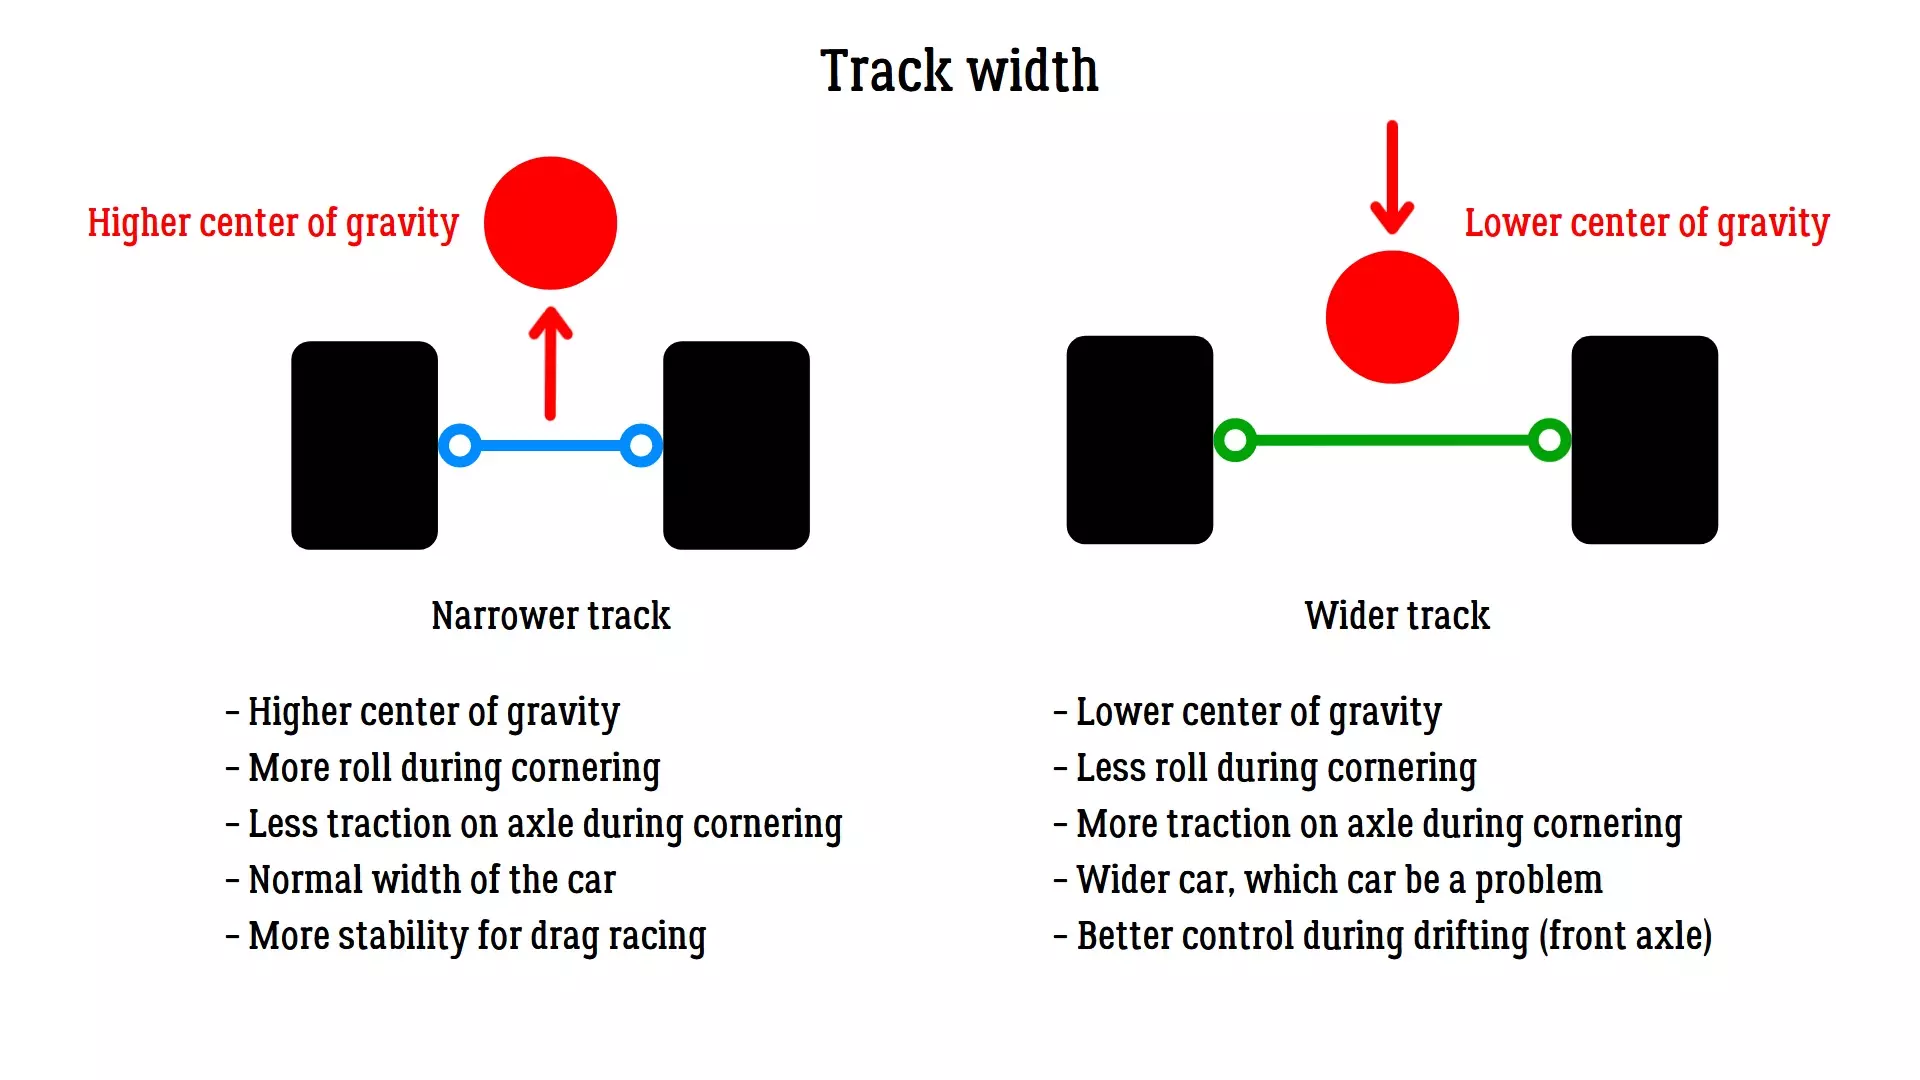
轮距:轮距可降低重心并提升操控性。 尽量保持车辆两端的轮距设置一致,无需单独增加某一端的数值。 参数:前轮轮距 后轮轮距 数值:0 2
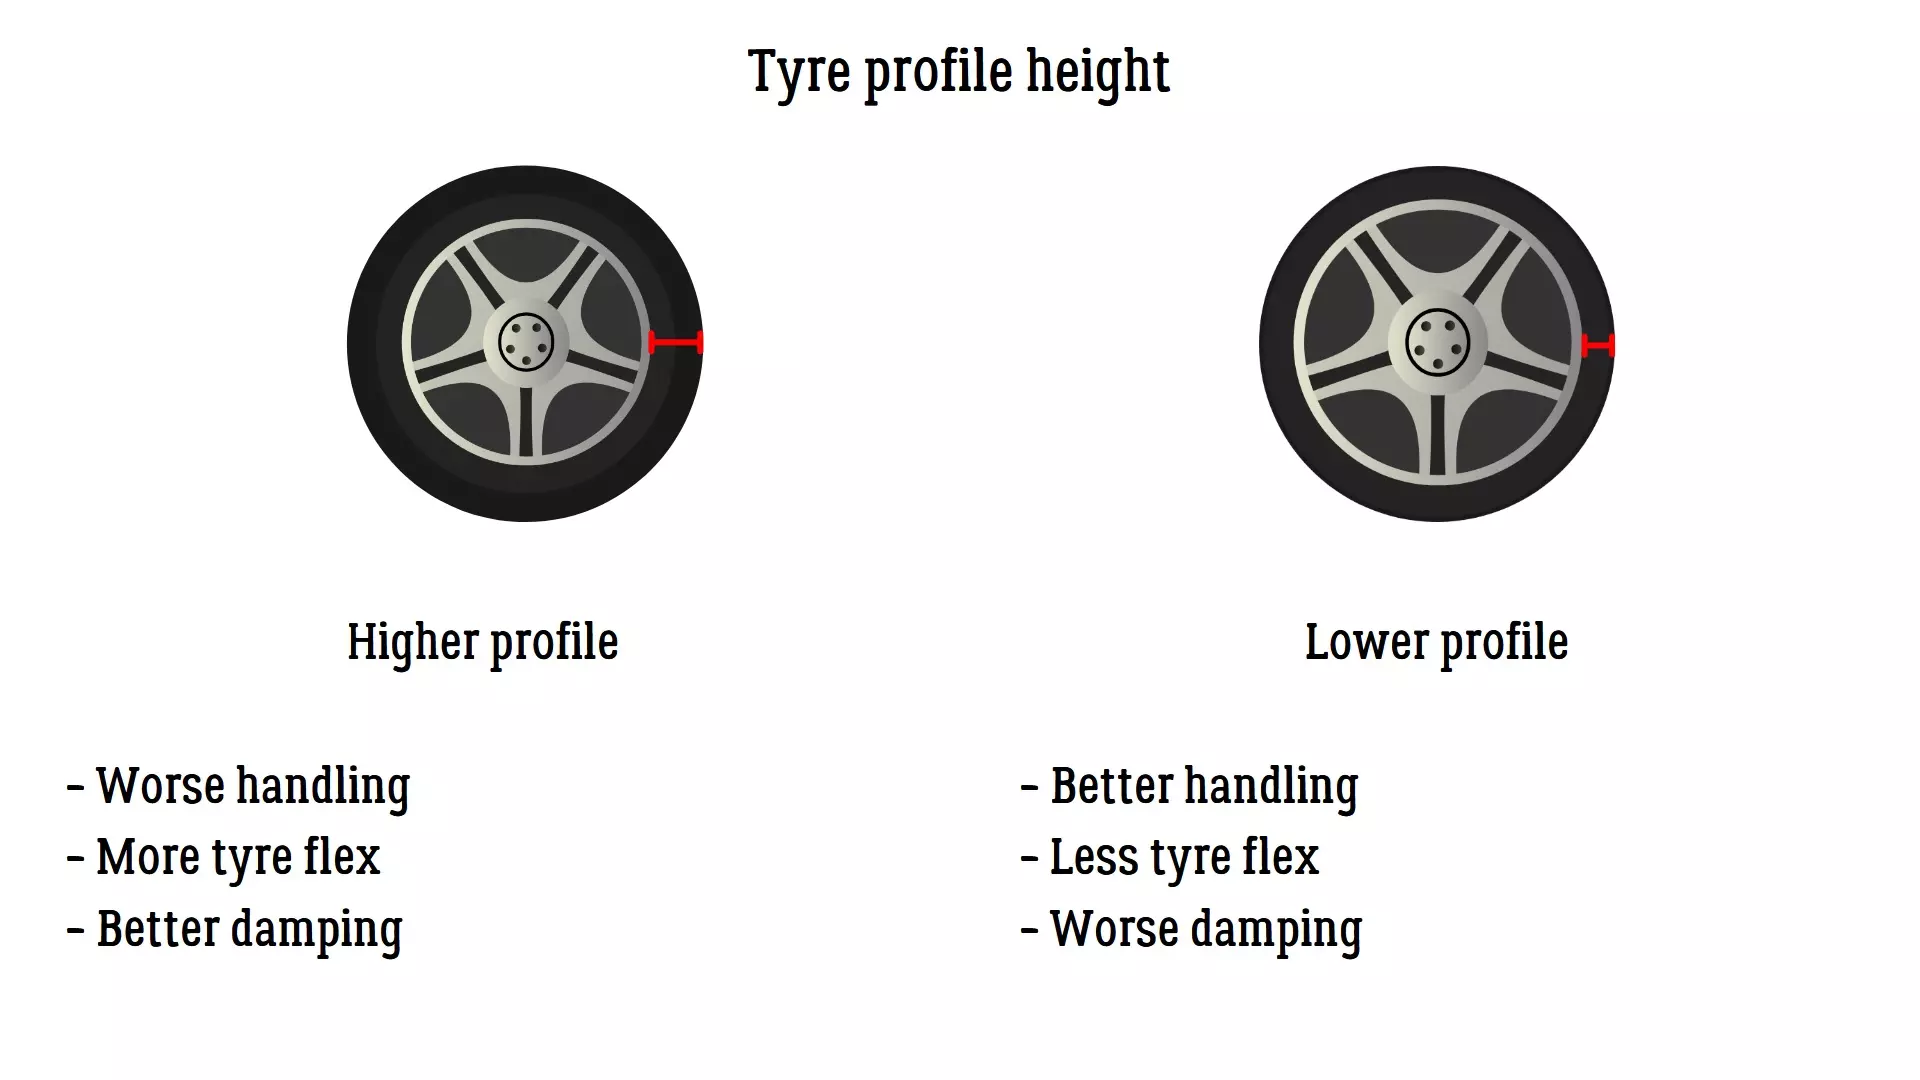
轮胎扁平率 轮胎扁平率越小,你对车辆的操控性就越好,整体抓地力也越强。 但要注意,过低的扁平率可能会导致不可预测的结果,因为胎壁不足以吸收车辆的动态变化。建议将扁平率保持在30%。 参数 前轮扁平率 后轮扁平率 数值 30% 30%
Transmission In this section you will find the adjustments for the following components: Diff. locking ratio Final drive Gears Diff. locking ratioAdjustable limited-slip differential. 0% is an open differential, which means that both of rear wheels are rotating independently. 100% is a completely locked differential, both of rear wheels are rotating at the same speed.⚠️ The more the differential is locked, the faster you will exit the corners, but the risk of losing traction is higher. ParameterDiff. locking ratioValue0.10 Final driveThe final drive adjusts the overall length of all gears, without altering the ratios of every gear individually. Bigger values mean shorter gears, lower values mean longer gears. Typically this is adjusted according to the track layout, tracks with a lot of tight turns would need shorter gears for faster power output, while long configurations with high-speed sections would require longer gears. In the end you’ll want to find a sweet spot that would suite the majority of tracks. Adjust this setting first, before tuning the individual gear settings. This setting can be also seen as a final torque multiplier, the bigger the number, the faster is the acceleration. ParameterFinal driveValue3.75 GearsThe individual adjustment of every gear’s ratio. Bigger values mean shorter gear, smaller values mean longer gears. As with the final gear ratio, this is a torque multiplier, hence why shorter gears give more acceleration. This setting is useful if you find yourself switching gears on corners where it’s not really needed. It is quite hard to adjust, as you need to constantly test the results on track for every gear. I can recommend you to search IRL gear ratios for the desired car (or at least something close in terms of performance). Personally I managed to adjust Voodoo (Viper), simply by finding gear ratios for IRL Vipers. ParameterGear 1Gear 2Gear 3Gear 4Gear 5Gear 6Value2.261.581.191.000.770.66 Brakes In this section you will find the adjustments for the following components: Brake torque Front brake bias ABS Launch control Brake torqueThe force applied to brakes, the bigger it is, the faster the car will stop. In time attack you go faster when braking. If you plan on using ABS, max it for the best performance. If you don't want to use ABS, fine tune the brake torque to avoid wheel lockup. ParameterBrake torqueValue10000 N/m Front brake biasThis setting tells the car where to apply the braking force. More front brake bias will mean that the front wheels will do more to stop the car, than the rear wheels. Usually you want values somewhere between 55% and 65% for the best performance. ParameterFront brake biasValue62 % ABSThis settings helps you prevent locking the wheels when braking. If you just want max performance, turn it on and couple it with max. brake torque. Alternatively you can disable it and achieve the same effect with a proper brake pedal work. ParameterABSValueYes Launch controlThis setting is not used in time attack races. ParameterLaunch controlValueNo Performance comparison pt. 1 (1st - 56th) In this section I will provide my test results for cars tuned with the help of this guide. I measured performance of all the cars listed below with Racing tune on Parking A circuit using Thrustmaster T150 wheel. The results should be very similar when using a gamepad with assists switched off. The acceleration and handling are rated subjectively on a scale from 1 to 5 stars. ⭐ Car namePositionBest timeClassAccelerationHandlingRolla ZR100:47.9405⭐⭐⭐⭐⭐⭐⭐⭐⭐⭐Syberia WDC200:49.0794⭐⭐⭐⭐⭐⭐⭐⭐⭐⭐Flanker F300:49.5005⭐⭐⭐⭐⭐⭐⭐⭐Wellington S20400:49.5993⭐⭐⭐⭐⭐⭐⭐⭐⭐⭐⭐Horizon GT4500:50.2993⭐⭐⭐⭐⭐⭐⭐⭐⭐⭐EVA MR600:50.4393⭐⭐⭐⭐⭐⭐⭐⭐⭐⭐Voodoo700:50.8205⭐⭐⭐⭐⭐⭐⭐⭐⭐Spector RS800:50.8595⭐⭐⭐⭐⭐⭐⭐⭐⭐⭐Syberia SWI900:50.8603⭐⭐⭐⭐⭐⭐⭐⭐⭐⭐Last Prince1000:50.8794⭐⭐⭐⭐⭐⭐⭐⭐⭐⭐Atlas GT1100:50.8995⭐⭐⭐⭐⭐⭐⭐⭐⭐Godzilla R31200:51.0002⭐⭐⭐⭐⭐⭐⭐⭐⭐⭐Kanniedood1300:51.0004⭐⭐⭐⭐⭐⭐⭐⭐⭐Vanguard1400:51.1205⭐⭐⭐⭐⭐⭐⭐⭐⭐Phoenix NX1500:51.6192⭐⭐⭐⭐⭐⭐⭐⭐⭐⭐Fujin SX1600:51.7804⭐⭐⭐⭐⭐⭐⭐⭐⭐⭐Karnage 7C1700:51.8395⭐⭐⭐⭐⭐⭐⭐⭐⭐Carrot II1800:52.0005⭐⭐⭐⭐⭐⭐⭐⭐Lynx1900:52.0592⭐⭐⭐⭐⭐⭐⭐⭐⭐⭐Eleganto2000:52.1594⭐⭐⭐⭐⭐⭐⭐⭐SpeedLine GT2100:52.3395⭐⭐⭐⭐⭐⭐⭐Piranha X2200:52.4393⭐⭐⭐⭐⭐⭐⭐⭐⭐Asura M12300:52.5804⭐⭐⭐⭐⭐⭐⭐⭐⭐Corona2400:52.5993⭐⭐⭐⭐⭐⭐⭐⭐⭐Mifune2500:52.6402⭐⭐⭐⭐⭐⭐⭐⭐Patron GT2600:52.6605⭐⭐⭐⭐⭐⭐⭐⭐Cobra2700:52.7995⭐⭐⭐⭐⭐⭐⭐⭐⭐Panther M52800:52.8191⭐⭐⭐⭐⭐⭐⭐⭐⭐Falcon FC 90-S2900:52.8193⭐⭐⭐⭐⭐⭐⭐⭐⭐⭐Hachi-Roku3000:52.8591⭐⭐⭐⭐⭐⭐⭐⭐⭐Falcon RZ3100:52.8994⭐⭐⭐⭐⭐⭐⭐⭐⭐⭐Hachi-Go3200:52.9191⭐⭐⭐⭐⭐⭐⭐⭐⭐SpaceKnight3300:53.0205⭐⭐⭐⭐⭐⭐⭐Eva X3400:53.0994⭐⭐⭐⭐⭐⭐⭐⭐⭐Samurai II3500:53.2594⭐⭐⭐⭐⭐⭐⭐⭐Wanderer L303600:53.3005⭐⭐⭐⭐⭐⭐⭐⭐Judge3700:53.4594⭐⭐⭐⭐⭐⭐⭐⭐Sorrow3800:53.5203⭐⭐⭐⭐⭐⭐⭐⭐Burner JDM3900:53.6593⭐⭐⭐⭐⭐⭐⭐Solar4000:53.7202⭐⭐⭐⭐⭐⭐⭐⭐Imperior4100:53.7602⭐⭐⭐⭐⭐⭐⭐⭐⭐DTM 464200:53.7993⭐⭐⭐⭐⭐⭐⭐Caravan G64300:53.8402⭐⭐⭐⭐⭐⭐⭐⭐Hunter4400:54.2194⭐⭐⭐⭐⭐⭐⭐Penguin4500:54.2393⭐⭐⭐⭐⭐⭐Hakosuka4600:54.2594⭐⭐⭐⭐⭐⭐⭐⭐Loki 4M4700:54.3395⭐⭐⭐⭐⭐⭐⭐Hornet GT4800:54.3603⭐⭐⭐⭐⭐⭐⭐Hummel4900:54.4594⭐⭐⭐⭐⭐⭐⭐Bandit5000:54.5004⭐⭐⭐⭐⭐⭐⭐Wütend5100:54.6392⭐⭐⭐⭐⭐⭐⭐UDM 35200:54.6604⭐⭐⭐⭐⭐⭐⭐⭐VZ2125300:54.7192⭐⭐⭐⭐⭐⭐⭐⭐Warden5400:54.7394⭐⭐⭐⭐⭐⭐⭐Unicorn5500:54.7404⭐⭐⭐⭐⭐⭐⭐Cobra GT5305600:54.9595⭐⭐⭐⭐⭐⭐⭐ Performance comparison pt. 2 (57th - 86th) Car namePositionBest timeClassAccelerationHandlingZismo5700:55.0595⭐⭐⭐⭐⭐⭐⭐Bimmy P305800:55.0801⭐⭐⭐⭐⭐⭐⭐⭐Midnight5900:55.1793⭐⭐⭐⭐⭐⭐⭐⭐Black Fox6000:55.1802⭐⭐⭐⭐⭐⭐⭐VZ 2106100:55.2591⭐⭐⭐⭐⭐⭐⭐⭐Spark ZR6200:55.3205⭐⭐⭐⭐⭐⭐⭐⭐Interceptor6300:55.3593⭐⭐⭐⭐⭐⭐⭐⭐Grace GT6400:55.6595⭐⭐⭐⭐⭐⭐Kitsune6500:55.6804⭐⭐⭐⭐⭐⭐Glorious XZ6600:55.7204⭐⭐⭐⭐⭐⭐⭐Panther M5 90-S6700:55.8401⭐⭐⭐⭐⭐⭐⭐⭐Rattlesnake6800:55.8604⭐⭐⭐⭐⭐⭐Thunderstrike6900:55.8992⭐⭐⭐⭐⭐⭐Shark GT7000:56.0805⭐⭐⭐⭐⭐⭐⭐⭐Interstate7100:56.4194⭐⭐⭐⭐⭐⭐⭐Magnum RT7200:56.4594⭐⭐⭐⭐⭐⭐Raven RV87300:56.5003⭐⭐⭐⭐⭐⭐Equator D7400:56.5993⭐⭐⭐⭐⭐Inferno7500:56.9393⭐⭐⭐⭐⭐⭐Nomad GT7600:56.9395⭐⭐⭐⭐⭐⭐Flash7700:56.9805⭐⭐⭐⭐⭐⭐⭐Pirate7800:57.0592⭐⭐⭐⭐⭐⭐Hotrod7900:57.0804⭐⭐⭐⭐⭐Dacohosu8000:57.3191⭐⭐⭐⭐⭐⭐⭐Black Jack X228100:59.8795⭐⭐⭐⭐⭐Betsy8200:59.0403⭐⭐⭐⭐⭐⭐Black Jack X1508301:00.2395⭐⭐⭐⭐⭐Cargo8401:00.5203⭐⭐⭐⭐Shadow XTR8501:01.1605⭐⭐⭐⭐⭐Warrior8601:02.0595⭐⭐⭐⭐ Performance comparison pt. 3 Here you will find a small recap on fastest car in each class. Class 1
二等舱

三等舱

无法翻译,已删除。
无法翻译,已删除。

结束 好了,差不多就是这些了。如果你有其他补充信息,欢迎评论。