换一换
换一换 


包含本体游戏及3个DLC。我不会详细介绍具体的游戏机制,因为已有两篇Steam指南对此进行了涵盖。本指南更像是一个帮助你高效经营居酒屋的工具,我会提及一些个人认为有帮助的内容。 开始之前的常规说明: 包含本体游戏及3个DLC。我不会详细介绍具体的游戏机制,因为已有两篇Steam指南对此进行了涵盖。本指南包含关于你未来伙伴以及游戏所有区域的剧透。除了捂住你的眼睛并点击离开外,我对此也没什么好说的。虽然我会对每个区域的可用伙伴进行剧透标签处理,但伙伴部分显然充满了剧透。以下是本指南包含的内容: 地图 各区域的基本详情 商店 稀有客人 伙伴 非常长的任务列表 稍短的新闻列表 非常基础的提示。若需详细内容,请查看Suika Ibuki或nobody's fault but mine的指南。 以下是本指南不包含的内容: 游戏机制(已有其他两篇指南涵盖) 食谱和食材列表(请查阅维基。商店部分已涵盖必要内容) 特殊客人,例如铃奈庵和联动角色。
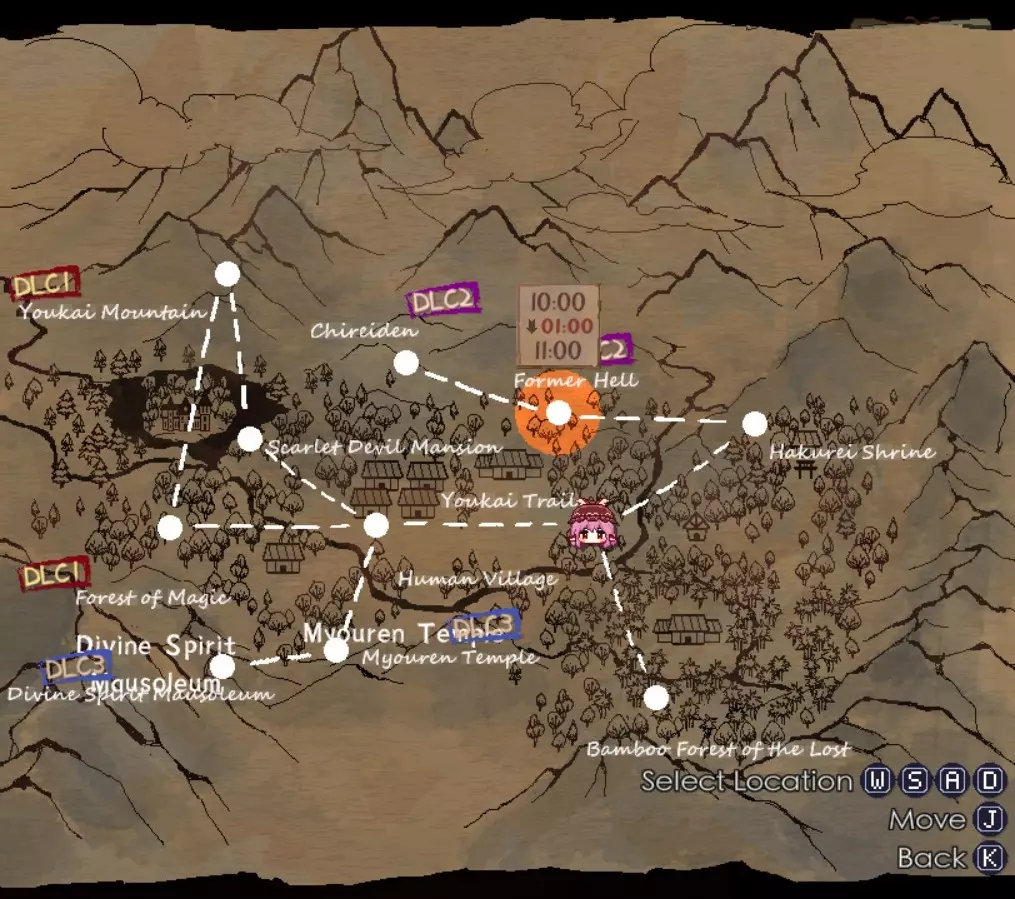
You start out at Youkai Trail and each area unlocks like so: Youkai Trail > Human Village > [DLC 1] Forest of Magic > [DLC 1] Youkai Mountain > Hakurei Shrine > [DLC 2] Former Hell > [DLC 2] Palace of the Earth Spirits > Scarlet Devil Mansion > [DLC 3] Myouren Temple > [DLC 3] Divine Spirit Mausoleum > Bamboo Forest of the Lost If you are only concerned about maxing bond level, towards the end my travel route is to back track from Palace of the Earth Spirits and then make my way towards the west side of the map. Passing through the Village and make my way down towards the Mausoleum. Finally back up towards the Youkai Mountain. By the time I end up at either Scarlet Devil Mansion or Forest of Magic, I'll still have 30 minutes left to invite someone or get ingredients. Doable if you have no need to make anything for quests. (But you won't be able to ask Wriggle to get stuff for you :( ) However this route is not usable once Bamboo Forest of the Lost is available. You simply will not have enough time to go to each location. I'd prioritize on maxing bond levels for residents of Youkai Mountain and Forest of Magic first just so you don't need to go that way unless I need certain ingredients. Because you almost always start out at Youkai Trail, it's easy to talk to the 3 characters here to slowly raise their friendship just through dialogue once you hit level 4. Keep in mind with the exception of Chen, Rumia and Wriggle can also appear as rare guests in Forest of Magic sometimes. (Although the forest itself is easy to stall progression-wise early on...) You will always go through Human Village if you hope to get to the left side of the map, so I also wouldn't spend too much time here after other areas have opened up. Has the same geographical advantage of Youkai Trail so you have plenty of opportunity to talk to the rare guests here. I would stock up on Akyuu's reward card though as early as possible. There's a particular NPC in the Village who wants Akyuu's reward spell card that generates Signed Washi. The NPC will trade 3 Signed Washi for 3 premium meat/fish or high level beverage choice. She will make a posting in the newspaper so just keep an eye on that. Tips Smart shopperThe farther away from Mystia's home, the more expensive ingredients tend to be in shops. Shangai Doll in Forest of Magic's ingredients are very reasonably priced though. Hakurei Shrine's fairy maid's meat ingredients while fluctuate somewhat in price, she has the best deals because... they are nearly expired. But this is video game. Expiration date doesn't exist in Gensokyo (or common sense.) Region specific specialties like Black Salt will be the cheapest from their place of origin Youkai Mountain. Though mundane items such as Radish will be doubled in price if purchased in Hell rather than from the Human Village. (Or you got scammed by the scalper merchant on Youkai Trail) Cheapskate scavengingBut shopping costs money, if you can scavenge for free why not scavenge. It's why maxing someone like Wriggle's bond can be very beneficial. For the cost of 30 minutes she can collect everything on Youkai Trail in one go for you at the end of the day. Each area has someone like Wriggle who can do this kind of job. Akyuu in Human Village. Suika in Hakurei Shrine. So on so forth. You will have to buy most drinks though. Fairies are not made of money. Cheap and steady wins the raceEverybody has a budget. On one end of the spectrum there's Marisa, who's filthy rich and then there's Cirno on the other end. As tempting as it is to throw your most expensive dishes at your special guests, there's no way someone like Cirno can afford a deluxe sushi boat with her meager fairy allowance. Because I prefer maxing my guests's level first over squeezing them for money, I will serve them cheap dishes stacked with extra ingredients. They pay the same price regardless of how premium your added-on ingredients are. You may lose money in the short run, but the perks or recipes they offer down the line would be worth it. Happy guest or repeat orders?Regarding guest preferences, Night Sparrow set ignores rare guest's request if the food is made during Hyper mode. Useful if you can meet all the other tags but not the one that's requested. But if you want them to increase chances of sticking around, try the Suspicious set kitchenware. Guests are 30% more likely to order if you serve them food made with these. Night Sparrow series is available very early on while Suspicious series only becomes available once you've reached the third base game area. The special menuIt is not necessary to set a dish on the menu to be able to cook it. As long as you remember what the needed ingredients and the corresponding kitchenware you need, you can make it. Putting an item on the menu just makes it easier to select really. Of course, nobody could order outside of the standard menu this way. Mini game call backThe rhythm mini game during the Izakaya phase is worth mastering. One of the spell card you generate from succeeding the game is "Toss Serving." Unless your partner can teleport or throw knives, this is the fastest way to serve guests. Getting this spell card or entering Hyper mode will be necessary for the final part of the game. The mini game's pretty forgiving compared to actual rhythm games at least. Good things do happen if you are generousFeel like donating to the shinre is a scam? Maaaybe. Though there's secret service once you do donate enough. Teleportation service for a very nominal fee. You just need to donate 25500 yen to Reimu to unlock it ;) Teleporting this way does not cost any time at the cost of some chump change. Achievement farmingIf you want to get all achievements, there are 2 points you may want to keep separate save points for. One for when Mystia is dragged into an unavoidable event on 3/14. The event's outcome will net your 1 of 2 possible achievements. The other achievement will be missed if you continue the main story after this. Another save for once the final mission is available. Earliest point for this is 3/24 but you still go on with your main game until you feel you are ready for it. This is a good spot to farm all your punishment cards. In a sense, it's also possible to miss another achievement here. Lose intentionally in the final fight. Tewi also stops scalping you once you've become a good friend with her. So if you haven't been scammed by her 25 times, there's that final mission save you can always load back to. Sakuya has a counter based achievement where you need to trade with her X amount of times to unlock it. There's no easy way to get around this one. Save/Reload doesn't work. Loading from an older save doesn't work. Loading a newer save on a later date but same item requests doesn't work. Loading the old save from after you've made progress on the new mission also doesn't work. Fastest way is to sleep for days until she posts an ad in the papers again. Repeat until you hit 30... Earliest you can get this achievement if you didn't miss any Sakuya's quest is 5/23. Unless... You feel like editing your saves. Hishiro Chizuru has a guide on modifying the save files for Sakuya's errands. The same method can be applied for Tewi's shop too. Yes it's in Chinese. But the screenshots are fairly self-explanatory. It involves copy pasting the specific entry X number of times. Do backup your save files before you attempt this. https://steamcommunity.com/sharedfiles/filedetails/?id=2760195446 Closet-ful of goodiesDo you remember Mystia has a basement? In addition to the Closet to change her costumes, there's also a Presents Cabinet that allows you to turn on/off the cool stuff you got from your friends. By default, all the goodies you receive are not active until you've enabled them in the basement. I entirely forgot about the existence of this thing until I already beat the game. Oops... Oh. There's also a record player that's the BGM player of this game. I like it, okay?If there's one particular BGM you particularly love and would love to hear it played even during Mystai's work phase, you can set it from her record player in the basement. You are given the option of looping one song or the whole set from an area. Some friends are just worth it more than the othersThere are 3 types of gifts you can get on each map: costumes, scavenging service, and useful passive items. If you have DLC 1, I highly recommend gunning for Nitori ASAP. At max bond she gifts you a phone and it does what you expect a phone to do. Contact people to: Invite them, commission them, or even do some shopping. Sadly Kappa technology hasn't quite got that mobile aspect down pat so you are stuck with a very 80s vintage phone at home. The phone will not show up until you enable it from the Present Cabinet. You cannot call anyone you haven't reached at least level 4 bond with. Multi-invite or commission doesn't allow you to bypass the 30 minutes requirement for each guest. If you ask 2, you spend 1 hours to do so. If you invite everyone, you spend .5 x the number of you invited. If you don't feel like spending a LOT of money over a period of at least 26 days to unlock the secret service, this is a good alternative. Bamboo expansionFor Twei's level 3 quests where you need to give her [Sweet] and [Small Portion] tag, you can just give her the Mochi from Human Village's merchant. For Chen's final upgrade for this region you can just get her Lunar Dango from Ringo in the Human Village. You could also placate Twei with the Mochi after adding some tag easily as well with the store bought snack should she drop in uninvited. Foundation dishes to build up on These are some of the basic and easy dishes I like to use to build up on to please the rare guests. Due to menu restraint some obviously can't make it.
基础游戏食谱: 鲜豆腐:初始自带食谱!经典又美味。适合素食者、小食量人群,奇怪的是,萃香也喜欢。由于没有可转化为暗物质的X标签,你可以轻松在上面叠加肉类食材和其他配料。标签:【素食】、【家常菜】、【清淡】、【下酒】、【小份】。 饭团:适合手头拮据的红白和麟之介。 味增豆腐:阿求早期就能解锁的简单食谱。标签:【素食】、【家常菜】、【清淡】、【日式】。偶尔阿求会要求带有【汤品】标签的食物,这道食谱就非常合适。 落樱缤纷:阿求的另一道佳肴。仅需1份特级金枪鱼,但带有一些针对挑剔食客的特定标签:【日式】、【上镜】、【小份】、【海味珍馐】。豆腐炖或烤蘑菇:主要针对 Mokou 的【热】标签。这两种料理价格便宜,且有足够的空间搭配【水果味】或【辣味】来满足 Mokou。豆腐炖可从 Kasen 处获得。烤蘑菇【食谱】则来自游戏初期附近妖怪小径的一个 NPC 任务。 粉饭团:Reimu 制作的一道不错的料理。具有【家常菜】【饱腹感】【日式】【素食】和【热】标签。 能量汤:获取【力量提升】标签最简便的方式。注意【热】标签对某些怕辣角色来说是禁忌,比如 Chen(尽管这道食谱是她给你的)和 Kogasa。 仿制熊肉炖:不涉及 DLC 的情况下,这道由 Rumia 提供的假熊肉炖是另一个可靠的【力量提升】标签来源,且没有【热】标签。猪肉饭团:仅需1份猪肉。这是一道非常适合新手的早期菜肴,能满足肉食爱好者的需求。这道菜也无法转化为暗物质。完成慧音的学校午餐盒任务后,她会给你这个食谱。 玫瑰萝卜沙拉:天子的入门级食谱,非常适合追求【素食】【清淡】【上镜】【清凉】标签的人。对天子本人(喜欢素食、清淡和上镜)和琪露诺(喜欢清凉和上镜)都很有用。 学者银杏:适合喜欢【文化背景】的学者型人物。它同时具备【甜味】和【素食】属性,算是额外的优点。与慧音的羁绊等级达到3级后,她会给你这个食谱。适合慧音、华扇,偶尔也适合阿求;爱丽丝和成美则取决于她们的要求以及你是否计划进行标签堆叠。 优昙华蛋糕:这是一种使用稀有食材的高级蛋糕,在游戏后期才能轻松获得这种食材。但这款蛋糕是获取【传说】、【上镜】和【梦幻】标签的“最简单”方式。它很容易满足帕秋莉的多个标签要求,也是为天子制作【传说】标签料理的良好基础。与莉格露的羁绊达到4级时,她会赠送给你。 麻糬:遇到骗子帝时可以使用。在从她那里获得食谱之前,你也可以直接在人类村落购买现成的麻糬。搭配合适食材的鲜豆腐对帝来说也适用。 猪肉炒饭:具有【肉类】、【下酒】、【家常菜】和【中式】标签。不过,专门想找家常菜的人通常不想要【油腻】标签。还有那个奇怪的鬼族萃香也不喜欢【油腻】的食物。完成博丽神社老婆婆NPC的任务就能获得这个食谱。 汤圆或饺子——可以用银蛙币在香霖堂购买的食谱。很适合在道士和美玲要求中式、素食、家常菜或有文化背景的食物时用来安抚他们。我记得这些是基础游戏里就有的……? 二天一流:该死的【灵光炸裂!】标签。虽然它是所有带有这个标签的食物中最贵的,但可能是满足勇仪或布都需求的最简单的一种。水煮鱼也可以作为满足勇仪需求的更便宜替代选择。这个食谱可以从萃香那里获得。
DLC食谱: 狮子头:这是一道极其简单的肉类食谱,适合任何食肉动物或海量饮酒者。(不过要小心露米娅,因为她讨厌【适合佐酒】这个标签。)这道菜仅需1份牛肉,就自带【肉类】【适合佐酒】【咸鲜】【招牌】和【特色】标签,是作为基础菜品的绝佳选择。唯一的缺点是需要拥有DLC 2,因为只有勇仪能给你这道食谱。 黄金脆皮鱼糕:由早苗提供的不错食谱。它带有【适合佐酒】和【力量提升】标签。由于是油炸食品,所以仍有讨厌的【油腻】标签。但在合适的情况下,这道菜对某些人来说会很合适。 握寿司:通常用于成美。我也喜欢将其改良后给辉夜食用。【温和】、【日式】、【咸鲜】、【文化背景】。成美的第一道食谱,需要DLC 1 御好烧:可能是你最早能轻松获得带有【上镜】和【小份】标签的食物。【日式】标签真的只是额外加分项。我通常用这个给早苗,除非她在谈论守矢神社的两位神明。需要DLC 1。 樱花布丁:它是御好烧的【甜味】、【果香】且【清凉】的替代品,缺点是要到DLC 2的地图中遇到觉后才能获得。 瞬杀☆:再次特别提及所有带有【力量提升】标签的食物。这是射命丸文带来的。除了【力量提升】,它还带有【山珍】、【昂贵】标签。可用于勇仪和布都。烟熏海盗:这是一个非常后期的食谱,由DLC3中命莲寺的水蜜交给你。这是最后一个带有【力量提升】标签的食谱。价格与即死☆大致相同,但它用【山珍】标签和额外的食材槽换取了【传说】标签,价格也略低一些。虽然它符合水蜜自身的许多标签,但对于丰聪耳神子来说一般,对于多多良小伞来说因为预算问题也一般,在某种程度上,如果勇仪要求正确的标签,可能会适合她。红美铃因为预算少而不考虑。 通常与特定稀有客人相关的食谱往往会受到他们的好评,但这并非绝对规则。例如,慧音交给你的第一个食谱【油炸豆腐】就带有她讨厌的【油腻】标签。不过,即使以默认状态供应【学者的银杏】,她也往往很喜欢。如果不确定,一定要先查看她们的偏好。带有【甜】【奇特】等特殊口味标签的食物,很容易通过添加额外食材来叠加效果。但像【家常菜】【日式】或【中式】这类与文化相关的标签就比较棘手。对于有这类偏好标签的角色,最好先根据这些标签进行筛选。比如,当小伞要求【家常菜】标签时,筛选该标签可以找出一些非常实惠的食物。如果她没有要求【强身健体】,那么猪肉丼或牛肉丼会是不错的基础选择。 妖怪小径

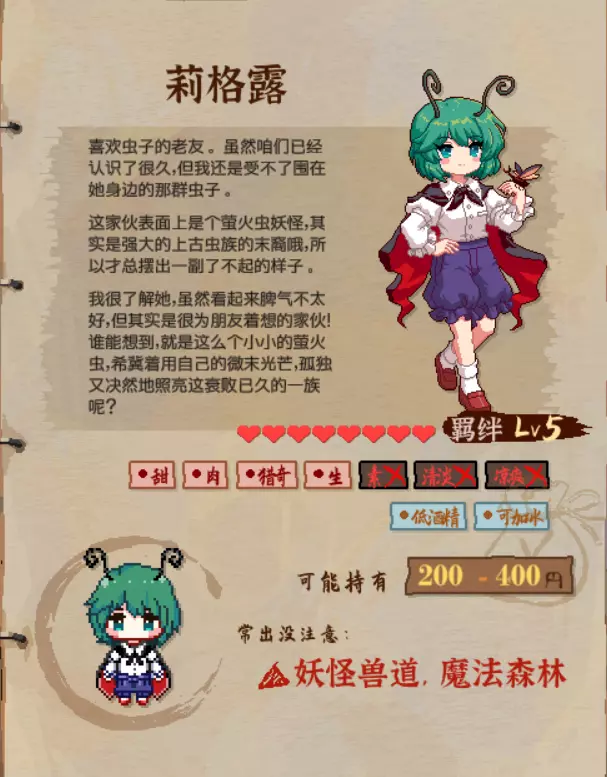
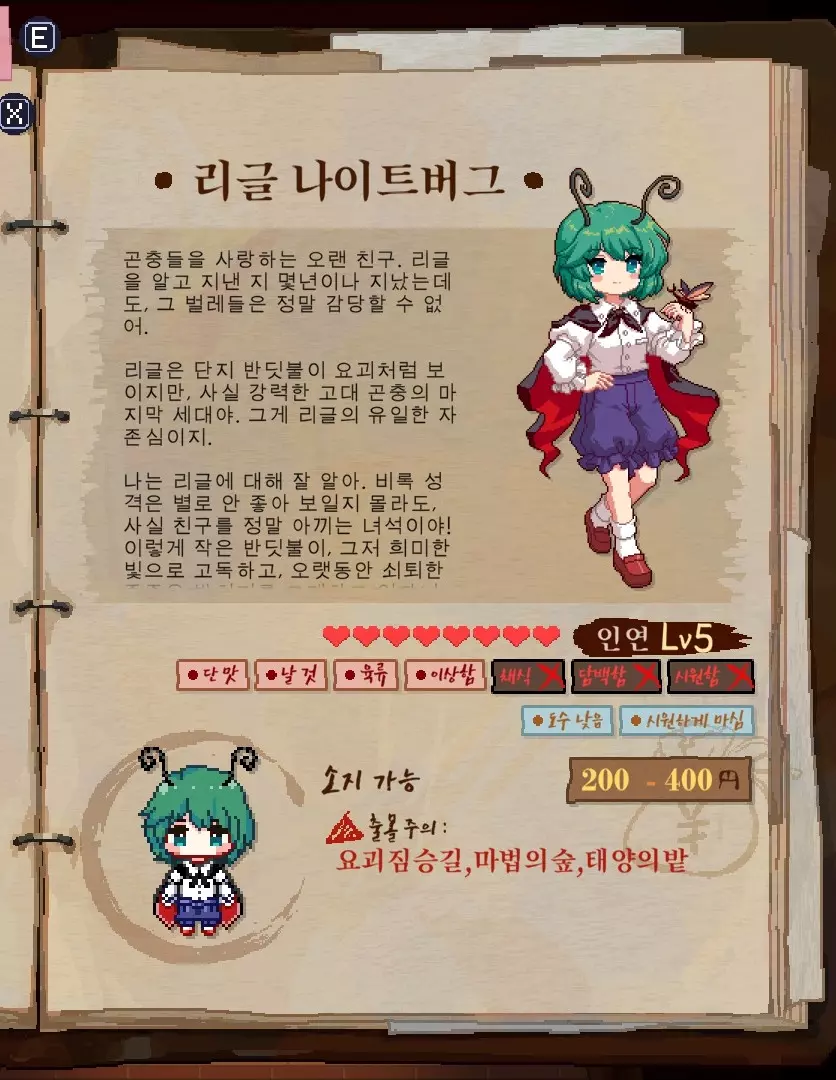
莉格露·奈特巴格 喜好:甜食、肉类、生食、奇特食物 厌恶:素食、清淡食物、冷食 饮品:低酒精、可冷藏饮品 预算:200-400日元 奖励:露水溏心蛋【食谱】、油炸蝉蜕【食谱】、优昙华蛋糕【食谱】、妖怪小径资源收集 常出现地点:妖怪小径、魔法森林 奖励符卡:灯火「萤火现象」 召唤一大群萤火虫来增强你的氛围。客人出现概率提升30% 惩罚符卡:莉格露符「夜虫龙卷风」召唤虫子驱赶走所有客人 露米娅 喜好:生的、招牌、肉类、馅料丰富、流行趋势-热门、奇特 厌恶:昂贵、下酒、流行趋势-冷门 饮品:苦的、苏打 预算:150-350日元 奖励:臭豆腐【食谱】、油炸七鳃鳗【食谱】、仿熊肉炖菜【食谱】、黑色西装服装 常出现地点:妖怪小径、魔法森林 奖励符卡:月符「月光射线」随机给予3种已记录在笔记本中的肉类食材 惩罚符卡:暗符「境界」黑暗笼罩厨房区域20秒 千羽鹤 喜好:水生、烧烤、甜的、肉类、油腻、流行趋势-热门 厌恶:辣的、素食、流行趋势- 冷门奇特饮品:果味、干型 预算:400-600日元 奖励:神秘鱼干脆片【食谱】、猪肉鳟鱼串【食谱】、能量汤【食谱】、招财猫道具 常见地点:妖怪小径 奖励符卡:隐士符「凤凰蛋」 随机给予3种已记录在笔记本中的鱼类食材 惩罚符卡:方向符「禁忌方向」 以可爱猫咪的力量降低新客人到来的几率 稀有客人:三位居民+魔理沙 可解锁伙伴:响子 资源:海藻、三文鱼、七鳃鳗、露水(10:00-11:30)、蝉蜕、土豆(同一采集点偶尔会产出萝卜)、蜂蜜、优昙华(16:00于博丽神社)、野猪肉、麻雀酒(11:30在通往竹林的小路上)、獭祭(在达成特定条件后16:00开始出现)特定NPC任务,月见草(17:30从竹林获取)
杂货店[黄牛]: 与人类村落的价格相比,这里的价格略高一些。不过像神灵庙或地灵殿这类偏远地区,价格会更高。 鸡蛋 - 2日元 猪肉 - 4日元 牛肉 - 6日元 豆腐 - 3日元 土豆 - 4日元 洋葱 - 5日元 南瓜 - 6日元 萝卜 - 7日元 海苔 - 1日元 辣椒 - 1日元 水果嗨棒 - 5日元 澪 - 8日元 水果酸酒 - 5日元 竹笋 - 17日元 妖怪小径是一个非常特别的食材收集区域,与其他地方不同。露水只在每天的前1.5小时出现。然后麻雀酒在11:30出现。优昙华只能在16:00收集,并且必须从博丽神社的另一条路前往。月之草就像珍稀花朵一样。你必须在17:30从只能通过竹林另一个入口到达的宝塔处获取它。这里的商人价格确实比人类村落的要高,但只是略高一些。与后面的区域相比,这里的价格仍然相当合理。米斯蒂娅在游戏内会提到她知道自己被这里的商人敲竹杠了。在你能够进入下一个区域之前,专注于自己收集食材,反正你有的是时间。 建议尽快将莉格露的好感度提升至最高。好感度达到最高后,你可以请求她为你收集妖怪小径的食材。她收集到的酒类也可能是非常好的4级饮品。橙虽然不那么重要,但她选择的饮品偶尔也会包含一些4级饮品,不过她的选择不如莉格露的多样化。将陈美铃升到满级会给你招财猫道具,能提升5%的小费比例。如果你想打发时间,早期就把她升到满级可能是值得的。如果你想通过存档读档来刷角色掉落的优质饮品,完全可以这么做。他们离起始点很近,操作很快,虽然有点 tedious,但如果你急需额外现金的话是可行的。毕竟大多数高级饮品要到游戏后期才能解锁。 园原魅铃真的没什么特别有价值的东西。不过她的服装很搞笑。不过我觉得在工作阶段这服装很让人分心。那双一直转的豆豆眼是让你感到害怕,还是像个小学生一样咯咯笑呢? 值得注意的食谱:莉格露的4级优昙华蛋糕相当不错。遗憾的是,制作同款蛋糕的主要食材要到游戏后期才能轻松获取。最终,在妖怪小径会有一个孩子,完成他的任务后会奖励2朵优昙华和1瓶波子汽水,这能让你很早就完成莉格露的任务。阿求的扇子有时也会奖励优昙华。 橙的4级力量汤是获取麻烦的【力量提升】标签的非常经济的方法。对某些鬼族和某个特定的陵墓幽灵很有用。 露米娅的4级模仿熊掌还不错,前提是食材不成问题。但所有食材在前期都很难收集。伊比利亚猪肉、竹笋和河豚在你到达人类村落或能进入DLC1的妖怪山之前都不容易获得。人类村落的铃奈庵所售卖的商品也很不稳定,所以你不能指望从那里买到竹笋。 人类村落

稗田阿求 偏好:日语、清淡、文化背景、汤类、优质、甜味、流行趋势 厌恶:油腻、咸味、辣味、冷门趋势 饮品:清酒、可加热 预算:500-800日元 奖励:味噌豆腐【食谱】、蔬菜沙拉【食谱】、落樱【食谱】、人间之里资源收集 常出现地点:人间之里、【DLC 3】命莲寺 奖励符卡:「这一切也是妖怪所为吗?」 获得著名小说家签名和纸用于交易稀有物品 惩罚符卡:座谈会「无良餐馆的黑历史」 效果:将氛围降至0 上白泽慧音 喜好:文化背景、素食、家常菜、清淡、中餐、日料、流行趋势 厌恶:油腻、冷门趋势、大份量、咸味 饮品:烈酒、清酒、烧酒 预算:400-800日元 奖励:油炸豆腐【食谱】、学者的银杏【食谱】、白雪【食谱】、中式校服服装 常出现地点:人类村落、【DLC 1】魔法森林、【DLC 3】命莲寺 奖励符卡:地符「三神器」 三神器-剑:随机给予2种蔬菜 三神器-镜:15秒内制作新菜品不消耗任何食材 三神器-玉:随机揭露一位特殊客人的未知秘密/标签 三神器 - 国家:慧音老师认可了你的居酒屋。顾客将涌向你的店铺 惩罚符卡:土符「秘传·头槌」 你被击中并昏迷20秒。伊吹萃香 偏好:文化背景、日语、擅长饮酒、家常菜 厌恶:廉价、生食、辛辣 饮品:低度酒、陈酿、纯饮 预算:400-600日元 奖励:豆腐炖菜【食谱】、牛肉盖饭【食谱】、猎人砂锅【食谱】、幸运牡丹道具 常出现地点:人类村落、【DLC 3】神魂陵墓 奖励符卡:"猛兽的艺术表现" 萃香的宠物虎表演会使客人随机支付1-30日元小费 惩罚符卡:"凡尘欲望的业力冥想训练" 接下来30秒内所有顾客只会点最便宜的食物和绿茶 稀有客人:3位居民、铃奈庵店主(出现在特殊客人标签下)、魔理沙 搭档:本居小铃资源:海藻、金枪鱼、银杏果、鸡蛋、洋葱、南瓜、萝卜
商店: 农夫: 鸡蛋 - 1日元 猪肉 - 3日元 牛肉 - 4日元 豆腐 - 2日元 土豆 - 3日元 洋葱 - 3日元 南瓜 - 4日元 萝卜 - 4日元 海苔 - 1日元 辣椒 - 1日元 苹果 月见团子的价格并非固定不变 月见团子* - 43日元 弹珠汽水 - 16日元 【团子会在当天结束时过期,因为它被算作一道菜】 清兰: 年糕 - 10日元 牛奶 - 6日元 葡萄柚汁 - 8日元 【年糕会在当天结束时过期,因为它被算作一道菜】 酒商: 他的价格并非固定不变,可能会在这个范围内波动 梅酒 - 15日元 ZUN啤酒 - 9日元 三月精 - 16日元 美少女欧米茄 - 9日元 香霖堂【随机城市】 默认情况下,他的定价是最高的,除非你拥有他奖励符卡中的折扣券:可享受20%折扣,使用后失效。即便在打了20%的折扣后,竹林里的妖怪兔子都能和他相提并论,所以仍然不推荐。这家伙是继帝之后最大的骗子。更糟糕的是,他的定价还极其不稳定。 七鳃鳗 蘑菇 桃子 糯米 竹笋 竹子 冰 桂花酒 [随着游戏进程会持续更新] 三位居民都有一定几率给你不错的酒。若你拥有DLC,华扇偶尔还会给你DLC 2中的酒水选择。慧音偶尔会给你“满月之夜”,这是一款4级的非常昂贵的酒,价值440日元。不过我觉得,如果你想要酒,或许去碰碰运气找橙或莉格露会更容易些。阿求(Akyuu)是优先升级到满级的不错选择,因为她和莉格露(Wriggle)一样,满级后可以为你收集人类村落的食材。获取她的奖励符卡还能让你从她的狂热粉丝那里额外获得一些高级食材。慧音(Keine)的5级奖励是一套相当单调的服装。华扇(Kasen)的5级奖励是一个被动道具,能在客人每次用餐时提升15点满意度。从难度上来说,这三位都很容易升到满级,因为她们喜欢的标签很容易通过廉价食物或极易获取的食材达成。 值得注意的食谱:阿求的食谱都相当实用且容易记住。我经常用她的2级食谱【味增豆腐】来满足【日式】或【家常菜】标签。制作它只需要一块豆腐,这意味着我可以省下一个宝贵的食谱槽位,用来放置更赚钱的食谱。(记住,准备阶段不需要选择该食谱就能使用。解锁后,你只需记住所需的食材并拥有必要的厨具即可)它的用途非常广泛,因为你有3-4个槽位可以轻松标记堆叠。她给的3级蔬菜沙拉也还不错,因为食材非常常见。不过对于稀有客人来说,它可能不是最佳选择,但作为获得更好食谱前的过渡选择还是不错的。4级的落英缤纷需要特级金枪鱼,但只需要金枪鱼和砧板。非常容易记住。从标签角度来看,这不算个坏选择,但稳定获取【高级金枪鱼】会是你更大的难题。 慧音有两个相当简单的食谱,但说实话我根本不用她的2级食谱【油炸豆腐】。【油腻】标签是个大缺点,因为三分之二的村民都讨厌这个标签,包括慧音自己。她的3级食谱【学者的银杏】有用得多,只需要同名的坚果和蜂蜜。前期这是能获得【文化背景】或【中式】标签的最简单食谱之一,很适合那些喜欢甜食的学者型角色。4级食谱【白雪】价格昂贵,而且在你解锁博丽神社、红魔馆或DLC1的妖怪山之前,【河豚】并不容易获得。 华扇的食谱只能说一般般。2级的豆腐炖通常在实用性上不如阿求的味增豆腐。通常来说,【热】标签并非主要的需求条件。3级就是普通的牛肉盖饭,标签相当基础。4级的猎人 casserole(炖菜)存在和慧音的白雪、伊比利亚猪肉相同的问题——伊比利亚猪肉要到游戏后期才能从商人处买到,比如博丽神社以及DLC 2中旧地狱的鬼商人。 【DLC 1】魔法森林

爱丽丝·玛格特罗依德 喜好:文化背景、家常菜、高级料理、西式料理、甜食 厌恶:肉类、馅料、油腻食物、奇怪的东西 饮品:西式饮品、现代饮品、酒精饮料 预算:500-800日元 奖励:奶油蘑菇汤【食谱】、普通“吃我”纸杯蛋糕【食谱】、七彩羊羹【食谱】、魔法森林食材采集 常出现地点:魔法森林 奖励符卡:“孩子与人偶的圆舞曲” 爱丽丝的人偶会变形成客人并坐满所有剩余空位。 惩罚符卡:魔法符“巧妙的牺牲” 随机炸毁厨房用具。修复需60秒 雾雨魔理沙 喜好:打劫、日式料理、油腻食物、流行趋势、传说级料理、菌类、辣味 厌恶:过时趋势、奇怪的东西 饮品:可冷藏饮品、低酒精饮品 预算:3000-5000日元最富有的人 奖励:猪肉蘑菇炒【食谱】、秘制鲜香蘑菇火锅【食谱】、蘑菇少女的踢踏锅【食谱】、女巫裙装 出现地点:所有区域 奖励符卡:Shooting Star "Super Perseid" 随机给予3种蘑菇食材,有几率获得松露 惩罚符卡:Magic Spell "I'll Take That!" 随机偷走2件物品,可能是已完成的菜肴、食材甚至饮品,她还会不付钱就跑掉...矢田寺成美 偏好:文化背景、清淡、日式、山珍、特产 厌恶:饱腹感强、油腻 饮品:年份酒、低酒精度、可冷藏、纯饮、温和酒精 预算:300-600日元 奖励:握寿司【食谱】、鲜虾酿南瓜【食谱】、佛跳墙【食谱】、地藏像【物品】 常出现地点:魔法森林、【DLC 3】命莲寺 奖励符卡:魔法「顿悟」 接下来60秒内,顾客结账时会支付50%额外小费 惩罚符卡:地藏「业火救赎」 召唤业火焚烧三个随机增益效果,移除它们并结束其作用 稀有客人:3位居民、早苗、灵梦、慧音 搭档:梦子 资源:妖精露、蘑菇、露水、银杏果、萝卜、桃子
商店: 上海娃娃: 奶油 - 3日元 鸡蛋 - 1日元 牛肉 - 5日元 南瓜 - 5日元 松露 - 16日元 蘑菇 - 6日元 银杏果 - 2日元 蜂蜜 - 5日元 糯米 - 5日元 面粉 - 3日元 咖啡 - 20日元 冰淇淋冰沙 - 14日元 普通健身茶 - 32日元 前期不用在这里花太多时间,除非你的菜品里要用到很多蘑菇,或者需要从上海娃娃那里购买其他东西。至少她是个很公道的商人。我建议先获取成美的2级握寿司食谱,然后继续推进。当你和爱丽丝的友谊值达到最高后,她会成为魔法森林的食材收集者。不过这里有个问题,她任务所需的关键食材之一葡萄要到故事后期才能获得,所以在这部分进度上你会停滞很长一段时间。玛西亚有一定几率会给你稀有饮品。如果外观对你来说很重要的话,她的5级服装相当不错。由于玛莉萨的特性是会出现在各种地方,所以她是所有人中最容易升到满级的。令人惊讶的是,她是游戏中预算最高的富有的客人。如果可以的话,我会给她上最贵的菜品和饮品。与成海的羁绊达到满级会奖励你一个地藏像。它能让米斯蒂娅每天从访客那里获得供品。在她的家外面与地藏像互动可以获得奖励。只有当你将所有3位居民的羁绊都升到满级后,秘密伙伴才会解锁。 食谱:成海自己的2级食谱非常适合满足她的大多数喜好标签。握寿司也很容易记住。它也是带有文化背景或日本标签的不错选择。3级的鲜虾酿南瓜感觉一般。不过她的4级菜品佛跳墙就厉害了,里面全是顶级肉类食材,还加了松露。除非你能轻松获得和牛、顶级金枪鱼、伊比利亚猪肉、河豚和松露,否则这道菜不会是你每天都做的。我记得我用这道菜完成了某个陵墓居民的任务?可能是二岩猯藏的。 魔理沙对蘑菇的喜爱体现在她所有的食谱中。这些食谱基本上是为她自己量身定制的。好在魔理沙自己完全买得起她最贵的菜,甚至还有余钱。毕竟她的预算在3000到5000日元之间。就连天子都没魔理沙有钱!魔理沙的奖励符卡还有机会给你松露,所以你甚至可能不亏或者还赚。 爱丽丝喜欢西式菜肴。她的所有食谱都是西式的,最后两道带有【文化背景】标签。遗憾的是,这两道菜都明确需要【葡萄】,而葡萄要到红魔馆取得一定进展后才能获得。她的3级【吃掉我】纸杯蛋糕是达成【文化背景】【上镜】和【高级】标签的好方法。4级的【七彩羊羹】很畅销,但除了葡萄外还需要【优昙华】。如果能克服这些食材供应障碍,它带有一些非常适合某些极其挑剔的稀有客人的优秀标签:【文化背景】【梦幻】和【绝妙】。而【优昙华蛋糕】除非你有多余的【月之草】,否则就缺少这些标签。 【DLC 1】妖怪之山

东风谷早苗 喜好:日式、上镜、梦幻、家常菜、甜味、流行 厌恶:辛辣、奇怪、生的、油腻 饮品:现代风、甜味、低酒精、纯饮、苏打、清酒、果味、无酒精、苦味 预算:400-600日元 奖励:御好烧【食谱】、章鱼烧【食谱】、海胆刺身【食谱】、冬季水手服服装 常出现地点:妖怪山、【DLC 1】魔法森林、【DLC 3】命莲寺、【DLC 3】神灵庙 奖励符卡:神德「丰收稔年雨」生成3种饮品和3种食材 惩罚符卡:奇迹「昼客星」30秒内封锁所有增益效果 犬走椛 喜好:肉类、大份量、山珍、油腻、下酒 厌恶:奇怪、清淡、素食 饮品:纯饮、中酒精、高酒精预算:300-400日元 奖励:天妇罗炸虾【食谱】、黄金酥脆鱼糕【食谱】、全肉盛宴【食谱】、妖怪山食材收集 常见地点:妖怪山 奖励符卡:"天狗日常小酌" 短时间内会有大量白狼天狗前来用餐 惩罚符卡:"戒严令" 禁止新客人进入30秒 河城荷取 偏好:高级、佐酒、咸味、招牌、奇特、水产 厌恶:素食、文化背景、山珍 饮品:纯饮、高度酒、清酒、低度酒 预算:400-500日元 奖励:腌菜【食谱】、奶油螃蟹【食谱】、仿尻子玉【食谱】、河童重型电话 常见地点:妖怪山 奖励符卡:河童“伸展吧手臂”:接下来120秒内,伙伴可使用河童科技供应食物和饮料。惩罚符卡:水符“河童的山洪暴发”:洪水会冲走居酒屋中3-5名随机正在用餐的客人。稀有客人:3名居民、琪露诺(解锁红魔馆后)、伊吹萃香(解锁博丽神社后)、魔理沙。伙伴:键山雏。资源:三文鱼、螃蟹、鳟鱼、黄瓜、土豆、黑盐、银杏果、野猪肉。
商店: 大吟酿始终有货。其他所有商品的库存均为随机。 河童商人: 章鱼 - 5 日元 黑盐 - 1 日元 螃蟹 - 4 日元 海胆 - 大吟酿 - 84 日元 假设你购买了DLC 1,妖怪之山将是你首个能稳定获取稀有肉类和鱼类的地方。最终,你还可以从它的另一个出口前往红魔馆。 此区域的主要食材收集者是早苗。她的大多数标签都很容易满足:大份量、肉类、下酒、油腻。山珍标签可能稍难一些,但此时你已能获得松露和伊比利亚猪肉。铃仙则更棘手,因为她偶尔会要求【高级】标签的菜肴,并且不知为何讨厌素食。她自己的2级食谱【腌菜】没有标签组合,这根本不行,搞什么啊?早苗本人很容易用她自己那道简单的菜肴讨好,不过她的5级奖励只是一套服装。带有合适标签的【味增豆腐】也能轻松满足她的要求。另外,和其他居民不同,她还会外出旅行,很容易提升好感度到满级。值得把河城荷取的好感度提升到满级,她会送你一部手机,这部手机可以联系稀有客人邀请他们、委托他们为你搜寻物品,甚至可以呼叫商人。没错,你可以批量呼叫,这样就能舒适地在家购物和收取搜寻到的物品了。河童科技太神奇了!不过拿到手机后,你需要在米斯蒂娅地下室的【礼物柜】中启用这个功能。 这东西怎么运作的?为什么能运作?这里可是幻想乡,别管什么常识了。不过有个限制。你必须和伙伴们至少达到4级才能呼叫他们。 这里的秘密伙伴只有在你与所有人的羁绊都达到最大值后才会加入。 食谱方面:早苗的2级食谱奖励【御好烧】的标签非常不错,如果你需要【日式】【上镜】【招牌菜】或【小份】标签的话。它需要的食材相当常见,比如面粉、鸡蛋和萝卜。3级食谱【章鱼烧】则用处小得多,而且章鱼主要只能从河童商人那里购买。说实话,御好烧更容易使用。4级的【海胆刺身】虽然制作简单,但和章鱼烧有同样的问题——海胆只能从妖怪山商人那里购买。 文的2级食谱【天妇罗】相当普通,没什么特别之处。她的3级奖励【黄金酥脆鱼糕】相当不错,带有【下酒】和【力量提升】标签,所需食材也很容易收集:鳟鱼、面粉和蜂蜜。而4级的【全肉盛宴】和其他常见的4级食谱一样,存在食材难以获取的问题,而且主要是为她专属定制的。 itori的2级菜品【腌菜】很有意思。这是一道极其廉价的1级料理,但其食材只能在妖怪山找到或购买,且数量不多。我主要用它来满足萃香那些麻烦的【下酒】和【小份】标签,需要进行一些标签叠加。所以对普通客人来说不是很有用。3级的【奶油螃蟹】在标签方面稍好一些,但同样需要妖怪山的专属食材。第四关的【仿造尻子玉】真是个奇怪的东西,尽管河童传说中说河童对这玩意儿非常着迷,但实际上河童自己也不会争相购买。又贵又没用。 博丽神社

博丽灵梦 偏好:美味、优质、饱腹感、便宜、甜味、流行趋势 厌恶:昂贵、适合配酒、冷门趋势 饮品:可加热、低酒精、无酒精 预算:150-300日元稀有客人中第二贫穷的 奖励:粉色饭团【食谱】、什锦火锅【食谱】、大名盛宴【食谱】、褪色巫女服【服装】 常见地点:博丽神社、人类村落、魔法森林、妖怪山 奖励符卡:梦想「二重结界」 创建一个保护屏障,可完全抵消下一位特殊客人的惩罚符卡 惩罚符卡:灵「幻想封印」 随机禁用菜单上的3道菜品,持续30秒 伊吹萃香 喜好:增强体力、适合下酒、小份、肉类、日式、流行趋势 厌恶:油腻、冷门趋势 饮品:纯饮、高度酒 预算:600-800日元 奖励:炸猪排【食谱】、能量串烧【食谱】、二天一流【食谱】、博丽神社食材收集常见地点:博丽神社、妖怪山 奖励符卡:朱点「鬼之酒诱」 迷你萃香会给你一瓶酒 惩罚符卡:「百鬼夜行」 3个迷你萃香会偷走你3瓶最昂贵的酒 比那名居天子 偏好:果味、昂贵、传奇、上镜、温和、素食、甜味、小众潮流 厌恶:肉类、家常菜、油腻、大众潮流 饮品:鸡尾酒、高度酒 预算:2000-3000日元第二富有的客人 奖励:玫瑰状萝卜沙拉【食谱】、桃子 tapioca【食谱】、桃子虾仁沙拉【食谱】、幸运桃子道具 常见地点:博丽神社、旧地狱、妖怪之山、神灵庙 奖励符卡:“全人类绯色感知之空” 效果:将所有用餐客人的满意度提升至85% 惩罚符卡:“神罚之柱” 效果:摧毁一张餐桌并吓跑正在用餐的客人,该位置60秒内无餐桌和客人 稀有客人:3位居民、魔理沙 搭档:驹草阿吽 资源:土豆、桃子、蝉蜕、蘑菇、银杏果
Shop: Fairy Maid Selling Leftovers: Price fluctuate around this range [rare] Bloody Remy - 17 yen Puffer Fish - 16 yen Iberico Pork - 13 yen Premium Tuna - 13 yen Boar Meat - 10 yen Wagyu Beef - 15 yen [rare] Truffle - 19 yen Kappa Tea Merchant: Price fluctuates around this range Tengu Tango - 39 yen Divine Wheat - 25 yen [rare] Jade Dew Tea - 26 yen Home of the red-white miko Reimu. Suika's always loitering by the pond in the back while a delinquent celestial's at the front entrance harassing you. Resource-wise, not too spectacular. The merchants here do finally sell some better meat and beverages though. Once this opens up you are finally given access to Udumbara yourself instead of relying on Wriggle. Worth noting for this specific location is that this is the only location to obtain the Silver Froggy Coin. Moriya's branch shrine donation box has a chance of rewarding you random cooked dishes or drinks, but it will always give you 1 Silver Froggy Coin for interacting with it. There's a cap to using the box too daily, 4 froggy coins maximum. You can trade the coin at Rinnosuke's for 2 really simple Chinese recipes, cosmetics, or getting more tracks for the juke box. Suika once reaches max bond, becomes the ingredient gatherer for the shrine. Problem being she's a picky eater and not a big roamer. If you don't operate at Youkai Mountain or the Shrine often enough, she can be a hard one to max if you aren't mindful of her budget or know all her favorites. Being an oni you'd assumed she's a big eater, nope. She likes small portions and also hates Greasy food while Kasen's fine with it. Reimu can be an ass to please too because she's notoriously poor but still demands Premium or Wonderful things sometimes. (Only one step above Cirno in terms of budget by 50 yen) I'd honestly just take advantage of the Night Sparrow set during Hyper mode to bypass her pickiness. Reimu's level 5 reward's a faded miko outfit, really fits the theme of the poverty miko. Meanwhile Tenshi compared to the other two is loaded. She's the second richest after Marisa with a budget of 2000 - 3000 yen. She likes the finer things in life so she will request Legendary or Expensive tags. Being a delinquent she also likes Unpopular Food. Easiest of the 3 to please IMO. Tenshi's level 5 reward's the Lucky Peach. Customers have a 15% chance to give a perfect review regardless of enjoyment. Not bad at all. Recipes:IMO Reimu's only good recipe is the level 2 reward Pink Rice Ball. If regular Rice Ball won't do, I'll use this to tag stack. Great for Mokou once you applied proper tags. Suika the oni weirdo's level 2 recipe Fried Pork Cutlet's a very cheap way to have Homecooking, Meat, Filling and Greasy tags. Not too shabby for the carnivores that require specific tag stacking with this base. Her level 3 Energy Skewer's... ok. I can see it as a base for meeting Soga no Tojiko's needs. (the ghost who goes 'biribiri' in Mausoleum) Although if I'm only after Barbecued tag I can use cheaper dish to go off that. On the other spectrum I can also use Utusho's Instant*Death as well for better effect. Suika's final recipe Niten Ichiryu's the earliest time you can have access to the very elusive 'Aura Bursting!' tag. Lore-wise said to be a favorite among oni. It's definitely good for ticking some of Yuugi's boxes and she does have more money (600 - 1000 yen) than the others to spend. Tenshi's dishes are pretty great for vegetarians and those who like Photogenic and Sweet tags. Her first recipe reward Rose-like Daikon Salad requires just a simple Radish but gives rarer tags like Cool and Photogenic. Good to please herself and Cirno. Peach Tapioca's a pretty dish with the downside of requiring Ice. Until you meet Cirno you won't have a steady supply of the stuff unless you get lucky at Rinnosuke's shop. The final recipe award Peach & Shrimp Salad in terms of a final reward dish, isn't too bad to make compared to some others. Well, it also requires Ice though. [DLC 2] Former Hell

黑谷山女 喜好:咸味、生食、上镜、奇特、甜味、流行趋势 厌恶:咸味、油腻、热饮 饮品:啤酒、低酒精、甜味、温和酒精 预算:250-400日元 奖励:酥脆螺旋卷【食谱】、望顶派【食谱】、兜甲蒸糕【食谱】、山女的推荐信+旧地狱食材收集 常出现地点:旧地狱 奖励符卡:"Underground Idol's Party Night"(接下来30秒内排队的客人会被偶像吸引,即使营业结束也不会离开) 惩罚符卡:小丝"Kandata's Rope"(移动速度降低80%,持续30秒) 水桥帕露西 喜好:肉类、咸味、鲜味、非主流趋势、水果味、酸味、辣味 厌恶:甜味、流行趋势 饮品:干型、纯饮、苦味、无酒精,可加热 预算:300-400日元 奖励:痛苦芝士棒【食谱】、阴郁水果派【食谱】、 agony关东煮【食谱】、帕秋莉的推荐信+稻草人偶道具 常见地点:旧地狱 奖励符卡:“嫉妒与透支” 将当前所有客人的预算提高到与在场最富有的顾客相同 惩罚符卡:恶意符“深夜参拜” 使你搭档当天的工资翻倍。(不过如果我没给他们发工资呢?) 星熊勇仪 偏好:招牌菜、大份、传说级、下酒、灵光迸发!喜好:日语、提升力量、流行趋势 厌恶:素食、力量、小份食物 饮品:复古酒、啤酒、高度酒、清酒 预算:600-1000日元 奖励:狮子头【食谱】、巨型玉子烧【食谱】、大江户船宴【食谱】、勇仪的推荐信+浴衣之花服装 常出现地点:旧地狱、地灵殿 奖励符卡:"从歌到舞" 使用星熊料理提升一定数量饮品等级 最大概率提升3个1级饮品 75%概率提升2个2级饮品 50%概率提升1个3级饮品 惩罚符卡:四大秘法"三步 knockout" 勇仪创建3个区域限制移动60秒 第一步:安全区 第二步-罪人之枷锁:移动速度降低50%当进入区域【第三步 - 灵魂与异常现象】时:进入该区域会立即使你眩晕30秒 稀有访客:3位居民、天子 伙伴:小碎骨 资源:蝉蜕、柠檬、三文鱼、伊比利亚猪肉、和牛、冰帝莲花、鸡蛋
商店: 鬼商人: 妖怪小径的杂货商部分商品其实更便宜 牛肉 - 8日元 伊比利亚猪肉 - 20日元 鳟鱼 - 4日元 三文鱼 - 13日元 竹笋 - 22日元 萝卜 - 9日元 辣椒 - 1日元 桂花酒 - 34日元 鬼杀手 - 179日元 天狗探戈 - 39日元 獭祭 - 73日元 火鼠裘 - 235日元 这里的商店价格偏高,但适合购买昂贵的酒类。旧地狱有一处温泉,能在夜间提升伙伴的工作效率。虽然需要花费一些钱,但可能物有所值。(每个进入温泉的角色都有独特的CG) 山女等级达到最高后会为你收集食材。勇仪会送给你一件漂亮的浴衣。而帕露西会嫉妒地送给你一个稻草人偶,它能让你在一次连击结束时允许出现一个失误。与DLC 1区域相同,将所有3个角色的羁绊等级提升至满级,即可解锁该区域的秘密伙伴。 食谱: 你现在身处旧地狱,这里的料理风格超凡脱俗,与地表世界截然不同。山女肯定会给你一堆非常怪异的食谱。她的所有食谱都必定带有【奇特】标签,且最后两道食谱还被归类为【昂贵】。除了在旧地狱或地灵殿之外,你可能不太会用到她的食谱。 帕露西的食谱虽然缺少【奇特】标签,但弥补这一点的是其食材需要DLC 2的专属物品:奶酪或柠檬。她的最终食谱【痛苦关东煮】的标签组合十分杂乱,很难用于招待稀有客人。虽然作为一道常见的客用料理,但它完全可以制作,因为所有食材都能从村庄NPC处购买。不过烹饪起来需要很长时间。 勇仪绝对是那种要么大干一场要么干脆放弃的类型。她的第一道食谱【狮子头】只需要适量的牛肉,仅此而已。但它有很多不错的标签可以利用,比如【下酒】、【肉类】、【咸鲜】、【招牌】和【特色】。可惜它没有【力量提升】标签,因为到这个阶段,很多食肉的稀有客人都会需要【力量提升】标签。她的下一级食谱【巨型玉子烧】确实有这个标签,但是……我只剩下一个槽位可以添加了。勇仪的最终食谱【大江户船宴】对客人来说非常昂贵。不太可能用于招待特殊客人,但到这个时候,【高级金枪鱼】和【冰块】对你来说可能已经不是问题了。【DLC 2】地灵殿

古明地觉 喜好:甜食、小份、梦幻、特色、增强体力、家常菜 厌恶:肉类、山珍、辛辣、奇怪、大份 饮品:无酒精、苦味、苏打、刺激性 预算:500-600日元 奖励:樱花布丁【食谱】、能量布丁【食谱】、燃尽布丁【食谱】、觉的推荐信+第三只眼道具 常出现地点:地灵殿、竹林、【DLC 3】命莲寺 奖励符卡:追忆「快乐回忆」 效果:随机发动已解锁稀有顾客的奖励符卡 惩罚符卡:追忆「不快乐回忆」 效果:随机发动已解锁稀有顾客的惩罚符卡 火焰猫燐 喜好:水产、海味、咸味、梦幻、奇怪喜好:流行趋势 厌恶:生的食物 热饮偏好:低度酒、清酒、果味 预算:500-700日元 奖励:猫饭【食谱】、三文鱼天妇罗【食谱】、龙鲤鱼【食谱】、铃的推荐信+地灵殿食材收集 常出现地点:地灵殿、旧地狱、【DLC 3】命莲寺、【DLC 3】神灵庙 奖励符卡:猫符「猫步」——接下来30秒内,供应带有「低度酒」标签的饮品将获得最高评价 惩罚符卡:「死灰复燃」——当铃仙离开时,她的餐桌会留下怨灵,怨灵会继续按照铃仙的偏好下单。怨灵无法被赶走,也不会付款。她们只会像普通客人一样满意后才会离开 灵乌路空 喜好:肉类、油腻、咸味、辣味、热食、力量增强类 厌恶:清淡、菌类 饮品:鸡尾酒、低度酒、可加热饮品 预算:500-800日元 奖励:芝士蛋包饭【食谱】、瞬杀☆【食谱】、注意!地狱特餐【食谱】、空的推荐信+星尘斗篷服装 常出现地点:地灵殿 奖励符卡:【地狱托卡马克】 接下来60秒内核能过载沸腾锅和蒸锅,可瞬间烹饪菜肴。 惩罚符卡:地狱之光【扩散地狱火】 下次未能完美演唱麻雀小调时将发生核爆炸,当晚厨具全部禁用。爆炸还会导致部分排队的顾客仓皇逃命。 稀有客人:3位居民、勇仪、帕秋莉 伙伴:小町 资源:优昙华、奶酪、松露、蘑菇、银杏果、三文鱼、河豚、玉露茶、教父、晓
Shop: Hell Raven: Tofu - 4 yen Butter - 4 yen Lunar Herb - 39 yen Ginkgo Nut - 4 yen Cheese - 10 yen Lemon - 4 yen Ribovitan - 25 yen Komeiji Ice Cream - 20 yen Palace of the Earth Spirits'a treasure trove of goodies. There's a wine cellar, cheese attic, a nice resourceful garden and very helpful pets. It's definitely worth the long trek to pick things up here. Rin the ingredient gatherer of this zone is also a roamer who can be found in Former Hell, Myouren Temple and Divine Spirits Mausoleum. This makes her VERY easy to max. Her tags aren't too terrible. The tricky ones such as Dreamy and maybe Sea Delicacy can be bypassed with the Night Sparrow set if you do lack those ingredients. Meanwhile her owner and fellow pet likes to be home bodies. Satori's easy to please until she wants Dreamy stuff. Utsuho's your standard carnivorous meat loving youkai, also easy to please. In terms of bond rewards, Rin is the resource gatherer of this area. Utsuho gives you a cool cape. And Satori gives you an item that allows you see customer's budget. Recipes: Neko-manma's probably the only recipe you'd realistically use from Rin. By this point you'll have better alternatives in term of pricing and availability. Her final recipe Dragon Carp calls for Lunar Herb too. Not the easiest thing to get usually. Utsuho's recipes more usable. Cheese Omelet is ok, but you really want that level 3 Instant*Death. It's got decent tags for the carnivores and the ingredients list ain't too shabby either: Boar Meat, Venison and Onion. Her final recipe 'CAUTION!! Hellish Spice!' though... Maybe if you have Cheese and Chili to burn for common guests. Satori's first recipe is pretty simple and easy with a decent set of tags. A Honey and Peach for Cool, Fruity, Photogenic, Small Portion, Specialty, and Sweet. It would be a good fit for Cirno and Tenshi if Tenshi's Daikon Salad doesn't exist. Her next 2 recipes are less usable however. Both require Lemon and Grapes if you don't have a decent supply of them. Satori herself will love them, but not necessarily good for other rare guests unless Tenshi or Cirno. But Cirno's even more broke than Reimu... [DLC 2 content] Beating the Bizarre Cooking Competition In order to participate in BCC you'll need to obtain Letter of Recommendations from 6 people. Basically the rare guests from Former Hell and Palace of the Earth Spirits. Once you max their bonds and obtain the letters, you can get the ball rolling by talking to Rin. You can also try the competition again even after winning it the first time. Satori will even have a difficulty selection should you feel daring enough. For the BCC I suggest getting a Notepad or pen and paper ready for part 1. If you've been overly reliant on Suspicious or Night Sparrow kitchenware set, these items' effects have been disabled by Koishi for the duration of this competition. So just take your fastest kitchenware. Keep in mind there's also no saves or checkpoint between competition phases. Set aside at least... 1.5 hours for this competition. It took me quite a while because I went in completely blind but should be much shorter if you are reading this guide. Part 1 Order obfuscation Random nameless youkai you've ever served will have all their orders obfuscated. Your job is to get their orders right/please them 20 times. Preparation-wise... Easy recipes with lots of empty slots for tag stacking. These are just some of the notes I made for when I went through BCC: Youkai Fox: JP, CN, Meat, Signature, Small Portion Falling Blossoms + Lamprey + any meat Sangetsusei Tsuchigumo: Greasy, mountain delicacy, filing, savory, sweet, raw, large, strange Fried Pork Cutlet + Honey + Lamprey + Egg + Cicada Slough Wind Priestess Oni: Meat, premium legendary, alchol, savory, strength, aura, specialty, popular Power Soup + Wagyu Beef + Lamprey Fire Rat's Robe or Sangetsusei Hone-onna: Carved Rose Salad + Cicada Slough, Lamprey + Mushroom + Lemon ZUN Beer Youkai Leopard: Meat, mountain, sea, greasy, premium, raw, hot, specialty, popular Lion's Haed + Iberico + Egg + Butter Sangetsusei Part 2 Musical chair with random seasoningPart 2 of BCC is when things get slightly tricky. Though I consider this the easiest portion. All the guests that show up are rare guests, with the caveat of you need to satisfy them while at the same time add the random ingredient with the appropriate tag. In short, their request + the random flavor of the moment. There's a timer in the bottom right counting down with a random seasoning tag. If it says [Salty], you add something [Salty] to whatever is being cooked and serve it to the guest before the timer resets. If [Sour], you add Lemon to the dish and serve it quickly. Remember that some dishes may not be compatible with specific seasoning, turning them into Dark Matter once the incompatible ingredient is added. Similar to part 1, completely satisfy your guests' orders 10 times. Part 3: Koishi? Koishi? Koishi? Your only customers are Koishis. Yes, plural. Only 1 Koishi's order will be obfuscated. The trick to this part is to feed the other Koishi what they order + the requested random seasoning. So part 2's gimmick + Konishi. Get the regular Koishi's orders right the hidden tag above them will reveal one of the obfuscated order's tags. After revealing all the tags and making the appropriate dish for the hidden Koishi's tags, she'll enter into a brief vulnerable state. During this brief phase you need to feed her as much food and drinks as possible to wear her down. Rather than aim for complete customer satisfaction just treat this as force feeding. Quantity over quality. Speed is of the essence because there IS another timer on the top counting down. Information regarding Koishi's damage mechanic courtesy of Suika Ibuki 引用自 Suika Ibuki:For DLC 2, additional information that's important, but is NOT mentioned in the game, is that "damage" to Koishi directly corresponds to the level of the recipe that you are giving her. Using Rice Balls, which is level 1, only does "1 damage" to her "health" during damage phase. This is especially important if you're redoing the Lunatic Version, as time is very tight if you're only doing 1 damage every time. Instead, cooking high level recipes during the "tag investigation" phase, then storing it until you reach damage phase to use, is a good idea to maximize your time and damage dealt for a much easier time. I hope this also helps anybody doing DLC 2's Boss! On paper it's easier than phase 2 of the final mission. In terms of chaos though, it's complete ♥♥♥♥♥♥♥♥ insane. Because all the Koishis DO NOT order from the menu you provided. They can order anything from all the recipes you've unlocked. The only consistency you'll have is she will not ask for anything that takes 5 ingredients to cook. Because you need that 1 slot for the random seasoning. There's a chance she'll still ask for full size dishes according to the comments. Definitely have a separate window with all the recipes open. Even though Koishi's orders are completely random, I'd still put in tricky recipes you have difficulty remember into the menu to save you some time when making selections. If you are lucky she may order from one of them. I doubt you'll get the same tags I did, but here's what she threw at me. Alcohol, Specialty, Salty, Savory Chillable X Homecooking X Legendary Raw, Salty, Savory, Greasy Sake X Sea X Fruity BBQ, Greasy, Mountain, Meat Beer X Aquatic X Mild Scarlet Devil Mansion

红美铃 喜好:提升力量、肉类、饱腹感、中式、流行趋势 厌恶:西式、奇怪、水果味、冷门趋势 饮品:刺激性、陈酿、可加热 预算:200-400日元 奖励:烤鳗鱼[食谱]、黄金排骨汤[食谱]、彩虹煎肉包[食谱]、Humpty Panpty道具 常出现地点:红魔馆 奖励符卡:花符「华丽甜花」 美铃在接下来60秒内表演马戏技巧,每2秒增加1点气氛值 惩罚符卡:「N0ver say no to p0nda」 一只愤怒的熊猫会摧毁餐桌并吓跑该桌的客人。减少10点氛围值,并使桌子在接下来90秒内无法使用 9 琪露诺偏好:上镜、甜美、酷、奇特、潮流-小众 讨厌:昂贵、有文化背景、适合佐酒、潮流-大众 饮品:甜口、果味、可冰镇 预算:100-200日元。贫穷妖精,最穷的稀有客人 奖励:【真·海鲜味噌汤】食谱、【生鱼片拼盘】食谱、【猪鹿蝶】食谱、在红魔馆收集食材 常出现地点:红魔馆、【DLC 1】妖怪之山 奖励符卡:"Sweet Ice Fairy" 随机给予3种带有【可冰镇】标签的普通饮品和2-5个冰块 惩罚符卡:Freeze Sign "Perfect Freeze" 随机冻结3件厨具厨房用具中任何未完成的菜肴都将被冻结并碎裂。持续30秒 帕秋莉·诺蕾姬 喜好:甜味、高级、西式、上镜、梦幻 厌恶:生食、辛辣、奇怪、咸味 饮品:苏打水、鸡尾酒、烈酒 预算:600-1000日元 奖励:班尼迪克蛋【食谱】、意大利烩饭【食谱】、惠灵顿牛排【食谱】、睡衣服装 常出现地点:红魔馆、【DLC 1】魔法森林、【DLC 2】地灵殿 奖励符卡:知识奇妙冒险“文化氛围” 接下来30秒内,所有带有“文化”标签的菜肴都将获得最高评价 惩罚符卡:金与水之符“水银之毒” 接下来30秒内,所有菜肴有50%的几率变成暗物质稀有访客:3位居民,魔理沙 搭档:咲夜 资源:金枪鱼、露水、虾、葡萄、冰
商店: 哥布林商人: 价格可能有所不同 黄油 - 6日元 面粉 - 7日元 和牛 - 29日元 河豚 - 30日元 特级金枪鱼 - 25日元 猪肉炒饭* - 11日元 【猪肉炒饭若未使用将在结束时过期】 匿名仙女女仆: 内格罗尼 - 49日元 教父 - 88日元 小恶魔: 阿芙佳朵 - 17日元 绯红之雾 - 37日元 绯红之茶 - 12日元 终于,爱丽丝任务中难以获取的葡萄触手可及了。红魔馆是唯一可以搜寻到葡萄和冰的地方(无DLC情况下)。这里的NPC还出售优质肉类和西式饮品。在某个阶段后,你还可以完成咲夜对6份4级酒精的需求。尽量不要和琪露诺过多交谈,因为你(玩家)会因为她的愚蠢而损失一些脑细胞。遗憾的是,如果你希望她为你收集这里的食材,你确实需要将她的好感度提升至满级。将帕秋莉的好感度提升至满级可获得睡衣服装,将美玲的好感度提升至满级则可获得道具【Humpty Panpty】,该道具能让所有客人每15秒额外支付1-20日元小费。 食谱方面,我就不详细说明了,因为目前你在标签和定价方面已有不错的选择。不过帕秋莉的4级食谱【惠灵顿牛排】拥有特定任务所需的标签,我记得是小恶魔的任务,但其奖励并不是特别丰厚。美玲的4级食谱【彩虹煎包】作为一道高级菜品,在食材准备方面也非常简单。 【DLC 3】命莲寺

村纱水蜜 喜好:肉类、高级、饱腹感、咸味、鲜味、特色、增强体力 厌恶:素食、酸味、奇怪、小份量 饮品:可冰镇、西式、高度酒、干型 预算:400-600日元 奖励:【食谱】比斯开饼干、【食谱】烟熏海盗肉、【食谱】佛跳墙、海盗服装 常出现地点:命莲寺 奖励符卡:"船之残响幻影" 获得持续15秒的船幽灵附身 buff。该 buff 生效期间,你当前所有激活的奖励符卡(不包括此符卡)持续时间延长 惩罚符卡:溺水叹息"深渊漩涡" 5秒内无法移动。可通过快速点击移动键加快恢复接下来的20秒内,你的移动方向将反转 封兽鵺 喜好:咸味、招牌、绝妙、特色、奇特、生、肉类、上镜、潮流-冷门 厌恶:酸味、西式、潮流-热门 饮品:陈年、纯饮、可加热、烧酒 预算:300-500日元 奖励:【食谱】云岩棉花糖、【食谱】纯白莲花、【食谱】星莲船、UFO老虎机道具 常出现地点:命莲寺 奖励符卡:愉悦「东方RGB」 转动UFO可获得保底奖励。结果将为以下情况之一: 3个红色UFO:接下来15秒内,无论菜品如何,都将获得最高评分 3个绿色UFO:接下来15秒内,你的食材和饮品不会被消耗 3个蓝色UFO:接下来15秒内,你的收入增加100% 红、绿、蓝:你将获得上述所有3种增益效果 惩罚符卡:厌恶【东方RRB】 旋转必定失败的轮盘,结果将为以下情况之一: 红红绿:接下来15秒内,无论菜品如何,都将获得最低评分 绿绿0:接下来15秒内,你将消耗3倍数量的食材和饮品 蓝蓝0:接下来15秒内,你的收入减少66% 红红蓝:获得上述所有3种减益效果 多多良小伞偏好:喜好:美味、家常菜、饱腹感、甜味、增强体力、流行趋势、上镜、奇特 厌恶:热食、汤类、辛辣 饮品:果味、低度酒、可冷藏、年份酒 预算:150-300日元 奖励:【食谱】烤红薯、【食谱】八升麻团子、【食谱】心跳惊喜!活动:为命莲寺收集食材 常见地点:命莲寺 奖励符卡:雨叹「雨夜的怪谈」 效果:接下来30秒内,所有带有【怪异】标签的食物烹饪速度提升30%,顾客重新点餐的概率也增加30% 惩罚符卡:「巨大幽灵伞」 效果:小伞会吓退所有排队的客人 稀有客人:3位居民、阿求、慧音、铃、成美、早苗、魔理沙 搭档:云居一轮 资源:红薯、冰帝莲、莲子、虾、蜂蜜、优昙华
商店: 祢豆子林: 黑盐 - 2日元 奶酪 - 9日元 蜂蜜 - 8日元 奶油 - 5日元 辣椒 - 1日元 獭祭 - 68日元 杨枝甘露 - 26日元 红薯 - 4日元 小伞在此收集资源。你从水蜜处获得海盗外套。鵺给了你一个……UFO老虎机。启用后会在米斯蒂娅的地下室放置一台老虎机。有机会赢得【什么都没有】、食材和饮料。典型的扭蛋机制,但实际上有每日限制。第一次抽奖花费100,第二次200,第三次400、800、1600……如果你每天都抽,总花费为3100。 与红魔馆类似,到这一步你已经有足够的菜品来满足稀有客人的需求了。不过我确实经常使用水蜜的烟熏海盗料理。这是2级料理,但需要来自妖怪山的黑盐,而且只剩下1个槽位用于标签叠加。纽的第一道食谱【棉花糖】仅使用蜂蜜和桃子就能获得稀有的【完美】标签。这两种食材都非常容易获取,很适合作为基础标签。 【DLC 3】神魂陵墓

物部布都 喜好:日式、高级、传说级、温和、山珍、灵光迸发!、流行趋势 厌恶:冷门趋势、西式、生食 饮品偏好:纯饮、可加热、苏打、低度酒 预算:600-900日元 奖励:【食谱】松子蛋糕、【食谱】、【食谱】白鹿不屈松、【食谱】八卦鱼肚、乌木火焰烤架 常出现地点:神灵庙 奖励符卡:圣女「天照大神的供奉」 接下来10秒内,根据顾客评价:普通评价奖励1级饮品,满意评价奖励2级饮品,完美评价奖励3级饮品。 惩罚符卡:传火「火焰笼罩的托盘」 接下来30秒内,你只能使用一个槽位为顾客服务。任何留在禁用槽位中的物品都将被销毁。 霍青娥 偏好:中式、素食、传说级、甜味、美味、小份、特色、潮流-流行 厌恶:油腻、饱腹感强 饮品:果味、低酒精、清酒、现代 预算:400-900日元 奖励:【食谱】糖渍栗子、【食谱】天师炖蘑菇、【食谱】鱼形莲花灯、服装 常出现地点:神灵庙 奖励符卡:邪术「天下无墙」 接下来30秒,米斯蒂娅获得穿墙能力,可以穿过任何障碍物或顾客。 惩罚符卡:魔化「走火入魔」 接下来30秒,你的稀有客人将陷入狂暴状态。每次他们结账时,无论初始评分如何,都有30%的几率使用惩罚法术卡。如果他们已经在使用惩罚法术卡,则会再次使用。曾我部静子 喜好:增强力量、招牌菜、饱腹感、家常菜、油腻、日式、烧烤 厌恶:甜味、清凉 饮品:高度酒、啤酒、烧酒、苦味 预算:500-600日元 奖励:【食谱】拔丝地瓜、【食谱】黄金双菇卷、【食谱】天妇罗拼盘、神灵庙食材收集 常出现地点:神灵庙 奖励符卡:迅雷之影「电光石火」 接下来30秒内,米斯蒂娅和其搭档的移动速度提升30% 惩罚符卡:天罚「天雷一击」 下次未能完美演奏麻雀小调时,将触发神罚并击晕一名搭档30秒稀有访客:3位居民,分别是天子、华扇、铃仙、魔理沙 搭档:幽香 资源:松子、栗子、并蒂莲、虾、七鳃鳗、金枪鱼、三文鱼、莲子、冰、露水
商店: 道士: 和牛 - 24日元 鹿肉 - 12日元 蘑菇 - 11日元 松露 - 30日元 三文鱼 - 14日元 金枪鱼 - 18日元 河豚 - 25日元 麒麟 - 107日元 神麦 - 27日元 桂花酒 - 36日元 栗子 - 6日元 松子 - 9日元 露水 - 6日元 奖励方面,圣白莲会给你一套服装。封兽鵺会主动帮你收集食材。丰聪耳神子会给你一个新厨具,它能让烹饪速度提升15%,能立即完成所有带有【肉类】标签的料理,还有30%的几率返还食材。这真的是好东西。 和红魔馆的情况一样,到了这个阶段,你已经有足够多的菜品可以满足那些稀客的需求了。圣白莲的蜜渍栗子可能适合【小份】标签且没有特定禁用标签的情况,但鲜豆腐也一样适用。如果不是萃香还有提升力量、酒量好或懂日语这些额外要求,对她来说本该是不错的。这些要求我可满足不了。至于清兰或觉,我完全可以用鲜豆腐代替,也不用特意来陵墓找栗子了。 迷途竹林

稻羽二依 喜好:小份、梦幻、传说、甜味、流行趋势、酷 厌恶:油腻、山珍、奇怪、冷门趋势 饮品:果味、甜味、无酒精 预算:200-400日元 奖励:麻糬【食谱】、桃子八桥【食谱】、月见团子【食谱】、幸运兔子?道具 常出现地点:迷途竹林,以及在与她关系变好前会像个强行推销的骗子商人一样四处出现 奖励符卡:活力「四叶草带来的幸运」 所有食材收集点的冷却时间立即刷新,且次日收集时会额外获得1-2份食材 惩罚符卡:回忆「那年的兔子恐怖」 再次强制交易。若拒绝,她会发动另一张惩罚符卡。惩罚符卡2:戏法「组合消失术」 重置你的连击数,并在接下来30秒内阻止你积累新的连击数 蓬莱仙 Kaguya 喜好:精彩、文化背景、传奇、日式、潮流-流行 厌恶:大份量、招牌、奇怪、潮流-冷门 饮品:现代、清酒、复古 预算:1000-1500日元 奖励:蒸蛋竹笋【食谱】、月之恋人饼干【食谱】、蓬莱枝【食谱】、访客的和服服装 常出现地点:迷途竹林 奖励符卡:「永夜的终结-升世-」 回溯时间并增加30秒营业时间 惩罚符卡:神器「蓬莱玉枝-梦幻乐园-」 快进时间并减少30秒营业时间藤原妹红 喜好:水果味、灵光迸发!、热的、辛辣 厌恶:昂贵、高级、绝妙 饮品:烧酒、苦味、干型 预算:300-600日元 奖励:麻婆豆腐【食谱】、水煮鱼【食谱】、富士熔岩【食谱】、迷途竹林食材采集 常出现地点:迷途竹林 奖励符卡:不死「火鸟·凤翼天翔」 接下来20秒内,菜品制作速度提升50% 惩罚符卡:藤原「灭罪寺的伤痕」 接下来30秒内,无论菜品品质如何,客人最多只会给出“一般”评价 稀有客人:3位居民、魔理沙 搭档:铃仙 资源:月球火箭、高级金枪鱼、蘑菇、竹笋、竹子
商店: 妖怪兔子美食店: 价格非固定 满月之夜 - 227日元 桂花酒 - 31日元 糯米 - 8日元 【稀有】月草 - 32日元 和牛 - 21日元 河豚 - 22日元 特级金枪鱼 - 18日元 牛肉 - 10日元 当你到达竹林后,骗子兔子因幡帝会被正式认定为稀有客人。我之前解锁的所有标签显然毫无意义,因为她只是一个行骗的NPC商人?到达这里后不久,你就会卷入辉夜和妹红之间一场典型的争执。如果你热衷于成就收集,建议在此处额外创建一个备份存档。因幡帝的最高羁绊物品是幸运兔子?它激活时,有15%的几率使烹饪菜肴不消耗食材。辉夜在最高羁绊时会给你一套服装。Mokou自愿在这里为你收集食材。 还在为最终的推车升级发愁吗?去人类村落购买月团子吧。 厨具: 这是烹饪的工具,非常重要。随着主线任务的推进,香霖堂会提供更多厨具,基本上每次你解锁一个主要区域,都会导致米斯蒂娅又背上一笔债务。出于显而易见的原因,只有米斯蒂娅才能激活厨具的特殊效果(如果有的话)。

你一开始会拥有这些。出于某些原因,你可以选择购买更多。但如果你有闲钱,不妨投资下一级别的超级套装。

借助金钱的力量,现在你的菜肴可以烹饪速度提升5%,并且使用超级系列厨具后,顾客再次点餐的可能性增加3%。

夜雀套装需要你用奇异岩石进行交易,而非用货币购买。从现在开始,你未来所有的厨具都需要使用各区域NPC的专属货币进行交易。对于妖怪小径区域,其专属货币就是奇异岩石。 夜雀套装相当特别。它的缺点是烹饪时间会增加25%,但在超级模式下制作的食物会忽略稀有客人的订单要求,转而根据客人的偏好来进行评价。如果你遇到想要稀有标签的客人,这会非常有用。需要注意的是,显然助理厨师NPC无法享受此效果,因为这明显是针对稀有客人的。如果你不介意额外的烹饪时间,这套装备可以一直用到游戏后期。

极限系列。每件售价5000日元和7枚奇特硬币。你可以通过完成人类村的任务获得硬币。食物烹饪速度现在加快10%,客人再次点餐的可能性提高8%。

核子系列需要通过完成博丽神社的NPC任务获得破损护符。烹饪速度提升50%,但在超级模式外使用时有40%的概率生成暗物质。不过,若在超级模式期间使用,此概率会降至5%。如果你擅长节奏游戏,这相当值得。我会将这些作为辅助炊具而非主要炊具使用,因为在超级模式外使用昂贵食材时,40%的暗物质生成概率相当高。

可疑的系列。每个物品交易都要花费7个红宝石,这太可疑了,简直是骗局。解锁红魔馆后即可使用。烹饪食物的时间增加10%,但客人再次点餐的概率提高30%。我用麻雀套装换了这个,想试着更快提升稀有客人的等级。效果似乎还不错?

你喜欢金钱吗?月见系列在烹饪时有40%的几率召唤兔子。每只兔子可使小费增加5%,持续20秒。该系列在【失落的竹林】区域解锁后可用,需要通过交易获得【闪亮的竹子】。不过这已经接近游戏后期了,此时我更推荐优先选择【核能】系列或【可疑】系列。

DLC 3 only. Futo will gift you Ebony Flame after you max her bond. Cooks food 15% faster, instantly finishes anything with [Meat] tag, and 30% chance of refunding used ingredient. Tasks - Main Quests Usually involves Chen threatening to break Mystia's kneecaps should she fail to pay back the debt at the end of the deadline. If you fail to complete the main base game's quests, it's GG. DLC stuff also falls under this but because they are optional content, no deadline for these. Paying Off Debt - Youkai Trail - Have 3000 yen by end of 1/15 Get Operation Permit - Human Village - Talk to Keine by the end of 1/17 Detective Mystia Lorelei! - First Case - Examine the shiny spot by the Dragon God statue in the Human Village on 1/23 Detective Mystia Lorelei! - Second Case - Examine the shiny spot by the Dragon God statue in the Human Village on 1/25 Detective Mystia Lorelei! - Third Case - Check the chicken coop in the top right part of Human Village on 1/27 Paying Off Debt - Human Village - Have 6000 yen by end of 2/3 Oni's Sake Give 3 Fruity Sour to Suika by the end of 2/13 Reward: 8 Fire Rat's Robe Heavenly Cuisine Give 1 Wagyu Beef to Tenshi by the end of 2/14 Reward: 8 Peach Paying Off Debt - Hakurei Shrine - Have 10000 yen by end of 2/17 Get Operation Permit - Scarlet Devil Mansion - Talk to Meiling by the end of 2/19 Obtain Permit - Vineyard - Talk to Meiling by the end of 2/26 Objective! Obtain Meiling's Autograph! Give 1 cuisine with [Chinese] tag to the Meiling by end of 2/26 Reward: Hong Meiling's Autograph There's a Goblin merchant towards the bottom right of the map who sells Pork Stir Fry for 11 yen if you don't want to cook Free Grapes For All! Talk to the goblin NPC after getting Meiling's Autograph by end of 2/26 From this point on you can pick the grapes behind the goblin NPC Find A Wine-making Jar Talk to Rinnosuke with 2000 yen available. Return to Sakuya after this Complete this by the end of 2/28 I wonder if it's possible to talk to him and still get the jar if you have no money... Where is Miss Sakuya Talk to Meiling by the end of 3/1 Report to Miss Sakuya! Talk to Sakuya by the end of 3/1 She's chilling on the right side of the mansion past the path towards Patchouli Pick Up The Finished Product! Talk to Sakuya by the end of 3/23 Reward: 1 Akatsuki, 1 Full Moon's Eve, 1 Fire Rat's Robe Paying Off Debt - Misty Lake - Have 15000 yen by end of 3/5 The Destiny Between The Immortals Sell Immortal Turkey and/or Kaguya-hime in the Izakaya Quest will be completed on 3/17 Make a separate save point if you want to see the other party win. You don't have to sell both items at the same time so you can absolutely rig this contest Paying Off Debt - Bamboo Forest - Have 20000 yen by end of 3/22 The Original Aspiration ~ Part I ~ This appears after you've defeated the boss of the base game Talk to Chen Tasks - Side Quests for base game Early on you need to wander aimlessly on Youkai Trail to find the NPC with a ! above their head for quests. Once News is accessible it'll inform you where the quest giver is. The quests are sorted in the order I completed them so they are chronologically listed. Youkai Trail:1/8 I Want To Trade With Humans... Requirement: Talk to Grocer NPC Reward: 50 yen, 10 Cicada Slough, 7 Bizarre Rock 1/9 Fading Eyesight Due To Old Age Requirement: Hang lanterns on various poles around the trail Reward: 50 yen, [Recipe] Roasted Mushroom, 8 Bizarre Rock *Roasted Mushroom is required for one of Tojiko's quest. No way you can possibly miss this quest... 1/11 Mysterious Parties At The Youkai Trail Requirement: Pick up the bottles from the trail south of Mystia's home and bring them back to the NPC Reward: 3 Dassai, 7 Bizarre Rock From this point on you can start picking up Dassai at this location after 16:00 1/13 Those Idiotic Humans! Requirement: Make 2 Dew Runny Eggs and give to Wriggle. You need to reach level 2 bond with her for the recipe. Reward: 150 yen, 3 Cicada Slough, 8 Bizarre Rock 1/13 To Protect The Human Village And Youkai Trail From Devastation! Requirement: Give 3 food with [Meat] tags to the quest giver Reward: 100 yen, 5 Cicada Slough, 7 Bizarre Rock 1/14 Looking For A Cook For Cats! Requirement: Give 3 Grilled Lamprey to Chen Reward: 150 yen, 5 Umeshu, 8 Bizarre Rock [EXPANSION] Youkai Trail Branch Expansion Requirement: Give 4 cuisine with [Aquatic, Barbecued] tags and have 5000 yen Reward: Unlock Youkai Trail Izakaya 4 Grilled Lamprey Human Village [EXPANSION] Human Village Branch Expansion Requirement: Give 4 cuisine with [Aquatic, Small Portion] tags and have 3000 yen Reward: Human Village Cabin unlocked 1/16 The Way Of Human Entertainment Requirement: Give 1 Sparrow Sake to the NPC Reward: 13 Quaint Coin 1/18 Looking For Miss Akyuu's Signed Washi Requirement: Give 3 Signed Washi Reward: 1 Lunar Herb, 2 Udumbara, 3 Premium Tuna 1/20 Turns Out, There Might Be Free Lunch! Requirement: Serve Dark Matter to Rinnosuke when he comes to eat Reward: 500 yen, 5 Boar Meat, 14 Quaint Coin [EXPANSION] Human Village Branch Expansion Plus Requirement: Give 4 cuisine with [Aquatic, Cultural Background] tags and have 8000 yen Reward: Human Village Izakaya unlocked 1/25 Bounty: Inari God's Tribute Requirement: Give 5 Deep Fried Tofu to the kid Reward: 150 yen, 5 Umeshu, 9 Quaint Coin 1/26 Bounty: Lunchboxes for School Requirement: Give 5 Pork Bowl to Keine Reward: 150 yen, [Recipe] Pork Rice Ball, 9 Quaint Coin Mystia learns the Pork Bowl recipe at level 8 1/26 Looking For Miss Akyuu's Signed Washi Requirement: Give 3 Signed Washi Reward: 3 Pufferfish, 3 Truffle, 3 Wagyu Beef 2/3 Looking For Miss Akyuu's Signed Washi Requirement: Give 3 Signed Washi Reward: 3 Godfather, 3 Dassai, 3 Jade Dew Tea Hakurei Shrine[EXPANSION] Hakurei Shrine Branch Expansion Requirement: Give 2 cuisine with [Cool] tags and have 5000 yen Reward: Shrine Cabin unlocked 2/5 Looking For Strength-Boosting Food Requirement: Give 2 food with [Strength-Boosting] tags Reward: [Recipe] Pork Stir Fry, 9 Torn Tailsman Chen's level 4 recipe should be a good one for this... 2/5 Suspicious Altar Requirement: Interact with the suspicious altar and report back to Reimu Reward: that 1 Silver Froggy Coin you got from interacting with the altar... Find A Way To Deal With The Annoying Rabbit Requirement: Talk to Reimu Reward: What reward? You can donate to Reimu but Tewi can still show up... 2/7 Bounty: Lunchboxes for Hakurei Shrine's Volunteers Requirement: Give 5 food with [Filling] tags Reward: 9 Torn Tailsman Easy peazy. Make some Rice Balls. 2/7 Supply and Demand Requirement: Talk to Reimu, Suika and Tenshi then report back to the kappa merchant Reward: 9 Torn Tailsman 2/7 Looking For Miss Akyuu's Signed Washi Requirement: Give 3 Signed Washi Reward: 1 Akatsuki, 1 Full Moon's Eve, 1 Fire Rat's Robe Yep it's that one rabid fan standing next to Kourindou again... [EXPANSION] Hakurei Shrine Branch Expansion Plus Requirement: Give 3 cuisine with [Fruity] tags and have 10000 yen Reward: Shrine Izakaya unlocked 2/9 Bounty: Jealousy Between Housewives Requirement: Give 1 food with [Photogenic] tag Reward: 150 yen, 15 Ice Cube, 9 Torn Tailsman 2/10, 2/15, 2/18, 2/23, 2/26, 3/3, 3/7, 3/13, 3/16, 3/20, 3/23, 3/27 Looking For Miss Akyuu's Signed Washi Requirement: Give 3 Signed Washi Reward: ??? After a certain point I think her quests just loop back to the beginning in terms of reward drops. 2/13 Alcohol Surrogate Shopper Requirement: Give the NPC 24 ZUN Beer Reward: 1500 yen, 9 Torn Tailsman ZUN will be proud? Scarlet Devil Mansion 2/21 Haunted Mansion's Scary Rumor Requirement: Check out the frozen lake surface. Poor Daiyousei... Reward: 6 Ruby Cirno's Perfect Math Class Requirement: Give 3 Trout to Patchouli Reward: 6 Ruby, you loses some brain cells This is a lead-in from Daiyousei's quest. Mystia's Perfect Cooking Class Requirement: 1. Give Cirno 1 food with [Sweet] tag 2. Give Cirno 1 food with [Photogenic] tag 3. Give Cirno 1 food with [Fruity] tag Reward: 7 Ruby Same as above [EXPANSION] Scarlet Devil Mansion Branch Expansion Requirement: Give 2 cuisine with [Western, Meat] tags and have 8000 yen Reward: Mansion Cabin unlocked [EXPANSION] Scarlet Devil Mansion Branch Expansion Plus Requirement: Give 5 cuisine with [Dreamy] tags and have 15000 yen Reward: Mansion Izakaya unlocked 2/21 Help! I Need To Provide Special Cuisines For An Important VIP... Requirement: Give 3 food with [Premium, Sweet] tags Reward: 5 Negroni, 6 Ruby 2/24 I Want To Know About Lady Meiling's Homeland Cuisine! Requirement: Give 5 [Chinese] tag food to the goblin NPC Reward: [Recipe] Cantonese Char Siu, 6 Ruby Gawwwwwwblins 2/25 I'm Once Again Asking For Your Cooking Support Requirement: Give 3 food [Western, Sweet] tags to the Fairy Maid NPC Reward: 5 Godfather, 7 Ruby 3/2 Chief Maid's Shopping List Requirement: 1. Give 30 Pork 2. Give 20 Beef 3. Give 10 Boar Meat 4. Give 5 Ibarico Pork 5. Give 2 Wagyu Beef Reward: 6 Fire Rat's Robe 3/5 Chief Maid's Shopping List Requirement: 1. Give 30 Tofu 2. Give 20 Radish 3. Give 10 Mushroom 4. Give 1 Truffle 5. Give 1 Udumbara Reward: 6 Full Moon's Eve 2/23 Finding The Perfect Lady Patchouli's Weakness Requirement: 1. Give 2 food with [Western, Premium] tags 2. Give 2 food with [Photogenic, Sweet] tags Reward: 5 Affogato, 7 Ruby #1's the hardest to fulfill. I didn't finish it until I got Beef Wellington recipe from Patchuli's level 4 bond reward. Bamboo Forest of the Lost [EXPANSION] Bamboo Forest of the Lost Branch Expansion Requirement: Give 3 cuisine with [Hot, Spicy] tags and have 10000 yen Reward: Bamboo Forest Cabin unlocked 3/9 Take Back The Stolen Natural Spring Requirement: Give 5 Roasted Mushrooms Reward: 11 Shining Bamboo wao who could've predicted it was her all along... 3/11 Looking for A Philosopher Book Requirement: Give 10 Bamboo Reward: [Recipe] Flowing Somen, 11 Shining Bamboo Somen is delicious 3/8 Chief Maid's Shopping List (X5) Requirement: 1. Give 30 Trout 2. Give 20 Lamprey 3. Give 10 Salmon 4. Give 2 Premium Tuna 5. Give 2 Pufferfish Reward: 6 Akatsuki At this point reward table loops back to the start I think. Same quests on 3/14, 3/17, 3/20, 3/22, 3/25, 4/1 3/12 Short Concert In The Bamboo Forest Requirement: Give 5 food with [Cultural Background] tags Reward: 11 Shining Bamboo 3/14 It's Kind of Lonely Here In the Pond Requirement: Give 5 Lamprey Reward: Shining Bamboo 12 RIP local pond's ecosystem Tasks - Side Quests DLC portion [EXPANSION] Forest of Magic Branch Expansion Requirement: Give 5 Fairy Dew and have 3000 yen Reward: Forest of Magic Cabin unlocked [EXPANSION] Youkai Mountain Branch Expansion Requirement: Give 5 cuisine with [Specialty] tags and have 3000 yen Reward: Youkai Mountain Cabin unlocked [EXPANSION] Forest of Magic Branch Expansion Plus Requirement: Give 3 cuisine with [Fungus, Specialty] tags and have 5000 yen Reward: Forest of Magic Izakaya unlocked [EXPANSION] Youkai Mountain Branch Expansion Plus Requirement: Give 5 cuisine with [Mountain Delicacy, Premium] tags and have 5000 yen Reward: Youkai Mountain Izakaya unlocked [EXPANSION] Streets of Former Hell Branch Expansion Requirement: Give 5 cuisine with [Strange] tags and have 5000 yen Reward: Former Hell Cabin unlocked [EXPANSION] Palace of the Earth Spirits Branch Expansion Requirement: Give 3 Cheese and have 5000 yen Reward: Palace Cabin unlocked [EXPANSION] Streets of Former Hell Branch Expansion Plus Requirement: Give 5 cuisine with [Strange, Specialty] tags and have 10000 yen Reward: Former Hell Izakaya unlocked [EXPANSION] Palace of the Earth Spirits Branch Expansion Plus Requirement: Give 5 cuisine with [Sour] tag and have 10000 yen Reward: Palace Izakaya unlocked Better hurry up with raising Parsee's bond :x [EXPANSION] Myouren Temple Branch Expansion Requirement: Give 5 Mango Pomelo Sago and have 5000 yen Reward: Myouren Temple Cabin unlocked You can buy it from the NPC in the Mausoleum [EXPANSION] Divine Spirits Mausoleum Branch Expansion Requirement: Give 3 cuisine with [Pine Seed] ingredients and have 5000 yen Reward: Divine Spirit Mausoleum Cabin unlocked [EXPANSION] Divine Spirit Mausoleum Expansion Plus Requirement: Give 12 Kirin and have 10000 yen Reward: Divine Spirit Mausoleum Izakaya unlocked [EXPANSION] Myouren Temple Branch Expansion Plus Requirement: Give 5 cuisine with [Strength-Boosting, Meat] tags and have 10000 yen Reward: Myouren Temple Izakaya unlocked [DLC 3] A Very Busy Hakurei Miko Talk to Reimu Available on 2/20 with no deadline [DLC 3] Beware of Tanuki! Talk to the mystery tanuki standing outside Mystia's house She will only spawn after you talk to Reimu first Available on 2/20 with no deadline after finishing the previous task [DLC 3] A Matter of Life and Death for Beast Youkai? Go to Myouren Temple and talk to Kyouko Available on 2/20 with no deadline after finishing the previous task [DLC 3] Tanuki Espionage Operation! Reach Bond level with the 6 DLC 3 rare guests. This allows you to participate in the DLC 3's special event [DLC 3] The Tanuki Boss's Battle Plans Talk to Mamizou after enlisting partners at the Hakurei Shrine and Human Village. Tasks - Bond base game part 1 Youkai TrailRumia Spicy Dark Matter?! Requirement: Give 1 Tofu Reward: [Recipe[ Stinky Tofu Have Rumia Try the [Stinky Tofu]! Requirement: Serve the dish to Rumia Advance to next bond level Spicy Dark Matter?! Requirement: Give 1 Tofu Reward: [Recipe[ Stinky Tofu Have Rumia Try the [Fried Lampreys! Requirement: Serve the dish to Rumia Advance to next bond level Dark Matter?! Part One Give 1 Iberico Pork Dark Matter?! Part Two Give 1 Bamboo Shoot Have Rumia Try the [Imitation Bear Paw]! Requirement: Serve the dish to Rumia Advance to next bond level Wriggle A Date Between Morning Dew and Egg? Requirement: Give 1 Dew Reward: [Recipe] Dew Runny Eggs Have Wriggle Try the [Dew Runny Eggs]! Requirement: Serve the dish to Wriggle when she visits at night Advance to next bond level Have Wriggle Try the [Fried Cicada Sloughs]! Requirement: Serve the dish to Wriggle when she visits at night Advance to next bond level Please Help This Thoughtful Young Youkai Requirement: Give 4 Grilled Lamprey Reward: 2 Udumbara , 1 Ramune You can use this towards Wriggle's next request, quest's given by a different NPC The Flower of The Insect Race Requirement: Give 1 Udumbara Reward: [Recipe] Udumbara Cake Have Wriggle Try the [Udumbara Cake]! Requirement: Serve the dish to Wriggle when she visits at night Advance to next bond level Chen Have Chen Try the [Secret Dried Fish Crisp]! Requirement: Serve the dish to Chen at night Advance to next bond level Drunk Cat - Pork Chapter Requirement: Give 1 Pork Drunk Cat - Trout Chapter Requirement: Give 1 Trout Drunk Cat - Pork & Trout Chapter Requirement: Give 1 Pork and 1 Trout Have Chen Try the [Pork & Trout Kebab[! Requirement: Serve the dish to Chen at night Advance to next bond level Operation Stray Cats ~ Part One Requirement: Give 1 Seaweed Operation Stray Cats ~ Part Two Requirement: Give 1 Seaweed and 1 Boar Meat Reward: [Recipe] Power Soup Have Chen Try the [Power Soup]! Requirement: Serve the dish to Chen at night Advance to next bond level Human Village Akyuu Have Miss Akyuu Try the [Miso Tofu]! Requirement: Serve the dish to Akyuu at night Advance to next bond level Pick The Right Vegetable For The Right Job Requirement: Give 1 Potato and 1 Pumpkin Reward: [Recipe] Vegetable Salad Have Miss Akyuu Try the [Vegetable Salad]! Requirement: Serve the dish to Akyuu at night Advance to next bond level Have Miss Akyuu Try the [Falling Blossoms]! Requirement: Serve the dish to Akyuu at night Advance to next bond level Kasen Have Miss Kasen Try the [Tofu Stew]! Requirement: Serve the dish to Kasen at night Advance to next bond level Prepare The Izakaya For The God of Fortune Requirement: Give 1 Beef Reward: [Recipe] Beef Bowl Have Miss Kasen Try the [Beef Bowl]! Requirement: Serve the dish to Kasen at night Advance to next bond level Learn From The Sage's Beast! Requirement: Give 1 Pumpkin Reward: [Recipe] Hunter's Casserole Have Miss Kasen Try the [Hunter's Casserolel]! Requirement: Serve the dish to Kasen at night Advance to next bond level Keine Have Keine-sensei Try the [Deep Fried Tofu]! Requirement: Serve the dish to Keine at night Advance to next bond level Have Keine-sensei Try the [Scholar's Ginkgo]! Requirement: Serve the dish to Keine at night Advance to next bond level Ingredients From Across The Sea! Requirement: Give 1 Pufferfish Reward: [Recipe] Shirayuki Have Keine-sensei Try the [Shirayuki]! Requirement: Serve the dish to Keine at night Advance to next bond level Hakurei ShrineReimu The Hidden Warmth In A Rice Ball? Requirement: Give 5 Onion Reward: [Recipe] Pink Rice Ball Have Miss Reimu Try the [Pink Rice Ball]! Requirement: Serve the dish to Reimu at night Advance to next bond level Have Miss Reimu Try the [Hodgepodgel]! Requirement: Serve the dish to Reimu at night Advance to next bond level The Most Expensive Ingredients Requirement: Give 1 Iberico Pork, 1 Wagyu Beef, 1 Pufferfish Reward: [Recipe] Daimyo's Feast Have Miss Reimu Try the [Daimyo's Feastl]! Requirement: Serve the dish to Reimu at night Advance to next bond level Tenshi Class and Elegance? Requirement: Give 5 Radish Reward: [Recipe] Carved Rose Salad Have Miss Tenshi Try the [Carved Rose Salad]! Requirement: Serve the dish to Tenshi at night Advance to next bond level Have Miss Tenshi Try the [Peach Tapioca]! Requirement: Serve the dish to Tenshi at night Advance to next bond level Heavenly Peach vs Earth Peach Requirement: Give 3 Peach Reward: [Recipe] Peach & Shrimp Salad Have Miss Tenshi Try the [Peach & Shrimp Salad]! Requirement: Serve the dish to Tenshi at night Advance to next bond level Suika This Pork Is Different From That Pork!? Requirement: Give 3 Pork Reward: [Recipe] Fried Pork Cutlet Have Miss Suika Try the [Fried Pork Cutlet]! Requirement: Serve the dish to Suika at night Advance to next bond level Have Miss Suika Try the [Energy Skewer]! Requirement: Serve the dish to Suika at night Advance to next bond level The Super Cuisine That Every Oni Knows!? Requirement: Give 1 Iberico Pork, 1 Boar Meat Reward: [Recipe] Niten Ichiryu Have Miss Suika Try the [Niten Ichiryu]! Requirement: Serve the dish to Suika at night Advance to next bond level Scarlet Devil MansionMeiling Lamprey Dishes From Afar Requirement: Give 2 Grilled Lamprey Reward: [Recipe] Kabayaki Lamprey Have Miss Meiling Try the [Kabayaki Lamprey]! Requirement: Serve the dish to Meiling at night Advance to next bond level Have Miss Meiling Try the [Golden Ribs Soup]! Requirement: Serve the dish to Meiling at night Advance to next bond level Find The Right Meat For The Perfect Buns Requirement: Give 3 Iberico Pork Reward: [Recipe] Rainbow Pan-fried Pork Buns Have Miss Meiling Try the [Rainbow Pan-fried Pork Buns! Requirement: Serve the dish to Meiling at night Advance to next bond level Cirno Lawsuit From An Idiotic Fairy!? Requirement: Give 3 Salmon Reward: [Recipe] Real - Seafood Miso Soup Have Cirno Try the [Real - Seafood Miso Soup]! Requirement: Serve the dish to Cirno at night Advance to next bond level Have Cirno Try the [Sashimi Platter]! Requirement: Serve the dish to Cirno at night Advance to next bond level Looking For The Right Meat For A Cold Plate Requirement: Give 2 Pork Bowl Reward: [Recipe] Ino-Shika-Chou Have Cirno Try the [Ino-Shika-Chou]! Requirement: Serve the dish to Cirno at night Advance to next bond level Patchouli Have Miss Patchouli Try the [Eggs Benedict]! Requirement: Serve the dish to Patchouli at night Advance to next bond level The Cuisine In The Book Requirement: Give 1 Roasted Mushroom Reward: [Recipe] Italian Risotto Have Miss Patchouli Try the [Italian Risotto]! Requirement: Serve the dish to Patchouli at night Advance to next bond level Don't Get Too Cocky Now! Requirement: Give 1 Cuisines with [Premium] tag Reward: [Recipe] Beef Wellington Have Miss Patchouli Try the [Beef Wellington]! Requirement: Serve the dish to Patchouli at night Advance to next bond level Tasks - Bond base game part 2 Bamboo Forest of the LostTewi Rabbit's Secret Recipe? Requirement: Give 1 Cuisine with [Specialty] tags Reward: [Recipe] Mochi If you are feeling particularly lazy you can buy the Lunar Dango from the Human Village to give it to Tewi Have Tewi Try the [Mochi]! Requirement: Serve the dish to Tewi at night Advance to next bond level Asking For A Return Gift Before Sending Yours!? Have You No Shame!? Requirement: Give 1 Cuisine with [Wonderful] tags Reward: [Recipe] Peach Yatsuhashi Again, a store bought Lunar Dango can do the job nicely. Have Tewi Try the [Peach Yatsuhashi]! Requirement: Serve the dish to Tewi at night Advance to next bond level Companion Rabbit Requirement: Give 1 Cuisine with [Sweetl] tags Give 1 Cuisine with [Small Portion] tags Reward: [Recipe] Lunar Dango Buy 2 Mochi from Human Village and call it a day. Mokou Bring Out The HOTTEST Stuff You Got! Requirement: Give 3 Chili Reward: [Recipe] Mapo Tofu Have Miss Mokou Try the [Mapo Tofu]! Requirement: Serve the dish to Mokou at night Advance to next bond level Eat Your Sorrows Away! Requirement: Give 1 Cuisine with [Aura Bursting!] tags Give 1 Cuisine with [Legendary] tags Reward: [Recipe] Fuji's Lava Have Miss Mokou Try the [Fuji's Lava]! Requirement: Serve the dish to Mokou at night Advance to next bond level Kaguya Have Miss Kaguya Try the [Steamed Egg & Bamboo Shoots]! Requirement: Serve the dish to Kaguya at night Advance to next bond level "Lunar Capital Expo" Opening Soon! Requirement: Give 5 Immortal Turkey Reward: [Recipe] Lunar Lover Biscuits Have Miss Kaguya Try the [Lunar Lover Biscuits]! Requirement: Serve the dish to Kaguya at night Advance to next bond level The Sixth Puzzle From The Princess Requirement: Give 1 Cuisine with [Legendary], [Cultural Background] tags Reward: [Recipe] Hourai Branch Have Miss Kaguya Try the [Hourai Branch]! Requirement: Serve the dish to Kaguya at night Advance to next bond level Tasks - Bonds [DLC 1] Forest of MagicMarisa Distinguishing Poisonous Mushrooms From Edible Ones Requirement: Give 3 Pork Reward: [Recipe] Pork & Mushroom Stir Fry Have Miss Marisa Try the [Pork & Mushroom Stir Fry]! Requirement: Serve the dish to Marisa Advance to next bond level The Magic Book Containing Mushroom Recipes Requirement: Give 2 Truffle Give 2 Mushroom Reward: [Recipe] Secret Savory Mushroom Hotpot Have Miss Marisa Try the [Secret Savory Mushroom Hotpot]! Requirement: Serve the dish to Marisa Advance to next bond level The Witch Dancing On The Tip Of The Tongue! Requirement: Give 1 Cuisines with [Legendary] tags Give 1 Cuisines with [Hot] tags Reward: [Recipe] Mushroom Maiden's Tip Tap Pot Have Miss Marisa Try the [Mushroom Maiden's Tip Tap Pot]! Requirement: Serve the dish to Marisa Advance to next bond level Narumi Have Miss Narumi Try the [Nigiri Sushi]! Requirement: Serve the dish to Narumi Advance to next bond level Tributes to Jizo Buddha Requirement: Give 1 Cuisines with [Specialty] tags Give 1 Cuisines with [Cultural Background] tags Reward: [Recipe] Shrimp-Stuffed Pumpkin Have Miss Narumi Try the [Shrimp-Stuffed Pumpkin]! Requirement: Serve the dish to Narumi Advance to next bond level The Foreign Cuisines That Can Save A NEET! Requirement: Give 1 Cuisines with [Western] tags Give 1 Cuisines with [Chinese] tags Reward: [Recipe] Buddha Jumps Over The Wall Have Miss Narumi Try the [Buddha Jumps Over The Wall]! Requirement: Serve the dish to Narumi Advance to next bond level Alice Have Miss Alice Try the [Cream of Mushroom Soup]! Requirement: Serve the dish to Alice Advance to next bond level A Fairy Tale Cake That Can Turn One Into A Giant? Requirement: Give 10 Grapes Reward: [Recipe] Ordinary "Eat Me" Cupcake Have Miss Alice Try the [Ordinary "Eat Me" Cupcake]! Requirement: Serve the dish to Alice Advance to next bond level Find The Suitable Legendary Ingredient For The Seven-colored Cuisine! Requirement: Give 1 Cuisine with [Udumbara] ingredient Reward: [Recipe] Seven-colored Yokan Have Miss Alice Try the [Seven-colored Yokan]! Requirement: Serve the dish to Alice Advance to next bond level Youkai MountainNitori Mysterious "Cucumbers For Dummies" Requirement: Give 5 Cucumber Reward: [Recipe] Pickles Have Miss Nitori Try the [Pickles]! Requirement: Serve the dish to Nitori Advance to next bond level Have Miss Nitori Try the [Creamy Crab]! Requirement: Serve the dish to Nitori Advance to next bond level The Missing Key Ingredient Is!? Requirement: Give 1 Fried Cicada Sloughs Reward: [Recipe] Imitation Shirikodama Have Miss Nitori Try the [Imitation Shirikodama]! Requirement: Serve the dish to Nitori Advance to next bond level Sanae Have Miss Sanae Try the [Okonomiyaki]! Requirement: Serve the dish to Sanae Advance to next bond level Challenge From A Living God! Requirement: Give 1 Octopus Reward: [Recipe] Takoyaki Have Miss Sanae Try the [Takoyaki]! Requirement: Serve the dish to Sanae Advance to next bond level The Mysterious Ingredient of The Outside World Requirement: Gives 1 Sea Urchin Reward: [Recipe] Sea Urchin Sashimi Have Miss Sanae Try the [Sea Urchin Sashimi]! Requirement: Serve the dish to Sanae Advance to next bond level Momiji Have Miss Momiji Try the [Deep Fried Shrimp Tempura]! Requirement: Serve the dish to Momiji Advance to next bond level Hangovers Are Not Good For Your Health~ Requirement: Give 3 Honey Reward: [Recipe] Golden Crispy Fish Cakes Have Miss Momiji Try the [Golden Crispy Fish Cakes]! Requirement: Serve the dish to Momiji Advance to next bond level The Working Class Only Need To Worry About Themselves! Requirement: Give 1 Cuisine with [Meat] tags Reward: [Recipe] All-Meat Feast Have Miss Momiji Try the [All-Meat Feast]! Requirement: Serve the dish to Momiji Advance to next bond level Tasks - Bonds [DLC 2] Former HellYamame Beware of Food Poisoning! Requirement: Give 2 Tonkotsu Ramen Reward: [Recipe] Crispy Spirals Have Miss Yamame Try the [Crispy Spirals]! Requirement: Serve the dish to Yamame at night Advance to next bond level Have Miss Yamame Try the [Ceiling-Longing Pie]! Requirement: Serve the dish to Yamame at night Advance to next bond level The Underworld's Popular "Strength-Boosting" Dish Requirement: Give 2 Cuisine with [Strength-Boosting] tags Reward: [Recipe] Kabuto Steamed Cake Have Miss Yamame Try the [Kabuto Steamed Cake]! Requirement: Serve the dish to Yamame at night Advance to next bond level Yuugi Requirement: Give 2 Cuisine with [Good with Alcohol] tags Give 2 Beverages with [High Alcohol] tags Reward: [Recipe] Lion's Head Have Miss Yuugi Try the [Lion's Head]! Requirement: Serve the dish to Yuugi at night Advance to next bond level The Grand Objects Competition is in Full Swing! Requirement: Give 1 Radish Give 1 Pumpkin Give 1 Trout Give 1 Iberico Pork Reward: [Recipe] Giant Tamagoyaki Have Miss Yuugi Try the [Giant Tamagoyaki]! Requirement: Serve the dish to Yuugi at night Advance to next bond level Even Birdies Have Grit! Requirement: Give 1 Cuisine with [Legendary] tags Give 1 Cuisine with [Wonderful] tags Give 1 Cuisine with [Dreamy] tags Give 1 Cuisine with [Strength-Boosting] tags Give 1 Cuisine with [Premium] tags Reward: [Recipe] Oedo Boat Festival Have Miss Yuugi Try the [Oedo Boat Festival]! Requirement: Serve the dish to Yuugi at night Advance to next bond level Parsee Have Miss Parsee Try the [Misery Cheese Sticks]! Requirement: Serve the dish to Parsee at night Advance to next bond level Let's Exchange Fruits Requirement: Give 2 Cuisine with [Peach] ingredients Give 2 Grapes Reward: [Recipe] Gloomy Fruit Pie Have Miss Parsee Try the [Gloomy Fruit Pie]! Requirement: Serve the dish to Parsee at night Advance to next bond level The Underworld's Most Popular Disk - Unmasked! Requirement: Give 20 Chili Reward: [Recipe] Agony Oden Have Miss Parsee Try the [Agony Oden]! Requirement: Serve the dish to Parsee at night Advance to next bond level Palace of the Earth SpiritsRin Cat Rice? Cat Food? Requirement: Give 1 Beef Bowl Reward: [Recipe] Neko-manma Have Orin Try the [Neko-manma]! Requirement: Serve the dish to Rin at night Advance to next bond level Satori-sama's Favorite Food? Requirement: Give 1 Sakura Pudding Reward: [Recipe] Salmon Tempura Have Orin Try the [Salmon Tempura]! Requirement: Serve the dish to Rin at night Advance to next bond level Cuisine with History Requirement: Give 1 Scholar's Ginkgo Reward: [Recipe] Dragon Carp Have Orin Try the [Dragon Carp]! Requirement: Serve the dish to Rin at night Advance to next bond level Satori Rise and Shine! Requirement: Give 5 Beverages with [Stimulating] tags Reward: [Recipe] Sakura Pudding Have Miss Satori Try the [Sakura Pudding]! Requirement: Serve the dish to Satori at night Advance to next bond level Go Forth! Komeiji Satori! Requirement: Give 2 Cuisine with [Strength-Boosting] tags Reward: [Recipe] Energy Pudding Have Miss Satori Try the [Energy Pudding]! Requirement: Serve the dish to Satori at night Advance to next bond level Energy Pudding Resupply Requirement: Give 5 Energy Pudding Reward: [Recipe] Burn-out Pudding Have Miss Satori Try the [Burn-out Pudding]! Requirement: Serve the dish to Satori at night Advance to next bond level Utsuho Have Okuu Try the [Cheese Omelette]! Requirement: Serve the dish to Utsuho at night Advance to next bond level Divine Flame Skewers Requirement: Give 2 Cuisines with [Hot] tags Give 3 Boar Meat Give 3 Venison Give 10 Onion Reward: [Recipe] Instant☆Death Have Okuu Try the [Instant☆Death]! Requirement: Serve the dish to Utsuho at night Advance to next bond level Heat Up Your Brain!? Requirement: Give 3 Cuisine with [Hot] tags Reward: [Recipe] CAUTION!! Hellish Spice! Have Okuu Try the [CAUTION!! Hellish Spice!]! Requirement: Serve the dish to Utsuho at night Advance to next bond level Tasks - Bonds [DLC 3] Divine Spirits MausoleumSeiga Culinary Magic Trick!? Requirement: Give 2 Chestnut Give 2 Honey Reward: [Recipe] Honeyed Chestnut Have Seiga Try the [Honeyed Chestnut]! Requirement: Serve the dish to Seiga at night Advance to next bond level A Chestnut Story~ Requirement: Give 2 Honeyed Chestnut Reward: [Recipe] Tianshi's Stewed Mushrooms Have Seiga Try the [Tianshi's Stewed Mushroom]! Requirement: Serve the dish to Seiga at night Advance to next bond level Taoism's Lotus Flower Feast! Requirement: Give 5 Cuisine with [Cultural Background] tags Reward: [Recipe] Fish Lotus Lamps Have Seiga Try the [Fish Lotus Lamps]! Requirement: Serve the dish to Seiga at night Advance to next bond level Tojiko Buried Sweet Potatoes! Requirement: Give 5 Sweet Potato Reward: [Recipe] Candied Sweet Potato Have Tojiko Try the [Candied Sweet Potato]! Requirement: Serve the dish to Tojiko at night Advance to next bond level Let's Exchange Dishes! Requirement: Give 5 Cuisine with [Mushroom] ingredients Reward: [Recipe] Golden Two-Shroom Wrap Have Tojiko Try the [Golden Two-Shroom Wrap]! Requirement: Serve the dish to Tojiko at night Advance to next bond level Deep Fried Match Made in Heaven? Requirement: Give 1 Fried Pork Cutlet Give 1 Potato Croquettes Give 1 Pancake with Syrup Reward: [Recipe] Tempura Platter Have Tojiko Try the [Assorted Tempura]! Requirement: Serve the dish to Tojiko at night Advance to next bond level Mononobe no Futo A Treat For The Old-Time Hermit! Requirement: Give 1 Cuisine with [Strength-Boosting] tags Reward: [Recipe] Pine Nut Cake Have Futo Try the [Pine Nut Cake]! Requirement: Serve the dish to Futo at night Advance to next bond level The Symbol of Longevity!? Requirement: Give 1 Cuisine with [Venison] ingredient Reward: [Recipe] White Deer, Unyielding Pine Have Futo Try the [White Deer, Unyielding Pine]! Requirement: Serve the dish to Futo at night Advance to next bond level The Colors of Gensokyo and Taoism? Requirement: Give 2 Cuisine with [Japanese, Specialty] tags Reward: [Recipe] Eight Trigram Fish Maws Have Futo Try the [Eight Trigram Fish Maws]! Requirement: Serve the dish to Futo at night Advance to next bond level Myouren TempleNue Pranking the Old Man! Requirement: Give 10 Peach Reward: Unzan Cotton Candy Have Nue Try the [Unzan Cotton Candy]! Requirement: Serve the dish to Nue at night Advance to next bond level Nue's Mystery Game Requirement: Give 1 Cuisine with [Dreamy] tags Reward: [Recipe] Pure White Lotus Have Nue Try the [Pure White Lotus]! Requirement: Serve the dish to Nue at night Advance to next bond level To Identify the Unindentified! Requirement: Give 5 Cuisine with [Dreamy] tags Reward: [Recipe] Star Lotus Ship Have Nue Try the [Star Lotus Ship]! Requirement: Serve the dish to Nue at night Advance to next bond level Murasa Have Murasa Try the [Biscay Biscuits]! Requirement: Serve the dish to Murasa at night Advance to next bond level Like Eggs on Scrambled Eggs!? Requirement: Give 3 Cuisine with [Premium] tags Reward: [Recipe] Smoked Buccaneer Have Murasa Try the [Smoked Buccaneer]! Requirement: Serve the dish to Murasa at night Advance to next bond level The Ship Phantom's Debt! Requirement: Give 5 Cuisine with [Vegetarian, Wonderful] tags Reward: [Recipe] Buddha's Delight Have Murasa Try the [Buddha's Delight]! Requirement: Serve the dish to Murasa at night Advance to next bond level Kogasa Have Kogasa Try the [Baked Sweet Potato]! Requirement: Serve the dish to Kogasa at night Advance to next bond level Shrine Maidens Selling Outside World Dango!? Requirement: Give 1 Lunar Dango Give 1 Mochi Reward: [Recipe] Yashouma Dango Have Kogasa Try the [Yashouma Dango]! Requirement: Serve the dish to Kogasa at night Advance to next bond level Let's Make a Heart-Throbbing Dish! Requirement: Give 5 Cuisine with [Wonderful] tags Reward: [Recipe] Heart-Throbbing Surprise Have Kogasa Try the [Heart-Throbbing Surprise]! Requirement: Serve the dish to Kogasa at night Advance to next bond level News Tasks already cover a majority of the quests stuff so I'll skip those. 1/6 Filling foods are popular. Gives food with [Filling] tags the [Trend - Popular] tag. 1/10 Filling foods are no longer popular. The new tag is removed. 1/11 Chen upgrades your Youkai Trail cart for free. 1/14 Filling foods are now unpopular. Gives food with [Filling] tags the [Trend - unpopular] tag. 1/18 Filling food's trend tag is removed. 1/18 DLC 1 areas Youkai Mountain and Forest of Magic is now accessible along with the base area Human Village. 1/20 Greasy foods are now unpopular. Gives food with [Greasy] tags the [Trend - unpopular] tag. 1/27 Greasy food's trend tag is removed. 2/4 Chinese foods are popular. Gives food with [Chinese] tags the [Trend - Popular] tag. 2/5 Base area Hakurei Shrine is now accessible. 2/5 Notice that Tewi will start terrorizing you during the work phase 2/7 Green Tea prices goes up 2/8 DLC 2's areas Former Hell and Palace of the Earth Spirits are now accessible 2/9 Chinese foods are no longer popular. The new tag is removed. 2/10 Green Tea price returns to normal 2/14 Foods with [Good with Alcohol] tag are now unpopular. Gives food with this tag the [Trend - Unpopular] tag. 2/20 SDM is now accessible along with DLC 3's areas. 2/21 Foods with [Good with Alcohol] tag returns to normal. 2/24 Foods with [Mild] tag are now unpopular. Gives food with this tag the [Trend - Unpopular] tag. 3/3 Foods with [Mild] tag returns to normal. 3/6 Filling foods are popular. Gives food with [Filling] tags the [Trend - Popular] tag. Why do I have a sense of deja vu? 3/9 Bamboo Forest of the Lost is open. 3/12 Filling foods are no longer popular. Loses trend tag. 3/14 Beginning of 2 idiots' contest. I suggest making an extra save point here and do not overwrite this. 3/17 Japanese foods are popular. Gives food with [Japanese] tags the [Trend - Popular] tag. 3/18 End of the contest 3/24 Final mission is available. Talk to Youmu at the Hakurei Shrine Keep a save here if you want to farm punishment cards. For those after the 50 punishment achievo or looking for a specific character, Wriggle's punishment spell card activates pretty quickly if you leave her alone and she chases out the other guests. 4/1 Filling foods are popular. Gives food with [Vegetarian] tags the [Trend - Popular] tag Partners Shield your eyes or skip this section if you don't want to find out about main quest partners or the hidden ones. Most will join your automatically as per main story progression. A few will only appear once you met certain criteria: maxing certain individual's friendship. They will appear the next day once you've triggered the respective person's level 5 dialogue. Seems to be one partner for each area? Even though it says commission 0% for the characters, I'm pretty damn sure Reimu charges you for using Aunn. Lore-wise you also need to pay for Kyouko later on. I'm not sure how the fee is calculated. Kasodani Kyouko Kyouko joins your automatically at the start Her stats are average. Medium for both movement and work speed. No particular downside Movement: Medium Work: Medium Motoori Kosuzu Kosuzu will join your eventually automatically once you've progressed enough in Human Village. Slow movement but Fast work speed. I replace her later on since she usually gets in the way in the kitchen once more partners become available. Useful for those who struggles with getting Hyper mode. Movement: Slow Work: Fast Komano Aunn Aunn joins your automatically once you've made enough progress in Hakurei Shrine. She's the opposite of Kosuzu, Fast movement but slow work speed. Great for serving food or drinks. Movement: Fast Work: Slow Izayoi Sakuya Sakuya joins you automatically after you finished paying off the debt for the Scarlet Devil Mansion contract. She's a cheat character basically. The perfect maid who TELEPORTS when she moves, plus her work speed is fast. There's absolutely no reason not to use her unless you are afraid she's going to throw knives at Meiling. She won't. Outside of work? Meling's on her own. Movement: Teleports Work: Fast Reisen Udongein Inaba Reisen joins you eventually for the Eientei portion. Starting from this point your partner will have gimmicky special effects. For Reisen she increases guest tips by 20%. She moves Fast and her work speed is Medium. Better than Aunn overall in stats plus +20% for tips is pretty sweet. Movement: Fast Work: Medium Perk: Guest tips increased by 20% Kagiyama Hina DLC 1 only. Youkai Mountain Ever spinning Hina will join you after maxing all Youkai Mountain residents' bonds. Not recommended unless you like her character. (Her spinning endlessly even while serving is cute though) Stat is not good and she has a 15% chance of making Dark Matter if she's the one cooking. The cooking is instantaneous, but this game's difficulty is very forgiving so you really don't need her perk Movement: Slow Work: Medium Perk...? Immediately finishes cooking but has a 15% chance of cooking Dark Matter. May be a good combo with Yoshika and the Nuclear kitchenware Yumeko. DLC 1 only. Forest of Magic Need to max the forest resident's friendship level. Consider her the improved version of Kosuzu. Throws knives to deliver food... Movement: Medium Work: Fast Perk:Use throwing knives to deliver food. It's even faster than Mystia's throw. Kisume DLC 2 only. Former Hell Max everyone in Former Hell's bonds. Kyouko with bonus perk. Movement: Medium Work: Medium Perk: No negative effects when kicking out normal guests, but they won't pay. Onozuka Komachi DLC 2 only. Palace of the Earth Spirits The infamous slacker shinigami. Not surprisingly she's slow in everything. Movement: Slow Work: Slow Perk: Will sleep during work, but guests are immediately brought to their tables On the one hand, she seems pointless. But guest teleportation is pretty alright. Kumoi Ichirin DLC 3 only. Myouren Temple Movement: Medium Work: Fast Perk: Summons Unzan to work with her Miyako Yoshika. DLC 3 only. Divine Spirits Mausoleum Well.... She's a zombie. So don't be surprised if she's shambling around slowly. Movement: Slow Work: Slow Perk: Eats Dark Matter to improve your stats By "your" they mean Yoshika's. Any Dark Matter you put into the Food Storage will be gobbled up by her. The more she eats, the faster she goes. As interesting as it is to stack Hina and Nuclear kitchen set with her, Hina on cooking duty can get in your way especially if your Hyper mode runs out. And honestly it's such a gimmick you are better off using naturally fast characters unless you have to. You are not restricted to any partners at all unless it's a personal preference. Spoiler protection sparrow let's gooooooo