换一换
换一换 


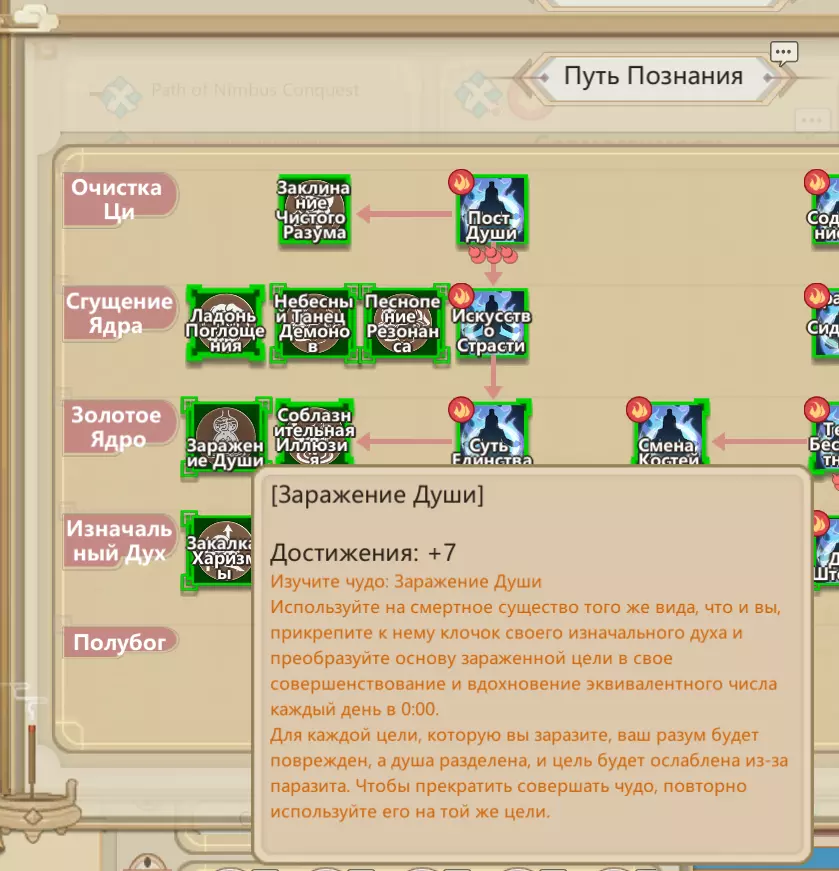
A document on how Cultivation Efficiency works for Xiandao Cultivators, and what to consider when designing Arrays and Rooms. Due to the amount of technical terminology, this is not meant to be a beginners guide. Introduction This is an attempt to explain what Cultivation Efficiency is for Xiandao Cultivation, how it works, and how it can be improved. That includes Cultivation Arrays, Cultivation Rooms, and the difference between Breakthrough and Cultivation rooms. Due to the high amount of technical terminology, this is not meant for beginners. Initial version, lacking Elemental Emitters with Distances, and detailed array building with examples. * Added Elemental Emitters. * Added example under Qi Cushion V Altar of Magic, added example on Metal Element Arrays Cultivation Efficiency Cultivation Efficiency can be considered as the amount of cultivation XP your cultivator gets during regular cultivation. There's an overview under the characters cultivation tab, listing eight factors: Law - How well the character's main stats and the cultivation Law matches. Element - How well the environment's elemental attribute matches the Law. Aid - Cultivation bonus provided by the character's master. Qi - The environment's Qi density grants a bonus to your cultivation. Cozy - The current location's coziness grants a bonus to your cultivation. You gain a bigger bonus by using higher-level materials. Season - Effect of current season on cultivation. Mood - Effect of character's mood on cultivation. Mental State - Effect of character's Mental State on cultivation. Law (Matching) FactorAll Laws have a base STAT requirement (listed on the wiki[amazing-cultivation-simulator.fandom.com]), the current Law matching is based on the cultivators current stats and Law Matching bonus properties (based on the element of the law). A disciple with Max stats and no changes to Law Matching bonus properties will have different Law bonus based on their Law. A list is below. Since Law Matching is used directly in the calculating Cultivation Efficiency, a higher number is always better. 150% and 250% will be listed with the same indicators, but 250% Law Matching will give more XP. Element FactorFor Laws that aren't None Element, the Elemental Strength of the Current Law Element is used as a multiplier. The Elemental Percentages for Tile where the Cultivator is at are used to calculate Elemental Strength. The function is similar to how auspiciousness is calculated, Same element with 1X, Feeding element with 2X, Overcoming element with -2X and any other elements are ignored. The resulting Power is references and the result is used as a multiplier. Possible ranges are listed below: Element Power Elemental Factor 1.85 and higher 2 Between 1 and 1.85 1.2 Between 0 and 1 1 Between -1 and 0 0.8 Between -1.9 and -1 0.5 Between -2 and -1.9 0.1 To put that into context, a Metal Cultivator would require at least 92.5% of Earth on its tile to reach the highest possible bonus, assuming no Fire is at 0%. For None Element cultivators, the Element Factor is always at 1. Aid, or Master FactorHaving a Master can increase Cultivation Efficiency. However, having the Master be a Corpse, Puppet, Zombie, or just Dead is equivalent to not having a Master. Same goes for having a higher Stage than the Master. A Master at Stage 8 (mid-GC) does not give a boost to a Disciple at Stage 9 (peak-GC). If Master and Disciple are at the same Stage, the Master will only give a boost if the Disciple is at a lower point. If the Disciple has more Cultivation XP, no boost will be given. If the previous doesn't apply, then the Master will give a bonus based on their Law. Master Law is identical to Disciple Law, Master Factor is 1.5 Master Law is not identical to Disciple Law, Master Factor is 1.2 There is no additional bonus for having same or feeding element laws. Qi FactorHigher Qi on Tile (not to be mixed up with Qi Gathering) will give a boost to cultivation efficiency. As this value is used directly (as opposed to referencing a dictionary), having more Qi on Tile is always useful. The formula for calculating the factor is: 0.7 + Qi on Tile / 250 Cozy FactorA good example of misleading description. The current location can either mean the terrain (if cultivating on the ground), flooring (if cultivating on a flooring tile), or the Cultivation "seat" (Bed, Qi Cushion, etc). If the cultivator isn't using a "seat", the Coziness factor listed comes from the Practice Effectiveness of the Terrain. If the cultivator is using a "seat", the Coziness factor comes from the Practice Effectiveness of the Building. However, it's important to note that the Terrain Coziness is misleading. Terrain coziness only influences the amount of energy gained from Cultivation, not the Cultivation XP gained. A list of main materials and Buildings with Practice Effectiveness are listed below. Season FactorFrom a mechanical point of view, the Season Factor for cultivation efficiency works similarly to the same Season Factor for Breakthroughs. As it can't be influenced, this guide will not go into details. Mood FactorIn a roundabout way, this is the current Mood of the Cultivator. Technically, it's the property EmotionEfficiency. Which has a MoodWeight attribute, with a Base of 0.4 and an Addion of 0.005. This means that having a higher Mood can translate into increased Cultivation Efficiency. But only up to a point, as EmotionEfficiency has a maximum value of 3. Mental State FactorMental State is important for Cultivation Efficiency, but is not used directly. It's referenced based on the current value. State Requirements Mental Factor Breakdown Below 0 0.1 Breakdown Between 0 and 30 0.1 Unstable Between 30 and 50 0.4 Stable Between 50 and 70 1 Composed Between 70 and 85 1.2 Harmony Between 85 and 95 1.5 Pristine Between 95 and 100 1.5 Pristine Above 100 1.5 This means that having Mental above 85 will give the highest Mental Factor. Other factors not listedApart from the eight already listed factors, there are three more, not listed in the Cultivation Efficiency Panel, that influence XP gain from cultivation. Cultivation Speed Bonus Property - Listed under stats, should be self explanatory. Global Cultivation Speed effect - From game Difficulty, lower on higher Difficulties. Golden Core Cultivation Speed Bonus - From game Difficulty, lower on higher Difficulties, only applies for cultivators past Golden Core. Cultivation Efficiency continued Due to Section size limits, this data is to accompany the previous section. CozinessMain Materials: Iron Bar:0.2 Igneocopper Bar:0.7 Ice Crystal Bar:0.7 Fire Essence Bar:0.7 Ice Essence Bar:0.7 Darksteel Bar:0.6 Lumina Core Bar:1 Brownstone Block:0.2 Graystone Block:0.2 Marble Block:0.2 Jade Block:0.8 Holy Stone Block:1.2 Spirit Stone Block:0.6 Spirit Crystal Block:1 Timber:0.2 Goldwood Timber:0.2 Parasol Timber:0.8 Spiritwood:1 Bamboo Stalk(DLC):0.2Buildings: Bed:0.2 Double Bed: 0.2 Cushion:0.5 Qi Cushion:1 Trigrams Cushion(DLC):1 Throne of Taos:2 Altar of Death(bugged, not available as a Seat in vanilla):2 Altar of Magic:1.4 Bamboo Bed(DLC):0.2An example, the highest Coziness can be achieved with a Holy Stone Throne of Taos, providing 2+1.2=3.2 Coziness. Law Matching with capped stats Law Name Law Element Law Match with capped stats Sixteen Supreme Steps Law Water 173% Myriad Artifact Law Wood 181% Seven-Slaughtering Sword Metal 173% Jade Purity Immortal Law None 177% Heaven Stealing Law Earth 157% Primordial Alchemy Law Fire 177% Emotion Severing Law Fire 169% Grand Chariot Wisdom Law Metal 181% Six Paths Reincarnation Law Wood 209% True Sun Refining Law Fire 225% Sunflower Refining Law Earth 173% Primordial Symbols Law None 165% Law of Nimbus Conquest (DLC) None 173% Displaying of FactorsThe eight factors are displayed using the following logic if the Current Value is greater than Base Value: (Current Value - Base Value for Factor) / Offset for FactorIf the Base Value is greater than Current Value, the calculation is different: (Base Value for Factor - Current Value) / Offset for FactorThe resulting value is clamped between 0 and 5, and multiplied by 1 for the first case, -1 for the second. Then the result is added by 5, and the resulting Integer (after rounding) is the amount of Indicators shown. Values for Factors: Efficiency Factor Base Value for Factor Offset for Factor Law 1 0.1 Element 1 0.1 Aid 1 0.1 Qi 1.2 0.1 Cozy 1 0.3 Season 1 0.06 Mood 0.9 0.1 Mental State 1 0.1 The base value used for Qi here differs from what is actually used for the function. This takes: 0.2+(Qi on Tile/50)An example of usage Cozy. A Spirit Crystal Altar of Magic would provide a value of 1+1.4=2.4 Which would end up with (2.4-1)/0.3=4.66 and 5+5=10, or 5 + indicators. Cultivation Arrays Some of those factors previously listed can be easily influenced with external means: Elemental factor can be increased by introducing Element Emitting Items and Buildings of the Feeding Element. Qi factor can be increased by increasing the Qi on Tile value, which is accomplished by increasing the Qi gathering value. Cozyness factor can be increased by replacing the Cultivation seat. The result is a Cultivation Array.
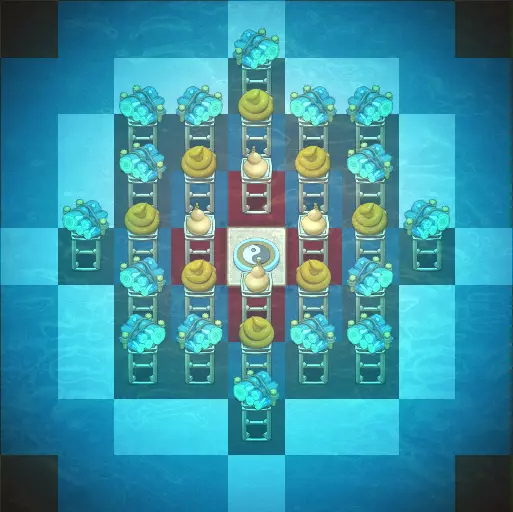
金属 cultivator 的数组简单示例。 尽可能使用喂养元素物品可提升元素因子。 提升中心地格的聚气值可增加气因子。 使用玄铁气坐垫可提升舒适度因子。 为何采用该形状?对于已阅读《手动气爆指南》及技术部分链接的玩家,以下内容应该较为熟悉。 范围与距离 这适用于所有光环,而非仅元素和聚气发射器。 光环随距离产生的效果取决于相关物品的属性。基于聚气术语的三条规则: 当距离>聚气范围-1时,效果=0 当距离≤聚气衰减起始范围时,效果=聚气值 当距离≤聚气范围-1时,效果=聚气值×衰减系数的(距离-聚气衰减起始范围)次方,即聚气值×(衰减系数^(距离-聚气衰减起始范围)) ACS中格子间的距离按三角法计算。MQB指南中有包含范围的示例。以下是带距离的示例:
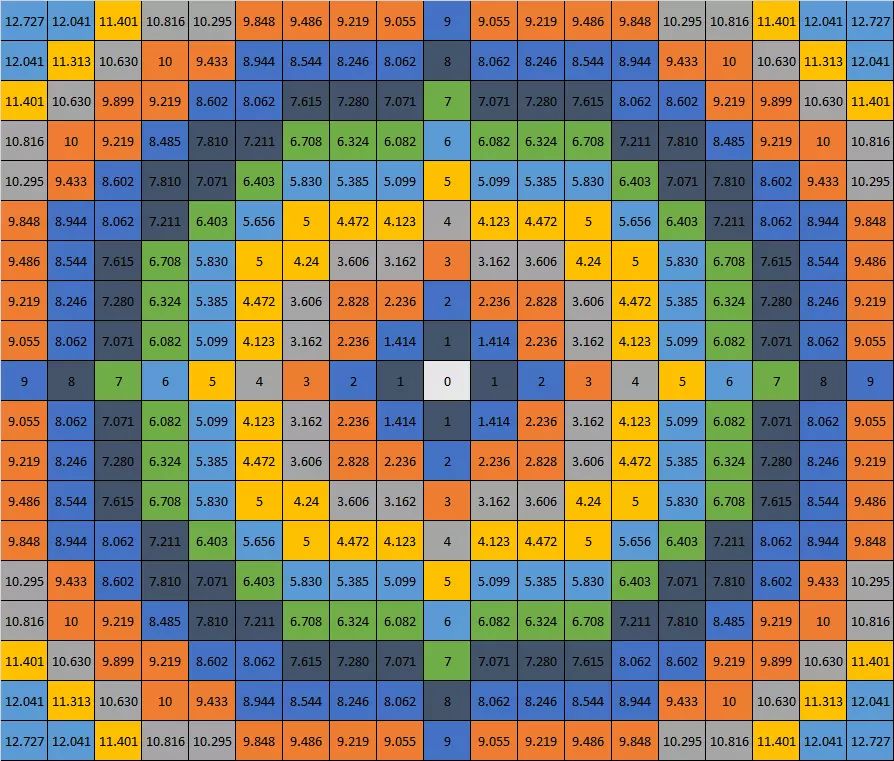
范围1,距离0。 范围2,距离1。 范围3,距离1.414和2。 范围4,距离2.246、2.828和3。以此类推。 基于上述内容,可构建如下【聚气】机制:
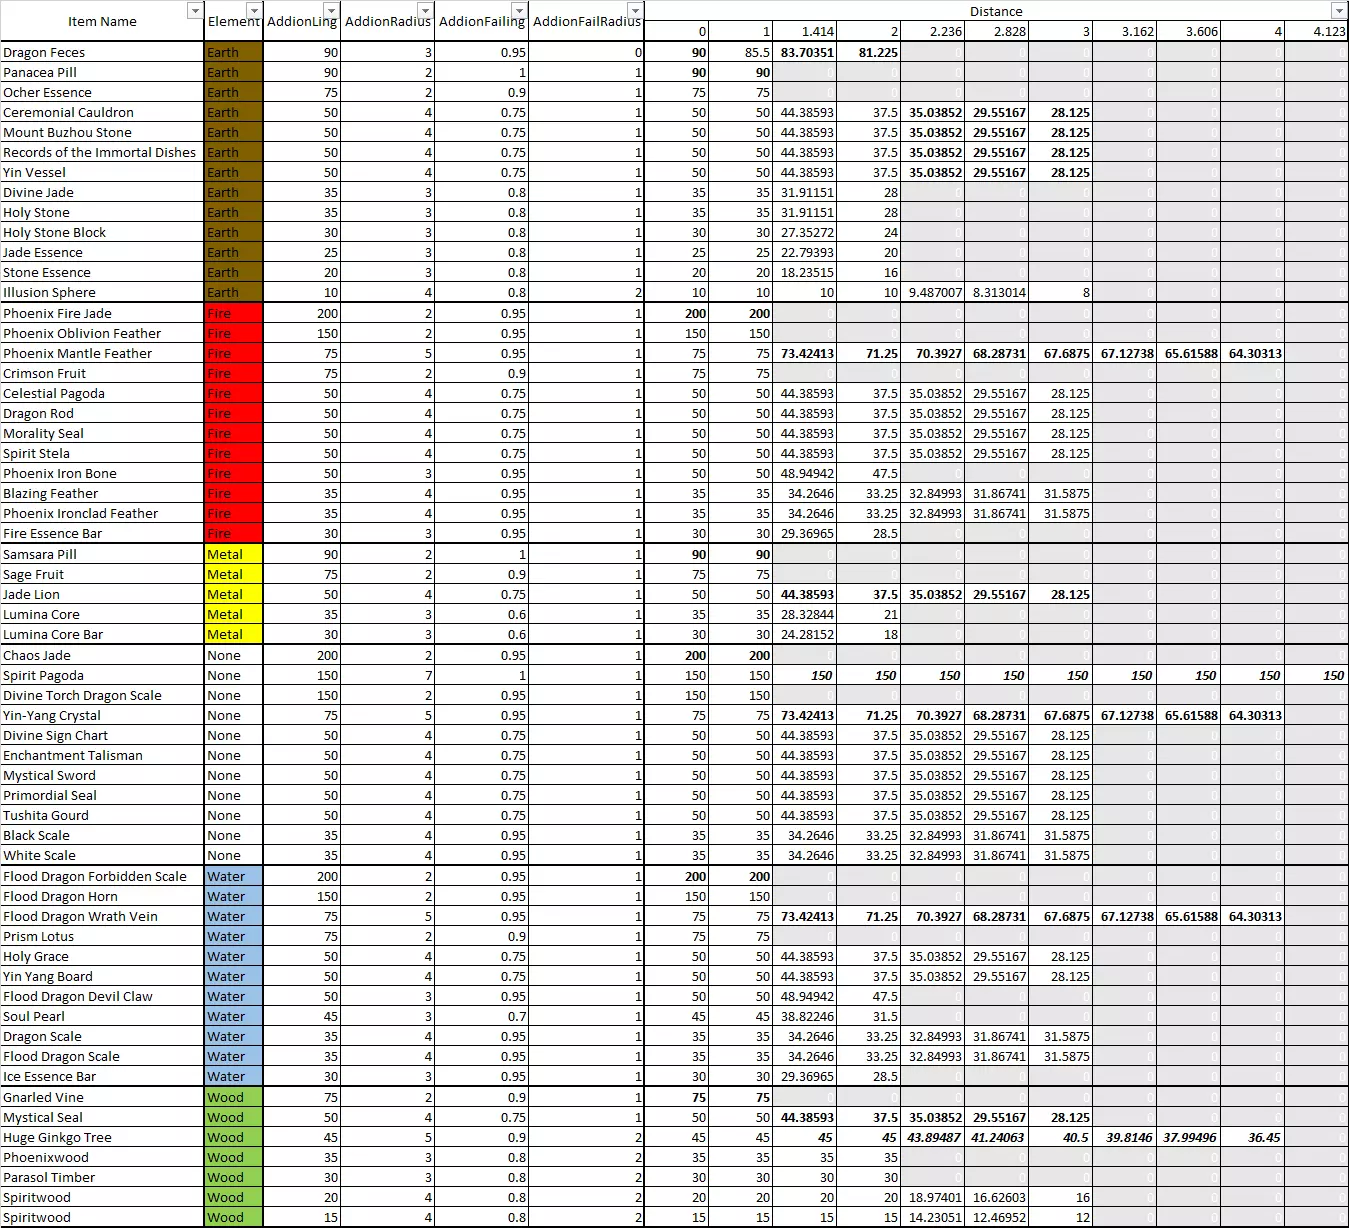
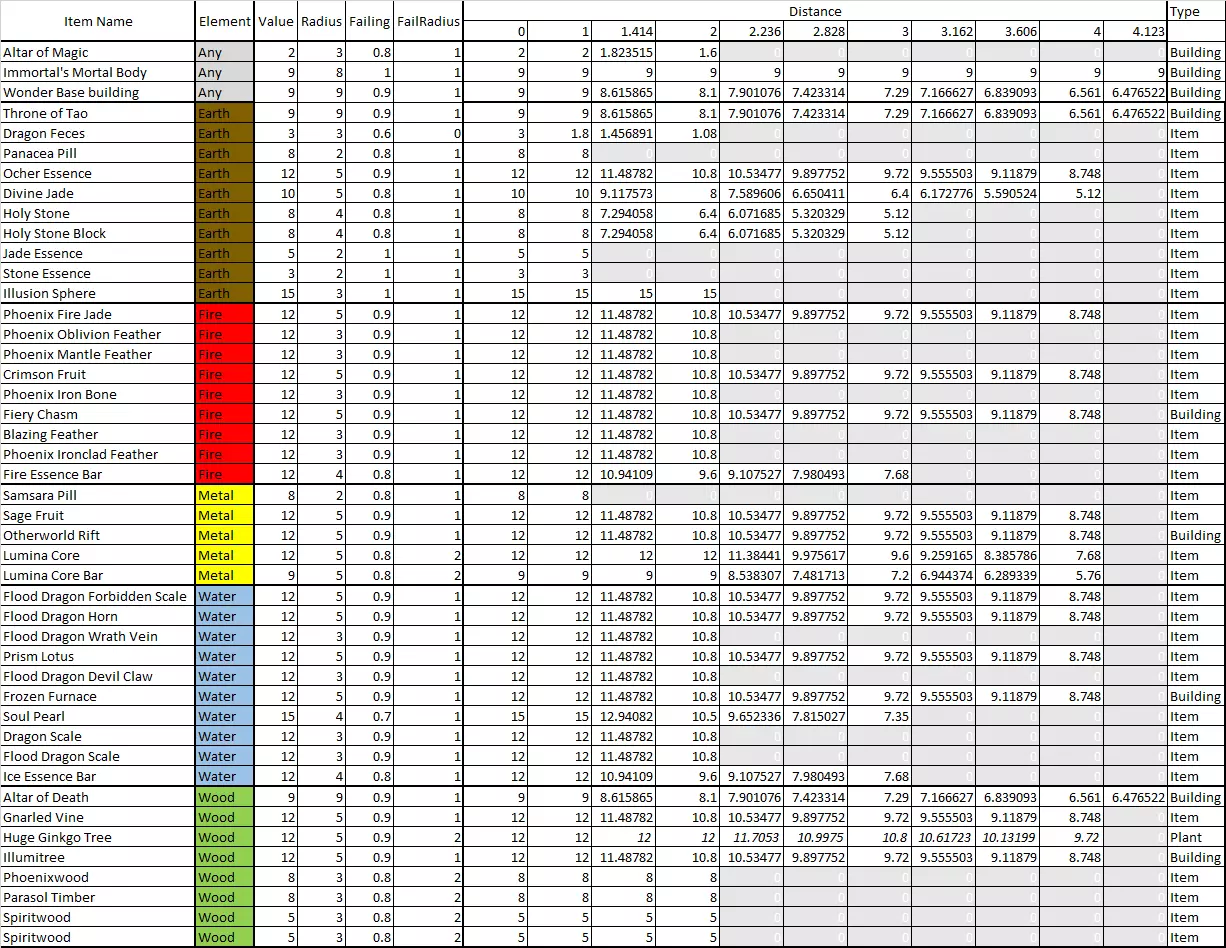
可以创建一个类似的元素发射器表格:
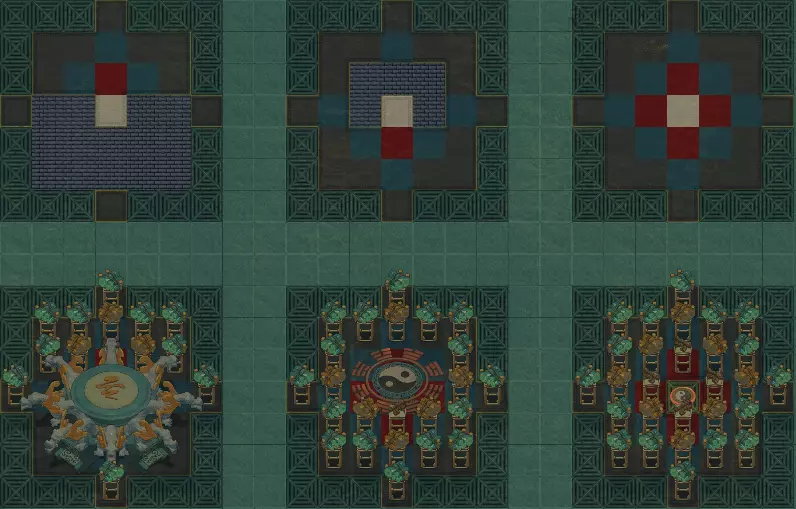
灵气与聚气 上述示意图可用于最大化中心区域的聚气效果。但聚气本身对修炼效率并无影响,真正需要的是区域灵气值。 虽然MQB指南提供了更多相关技术信息,但对于修炼阵法,有两点需要牢记: 灵气相关属性:吸收、容纳、衰减。 所有物品都具备这些属性值。这三种属性会在灵气更新周期中发挥作用。 打个比方,如果大部分灵气被阵台吸收,再被其他物品进一步衰减,阵法的效果就会大打折扣。 这就是为什么建议使用灵石/晶石作为材料,因为它们不会吸收灵气。区域差异:灵气更新周期取决于地块灵气值、地块灵气聚集值及其相邻地块的差异。简单来说,这已足够说明问题。 查看阵法时,需考虑整个阵法。灵气聚集的最高值必须位于中心,且数值需合理递增,内部高外部低。否则,峰值可能出现在非预期地块,灵气会开始在远离中心的位置聚集,此时需要手动灵气爆发才能正常使用阵法。 修炼座椅:第三个因素是舒适度。上文列出了具有舒适(修炼效率)值的建筑和材料。已知这些参数后,有三个合理选择:极早期修炼可使用坐垫。早期修炼和提升聚气效果的【聚气坐垫】。 【魔法祭坛】能提供最高的舒适度。床比坐垫占用更多空间,而奇观类建筑占用空间过大。而且当你获得它们时,常规阵法的聚气效果已经更强了。 对于占用多个格子的座椅,灵气和元素强度仍只作用于修士所在的格子。 使用魔法祭坛时,【灵晶】是极佳的材料,只有【圣石】能提供更高的加成。对于水元素修士,【光辉核心】提供与灵晶相同的效果,同时还能提供元素加成。 聚气坐垫和魔法祭坛各有其作用。 初期,聚气坐垫价格低廉且效果显著。获取后,【魔法祭坛】因其提升的聚气效果和舒适度,是一个理想选择。 当有更好的材料时,【聚气坐垫】可能看起来是个改进,因为【魔法祭坛】占用更多空间。 如果4个3.606、4个3.162、2个3、2个2.828、4个2.236、3个2、2个1.414、3个1和1个0距离的聚气物品能达到600聚气,那么【魔法祭坛】在聚气方面就不再是改进了。 但它在舒适度方面仍会保持优势。 火属性修炼者的布局:右侧基础配置带【聚气坐垫】,中间是带【八卦坐垫】(DLC)的替代方案,左侧是【灵木魔法祭坛】(舒适度高于凤凰木材质)。每个阵盘上方都有说明,标注了修炼者的位置以及座椅所占据的格子。 基础配置使用16份灵木、8份凤木和4份虬结藤蔓,坐垫下方没有放置物品。中心格子的聚气值约为922。 替代配置牺牲了2个范围3和3个范围2的格子。中心格子的聚气值约为627。 AoM配置牺牲了6个范围4、5个范围3和3个范围2的格子。中心格子的聚气值约为953。
接下来是下一部分——修炼室。 修炼室 用于修炼的房间,并非实际的风水房间类型。 修炼室至少包含一个修炼阵。 将阵法封闭在房间内可提供两种效果:温度平衡和灵气遗物。 虽然温度平衡对修炼效率影响不大,但灵气遗物则不然。 修炼用灵气遗物:兼容的灵气遗物会为房间内的任何人提供增益。如果该效果可用于提升任何与修炼效率相关的因素,那么它就能用于修炼。 由于灵气遗物的生成具有随机性,并非所有灵气遗物都能生效。 而且,也不是所有灵气遗物的效果都能提升修炼效率。例如,三种印章(先天印、玄奇印、道德印)可以提升心境。但如果心境已经足够高,就不会对修炼效率产生加成。 修炼室或突破室 历史背景: 早期指南之一的《基础指南》对修炼室和突破室有其见解。它建议修炼室采用更小/更经济的设计,而仅在突破室中使用合适的阵法。

类似这样,所有靠近坐垫的架子都放置带有灵气元素的物品,顶部的架子则放置灵木。 基础指南中提到了另一种方法,建议始终使用合适的阵法,并忽略上图中的设计。 两种指南都有其合理之处。 修炼室可以比突破室更便宜。 突破并不需要与修炼相同的条件,为两者设计不同的布局是合理的。对于修炼而言,如果你没有足够的资源来构建合适的阵法,像上图那样的简易仿制品在紧急情况下也能凑合用。只是有一个逻辑上的小错误,两侧最上方的两个架子距离为2.236,换句话说就是范围4。这意味着那些架子也应该放置灵木。区分两者的另一点是,【舒适度】仅用于【修炼】,而非【突破】。【聚灵阵】可能对【修炼室】更有用,但如果你的阵法使用了灵气值更高的【灵垫】,那么哪个效果更好就很明显了。 【 relics(法宝)】也是如此。例如【灵塔】,当它与阵法匹配时会增加【最大灵气值】,这对【金丹突破】极为有用。而在常规修炼中,它只会为阵法增加【聚灵】效果。 【阵法示例】 本节包含阵法图片,并在需要时添加说明。主要用于提供灵感。后续将添加更多阵法。 【金属性阵法用于水属性】
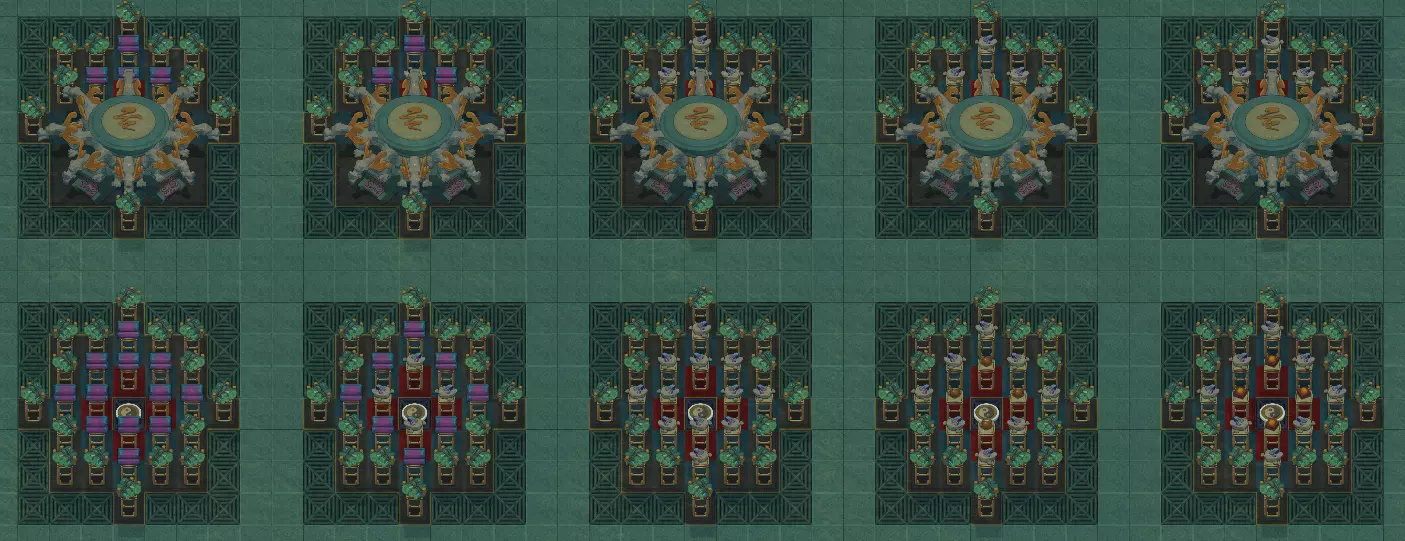
水元素修炼者的金属元素阵列进阶路线。 4格范围使用恒定灵木。 3格范围:从光辉核心棒进阶至光辉核心。 2格范围:从光辉核心棒进阶至光辉核心,再到圣贤果实,最后到轮回丹。 上方设有光辉核心魔法祭坛,设计相同。 下排聚气值:631>651>679>839>899 上排聚气值:869>874>885>925>940 使用效果极佳
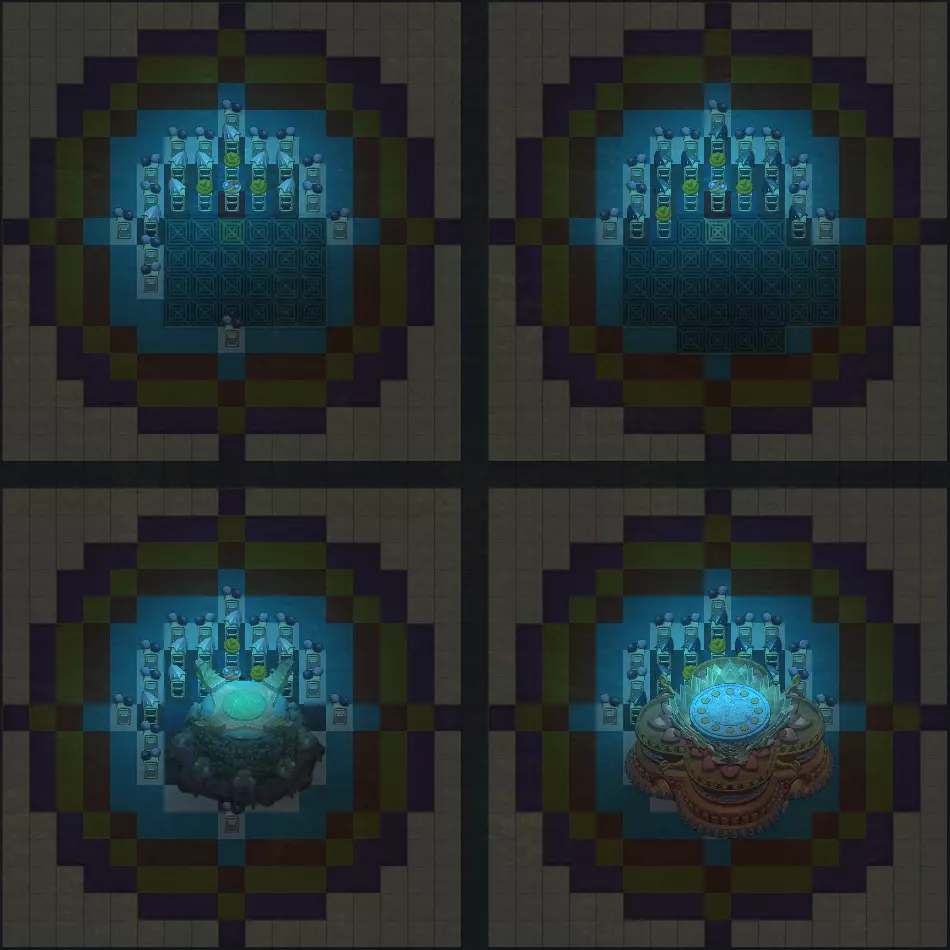
奇观作为阵列基座使用的示例。上方阵列中标记了培育者瓷砖。这属于那种“技术上可行但不代表应该这么做”的情况。