换一换
换一换 


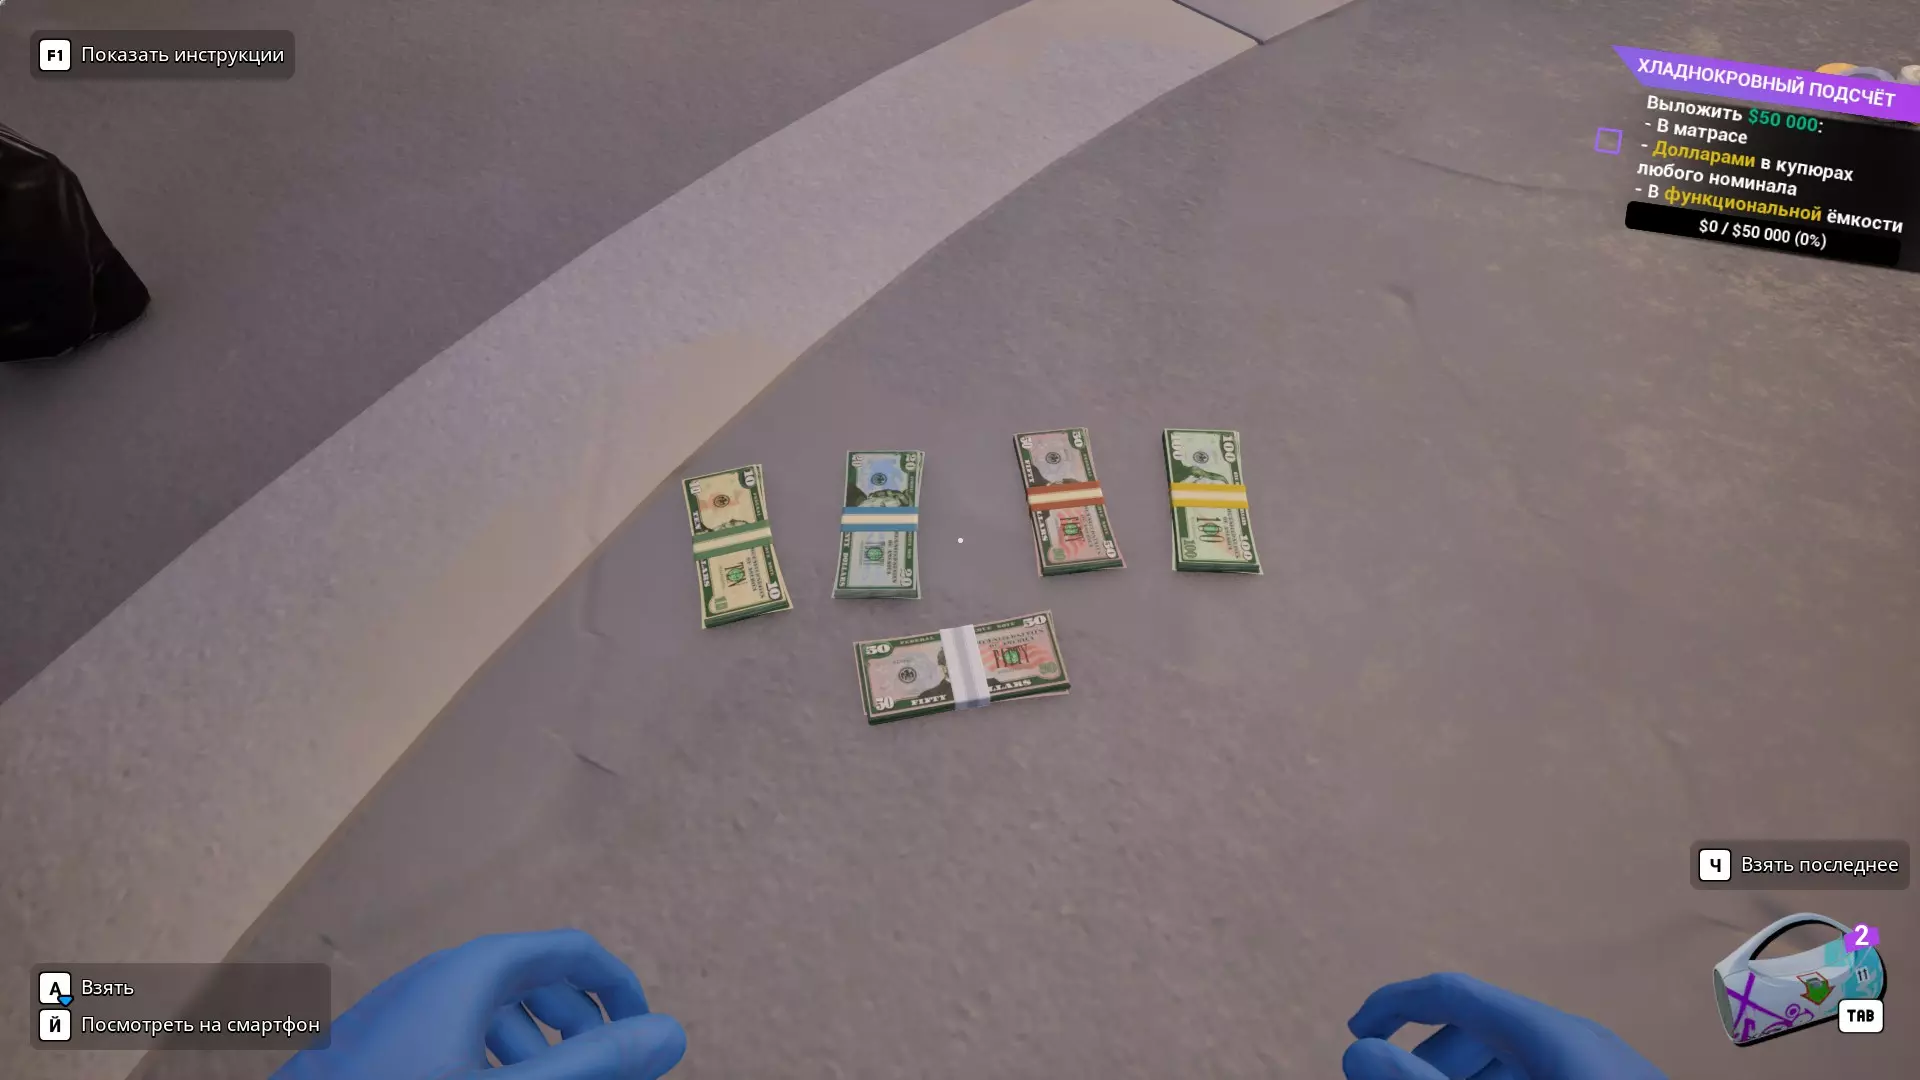
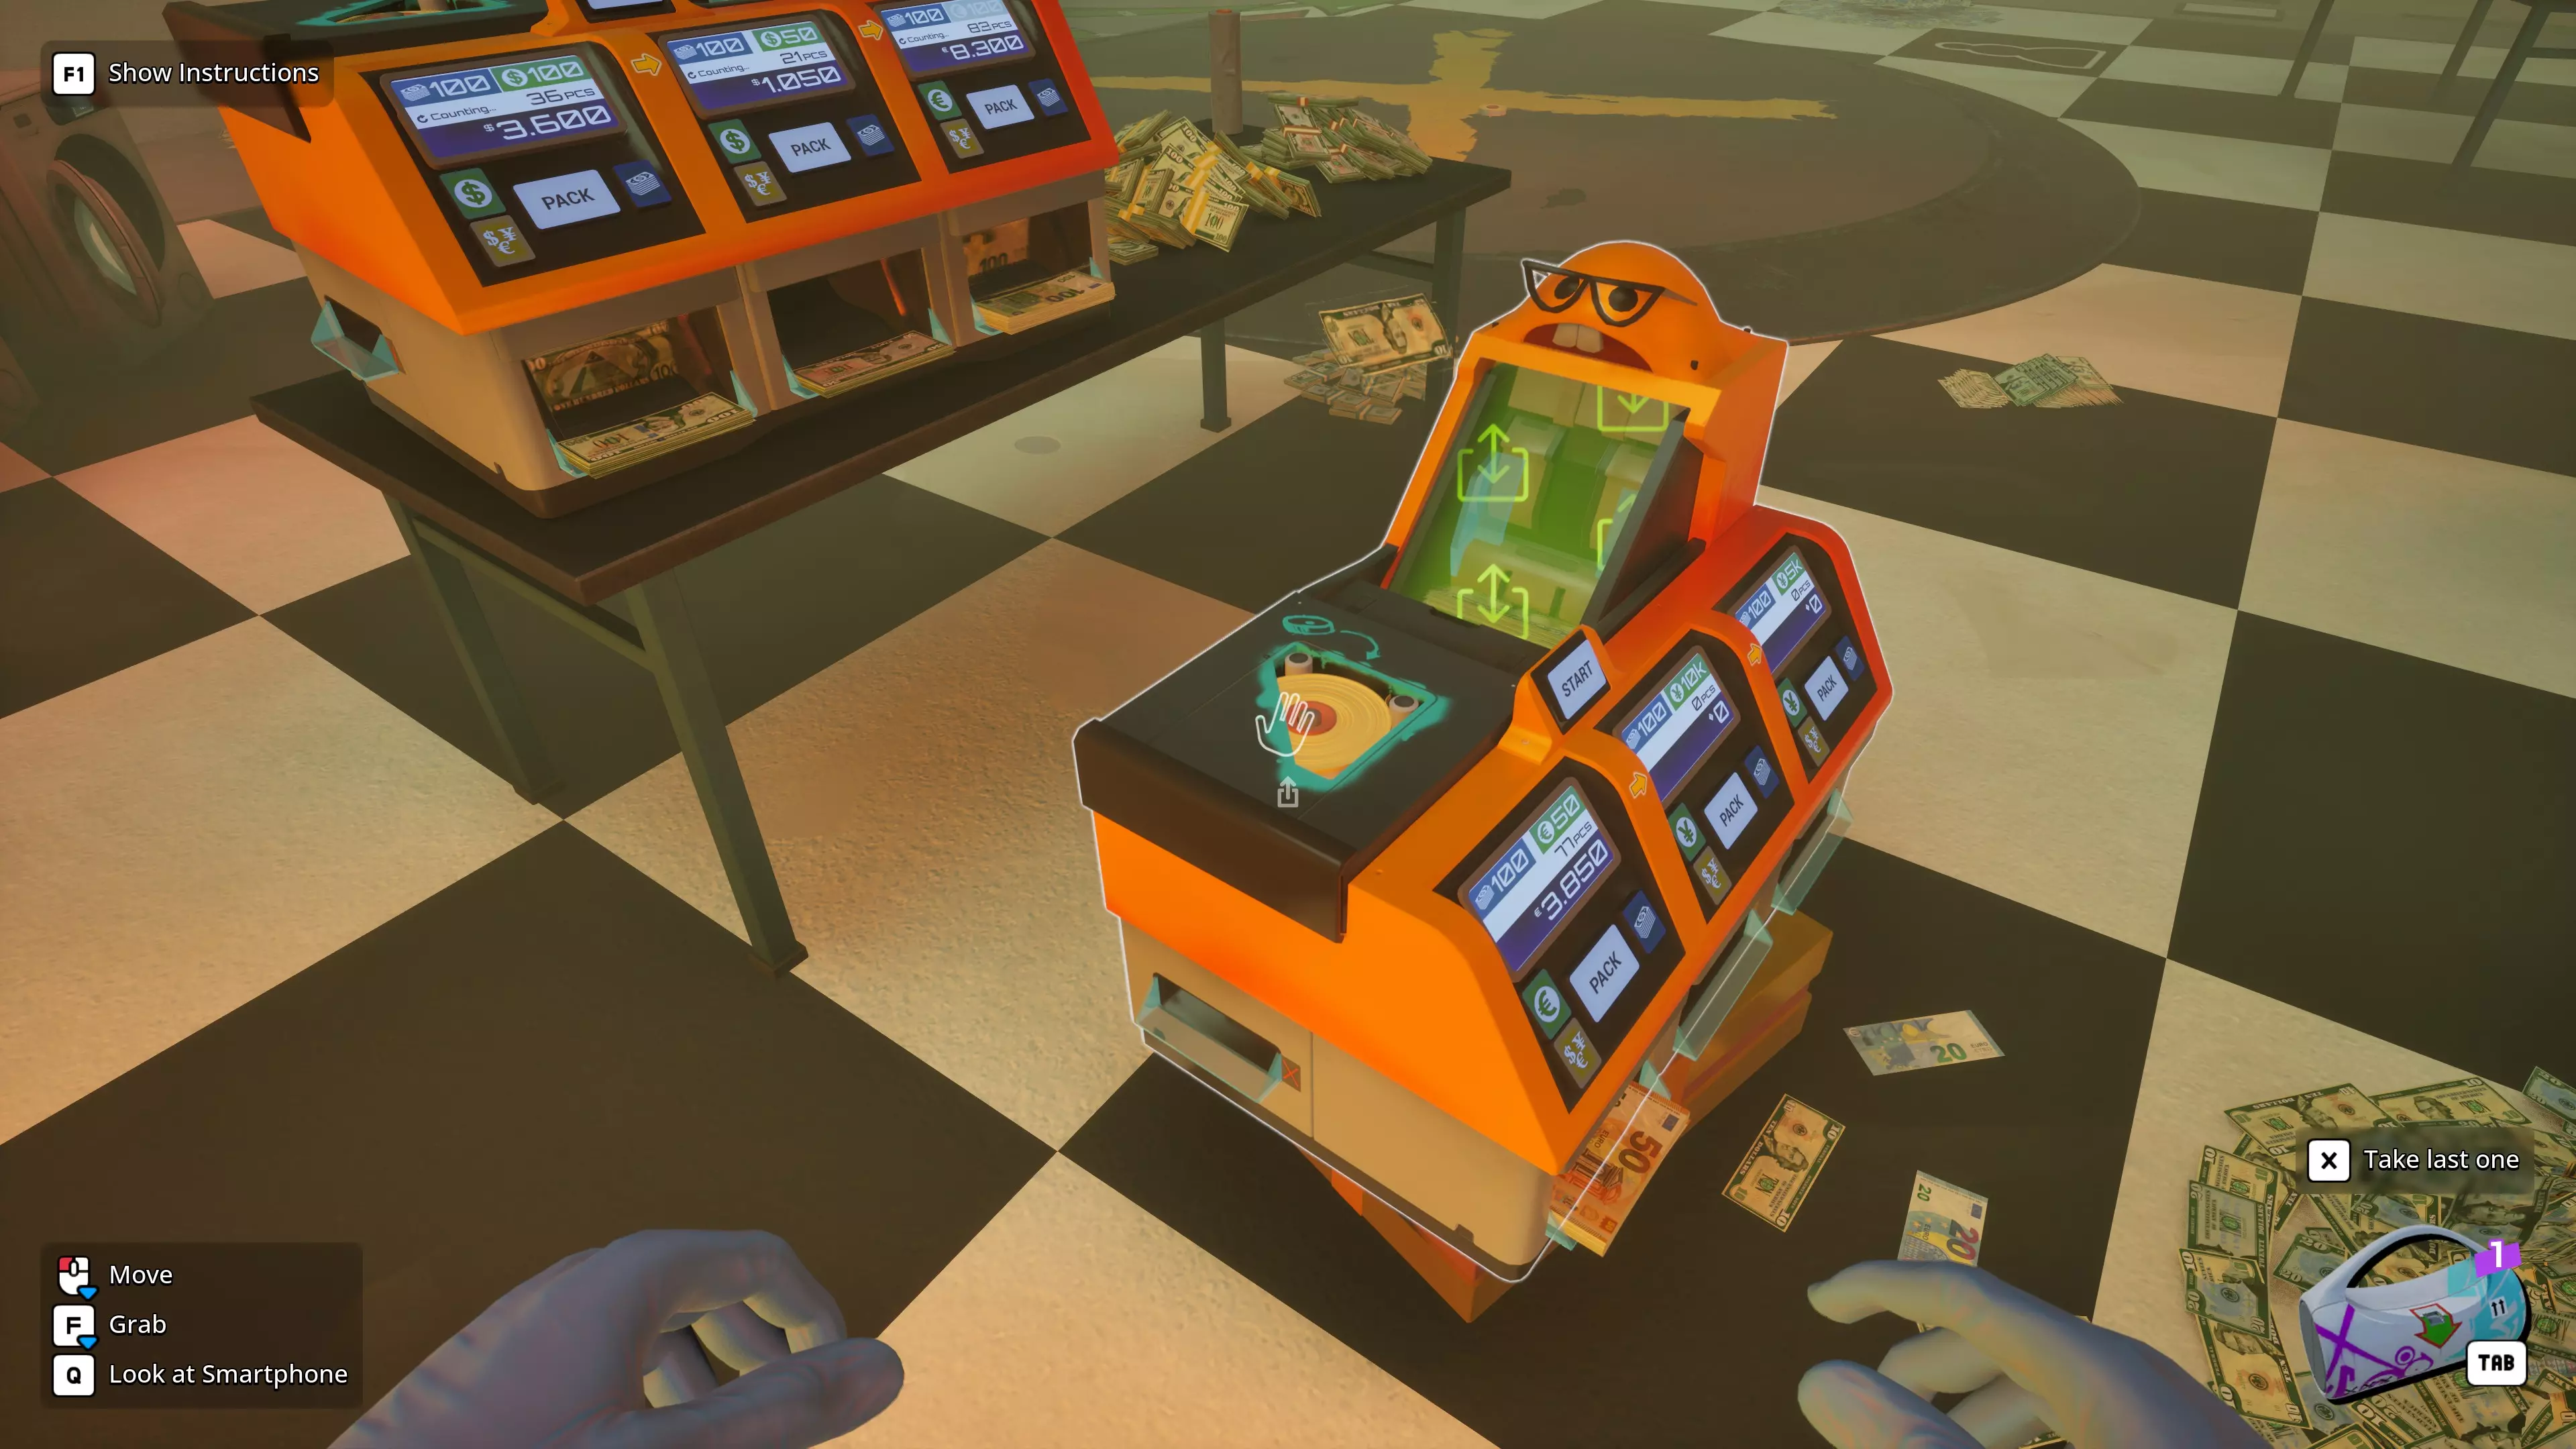
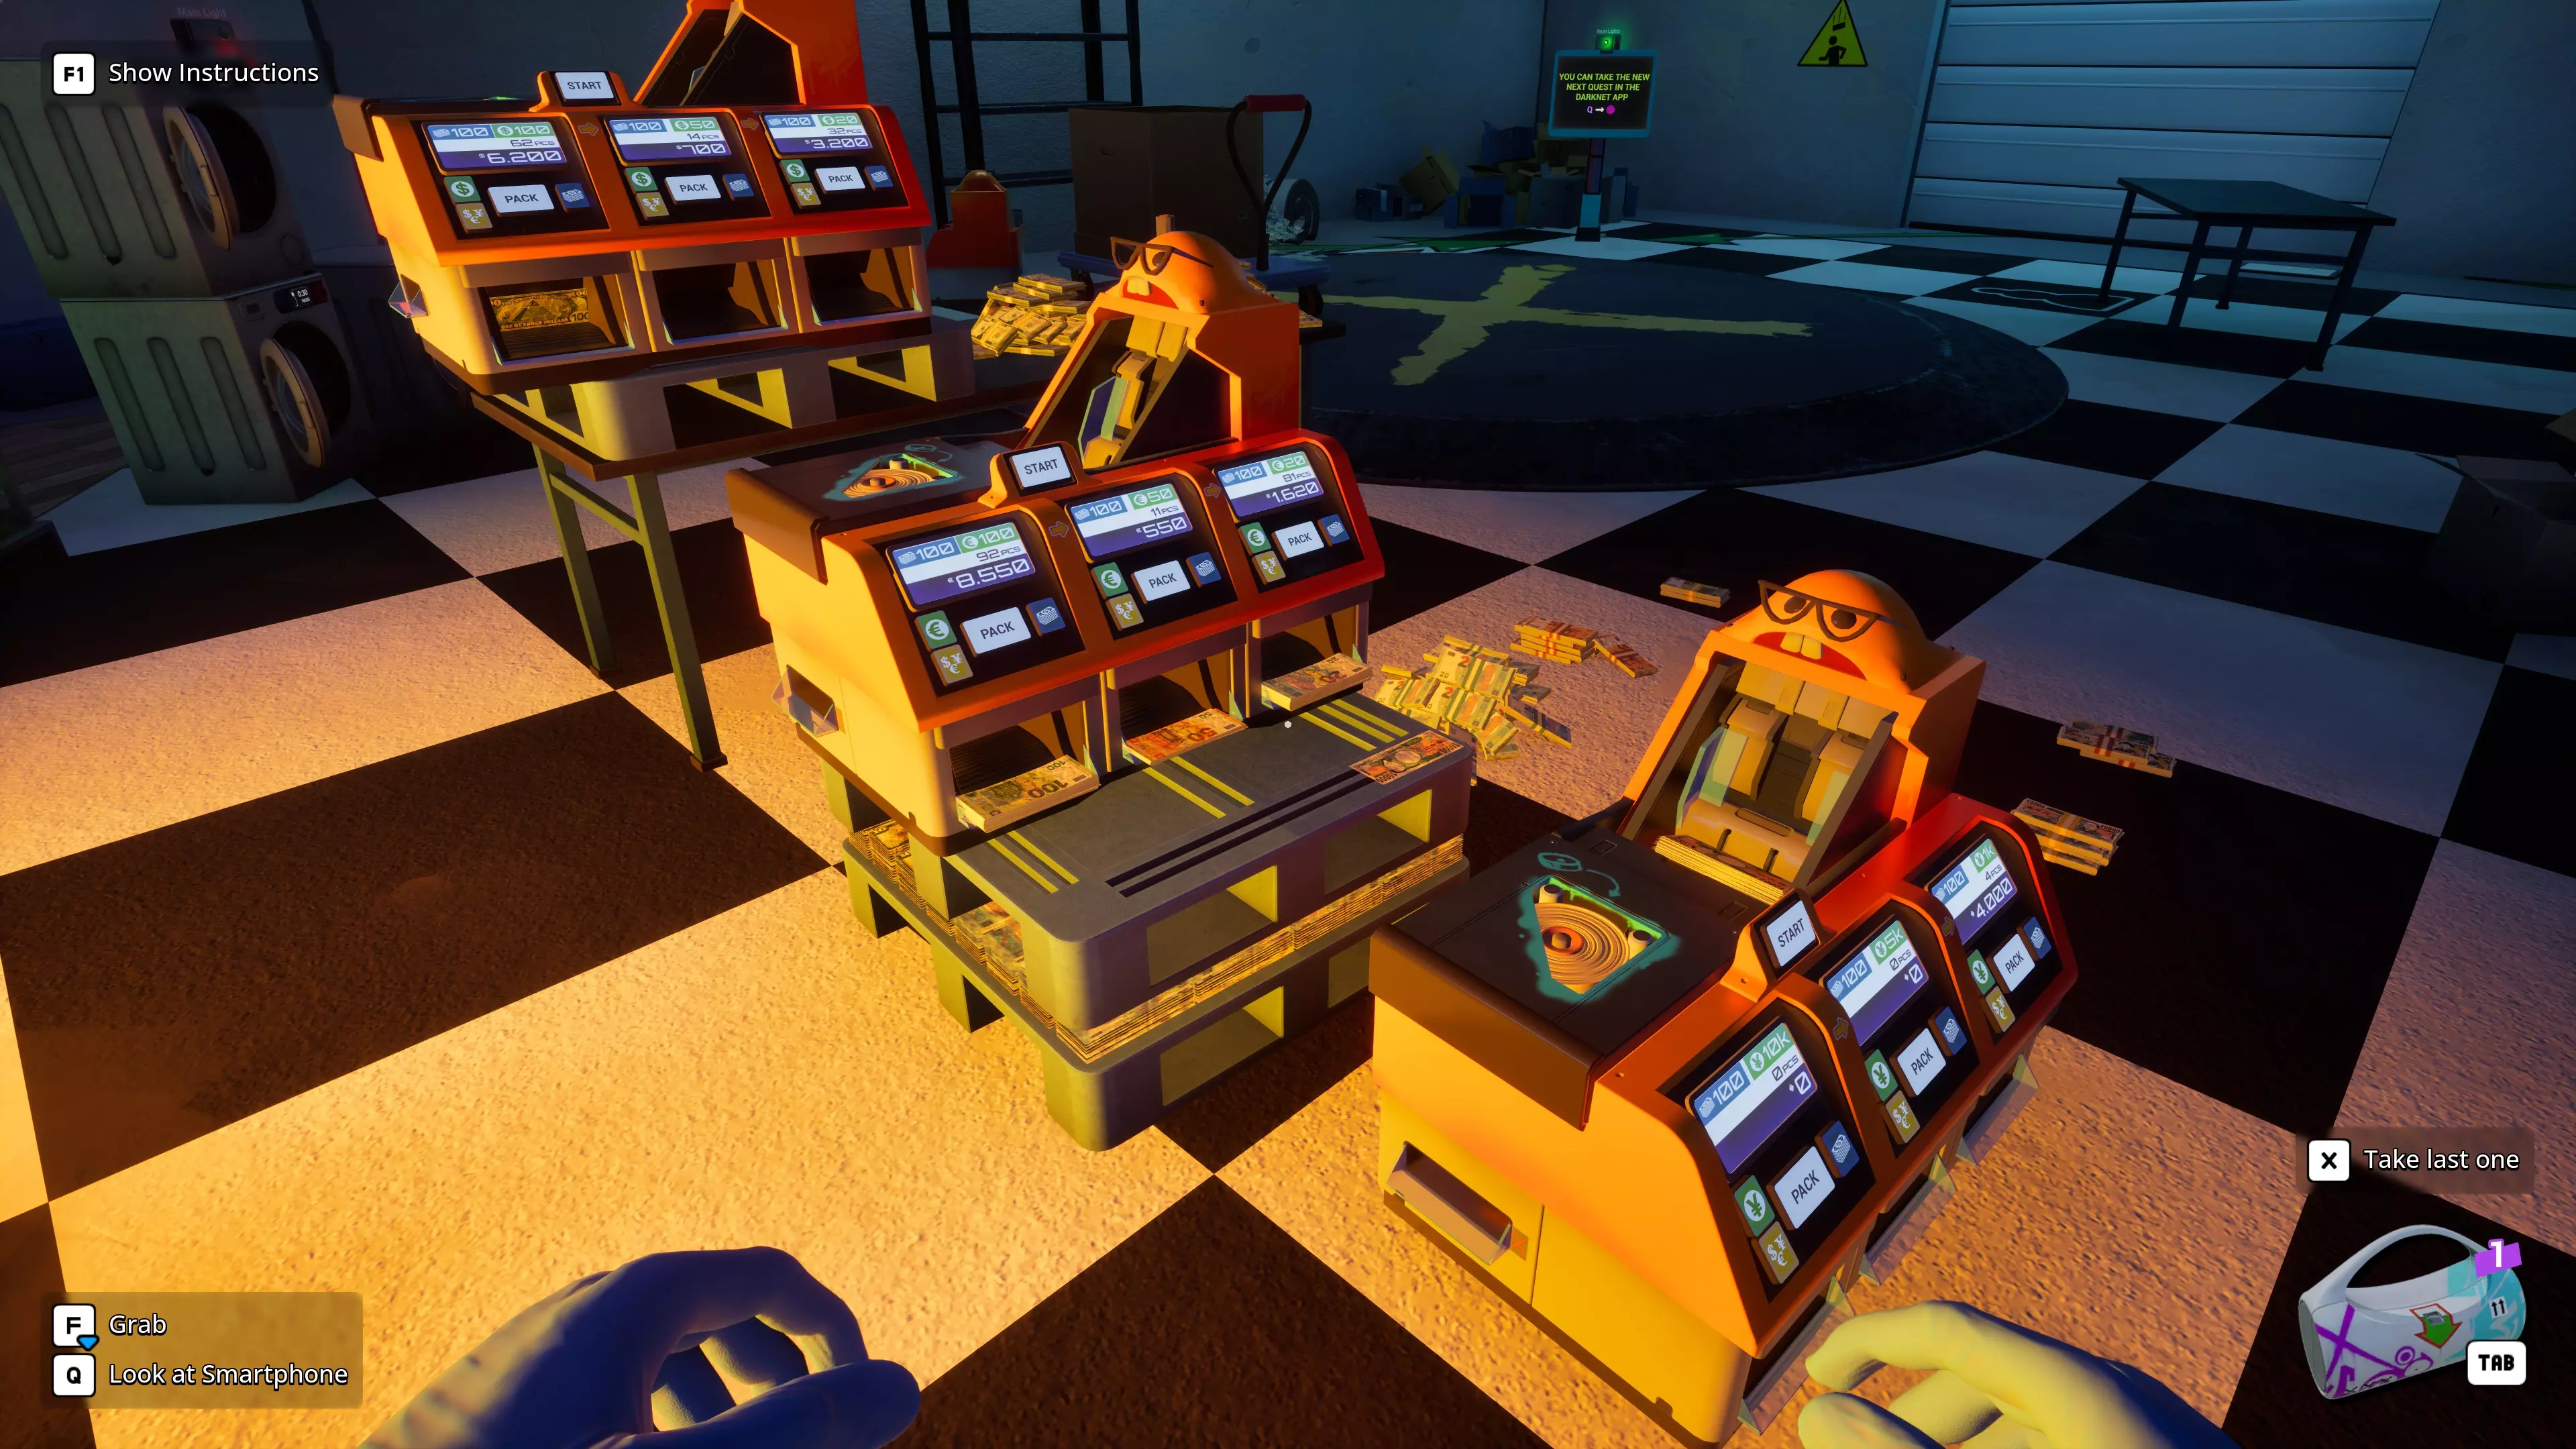
How to go through the game efficiently, ingame tricks and avoiding the softlock quests Money (and Supply) mechanics Left click a bill to pick it up. Once you have two in hand, you can hold M1 to automatically pick up more bills and ONLY bills - this filter mechanic also works for trash. You can pickup up to 100 into a neat STACK. As soon as you pick up a second "trash" item, they merge and turn into a trash bag which can only pick up more trash. The bag has a max capacity. Use F to sweep up loose bills that are spread out. This can yield up to a full HANDFUL. If your first F only hit bills, your subsequent F will filter only for bills. This is useful for cleaning messes. Caution, if non-bill items are in your first F sweep, you instead just grab a handful of random stuff and no filtering happens. Loose bills on the map combine into a PILE automatically once 101 are lying close together. From a PILE, you can no longer grab single bills. Holding F and left clicking a PILE gives you a HANDFUL (300) of the bills. Note this may be less than the max amount if the PILE contains less than that. Long left clicking a PILE grabs up to 100 bills in a neat STACK, however the stack is not sorted by bill type. Still useful for the "150 bills" quest. With a STACK in hand, holding M2 and pressing X allows you to drop single bills, which is useful when you need less than 100 or when getting the basketball achievement. You can carry an infinite number of bills in your hands using the SPHERE grab. First grab a HANDFUL, then hold M2 and touch more money with it. It vacuums it up and turns into a SPHERE which does not appear to have an upper limit. If you try to overfill a money counter or a washing machine, the bills that don't fit burst away explosively. Avoid doing this, as they may fly into sorted PILES and contaminate them. Grabbing loose bills from a container yields a more loose HANDFUL which will not cleanly insert into counters - drop it on the ground first and re-grab with F for a compact HANDFUL. Wet bills will eventually dry on their own, even when bound in stacks. Unsure about plastic The Dryer does not have an upper limit on how many bills it can handle. The Washing machine can be used to separate bills from items - if you grab cash out of a washing machine with F, trash, items and coins separate away and fall to the ground. The Washing machine also breaks open any money packs. It is possible for the machine to become severely overfilled because of this - you may have to use F many times to empty it after. Ink and Dirt can spread from one bill to others. Never mix inked or dirty bills with clean ones. Dirt is washed off in the washing machine, ink can technically be scrubbed off on the worktable. But it isn't worth the time investment. Feed inked bills to the pig. Always open treasury bags with the knife, never by hand. You wont see ink that way, ever, until you reach the endgame vault. Dollars have 4 bill types which is one more than the XXL Counter can handle. Euro and Yen however only have 3 bill types. Once in midgame, coins start to appear in tasks. Filter them out with the washing machine and keep them. Tasks ask for coins rarely. Picking these up into a stack with M1 grabs 20 coins, which is helpful when counting them for an order. Your full packed money packs are color coded, but incoming pack straps may lie! Incoming packs may be incomplete or have mixed bills. Supplies and hand tools: Tape and plastic combine with themselves! Pick up one, left click another, and they merge. Plastic is almost never asked for, and the initial supply should last your entire game. Tape however, you should buy in bulk of 20-30, combine them into one, and keep them on your table until you run out. The game recommends you keep tools in your bag, which is clunky. I recommend you only keep the knife on you so you can whip it out with X. You need it to cut open packs before you have the washer, to open treasury bags, locked cases, and to cut mattresses. Leave tape and plastic on your working table, near the money counter - you can quickly use them if needed. Tools and the Worktable You get a bunch of free stuff in early story tasks (the yellow ones): a shopping cart a bunch of tape and plastic a knife a Dryer a Washing Machine a Ladder Another story task makes you buy the first money counter, which isn't free but you still have it after. When the map expands into the area with the pig, the "upper area" you can pay to access contains 2 more Washing machines. This area also contains the worktable on the left. You should buy all the worktable upgrades in the shop as soon as you can, they cost almost nothing. When the map expands into the vault, you can find a small UV lamp inside on the right, as well as a Trolley. Since using UV light is super annoying (you need a dark area), i recommend only using the one on the worktable. Counterfeits are sorted out by any money counter above the basic one, and for marked bills i would suggest just ignoring them altogether until the vault quests. Just add some extra cash into the deliveries to hit the goal amount for sure. Picking out single marked bills is a gigantic waste of your time and never worth the effort. The vault quests near the end do force you into it, however. As mentioned before, washing machines can automatically break open packs and help sort out trash. You can stack multiple washing machines on top of each other, if you overfill the topmost one the one below may suck in the falling remains. A washing machine has a limit of 300 or slightly more objects, it can always take a full HANDFUL. You only need the one dryer as it can handle an infinite pile size. Money Counters The basic money counter cannot spot counterfeits, which also means it is the only counter than can sort counterfeits. The basic and L models spit out bills in an arc, which means you can technically daisy chain them. But it is largely unhelpful and i didn't do it. You should keep leveling to get the L counter before you accept the first story quest which involves fake bills. Note the counters work faster if they "hit" and much slower if they "miss", so avoid sifting giant piles to find a single bill The XXL counter can handle multiple currencies and bill types at the same time, however you cannot use multiple slots for the exact same bill, the duplicate slot(s) will get nothing. Each counter accepts a specific amounts of bills: The basic one takes one HANDFUL (300), the L models take two HANDFULs (600), and the XXL model accepts three HANDFULs (900). Do not overfill or bills go flying everywhere. Be patient, or you will clean up messes. Other tools I haven't really found a good use for any of the racks or the slide. Avoid buying them until you don't know what else to do with your crypto. Packaging Open containers can spill their contents, so close them if you move them around. Tasks usually provide money in some container. If the container is a treasury bag, make sure to cut it and remove the money that way. Then burn the bag. You should burn dirty containers after emptying them. They are useless to you. Wet containers, however, will eventually dry, so put them with your empty containers. Keep all other clean containers for reuse except maybe the gift boxes, tasks never ask for these. Mattresses have to be cut twice with the knife before you can add money. Keep empty containers opened and away from the drop zone so you can easily find fresh inputs, they bounce quite far sometimes. Don't use the shopping cart to move money around, it can only take 1650 bills. The XXL carton can take twice that. And the SPHERE grab has no limit. Gold bars later are different - you need the trolley to move those quickly. You can only hand-carry one gold bar, but you can also hand-carry containers that contain multiple gold bars. Feeding the Pig To end the game, you have to feed a million dollars worth of currency to the pig and do the final tasks. Notes: The pig accepts any and all currency including Euro, Yen, fake, inked, dirty, marked and wet bills. YOU CAN SOFTLOCK YOURSELF if you feed counterfeit or marked bills to the pig. The panther quest early on for fake bills and the final vault quests specifically need a large batch of fake bills you get in one of the first quests, and a large quantity of marked bills found in the vault respectively. DO NOT FEED THOSE TO THE PIG OR MIX THEM WITH YOUR NORMAL STASH I'm pretty sure that's a bug and you are supposed to get counterfeits and marked ones from side tasks, but i didn't get any. See dangerous tasks below. I recommend putting the shopping cart or a XXL carton underneath the feeding port to catch spillage, the port only takes 100 bills or 20 money packs at a time. USE PACKS. Feeding loose bills to the pig is much slower than feeding packs. Feeding small bills to the pig is mostly a waste of time ... do more tasks instead and you will have more big bills to feed it much faster. The vault contains about 212k dollars in loose bills which do not appear to be fake or marked. So you you are free to pig those. Make sure not to pig the ones in the cartons. Dangerous tasks: "GLOVED HAND" task early in the story gives you a ♥♥♥♥♥♥♥♥ of fake 10 and 20s and real 50s and 100s. You absolutely need the fake bills for the "PANTHER" story task which you cannot discard once started. "Truth of the Vault" and the Panther Vault task both require the bills located in the vault entryway area in cartons and sports bags. Do not use these for anything else. Do not pig them or mix them with your normal money. Main gameplay loop So, how do we progress quickly? By following a maxim: Don't waste your time. Barring maybe the first 2-3 tasks, 20 and 10 dollar bills are a waste of your time. So are 20 and 10 Euro bills and 1k Yen bills. Barring the extreme early game, you always receive enough money to fulfill orders with just big bills. Early game loop (Counting machine) If the money provided has packs, cut them open with the knife. So, once you have the first counting machine, set it to 100$ and sift your money pile. Pack stacks. Put the remaining 100$ bills to the side, into a carton maybe. Use these next 100$ round. Now set it to 50$ and sift your money pile again. Pack these. Store the rest of 50s for next round. You should be able to fulfill any quest with just these packs. Toss the remaining 20s and 10s into a loose "discard" pile in a corner. Only pack full stacks of 100 each so you know exactly how much money you have there. Keep your stacks on the worktable or in cartons split by type. Always fulfill orders with just the exact amount asked for, not more. By all means run multiple tasks concurrently so you only have one big money pile to sift twice. Should a very rare task ask for 20 bills, you can sift the discard pile once. YOU CAN SOFTLOCK YOURSELF* if you feed counterfeit or marked bills to the pig. The panther quest early on for fake bills and the final vault quests specifically need a large batch of fake bills you get in one of the first quests, and a large quantity of marked bills found in the vault respectively. DO NOT FEED THOSE TO THE PIG OR MIX THEM WITH YOUR NORMAL STASH I'm pretty sure that's a bug and you are supposed to get counterfeits and marked ones from side tasks, but i didn't get any. *mostly. Side quests will provide low, LOW amounts of counterfeit and marked bills. Mid game loop (Washer, Dryer, L Counter) Set up your workspace like an efficient pipeline! The washing machine should be near the drop zone so you don't have to drag the money too far But not IN the drop zone, so dropping items don't mix wildly the dryer should be next to the washing machine your counting machine should be near the dryer the counting machine counterfeit output should not be in danger of mixing with any other piles the counting machine remainder pile should not be in danger of mixing with any other piles the counting machine should be on the edge of a table, so you can grab the remainder pile and quickly make it the input pile again without bumping into or running over things
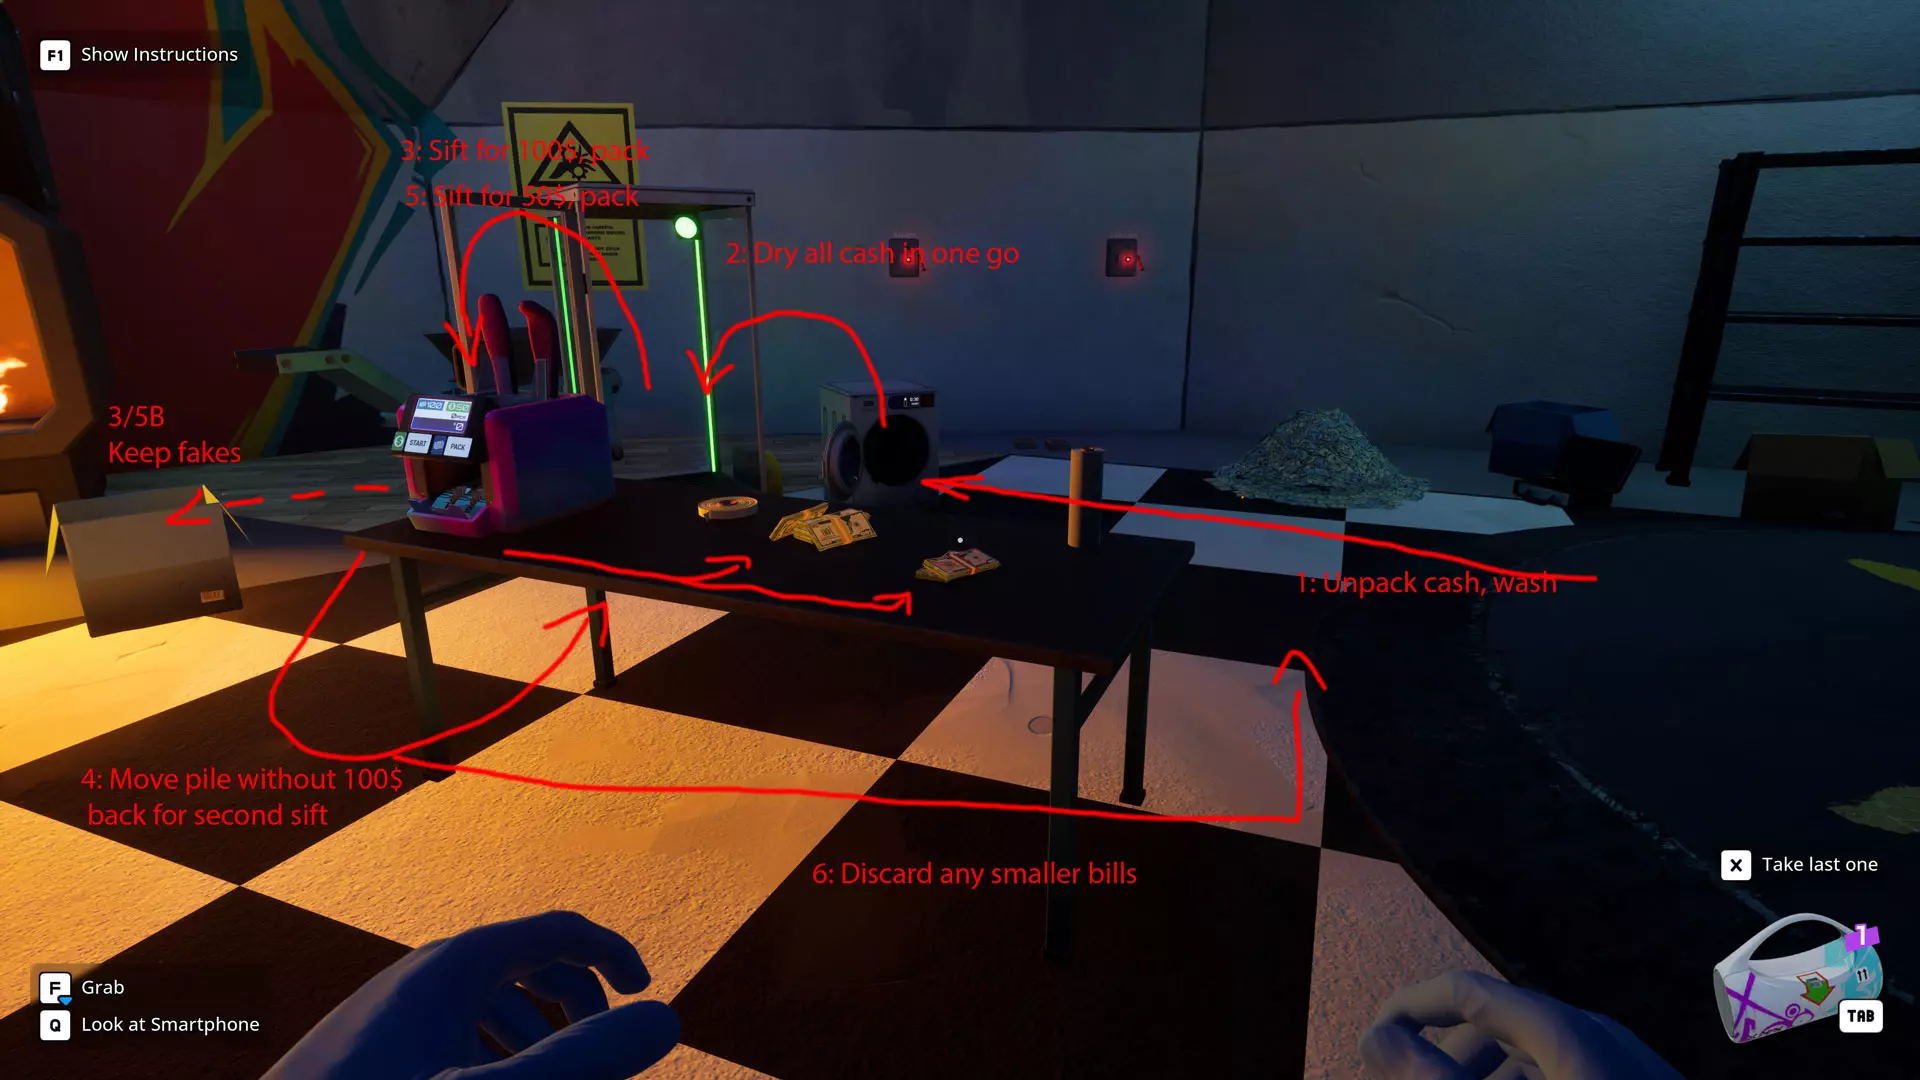
流程: 打开输入容器,将所有内容扔进洗衣机。 将湿的结果扔进烘干机。如果你有更多待洗物品,继续扔进洗衣机,捡起垃圾并烧掉。【保留硬币】,因为有些任务需要用到。 烘干机只需运行一次,因为它可以容纳无限量的纸币。 现在你有一堆干燥干净的钱可供筛选。 筛选并打包100美元。 筛选并打包50美元。 剩余的放入丢弃堆。 将假币单独放在一个堆里,用于少数需要它们的剧情任务。 同时进行多个任务,这样你只需将一大堆积钱筛选两次。在拥有欧元机器之前,只需避开要求欧元的任务。 一旦获得欧元机器,就为欧元任务并行运行相同的设置。但现在,欧元机器的废料中可能含有美元,而美元机器的废料中可能含有欧元。 游戏结束循环(洗衣机、烘干机、超大号分拣台): 1. 打开输入容器,将所有物品扔进洗衣机。 2. 将湿的结果扔进烘干机。如果还有更多待洗物品,继续放入洗衣机。捡起垃圾并烧掉。保留硬币,因为有些任务会需要它们。同时保留项链和花瓶。 3. 烘干机只需运行一次,因为它可以容纳无限量的纸币。 4. 现在你有一堆干燥干净的钱可供筛选,其中可能包含所有三种货币。我建议只连续接受单一货币类型的任务,优先选择高价值任务以获取更多经验值和盈余。不过,你也可以接受各种混合钞票,总共筛选两次:100美元、50美元、100欧元和50欧元,另外两种高面额日元会自动抓取任何值得打包的钞票。其余的钞票处理起来纯属浪费时间,直接扔到角落里就行。有些任务设有时间限制,但这些限制都非常宽松。而且,即使你丢弃小额钞票,也应该已经积累了大量盈余。我甚至常常在还没碰到来款之前就能完成订单,然后从容地进行筛选。
在串联计数器时,你可以使用托盘或其他实体物品来实现完美放置。
救命,我把弃牌堆里的牌全塞进去了
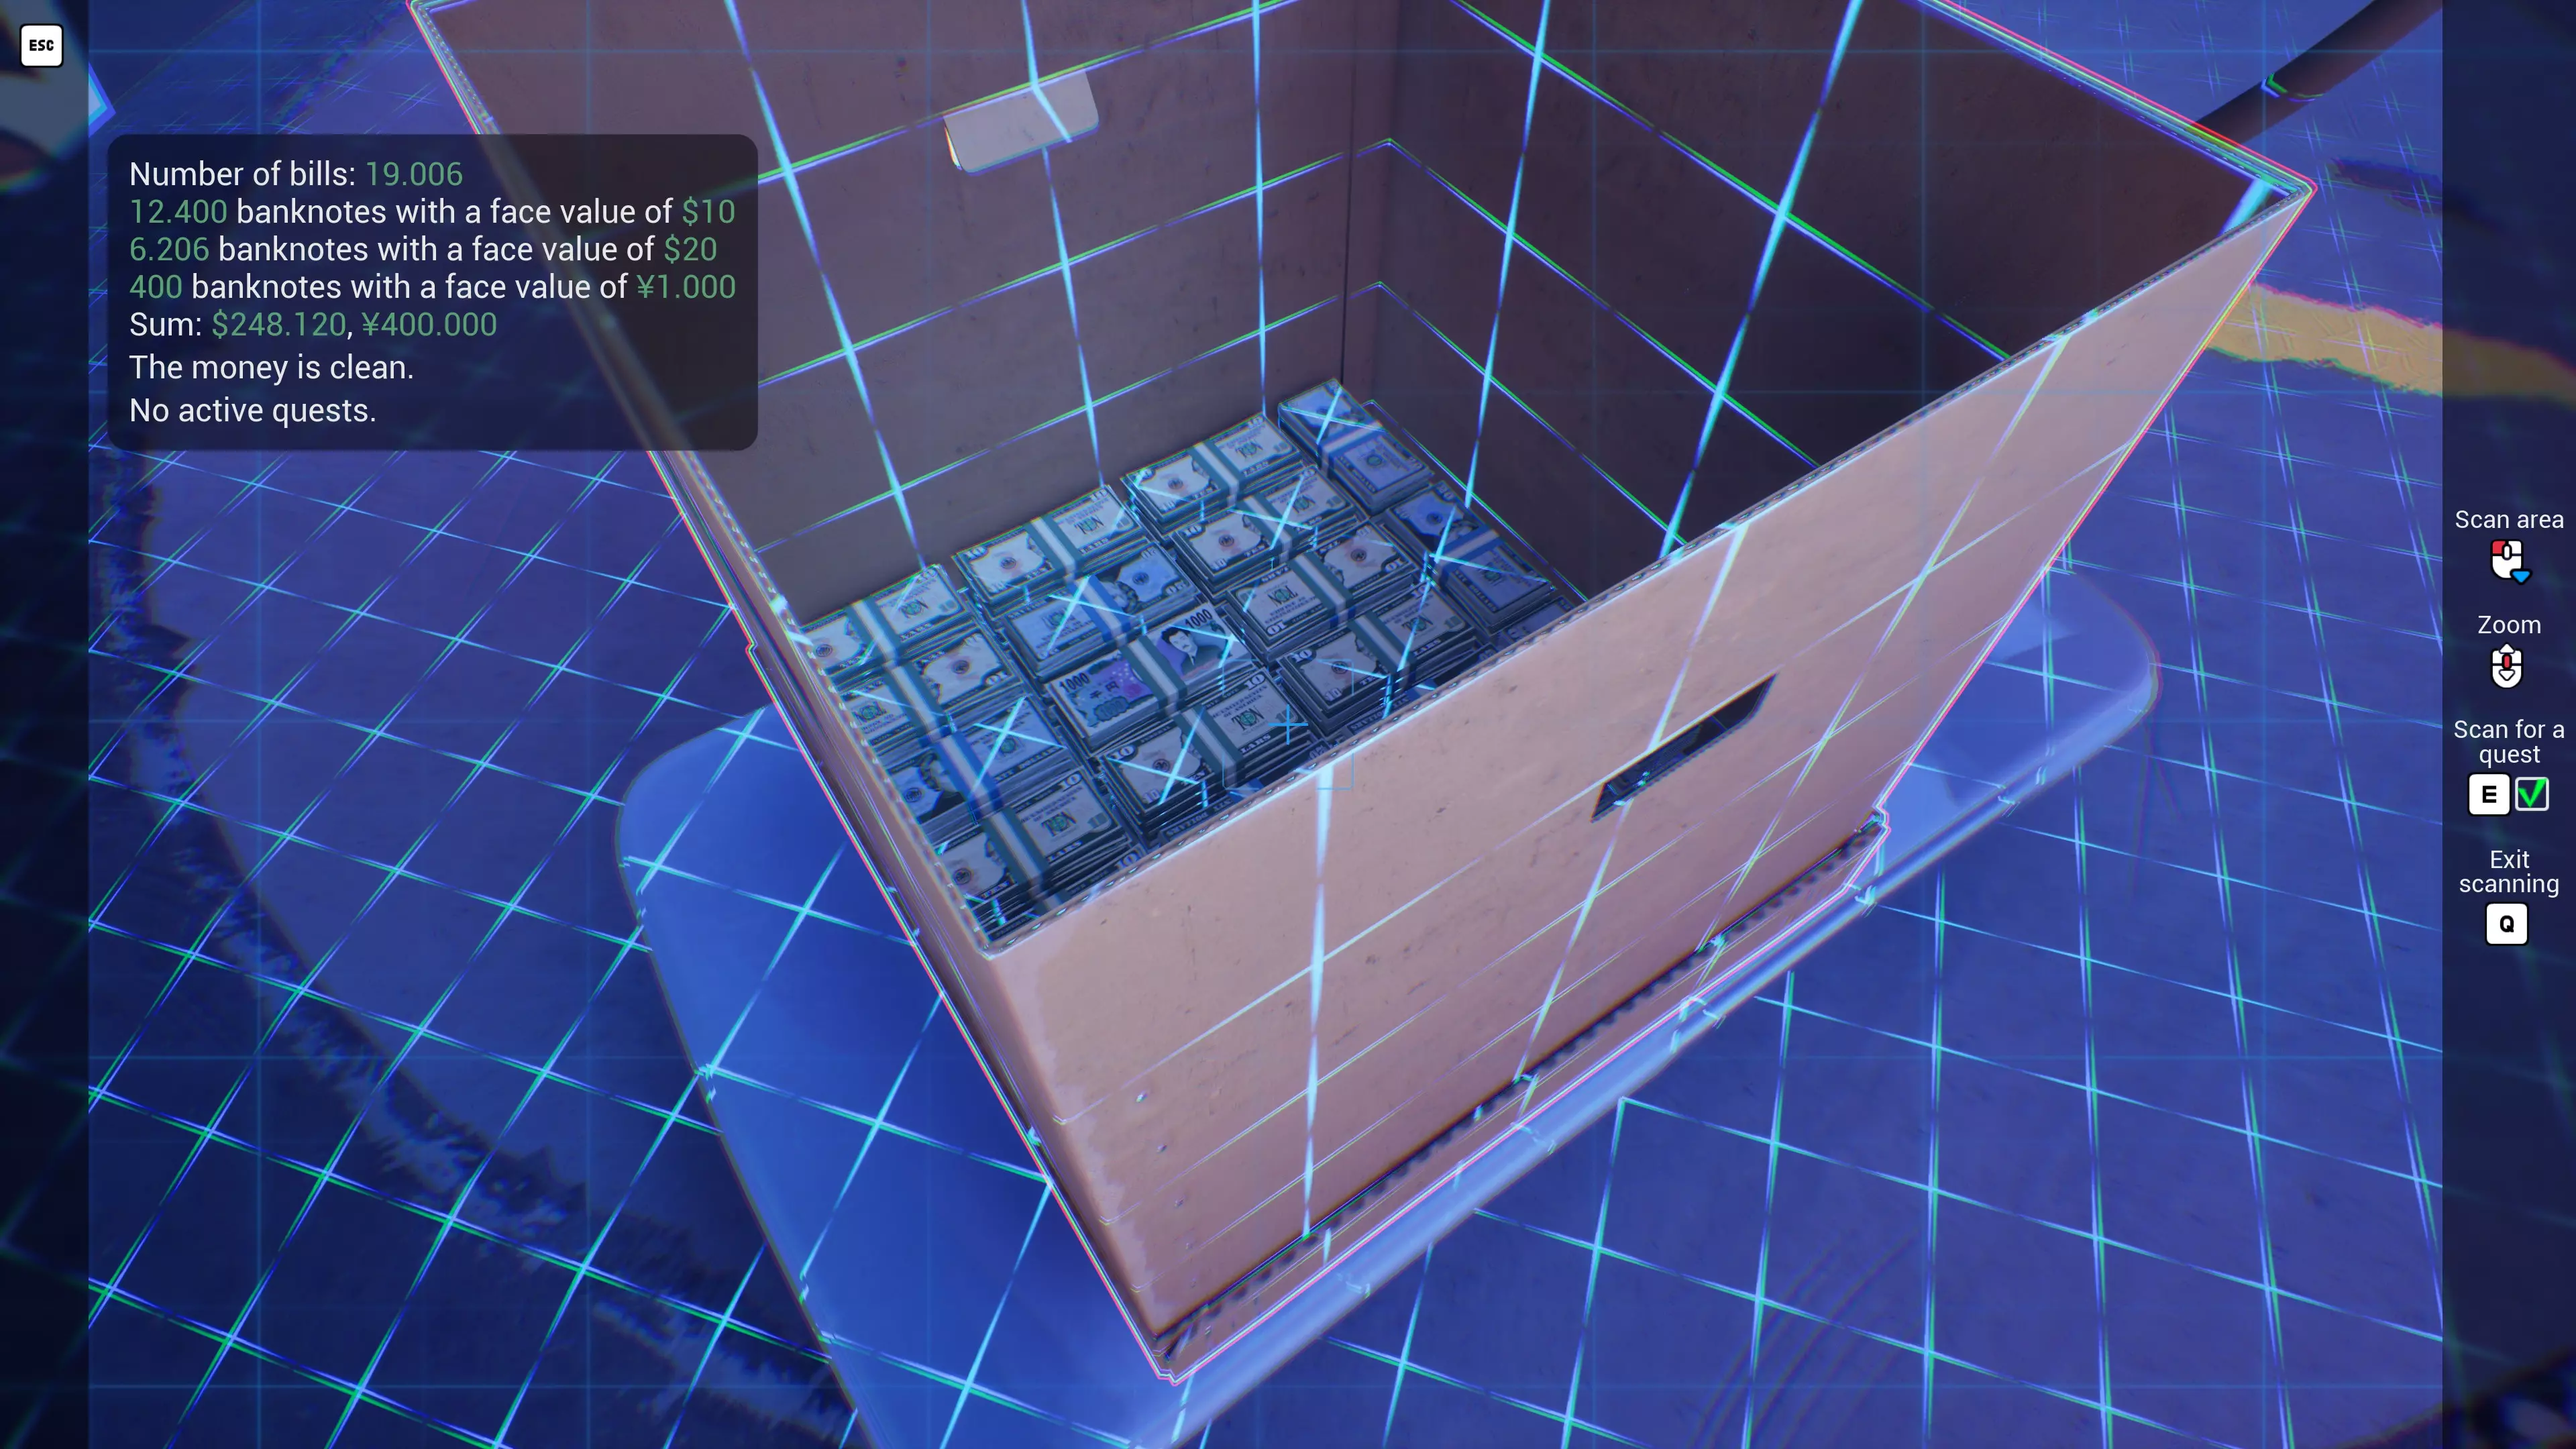
【金库任务/金库金钱内容】 金库入口处有运动包和纸箱,里面装着带有印记的脏钱。除了最终任务外,不要将这些钱用于任何其他用途,否则可能会导致游戏软锁。 纸箱中只装有印有黑莲花标记的脏钞票。 运动包(除一个混合包外)要么只装有警方标记的钞票,要么只装有黑莲花标记的钞票,且均带有印记。其中一个包是两种钞票的混合。 如果不想自找麻烦,请勿混合这些钞票。如果必须将它们分开,只需手动分拣那个混合包即可。总共有: 约770张带有墨迹的警方标记钞票,主要为日元; 约700张带有墨迹的黑莲花标记钞票,主要为日元; 约2650张脏污的黑莲花标记钞票,主要为日元。 所以剧情任务的钞票绝对足够,除非你弄丢了这些。 此外还有金条,右侧架子上的箱子里装有关于你、罪犯和政府的文件。 金库更深处有管道任务物品、一辆手推车和一盏紫外线灯,其他似乎没什么特别的东西,纸箱看起来是空的。左后方水桶旁边藏着一张艺术风格的钞票。 完成游戏的其他任务: 还有一些与金钱无关的小任务需要完成: 红色手柄位于传送带按钮右上方的横梁顶部。使用获得的免费梯子即可够到。你需要那个手柄来修理【损坏的开关】并扩展可玩区域。 注意:扳动开关会引发爆炸,物理抛射地图中附近的松散物品,所以或许应先将所有贵重的钱堆放入容器并关闭它们。丢弃物堆也可能需要这样做。但爆炸的焦点是开关所在的储罐。 迫击炮底座位于你可以解锁的【休闲区】。 猪发射控制装置在第三层,你需要通过左侧的楼梯解锁第二层,然后使用左后方顶部的梯子到达第三层。那里是进行修理的面板和管道所在的位置。 管道可以在金库右侧的一个扩展架顶部找到。当你站在架子上时,可以把它撬起来,这样就能轻松够到了。 关于要求收集项链和雕像的任务,我目前不知道有什么方法可以获得更多。商店里买不到,随机任务中我也从未得到过额外的。保险库和剧情任务中的数量不足以完成这些任务。这很可能是一个bug。