换一换
换一换 


《太吾绘卷》新手及回归玩家基础战斗机制指南 简介 本文将为新手及回归玩家提供一份《太吾绘卷》的基础战斗机制指南。战斗系统可能是游戏中最令人困惑的部分之一,且自抢先体验版以来发生了较大变化。 考虑到游戏仍在进行平衡性调整和内容更新,本文不会涉及具体公式和计算(这些内容很可能会发生变动),而是旨在让大家对战斗机制和各项属性的作用有一个大致了解。 本文并非深度build指南,因为游戏的玩法和build方式实在太多。我希望通过解释机制,帮助大家理解游戏,从而在游戏中做出自己的决策。我暂时也不会涵盖非战斗相关的内容,比如技能学习方法,因为本指南目前已经很长了。 注意 - 五月补丁战斗重做 鉴于当前开发分支的战斗更新,我将对一些主要变化进行说明。由于这些内容仍处于开发分支阶段,目前我不会将其纳入指南中,但这可以让大家提前了解未来的改动方向。希望在我有机会进一步体验这些变化后,能为指南提供更详细的更新。 1. 伤害现在会累积。以前,一次攻击要么造成伤害,要么因威力不足而无法造成伤害。面对高生命值的对手,如果无法造成伤害,你必须通过攻击弱点或其他削弱方法才能对其造成伤害。现在,你只需进行足够次数的攻击即可。1. 据我所知,利用较高的决心值偏转攻击仍是完全无视伤害的一种方式。 2. 提升/降低受伤等级的技能似乎整体被削弱为基本的伤害减免效果,考虑到之前受伤是全有或全无的机制,现在的效果可能更弱。 3. 偏转现在只能格挡三分之二的伤害,而非全部。你仍然可以通过快速造成大量伤害或使用风格切换来突破偏转。 4. 风格切换现在允许你瞄准特定的身体部位。 5. 对对手施加毒药现在可以产生额外效果,具体列表较长,相关详细内容可参考相关更新说明。 战斗属性
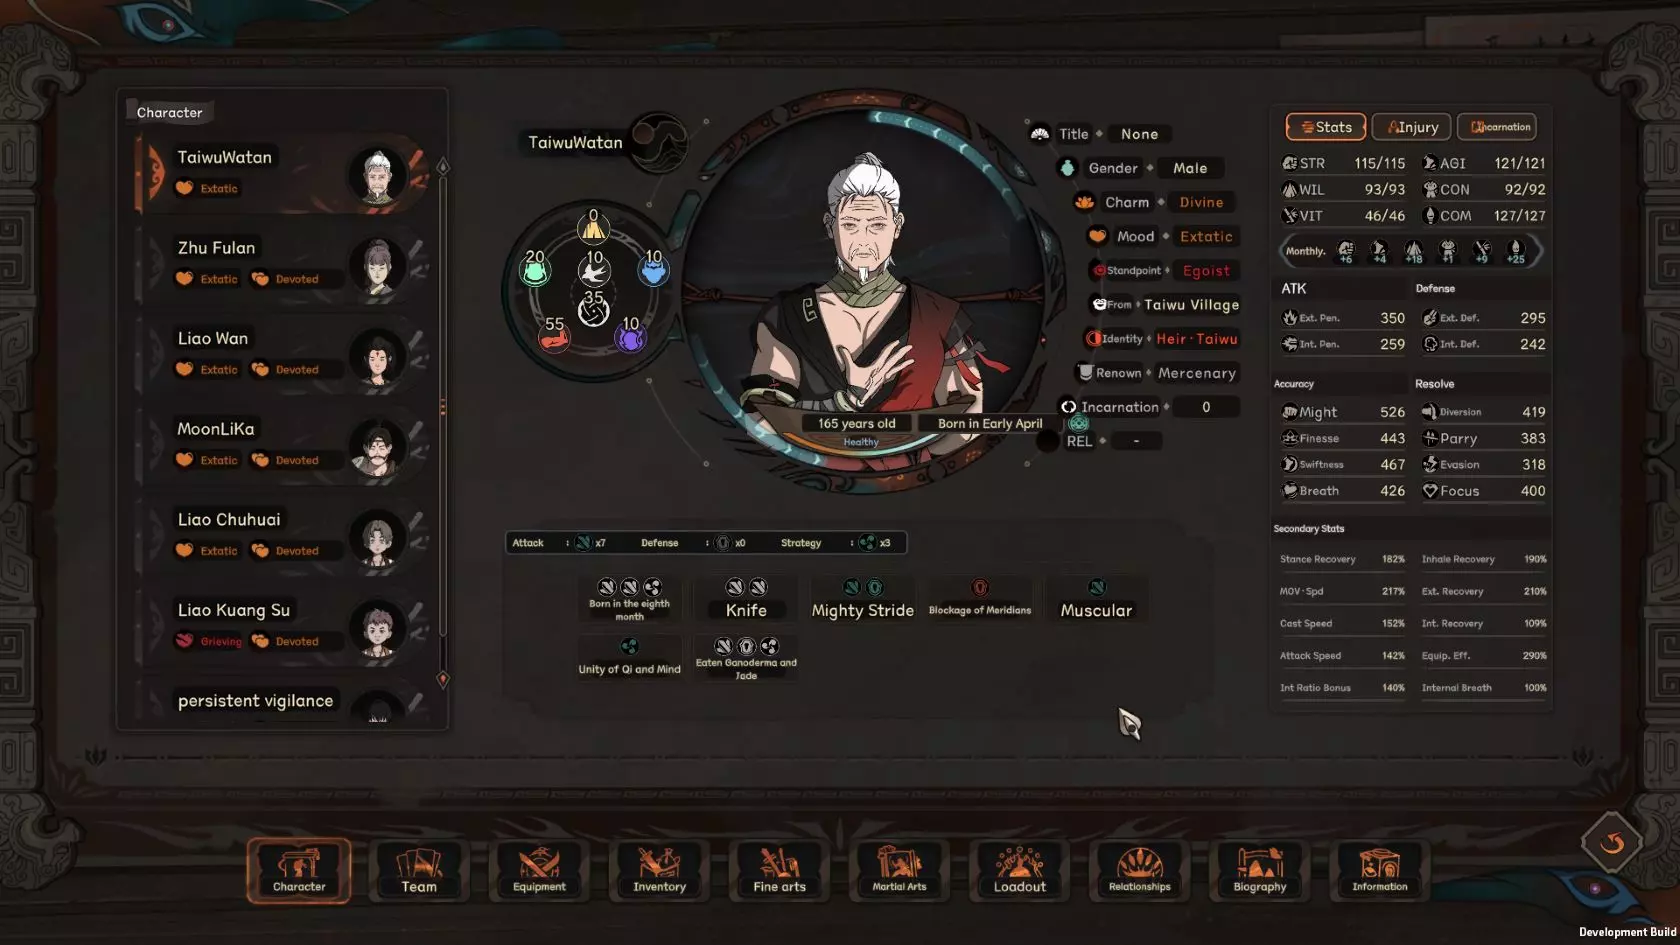
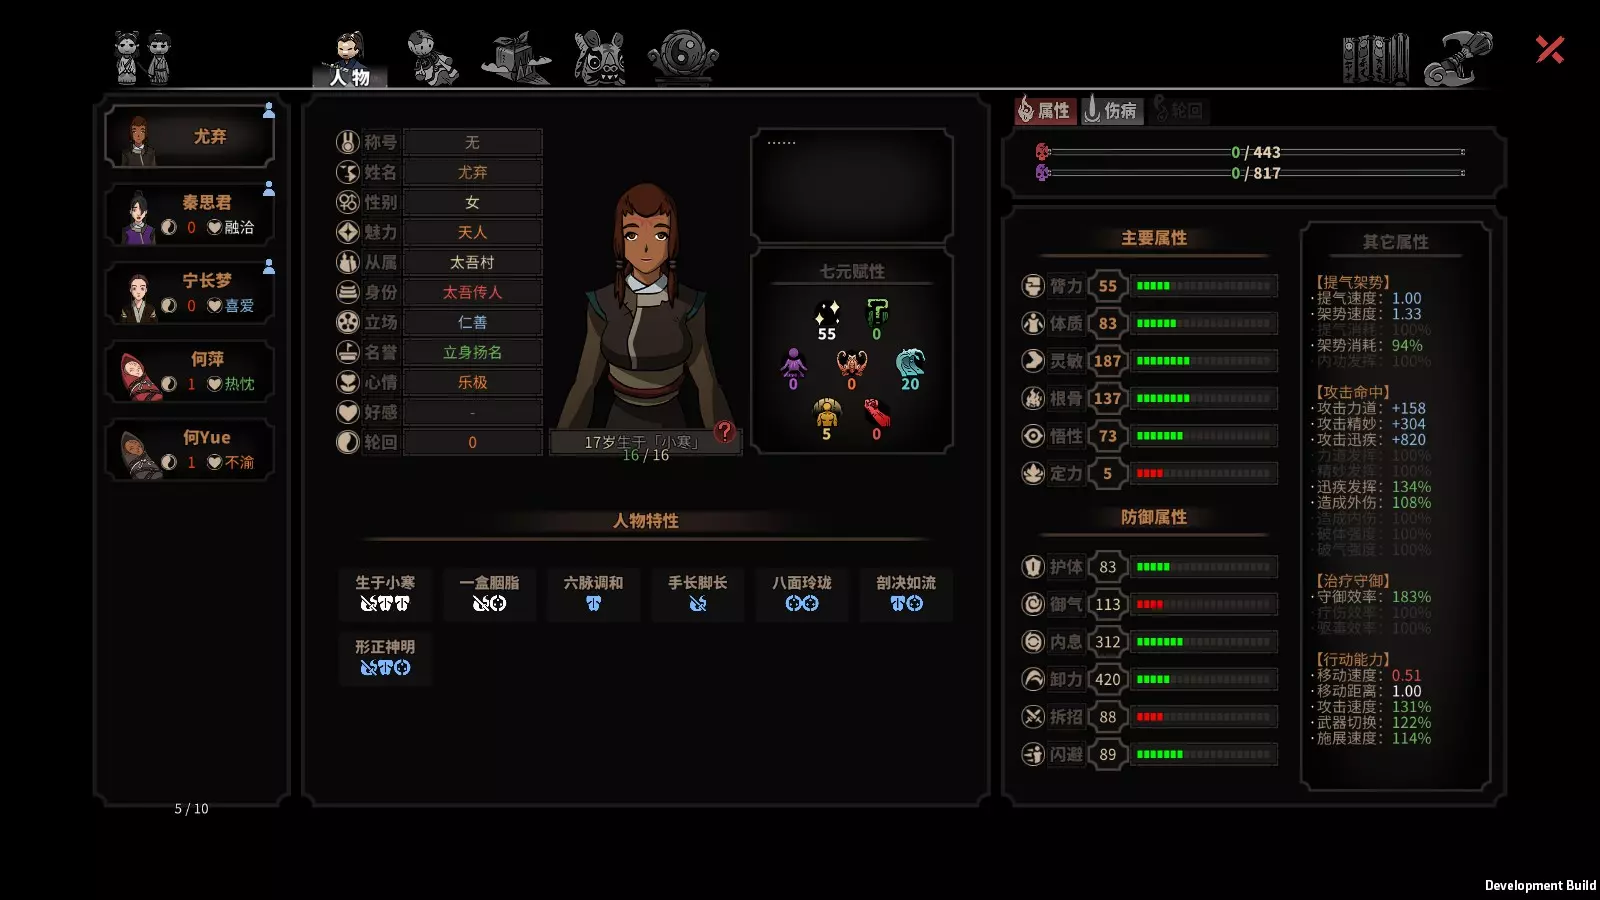
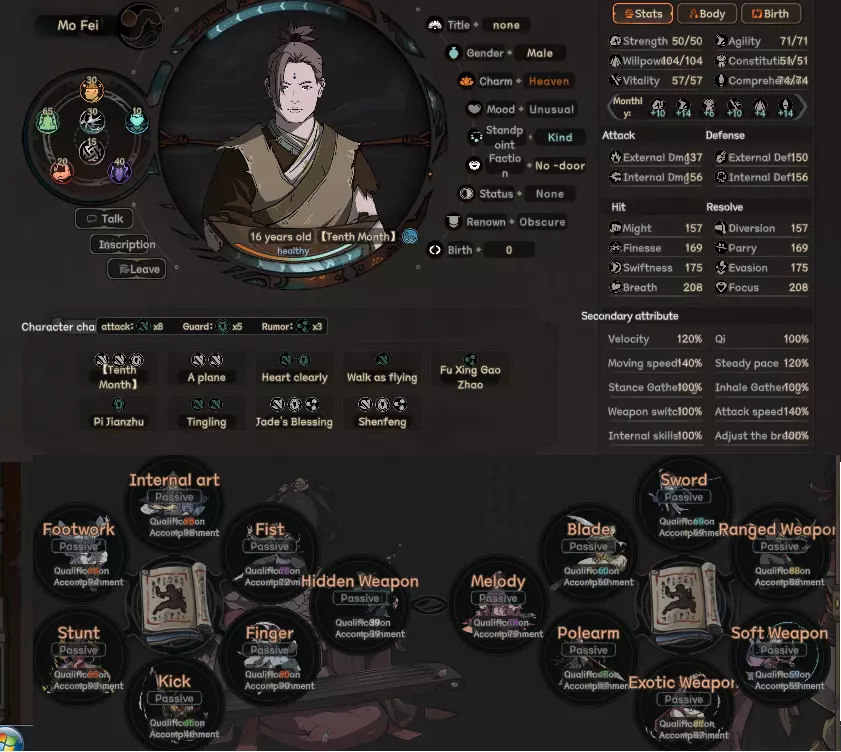
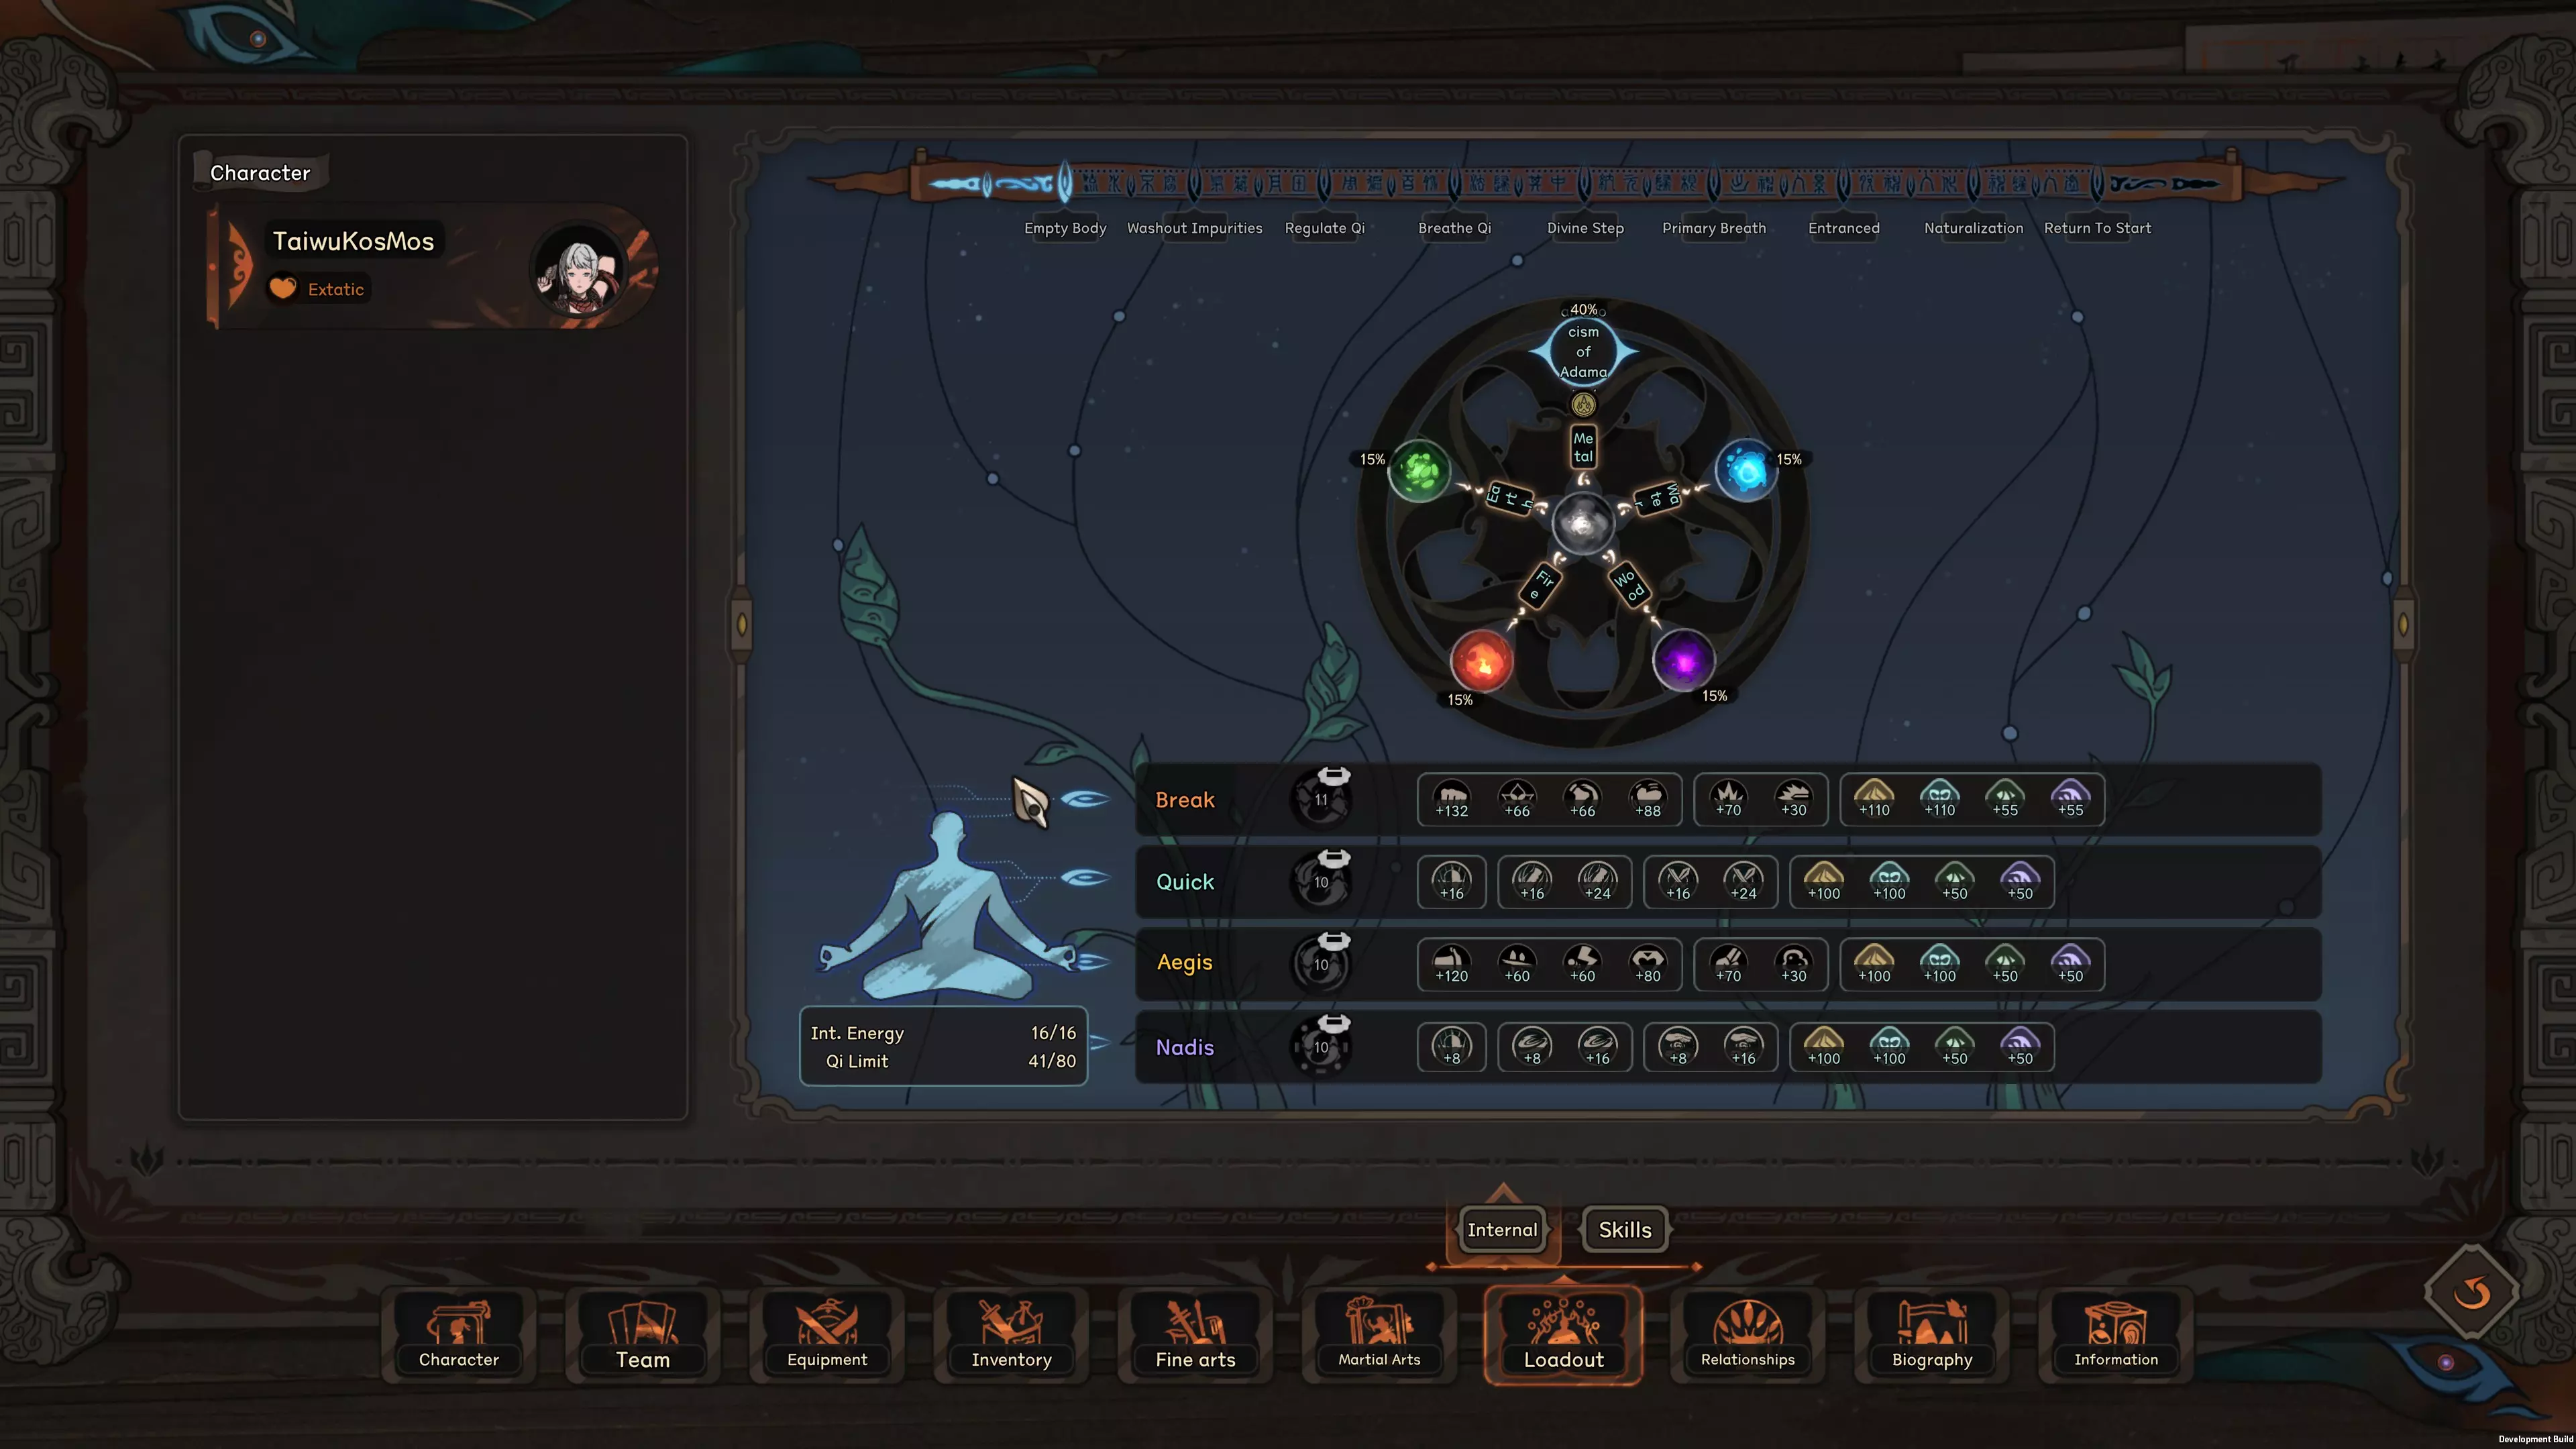
进入战斗界面之前,了解《太吾绘卷》中各项基础战斗属性的作用会很有帮助。请注意,由于英文翻译仍在进行中,我将使用当前版本的属性译名,若有任何变动,请告知我。 如角色窗口所示,与战斗相关的属性位于屏幕右侧。
基础属性是角色的基本属性,通常难以更改。大多数情况下,它们不会直接影响战斗,但大多数装备/技能在计算其效果时需要一项或多项基础属性。如果缺少所需属性,你可能无法充分发挥装备/技能的全部效果。不过,各项属性也会影响多种战斗属性,具体如下: 力量(STR) 提升威力/分散值 增加角色的装备重量上限(从而减少因穿戴重型装备而受到的速度惩罚) 敏捷(AGI) 提升迅捷值/闪避值 意志(WIL) 提升气息值和专注值 体质(CON) 提升额外攻击/额外防御 每10点体质可使每月使用的消耗品数量增加1个VIT 提升智力攻击/防御 COM 提升阅读速度 提升灵巧/格挡 各项基础属性若因任何原因降低,每月都会恢复。部分属性在角色年轻时恢复更快,例如STR,其他属性则在角色年长时恢复更快,例如WIL。
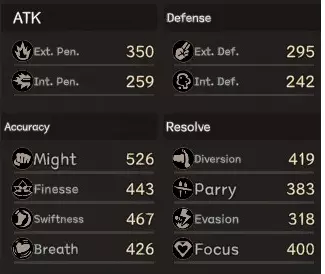
下一组属性是攻击属性,如前所述,这些属性会受到你的主属性、真气分配、装备以及已装备技能的被动效果影响。在《太吾绘卷》中,攻击能否产生效果取决于两个因素:攻击是否命中,以及攻击能否穿透防御者的防御。 你的角色的每次普通攻击都会基于四种命中属性中的一种,该属性会与对手相应的定力属性进行比较,以判断攻击是否命中。命中率并非简单的命中/未命中概率。当你的命中率属性超过敌人相应的意志属性越多,你的攻击就越有可能造成额外伤害;但如果你的命中率属性过低,攻击被防御方化解并完全抵消的概率就会越来越高。 一旦攻击命中,游戏会将外部攻击/智力攻击属性(具体使用哪种属性取决于攻击所用的武器/技能)与相应的防御属性进行比较,以确定实际造成的伤害(如果有的话)。一般来说,高【精准度】不仅能确保你的攻击命中,还能增加造成的伤害,可以理解为你的角色能更精准地打出致命一击,至少能保证攻击产生效果。另一方面,高【攻击力】是将这些攻击转化为实际伤害所必需的。关于伤害计算的更多内容,请参见战斗界面部分。
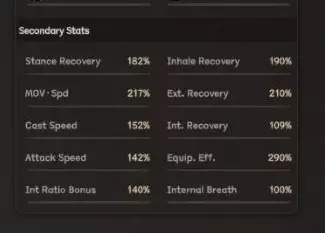
游戏中还有一系列次要属性会进一步影响战斗中的各种行动,我会在此简要介绍,并在讲解战斗机制时再做详细说明。 姿态恢复:角色每次命中或受到攻击时恢复姿态的速率。 吸气恢复:角色在战斗中随时间恢复吸气的速率。 移动速度:顾名思义,此属性越高,角色消耗相同移动量时移动的速度越快、距离越远。 异常恢复:角色从对手攻击造成的弱点状态中恢复的速度。 施法速度:角色在战斗中完成技能引导的速度。内力恢复 - 角色从穴位受击状态恢复的速度。 攻击速度 - 角色在战斗中获得攻击行动的速度。 装备效率 - 影响武器/装备可达到的最大效能(若此属性较高,且武器所需属性足够高,可使武器效能超过100%)。同时减少切换武器的冷却时间。 内力比例加成 - 让你能更自由地调整武器和技能的内外伤比例,后续将详细说明。 内力调息 - 加快失去的真气恢复速度,延长额外获得真气的持续时间。同时加快混乱内息的恢复速度,并减少受到的混乱内息。 基础移动与攻击
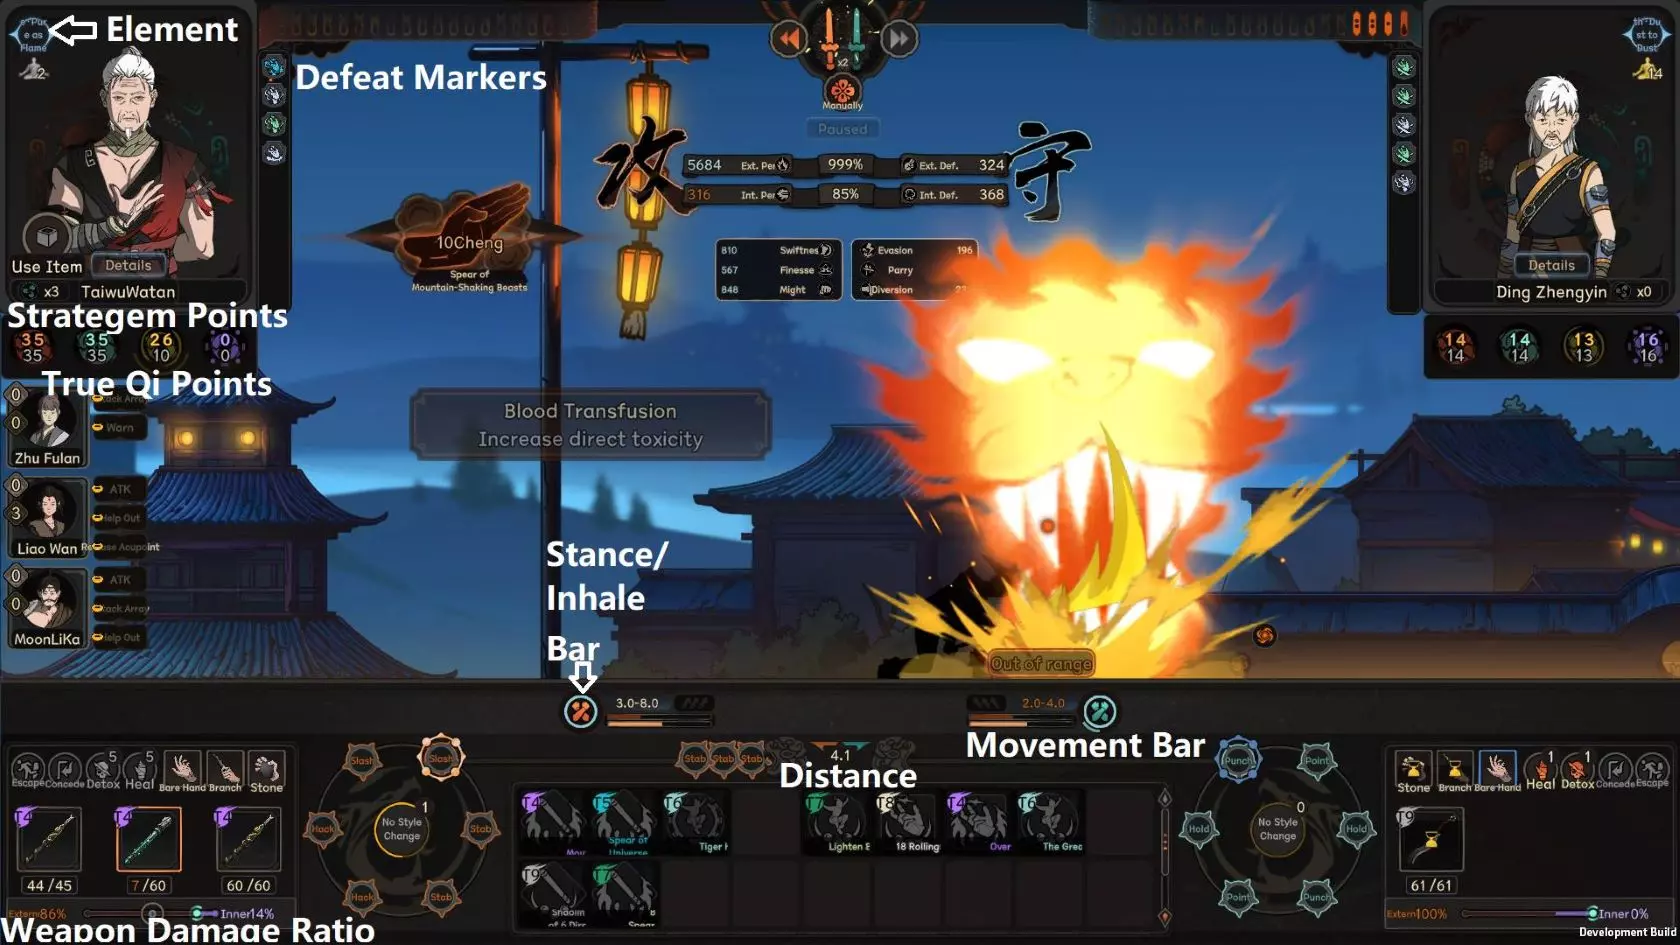
战斗界面如上所示,我已对界面主要部分做了一些标记,并会在后续内容中提及(内容略有过时,将逐步更新)。 战斗的基本操作很简单:A/D键左右移动,左键点击攻击,所有可用技能均位于界面底部。 移动: 你与敌人之间的距离显示在屏幕中央,每种武器都有攻击范围,显示在移动条上方。技能可能会进一步改变武器的攻击范围。超出范围的攻击必定会 miss,这也包括敌人的技能,只要你足够快,就能完全躲避它们。 移动条分为两部分,上方的条显示你的移动点数。没有移动技能时,你可以通过按左右键移动,不受移动点数限制,但这种移动比使用技能慢。 使用移动技能会消耗部分移动点数,并在底部移动条显示的持续时间内允许你移动(并享受移动技能带来的其他效果)。注意,在移动技能激活时移动通常会使底部移动条消耗得更快,因此对于某些专注于增益效果的移动技能,施放后不移动可能更有利。 移动点数会以顶部条灰色部分的形式逐渐恢复,直到灰色部分填满顶部条,但此时实际上不会恢复任何移动点数,且任何移动都会重置恢复进度。当顶部的灰色条填满后,它会开始快速恢复你的实际移动点数直至补满,但此过程会被任何移动点的使用所中断。激活移动技能也会停止移动点的恢复。 因此,为了能更快恢复,通常你不希望过度消耗移动条。如果你完全耗尽移动点,就会在很长一段时间内陷入被动。 攻击 移动条正上方、攻击范围之上有3个剑形图标,这代表你当前储存的攻击次数,其恢复速度取决于你的攻击速度。左键点击会消耗1-3个攻击计数,并使你的角色进行一次基础武器攻击。通常来说,强力且重型的武器需要消耗更多连击点才能发动攻击,但造成的伤害也更高。 每次左键点击攻击时,你可能会发动多次攻击,这种情况发生的概率取决于武器上显示的连击率。(这并非直接计算得出,但连击率越高,你就越容易看到这些连击效果) 你最多可以积攒3个连击点(某些技能可以增加上限),以便能够连续快速攻击,从而突破敌人的武器格挡,或者迅速累积他们的击破进度条。 武器与流派
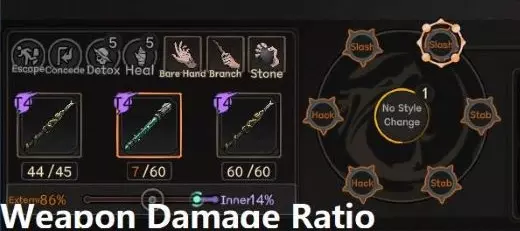
每次攻击都将采用武器所能施展的其中一种攻击方式,这些方式会显示在屏幕左下角的旋转轮盘上。此处,该武器可施展挥砍、劈击和突刺,其中挥砍被高亮显示为下一个要使用的攻击方式。每种攻击方式对应不同的精准度属性(在本例中,挥砍对应技巧,劈击对应力量,突刺对应敏捷),考虑到对手的韧性属性,这点十分重要。 不同的武器可能拥有不同数量的攻击方式,例如,一把轻剑的攻击轮盘上可能有4种突刺方式,而挥砍和劈击各只有1种。 你可以随时点击武器图标切换武器,切换后原武器将进入冷却状态。每次攻击时,风格轮的内圈会逐渐充能,充满后将获得一次【风格切换】充能。此时双击风格轮周围的任意风格即可切换至该风格,并使该次攻击获得额外的精准度加成。你可以储存多次风格切换充能,且切换武器时充能不会消失。 武器格挡 自游戏发布以来,该机制已进行大幅重做。现在,风格轮右侧设有两个格挡条,分别对应内伤/外伤伤害。格挡条的总量取决于你使用的武器及其内外伤比例。 当格挡条尚有剩余时,你所受伤害会降低,每次受到攻击都会消耗部分格挡条。若格挡被击破,敌人将对你发动一次额外的破防攻击,可能造成相当高的伤害。当你的格挡条被打破后,它将开始再生,在此期间你无法格挡。格挡条也可以通过切换到其他武器或施放护盾技能来恢复。武器伤害倍率
你可以通过上方显示的滑块在战斗中调整武器的伤害比例,可调整的幅度取决于武器类型和你的智力比例加成属性。某些武器类型用途广泛,允许你根据敌人进行调整,调整比例也会影响每次攻击所应用的智力/外部攻击数值。 因此,如果你难以穿透敌人的外部和智力防御,将伤害比例调整为50/50只会让情况更糟。 另一方面,如果对手的防御属性较弱,50/50的比例可以让你在命中时同时造成智力和外部伤害,这可能会迅速给敌人叠加大量伤害。 注意,攻击技能的伤害比例需在武学面板中单独为该技能进行调整。胜利战斗与战败标记 胜利战斗 战斗的目的是对敌人造成足够的战败标记以获得胜利。击败对手所需的战败标记数量完全取决于战斗的性质,一场练习赛可能只需10个战败标记就能决出胜负,而一场生死之战则需要30个战败标记。

以上是已受到一定伤害的敌人的击破计量条示例。敌人身上可能会被施加多种击破标记,无论施加多少种,只要击破计量条被填满,敌人就会被击破。下面我将依次进行说明。 击破计量条下方是显示各部位伤害的计量条。当某个身体部位受到伤害时,该部位的图标会逐渐填充,填满后将生成一个受伤标记。这与之前非全即无的受伤机制不同。现在,即使攻击未能造成决定性效果,至少也会造成一定伤害,这些伤害最终会累积成一个受伤标记。身体部位生命值可通过学习武术提升,通常是学习依赖该身体部位的技能,例如提升腿部生命值的踢技。请注意,这些效果不会叠加,仅最高等级的效果生效。 通常,每个击破标记会根据造成该标记的攻击所命中的敌人身体部位进行归属,你可以通过悬停在该标记上来查看。这一点很重要,因为有些技能会专门针对特定的身体部位。 弱点 - 橙色 - 最容易施加的击破标记,任何成功命中的攻击都可能对敌人施加弱点(除非敌人的外部/内部防御力极高,或者你的攻击完全未命中),这些弱点会随时间迅速消失。敌人身上相应部位也会显示为发光点。标记上的点数表示其弱点的严重程度,使用高精度攻击或造成伤害可能会产生更严重的标记,这些标记需要更长时间才会消失。 当弱点击破标记存在时,后续攻击同一身体部位将更容易造成伤害。因此,本质上如果敌人的防御值很高,但你的准确度足以至少造成一些弱点标记,那么积攒攻击然后连续快速攻击可能是个好主意,有了许多弱点标记后,你的攻击更有可能最终对敌人造成伤害。 穴位-深蓝-与弱点类似,但通常只能由技能触发,虽然它也会自行消失,但持续时间往往比弱点长得多。穴位不会像弱点那样使敌人变得更脆弱,而是根据其位置施加减益效果。例如,腿部的穴位会降低移动速度,胸部的穴位会减少吸气。 外伤-红色-由突破目标外部防御/护甲的外部伤害攻击造成。与弱点不同,外伤不会随时间消失,但在特定情况下有不少技能可以治疗外伤。 任何身体部位最多可出现6处外伤。同一部位有5处外伤时,受伤角色会受到减益效果;有6处外伤时,还会阻止其施放恢复该身体部位的技能。身体部位受到的超出6点的伤害将转化为重伤标记,重伤标记并非局限于单个身体部位,但相比普通伤害标记更难造成,因此通常攻击多个身体部位效率更高。 内伤 - 浅蓝色 - 与外伤机制相同,区别在于内伤通过内部伤害造成。内伤标记与外伤标记的其他规则一致,但每个身体部位可同时存在6个内伤标记和6个外伤标记。因此,若能确保攻击足以穿透对手相应防御,使用同时造成内伤和外伤的攻击通常更为有效。 daze/breath injury - 灰色带心形符号 - 目前对此的翻译尚不明确。这基本上是由声音攻击通常造成的精神损伤,但也可能由一些特殊技能导致。这种损伤会持续很长时间,并且会对敌人的专注力施加减益效果,本质上使他们更容易受到后续声音攻击的影响。 旧伤——这是外部/内部损伤的特殊版本,颜色更深。这些是你进入战斗时已存在的任何损伤,也可能由某些技能造成。在战斗中,它们比普通版本的损伤更难治愈,但其他方面则完全相同。 中毒——这部分内容值得单独说明,因此我可能会在之后再详细介绍。目前只需了解,一种毒素最多可叠加3个自身类型的毒素标记,但它可以通过其他效果促成胜利,例如在特定条件下造成更多的外部/内部伤害。 技能 战斗中有3种主动技能可使用:移动技能、攻击技能和防御技能。我将以这个技能为例讲解攻击技能,它是最复杂的技能类型。

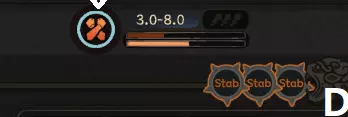
攻击范围 从上往下看,技能会改变武器的攻击范围,通常是增加范围,从而更难躲避,这里是增加最大和最小范围各0.5。 威力 威力百分比显示在当前属性下,该技能的效果如何。如果威力高于或低于100%,技能的大部分属性会相应地增强或减弱(超过100%通常只能通过内功/元素亲和加成实现,但达到150%以上并不难)。 吸气和架势消耗 技能会消耗一定的架势值和吸气值,战斗中在移动条旁边的圆圈中显示,如下所示。

外环是你的架势,当你受到攻击或攻击敌人时会恢复。内环是你的吸气,会随时间自然恢复。移动和防御技能消耗固定数量的架势/吸气,而攻击技能几乎总是消耗100%的架势和吸气总和,架势与吸气的比例也就是技能外部/内部伤害的比例。(这可以在底部的技能突破窗口中调整)
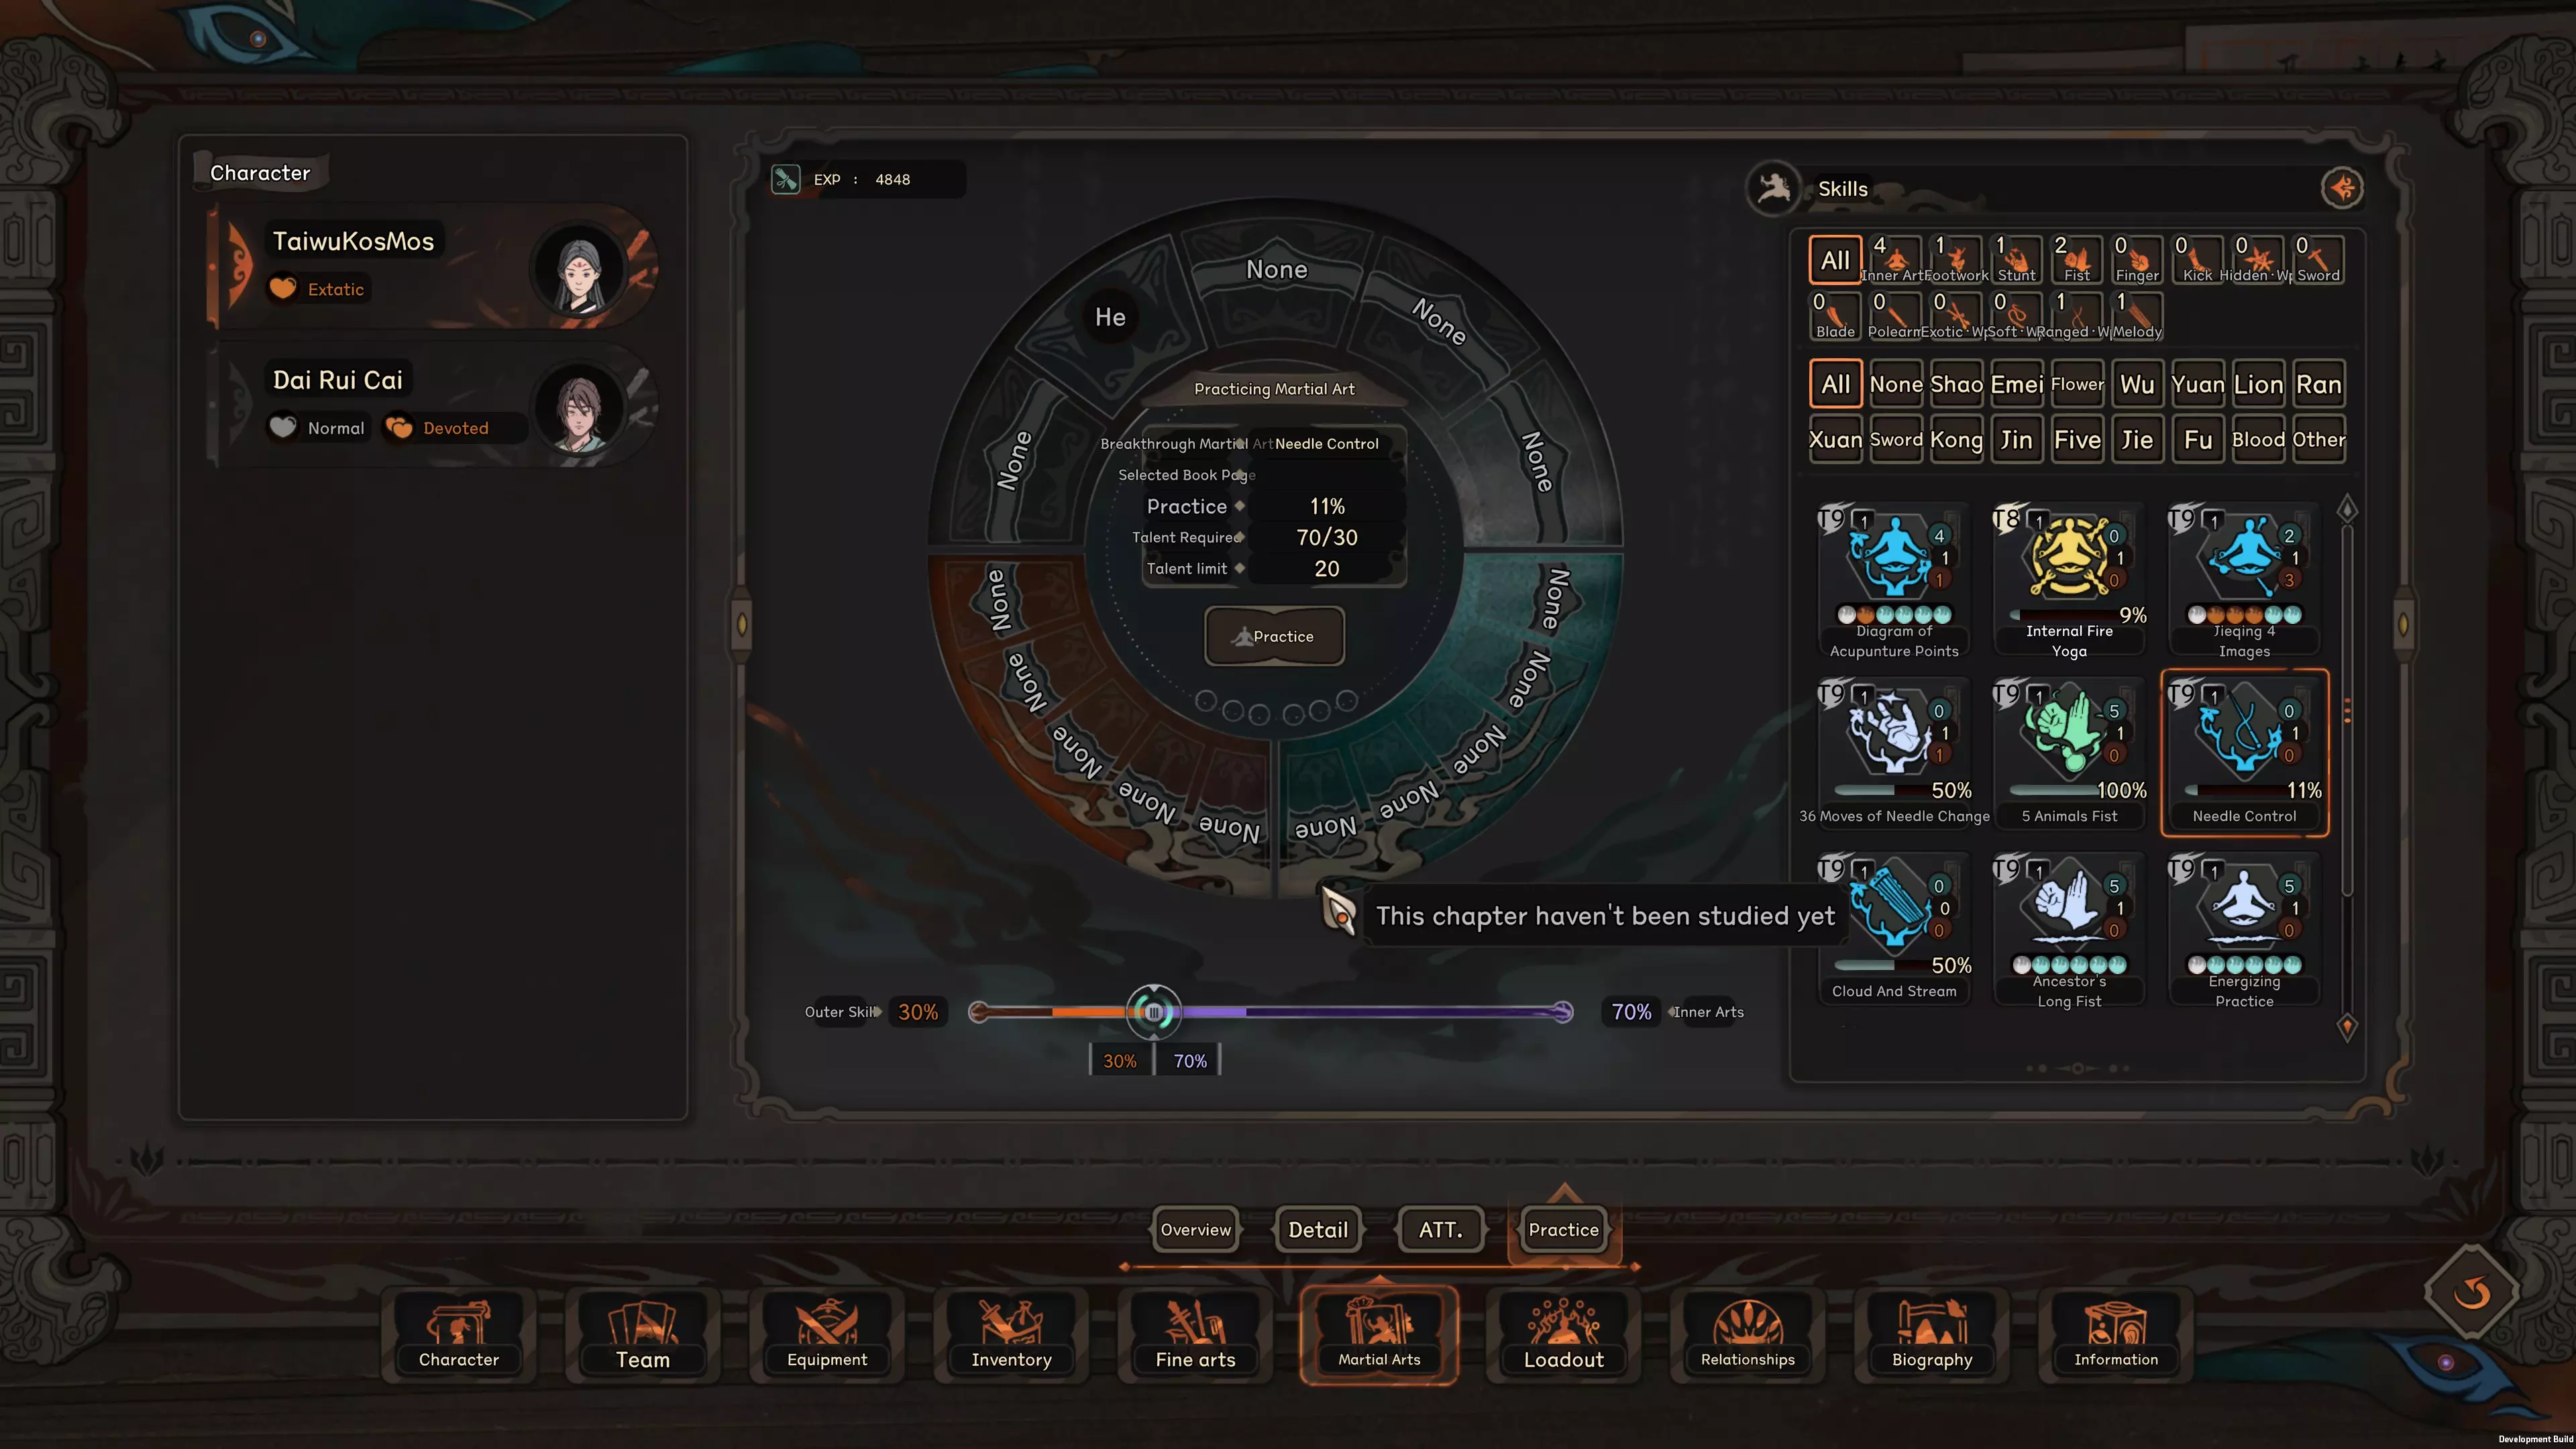
风格消耗 攻击技能同样消耗一定数量的风格值,当你使用该风格进行攻击并命中时即可获得风格值。如果攻击形成连击,且连击持续足够长的时间,你还能获得额外的风格值。
你积累的风格值会显示在移动条下方,请注意你只能持有有限数量的风格值,超出部分将被浪费。 同样值得注意的是,只要武器能够生成相同的风格,它们就可能可以使用相同的技能。例如,一个消耗突刺风格的剑类技能,即使你手持的 saber(军刀)在其风格轮中也有突刺风格,也可以使用该技能。 技能属性 这部分说明了技能攻击对攻击和命中属性的修正量。在这种情况下,你可以看到该攻击将造成你普通外部穿透和内部穿透的280%伤害。 此外,每个命中属性旁边的红色条还显示了根据相对命中值,该技能将造成的伤害比例。本质上,使用技能攻击时,敌人需要对3项命中属性分别进行格挡判定。例如,若敌人的闪避值超过你的敏捷值,你的技能将仅造成50%的威力,因此伤害也会相应降低。 防御技能 此类技能不消耗流派点数,但会消耗固定数量的架势值或吸气值。 防御技能大致分为三类:一是单纯提升防御或决心属性以增强生存能力的技能;二是在敌人特定类型攻击未命中时允许进行反击的技能;三是能够将特定类型伤害反弹给敌人的技能。 所有防御技能都有固定的持续时间,在此期间你可以移动(但不能使用移动技能)、普通攻击和使用物品,但无法使用攻击技能。移动技能 这些技能不消耗流派值,但会消耗固定数量的移动值(某些情况下可能还会消耗流派值或吸气值)。 如移动部分所述,它们的持续时间显示在底部的移动条上,通常分为两类:一类是加快移动速度,另一类是在持续期间为你提供增益效果,同时允许你以正常速度移动。 装备
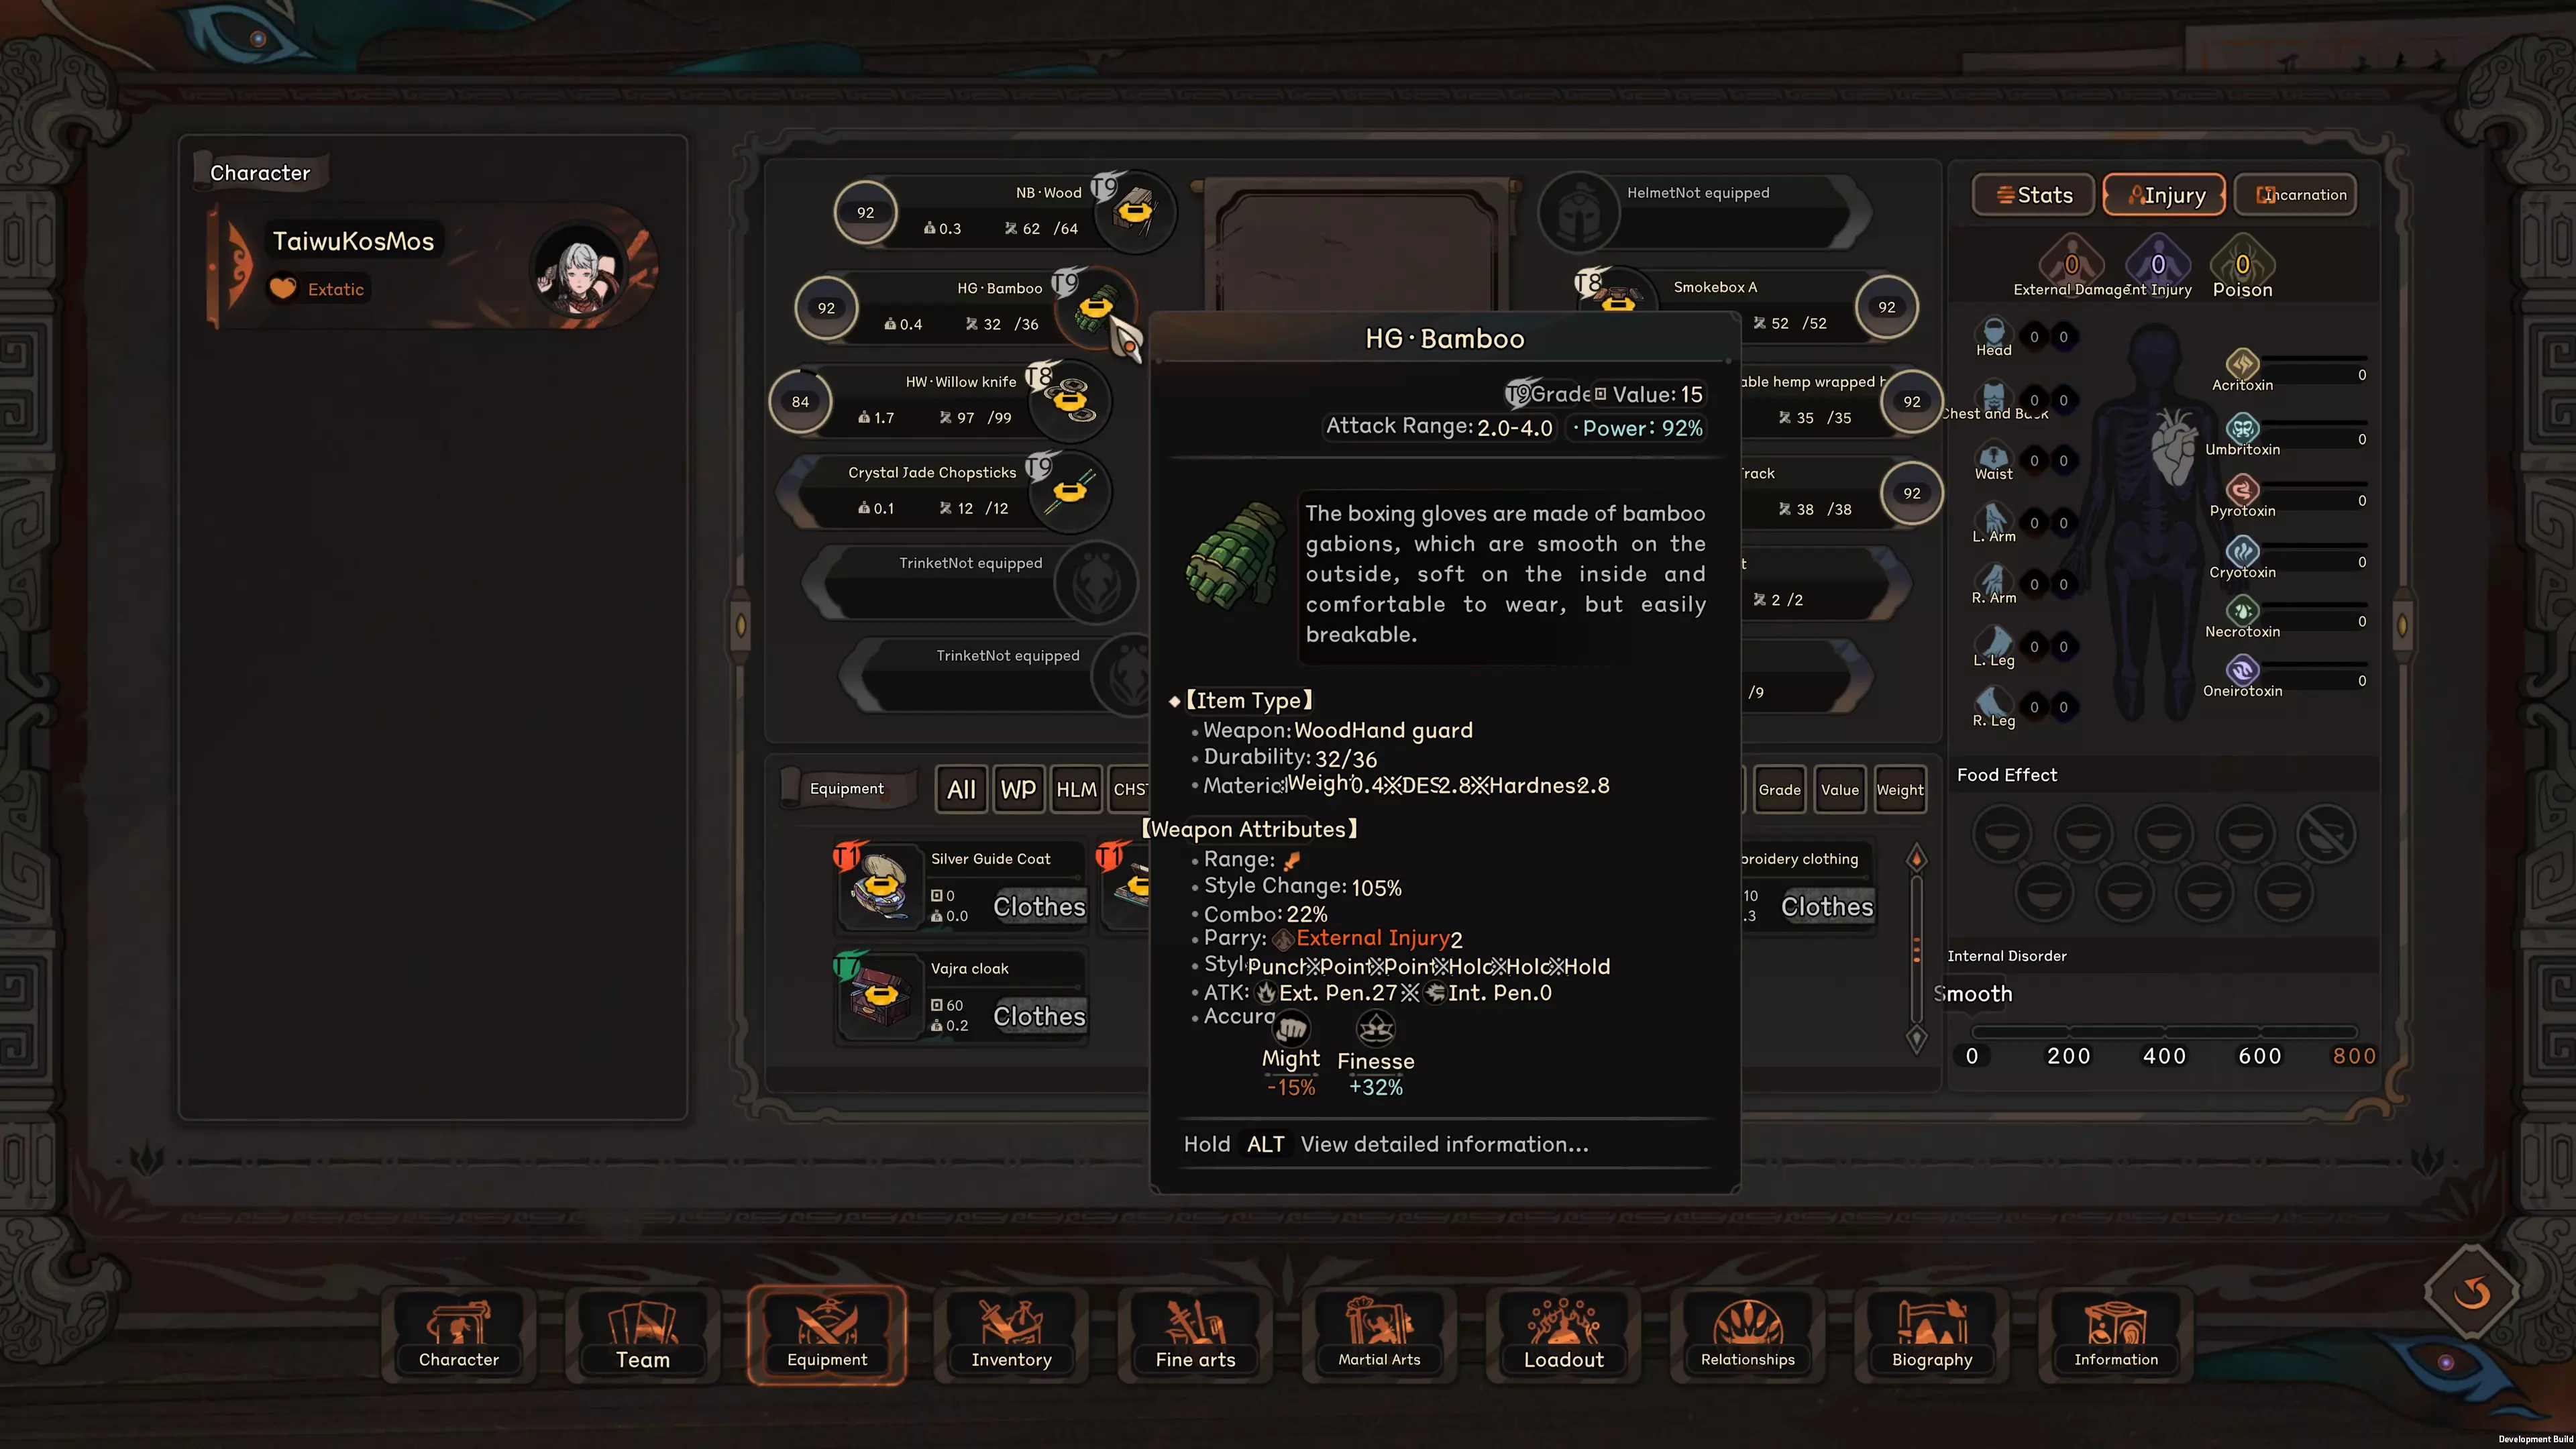
下面我将解释一些未被清晰说明的武器属性。 首先,护甲只有在其覆盖的身体部位被击中时才会生效,武器效果也只有在使用该武器攻击时才会生效。 DES与硬度: 武器具有DES,可理解为【护甲穿透】。如果武器的DES大于护甲的硬度,该护甲的效果将会降低。被高DES武器击中也更有可能损坏护甲的耐久度。 更重要的是,大多数护甲都有降低所受伤害数值的属性。这是一种强大的效果,因为如果你的攻击属性原本能让一次命中造成比如2个额外伤害 defeat markers,那么能减少2点额外伤害的护甲会完全抵消该伤害,让使用者避免长期损伤。当武器的DES高于护甲的硬度时,会无视护甲的伤害减免效果(但不会完全无视护甲提供的防御属性)。 同样,如果护甲的DES(硬度)高于武器的硬度,会降低该武器的效果,并且武器击中护甲时会损失更多耐久度。 除了重量限制和部分技能外,重量本身似乎不会影响战斗。不过超重会使你减速。风格变化与连击 如前文战斗部分所述,普通攻击可积累风格变化充能并可能衔接连击,据我所知,这两者完全由所用武器的风格变化与连击属性决定(不过部分技能会进一步修改这些属性)。 格挡 本指南前文已解释过格挡机制,额外补充一点:若能调整武器的伤害比例,武器可格挡的伤害量也会相应变化。例如,某手套可格挡2点外部伤害,若将其伤害比例调整为内部伤害与外部伤害各50%,则格挡量也会相应调整为1点外部伤害和1点内部伤害。我不太确定这是否是预期效果,所以开发者未来可能会进行修复。 其他武器属性应该都比较容易理解,但如果有任何问题,请告诉我。 毒素 【毒素】

在《太吾绘卷》中,每个角色对状态窗口【伤势】标签下所列的6种毒均拥有抗性。将鼠标悬停在毒的类型上,即可查看该角色对特定类型毒的抗性。 毒抗性受多种因素影响,包括装备、技能以及内力分配。通常,毒抗性的主要来源是内力分配,每点内力能提供多少抗性取决于角色的属性。一般而言,如果不依靠装备和技能来弥补,角色至少会对一两种毒存在弱点(也有少数角色和 Boss 可能对某些甚至所有毒免疫)。当角色体内的毒素超过其对应类型的毒素抗性时,该角色开始受到中毒效果影响。此时,若角色处于战斗状态,还会获得一个对应类型的中毒标记。当毒素达到毒素抗性的200%时,效果会更加严重,同时生成第二个标记。当毒素超过角色毒素抗性的300%时,生成第三个标记,且毒素继续增加将不再使效果恶化。 施加毒素 毒素通常通过两种方式施加。一些攻击性技能,尤其是来自五仙教、百花谷等门派的技能,会对目标施加一定量的毒素。若以超过100%的威力释放技能,会施加更多毒素,反之则施加较少。或者,你可以选择一种毒药,然后使用毒药工坊建筑将所选毒药涂抹到武器或防具上。之后,每当武器命中敌人,或敌人攻击涂抹了毒药的防具部位时,武器或防具上的毒药剂量就会生效。这些毒药不会耗尽,你可以在攻击时不断叠加。 部分武器天生带有毒性,其中最典型的是毒粉武器。 需要注意的重要一点是,除了会施加固定剂量的毒药外,毒药还分为三个等级。(目前似乎尚未确定官方中文译名,因此这里将从弱到强的三个等级暂称为原始、强效和异域。)原始毒素无论如何都无法使毒素效果超过毒素抗性的199%。因此,如果敌人拥有100点冰毒素抗性,使用涂有40点原始冰毒素的武器攻击他们3次会使他们中毒并施加一个击败标记,但总共攻击5次只会使敌人身上的毒素上限达到199。所以,如果你想将毒素效果提升到下一级或更高,除非你此时使用能造成至少1点【强效】或【异域】冰毒素的武器/技能攻击他们。 强效毒素同样有上限,为毒素抗性的299%,而异域毒素的上限为32000,这个数值通常足以对任何你遇到的目标施加所有3个毒素标记。 毒素效果
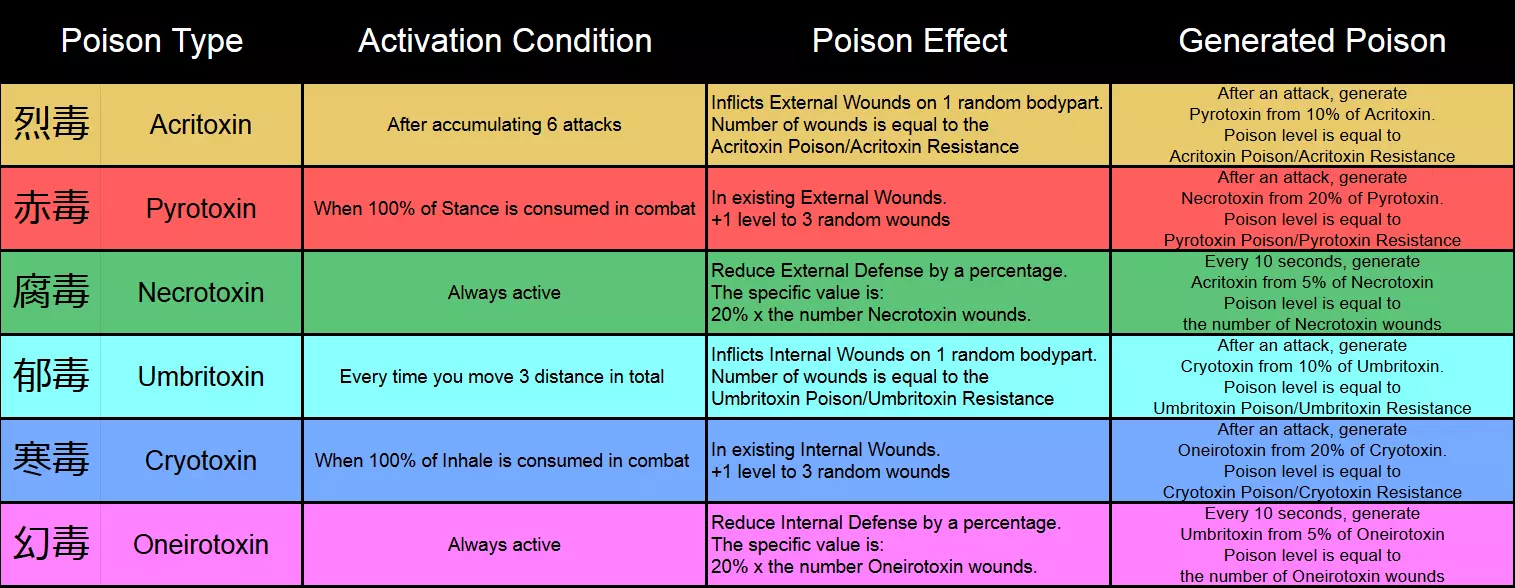
(非常感谢太吾绘卷Discord上的Liwei提供此图表) 当目标身上至少有1个中毒状态标记时,上述效果将根据中毒类型开始触发。每种毒素都有一个激活条件,当条件满足时,会施加毒素效果,同时将部分现有毒素转化为另一种类型的毒素。 对于大多数毒素类型,当效果超过200%和300%阈值时,毒素效果会变得更强。 如果使用得当,毒素对于那些对特定类型毒素敏感的敌人来说是非常强大的工具,并且如果你能坚持足够长的时间让毒素生效并发挥作用,它可以成为战胜强大得多的对手的一种方法。 内力分配
The main way a character gains strength in Taiwu is allocating int energy gained from running inner skill to various True Qi, which increase various basic and secondary stats described in the beginning of this article. Elemental Effect on True Qi The effect of these True Qi points are rather self explanatory, so you can look at them yourself, but what isn't obvious is that your element also affect the effect of each true Qi Point. It is obvious that break Qi points give offensive stats, but as you can see from the screen shot above, this character is gaining more Force than Finess, more ext atk than int atk. This is because the character's element is Metal, which cause each true Qi point invested to give more stats related to phyiscal damage and force, less for internal attacks. The general focus of each element is as follows: Metal : Best Force, ext attack and Stance Recovery, decent attack speed as well. Very bad int attack, finesse and quickness. Wood: Best Quickness and int ratio bonus, making them flexible, but overall stat leans twoard int attack. Water: Best breath, move speed, and leans heavily into internal attack/def with very bad physical attack/def stats. Fire: Balanced Stat across the board. Earth: Best Finesse and Equipment efficency, leans towards ext attack but otherwise pretty balanced. Mix of element will result in a mix of these stats. For example, mixing Metal and Earth results in the highest ext attack but also the worst int attack, mixing metal and water instead results in slightly more balanced stat between ext and int attack compared to pure metal or pure water( but still leaning towards the more dominant element of the two) Gaining and Losing Qi in Combat There are a lot of skill that cause player or enemy to gain/lose/siphon True Qi in combat, if True Qi changes from their basement for any reason, they will fairly rapidly return to their base level, the speed this happens depend on the character's internal breath stats. High int breath slows down the speed in which you lose bonus True Qi, and increase the speed you recover any lost Qi. As is, I think the system can use some further balance, most small amount of Qi gain from skills will quickly return to normal and is thus almost useless, only skills that continous gain/destroy true Qi or skills that gives a massive amount at once sees a significant impact in game right now. More Advanced Stuff So up to this point this guide has been explaining the how the mechanics function, here I will also give some more in depth detail that I felt might be a bit too detailed for a basic guide and tips to help those who want to min-max a bit more. How Much Accuracy do I need? Currently, if your Accuracy stat is greater than the Corresponding Resolve stat of the opponent (note the base stat in character window does not account for modifiers such as weapon, armor or debuff from weakpoint on target body part, etc...), the attack will hit. Otherwise there is a progressively greater chance to miss. As a result, you should aim to have your raw accuracy stat to be at least around the same level as your enemy, considering various buff from armors and abilities, having your base accuracy at around 70-80% of the enemies will cause to begin struggling with landing hits. More importantly, sub-par accuracy also severely limits the damage any attack you do land. If your accuracy in one area is far outclassed by your opponent's corresponding resolve stat, consider avoiding attacks based on that accuracy stat all together by using style change or weapon that focus on the accuracy stat that gives you the biggest advantage against your current opponent. How to get damaging attacks? To expand a bit on the damage system in taiwu, each hit in taiwu has a hit strength score determined by a variety of factors, if the strength is high enough to meet the threshold required by a type of defeat marker, that defeat marker will be inflicted. For example the threshold to inflict a weak point marker is very very low, which is why you will find it possible to land plenty of weak point marker on a enemy but never getting an injury. Accuracy in taiwu has the additional effect of determining the hit strength of the attack as well, think of this as a more skilled attacker is not only able to land blows, but more precise and thus damaging blows as well. But the other half of the equation is that attack need to have enough power behind it to pierce whatever qi/armor defense of the defender, which is where the ext/int atk/def stat comes in. Hit strength is determined by both accuracy stat and atk/def stats, currently calculated multiplicatively, so to have effective attacks, you need to have a balance of accuracy and atk stats to cause lasting damage. If you have massive accuracy advantage over the enemy, but poor penetration, it is likely that your hit will still struggle to leave a mark. Thus while you want both more accuracy than the enemy's resolve and more atk than the enemy's defence, increasing the area where you are lagging behind, whether it be through skills, equipment, or food/potions will give you more return in damage effectiveness. Lastly, many armor and some skills reduce the damage of taken by a certain level. This means that if the enemy wears a armor that has -2 ext injury, if your attack would've caused 2 level of ext injury but hit the armor, it simply causes weak points. This is a common reason why in evenly matched fights basic attack ends up taking no damage. Therefore it is very important to consider ways to work around these damage reduction, a good choice is using, or at least carrying a weapon with high DES stats, since that can negate damage reduction provided by armor, which is one of the most common source of damage reduction. Advantage and Disadvantage of Break Skills vs Basic Attack Attacking with skills works very similar to base attacks, they just give the attack a further boost to both accuracy and attack stats, each attack skill will play out as a combo where each accuracy stat of the skill is compared to the corresponding resolve of the enemy (in most case all 3 accuracy stat will be used, but some skill don't use all 3), with the hit strength of the final hit reduced if one or more of the accuracy check fails. Note unlike normal attack, if your accuracy in a break skill attack is lower than the enemy's resolve, that part will miss, instead of only having a chance to miss. Another thing to note is that break skill hits only one body part, since each body part can only take 6 ext injuries and 6 int injuries at most, it is not efficient to use break skills if your normal attack can cause good damage already, since those give you more chance to hit multiple body part. Ofcourse, if your attack is very very strong, damage to a body part with 6 injuries already can overflow into heavy injury marker that isnt isolated to a body part, but those marker have a high required damage threshold, so maybe an attack that can put 5 injury marker on a unharmed body part can only do 2-3 heavy injury marker when it hit an already crippled location. Therefore, if we don't count the break skill's special effect (granted, some of these effects are huge), the mean reason you'd use them to deal damage is in situations where your basic attack just don't have quite enough oomph to cause lasting injuries. Sound/Mental Attacks Strength of these attack depends entirely on the comparison between you and the attacker's breath/focus, and almost no armor/skill modifies them in anyway, so as long as your Breath > the enemy's Focus you can expect good damage to be done with sound attacks, and since each dazed defeat marker further reduce your Focus, this can quickly snowball. I expect to see this getting some what balanced as newer patches come out, but at the moment it is probably one of the strongest form of attack if you can put in the investment. Buff items Do not underestimate the effect of buff items, especially wine/tea which provide a substantial boost to your stats. You can easily get 200-300 stats if you use med-high tier tea and alcohol before a fight, which can translate to a 30-40% stat increase for a mid-game character, given accuracy and attack stat has a multiplicative effect on hit strength, you can see this can translate a very significant improvement in damage dealt. Counter Attack and Reflection Currently, the effectiveness of a defensive skill that cause damage reflection is based on the final hit strength of the attack hitting you, after calculating your resolve and def stats (but ignoring the buff provided by the reflection skill itself), meaning if you are tanky, your reflection is actually less effective. However, note that reflection damage will circumvent almost all form of damage reduction effects, so if your enemy relies on damage reduction it may still be a better choice than counter attack. On the otherhand, counterattack is based on a standard attack from your character, with its hit strength multiplied based on the counter attack skill, this means while counterattack remains effective if you are very tanky, it can sometime be a win-more skill since it usually only trigger when you resolve an enemy's attack, and the buffed counterattack itself will still have trouble hurting the enemy if you are far outclassed. Worth noting counterattack also circumvent most damage reduction, but NOT damage reduction from armor, which is one of the most common type of damage reduction. Overall between the two I will say Reflection tends to be more effective, but in many cases and especially with high tier defensive skills you are really there for the additional effects, some of which are absolutely bonkers powerful, like resetting damage you've taken at the end of the skill, quickly regenerate all wounds, etc.... Closing Well, that was quite a handful to take in, but hopefully this helps explain some of the mechanics behind the combat of taiwu, and I will probably spend some more time to provide a bit more detail on weapon stats, poison, and character assistance when time permits. In the meantime, please let me know if there are any questions or issues :) Thanks to Gurukof and Kasper over at taiwu discord for providing me with the en mod images used here and Liwei for the very nicely made Poison effect chart~