换一换
换一换 


《石质碎片》通用指南、技巧和窍门:助你掌握击败游戏所需的一切知识。大部分通用技巧、地下城攻略和战斗方法在装备III版本中仍然适用。 概述 大家好!我是newbie94p1!你们可能因为我击杀“硬币巨魔”的视频认识我,也可能不认识。在Discord上,有些人可能知道我叫Heistsenbee Al’qud Baker。无论如何,这是我为《石质碎片》玩家准备的指南,包含一些我认为有帮助的技巧和窍门。本指南最初撰写时,《石质碎片》尚处于测试版0.6.1.10补丁阶段。我会随着时间推移,以及当我发现或想到新内容时更新本指南。如果你对我所写的内容有任何问题、更正或补充,欢迎联系我。(任何你认为有帮助的建议都将不胜感激) 本指南将涵盖我认为对所有《石质碎片》新老玩家都有用的大部分基础知识、技巧和窍门。本指南假设你以正常方式玩游戏,不涉及为了附魔或战利品而反复读档。这里的技巧和窍门适用于任何build/职业/技能树。
特别感谢我在Discord上的朋友们:Poisoneye、SamBoha、Cake、SimplyJeef、Moomer以及其他许多朋友。你们的贡献让这份指南得以完善。爱你们。 自0.7.0.22版本更新后,游戏难度大幅提升。此处列出的技巧仍然适用,但在地下城探索时你需要更加小心。 更新日志 15/08/2022 - 对战斗相关技巧部分进行了一些更新。由于每个部分的字符限制,战斗相关技巧已分为第一部分和第二部分。 - 一些 minor 格式调整。 06/08/2022 “遗忘传说”更新中,大多数关于战斗和地下城探索的通用技巧应该仍然有效。不过,一旦我更熟悉新机制,我会尝试更新更多技巧。- 新增提示已添加至【游戏体验优化】板块和【地牢提示】板块 - 【远古巨魔】板块现已更名为【可选首领】板块,因为游戏中现在新增了另一个小型首领。我将尽快更新相关提示 2022年6月4日 【有用NPC/小型任务/训练师】列表已更新。不知怎么回事我之前把这些给忘了,抱歉各位 2022年4月2日 【兴趣点】板块已更新。抱歉拖了这么久,之前身体不太舒服。未来我会尝试为每种武器类型添加【build】板块 我还新增了一个板块,用于收集我发现的各种【build】和指南,我认为这些内容很有趣或值得存档 2021年12月28日 Steam不知为何将我的文档链接标记为潜在恶意链接。如果问题未能尽快解决,我会将文档中的所有内容迁移到这里,但这需要一点时间别指望我能等Steam解决这个问题了。我会开始把东西转移到这里。 2021年12月29日 我的大部分指南现在都在下面。该死的骗子和钓鱼者:( 2021年12月16日-安息吧“蜜蜂之路”,很可能不再可行了。
08/12/2021- Added a new section: ''How to build your character''. This section includes the basics on how to build a character with any weapon/skills/spell choice in mind. This includes stat distribution, gears, skill choice. 04/12/2021- Added more tips + video examples to deal with Necromancers in ''Combat related tips'' section. 28/11/2021: - Added staff troll kill guide video from poisoneye to ''Ancient Troll tips'' section. - Added videos/tips on how to deal with necromancer at early levels in ''Combat related tips'' section. 27/11/2021: - Added another easy way to kill the troll 22/11/2021: Sections updated for City of Gold Patch.- General tips and QoL stuff. - Combat related tips. - Dungeon related tips. - Drugs/traps usage tips - Ancient Troll tips. 18/11/2021: The guide is outdated for City of Gold Patch. I will update it as soon as the bugs are ironed out more and I get a few playthroughs in. General and QoL tips - 1 - Your enjoyment comes first. Put the game down if you aren't enjoying yourself. Stoneshard can be a very frustrating game to play. You WILL DIE ALOT. Sometimes due to elements outside of your control. Put the game down if you feel like you are running into a corner. A frustrated mind leads to bad decisions which can only leads to more death and more frustrations. - Familiarize yourself with the controls: Before you do anything, check the control options to see what you can do and what key bindings there are. Change them to whatever fits you the most. The game allows you to interact with the environment and move with your mouse. However the situations might come where you want to move but accidentally click on and pick up loot on the ground instead. This CAN and WILL KILL YOU!! So if you want to move around during combat, I highly suggest using the keyboard for precise movement. - What build should I go for? The easiest skill path to pick up when you are new to the game is Pyromancy. It has decent range, good damage and will teach you how to kite enemies. Hardest will be geomancy since it has a slow ramp up and requires a decent amount of understanding of the game’s mechanics in order to pilot effectively. The weapon trees are relatively balanced and easy to grasp. - Always make sure your character is not in rest mode when you have to AFK: Stoneshard is a turn based game. However, during rest mode the game will automatically skip turns and move time forward till you either die of hunger/thirst or some enemy walks into your vicinity. If you happen to need to afk at some point, MAKE SURE YOU ARE NOT IN REST MODE. You don’t want a stupid death while starving in fetal position. - Rest often, but find a safe space to do it. In stoneshard you are always in a combat state. When you rest, your vision will become narrowed to only 2-3 tiles around you. Make sure you aren’t followed by anything and rest to recover your injuries. In dungeons, this can be a room that you’ve already cleared. Lock the doors and hug your knees. Resting often will help save you supplies in the long run. - Pay attention to where you are going. Stoneshard will path the nearest way for your character to go to the point you click. This will not avoid potential dangers on the way. So don’t take your mind away when you are walking. - Swimming in deep water takes energy. If you run out, you WILL LOSE HP EVERY TURN AND WILL DROWN. - You can refill your water-skin at a well or river. You can pour water from your water-skin over yourself when you are on fire to put it out. - You can now fill most type of containers (bottles, buckets, cups) with water. You can then use them like you use a waterskin. - Save often. You can do this at the inn or at beds in bandit camps POIs. - Right click on NPCs and select swap if you find yourself stuck between/behind them. - Prioritize your survival at all costs. This ‘’tip’’ might sound redundant but honestly can’t be stressed enough. As long as you are alive and well you can grind back the exp/gold that you have missed. If you run out of medical supplies, it is generally wise to back off to town instead of exploring the dungeon. If you don’t think you can take on 3 or 4 dudes then running might be the wiser option. One unlucky dice roll or maybe an injury untreated because you don't have a splint for it can ruin your day very fast. - Always plan for a way out. Stoneshard is a turn-based game. This means you have time to look at the situation at hand and plan your moves. If you are out in the open and ambushed, look for the best direction to run and fight towards that. If you are in a dungeon, pull the fight near the dungeon entrance if possible. - Zone swap is your friend. If you found yourself being chased by bandits or animals, consider swapping to a new zone to rest up + run or move to a new position to engage. THIS WILL ONLY WORK IF YOU ARE AT LEAST 6 TILES AWAY FROM YOUR NEAREST AGGRESSOR. If they are within that range of you then THEY WILL FOLLOW YOU TO THE NEXT ZONE. - Don’t make noise unless you want to fight something. Game has a noise mechanic which can pull enemies from the nearby area (this can mean around the zone if you are in the open, or the next room if you are in a dungeon). Noise you can make includes: fighting or shouting. DO NOT do those in a dungeon/where you meet hostiles UNLESS you want to fight and are sure you can deal with whatever is coming. - Points of interest are great to do but not necessary. These question marks points on the maps often contain bandit camps or some other interesting stuff. These can give you exp and sometimes okay loots if you are lucky. I will talk more about them in a section down below. - Don’t just click to move your character across the zones. Move a few tiles at a time. Take a look around you and listen to audio cues. This is a mistake I often see players make. They will just walk across the zones without a care in the world and often walk into bears/wolves, etc. Walk slowly and pay attention to your surroundings. Aggressive animals have a range which they won’t pursue you as long as you stay out of it. Wolves/boars’ are about 7 - 10 tiles. Bears/bisons’ are a bit shorter at about 5 - 6. - Always keep at least 1 splint and 1 or 2 bandages on you. Nuff said. Sometimes injuries will be so severe that hugging your knees alone just won’t do. Sometimes the bleeding just won’t stop. Sometimes you will step on a trap. - Press Alt when near rivers to see leeches. If you have energy you can swim out and grab them. This is a basically free method to get medicine. Leeches can heal your body parts after a period of time. - Traps are great. With the introduction of the trapper and drugs into the game, you can now buy them for a price. The trapper will move between Mannshire and Osbrook every few days. He will always sit in front of the inn and sell traps/nets/caltrops/drugs etc. I personally would recommend you take a claw trap if you can afford it before you venture into any dungeon. They deal massive damage, can cause injuries and immobilization. This can help you to either pump enemies full of arrows or run if you choose to. I will have a section below on how to use these. You can now buy them at Osbrook blacksmith (as of patch 0.7.0.23) - Fleaworts and berries are plenty. Use them. Not much to say about this one. Berries are everywhere. They replenish both thirst and hunger. They can definitely help you save on food money. Fleaworts can heal your injuries and boost your health restoration. - For now items left on the ground will not despawn so you can just throw items around if you run out of storage space. -If you find yourself out of food in the wilds and have no skinning, hunt small birds by throwing objects at them. Most birds will go down from one hit from objects like iron ingots, daggers, bottles, etc. These birds can then be plucked without any skills needed and will often leave meat morsels or tender meat. You can make a campfire by gathering 4 sticks and use the campfire skill unlocked by default for every character. General and QoL tips - 2 - Keep your morale and sanity high. High morale and sanity increases your chances of getting positive mental effects like prudence or second wind. These effects, especially the latter, can save you from life or death situations. Check the Stoneshard wiki for a full list of what can increase your sanity. Morale most of the time can be increased through just sleeping or drinking ale/wine/eating some food. More methods of increasing morale and sanity include praying and eating Mindwort plants. - Treat your body parts. It’s always better to have your body part condition at 100% before taking any more fights. This means you will always be at maximum HP possible at the start of fights. You don’t want to be injured mid battle because one of your body parts was damaged but not to the point of getting an injury before. Healing salves and leeches are the best method to do this. They are sold at the herbalist who lives in a hut south of the Osbrook marke, the priest in the big church in Mannshire and the merchant in Mint Square at Brynn. - Treat your pain. Pain will increase the damage you take. Ideally if you can keep your pain under 10% would be the best. The first pain threshold starts at 25% at which you will take 10% more damage. Just because you aren’t at this threshold yet doesn’t mean you shouldn’t treat your pain. If you are at between 10% and 20% pain, you can easily reach the first threshold with just 1 or 2 bad hits. You wouldn’t want to waste a turn or two treating pain in the middle of a brawl. Common effective pain killers are alcohol or herbal extract. For pain of 50% or more I would recommend just using ether inhaler or soporific sponge. The latter needs a safe space for you to sleep but works really well without much of a downside. The sponge/herbal extract can be bought at herbalists and the inhaler at the priest in Mannshire. If you are in the middle of the forest, then Fly Agaric is an easy to find solution to pain. Just look on the ground for a bit and you will find a bunch of them. - Spending turns next to a campfire will take away your wet status. Each turn spent next to a campfire will take away 4 turns of wetness duration. You can make a campfire by gathering 4 sticks and use the make campfire skill in Survival tree. This skill is unlocked by default for every character. -The survival tree is pretty good. Use it. It has many passives that massively increase your survivability against the elements. Points in this tree can help you hunt/save money on medicines/bedrolls. Overall a really good tree to drop one or two points in. Would recommend. - Keep track of your equipment's durability. If you do repairs after every dungeon it will save you a lot of money in the long run since repairing heavily damaged items can cost a ton later in the game. Make a habit of repairing everything every time you go sell your items after a dungeon completion. - Bring 2 or so water-skin on you at all times. Fighting/using skills and spells now (as of patch 0.7.0.22) makes you thirstier. Also a backup water-skin to douse yourself with in the event you stepped on a fire trap. - Use trees/rocks and objects to your advantage. Due to the fact that in Stoneshard people can’t move diagonally around corners, you should use this to your advantage when being chased. Run into the woods, zig zags around trees, rocks, etc. This can create distance between you and enemy AI giving you time to run. - Have a crowbar on you. This can be used to unlock doors/chests with 100% success rates. They can be repaired at blacksmith for a cheap price. They can be equipped in your 2nd loadout and used to smash things without having to worry about durability lost. - Keep the potions but don’t drink them unless you have to. Sometimes you will find bottles on shelves with unknown effects. These are potions which can be harmful or awesome depending on your luck. You can identify them with identification scrolls bought at general merchants or the mannshire priest. - You can throw harmful potions at enemies - Throw oils on harpies will make them unable to fly. Oils/alcohol on enemies will make them take more fire damage. - Avoid roads if you don't want to fight ambushes. On the other hand, stay on roads if you want exp. The chances of you meeting ambushes by bandits increases when you walk on roads. These ambushes will scale to your player level. They can be a good source of exp or a deathtrap if you don’t know what you are doing. - Don’t stick to common fantasy RPG tropes when gearing up. Stoneshard armors and gears don't require stats to equip. You can pretty much equip whatever you like on whatever character you like. Just because you are an archer doesn’t mean you cannot wear heavy gear. The difference between gears are just appearances and stat bonuses/penalties. Look at the gears and equip accordingly to what you need. Do be careful since heavy armors can have nasty energy penalties so level up your VIT or enchant them with energy accordingly. - Merchants have certain likes and dislikes when it comes to buying goods from players. Talking to them or just using general common sense will work. Metal stuff sells for more at blacksmiths, wooden stuff at carpenters, jewelry to pawnbrokers, etc. Unidentified items cannot be sold to normal vendors - Talk to NPCs to get rumors about Points of Interests (POIs) on the map. Combat related tips - 1 - Read what your skills do. REMEMBER THEM. Skills in stoneshard sometimes will apply additional effects or have additional effects depending on the condition. Some skill combinations are meant to be used in certain order (e.g. Nail down => Impaling Lunge, etc. .). Some skills will be better used when in certain positions relative to terrain. (e.g. skills with knock-back will have better effects if your targets have their backs against walls/objects). Remember what your skills do, figure out what the ideal skill rotation is will increase your combat efficiency by a lot. - Don’t try to fight 1 v many. Encounters in Stoneshard ARE deadly. Since the game is turn based, having many enemies hitting you will mean you take tons of damage per turn and can only hit back once. Find terrains to fight so that there’s only at most 2 guys hitting you at a time, 1 is ideal. A 1v1 fight will always be easiest. If you don’t think you can create this situation, RUN till you can. Or test your luck :P I can’t force you. -The above tip might not be correct 100% of the time. Sometimes some build requires you to be in the middle of multiple enemies for maximum benefit. EXPERIMENT AND USE YOUR JUDGMENT. If you aren't exactly sure then you can just follow the above tip. - Never fight enemies where you find them. This means let them chase you to a better area further than the point of contact. If you do this properly you will very rarely run into a situation where you pull multiple mob groups at once which can easily mean your doom. - INSPECT ENEMIES ALWAYS. You can right click enemies and select inspect to see its statuses. This will show you the enemies’ HP, Energy and armor values as well as their resistances + their skills. Information is king. - DO NOT FIGHT WHERE YOU HAVE WALLS/OBJECTS ON YOUR BACK. In Stoneshard if you are knocked back into a wall/object you will be dazed and take massive damage. The same thing also applies to your enemies so if you have knockback in your skill set then lure enemies to where you can knock them into objects and walls to enjoy your free daze and damage. - If you are playing melee, consider getting a crossbow and Take Aim skill. A hunting crossbow should be affordable after the first dungeon or a few POIs. Take aim is in the Ranged Weapon tree. The trapper help you unlock tier 1 of this tree for 250 gold. The crossbow has range and with take aim you would have decent accuracy to hit at least one or two shots before they reach you in melee. Do consider putting points into PRC till you have 15 for 1 extra vision, accuracy and shooting range. -If you are playing mages, you can pick up Seal of Finesse then start DW mace to melee people till you unlock tier 2 spells. Max stacks Seal of Finesse can reduce your fumble by 20%, will be fully stacked by the time you reach melee range of enemies and will negate a lot fumble penalties of DW. Peasant flails is a common drop, is cheap to maintain and a DW hit will out damage all tier 1 spells. Shoot spells until people are in melee then just fight them in melee. Most enemies before level 5 won't be a threat and the faster you kill people the better. - If you see dogs with mancatchers, MOVE, don’t fight them there. The dog bark can pull stuff from all around the cell towards your position. This can become a tide of enemies really quickly. If you see the dog bark, pull the fight away from that position, preferably to the nearest zone exit. - The utility trees are great. Use them. The utility trees Athletics and Combat Mastery are great to compliment melee combat. Do consider taking points in them if you find yourself having extra skill points but haven’t unlocked higher tier weapon skills yet. - If you are netted, just skip your turn. This will reduce the duration of the net. The higher your STR is, the more turns you can shave off being netted by skipping turns. - Throw bottles of oils or alcohol at dangerous enemies. If you hit they can get covered in oil/alcohol status which makes them fumble a lot more. An enemy fumbling more can mean the difference between life or death. A fumbled melee skill means half damage and no status effect dealt. This means whatever bleed/stun, etc they can inflict on you turns into nothing. A tough boss battle can become a cakewalk if the bosses just fumbles every attack. - Tips on hunting wolves early on: Approach the wolf pack one tile at a time, ideally so that only 1 of them is in your line of sight. Keep moving closer until the wolf has yellow question marks above its head. This means it is suspicious of you entering its territory. Stand still and skip turns until he turns hostile and starts chasing you. You can now pull him away from the pack and kill him quietly one on one. Rest afterwards and repeat the process till everything dies. This can probably work on bison packs as well though I haven’t really tested it yet. Another way to do this is to throw berries, pine cones, or any small objects at the wolf. This can also pull the wolf away from the pack. - Tips on killing bears early on: Don’t try it unless you meet a bear right next to a village/town. This is a cheese tactic. Pull him into a town, the NPCs there will fight him, you can then pelt him with arrows on the side. Do remember to use take aim cause if you miss and hit a NPC you will immediately become a criminal. - Tips against caster AI: Most caster AI (necromancers is the biggest example) will have one or two debuff spells with either one or two damage spells. Debuff spells often have double the range of damage spells. Stay at debuff range to waste their cds and energy. Inspect them to see their range and cd. They won’t move in unless they can’t see you or they are oom. If you see a necromancer in a room with a few more melee enemies, back off ASAP to pull them out of the room. The minions will follow you but the necro will only follow you to a certain range to cast debuffs/buffs. If you stay at max range you should be safe to deal with the minions. Cutting line of sight with necro can make him either walk up to melee range or even drop his aggro completely. If you are in the dungeons, using a position listed in ‘’Dungeon tips ‘’ section to fight is also recommended as an alternative. Examples: - Ranged fight with level 2 Dirwin. Dirwin has Take Aim, Constant practice and Distracting Shot. - Same fight with the same Dirwin but just melee auto attacks with no melee skills: If you are playing any melee character you would have an easier time since you actually have melee skills to play with. Skills from utility trees that can help are: Seize the Initiative, Mighty Kick or War Cry(not recommended since war cry can pull other stuff from the dungeons). Combat related tips - 2 - Tips against enemies with charge attacks. This includes Bosses/ringleaders who have: Heroic Charge, On Rush, Mutilating Lunge, Dash, Skull Crusher. They will always rush at you with these attacks/skills once they are in range. Use this against them by standing behind traps that you either brought with you or found inside the dungeon. Lure these enemies there and they will yolo into you and thus step on those traps without care. Inspect them to see their dash range. If no traps are present, standing at a corridor corner can help. Sometimes the line of sight of AI means they can’t see you to charge at you. - Tips against enemies with high bleed chance. This includes dagger bandits/Proselyte bosses with Gaping Wound and other dagger skills. Increase your permanent bleed resistance through the use of armors or increase them temporarily before the fight with herbs. Find Nettles/Fleaworts/Horsetails (these are plenty in fields/roadside) and consume one or two of them before the fight. As long as you can pass the bleed check by Gaping wound, you should be in a good position to kill them. Inspect their skills to see their bleed chance in order to chomp down the adequate amount. - Tips against spear enemies. If you have gap-closers like Dash, Mutilating Lunge, etc. then use it on them before they get into their range to do Nail Down/Impaling Lunge combo. High move resistance through boots/enchants/skills will also help. If you can fully block Nail Down then you won’t be immobilized for Impaling Lunge resets. Consider using Raise Shield/block chance increase skills before tanking those hits. How to build your character I will have dedicated build recommendations for each weapons tree in the future if people want it. Right now this section is a baseline of my thought process when I build any character which I think will be helpful for everyone. I believe if you follow this you can build any character you want regardless of weapon/skill/spell choice. I personally believe that the weapons in Stoneshard are relatively balanced. Nothing is weak or not viable, you as a player just need to figure out how. Anyway, below is how to build a character Heisenbee style. Before we get into this, we need to understand what happens when you hit somebody in Stoneshard. Here’s a flowchart of how things work (credits to the devs):
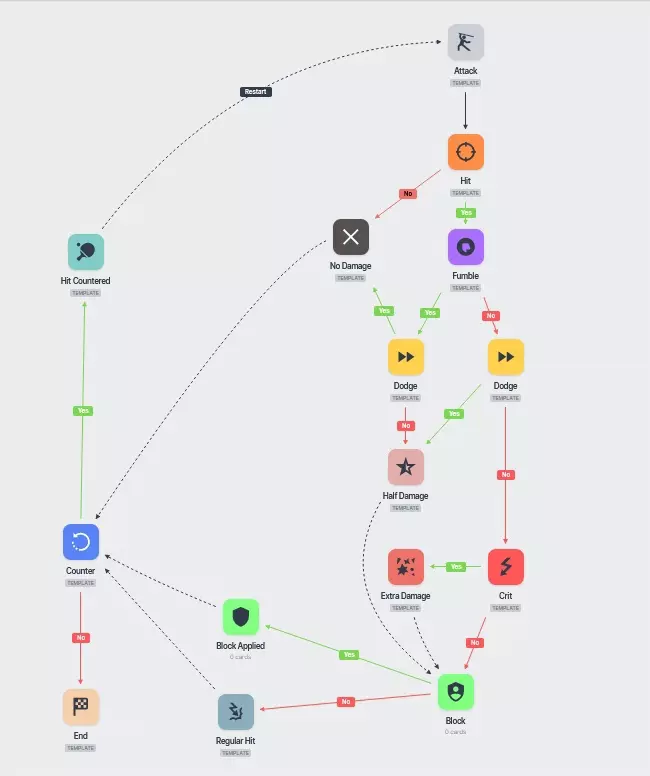
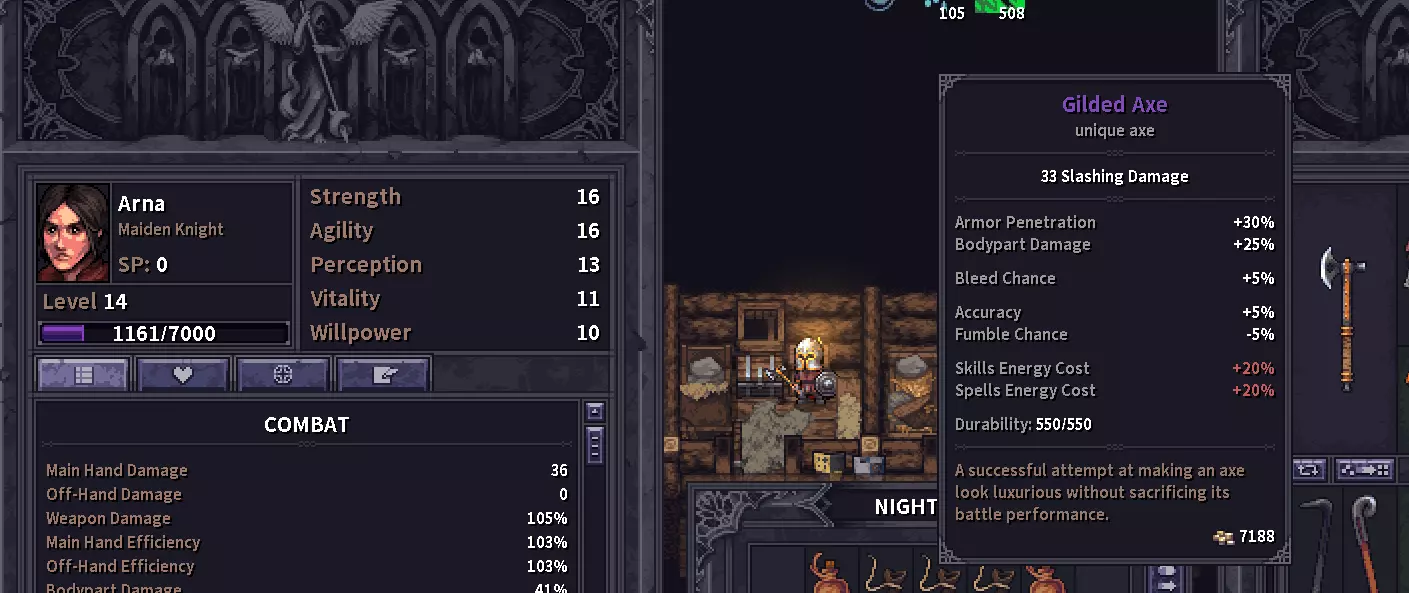
从流程图中可以看出,攻击判定优先进行,其次是失误判定,然后是目标的闪避判定,最后是暴击判定。【范围法术无法被闪避】(据我所知)。这意味着在近战战斗中,提升伤害最重要的属性包括命中率、失误率、暴击率和武器伤害。 这就涉及到近战角色的属性分配问题。现在由于新增了训练师,并且部分商人的库存中移除了技能书,你现在可以通过属性分配来提升更高等级的技能。大多数近战技能需要力量、敏捷或感知的组合才能升级。在这些属性上投入足够的属性点,你就能解锁学习这些技能的能力。对我个人而言,任何近战角色无论选择何种武器,15点力量、15点敏捷和15点感知都是不错的基础属性。但这并非适用于所有Build。你的属性优先级会根据所选武器和技能树而改变。 - 失手攻击会造成一半伤害,且其施加流血、眩晕、击退等效果的几率降为0。如果敌人闪避了失手攻击,那么他将不会受到任何伤害。因此,要尽可能降低你的失手几率。我发现,当挥舞武器时,若失手几率在10%左右,这是一个可接受的数值。当然,理想情况下你会希望失手几率为0%。 - 对于单手武器使用者,如果两个角色都使用基础伤害约为30的武器,那么15力量15敏捷的角色与20力量的角色拥有相同的武器伤害。这是由于单手武器的手部效率机制导致的。如果你单手的手部效率超过100%,也会提升该手的武器伤害。15点敏捷可提供2.5%的手部效率,游戏会将其向上取整为3%。对于基础伤害约为30的武器,由于数字取整,3%的手部效率相当于5%的武器伤害。对于基础伤害低于此数值(接近20)或高于此数值(接近40)的武器,3%和5%武器伤害之间的差异约为1点伤害。(我的阿尔娜主手使用36伤害的武器,副手是33伤害的斧头)
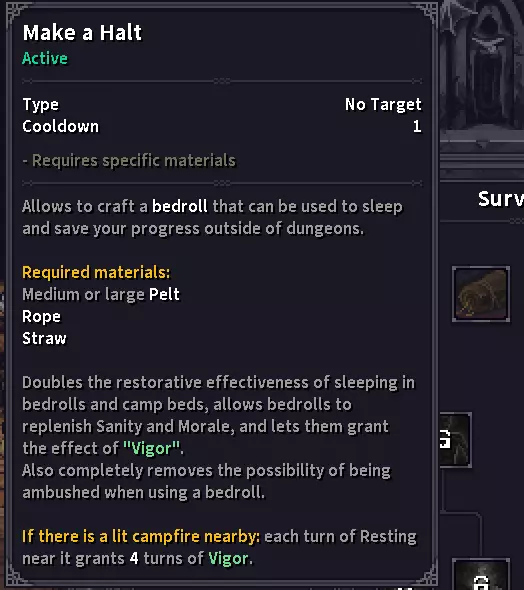
So what does this mean exactly? Character A with 20 STR 10 AGI will deal the same amount of damage (crits not included) as Character B with 15 STR 15 AGI. Character A will crit with a bit more damage than character B (due to 7.5% more crit efficiency). Character B however, will fumble a lot less/counter more/dodge more and thus will be more effective in combat. Char B can also use weapons with high crit chance/crit efficiency with more effectiveness since those weapons also tend to have a lot of fumble chance. This is my personal preference of course, you can obviously reduce your fumble chance through skills and gear. I just think that this distribution is good for the stat it gives while not being hampered too much. - When distributing stat, prioritize what you need for your build. This will often mean putting points in stat to unlock skills. The priority for me when putting stat is: skill unlock -> accuracy -> reduce fumble -> weapon damage. - Understand your stats. This means knowing what each give for each point, what the thresholds will give you. - Understand your weapon. This means read the skills, the whole tree, what they do, what the crit effect of the weapon does. Think about how they interact with each other, imagine what your rotation of skills will be like in combat. This will help a lot in allocating stat points and skill points. - Be flexible when you stat, think about what you want and stat accordingly. Does your character block a lot (shield + swords/2h sword/spears)? Then STR can be your friend. Does your character dodge/counter a lot (daggers/dagger + buckler)? Then agi it is. If you find yourself running oom then VIT it is. The beauty of Stoneshard is the flexibility of character building. Almost everything works (as long as you can unlock skills with correct stats ofc :D) - If you go with the baseline I use, afterwards just put points in whatever you think your character does best. The baseline of stat I said above is just a guideline after all. It gets you the first threshold of those stat while not compromising nor hampering your character in any way. - Perception is underrated stat. More vision is always good. Most mobs/bandits you will meet in the fields only have 10 vision, so even if you have 1 more vision than them will mean you spot them 1 turn sooner giving you a chance to shoot or run or pull them towards a more advantageous position. In dungeons, more PER will mean you can hear people from further behind doors and plan accordingly. And now since PER thresholds give you crit chance, there’s not really a downside to getting to 15 PER. - For ranged characters, just pump PER. For mages, I recommend pump PER till 15 then pump WIL. This is pretty brainless, PER thresholds gives you more vision and more range to your shooting and spells. For mages 1 more range to your spells is pretty powerful so I always recommend getting at least 15 PER. Your spells can also crit so the extra crit chance actually isn't a waste. This isn’t mandatory. Pumping WIL for mages will always be the best choice but there are a few in the trees that can also be unlocked with PER. BE MINDFUL when doing this because it can push your unlock of higher tier spells by a few levels. If you find the utility of range worth it then feel free to do so. - Prioritize the weapon skill of your weapon of choice, then to the utility trees. - Gear up for every part of your body. For the content of City of Gold, you don’t need more than 12 - 15 PROT per body part armor. City of Gold patch reintroduces the armor concept which only protects that body part instead of them stacking to protect your whole body. This means your helmet will only tank hits to your head, your boots protect your legs only, etc. When somebody hits you, they will try to prio whichever part is least protected, unless otherwise stated by the skills they use. You can go heavier than 15 PROT per part. The options are there. But keep in mind that this will be costly to both acquire and maintain. I personally don’t find it necessary for the content of City of Gold. Dungeon related tips. - SPAM EXAMINE SURROUNDINGS: This should be done at least once or twice every time you walk into a dungeon room to spot hidden traps. Spam this skill near walls for a higher chance to spot secret rooms. - You can stand next to a door and use shout to lure enemies out of the room. If they haven't spotted you then you can get a free critical hit which can swing the tide of battle. Do be careful as Shout makes a lot more noise now (as of patch 0.8.0.12) so you can pull some unintended enemies. - Be prepared to bring an abundance of meds. This will include: at least 1 or 2 splints, 3 or so healing salves, at least 1 bandage roll and a few leeches. As you get stronger, you will get hurt less but for early game when things are hard, always come to a dungeon with at least the amount above or more. If you want to do first contract at level 1, more meds than the listed above are necessary. I would recommend using most of your starting money on it if possible. -Have a checklist of what you need to do before a dungeon. Check your equipment, your meds, your food. You don’t want to be caught lacking one of these in the middle of the dungeon. The walk back can be a pain in the ass or even dangerous. - If you find yourself having problems with fatigue when clearing a dungeon, consider taking a point in Make a Halt in Survival tree
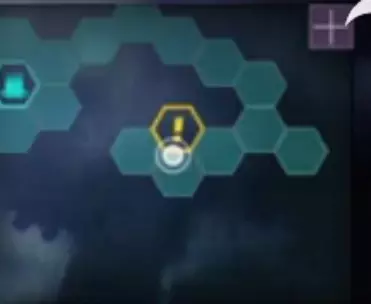
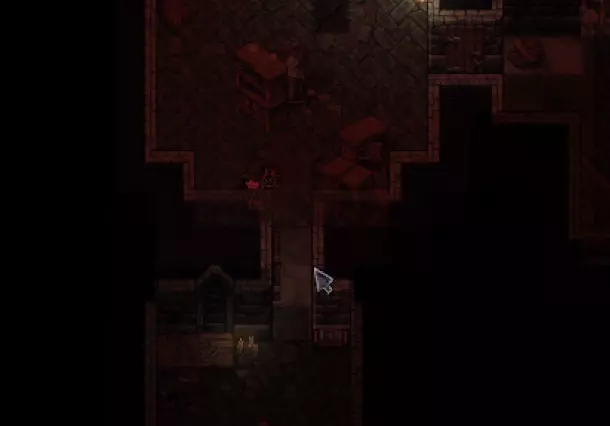
这棵技能树的被动效果会在你站在营火旁行动时为你提供活力 buff(营火可通过你默认拥有的营火技能轻松建造)。活力 buff 能提升你的最大能量、能量恢复速度,最重要的是提供 75% 的疲劳抗性。 - 如果你不想消耗技能点,可以在进入地下城前尽可能长时间睡眠。每睡眠一小时会减少 7% 的疲劳,并给予 120 回合的活力 buff(数值可能在未来补丁中调整)。900 多回合的活力 buff 应该能让你有充足时间清理地下城,而不会受太多疲劳影响。 - 不要在发现敌人的地方战斗。这是由于噪音机制。如果你在一个房间战斗,隔壁房间的敌人很可能已经听到动静并会向你冲来。如果你看到敌人,先吸引其注意力,然后将其引到更有利的位置再战斗。这样可以确保你永远不会陷入无法应对的大规模战斗。不过这个技巧对【地脉术士】不太适用,因为你召唤巨石的瞬间,地牢里的所有敌人都会听到动静。 - 最佳战斗位置是走廊入口的侧面。示例如下:
这个位置能确保你每次只需面对一个敌人,同时隔壁房间的远程敌人无法获得射击你的视野。你的身后没有任何威胁,而敌人身后则有一堵墙。如果你拥有【击退】类技能,比如强力踢击、猛攻、狂风打击等,这个位置将让你有很大机会把敌人击退到墙上,从而造成眩晕和巨额伤害。这种位置或任何类似的布局,在90%的情况下都是近战战斗的最佳选择。 - 如果你发现尖刺陷阱,最好不要去触动它。如果可能的话,把敌人引诱到那里,迫使他们在陷阱上战斗。不过这个技巧并非总能奏效,尤其是当敌人拥有不错的感知属性并已经发现陷阱时。但如果他们不这么做,就会冲进陷阱,并且只要陷阱未被拆除,每回合都会受到伤害。 - 发现陷阱后要记住它们的位置。《石质碎片》不会自动规划路径让你躲避已发现的陷阱,所以要留意。陷阱位置也可以用来引诱敌人。 - 使用爪形陷阱。这个物品自加入游戏以来就非常强力。它有3次使用次数,每次使用造成30点伤害,并且100%几率使踩中者 immobilize(定身)。最棒的是可以在铁匠处修理以获得更多使用次数。可以从坐在奥斯布鲁克或曼恩郡酒馆前的捕兽人那里购买,也可以在奥斯布鲁克的铁匠铺买到。如果没看到他,只需等待几天游戏内时间。在森林中频繁检查周围环境,运气好的话也能找到捕兽夹。向捕兽夹投掷重物(比如武器)来触发它,之后你就可以捡起它并随意使用了。 - 使用烟雾弹来对抗远程施法者或弓箭手。他们无法射击或瞄准看不见的目标。对他们或自己使用烟雾弹,可以为你争取拉近距离的时间。我个人觉得这并非必需,但它确实是一个可用的选择。烟雾弹可以在捕兽者处购买。

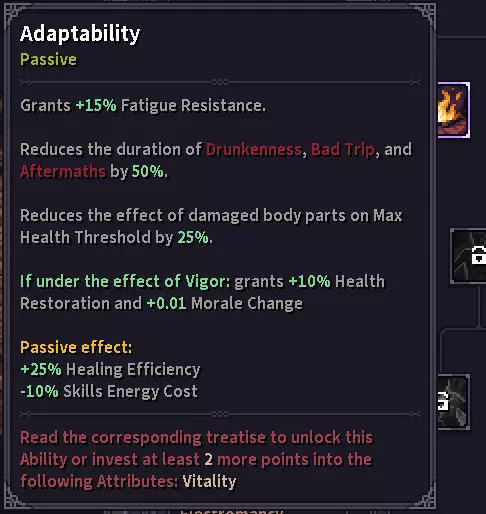
- 利用障碍物阻挡施法者和弓箭手的视线。在地下城场景中,会有许多关闭的门或拐角可用来阻挡弓箭手或施法者的视线。由于敌人的AI设定,它们会试图寻找你的位置并对你发动攻击,这通常意味着它们会走进你的近战范围。 - 施法者AI有时不会进行近战攻击。利用这一点来消耗它们的能量。有时没有近战能力的敌方施法者会站在远处对你施加减益效果,直到没有其他选择。查看它们的技能以了解其攻击范围,这样你就能保持在刚好无法被攻击到的距离。它们会在技能冷却结束后立即施放减益效果,最终耗尽自己的能量。当减益效果消失后,它们就只是普通的近战小怪,不再构成实质威胁。 - 攻击门。如果你使用弓箭角色,可以先用撬棍破坏门,然后在安全距离内对门进行最后一击。这样你就能在保持足够安全距离的同时查看房间内部情况。我个人觉得没必要这么做,但你可以了解一下这种操作方式。 - 强盗地牢有更多食物,骷髅地牢有更多贵重物品,吸血鬼地牢有更多药品。如果你去强盗地牢,通常会获得足够几天食用的食物。 - 打开石棺时要小心,因为里面可能会生成幽灵。确保你状态良好且附近没有敌人,因为与幽灵战斗会非常棘手。 陷阱/药品使用技巧。目前《石质碎片》中有6种药物。大多数药物可以在腐烂柳树酒馆的杂货商/炼金术士处或布林的商人处购买。其中最稀有的是星尘,目前尚未在上述商人处发现出售,只能通过地下城战利品获得。 药物在持续时间结束后会产生不良的后遗症效果,有些甚至可能致命。使用抗毒素或生存技能中的适应能力可以将这些后遗症效果减半。
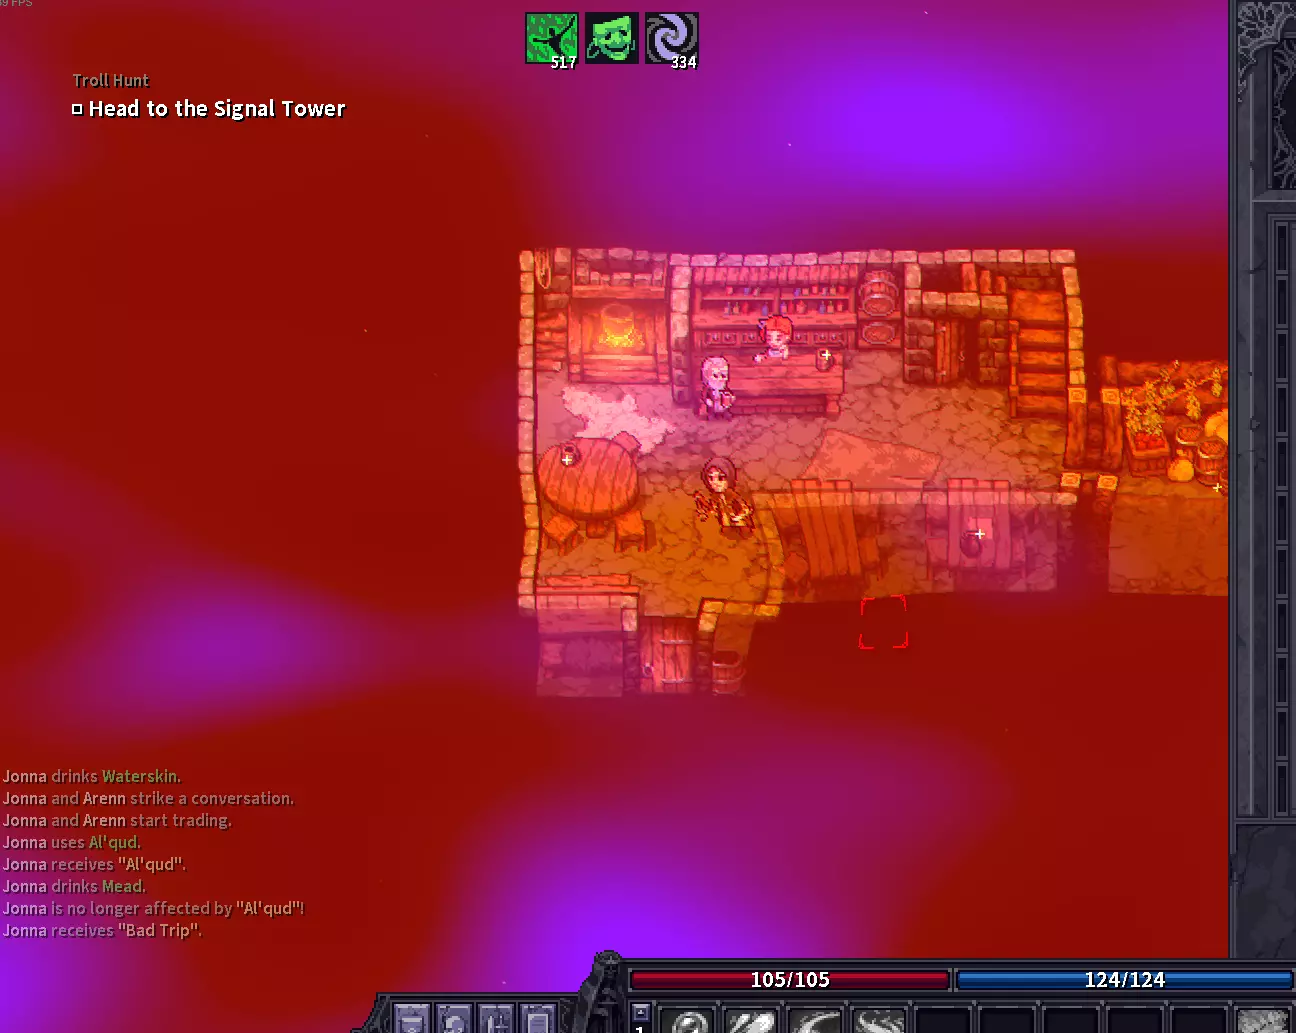
如果你同时使用两种药物,或者使用一种药物后饮酒,将会导致【恶性幻觉】,这可能会非常难受(游戏中你的屏幕也会呈现出相应效果)。恶性幻觉的持续时间只能通过食用【心灵草】来缩短。如果你在使用药物时手边没有解毒剂,请记住这一点,因为主动引发恶性幻觉后食用心灵草可能有机会挽救你的生命。
- 药物使用本身很好理解。根据你的角色需求选择相应的药物即可。我个人认为【阿尔库德】是大多数Build的最佳全能药物,因为更高的能量回复永远不会出错。【黄蜂蜜】可能是任何闪避型角色的必备品,或者如果你只是想提高整体暴击率的话也很有用。 - 【尼卡夫】可用于某些弓箭手/游侠战斗中,让你能从极远的距离观察和射击。 - 投掷网可用于阻止敌人逃跑或冲向你。被网住的人还会受到防御和进攻能力的减益效果。 - 爪形陷阱与远程武器和长矛有很好的协同效果。被固定的目标无法移动,且闪避率降低。我发现如果我躲到敌人视线之外再放置陷阱,他们发现陷阱的几率可能会降低(不确定是否100%有效,也可能只是巧合)。在门和走廊前设置陷阱,大喊一声然后等待敌人从房间里出来走进陷阱,往往能取得惊人的效果。 可选Boss 远古巨魔 远古巨魔是《石质碎片》目前内容中的“最终可选Boss”。当你抵达曼郡且等级至少达到10级后,会从总督处接到击杀他的任务。他位于信号塔内,该地点在地图上未被发现前会显示为一个兴趣点。巨魔乍一看可能很难对付,但就像电子游戏中的所有 Boss 一样,它也有固定的行动模式,你可以利用这一点来取得优势。 通用技巧和/或“巨魔之舞”的常规方法: 每个武器流派都有其独特的技能/移动模式循环来应对巨魔。但总体而言,它们都可以运用以下技巧来规划战斗。 - 巨魔没有借机攻击。这意味着如果你处于近战范围内,跑开是安全的。大多数情况下,它只会跟着你。 - 如果你不确定巨魔接下来要做什么,一定要【观察】它。巨魔的行动总是基于其技能冷却时间以及能量/生命值。因此,要经常观察它,以决定下一步的最佳行动。只要你与巨魔保持在2格范围内,它就永远不会扔石头。如果你不想应对【石头】攻击,就可以待在这个范围内。这样你就无需投入资源去获取像【冲刺】这样非必需的技能了。
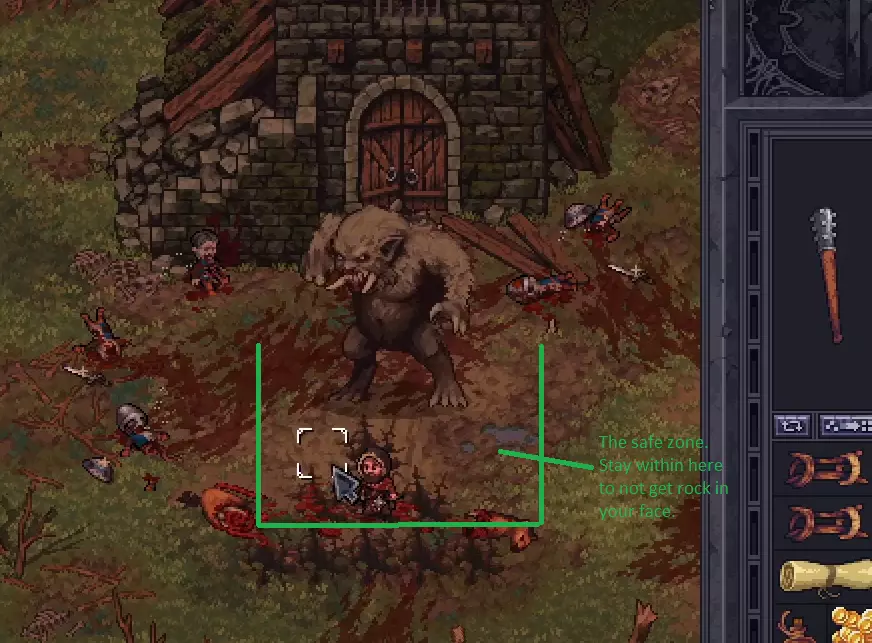
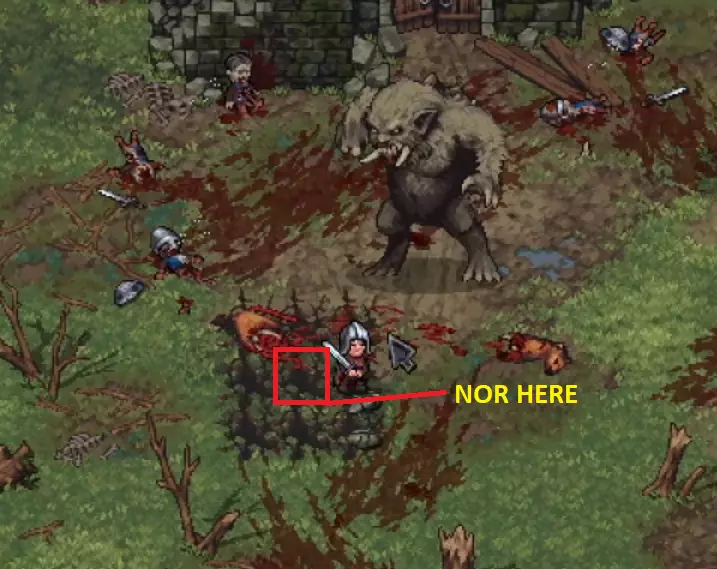
永远不要处于相对于巨魔的某些位置。在这些位置上,除非你拥有超过2格距离的冲刺技能,否则你永远无法躲避冲击波。如果你被巨魔的咆哮击晕或 daze( daze 指眩晕效果),仍然会陷入困境,因此最好避开这些位置。如果你不小心处于这些位置,一定要移动。重新调整位置总是比寄希望于通过击晕或 daze 的随机判定来冲刺逃脱更好。

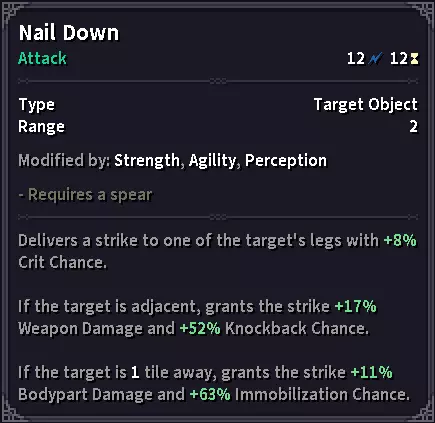
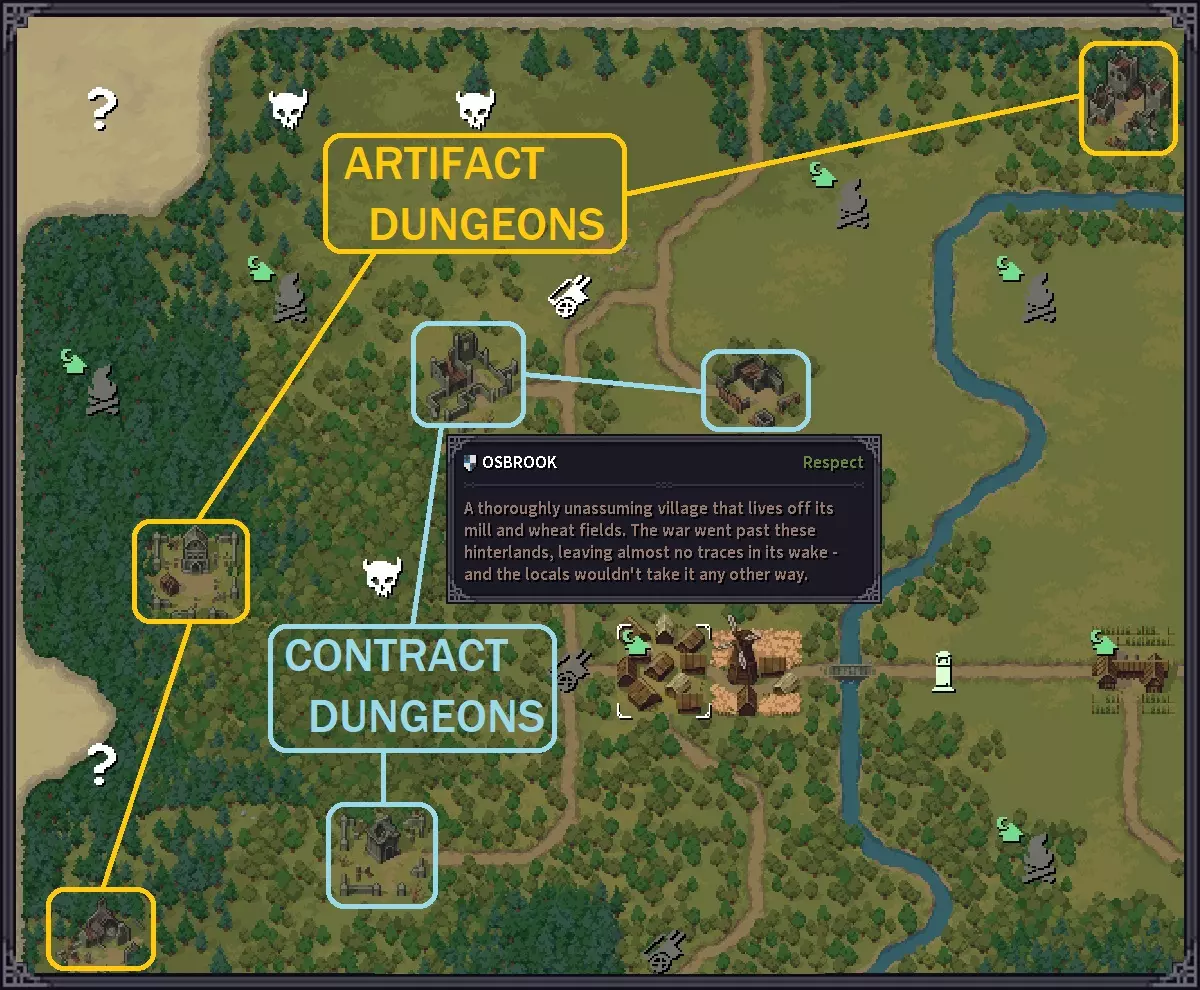
- Swap your loadouts or have 2 loadouts in case of troll roar. Troll roar has a 25% chance of disarming you. This chance cannot be reduced by any means. So inspect him and swap your loadouts before he roars. Or have a 2nd loadout in case you drop one. He will only roar if you are 1 tile away from him at least. - Have enough space in your inventory to pick up your weapons instantly when you drop them. Equipping stuff and taking them from the ground both count as a turn. If you don’t have inventory space when you pick up your weapons then you are forced to equip it that same turn and thus will not be able to move. - Troll will always use shockwave if you are in its range and he has that cooldown up/has energy for it. This is probably the most important point you need to remember. If the troll has energy for shockwave, he will use it off cooldown. Niche cases where he will swipe you instead only happen super rarely or his energy level drops down to about 15% - 20% range or lower. The turn before he raises his arms to do the shockwave will be your free turn to either hit him/use spells or patch yourself up. - If you are in melee range and he just used shockwave, move away from him. This guarantees that you don’t have to tank his swipe if you don’t want to. Troll will follow you if no other cd is up. Inspect him always to see if the shockwave is off cd. - Save your gap closer attacks to interrupt troll regeneration. Troll will always try to regenerate once he has hit a certain threshold of about 75% max HP or he has a negative effect on him. This can only be interrupted by a melee attack and the troll will only start his regen when you are at least 1 tile away from him. Special melee abilities which have 2 tile reach are: the spear’s Impaling lunge/nail down/seize the initiative/sudden lunge and the 2h axe’s make space/hooking chop. Other charge attacks include: Heroic charge, Mutilating Lunge, On rush, Skull crusher, Step Aside. After the regeneration is interrupted, the troll will take extra damage for a few turns. If you have any buffs to your damage/high damage or high crit chance abilities, this will be a decent time to use them. - You can bring smoke bomb to prevent the troll from throwing his first rock. At the start of the fight, throw a smoke bomb right in front of the troll. This will block his vision and thus he won’t be able to throw the rock. He will instead move forward towards you. - Important supplies to bring: Healing salves (4 - 6), bandages (3 - 4), splints (2 - 3), ether inhaler (1 is probably enough),vivifying essence (1 is probably enough) potions/drugs if you have any, antitoxins for intox or drug aftermath. Potions like sturdiness, deadly, pain killing/anesthesia or energy drain are very good. Also water and food. If you are having energy problems during the fight, consider taking Al’qud or drinking a lot of Elven Mud beforehand. This setup is enough for when you are sure you won't mess up your movements during the fight. If you are new to the troll fight, definitely bring more than what is listed above (1,5 to 2 times more). - Important resistances to get before the fight: *Control resistances. Number one priority. You don’t want to get stunned/dazed. Period. Get this as high as you can. Easy way to get this is to get helmets. Enchantments on gear will also help. * Bleed resistances. Troll swipe has rending damage and will most likely bleed you. Get this resistance if you plan to face tank the swipe. Ignore this if you think you can kite troll with the steps I’ve shown you above. * Rending or physical resistances. Nuff said. The video guide below on how to kill the troll with staff from poisoneye. Check out his channel for even more stoneshard related stuff. https://youtu.be/Z3LXvsIrzJM There used to be 2 more strats that you can use to fight the troll but are no longer feasible due to nerf bat from the devs. Check my docs out if you want more details. I will leave one of the vid about it down below. https://youtu.be/RuXbYz-VG2w Points of Interest (some spoilers included) I will only put POIs that I find the most useful/ have something of value in them. A lot of POIs not mentioned either have nothing much or are story related so it’s better for people to find out on their own. Exploring is fun :D You can get rumours about POIs by talking to NPCs. Most of the time POIs will be camps with 2 to 3 enemies in it. You can find and kill them early on for exp and some loot in their chests if you are lucky. - There are now hunting grounds for most animals. These are zones with increased spawn rate of said animals. You can find them either by exploring or talking to NPCs in towns. - Leprosarium: There’s nothing much here aside from a few pieces of medicine. A cool looking Plague doctor mask and a bed. - Witch hut: There’s a witch here LOL. Inside the place there should be a witch staff, a witch hat and a decent amulet. Speak to her and she will give you a potion. If you need water, there’s a well outside the hut. Take her stuff for a fun surprise!! - Hermit’s hut. Inside the hut you will find a healer staff and a backpack. This is now a location for a quest. - Ruined Manor: The POI with the most loot at the moment. Once you get to the building you will see a campfire. To the upper left of it you will see some destructible crate. Destroy them to reveal a hatch to the basement. Down in the basement you will see a chest, a weapon rack and a bookshelf as well as a boar head on the wall. The closed door cannot be open through normal means. Once you exit the basement, an encounter will trigger with enemies relatively close to your level. Defeat the ringleader and he will drop a key to unlock the door. The boar head you can take back to Osbrook’s Inn for a nice bonus to rent price and free beer everyday. Inside the door there’s a bed and a bookshelf. - Signal tower. - This is where the ancient troll is. The ‘’final but optional boss’’ for the content right now. The required level for the quest to kill the troll is now 10. After you get level 10, if you talk to the elder in Mannshire, he will say the governor has a job for you. Go see the governor for details of the quest. - Rotten Willow Tavern. Den of thieves. It will always be North East of Mannshire. If you follow one of the branch roads from Mannshire you will read there. Here you have a bed to save. The Innkeeper will buy all your stolen goods no questions asked. An NPC named Stone sells drugs. Another NPC called L’Owcrey will buy your cursed items and occult related items like grimoire/occult cloak/necromancer staff. Selling him occult items will increase your reputation with the place. - Ransacked Homestead. Can have unique items. Useful NPCs/Mini quest/Trainers Useful NPCs: Herbalist.
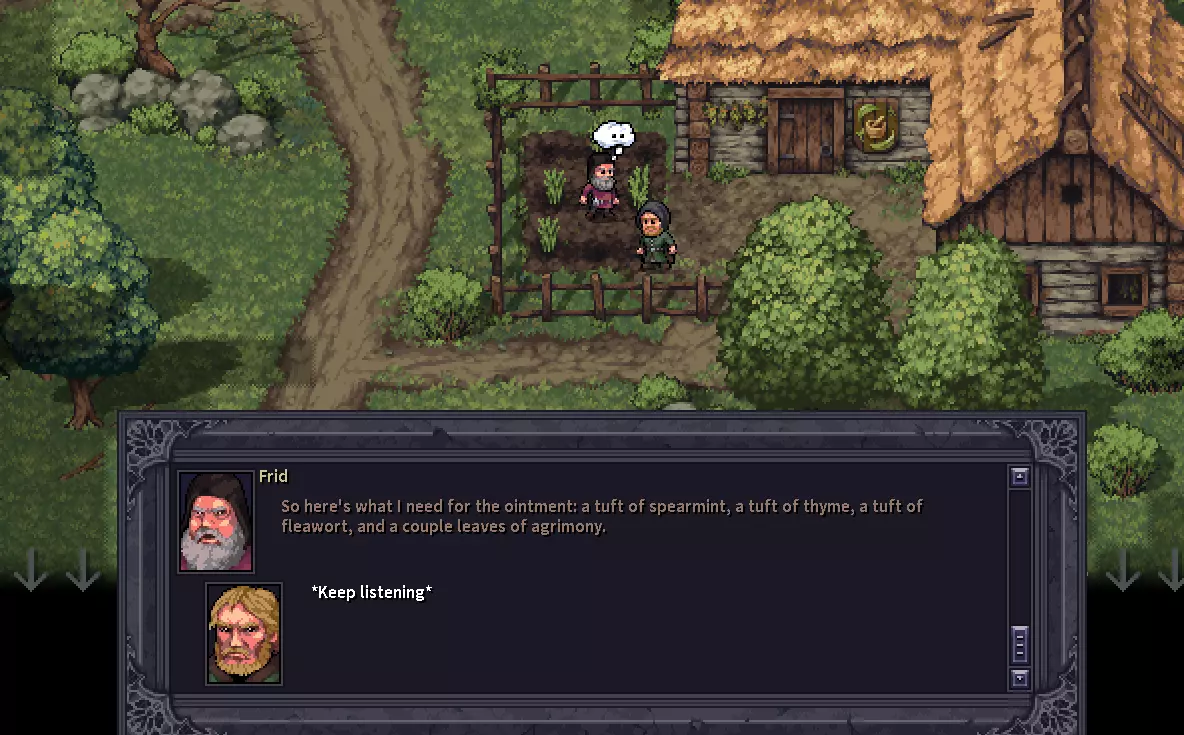
在奥斯布鲁克,他将是你主要的药品供应商。你可以从他那里买到治疗药膏、水蛭、草药提取物等。他有一个简单的小任务,就是为他收集草药,每种列出的草药各一束。
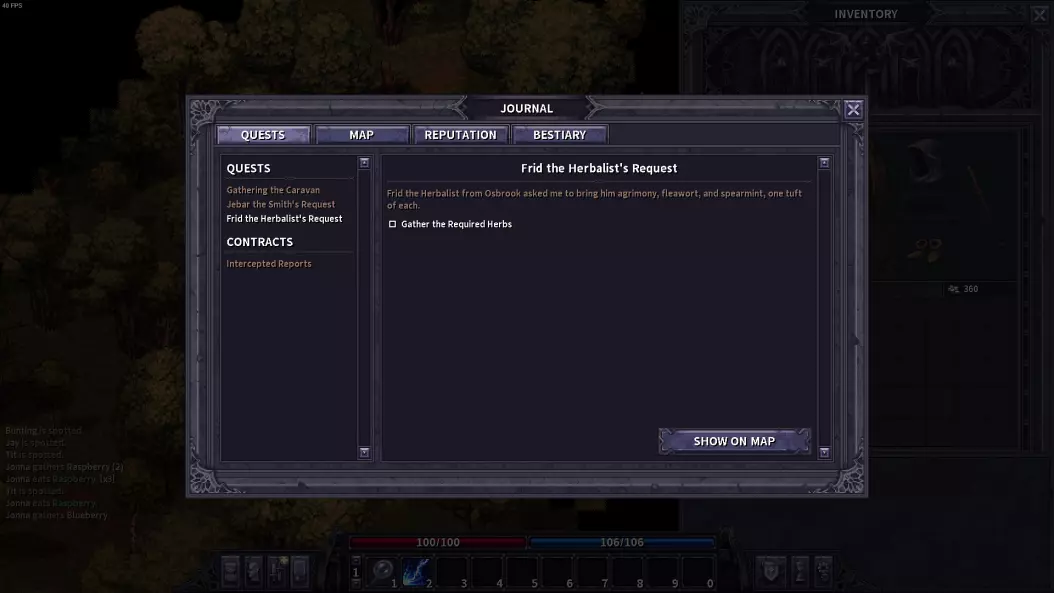
奥斯布鲁克附近的区域有一座磨坊。运气好的话,你沿着麦田走走逛逛,就能在同一区域找到留兰香和百里香。如果没找到,你就得去奥斯布鲁克附近的田野寻找,这些田野通常距离奥斯布鲁克1到2个区域远。 这个小型任务的奖励是从治疗药膏、草药提取物、水蛭或夹板中随机获得2件药品,同时你与奥斯布鲁克的声望也会提升。 大多数人可能会忽略这个任务,但我觉得在游戏刚开始时做这个任务非常简单,而且在初期没什么钱的时候,奖励也相当实用。 猎人
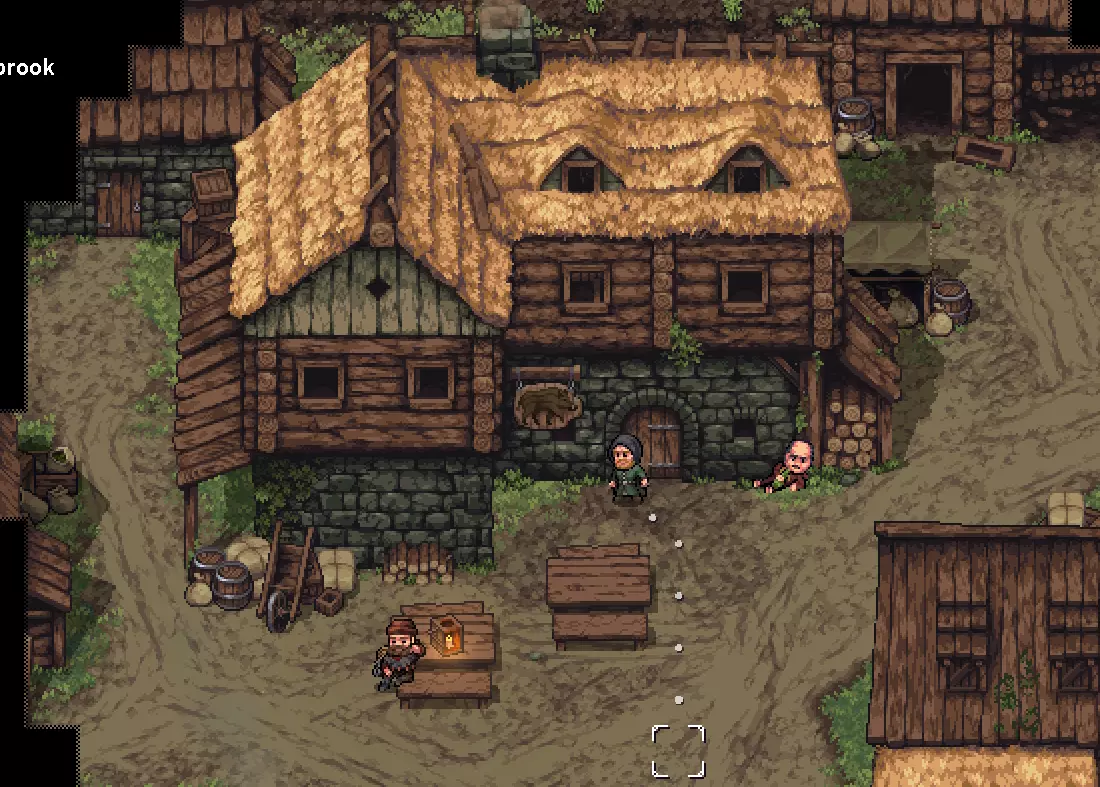
他总是坐在奥斯布鲁克或曼恩郡的酒馆前的桌子旁。每隔几天,他就会在这两个城镇之间来回移动。如果你创建了新角色却在奥斯布鲁克看不到他,只需重新创建角色,直到他出现为止。 他主要出售狩猎战利品,比如兽皮或熊脂,但有时也会有爪形陷阱、铁蒺藜、网,或是毒刺瓶、烟雾弹之类的实用物品。 【醉汉拉姆】
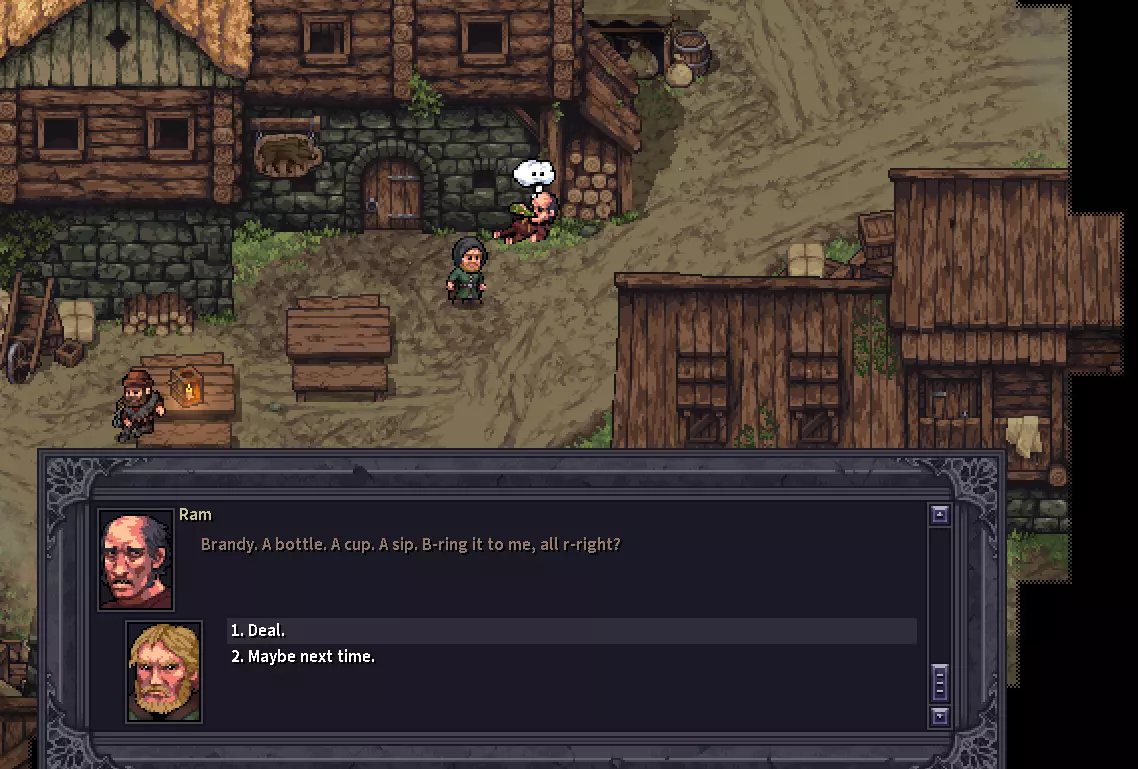
乌纳尔,这位抄写员,有一个小型任务,需要你为他找到一瓶白兰地。这瓶白兰地可以作为战利品从强盗地牢中获得,或者直接从酒馆老板那里购买。任务奖励是一个附魔的尖牙护身符,对于暴击流玩家来说是个还不错的护身符。如果你运气好的话,可能会在它上面获得不错的附魔效果。
可在曼郡城堡一楼找到他。他出售双持/运动/ pyro/ geo/生存技能书。 训练师列表:目前你可以与这些NPC对话并支付一些金钱来解锁大多数技能树的1级。 奥斯布鲁克 1h斧头 - 木匠 1h锤杖 - 铁匠 长矛 - 独自坐在兵营的卫兵 盾牌 - 奥斯布鲁克酒馆前的醉汉 曼郡 剑 - 曼郡城堡入口外的卫兵 匕首 - 杂货商 双手剑/战斗精通 - 总督 双手斧头 - 木匠 双手锤杖 - 铁匠 法杖 - 牧师 其他 远程/运动 - 猎人 一些我认为值得参考的有趣或优秀的build思路。 Skirmisher Dirwin(作者:u/RepresentativeBee545)无法识别内容,已删除。