换一换
换一换 


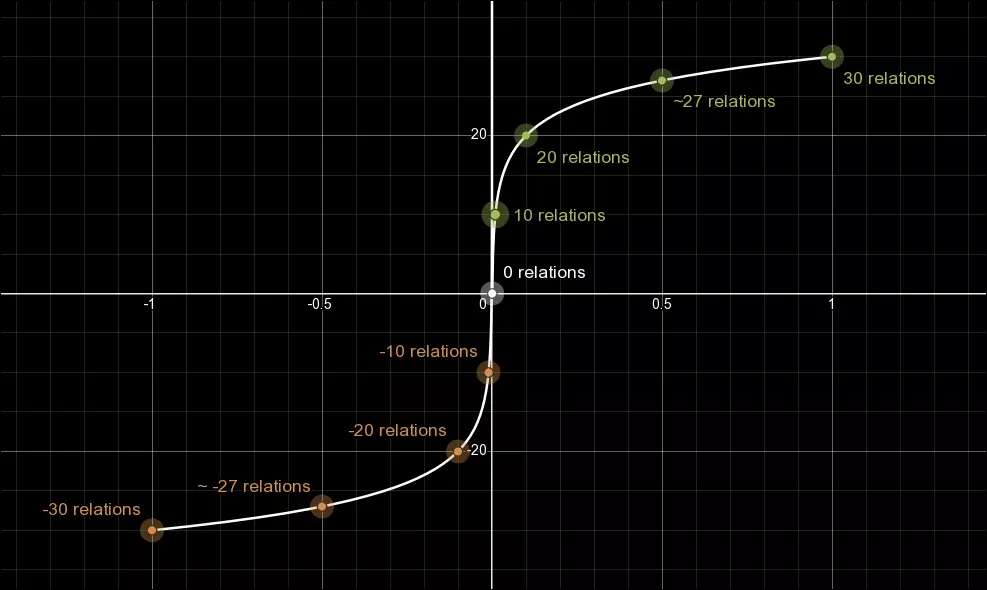
I come back to this game about once a year. It's so complex it's easy to forget things. Here are my tips from me to me. New or returning players may find this helpful. Up to date for 6.2. Mods I Recommend These are mods I highly recommend: 1. VRO - This one is mandatory in my opinion. Basically makes capital ships much sturdier and more expensive. They don't feel like big fighters anymore. 2. Fire and Smoke - To improve the explosions. You get very pretty explosions with this. 3. Better Kill Credit - Gives you reputation and bounties if your AI ships get bounty kills. 4. Faster Training - Trains your pilots faster. Pilots learn at a glacial pace normally, it's still very slow with this mod but better and certainly not game breaking. 5. Sector Explorer - This is a great default behavior for scouts. They will explore a sector much more efficiently than the default command by starting in the center and going in circles. 6. No more superhighways - I liked this when the universe was small, but as of version 6.20 with all the DLC the galaxy is quite large. So I actually play with it off these days because it can take a long time to get where you want to go. Be aware this tilts trade a bit more in favor of S/M ships because L/XL ships can't use the highways. 7. Capital ship loot magnet - I like this, but the problem is your miners and traders seem to constantly accidentally pick up illegal loot and the police will attack them. Removing this mod seemed to help a lot with this. Good resources for game tips Captain Collins on YouTube has an excellent library of tips and tricks. These cover many aspects of the game and are quick and to the point. Be aware, some of it does get out of date as the game has been updated quite a bit over the years. Random Helpful Tips -The game is primarily an economic simulator. Yes there is some space combat, but that's not really the point of the game. Combat has more importance though, because it has actual economic consequences. -I find the Terrans to be quite easy and fun to play. Their economy is much more streamlined than the Commonwealth factions with way fewer things to manufacture. With the VRO mod, they also have terrific battleships and cruisers that can go toe to toe with the Xenon. Their weapons are strong and each have a pretty well defined role, without an overwhelming number of options such as the Argon. They're actually a great faction for a new player to start with! The downside is Terran bases far outside Terran space might be harder to construct and supply because other races won't have the wares they need - you'll have to do that yourself. -If you need to make an unfriendly faction friendly, camp outside one of their stations and wait for the "criminals" from their mass traffic who will show up as enemies. Mass traffic are the really tiny shuttles flying from different parts of the station. Carefully blow them out of the sky without hitting the station. Each one you down gives you one rep. You need -9 to be able to trade, then your traders will take it from there. They seem to randomly appear and it seems like the more traffic, the more likely you'll see a criminal so try to go for stations with large habitat modules as the traffic volume is related to the station population. -Speaking of rep, you cannot lose or gain rep with the SCA (Scale Plate Pact) pirates. It's always -5 no matter what. So feel free to attack, board, do whatever to their ships. In fact they will harass your miners and traders, so feel free to be proactive in shooting them down when you see them. -You can set custom alarms in the Global Settings. For instance, if a pesky SCA ship shows up in your satellite network, you can get an alarm so you can intercept before he starts to cause trouble. This is also very helpful to notify you if a Xenon capital ship is invading an important sector, or if a the Xenon have an XL ship ready to invade. This feature is awesome. -Press R on the map to reset your view orientation directly over yourself. There is a small icon on the map you can press to do the same. Ultra useful. -Hold shift and drag a box with the left mouse button to select multiple ships on the map. -In your cockpit, with a ship selected you can press F to get the same menu you'd get as if you'd right click the ship. This is useful for comms, scanning, and teleporting. -Be aware you can filter Trade settings to look for large, medium, or small quantities. If it seems as if no one in the galaxy is making the ware you need, make sure you reduce the quantity as someone somewhere should have at least a little available. -Under Global Settings, you can change message notifications. At some point when you have hundreds of ships, you'll want to turn off trade notifications as it will literally be going nonstop. -The illegal inventory items are generally not worthwhile. Go to inventory and "drop illegal items" to get rid of them. If you want to keep them, use the safe deposit box in the "Research Lab" location of your player HQ. You can also sell them there at the Trader's Corner. It's definitely not worth having the police come after you though. You can escape, but the police will aggo your ships in the system for about 10 minutes. It's not worth losing a $6M trading ship for some stupid Spacefly Eggs. -You can also assign a ship as an inventory collector to make sure he picks up inventory items and deposits them at HQ. -Use Global Settings to make a trade rule to trade only with your own faction. This is helpful for your stations as certain goods you won't want to buy (i.e. for ore you may only want your own factions miners to supply this). Just be sure to either enable or disable it as you want per good, and a global rule will also apply to the Build Inventory as well. So be sure that's unrestricted if you want others to supply your station builds. -Your owned Station logic is a bit funky. They need to see a "buy/sell" command for your traders and miners to actually function for the station. If you want ONLY your miners to supply your ore, put "buy offer" up to full inventory at the highest price, but set your trade rule to your faction only. Similar for other wares. But be sure you have "no restriction" on items you want to sell directly to visiting NPC traders (or if you care, sell only to a certain faction with other rules). -Do setup blacklist under Global Settings for your ships (civilian at the very least). Definitely exclude Xenon sectors otherwise they'll take a shortcut to their destination right though a Xenon infested sector. Also if a sector is getting invaded by a Xenon fleet, consider temporarily blacklisting that sector for your civilian ships. If a busy route gets blockaded and your transports try to run it, you can lose millions worth of destroyed ships and killed captains. At some point, you'll probably want to secure key trading routes from the Xenon, but you need some serious money to do this so it won't happen right away. -Protectyon is reputed to be very expensive and hard to obtain from the story. But once you build a protectyon shield and container, you can easily get it from Tibebreak. -The damage from the Tide to a station without Protectyon is not severe. If the station gets a few repair drones it will easily repair it before the next Tide, which is about once an hour. Therefore you can build bases in Avarice even without Protectyon, as you do need to go through the fairly extensive story to get both the shield and container for it. But once you do, it's easy to buy enough to last the entire game with one trade run from Tidebreak as only one is used every Tide. -You could probably make some money from selling Protectyon to Tidebreak. But it's generally not worth the effort. It's more a story element than a real trade good. -Hacking stations is a great way to save a lot of money on station blueprints. Only certain types of station modules can be hacked (not the super expensive wharves or shipyards for instance). You'll need an EMP bomb. Deploy it directly on the module on want the blueprint for and detonate. 4 signals will be generated, scan them in your suit and at least one of them will be the blueprint for that station module. Great for production and habitation modules and will save you tons of money! -How do you know which station module is the right one? Zoom into the station on the map, select it and find the module you want in its submenu on the map. It should get highlighted on the station and you should be able to target it from there. -Consider playing a bit suboptimally by making some enemies out of major factions. It makes the game harder but more interesting. Starting Out Your main goal is to make a little bit of money so you can start to afford autominers. The best way to do this is to scout out your local sectors, place satellites so you can see the station supply and demand, place resource probes so you know what's available, and take on missions (story and random). If you have a cargo ship, trading can be easy and profitable using the trade filters once you have a basic satellite network to give you live information on station supply and demand. The rep gain is also helpful from the missions as you get better prices the higher your rep with a faction, as well as access to their larger ships and better weapons. Another decent way of making money is to farm crystals from asteroid fields. Sit in an asteroid field and look for a twinkle. Shoot the crystal and collect it, then sell to at any station's Trader's Corner (it is an inventory item not a cargo item). Physically walk to the Trader's Corner and sell it to the human or alien vendor there (it is not done in the station interface). Once you make enough to get a single cheap S autominer, do so right away as this will dramatically increase your income. Economic Overview Each playthrough, the wharves and shipyards will always be in the same sectors but the other factories are randomized. So each playthrough the economy will behave a bit differently. Also, factions will build more factories over time so things will change as the game progresses. The economy basically has several tiers of items as indicated by the icon from the associated module: 0. Energy cells - produced from solar panels and used by every other station module 1. Raw wares - ores, silicon, and several liquids 2. Basic goods - such as refined metal 3. Intermediate goods - such as hull parts 4. Advanced goods - such as advanced electronics 5. Ships - Needs most advanced wares and some intermediate wares (like hull parts). Each race also has a separate food economy. Food + medical supplies allows your station to support crew in habitat modules. The closer your station is to the ideal crew size, the bigger the productivity bonus to all your modules. It can be a large bonus so it is worth getting. I'll cover the following: 1. Automining 2. Autotrading 3. Profitable Factories 4. Scrap 5. Shipyards Economy 1. Automining Automining is a core profit generator throughout the game and important for your faction's economy in this game. Your first goal should be to get a few small autominers set to Local Automine in order to generate passive income. Ship Size For automining, the bigger the ship the faster the profits. So L miners are the end goal. An L miner can make you over $1M per hour. However, be sure to check the demand in the area (Trade Filter, set for solids and liquids). Be sure there's "large" demand in a sector before placing a large autominer there. How to find a good sector to mine First, scout out sectors completely and drop a bunch of resource probes so you know exactly what's available to mine. Then check the Trade Filter with solids and liquids set to see demand. You can look for large or medium demand. A sector is great to Local Automine if there's lots of demand for the resource of that sector (obviously). But avoid sectors with tons of resources but no local demand for them. There's other ways to exploit this situation, but not through local autominers. If there's no local demand for that resource, you can get around that with Advanced Automining if you have enough pilot skills on your captains, or by using the Repeat behavior. Local Automining vs. Advanced Automining Local Autominers stay in one sector (they can travel within split sectors though like Grand Exchange which makes those sectors ideal). Advanced Autominers can travel a number of sectors. This is helpful if the demand is in an adjacent sector, but requires 3 star pilots. In general, I prefer Local Automining, but Advanced Automining can be helpful when the demand is close. But beware, your miners and not that fast so you don't want them to have to travel many sectors to find the demand. Think of 1 or 2 sectors between demand and the ore or gas they will harvest. Mining Stations Another option which is profitable is to make a mining station. This is just a station with docks and solid and liquid containers. Your local autominers not assigned to the station will preferentially fill this station, and of course you can assign miners to the station as well. Non player miners will actually buy your ores / liquids and you can also assign mining ships to "Trade for station" and they will sell your ores / liquids up to 5 sectors away just like a trading ship would sell wares. As always, use smaller faster ships as traders for your stations as the AI loves to choose small highly profitable trades as opposed to fully utilizing the inventory space of your large ships. So for this setup, ideally you'd have M and L miners mining the ore / liquids and S miners trading for your station. I'm not sure if the ROI is as good as free automining, theoretically it should be as good or better, but it does keep things a bit more organized as your station can mine and trade up to 5 sectors away with a 5 star manager. Use of Repeat Behavior Two good uses. 1. If you don't have access to Advanced Automining and the demand is in a different sector from the resources, set a repeat order for "Mine point A, Mine point B, sell to station A, sell to station B" etc. If it can't find ore to mine at point A it moves on to point B, if it can't sell to station A, it moves on to station B, etc. So it's a great way to have precise control over automining but requires a lot more setup. 2. If you want your miners to work specifically for your mining station and control exactly where they mine as opposed to the AI sending them into areas that might be dangerous, you can do that with this function. They can't be directly assigned to the station in this manner, but they can be dedicated to supplying it. Economy 2. Autotrading Autotrading is far less of a profit generator in this game than in X3 where it was the backbone of your passive income. It will make you some profits, but the side benefit is that it keeps the economy moving in your faction. If you do not keep the economy moving, there will be shortages in the Wharves and Shipyards when you are trying to buy ships. These are super annoying and also impair your faction's ability to fight battles against the Xenon or other factions. Xenon advancements can threaten your profitsss. Ship Size Favor S and smaller, faster M ships for Autotrades and larger M ships or L ships for manual trades. The AI tends not to use the full inventory of larger ships, so you might find it frequently wasting your 50,000 capacity super freighter on about a 100 unit trade. Manually Trading This favors larger M ships and L ships. This actually is pretty profitable! With an L cargo ship, once you have scouted a large section of galaxy, you can make good profits by manually queuing up a large number of very profitable trades that go way beyond the 5 sector limit of autotrading. Simply use the Trade Filters on the map and zoom way out to find items in large supply and locations where those items are in large demand. You can queue up a few dozen runs that will keep your freighter captain busy for hours and make you very good income. You can also use the same trick to distribute wares that your own stations produce throughout the galaxy, unimpeded by the 5 sector range limits that stations traders have. Good uses of Repeat Behavior You can have a single station of yours supply all your other stations with any ware you want using Repeat behavior. A good example is a scrapyard in Avarice supplying your shipyard with Hull Parts or an energy cell plant in a sector with very high solar output supplying or supplementing energy throughout your stations. Be sure the ware is "for sale" and "for buy" using your faction only though with appropriate limits set to "sell all but" and "buy up to" for the respective producing and consuming station. Repeat Behavior can only buy/sell and not "exchange wares". The stations source station must therefore "want" to "sell" the ware and the receiving station must "want" to "buy" the ware, even though it's free because it's your own ships. You could also use a similar method to ensure decent supply of common shortages for friendly faction Wharves (i.e. hull parts, weapon components, turret components, shield components) by having them have multiple cycled buy commands and sell commands. This has the advantage of not needing a skilled pilot. Local Autotrading This is limited and only useful for leveling your captains up. It is only in 1 sector (though travel within partitioned sectors like Grand Exchange is allowed) and 1 ware. Carefully find sectors with clear demand and supply of the same ware. Be aware the economics may change so you might have to change the ware and/or sector over time. I generally don't like to use this much. If I want good captains, I usually poach them from my auto-mining fleet. Fill Shortages This requires only a 2 star captain, which many of your service personnel will achieve. So you don't need to do anything specifically to hire them, just check your global personnel tab and find the best candidate for your new ship. This does not ensure profits - they will simply buy a ware at any price within the allowable sectors to fill that shortfall. It makes sense for Hull Parts, Weapon Components, Shield Components, Turret components at Wharves and Shipyards sectors because those are often bought at good prices and the shortages are annoying as well as important to fill to keep your faction viable. It may also make sense for an obviously high demand item (for instance, refined metals are often in very high demand in a sector with tons of hull parts factories). But once the captain gets to 3 star I don't see any advantage over Advanced Autotrade or Repeat Behavior. Advanced Autotrade This needs 3 star captains to autotrade wares you specify in the distance you specify, up to 5 sectors for 5 star captains. Again, I would favor S or faster M ships for this as the captains love small trades. This limits their profitability quite a bit. Try to analyze and select wares with large demand otherwise they may waste a ton of time doing small trades. You can easily select all wares but the AI is not great at finding the most profitable trade, and will happily sell 100 silicon wafers when they could sell 1000 refined metals just as easily. Dedicated Trading Stations The idea is to set up a station with container storage, docking, and no production at all. Set the station to buy low and sell at a higher price and give it a few assigned trading ships (prefer S/M ships) The advantage is, you don't need to have highly skilled captains to cover many sectors as the manager skill sets the range (up to 5 sectors for 5 star managers). However, I have NEVER made much profit from this method. Even with a skilled manager, they don't seem to lose much money but they don't seem to gain much compared to other methods in the game either. Perhaps there is some better combination of inputs that would make this better (buy for less? sell for more?). But I've been unimpressed every time I've tried this. Economy 3. Profitable Stations You can start building stations earlier than you might think. You should do this because it does take some time for them to get built. Also, small stations are pretty cheap (like 2-4 million) so don't hesitate to use them to make use of the better trading and mining features they offer that are less dependent on pilot skill to cover many sectors. Types of Stations: 1. Mining Station - discussed above. I like these 2. Trading Station - discussed above. I don't like these because they don't seem to make money. 3. Factory - Converts raw or intermediate wares to more advanced wares, which THEORETICALLY should net more (not always!) Can have integrated mining or rely on interstation transport with the "Repeat Behavior" to get its raw resources or intermediate goods. One megafactory or many smaller factories? You be the judge. 4. Shipyard - Similar to Factory but makes ships. Can likewise just be a Wharf / Shipyard or can have any amount of processing of raw goods and production of intermediate goods that you want. 5. Distribution center - Since your factory traders can only have a maximum reach of 5 sectors, you can have a dedicated distribution center station 10 sectors away and ship goods to it using transports with "Repeat Behavior." You can consider placing one in or near each friendly faction capital sector to maximize profitsss. Scale up your factory and mining operations to meet demand. Consider a dedicated "Energy Cell" station in a system with very high solar output under the sector information tab. >200% is good. You can start your factory as a mining station and when you have the funds, convert it to a factory. Usually the more advanced goods will be more scarce and more profitable, but not always so be cautious about what you're aiming to produce. Be sure there's a LOT of demand for it and not much supply. It's hard to go wrong with refined metals (teladi use teladianium instead) because usually there's a large demand for them. They're needed for hull parts, which you can convert your factory into producing later when ready. This is may be even more profitable because there's a huge demand for hull parts at shipyards, but as always beware that the economy is randomized and you might have tons of hull parts factories in your faction home sectors. Station building tips To limit the micro of building a station, you want to be able to assign transports to "trade for the building inventory" of the station under construction. It's good to keep a few dedicated transport ships around for this sole purpose. I prefer large capacity M transports for this role. However, you need AT LEAST ONE structure present before you can assign them this role. So BUILD ONE small dock as your first module. Once that's complete, then you can plan out the rest of the station. You can then assign your building transports to that station's Building Inventory and they'll take care of the micro for you once you've assigned a manager. Be aware you still might have a bottleneck if a needed resource is 5 or more sectors away as the manager skill limits how far they can look for wares. So then you have to manually arrange the trade. What size ships to assign to the station? For miners, use the largest you can afford as to limit the back and forth. Lean towards large capacity M miners or L miners. If it will be a big station be sure you have plenty of docking spaces for them. For assigned station traders, I prefer many large capacity S ships. The AI tends to love to make a small trade even if a large, profitable trade is available. The only exception is if there's tons of demand nearby (like 100,000+) and you tinker with the station Logical Overview so that you're essentially only selling that item. In that case, it might make good use of the M and L traders. But if your station makes and sells many items, lean towards the S traders. Use the Repeat Behavior There are several great uses for this. Use L transports for this: 1. Distributing energy cells across your stations from a dedicated energy cell facility. 2. Distributing intermediate goods across your factories 3. Distributing final goods to Distribution centers Megafactories vs Dedicated Factories This is stylistic. It certainly cuts down on the transports you need if you have only a single megafactory, but that sector can get laggy. Having more spread out factories may allow you to get more markets, as well. I think both approaches are viable. Player HQ as a megafactory and shipyard. You can do this, and it does make research easier as you'll simply make all the items needed for it. But the player HQ is not in the safest system. You may expect your traders and miners to get harassed by Khaak and Xenon quite a bit. The Khaak pose no threat to your station, but they might shoot down some of your miners before your response force can react. Definitely hack modules This will save you many millions rather than purchasing these blueprints. If done right you will not lose rep with the station faction either. Research hacking at the Player HQ when you want to build stations. Find EMP bombs at the HAT pirate stations Trader's corner. The SCA pirate base has 3 trade corners, all of which can carry the bombs. They cost about $110,000. You can also assemble them if you have the components, but I usually just buy them. Hacking is easy. You can identify the station module on the map. Fly up close then exit in your shuttle. Shoot your EMP bomb onto the station, then right click it to select detonate. It will leave 4 hacking signals. In you suit only (Ship will not work) go to scan mode Shift+2 and go up very close. One of the 4 hacked signals will contain the blueprint for the module. Do quicksave because sometimes the signals will spawn in an inaccessible area. While the station doesn't seem to shoot at you, it may launch defense drones against you if it has them. If that happens, just go back into your ship for a moment and you will lose the aggro. Be aware, not every module blueprint can be hacked. Wharves and Shipyards cannot be hacked. And you have to have the associated research to do it. Economy 4. Scrapping Scrapping wrecks provides you with lots of Claytroncis and Hull Parts, both of which are very important and in high demand for station building and ship building. There is also naturally occuring scrap that you can process, not only destroyed ships. Scrapping is done like this: 1. Manticore M tugs bought from the Riptide factions in Avarice will tug wrecks or scrap cubes to a Scrap Processor in a station. It will show up as Raw Scrap in the station. It has its own storage. 2. The Scrap processor uses a good amount of energy to break it to Scrap Metal, which uses Solid (NOT CONTAINER) storage. 3. Then a Scrap Recycler will convert Scrap Metal to Hull Parts and Claytronics using a HUGE amount of energy. These use container storage. -Large or XL wrecks need to be chopped up into Scrap Cubes by the L-sized Riptide ship the Tueta. It uses construction drones to convert the wreck into scrap cubes which can be towed by the manticores. -Manticores can be assigned to scrap for a station, just like trading or mining. However, they seem a bit stupider. I've seen plenty of salvagers sitting around saying there's nothing to salvage in range even when there's gobs of wrecks clearly within their jump limit. -Given the HUGE energy requirement for scrap recycling, as well as the relative stupidity of your Manticores outside of one sector, this lends itself toward a central recycling plant in Avarice or another system with very high solar %, and multiple smaller junkyards concentrated at the Xenon choke points or other flashpoints that only process the raw scrap to scrap metal. Use L miners to ship the scrap metal to the central plant, use L transports to distribute energy cells to power the operation and claytronics / hull parts to the junkyards to be sold by your traders. -Apparently you can use a "Closed Loop" economic process to make some Argon ships without the need for anything but Energy Cells, Claytronics, and Hull Parts. -In Avarice, a Protectyon Shield Generator and Protectyon storage is needed to prevent the periodic Tide from damaging your station. You can buy the Protectyon from Tidebreak station. Don't worry, it is enabled to buy after you build your first Protectyon storage, which you need to complete the Avarice story arc to get (which frankly is a bit of a chore). Theoretically, the tide doesn't do tons of damage though so you can probably set up a base in Avarice without the shield and just repair the damage in between the tides by having station repair drones. -I would try to get at least a small scrapping setup going prior to getting a shipyard as it's very helpful to have the extra Claytronics and Hull Parts as they sell well, and are needed for stations and ship building, respectively. Economy 5. Shipyards S/M factory modules are incredibly expensive (around $120 million depending on the race), but are absolutely worth it. They will enormously increase your income in four ways: 1. Other factions will buy LOTS of ships from you if you have the blue prints - check the Transaction log and filter "Sold Ships." You'll be impressed. The ships they buy are NOT shown as being built in the station mouseover like your own ships, but if you stand in the bay you can see them being built. 2. If you need to raise money quick, you can build a bunch of ships and sell them to another faction. Just select the the ships and right click on the faction's Wharf and it will be an option. A high preset heavy fighter sells for around $1.6M. 3. It will save you tons of money by building your own ships. 4. With the all the extra ships you can improve your security situation dramatically, by protecting against Khaak raids, random pirates, and protecting important trade lanes from the Xenon. You can theoretically place escorts on all your remote miners in systems prone to Khaak or pirates. Tips: -You don't need to wait to produce every item to build the S/M factory. You can manually queue or semi-automate using Repeat Behavior purchases of important wares necessary for building ships (Hull Parts, Engine Parts, Turret Components, Shield Components, etc). You station traders can also get some of these wares, and you can allow purchase from other factions. It's easier to make everything later using the funds you get from the shipyard. -Whether you build a huge vertically integrated factory that makes everything for the ships, or make separate factories and set up deliveries with L transports on Repeat Behavior, or even just rely on your station traders, it's up to you. I think all these routes are viable. -It's also going to cost around $20M or so to buy all the blueprints for all the S ships and S ship components from a faction to get them started buying ships from you. Do this for all nearby factions so that they all buy from you. The more losses the take in battle, the more they'll buy (the Xenon are good for business in that way). -Be sure there are no restrictions on other factions purchasing your ships on the "ship" ware in the logical overview, Unless you need to conserve resources to build your own fleet, that is. -With your own shipyard, S and M ships (especially fighters) have basically become expendable for you! Don't sweat a few losses. Economy Bonus - How the Economy Works with Flowcharts How the Economy Works -Don't be phased by how complex the economy seems. You can easily build up a megafactory by simply getting one or more production of each tier. Then build up the next tier in the same way. That's literally all you need to know - the rest is just bonus info for those interested. -I view the economy as having 5 tiers of production for building ships, and a separate economy for the food and medical supplies for station population. -There are really 5 tiers of factory production for ships: 0: Energy cells which is needed for everything 1: Raw resources such as ore, silicone, hydrogen, and methane. These are stored in solid or liquid containers by the way! 2: Basic Products: Antimatter Cells, Silicon Wafers, Refined Metals, Graphene, Superfluid Coolant 3: Intermediate Products: Engine Parts, Microchips, Scanning Array, Advanced Composits, Hull Parts, Quantum Tubes, Plasma Conductors 4: Advanced Products: Claytronics, Weapon Components, Smart Chips, Antimatter Converters, Drone / Missile / Turret/ Shield Components, Fuel Cells 5. Ships which use most or all of the Tier 4 components. -There are three types of building "rules" for constructing stations and ships. You can select these as you are in the building interface. -When you are building your station, each tier is conviently noted by a specific icon indicating which tier of production it belongs to. -There is also a separate economy for supplying the people in your habitat modules. It involves a shorter production chain for Medical Supplies and each race's preferred food item (Food rations for Argon, Nostrop Oil for Teladi, Soka Husk for Paranid, Scruffin Fruit for Split). Your station will slowly consume these wares to grow and maintain population. Definitely worth it as you can get some very large production bonuses. The following chart by Lolwat420 illustrates the tiered nature of the economy very well (I slightly altered his version so it would fit into a steam guide). Raw resources are yellow, basic products are orange, intermediate products are light green, advanced products are dark green.
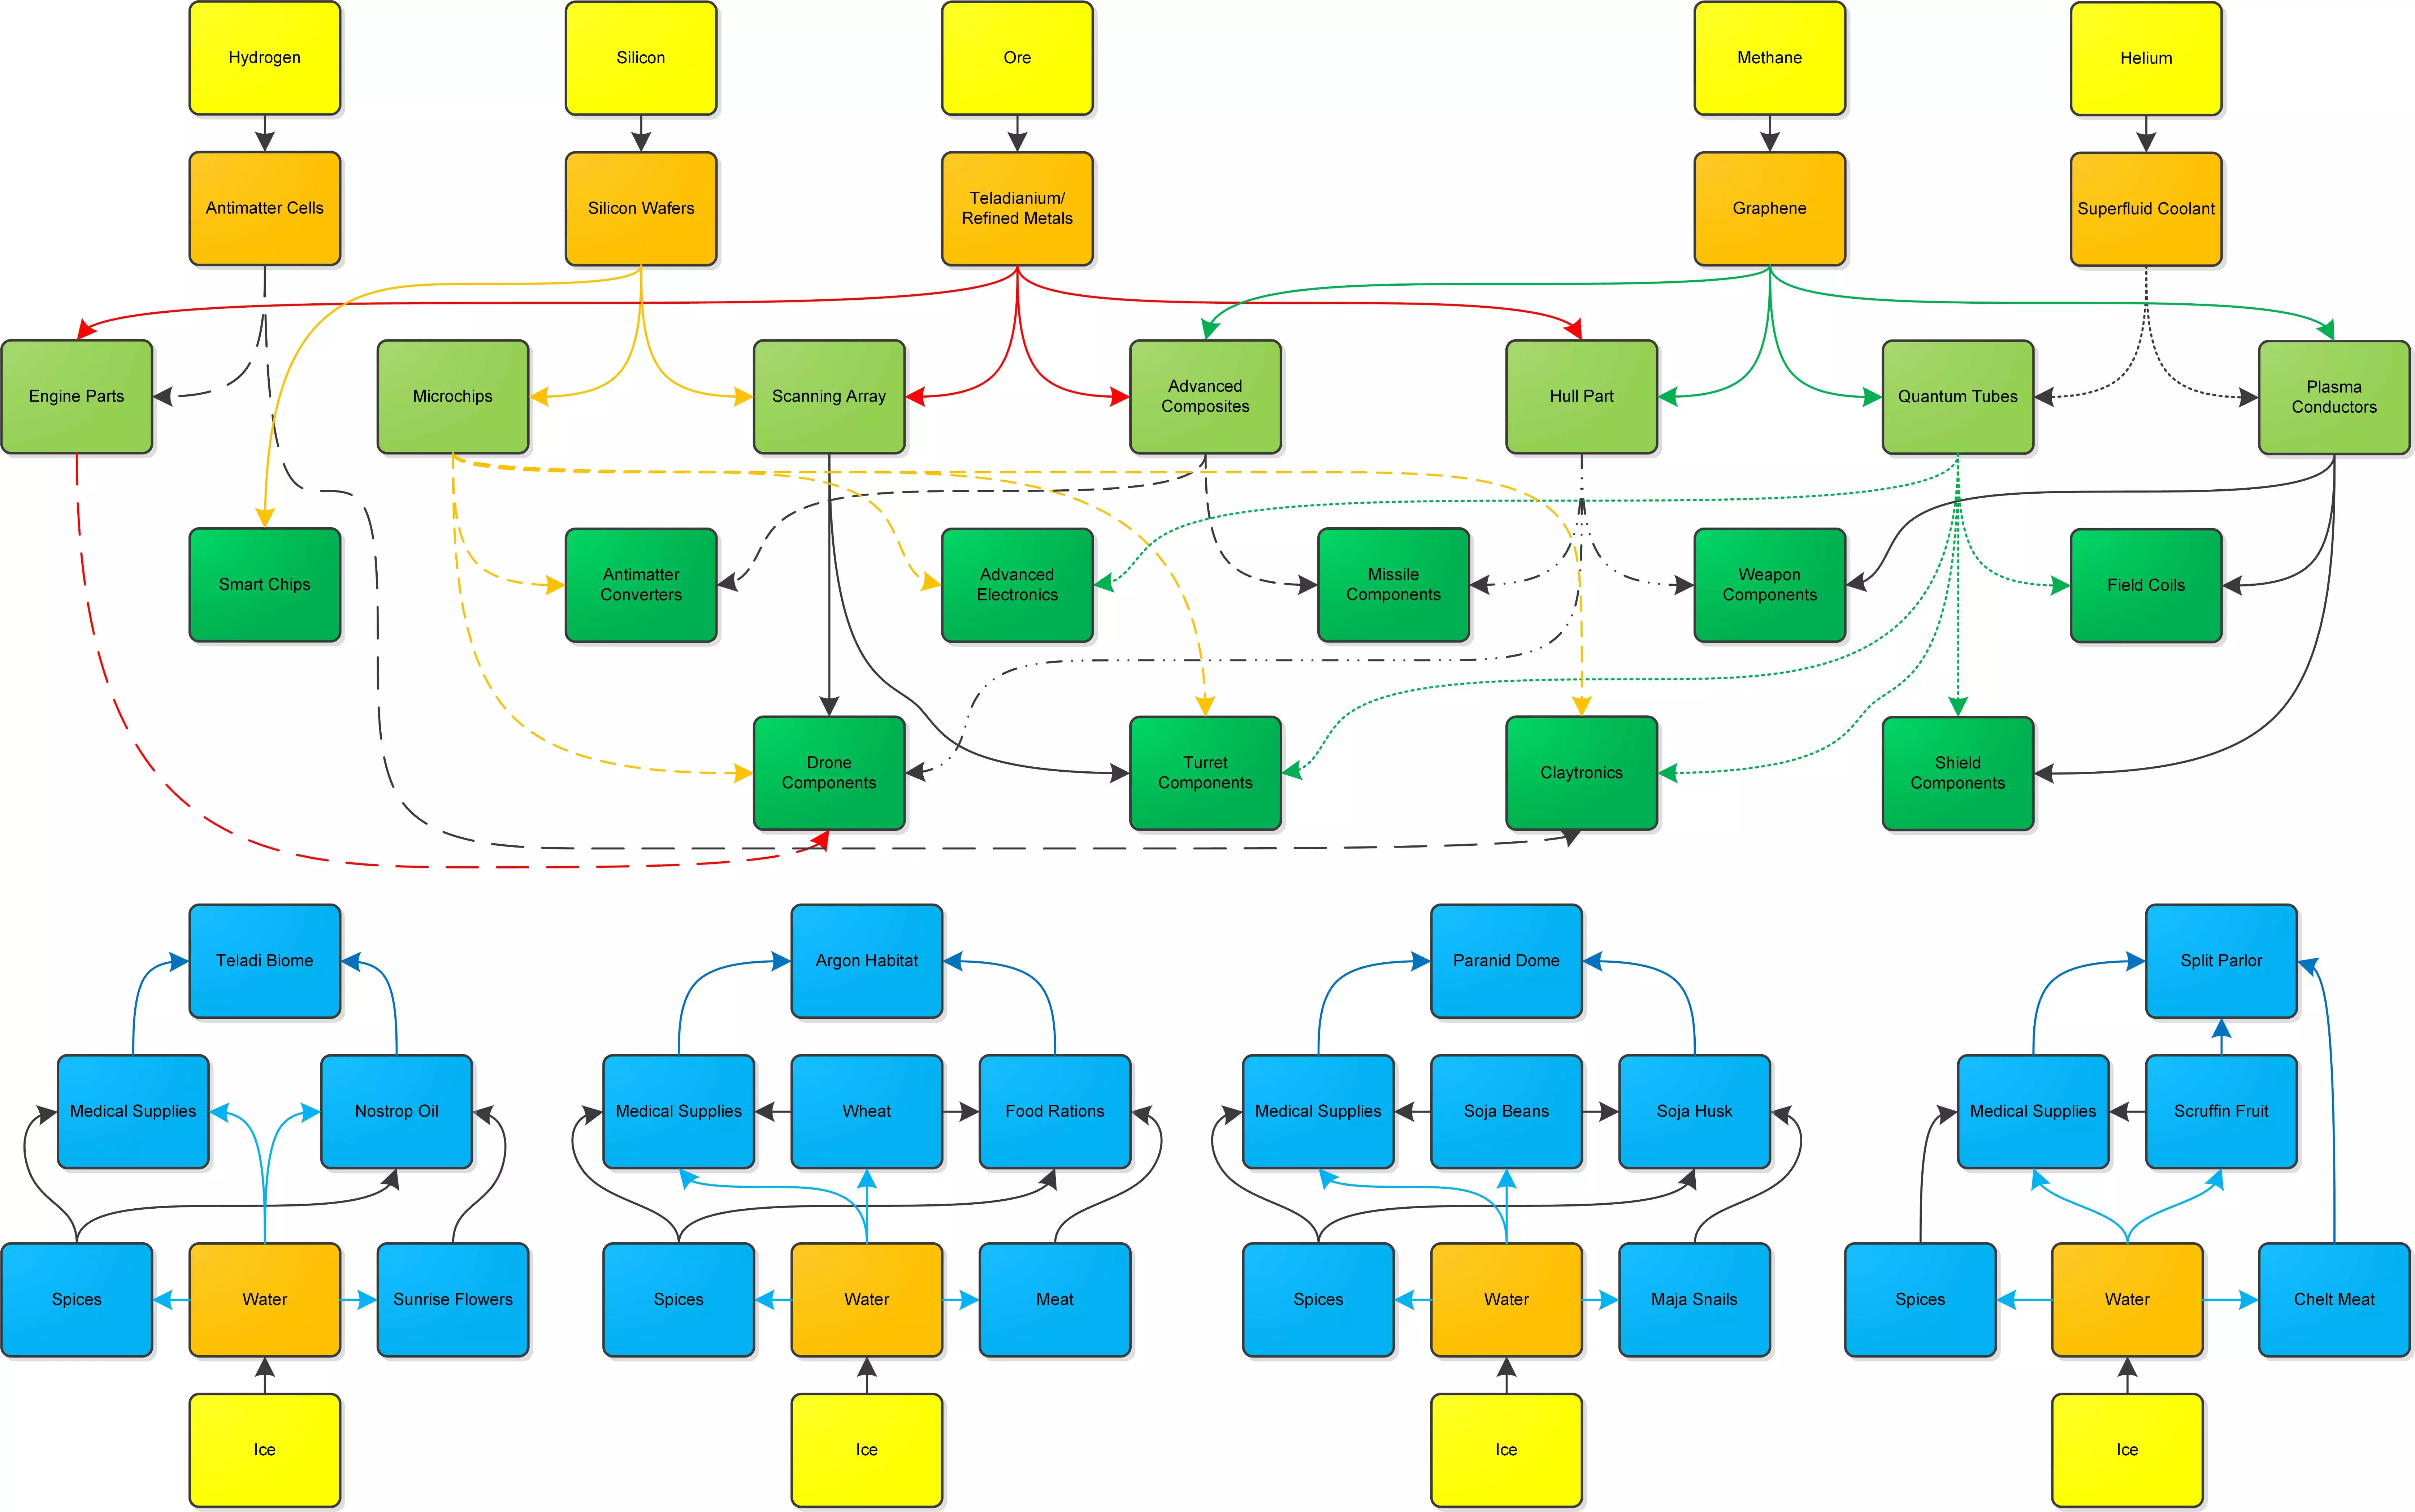
Build Rules There are also three different building rules or methods you can use. These are used to make each module of a station as well as ships. 1. Universal (what most of the races use) 2. Terran (a whole different production chain that has fewer products overall. This is needed for any Terran structures or ships). 3. Closed Loop (meant for Avarice, relies on the products of scrap refining only but can build less with this. I haven't tested this out much yet but it's very simple indeed compared to the others) -You can choose which building method you want your stations to use when they are made. -The Universal economy is certainly the most complex. It has multiple basic, intermediate, and advanced products. Each tier of production facility has its own icon so you know what "tier" you're producing. You can get basic production much earlier than you think (if you have 2-4 million you can start a basic factory). -There can be some individual quirks with each race within the Universal System. Note the Taldi use Teladianium instead of Refined Metal like the other races. The Boron need lots of water for everything because they are aquatic. Astlune also made a good flowchart that includes all 3 build rules, though does not quite illustrate the tiered nature of the economy as well: https://steamcommunity.com/sharedfiles/filedetails/?id=3097673492 Combat Overview Bear in mind, I only play using VRO, but these likely will apply to vanilla as well. Combat in X4 is fascinating compared to other games because it has real consequences to the economy. Xenon raiders shooting down a bunch of traders may lead to higher demand for goods and more demand for ships as the factions seek to replace their losses. One faction may take a sector from another, or the Xenon may take a sector from a faction that's important to you. Khaak may harass remote miners and traders (yours included) and those losses will need to be replaced. I will cover: 1. What to do each of the fleet commands do? 2. The new Carrier "Protect Position" command 3. How I like to set up my forces 4. Sector Patrols 5. Gate blockade 6. Station siege Combat 1. Fleet Commands Fleets are made by right clicking ships onto a command ship and then setting a behavior for that group of ships. The commander has his own behavior selected just like automining. Bear in mind, turret behavior will shoot to whatever the turret is set to, so best to keep on attack all enemies. The below just dictate how the ship will move and what it will use its main weapons on. The possible fleet commands are: Attack for Commander - Ship will use its main guns to attack any ship the commander is attacking. Defend for Commander - Ship will use its main guns to attack any ship attacking the commander specifically (not other ships in the fleet!). Intercept for Commander - Ship will actively attack S and M ships within a certain range of the commander, but ignore L or XL ships. Bombard for Commander - Ship will actively attack L or XL ships within a certain range of the commander, but ignore S or M ships. This is NOT meant for attacking stations. Mimic Commader Behavior - The ship will mimic the behavior you've set for the command ship. Combat 2. Protect Position with carriers 6.2 added Protect Position. Only a carrier led force can do this. It's awesome because your S and M ships will repair at the carrier in between fights. Also the carrier does not need to be anywhere close to the position - it can be way across the sector or even in another sector. It's actually a great way to attack as well, if you want your carrier to stay out of the fighting itself. To do this, right click on the carrier commander and select Protect Position. A great control ring will appear for each wing. Left click and drag to move it to a new spot, right click on it to get several options including whether they should reinforce other wings that encounter enemies in their position. In this manner, a single carrier with enough fighters can cover several gates. Combat 3. How I like to set up my forces As of 6.2, Carrier fleets are now incredibly viable using the Protect Position command. Why? Your fighters will automatically repair (though they don't always retreat as early as they should, they at least reliably repair in between battles), you can cover multiple areas of the map or multiple gates or even multiple sectors with one carrier fleet, and the carrier itself will stay out of the fight unless you order it to participate. You can use more fighters than the carrier has capacity for as well. So, as of 6.2 with VRO, I like 4 types of fleets: 1. Patrol Fleets - These are only meant to fight of Khaak and pirates as well as small Xenon forces. I like a patrol sized carrier (i.e. Boron Guppy) with around a dozen or so fighters and some corvettes. A frigate can also be helpful, though the speed of the fighters is an asset because the goal is to save your civilian craft before they are destroyed. Use protect position and split the subordinates into several smaller groups, each assigned to hotspots where your civilian ships tend to be. By default, if one "protect area" is triggered, then all the other wings will come to help (to disable this, you can right click on the "protect position" green target but it's quite a nice feature). Do NOT use Patrol System, as it currently stands it is worthless and relies on your ships blundering into enemies as opposed to actively responding to detected enemies in the system like you'd think it should. 2. XL Carrier Fleet - A fleet led by a carrier with a full compliment of fighters at least up to its capacity. Using Protect Position, it can shut down a Jump Gate or even several very well. It seems as though a fleet of about 30 heavy fighters with high equipment can take out a K or V with only around 1 casualty. With a full compliment of fighters and M ships (that's 80 fighters and 12 Corvettes on a Boron Shark), you are not likely to take many loses against the Xenon. This fleet is not meant to attack stations, however, as you'll likely take a lot of fighter losses. 3. A Battleship and Destroyer Fleet - This is very expensive and meant to raid Xenon territory and destroy Xenon stations. Ideally at least 3 battleships, with several destroyers as backup. This fleet needs to be able to survive running headlong into a Xenon I or two, backed by 2-3 destroyers and a swarm of fighters. Be careful to have the battleships take the brunt of the enemy attack though as the destroyers will tend to go down much quicker. Can coordinate with the carrier fleet for great effect. The AI does not work well with large turreted ships, so just park these guys where you need them and let the turrets do the work. Think of them as having a zone of control, rather than sending them on attack commands that will make them maneuver in weird suboptimal ways. 4. An Auxilary ship well behind the main fleet for repairs of the large ships as needed. Minor escorts only. Combat 4. How to patrol a sector You'd think a fleet on "Patrol Sector" would do it. You'd be wrong! Unfortunately those ships will NOT respond to distress calls of your other ships in the sector. So it's kind of a useless behavior. They'll simply wander around the sector and attack any hostiles who they happen to blunder into. Better alternatives that I like: 1. For non-carriers - Use Repeat Behavior and "Attack Position" command over several areas of the sector. The ship will cycle through the list of positions for potential enemies forever. When one is detected, it will attack. 2. For carriers with plenty of fighters, split the fighters into several different wings. Then right click on the carrier and select "Protect Position". Fan out the different groups to cover a large area of the sector. Right click each position marker to be sure that they will help fighters in the other sector when a threat is detected. 3. Escort your civilian ships - if you have the extra fighters, a small group per L transport or miner can ward away a lot of trouble. Set "intercept for commander." If the threat is a XL or L ship, you may have to manually order the group to attack. Combat 5. Blockading a Gate For non-carriers, using a defend position command will work. Alternatively, you can just park capital ships with a lot of turrets at the gate and allow the turrets to do the work. For carriers, use the protect position ability. That way your fighters will repair as needed in between fights. And the carrier does NOT need to be in harms way to do this - it can be way across the sector or even in another sector. The Xenon can sometimes attack with a significant force (an I and two K's with fighters), but you can start a blockade with a light carrier and 30 heavy fighters. That should take down a K with minimal fighter losses. Just set alarms so you're notified of Xenon capital ships and pull back if it looks like a large invasion force is imminent. A completely full carrier can shutdown a gate entirely with minimal losses, even if a large Xenon force jumps through. Alternatively around 3 battleships should be able to shutdown almost all Xenon raids, particularly if backed by destroyers. And of course, you can make a permanent defensive base at the gate to reinforce it if you want to free up your fleet or invade the other side without letting stragglers through. Make this very close to the gate so that turrets are in firing range as soon as an enemy crosses out, but don't physically occlude the gate or your ships may have difficulties passing through the gate. "Deadlock" designs on YouTube are fun, but your AI ships will have a heck of a time using that gate if you're in system. As always, build the dock first so you can assign a station commander, then build the rest of the station with a dedicated transport fleet assigned to its building inventory. You can manually queue build inventory deliveries as well - the construction takes a while so it's good to get it started ASAP. When I invade the Xenon, i will usually create a defensive base on my side of every captured system to lock it down entirely. That way, my economic ships can exploit the system without having to worry about Xenon stragglers coming through (and many will try) while my main fleet is fighting in the next system. Combat 6. Station siege Generally, you'll want to do this with battleships loaded with long range weapons. It's pretty annoying currently because there's no good way to tell your ships to "engage at maximum weapons range" or "siege station" or "bombard station." Do NOT use an attack command because your ship will get way too close and get destroyed by station turret fire. Do NOT use "siege" commands because that is basically an intercept order against L and XL ships - it has nothing to do with bombarding stations. You'll want to move your battleship fleet just within main weapons range of the enemy station, then cancel all commands and let the turrets do the work. There can be some wonky behaviour with your ship turrets where they should fire at the station, but they just decide not to. Or some of them do, and some of them decide not to. I think this relates to what parts of the station the turret is targeting and whether it can actually face that direction given the ship orientation. Sometimes the turret will fixate on a part of the station it can't actually hit even when it could easily hit a different module on the station. This is worst with Kha'ak stations in my experience. If this happens, just move the ship to where at least a few of the turrets are firing and be patient. You can control the lead ship to manually do this. Then jump to the other ships to fine tune their positions as well, since they won't always be arranged well to fire their long range weapons. You can do this manually or with the fly here command, but make sure you order them to stop when you get them in position because they'll behave in odd ways otherwise. Turreted ships don't seem to have good AI for attacking, so it's better to just view them as a mobile weapons platform that should sit in place and fire, not maneuver. Should you destroy the Xenon? The Xenon can create a lot of trouble if they breakthrough into sectors that are economically important to you or start to destroy your traders and miners before you're rich enough to easily replace them. They are also sitting on sectors that are rich in resources which you can take if you want. However, with Tides of Avarice you can recycle their destroyed ships. So, with an effective blockade and good recycling stations, they are essentially throwing those resources at you. Also, they destroy ships of the other factions, thereby keeping them buying more ships from you. So you might not want to cripple them entirely or blockade them TOO effectively. So while they are theoretically the enemy, they also kind of help your war profiteering. Piracy and Boarding Piracy is a bit futsy but it is viable. It can get you some pretty expensive ships well before you could afford them yourself. It will cost only about 5-20% the cost of the ship to repair it after capturing it. You will need reasonable resources at your disposal to do this, so it is more a mid game activity not an early game activity. If I do piracy, I usually do it when I'm saving up for my first Wharf as that takes a lot of time and you usually have the income at that point to support your pirate fleet. After the initial costs, the expense will not be that great as your only expenses are repair captured ships and replacing KIA marines. Here are the steps. Step 0. Preparations. You will need: -a good heavy fighter or a preferably a good corvette with lots of main weapons (such as Paranid Nemesis or Split Dragon). -A few ships loaded with marines. High crew corvettes make good marine assault shuttles. Load them with one service personnel and the rest marines. Frigates/light carriers can also make good marine transports because they can carry more marines but beware, you don't want too many active turrets around or you they might destroy your target ship. Around 3-6 Paranid Gorgons or Argon Cerberus loaded almost entirely with marines should be able to successfully board many ships. I've also added some M transports to my assault shuttle fleet and they actually do great, carry a large number of marines, and are pretty inexpensive - just make sure the enemy ship is mostly disabled before you call them in as they will not last long against enemy fire. -A good target. This is best in neutral space so the police leave you alone, but you can do it to the SCA anywhere. Aim for ships without very large crews. L miners in neutral regions with about 10 crew are great targets. Large transports with 100+ crew will be very tough to crack. Ideally you want ships with 30 or less crew. You can only board L or XL ships. -I have had very good luck in my Paranid campaign in Nopileos's fortune snagging SCA destroyers and HOP large miners. Step 1. Scan the target ship -You can only board L or XL ships. -Scan the ship by closing within about 1.5 km, go to scan mode (Shift+2), and then right click on the ship or press F while it is targeted and select scan. When the scanning icon is green, it'll tell you the ship cargo and crew size. They will voice their protests but won't aggro you. -You can only board scanned ships. Step 2. Disable the ship -First, I like to take out its engines so that it doesn't enter travel mode if I stop shooting it. -Then, I like to take out a number of the turrets as this is a requirement for boarding. -You can select a turret or engine or shield component by left clicking on it. Scan mode (Shift + 2) highlights them as well so you can see them more easily. -You CAN have your allied ships help with this, but I find it way better to just do this myself as they tend to cause too much damage to the enemy ship or just get themselves killed. A punchy corvette is more than enough to do this alone as long as you stay very close to the target ship so it can't target you with lots of turrets at one time. Step 3. Issue the board command to your troop shuttles -Shift and left click to drag a box over your troop shuttles. -Right click on the enemy ship and select board. -A boarding plan box will pop up. It lets you specify how many marines from each ship you want to send (sadly limited by the target ship size), roughly how many external turrets need to be disabled for your troop pods to launch, and also what percentage the enemy hull needs to be damaged for your troops to begin to actually breach and assault the ship. -At any point, you can re-select "board ship" and you can see the status of this plan. But be warned once you initiate it, you cannot modify the plan. -Be warned, your allied ships are not that bright and may kill your target ship. Particularly their turrets won't target components and will just shoot the target ship hull, so you may want to disarm their turrets so you don't accidentally kill the ship you want to capture. Or just use relatively harmless ships like transports as your marine shuttles. Step 4. You will get a mission to disable any remaining turrets that need to be disabled for your shuttles to launch marine pods. -The number of turrets you need to disable will be based on the plan you selected. -Once all the required turrets are destroyed, your troop ships will get nearish to the enemy and launch troop pods that will attach to the hull of the target ship. -If one of you troop pods bugs out and fails to attach, you can shoot it down to progress to the next step as it will NOT progress until every troop pod you planned to launch is either shot down or attached to the enemy ship. You can save 5 of the 6 marines on the pod by selecting it on the map and right clicking one of your ships to "transfer crew." Then shoot down the pod so the boarding progresses. (Juan_B found that you can instead ram the target ship to dislodge bugged out pods, I am testing this). Step 5. When ALL marines pods are either shot down or attached to the enemy ship, the mission will update to damage the enemy hull to the amount you specified in the plan. -ALL pods must be accounted for - either dead or attached successfully. So if this stage doesn't seem to progress, look around for bugged out pods. Step 6. When the hull is damaged to the amount specified, your marines will enter the enemy ship and kill the crew. -Be aware, the defenders have an advantage so you need to either bring good marines or have a good numbers advantage. -Since the target ship will have a maximum crew size, there's a maximum number of marines you can have board during a single operation. So unfortunately, you can't flood a ship with marines to guarantee victory. That means some targets with a lot of crew may need more than one boarding operation to capture. -You can monitor the progress by the voice chatter from the boarding team, or watching the crew numbers on the target go down, or reselecting "board" to see the status of the plan and how many of your marines are still alive. -Once the enemy crew is killed, you will take over the ship! Step 7. Assign a captain from your personnel to the new ship. Step 8. Send your marines back to the troop ships. -The easiest way to do this is on the map, select the captured ship and right click on a troop ship, then select "transfer crew" to send them back. Step 9. Repair the engines -If you disable the engines as I prefer to, you'll need at least one engine repaired to 30% to have it limp back to an equipment bay or shipyard for repairs. -There are two ways to do this. -First, you can transfer some service crew either from your global pool or from one of your nearby ships. They will slowly repair some systems incompletely including the engines. -Alternatively or in addition, you can jump into your spacesuit and use your repair laser on the engine that isn't completely destroyed. It needs to be to 30% to function. (The crew can get it from 0% to 1%, then you can start repairing it to speed the process). -If the ship had repair drones and you don't shoot them all down, they will help you with this process. Step 10. Repair the ship or sell it -Send it to an equipment dock or shipyard to repair it and integrate it into your fleet. -Or, right click on any faction wharf or shipyard with the ship selected and you will have the option to directly sell it to them.