换一换
换一换 


技能升级最佳方法指南 简介 本指南旨在提供更高效的各技能升级方法,包括部分技能的被动升级方式。 本指南结合了本人的想法以及游戏Discord服务器中其他玩家分享的经验。 若你有其他技能升级方法的建议,可在下方留言。 剧透警告:本指南部分内容可能包含游戏后期的剧透。 基础准备 以下是更高效刷取技能经验值所需的物品: 人类大脑 - 通过分解人类技能获得,而人类技能可通过肢解任何人类敌人(包括僵尸)的尸体获取。食用人类大脑会获得15%的临时经验值加成,但代价是角色会生病,并随机呕吐数次。确保你能恢复呕吐所损失的饥饿度和口渴度,但15%的经验值加成是值得的,尤其是它适用于所有技能。 汤类——某些汤可以为特定技能提供经验值加成,因此强烈建议在训练这些技能前制作并食用这些汤。 宠物石——这是一种饰品,能增加最低技能的经验值获取。 可选:凯莉——这是一种饰品,能增加10%的经验值获取。不过,凯莉要到游戏后期的水电站区域才能获得,所以是否要等到获得凯莉再行动,取决于你自己的选择。 可选:皱巴巴的脑髓——这是一个我建议必选的特性,它能为所有技能提供20%的经验值加成,让技能升级变得容易很多。 可选:其他增加经验值的特性——像十项全能选手、业余厨师和园丁这类特性,也能为特定技能提供经验值加成,同样有助于这些技能的升级。 重要: Leyak 如果你在游戏中已经到了Leyak开始出现的阶段,还在被动训练技能,这可能会有问题,因为Leyak有可能在你训练时出现并杀死你的角色。防止这种情况最简单的方法是装备感知伙伴饰品,该饰品的效果会使 Leyak 始终处于被注视状态,即使从背后也是如此。或者,当你被动训练技能时,确保携带一个X光炮塔和一个电池(工业级),并让炮塔保持在附近。这样,如果 Leyak 出现,炮塔会阻止它杀死你的角色(在此过程中你还可以刷一些 Leyak 精华,但建议同时携带一个容器,将精华存放在远离角色位置的地方)。 疾跑
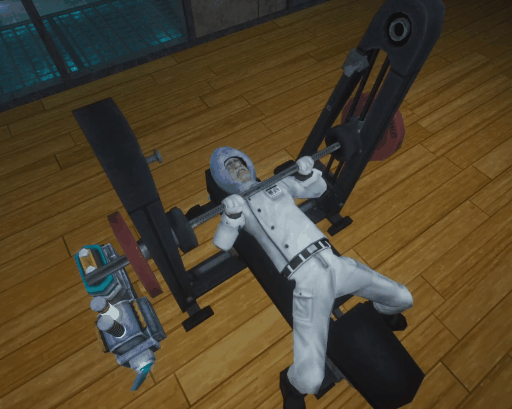
XP获取条件:冲刺 推荐汤品:清淡豌豆汤 推荐增益:状态良好/营养充足、糖分过高(可通过甜糊或根啤漂浮获得) 最佳专长:红移 最低推荐等级:10级(以获得更快的整体速度) 前期训练技巧:坚持冲刺,没有其他捷径。 训练冲刺技能有两种方法:使用健身自行车或直接冲刺。 健身自行车是提升该技能最有效的方式。你可以在使用它的同时做其他事情,比如等待食物烹饪。但当达到一定的XP阈值后,角色会获得乳酸堆积减益,导致暂时无法通过健身自行车获得冲刺XP。当减益效果消失后,你可以再次使用健身自行车来获取冲刺经验值。 除了使用健身自行车外,训练冲刺的最佳方法是在游戏过程中被动训练。外出前食用淡味豌豆汤会有所帮助,此外还要保持饥饿值和口渴值处于满状态,以获得【心情愉快】或【营养充足】加成,这些加成能降低耐力消耗率(让你更频繁地冲刺)。【糖分高涨】加成(通过饮用根汁汽水漂浮饮料或甜味糊获得)也有助于降低耐力消耗率。 如果想在不使用健身自行车的情况下主动训练冲刺,最佳地点是【镜中世界】,因为那里是一个空旷的大型空间,没有任何障碍物。在游戏的按键设置中为自动移动绑定一个按键,然后在辅助功能设置里开启切换冲刺功能。之后按下自动移动键并开启切换冲刺。当你的角色到达镜中世界的边界时,会“传送”并转身,从而继续移动。注意不要让角色朝着中心的洞移动。 另外,记住如果你的耐力较低,可以在某些地方躺下(长沙发、军用 cot、床等)来快速恢复耐力。力量 经验值获取条件:穿戴极重护甲时移动;携带一定重量(黄色条 - 较少经验值)或较重重量(浅红色条 - 较多经验值)时移动,但完全超重时无法获取 推荐汤品:A&L Mega-Stew 最佳专长:Step Aside、Heavy Weapons、Heavy Armor Specialization 建议最低等级:8级(可使用Heavy Weapons) 前期训练技巧:等待获取完整的FORGE套装。这将使角色达到最高护甲等级,虽然会变慢,但移动时可被动获得力量经验值。此方法在力量达到15前有效 训练力量需角色使用卧推架或携带重量时移动卧推是最有效的锻炼方法,你可以在做其他事情时进行,比如等待食物准备好。不过,在某些时候,你的角色会获得【乳酸手臂】负面状态,导致暂时无法通过卧推获得力量经验值。当该负面状态消失后,你的角色就能再次通过卧推获得力量经验值。 为了通过负重获得力量经验值,你的角色的负重状态必须是【沉重负载】(黄色负重条)或【负重过量】(浅红色负重条)——后者更好,因为它每秒提供更多经验值。要达到这种状态,只需在角色的 inventory 中装满物品来增加负重条,可以通过携带大量堆叠物品或携带非常重的物品。只要别让你的状态变成【超重】(亮红色重量条),因为这不会提供力量经验值。 训练力量时,要注意技能升级的时机——这会增加角色的最大负重,进而减少重量条,可能让你从【负重】状态变为【沉重负担】,或者从【沉重负担】变为无负重状态。当力量升级导致负重状态变化时,记得往背包里多放些物品,以保持【负重】状态。 除了卧推,还有3种不同的力量训练方法,其中2种是被动的。
方法一:镜中世界 镜中世界是一片巨大的空旷区域,非常适合被动训练力量属性。为自动移动功能分配一个按键,进入镜中世界后按下该键,让角色持续移动。当角色到达区域边缘时,会自动“传送”并转身。只需确保转身时角色不会朝着中央的洞口移动即可。
方法二:斜坡训练 此方法的效果不如“镜中世界”,因为操作起来有些麻烦,但它可以在游戏更早阶段使用,并且可以被动进行。 基本操作是:在某个天花板较低的地方放置一个斜坡(上方截图来自制造业西区的电车站),然后在斜坡上放置一个气态巢,接着在负重状态下使用自动移动键让角色持续向斜坡移动。气态巢会将角色推回,使其再次向斜坡移动,在此过程中不断产生经验值。 不过,如前所述,此方法操作起来可能有些麻烦,因此在让角色自动训练前,要确保力量经验值正在增长。此外,你需要让角色尽可能长时间待在地面上——这就是为什么建议在天花板较低的地方进行此操作,这样角色在空中停留的时间会尽可能少,因为角色在空中时不会获得经验值。为此,建议穿上【套装】(会减慢角色速度)和重型护甲,让角色在地面上移动得更慢。经验值是根据移动时间而非距离来计算的,所以角色移动速度变慢不会影响经验值的获取频率。
方法三:自动售货机 此方法能提供更多经验值,但无法被动进行。此外,还需要5点力量属性才能解锁摇动自动售货机的能力。 使用此方法时,仍需让角色处于负重状态。具体操作如下:前往有两台自动售货机的地点,先摇动其中一台,再摇动另一台,然后稍微移动一下,直到可以再次摇动售货机。每次摇动售货机都会获得经验值,移动过程中也会获得一些额外经验值。 投掷
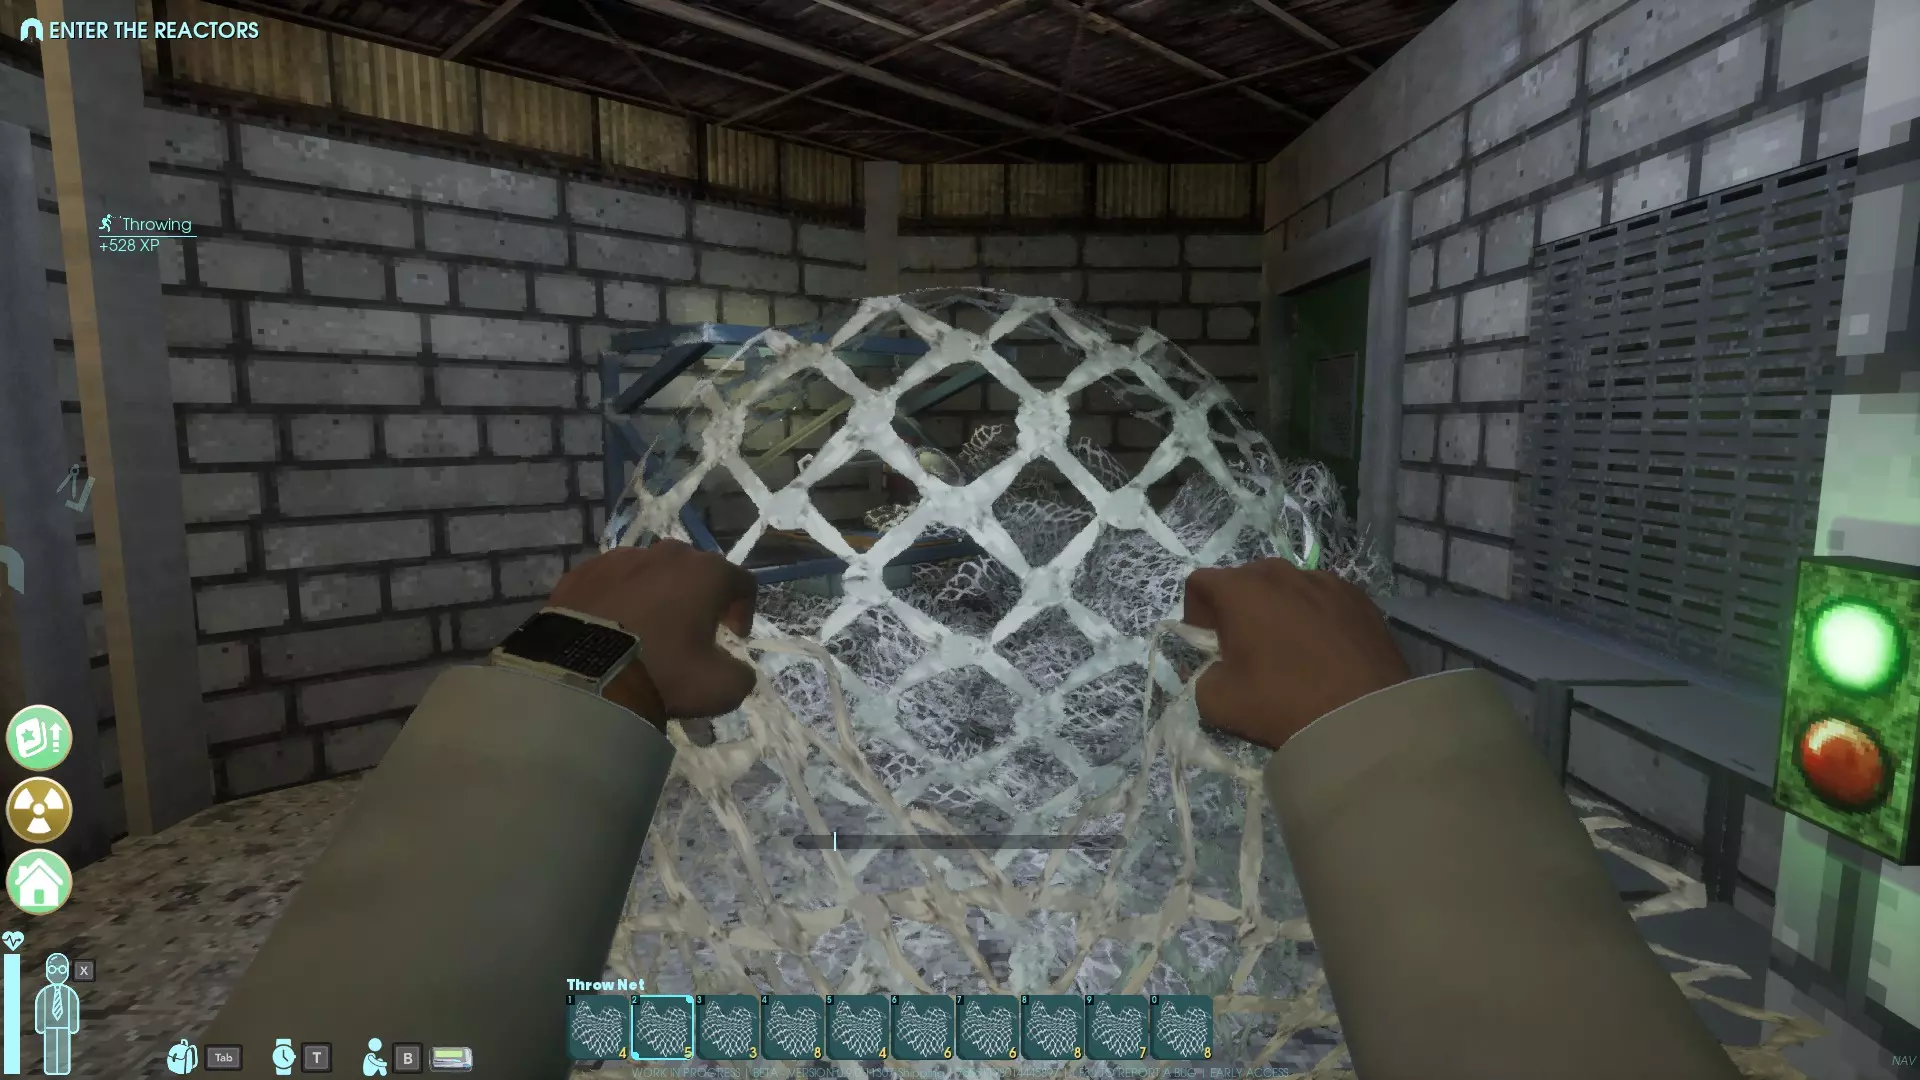
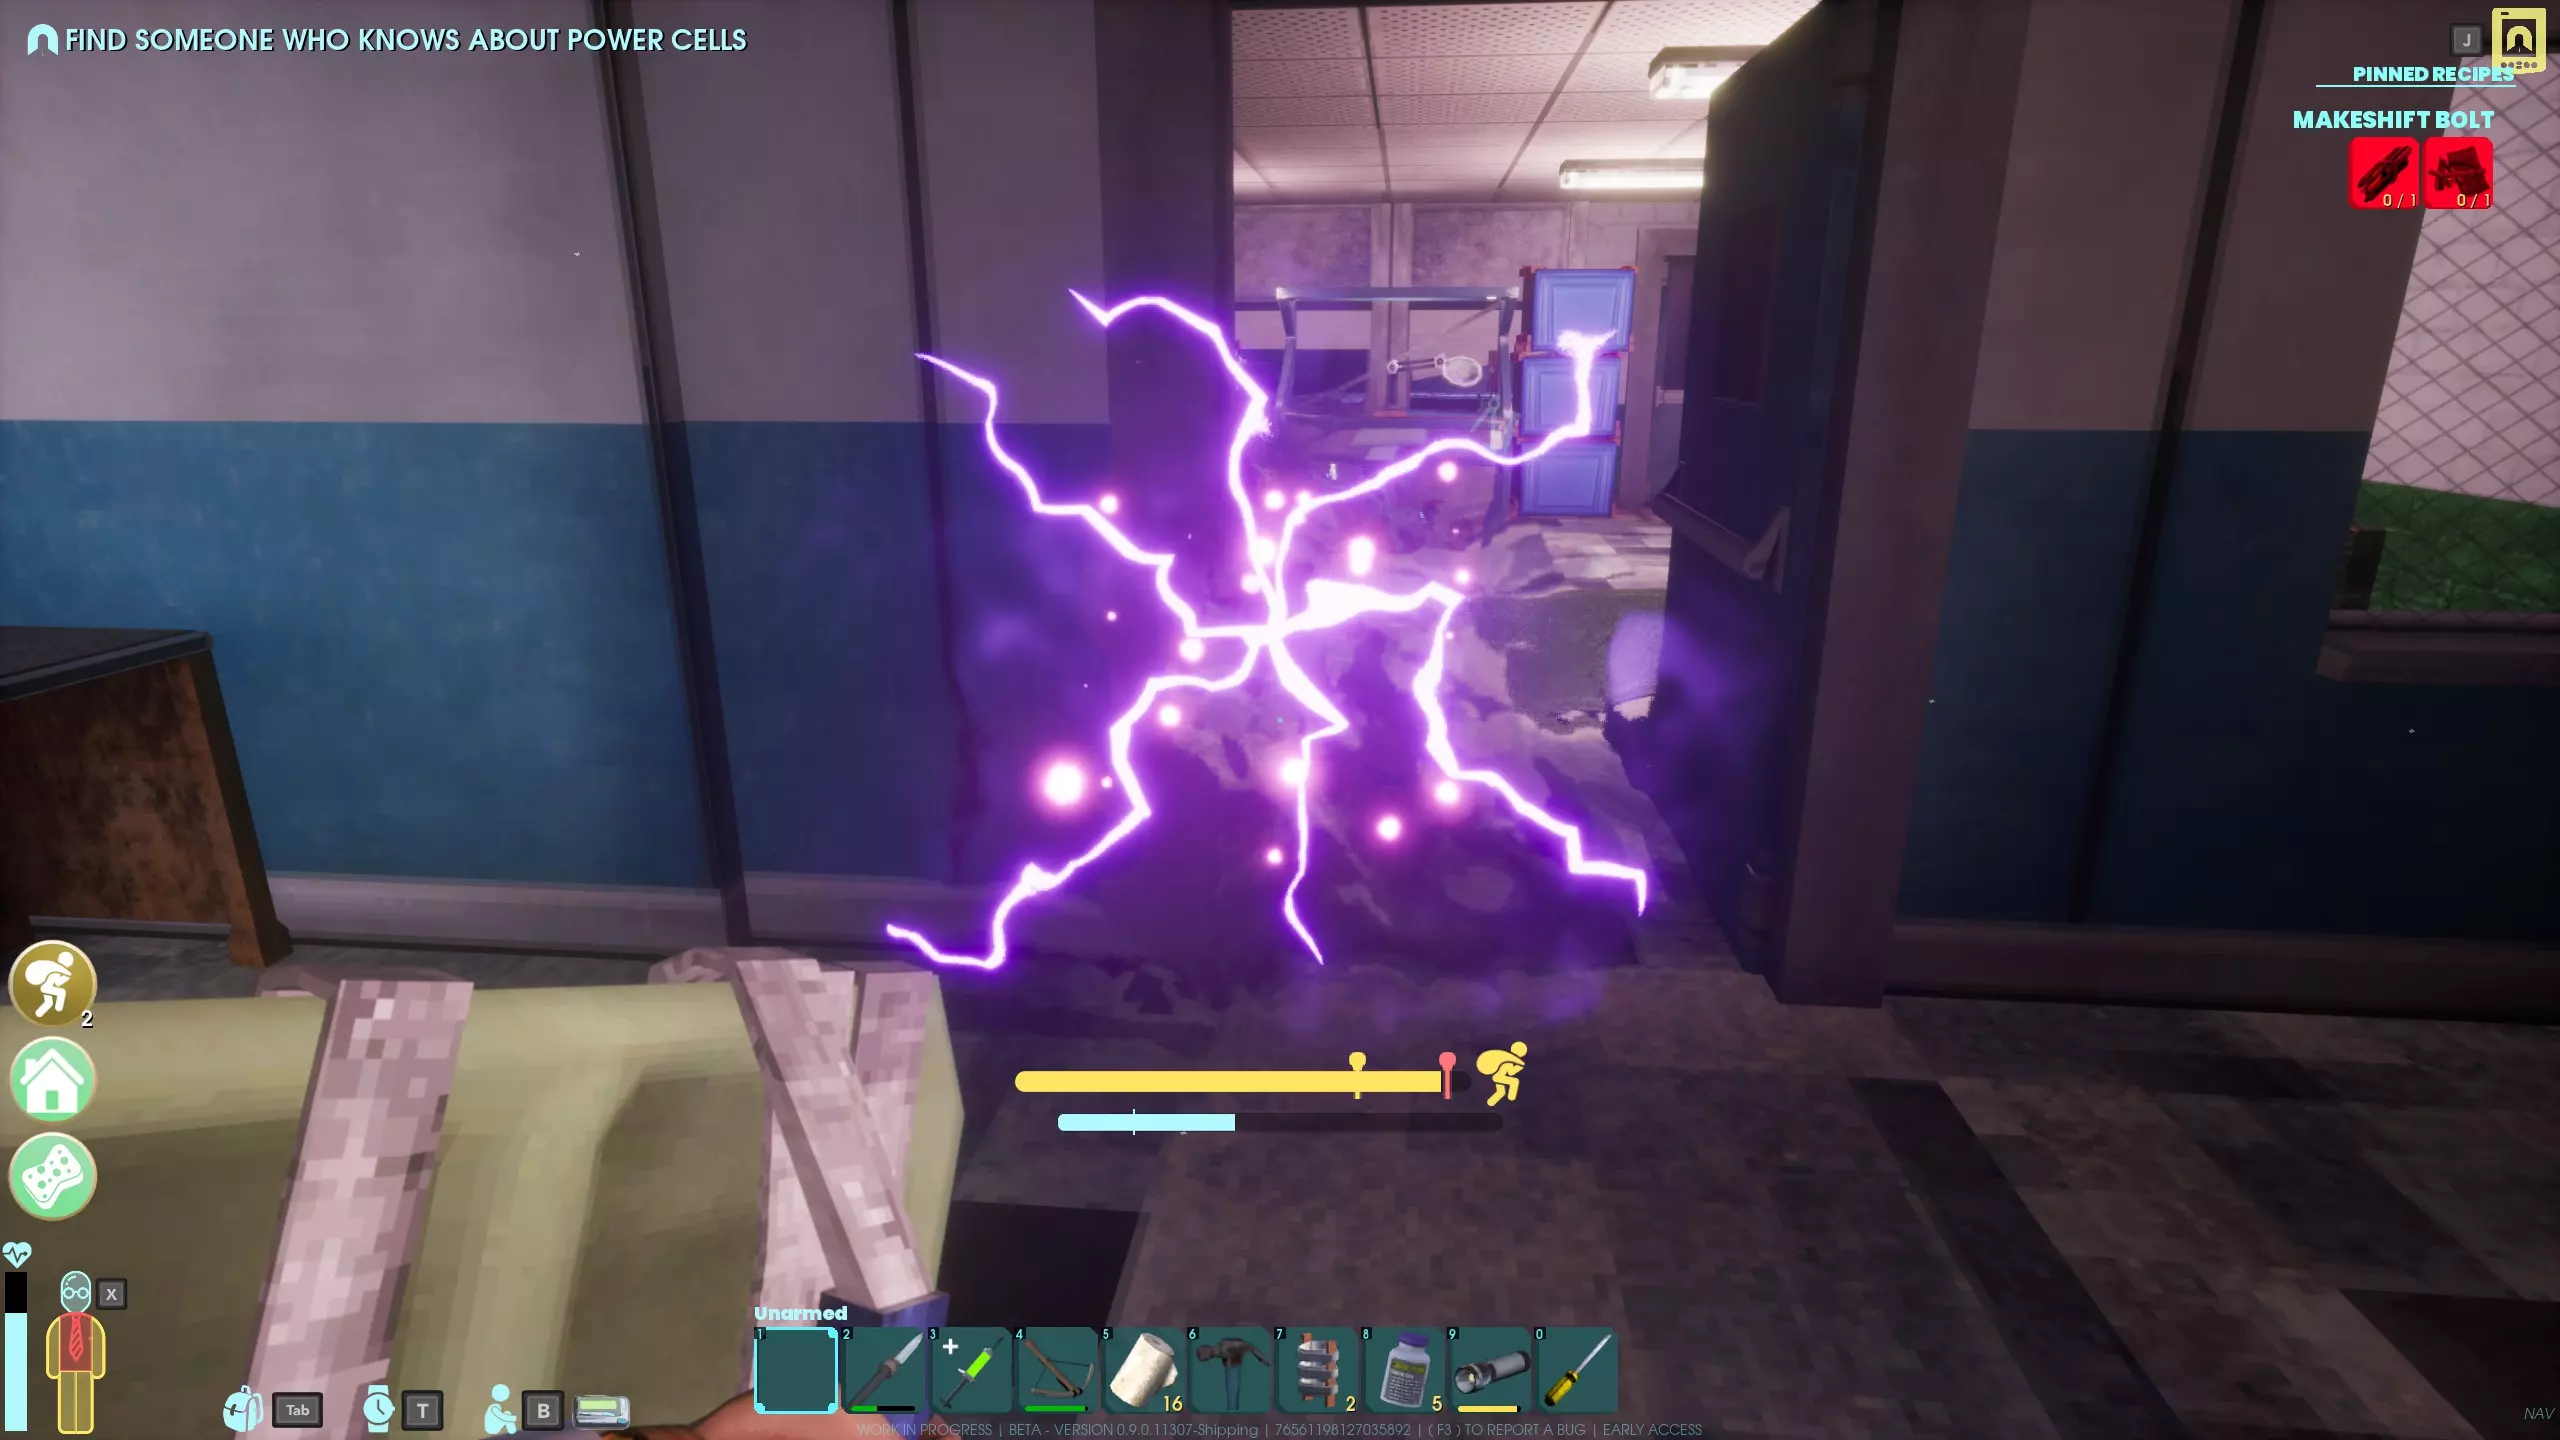
XP获取条件:投掷任意可投掷武器或物品、用投掷武器击中敌人,或拾取橡胶弹球 推荐汤品:无 最佳特长:【投射物拾取】、【工匠】、【终极速度】、【量子位移】 最低推荐等级:12级(允许额外制作1个可投掷物品,包括手榴弹) 前期训练技巧:制作投掷飞镖并向敌人投掷。或者制作网并持续四处投掷。 根据最近的圣诞节更新,投掷技能的升级现在变得相当容易,这得益于投掷武器的加入,并且游戏现在会根据投掷物品和投掷距离计算伤害和XP,因此现在可以在与敌人战斗时提升该技能等级。尽量从尽可能远的距离攻击敌人以获得最大经验值。你也可以使用量子镐来提升投掷等级,因为投掷后镐会返回角色手中。投掷网的方法:
这种方法的操作是,将满堆叠的网放置在每个快捷栏槽位中,然后投掷一张网,接着立即切换到其他物品槽位,这样可以取消投掷动画,从而无需等待延迟就能投掷另一张网。 投掷完所有网后,使用真空装置回收所有网,然后将其放在充电站上并重新开始该过程。(或者,一旦拥有投射物自动拾取功能,你只需走进网就能自动捡起它们) 请注意,在此过程中可能会丢失几张网,我不确定原因——即使我在封闭的房间里进行此操作,也发现有些网不知为何会跑到房间外面,或者我就是找不到它们。另外,当你完成投掷技能的训练后,如果你不想保留网,你可以用它们来训练制作技能,并将其全部拆解为纸碎片。潜行
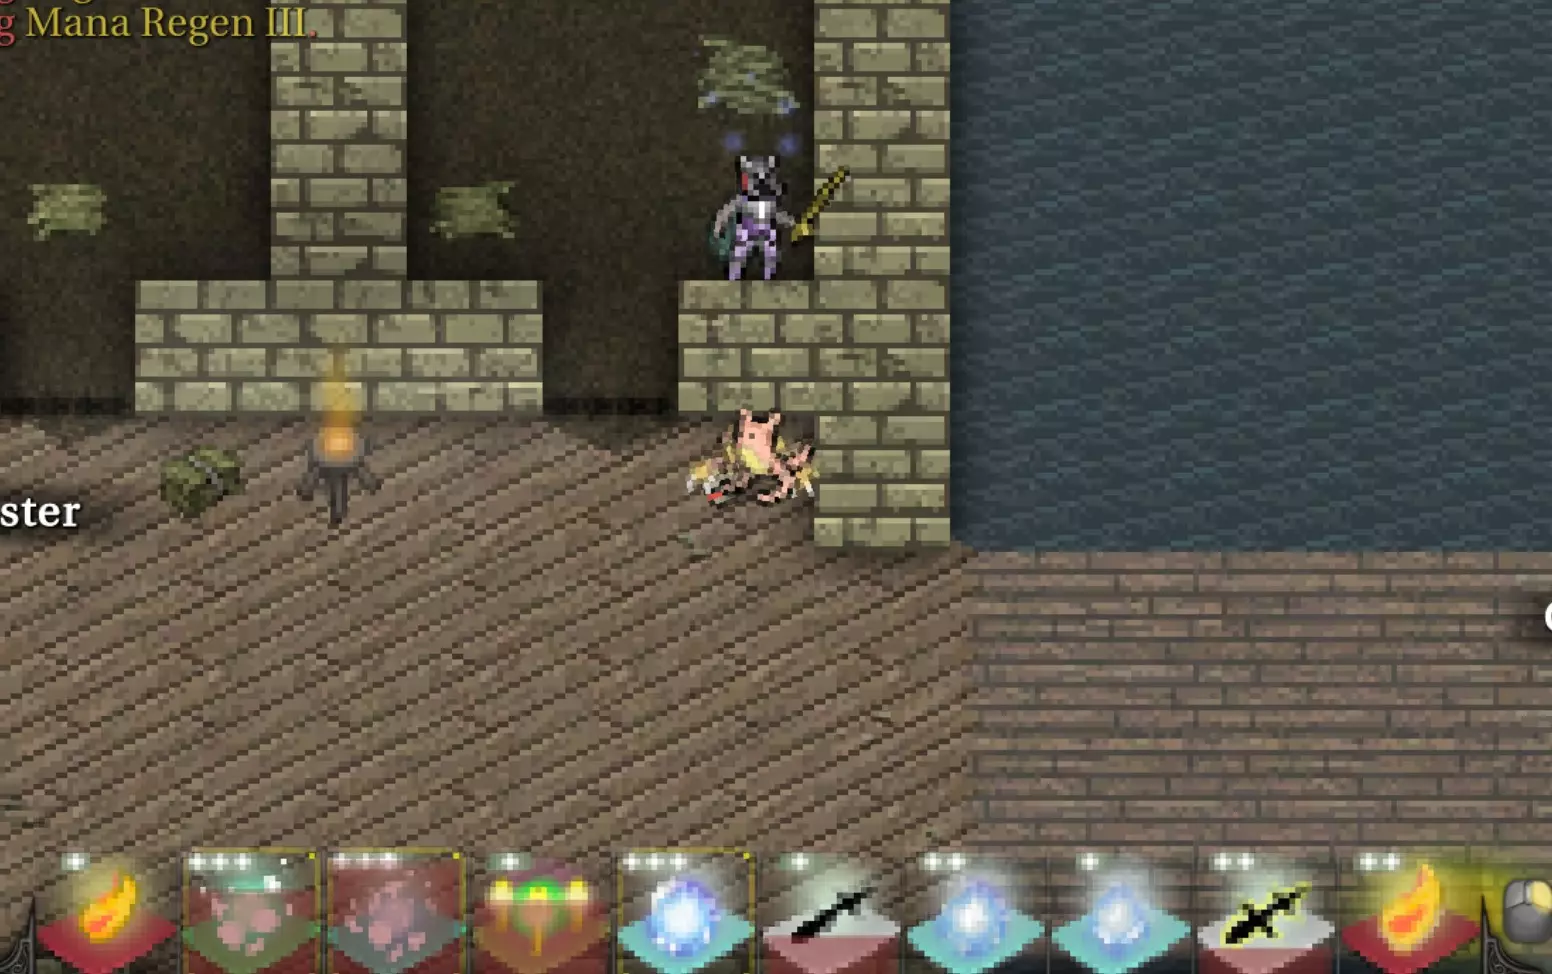
潜行经验值获取条件:在未被敌人发现的情况下保持蹲伏状态靠近敌人(敌人移动时可获得更多经验值),或在未被发现时击中敌人。 推荐汤品:清淡豌豆汤 推荐装备:水晶/透明护甲套装 最佳专长:生物暗影、敏捷、夜猫子、办公室刺客、跨维度 最低推荐等级:5级(更快的蹲伏移动速度和翻滚能力) 早期游戏训练技巧:尽可能对敌人发动潜行攻击。 提升潜行经验值有三种方法——一种是被动但较慢的方法,另一种更快但需要主动操作。第三种方法效率低于第二种,但在游戏初期即可使用。被动方法是,完全蹲伏在上面截图所示的位置,就在弗拉希尔银行入口附近的大招牌旁边。四处走动的“作曲家”(Composer)在你潜行靠近时会提供大量潜行经验值(那些静止不动的提供的经验值要少得多)。如果你蹲伏在截图中那个“作曲家”附近,当它四处走动时,你会获得大量潜行经验值。注意不要靠得太近,否则会激怒它。 你还可以在银行内设置一个小站点,以便在需要时睡觉、多喝些汤和使用厕所。 一旦你获得“水晶/透明”(Crystalline/Lucent) armor set,提升潜行等级会变得更加容易,因为敌人将完全看不到你,这让你可以站得离他们更近。只需确保不要停留在他们的巡逻路线上,或者不蹲下就移动。 下面的动图展示了穿着水晶/透明装甲套装时,在晶甲虫附近提升潜行等级的过程。
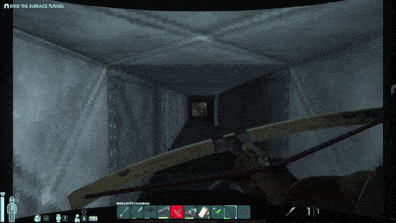
Note: Even though there are some locations in the game where there are more than one patrolling enemy, this does not increase Sneaking XP gain. Without the Crystalline/Lucent armor set, Flathill is the best location for farm Sneaking XP. With this set, there are better options than Flathill, as seen in the gif above. The second method involves capturing a Skink and bringing it to your base. In your base, place it on the ground and use a Quill Rifle to shoot it from behind - each clip should earn around 700 XP. After each clip, pick up the Skink and place it back down, so you don't end up killing it. The third method is simple: throw Metal Scrap onto Carbuncles while they haven't detected you. Each hit grants 30 Sneaking XP. While the Carbuncle will die eventually, there is one Carbuncle at the first area in the game (where the game tells you that you can sneak past enemies) that respawns every time the game is loaded, so you can quit the game and then reload to make it respawn. Blunt Melee & Sharp Melee XP tick conditions: strike any enemy or breakable object - XP is based on hit, not damage Recommended soup: Meaty Stew Best perks (Blunt Melee): Power Attack, Power Hungry, Smash Best perks (Sharp Melee): Clean Cutter, Slice N' Dice, Heartseeker Minimum recommended level (Blunt Melee): 7 (gives you the ability to perform power attacks while running) Minimum recommended level (Sharp Melee): 5 (less chance of getting Bio Scrap when harvesting enemies) Early game training tip: Avoid using the Vacuum and instead use Knives and Pipe Clubs to destroy breakables. Even if you have a better Blunt weapon, keep a Pipe Club on you at all times - use it to destroy breakables and save your weapon for fighting enemies. There are two ways of leveling up Blunt Melee and Sharp Melee. The first, as one would expect, is just fighting enemies. The second is by destroying breakables. When striking breakables like boxes and computers, you'll earn Blunt/Sharp XP. And if there are multiple breakables close to each other, you'll earn XP for each of them that you strike. Based on this, what I'd do is always carry a Knife on me, then use it on breakables around. There are two reasons why I use it - the first is that most of its attacks swing in archs, either horizontally or vertically, allowing it to strike multiple objects (unlike something like the Shiv, which only has a stab attack). The second is that it has low damage, so it takes multiple hits to break objects. (However, note that as your Sharp Melee skills level up, you'll be causing more damage, so even the Hammer and the Knife will take less hits to break objects) The only issue with this method is that it breaks often, so you'll either need to repair it often, carry Duct Tape with you (to repair them without the need of a Repair and Salvage Station) or carry multiple Knives. For Blunt Melee, as the Hammer is now categorized as a Tool and no longer as a Blunt Weapon, this means that you'll need to use an actual weapon. The Pipe Club is recommended as the craftable Blunt Weapon with the lowest damage. Besides this method, the only other recommendation is to just fight enemies. Use a low damage weapon so it takes more hits to kill them (and you get XP for each hit). Important: Do not use broken Knives to break objects, as they do not generate XP on hit. Accuracy XP tick conditions: hit any enemy - XP is based on hit, not damage Recommended soup: Sustenance Soup Recommended gear: Order Helmet, Lodestone Crossbow Best perks: Straight as an Arrow, Mil-Spec / Bio-Metric Armwraps, Bio-Mimic Armwraps Recipe, Stopping Power (plus Accuracy 18 for the recipe to craft the Bio-Fusion Imitator) Minimum recommended level: 10 (less chance for projectiles like bolts and discs to break on impact) Early game training tip: Craft a Makeshift Crossbow and use it against enemies. Unlike Blunt Melee and Sharp Melee, unfortunately Accuracy cannot be trained by shooting breakables, so your only method of training it is to shoot enemies. Fortunately, there is something that you can do to earn more XP. You'll need a gun with a lot of ammo for it - the Pistol is an option if you have a lot of 9mm ammo saved up, but you can also use the Grinder since Grinder Discs are easy to make (and you can recover some of them too). While shotguns can also be used, they deal considerably more damage and don't earn any extra XP compared to other guns. My recommendation would be the Lodestone Crossbow, for three reasons: Makeshift Bolts are very cheap to make, the Lodestone Crossbow can hold up to 8 bolts and it reloads very quickly (great for leveling Reloading as well). The idea is that, again, you earn XP per hit and not based on damage caused, so go up to enemies and shoot them anywhere except for the head. The idea being that you want to get the most XP from each enemy so you have to rely less on enemies respawning to continue training. (Alternatively, you can go into the sandbox settings and increase the enemy spawn rate) You can also use a SMG instead of the Pistol if you're using 9mm ammo, since the high fire rate means you'll tick XP a lot more often. However, I recommend running up to enemies and shooting them at point blank range, to minimize ammo wasted. Otherwise, you might miss some shots due to enemies moving and the gun's recoil. Finally, while training Accuracy, if you're using the Pistol, SMG or a shotgun, you can equip the Sigil of the Hearth in order to mitigate some of the ammo you spend. Reloading XP tick conditions: reload any weapon Recommended soup: Sustenance Soup Recommended gear: Order Helmet, Giant's Pack, quick-reloading weapon (Quill Spear is the best option, otherwise Lodestone Crossbow and Net Launcher also work well) Best perks: Basic Geometry, Speedloader, Loose Rounds Minimum recommended level: 10 (faster reloading) Early game training tip: Reload your weapon whenever you're idle. (see below to see how this works) Reloading guns give a lot of Reloading XP on each reload, so the process is simple: go to your inventory, empty the gun's magazine, then immediately reload the weapon. When the weapon reloading animation is about to finish, hold R, then release it once the weapon is done reloading, so it'll instantly reload again (just make sure to not move the mouse over any ammo types). You can also do this as soon as you have access to the Makeshift Crossbow. This is unfortunately a pretty boring and tiresome process since all you're doing is unloading magazine and then reloading, but due to the high XP earned per reload and the amount of bonuses you can accumulate (Human Brain + Sustenance Soup + Order Helmet), you can level it up pretty quickly. The Quill Spear is the best weapon to use to level up Reloading, due to how quickly it reloads, compared to other weapons. Other good options are the Net Launcher and the Lodestone Crossbow, which can be acquired earlier in the game. Using the Giant's Pack is also recommended, as it increases reloading speed by 15%. It has a chance to be obtained when harvesting corpses from Jotuns. One recommendation is to train this skill passively while exploring the facility - just hold R to reload your weapon, even if the magazine is full. This way, you'll generate Reloading XP constantly without having to actively train it. The gif below shows this recommendation in practice - training Reloading while exploring around.
ĺćŻ
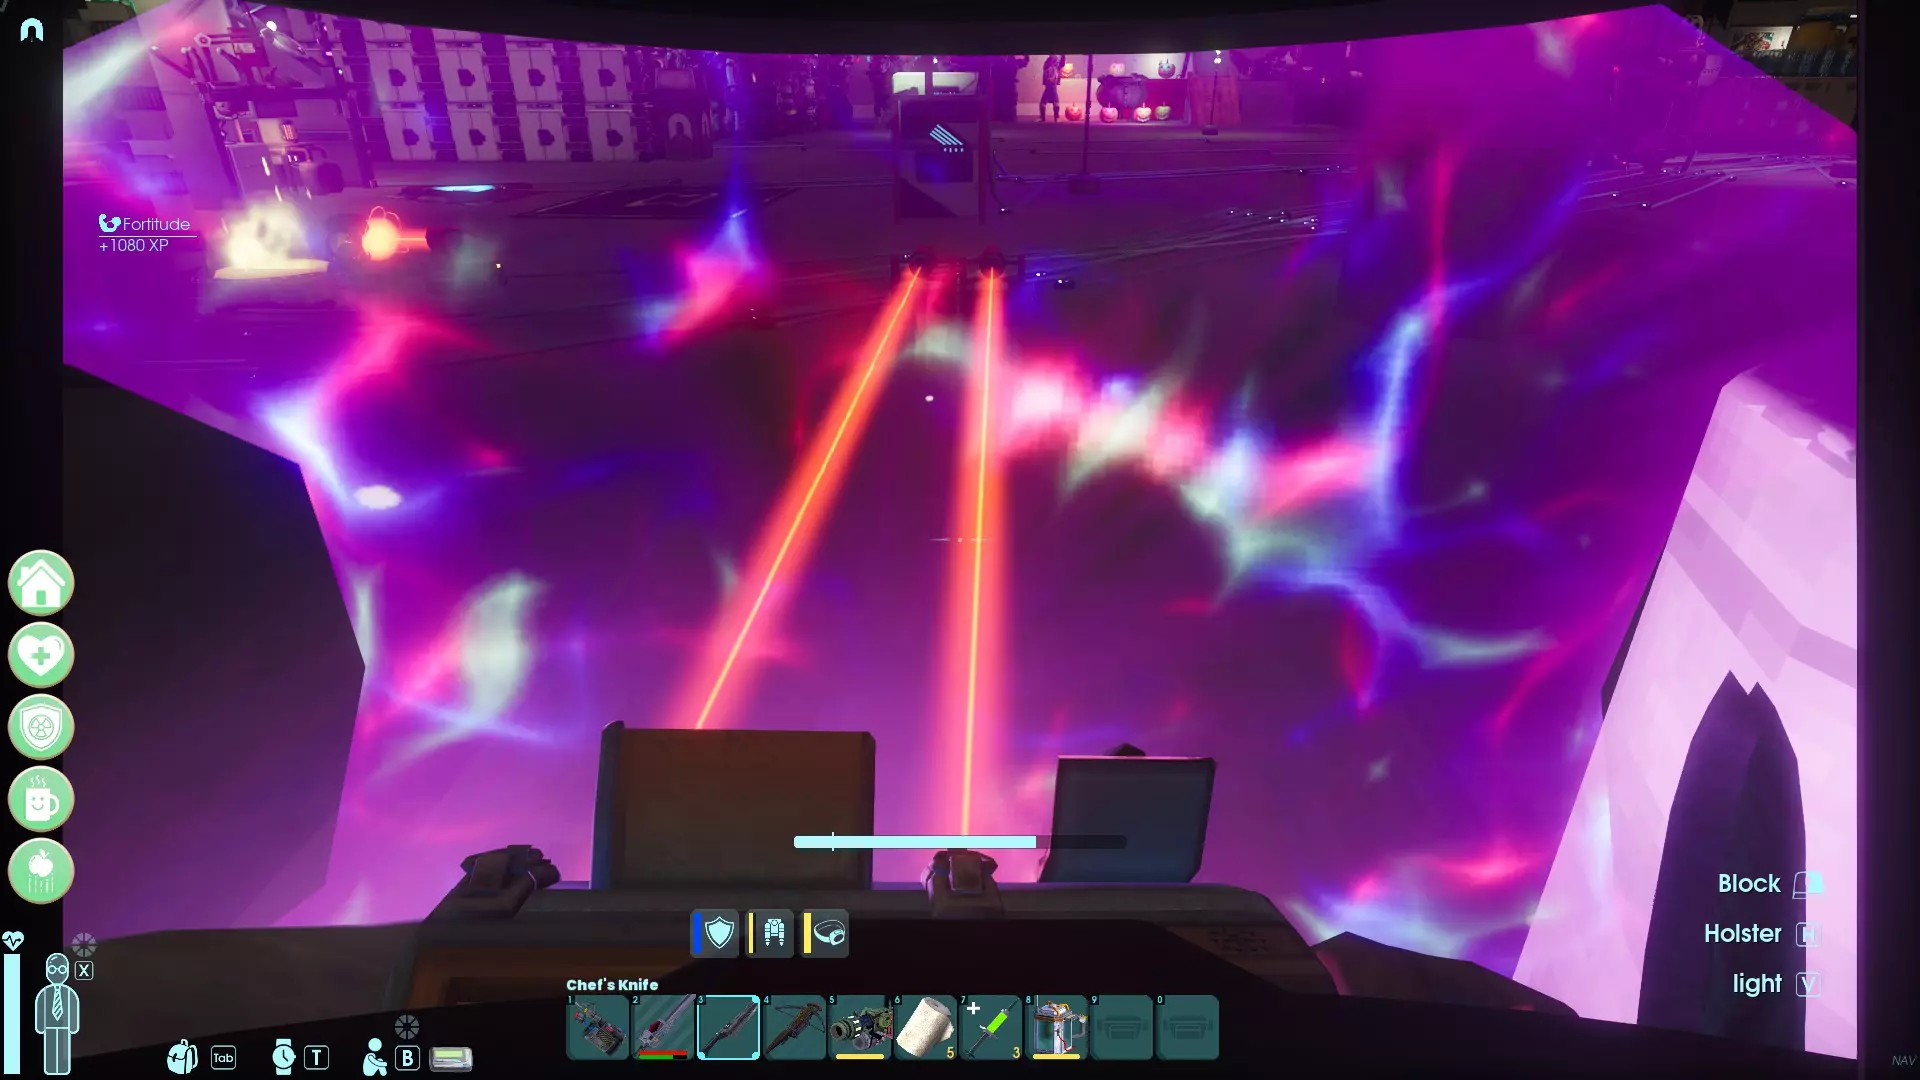
XP tick conditions: receive any damage Recommended soup: None Recommended gear: Hardlight Shield and Security armor set (for one of the methods) Best perks: Habituation, Reflective Mantle, Strong Ecosystem Minimum recommended level: 5 (faster health regen) Early game training tip: Use shields to block attacks. There are two good methods to level up Fortitude. The first is through the use of lasers and the Hardlight Shield. You gain Fortitude XP when taking damage and when blocking - this method is based on blocking lasers. The Hardlight Shield can be recharged like all other devices/equipments that use power, so it can be recharged as lot as you have a way of recharging it. Place two Laser Emitters pointing to one corner. If you have access to Charging Pads, place one Pad directly onto that corner and a third Laser Emitter pointed at it. Otherwise, craft an extra Hardlight Shield and place a Charging Station nearby - when one of the shields runs out, place it on the station and switch to the other one. Additionally, activate "Toggle Shield Block" in the Accessibility options so you don't need to keep holding down the block button. You will also need the Security armor set, which makes it so you don't spend Stamina when blocking attacks. What you want to do is stand in front of the two lasers while blocking, which will then generate Fortitude XP very quickly, then use the Charging Pad or the Charging Station to recharge. Note: more than 2 lasers can also be used, but this will also drain your Stamina a lot faster, so it's not recommended if you don't have access to a Charging Pad. The second method has less requirements, but it's mostly efficient up until before disabling the turrets in the Control Center - after that, the method still works, but it's less efficient. For this method, go to the Laboratories sector, specifically the Containment area, and place a bed close to the range of the turrets. The idea is simple: sleep on this bed to set it as your respawn point, then purposedly let the turrets gun your character down. You receive Fortitude XP for each hit, so this will generate XP very quickly. Upon dying, just respawn and repeat the process. Keep a Hammer on your character to fix the Bed, in case it takes any damage. Important notes for the second method: Do not wear any gear with durability when doing this, as it'll take damage when dying. (Alternatively, you can turn off durability damage on death in the sandbox options) Do not use any temporary bonuses like consuming Human Brains, as bonuses are lost on death. Other possible leveling methods include: Standing close to the smoke in The Train (place a Bed nearby to respawn when dying and follow the same notes for the second method above) Place a Bed under the cable with sparks in Offices level 2 (close to the elevator) and stand under the cable (follow the same notes for the second method above) Crafting XP tick conditions: craft, repair or salvage any item Recommended soup: Balanced Stew Best perks: More Bench, Mega Bench, Eye For Detail, Super Bench, Precision Engineering Minimum recommended level: 5 (access to the first two upgrade tiers for the Crafting Bench) Early game training tip: Salvage Wood Planks into Paper Scrap (or craft Nets, then disassemble them into Paper Scrap), then use Paper Scrap to craft Cloth Scrap. There will be some loss of resources, but you can continue to use Cloth Scrap to craft more Nets and repeat the process. Alternatively, craft Water Bottles, then salvage them. There are two good ways of earning Crafting XP: crafting items and salvaging items (in a Repair & Salvage Station, not the Auto-Salvager). And as you accumulate resources, you'll end up with plenty of options to craft and salvage. So the best you can do is eat a Human Brain, have some Balanced Stew, then go on a crafting/salvaging spree. Here are some recommendations: Salvage Cracked Flashlights into Military Electronics, then salvage Military Electronics into Tech Scrap Use Cloth Scrap to craft Throwing Nets, then salvage Throwing Nets into Paper Scrap, then craft Paper Scrap into Cloth Scrap (there will be some loss of Cloth Scrap in the process but it's a great way of recycling items and gain Crafting XP) Salvage Rotten Food Use Wood to craft Paper Scrap Use Paper Scrap to craft Cloth Scrap Use Metal Scrap to craft Boxes of Screws Craft multiple Water Bottles, then salvage them - each bottle requires 1 Plastic Scrap and then also salvages into 1 Plastic Scrap, so they spend no resources (you can also position your character in front of an Auto Salvager and craft Water Bottles until they fill up your inventory so that any extra Water Bottles you craft fall into the Auto Salvager, so you can then easily collect all the Plastic Scrap generated by the Auto Salvager and then continue to craft more Water Bottles) Use Wood & Glass Scrap to craft Test Tubes (also see tip below) Craft Glowsticks - better if you have Throwing 12 so you craft 2 Glowsticks at once - and then scrap them. However, note that Glowsticks require Test Tube and Bio Scrap to craft. The conversion of Test Tube > 2 Glowsticks > 2 Glass Scrap means that you'll end up with more Glass Scrap, at the cost of Wood (if you're crafting Test Tubes) and Bio Scrap Construction XP tick conditions: Build, package or repair any furniture Recommended soup: Balanced Stew Recommended gear: Hard Hat, Screwdriver Best perks: Razer With Care, Castle Doctrine, Spontaneous Furniture Event Early game training tip: Disassemble a lot of furniture on the way or keep packaging and re-building the same pieces of furniture repeatedly. There are two methods to quickly level up Construction: building or packaging. For building, just craft or collect a lot of pieces of furniture, place them all close to one another, then build them one by one. When done, dismantle them and repeat the process. If you have a friend, your friend can dismantle the pieces of furniture after they're built and then redeploy them, so you can continue building without interruptions. Use a Screwdriver, as the XP isn't based on how much you build. The Screwdriver will take longer to build each furniture, giving you more XP before it's fully built. For packaging, places like the Data Farms at level 2 of the Office Sector or the Furniture Store are great for going on a packaging spree - just go to one of these places and package absolutely everything you see. (Note: remember to package furniture and not use the Hammer's "destroy furniture" option, as this is a lot slower and spends the Hammer's durability) What I would recommend is waiting until you get to the Furniture Store, as it's the place with the most items you can package and, as long as you don't press any of the buttons, no enemies will bother you while you're doing so. Then go to the Furniture Store (you can set up a Crafting Bench right close to the portal so you can teleport there), package everything and wait until portal worlds reset. Each time they reset, go back to the store and package everything again. This will allow you to max Construction easily. Since many of these items won't break when you package them (specially with higher Construction levels), If you want to obtain some resources during these trips, you can bring an Auto-Salvager with you, connect it to a battery and then drop everything that doesn't break in there. The packaging method is recommend for before you obtain the Power Drill or the Construction Gauntlet, as XP from packaging or packaging speed do not depend on any tools you're using. But, once you have access to the Power Drill or the Construction Gauntlet, then building should be better for XP gain than packaging. First Aid XP tick conditions: use any healing item Recommended soup: None Best perks: Rad Remover, Aftercare, Combat Doctor, Brink of Death Minimum recommended level: 4 (access to the Pentetic Acid Syringe) Early game training tip: Just use healing items, no other way around it. Unfortunately, there is no good way of leveling up First Aid other than just using healing items. If you have a large stock of Bio Scrap and Anteverse Wheat, you can make a lot of Healing Syringes and use them constantly while standing in a source of small damage (like in front of a laser), but even then, it isn't very effective. You can also make lots of Splints, break your bones on purpose from fall damage and then use Splints, but this ends up falling in the same situation as Healing Syringes. Although Splints are slightly easier to make - they require Duct Tape, which then require Enethiol to make and Enethiol isn't too easy to find, but each time Duct Tape is crafted, you get 5 of them, making it easier to craft a lot of Splints (and Splints can also stack up to 8, while Healing Syringes only stack up to 3). If you want to try this method, I'd recommend setting it up close to your Crafting Bench so you receive the benefits of your Bench's healing area (granted that you have the corresponding Bench upgrade), so that you'll heal some of the damage taken by fall damage. Setting up a Ramp with Bridges can be useful to get high enough to fall and break bones while staying inside the Bench's healing zone. It's also worth mentioning that, when playing multiplayer, healing other players earns a LOT more XP than healing yourself, so this may be a viable way to train First Aid, if the group wants to have a dedicated doctor in the group. One player can purposedly take fall damage (which also generates Fortitude XP) while getting healed with Splints and Healing Syringes. Alternatively, another way of leveling up First Aid is to stand close to a source of radiation and constantly use Iodine Tablets or Pentetic Acid Syringes. (also better in multiplayer since the Syringes can be used in other players and generate a lot more XP than using it on yourself) If eventually there is a better way of leveling up First Aid, I'll update this section. Cooking XP tick conditions: fully prepare any food item Recommended soup: None Recommended gear: Carson Family Cookbook Best perks: Soupsmith, Hearty & Oven Recipes, Serving Seconds, Fast Food Minimum recommended level: 10 (more health regen and access to the Oven) Early game training tip: Harvest all alien enemies you kill and bring the meat to your base, then cook everything. Recommend having at least 2 stoves to speed up the process. Cooking can be leveled up while playing the game normally - keep your fridge stocked up on meats and/or fish filets. If there are any meats or filets that are about to spoil, cook them - don't let anything go bad. If the fridge is getting too full, then cook some excess meat. This will level up Cooking pretty quickly while you're playing the game. If you want to actively train Cooking, then fill up a fridge with meats and/or fish filets and set up multiple stoves (I used 4), then eat a Human Brain and cook them all. Goes without saying, but don't let anything burn, as you get less XP for doing so. While soups and other food recipes are better sources of sustenance, they're less effective for earning Cooking XP - cooking lots of meat and fish is the best way of earning it. Finally, if you don't want to craft Makeshift Stoves, the kitchen in the Waterfall Apartment has 4 stoves with a total of 16 stove burners, in addition to a Refrigerator and a power socket, making it an ideal alternative to set up a cooking station to level up Cooking. Agriculture XP tick conditions: grow (not harvest) any plant, water a plot or pick up any Agriculture-related items (such as Anteverse Wheat) Recommended Soup: Veggie Stew Best perks: Entangled Ecosystem, Prudent Plucking Minimum recommended level: 13 (each plant consumes less water based on how many other plants are around) Early game training tip: Go to Far Garden and get the Wheat that grows there. Later, in Manufacturing, there is also a part of the mines that has some Wheat. Agriculture is pretty easy to level up, both because it levels up passively as your crops grow and also because you gain Agriculture XP from collecting plants and seeds around the world. You can level it up passively as you play the game (just remember to keep your crops watered), but if you want to actively train it, then there are three places you can do so: the Wildlife Pens in the Cascade Laboratories area, the Mycofields, and the Hydroplant. In the first two locations, there are lots of Anteverse Wheat to collect (in addition to Rope Plant Seeds in the Mycofields). In the Mycofields, these items respawn every portal world reset, while in the Wildlife Pens, they regrow over time. Some can also be collected from the Far Garden, but considerably less. In the Hydroplant, jump into the water and collect Murkweed, which also regrows over time - just remember to bring a Diving Suit. Fishing XP tick conditions: obtain any fish Recommended food: Roasted Nori Snack Recommended gear: Lucky Fishing Hat Best perks: Fish Sense, Tacklebox, Lucky Fishing Hat, Bait and Switch Minimum recommended level: 10 (access to the Lucky Fishing Hat) Early game training tip: Just fish, no other way around it. Fishing is pretty easy to level up, but requires patience, as there is no other way to earn Fishing XP besides accumulating bonuses and catching fish. The best that I can recommend is to choose locations where you have less chance of obtaining trash items (as they give less Fishing XP) and is less likely to be bothered by enemies. Far Garden and the pool of Anteverse Juice in the mines in Manufacturing West are two good locations. Using bait also helps, since it increases the chances of catching the fish for the bait used. You can also use Bait 98 and Portal Fish Bait to help catch rare fish, since those give considerably more Fishing XP, but these baits are hard to make due to the materials necessary to make them. Fishing training can also be paired with Cooking training: collect fish, bring them back to base, prep the fish, store the filets in a fridge, then cook them once the fridge is full or if they're about to go bad. Leveling up multiple skills simultaneously It goes without saying, but skills can be leveled simultaneously. So, here are some suggestions on how to level up multiple skills at the same time: Cooking + other skills: While cooking meat, it takes some time for the meat to be fully cooked. You can use this time to train other skills: craft items, throw Nets, run around, reload a weapon, move while carrying heavy weight, etc. Sprinting + Strength + Reloading: This requires Reloading to be already at level 15 (otherwise you can still train Strength + Reloading or Sprinting + Strength). Equip the full Maestro set with a Fog Lantern, drink Bland Pea Soup and Sustenance Soup. If you have one, equip a Giant's Pack as well. Go to the World in the Mirror and just keep running while carrying heavy weight and while constantly reloading your weapon (hold R to unload your magazine, then press R to immediately reload). Sprinting + Strength + Throwing: Similar to above, but using Nets instead. Requires Throwing 5 so you can then automatically pick up your nets as you throw them. Just keep on throwing nets while running and carrying heavy weight. Sneaking + Reloading (and possibly also Strength): You can reload your weapon while in stealth. If you have the Crystalline set, you can also use it to move while being invisible, which can be used to generate Strength XP, just make sure to not touch any enemies while doing so. Credits In addition to the Discord community, here's a shoutout to everyone who's reached out to provide additional advice for the guide: Wavuvi Goobius Timboy Torquin Sly-Scale WhiteFang784 Aku Aunt Floof Hamtaro589 no iamc24 cubedotzip NoShame Rage-Filled Ani gurb Changelog October 5th, 2024: rewrote the Throwing section with a much faster method and made adjustments to other sections according to some suggestions provided by other players. December 1st, 2024: updated the Crafting and First Aid sections with some tips by Sly-Scale. December 8th, 2024: updated the Throwing section according to the new updates to the skill and the inclusion of Throwing weapons; updated Reloading according to a tip from WhiteFang784 to hold R to reload on a full mag (instead of having to access the inventory); updated the Basics section to include the Pet Rock and a tip about using the Sensory Companion against the Leyak. December 23rd, 2024: updated the Crafting section with a tip from Aku regarding the use of the Auto Salvager while crafting Water Bottles. January 18th, 2025: Included a gif showing the method of training Reloading while exploring (based on WhiteFang784's suggestion from before). January 26th, 2025: Included the XP tick conditions for each skill. February 13th, 2025: Updated the Throwing section, as the method of using Fire + Alt Fire no longer works. Also included a list of best perks for each skill. August 13th, 2025: Updated almost all sections with information on some new perks and a few other details, but mostly updated leveling methods for Sneaking, Blunt Melee, Reloading, Fortitude, Construction, and Agriculture. August 15th, 2025: Added a section on how to simultaneously level up Sprinting, Strength and Reloading/Throwing. August 19th, 2025: Small changes to the Reloading and Fortitude sections. Included early game tips for every skill. Re-wrote the section on leveling up multiple skills simultaneously. August 23rd, 2025: Added a minimum recommended level for each skill. February 18th, 2026: Included the Bench Press and Exercise Bike for Strength and Sprinting; included using Metal Scrap to craft Boxes of Screws for Crafting; included a gif example of leveling up Sneaking using the Crystalline/Lucent armor set.