换一换
换一换 


一份全面指南,助你从初出茅庐的新手成长为不可阻挡的强者。我将逐步讲解基础知识,帮助你快速提升,或许还能教你几招新技巧。 简介 如果你跳过了开场动画,这里为你简述故事:在你10岁时,你杀死了王子,而公主声称亲眼目睹了这一切,因此这被认定为事实。这故事听起来很离谱,但谁会相信你呢?于是你逃回家中。国王怒不可遏,下令处死所有与你描述相似的孩子——按照中世纪的标准,几乎所有孩子都符合条件。所有市民因此发起了一场反抗运动,以保护这些无端被屠杀的孩子们。你的父亲仍有忧虑,当晚便将你送走以确保你的安全。父亲的朋友一直保护着你,直到某天夜里,一名卑鄙的刺客杀害了你的监护人。你再次逃亡,但这次是回到你曾经的故土…… 游戏初期,你基本上失去了一切。你需要重新开始,做得更好! 我会尽快让你独自面对挑战,因为我会帮助你把小小的营地发展成你的帝国(或者至少是更像样的地方)。 首先,我会为你介绍一些音乐,让你的阅读体验更有趣一些。 现在你成了一个平民…… 你的新生活从现在开始。你除了身上的衣服一无所有,这很糟糕。但我会助你前进,帮你成为一股不可阻挡的力量。首先,转身快速探索一下废墟,你会发现一些东西。探索完毕后,去赫恩迪恩找长老谈话。他表面上会让你离开,不想惹麻烦,但内心其实很有同情心。他会让你在城外搭建营地,只是他希望你不会再回来,最好是被狼或其他什么东西带走。他会这样考验你好几次,直到对你放下戒心。过一段时间,你就可以雇佣他的一些村民来为你效力了。接受他的任务,向他展示你的能力吧! 你可以在城市领地外的任何地方建造你的小屋,但越安全的地方,发展起来需要的时间就越长。
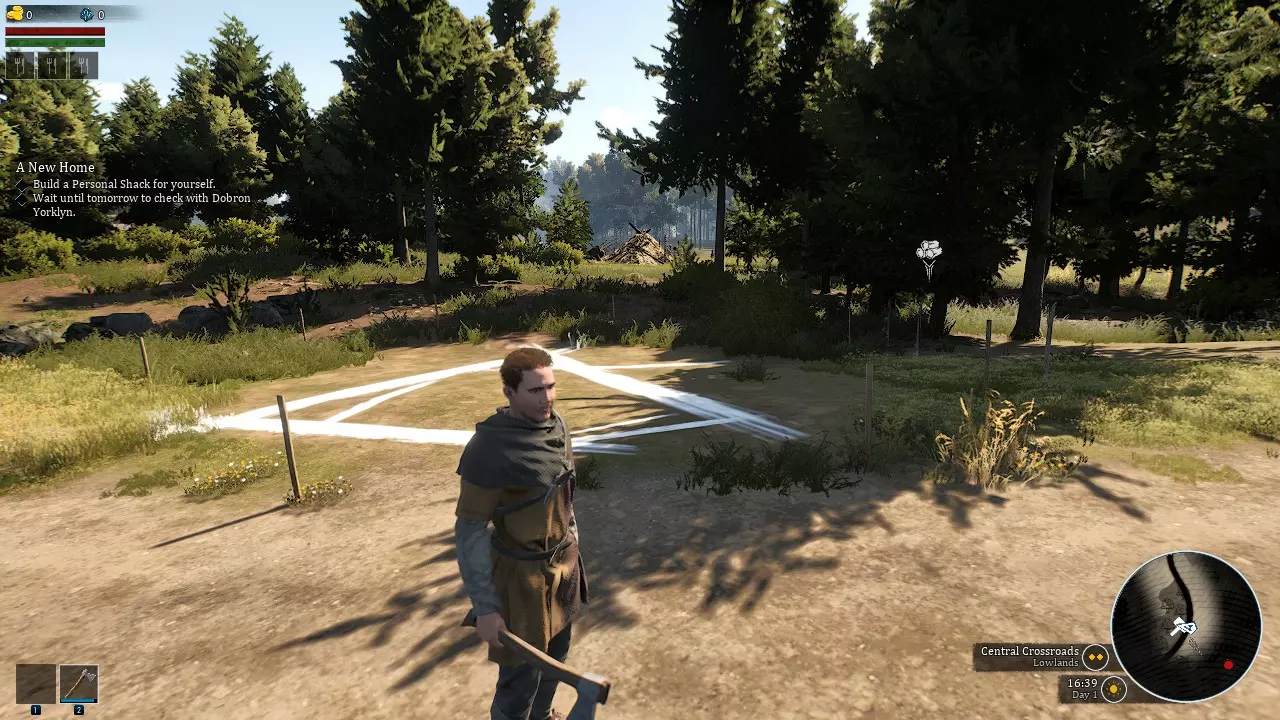
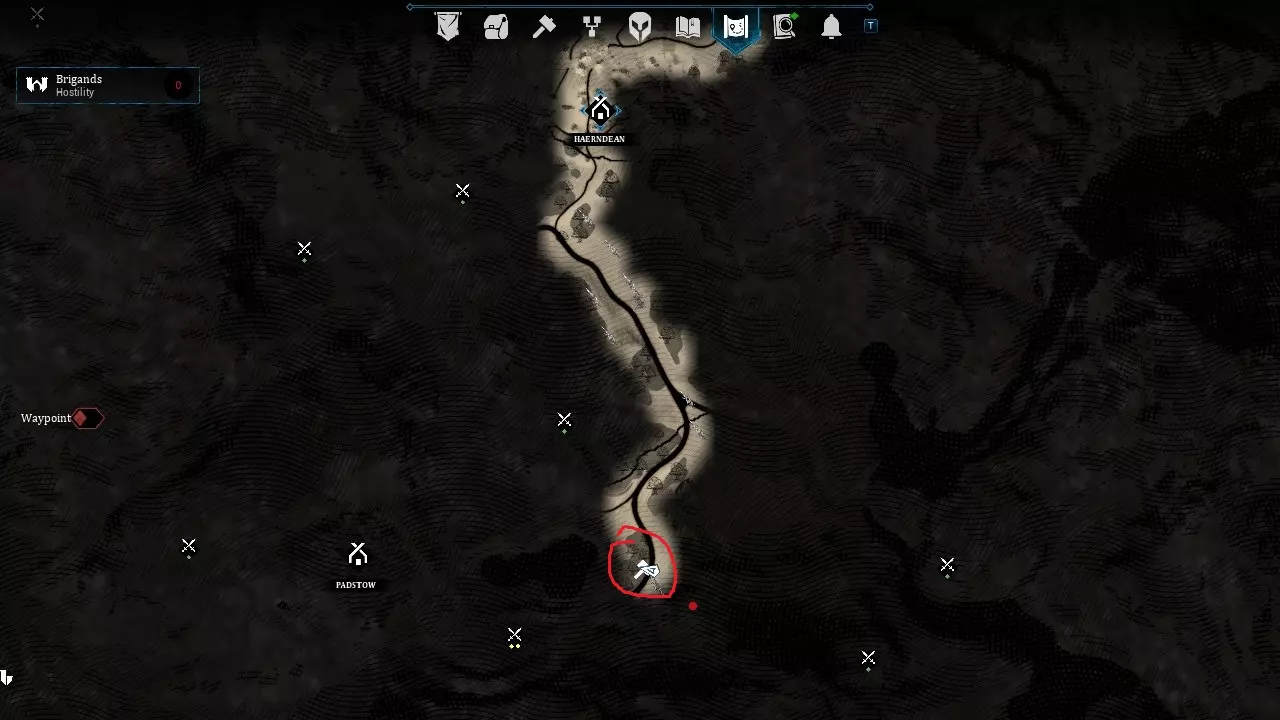
在上述地点或其附近搭建你的营地。在出发去占领你的新家时,你需要考虑收集材料。有几样东西是必需的。首先,你应该准备一把斧头,然后是一根棍棒。制作斧头需要2块石头和6根树枝(在地上寻找树枝和石头)。按下【I】键打开物品栏,在右下角你会看到你的角色可以一直制作的3样东西(斧头、棍棒和火把)。一旦你有了斧头,就可以砍伐幼树,每棵幼树能获得3-4根树枝。制作好斧头后,获取树枝会比在树林里悠闲漫步时寻找要容易得多。制作棍棒只需要4根树枝。现在,要建造你的新住所,你需要2种材料:6份亚麻和10份木材(树枝)。
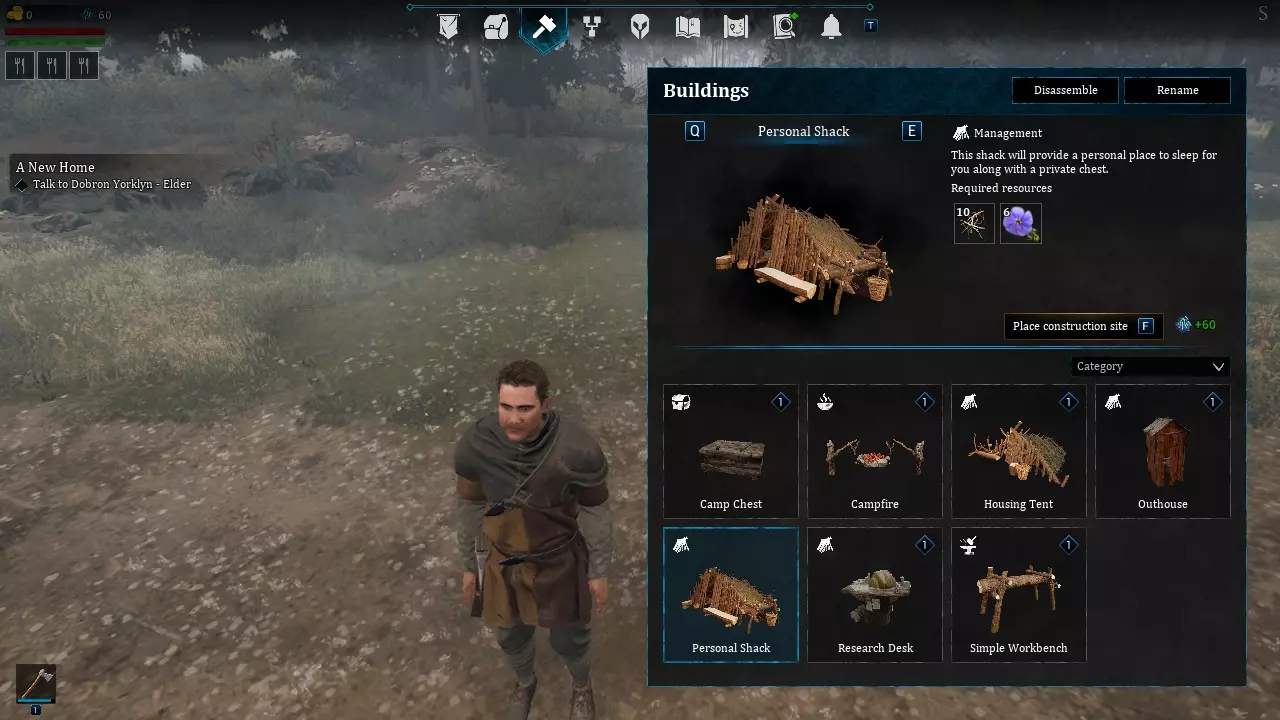
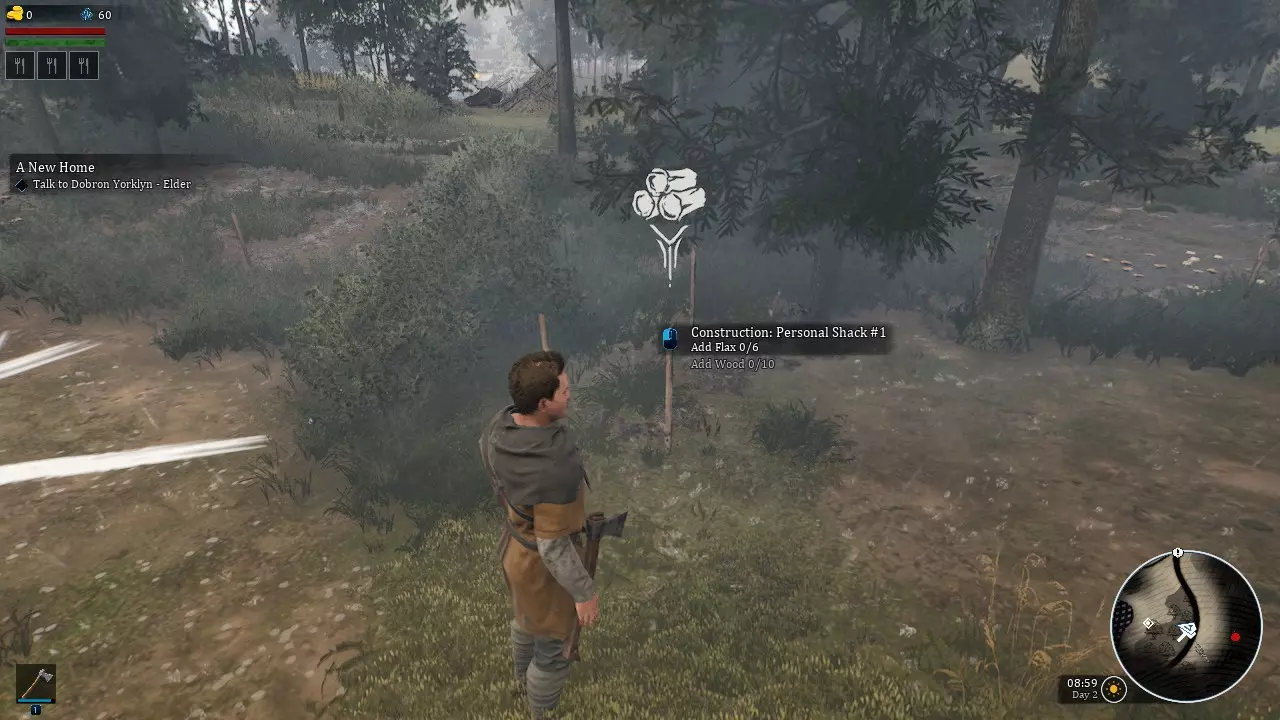
You are now ready to wait out the evening until the next morning... Blah. Might as well be productive and build everything you can now. Hit "B" on your keyboard and look up what you want to build and how much materials you will need to harvest. The image on the right is where you store the material gained until you have everything needed. Now this isn't necessary on small projects, but on larger ones you just simply won't have enough room in your inventory. I have played through the spot below, and while it is difficult if you get caught, as long as you are not within aggro range no harm will come to your new home if you run away. Building up your community (Tier 1) So, you've woken up from your first nights rest in your shack. It's about time you start working on building up your city. If you haven't already gotten Lubomir, now would be time. Head over to Hearndean and talk with the mayor and get the quest find Lubomir and get him to make traps for the city because for some reason they are useless. Once you get Lubomir head back to your village and get him working on the research station (if already built) while you build a home for him. Go to the build menu (B) and select the housing tent. Place it where would would like. After you gather all the material required for it, you can start building other things such as a simple workbench and research station. After those are built you may want to start building some storage containers (build 2 or 3). Once you have the traps completed you can use a few to start getting meat and pelts. Send Lubomir to research the foraging camp. This will open up more things useful to research after. You can research what you wish but if you pull up the tech tree, you can see what steps would be best suited to you I will list my preferred research order in researching. While you're doing all this Lubomir will be setting up your village with resources and research (only you can place buildings), Lubomir can also construct your buildings you wish to place. It will be a lot for him, so eventually you will have to hire villagers from cities you form relationships with to gain villagers, please read "Relationships and Villagers". After researching all the buildings you can now work on researching the Village Hall. This will advance you to tier 2. Things start to get fun now. Controlling your character - Hunting & Fighting So the basic controls are simple, a mouse click here, a mouse click there and your good. However, Bellwright is slightly more complex then that and takes some practice to get used to. HarvestingDuring your harvesting you use the left mouse button, it will pick up everything you need. Now, if you drop something or your inventory is full you don't use the mouse to pick it up, you will use the F key. Hunting with a bowWhen hunting animals you generally use a bow, its hard to run after a rabbit or deer when you spook them, you will try but there is a 99% chance you will not strike them. Foes like foxes and boars are different, they will attack you which is much preferred when you want some meat or hide, but they do hit quite hard if you aren't prepared. The bow is a fun tool but take practice as well, unlike most FPS games, this is not CoD or Fortnite. Your arrow has a trajectory and is not being release at 2000+ ft/s, so you will have to aim accordingly. Deer are probably the hardest to hunt mainly because they become spooked quite easily and dash off to be untraceable in a wooded area. What I do when I'm out hunting for deer is run around mainly and wait for the eye to pop up in the middle of the screen. Once I see that I cease all forward movement and back step, if it is a wooded area you need to scan around to find your buck, once you spot it you need to line it up with a side shot so you can go for its head. Now if you aim for the deer's head, your trajectory will graze its chin hairs which will scare the dingle-berries out of it and it will dart and be hard to find and follow after. If you catch up with it or find a new deer to hunt, you need to do this, and you will quickly have success. Same steps as above until your release. You will watch/follow the deer until it stops, you aim a little over its head. Now, do not shoot. 9 times out of 10, it will graze and you WILL curse (I still do), just a moments of patience and victory is yours. The deer usually grazes for 2 seconds, when it lifts its head is the moment you strike. Look where your aiming just before release to be certain of the drop compensation and blamo, if you got the red x, you just bagged yourself some meat, hides and hopefully a Trophy. Melee CombatCombat is where the complex comes in, if you have a shield a simple block will suffice holding the right mouse button, but if you were hunting or attacking your enemies with a bow, it's more difficult to equip your shield while running away. I prefer to stand and fight, but attention and timing is everything. Enemy swings are as fast as yours and eventually gets easier to defend if you just practice. Combat and defense is 4 way directional. Up, down, left, and right. Your shield is not directional, its just click and use. Defending The blocking with your weapon or shield is done through your RMB (right mouse button), and it is not generic But you can make it, see link below. If your enemy swings right (your left), you have to block left. If he swing overhand, you block up, etc. This is done by holding down the right mouse button and moving the mouse in the direction of your opponents attack. The more difficult part is when there are 2 or more enemies, which is common. This is harder to block and gives your very little room to attack. A way to overcome this is to walk backwards and wait for an enemy to swing, when they swing you block followed by a swing (usually a side swing). If there are more then 2 enemies you can run. Even if you are using your shield to defend, you can only take so many hits before it breaks. What I have noticed was that the scene in this is true for attacks from behind.

https://en.wikipedia.org/wiki/Troy_(film) Attacking Attacking is a little more forward and easier, unless they block it, which does happen quite often. Using your LMB (left mouse button) and direction, you can control where your swing come from. Also recently changed holding the LMB will charge up your attack (damage increase). The Devs also introduced Feint and Riposte. With feint you can cancel your current attack using RMB and initiate another from a different direction. However, if you wait until too far into your swing, you won’t be able to cancel it. This is helpful when you have initiated a swing into a direction that you see an enemy is already blocking. You can feint to try to make them miss their next block. The riposte mechanic works like this. You must attack in the direction from which you are receiving an attack. If you time it correctly, you can both block an incoming attack and initiate your own. For more combat details https://store.steampowered.com/news/app/1812450/view/6851744408517481172 There are two blocking modes - fluid (default) and non-fluid, which can be toggled in game settings How and where to get skill points and read books How you get skill points is simple. It is in every action you take (except movement) Every swing of the sword, every craft you create and every arrow you shoot. The only exception to those are, it has to have an end result. Your sword must hit the enemy, and your arrow must strike its target. Breaking it down further. You will get your 1H skill point from using a one handed weapon, whether it be a sword, club or axe. 2H, a two handed weapon and so on. Along with most of your base skills you get a secondary. With 1H and 2H you get Str as well, with Archery you get Agi. With harvesting, farming, hunting, cooking, and crafting you get the associated skill. You can also increase these skill quicker with books. There are a range of books dedicated to each skill you can gain. The fun part is there are 5 tiers of books. Apprentice 500 skillJourneyman 1500 skillProficient 3000 skillMaster 6000 skill Expert 9000 skillThe Apprentice book is the easiest to acquire and these can be used at all skill levels. These books can be acquired from Hearndean for 150 coin. As well, you will get a lot of them in battles with bandits and brigands. The Journeyman book is also simple to acquire and can be used at skill levels 3 and above. The books can be acquired from Padstow for 300 coin. This book you will also get a fair amount in battles with bandits and brigands. The Proficient book is harder to gain and can be used at skill levels 5 and above. The Master book is difficult to get and can be used at level 7 and above. The Expert book is harder to get then a villager with 10 skill level, they can be used at level 9 and above. There are also skill books for your villagers. There are currently 2, and they are labour and research skills. The villagers can also use all the skill books available. Relationships and Villagers Your first relationship with usually be with Hearndean, seeing as the are the starting quest givers. Building a relationship with other villages is important as this is how you can hire villagers to become your citizens. You build your relationships through quests, gifts, and trade trade after liberation. The quests you do can range in "Trust and Renown" points. You can earn renown by completing quests, building, and vanquishing enemies at your gate (or near you). Renown is how you hire villagers. There are 6 stages of relations with a village,StrangerAssociateFriendProtectorLiberatorBellwrightAs a stranger there is not much to do but quests, walk around the city and on your mini-map in the lower right hand corner you will see "?" for villagers who offer quests. Once you become an asssociate, you can start to hire villagers for your city I wait until friend status. Your hiring choices are bottom of the barrel, they can help you get stuff started and sorted. The stats are generally random, but I've gotten one or two that were decent at early stages. When you get to friend rank you start to see how much better stats are and usually you can narrow it down to what type of job you want your villager to do. Protector will give you better quality citizens, you may have to sift through them, but it is worth it. Liberation is your first goal, once you get that, you can hire job specific villagers such as Blacksmith, Weaver, Carpenter etc. This will vary from city to city, please see DreXav's Guide under "Useful links & fellow guides". Bellwright will be your end goal for relationships. You will get the cream of the crop to choose from, they will have higher job stats, as well as higher combat stats. You will soon be on your way to take down the bad boys and girls of Karvenia. Everything about outposts and deliveries OutpostsA means to an end and less travel for all your villagers. Creating outposts is a fairly simple task, the reasoning behind it is as well. The reason you should build outposts is simple. It will keep your villagers close by. It will keep your villagers from walking half a map to return with a handful of resources. It will give you piece of mind. An outpost needs housing of course, and then what ever you want extracted from the area. This could be iron, copper, granite, etc. Or it could be peat, berries. So choose what extraction building you may need. The main thing it needs in order to transport your locally sourced goods now is, a storage area. It will have to be a stockpile at minimum, this will be your go to storage for any OP unless you plan to do large scale things with it. Creating an outpost is simple.
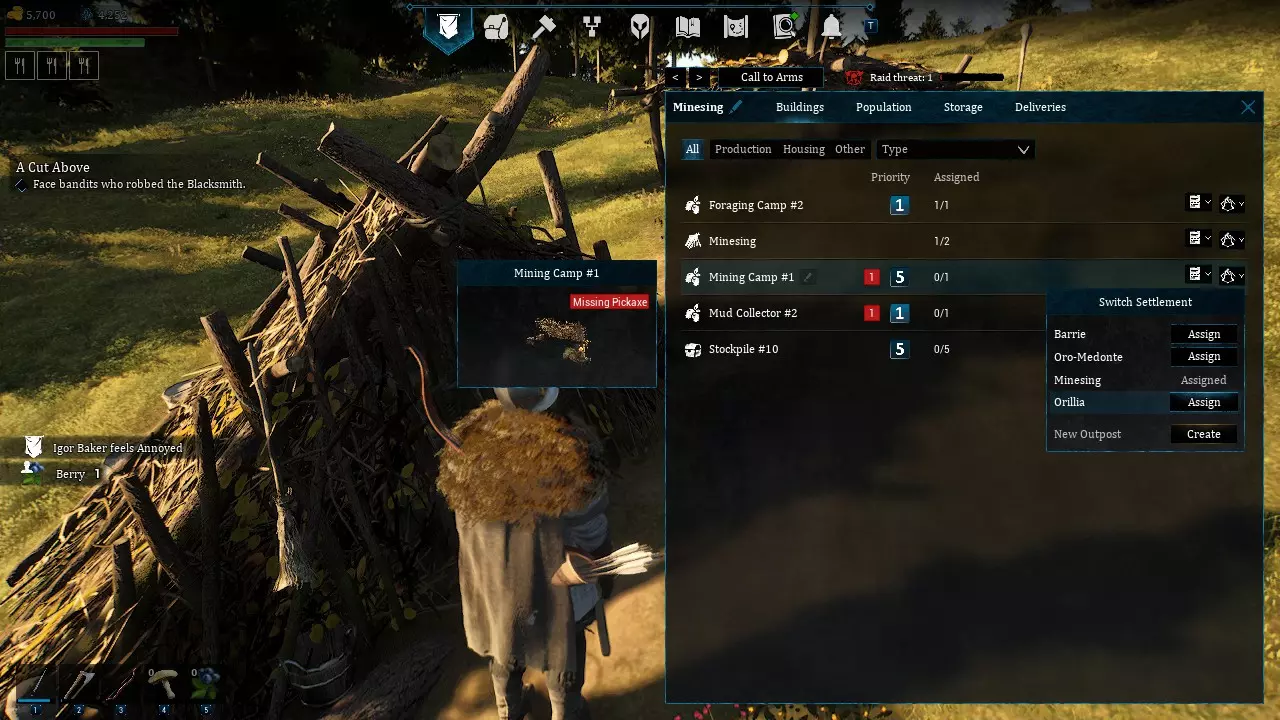
例如,你想开采一些铜矿。首先,打开建造菜单(B键)。然后选择矿场。由于需要为此建筑创建新前哨站,你需要按(N键)打开总览界面。进入建筑标签页,找到你刚建造的矿场,它会显示一个与你刚建造的矿场对应的编号。在右侧找到切换定居点图标,点击它并在选择新前哨站部分下点击创建。之后,你建造的每个新建筑都将自动归属于该前哨站。 货物运输:阅读以下内容后,运输货物会变得相当简单。设置运输需从总览标签页(N键)开始,在该界面顶部有一个运输标签页,点击它即可。从那里你会看到一个空白屏幕,底部有搜索功能。假设你想把一些铜矿运回你的村庄。

在左上角顶部,你可以看到你的村庄名称,其上方可以使用两侧的箭头切换村庄(这能让你知道将接收你输入资源的村庄)。现在在搜索栏中输入“铜矿”,并从弹出的词语中选择它。这会创建一个交付订单,然后你选择空白下拉菜单并选择生产铜矿的前哨站。
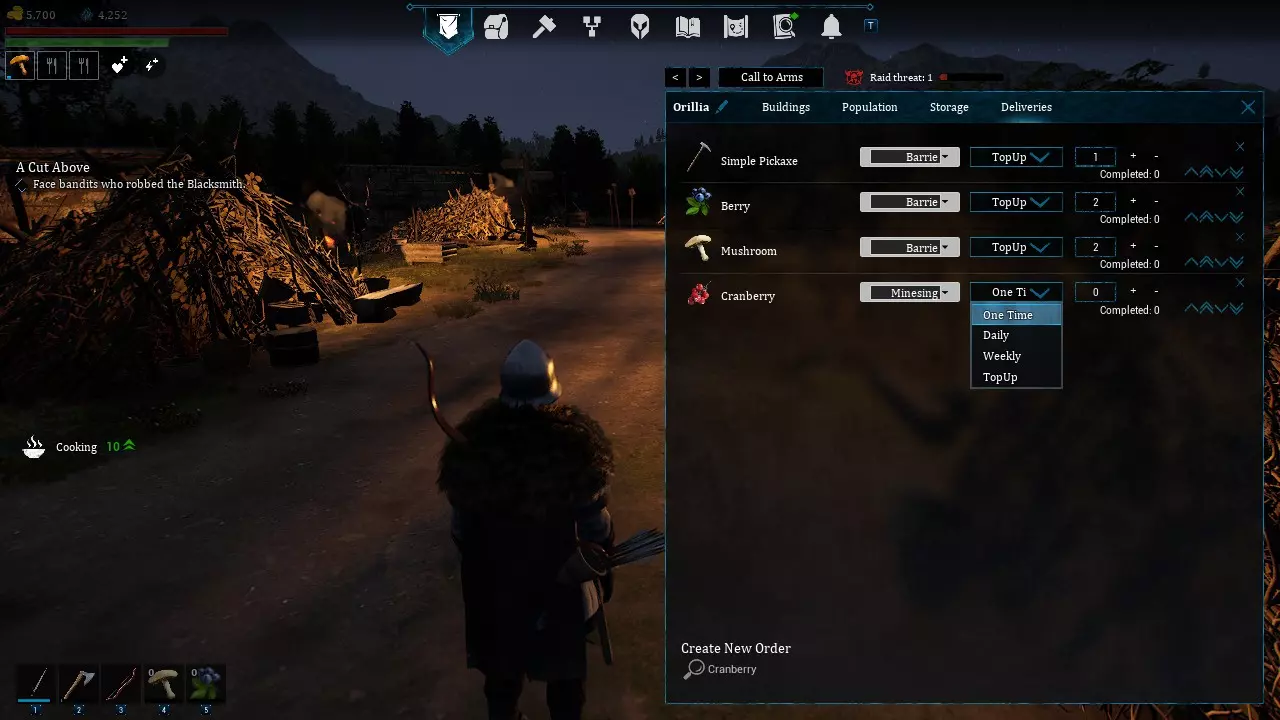

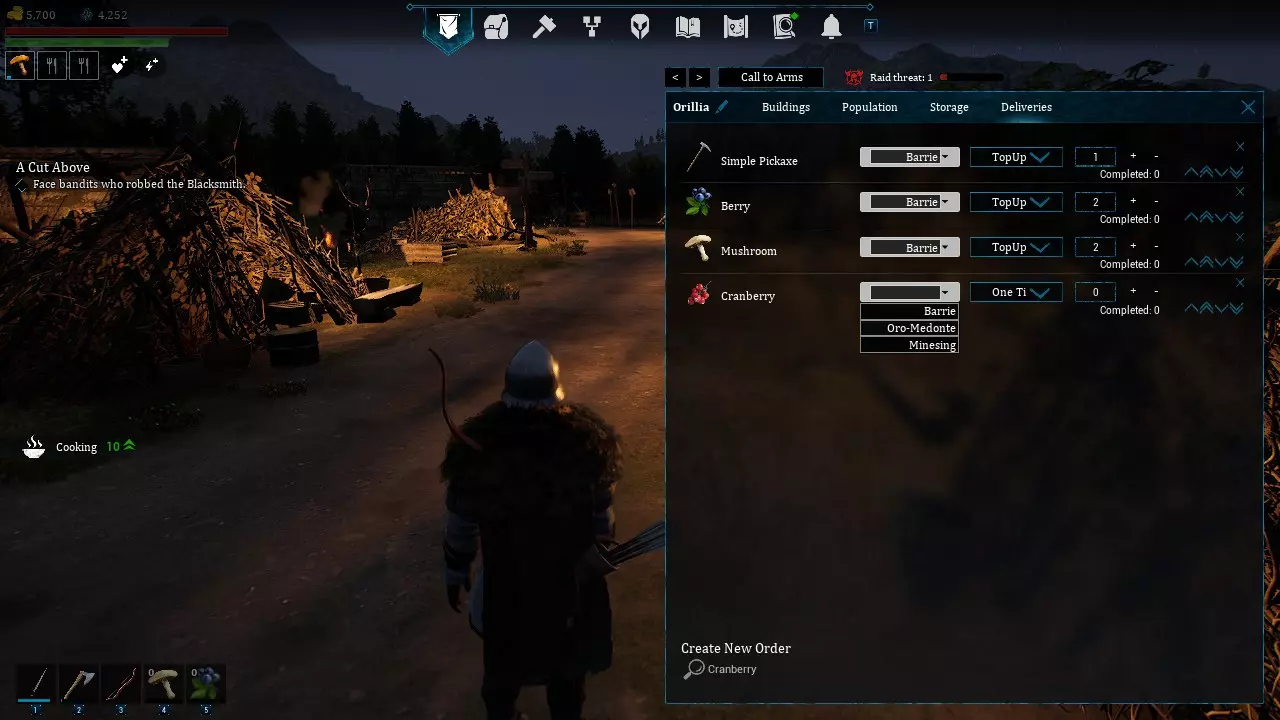
然后你可以选择希望配送发生的时间范围。你可以选择一次性、每日、每周或补充配送。做出你的选择。然后你要选择从哨站导入村庄的数量。这样就完成了! 这需要双向运作,哨站的村民需要物资,无论是镐、斧还是食物。你需要为他们配备这些物资,这样他们才能为你工作。实现这一点的简单方法与我们已经设置的配送方式相同,唯一的区别是……你需要在概览标签中将城市更改为你想要供应的城市。 注意:其他需要考虑的事情是加快你的产出,不要停止生产。对于你的一级资源,例如铜或泥炭。你也可以建造一个工作台,每天转移资源来修理工具,或者建造一个采集小屋来获取基本的木棍和石头。当然,这需要不止一个村民才能良好运作。 让村民做好战斗准备 我个人一开始研究了几乎所有有用的建筑,期间研究了武器,只研究了冒险者服饰。在我看来,其他盔甲都没用,把收集的皮条集中用在武器上。如果你雇佣了不错的村民,他们至少可以装备+1力量的武器,我会为这些村民制作 rondel( rondel)。对于力量较高的村民,我会选择短剑。确保所有村民都配备盾牌,如果没有盾牌,就让他们使用弓箭。要做到这些,需要大量收集资源,你会需要很多木材。 如果你进展顺利,即将完成村庄大厅(T2)的建造,那么就需要开始研究和打造 armor(盔甲)了。你的主要关注点应该是身体、腿部和头部的 armor(盔甲),这主要是因为它们的防御值。在 T2 阶段,我会专注于打造 armor(盔甲),但同时也需要建造建筑。因此,在开始研究前,确保你拥有所需的资源供应,以保证过程尽可能顺利。如果资源不足,就去狩猎和采集。招募村民时,我喜欢确保他们的力量值大于0,这样他们就能装备盾牌。但要确保他们的其他大部分属性(如工艺/收割等)达到4或以上,直到你建立良好的关系来找到更好的村民。 还要记得找一位高等级且能力强的研究员,这能加快研究速度,直到你需要特定工作的研究员为止。 当你准备好让手下战斗并为他们配备装备时,在拥有集结地之前,你可以将所有武器、食物和 armor 存放在一个储物堆里。当你将他们纳入麾下后,按“E”键并点击储物堆,他们就会自行装备,但不会升级到更好的武器和 armor。我通常的做法是在雇佣村民时脱掉他们的装备,他们大多数装备的防御值最多也就加10。这样一来,当有合适的 armor(盔甲)时,他们就会自动升级。武器则需要手动更换。 【生存挑战:抵御袭击和流窜匪徒】 袭击等级会根据你的村庄发展进度而变化,你建造的每一座新建筑通常都会提升袭击等级,但在前期提升幅度很小。 抵御袭击并不难,但如果你处于匪徒活动频繁的区域,这可能就是一项艰巨的任务。确保你的村民都配备武器和盾牌,这能让他们在你赶来支援前保持存活。 你首先要做的是让村民成为预备兵(我有一个村民的战斗技能为0,所以没算进去),一旦他们成为预备兵,集结他们就很简单了。在右上角【守卫】按钮旁边、【坚守阵地】按钮下方,点击【后备兵】即可激活。对所有村民执行此操作,或者只对那些你希望参与战斗的村民执行。

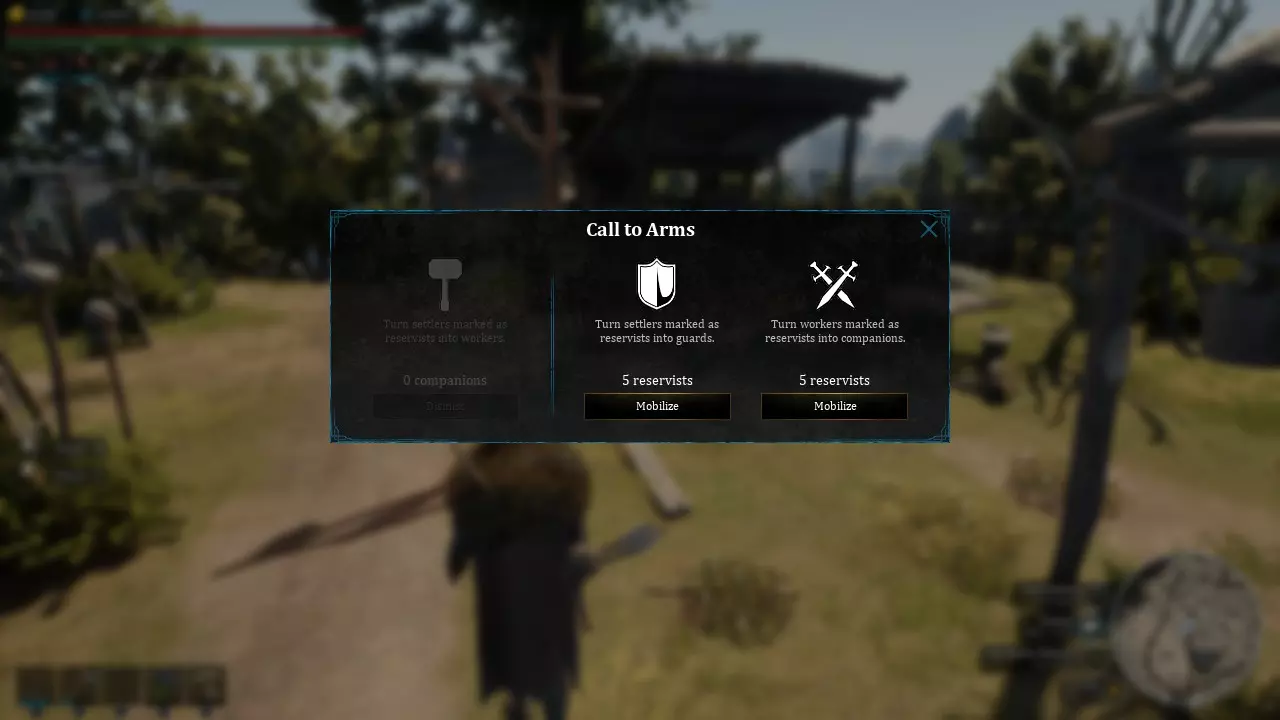
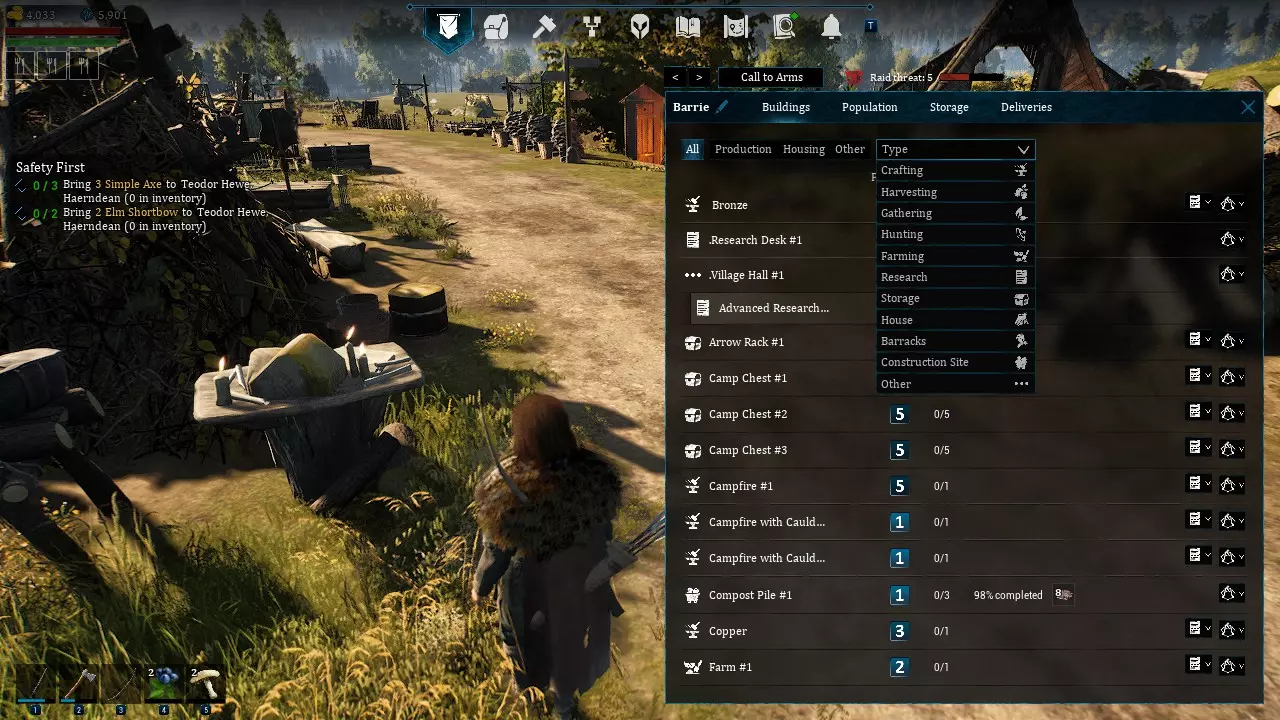
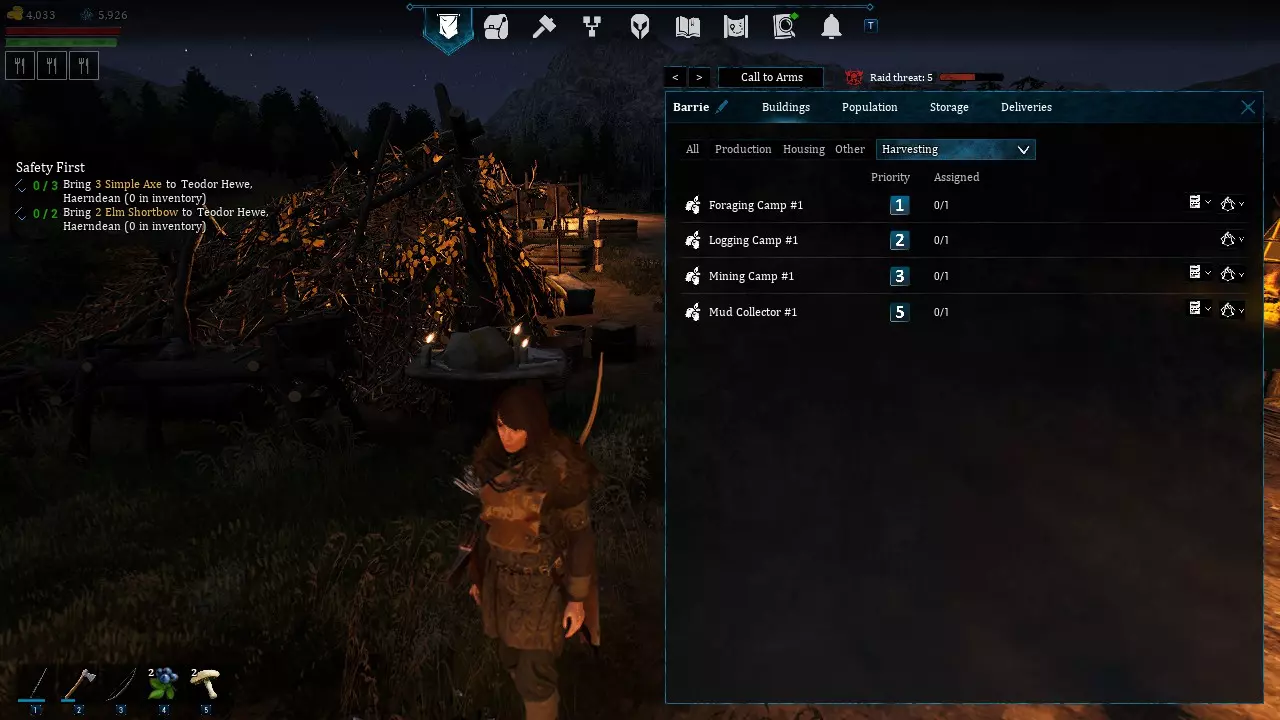
若要快速召集村民,甚至在奔跑时也能操作,只需按下【K】键。这会调出召集菜单,在菜单中点击中间的“守卫”或右侧的“同伴”选项即可。 村民有3种服务等级: - 预备役村民仅在你吸引敌人仇恨时才会攻击,且只有附近区域的预备役会前来援助。 - 守卫村民会进入警戒状态,主动攻击任何敌人。就像你在NPC村庄看到的那样,其他守卫在收到警报后也会赶来支援。 - 同伴村民会直接前往你的位置,在你陷入困境时非常有用。 我个人最常使用同伴功能。 如何结交盟友……解放行动 在游戏中,结交盟友的最佳方式是毫不犹豫、无所畏惧地为他们提供帮助。你已经完成了不少任务,但提升保护者身份的速度实在太慢了。不过有个好消息,你可以通过交易硬币和狼牙来加快进度。虽然硬币很难获得,但狼牙要容易得多,如果你有狩猎小屋,就能积累相当数量的狼牙。 这适用于与任何城市的信任等级提升,虽然需要花些时间,但为了获得保护者身份,这样做是值得的,村民选择方面的好处非常多。 其中一些内容在【关系与村民】部分已有介绍。 现在你准备好解放村庄了。不要急于和村长交谈,你首先需要支援,因为城市里所有的强盗都会联合起来对付你。所以,在重蹈我的覆辙之前,带上几个朋友一起去。我用8个人做到了,但你应该带更多同伴去击败回收队。击败城市里的土匪后,你需要建造钟楼。根据距离和手头的材料,建造钟楼可能需要1天到3天时间。钟楼建成后,你再次与长老交谈,回收队似乎就会开始集结部队并向那座城市进军。 他们来自很远的地方,通常需要10到15分钟甚至更长时间才能到达,我建议不要睡觉。如果他们摧毁了钟楼,你就失败了,需要再次和长老交谈并重建钟楼。战斗很容易就能获胜,只需12名村民,每个村民配备与其等级相匹配的武器和盾牌。盔甲不是主要因素,因为他们的攻击力非常强。如果你喜欢使用弓箭,我建议你也携带一面盾牌。通常两下攻击就可能让你倒下。 战斗结束后,再次与村庄长老交谈,这样你就获得了【贝尔莱特】在城市中的身份。这使你能够在城市中雇佣专业人员,只要你的声望足够高,甚至在离开城市之前就能进行雇佣。更多细节请参见【关系与村民】部分。 如何进行交易(仍在完善中) 在【贝尔莱特】中,初次进行交易可能会有些复杂,但读完本部分后,我会确保你理解交易机制。 如何管理你的优先级……你这个懒虫 当你需要完成所有事情时,优先级管理确实会让人觉得复杂,这是可以理解的。我会为你展示一种理解优先级系统的简单方法。在城市管理标签页(N键)的建筑部分,会列出你已建造和正在建造的所有建筑。右侧的图片将帮助你了解在为村民分配特定任务类型时,每个类别中包含哪些内容。
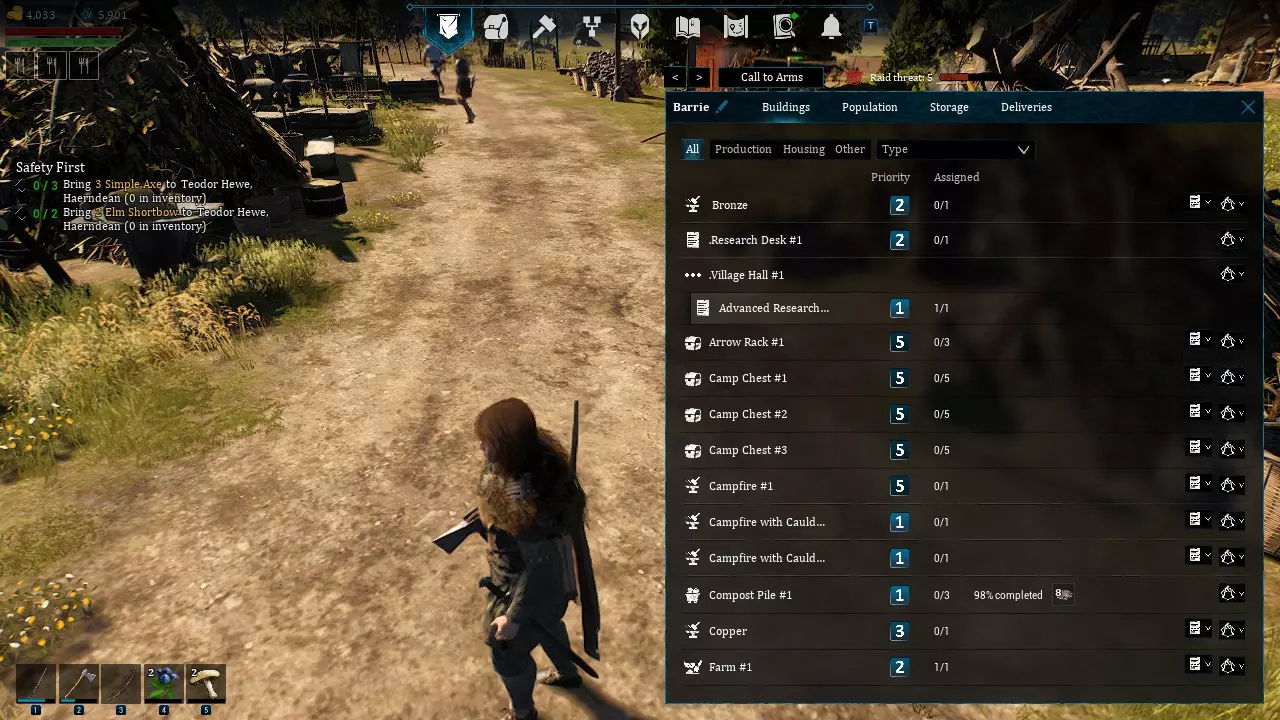
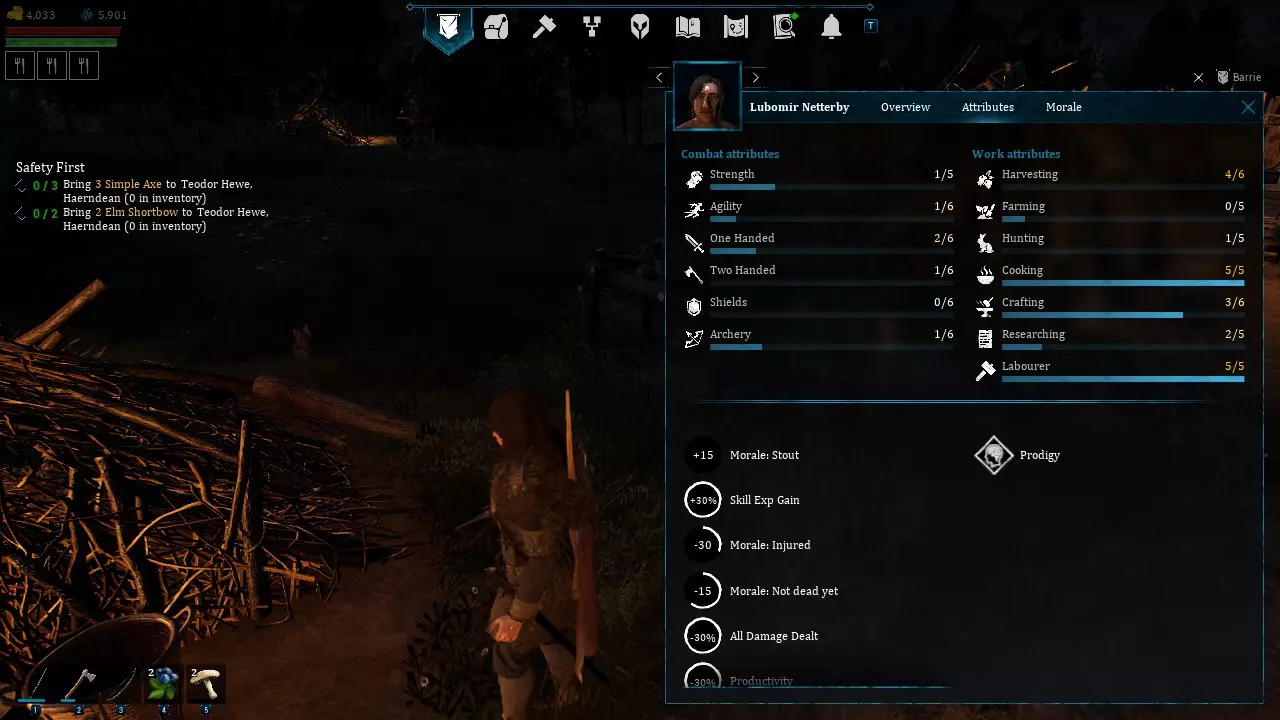
制作、采集、狩猎等是村民的技能类别。有些村民的某项技能等级更高,因此要为手头的任务找到合适的村民。我们来看看卢博米尔,了解一下他能做什么。 我通常通过左侧界面分配所有任务,不过右侧界面也可以使用。在左侧界面中,你可以看到他能执行的任务、当前等级以及等级上限。他可以执行所有任务,但采集、烹饪和劳作技能等级最高。因此,根据可用的工作,你可以指派他做任何事。我将他选为杂役,所以他负责所有基础且快速完成的工作(例如建造)。
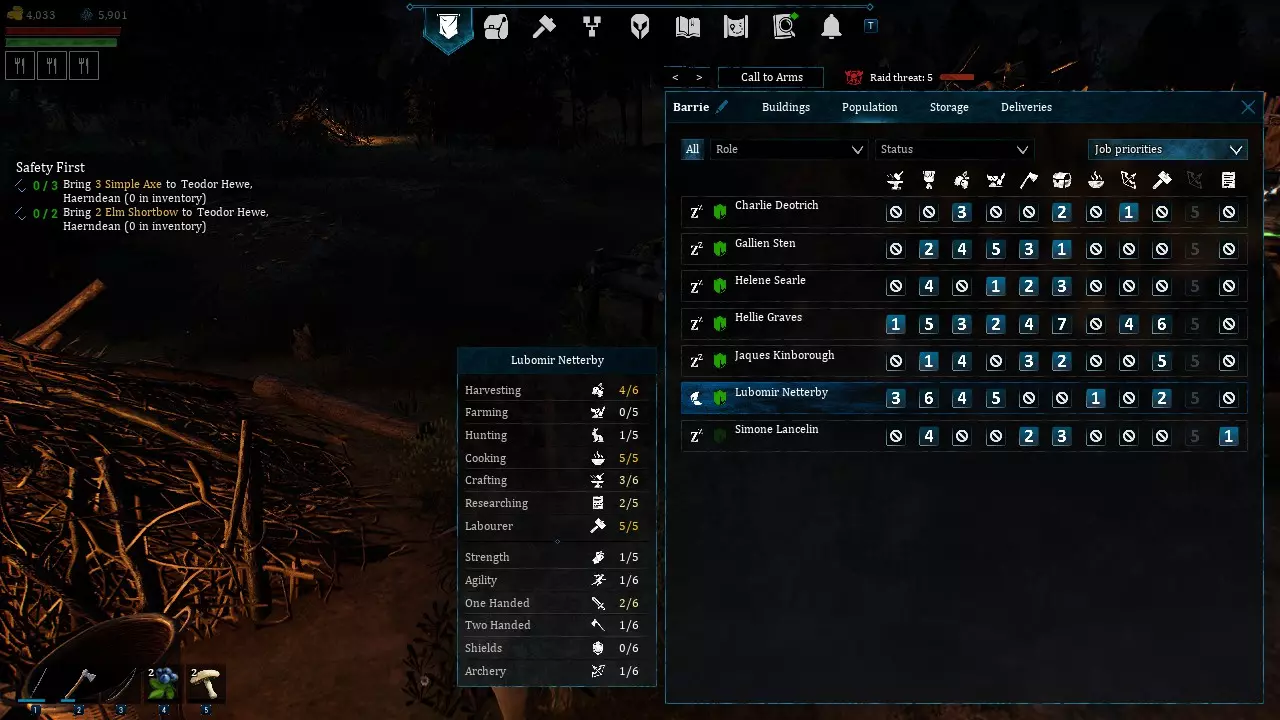
现在,如果你查看下方这些图片并从下拉菜单中选择制作类别,就能看到你的制作建筑是如何分类的。我的青铜、锡和铜相关建筑都属于冶炼厂。其余的则不言自明。在这个界面中,我可以设置工匠们如何优先处理村庄的工作任务。我通常将认为重要的任务标记为1,依此类推。这只是个大致思路,具体设置因人而异。

总结一下,你在这里看到的是我分配的工匠们将要执行的任务。如果他们有其他优先事项(正如你看到的一些情况),当他们完成所在类别的任务后,如果仍有工作可做,就会转向第二类任务。如果没有,他们会继续跳转到列出的第三类任务,以此类推。 食物属性(开发中) 无效果食物(按时间排序) 浆果 - 2小时30分钟(+8生命值(0.1/秒回复))(耐力(+20耐力(3/秒回复)) 蘑菇 - 3小时30分钟(+16生命值(0.1/秒回复))(+14耐力(2/秒回复)) 浆果酱 - 4小时30分钟(+14生命值(0.25/秒回复))(+40耐力(7/秒回复)) 蘑菇炖菜 - 5小时(+15生命值(0.4/秒回复))(+45耐力(7/秒回复)) 熟肉 - 5小时(+35生命值(0.25/秒回复))(+12耐力(3/秒回复)) 肉炖菜 - 6小时(+40生命值(0.再生效果:每秒5点 (+13耐力值,每秒5点再生) 大型熏肉 - 持续6小时 (+60生命值,每秒0.5点再生) (+20耐力值,每秒5点再生) 小型熏肉 - 持续5小时 (+45生命值,每秒0.25点再生) (+15耐力值,每秒4点再生) 熏肉 - 持续5小时30分钟 (+55生命值,每秒0.4点再生) (+18耐力值,每秒4点再生) 多重增益 鱼肉 stew - 持续7小时 (30%生产力提升,20%经验值提升) (+35生命值,每秒0.4点再生) (+35耐力值,每秒7点再生) 经验值增益 蔓越莓 - 持续3小时 (30%经验值提升) (+13生命值,每秒0.1点再生) (+40耐力值,每秒3点再生) 生产力增益 干蘑菇 - 持续4小时30分钟 (+20%生产力) (+20生命值,每秒0.2点再生) (+20耐力值,每秒2点再生) 烤鱼 - 持续4小时30分钟 (+20%生产力) (+45生命值,每秒0.25点再生) (+15耐力值,每秒4点再生) 饥饿增益 干浆果 - 持续4小时 (-20%饥饿速度) (+16生命值,每秒0.25/秒 生命恢复)(36 耐力值(3/秒 耐力恢复)) 熏鱼 - 4小时30分钟(-30% 饥饿速度)(+30 生命值(0.3/秒 生命恢复))(+60 耐力值(6/秒 耐力恢复)) 战斗增益 精致炖菜 - 8小时(+20% 战斗效果)(+40 生命值(0.75/秒 生命恢复))(+45 耐力值(6/秒 耐力恢复)) 修理工具和武器 修理武器或工具是一项简单的任务,只需几个步骤就能确保其最终恢复到可接受的耐久度。首先,我们需要打开军队选项卡(HUD顶部的头盔图标)来开始这项任务。 打开军队选项卡后,添加小队,然后点击小队选项卡本身。在同伴菜单中,你会看到食物滑块和耐久度滑块。你可以选择最低可接受的耐久度,这样就设置完成了。当武器或工具的耐久度低于你设定的可接受百分比时,系统会将其标记为需要立即修理。 当你的某个负责运输的村民有机会时,他们会自动将这些需要修理的物品送到工匠处或相应的修理站。 如果前哨站没有修理站,前哨站的修理工作也会通过运输系统以同样的方式进行。请阅读【关于前哨站和运输的所有内容】部分。 资源(开发中) 提示与技巧 前哨站帮助: 在较远的位置放置一两个箱子(或储物堆)用于材料存储。如果你想建造钟楼,又不想让所有人都穿过整个地图来运送材料,就可以使用这种方法。它能简化你的建造过程,并存储建造所需的稀有材料,防止被偷走。 可以将其设为前哨站,无论是临时的还是永久的。别忘了你的旅行标记。 实用链接及其他指南: DreXav的指南 - 该指南在如何找到所需专业以及包含村庄库存和购买信息的电子表格方面非常出色。DreXav为此付出的努力值得称赞。 Dairuka的指南 - Dairuka在其关于如何自动化前哨站的简单解释方面做得非常出色。可以将其视为一种更高级的工人和物资配送设置方式,以供应你的主城。 指南更新: 目前,我相信已经为你提供了对游戏基础知识的良好介绍。如果您有任何问题或建议,我都乐意倾听,并会尽力满足您的需求。在此之前,我会像大白一样,去追逐蝴蝶。

修订说明 * 章节内下划线内容表示已使用最新日期编辑 11-07-24 修理工具和武器 29-06-24 提示与技巧 26-06-24 如何管理你的优先事项...你这个懒虫 23-06-24 角色控制 - 狩猎与战斗 21-06-24 指南发布