换一换
换一换 


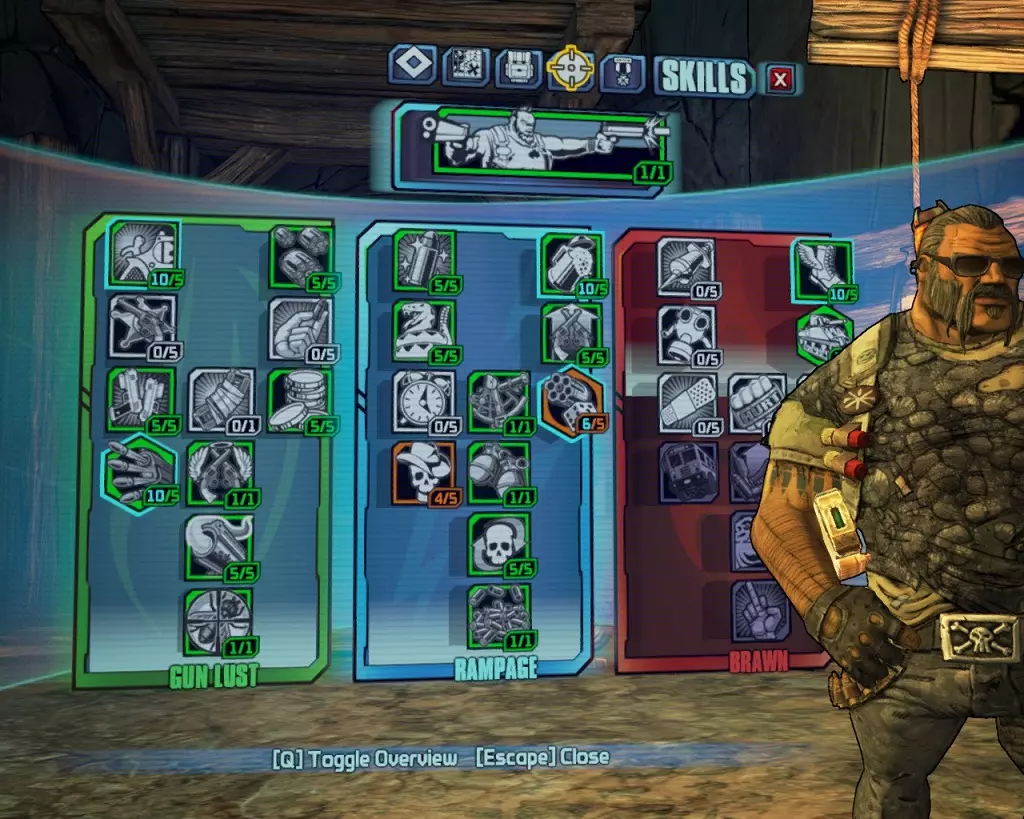
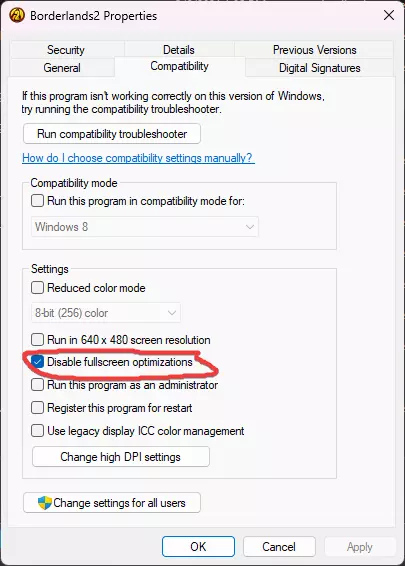
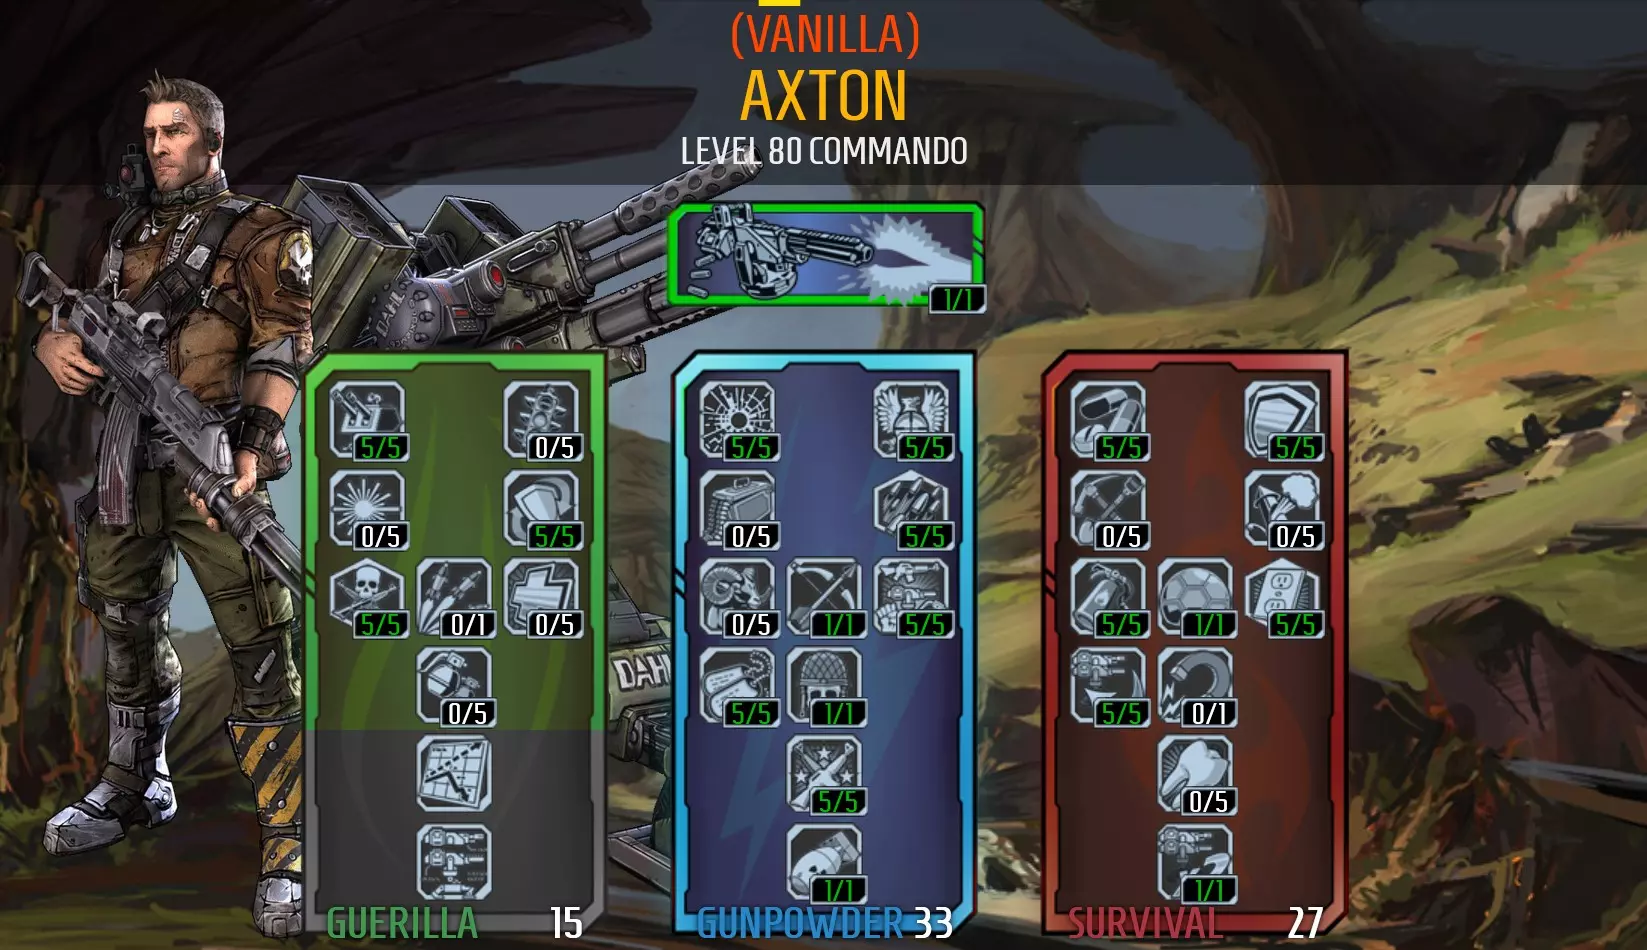
我玩过很多《无主之地2》。我对角色技能树的尝试越多,就越欣赏和享受这款游戏。我制作了本指南来分享一些配装。希望你喜欢 :) 简介 欢迎 《无主之地2》一直是我最爱的游戏之一,我确实玩了很久。本指南包含了我尝试过的所有成功配装(还有一些没成功的就没放进来)。每个配装都会包括:评分、技能树、游玩技巧、推荐装备以及一段实机演示视频。总的来说,本指南旨在展示配装的多样性,并通过我亲自从1级练到72级+OP等级的可靠配装,为大家提供其他的游戏玩法,这些配装均未使用模组、修改文件或漏洞。这些配装已在80级OP10难度下重新测试,确保在【小缇娜强袭龙堡】更新后仍可正常使用。 本指南内容较多,请使用滚动条或目录菜单跳转到您想查看的部分。 希望您能找到喜欢或有用的内容。 猎宝人们,玩得开心! 请注意: 我使用【Borderlands 2 Skill Calculator】来展示角色的技能加点方式。 如何构建配装 新手需要了解的技能树知识: 技能树采用层级系统,每在一个树中投入5点技能点即可解锁下一层级。 每个技能树的最后一个技能是【质变技能】。技能树中还有其他只需投入1点即可点满的技能,它们也能提供特殊增益。带有六边形边框的技能是【杀戮技能】——当你击杀目标时,它们会激活一段时间(约8秒)。 通常情况下,将技能点完全投入到一个技能中比分散加点以解锁所有技能更好。 你可以在31级时到达第一个技能树的底部。在57级时,你将能够使用其中两个技能,但在最高等级80级时,你无法获得第三个。 你可以随时在【自定义站】通过点击【重置技能点】选项来重置你的技能点。你可以多次进行此操作,且不会花费太多游戏内货币。 如果你对技能选择感到困惑,想要一个简单的选择方法,可以先查看每个技能树的最后一个技能,然后选择你最喜欢的那个。接下来,将你的点数投入到该技能树中;在通过层级系统逐步解锁至最后一个技能的过程中,你每次只需在两个技能之间做出选择。 如何构建流派: 构建流派始于一个想法,然后是使其实现的决心。 寻找能够相互配合的技能。 基于装备类型或偏好的游玩风格来构建。例如:你可能想使用霰弹枪或增益护盾,你可能喜欢近距离击杀敌人,或使用远程攻击、支援队友,或是成为主要伤害来源。 围绕你找到的职业模组来构建。《无主之地2》中的职业模组都有特定主题。如果当前构建与你不匹配,你总能找到新的职业模组。你甚至可能偶然发现一种配装。还有一点……你可以打造适配多种职业模组的配装,这样就能根据需要切换符合条件的职业模组来改变自身优势。例如:魔女可以装备一个侧重辅助技能的模组,然后通过切换到带有伤害技能的模组(无需重新分配任何技能点)来转为进攻型。这只有在你解锁了两种职业模组所需的全部技能时才有效。 艾克斯顿——传奇士兵(最适合输出) “十年达尔军事经验为你效力” 这套配装利用艾克斯顿的技能、职业模组、圣物和护盾来尽可能提升他的伤害。这个流派比其他“玻璃大炮”流派更容易上手,因为艾克斯顿的炮塔可以用来吸引敌人注意力并施加slag(腐蚀)效果。 伤害:9(可单人挑战无敌的哈迪拉克) 生存能力:4 难度:2 乐趣:7 技能树如下:

提示: 如果你倾向于使用无元素武器,可以考虑将点数从超载技能转移到使命召唤技能上。不过,要单人挑战无敌的哈迪拉克并在不浪费过多 reload 时间的情况下爆发伤害,超载技能是必需的。 为避免受到攻击: 1. 待在掩体中,尽量每次只瞄准一个敌人。 2. 保持距离,因为敌人在远距离时精准度会下降。 3. 优先集火射速较高的敌人——他们射击次数越多,命中你的可能性就越大(使用火箭筒或狙击枪的敌人除外)。 使用蜜蜂护盾时,意志技能是个不错的选择,它能减少护盾充能延迟。 这套配装的生命值恢复能力不强,因为其核心思路在于避免受到伤害。如果游玩时足够谨慎,【准备】技能提供的生命回复就已足够。必要时,【输血手雷】能提供更快的恢复效果。 你的炮塔可用于施加【腐蚀】效果、吸引敌人注意力、造成伤害以及提供临时掩护。部署炮塔时,要将它们分散开来,这样它们就能覆盖不同角度,且不会同时被摧毁。同时,要将炮塔置于身前,让它们承受大部分伤害。 携带更坚固的护盾(例如【壁垒】、【进化】、【反派】或适应性护盾),以便更快穿越敌群到达目标位置,并能在面对使用无法躲避攻击的 Boss 时存活下来。 让你的炮塔自动选择目标,这样你和炮塔就能协同作战,你也无需切换武器来对敌人施加腐蚀效果。 打出暴击对于输出伤害至关重要。技巧源于练习,随着你熟悉敌人的移动模式,操作会变得越来越轻松。 准备一把无需蜜蜂护盾也能杀敌的枪械,以便在“浴血奋战”状态下进行自救。 推荐装备: 武器:任意高伤害输出武器。牙签、不洁的哈罗德、母狗冲锋枪和碎颅者都是不错的选择。具有暴击伤害加成的武器能从蜜蜂护盾中获得更好的增益效果。 护盾:蜜蜂护盾,用于提升额外伤害。 手雷:任意你喜欢的类型。我使用魔法导弹来腐蚀敌人。吸血手雷可用于更快地恢复生命值。 职业模组:传奇士兵职业模组——它能提供额外的枪械伤害、射速和技能冷却时间缩短。 圣物:对偏好的武器、制造商或元素提供伤害加成。此配装的问题: 这是一套不错的配装,但在生命值恢复方面存在不足。 在没有炮塔支援时,你会更加脆弱。有时你需要躲避直到炮塔可以再次使用,而且该配装在长时间战斗(例如 boss 战)中可能会失效。 游戏玩法视频: 【单人 farming 无敌的哈迪拉克】等级 80 OP10 【艾克斯顿 - 坚韧尖兵(坦克)】 "我才不会死" 这套配装旨在增强艾克斯顿的护盾和生命值。如果这还不够,它还能让他有 40% 的几率避免死亡。但还有更多... 如果他确实倒下了,他将获得 115% 的伤害加成和 140% 的移动速度加成,以帮助他重新站起来。最后,这套加点包含了能为他提供额外伤害的技能,因此战斗不会持续太久。 伤害:4(装备蜜蜂护盾时为7) 韧性:8 难度:3 乐趣:8 以下是技能树:

技巧: 此配装的韧性来自于生命值和护盾的同时再生。当你的生命值降低时,护盾会更快开始充能,从而触发护盾与生命值同时再生的状态。护盾会先充能完毕,为你的生命值恢复争取一些时间。 坚韧有40%的几率忽略死亡。当坚韧触发时,它会恢复你50%的生命值(HP),并且只要你持续受到伤害,就可以连续触发。但要注意,坚韧效果会迅速消失(查看经验条上方的计时器),如果效果消失,你将需要再次碰运气。降低你的最大生命值可能会更容易保持坚韧效果激活,但不要过度依赖它。坚韧就像是一张“免罪卡”……你要把它揣在口袋里,尽量避免锒铛入狱。 你的炮塔将有助于削弱敌人、提升枪械伤害并提供掩护。方阵护盾在火力下持续时间不长,但你可以将炮塔一个接一个放置,这样就能同时躲在两个护盾后面。这段平静的时间能让你有机会充能护盾、恢复一些生命值,然后“精神饱满、状态良好”地重返战斗。 不要为了【 Rough Rider 】而放弃你的护盾——与在低生命值时仍能充能的护盾相比,它在保命方面表现不佳。护盾能提供火焰和腐蚀伤害抗性,而没有护盾的话,你会受到额外的火焰伤害。如果你想加快游戏节奏,可以在这套配装中使用蜜蜂护盾。虽然蜜蜂护盾的容量较低,但不会对配装的生存能力造成太大影响。 建议装备: 武器:这套配装需要高伤害武器,例如【哈罗德】、【开峰者】、【碎颅者】或【劫掠者(紫色托格)】霰弹枪 护盾:【新生者】或【进化】护盾能增强生命回复能力。如果没有这些,适应性护盾也是不错的选择。 手雷:【魔法导弹】手雷模组能让你无需切换武器就能更快地对敌人上渣。 职业模组:【传奇尖兵】职业模组。提供+6【坚韧】技能点的模组也是很好的选择。【游侠】职业模组可提供射速加成和暴击伤害加成。遗物:增加生命值的遗物或增加护盾容量的遗物能帮助你存活;【塞拉弗之血】是个不错的选择,它能提供生命值加成和生命 regeneration。 此配装的问题: 无主之地2是一款极度依赖伤害的游戏,因为后期敌人拥有高得离谱的生命值。在无主之地2的后期游戏中,坦克型角色也可能在连续几次攻击下被击倒。要让你的角色足够坚韧以保证生存,但也不要忽视伤害;你需要能够在不浪费过多时间和弹药的情况下完成击杀。我最终养成了使用【蜜蜂护盾】来提升伤害的习惯。《无主之地》初代中坦克角色的作用更强,因为他们能在队友返场期间持续进行 boss 战;而《无主之地2》采用了锁定机制,玩家死亡后无法立即重返战斗。 尽管如此,“坚毅”仍是一个非常有趣的技能,且“尖兵职业模组”能很好地与之搭配。 艾克顿 - 爆米花炮塔 - 工程师(易上手) “亲爱的,把他们撕碎” 通过此build强化你的炮塔并叠加冷却缩减,这样你就能按需频繁部署强大的炮塔。你的炮塔将吸引敌人火力、施加slag效果,并提供额外伤害。此build还包含一些针对艾克顿的伤害提升。伤害:8 韧性:部署炮塔时为5(几乎总是如此) 难度:2 乐趣:5 技能树如下:

冷却速率可以提升至100%以上。但这并不意味着技能会立即充能完毕,因为它是基于充能速率而非总时长(+100%充能速率会使等待时间减半)。对于艾克斯顿的主动技能,10%的充能速率大约能加快1秒充能时间。 艾克斯顿的炮塔“就像战场上多了一名额外玩家”,并且能从职业模组中获得团队增益。 如果艾克斯顿的炮塔固定在墙上,敌人会更难击中它们。 你可以捡起炮塔来返还部分主动技能冷却时间。当炮塔不再需要、位置不佳或你想向前推进时,都可以这样做。部署炮塔时,可以将其视为带枪的安全摄像头——你希望它们能尽可能多地监控战场。这样能让敌人难以躲在掩体后,你也不太可能在没有炮塔支援的情况下与敌人交战。 推荐装备: 武器:此配装不特定于某类武器。 护盾:【蜜蜂护盾】表现出色,因为当你的炮塔吸引火力时,你很容易保持满护盾状态。如果有敌人攻击你,只需躲到掩体后,直到他们转而攻击你的炮塔。使用蜜蜂护盾时,【意志】技能很有用,它能减少护盾充能延迟。带有暴击伤害加成的武器将从放大伤害中获得更大收益。手雷:高伤害手雷,例如快速球或奖励包 职业模组:传奇工程师职业模组。如果尚未拥有,工程师职业模组有蓝色和紫色版本 圣物:+技能冷却速率 此配装的问题:艾克斯顿的炮塔会随 overpower 等级提升而增强,但炮塔伤害在每个 OP 等级下的效果会逐渐降低。尽管如此,你的炮塔仍能击杀敌人并发挥其他作用,例如施加 slag 效果和吸收伤害 艾克斯顿 - 爆破专家(可行) 核弹、哨戒炮塔和火箭筒……真是充实的一天 此配装围绕提升火箭筒、手雷和枪械伤害构建它还能显著提升护盾强度,但也可以通过配置(取决于装备的护盾类型)来增强伤害。 伤害:7 韧性:6 难度:3 乐趣:6 技能树如下:

提示:如果你想围绕火箭筒构建这套配装,你需要【沙姆】或【大爆炸爆破者】护盾来补充火箭弹,因为火箭弹不易获取且从商人处购买价格昂贵。 如果你选择使用【大爆炸爆破者】,请避免投入点数到【坚韧】(生存技能第三层),因为持续伤害效果将是护盾充能器的主要来源。每一点状态效果伤害都有几率触发充能护盾。状态效果还会通过充能器提供比状态效果造成的伤害更多的护盾值。 火箭筒将受益于所有【枪械伤害】加成。你的炮塔有三个主要用途:部署能够对敌人造成伤害并击退敌人的核弹、在部署期间提升你的枪械伤害,以及吸引敌人注意力。 当你的炮塔部署时,你的手雷将获得65%的伤害加成(未部署炮塔时为35%)。 携带【蜜蜂护盾】以在需要提升枪械伤害时使用。 建议装备:高伤害武器,以充分利用技能树提供的伤害加成。 高伤害火箭筒,例如【诺基姆】【巴达布姆】或【诺法利特】。 高伤害手雷,例如【奇点】【快速球】【奖励包】或【火焰风暴】。 寻找能够提升枪械伤害的职业模组。提升枪械伤害的模组将比【 grenadier 】职业或【 veteran 】职业中带有【 steady 】技能点的模组更有益。假护盾更容易刷取,但大爆炸发射器更可能让你在战斗中存活。如果你能获得大爆炸发射器,它还会生成手雷。 这个配装的问题 该配装平衡性良好——没有太多弱点,但也没有任何特别突出的优势。 核弹技能的伤害在高等级时效果会降低,但你仍然可以使用核弹来击退敌人;这能让你在敌人从爆炸中恢复时获得击杀它们的时间。 艾克斯顿 - 游侠(团队玩家) “被评为‘充能最快’的达尔军人。” 游侠职业围绕护盾强度和连续快速击杀构建。每次击杀会为你的护盾充能(每秒10%),并提升移动速度、伤害和射速。此流派可作为护盾坦克或纯输出玩法。 伤害:6(坦克)或10(输出) 韧性:7(坦克)或4(输出) 难度:2(坦克)或4(输出) 乐趣:5(坦克)或5(输出) 技能树如下:
技巧: 你可以使用这套配装,要么凭借高容量护盾承受伤害,要么利用蜜蜂护盾的增幅伤害快速消灭敌人。 这套配装的大部分强度与杀戮技能相关,而这些技能会通过职业模组得到进一步强化。这意味着保持输出以持续击杀敌人来维持强度至关重要。 由游侠职业模组强化的其中一个杀戮技能是快速充能,该技能常被“心甘情愿”效果覆盖。快速充能能让你在无需等待护盾充能延迟的情况下为护盾充能(8秒内每秒10%,总计80%护盾值)。不过,“心甘情愿”效果会在1-4秒后生效,并能更快地为你充能护盾(恢复100%护盾值)。因此,相比使用快速充能,寻找不受伤害的间隙来充能护盾更为可取。快速充能仍然是必选技能,因为在难以避免伤害的场合(例如克雷多克之子)它非常实用,而且如果你想解锁双子座技能,生存系天赋树需要投入5点。 这套配装侧重于护盾强度和护盾恢复,而非生命值。尽量避免受到生命值伤害。如果你想提升生存能力,可以考虑牺牲生命值来换取更多护盾。 你的炮塔在部署时可用于击退敌人、吸引火力、提升艾克斯顿的枪械伤害,还能部署方阵护盾,为你的护盾恢复争取足够时间。在这套配装下,你的炮塔子弹造成的伤害不会太高。在哨卫技能上投入点数是为了延长炮塔持续时间,这样你就能从战前线技能提供的艾克斯顿枪械伤害+30%效果中获得更久的收益。 每次切换到腐蚀武器时,尽量对多个敌人施加腐蚀效果,这样当你的杀戮技能激活时,就能像多米诺骨牌一样将他们击倒。当杀戮技能激活时,你不希望在腐蚀武器和其他武器之间频繁切换,因为这会浪费宝贵的时间。如果无法避免这种情况,专精技能将有助于减少时间损失。 这套配装与使用收割者职业模组的狂枪手搭配效果非常好,因为他可以使你的杀戮技能持续时间翻倍。 建议装备 武器:如果玩坦克流,推荐【不洁的哈罗德】。否则,寻找那些在属性面板上拥有高伤害数值,同时还具备不错射速的枪械。托格(Torgue)制造的武器通常都很可靠。如果你使用【蜜蜂】护盾,那么可以寻找高射速或增加暴击伤害的枪械。【女士之拳】手枪和【小骗子】冲锋枪都是不错的选择。你的元素武器需要有较高的元素触发几率,这样就不会浪费宝贵的杀戮技能持续时间去尝试对目标施加元素效果。【slagga】冲锋枪是首选。 护盾:由于大量技能点都与杀戮技能相关,使用【蜜蜂】护盾能让你发挥出更高的战斗力。不过这套配装也很适合抗伤害。一些最佳选择包括【封锁】、【反派】,或者任何高容量的紫色【龟甲】护盾。手雷:奇点手雷能将敌人从掩体后拉出来,并使“持盾游牧民”“蜘蛛蚁”等敌人转身,让你可以攻击它们的暴击区域。 职业模组:此配装使用传奇游侠职业模组,低等级时也可使用电击兵或步枪手职业模组。 圣物:选择【+护盾容量】和【对三种伤害类型的抗性】以提升生存能力(其中一种抗性建议为电击抗性),否则可选择【+偏好武器伤害】。此build存在的问题: 游戏在使用坦克型build时会明显卡顿,且游戏后期的伤害惩罚机制相当严苛,尤其是面对会反弹子弹的敌人时(无论你的角色有多肉,由于自身造成的伤害与角色韧性的差距,你都会被1-2枪秒杀)。 即使拥有额外抗性,电击依然会摧毁你的护盾。 该build依赖击杀技能,因此在击杀第一个敌人前缺乏战斗力。此外,进入濒死状态时会失去击杀技能,这会让你更难复活。 盖奇-迅捷无政府主义者(推荐) 当她击中敌人时,伤害会非常可观!这套BD围绕无政府主义技能构建,能够维持强大的护盾并在击杀目标间快速移动。这是我最强的机械术士BD 伤害:8 生存:7 难度:3 乐趣:6 技能树如下:
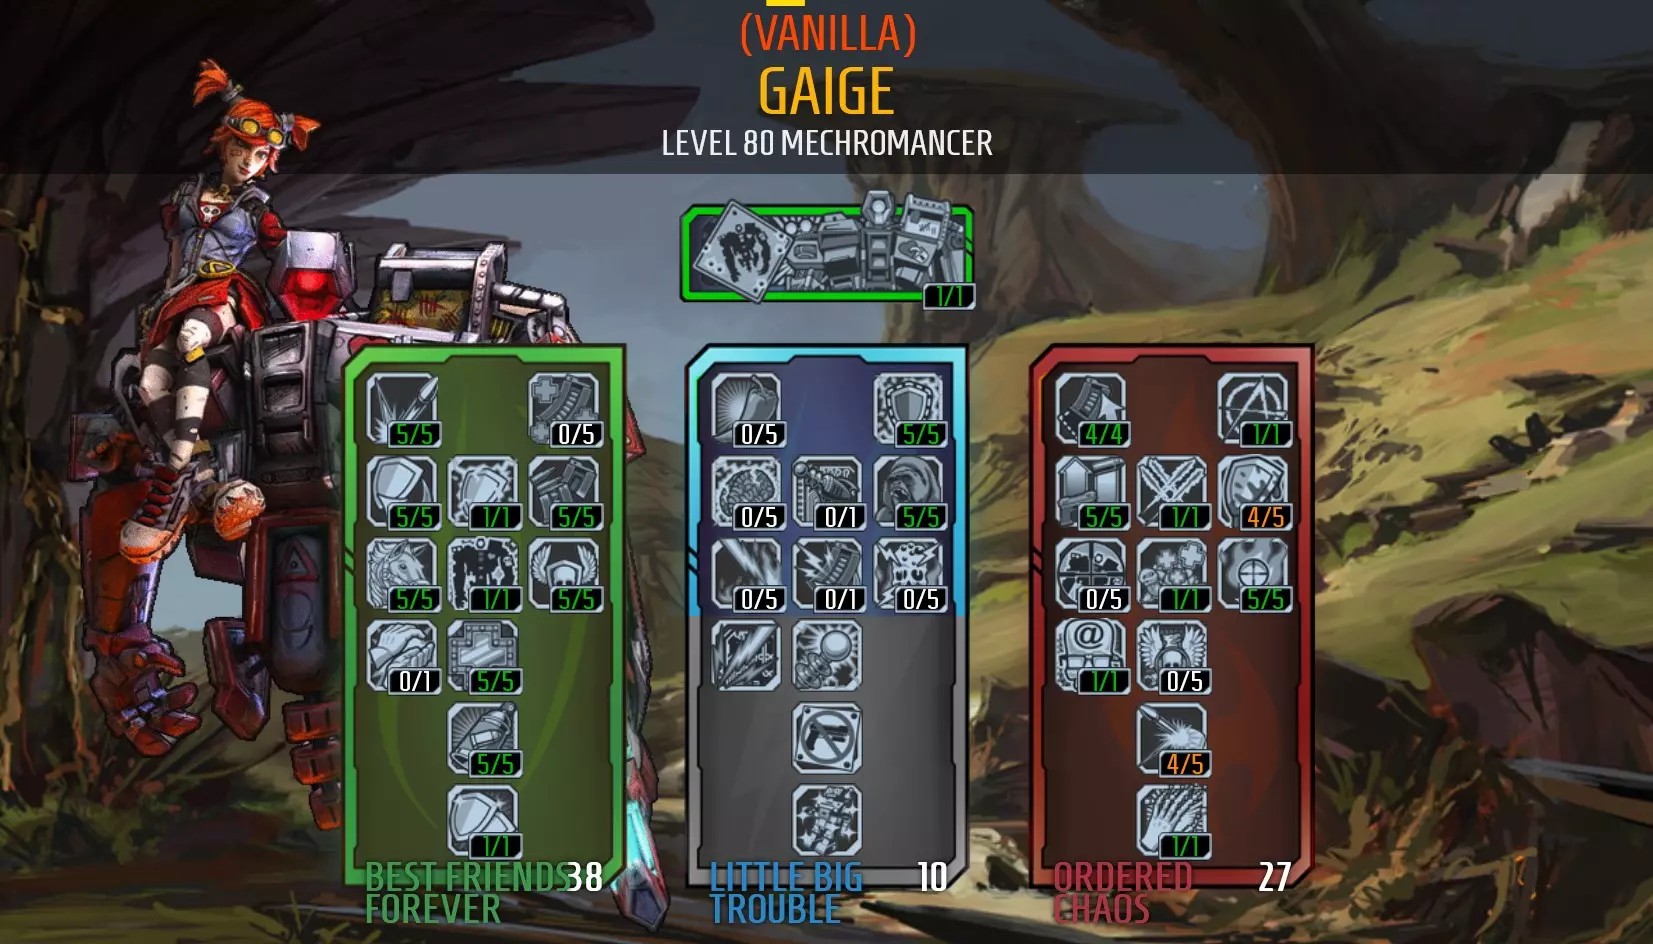
提示:当你开始积累混乱层数时,对敌人上渣元素效果对于击杀他们至关重要。不过不要停止对敌人上渣,即使在混乱层数满层时,它也能继续帮助快速消灭敌人(还能帮你节省弹药)。 在获得第一次击杀前保持谨慎,这次击杀会激活【不可阻挡之力】,提升你的移动速度,让你能靠近另一个敌人。靠近敌人能增加你直接命中的几率,从而充分利用混乱层数的效果。在混乱层数达到最大值(400层)时,你的枪械将造成+700%的子弹伤害,再加上职业模组提供的枪械伤害以及其他任何来源的加成,但这一切都只在你直接命中时生效。跳弹只能造成你总伤害的50%。【血染护盾】在击杀敌人后会恢复80%的护盾值,但会消耗4%的生命值。此技能可与【势不可挡】配合使用,通过不断击杀敌人来持续补充护盾,从而维持生存。 注意关注你的生命值,当生命值低于50%时,使用【利爪】来恢复生命值。游戏中有一个机制:当你的生命值高于50%时,即使受到巨额伤害也不会直接死亡。此时你不会进入【生死之战】状态,而是会保留临界生命值,并获得短暂的无敌时间(约2秒),之后再受到攻击才会被击倒。 当遇到更强大的敌人或预计会有长时间战斗时,召唤【死亡陷阱】作为额外掩护。它会帮助吸引敌人注意力并承受部分伤害。避免使用【Discord】,并尽快积累混乱值;混乱值越高,你的力量就越强。你可以完全不解锁【Discord】,但如果在未清空弹匣的情况下意外重新加载,就有失去所有混乱值的风险。所以【Discord】可以算是一个值得的安全保障。 使用你能找到的最高容量护盾,但不要使用【Hoplite】或【Fabled Tortoise】。这些护盾会减慢你的移动速度,使你无法靠近敌人并造成直接命中。 当你处于【Fight for Your Life】状态且能够自救时,你将获得满护盾和移动速度加成,这会降低你再次被击倒的几率。 推荐物品:武器:【Unkempt Harold】——最好是双发版本。其他方面,需要一把高伤害爆发武器,以及一把高射速的slag武器(冲锋枪slag概率约22-24%为宜)。 护盾:任意高容量护盾。紫色品质的Turtle护盾即可满足需求。 手雷:奇点手雷用于聚怪,和/或快速球手雷用于消灭空中单位。 职业模组:传奇级无政府主义者职业模组。若使用低品质职业模组,可选择技术专家职业模组提升生存能力(但避免点出穿插爆发技能),或选择机器人专家职业模组以更好地利用死亡陷阱。低品质的无政府主义者职业模组虽无法提供理想的技能点,但会增加枪械伤害并降低精准度。 圣物:增加护盾容量并附带抗性(优先选择电击抗性)。增加手枪伤害或爆炸伤害的遗物也是可行的,但在更高等级时,你会更频繁地进入濒死状态。 这个Build的问题:它叠加混乱层数的速度足够快,所以玩了一段时间后死亡不会造成太大影响。我发现“不洁的哈罗德”即使在400层混乱状态下,精准度仍然保持得相当不错,因为子弹会以固定的宽幅散布模式发射。但当你有超过250层混乱时,射击空中单位仍然很有挑战性。 盖奇 - 机器人专家(易于上手) 我是世上最伟大的工程师! 这个Build围绕着最大化死亡陷阱的(有用)技能构建,但也分支到混乱技能,这样你自己也能牵制敌人。这套Build大量使用冷却时间减少属性,以便你能尽可能频繁地召唤死亡陷阱。 伤害:8 生存:3 难度:2 乐趣:7 技能树如下:
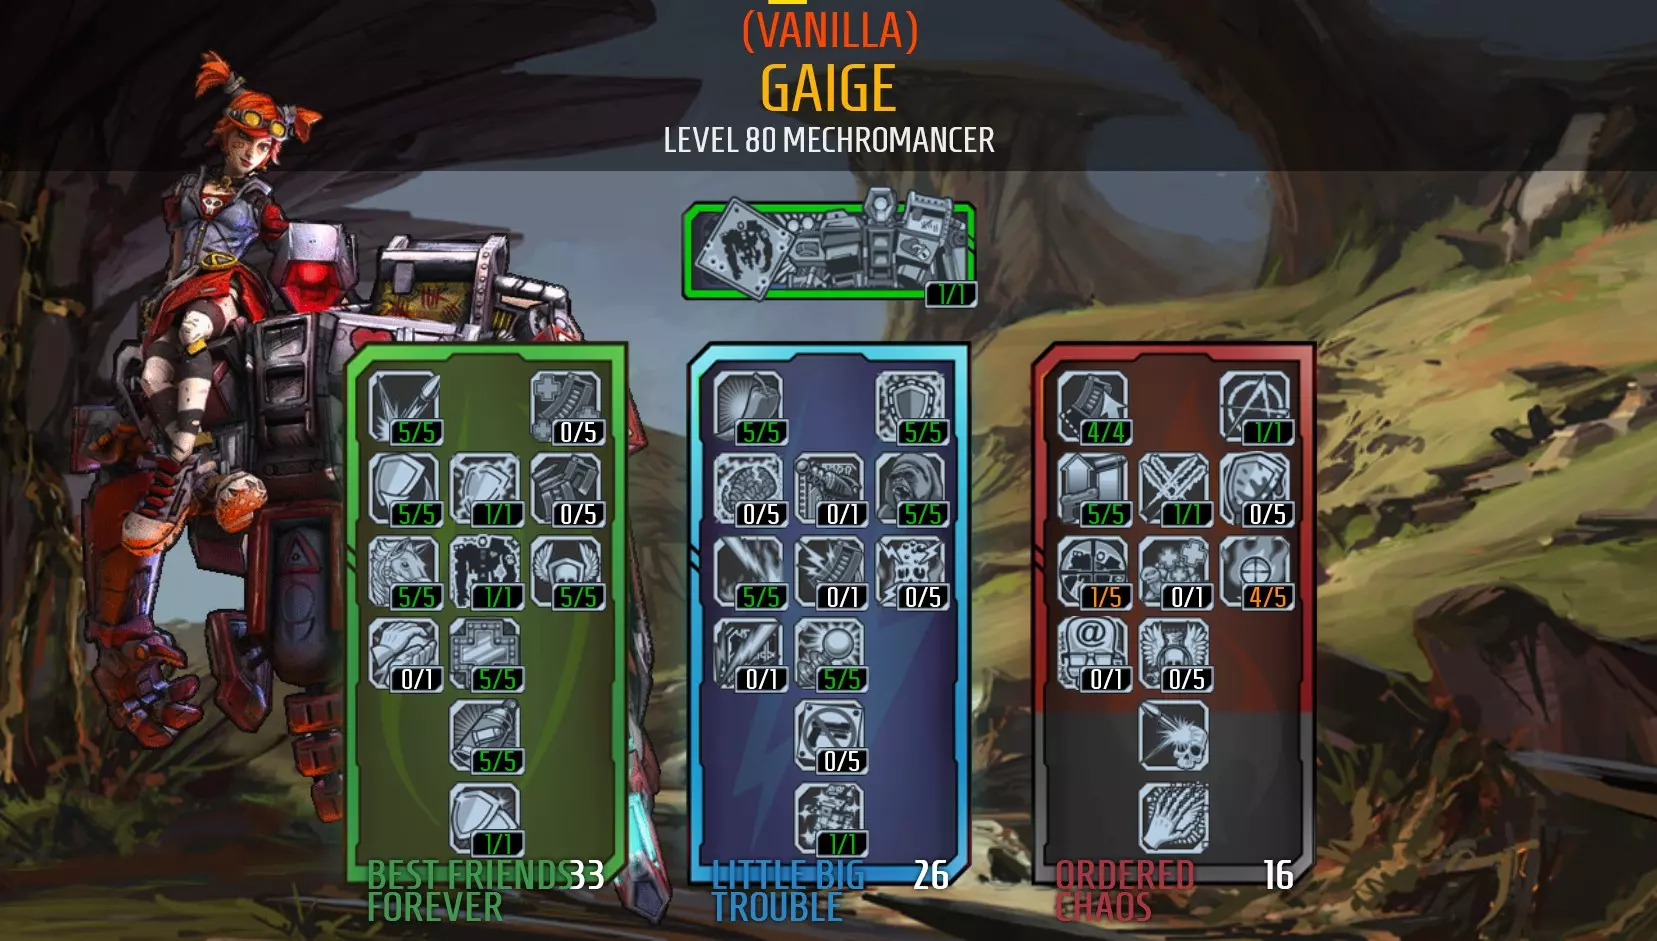
https://youtu.be/Hva7by5qsmg Tips: Deathtrap will use Robot Rampage as his first attack after he is summoned. This attack will deal double damage if he is charged with an element - Make it Sparkle. Keep Deathtrap charged with an element to double his damage. His elemental damage is equal to his physical damage. Increases to his physical damage will increase his elemental damage. This build requires the player uses a roid shield so Deathtrap can use his Sharing is Caring to receive a copy and deal crazy damage. Deathtrap will just be a bullet sponge without it and you'd be weaker than you would be with a different build. The good thing about this build is that Deathtrap gives you instant power; he doesn't need Anarchy to deal damage. Just run support for him while you're starting to accrue Anarchy so Gaige can deal damage. Dying is a real set-back when using Anarchy as you'll lose all of your stacks and have to start accumulating them again. The only 'sound advice' I can give here, is 'die less'. Nah, Just kidding; try to avoid tough fights without Deathtrap backing you up. Enemies are more likely to target Deathtrap, so you can hide behind him while he soaks up the damage for you. Deathtrap counts as an extra player, so team boosts also have an effect on him. You will need to get these boosts (like +attack speed) from other players as Gaige doesn't have much to offer herself (other than +team max health or +team elemental effect damage). Cooldown rate can be increased above 100%. 100% recharge will halve the wait time for your Action Skill. For Gaige, 6% cooldown rate is about 1 second faster. Deathtrap can activate your kill skills but he doesn't benefit from them (or any of your stats). Increasing Gaige's melee damage by any source DOES NOT increase Deathtrap's damage. Don't use a Hoplite shield when Sharing is Caring is unlocked as Deathtrap's copy will slow you down. Deathtrap can be healed by transfusion grenades but this will be quite minimal, Maya's Restoration, and Maya's Elated skill are more effective. Explosive Clap is an early game skill that is ineffective late game. Avoid unlocking The Stare and One Two Boom. Deathtrap is not intelligent when using The Stare and will target enemies resistant to fire and sometimes players. Deathtrap takes too long to charge and shoot One Two Boom and you will have difficulty shooting the orb to trigger the explosion due to your negative accuracy. Both are ineffective damage dealers compared to Deathtrap's melee attacks. Accuracy on guns doesn't matter much as your Anarchy will erode it. Guns with higher base damage will receive a greater damage increase from Anarchy. You won't be using a Bee shield with this build, so fire rate becomes less vital for damage output, but consider how many shots will be needed to hit your target. Getting in close to an enemy will slightly reduce your chances missing, and is worth the chance of scoring a direct hit for maximum damage. Ricocheted bullets will deal 50% less damage. Deathtrap sucks in boss fights as he will use his lightning bolt attack instead of meleeing them. Swap your roid shield out in boss fights for something that can keep Gaige alive or a Bee shield for extra damage. Suggested Items: Weapons: There will be times when Deathtrap is being a dumbass, so you will need a powerful weapon like an Unkempt Herald to carry him when he's not being useful. The predictable spread of the Unkempt Harold will also make it easier to hit enemies. Shield: The Hide of Terramorphous will give the largest boost to Deathtrap's melee damage, but a good purple Maylay shield will work fine if you can't farm Terramorphius yet. Grenade: Grenades don't really matter but they can be used to accurately kill enemies as they are not affected by Anarchy's negative accuracy stat. Class Mod: Legendary Roboteer Class Mod is the best option as it provides cooldown reduction, melee damage, toughness and movement speed for Deathtrap. The Legendary Mechromancer Class Mod can also be used but it will only provide cooldown reduction and melee damage. A regular Roboteer Class Mod is also viable. Relic: Use an Action Skill Cooldown relic to help Deathtrap recharge quicker. Problems with this build: Deathtrap is only effective while he is meleeing things. He's useless against flying enemies and most bosses as he will use his lightning bolt attack instead, which doesn't deal damage late game (seriously, he can't even kill a surveyor bot with this skill). You can't tell him who to target or recall him to reset him, So if he attacks something he can't kill (like a Stinging Cactus), he'll stay locked onto it until he expires or you move a great distance away from him. If possible, kill the target he's electrocuting so he can pick a new target. There's no way to return Deathrap when he's no longer needed (unless you change zones or jump into a vehicle) and his cooldown only begins after he dies or despawns. This means there will be times when you'll be on your own and you won't be benefitting from all of the points you've invested into him. I've managed to reduce the cooldown time to 23 seconds, which isn't bad. You can always use your Anarchy to kill things without him if you need to do something while you wait! You will have difficulty hitting flying units due to your negative accuracy. Try to avoid fighting flying things. If you have to fight them, use grenades or shoot at them (or the ground to richochet bullets) when they're flying low. The Mechromancer is a class that really doesn't have skills to increase her damage output other than Anarchy. This means all Mechromancer builds will play the same way and suffer from 'no accuracy'. You simply won't deal enough damage without Anarchy, but you can balance it around 250 stacks if you can't stand not hitting things. You can't run a Bee shield with this build, as Deathtrap newds the roid damage. Gameplay Videos: https://youtu.be/ztbfujyWHGU Gaige - Catalyst (Not Reccomended) Ugh, got some brain on my shoes. *Sniff* I like it This build is based around Gaige's 'Little Big Trouble' skill tree for electrical burn. I've respecced this character more than a few times and this is what i ended up with using to deal the most damage: Damage: 9 Toughness: 8 against bullets/rockets, 2 against everything else while Sham shield is equipped. Difficulty: 2 Fun: 5 The Skill Tree:
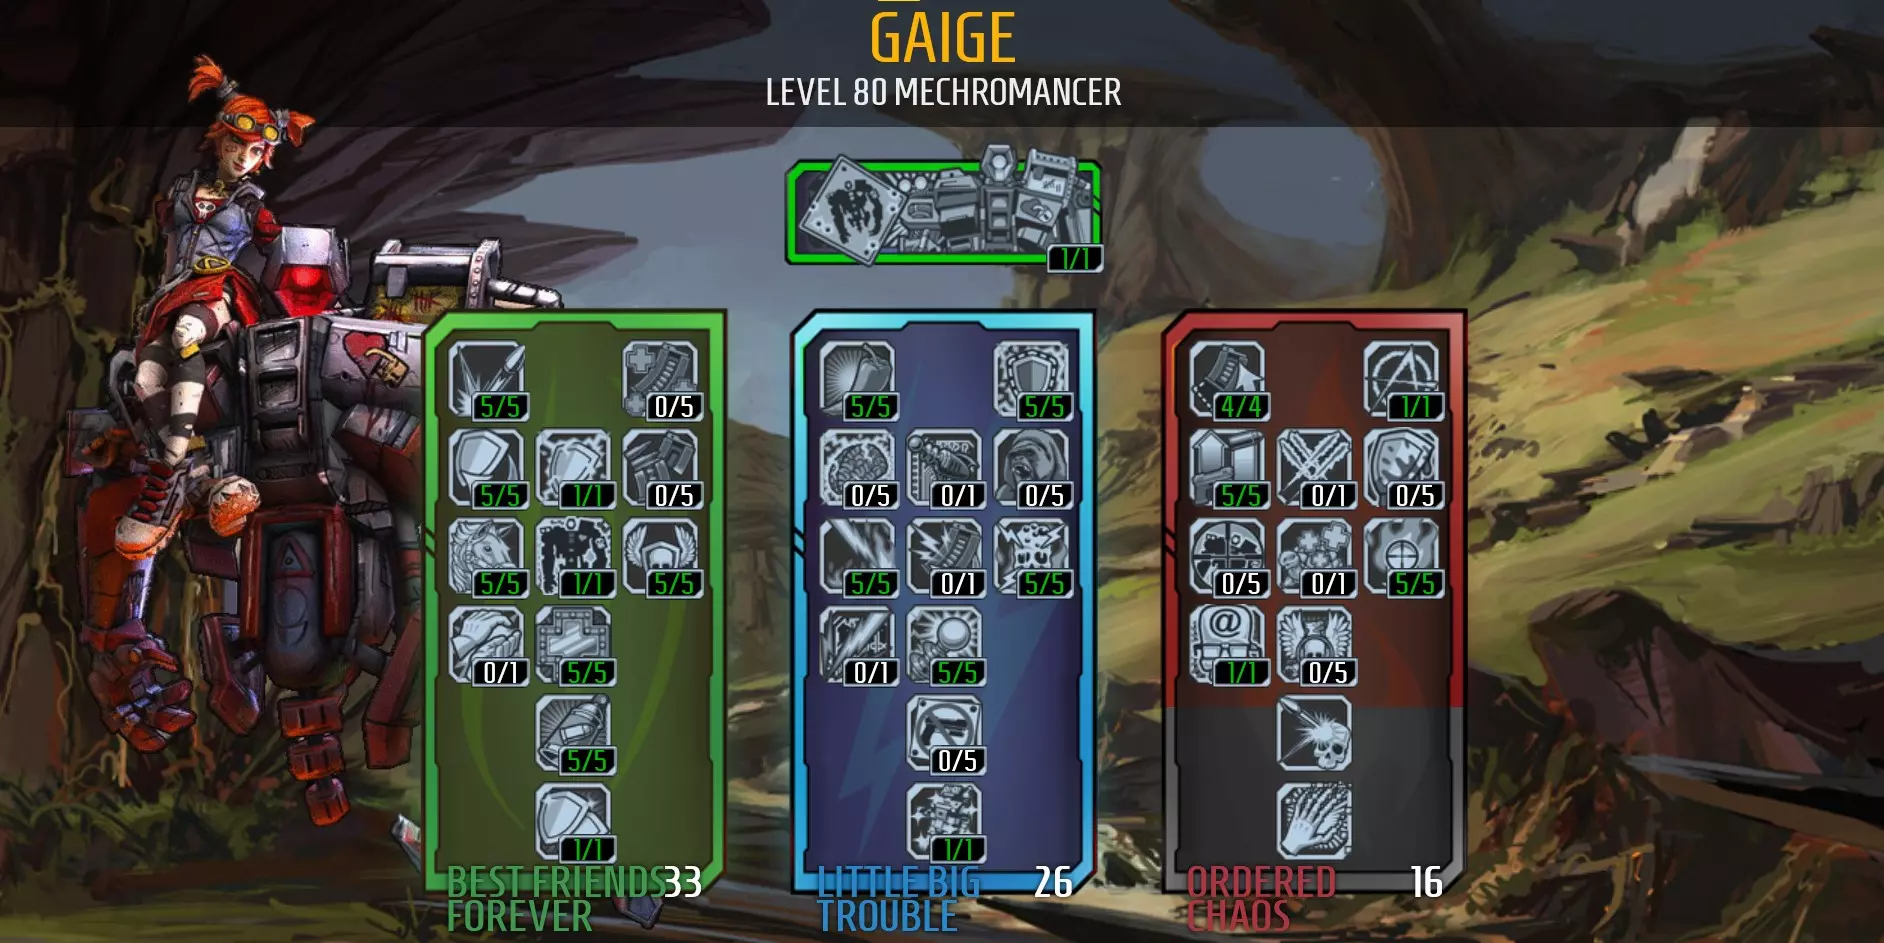
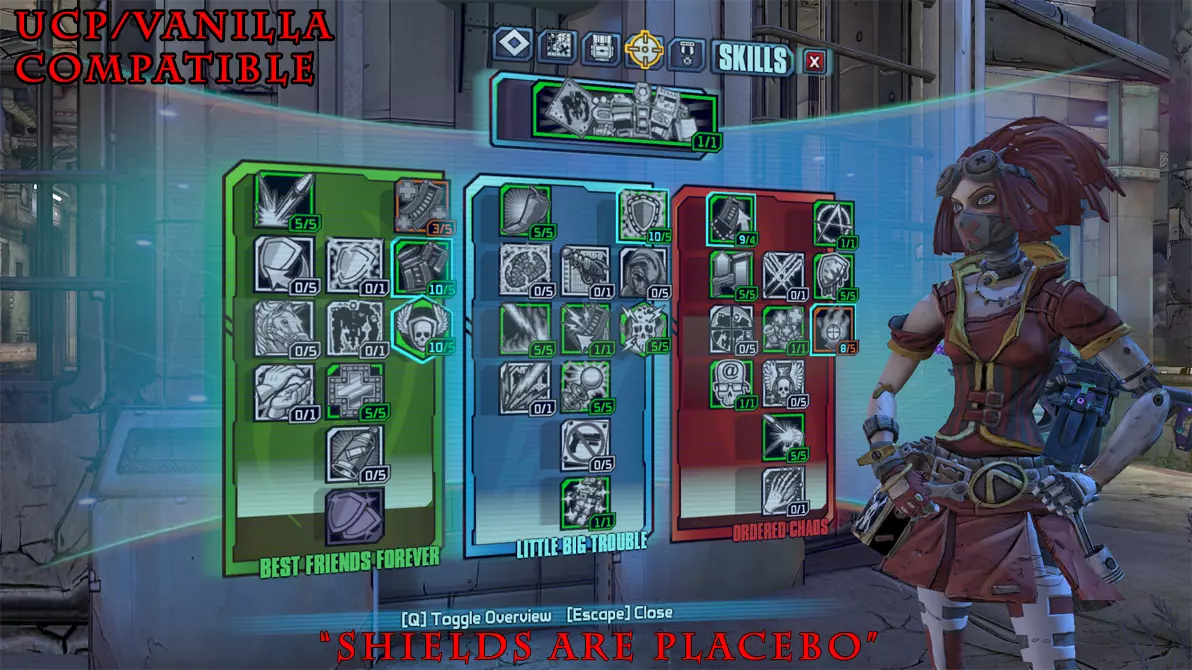
技巧:手榴弹造成的状态效果伤害高于枪械。尝试利用这一点,尤其是在邪恶女巫击杀敌人后激活技能时。 随着精准度的提升,瞄准会变得更加困难,但直接命中可造成最高700%的额外伤害。通过slag效果和【+电击伤害】可以进一步提升这一伤害。寻找机会靠近敌人以命中这些关键射击。 不过要注意避免承受过多伤害,因为护盾需要在不受伤害的情况下才能充能,且你的生命值恢复能力不佳。可以考虑将【势不可挡】技能的点数分配到【浴血护盾】上,以消耗生命值为代价立即充能护盾。不过,在使用诺法雷或者能同时击杀多个敌人的情况下,【血浸护盾】并不是个好选择,因为它会过快地削减你的生命值。 使用弹夹容量小且 reload 速度快的武器,比如四连发霰弹枪,可以快速叠加混乱层数,但能高效杀敌的强力武器叠层会更快、更可靠。 死亡陷阱的冷却时间很长,所以你要么得留着它对付更难的敌人,要么就尽可能堆动作技能冷却缩减。获得至少70%的动作技能冷却缩减后,死亡陷阱的再次召唤等待时间会变为30秒,这样在你需要时,它就能随时在附近吸引火力。 冷却缩减率可以堆到100%以上(100%冷却缩减会使等待时间减半)。盖奇的主动技能中,6%大约等于1秒。 你可以使用【挚友永恒】技能树左上角的【弹无虚发】技能让子弹反弹。你可以利用这一点让子弹绕过拐角,这样就能在紧张的战斗中躲在掩体后杀敌并(用莫克西武器)回血。 推荐装备:武器:带有高元素触发几率和状态伤害的电击元素武器。高射速枪械能帮助你同时对多个敌人造成持续伤害。由于敌人的生命值回复会抵消大部分状态效果伤害,你需要基础伤害更高的武器来更有效地削减生命值。携带像【大黄蜂】这样的腐蚀武器或像【哈罗德】这样的爆炸武器,将有助于对付那些难缠的装甲单位和秃鹫战机。护盾:斯巴达盾或紫色龟壳盾是生存的不错选择,但如果死亡陷阱和其他玩家都装备了斯巴达盾,会降低你的移动速度。盖奇有两种毕业伤害搭配方案:要么使用沙姆护盾搭配铱矿火箭筒(如诺法雷),要么使用蜜蜂护盾搭配高射速武器。 手雷:选择电属性手雷,专注于其状态效果伤害。连锁闪电手雷是最佳选择,电椅手雷和类星体手雷也是不错的选项。 职业模组:传奇催化剂职业模组或电击者职业模组。 圣物:【+电伤害圣物】(增加电伤害也会提升你的电击灼烧技能的点燃伤害)。 此build的问题:在毕业内容中表现不如其他build。元素燃烧效果伤害无法击杀敌人,你需要依靠枪械伤害。这可以通过蜜蜂护盾或沙姆火箭筒组合来实现。 角色需要一段时间才能“热身”(积累混乱层数),死亡会造成严重挫折,因为你会失去所有混乱层数并不得不重新开始。不过,由于通常死亡没有其他后果,这一机制让游戏更具挑战性。这个问题可以通过持续提升伤害输出和投入点数到【类型转换免疫】来解决,后者能让你快30%达到最大层数。 在最大层数时,你很难击中空中单位。尽量避开空中单位,它们不值得你费心。了解敌人的移动模式,并等待它们低飞至地面时再攻击,会更容易命中目标。 盖奇——全职业通才(终局Build) “打破游戏平衡” 这是一个使用【大地行者杀手】职业模组的终局Build。它将盖奇的其他三种Build(机器人专家、催化剂、无政府主义者)整合为一个Build。该职业模组还能让你达到600层混乱值(+1050%枪械伤害)。 伤害:8 生存:5 难度:2 乐趣:6 技能树如下:
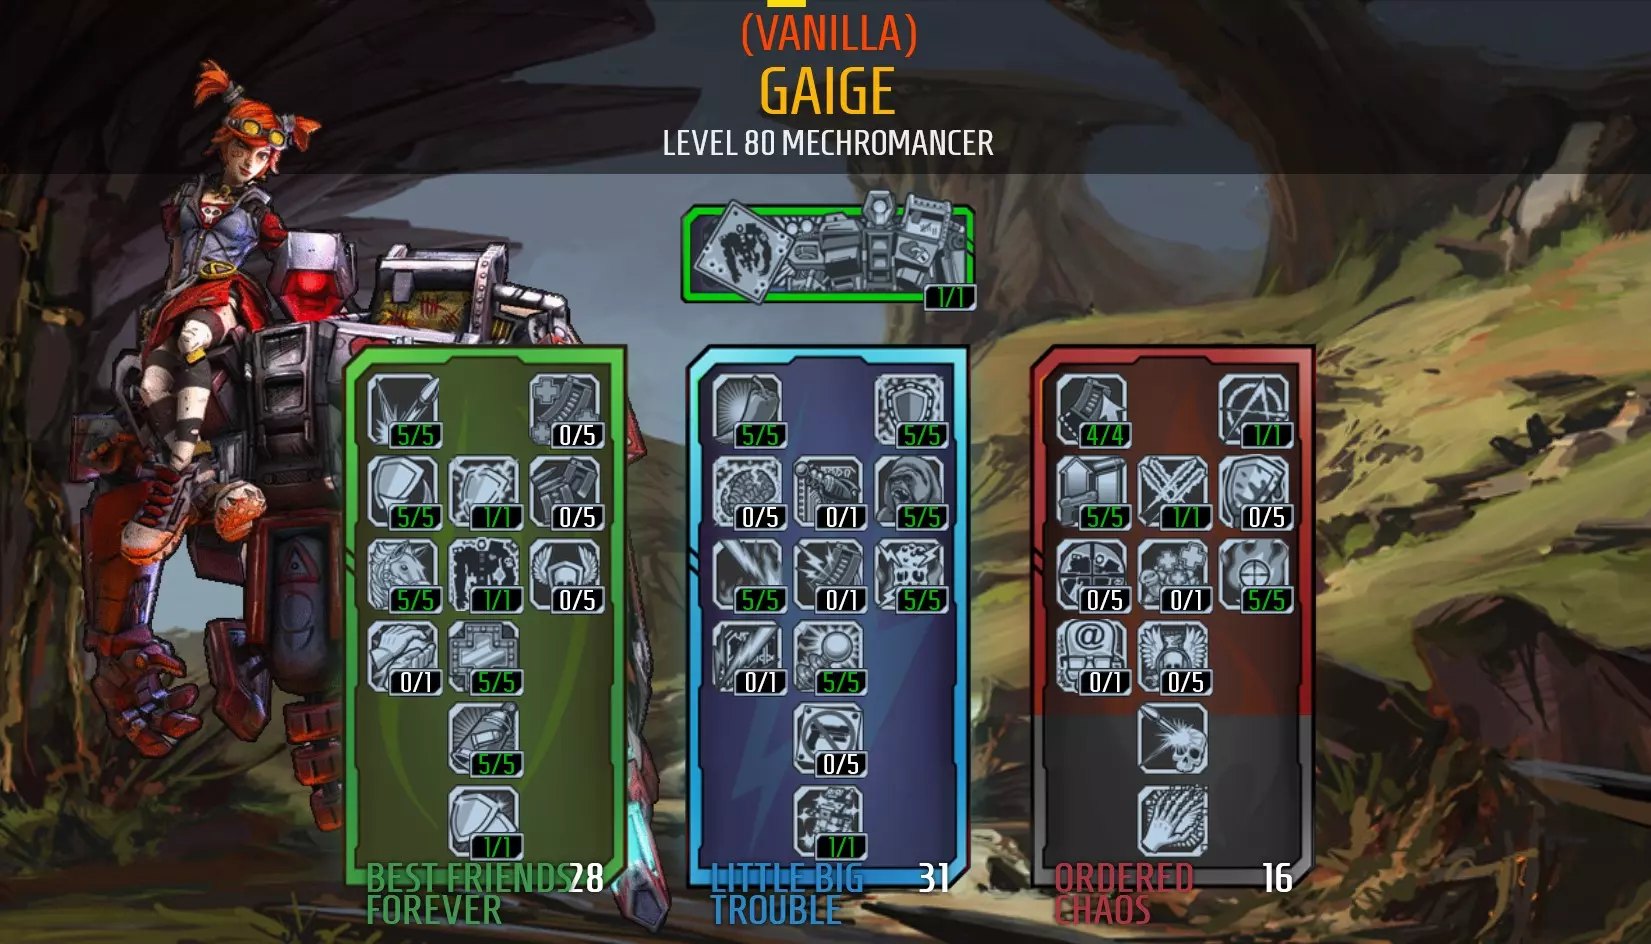
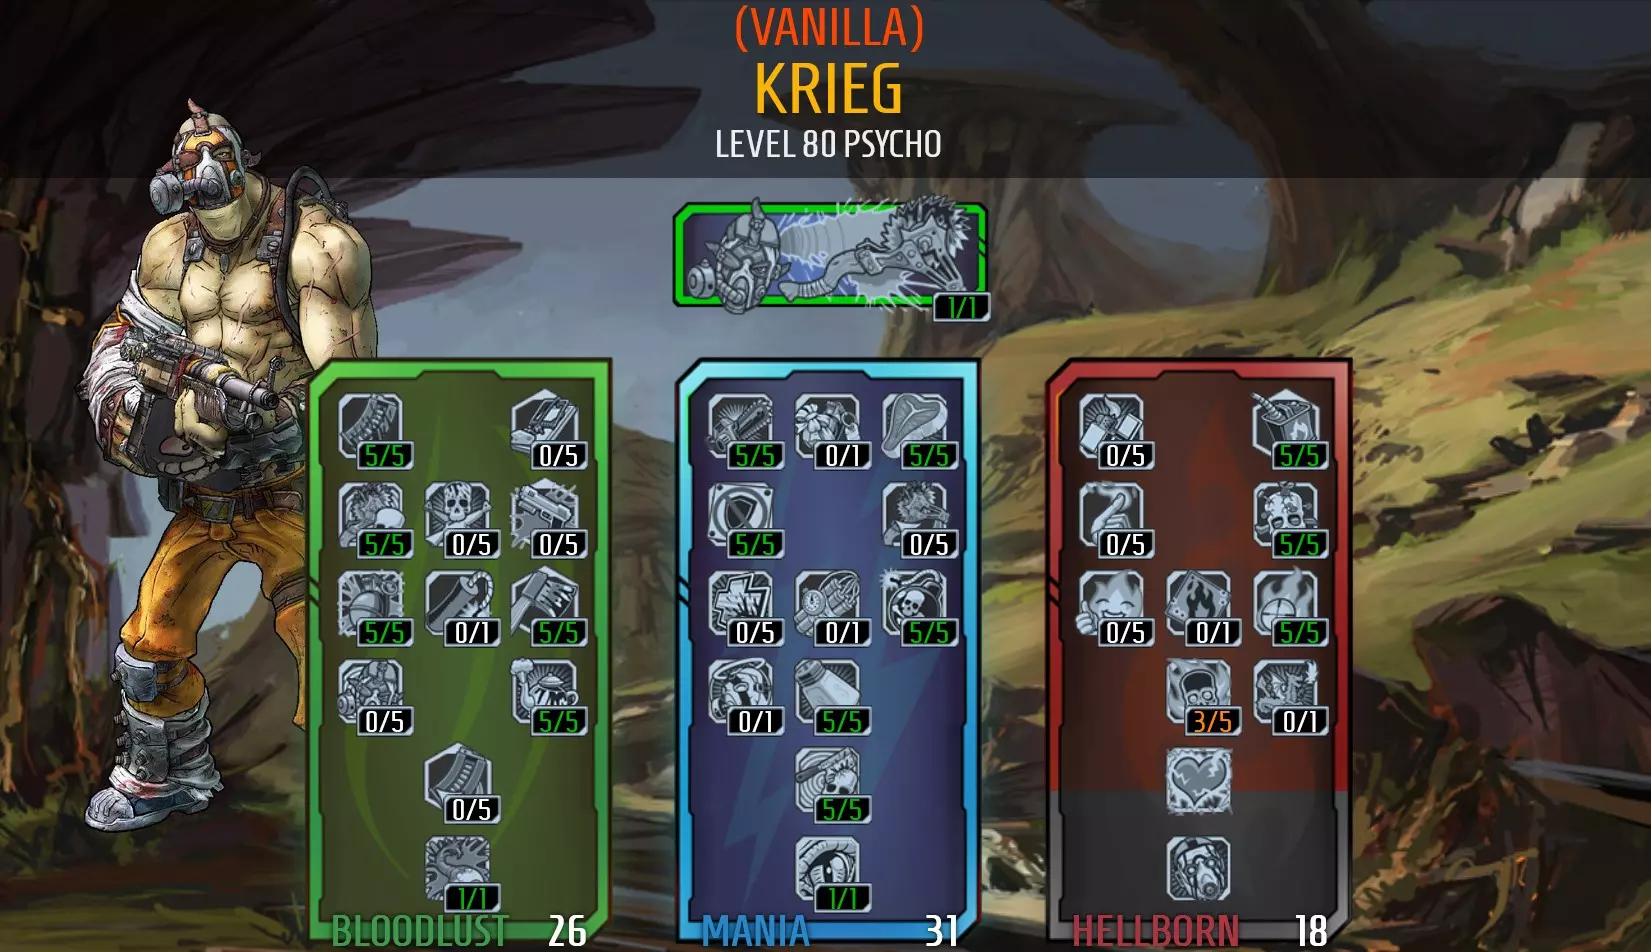
提示:由于【混乱】会削弱武器的精准度,所以武器的精准度并不重要。基础伤害更高的武器能从【混乱】中获得更大的伤害提升。这套配装不会使用【蜜蜂】护盾,因此射速对伤害输出的影响不大,但要考虑击中目标所需的射击次数。靠近敌人也不会显著提高直接命中的概率,除非你离要射击的【歌利亚】近到几乎能亲到它。 状态效果伤害由手雷造成,而非枪械;枪械造成的状态效果伤害仅为手雷的一小部分。【邪恶女巫】模组会在你击杀敌人后短时间内提升你的状态效果伤害。电击灼烧的伤害会随你的电属性伤害提升(尽管它显示为火焰伤害)。 当你开始积累混乱层数时,对敌人上slag(slag效果)是击杀他们的关键。不过不要停止对敌人上slag,即使在满混乱层数时,它也能继续帮助快速消灭敌人,还能帮你节省弹药。 这套配装要求玩家使用Maylay/Roid护盾,这样死亡陷阱就能通过“分享即关爱”技能获得护盾复制,从而造成极高伤害。没有这个护盾,死亡陷阱就只是个肉盾。这套配装的优点是死亡陷阱能让你立即获得战力;它不需要混乱层数就能造成伤害。在你开始积累混乱层数时,只需为它提供支援即可。 死亡陷阱在被召唤后会首先使用“机器人狂暴”技能。若死亡陷阱处于元素充能状态,此攻击将造成双倍伤害——让它闪耀起来。 保持死亡陷阱的元素充能状态可使其伤害翻倍。其元素伤害与物理伤害数值相等,物理伤害的提升也会增加元素伤害。 死亡陷阱算作额外一名玩家,因此团队增益对其同样生效。盖奇自身能提供的增益有限(仅有团队最大生命值提升或团队元素效果伤害提升),你需要从其他玩家处获取诸如攻击速度提升等增益。 死亡陷阱可以触发你的击杀技能,但自身无法从中获益(也无法获得你的任何属性加成)。 任何来源提升的盖奇近战伤害,均不会增加死亡陷阱的伤害。死亡陷阱可以通过输血手雷治疗,但效果非常微弱,玛雅的“修复”和“欢欣鼓舞”技能效果更佳。 推荐装备: 武器:牙签、冗余纤维、诺法莱特、寻路者 护盾:梅莱/狂暴护盾。巨兽之皮能提供最高的狂暴伤害加成,其尖刺和新星伤害也很实用,即使在后期游戏中也是如此。你也可以使用 Sham 护盾,但最终可能会炸到自己。 手雷:闪电属性手雷。连锁闪电是不错的选择,电椅手雷是另一个选项。 职业模组:巨兽杀手(机械术士)职业模组 圣物:远古之皮,带有+电击伤害和技能冷却速率加成。 此build的一些问题:0精准度很糟糕。有时候感觉角色像是在自动战斗,而你只是在等待射击命中。还有些时候,向上射击几乎不可能命中目标。 积累600点混乱值需要一段时间,所以死亡会是一个很大的挫折。获得诺法雷和沙姆护盾将有助于你在 pyro pete's bar 更快地刷取混乱值,但这仍然需要大约10分钟(包括移动时间)。 死亡陷阱在大多数 boss 战中表现糟糕,因为它倾向于使用闪电攻击而不是近战攻击。 Krieg - 地狱之子/火炬(烧烤大师) 他着火了!!!这套加点专注于最大化 Krieg 的元素伤害,并大幅提升其韧性、射速、精准度,以及一个大型但临时的枪械伤害加成。 伤害:8 韧性:9 难度:2 乐趣:6 技能树如下:
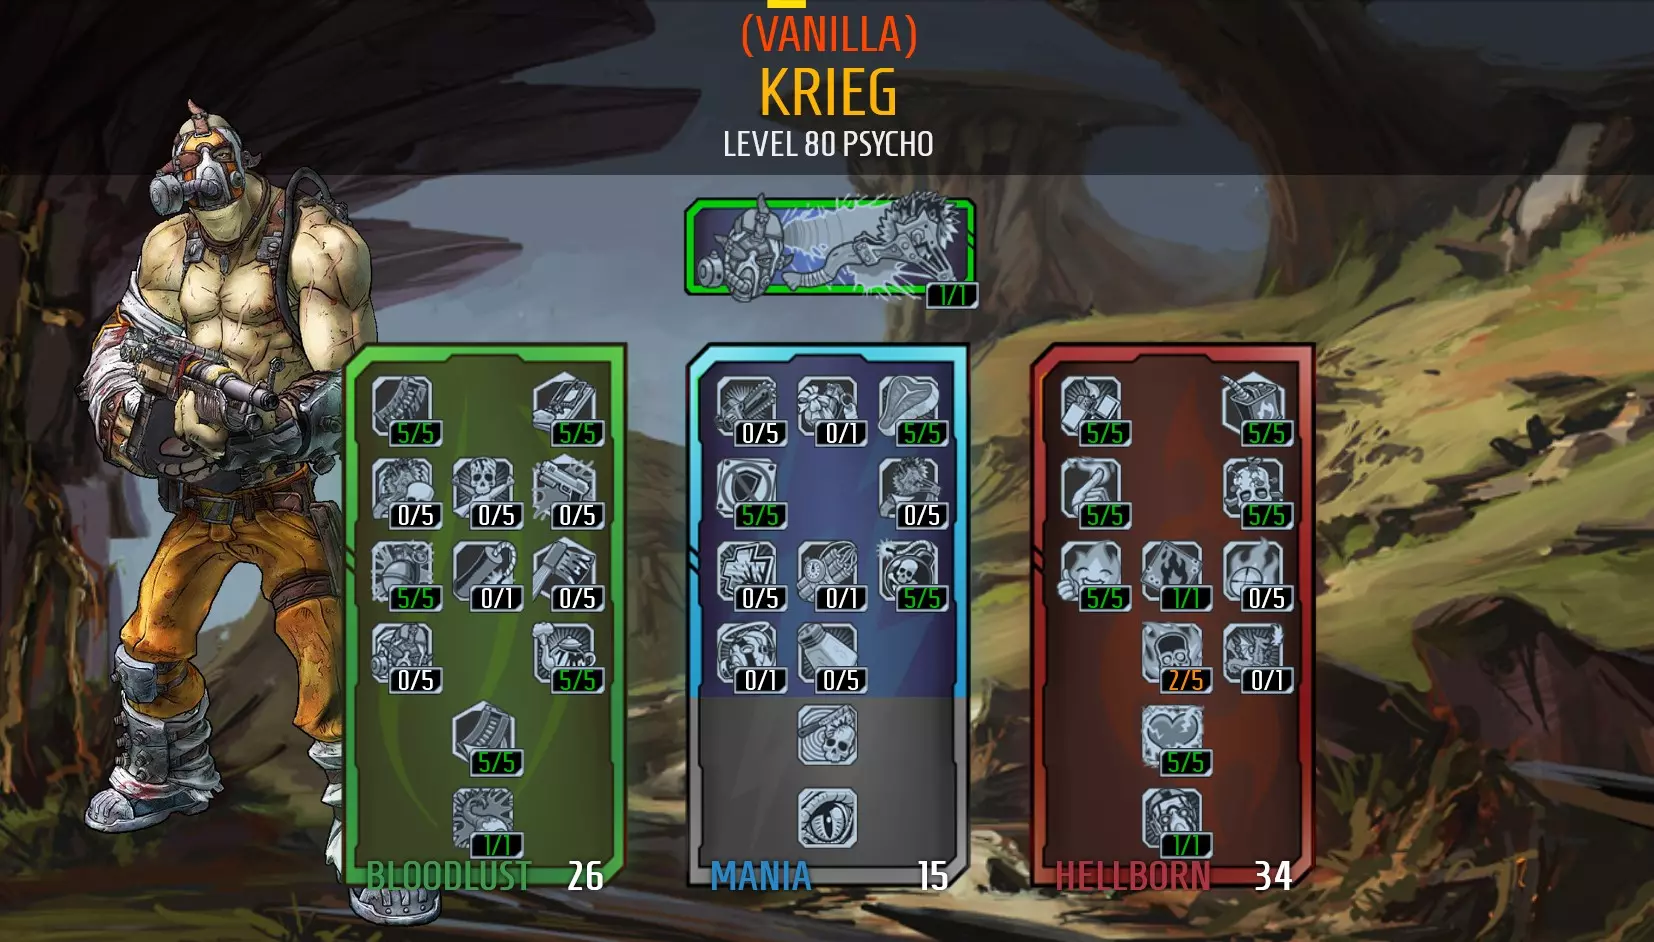
https://youtu.be/tc3u6H794H8 Tips: Focus on slagging things. your Raving Retribution will take care of the rest. Burn Baby Burn and your class mod will give you a big increase to your burn status effects (status effect damage refers to damage over time effects and slag). Your other elements will not receive any bonus damage but may still be beneficial against enemies resistant to fire. Otherwise you could just use an explosive weapon to dispose of them quickly. Pay attention to if enemies have shields equipped. Shields provide resistance to fire and corrosive damage and will need to be broken if you want your burns to hurt them. Grenades deal much higher status effect damage than weapons, but weapons can stack status effect damage faster. Elemental Empathy is a powerful skill, but only converts status effect damage to health. This skill will keep you alive of you can keep multiple enemies slagged and under status effect damage at the same time. This ability may fail if you only have 1 person ignited, or targets are resistant to the status effect applied. Avoid shields that have immunity to burn damage. They will stop you from being able to immolate yourself so you won't be able to get the bonus "on fire" stats. killing an enemy with a grenade or explosion will activate Bloodbath, giving you a massive boost (up to %500) to gun damage for a short time. The initial impact damage of Raving Retribution counts as explosive damage. Kills from status effect damage applied by grenades and explosions will not activate Bloodbath. Don't worry about the clips size of your weapons, Blood-Filled Guns and Elemental Elation will give huge boosts to magazine size. This also means you can better utilise weapons that are normally designed to deal massive damage but need to be reloaded often. It's much easier to apply status effects when you are on fire. Loot ammo and health vials after battles where you are missing health, so you're ready for the next fight. You're vulnerable at the start of fights while you're applying status effects, starting a fight with low health won't help. Increase your health as much as you can. This will help keep you alive when you don't have many active status effects, and surviving being on fire after fights. Your experience bar can only show up to 5 skills active at a time, but the other skills will still be active in the background (Blood Bath, Elemental Elation, Blood Twitch, Nervous Blood, Fuel the Fire, and Salt the Wound can all be active at the same time, but the game will only display some of their icons on the exp bar). Suggested items: Weapons: Moxxi weapons will provide additional healing. The Good Touch, Slow Hand, Grog Nozzle, and Ruby are good options. I use the Slow Hand to slag enemies. An Unkempt Harold is also useful for enemies that won't burn, especially when it's receiving bonus damage from Bloodbath. A rocket launcher such as a Nukem, World Burn or Norfleet can also be used to recover from Fight for Your Life. Shield: Rough Rider as it provides additional health and damage reduction. The Flame of the Firehawk will work for lower levels. Grenade: Firestorm or Antifection to apply status effect damage. The Fast Ball also works well to get grenade kills for bigger Bloodsplosions and to activate Bloodbath for increased blood damage. Class Mod: Legendary Torch Class Mod (best option), or Legendary Psycho Class Mod as it provides similar damage boost to ignite damage and more max health, but burns on yourself and enemies will not last as long. Relic: +Max Health (best), or +Fire Damage. Problems with this build: Occasionally you will die from self-immolation (after combat finishes) and there's nothing you can do about it but bite your nails and hope you live it. You can increase your chances of survival by: A) Maxing out Numbed Nerves for damage reduction, B) equip a fire damage resistance relic, C) use a damage reduction shield, and D) Avoid killing the last enemy too quickly so you can steal some last minute heals from Elemental Empathy before they die. The build is not as good against enemies that are resistant to fire. Don't over invest into fire damage and keep some other elemental weapons handy. Hellborn Psychos struggle even more against enemies that cannot receive status effects as you will not be able to receive any 'On Fire' benefits and Elemental Empathy won't work (no heals). These enemies are usually close to others that can receive status effects; try to keep these alive to maintain on fire effects and heal yourself. Gameplay Videos https://youtu.be/r-Uhzmma_QA Krieg - Hellborn Grenade Psycho I COOKED THE LITTLE RED ROCK AND THREW IT AT YOUR DEATH! With this build you can use grenades as your primary weapon. With this build you'll be running through mobs lobbing grenade after grenade with each kill giving you more grenades to throw until you're heart is content. You can do this 2 different ways -based around explosive or elemental grenades. This build uses the left tree for grenade skills, then the right tree for elemental damage. Damage: 8(solo) 5(co-op) Toughness: 4-8 (increases when on fire) Difficulty: 4 Fun: 9 Here's the skill tree:
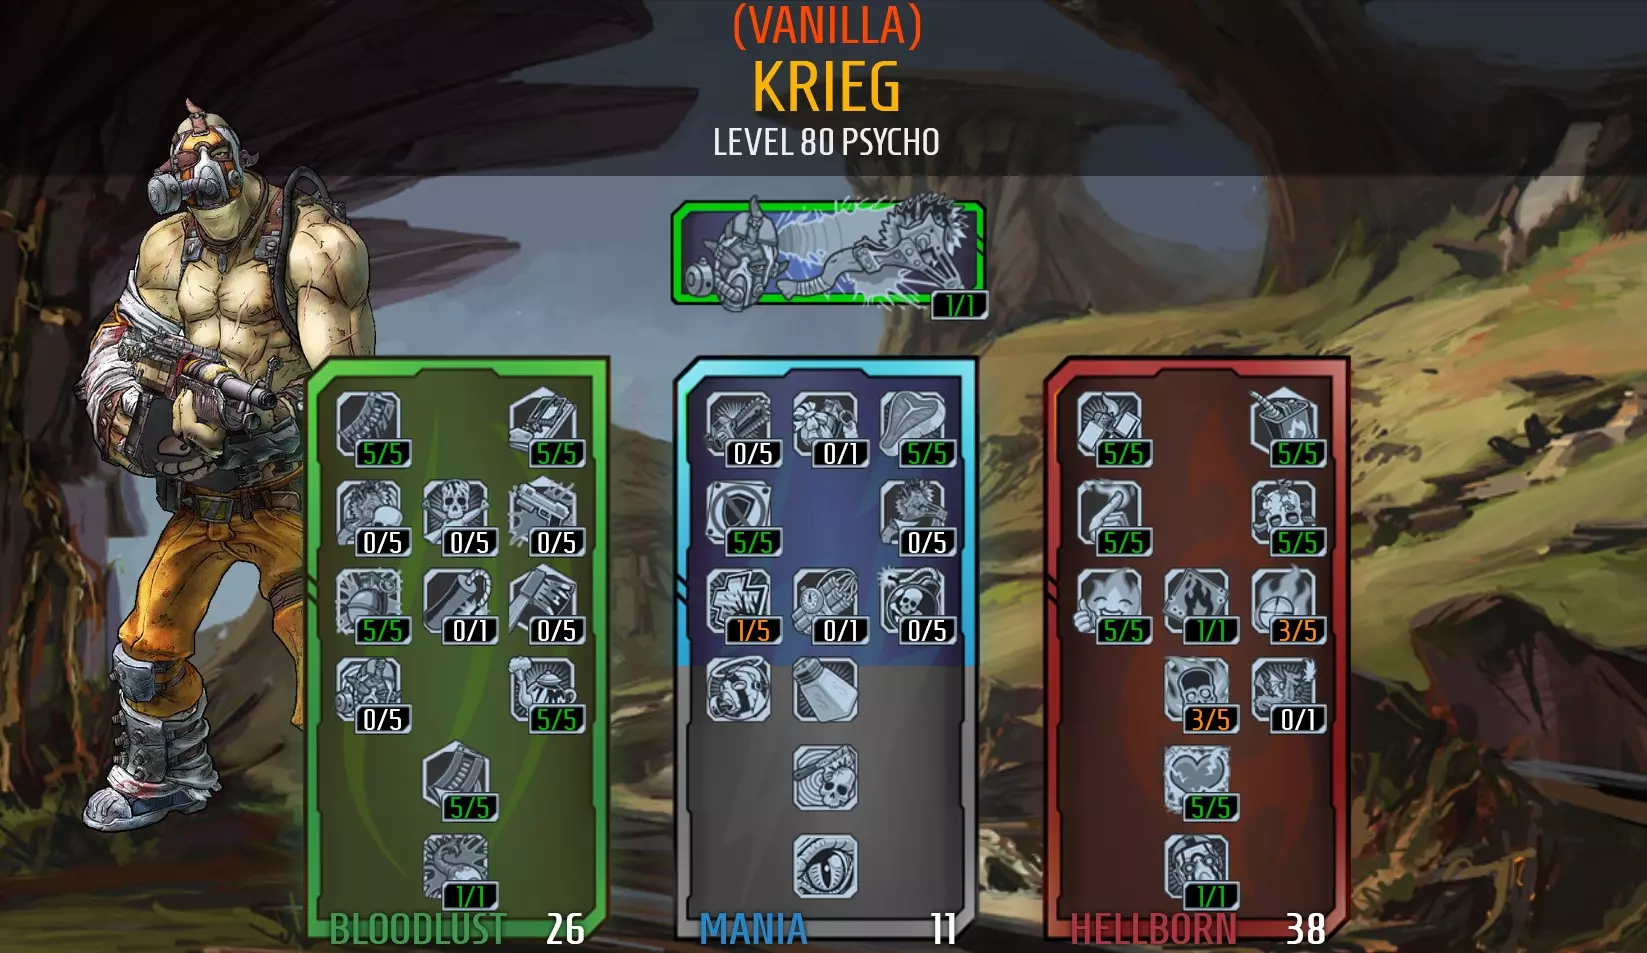
https://youtu.be/_qUNg-zpMbk Tips: Your power scales with Bloodlust stacks. Bloodlust stacks can be accumulated by dealing constant damage to enemies but start to decay quickly when you stop dealing damage. Applying status effects and using high fire rate weapons can help you to accumulate bloodlust stacks quickly. Killing an enemy with a melee attack activates Fuel the Blood, which will greatly increase your grenade damage for a short period of time, but you would have to invest most of your skill points into melee damage skills to make this skill viable, so it has not been selected. Killing an enemy with a grenade or explosion will activate Blood Bath which will cause enemies to drop grenades and significantly increase your gun damage for a period of time. Killing enemies with Bloodsplosion and the initial impact of Raving Retribution's homing fire balls count as killing enemies with explosions and will also activate Blood Bath. Using a class mod that extends your kill skill duration will help you to better utilise kill skills such as Blood Bath. You can run this character with all 5 elements if the elements on your guns are different to your grenade; so you can always play to your opponents weaknesses; but only your fire damage will be receiving bonus damage. Use shields that give +health as shield capacity won't last long and will not recharge as you will be receiving burn damage from being 'on fire'. Also avoid shields that have immunity to burn damage, as they will stop you from being able to light yourself on fire and get the "on fire" bonuses from your Hellborn skill tree - this would also prevent you from using your best skill - Raving Retribution. Grenades aim off-centre to the left of your cross-hair with most guns equiped. This is important when using the Fast Ball grenade mod. Grenades aim at the centre of your cross-hair when a rocket launcher is equiped. Lightning type Chemical Sprayer grenades are safer to use as they will not hit you when you're running inside their area of effect. Careful when using the Quasar or Electric Chair grenades though, as the explosions caused by these grenades will hurt you, even if their chemical sprayer component does not. Avoid using Bouncing Betty grenades as they deal damage by 'spraying bullets'. Kills achieved with bouncing betties will not count as killing an enemy with a grenade or an explosion, because you're actually killing enemies with bullets. Damage reduction sources start to lose their effectiveness when multiple sources are applied. Numbed Nerves and a Rough Rider shield will provide enough damage reduction to stay alive with this build, additional sources will reduce damage further but not by much more. Krieg's abilities allow him to exceed 100% damage reduction, but he will still take damage because the game calculates damage reduction by carrying incoming damage through all sources of damage reduction in turn, instead of cumulatively (You won't have 145% damage reduction, you will have incoming damage-75%=value-50%=value-20%=total damage reduction). This simply means you cannot be invulnerable unless you receive 100% damage reduction from a single source. Suggested Items: Weapons: The Good Touch, Slow Hand, Rubie and Grog Nozzle are ideal weapons as they can apply fire and slag elements, and convert a percentage of damage dealt to healing. Slag is preferred to amplify damage. Other elements can be used to heal when enemies are resistant to fire. An Unkempt Harold can come in handy for enemies that are immune to damage over time effects (i.e Constructors). The Logan's Gun or the Thunderball Fist are useful (but not effective late game), as the explosions caused by these guns will cause enemies to drop grenades. Shield: the Flame of the Firehawk will work at lower levels but loses its effectiveness late game. The Rough Rider will increase your health and provide damage reduction that will keep you alive late game. Grenade: Chemical sprayer grenades are easy to find and fire types will deal significantly more damage but electricity will let you enter it's radius unharmed which makes it easier to draw enemies into it. It also kills enemy shields so you can better deal damage with your fire and corrosive weapons. Sprayer grenades will be effective up until ~level 55. After that, you'll need something that hits harder such as an elemental Fast Ball. The Fast Ball will 1 or 2 hit most slagged enemies and trigger greater Bloodsplosions damage. Bloodsplosion will deal additional damage to slagged enemies, and can chain further from the enemies it kills. Class Mod: Legendary ReaperMod or Blister Class Mod. These class mods will extend the duration of killskills, so you can reap the bonus gun damage granted by Blood Bath after getting a kill with grenades or explosions. Relic: +elemental damage relic, +health can also be beneficial but less preferable. Problems with this build The build works best when playing solo as enemy health will increase as more players join, this will mean you will need more grenades to kill things and your pool of grenades will dry up quicker. Also, other players will become excited when they see how many grenades are being dropped and start burning through grenades themselves, so there will be fewer to go around. This problem can be managed by focusing more on using your elemental weapons and saving grenades for weaker enemies or to finish off enemies to activate your Blood Bath skill for more gun damage. Sprayer grenade damage dropped off around level 52-55. After that, swap to a Fast Ball for additional damage. You will occasionally die from self-immolation. Fortunately, Borderlands 2 is a game where dying doesn't really matter. I've learnt to enjoy the psycho's self destructive behaviours but if it does annoy you, you could swap the +elemental damage relic with one that gives you +health or +fire resistance. Krieg's Elemental Empathy is not very effective against slag resistant/immune enemies -so be more cautious around these enemies. It goes without saying but Krieg's damage is significantly lower against fire resistant enemies. Keep another high damage weapon handy to deal with these enemies and don't over invest into fire damage weapons/grenades. If you come up against a red dragon, you're going to have a bad day - don't fight them unless you have to; and you better be well equipped. Gameplay video: https://youtu.be/-3h0LrCOuyY Krieg - Hellborn Melee Psycho (Tougher) YOU'LL NEVER KILL MEEEEEE!!! This is a melee build for Krieg that focuses on his tankiness. He'll still have decent power behind him, not as much as he could but he'll benefit from a lot more damage reduction. He won't mind hitting himself in the face and will surely outlast his opponent Damage: 5 Toughness: 8 Difficulty: 6 Fun: 4 Here's the skill tree:
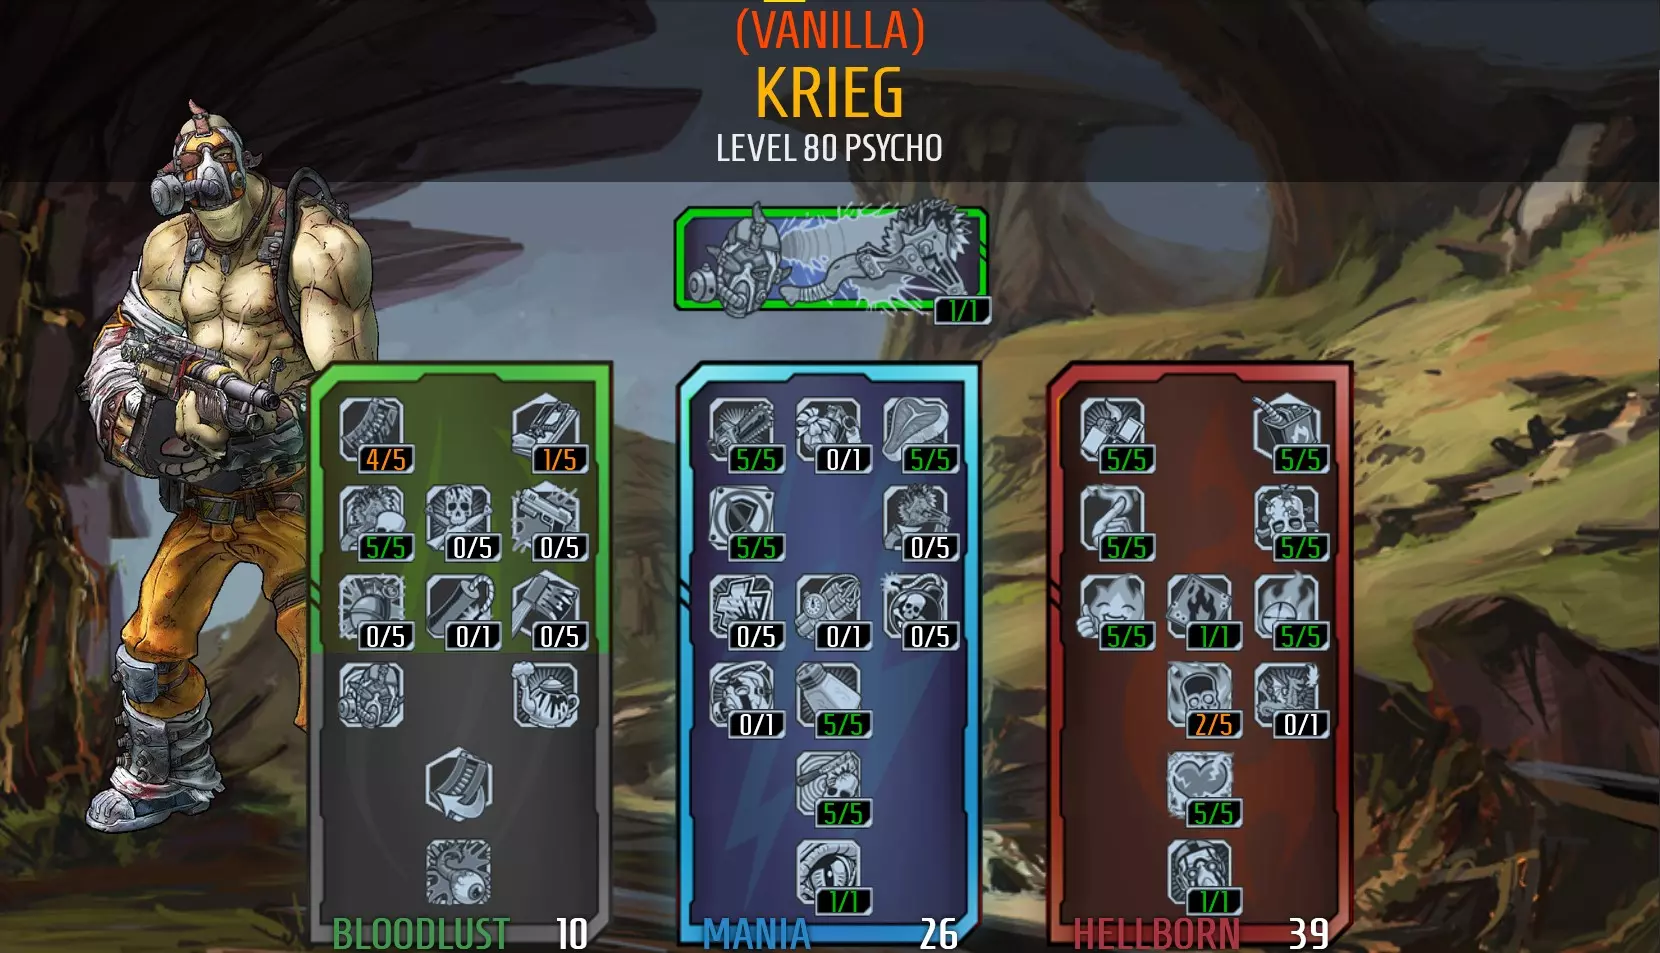
技能树视频 提示:你的力量会随嗜血层数和伤口撒盐层数提升。首次近战击杀会为你提供大量嗜血层数(提升伤害减免),同时你也会开始积累伤口撒盐层数(提升近战伤害)。首次击杀后,你将迅速获得 momentum。 我没有在血之 trance 上投入点数,因为我希望缩短巨斧狂暴的持续时间。较短的持续时间在 boss 战中可能有帮助,因为重新激活释放野兽会回满你的生命值,并让你在无法通过近战击杀恢复生命的情况下保持存活。在狂斧突袭状态外,要注意通过元素共鸣和莫克西武器获得的治疗,因为不稳定的治疗量会让释放野兽的时机更难把握。激活释放野兽并通过 Krieg的主动技能击杀敌人可以完全恢复生命值。但释放野兽的时机如果把握不当,会使你的生命值处于危险的低位,很可能不足以在被击入濒死状态前击杀任何敌人来恢复生命值。 无主之地2中的伤害减免计算方式很复杂——说实话,我仍然不明白它是如何运作的,因为我数学很差。但我知道的是,只有当100%伤害减免来自单一来源(例如当职业模组将动能反射提升至至少10点时,叠加多种伤害减免来源会产生收益递减效果。以前我不懂其中的数学原理,以为伤害减免上限在70%-80%左右,但现在我明白了,当应用多种伤害减免来源时,伤害减免属性的效果会减弱,从而产生瓶颈效应。 推荐装备: 武器:选择能够造成高额伤害的马里旺元素武器,施法者冲锋枪和泰迪尔武器是不错的选择,因为在狂暴间隙你可以放心消耗弹药。 护盾:使用【不羁骑手】以获得额外20%的伤害减免和生命值。 手雷:任何手雷均可,但要小心【吸血手雷】,因为当你想激活【释放野兽】时,它可能会为你回血。职业模组:传奇镰刀(减伤和增加近战伤害)、传奇火炬(减伤和火焰伤害)或传奇疯子(增加生命值和燃烧伤害)。对于低品质模组,蓝色或紫色的镰刀模组将是最佳选择,不过也有其他能为嗜血技能提供额外点数的选项。 圣物方面,增加最大生命值的圣物是最佳选择。增加抗性的圣物可以作为不错的替代品。 此流派的问题:当你的巨斧狂怒技能处于冷却状态时,你会更加脆弱。 你的伤害不会达到最佳水平,因此战斗会持续更长时间(更安全,但耗时更长)。 你最好熟练掌握扔斧头的技巧,因为你会经常用到它,尤其是如果你使用传奇火炬职业模组的话。你无法近战攻击飞行敌人,所以要用投掷的飞斧击中秃鹫这类敌人需要一些练习。坦克流派在某些情况下仍然会被秒杀,例如对抗使用火箭筒或狙击枪的敌人。对于不会受到状态效果伤害且拥有大量生命值的敌人,比如构造体,用该流派击败它们极具挑战性。 Krieg - 爆炸手雷/死神(强烈推荐) 轰,砰,轰!爆炸效果!这是我玩过的最有趣的流派之一。它能让你将手雷作为主要武器使用,而且如果操作得当,还能为近战伤害和枪械伤害提供巨额加成(每种伤害最高可达500%)。它还会触发【血腥爆炸】效果,你可以对一个敌人造成巨额伤害,然后看着它周围的一切都发生爆炸。 伤害:8 韧性:3-7(使用【战斧狂怒】时韧性会提升) 难度:4 乐趣:8 技能树如下:
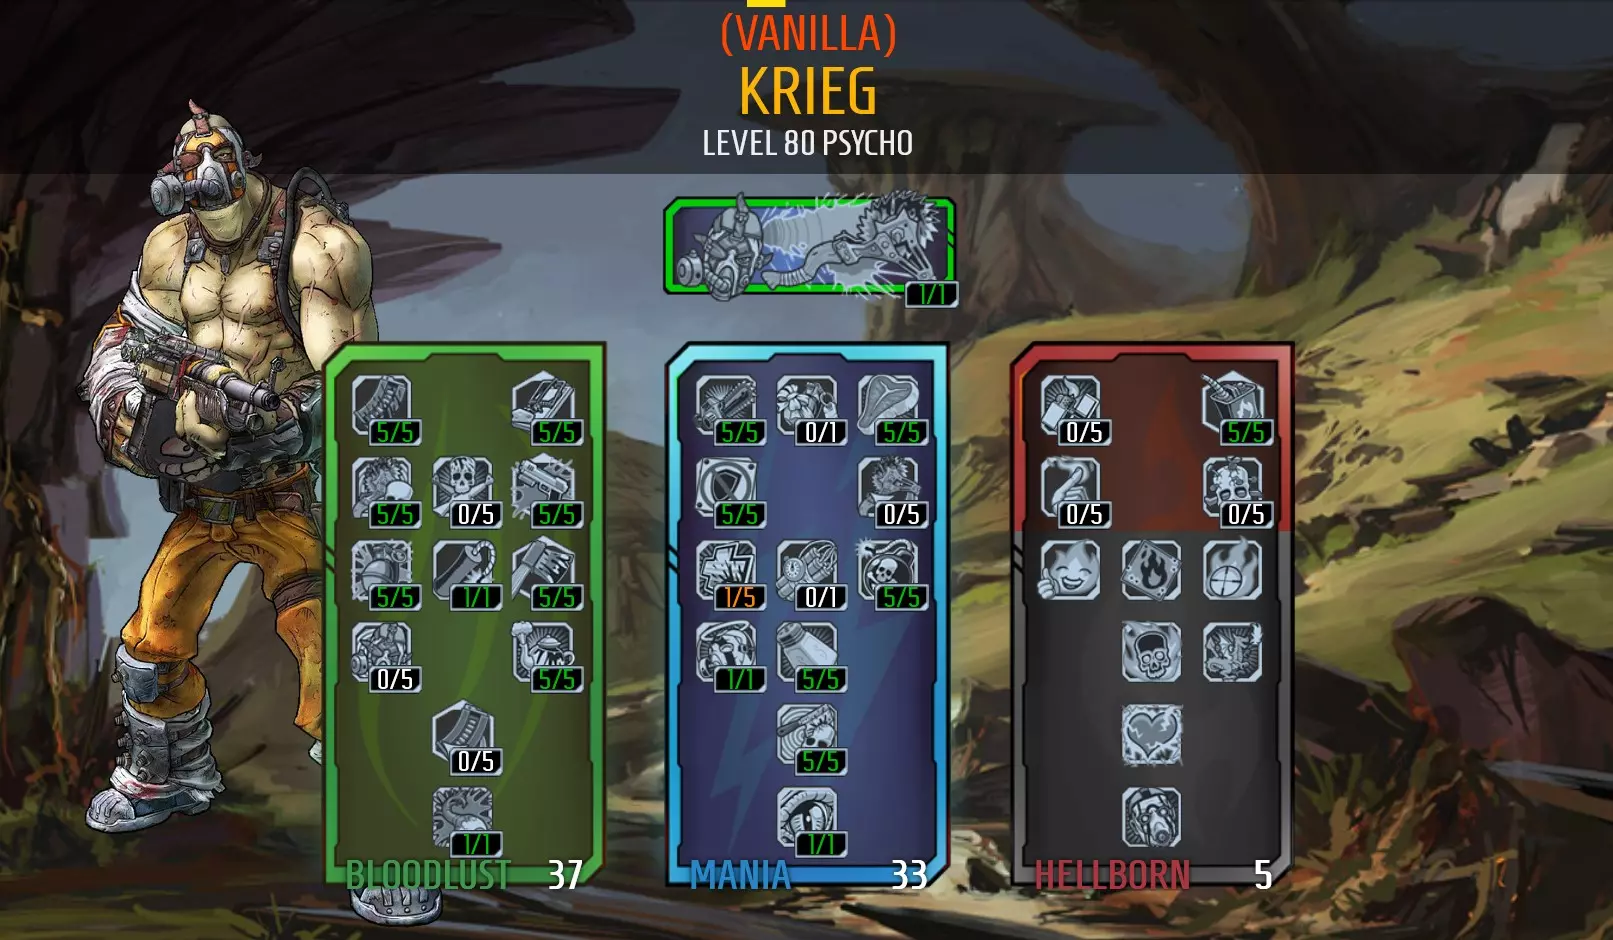
https://youtu.be/flu1ICZsz9M Tips: A lot of this build's power is tied to kill skills that scale with Bloodlust Stacks. Learning how to gain and maintain bloodlust stacks will help to reach the full power of this build. for starters, bloodlust stacks are gained by dealing damage to enemies and are quickly lost when you stop dealing damage. This build uses melee damage to accumulate bloodlust stacks quickly through Taste of Blood and Fuel the Blood which will give bonus bloodlust stacks for getting kills during Buzz Axe Rampage and getting melee kills. 2 quick kills using these skills will have you at full bloodlust stacks in no time. killing an enemy by shooting them with a gun will increase your melee damage, Killing an enemy with a melee attack will increase your grenade damage, killing an enemy with a grenade (or explosion) will increase your gun damage, and the cycle continues. Remember: SMG (Shoot, Melee, Grenade) - although it might be easier to start this cycle with a melee kill. Your thrown axe receives bonus melee damage and counts as a grenade when dynamite is strapped to it with Buzz Axe Bombardier. Your thrown Buzz Axes will deal crazy damage when Blood Overdrive and Fuel the Blood are both active as they will receive up to +500% melee damage and +100% grenade damage from these skills. You don't need many points in Thrill of the Kill as the damage you dish out is much higher than your max health. So any proportion of damage is likely to heal you back to full, or close to full. The important thing is that this skill should be healing you to above half health after each kill, this will activate the health gate that prevents you from being one shot by a massive damage source. You will need to be utilising your kill skills so that you can kill enemies quickly so you can keep receiving healing from this skill to keep you alive outside of Buzz Axe Rampage. This will also allow you to stay in combat and maintain those bloodlust stacks. 'Blood Filled Magazines' will further boost the damage of Tediore weapons that are thrown when reloaded. Tediore weapons are also classified as grenades when they are reloaded, and can receive bonus damage from Fuel the Blood and can activate Blood Bath if they kill an enemy. You can put fewer points into Blood Bath (to reach grenade drop chance of 100%) if you have a class mod that boosting the skill level. A percentage higher than 100% gives you a chance of dropping 2 grenades instead of 1. When using homing type grenades, they tend to lock onto the first thing you're aiming at (if not the closest enemy). If you're using homing grenades you should throw them in different directions (left and right) so that they can home into the hordes from different sides and hit different targets. The 2.5 second delay before you start using bloodlust stacks might not seem like much, but it will give you enough time to target the next baddie after kills and keep your stack count high during fights. Blood Twitch and Fuel the Fire work really well together as you can quickly swap to a slag weapon that is pretty much guarantied to slag on the first shot or two, then swap back to your damaging weapon to keep on reaping lives. Additionally, Fuel the Fire does not need you to be 'On Fire' to receive the full benefit of the skill. Avoid using fire-type weapons, you will receive no benefit from lighting yourself on fire when igniting enemies. Using a class mod that extends the duration of your kill skills will make them less situational and more useful. Explosive weapons will be able to active Blood Bath so they can sustain their own bonus damage. They can also active Blood Overdrive so you're ready to melee enemies for massive damage if you need to activate Buzz Axe Rampage. Use Buzz Axe Rampage to save yourself when you are at critical health and unable to score a quick kill for heal yourself. Release the Beast will activate if your health is low enough (indicated by a red exclamation mark icon flashing next to your health bar) and will heal you back to full with some damage reduction to keep you alive. You will lose your bonus damage reduction immediately when Buzz Axe Rampage and it takes awhile for Krieg to return to his weapons, you will take massive damage during this time. You may want to take cover as Buzz Axe Rampage ends so you don't get trapped in an endless cycle of activating Release the Beast over and over to stay alive. Suggested items:Weapons: The Unkempt Harold will hit the hardest. Any explosive weapon will do while levelling, Tediore guns with large clips that reload like a grenades are great. Any fast firing slag weapon will do, preferably with a larger clip so you don't have to reload it. And rocket launchers such as the Nukem are good for recovering your feet in tricky situations. Shield: Use a Rough Rider for the extra 20% damage reduction and health. Grenade: the Fast Ball will be your best option as it will score higher 'Overkill' damage than other grenade mods, which is then applied to Bloodsplosion - dealing massive damage to others around the dying enemy. The Fast Ball is easy to farm, but if you're still levelling, any other higher damage grenade will do, just avoid bouncing betties - they kill enemies with bullets, not the grenade itself and won't trigger Blood Bath. Status effect grenades are also less reliable. Class Mods: Legendary Reaper Class Mod is the best option as it provides boosts to the most important kill skills and extends their duration. Levelling up you could use a blue or purple Crunch (+explosive damage) or Reaper (Kill skills) class mod. Relic a + max health will be your best option. A +explosive damage relic is also a good option but carries more risk. Problems with this build: The build works best when playing solo as enemy health starts increasing when more players join -which will then cost you more grenades to kill things. Also, other players will become excited when they see how many grenades are on the ground and start throwing them themselves which will reduces your ability to keep throwing them. But don't threat too much, this build still gives you some good boosts to melee and weapon damage. Kills with explosive weapons will also help replenish your grenade count (unlike the elemental version of the grenade psycho which relies on Raving Retribution to do this). A lot of the builds power is tied to kill skills and will be much weaker in boss fights where there are no minions to kill to activate it's power. The damage reduction Krieg receives will keep him alive but it will be a slow fight without the bonus damage his kill skills provide. Gameplay Video: https://youtu.be/vIt5cxfprzg Krieg - Bloodlust Melee Psycho (More Damage) meat... meat... MEAT! CARVE THE MEAT! WHERE'S MY SALT!? Hack, slash and explode your enemies into tiny chunks with this build that makes the most of Krieg's devastating melee damage. You will be able to kill enemies in 1-4 hits (except bosses) and kills will trigger blodsplosion to explode or weaken nearby enemies. Damage: 10 prior to OP levels and 6 after OP levels Toughness: 6 Difficulty: 6 Fun: 10 prior to OP levels and 4 after OP levels Here's the skill tree:
https://youtu.be/9gy9Rr6SrBE Tips: Practice your axe throwing skills, you're going to need to master your axe throwing skills to take down flying enemies like buzzards and get kills to stay upright. Some enemies like to run away, hitting them with a flying axe will make them stumble so you can catch them. Your Buzz Axe Rampage damage isn't boosted by your guns melee damage (if it has a blade attached) but it is by other items (i.e. relic, class mods, roid shields). Your melee damage can be boosted by guns when you're not rampaging. Don't discount your weapons, you will still need them to get yourself back up when you go down. There are 3 ways to tell if Release the Beast is ready: listen for Krieg to tell you when it's ready, there should be a red exclamation mark on the right-hand side of the health bar and the health icon on the left-hand side of the bar should be shaking like crazy. If you are badly wounded, but not low enough for Release the Beast, take cover and try to hit yourself in the head - then you'll be good to go. Borderlands 2 has a mechanic that stops you from getting knocked in one hit. This only occurs when you suffer a killing blow while your health is stable (HP is above 50%, and is indicated by the health icon not shaking). This 'health gate' will knock you down to critical health and give you 2 seconds of invulnerability, but the next will down you. This happens fairly reliably at higher levels and provides the perfect opportunity to use Release the Beast. Beware though, if your health was already below 50% before you take a hit, the health gate will not trigger and the next hit may down you without giving any opportunity to trigger Release the Beast. You can still swing your axe to deal damage while you have a 3rd person view of your character entering Fight For Your Life. So keep swinging! Your power scales with Bloodlust and Salt the Wound stacks. Your first melee kill will give you a heap of bloodlust stacks (increasing your damage reduction), and you will have started to accumulate some salt the wound stacks (increasing your melee damage). You will gain momentum very quickly after that first kill. I've avoided putting points into Blood Trance as I want to keep my Buzzaxe Rampage duration short. Having a shorter duration can be helpful in boss fights, as re-activating Release the Beast will refill your health and keep you alive in situations where you cannot heal from getting a melee kill. Avoid healing skills like Elemental Empathy, Thrill of the Kill, and Moxxi weapons as unexpected heals can make it harder to time Release the Beast. You can heal from activating Release the Beast and getting a kill with Krieg's action skill will heal him to full. How damage reduction is calculated in BL2 is complicated - and honestly, I still don't understand how it works as I'm very bad at maths. What I do understand is that 100% damage reduction will only equal 'immune' if it comes from a single source (i.e. Kinetic Reflection boosted to at least 10 points by a class mod), and you will receive diminishing returns when you apply multiple sources of damage reduction. Without understanding the maths, I used to think damage reduction capped around 70-80%, but I now understand damage reduction stats lose their effectiveness when there are multiple sources of damage reduction applied, resulting in a plateau effect - see 'other notes / Krieg' for more info. Suggested items: Weapons: The Unkempt Harold works well with this build (tired of recommending it but it is a good gun). If you're tired of the Unkempt Harold and want to use something else, look for explosive weapons with good enough damage to get a quick kill when fighting for your life - but finding an alternative to the Unkempt Harold will be difficult. Tediore guns are also good as you can afford to burn ammo as you spend soo much time in Buzz Axe Rampage that you barely get to use your gun. They also receive bonus grenade damage on reloads, and are thrown like your axe - it's good practice! Keep a weapon handy to slag enemies before you enter your buzz axe rampage to score a couple of quick kills. Shield: I was using a roid shield will devastate enemies up until you start to complete overpower levels. A good purple roid shield can give you just as much damage as a the Seraph Pun-chee but thw Hide of Terramorphous will give the largest damage boost. You will need to use a Rough Rider late game to increase your toughness to stay alive long enough to deal damage. Don't use a Love Thumper as it is not effective higher levels and the blasts can hurt your teammates, unless that's what you want. Grenade: Use a high damage grenade like the Fast Ball, or something to light yourself on fire before you activate rampage, such as a Fire Storm or Antifection. Class Mod: Legendary Sickle Class Mod or a blue and purple Sickle mod. Problems with this build: This build is a lot of fun up until level 80 as it loses it's effectiveness as you overpower. Enemy health will scale too quickly for you to get the fast 'high damage' kills that grant huge Bloodsplosions. You will need to trade some of your damage for additional hitpoints so you can stay alive long enough to get a kill. Krieg's biggest threat is himself. His self harming behaviour (negative impact of silence the voices), causes him to bash himself and leaves him open to enemy attacks. It also may prevent you from getting a kill that would heal you and keep you going. However, the damage bonus from Silence the Voices is just too good to pass up. There's no skill called Counselling, so you're just going to have to accept Krieg the way he is if you want the massive damage this skill offers... mental health issues and all. Missing your timing on Release the Beast will place you in a very vulnerable position - it will place your Buzz Axe Rampage on cooldown, so you can't tap into your main strength, and it'll likely put you into fight for your life as you will be starting a rampage with low health. Getting the timing right becomes increasingly harder as your health pool gets larger. Taking health damage will reduce the cooldown faster. Some enemies won't let you get close enough to melee them, you will need to throw your axe instead but this will deal noticeably less damage. Not good against most bosses. You'll have to use your guns instead. Gameplay Video: https://youtu.be/fffZnVNORwY Maya - Legendary Siren (Easy to play) "Pick 'em up and shoot 'em down. I love my powers!" This is a really easy build to play that focuses on accelerating Maya's action skill - Phaselock as much as possible. You won't need to be a good aim when you can use Phaselock every few seconds to hold enemies still while you shoot them through. On top of this, the build offers improvements to shield functionality and provides 3 sources of healing to keep you alive. Damage: 7 Toughness: 7 Difficulty: 2 Fun: 4 Here's the skill tree:
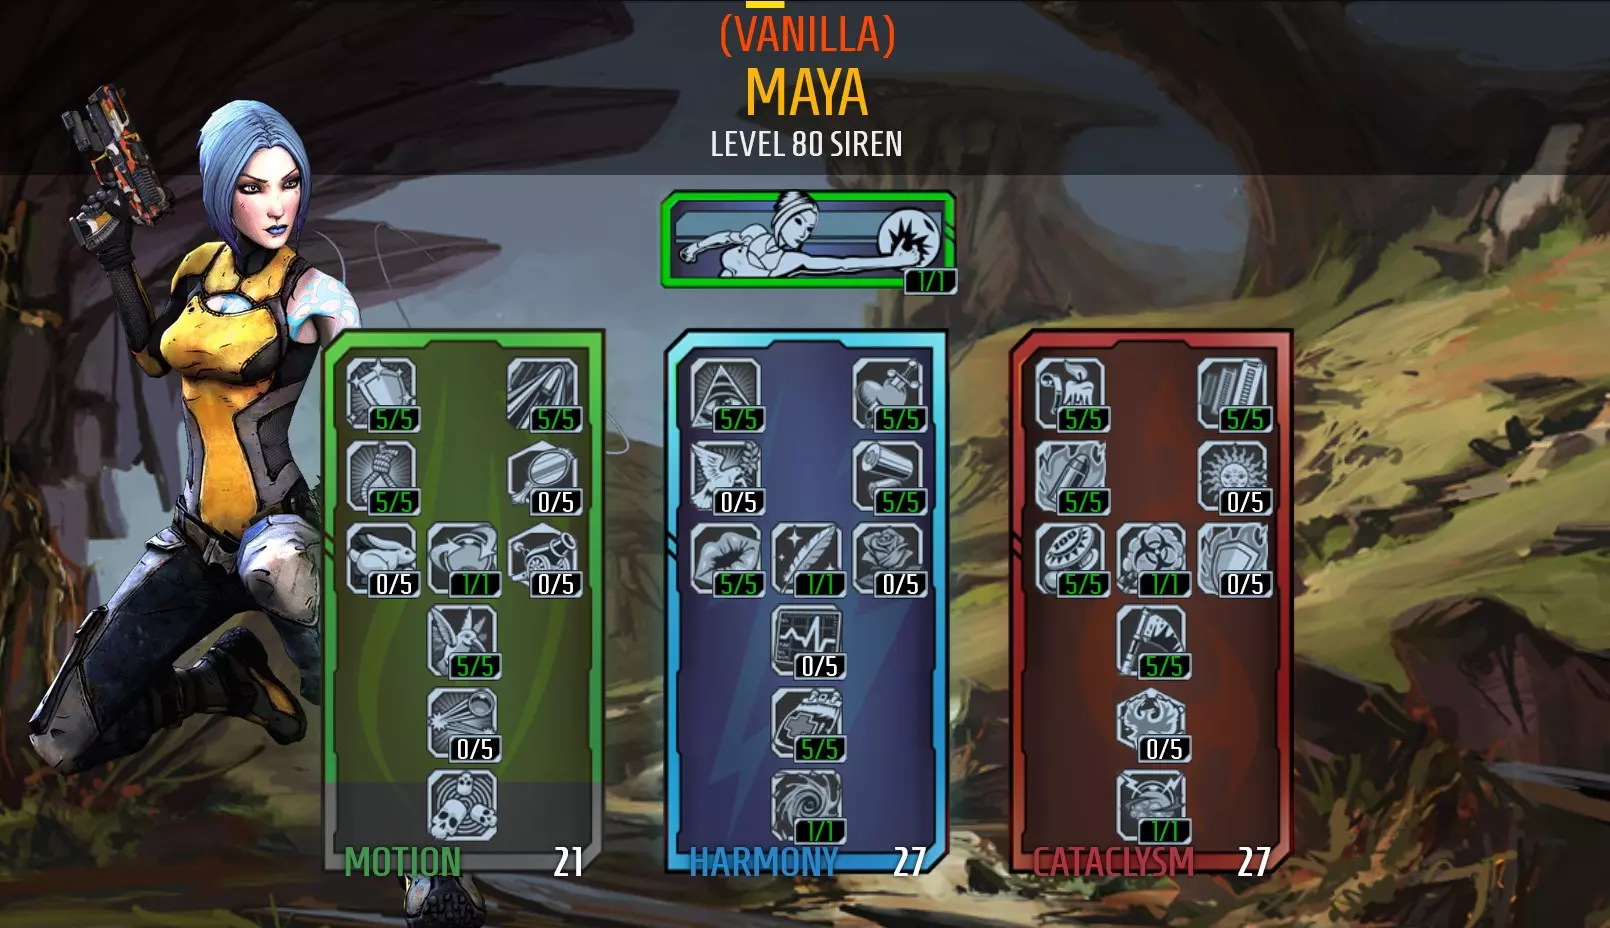
技巧:尽可能通过职业模组、圣物和【快速】技能来提高你的主动技能冷却速率。 避免选择【思维锁定】,因为这会使冷却时间增加4秒。 使用能提升韧性的护盾,这样你就能在需要的位置对相位锁定的敌人进行暴击,而不必担心自身受到伤害。 一旦相位锁定敌人,就全力输出。这样你的技能就能快速充能,以便再次使用来锁定下一个目标。 尝试激活相位锁定时不必担心失败,你可以立即重试。 避免使用弹夹容量小的武器。当你对敌人使用相位锁定时,你需要在无需多次 reload 的情况下对其造成大量伤害。 不必急于在前期解锁生命汲取和轻蔑技能。你的伤害和主动技能的实用性更为重要。 当你拥有生命汲取后,在击杀被相位锁定的敌人后继续造成伤害,以维持生命值,直到主动技能再次可用。 对抗无法被相位锁定的敌人时,你将损失 30% 的枪械伤害,因为你无法激活毁灭技能。面对这些敌人时要更加小心。 相位锁定可以在极远的距离使用。你可以搭配蜜蜂护盾,并使用精准武器(狙击枪除外)进行狙击,以通过此流派造成更高伤害。推荐装备:武器:【莫西小姐的好触感】,它拥有不错的弹匣容量、额外的暴击伤害,并能提供额外治疗。你可以在避难所中找到莫西,通过向她的小费罐里投钱直到她给你这把武器。你可以多次这样做,但第二次投钱时她会给你【莫西小姐的坏触感】,这把武器带有腐蚀元素而非火焰元素。一个角色在其游戏生涯中只会获得一次【莫西小姐的坏触感】(无论周目数或谁投的钱),其他时候都会获得【莫西小姐的好触感】。当然,【不羁哈罗德】也适用。护盾:【拮抗剂】和【封锁】是不错的选择,它们提供固定伤害减免,不过紫色品质的【海龟】护盾和【适应性】护盾也能使用。 手雷:使用电属性手雷模组来破盾。 职业模组:【传奇魔女职业模组】,如果还在升级阶段,【束缚者职业模组】也可以。 圣物:+技能冷却速率。【远古之骨】还能为你偏好的元素提供额外伤害。 该流派存在的一些问题:玩法简单,但挑战度的降低可能会让游戏很快变得无聊。 对无法被相位锁定的敌人效果较弱。 玩起来比其他角色流派感觉更慢。 在尝试射击敌人时,并没有真正教会你如何预判移动。玛雅 - 凶猛猫咪(最适合输出) “天啊,她拿着冲锋枪。她是个魔女战士。”—— Krieg 这套配装使用猫类模组,可增加冲锋枪伤害并提供伤害加成技能。搭配蜂巢护盾和加伤圣物,你就能像魔女该有的样子一样轻松消灭敌人。 伤害:9(可单刷无敌的哈迪拉克) 生存:3 难度:3 乐趣:7 技能树如下:
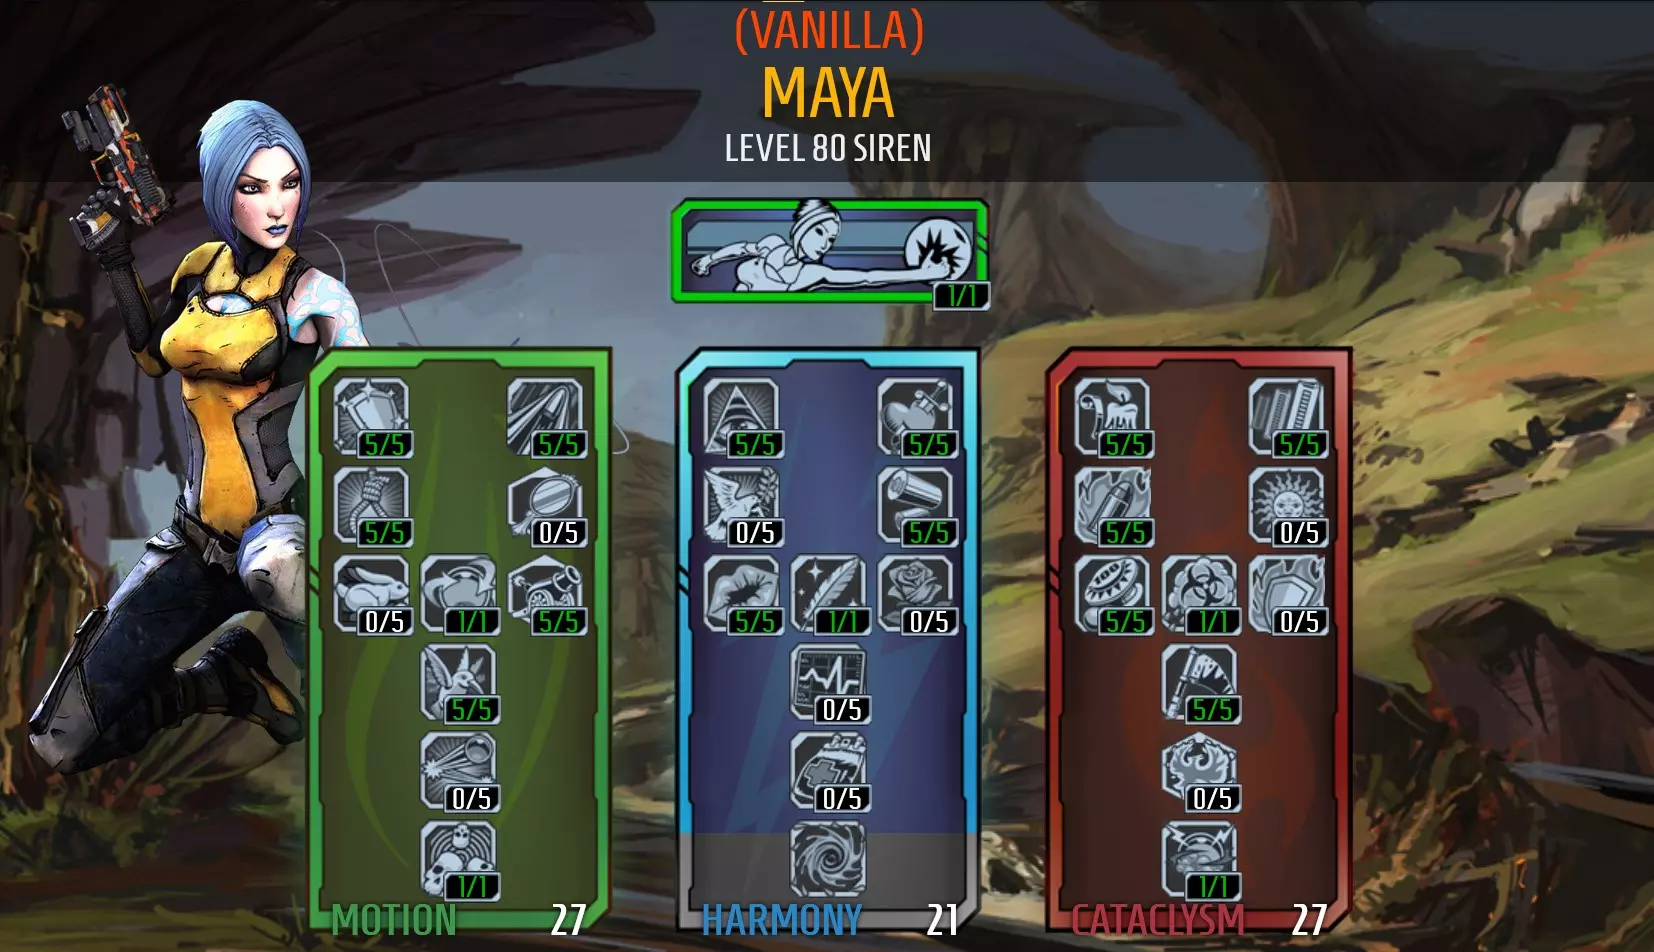
提示: 装备猫职业模组后,冲锋枪(SMG)的伤害将显著高于你的其他武器。 沙鹰是这套配装中最佳的高伤害选择,但好触感与坏触感冲锋枪能提供治疗效果,帮助你维持生存。由于目标是避免受到伤害,因此你应该不需要太多治疗。 使用蜜蜂护盾时,只要护盾处于完全充能状态,它就会为枪械发射的子弹附加增伤效果,且增伤幅度会远高于枪械的基础伤害。为了最大化蜜蜂护盾提供的伤害,应优先选择高射速武器或发射多发弹丸的武器。例如:【B!tch】冲锋枪拥有高射速,而沙鹰则能在每次射击中发射7发弹丸。【破坏】技能能大幅提升伤害,因为它同时增加射速和枪械伤害;【连锁反应】则会使一定比例的子弹发生弹跳。但这些技能只有在你相位锁定敌人时才会生效。要避免击杀被相位锁定的敌人,以延长这些增益效果的持续时间。 【思维锁定】会延长你的相位锁定能力持续时间,并让敌人有其他目标可攻击。敌人会优先攻击被思维锁定的目标,这将使你更容易维持【蜜蜂】护盾。 【聚合】能将敌人聚集起来,【毁灭】则会使它们进入slag状态。之后你只需将它们横扫即可。 使用【蜜蜂】护盾可能需要一定的学习过程,因为你需要熟练避开所有伤害来源。与敌人保持一定距离(这样他们会失去准度)并躲在掩体后面会有所帮助。此外,优先攻击使用爆炸性投射物的敌人、狙击手和高射速敌人(按此顺序)。你的装备已经拥有足够的伤害,不需要蜜蜂护盾,但有它会更好。 获取沙鹰时(“猩红船长与她的海盗宝藏”中“哎呀”任务的奖励),留意带有“飞行”前缀的沙鹰。飞行沙鹰的投射物飞行速度更快,使用起来更轻松。如果你不喜欢获得的沙鹰,可以强制关闭应用程序而不保存,重新加载游戏,然后再次提交任务尝试。 建议物品 该配装以冲锋枪为核心。我使用皇帝冲锋枪进行升级。使用起来感觉流畅利落(就像战术突破一样),但它的伤害无法与沙鹰相提并论。搭配蜜蜂护盾时,沙鹰是更强的选择,因为它每次发射4轮弹幕,每轮7发子弹(共28发),而蜜蜂护盾的增伤效果会作用于每一发子弹。 由于这是一个DPS流派,蜜蜂护盾是最佳选择。 手雷的选择无关紧要。我使用魔法导弹来使敌人陷入 slag 状态。 使用增加冲锋枪伤害的圣物。 该流派围绕猫类模组构建。对于终局内容,寻找传奇猫类模组。 此流派的问题: 这是一个相当不错的全能流派,但在无法引导相位锁定的情况下效果会打折扣。 沙鹰的弹药消耗速度比其他冲锋枪略快。搜索战利品容器来补充弹药,并携带一把备用武器。 玛雅 - 束缚者(团队玩家 - 平衡型) 若我们团结起来,定能存活下去。我们的敌人则不会。 这是一个全能的平衡型build,能够频繁释放相位锁定,为团队加速技能冷却,治疗队友并造成伤害。其设计初衷是与其他玩家协作,但在队友不在或想在游戏间隙刷取战利品时, solo游玩也表现不俗。 伤害:8 韧性:5 难度:3 乐趣:6 技能树如下
https://youtu.be/kXdiAeqD6eU Tips: when using Phaselock, don't kill the trapped enemy too quickly so you can continue to benefit from Wreck and Chain Reaction. Instead, shoot at other enemies then finish off the Thoughtlocked enemy just before it's released. Sub-Sequence can be a good skill with this build due to the 10-11 points you can get in Sweet Release. If you have Sub-Sequence unlocked, you will want to focus damage on the Phaselocked target each time it jumps to keep releasing healing orbs with each kill. However, the focus was on being able to hold a target for as long as possible, so Sub-Sequence was not selected for this build as there is a game mechanic that shortens the Phaselocked duration each time it targets the same enemy, and Sub-Sequence jumps can initiate this. Weapons with larger magazine sizes tend to take longer to reload but you can reload them while your Phaselock ability is cooling down so your guns are prepped for the next time you use your ability. Res is only useful if you're playing co-op. Helios is a good early game skill but it's a rubbish end game skill. Ignore the 5 points the Legendary Binder Class Mod gives to this skill when you're above level 72. It's easier to shoot players to heal them with guns that have bullet spread, deal AoE damage, and/or have higher fire rates. Be mindful of the weapon's reload speed; players will be downed while you're reloading if you're trying to heal them while they're still taking damage. Suggested items: Weapons with larger clips work better with this build as you don't loose damage output reloading while Phaselock is active. Avoid using snipers as this build consumes ammo like a badass midget consumes drinks at a bar. I pretty much used Miss Moxi's Good Touch the whole way through -I've settled with one that has an extended magazine. Weapons that deal AoE damage or a bit of bullet spread are effective after Converge bunches enemies up. This build is based on the Legendary Binder Class Mod, but is highly flexible other mods depending on which aspect you want to focus on. The Bee shield work well with this build. There are plenty of options for tanking if you want to focus on playing the support role. Your choice: Magic Missile to slag, Singularity Grenade to better group enemies and deal AoE damage (Quasar is a good option), or Transfusion type grenade to heal (look for 'sticky homing' types as these will release healing orbs immediately on explosion). Problems with this build The build will consume a lot of ammo but as long as you have a slag weapon and 3 offensive guns, you should be fine. Your Phaselock can't pick up larger enemies so you won't be able to gain the large increase to damage and fire rate bonus when versing larger units like constructors or buzzards unless there are smaller enemies around. You will do better with a different build if you plan on playing solo most of the time. Gameplay Videos https://youtu.be/iaoZgIUaeuo Maya - Nurse (Co-Op - Full Support)* Oops, this build is outdated and is being reviewed. check back soon! 17/05/2022 If looks could heal How the build works Your friends will be happy to have you in their team looking after them with this build. The build is all about support, your ults will mind control things that then taunt and tank enemy damage, you and your team will regenerate %10 of your max health per a second while you have an enemy Phaselocked, you can shoot team mates to heal them, you focus on slagging things so they don't have to, and you can revive from distances with your action ability. Here's the skill tree: Tips: Weapons with a fast fire rate, a little bit of spread, or cause area effect damage will make it easier to hit your team mates to heal them when they're running around erratically. Enemies will focus their attention on targets under the influence of Thoughtlock (bottom skill in the left/Motion tree). This build is good for players who want to support inexperienced players, or for inexperienced players to feel like they are contributing (you are!). Recommended items: a couple of items to slag with -doesn't matter what as long as it has a good chance to slag and you can sustain the ammo The build is not weapon specific but probably works better with larger clips and/or higher fire rate weapons. I found the Invader with +crit damage was handy for dealing damage when i was playing on my own. I've also used the The Hellfire and Hornet which were effective enough. The Legendary Nurse Mod will give you the best stats. If you don't have this you could use a Matriarch, Cleric or Nurse(basic) Class Mod. If levelling up solo, you may even want to consider using a Cat class mod to increase your damage. Transfusion or slag grenades will give you more support utility. I'm using the Magic Missile. Your shield doesn't matter but you could use a Bee Shield to boost your damage if you're good at staying out of the combat, any form of the adaptive shield to increase your survivability (i.e. Evolution), or Antagonist to compliment your Kinetic Reflection ability. Problems with this build: The builds damage was good enough to solo level to 72 and pull your weight in multiplayer but this build's damage was not fantastic. It can be annoying when a mind controlled enemies reset because there's nothing for them to fight. It's harder to drill damage into a mind controlled enemy that's moving around than one that's being held still If this is your only character and you can't be bothered levelling another up, you could find yourself quitting Borderlands 2 when your friends do (or you could simply respec it to try something else you can do on your own). Video Guide:
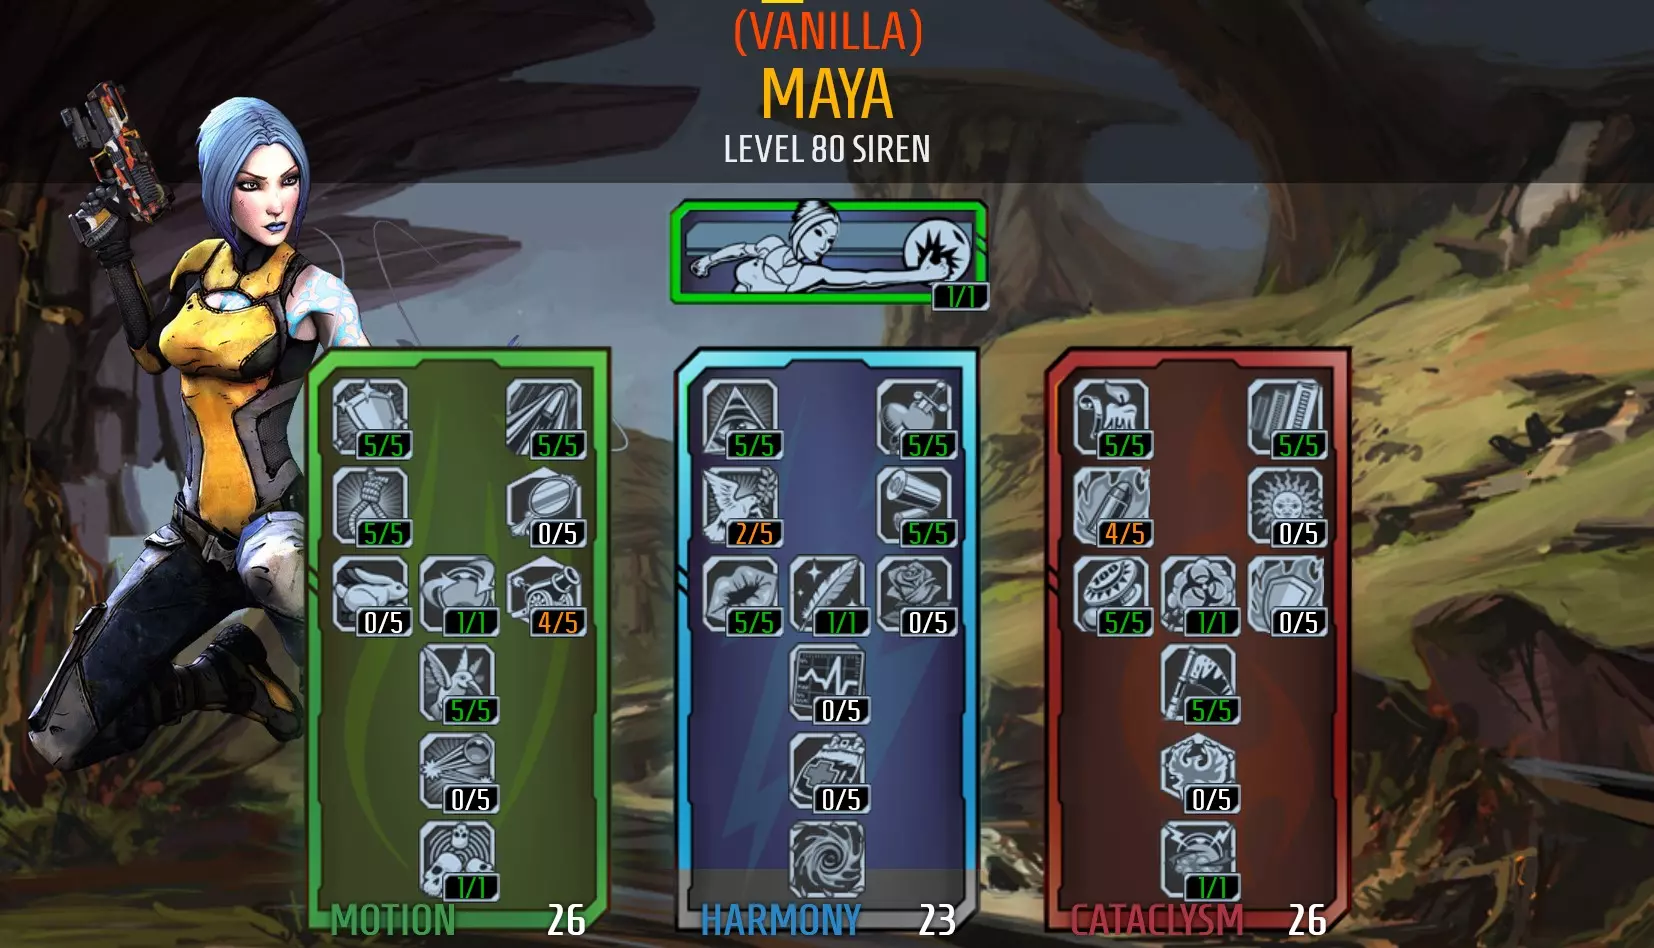
玛雅 - 疾行/女妖(速通流) “没时间浪费了,赶紧行动!” 玛雅可以将移动速度提升最高110%,这对于速通和刷装备非常有利。你只需要一个蓝色品质的女妖职业模组、一个不羁者护盾,并在她的疾行技能上投入点数。“专用”流派适合希望100%装备女妖职业模组的玩家,但“通用”流派是更好的选择,因为你可以在方便时在主流派和移动速度流派之间切换。 伤害:6 生存:5 难度:5 乐趣:7 技能树如下:

Note: This build only need points in Fleet. https://youtu.be/F7ss1DajQXQ Tips: Consider including Fleet in another Siren build so you can swap between your Banshee class mod and Rough Rider shield when you want to gain the Fleet Siren's speed boost, and swap to your main class mod and shield when you want to deal more damage. Sweet Release provides good healing when you're below 50% health, but the health orbs move too slowly to catch you when you're using Fleet. You will need to wait for the health orbs to reach you on run towards them if you want to use Sweet Release with your build. Suspension and Thoughtlock work well together as you will be able to hold a target 19.5 seconds. You will also heal 5% of your health each second while an enemy is Phaselocked if you have unlocked Elation. Thoughtlock can be used to distract other enemies, as they tend to prioritised attacking Thoughtlocked targets over players. Using Thoughtlock to distract enemies can be handy for running through crowded areas when you're trying to skip content. Also consider increasing your Action-Skill Cooldown Rate so it's ready to use before you run through the next area. It's worth investing into abilities that heal Maya to keep her alive while she is using the Rough Rider and has no shields. Life Tap is a useful healing ability and it pairs well with Recompense and Kinetic Reflection as you will heal a percentage of damage these skills reflect back at attackers. These skills are more useful if reflected damage is hitting slagged enemies. Life Tap only needs to keep you alive until Thoughtlock is ready to use again. Be careful when using Skorn, as it moves slower than you can run with Fleet. Avoid casting Skorn while running forwards as you will run through the projectile, causing it to explode and slag yourself. Skorn has a moderate cooldown and isn't always reliable, so bring a slag weapon just in case. Ruin is a good substitute as it is reliable for slagging, but you will need to give up Life Tap for Flicker. Recompense will be less useful without Life Tap, so consider moving points from Recompense to Sweet Release for an alternative source of healing. Blue level 50 Banshee Class Mods are the highest quality mods you can find for this build as they can give +6 skill points to Fleet and don't decrease your health as much as higher level mods. You also will not benefit from the +shield recharge rate and -shield recharge delay stats that higher level class mods offer. Suggested items Weapons: Moxxi weapons will provide some additional healing - Miss Moxxi's Good Touch has been a reliable weapon. The Unkempt Harold also packs a punch. Bring a slag weapon as Skorn isn't always reliable. Shield: Rough Rider Grenade: Firestorm grenade for some additional status damage and almost instant healing while Life Tap is active and to AoE nuke enemies after they have been grouped with Converge and slagged with Skorn. Class Mod: Blue Level 50 Banshee Class Mod with +6 to Fleet. The Breakneck version provides the better secondary skill. Relic: Skin of the Ancients will give you +Action Skill Cooldown Rate and +Elemental Damage (Best Option), otherwise look for +Action Skill Cooldown Rate (preferred), +Damage to preferred weapon (2nd pref), or +Max HP(3rd pref). Problem's with this build: This build works for guerrilla tactic fights and isn't good for boss fights. The build also struggles against enemies that cannot be Phaselocked as you cannot receive healing from Elation. Fire elemental damage is good against flesh - that's you without shield protection. Prioritise eliminating enemies dishing out fire damage. This build only heals through combat (and Dr Zed Vendors). It's risky trying to recover health when you're already low. I was initially using Sustenance to counter this but then got rid of it because it wasn't have a big impact. The build sacrifices damage and toughness for speed. Using an interchangeable build will reduce power loss for your character. Video Guide: https://youtu.be/vE56yvQ7L_M https://youtu.be/0clPHaKy0m4 https://youtu.be/eCZwlhMGQKE Maya - Vampire* Oops, this build is outdated and is being reviewed. check back soon! 17/05/2022 "While others wither, I grow stronger" There's some seemingly useless skills in Borderlands 2, but even those skills can become useful when paired with another. Recompense and Blight Pheonix are pretty bad skills on their own, but when you pair them with Life Tap you get a Vampiric Siren. Just kill something to activate Life Tap and then hurt your enemies to heal. Here's the skill tree: Tips: You should use class modsthat increase Life Tap to get the most out of this build. Alternate between Phaselock and Skorn to slag without needing to switch to slag weapon or use grenades. Avoid weapons with long reload times or that need to be reloaded too frequently as this is when you're most vulnerable of getting knocked down. Blight Pheonix will be useless if you're not getting up close to your target. Some points in Fleet will help with this. Be very careful when recovering from Fight for your Life as you will revive with no shields and low health. You will recover with your kill skills active so you can be aggressive to steal health or seek cover until you have a plan/opportunity to engage. If you're not able to chain a kill before your kill skills deactivate, you may need to consider upgrading your weapons or using something to sustain your health until you can get your next kill (i.e. Elated or transfusion grenades). The pulsing noise Life Tap emits was annoying at first, but you get used to it. It's far less annoying when you consider it a useful audial way to tell when your kill skills end (when it stops emitting noise). You're safer when it's pulsing. Trickster class mods can increase your Life Tap and Kinetic Reflection. If you can boost your Kinetic Reflection to 10 points you will gain 100% damage reduction and bullet reflection -making you bullet proof until the kill skill wears off. Suggested items This build even works well with less popular guns like Sledges Shotgun and the Infinity Pistol. You can use just about anything, however I've found the Moxxi weapons don't add much to the already decent life steal. A Rough Rider Shield for the damage reduction and extra health. a transfusion type grenade (to top up health when Life Tap isn't active (i.e. start of a fight, against constructors or something else you can't kill within 7 seconds) A +max health relic as this gives more room for your health to fluctuate. You may find you're going down too often without this. A class mod that increases your Life Tap skill. I preferred the Trickster variant but a matriarch or cleric(Tiny Tina DLC) can also work. Problem's with this build: Not good against bosses (that don't have minions) No other serious concerns. Video Guide: To be added soon Salvador - Rampage (My Main) NEED MORE BULLETS! This build can solo Digistruct Peak on OP10 and is based around using hyperion weapons to shoot accurately from the hip while endlessly gunzerkering. The build you will see here was refined to use pistols such as duel wielding Lady Fists (non elemental and slag), or an Unkempt Harold with a Grog Nozzle, to reap major damage benefits from No Kill Like Overkill Damage: 10 Toughness: 3 (with Lady Fist pistols) 10 (with Grog Nozzle pistol]) Difficulty: 3 Fun: 5 Here's the skill tree:
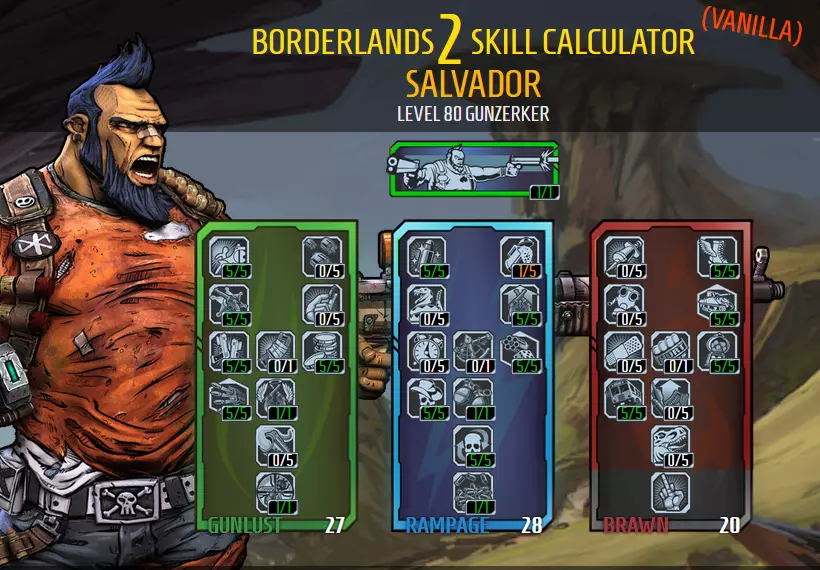
TipsWhen using the Lady Fist: Hyperion weapons are good for Gunzerking as they increase accuracy while holding down the trigger. This makes them accurate when shooting from the hip. The Lady Fist works well if you use a Bee shield and can consistently score critical hits. Kill a weak enemy first to activate No Kill Like Overkill to apply additional 'overkill' damage to each shot. Each kill will re-apply No Kill Like Overkill based on the new value 'overkill' value, meaning the 'overkill damage can stack on top of itself and continue to climb with each consecutive kill while the ability is active. The Lady Fist gun damage, Bee shield's amp shots and 'overkill damage' will all receive the +800 critical hit damage the Lady Fist provides; this is what causes your damage to sky rocket after the first kill or two, and will continue to climb until you reach maximum damage as long as you keep getting kills with critical hits. Killing an enemy with a body shot may cause your damage to topple and you will have to build it back up. The Lady Fist does not work with the Grog Nozzle as it does not deal enough damage without the Bee shield's amp shots and the drunk effect the Grog Nozzle applies will cause it to become too inaccurate to use until you sober up. The Unkempt Harold and Grog Nozzle option requires far less skill to deal massive damage and increase survivability, but you will need to ditch the Bee shield for something tougher to get closer to enemies. Just hold the trigger down and spray high damaging explosive bullets (which are fantastic against most enemies) and the [Grog Nozzle[/i] will convert a percentage of damage dealt to heal yourself. You will only be able to get a permanent one through mods (literally the only thing i used the community mod for). Otherwise you may get one from other players or leaving 'The Beard Makes the Man' mission is incomplete. If you opt for leaving 'The Beard makes the Man' mission incomplete, you risk losing access to your Grog Nozzle while you're in a game where the party leader has finished the mission, but you will regain access when you leave their party. When playing in groups you will need I'm Ready Already as other players will be killing enemies preventing you from extending your gunzerking duration. You can combine skills such as Inconceivable, Filled to the Brim, and 5 Shots or 6 (kill skill) to shoot free bullets non-stop without reloading for a short time after getting a kill. If you a couple of Topneaa rocket launchers equipped (preferably one slag and one for damage) - you can hold your trigger down and spray enemies with free rockets. This will deal less damage than just using your pistols though, but it looks impressive - like a Super Saiyan slamming enemies with 'Continuous Kikōha'. Suggested Items:Weapons: Guns like the Unkempt Harold, Grog Nozzle (for healing), Lady Fist are good. I've also tried duel wielding B|tches SMG (i didn't name this gun), it works OK but it's not nearly as powerful and drains more ammo. I stuck to Hyperion weapons when levelling up as they are accurate when fired from the hip when duel wielding. Shield: Blockade, Antagonist, Rough Rider, or at the very least an Adaptive shield will give you more survivability. A Bee shield will give your more damage and compliment the Lady Fist, but you will need to play more cautiously. Grenade: Singularity grenades are good for grouping and nuking enemies, especially when using an Unkempt Harold. Class Mod: Legendary Hoarder Class Mod, or a Tiny Tina Monk Class Mod. Relic: +pistol damage, +explosive damage (for Unkempt Harold), or +health Problems with this Build The Lady Fist only works well against enemies with crit zones; so use the Unkempt Harold against creatures without crit zones. Also, getting the right Lady Fists can be annoying. Here's how you can do it, but it's an exploit - so if you don't want to do this then i suggest you finish reading this section here. Here's how it works: if you don't like the reward you've received you can force the application to close without saving, reload your game and turn the mission in again, and repeat until you get the gun parts and/or element you want. You can also have a second account join with a freshly made character to earn a second reward simultaneously. Gameplay Videos: https://youtu.be/ANqccZv2CRM https://youtu.be/WQ0-TB0mQqw Salvador - Zippy Beserker (Speed Runner) NOW LET'S HAVE SOME FUN! This build was based around the gunzerker's ability to move quickly. It's quite satisfying leaving your friends in the dust with Salvador's athletic ability -watch his little legs go! but wait, there's more! The build also hypes up his attack speed, reload speed, and boasts some damage, which allows you to melt enemies with an almost endless barrage of bullets. Damage: 7 Toughness: 10 Difficulty: 2 Fun: 8 Here's the skill tree:
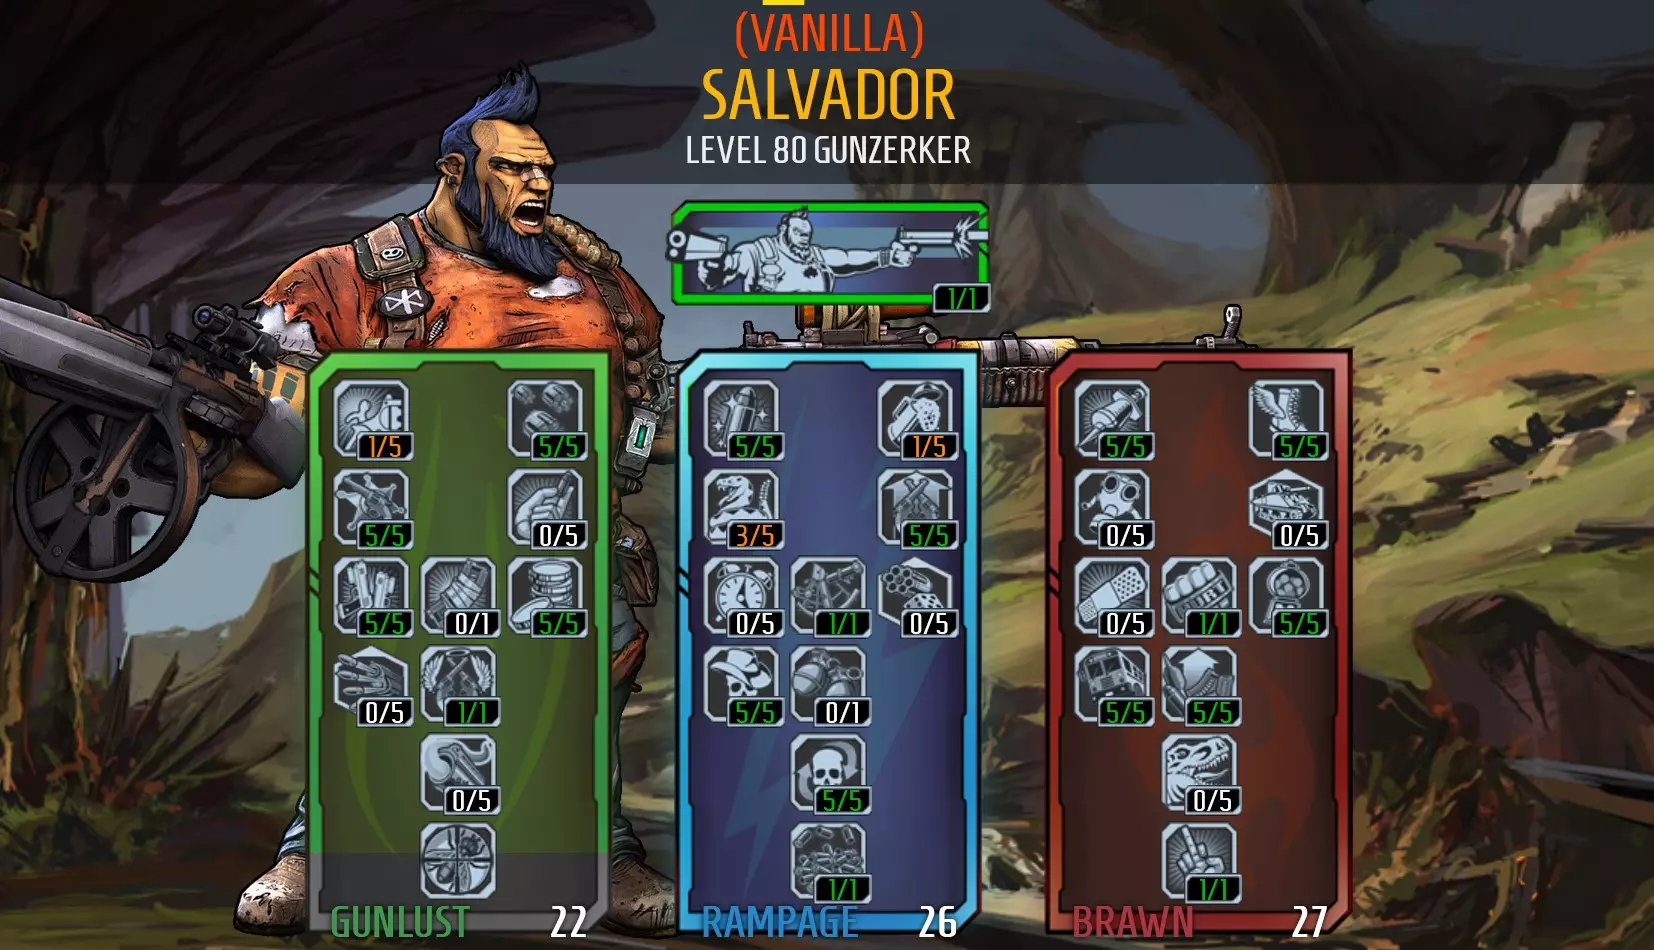
技巧:这套配装的移动速度让你能轻松调整到【无主之地】系列中【哈罗德霰弹枪】的最佳输出距离——子弹刚开始分裂扩散的位置,同时还能阻止敌人近身。 这套配装与【格洛克喷嘴】搭配效果很好,武器的高射速和短装填时间能让你持续获得治疗。你只能通过模组获得永久的格洛克喷嘴(这也是我使用社区模组的唯一原因)。除此之外,你也可能从其他玩家那里获得,或者将【胡子成就男人】任务保持未完成状态。如果你选择不完成【胡子成就男人】任务,当你加入已完成该任务的队伍领袖所在的游戏时,你将无法使用【格罗格喷嘴】,但离开队伍后即可重新使用。 如果你在手动 reload 枪械时按住扳机键,将不会失去【持续开火】带来的攻击速度加成。 你会快速消耗弹药,因此需要另一套武器来交替补充弹药。 使用手枪时伤害提升15%,双持两把同类型枪械时伤害提升30%。 不要仅依靠射速来“挠痒痒”般杀死敌人,应在可行的情况下提升枪械伤害,让子弹更具威力。这是一个单人刷无敌大鲨吉的优秀配装,你可以把他打到毒池里。 推荐装备: 武器:最好使用【哈罗德】和【格罗格喷嘴】,否则就选择能通过射速和 reload 速度持续输出伤害的武器,以及一把莫西武器来获得额外治疗。 护盾:【 Rough Rider Shield 】——它能保持【 All Out of Bubblegum 】效果激活,并让你在冲击敌人时存活下来。 手雷:【奇点类】手雷很适合聚怪,这样你用哈罗德就能击中更多敌人。装备莫西武器时,【连锁闪电】手雷可用于破盾和快速治疗。【化学喷雾】手雷也可能有帮助,因为它们的效果持续时间更长。 职业模组:【传奇狂战士职业模组】。如果需要,可以使用野兽职业模组或叛逆者职业模组。 圣物:使用加生命值的圣物来提高生存能力 此Build存在的问题:我使用这个Build时没有遇到什么问题,除了难以找到能支撑它的武器。它搭配爆炸武器效果更好,哈罗德霰弹枪相对容易获取,不借助社区模组获取格洛克喷嘴会有难度,其他莫克西武器获取难度适中但需要花时间,而且它们的治疗效果也没那么显著。我发现除了鲁达狙击步枪外,其他枪支很难打出高额“子弹”伤害。鲁达之所以表现出色,是因为它基础伤害和暴击伤害都很高,不过真正让它适配这个Build的是其大容量弹匣。鲁达狙击枪有极低概率从沙尘之地的盖特尔处掉落,但在刷他的过程中你会遇到大量的肥胖蜘蛛蚁。 游戏玩法视频: 零 - 狙击手(一击必杀) 我已将你击溃/来自无名之处的致命一击/来自我最好的狙击枪 这套配装专注于使用狙击步枪从远处轰杀敌人,但在狙击枪不适用的情况下,他也能依靠其他枪械。他是个玻璃大炮,但你喜欢大炮,对吧? 伤害:9(使用欺诈技能偶尔能打出最大伤害) 生存能力:2 难度:6 乐趣:5 技能树如下:
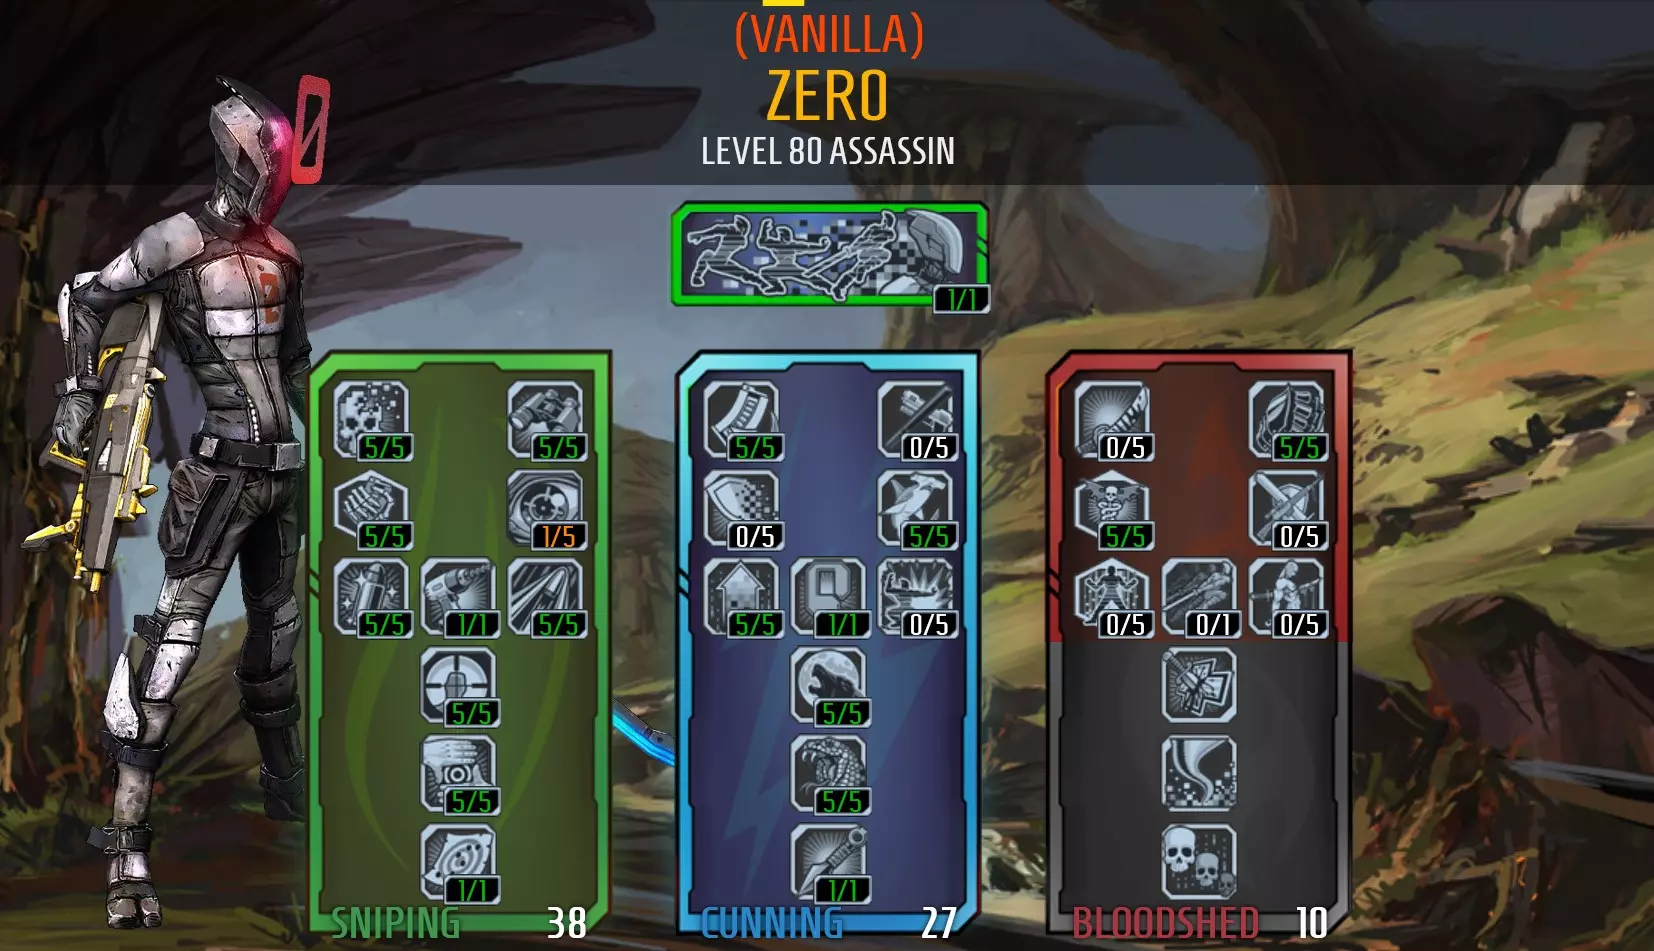
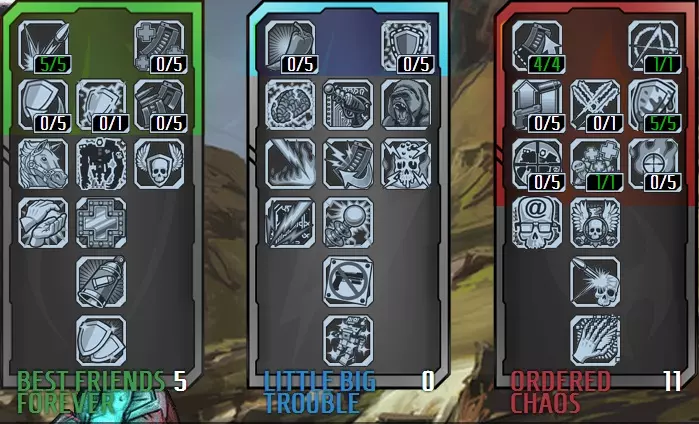
提示:具有【暴击伤害加成】的狙击手通常能造成更高伤害。 如果进行身体射击,这家伙的伤害仍然不会太高,但暴击将造成毁灭性打击。 需要运用以下几个技能来造成伤害: - 【伏击】技能在攻击敌人背部或目标攻击其他单位时会提升你的伤害。 - 【死亡标记】会使被标记敌人受到的所有来源伤害增加80%(可在使用【欺诈】技能期间通过【死亡绽放】施加)。 - 【欺诈】技能若等到即将结束时使用,将造成巨额伤害(+200%枪械伤害和+250%暴击伤害)。 - 【一击必杀】会使满弹匣发射的第一发子弹造成额外伤害。射击前请为狙击枪装弹。击杀敌人后,【杀手】技能会在短时间内提升你的暴击伤害。 用slag(slag效果)攻击敌人可使其受到的伤害增加300%。 推荐装备:一把带有暴击加成的雅各布斯狙击步枪就足够了。 【鲁达】(自动狙击步枪)适合击杀 bosses 和像机械师这样的难缠单位,但会快速消耗弹药。 如果你总是稍微打偏目标,【碎颅者】的弹丸扩散能帮助你更稳定地命中目标。 【鹰眼】拥有极高的暴击伤害加成,但基础伤害较低,因此只对有暴击部位的敌人有效。 强烈建议随身携带一把腐蚀属性武器,用于对付终极铁金刚装载机这类难缠或无暴击部位的敌人。【大黄蜂】是不错的选择。这套配装也适用于其他武器,比如打击者霰弹枪、玛吉手枪和【小骗子】冲锋枪。当我厌倦了狙击,或者面对那些快速逼近的敌人时,我会使用这些武器。 由于这套配装没有治疗能力,我使用输血手雷来维持生命值。吸血手雷是个不错的选择,因为它的效果持续时间更长。 我在这个角色上使用的是传奇杀手职业模组,但如果没有的话,你也可以使用狙击职业模组。一个蜜蜂护盾和一个【+狙击伤害】圣物能进一步提升你的伤害。 这套配装存在一些问题:我放弃了这个角色,因为我觉得他的生命值太低了,而且对抗那些没有暴击点或者暴击点出现故障导致无法命中的敌人(比如精英摩托帮)时非常令人沮丧。我通过使用像大黄蜂这样的武器来对付一些较难的敌人,勉强能应对没有暴击点的敌人。有些敌人虽然有暴击点,但当敌人面向你时(在 solo 游玩时几乎总是如此),你无法命中这些暴击点。这套配装在合作模式中更容易使用,因为你有队友可以将敌人转向,让你能够逐个消灭他们。这个build没有任何生命恢复能力,而且韧性也不高,所以你会经常倒地。为了应对这个问题,我使用了输血手雷来治疗。另外,倒地时不要慌张,慢慢来,充分利用【浴血奋战】状态。 这个build在《无主之地2:小缇娜的龙堡大冒险》DLC中表现挣扎,因为有大量敌人会快速逼近你,比如冲锋的兽人以及飞行的骷髅。你可以通过腰射狙击或者使用冲锋枪、霰弹枪等其他武器来更好地应对这些敌人。 零 - 忍者(近战) "吾剑已磨砺/吾身隐无形/真刺客也" 这个build围绕刺客的近战攻击构建。我发现给这家伙升级挺有挑战性的,但当你达到62级,能够在【死亡绽放】(中下方/诡诈系技能树)和【众生陨落】(右下角/浴血系技能树)两个技能上加点后,一切就变得容易多了。这是一个值得尝试的build,它提供了非常独特的玩法。 伤害:7 生存能力:2-6(生命值较低,但凭借【律法与秩序】每次近战攻击都能回满生命值) 难度:7 乐趣:6 技能树如下:
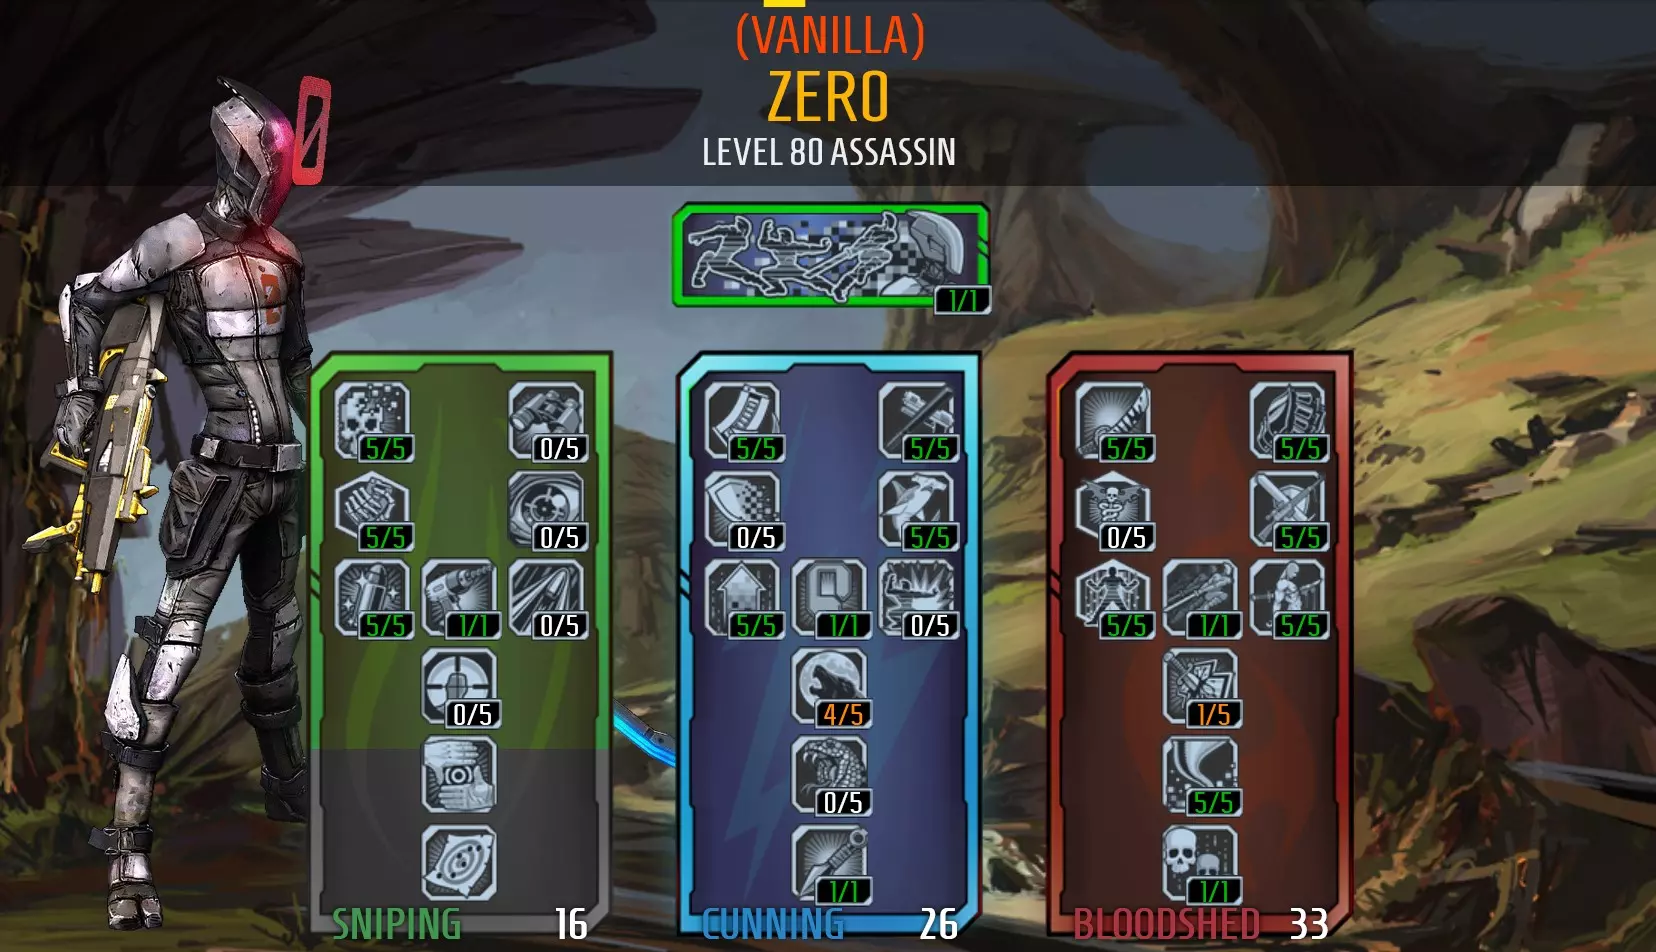
https://youtu.be/3--ZDJM0hDg Tips: To play this build effectively, you need to know where your damage comes from: Killing Bl0w will activate when an enemy's health drops below 30% Be Like Water will increase your next melee attack's damage after you shoot something. A melee attack will increase the damage of your next shot fired. Backstab will increase your melee damage when attacking an enemy from behind. Ambush will also increase damage you deal when you attack an enemy from behind or it's attacking something other than you. This boost also effects gun damage. F0ll0wthr0ugh will increase your melee damage and movement speed after you get a kill. It also increases gun damage. Like The Wind will increase melee damage when moving. Rising Sh0t will increase your melee damage when melee attacks are dealt in quick succession. Also effects gun damage. Death Mark will increase all damage the marked target takes by 80% Slag will increase damage by 300% Decepti0n will deal up to 650% melee damage. To score maximum damage, you need to attack an enemy at the end of it's duration (notice the scaling bar displayed on screen while Decepti0n is active. Maximum damage is achieved when the loading bar reaches the explosion icon) C0unter Strike has a chance to activate when you take damage, granting increased damage on your next melee attack if executed quickly. Aim for critical hits You can further increase your melee damage by equipping class mods, roid shields, and +melee damage relics. To maximise damage you need to meet the requirements of as many of these points as practical when striking your opponent. Many Must Fall will extend the duration of Decepti0n after each melee kill while Decepti0n is active. It doesn't add much time though, so you'll need to attack your next target quickly. You will have enough time to use Death Bl0ss0m to Death Mark a new target and either strike before the kunai explodes or wait until after it explodes. Alternatively, you can try to Death Mark multiple targets, and stay 2 steps ahead with marks so you won't be charging into exploding kunai. You can use Death Bl0ss0m to weaken enemies, apply Death Mark and try to slag your targets to make it easier to kill them with your next melee attack. If you successfully kill a target with a melee attack while Decepti0n is active you'll be able to use Death B0ss0m again. Try to use kunai as much as possible as it's a good damage dealer, but try not to kill your targets with kunai as this won't activate Many Must Fall. Careful not to hurt yourself with Death Bl0ss0m's explosions, as you don't have a lot of health and they will down you quickly. Throwing grenades does not break Decepti0n so you can use grenades to slag enemies snd/or break your shields to activate roid damage while Decepti0n is active. Suggested items Use Captain Blades Rapier when you activate Decepti0n as it gives a massive +200% but it's gun damage is horrible. You can swap to a different weapon after Decepti0n to deal gun damage. The Law (pistol) and Order (shield) are a good combination, as melee attacks will heal you when both are equiped. These items are obtained as mission rewards from Santuary missions Won't Get Fooled Again for Law, and BFFs for Order. The Grog Nozzle is a good alternative as it provideshealing as well, but hard to get with the +melee damage variant. You may want to ask the Borderlands community to give you one for this build (only way to acquire it as it cannot be farmed). you could use either a Legendary Ninja Class Mod (preferred) or a Legendary Hunter Class Mod would work if you altered the spec. If you don't have one of these, you could use a blue or purple Ninja Class Mod or an Infiltrator Class Mod. I'm using a relic that boosts my melee damage. A reduce cooldown relic would also work. A slag grenade is handy. Transfusion for additional healing, Bouncing betties as they last longer in combat, or Magic Missile. You may want to keep a weapon handy to manage things you don't want to get too close to (like constructors). a sniper, Maliwan Caster or a thrown-like-a-grenade Tediore will do the trick. This weapon should be reliable enough to use to recover from Fight For Your Life. Problem's with this build: Levelling the character up wasn't a fun experience but it was worth it in the end. Sometimes it was difficult to melee flying enemies -but my friends thought it was funny watching an assassin using Dashing Strike to fly through the air yo chase them. You will become better at timing your attacks against aerial units with practice. The build does not have much toughness and will fall quickly to enemies you can't melee. Gameplay Videos: https://youtu.be/2zfJ3W8NN84 https://youtu.be/8P2tpqyCD-g Zero - Contract Killer (Team Player)* Oops, this build is outdated and is being reviewed. check back soon! 17/05/2022 " I'm on a mission / With automatic weapons / It's kill or be killed." This build uses the Cunning skill tree and the Sniping skill tree, but not for sniping -which makes things a lot easier. Here's the skill tree: Tips: Rising Sh0t is considered useless by the wider community but it's not with this build. Rising Sh0t is very effective with automatic weapons when you're holding the trigger and consistently hitting your enemy. Use Decepti0n often, while active use Death Bl0ss0m to apply Death Mark to multiple enemies, recharge your shields, regen health and reload your gun. Ambush is not as useful when playing solo, you will get an increase in damage while Decepti0n is active but that boost will end as soon as you're revealed. It's more useful in co-operative play when enemies are attacking other players. Zero is a hero that's based on skill. His damage comes from consistently getting critical hits. Use Death Mark on things you can't slag In co-op games, use Decepti0n to trick enemies into targeting another player. Look for opportunities to use B0re. If you can get a kill just before you use Decepti0n you will gain movement speed from F0ll0w Thr0ugh (kill skill) and Innervate (augmentation for Decepti0n) which can help you reposition to line a couple of baddies up. Suggested items Automatic Weapons. The B|tch SMG and Lady Fist work well because of their bonus critical hit damage. A Bee shield to maximise damage -will also compliment weapons like the B|tch and Lady Fist. A slag grenade can be handy to slag things while using Decepti0n or so you don't have to swap weapons to slag -the Magic Missile is a good option for this. A transfusion grenade can also be helpful to replenish your health when needed -I'm using a Slag O-Negative. This build uses a Legendary Killer class mod. a Blue stalker class mod that has Rising Shot and Follow through is also a good option. I levelled up using 'Spy' class mods. I wasn't fussed about the non-legendary killer class mods. A Cooldown reduction relic or a +gun damage relic. I'm using a Cooldown Reduction Relic. Problem's with this build: This is a strong build for Zero, the only weakness is Zero himself -his character is designed to dish out damage but not take it. Part of this, is Zero's inability to heal himself if he takes damage. P.S. I know a lot of you reading this will argue that zero can heal himself with a Grog Nozzle and tank just fine when using a melee build with Law and Order. I'd argue that's the gun healing, not Zero Video Guide: To be added later Zero - Hunter (Guns and Melee - Balanced) Whether you're at range / Or you want melee combat / I'm prepared for you If you're unsure if you want to be sniper or melee zero, just go both. Many of the skills selected for this build boost your gun and melee damage well enough that you will be able to use Decepti0n to one shot enemies with a well placed Sniper bullet, or by stabbing them in the back. Damage: 8 Toughness: 4 Difficulty: 5 Fun: 6 Here's the skill tree:
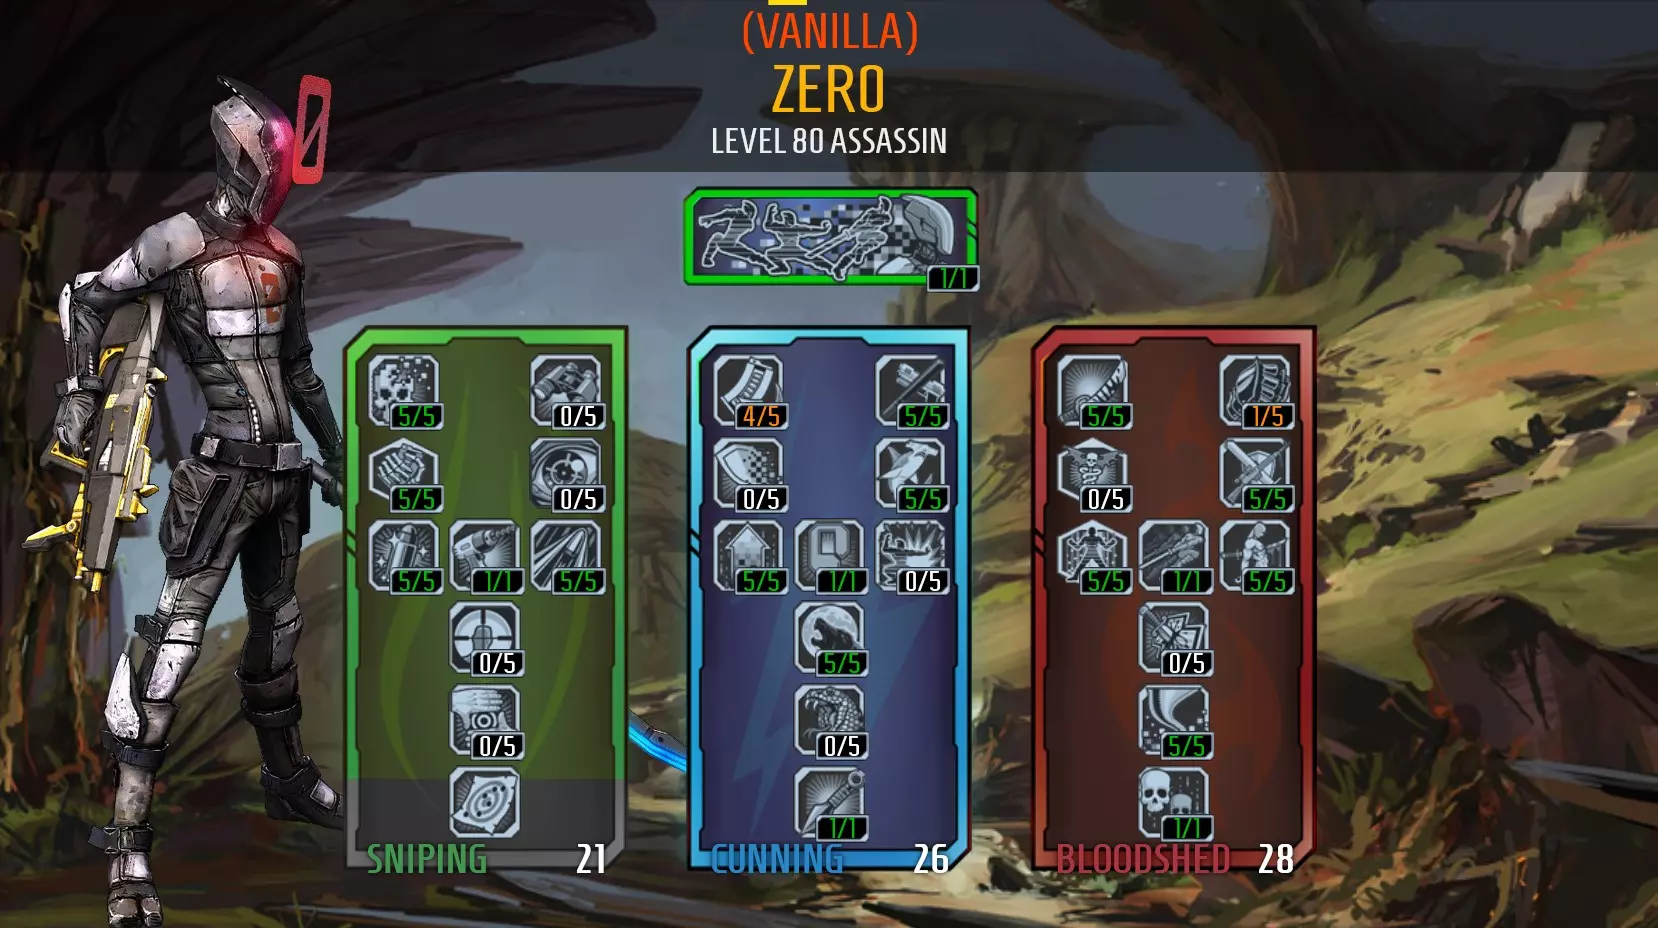
https://youtu.be/YSd0NPrA2pQ Tips: Knowing where your damage comes from will help you kill enemies more easily, and one-hit-kill things with Decepti0n. The following increases both your melee and gun damage: Like The Wind will increase gun and melee damage when moving. Rising Sh0t will increase your gun and melee damage when quickly hitting the enemy multiple times. Stacks decline quickly when there is a pause between dealing damage. Death Mark will increase all damage the marked target takes by 80%, this can be applied with Death Bl0ss0m kunai while using Decepti0n Decepti0n will deal up to 650% melee damage. To score maximum damage, you need to attack an enemy at the end of it's duration (notice the scaling bar displayed on screen while Decepti0n is active. Maximum damage is achieved when the loading bar reaches the explosion icon at the end of the bar) Ambush will also increase damage you deal when you attack an enemy from behind, or when it's attacking something other than you. Be Like Water will increase your next melee attack's damage after you shoot something. A melee attack will increase the damage of your next shot fired. Zero's skills boost his critical hit damage. Critical hits will be devastating, shooting enemies without scoring critical hits will just tickle them. F0ll0wthr0ugh will increase your gun damage, melee damage and movement speed after you get a kill. Killer will increase your critical hit damage for a short time after killing something. Slag will increase damage by 300% The following will increase your melee damage: Killing Bl0w will activate when an enemy's health drops below 30% Backstab will increase your melee damage when attacking an enemy from behind. Movement speed provided by Innervate and F0ll0w Thr0ugh will help you to get behind enemies to Ambush and Backstab them. C0unter Strike has a chance to activate when you take damage, granting increased damage on your next melee attack if executed quickly. Roid/Maylay shields are essential for dealing melee damage. Swap from guns to melee when your shields break, or break your own shields with shock damage when you want to amp your melee damage. Many players use a Lightning bolt grenade mod to do this, and grenades can be used while Decepti0n is active without ending it. A slightly lower level Lightning bolt will help you to avoid self-inflicting unnecessary damage. The Following will increase your gun damage: 0ne Sh0t 0ne Kill will cause the first bullet fired from a fully loaded magazine to deal bonus damage. Reload your sniper before shooting, especially when using Decepti0n. Vel0city increases your gun damage by 10% and your critical hit damage by 15% Innervate will increase your gun damage by 10% while moving in Decepti0nSuggested Items:Weapons: A good sniper, the Amigo is the best option. A Law pistol (for Law and Order combo), something to slag with, and something hard hitting like an Unkempt Harold for enemies without crit zones. Shield: Order shield. The Law and Order combo makes melee attacks heal you, which will keep you alive when you're stuck in melee range with an enemy like Rabbid Stalkers Grenade: Chain Lightning or Lightning Bolt to break your melee shields when wanted, or a grenade that can slag while Decepti0n is active. Slag grenades need 0 fuse time due to Decepti0n's short duration. Magic Missile grenade mods are reliable when wanting to slag enemies, but be careful of their explosions though. Class Mod: Legendary Hunter Class Mod Relic: +melee damage, or +sniper damage, or +action skill cooldown rate. Some problems with this build:Your snipers don't punch as hard as they would as a dedicated sniper build, and your power does not scale without Critical Ascenti0n. You also lose a bit of melee damage but not much. The build feels a bit equipment based; without the Law and Order combo, Zero doesn't have enough healing to tank enough damage to really utilise his C0unter Strike ability. Zero continues to toughness and the ability to recover health in situations where he cannot melee enemies. Gameplay Videos: https://youtu.be/k8mba1oIy7M Need Loot? Here's a list of farming locations to help you find equipment (non boss specific): Want more golden keys?: This is the website I use to find codes for golden keys for Borderlands 2 and Borderlands: The Pre-Sequel - http://orcz.com/Borderlands_2:_Golden_Key Loot midget farming in the Wildlife Exploitation Preserve: You have a gaurentted chance to find 4 loot midgets as long as you do not pick up a single echo recording when you have accepted the Doctor's Orders mission (each echo recroding you pick up will reduce how many midgets you find by 1). You'll find the midgets at the third echo location when you start to open some boxes in a small room (where they were keeping bloodwing captive before they moved her). Farming the loot midgets works better if you have the Natural Selection Annex DLC as you can enter this area and leave it again to create a save checkpoint further into the Wildlife Exploitation Preserve (so you don't have to run the whole thing). Also, you can keep the Animal Rights mission active to reduce the number of enemies you fight on the way to the midgets. Tubby farming: there is a small chance to find tubby creatures. Tubbies appear fatter and have a good chance to drop valuable items - mostly class mods at higher levels of the game, they are also the only source of some pearlescent weapons in the game. To farm tubby creatures you want to go somewhere where lots of beasts spawn and there is a good chance that some off these will be badasses (i.e. varkids, skags, spiderants, stalkers, and skeletons). There are other tubby creatures (i.e. rakks, psycho's, nomads, and goliaths) but these are much harder to find. When farming varkids, there is a chance that a varkid will evolve into a tubby version but i didn't see this happen very often when i was trying to spawn Vermivorous the invincible. Marcus Mercenary Day -Loot Train [Requires DLC]: You can kill Mr Tinder Snowflake then head back to town, where a train will stop. You can then pull the lever on the second carriage to open the presents sent by Marcus. You'll get lots of random loot this way and some eridium, some purples and hopefully an orange. This can be repeated as many times as you want and is a good option for farming class mods. BNK3R: The BNK3R is a good early game farm when you don't have many orange items or you need a Sham shield. When you kill the bunker it will drop several purple items - most of these will be trash but some good quality purple items are worth looking for (i.e. Maylay/Roid shield, Turtle Shield, Sniper Rifle, Grenades, Caster SMGs, etc.). There's also a red chest under the waterfall which will have a low chance of giving orange items. The BNK3R is an easy boss to farm with any character but Zero will down him the fastest with B0re when you shoot BNK3R in the right spot. The following is an exploit: There are two round dishes underneath the BNK3R, you will want to shoot the top part of the dish on BNK3R's right-hand-side. It works better when shooting it from underneath towards the turret dish on top of the BNK3R. Using a gun with a little bit of bullet spread will help. Farming the Treasure of the Sands [Requires DLC] (Exploit): The final mission of Captain Scarlet and her Pirate Booty DLC, you will be able to kill a boss called the Leviathan and enter a vault with lots of treasure chests (and some of these have an increased chance to give high quality stuff). After you loot the treasure room, you'll be able to accept another mission to repeat the last boss to loot the treasure room again. Here's the kicker: if you don't hand in the Treasure of the Sands mission, you'll be able to keep accessing the Lair of the Leviathan, where you can do some shifty stuff to glitch your way back into the room so you can keep looting the chests inside. Here's a video by BroCo Gaming showing you how to use this exploit: Farming the Rough Rider shield/Bulwark [Requires DLC]: a lot of builds are based around the Rough Rider shield. you can get this in Sir Hammerlock's Big Game Hunt DLC in Hunter's Grotto. As you play the DLC you'll get a quest to hunt the Bulwark. You don't need the quest to kill it again. You can find it here:
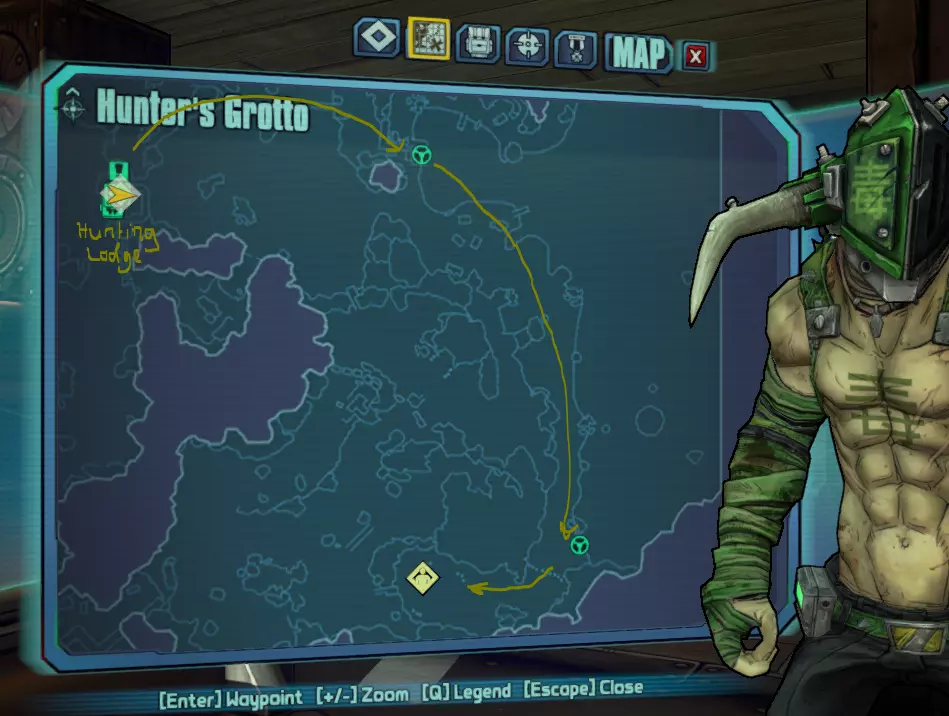
刷【无主之地2】中的【不羁哈罗德】/【萨维奇·李】:萨维奇·李可以在【三 horns 峡谷】的多个位置找到。他有机会在 bullymongs( bullymong 是一种游戏内生物,可译为“ bullymong 巨兽”)附近生成。杀死他后,他有相当大的几率掉落【不羁哈罗德】——一把伤害极高的手枪。 另一种我用来稳定获取【不羁哈罗德】的【双发穿透】变体的方法,我认为如果你能快速完成任何一个可获取硬币的任务来快速赚取硬币,这种方法会更快。使用盖奇,我大约15分钟就能赚够所需的硬币,然后再花20分钟就能在托格售货机里找到这把枪。35分钟获得一把双发穿透不羁哈罗德,比反复击杀萨维奇·李更快。刷蜜蜂护盾:干旱 nexus-墓地的猎人赫尔奎斯特和《无主之地2:小缇娜的龙堡之袭》中的树人掉落蜜蜂护盾的概率更高。我更喜欢刷树人,因为森林区域有很多树人聚集,而且它们的掉落率非常不错。 尚未完成的配装 其他我想尝试的配装——但我可能永远不会完成这些。角色 配装主题+(角色实际等级) Krieg 元素突击步枪为主武器(已达72级OP2) 基于元素霰弹枪 Salvador 使用传奇囤积者职业模组的Tediore武器(61级) Zero 基于Unf0rseen和Ambush(25级) 其他说明 突击兵: 职责召唤对加农炮突击步枪有伤害加成,但对Tediore武器的 reload 无加成 手雷伤害加成对加农炮突击步枪和Tediore武器的 reload 均有效 狂枪手: 即使有狂枪手的射速加成,Hyperion狙击枪在60级后伤害不足(50级开始就难以造成有效伤害) 机械术士: 电击灼烧伤害会受到电击伤害加成的影响 穿插爆发存在bug,对某些敌人(如 Warrior)使用时会导致游戏崩溃该技能的伤害不会随着投入额外技能点而提升,仅会增加 slag( slag 效果)的触发几率。 Krieg: 减伤机制:受到的伤害会通过一系列计算逐步降低,每次仅应用一种减伤来源。例如,若你拥有“嗜血之味”(ToB)提供的75%减伤、“数字神经”(NN)提供的50%减伤以及“不羁骑手”(RR)提供的20%减伤,且这些减伤效果是单独计算的: 100% 初始伤害 -75%(ToB)= 25% 剩余伤害, 25% 剩余伤害再 -50%(NN)= 12.5% 剩余伤害, 12.5% 剩余伤害再 -20%(RR)= 最终受到10%伤害。 即便上述计算准确,我仍不清楚游戏中减伤来源的计算顺序是如何确定的。