换一换
换一换 


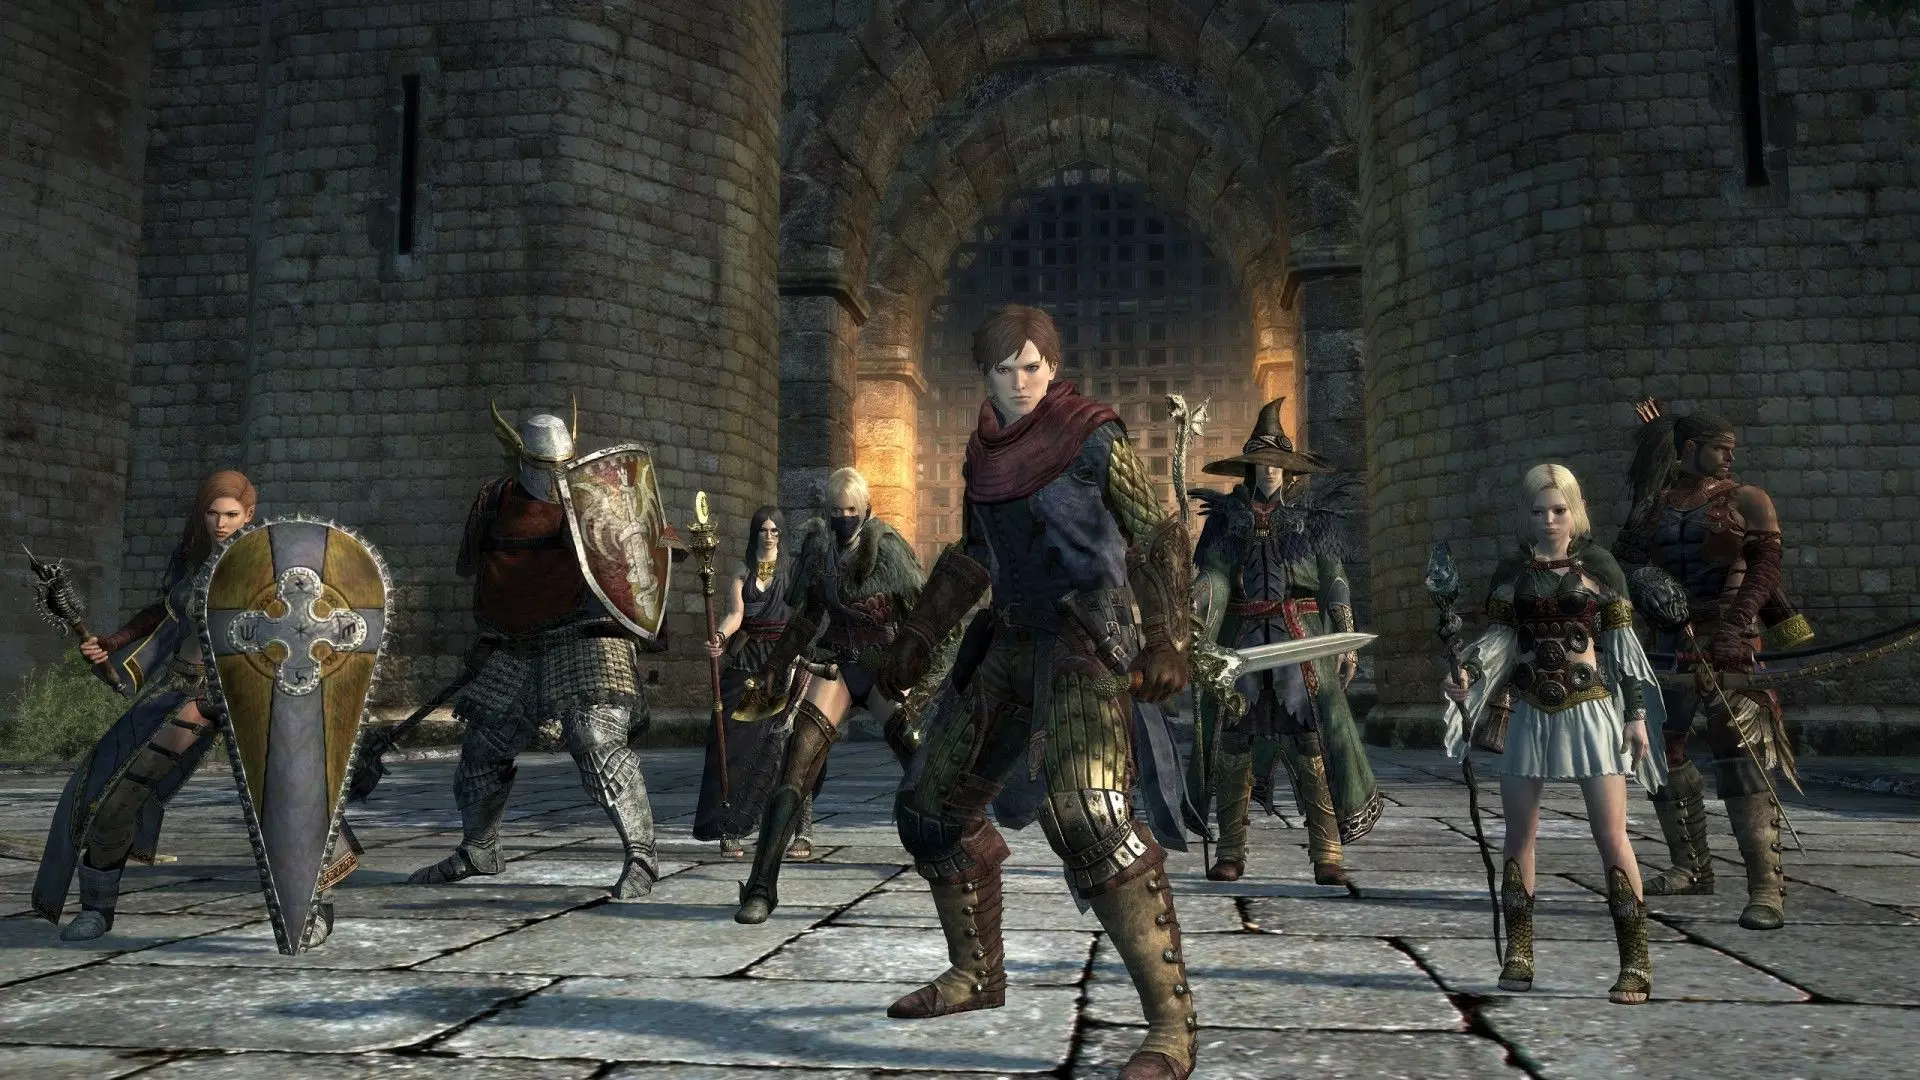
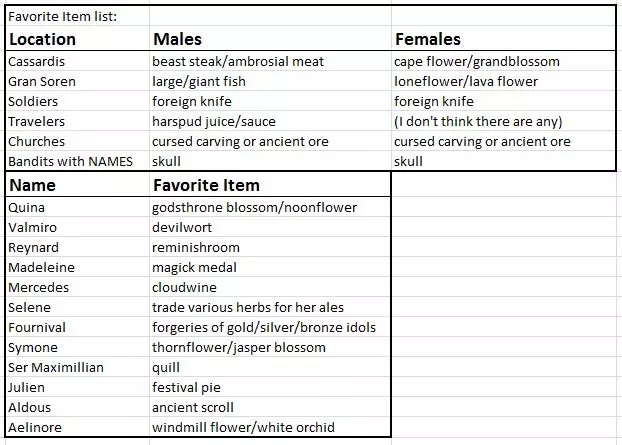
A step-by-step guide to complete all of the main quests and side quests for Dragon's Dogma & the Dark Arisen content. In chronological order so you won't have to worry about any of the quests expiring without some warning from me. NOT INCLUDED: From a Different Sky token missions, "love interest" escort missions, "defeat the enemy" instance quests found in the wilderness rather than on a notice board. Photo credit: dragonsdogma.wikia.com TECHNICAL DIFFICULTIES... You may get an error message if you click to open the screenshots of the spreadsheet for the list of quests. It says something about a bad url even though it should be a JPG file not a URL. Check the final chapter of this guide for two options to get the guide in a different format. I reported it to Steam and they said this in response: "We have been able to reproduce the issue. We have forwarded the issue on to the appropriate developers to look into it further. For now you can bypass the issue by clicking on the URL that appears in this pop up on while the Steam client, or by right clicking on the image and selecting open in a new tab while on an external web browser. Both of these options bring you to the correct image. If you have any further questions, please let us know - we will be happy to assist you." So there you go. As a temporary fix, you'll need to open the image in a new window. Then you can resize it within that window... or take a screenshot of it (try using Windows Snipping Tool) and put it into Paint or Photoshop and resize the image to your liking that way. When Steam's tech support team figures out (and fixes) the issue I'll delete this notice. Sorry for the inconvenience. Intro: What to Expect from This Guide First off, I will NOT be covering the "love interest" escort quests that you get just by making someone like you enough that they put a request on the notice board for you to take them halfway around the world. Those quests are self explanatory. I will have a couple of notes about them (particularly the characters who leave the game at some point) in the walkthrough, but nothing in any real depth about them. Secondly, I am not posting images of maps, screenshots, or videos of how to get places. Part of the fun of this game is learning to explore on your own. You just might think of a way to do things that is better than my way. Third, I am not going into great depth about the "From a Different Sky" quests because the rewards are minimal and making a list of each location would just be tedious. I will have a small section with a few important notes about how those fit into the timeline of other quests though. I am going to start out with a few notes about the "From a Different Sky" badge fetch quests. That will be followed by a brief section about how to give NPCs gifts and why you would want to do that. Then a few generic notes for "newbies" to help keep you alive until you get the hang of things. Then I will jump into a chronological run-down of where to go and what to do when you get there. I will cover the main story quest, all side quests (given by notice boards or by individual NPC) except the Escorts and From a Different Sky, the Bitterblack Isle quests, and the "post-game" quests that pop up only after you kill the boss dragon. After the timeline, I will discuss the concept of New Game + and how that works with this game. There are a few points in the story where you must make a choice that has consequences that persist until you start a new game +. Fair warning there are a few spoilers here so you can make an informed decision. Notes on "From a Different Sky" badge quests "From a Different Sky" will have you running back and forth across the world trying to find and grab a bunch of items known as Badge of Vows. It is just a collectible gig, nothing fantastic. Still, completionists will get some satisfaction from finishing the entire list. Each of these quests will be listed only on the notice board in the basement of the Pawn Guild in Gran Soren City. I am NOT covering the "From a Different Sky" badge locations here. I may post a separate guide for that later, but I think there are plenty of ways to get help with those if you need it so I probably won't bother with it. For example, try Youtube. I will, however, toss a couple of notes at you now about those badges. There are 100 badges total for those quests, and three of them appear in the final dungeon and thus WILL NOT be posted on the notice board until you begin the final quest for "Deny Salvation." Also, those three badges MUST be obtained on your first run because that dungeon becomes inaccessible after you beat the boss dragon. Those badges, in the order they appear in the dungeon, are numbered 87, 39, and 40. So work around those numbers and obtain the other 97 badges until the very end of your main quest to get your heart back from the dragon. The other badges can be obtained in any order you choose to accept the quests, and at any time because you can revisit every other area of the game. However, remember that the notice board can only hold five or six active quests at one time so you will have to collect a badge and then return to the board to complete that quest before another one will appear on the board. Also, the quests will only appear on the notice board once the area where the badge is located becomes open to you via a side quest or the main quest. And don't forget that the badges DO NOT EXIST in the real world until you accept the quest to obtain that specific badge, so you cannot run around and collect them all and then turn them all in at once. You can, however, collect all the badges and turn them in on your first play, then put them into storage so you have them ready on your new game + take them out of storage as you need them to avoid running all over the world again but still complete these quests. Or you could collect them, turn them in for the quest reward, then sell them... they are worth quite a bit of gold. Some badges will require the double-jump ability of the ranger. Some will require the glide ability of the mage. Some will require you to shoot them with a bow. There is even one that you need to demolish a wall to find it. So if you are at the indicated location but just can't reach the thing, try changing your vocation or learning a new skill first. If you accept a Badge of Vows quest, it will NEVER expire in your list (except those three that are in Greatwall Fortress) until you slay the dragon. They do NOT interact with story or Bitterblack Isle quest progression in any way except that a few areas of the game are closed to you until you reach a certain point and the badges in those places will not be available as quests until you unlock the location. NPCs: Gifts, Escorts, and Romance One thing you will probably notice really early in the game, is that when you talk to NPCs one of your options is to give them a gift. Now you might think that if you give them a gift, or enough gifts, then they will eventually reward you with something cool like a bigger sword or a healing potion or something. That's how this works in most RPGs, right? Not in this game. In this game, it is tied into the Affinity system. Every human NPC in the game has a certain Affinity Level towards you. They usually start out neutral, let's call that zero affinity. This means they will talk to you, they will do business with you if they are a merchant, but mostly they don't really know you exist. You can raise affinity in four basic ways. The easiest is just to talk to them. A lot. Like five or six times a day. Talking only raises affinity a small amount, but over time it will show. You could complete a side quest they give you, or one that they benefit from. That will give you a medium boost to affinity. You could impress their neighbors by doing heroic deeds (such as defeating the cyclops and hydra at the Encampment impresses the soldiers and villagers there and in Cassardis). You can give them a gift - most items will work as a general gift. A regular gift is a small boost to affinity, but better than just talking. And each NPC has a specific gift that they really love - that will raise affinity by quite a bit. Then there is one item, the Arisen's Bond, that essentially acts like an engagement ring. Giving that as a gift will instantly make the person fall in love with you. Once you get a NPC to affinity level 2, where they like you but they still don't quite love you, they will greet you as soon as they see you in the streets. And if the timing is right, they will leave a note for you on the local notice board (Cassardis inn or Gran Soren inn) asking you to escort them to some far-away location. Completing the escort mission will further increase their affinity for you. At affinity level 3, they will visibly blush when you talk to them. A handful of NPCs need to be at affinity level 3 before you see their escort quest on the board, and a few of them have strict timing requirements and are unavailable during certain parts of the main story. At affinity level 4, they get a pink halo when you approach them. This means they LOVE you. Each merchant has a list of items for sale that determines what they sell at each stage of the main quest as you progress. That list also specifies a few items that they only offer for sale if they reach affinity level four. So the extra goodies for sale is a good reason to give merchant NPCs a lot of gifts. The real reason to raise someone's affinity though, is to make them your spouse (unofficially of course). Spoiler! Whoever you are engaged to at the end of the main quest, will be kidnapped by the dragon and you will be given a choice to save that person or save yourself. After you defeat the dragon, your fiancee will live at your house in Cassardis instead of wherever they were before. And then after the final post-game quest, you get a special end-game scene with that person. Note that it is possible for several people to love you at the same time. The one chosen for this story-related role is the one who MOST RECENTLY got that pink halo at affinity level 4. If there is a specific NPC you want to get with at the end of the game, you can arrange it by lowering the affinity of all the other NPCs who love you. You can lower that affinity in several ways. You could pick that person up and gently set them down. They do not like to be man-handled. You could draw your weapon and then try to talk to them, it makes them nervous so their affinity drops even if you do not actually use the weapon. You could run into them at full speed so they have to get out of the way. You could give them a certain item (Liquid Effluvium) found only at the shop in Bitterblack Isle to reset their affinity to zero if you accidentally raised it, or if you raised it on purpose but now you want to reset it. You can also lower affinity by punching, shooting, casting painful magic on, picking up and THROWING, or otherwise injuring a person. However, that is a crime and if you do it inside the city you will be arrested and tossed in prison. There is also a danger that you might actually kill the person by trying to do it that way. Pawns count as people in this case, so if you want to toss your pawn off a high place, do it outside the city walls. You can reduce affinity to a negative state. In this state, the character will be generally upset with you, afraid of you, and if they are a merchant then they will not do business with you. You also will not be able to accept any side quests they might offer. When it comes to choosing "the right gift" most NPCs have an item in mind that they prefer. For 95% of them, it depends only on their location and whether they are a man or woman. But there are a few who have individual tastes that differ from everyone else in their neighborhood. Here is a picture of a list I made, showing everyone's favorite things:
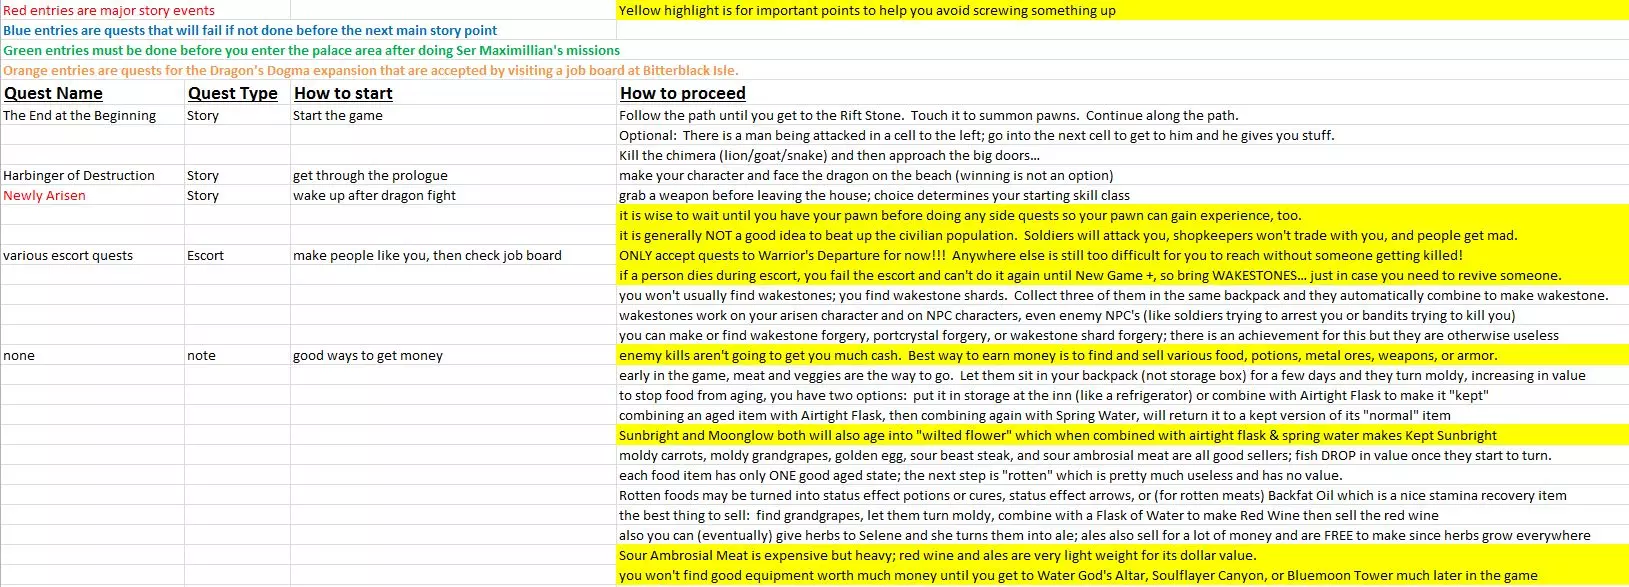
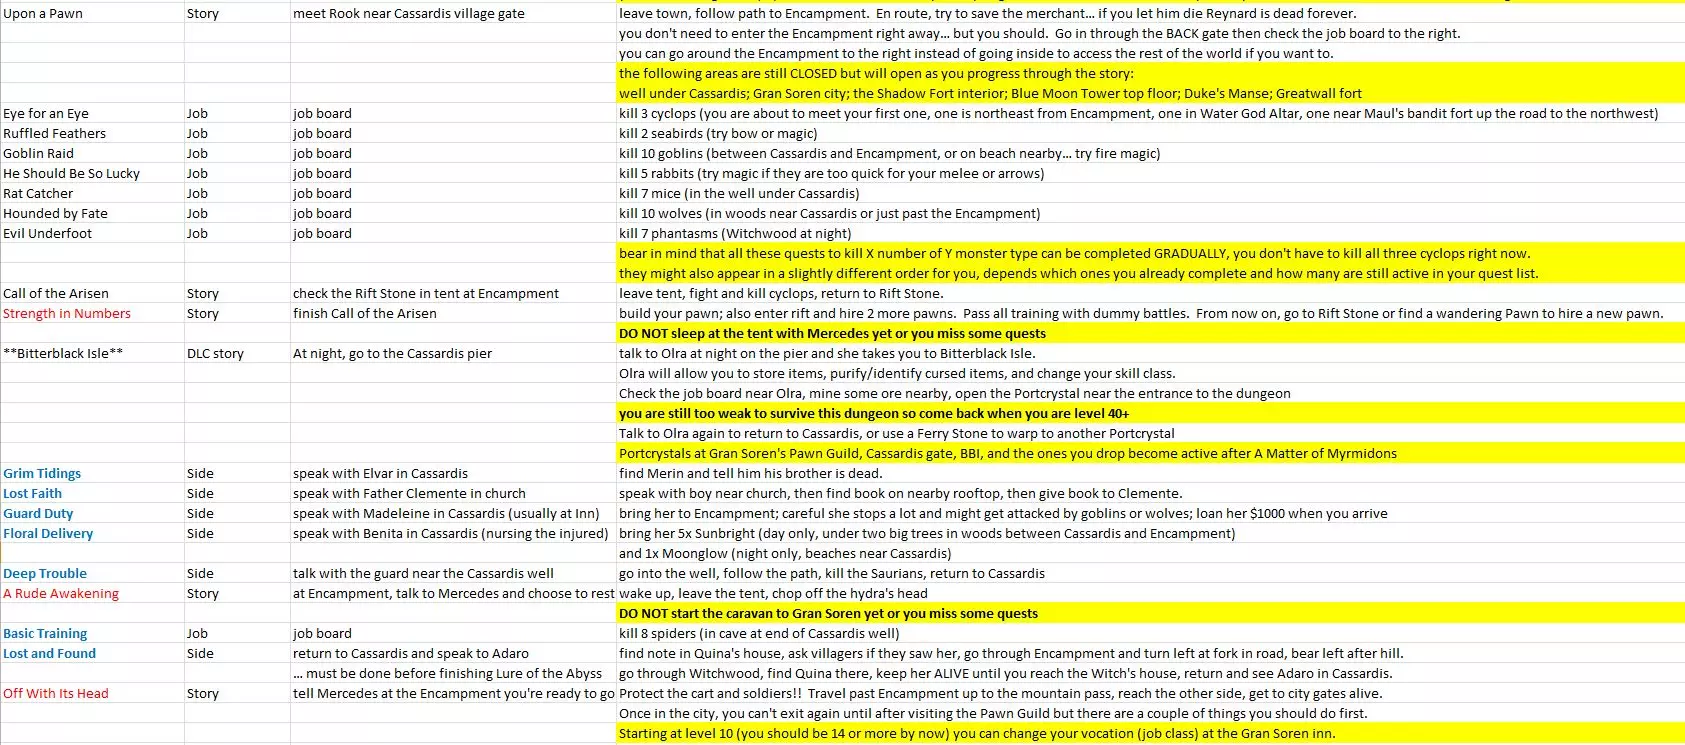
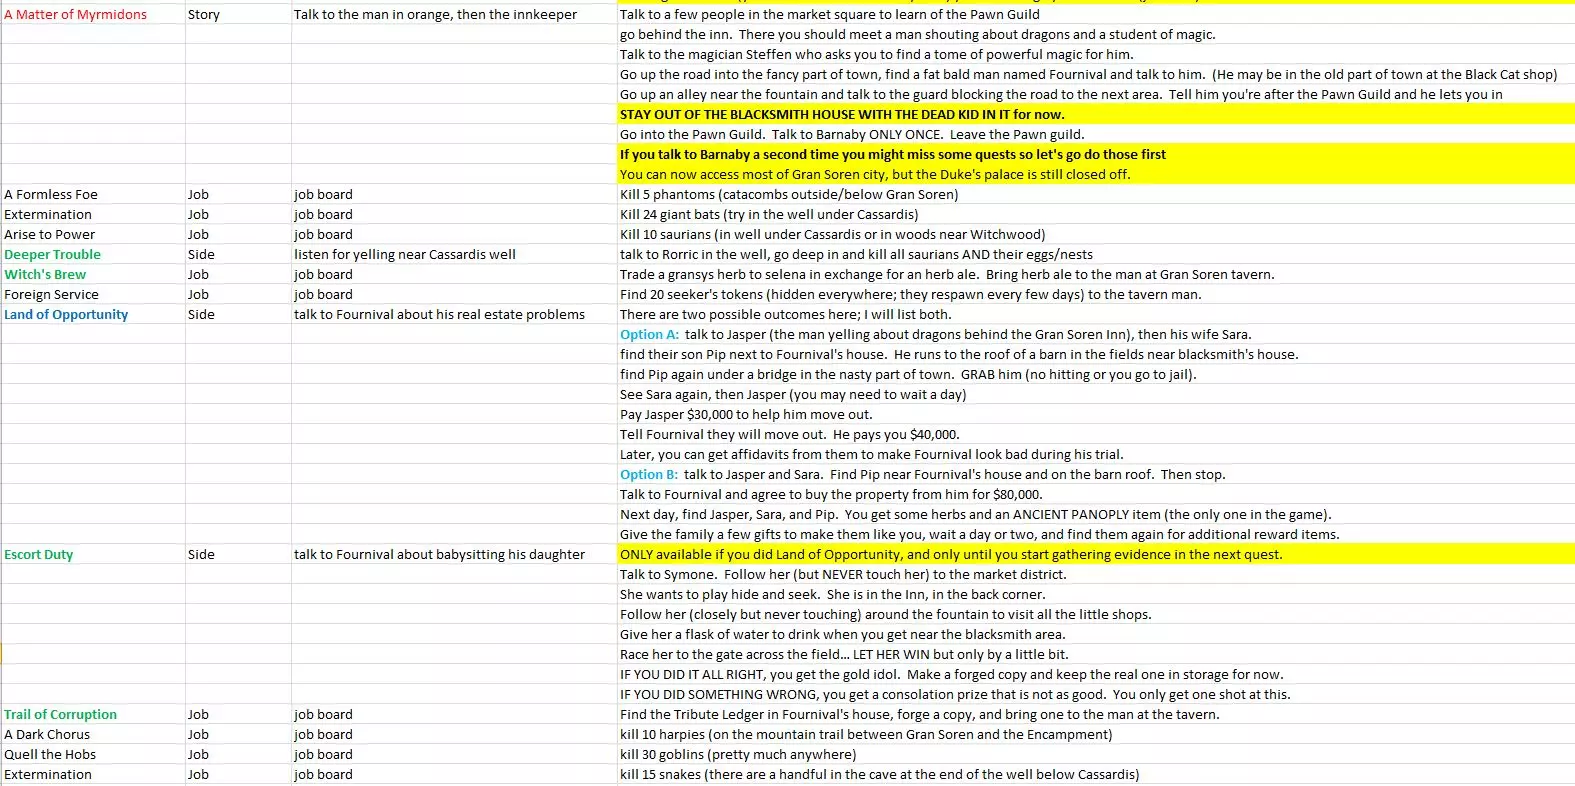
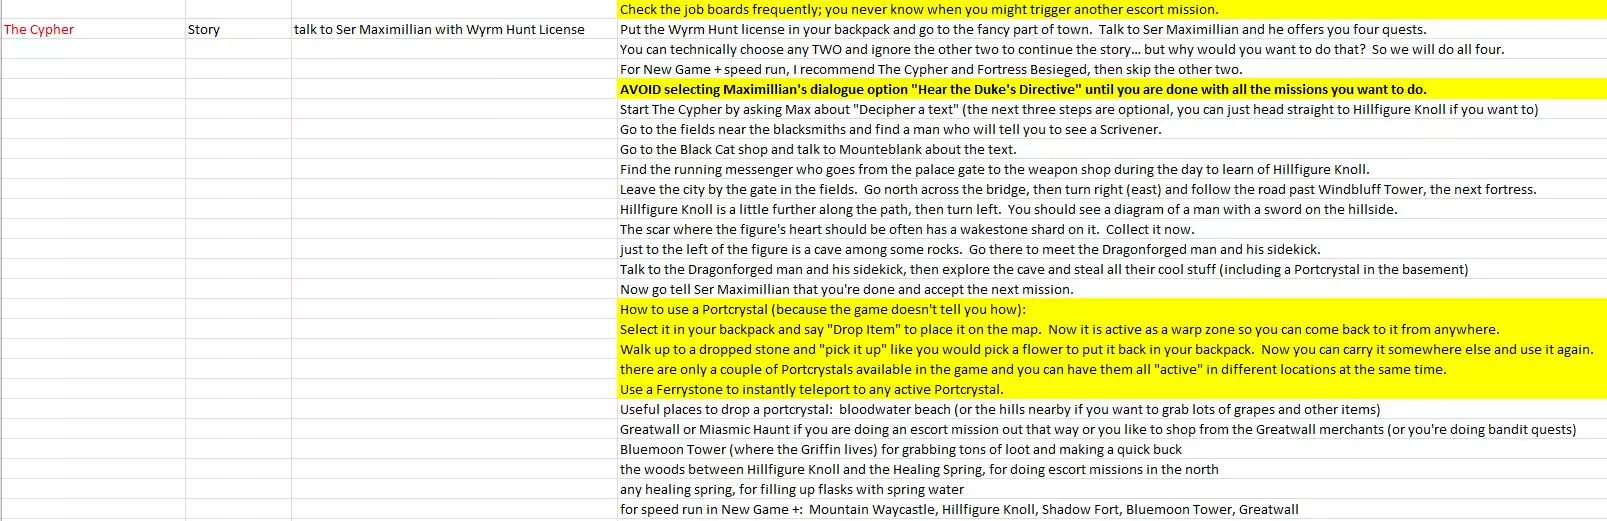
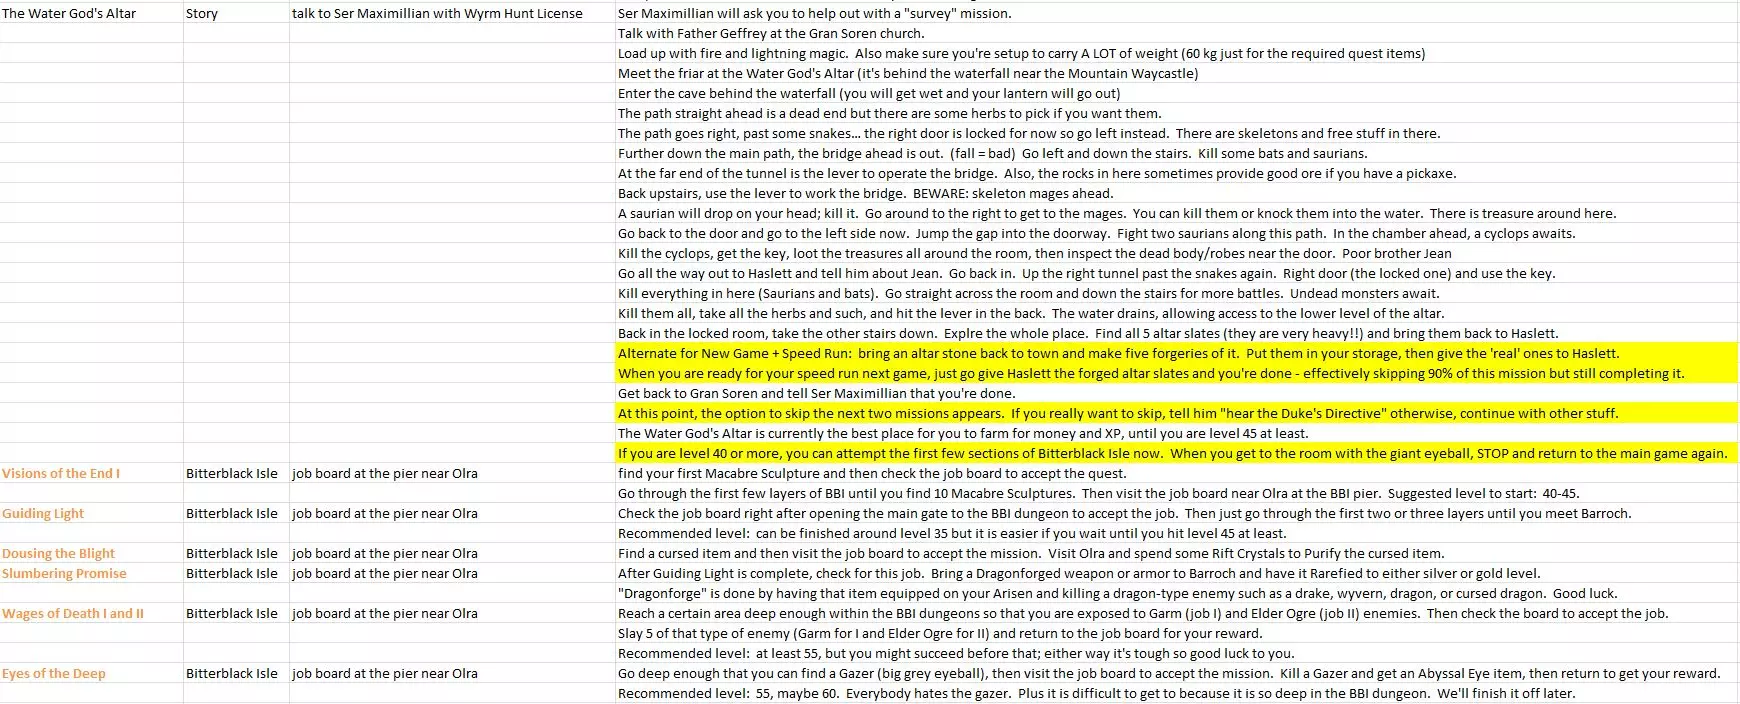
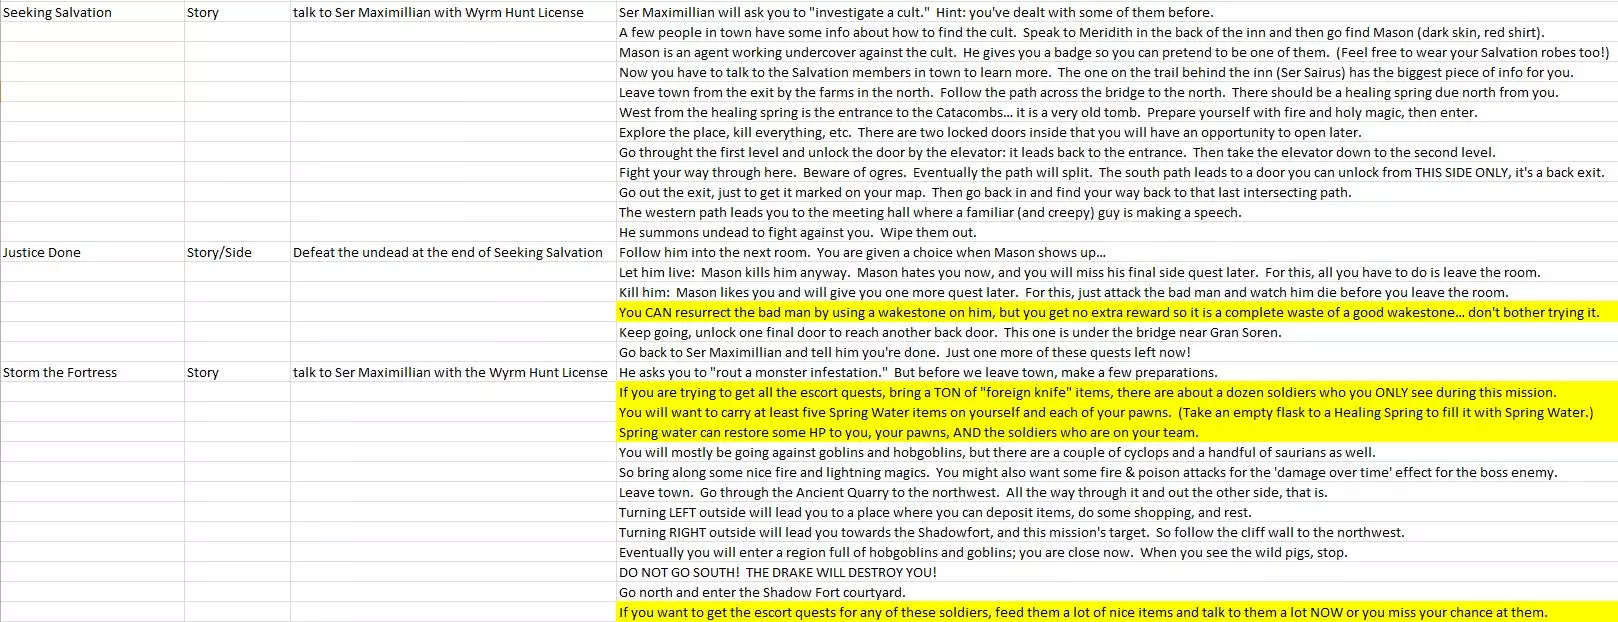
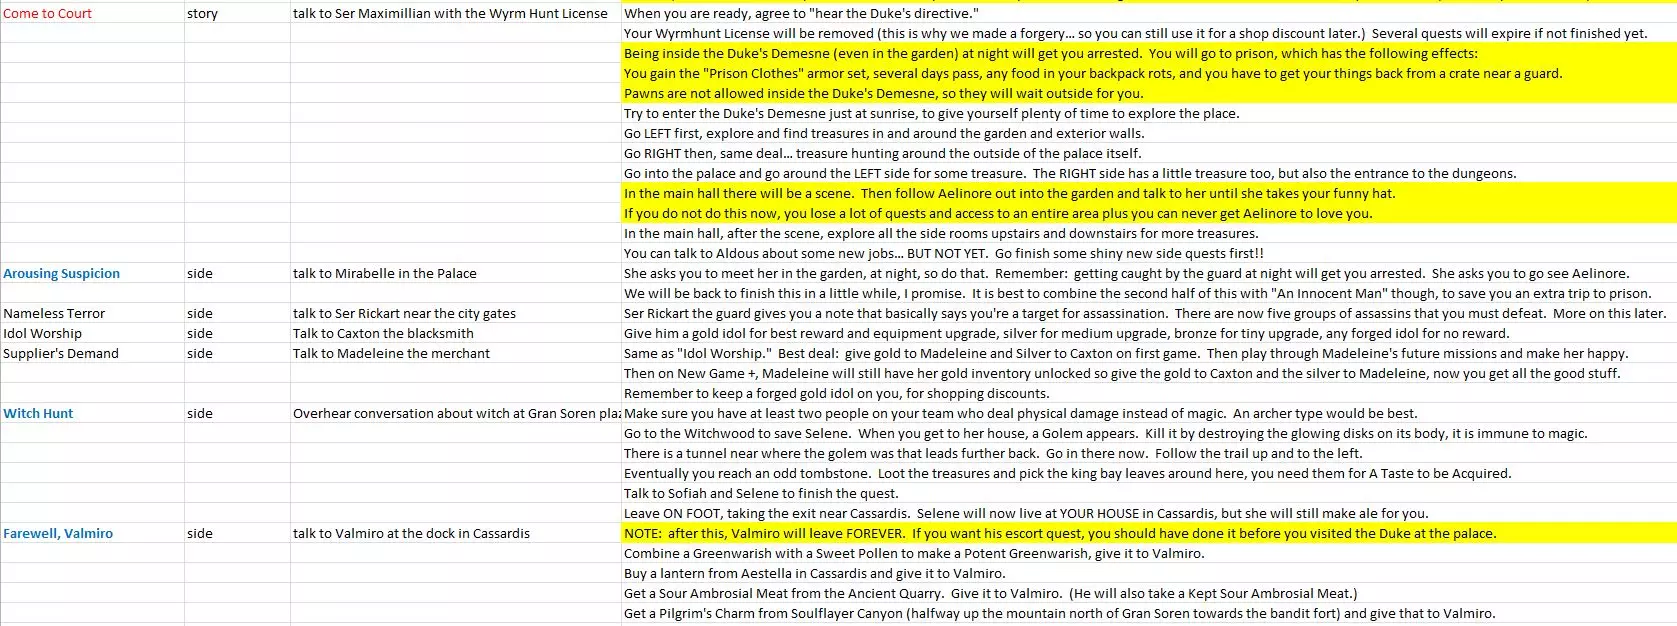
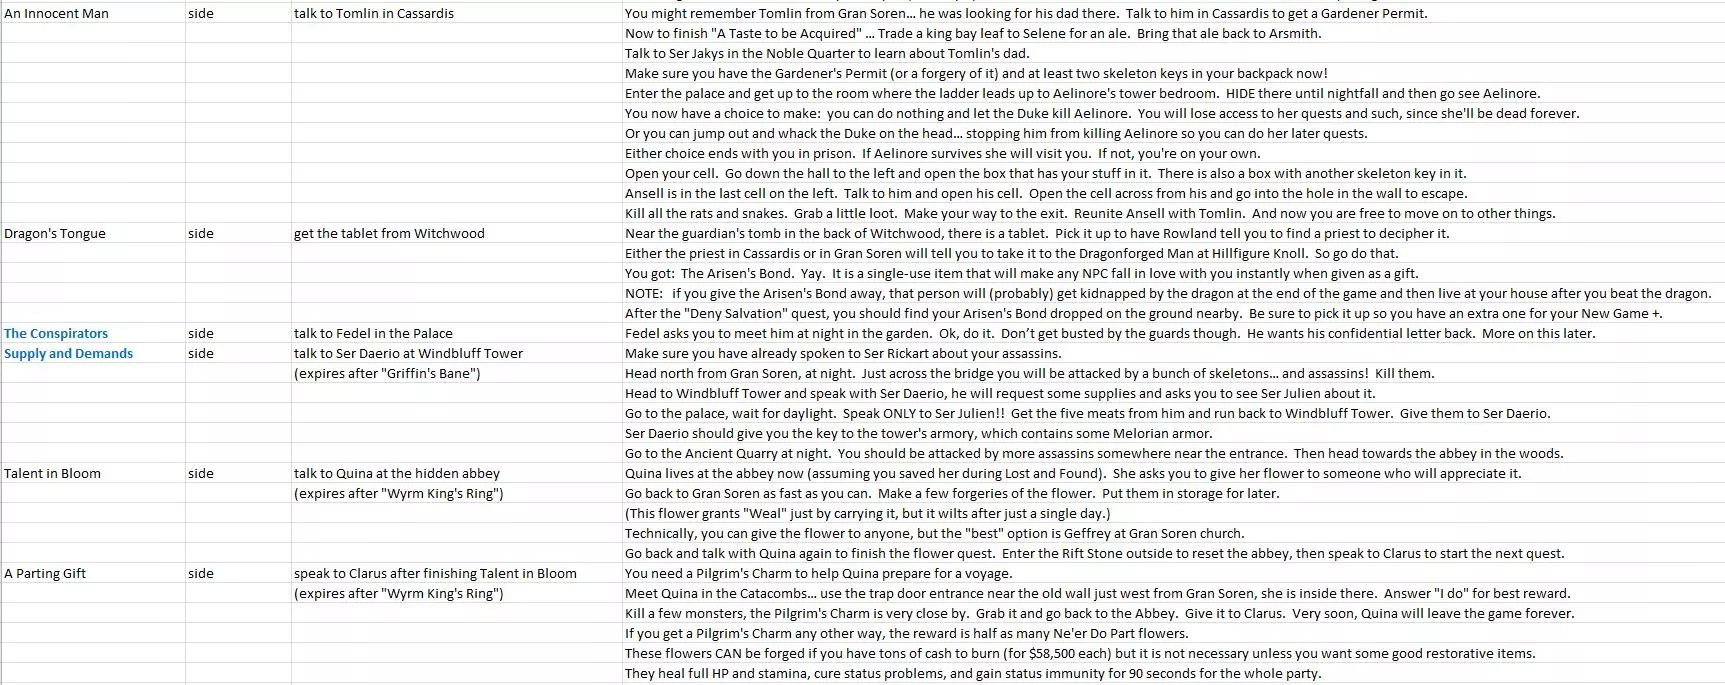
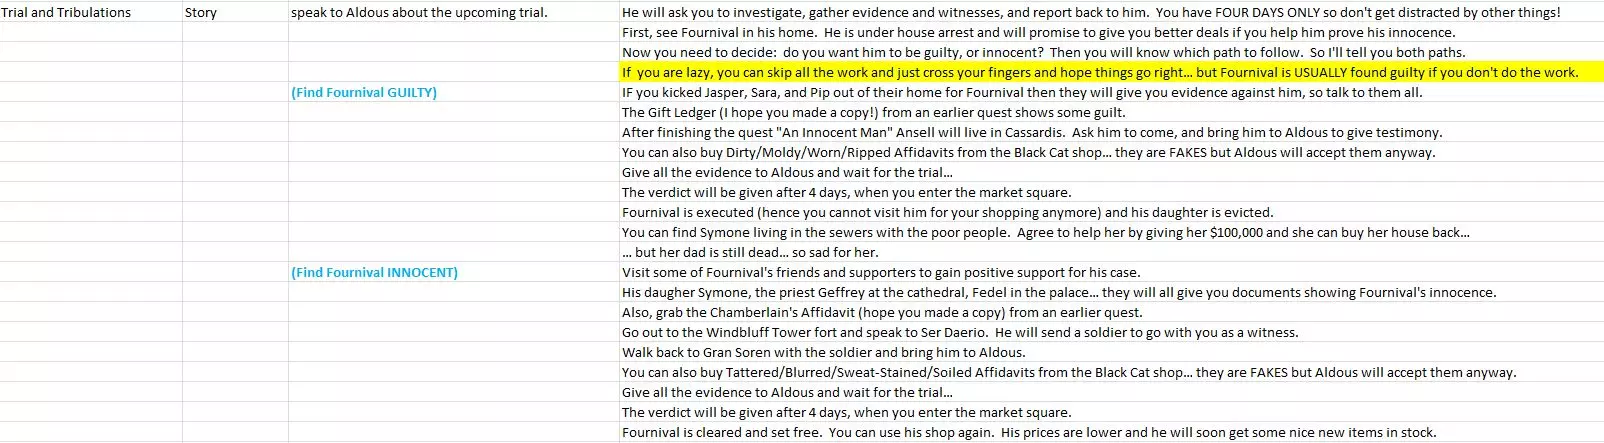
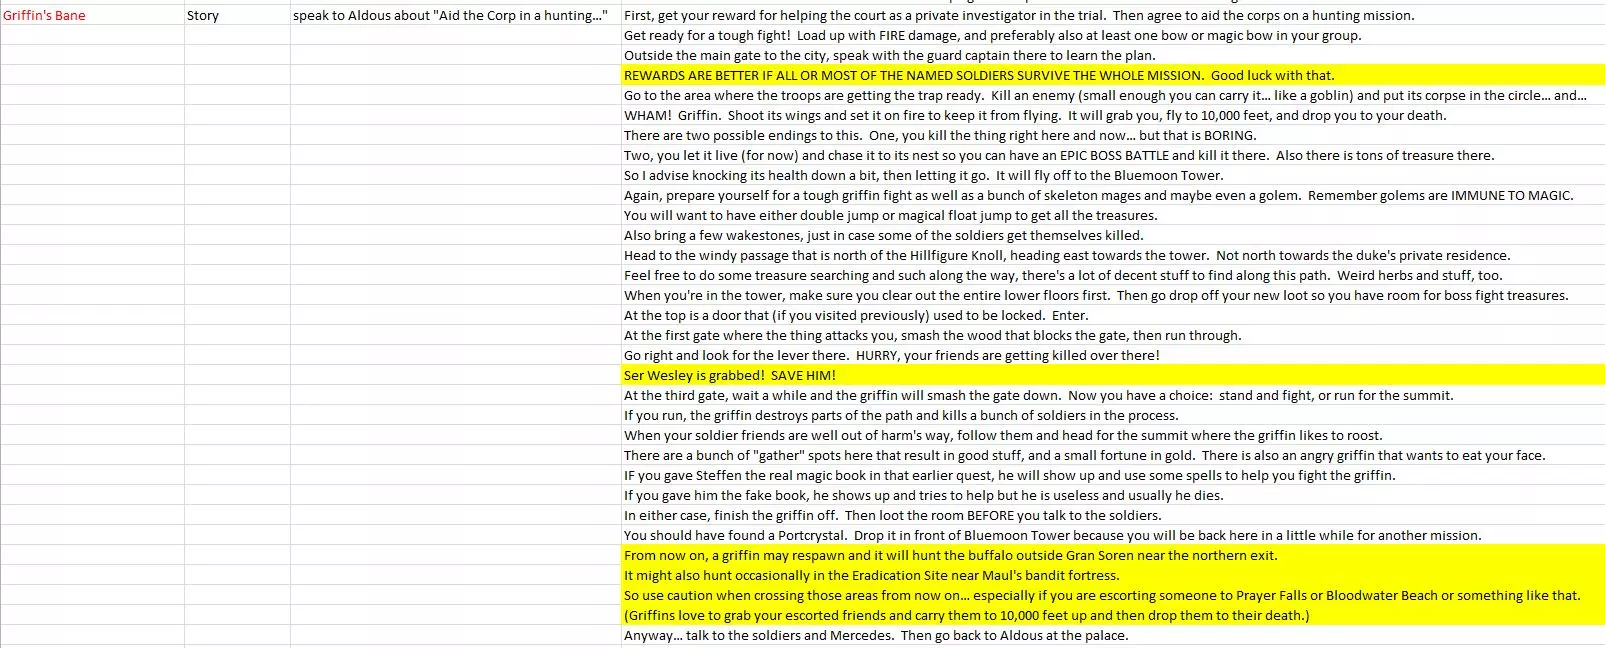
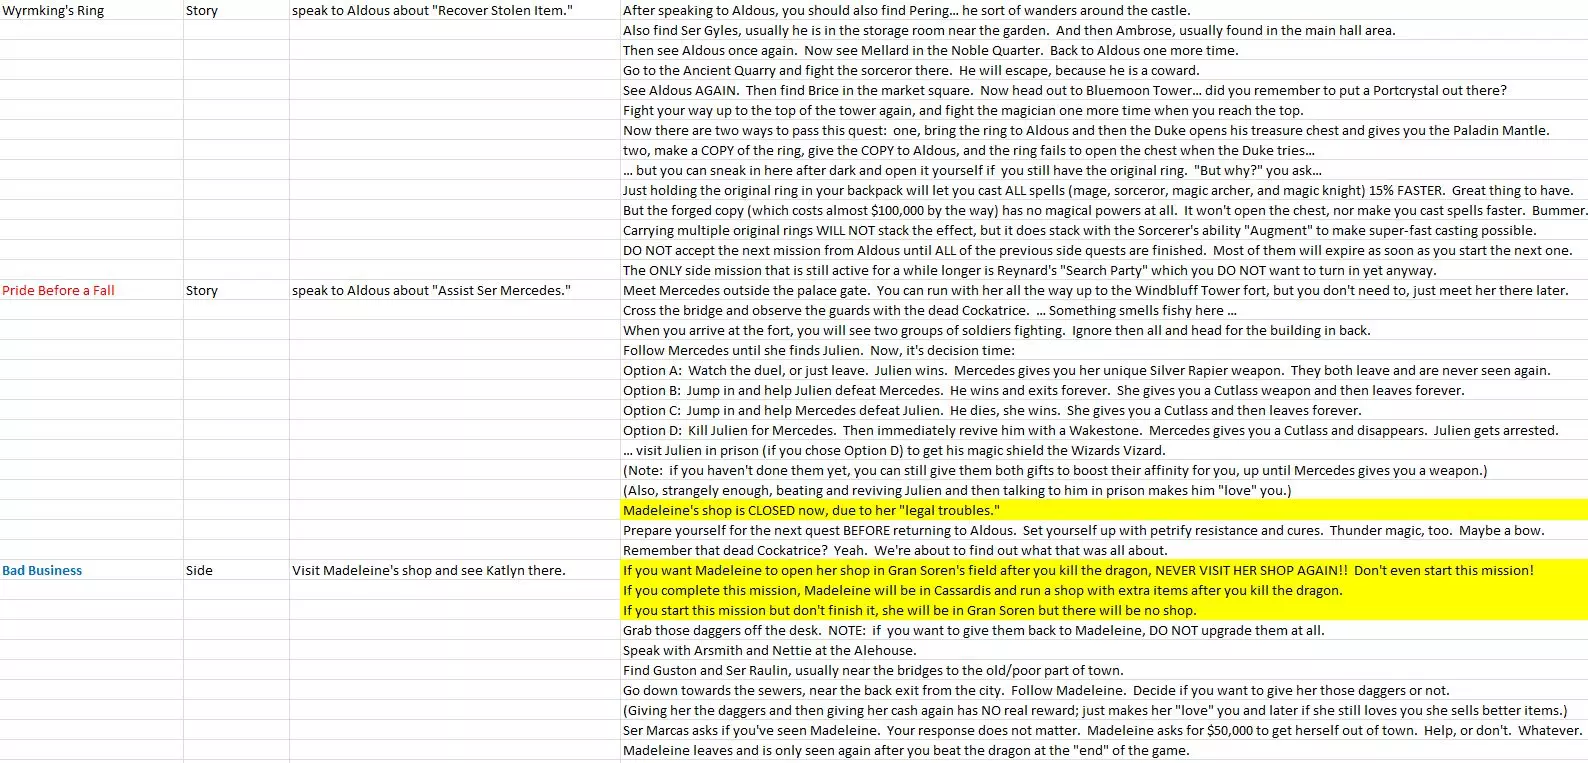
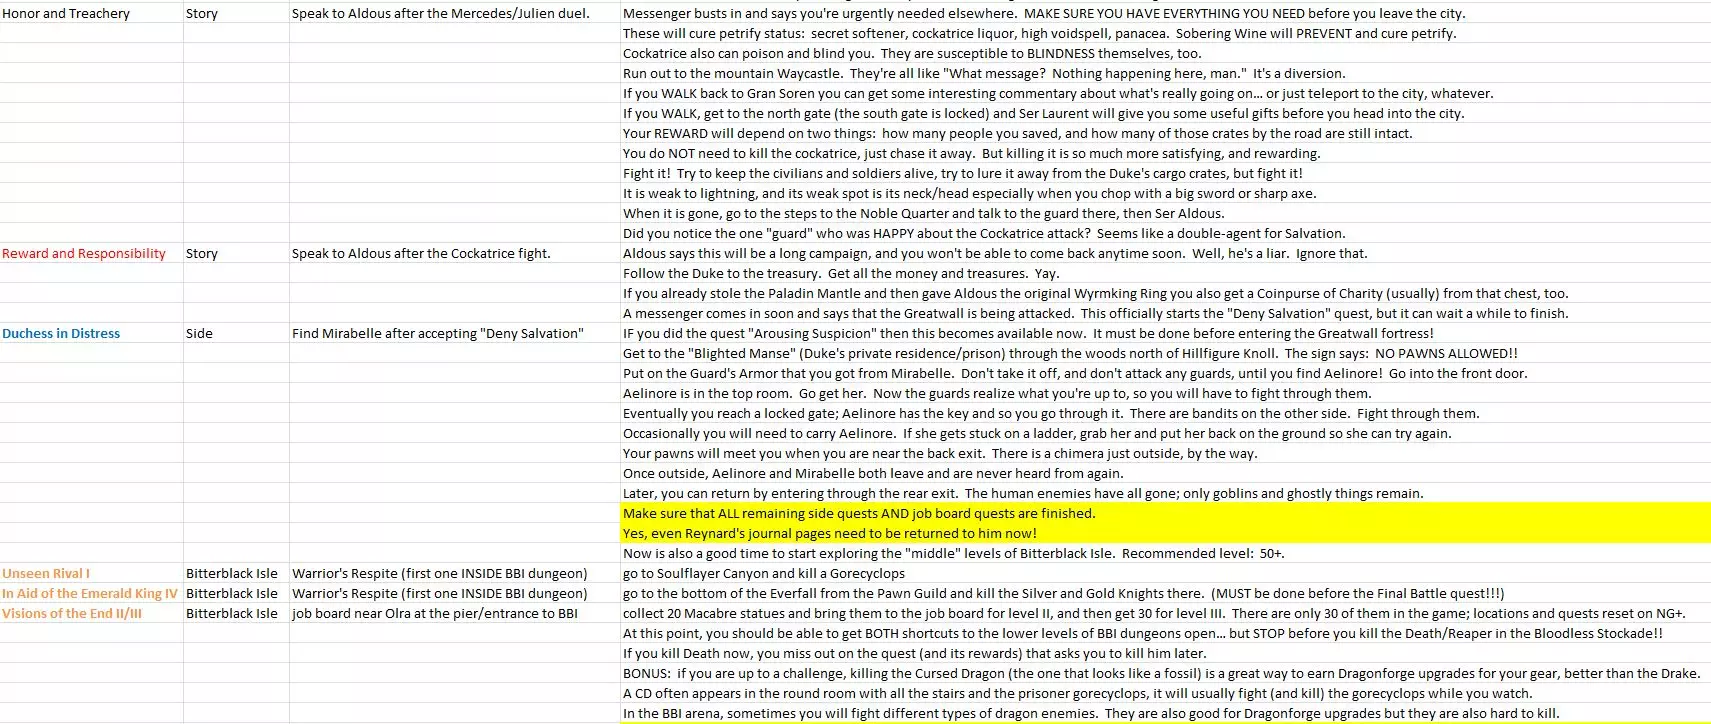
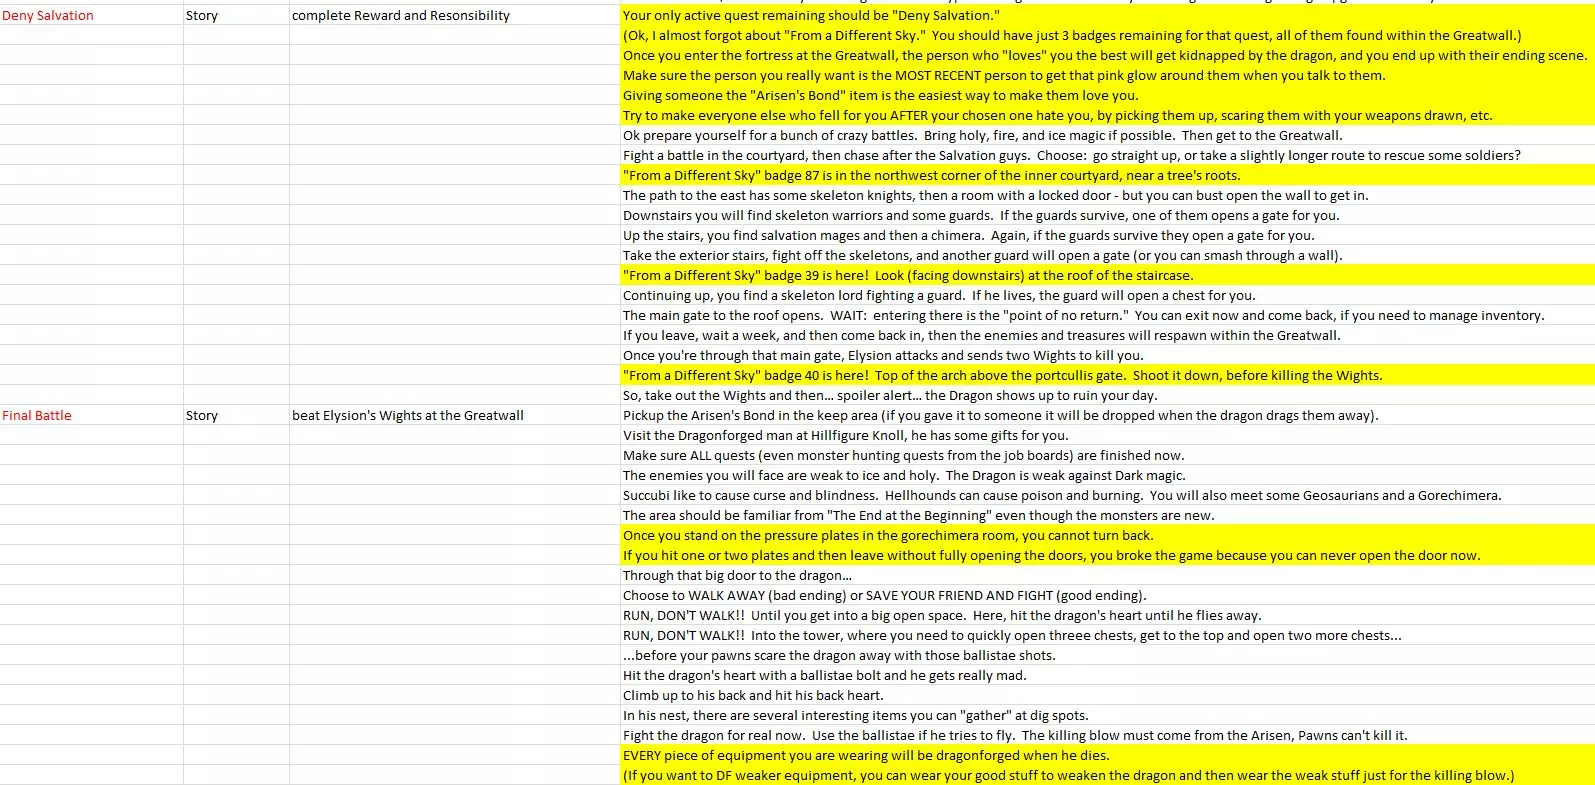
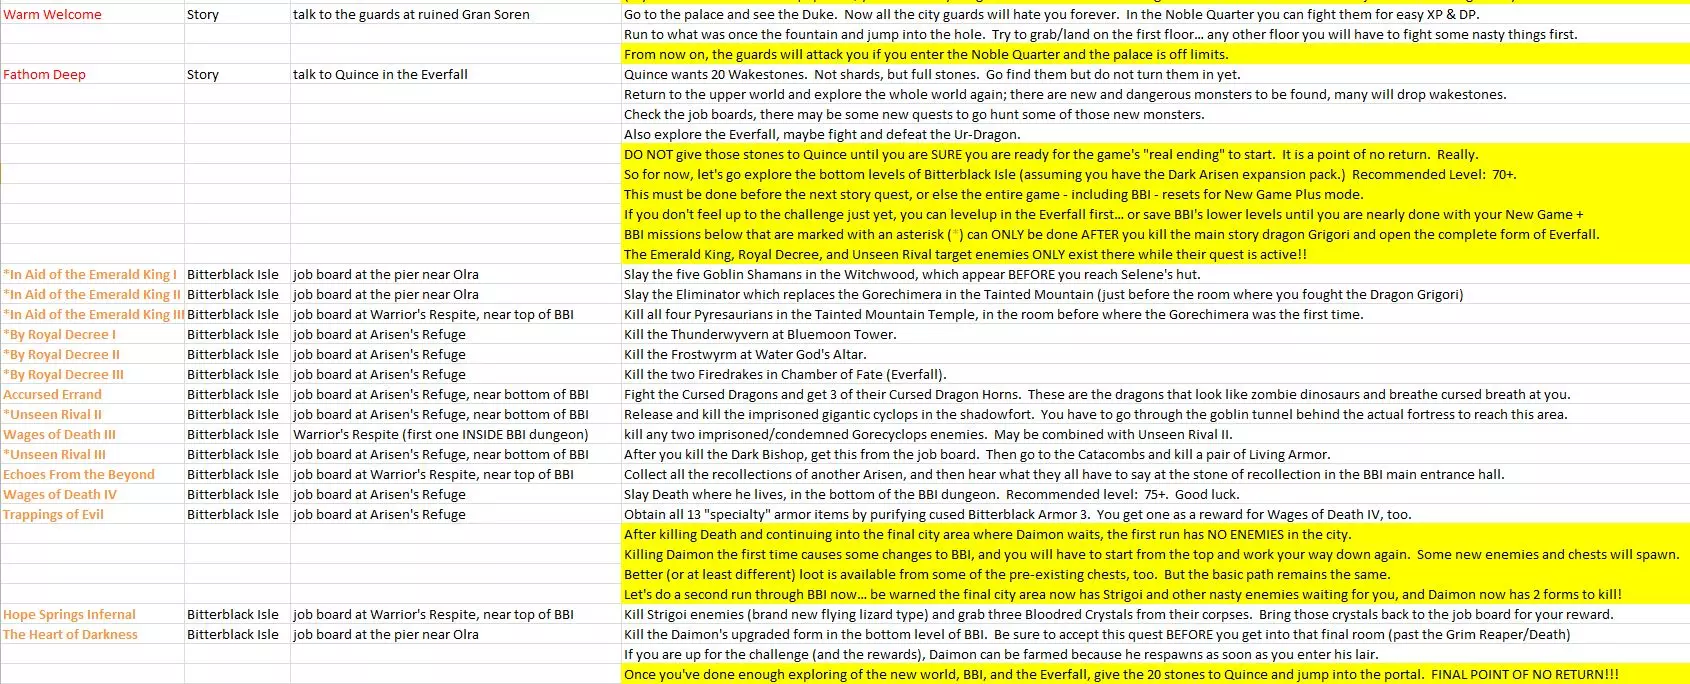
One final note about Affinity: it will DECAY over time, back to neutral zero. In order to maintain a high affinity with any NPC, you must talk to them twice or give them one gift on each of at least two days out of every seven (rough estimate). Basically, if you ignore people they will eventually forget why they ever liked you. Notes on NPC Escort Missions READ THIS if you plan to do some escort missions. These tips just might be the difference between life and death for you and your NPC friend. Once you get a NPC to affinity level 2, where they like you but they still don't quite love you, they will greet you as soon as they see you in the streets. And if the timing is right, they will leave a note for you on the local notice board (Cassardis inn or Gran Soren inn) asking you to escort them to some far-away location. Completing the escort mission will further increase their affinity for you. At affinity level 3, they will visibly blush when you talk to them. A handful of NPCs need to be at affinity level 3 before you see their escort quest on the board, and a few of them have strict timing requirements and are unavailable during certain parts of the main story. In addition to the "romance" story element, some of the escort quests have decent rewards (gold, weapons, rare items). Some of them have pretty stupid rewards. I am currently attempting to compile a complete list of escort quests... but it is taking FOREVER to finish. And if it ever does get done that will be a separate guide. Here I will just give you some tips to get you started. When you are a newbie Arisen, probably right after you kill that half-dead cyclops outside the Encampment, you will see your first two or three Escort jobs on the Cassardis notice board. Be very picky about which jobs you take, and when! When you are still just a baby, you can take Escort quests to Warrior's Departure because it is right outside the Encampment. Once you reach Gran Soren City, you can take trips to Cape Pactforge (right outside the city, near the ocean), Stones of Courage (still very close to the city - but beware of goblins and hobgoblins), and Prayer Falls (travel there ONLY by day - at night there is an army of undead and several ogres). For all other destinations, wait until you are harder to kill. General Escort Mission tips:Bring TWO Wakestones (not shards) just in case you need to revive your NPC friend. Jobs only stay active on the board for about seven days. Then you have to find that NPC and raise their affinity level a little to get the job back. Only six jobs can be shown on the board at any one time. Finish one job to make the seventh one appear. Place a Portcrystal at your escort destination BEFORE you accept the mission - the easy way. Later in the game there will be a griffin in the fields just west of Gran Soren, and another in the fields northeast from the western bandit fort. Griffins like to grab your NPC friend, fly him a mile high, and then drop him to his instant death. But griffins take about a week to respawn, so kill the griffins before you accept those escort missions that travel those areas. If you are going to Shadowfort, do NOT go north through Devilfire Grove or you will encounter the Drake. He will swipe, claw, chew, and breathe fire until your NPC friend is dead. Avoid this by taking the path to the east by the little rest camp and going around the lake to the Shadowfort. Chimera appear in several places: west of Prayer Falls, in the woods en route to Bloodwater Beach, and a few others. Like the griffin, they love to eat NPCs and they take a few days to respawn, so kill them before you take the mission. Escort Mission target location descriptions:Warrior's Departure: east of Encampment, a gravestone on a peninsula Cape Pactforge: exit Gran Soren by the south gate and turn left at the end of the bridge. Walk past the cows to a small grassy hill overlooking the ocean, with some crates on it. Stones of Courage: exit Gran Soren from the south gate. Move up the path towards the mountain waycastle, but take your first left and wade through a small army of goblins and hobgoblins until you find the strange stones standing on a cliff by the sea. Prayer Falls: walk west from Gran Soren's northern exit. Follow the river's southern bank through the fields and forests. It is on the rock just east of the abbey in the woods. BEWARE of undead army and ogres at night, only go there in daylight. Shadowfort: On the western side of the world, from the southern exit of Ancient Quarry, turn right and follow the rock wall until you reach the fortress gate. BEWARE of the Drake to the south. Bloodwater Beach: From the western bandit fort, follow the coastline north until you reach a total dead-end. It is at the back side of a small rock formation on that final beach. There are two cyclops in a sort of pit at the other end of the tunnel that connects to the beach. Hilligure Knoll: North and across the river from Gran Soren, then turn right and follow the path past the army fort. Just north from that is a hill with a drawing of a warrior on it. You want to be on the left side of the drawing, right on his foot. Healing Spring: Go north from Gran Soren, cross the river, go northeast past the army fort, past Hillfigure Knoll, go uphill and keep going northeast until you reach a healing spring. Greatwall: follow the mountain pass NORTH of Gran Soren, past the female bandit fort, then go northeast. It is right in front of the camp at the Greatwall fortress. Miasmic Haunt: stand on a canoe on the western side of the swamp that is northwest from the female bandit fort. The canoe is between a small island and the shore. DO NOT go there at night, there is a rather nasty wight in the vicinity. Quick tips on Bitterblack Isle dungeon From almost the beginning of the game, Bitterblack Isle is accessible by speaking with Olra (the creepy blonde lady) who stands at the pier in Cassardis village at night. By all means, go there to get the place active on your Ferrystone travel map. You can even explore the small exterior area of the island near the docks. There is some good stuff to mine and you can find some decent crate loot there. If you are a mage/sorceror you can also do some creative jumping to reach some of the higher rock platforms for more free stuff. To the right of the big doors you will find a portcrystal to mark this place on your map, and a Rift Stone where you can go to summon pawns. Behind Olra is a notice board with special jobs unique to this place. There is also a bed in front of Olra. You can also speak with Olra and she offers a few services for you. Feel free, too, to go into that first big set of doors - there are no enemies in the FIRST room but there are a few crates and jugs you can smash that might have some little trinkets inside. SAVE YOUR GAME before you go through that second door though. If you are still level 10, which a lot of people are because they just want to "see how hard it really is" then you should turn back now. As Dumbledore said, "the third floor corridor on the right hand side is out of bounds to everyone who does not wish to die a most painful death." My advice: wait until you are level 45 at least before you go through that second door. And make sure you have some decent gear - preferably "Dragonforged" by the Drake in Devilfire Grove. When you do make your attempt, check the message board first because it has some jobs for you to do while you're in there. Also keep an eye out for "Macabre Statue" items that are hidden all over the place. You will want to find ALL of them to complete the job board quests related to them. Check Youtube for their locations if you think you missed some. After a couple of hallways you will come to a courtyard with goblins and hobgoblins and cyclops (Oh, my!)... and... wait for it... DEATH HIMSELF!!! Keep going and you will find a man named Barroch who will do a few interesting things for you. If you have Dragonforged gear, some crazy rare items, and a TON of riftcrystals, he can improve your gear beyond Dragonforged to the Rarefied level. But wait on that because first you need to turn in the job that had you go find him, then rarefying an item is another job from the notice board. To get it you will need to turn in some quests (remember the boards only hold 5 or 6 quests at a time). Finding him is a quest, find 10/20/30 macabre statues is a series of quests. Have Olra identify a cursed "Bitterblack X" item is another quest. Go clear your quest board to get a new batch. The room where you find Barroch is interesting. There are no enemies, only fluffy cute animals. Explore the crap out of this place... but take note: the doors that open using the crystal keys, you CANNOT find enough crystals to open all of them in a single game, so choose wisely. The door on the top, straight across from Barroch, is guarded by spiders and snakes. That door leads to the Room of Pain and Suffering. Every time you enter, you will be greeted by a different "super ultra badass" type of enemy. Seriously, that room will make you cry. But there is a ton of good loot hidden all over that room. On the ground floor, the room to the right of the staircase leads you to a prison that holds a gorecyclops. Don't mess with him yet just ignore him. At the top of the room you will find some skeleton sorcerors (kill them quickly) and a GARGOYLE who likes to petrify people. Get all the free stuff, and be sure to get the key from the very top of the room. Then explore the tunnels behind that room, there is more free stuff there. Just beware the water is poison/blind soup and the Leapworms come at you in numbers and inflict a bunch of status effects. Then, back in the furry critter room, the door on the first floor with the key-hole leads you deeper into this hell. Open the door so you don't have to remember to bring the key with you next time. Now it is up to you whether to continue on, or head back and save this place for later. I recommend waiting until level 55-60 before you move on here. Beyond that door you will meet a few enemies that become quests on the notice board, but I think you have to meet one before the quest pops up. Garm (big evil dog monster), elder ogre (like an ogre but tougher), and Gazer (big grey eye with tentacles). Really the quest does not say "go kill a gazer" it says "obtain an Abyssal Eye" but the way to do that is to kill the Gazer. It is the only one in the regular game and it does not respawn so save your game before you fight it, and reload if it does not drop that Abyssal Eye. Once you reach the Warrior's Respite room, Barroch will travel between I think four locations on the island. There is a job board in the Warrior's Respite. Here you can obtain/turn in your Macabre Statue jobs (remember you need to carry ALL statues to turn in the quest). You can also get two jobs to go slay some monsters in the main game world. One will take you to Soulflayer Canyon to fight a Gorecyclops - and good luck with that! Another will send you back to Gran Soren, in the Everfall under the Pawn Guild, to fight a pair of knights. Death can be killed (no more respawns) in his home in the final sewer level. Be sure you have the active quest to kill him first! Just beyond Death is a ruined city where Daimon awaits. Be sure to have the quest to kill him before you enter the room! Killing Daimon changes the dungeon a bit, new/different loot etc. plus you will have to start from the top and work down again to kill Daimon's true form this time. And there are new/harder enemies to fight. Plus a few new job board quests from time to time as you encounter new enemies. Make sure you have the quest to kill Daimon's final form before you enter his city area! Also, once you are level 60 and have some sort of CURSE/PETRIFY protection, you can fight a Cursed Dragon for a decent chance to Dragonforge your gear. "Easiest" place to find cursed dragon is to drop a rancid bait meat item into the room with the prisoner cyclops, then run up and kill all the mages and the gargoyle, then go kill a bunch of leapworms. You might also need to free the big cyclops by jumping on his head and hitting the chain on his mask. Anyway, a cursed dragon will usually drop down into the room and fight the cyclops. If you want the XP, make sure that YOU deliver the deathblow, but otherwise you can just watch as the dragon destroys the cyclops. Then you can fight the dragon. Basically there are five areas to this place. The exterior you can do anytime because there are no enemies. Second door to the fuzzy critter room: be level 35+. Fuzzy critters to the Gazer: be level 45+. There is a shortcut staircase just after Gazer. Shortcut one to the Bishop: be level 70+ (90 is better). There is another shortcut after Bishop. Shortcut two to Death/Daimon: be level 100+ Round Two... GOOD LUCK!! Remember that finishing the main game after stepping into Quince's portal will reset everything, including this dungeon! Certain Bitterblack Isle items (Macabre Statues) will not carry over to New Game +. Building Your Character, and How to Not Die in the First Ten Minutes Shortly after the prologue/tutorial, you will be able to create your own Arisen character. Soon after that, you will be asked to build your own Pawn sidekick. The process for both is basically the same. The main difference is that Pawns cannot use some of the advanced job classes, but you will not have to worry about that until you reach the big city (in Walkthrough 2) anyway. Your character's basic looks are up to you, based on your personal preference. The three things that have real effects on the game are the sex, height, and weight. For the sexes, the only difference is that there are a few pieces of armor and clothing that are only able to be worn by women and a couple that are only for men. There is a set of lady's clothes that can make your man dress like a woman though, so it's not such a big deal really. As for the story and the romance options, the sex does not matter at all. I prefer to play as a female simply because the female-exclusive armor has slightly better status resistances and defensive statistics than anything of comparalbe quality for the men. Your height is affected by your selection of torso, legs, and head. Taller people walk faster and have longer reach with weapons. Jump height is the same for all characters. Taller people are slightly harder to knock back or knock down, but that really does not matter much in this game because if an enemy is strong enough to knock you down, then it will knock you down regardless of your height. Taller people have an easier time climbing on the bigger enemies and can throw smaller enemies and items slightly farther than short people. On the other hand, short people can run between the legs of cyclops and ogres. Short people can also fit into the tunnels below the Shadowfort's inner courtyard... but there is really nothing special in those holes. Weight is the one that really matters. The heavier you are, the more stuff you can carry in your backpack. Heavy people use stamina slower than light people, but heavy people reover stamina much slower, too. There is a point in the game where you must walk through a canyon with very strong winds. Light characters will have trouble moving forward there and you need to RUN in order to move at all. Heavy characters will have no problem just walking there. Heavy characters have an easier time lifting and holding enemies or objects. Lighter people find it easier to climb or cling to enemies, climb up ledges, etc. There are two or three places in the game where a lighter person can grab a harpy and be flown up to a secret platform with some loot on it - one is a Badge of Vows but otherwise it's nothing special. The main thing is, you are going to find quite a bit of stuff in your travels. A lot of it will not be immediately useful, and some of it will only be useful to sell. So if you are heavy and can carry more stuff, then you can travel farther before you have to return and drop off your stuff. After you build your character, there is a scene with the dragon and then you are forced to choose a vocation. You can switch to another vocation of these three initial choices (fighter, mage, ranger) at any time by visiting Olra on BBI or Asalam in Gran Soren City. After you reach level 10, the other vocations are available to you. Each new vocation will cost you 1000 discipline points to unlock though. If you follow my walkthrough, you will probably be level 20-ish when you first reach Gran Soren. The different vocations each have different stat upgrades at levelup time. This means it is wise to change vocations every now and then to balance some of those stats that your main vocation choice ignores. I will not go into much detail on that stuff here; there are plenty of character build examples out there and the wiki [dragonsdogma.wikia.com] has a stat calculator to show you what your character would look like after a certain number of levels with each vocation. I will say that i start as a ranger every time. That bow is handy for killing birds, which is necessary for a side quest or two and also for finding eggs that become golden eggs. It is also useful for hitting enemies before they get close enough to kill me. Until you hit level 12 or so, even those goblins are a real danger to you. The daggers provide very quick attacks, which are nice for the weaker enemies you will face during the first part of your journey. And you find decent daggers earlier than any of the other weapons. The fighter will be stuck with his poor initial equipment for a longer time, and the mage is easy prey for everything unless you boost your defense a bit before you choose to be a mage. Now with that stuff out of the way, here are a few things you need to know before you really get rolling. Falling from a high place will kill you. Deep water will kill you - and not by drowning. In certain places you just take a little damage and wash up on shore, in other places you die. Watch for herbs, flowers, and fruits as you travel. They can be useful. Sometimes you will see a blue glow in a bush, or in the shallow water. These are gather points where you might find some herbs, weapons, potions, or fish. Most of them can be used a few times before they shut down. Most enemies respawn after a couple of days. Big enemies might need a week or so. Bitterblack Isle, accessed first by talking to Olra on the Cassardis pier at night, is DANGEROUS. Meat, fruit, veggies, and certain other items will decay in a few days. Most things have three states: fresh, moldy/sour/rank, and rotten/wilted. The second decay state heals you the most. The rotten/wilted state will usually poison you or something. if an item seems useless, it is probably used for an alchemy combination or else for upgrading some piece of equipment. Equipment must be upgraded at least to one-star level before it can become dragonforged. Three-star level is better and has a better chance of becoming dragonforged. Dragonforging only happens when your Arisen wears that piece of equipment to deal the deathblow to a dragon-type enemy. Save OFTEN. Be willing to explore, but be cautious. Don't let Pawns carry anything that they can eat, drink, or throw... unless you want them to eat it, drink it, or throw it. Because they will do so very often. Walkthrough 1: Get to tha Chop - ahem - Get to the Caravan I found it easier to work in Microsoft Excel to prepare my timeline for the quests. So my list of tasks is a series of screenshots from my spreadsheet. Not the prettiest thing ever, I know, but hopefully you can understand well enough what I am trying to do with it. Basically, start from the top line and work your way down. The left column shows the name of the mission. Then it shows, from left to right: what type of quest it is (main story, side, job board, or Bitterblack Isle), what you have to do to start or accept the quest, and then a step by step guide to working through the quest. Note that some quests are started early but completed in stages, and sometimes you can finish several quests at the same time. So, here we go... There is a little prologue that acts like baby's first training mission, to get you accustomed to the controls and the basics of combat. Then you get to build your own character and get your first taste of the story and the journey you are about to undertake. During this phase, ignore any escort type quests you see. Prologue and some startup newbie advice:
接下来的攻略阶段完全局限于世界地图的南部区域。你目前还无法进入格兰·索伦城(游戏的大部分剧情将在此展开),因为山口已关闭,即便你尝试绕远路,城门也处于关闭状态。在此阶段,继续无视任务板上的任何护送请求……除非任务明确说明目的地是勇士启程地。你可以接这个任务,但如果现在尝试前往其他任何目的地,你的NPC同伴最终会死亡……你自己也可能丧命。 你的第一个真正任务,直至你带领商队前往大城市:
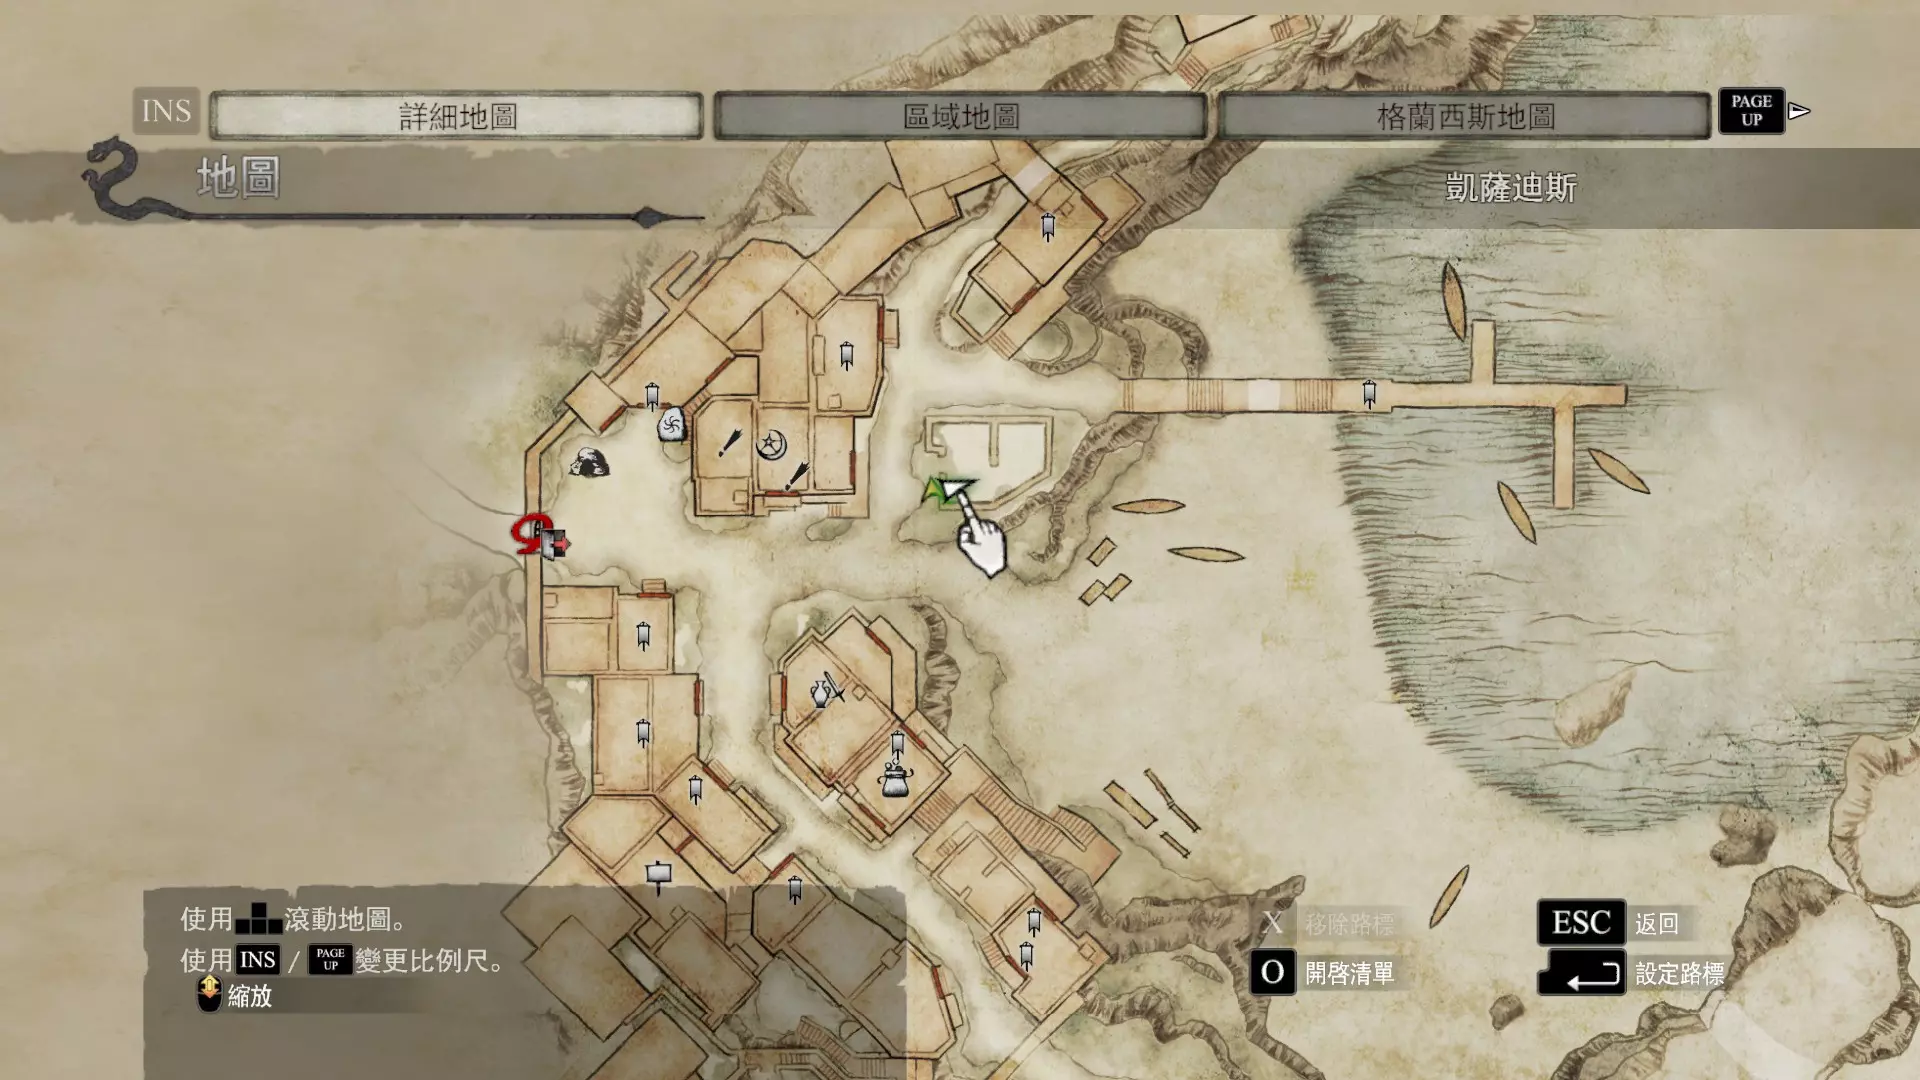
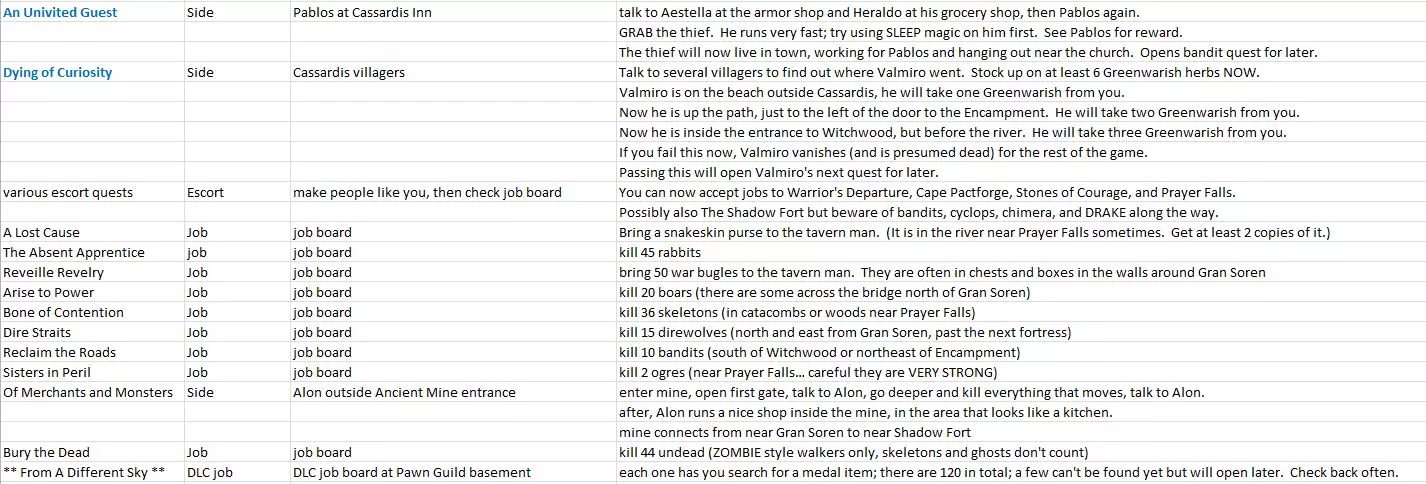
现在你身处大城市中,有几件事需要了解。 喷泉周围的集市广场将是你的主要活动中心。那里有一家旅馆、一家理发店、两家商店,以及两个用于接取任务的布告栏。 从喷泉向右走,穿过一座桥就能进入老城区。在那里,你会发现许多隐藏的宝藏(记得探索屋顶),玛德琳最终会在那里开一家店,还有黑猫商店。在黑猫商店,你可以购买特殊物品、武器和 armor。你还可以制作“伪造品”,它们基本上是游戏中大多数物品的复制品。不过,你无法伪造武器、盾牌、armor、服装或任何其他可装备的物品。“魔法”特殊物品的仿制品,如传送结晶、复活石和渡鸦石,其效果与原版不同,且物品描述中会标注【仿制品】。大多数文档、食物、药水、金属矿石等可以被仿制,且仿制品功能与原版完全一致。制作仿制品的成本通常较高。 城镇的这一区域还有其他值得注意的地方:有一个通往地牢的下水道系统,下水道旁边是城市的东后方出口。 从喷泉向左走会进入铁匠村,再往前走是城市农场,然后是北城门。进入铁匠村后,左手边是 pawn 公会。马路对面有一所房子,前门敞开着,这是威廉的家,他的儿子刚刚去世。在你完全准备好之前,不要进入这所房子;一旦开始他的任务,就会进入计时状态。我会在时间线列表中告诉你何时去做。 径直走过喷泉,经过旅馆和武器店,就会到达贵族区,那里住着富人。城镇的那个区域还有一座大教堂。在教堂的另一边,你应该能看到宫殿区域的入口,目前是锁着的。 在城内,伤害他人(包括 pawn)是犯罪行为。这样做会被关进监狱。不过偷窃不算犯罪,所以尽管砸开所有箱子,拿走所有没被固定在地板上的东西。 梅赛德斯暂时离开了。当你能进入宫殿后,会再次见到她。每次你离开城市时,城南和城西的田野里都满是牛群。它们经常掉落野兽排,偶尔还会掉落美味肉块。这些牛也很容易击杀……但要小心,狮鹫也喜欢捕食这些牛。我提到牛肉是因为野兽排是卡萨尔迪斯村大多数男性最喜欢的礼物。 攻略2:一堆随机支线任务 你已经抵达了大城市格兰索伦。真不错。
记住,你可以使用 pawn 公会内的裂隙石雇佣新的 pawn。你也可以直接与在建筑内外闲逛的 pawn 交谈来雇佣他们。你无法雇佣巴纳比。 现在我们已经处理了一些租金问题,做了一些 babysitting,还遇到了 pawn 中介巴纳比。接下来我们需要返回卡萨迪斯,查看那些任务板,完成一些如果忘记就会过期的支线任务。同时也要查看营地的任务板,看看是否有新任务。
没错,我们会经常在卡萨尔迪斯和格兰索伦之间来回奔波,尤其是如果你想做很多护送任务的话。幸运的是,你应该有传送石,可以在眨眼间在任何传送水晶位置之间传送。卡萨尔迪斯村门外、格兰索伦的 pawn 公会旁边以及黑咒岛都有永久性的传送水晶。随着游戏进程,你还会找到一些可以拾取并随意放置的传送水晶。现在我们要去城外转转,目的是和一些 bandit 交朋友。离开城市前,一定要从黑猫商店给队伍里的每个男性购买女装,或者确保队伍里全是女性。
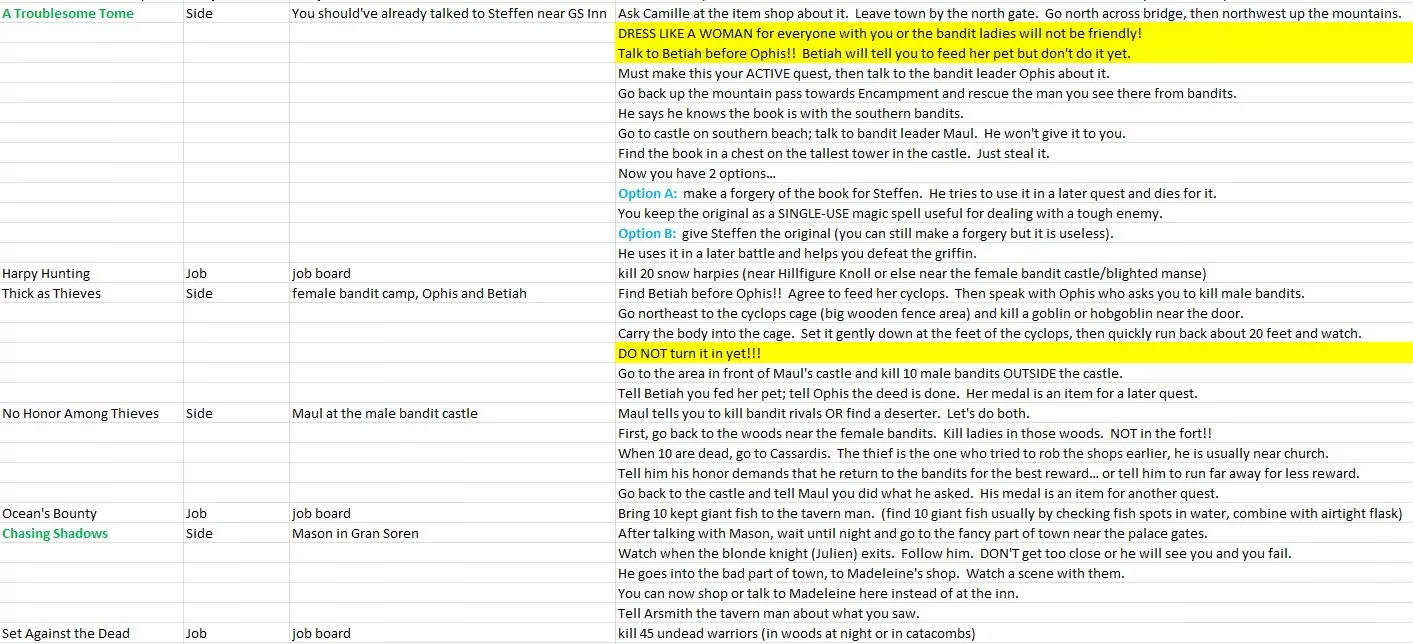
目前所有的支线任务应该都已开放,接下来我们将继续推进主线剧情的下一部分。为下一个任务做准备的话,建议队伍中配备一名拥有火焰魔法的角色、一名拥有神圣魔法的角色,并且你的 arisen(觉醒者)最好使用具备二段跳或滑翔能力的职业。另外,在继续之前,请将所有复活石和复活石碎片存入仓库,这样你将获得一块免费的复活石(实际上是三块碎片)。还有,当你到达深渊诱惑 chambers(房间)的底部时,如果跳上底部房间周围的阳台,会发现地板上散落着大量金币。
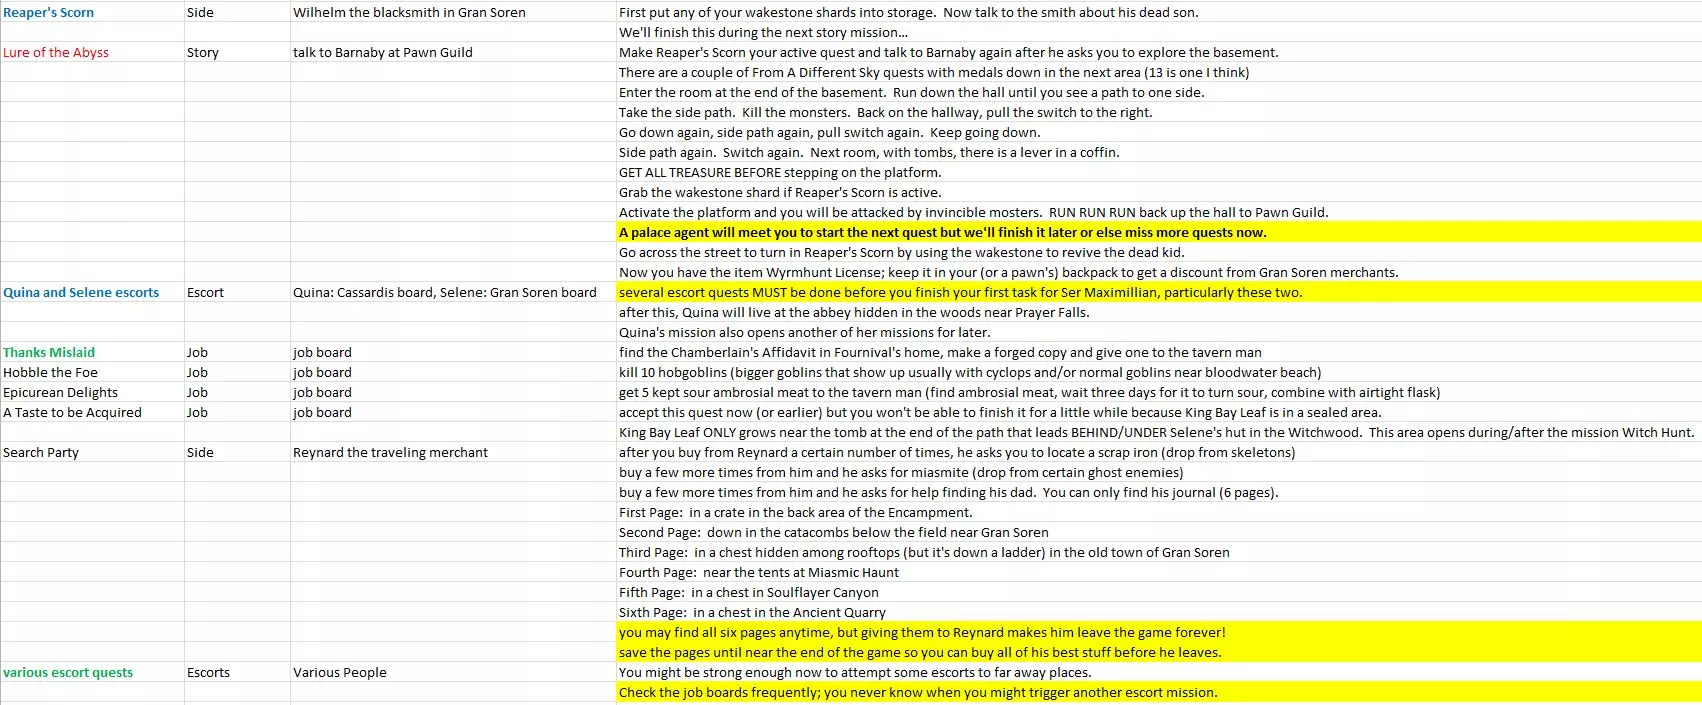
此时,你可能已经达到35级左右。一旦达到35级,你可以尝试一些难度更高的护送任务目的地,但仍需小心。 攻略3:为公爵的人效力,探索黑咒岛 首先,从卡桑德拉出发,途径营地,再返回格兰索伦,完成一次往返。查看所有任务公告板,了解可用任务。接受所有任务(不包括护送任务或“异空之叶”徽章收集任务)。现在查看你的未完成任务列表并完成它们。大多数任务会在你开始下一个主线任务后立即过期或失败。不过,要求你去获取王 bay leaf(原词:King Bay Leaf)的任务仍然可以进行,因为在本攻略阶段,该区域仍然处于锁定状态。此外,任何未完成的【黑咒岛】任务,例如击杀【魔眼】和收集10个【诡异雕像】的任务,都将保持激活状态,所以暂时不用担心完成这些任务。到目前为止,我在攻略中列出的所有其他任务都应该完成。说真的,如果你无视这个警告,导致任何未完成的任务自动失败,可别怪我。
公爵的第一个任务就到此为止了。只有一个任务是必须完成的(任意一个均可),但我还是打算把所有任务都列出来。记住,在确定完成这些任务以及接下来的所有支线任务之前,不要选择和马克西米利安“听取公爵的指令”。
注意!此时,确保你拥有一些能恢复整个队伍生命值的物品。赛琳的麦酒或泉水都可以……查看我的其他指南了解恢复物品,并选择一些对整个队伍有效的。在本次任务期间,军队被视为你队伍的一部分,而那些士兵不像你那么坚韧。你会从一些群体治疗药水类物品中受益。在内部庭院,你必须击败一些独眼巨人和大量哥布林才能到达真正的堡垒主楼。因此,也要准备好闪电魔法以及火焰或冰霜魔法中的一种。这里有一些誓约徽章;拥有二段跳将帮助你拿到它们,但你也可以稍后回来取。现在最重要的是防止任何士兵死亡。次要目标是在击杀哥布林首领前,阻止其从隧道逃脱。这个首领在濒死时会跳出窗户,而且速度极快,祝你能成功追上他。

Well, that concludes Maximillian's missions, also often called the "Wyrmhunt." If you want to keep a copy of your Wyrmhunt License (it offers a discount at Gran Soren shops) then go make a forged copy of it to keep in storage now because Maximillian will collect it from you next time you speak to him. Also, make sure you have no more open quests - except Bitterblack Isle, the King Bay Leaf quest, and maybe some escorts. Entering the palace is another cut-off where lots of old side quests will expire. Quests that I forgot about when I wrote the walkthrough There are several quests that I completely forgot to include in the walkthrough. These are optional side quests, nothing really significant EXCEPT "A Bookkeeper's Bind" leads to opening up a few new side tunnels in the Ancient Quarry with additional mining and treasures for you. After "COME TO COURT" is finished, these quests all become available. They remain active until you start the mission "PRIDE BEFORE A FALL." Possibly a bit longer, but I don't recommend waiting to see if they automatically fail or not. Keep an eye out for these on the job boards as you go through the next chapter of this walkthrough. For "A Bookkeeper's Bind" quest, you have to have completed the quest to get Alon to open his shop in the Ancient Quarry first, by killing all the bandits and ogres inside and opening the gate in the middle. Then you need to have already finished the mission Come To Court and so you met the Duke. Then if you go into the Ancient Quarry again, visit Alon's shop and he will sell the item "Promissory Note." You will need I think three of these from him (or forged copies). Bring one to the notice board at the Gran Soren alehouse. Then later, you return to the mine and find some miners looking for their fortunes. Talk to them with the Promissory Notes in your inventory and they should... eventually... open new areas of the mine with more mining spots and treasures for you. For "A Hero's Worth" you get a quest off of the Encampment notice board, to go slay some bandits. No real trick to this one... except you probably don't want to mess with the bandits who live INSIDE the castle because they are "real people" who you can use for escort quests later, plus Maul himself offers a couple of quests for you. So only attack the unnamed bandits outside the castle and along the trail back to the Encampment. They respawn in a few days if you've already killed them all. For "A Fabled Dram" you just have to collect five King Bay Leaf from the area behind Selene's hut, near the gravestone, after the mission Witch Hunt is completed. Unlike the similar mission A Taste To Be Acquired, this one just needs five leaves, you don't need to turn them into ale first. "Winged Reaver" is a quest from the Cassardis Inn job board, after you meet the Duke... and assuming it isn't already full of escort quests. You may need to clear some of those escort missions first to make this one appear; remember a job board can only hold five or six quests at a time. This is a quest to slay a griffin. Best to complete this during the main story quest Griffin's Bane, since that one griffin can satisfy this quest at the same time. Otherwise, you'll have to go hunting for another griffin. They respawn every week or two, and can be found flying between the plains near Maul's bandit fort, the plains near Gran Soren city, and the plains near Hillfigure Knoll (though outside Gran Soren is the most common place to find it). "Head Count" is a mission off of the Gran Soren alehouse job board after you meet the Duke. Somebody wants you to find and deliver 66 skulls to them. Don't ask why they want them. Skulls can be found all over the place, particularly in caves and tombs. Bring them back to Arsmith when you have all 66 of them. "Deliver the Goods" is also available from the Gran Soren alehouse board after meeting the Duke. Somebody wants a Leaden Globe. Find Alluvial Yore Ore - either on BBI or in the Bluemoon Tower - then find Ancient Ore from the Ancient Quarry or Water God's Altar. Combine the two to produce the Leaden Globe. Funny side note, this item is only useful if you want to commit suicide because using it causes you to petrify yourself. "Blood and Thunder" is available after meeting the Duke, in the Pawn Guild's job board. Just go kill seven phantasms, commonly found at barta crags or miasmic haunt (near the Greatwall) at night. "Swamp Things" should be available alongside "Blood and Thunder." Kill 10 Sulfur Saurians. The easiest place to find them is start from the Abbey and go north into and across the river where there is a little beach. During the day you should find the sulfur saurians. At night... you'll find something much nastier there. (It is worth noting that the snakeskin purse needed for A Lost Cause is located in the river near the sulfur saurians for this quest.) I think that is all of them now. If you see any more that I forgot or just missed, please mention them in the comments section. Walkthrough 4: Meet the Big Man, try to kill a Drake, and work as a paralegal. Well, that concludes Maximillian's missions, also often called the "Wyrmhunt." If you want to keep a copy of your Wyrmhunt License (it offers a discount at Gran Soren shops) then go make a forged copy of it to keep in storage now because Maximillian will collect it from you next time you speak to him. Also, make sure you have no more open quests - except Bitterblack Isle, the King Bay Leaf quest, and maybe some escorts. Entering the palace is another cut-off where lots of old side quests will expire.

如果你成功击败了巨龙,并且幸运地获得了它锻造的龙血装备,那么你可以返回黑咒岛,找到那里的铁匠巴罗奇。他会为你的龙血装备添加额外的强化等级,称为【稀有化】等级,不过这需要消耗裂隙水晶和一些极其稀有的物品。进行稀有化时,你必须先使用银色等级,然后才能选择金色等级。对一件物品进行稀有化可以完成一个黑咒岛的支线任务。你可以现在就去做,如果你愿意的话,或者也可以记住稍后当你准备好挑战黑咒岛地牢的下几层时再去做。如果你决定从法庭上救下福尼尔瓦,并且成功证明他无罪,一定要去拜访他,看看他有什么新货出售。如果你让他被处决,那么帮助他女儿的事情就完全是可选的,除了能让她对你好感度稍微提升一点外,没有实际奖励。 攻略5:击败狮鹫,找到魔法戒指,帮助一些老朋友。 好吧,我们的支线任务很快就要做完了!接下来继续推进主线剧情吧。
接下来,在你拿到戒指后,需要完成除了【黑咒岛】、【异空之眼】和【雷纳德的搜索队】之外的所有支线任务。你还应该完成所有计划要做的护送任务,朱利安的任务或许可以除外。(我听说埃德蒙公爵没有护送任务,但我仍在亲自验证这一点。那些讨厌的大型/巨型鱼类实在太稀有了。)提交戒指任务的结果并开始【骄兵必败】任务是一个重要节点,此时所有其他未完成的旧支线任务都将过期并失败。
到目前为止,我们的许多老朋友都已离开了游戏。奎娜、瓦尔米罗、梅赛德斯、玛德琳,还有朱利安——如果你杀了他或让他赢得决斗的话,以及如果法庭判定福尼瓦尔有罪,他也会离开。所有人都走了。只有玛德琳会在你击杀巨龙 boss 之前回来。很快还会有两个人离开:艾丽诺尔公爵夫人和她最好的朋友即将要么被杀死,要么逃离这片大陆。 在你提交上一个任务的结果之前,【准备好】与鸡蛇战斗。一旦你离开城市去查看那个“等待你的消息”,你将无法重新进入城市,除非立即与那东西战斗。这意味着你需要针对石化状态、诅咒状态等的防护和治疗物品,再加上一些雷电魔法。如果可以,用大剑劈砍它头部与颈部的连接处。
没错,你现在确实应该回到黑咒岛了。假设你一直有完成所有支线任务,并且在世界各地搜寻用于武器和 armor 升级的稀有物品,那么你的等级至少应该达到 60 级。接下来你要探索黑咒岛地牢的剩余部分,但不包括最后三个区域:死神所在的大厅、死亡之城以及最终 boss 房间。所以,如果你在类似下水道的区域看到死神出现,就停下来并返回地面……目前先这样。另外要记住,如果你有足够的裂隙水晶,可以净化那些名为“黑咒 armor”“黑咒装备”或“黑咒新奇道具”的“诅咒”物品。你也可以对任何已经龙化的装备进行稀有化处理。当你从那个地方出来时,你应该已经做好了充分准备来应对游戏的剩余部分。 攻略6:最终与那条龙战斗!完成黑咒岛。以及后续内容。 确保你所有的支线任务都已完成,但【来自异空的委托】系列的最后三个任务除外。这是一个临界点,任何未完成的事情都将永远无法完成。
现在你将首次前往真正的永坠之地(最初位于 pawn 公会下方的那个地方)。要对这个地方保持警惕。你将在这里面对主线游戏其他地方从未见过的怪物:邪眼、魅魔、血腥奇美拉、血腥独眼巨人,甚至还有古龙。你还会遇到全新的状态异常——这就是为什么你在游戏中会找到这么多恢复道具的原因。如果你处于在线模式,你将与你的 pawn 以及其他所有当前在线的玩家一同面对古龙。你们彼此之间是不可见的,但一个人造成的伤害会显示在所有人的屏幕上。当古龙被击败时,所有参与的玩家都将获得奖励;造成最后一击的玩家将获得最丰厚的奖励。在离线模式下,你将独自挑战【乌尔龙】。它的强度会有所降低,但奖励也会减少。因此,当你进入城市中央的大洞时,务必小心并做好充分准备。
不开玩笑。把那些石头交给昆西后进入传送门就是结局了,无法返回。所以,请确保你已完成当前周目中所有想完成的任务,确保你在黑咒岛已探索到计划中的进度,确保你已尽情探索了这个世界以及龙战后出现的新怪物。因为接下来你将前往远方……之后,整个游戏会重置为新游戏+。

And so, that is it. Next section I will explain some of the options available in New Game +. What to do for New Game + After you stab yourself with the Godsbane, it will give you the option to save your game, or it may do it automatically - I do not honestly remember which. Whatever, the game saves. After that, if you choose the option to "Start a New Game" it will overwrite your save file and it will NOT be a New Game + but just a regular new game. Everything gets deleted and you start from scratch. To start a New Game +, you need to choose the option to load a cleared game save. Here is a list of what you KEEP for New Game +. Arisen XP level, stats, vocation levels, and unlocked skills Pawn XP level, stats, vocation levels, and unlocked skills ALL items your party had; they are available in the inn's storage box. NPC Affinity levels are kept, but they can still decay over time. Merchant shopping lists are kept at their highest unlocked level. Gold and Rift Crystal currency is still in your wallet. Pawn knowledge of quests, areas, and enemies is kept intact Portcrystals are still located wherever you put them, and still accessible by Ferrystone travel Here are some changes main story quest is reset to the beginning, all quests marked as not started yet skip the original prologue from before you created your Arisen. side quests, escort quests, and other job board quests are reset as not yet started Bitterblack Isle will be as if you never visited it yet Any doors that you unlocked will be reset to their locked position. Pawn Guild notice board has some NEW QUESTS to kill some of the bigger and nastier monsters such as chmeras, ogres, succubi, etc. One of the shops in Gran Soren will sell Portcrystals. You will want to buy about six of them in addition to the ones you already found, to makd running around the world a little less tedious. After killing the dragon again, you will fight your original Arisen and Pawn in place of the original Seneschal and his pawn. On further NG++... you may get the latest version of your Arisen and Pawn, or else you may get one from another player who beat the game with Online Mode turned ON. There are also a couple of new options available to you: Speed Run and Hard Mode. My advice is to play through a NORMAL new game + until you reach Gran Soren and the Pawn Guild. Then do some shopping and go buy a bunch of Portcrystals. Now take a lap around the world and put a Portcrystal at each of these locations: mountain Waycastle near the Encampment Shadowfort front gate the western bandit fort the northern bandit fort entrance to the Greatwall camp entrance to the griffin's tower Hillfigure Knoll the army fort north of Gran Soren front entrance to the Duke's Manse in the far north Remember you still have permanent portcrystals on Bitterblack Isle, in front of Cassardis, and at the Pawn Guild in Gran Soren. With this setup, you can get anywhere in the world with a minimum amount of actual walking. If you are planning to do some more escort quests, you might also consider putting Portcrystals at Bloodwater Beach, the northern Healing Spring, Stones of Courage, and the Miasmic Haunt near that little canoe. One option is to play SPEED RUN MODE. You start from whatever your most recent save was (items, XP levels, gold, etc.) except the story resets to the beginning. Plus your Portcrystals will remain right where you left them. You can use your items and gold without worrying because speed run will not affect your original saved game. Nothing carries over from speed run back to your regular game - no items, no XP, no job levels, no new skills. The only thing you get as a permanent reward is a pair of new outfits that go into your storage box if you finish the whole speed run game. So go ahead and see how fast you are. The timer will run all the time, EXCEPT when you are in your inventory screen, inside a Rift Stone, cutscenes, or in the pause screen. There is no time limit on a speed run, but there is also NO saving during a speed run. You can sleep at the inn, but it will not save. It is done entirely in OFFLINE mode, so you cannot hire any pawns from the internet; only your main pawn and those included with the game as made by the developers. Also be aware that the speed run is set to NORMAL difficulty no matter what your game was originally at - so when you return from speed run your game will be set to normal even if you were on hard mode. Setting it back to hard mode then will reset the game to the beginning again. For the quickest time, SKIP all the escort quests, all the monster-slay notice board quests, the From a Different Sky quests, and any other side quest. You won't get to keep the rewards from them anyway. When you get to Maximillian's quests, do the one to decipher the tablet and then the one to storm the fortress at Shadowfort. Then skip the other two and "hear the duke's directive." Basically, just stick to the main story missions and stay away from Bitterblack Isle. The second new option is to play on HARD MODE. This doubles damage done to your Arisen (but not your pawn). It makes you burn stamina faster than normal (but not your pawn). Enemies are harder to knock down. You get a ton more XP, vocation points, and Gold from monsters. Rift Crystal drops happen less often though, so I hope you got everything you wanted with Rfit Crystals on your last run. Defeating the dragon and then beating the real end-game will unlock two new outfits that will show up in your storage box on your next NG+ cycle. To get to hard mode, you must select that option from the Options menu. Wherever you are in the game, switching from easy or normal TO hard will reset all your quests and start the story over from the beginning. You can downgrade from hard to normal at any time with no serious consequences though. If you can beat the Speed Run in less than an hour, then you are probably strong enough to try Hard Mode. Good luck. Full Guide for Download There are two options to get the guide if you are having problems viewing my images here. First is to download a Microsoft Excel spreadsheet file, provided by me. this is the guide I made IN ITS ENTIRETY. Second option is from a Steam user "Woodsy" who got the spreadsheet, decided to reformat it as a Google Document because it's easier to look at. I'll provide links for both options... OPTION A: MICROSOFT EXCEL SPREADSHEET DOWNLOADDue to popular demand, I am putting the Excel spreadsheet online for downloading. I cannot figure out how to post it on Steam so I placed it on my google drive folder, anyone can view it with or without signing in to google first so you don't even need a google account. Dragon's Dogma quest timeline Excel spreadsheet[drive.google.com] When you view the file you should see three tabs. The first is basic info about player and pawn weight and carrying capacity, and a little chart to show which stats levelup for which vocation class. The second is a list of HP and Stamina healing items (on the left) as well as some status effect cure items and a list of Selene's ales (on the right). The third tab is the actual walkthru as seen in this guide, but all in one single piece. A color key is on the top to tell you what the different color text is for. OPTION B: GOOGLE DOCS - VIEW ONLINE OR DOWNLOADWoodsy was kind enough to reformat the spreadsheet into a Google Docs version, and has posted it here for gamers to use: Woodsy's Google Docs Version[docs.google.com]. Fair warning: I didn't go through the entire document, just glanced over it quickly, so I can't guarantee that it is 100% true to the original... but it looks like Woodsy did a pretty good job. OTHER USEFUL INFORMATIONAnd for those who want some additional in-depth information about each quest, or item, or character or whatever... I recommend you visit the Dragon's Dogma Wiki page[dragonsdogma.wikia.com]. Good stuff on there. It is not 100% complete or 100% accurate but it should have most of what you're looking for if my guide isn't enough for you. I am working on a full listing of Escort missions as well: which characters want to go where, when you can start taking them there, and what the rewards are. It is VERY SLOW GOING (partly because my computer is broken and needs to be replaced, and partly because I'm working 60 hours/week these days) but I will post it here as a separate guide and also in the Google Drive with this file if I ever finish the thing. Thanks for the positive feedback, and happy gaming to you all.