换一换
换一换 


Prepare to achieve... one last time. Notes regarding missables First note: DLCs are NOT required for any achievements. Walkthroughs are provided for coverage. The format will start off by the name of the achievement followed by ways it is missed. If you miss something, then simply do it in the next playthrough as you have to beat the game three times anyways. Master of ExpressionToast - As long as you're still doing Siegward's questline and he's alive, you can still get this gesture. After that though, it's missed. Sleep - As long as you're still doing Siegward's questline and he's alive, you can still get this gesture. After that though, it's missed. Prostration - This is given by Unbreakable Patches in either event: The first is when you get trapped by Patches in the Cathedral of the Deep. After confronting him after the trap, he'll apologize and you'll learn this gesture. The other method is to not forgive patches in Firelink Shrine Patches Squat - Given by Unbreakable Patches in Firelink Shrine when he's squatting. (He seems to be squatting permanently after you first talk to him) Duel Bow - In order to earn this gesture, you must have five Dark Sigils (level up 5 times via Yoel which is missable completely: see Master of Miracles in the missable section). Now you have the requirement to summon Londor Pale Shade. Then summon him anytime and he will perform the gesture and teach it to you. If you beat all the bosses before summoning him, then you'll miss out. He can be summoned for the Abyss Watchers near the Farron Keep Perimeter bonfire. He is also available before the Pontiff fight. Proper Bow - This gesture can only be learned from the Yellowfinger Heyzel summon which requires you to turn in a pale tongue to the Rosaria's Fingers covenant which also requires you to join the covenant. Joining the covenant will effective fail the Sirris of the Sunless Realm questline. Darkmoon Loyalty - This gesture can only be learned from Sirris of the Sunless Realm. If you join Rosaria's Fingers and do not receive this gesture from her in Firelink Shrine, this will be missed. By My Sword - This gesture is obtained by summoning Black Hand Gotthard. He is summoned at the Abyss Watchers and Pontiff Sulyvahn. If you don't summon him for these two bosses, you will miss the gesture for this playthrough. Master of MiraclesUpon reaching the Undead Settlement, you will find Yoel of Londor. Befriending him will move him to Firelink Shrine as a merchant who also provides a free leveling service. Make sure to use expend all five leveling services PRIOR to using the Dark Sigil. Expending his services will kill him and he will be replaced with Yuria of Londor who sells the Londor Braille Divine Tome giving access to the following Miracles: Dark Blade, Vow of Silence, and Dead Again. Also, if you buy all the dark miracles prior to learning any unique spell (especially those from a later tome), she will refuse to talk to you and thus not letting you use the tome. Mound-MakersThe first instance of joining this covenant requires you to not kill the Cursed Rotten Greatwood boss of the Undead Settlement and heading from the Undead Settlement bonfire, go to the firepit, take the right across the bridge and take the path to the immediately right of the houses and trail the cliffside to a ladder. Take the ladder up and go forward and to the right and drop down to the isolated cliff. Here is a cage guy, DON'T KILL HIM. Interact with his cage to be moved to the Pit of Hollows then talk to Holy Knight Hodrick to join. If you kill the Cursed Rotten Greatwood, Hodrick dies. If you miss the first attempt above, then your second attempt is to go through with the Sirris of the Sunless Realm questline. If you go through with this questline, you'll miss a gesture in Farron Keep that requires you to join Rosaria's Fingers. After defeating the 3rd Lord of Cinders boss, return to the gate where you enter to fight the Curse Rotten Greatwood and find Sirris' summon sign. After helping her, she will let you join the covenant. Host of Embers | Multiplayer While the game still connects players using the White Soapstone item available from the Shrine Handmaid in Firelink Shrine at a small price of 500 souls, the naming conventions has shifted. As you are an Unkindled, or the Ashen One, you must now become a Host of Embers in order to summon players to your game, as well as be invaded. (This is the equivalent of being human in previous games) To become a Host of Embers, you can do a few things: Use the item 'Ember' Defeat a boss in your world Defeat a boss in someone else's world (you get an ember as well) Multiplayer areas are cut off by areas. Each area has a specific boss, and as long as that boss is alive, you can summon players to help you. This stays true to invasions as well. If the boss is no longer there, you will no longer encounter invasions by dark spirits for that specific area. Characteristics of Phantoms You no longer receive the 1.3x health bonus for being a Host of Embers You only receive half the number of estus rounded down based on each estus. Example: If you have 5 estus and 3 ashen, you will only be summoned with 2 estus and 1 ashen. Finally, there are three important statistics that affect summoning ranges. Soul Level Weapon Upgrade Tier Covenant Covenants & Soul LevelCovenantMinMaxSummoning a Player-20+20Blade of the Darkmoon/Blue Sentinel-10+30Watchdog of Farron/Aldrich Faithful-10+40Invasions from Warriors of Sunlight/No Covenant-10+30Invasions from Mound-Maker-10+35 WeaponsThis takes into account of your HIGHEST upgraded weapon. Not your equipped weapon as you can change equipment freely. User MaxTarget Max+0+2+1+3+2+4+3+5+4+6+5+8+6+9+7+10+8+10+9+10+10+10 Walkthrough - Intro | High Wall of Lothric We embark on our journey Ashen One. Cemetary of Ashes Pick up the item at the fountain to find an Ashen Estus Flask. Up to you to take the right route and fight the crystal golem, else ignore him. After going up the hill, you will find your first bonfire: 'Cemetery of Ashes' Gesture | Rest: Obtained after resting for the first time.

点燃火焰 首次点燃篝火。 沿着路线继续前进,你会到达一个圆形竞技场,并遭遇第一个 Boss。 我的提示:战斗的前半段相当简单。在他攻击间隙进行攻击,轻松打到一半血不是问题。到半血时,【后撤】。当他进入第二阶段后,只需保持靠近他,侧身躲避他的攻击。遇到大范围挥击时,翻滚躲避。如果你远程与他战斗,他会用奇特的招式让你难以应对。

初始薪王古达 击败初始薪王古达。 在 boss 战结束并获得螺旋剑后,你也将重获余火,成为余火宿主。

拥抱火焰 首次成为余火宿主。 现在点燃篝火:灰烬审判者古达。 打开大门,上山进入传火祭祀场。 传火祭祀场 站在中央灰烬附近时会出现提示,允许你将从古达处获得的螺旋剑插入祭祀场以生成篝火。照此操作。 这将解锁前往你已解锁的任何篝火并重新开始旅程的能力。 姿势【蜷缩】:与坐在楼梯上的骑士霍克伍德交谈,你将获得此姿势。 姿势【欢呼】:与铁匠安德烈交谈。 传火祭祀场有两座塔。左侧的塔由一名手持打刀、极其狡猾的剑士守卫。使用向前移动+R1键,你可以将他踢下悬崖杀死,获得2000魂。重新传送后,你可以在他的刷新点拾取他的装备。 洛斯里克高墙 前往洛斯里克高墙。这里非常壮观。 篝火:洛斯里克高墙 从篝火出发,有两条路可以走。右侧是死路,但如果你现在想要那把武器的话,尸体上有一把长弓。 否则,走左侧的路。那条龙已经死了,所以不用担心。清理这个区域,然后前往左侧的 ledge 并上楼梯。清理这个区域,然后上楼梯找到望远镜。遗憾的是,我们不能用这些望远镜来瞄准法术。 前往龙尾后面,你应该会看到一个可以跳下的 ledge。从这里跳下,拿起物品,然后进入内部。清理掉这里的两个敌人,然后顺着梯子下去。 现在回到了外面,有两条路可以走。走楼梯会引来一条真正的龙,而右边的路则不会。如果你引来了龙,再走右边的路,龙会杀死右边路上的大部分敌人。这条龙无法被杀死,但可以通过打掉它大约80%的生命值迫使它撤退。推荐的策略是:提升足够的敏捷值来使用弓箭,站在楼梯上瞄准它的左爪射击。在它使用火焰攻击前,你可以进行3-4次攻击。重复此过程直到它离开。 如果龙已经离开:你可以上去 loot 所有物品,然后进入塔楼。里面有一个【宝箱怪】,这是游戏中的第一个。攻击那个箱子,不要打开它。他会掉落一把带有深渊属性(暗)的深渊战斧。拾取所有物品后,爬上梯子并打开大门。 如果你跳过了龙,只需走右边的路,上楼后就能到达同一位置。 在下一座塔中,立即右转并上楼,即可找到下一个营火。 营火:城墙上的塔 从这里下楼,你会发现一扇锁着的门。暂时先忽略它,我会在介绍完这个区域后马上说明对应的钥匙。 继续朝另一个方向走,你会发现另一扇锁着的门。门内是NPC:来自不死聚落的葛雷瑞特。打开他牢房的钥匙是牢房钥匙,该钥匙可在本区域后续获得。 返回上楼,到外面的屋顶。这里有一个会变身的敌人,如果你不想和它的变身形态战斗,就先干掉它(它是离屋顶顶端最近的那个)。这个屋顶上还有一只水晶蜥蜴。 顺着梯子下去,进入建筑物内。直走,然后右转。翻滚穿过这里的木制障碍物。 关键物品:元素瓶碎片 | 在这个房间的底部,它在木桶后面的一具尸体上。 关键物品:牢房钥匙 | 然后在同一个房间里,有一小段楼梯通向一个死胡同。钥匙在尸体上。 清理完这个房间后,下楼去对付那个肥胖的骑士,官方名称是翼骑士。你可以选择杀死它,也可以无视它。你可以对它进行背刺。 离开这个区域,你就会进入所谓的最后一个房间。立即右转,一直向上前往塔楼。 捷径:升降机。在这座塔楼中有一台升降机,可将你带到第一个营火处,并打开大门正式解锁捷径,使第一个营火成为距离 boss 区域最近的营火。 返回最终房间。 关键物品:洛斯里克小旗。向上走会通往你遇见艾玛的礼拜堂。 誓约:青之守护者。拿到旗帜后继续与艾玛对话。

青之守护者 发现青之守护者誓约。 可选Boss:北方幽谷的舞娘。你将在之后的流程中遭遇这个Boss,但我在这里先提一下。如果你现在就杀死艾玛,就可以触发这场战斗。 前往底层,你将迎战北方幽谷的沃尼尔。 关于这场战斗,我给你3个技巧:1.最安全的位置是攻击他的臀部。2.注意他的钉锤,他会使用砸击和两次挥击,这些都很容易躲避。3.当他冲锋时,每次都会冲锋3次。

冷冽谷的波尔多 击败冷冽谷的波尔多。 前往悬崖,升起从艾玛处获得的旗帜。在前往不死聚落之前,我们先处理一些事情。 戒指|蓝泪石戒指:首先,从牢房中解救葛雷瑞特。最近的路线是从高墙塔篝火出发,下到底部,打开他所在塔楼的牢房。与他对话时,接受他寻找妹妹的请求,你将获得蓝泪石戒指。 流程 - 不死聚落 被传送后,你会找到第一个篝火。 篝火:高墙底部 隆道尔的尤艾尔|下楼后转身。在远处尽头,你会发现一个看起来像尸体散落各处的NPC。和他交谈并与他成为朋友,他就会返回传火祭祀场。我强烈建议死亡10次,将 Hollowing( hollowing )提升至20,以获得5个免费等级。之后,他会死亡并被隆道尔的尤莉亚取代。这一步应该在击败咒蚀大树或深渊监视者之前很久就完成,因为这些 Boss 被击败后他就会死亡。 姿势:招手 - 与隆道尔的尤艾尔交谈时获得。 现在从大门走常规路线,你很快就能找到下一个篝火。 篝火:不死聚落 进入前方的建筑,当你来到阳台上时,会看到一具悬挂的尸体上有物品。攻击尸体使物品掉落。下楼并到外面去。 关键物品:罗蕾塔的骨头 - 那具带有物品的尸体是罗蕾塔。我们将在重返传火祭祀场时处理下一件物品。 关键物品:元素瓶碎片。在同一区域,你会看到一个火坑旁正在进行仪式。该物品就在火坑旁边。 从这个区域有三条不同的路线。其中两条通往房屋,最后一条路线是一座桥。选择两条通往房屋路线中的左侧路径,进入房屋。 誓约:太阳战士。在这间房屋内,你会发现地上有一个洞。跳下去,物品就在你旁边的一具尸体上。 你还会找到一个元素汤,这是一个休息点,可以恢复你的生命值和专注值,无需消耗元素瓶。

太阳战士 发现太阳战士誓约。 解锁门后,返回楼梯向上走,然后往回走,在篝火区域,选择过桥的路线。不要直接穿过建筑物,而是走右边的路。会有一些烦人的家伙向你投掷飞镖,但处理起来不算太难。 在路径尽头,爬上梯子并向右走。从这里跳到小路上,你会看到一个带着笼子的人。暂时不要检查笼子。 戒指【火焰防护戒指】:你应该会看到一具挂在绳子上的尸体,上面有一件物品。如果你攻击它,它很可能会掉到下面的平台上。尝试从侧面攻击,让它掉在你所在的悬崖上。如果你无法让它落到顶部,稍后会再次提到这个物品。 现在你准备好了,检查笼子并进入其中,这样就能前往空洞之坑区域。【你必须在击败咒蚀大树 boss 之前完成此操作】。我强烈建议你这样做,以避免之后出现的麻烦。 誓约:【默林众】 现在你已身处空洞之坑,前往有烛光的角落并与 NPC 对话。

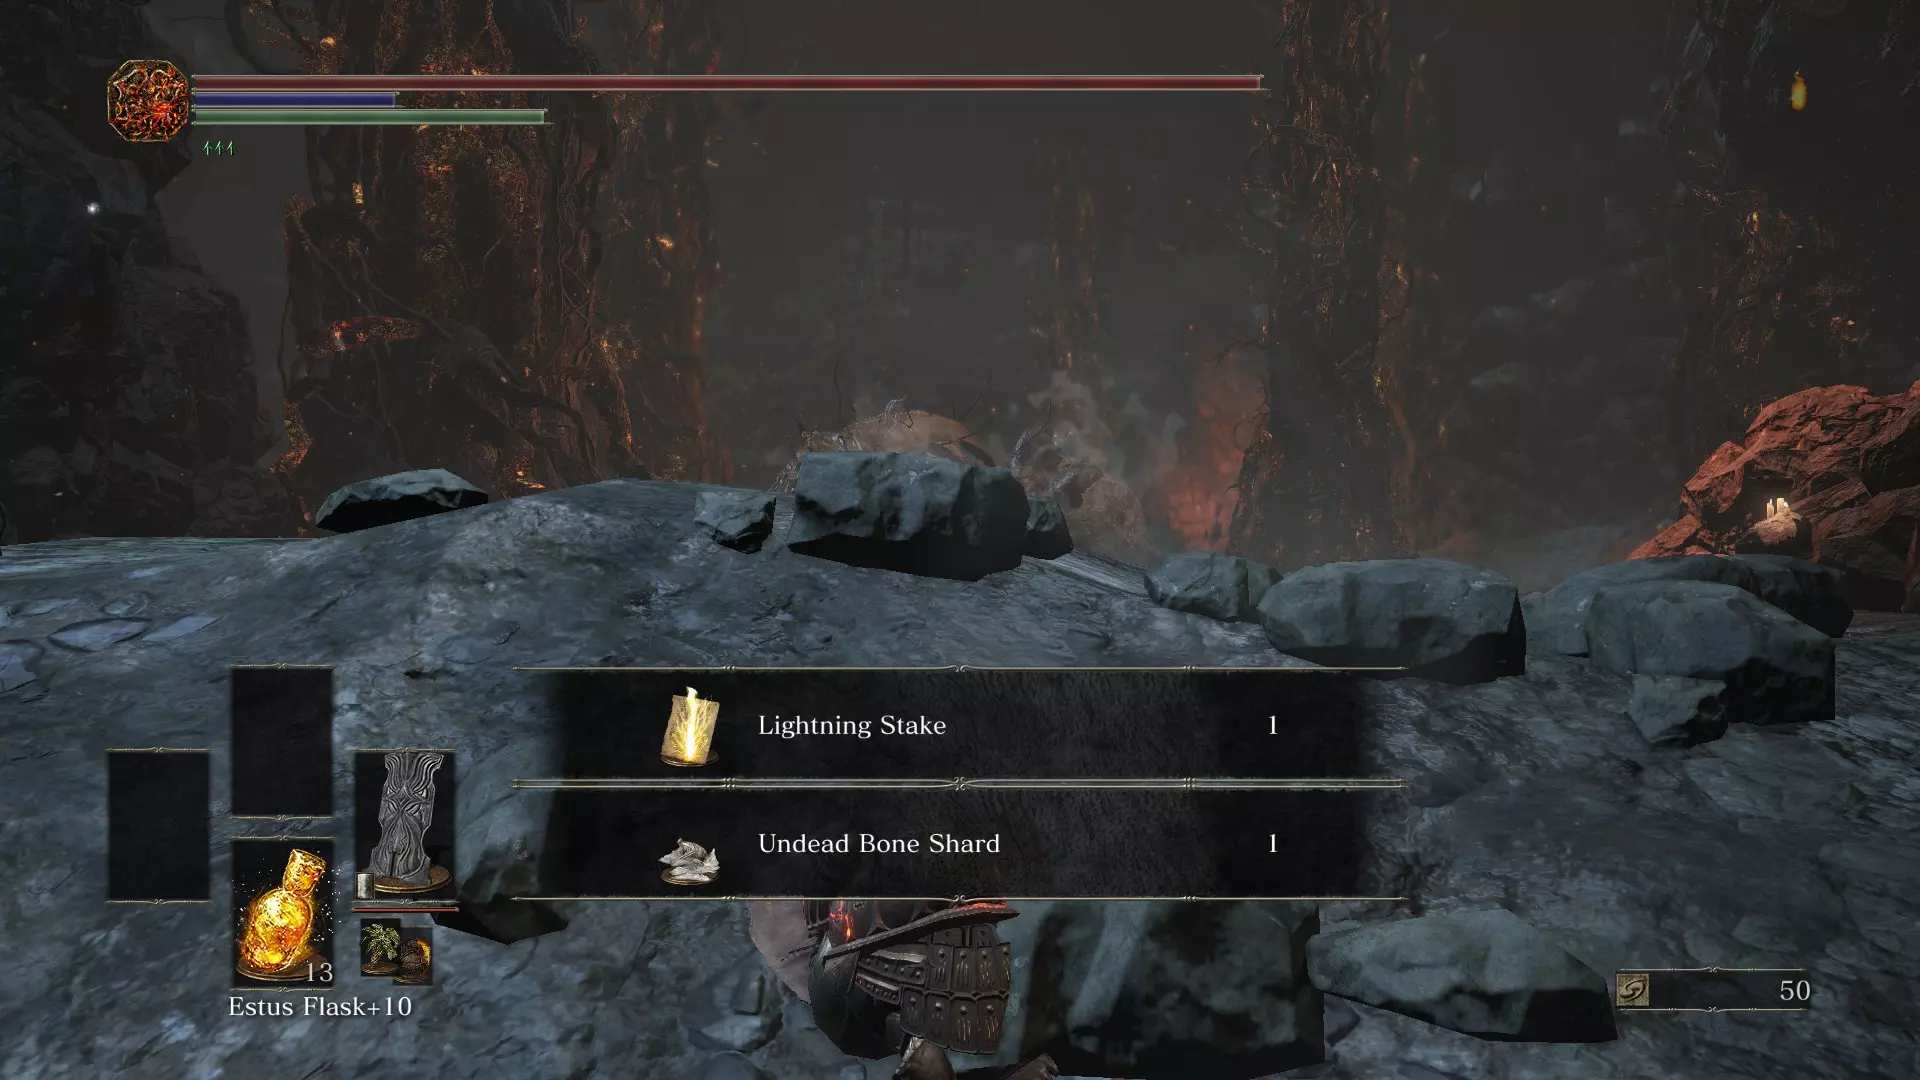
Mound-Makers Discover the Mound-Makers covenant. You'll have to use a Homeward Bone or the Dark Sign to leave this area. Now make your way back to that bridge, and this time cross the bridge and proceed through the houses and stables. Take the left and you'll be an area with firebomb throwing enemies. Ring | Flame Clutch Ring: You should see a guillotine, behind it is a walkway going off the cliff with this ring. Go under the firebomb thrower and dispatch the saw-guy with the fence backprotector. Now if you look to your right where two undeads are sitting, you will see a cliffside. As hard as it may look, if you run into the side of the house and slowly edge off, you'll find that you'll easily make it down there. Go inside for the hidden bonfire. Bonfire: Cliff Underside | This will progress Ringfinger Leonhard's sidequest slightly. Now, take the other exit and up the stairs. Take the roof ramp up and defeat the firebomb throwers. At the end tower, talk to the man in the cage. This is Cornyx the Pyromancer. Accept his request and he'll move himself to Firelink Shrine. Progress down the stairs now towards the giant door, but ignore the door for now. Go right and go across the bridge, ignoring the sewers for now. Exhaust the dialogue with the knight with the giant hammer. Go up to the chapel looking building (cannot be entered when invaded or phantoms summoned) so enter accordingly. When pulling the elevator, you will find Siegward of Catarina. The start of his sidequest begins now. Talk to him and he mentions not knowing how to use the elevator properly. Touch the lift and make the elevator go down, BUT DO NOT GO DOWN WITH IT. You'll get a different lift, take that one up. Do note the platform that you can drop off at on the way up. Do not go here yet. At the top of the tower is a giant. Talk to him and befriend him. He will help you in several areas later on. Now go down and Siegward should be gone. You can try going down and killing the enemy and unlocking another bonfire if you so wish to now; this will be mentioned again. Take the elevator up and drop onto the platform midway. Here you will find Siegward and he will thank you for figuring out his elevator problems. Now, you should see a demon. Siegward will assist in this fight, so use him to your advantage. Be warned, Siegward CAN die here, so don't bait him too hard. You need him to survive this encounter. Gesture | Toast: Talk to Siegward of Catarina after beating the demon and he'll award you with a Siegbrau and this gesture. Gesture | Sleep: Continue exhausting his dialogue until he falls asleep and then talk to him until you get this gesture. Ringfinger Leonhard Questline: Now head over towards the fire pit and you should see two corpses hanging over a hut. Attack the left corpse to loot a 'Pale Tongue' which allows you to progress his questline. Clear out the area and go up the staircase in the right building and cross the walkway to the other building. Go inside and climb more stairs until you're up top. Ring | Flynn's Ring: On the ledge on a corpse of the broken balcony is the ring. From here, look towards the big building with the giant door that you saw earlier from the most recent bonfire. There is a wooden hut that you can land on before rolling over towards the octogonal shaped tower. Ring | Chloranthy Ring: Inside this tower is the ring. Go down and then roll down the slopes. Head backwards and instead of taking the bridge, go into the sewers. Ring | Bloodbite Ring: Kill the giant rat in the sewers. Climb the ladder at the end and then open the gate here. Ahead is the next bonfire. Bonfire: Dilapidated Bridge From the bonfire, continue the path (from the bridge, go right). Ahead is an archway followed by a spear filled zone. If you followed this guide and befriended the giant, he will no longer hurl spears at you and will hurl the spears at the enemies instead. I recommend picking up all the Young White Branches here. Key Item: Undead Bone Shard | On the island to the right hovering on its own, the item is on the corpse. Key Item: Mortican's Ashes | In the same area, go up the slopes and go left. Go deep into the graves and you'll find this item. Go into the far building and up the stairs. Go straight and open the giant door to the right that was locked. To the left is a boss fight. Simple boss, just know that the boss only takes damage if you attack the eggs on his body.

【咒蚀大树】 击败咒蚀大树。 篝火:空洞之坑 你还将获得质变炉。去找鲁道斯 攻略 - 莱昂哈特与伊莲娜 | 献祭之道 传火祭祀场动作 | 欢迎:在传火祭祀场找到咒术师柯林。与他交谈,他会给你这个动作。 莱昂哈特支线任务:在最大王座附近的楼梯顶端,有一个男人斜靠在王座底部。与他交谈,可获得5个龟裂血红眼眸宝珠。 隆道尔任务线:与隆道尔的尤艾尔交谈,他会提到你的 Hollowing( hollowing )(可在状态中查看),每次使用他的免费升级服务,你都能获得一个黑暗印记。他最多可以提供5次。在获得5次免费升级前,确保不要治愈黑暗印记。现在你可以通过多次自杀来提升 Hollowing( hollowing 等级)至 16 级,从而获得全部 5 次等级提升。第五次升级后,传送离开并返回传火祭祀场,他就会离世。隆道尔的尤莉亚会接替他的位置。这个事件序列是后续获得 Duel Bow 姿势所必需的。 姿势 | 庄重鞠躬:与隆道尔的尤莉亚会面 担心的玩家请注意,尤艾尔出售的所有物品,尤莉亚也会出售。当你招募到欧贝克后,他会以更低的价格出售所有那些法术。 关键物品:升降梯房间钥匙 | 如果你击败了咒蚀大树 boss,或者解锁了悬崖底层篝火并获得了发青的舌头,与莱昂哈特交谈,他会给你这个物品。关键道具:墓地钥匙 | 将【送葬者骨灰】交给【侍女】,然后花费1500魂从她那里购买此钥匙。 洛斯里克高墙:获得【升降梯房间钥匙】后,传送到【高墙塔】篝火处。前往该塔的底层,用钥匙打开大门。乘坐升降梯下去,击败这里的【暗灵】。 关键道具:红眼宝珠 | 由【暗灵】掉落。 动作:鼓掌:返回传火祭祀场与【莱昂哈特】对话即可获得此动作。 不死聚落:从【破败桥梁】篝火出发,穿过桥梁进入下水道。使用从侍女处购买的【墓地钥匙】,现在可以打开右侧的大门。打开大门并穿过它。继续前进,你会进入一个开阔区域。直走并穿过前方的小路。在这条路线的尽头,你会找到卡利姆的伊莉娜。多次触碰她,她就会回到传火祭祀场。我建议在进行其他操作前先快速查看一下她的支线任务,因为她是唯一出售特定奇迹的NPC,你可能会错过一些。 牺牲之路 还记得不死聚落里那个有电梯的塔吗?去那里,往下走。你可以引诱敌人攻击你,然后快速冲向门打开它并到达篝火处。或者直接杀死敌人。注意:穿过这扇门时你可能会遇到严重的掉帧。 篝火:牺牲之路 沿着路径一直走,直到你到达一座桥,桥右侧的岩石上有一个施法者。不要过桥,向右跳下。戒指【摩恩戒指】:落下后,沿着小路前往一个洞穴,即可找到该物品。 关键物品【卡利姆盲文圣典】:位于摩恩戒指旁边。 返回桥梁,一路前进至下一个篝火处。 篝火【中途要塞】 誓约【青之守护者】:与亚斯特拉的安里和沉默的霍拉斯交谈,霍拉斯会给予你该物品。

青之守护者 发现青之守护者誓约。 前往沼泽区域。 戒指【大沼戒指】:击杀巨型螃蟹,直至其掉落该戒指。 关键物品【大沼咒术书】:在巨型螃蟹附近的墙边,有一具尸体持有此物品。 关键物品【法兰余烬】:从获取上一物品的位置出发,走右侧路径找到一个门口。进入后左转会遇到一名黑骑士,击杀他后直走,可在一具尸体上找到余烬。 从那里返回沼泽,回到之前的营火处。这次选择左侧路径而非直走,会通向新的营火。 营火【磔罚森林】 从森林出发,前往建筑物。绕到右侧并走到桥下。关键道具:元素瓶碎片 | 走到路的尽头后左转,它在一具尸体上。 从这里返回沼泽。向下跳并进入类似下水道的通道。 戒指 | 贤者戒指:位于下水道内。 离开下水道后,走左侧的楼梯。穿过门后左转。在走廊尽头右转。一直直走并上楼梯。在楼梯顶部进入房间并左转。 凡荷林的欧贝克 | 如果你拥有10点智力,他会移动到传火祭祀场。如果你现在想这样做,可以稍后在深邃教堂重置角色属性,或者之后再处理。强烈建议购买他的大部分/所有法术,这样他就不会离开。如果你找到卷轴,请尽快交给他。你可以从另一边的楼梯下去,然后穿过门进入 boss 区域:结晶老者。 关于结晶老者的提示:他会制造幻影,并且频繁传送。他的传送位置【总是在地图边缘】。此外,当他施放法术时,法术是紫色的;而幻影施放的法术是蓝色的。

Crystal Sage Defeat Crystal Sage. Firelink Shrine If you talked to Anri and Horace, then warp back to Firelink Shrine. Talk to Sirris of the Sunless Realm near the Shrine Handmaid to start her sidequest. Walkthrough - Cathedral of the Deep Split Choice regarding achievements here. From what I gather, it is impossible to obtain BOTH the Proper Bow gesture and the Silvercat Ring in a single playthrough. Which means you should pick one or the other to obtain. Also, it's very easy to miss another gesture and covenant depending on your actions. Long Story Short: Obtaining Proper Bow will fail the requirements to get the Silvercat Ring as a result of a hostile NPC. Obtaining the Silvercat Ring requires going passed the Abyss Watchers which is required to be alive for the Proper Bow gesture. What should you do? I like positive endings and events. Furthermore, Proper Bow isn't really a gesture that I use. So I'd opt to go for the Silvercat Ring instead for your first playthrough. The ring negates fall damage (will not negate instant death fall range). Plus you get to do Sirris' questline. Heysel has no questline. Cathedral of the Deep From the Crystal Sage bonfire, proceed over to the corner. If you recall during the boss fight, there was another fog gate. Take that path now. Bonfire: Cathedral of the Deep | This will show up rather shortly per usual. Key Item: Paladin's Ashes | From the first bonfire, go to your left immediately and you'll find the ashes at the end of the trail. Go up the stairs, and you'll find two rather difficult enemies to fight. Continue up and through all the archers. Go towards the church and open the door. Bonfire: Cleansing Chapel | This will act as your main bonfire for the area as you unlock shortcuts that will lead directly to here. Key Item: Estus Shard | From the bonfire, go back outside and this is sitting on the monument with several enemies praying. Go up the hill and into the graveyard. This area has a MASSIVE amount of enemies. They will continuously respawn, so don't waste your time here. Run through, pick up whatever items you want then make your way to the bridge. This next area is guarded by the javelin throwing giant from the Undead Settlement. If you befriended him, he will once again help you here. After ascending the narrow stairs, you'll get into a somewhat bigger area with two stairs to use. Key Item: Undead Bone Shard | Take the right going down the stairs and go to the very edge of the cliff. The item is on a corpse next to a white tree. Go back to the larger area and take the upward stairs this time. Now you have two choices: left or right. Go right all the way and take the ladder down. Once down, go straight and you should see a gate and a giant crystal lizard to your left. Ring | Poisonbite Ring: Take the path near the crystal lizard to find this ring at the end next to some tombstones. Retrace your steps back to the fork where you had two stairs. This time, go left and go up towards the giant main gates to the cathedral. Currently the door is locked, so take a right instead. From here, drop down the roof, then follow the roof to the very end. Soon you'll find some more stairs with two assassin type enemies. Take the left and go up the stairs. You will see several praying enemies here. Open the giant door to your left. Once inside, take your immediate left down the stairs. Follow this path to an elevator. Take the elevator and follow the linear path to unlock the shortcut back to the Cleansing Chapel bonfire. Now go back, and now go away from the elevator. You will notice a Giant. When you walk passed his hand, he will wake up. Read the next note so you're ready. Ring | Lloyd's Sword Ring | Pretty much, you need to get to the other side of the room. This requires going right, then taking two lefts. And during this time, the giant will be swinging his arms at you. This ring is midway through the route after you take your first left next to the enemy. Whenever you're ready, run. Miracle: Seek Guidance | After going passed that giant, go downstairs. Stop halfway and you'll find the miracle on this near-ceiling area. Go back to the staircase and head down all the way. Key Item: Deep Braille Divine Tome | There is a mimic in this room. Kill it for the tome. Proceed to the lower area of the room and passed the knight. Ring | Aldrich's Sapphire: Kill the giant cursed beast that was behind the Knight with the mace. Now from there, go back to the previous room with the knight and take the other stairs. This will lead you to the ground floor of the cathedral. If you're human, you'll be invaded by Longfinger Kirk. Go straight and follow the path to the right and down the stairs. You will notice that this area is the same area where you found the Poisonbite Ring. Follow this one way path until you reach two sets of door. The first one is an elevator. The second one is a shortcut. Open both. Now for a pit stop. I do not fully understand how to make Patches appear in the Cathedral of the Deep. I do know, that the gate has to be raised for you to be trapped. It seems this trap only occurs IF you've unlocked the shortcut mentioned above. Then, accessing the rafters via the elevator you just unlocked will prevent him from spawning. So if you really want him to spawn, avoid the rafters, unlock the shortcut, then return to ground floor and use the stairs near the second giant. Then go across the church pews and you'll find another elevator shortcut. If the gate is raised, then you did everything right and should see Patches using Siegward's armor. If not, then you already missed this section most likely. If you do miss it, you will not mess up any achievements as he has a force spawn later. From the shortcut, return to the ground floor of the cathedral. Go under the second giant and up the stairs. Here you'll see some deacons and two knights. Passed them on the left is an elevator shortcut. Use it to unlock it. At the top of the elevator, open the giant doors to the right. This will trigger Siegward's storyline. Whenever you feel like, talk to Siegward in the well right before the Cleansing Chapel bonfire. Now, continue inside and down the stairs and the gate SHOULD be raised acting as a bridge. If it is, then walk over and Patches will lower it trapping you to the giants, or the ground floor (Since you may have already killed these giants). Now, if you were lowered, then you'll have to return to the Cleansing Chapel bonfire. If you weren't lowered, then you'll have to ignore any Patches interaction stated in this area as he won't be here. But do read the encounter in Firelink Shrine. From here, take the door to the left and the left elevator. This will take you up top to a tower with a crossbow enemy. Kill him and go on the ledge and turn left. Take the ladder up. Ring | Deep Ring: After going up the ladder, kill the deacon here for the ring. Drop down, and go up the ramp and go inside to the rafters. You will find two knights (careful, left one has a crossbow). Note where the right knight is. Go behind him and drop down to the left. If you successfully had Patches lowered you, then talk to him. Gesture | Prostration: When talking to Patches, tell him 'You know who I am' and you will receive this gesture. Proceed up the stairs. Key Item: Red Sign Soapstone | Kill the non-hostile Man-Grub at the wall. Bonfire: Rosaria's Bed Chamber | Inside the doorway is a bonfire. Covenant: Rosaria's Fingers | Talk to her and receive the item.

誓约:罗莎莉亚的指头 发现罗莎莉亚的指头誓约。 返回楼下的祭坛,前往 Boss 处。 Boss:深渊的主教群 | 此 Boss 为多个敌人。集中攻击带有红光的主教。建议使用多目标技能。

深渊的执事 击败深渊的执事。 攻略 - 法兰要塞 | 希里斯、帕奇与希夫拉德 法兰要塞 从献祭之道的“受难森林”营火出发,进入墙上最近的入口。爬下梯子,即可到达法兰要塞及其营火处。 营火:法兰要塞 你好,病村! 咒术:铁身躯 | 从第一个营火出来,你会在毒沼中看到这个物品。在这里你肯定会中毒,之后可以随意使用营火。 关键物品:元素灰瓶碎片 | 从第一个营火出发,沿着左侧的陆地小径前进。然后在建筑物旁的斜坡后面可以找到该物品。 现在,我们先跳过有楼梯的较大陆地。而是绕到它的周围,你会发现一个暗灵。关键道具:【贤者的煤炭】| 位于暗灵附近的建筑内。 现在返回通往较大陆地的楼梯,确保熄灭该陆地上的火焰。接着前往离篝火最远的那段楼梯向下走。快速左转后,登上下一段楼梯。在楼梯顶部,熄灭这里的第二个火焰。 穿过桥梁,你会发现一处篝火。 篝火:【要塞遗迹】 关键道具:【不死人遗骨】| 从要塞遗迹篝火出发,走下斜坡,进入那个满是史莱姆的小屋。它位于一具尸体上。 姿势:【端正鞠躬】| 如果你已加入罗莎莉亚的指头,并奉献过发青的舌头,且击败了入侵的海泽尔,那么在这座塔附近召唤海泽尔即可获得该姿势。戒指【龙徽戒指】:从篝火出发,沿斜坡向下走,向左看会看到一只巨型螃蟹。击杀螃蟹后会掉落该戒指。 关键物品【贤者卷轴】:从螃蟹所在位置,沿着墙壁往回走至角落(远离白色树木的方向)。该物品位于角落一片空地上的尸体上,周围有许多陶罐。 从篝火出发,沿斜坡向下走后立即右转,此处有一栋建筑。转到建筑拐角处,会看到一个梯子,梯子底部有许多史莱姆。爬上梯子。 关键物品【逐梦者骨灰】:爬上梯子后,暂时忽略门口。向右走并上楼梯,到达楼梯顶部后停下,向左转向墙壁。攻击幻影墙壁即可找到该物品。篝火:法兰老狼 | 向下跳至篝火处。 誓约:法兰守卫 | 与你正前方的法兰老狼对话并祈祷加入誓约。

誓约:法兰的 watchdog 发现法兰的 watchdog 誓约。 乘坐电梯上去。 小 boss:离群恶魔 | 虽然该 boss 是游戏中的可选 boss,但要解锁成就需要击杀他两次。他的灵魂可转化为哈维尔戒指和火焰风暴咒术。 战斗结束后,回到那扇锁着的大门。向右走,你可以跳下去,沿着几条小路走就能通过大门。 关键物品:雷枪奇迹 | 位于该区域的一具尸体上。 回到要塞遗迹篝火处,走下斜坡,沿着右侧有小块陆地的路径前进。一直走到第三块巨大的陆地。走上楼梯,熄灭第三个也是最后一个火焰。 现在穿过大门。在你前进的路上,会遇到两个缓慢行走的暗灵。你可以选择与它们战斗,或者让它们和前方的咕噜怪互相攻击。无论如何,你都需要向右进入门口。 篝火:法兰要塞外围 姿势:决斗鞠躬 | 如果你从尤艾尔那里获得了5个黑暗印记,那么在这个篝火附近可以召唤隆道尔的白影来获取它。 魔法:强力魔法武器 | 从篝火出发,朝着你来时相反的方向走。沿着这条直线路径前进,经过一些咕噜怪和一只食人族水晶蜥蜴。在路的尽头有一个捷径,可以回到献祭之道,同时这里也能找到这个魔法。 奇迹:赎罪 | 从篝火出发,下楼后会发现墙上有个洞。跳下去,物品就在下方的尸体上。 关键物品:黄金卷轴 | 从之前的物品位置出发,直走然后跳下去。看向你的右侧(朝着你刚穿过的墙壁方向),你应该能找到一个洞穴。进入洞穴就能拿到卷轴。 Boss:深渊监视者,薪王 | 这场战斗分为两个阶段。第一阶段是混乱的混战状态。只有一个敌人会对Boss的生命值造成伤害。最多会额外生成两名深渊监视者,但攻击他们不会削减Boss的生命值。你可以在他们互相锁定目标之前,引诱他们攻击彼此。第一阶段结束后,进入第二阶段的真正Boss战,此时他会拔出一把巨大的火焰剑。如果你使用重武器,可以利用武器的击退效果。如果没有重武器,你就需要进行大量闪避。

Lords of Cinder: Abyss Watchers Defeat the Abyss Watchers, Lords of Cinder. Defeating the Abyss Watchers will make Patches move to Firelink Shrine. Firelink Shrine Give the Shrine Handmaid the Dreamchaser's Ashes. When she asks how you got it, tell her which ever choice you want. It will not change anything. Gesture: Darkmoon Loyalty | After that, rewarp to Firelink Shrine and Sirris should be near the Handmaid. Talk to Sirris and she'll teach you this gesture which is required to join the Blade of the Darkmoon (best way, not the only way). Key Item: Tower Key | This costs 20000 souls, but now is a great time to buy it. With the key, go up to the right tower with the gate (the one that didn't have the swordsman guarding it). Go up the stairs and across the bridge. Open the gate and go in. Now take the lift. Once you take the lift, you will hear the gate close. Ignore it for now. Key Item: Firekeeper Soul | At the top of the lift, up the stairs. Now go back down and you will see Patches at the door. Talk to him. You can use a Homeward bone to get out, but we need an item below you. The upper item is a Firekeeper set if you want to try the drop. Ring | Estus Ring: At the bottom of the tower with the lift. Return back to the bridge between towers. Drop down onto the roof. To the left, you can kick a ladder down so you never have to make this drop again. Go back up and at the middle of the circular part of the roof you will hear a bird. Go forward passed the nest and drop down on the platform just under it. Turn left and you'll find a doorway leading inside of the dome roof. Key Item: Estus Shard | Located on a corpse on the catwalk to the left. Key Item: Covetous Silver Serpent Ring | From the previous item, go to the next beam in the clockwise direction. Go to the end near the wall and attack it to reveal the illusory wall. Go to the end of the catwalk and drop off to the right to find a chest with the ring. Rewarp to Firelink Shrine and patches will be near the doorway that leads to the tower where you used the tower key. Gesture | Prostration: If you did not get Patches to spawn in Cathedral of the Deep, you can still get the gesture here. When he asks you to forgive him, DO NOT FORGIVE HIM. He will still be a merchant for you. Rewarp to Firelink Shrine again. Gesture | Patches Squat: He will now be in a permanent squatting position as a merchant. Talk to him to learn the gesture. Also, go buy all of Siegward's armor. You don't need the shield. Talk to Anri and Horace behind Ludleth. Cathedral of the Deep Remember, you must have opened the big gates across from Rosaria's Bed Chamber for Siegward to spawn. Go to the Cleansing Chapel bonfire, and go outside. Turn to your right and you should see a well. Talk to it. Give his armour back to progress his storyline. Walkthrough - Catacombs of Carthus Catacombs of Carthus From the Abyss Watchers bonfire, go forward and you'll reveal a hidden passage at the altar. Walk out, then take a left. Go halfway across the bridge then look left. Jump down. Key Item: Carthus Pyromancy Tome | At the end of the hall where you just dropped down. Now, take the right path now, and hit the wall to reveal an illusory wall. Take a left and go up the ladder. From the ladder, go into the room to the left then go all the way to the end with the doorway. Climb down the stairs. If you talked to Anri in Firelink Shrine then she'll be here. Talk to her and she mentions being separated from Horace. How tragic. If you're revisiting this place, then make sure you don't tell her where Horace is. If you killed Horace, then feel free to tell her. Now, go back up the stairs to and take the nearest long staircase. Be careful, a giant skeleton boulder will drop down on you from behind. Stand on the candle platforms to avoid being squashed. Descend all the way down, and take the left. Turn right and you'll find a room with a ton of pots. Kill the skeleton with the hat in this room. He keeps the boulder alive. Ring | Carthus Milkring: On a corpse in the room with pots. Key Item: Undead Bone Shard | Now that you cleared the pot room, go backwards and the Skeleton Boulder should die at the iron gates. It drops an Undead Bone Shard. Now return to the pot room and proceed ahead. Take a right at the end. Then take another right right and another. You will encounter your second skeleton boulder here. Follow the boulder then take your immediately left. Bonfire: Catacombs of Carthus | Being embered required ahead. Go back to the skeleton boulder and take the route downstairs. Take the stairs to the left and go up. Go left some more and you'll find the Grave Warden's Ashes. Not achievement related, but many people may request it. Go back to the sewers. Go towards the giant rat and take the right. Ring | Carthus Bloodring: Located at the end of this pathway. Return back to where you saw the giant rat. You will see a small hallway. Go in and you'll reach a gate that's locked. You will be invaded by Knight Slayer Tsorig. Ring | Knight Slayer's Ring: Defeat Knight Slayer Tsorig. Gesture: My Thanks! | See Knight Slayer's Ring above. Going back to the Sewers, now go through the only route you haven't gone to left. Go right and at the end is a cavern. Follow it out to an open area. Take a right and you'll be on the other side of that locked gate. Use the lever to open this shortcut. Heads up. When you cross the bridge, you will be chased by roughly 30 skeletons. Attacking the bridge will break it thus saving you from being killed by skeletons. Alternatively, you can run to the boss gate and eliminate skeletons slowly as they cannot reach the boss gate door. Before that though, take the route to the right of the bridge. You will find Anri here. Again, if you've already encountered Horace and he's alive, do not tell her where he is. If you did kill him, then you may tell her about it. From her position, you can drop down, then attack the bridge. From here, you can either fight the boss, or unlock the first Smouldering Lake bonfire which this guide will do. That bridge you just broke turns into a ladder. Take the ladder down. Mini Boss: Fire Demon | Drops Soul of a Demon. No achievement implications. After that, go downstairs. Ring | Witch's Ring: It's at the end of the hallway. Bonfire: Abandoned Tomb From here, return to the broken bridge for the boss fight. Boss: High Lord Wolnir | Again, some tips for the fight. Focus ALL of your attacks on his golden bracelets. Breaking his bracelets will do MASSIVE damage to him. Breaking all three bracelets will kill him. Asides from knowing that, be wary of the blue mist. It deals massive damage to you. The mist will always be surrounding his torso and down. He also has a spell where he breathes the mist that will temporarily engulf the area around him. So keep your distance.

霸王沃尼尔 击败霸王沃尼尔。之后你将很快见到游戏中最美的景象之一。 篝火:冷冽谷的伊鲁席尔 攻略 - 烟熏湖 烟熏湖 在前往冷冽谷的伊鲁席尔之前,我们要先搞定这个不错的区域。如果你是高生命值的战士型角色,应该没问题。如果你是法师型角色,确保至少有一些可以穿着跑动的防火装备。另外,拥有大量高充能的元素瓶也很好。为什么?因为你需要穿越熔岩。如果需要的话,你可以稍后再做这件事。 如果你按照本攻略操作,你应该已经激活了废弃坟墓篝火。前往那里。如果没有,就去霸王沃尼尔篝火。往回走到桥上。攻击桥柱将其破坏。将桥梁当作梯子使用。下去后,与火焰恶魔战斗(也可以选择不打)。在走廊尽头拿到【魔女戒指】,然后进入房间点燃篝火。 继续在该区域前进。在此提醒,这里有一个巨型弩炮,每次会发射三支箭。走出走廊后,你需要径直往前走,最终会碰到一面墙。仔细观察这面墙,大部分是天然岩石,其中一部分是石砖结构。引诱弩炮射击这面石砖墙。 【斑点石鳞戒指】:利用弩炮破坏石砖墙即可获得。 你会在右侧发现另一处石砖地面。如果你想开启通往该区域第三个篝火的捷径,也可以用弩炮将其破坏。我会这么做,因为它能跳过恶魔遗迹里很多没用的东西。 不管怎样,你到湖的对岸去。你会找到一个 boss 大门,在那之前,有一只会射闪电的巨大蠕虫。很“可爱”,对吧?
前往蠕虫的另一侧,站到投石器对面的岩石处。这样投石器就会攻击蠕虫。 奇迹:雷电柱 | 从巨型蠕虫处获得 关键物品:不死人骨片 | 从巨型蠕虫处获得 现在,沿着岩石小径向上走,进入洞穴。 篝火:恶魔遗迹 | 我个人会选择走捷径,但这里会按较长的路线进行攻略,因为它确实更长一些。 进入后向右转。在第二个区域,走下楼梯。前往你的最左侧。 关键物品:不死人骨片 | 位于一具恶魔尸体上。注意上方有鼻涕虫守护。 从原路返回,但直接走进走廊。在拐角处,你可以攻击一面幻影墙。这在二周目会与成就相关,但现在无关。总之,先左转,再左转。走到尽头后上楼梯。 篝火:老王前厅 在篝火所在房间的对角,有一面幻影墙。攻击它。 关键物品:元素瓶碎片 | 从幻影墙出发,沿着那条有超多史莱姆的长廊走。物品就在尽头。 关键物品:伊札里斯咒术书 | 从篝火返回,进入最近的门。在最后一个房间里,你会在尸体前的尸体上找到这本书。 从篝火处回到楼下。直走,直到到达那个有通往黑骑士的幻影墙的拐角。向右转,然后左转。你会看到一只老鼠。右转进入下一个房间。 在这个房间里,从走廊直走,攻击幻影墙。前往走廊尽头后左转。 关键物品:【克拉娜的咒术之火】| 哦不…… 走楼梯下去。现在,回想一下我之前给过的警告。升级过的元素瓶、火焰抗性等等。你现在就需要这些。红虫药丸、铁身躯咒术、火之Plate Ring等。不要翻滚。除非你有极高的生命值,否则翻滚几乎必死。只需一边跑一边用元素瓶回血。 咒术:【剧毒雾】| 在第一个火坑中,它是左侧最近的物品。远处的物品是一个护符。 回到有老鼠的房间,现在走左边的路下楼。你会进入一条狭窄的走廊,里面有几只老鼠。下楼到所有的蛇人那里。然后继续前进。 动作:【感谢】| 在上楼的楼梯前,左转。你需要处于余火状态。如果没有,就使用余火。当你走到走廊尽头右转下楼梯时,会再次遭遇【骑士杀手卓力格】的入侵。击败他或被他击败都会获得【感谢】动作。如果你想要,他还会掉落【烟之特大剑】。 咒术:【神圣火焰】| 同样在熔岩中,是左边的物品。我个人觉得这个更容易获取,但它们难度可能差不多。使用之前获取物品的相同策略即可拿到。 回到走廊,现在登上楼梯。你会来到一座横跨熔岩坑的桥上,这里有一名黑骑士。从他身边经过并爬上梯子。在顶部,沿着路径直走,你会到达弩炮处。如果你想关掉它,只需确保你装备了【斑点石质戒指】。 在弩炮的角落,你可以跳到岩石上。第一次下落会损失一半生命值,之后的下落则不会造成伤害。在底部,你会看到左侧有一个洞穴,进入它。 在洞穴尽头,你会遇到敌对的霍拉斯。杀死他。如果你不想杀他,只需确保不要告诉安里他在这里。如果你说了,安里会死。 现在返回【恶魔遗迹】篝火处,休息并补充你使用过的元素瓶。 Boss:老恶魔王 | 和游戏中的大多数恶魔一样,他的招式在很大程度上是相似的。不过,他确实有3-4个额外的攻击技能。他会释放两组火焰环。当他将锤子的厚重部分刺入地面时,会发动火焰环攻击。务必远离,因为该攻击可能从他自身开始,也可能从最远范围发起并向内收缩,若身处其中则必中。此攻击还可能形成连锁,若先内后外,接下来可能会先外后内,反之亦然。下一种攻击是他将锤子举向空中,此时他会召唤火球雨。最后一种攻击发生在他生命值较低时,他会跪下并引发爆炸,造成巨额伤害。

Old Demon King Defeat Old Demon King. Catacombs of Carthus Talk to Anri at the bridge and if you killed Horace, feel free to tell her about Smouldering Lake. If you didn't kill Horace, do not tell her. Walkthrough - Irithyll of the Boreal Valley Irithyll of the Boreal Valley You should already have the Irithyll of the Boreal Valley bonfire right after the Catacombs of Carthus area boss. If not, go from the High Lord Wolnir bonfire and proceed. Enter the bridge, and you will face your first Sulvyahn's Beast. Kill him here, or fight him later in the level. Ring | Pontiff's Right Eye: Dropped from Sulvyahn's Beast Bonfire: Central Irithyll Now that you've passed the bridge, that means the beast won't interfere anymore. Go back to the bridge and you should see a summoning sign from Sirris of the Sunless Realm. Get summoned by her and help her kill Creighton the Wanderer. Bring Hunter Charms to prevent him from using his Estus. He does carry one Divine Blessing for healing that will bypass the charm. He does massive damage using lightning. Make sure Sirris does not die, if she does you'll have to restart. From the Central Irithyll bonfire, go up the steps to the fountain, turn left and go all the way up again. Once you hit the next corner, there is a circular balcony. Hit the right stone railing to reveal a path, take the stairs to the left down. If you're co-oping, there's a fog gate here. You'll have to re-summon. Go down. Miracle: Dorhys' Gnawing | Kill the evangelist for this miracle. Return to that circular balcony, go right this time. At the intersection, take a left. Bonfire: Church of Yorshka | Anri of Astora will be here. Ring | Ring of the Evil Eye: Talk to Anri. Gesture | Quiet Resolve: Talk to Anri. In the corner near the entrance of the church, there are some statues. The one directly in the corner is a Pilgrim assassin. DON'T KILL HIM. You need him to kill Anri for Usurpation of Fire ending. He dies later on so you can obtain the Chameleon sorcery. Now take the other exit in the church. Turn to your right to the cliffs. Creighton will invade here if you're human. Make sure to kill him, or else you'll have some complications. Key Item: Undead Bone Shard | At the end of the cliffs is a giant tombstone. The item is behind it. Go back to where you left the church and take the stairs down. Take a right and go through the dark room and down some more stairs until you reach the river. Ring | Ring of Sacrifice: To the right in the river. This will be the only Ring of Sacrifice I will point out. You can buy these from Yuria. Now in the river, go left. You will notice a clearing to the right when you pass the bridge. Go there. Miracle: Great Heal | Located at the right end of the clearing mentioned above. Note: If you did not kill Sulyvahn's Beast on the bridge, you will fight him here. The ring will also drop accordingly. Now go straight and there's two routes. We'll unlock the bonfire first ahead. Go straight. Bonfire: Distant Manor Now return to the river and go into the sewers. The only thing worth mentioning is probably the Excremented-covered ashes in these sewers. It's in the cubby in front of the stairs. Go up the stairs to find Siegward having a grand ole time. Talk to him. Must have Siegward's quest up to this point for him to show here. Miracle: Emit Force | Given by Siegward. If you haven't gotten the Toast or Sleep gesture, make sure to get it here. There's also an Estus Soup here. Now go up the stairs and you'll be in a room with a few black knights. Go upstairs. Ring | Leo Ring | In a chest on the second floor opposite side to the archer. Go back down and out the door. Follow the linear path til you get to a fountain. Go up the elevator and open the gate to unlock a shortcut. Go back down the elevator. Continue along the stairs up linearly and you'll shortly reach the boss gate. Ignore this for now. Take the opposite stairs and open the gate to unlock another shortcut. Ring | Magic Clutch Ring: Once you open that shortcut, walk through the gate and turn left. That wall at the other side is an illusory wall with the ring. Make your way back to the boss gate and go to the center looking back. Look down and you can drop down to an item. Ring | Ring of the Sun's First Born: On the fountain in the main courtyard. Return to the boss. Boss Fight: Pontiff Sulyvahn | Like most bosses, he has two stages. The first stage is just him alone. The second stage, he will summon a phantom that will mimic his attacks with a slight delay. You can kill the phantom. Other than that, just the usual sword dodging.

教宗沙力万 击败教宗沙力万。 篝火:教宗沙力万【通常我不会标注 Boss 篝火,因为它们几乎没什么用,但由于冷冽谷还有第二部分,所以这里还是标出来】 走出去后肯定会立即被入侵。很遗憾,这里是 PVP 区域。不管怎样,向左走并上楼梯。你会发现一片巨人场地,只有两个巨人是活的。 左边是一个地下通道,进入地下通道。 戒指 | 暗术方石戒指:在地下通道的远处角落里 现在返回巨人场地,登上楼梯进入塔内。不要走塔内的楼梯,而是走到房间左边的远处角落,攻击左边的墙壁,那是一面幻影墙。另外,注意不要掉下去。顺着梯子下去,你会来到储水区。在这里,你需要与两只【教宗沙力万的野兽】战斗。如果你待在梯子附近,吸引右侧的那只,左侧的就会被柱子和墙壁卡住。这样你就能逐个击破,而不是同时面对两只。 戒指 | 宠爱戒指:击败两只教宗沙力万的野兽后获得。 誓约:【艾尔德里奇的信徒】 | 角落里是【大主教麦克唐纳】,那个胖胖的主教。和他对话。

誓约:罗德里克的信徒 发现罗德里克的信徒誓约。 篝火:水之储蓄池 现在返回梯子处并上楼。对于《黑暗之魂》初代玩家来说,这里应该很熟悉。建议向右跳下小路,然后跑到中途位置。这样塔楼会为你挡住附近的银骑士。一旦顶部的骑士射击,就向他跑去。 关键物品:东方人的骨灰 | 到达顶部后,向右走并下楼梯。 返回楼上,穿过顶部区域后向右转。右侧有一名骑士想要伏击你。走下斜坡,如果你愿意,可以绕过斜坡上的弓箭手,解锁一个相当无用的捷径。否则,进入暗月神庙的门口。攻击巨大雕像右侧的幻影墙壁。 戒指 | 反转戒指:位于暗月神殿祭坛右侧 稍后我们会回到这里进行仪式。 走另一条路并拉动拉杆。进入螺旋楼梯,拉动顶部的拉杆。到达顶部后,点燃篝火。 篝火:亚诺尔隆德 返回螺旋楼梯,从这里离开。但要走楼梯下去。到达楼梯底部后,前往有桥梁的地方。远处会有一座塔。这座桥实际上是隐形的。只需向前走,直到与有篝火的塔垂直,然后朝着篝火走去。篝火:监狱塔 誓约:暗月之剑 | 如果你按照本指南操作,应该已经从希里斯处获得暗月誓约姿势。若已获得,你可以向幽儿希卡队长下跪,她会允许你加入。如果你未获得且已失败希里斯的任务线,杀死幽儿希卡并搜刮她的尸体也能加入,但之后将无法向她上交【青之守护者誓约证物】。

誓约:暗月之剑 发现暗月之剑誓约。 流程攻略 - 亚诺尔隆德 | 伊鲁席尔地牢 | 罪业之都 很多人推荐接下来去伊鲁席尔地牢,但我们已经到这里了! 亚诺尔隆德 从亚诺尔隆德篝火出发,上楼梯后向左走。如果你玩过《黑暗之魂》,应该会认出接下来的场景。 关键物品:巨人煤炭 | 位于巨人铁匠的尸体上。 上他右侧的楼梯一直向上。现在你会进入主区域。在你所在一侧的执事旁边有一个【约定之证】,建议拾取。 到达底层,然后走向巨大的门。你会遇到一只巨大的诅咒野兽,类似深邃教堂里的那只。关键道具:阿尔德里奇的红宝石 | 由前述的巨型诅咒野兽掉落。 使用左侧的拉杆打开巨门。 关键道具:元素瓶碎片 | 从大门处转身,左侧有一个宝箱。打开它可获得元素瓶碎片。 Boss:阿尔德里奇,吞噬神明者 | 这场战斗与结晶老者有些相似,阿尔德里奇喜欢钻入地下然后在其他地方现身。他通常会在地图的四个角落出现。现在我要提两个危险的攻击。第一个是他向空中射箭。在战斗的第一阶段,这没什么影响,因为持续时间很短。在第二阶段,当他使用火焰时,这个攻击的持续时间会长达30秒左右。所以要小心。你需要留意的第二个攻击是【生命狩猎镰刀】。他会对你造成伤害并为自己恢复生命值。

Lord of Cinder: Aldrich, Devourer of Gods Defeat Aldrich, Devourer of Gods, Lord of Cinder. Irithyll Dungeon Warp to the Distant Manor bonfire. If you don't have it, it's accessed from the river near the sewers of Irithyll of the Boreal Valley. Go straight and down the stairs and outside. If you're embered, you'll be invaded by Alva. He hits like a tank. I kicked him off the cliff instead. Go through the tunnel for your first bonfire Bonfire: Irithyll Dungeon | I'll just mention here. The tall robe guys with irons can deplete your max health for a period of time. So, kill them quickly. Or knock them down with great weapons. Sorcery: Great Magic Shield | From the Irithyll Dungeon bonfire, run straight and drop off. Open the gate right behind you and kill the enemy for the sorcery. From the bonfire, go straight til you get to the ledge. Turn right, then turn left and cross the bridge. Go to you rright, and go in the first cell to the left. Go through the broken walls to the very end and open the gate here. (Note: That thing on the wall that doesn't attack, I have no idea what it is). Go left, then turn right and then open the only cell. Key Item: Jailbreaker's Key | In this cell. Now, return to the bridge and go left. There will be a gate here. Open it with the newly acquired key. Drop down. Ring | Bellowing Dragoncrest Ring: Drop down to the left again for this ring. Drop down and go into the room to the right. Key Item: Estus Shard | It's on the mimic. Go straight and turn the corner. There are a ton of enemies here. Go to the end and to the right is a cubby that you can drop down into. Drop down. Go straight and you'll see a sewer on the lefthand side. Go in. Key Item: Old Cell Key | In the chest at the end of the sewers. This is to free Siegward. Ring | Dark Clutch Ring: On a mimic at the end of the sewers Note: Opening the chest or fighting the mimic will activate the ambush of basilisks from the roof cave. Go back a little bit and yo'ull find a small tunnel in the sewers. This will lead to a room with two giant rats. Open the gate. Go left first, then take the path. Do note this area with the dragon statues. This is where you access Archdragon Peak with the Path of the Dragon gesture. Anywho, continue to the elevator. Take it up, then unlock the shortcut. Go back to the elevator. Miracle: Lightning Blade | On the way down on the elevator, drop off to the window for this spell. Now go back to the large room. Take the left this time. Key Item: Profaned Coal | Inside this giant cell. Hug the left side and you'll find another cell to the left. Open it. Key Item: Xanthous Ashes | In this cell. Ring | Dusk Crown Ring: Also in this cell. Now, Karla the Witch is also in this area near the room with two giant rats that you entered from. You do not have the key to open her cell yet. Just noting her spot now. Now, from the room where you got the ashes and coal, go left and follow the path. You will find a long bridge with a tower in the distance. You will see a gargoyle to the right on the wall. Sometimes shooting it with an arrow will make it fly to the bridge but miss. Kill it if you want, or run passed it. Profaned Capital Once in the tower, drop down or use the ladder. Then take the other ladder up. Bonfire: Profaned Capital Gesture | Stretched Out: On the corpse. So many ladders.... Gilligan? Key Item: Undead Bone Shard | Same corpse. Go down the ladder you just came up from, then drop down through the broken wall. Go left and through the hallway. You'll be in an area with tons of toxic. Drop down. Ring | Cursebite Ring: In the cave behind you at the very end. Go back. You should see a church in front of you. Take the ladder that you can see. Go to the roof and go around the ledge to the stairs. Turn around. Key Item: Logan's Scroll | Kill that guy casting spells at you. Miracle: Wrath of the Gods | After killing the sorcerer, drop down through the window. You'll have to drop down again into a not so happy place. Clear the place and open the doors. Go back up the ladder and the stairs. This time take the stairs all the way. At the top of the stairs, there is a rather oddly shaped room. There are two invisible enemies in front of you. Key Item: Jailer's Key Ring | End of hallway Return to the roof where you fought that sorcerer. Look towards the stairs and you should see a window above the stairs. Jump. If you got the Old Cell Key from the sewers, you can free Siegward here. Ring | Covetous Gold Serpent Ring: Next to Siegward Key Item: Titanite Slab | Given by Siegward Pyromancy: Profaned Flame | From the staircase, go all the way up until you reach Irithyll Dungeon. Once there, you'll be at knee level of the giant. Drop down (tons of rats down here) and the pyromancy is on a corpse. Now return to the Profaned Capital bonfire. Take the ladder on the edge of the tower now. Cross the bridge with the gargoyle and go into the building and turn right. Turn left towards the boss gate. Do not kill the mimics if you want to farm Symbol of Avarice. Hunter's Charm is fine. If you have kept up with Siegward's questline, then he will join the battle regardless. Boss: Yhorm the Giant | This giant has one weakness, Storm Ruler special attack. Siegward will use it. There is another one on the throne. To use it properly, two-hand it and use the strong attack until it flashes.

薪王:巨人尤姆 击败薪王巨人尤姆。 战斗结束后,希夫拉会将他的所有装备掉落在王座上,或者他死亡的地方。 冷冽谷的地牢:从罪业之都篝火出发,返回冷冽谷的地牢。进入巨人房间后,走左侧路径,打开尽头的牢房。里面是魔女卡菈。解救她并接受她的服务,将她送往传火祭祀场。 关键物品:监狱长的骨灰 | 从冷冽谷的地牢篝火出发,直走到边缘后右转。向右走下楼梯,这里有一个牢房,里面有该物品。攻略 - 舞者 | 妖王庭院 | 无主墓地 击败第三位薪王(深渊监视者/艾尔德里奇/尤姆)后,你将被传送到艾玛处,她会让你加入青之守护者。此时无需战斗,你可以直接离开。 与她对话,获得誓约水盆。 Boss:冷冽谷的舞娘 | 动作缓慢且移动方式奇特,但招式相当简单。最危险的招式无疑是舞娘开始旋转的时候,这个旋转持续时间很长。

北方山谷的舞娘 击败北方山谷的舞娘。 走到前方的祭坛,解锁一个梯子。 妖王庭院 从北方山谷的舞娘篝火处,爬上梯子后立即左转。 从这里直走并下楼梯。乘坐电梯,在中途跳下。 关键物品:元素瓶碎片 从岔路口右转,即可找到这个碎片。 从这里向前走,保持靠右。所有水池都有毒。变异敌人对火焰攻击较弱。总之,一直靠右走,直到抵达电梯。 乘坐电梯到顶部,然后往回走,可解锁捷径门(可选)。 或者,在电梯中途跳下。 戒指:龙鳞戒指 位于跳下处的一具尸体上。 继续前进至庭院。戒指 | 魔法石板戒指:守护大门的骑士会掉落此戒指 Boss:吞噬神明的艾尔德利奇 | 他的招式与波尔多的非常相似,但有三个区别。他会飞行,速度更快。飞行时,他会使用白龙吐息法术。他还有一个旋转攻击,由于他的主要攻击范围是腿部和尾部,所以很容易躲避。

吞噬神明的艾尔德利奇 击败吞噬神明的艾尔德利奇。 战斗结束后,前往下一个区域。 姿势:龙之路 | 在喷泉旁的尸体上。 向前走到尽头的宝箱处。宝箱后面的墙壁是幻影墙壁。 无主墓地 这里太黑了!

无主墓地 抵达无主墓地。 进入无主墓地时获得。 篝火:无主墓地 戒指【灰烬元素戒指】:沿着左侧墙壁走,进入另一条路线。戒指在那里的一具尸体上。 如果你注意到的话,这里是灰烬墓地的黑暗版本。前往你与初始薪王葛温德林战斗的地方,准备面对下一个 boss。 Boss【英雄古达】:令人惊讶的是,他的招式与初始薪王古达相同。有两个区别。在这场战斗中他不会变异。另一个令人不安的区别是他的攻击节奏。他的大多数攻击会先开始,然后停顿一下,再以快速动作继续。

英雄古达 击败英雄古达。战斗结束后,照常穿过大门。该区域有一对黑骑士。 戒指【黄蜂戒指】:到达黑暗火祭场的门口,然后右转,在一座坟墓旁找到此戒指。 关键物品【螺旋剑碎片】:位于黑暗火祭场的篝火位置。 关键物品【防火女之眼】:位于常规火祭场中卡利姆的伊莉娜所坐的位置。你需要打破一面幻影墙才能到达那里。 戒指【圣女戒指】:在黑暗火祭场的侍女处花费1000灵魂购买。 古龙顶端攻略 古龙顶端需要你击败“吞噬神明的艾尔德利奇”后获得的“古龙之道”姿势。现在传送到冷冽谷的地下监狱或罪业之都。从罪业之都出发:往回走,穿过桥梁回到冷冽谷的地下监狱。你会进入一个有许多会降低生命值敌人的房间。穿过它们,一直往前走。你会看到一段楼梯,然后在你的左边会找到龙雕像。 从冷冽谷的地下监狱营火出发:直接进入地牢,直到到达悬崖边。向右转,然后左转穿过桥梁。再左转走到尽头,跳下去。你应该已经解锁了通往龙雕像的电梯。如果没有,就使用罪业之都的路线。 到达这里后,你会看到一个破损的龙雕像。在它的左边有一块地毯,在这里使用【古龙之道】姿势。

古龙顶端 抵达古龙顶端。 这些区域成就真是友好!前往第一个篝火。 篝火:古龙顶端 | 前往有拉杆的大门。 戒指 | 雷电怪手戒指:在大门前左转,沿着这条狭窄的小路即可找到该戒指。 Boss:古老飞龙 | 有两种方法可以击杀这条龙。一种是常规方法,另一种是一击必杀的下落攻击。下落攻击现在就能获得击杀它的灵魂。要使用下落攻击,只需走上楼梯,沿着左边的路径一直走,直到找到雾门。左边有一个梯子,爬上梯子后跳到龙上方的断拱上。落下并使用下落攻击,就能将其秒杀。

古老飞龙 击败古老飞龙。 战斗结束后,你会自动传送到第二个营火。 营火:古龙院 在继续前进之前,回到第一个营火。前往你与古老飞龙战斗的地方,然后向右下楼。 戒指【钢铁防护戒指】:沿着这条路走到尽头,在靠近边缘的右侧。你可以越过这个边缘,转身沿着边缘往回走,会发现一具尸体。戒指就在楼梯侧面。 现在,回到第二个营火。 戒指【灾难戒指】:走出营火后,有一个带有巨大龙雕像的祭坛。在此处使用【古龙之道】姿势。 现在上楼,然后右转下楼进入走廊。走到走廊尽头后出去。戒指 | 雷之石板戒指:在这个木制平台上,向右转并爬上梯子。戒指位于此处的一具尸体上。 返回下方,穿过木桥。向右转并走到外面。在这里你会遇到几只滚地蜥蜴和另一只远古飞龙。一路向上并进入内部。沿着路径前进,走上楼梯。直走过去是一处篝火。暂时忽略用于敲钟的拉杆。 篝火:大钟楼 从篝火处下楼并向右转。走上楼梯进入塔楼,穿过门口。爬上梯子,你会发现哈维尔在这里。如果你需要,在龙旁边的尸体上有一块楔形石原盘。 奇迹:强力魔法屏障 | 在你与哈维尔战斗位置的左侧,跳下去你会找到这个法术。关键道具:追龙者骨灰 回到从营火下来的庭院。向上走,在大门前左转,就能找到骨灰。 现在你已准备好挑战 Boss。拉动营火附近平台上的拉杆。你会注意到一场剧烈的风暴,因此建议暂时不要拉动它。从拉杆处,跳到充当平台的雾气上。穿过雾门。 Boss:无名王者 该 Boss 有两个阶段。第一阶段是骑在飞龙上的王者。飞龙本身的生命值极低,所以你需要完美应对这个阶段,为接下来的战斗做好准备。当飞龙落地时,尝试大致站在它前方,直到它将脖子向右转。它会喷火,这时你可以对其造成大量伤害。当你耗尽飞龙的生命值后,将进入第二阶段,直面无名王者本人。这场战斗的风格与深渊监视者第二阶段相似,但王者会更多地使用法术,包括雷电风暴和几次冲锋。保持近距离,躲避他的攻击,进行几次反击,然后重复这个过程。

无名王者 击败无名王者。 Boss战后可获得【楔形石原盘】。 攻略 - 洛斯里克城 从【冷冽谷的舞娘】处出发,爬上梯子并向前走。进入下一个房间后,向右转,然后再次右转,即可到达第一个篝火。这篝火位置似乎没什么意义。 篝火:洛斯里克城 直行,然后左转,再右转,穿过所有楼梯。从这里开始,选择敌人最多的路径前进。你会从一个投掷猎人符咒的活尸下方经过。继续前进,你将到达一个有几具洛斯里克骑士尸体的区域,那里有第二个篝火。 篝火:龙训练场 走向桥梁,过桥前先阅读下一条提示。 关键物品:【不死人遗骨】| 这座桥有两个边缘。一个离你较近,一个离你较远。就像两侧的走道。你要到达桥下方远处的走道。所以先跑过桥,然后在桥的尽头处,向左或向右跳下。哪边都可以。这个物品就在桥的正下方。 回到桥上,现在从近侧跳下。向左走并上楼梯,然后走右边的楼梯。直走你会进入主走廊。跑向你前方的门,这条主走廊里的龙依然会喷火。 虽然这与成就无关,但消灭第一条龙会有所帮助。在下一个房间里,要么走你右边的梯子,要么走左边的楼梯然后转身,进入有龙爪的区域。那里会有一个变异敌人。用火杀死它!杀死那个敌人就能杀死龙。 总之,回到楼上,从左边的阳台出去。跳下去,然后径直上楼梯就能到达终点。为了安全起见,你可以解锁右侧的电梯捷径。 回到楼上后,进入右侧的房间,再从左边的阳台出去。 【戒指】红泪石戒指:在阳台上 现在回到岔路口,向左走。墙上应该有个洞,但我们暂时先不管它。从左边的梯子爬上去。穿过屋顶,再从梯子下来。 【戒指】骑士戒指:爬下梯子后的这个房间里有该戒指。 现在穿过桥。这里是太阳战士的交任务点,你需要在这里接取两个奇迹。 打开门,解锁那个“捷径”。回到梯子和墙上的洞口处。向下看,你应该能看到白龙的手。再次击杀它以消灭第二条龙。这样一来,主走廊和桥梁就不会再有火焰,可以安全地进行搜刮了。 进入内部,会遇到一个宝箱怪。 【关键物品:洛斯里克盲文圣典】| 与宝箱怪在同一个房间内 现在返回 Boss 大门。 【Boss:猎龙铠甲】| 和大多数 Boss 一样,分为两个阶段。第一阶段很简单,它的攻击前摇非常明显。唯一的提醒是注意不要被打下桥。在第二阶段,一只蝴蝶(那些看起来像根须的飞行生物)会协助猎龙铠甲作战。铠甲本身只会使用一种双手攻击。除此之外,这场战斗并不困难。

屠龙者铠甲 击败屠龙者铠甲。 攻略 - 大书库 大书库营火:大书库 | 到达此处相当简单。前往此处即可。 关键物品:大书库钥匙 | 真方便,进门的钥匙就在外面。我这就拿走! 小Boss:结晶老者 | 这是结晶老者的常规版本,但他的大部分招式都很相似。他没有分身,最终会停在书库的桥上。你必须击败他。 穿过书架迷宫,向左转然后直走。忽略第一个右转,跳下后走下一个右转。直走再左转,你会发现一群蜡烛头怪和一个装满蜡的池子。蜡可以保护你免受该区域的诅咒影响。尽可能地将头浸入蜡中。有几处需要低头通过的地方。进入暗室。 咒术:内在潜力 | 拉动暗室中的拉杆,然后向左走即可获得该咒术。 登上房间内的楼梯后右转。在你的右侧,会在桥上发现结晶老者。 你需要登上楼梯,然后绕到另一侧,那里有一个梯子。不用管梯子。左侧有一面墙壁,其中有一面幻影墙,攻击它。 魔法:灵魂洪流 | 位于幻影墙后面的路径尽头。 返回桥上并跳下去。彻底击败结晶老者。 关键物品:结晶卷轴 | 由结晶老者掉落。 现在回到桥上,走向拉杆并拉动它。 戒指 | 学者戒指:位于拉杆开启的书架捷径后面。朝着桥通向外部的反方向前进。在这里上楼梯,解锁此处的电梯。乘坐电梯返回上层,然后继续上楼梯。进入下一个更宽阔的区域后,直走,接着再次上楼梯。转身180度。 戒指 | 咬肉戒指:位于被几本诅咒书籍守护的尸体上。 再次转身,前往外面的阳台。顺着梯子向下爬,沿着屋顶前进,直到找到第一个石像鬼。在石像鬼所在的墙壁处,可以向右跳下到阳台,照此行动。 进入室内,你会回到档案馆上层的阳台。前往另一侧。 关键物品:不死人骨片 | 位于坐在椅子上的尸体处。 转身,从左侧的门出去。现在你会来到洛斯里克城的城墙上。穿过三个敌人后,你的右侧有一部电梯,解锁直达大书库第一个营火的捷径。乘坐电梯返回上层。 离开电梯所在的房间后,立即左转并上楼。下一个区域有三个金色羽翼骑士。如果击败所有三个骑士,你将获得【楔形石原盘】。 从楼梯来到圆形平台,屋顶的对面有一个独立的方形大屋顶区域。 关键物品:【元素瓶碎片】位于该方形屋顶区域的一具尸体上。 回到屋顶的圆形部分,走上楼梯。爬上梯子。 戒指:【猎人戒指】位于凉亭内的梯子顶端。 现在回到屋顶,前往你进入屋顶的位置。回头看,你会发现一个门口。走进去,跳到鸟笼上。 奇迹【神圣光柱】位于鸟笼内。 现在,一路回到城墙顶部,你可以先从大书库的第一个篝火处使用捷径。 穿过城墙,走上楼梯。在打猎龙铠甲之前,你的右侧有一个通往洛斯里克城的捷径。这部电梯其实和不死聚落的塔一样是双层电梯。乘坐电梯下去可以获得一块楔形石原盘。 好了, boss战时间到! Boss【双王子】:又是一场两阶段的boss战。第一阶段要对抗的是主要使用巨剑的 elder prince 洛里安。你唯一需要注意的是他在房间内 teleport 的能力。当你进入第二阶段时,洛斯里克王子会骑在他兄弟的背上进行组合战斗。洛斯里克会使用多种神圣法术,包括类似灵魂枪的法术,以及类似阿尔德里奇的紫色魔法冰雹——这些冰雹会先漂浮在周围,然后同时向你追踪而来。战斗中会有两条血条,一条是洛里安的,一条是洛斯里克的。将洛斯里克的血量打空会使他倒地,并让他的兄弟也随之倒下,此时你可以趁机攻击他的兄弟。之后洛斯里克会再次起身,重复这一过程。你完全有可能在洛斯里克完全站起来之前就将他的血量打空,这样就能持续攻击他和他的兄弟,不会遇到阻碍。

Lord of Cinder: Lothric, Younger Prince Defeat Lothric, Younger Prince, Lord of Cinder. Walkthrough - Finale & Clean-Up Firelink Shrine Now that you've defeated the four other Lord of Cinders, you now must return all five Cinders to their thrones to establish the connection to the Kiln of the First Flame. If you haven't given Ludleth the Transposing Kiln, do so now. The Five: Ludleth, Abyss Watchers, Yhorm the Giant, Aldrich the Devourer, and finally Lothric. Place their souls upon their respective thrones in Firelink Shrine. The Fire Keeper will move herself to the bonfire in the center. Interact. Quick Note: If you're intentionally going for 'The End of Fire' achievement and ending, make sure to give both the Fire Keeper Soul and the Eyes of the Fire Keeper to the Fire Keeper. Then after that, talk to her and agree to end the fire. That way, her summoning sign appears at the end. Kiln of the First Flame After a while, you'll be teleported to the Kiln of the First Flame. Walk outside, and activate the bonfire to warp to the Kiln of the First Flame. From here, simply walk up the hill for the final boss. Boss: Soul of Cinder | If you've fought against Gwyn in Dark Souls 1, then I need to say no more. As for the newcomers, Soul of Cinder has a well balanced repertoire with a strong melee range with his greatsword, has a grab attack that can't be blocked, and uses both sorceries and miracles. Other than that, the fight is fairly basic. Note: He can be parried. Ending Whichever ending you went with, do so. If you wanted Usurpation of Fire and completed its pre-requisites, then light the bonfire. If you wanted The End of Fire and completed its pre-requisites, then summon the Fire Keeper and let her do the rest. If you wanted To Link the First Flame, then light the bonfire. Not possible if you have completed the pre-requisites for Usurpation of Fire. After the credits, you have the option to immediately begin the next playthrough. Do not do this. Return to Firelink Shrine. Firelink Shrine Ring | Skull Ring: Check Ludleth's throne for this ring. Only appears after he has been sacrificed. You can still transpose at Ludleth's ashes. Transpose whatever goods you want to transpose. Buy whatever items you want from NPCs. Shrine Handmaid sells three rings via Ashes. She also sells a Titanite Slab now. Farm for Covenant Items. See Covenants. Best setup is respeccing for 99 luck, using Symbol of Avarice, Covetous Gold Serpent Ring, and using Rusted Coins to increase item discovery drop rate to 399. If you transpose the Crystal Sage Rapier, this can be even higher. If you know someone who plays this game and made it to NG++, they can drop the +2 version of the Gold Serpent Ring. Other than that, anything you've missed achievement wise and if you've ran out of things to do, then you may go to NG+. Well done Ashen One Walkthrough - NG+ See Endings Section to see which ending you need and plan accordingly. I will skip majority of the items covered in the NG walkthrough. If you need a specific item, check there instead of here. This will only go over new items that are present in NG+. I want to say they're all rings too. Cemetery of Ashes Ring | Speckled Stoneplate Ring +1: Located near the man-eater crystal lizard on the right side. High Wall of Lothric Ring | Fleshbite Ring +1: From the Tower on the Wall bonfire, go down the tower and out on the rooftop where you fight a transformed undead and find a crystal lizard. Go over to the ladder going down, and you should see the item on the adjacent roof. Make the jump to it. Undead Settlement Ring | Life Ring +1: On the ledge in the tower where you drop off the elevator early where Siegward sits before helping you kill a Fire Demon. It's hiding in the little cubby to the right. Ring | Poisonbite Ring +1: In the grave where the giant is throwing javelins, near the ashes is another corpse with this ring next to the well to the left of the house. Road of Sacrifices Ring | Lingering Dragoncrest Ring +1: From the Crucifixion Woods bonfire, look towards the swamp and the first giant crab and it's on a corpse near a tree. Farron Keep Ring | Wolf Ring +1: Next to the Keep Ruins bonfire outside the building. If you're looking towards the gate from the bonfire, it'll be on the other side of the left wall. Ring | Magic Stoneplate Ring +1: From the Farron Keep bonfire, go right into the poison pools. Go passed the Iron Flesh pyromancy and you'll find the ring on a corpse in the pools halfway before reaching the cave with the Golden Scroll. There's a few basilisks here. Cathedral of the Deep Ring | Ring of the Evil Eye +1: Right before the boss gate, behind the altar. Catacombs of Carthus Ring | Thunder Stoneplate Ring +1: After descending the long stairs with the first skeleton boulder (you should see the bonfire on the other side of the gate), take the first left and in the next room, turn right into the square room and it'll be on a corpse. There's a lot of pots here. Smouldering Lake Ring | Bloodbite Ring +1: At the top with the ballista. It's on the side of the ballista near the cliff. Irithyll of the Boreal Valley Ring | Covetous Gold Serpent Ring +1: From the Church of Yorshka bonfire, progress in the level passed the very very dark room with invisible enemies. At the end of the dark room, drop off onto a ledge to the right. Ring | Chloranthy Ring +1: In front of the Pontiff Sulyvahn boss gate behind the fountain where you find the Ring of the Sun's First Born. Ring | Ring of Favor +1: Up on the balcony in the room where you fight Pontiff Sulyvahn. From the Pontiff Sulyvahn bonfire, go straight and outside. Turn left, go up the stairs to meet the graves of many giants. Turn left into the dark underpass, go there, go through the doorway and up the stairs to find many pyromancy-casting Deacons. Turn around and there's a doorway. Go through the doorway, then take the bridge over to the other side and go straight. It's behind a pole to the left. Irithyll Dungeon Ring | Covetous Silver Serpent Ring +1: On the elevator near the Giant with the rats, take the elevator up and drop off midway for this ring. Profaned Capital Ring | Flame Stoneplate Ring +1: Above the doorway leading to the three hand enemies inside of the church. Take the ladder to the right, go on the ledge above the doorway, then drop down. Anor Londo Nothing new here! Consumed King's Garden Ring | Wood Grain Ring +1: Take the first elevator to the very bottom for the ring; it'll be sitting in the toxic pool. Untended Graves Ring | Ring of Steel Protection +1: Located at the right tower where you would use a Tower Key to open to the right of it. Lothric Castle Ring | Life Ring +2: In the room where you fight the right dragon's infection (first one that flies in), take the left doorway until you reach the corner. Look down and you should see the item on a ledge. Drop down for it. Ring | Dark Stoneplate Ring +1: From the Dragonslayer Armour bonfire, go over to where the ladder is where you access the roof of the Warrior of Sunlight covenant area. Instead of going up the ladder, go over to the ledge and look down. You should see a spot to drop down where you fight the hand of the white dragon. Drop down. go inside, up the stairs then out the door onto a balcony. The ring is on a corpse on this balcony on your right. Archdragon Peak Ring | Havel's Ring +1: From the Great Belfry bonfire, go down the stairs and up the hill. Pass the doorway with all the enemies, and look to your immediate left after the second doorway. Grand Archives Ring | Sage Ring +1: Found on the rafters, drop into the bird cage, then down into the rafters. If you know where the ladder is connecting to the rafters, go to the opposite corner rafter and you'll find the ring. The beam is white (concrete) and not brown (wood), so you know which one you need to be on. Walkthrough - NG++ See Endings Section to see which ending you need and plan accordingly. Cemetery of Ashes Ring | Wolf Ring +2: To the left of the doorway right after you fight Iudex Gundyr. High Wall of Lothric Ring | Ring of the Evil Eye +2: From the Tower on the Wall bonfire, go down and onto the rooftops. Go down the ladder, then go in the doorway. Go through the doorway that a knight emerges from. In this room is an estus shard on an anvil. To the left of that shard is the ring in the corner. Undead Settlement Ring | Covetous Silver Serpent Ring +2: After fighting the Stray Demon, go into the building on the right, up the stairs, across the bridge, and go up some more stairs. You should see Flynn's Ring at the top. Look left and you'll see the ring on the roof of a building. Drop down twice to get it. Road of Sacrifices Ring | Chloranthy Ring +2: From the Road of Sacrifices bonfire, proceed until you see the wagon near the cliff. Turn left and you should see a caster enemy. To the left of him, there's a small ledge you can drop down to with the ring. Farron Keep Ring | Dark Stoneplate Ring +2: From the Keep Ruins bonfire, turn around and go to where you extinguish the flame on this piece of land. Do not go through the door, instead break all the graves to the left to find the ring. Cathedral of the Deep Ring | Ring of Favor +2: On your way to the rafters, you'll go up an elevator and drop down onto a ramp-like roof. To your right is the entrance to the rafters. To your left is an alcove with the ring. Catacombs of Carthus Ring | Ring of Steel Protection +2: On the first bridge, there are some pillars to the left when you drop down. Land on the further one for the item. Smouldering Lake Ring | Flame Stoneplate Ring +2: From the Old King's Antechamber bonfire, go downstairs. Go straight and through the doorway. Turn right and you'll be in a hallway. At the turn, attack the left wall and the ring is in this room. Irithyll of the Boreal Valley Ring | Wood Grain Ring +2: After going up from the sewers, you find Siegward of Catarina. Go into the next open room with stairs. Ignoring the stairs, the doorway to the next area has the ring right after it to the right. Irithyll Dungeon Nothing new here still! Profaned Capital Ring | Magic Stoneplate Ring +2: From the Profaned Capital bonfire, go down the ladder to the middle of the broken tower you're in. Drop off, then go right and down the stairs. Item at the cliff edge. It's a bit hidden, so make sure to go to the very bottom of the ledge and look to your left. Anor Londo Ring | Havel's Ring +2: From the Anor Londo bonfire, move the turning staircase up if it isn't, go to the bottom and head towards the Blade of the Darkmoon covenant over the invisible walkway. Drop down 5 times and the item is on a beam. It's the item just under the Painted Armour set. Consumed King's Garden Ring | Sage Ring +2: At the beginning of the level, go down the elevator. Go out and go left and drop down. From here, turn around and you should see another set of stairs with an item on it. Running towards the bottom of the second set of stairs will make it. Untended Graves Ring | Life Ring +3: In dark Firelink Shrine, it's behind the main throne where you would put Prince Lorian's cinders. Lothric Castle Ring | Thunder Stoneplate Ring +2: From the Dragonslayer Armour bonfire, go back out and take the route to the left. Go up the set of stairs and go left out to the balcony. There's a long drop off the balcony to the left, take it and turn around and you'll see the item. (Do not drop a second time, that's a chime) Archdragon Peak Ring | Covetous Gold Serpent Ring +2: After the boss fight with the Nameless King, its on the long route on the right before the gate on the middle stairs. Grand Archives Ring | Lingering Dragoncrest Ring +2: On the roof with the three golden winged knights, go up the spiral stairs, ignore the ladder, then walk to the other side to find a small opening with the ring.

The Dark Soul Complete all achievements. Sidequest: Anri of Astora Note: This sidequest is essentially given in full during the Usurpation of Fire ending. Also, Anri is always the opposite sex of the character. I use her/she because my character is male. Step 1: The Early Setup Befriend Yoel of Londor in the early parts of the Undead Settlement. Level up 5 times for free to obtain 5 Dark Sigil. Yoel dies and Yuria of Londor replaces him. Never heal the Dark Sigil. Step 2: Meeting Anri of Astora Talk to her and Horace in the Road of Sacrifices at the Halfway Fortress bonfire. Defeat Deacons of the Deep. Talk to her and Horace in Firelink Shrine (behind Ludleth of Courland) Step 3: The Journey Afar In Catacombs of Carthus, go to the first skeleton boulder. At the top of the path, it should be on a fork in the stairs. Take the drop down route and then go through the doorway to your right. Go down the stairs and you should find Anri here. Exhaust her dialogue. Still in Catacombs of Carthus, get to the bridge. Instead of crossing the bridge, take the right path to find Anri once more. Exhaust her dialogue. Cross the bridge, cut it down and climb down to Smouldering Lake. From the first bonfire, go out into the lake, and hug the right side. You'll find a tunnel with Horace at the end who is hostile. Kill him. Return to Anri at her last position in Catacombs of Carthus. If you killed Horace, tell her about Smouldering Lake. If you did not kill Horace, do not tell her about Smouldering Lake. If she isn't here and there's a small glow there, then she's in the next area. This is fine. Step 4: Anri the Blue Sentinel Once you reach Irithyll of the Boreal Valley, you will find the Church of Yorshka which acts as a base for both the Blade of the Darkmoon and the Blue Sentinels. She is at this bonfire. Talking to her will net you both the Quiet Resolve gesture as well as the Ring of the Evil Eye. There will be statues in the corner, one of which is a chameleon of a pilgrim assassin. DO NOT KILL HIM. He will kill her, and you want her to die to him. Defeat Pontiff Sulyvahn. Step 5: The Wedding After the boss fight, you can return to Firelink Shrine and talk to Yuria of Londor and she will mention that your spouse awaits you at the Darkmoon Temple. Head to Anor Londo, but the room before the lift has an illusory wall. Knock it down. Talk to the Pilgrim to obtain the Sword of Avowal. Interact with Anri. Step 6: The Ending Light the Bonfire after the Final Boss. Note: There is another outcome for this, but you won't get much out of it. Sidequest: Cornyx of the Great Swamp Step 1: Rescuing Cornyx In the Undead Settlement, after the guillotine area with the fire bomb throwers, after passing the gate with the giant saw guy, turn right and you'll see a very sketchy drop to a cliff. This drop is possible. Just run continuously into the hut roof and you will safely make it down. You'll pass the Cliff Underside bonfire, then go through the other doorway and up the stairs. Go up the roof ramp and into the tower. Cross the bridge and up the mini stairs onto the other tower. Go around the tower and you'll find a cage containing Cornyx. Step 2: Services He will also give you a Pyromancy Flame when you talk to him in Firelink Shrine. Gesture: Welcome | Talk to him again and he will grant you this gesture. He sells basic pyromancies and accepts the Great Swamp, Carthus, and Izalith pyromancy tomes. Step 3: Gear At the Old Demon King boss fight in Smouldering Lake, you can summon an NPC named White Phantom Great Swamp Cuculus and defeat the boss to gain access to some special gear. If the above is completed successfully, returning to the cage where you found Cornyx in the Undead Settlement to find some gear. Sidequest: Grierat of the Undead Settlement Step 1: Rescuing Grierat From the Tower on the Wall bonfire in High Wall of Lothric, go to the very bottom. Go through the doorway and you'll find a staircase leading to Greirat's cell. No action required. Head to the rooftops then down the long ladder and inside the door. Go through the doorway with the knight and at the bottom of this room is a small set of stairs that just goes to a lower part of the room containing a corpse with the Cell Key. Return to Greirat's cell and free him. Help him and he will give you the Blue Tearstone Ring. He will also request you to find Loretta. Step 2: Finding Loretta She is located in the Undead Settlement. Before the big open area with the nice firepits, there is a corpse with an item hanging near the balcony. Attack it to drop the corpse. Get the item which turns out to be Loretta's Bones... oh. Return the bones back to Greirat. Gesture: Curl Up | Learned after giving him the bones and he starts grieving. He also lets you keep the Blue Tearstone Ring which you were suppose to give to Loretta. Step 3: Pillage Undead Settlement After giving him Loretta's Bones, he will offer to pillage new areas to obtain items to sell. If you walk away and tell him he can go after defeating the area boss, he will survive. He will return after you defeat an area boss. Step 4: Pillage Irithyll of the Boreal Valley After crossing the first bridge in this area, Greirat will request to pillage this area. Before allowing him, make sure you have a few things done. Rescue Siegward from the Well, requires buying his armor set from Patches. Do not tell Patches where he went, although I never got this prompt so I assume you can't. If the above isn't completed, then you need to tell Patches where Greirat went if you have not purchased Siegward's armor from him. If he dies, his ashes are in the sewers before you meet up with Siegward. Step 5: Pillage Lothric Castle He will request a third pillage which is to Lothric Castle. Again he may die if certain requirements aren't met. Dispatch of both dragons in the area, as well as eliminating Oceiros, the Consumed King, in the Consumed King's Garden should allow for Greirat to survive. If he dies, his ashes will be on the roof of the Grand Archives. Ashes Giving these to the Handmaid will lower her prices down to his. Unlock sales that he would've gotten by surviving. Manually killing him will only let him sell the items that he already had. Killing him while both him and Patches are in Firelink Shrine will make Patches hostile. Sidequest: Irina of Carim Step 1: Freeing Irina of Carim Not required, but talk to Egyom of Carim in the Undead Settlement. He has a giant mace sitting outside of the sewers near the tower with the giant. In the Undead Settlement, go to the area where the giant throws his javelins (graveyard). Here you will find a key item 'Moritcan's Ashes' in the graveyard. Give these ashes to the Handmaid to buy the Grave Key for 1500 Souls. Return to Undead Settlement and go into the sewers to open up the locked door. At the end of this long path, you will find Irina of Carim on the ground. Touch her multiple times. She will return to Firelink Shrine. Step 2: Irina the Fire Keeper Whatever you do, AVOID buying dark miracles from Irina for now. You will buy them later. After obtaining all the tomes, give them to Irina. Buy all NON-DARK miracles. She will become a Fire Keeper. She will move herself to the tower near Firelink giving you level up capabilities. The two tomes that contain dark miracles will be near her feet. Give them to Karla the Witch now that Irina can't teach you miracles and learn the dark miracles that way. Step 2B: Irina the Dark If you've accidentally bought a dark miracle, Egyom will kidnap her and move her near the gate of Iudex Gundyr. Defeat him and talk to Irina to move her back to Firelink Shrine. Do not touch her UNLESS you have the Morne's Gauntlets equipped. (Sold by Handmaid) If you buy all dark miracles, she will be unable to feel and loses the ability to teach you miracles. Sidequest: Leonhard Step 1: Meet Leonhard When you first get to Firelink Shrine, talk to Leonhard who stands right next to the largest throne in the room. He will give you 5x Cracked Red Eye Orbs. Step 2: The Darkwraith In the Undead Settlement, you'll find a Pale Tongue which is the first requirement. Your second requirement is to either lighting the Cliff Underside bonfire in Undead Settlement, or by defeating the Curse-Rotten Greatwood in the Undead Settlement. Then talk to Leonhard again and he'll give you the Lift Chamber Key giving you the chance to fight an imprisoned Darkwraith in High Wall of Lothric. Head to the Tower on the Wall bonfire in High Wall of Lothric, and go to the bottom floor and unlock the cell there. Head down the lift and defeat this Darkwraith. You will receive the Red Eye Orb. Talk to Leonhard to receive the 'Applause' gesture Step 3: Rosaria's Fingers In the Cathedral of the Deep, you can join the Rosaria's Fingers covenant. From here, join and offer at least 1 pale tongue to the covenant. (This will make Sirris hostile) He will move from Firelink Shrine to Rosaria's Chambers. Talk to him to exhaust his dialogue. Traveling from and to this bonfire will reveal that Rosaria was killed. However, the covenant functionality remains perfectly intact. Pick up the Black Eye Orb. Head to Aldrich's bonfire, and go up the elevator. Go into the room and the Black Eye Orb should be vibrating. Use it to invade Leonhard. Kill him to obtain his equips, and most importantly, the Soul of Rosaria. Soul of Rosaria can be used to revive Rosaria; however, we need it to transpose into the Bountiful Sunlight miracle through Ludleth. Sidequest: Ludleth of Courland Okay, not really a sidequest, but it felt weird throwing a small section for Ludleth with his name on it, so I named it as such. This is more focused on the transposition that are required for achievements. Note: After placing all four Lord of Cinders, then accessing the final area of the game, Ludleth will die. Make sure to give the Transposing Kiln BEFORE this. You will retain the ability to transpose after he dies. Ring: His ashes will have the Skull Ring. Make sure you pick it up before heading to the next playthrough. The items that are required for 100% are highlighted in blue. Soul NameBossLocationTransposition 1Transposition 2Transposition 3Soul of Boreal Valley VordtVordt of the Boreal ValleyHigh Wall of LothricVordt's Great HammerPontiff's Left EyeSoul of the Rotted GreatwoodCurse-rotten GreatwoodUndead SettlementHollowslayer GreatswordAstor's SpearSoul of a Crystal SageCrystal SageRoad of SacrificesCrystal Sage's RapierCrystal HailSoul of the Blood of the WolfAbyss WatchersFarron KeepFarron GreatswordWolf Knight's GreatswordSouls of the Deacons of the DeepDeacons of the DeepCathedral of the DeepDeep SoulCleric's CandlestickSoul of High Lord WolnirHigh Lord WolnirCatacombs of CarthusWolnir's Holy SwordBlack SerpentSoul of the Old Demon KingOld Demon KingSmouldering LakeChaos Bed VestigesOld King's Great HammerSoul of a DemonFire DemonCatacombs of Carthus/Smouldering LakeDemon's GreataxeDemon's FistSoul of Pontiff SulyvahnPontiff SulyvahnIrithyll of the Boreal ValleyGreatsword of JudgementProfaned GreatswordSoul of Yhorm the GiantYhorm the GiantProfaned CapitalYhorm's Great MacheteYhorm's GreatshieldSoul of AldrichAldrich, Devourer of GodsAnor LondoLifehunt ScytheDarkmoon LongbowSoul of RosariaRingfinger LeonahrdAnor LondoBountiful SunlightSoul of the DancerDancer of the Boreal ValleyHigh Wall of LothricSoothing SunlightDancer's Enchanted SwordsSoul of Dragonslayer ArmourDragonslayer ArmourLothric CastleDragonslayer GreataxeDragonslayer GreatshieldSoul of Consumed OceirosOceiros, the Consumed KingConsumed King's GardenWhite Dragon BreathMoonlight GreatswordSoul of Champion GundyrChampion GundyrUntended GravesGundyr's HalberdPrisoner's ChainSoul of the Twin PrincesLothric & Lorian, Twin PrincesGrand ArchivesLothric's Holy SwordLorian's Greatsword(Transposing both lets you transpose the Twin Prince's Greatsword)Soul of the Nameless KingNameless KingArchdragon PeakStorm Curved SwordDragonslayer SwordspearLightning StormSoul of a Stray DemonStray DemonFarron KeepHavel's RingBoulder HeaveSoul of the LordsSoul of CinderKiln of the First FlameSunlight SpearFirelink Greatsword * As you can see, you only need one of each soul except for the Stray Demon which you will need two of. * As for Soul of Rosaria, that can only be obtained by invading Leonhard during his questline. Killing Rosaria upfront will not drop her soul. Giving her soul back just brings her back to life with no actual benefits. Sidequest: Orbeck of Vinheim Step 1: Recruiting Orbeck In the Road of Sacrifices, right before the Crystal Sage, you will find Orbeck on the second floor of the building. Talking to him with 10 INT will convince him to move to Firelink Shrine. When he moves back, Yuria of Londor wants him dead. If you still need sorceries from Orbeck, or need to give him scrolls to buy sorceries, you can delay this as much as you want. After you've bought everything from him, then you can kill him and give his ashes to Yuria and obtain the Morion Blade. WARNING: Orbeck will eventually disappear from your game if you do not interact with him in terms of sorceries. Not sure what the exact requirement is, but to be safe, buy some sorceries early on as well as give him at least one scroll as you find one. See Master of Sorcery for details. Step 2: Young Dragon Ring Buy three of his sorceries and give him a sorcery scroll then talk to him for this item. This only occurs if you did not start as a sorcerer. If you did start as one, you got this ring as a starting ring. Step 3: Slumbering Dragoncrest Ring and Silent Ally Gesture After purchasing Aural Decoy, Farron Flashsword, and Pestilent Mist, talk to him to receive both items. Step 4: Graduation After giving him all four scrolls, and buying all of his spells, he will thank you and leave Firelink Shrine. You can summon him for the final Lord of Cinder: Lothric, Younger Prince His ashes will be in Grand Archives at a table near you find sorcery casting candleheads. Sidequest: Siegward of Catarina Note: You'll have two chances to get the Toast and Sleep gesture from Siegward. Once he moves to Irithyll Dungeon, the gestures will be lost til next playthrough. Step 1: The Elevator In the Undead Settlement, there is a tower there with a peculiar lift. Upon accessing the lift, you will find Siegward of Catarina. Talking to him, he'll mention that he can't figure out the elevator. Hit the pressure plate on the elevator, but don't take it down. Get off and let it go down. You will find that the elevator has two platforms. Take the platform up. Head back down and drop off the lift midway onto the platform. You should find Siegward moved up and thanking you for solving his elevator troubles. After exhausting his dialogue, go down and fight that Stray Demon. Siegward will happily join you. After the fight, talk to Siegward and he'll give you the 'Toast' gesture and a Siegbrau. Keep talking to him until he falls asleep. Talk to him again and you'll get the 'Sleep' gesture. Step 2: Cathedral of the Deep Before entering the cathedral for your second bonfire of the area, you'll see a well to the left. You can talk here to find that Siegward is stuck without his armor after you've opened the big gate opposite to Rosaria's Chambers that leads to the beginning of the area After you've opened the giant doors, leave the area then return through the doors. If you try walking over the gate bridge that you crossed to open the door, Patches will lower it. If you get back up, then talk to him, tell him 'You know who I am' and you'll earn the Prostration gesture. Patches will leave you alone. Go to Firelink Shrine, and go to the tower with the lift. Patches will lock you in. Either escape by dropping, or use a homeward bone. Go to Patches' spot in Firelink Shrine and he will apologize for locking you in. He will offer you services which you want so you can buy back Siegward's armor. Return Siegwards armor back to him in the well and you'll earn the Rejoice gesture. Step 3: Irithyll of the Boreal Valley After going through the lake, you'll have to go through the sewers. After ascending some stairs, you'll find Siegward. Exhaust his dialogue. You receive the Emit Force miracle. Step 4: Irithyll Dungeon This isn't a very important part, but I'll mention it. You can talk to Siegward through the gated windows where you fight the giant with the rats. Step 5: Profaned Capital First off, you'll need to go up the chapel looking building and then taking the stairs into the mountains. Inside you'll find the Jailer Key Ring. Next, from the chapel roof, you can jump over the stairs you just ascended into an open window. This will lead you to the cell of Siegward. He will reward you with a Titanite Slab. This will also enable him to help you during the boss fight: Yhorm the Giant where he hits like a tank. Step 6: Yhorm the Giant If you've done everything, Siegward will show up at this fight regardless if you're not embered, summoned. He also uses the Storm Ruler which destroys Yhorm dealing roughly 3000 damage per storm strike. If you happen to have a Storm Ruler, you too can spam this skill without expending FP during this boss fight. Bait for Siegward so he doesn't die. Aftermath: You will find Siegward's equipment in the boss room. Sidequest: Sirris of the Sunless Realm Obtaining the Rosaria banner will not make her hostile. Equipping the banner WILL make her hostile. Turning in a Pale Tongue into the covenant WILL make her hostile. Hostility effectively ends her sidequest. Step 1: Initiating her Quest She appears in Firelink Shrine after you talk to Horace and Anri. Talk to her. Open the Farron Gates in Farron Keep by extinguishing the three flames to light the three flames near the gate. She reappears in Firelink Shrine. Talking to her here will give you the Darkmoon Loyalty gesture. Used to join the Blade of the Darkmoon. If you don't get this gesture, killing Company Captain Yorshka will be the only other way to join the covenant. Obtain the Dreamchaser's Ashes in Farron Keep and give it to the Handmaid. The Handmaid will ask you where it's from, answer however you wish and travel from and to Firelink Shrine. Talk to Sirris once more. Step 2: Requesting her Assistance Obtain the Small Doll from Deacons of the Deep. May require you to rewarp at the boss bonfire for the item to appear. With this item, head to Irithyll's first bonfire. On the bridge, get summoned by using her sign. Dispatch of Creighton the Wanderer. Talk to her in Firelink Shrine. Defeat Aldrich in your own game. Head to the boss gate in the Undead Settlement and get summoned by her again. This time, she will swear fealty to you and you will help her dispatch of Holy Knight Hodrick who is the one who lets you join the Mound Makers. Step 3: Finale Speak to her in Firelink Shrine for one last time. The Sunset Shield will be at Hodrick's Grave After defeating the Twin Princes, her corpse is found at the same grave holding the Sunless Talisman. Her armor is purchaseable via the Shrine Handmaid. She leaves a note with the Shrine Handmaid. The Handmaid is most likely her Grandmother. Hodrick is her Grandfather. Sidequest: Unbreakable Patches Note: I have no idea how to get Patches to sell the Horsehoof Ring. So... kill him if you can't figure it out at the end of a playthrough. Step 1: Setup You will need to have progressed Siegward's initial step so he should be at the Cathedral of the Deep. Open up the large gate near the end of the Cathedral of the Deep that leads outside. Step 2: The Trap #1 Either warp from/to the Cathedral of the Deep, or quit game and reload the save. Going over the gate that acts as a bridge should cause Patches to pull the lever, thus lowering you to the giants. (Killing the giants may skip this) Get back up to where the lever was and talk to Patches who was wearing Siegward's armor. When talking to him, respond with 'You know who I am' You should receive the Prostration gesture Step 3: The Trap #2 If you did not meet him in the Cathedral of the Deep, killing the Abyss Watchers should make him show up in Firelink Shrine. This will not break his questline. Upon returning to Firelink Shrine, go into the tower. Go to the tower with the lift and Patches will lock you in. Either warp with a homeward bone, or drop down and exit through the gate. Talk to Patches in his usual location and he will apologize. If you did NOT meet him in the Cathedral of the Deep, make sure to NOT forgive him. This will net you the Prostration gesture. Step 4: Services Regardless of whether or not you forgive him, he will offer his services to you as a merchant. You should probably buy Siegward's armor to return to Siegward. You do not need to buy back the shield. Upon reloading or warping in and out, Patches will be permanently squatting and teaches you the Patches Squat gesture. Step 5: Greirat of the Undead Settlement If you know about Greirat, he sets off on pillages to obtain more items to sell. Patches seems to have some connection to him. When Greirat pillages Irithyll of the Boreal Valley, and if you have not bought Siegwards armor and given it to him, then Patches will refuse to sell you anything until you do. If you have progressed Siegward to Irithyll, then Greirat will not die there. Greirat will then pillage Lothric Castle. Sending Patches after him will not affect his success in pillaging the castle. Note: If you kill Greirat while in Firelink Shrine with Patches present in Firelink Shrine, Patches will be hostile to you. Endings There are a total of three ending achievements. So you'll have to beat the game three times. There is a fourth ending which I'll mention last.

夺火结局 达成“夺火结局”。 这是目前最难的结局,我建议你先完成这个结局。这样后续的周目就可以速通以更快完成。注意:交谈指的是完全耗尽对话内容。 在不死聚落与隆多尔的尤艾尔交谈。通过与他成为朋友,将他带回传火祭祀场。 获得15点 hollowing( hollowing),并通过尤艾尔免费升级五次,这样可以获得5个黑暗印记。绝对不要治愈黑暗印记。不过你可以通过耶尔卡雕像或洗点石来反转 hollowing( hollowing)。只是永远不要通过防火女治愈黑暗印记。 尤艾尔死亡,隆多尔的尤莉亚会在传火祭祀场取代他。 在牺牲之路的中途要塞营火处与沉默的霍拉斯和亚斯特拉的安里交谈。在深邃教堂击败深渊的执事。无需召唤。 在传火祭祀场与沉默的霍拉斯和亚斯特拉的安里交谈。 在卡萨斯地下墓地与亚斯特拉的安里交谈。从第一个骷髅巨石处,走到其路径的顶端,从楼梯跳下,然后穿过右侧的门,下楼即可找到她。 在卡萨斯地下墓地尽头的桥旁与亚斯特拉的安里交谈。 在烟熏湖杀死沉默的霍拉斯。从第一个篝火出发,沿着右墙走,直到找到一个小隧道。霍拉斯就在隧道尽头。如果你选择不杀死霍拉斯,那么不要告诉安里他在哪里。他会杀了她。 返回亚斯特拉的安里处。如果她还在那里,且你已杀死霍拉斯,可以告诉她关于烟熏湖的事。如果你没有杀死霍拉斯,【不要告诉她这件事】。 在冷冽谷的伊鲁席尔的尤莉亚教会篝火处,与亚斯特拉的安里对话。如果你之前没有获得,她会给你沉静意志姿势以及邪眼戒指。不要杀死房间角落里的刺客/朝圣者/雕像。如果你这么做,将无法达成这个结局。 击败冷冽谷的伊鲁席尔的教宗沙力万。 返回传火祭祀场,与隆道尔的尤利娅对话,她会告诉你你的配偶已在祭坛准备好。 前往位于亚诺尔隆德前的祭坛。从亚诺尔隆德篝火出发,走螺旋楼梯向下。在圆形房间里,攻击你面前的墙壁以露出秘密祭坛。与朝圣者对话,他会给你誓约之剑。在祭坛与安里互动。之后与朝圣者对话可获得【拟态】法术。在此处重新加载游戏还能拾取安里直剑。击败游戏最终 boss。与营火互动。注意:有说法称可以将从传火祭祀场塔楼获得的灵魂交给防火女。你可以把这个物品交给防火女,但要确保不要选择【治愈黑暗印记】选项。

传火结局 达成【传火结局】。 不要与安里结婚。你可以完成夺火相关任务,例如与尤艾尔、尤莉亚和安里互动,但不要在暗月教堂举行仪式。 不要按照防火女的要求灭火。 击败最终Boss后,点燃篝火。

火焰的终结 达成【火焰的终结】结局。 从火祭场附近的塔中获取防火女之魂,该塔需用塔之钥进入。 从无主墓地中伊莲娜所在的暗火祭场获取防火女的眼眸。 将这些物品交给你的防火女,并听完她的所有对话。 击败最终Boss后,通过篝火附近的防火女召唤印记召唤她。不要杀死她,否则无法获得该成就。 火焰的终结 - 替代结局 与【火焰的终结】结局步骤相同,但在召唤后的短暂时间内杀死她。此操作不会获得【火焰的终结】成就。 誓约 - 第一部分 誓约快速介绍:要加入誓约,必须找到其誓约旗帜。要加入誓约,只需在装备菜单中装备旗帜(它位于菱形槽的中间位置)。 若要提升对某个誓约的奉献等级,你需要找到与该誓约相关的实体来捐赠物品。幸运的是,《黑暗之魂3》现在允许你一次捐赠多个物品。誓约按加入顺序列出。
青之守护者誓约 发现青之守护者誓约。 旗帜位置:洛斯里克高壁 加入方法:在 Boss 区域附近,楼梯顶部有一座礼拜堂。名为艾玛的女性 NPC 会出现在那里,她还会交给你小旗帜。持续与她对话,直到她邀请你加入青之守护者誓约。 誓约等级提升:无
誓约:太阳战士 发现太阳战士誓约。 旗帜位置:不死聚落 加入方法:从不死聚落篝火出发,沿直线前进,直到抵达火祭场并遇到第一个肥胖施法者。消灭此处所有敌人后,有三条路径可选。两条通往房屋,最后一条通往桥梁。选择最左侧的路径进入房屋,打开门并走进去。消灭敌人后,寻找地面上的洞口,跳下洞口即可获得誓约羊皮纸。 奉献等级提升:洛斯里克城 | 猎龙铠甲附近 等级 需求 奖励 1 10个太阳徽章 奇迹【阳光之誓】 2 30个太阳徽章 奇迹【巨雷枪】 获取太阳徽章:达成【奇迹大师】成就需要30个太阳徽章。在太阳战士灵体存在的情况下击败区域 Boss。 仅在洛斯里克城的洛斯里克骑士处稀有掉落。在冷冽谷的舞娘营火与洛斯里克城营火之间可以找到三个洛斯里克骑士。 入侵其他玩家的游戏时,若另一名入侵者是太阳战士且主机被击败,也会获得太阳勋章。 可以与其他玩家刷取:使用联机密码,太阳战士放下红 soapstone 符,另一名玩家召唤他们。主机可以自杀或被灵体击败,灵体将获得太阳勋章。
【青教群隆】 发现青教群隆誓约。 旗帜位置:不死聚落/空洞之坑 加入方法:必须在击败该区域的BOSS“咒蚀大树”之前完成。从不死聚落篝火出发,前进至火坑处。此处有3条路线,选择桥梁路线。进入房屋前,走右侧的狭窄小路。沿着小路走到尽头,爬上梯子。向下跳到路上,会发现一个带着巨大空笼子的持锯者。与笼子互动后进入,触发过场动画将你传送至空洞之坑。与“神圣骑士霍里克”对话即可获得誓约道具。旗帜位置2:不死聚落 加入方式:若错过上述第一种方法,【前提是你从未加入过罗莎莉亚的指头誓约】。击败3位薪王后,返回与咒蚀大树战斗的地点(上层),你会看到太阳公主的希丽丝的召唤印记。帮助她后,她会让你加入该誓约。 若两种方法都错过,则需等待下一周目。 誓约等级 所需物品 奖励 1级 10个脊椎骨 血癫狂武士刀 2级 30个脊椎骨 【温暖】咒术 获取脊椎骨: 要达成咒术大师成就需要30个脊椎骨。 作为疯狂灵体,击杀其他灵体或宿主即可获得脊椎骨。在不死聚落的破败桥篝火附近,当疯狂之灵圣骑士霍克伍德入侵你时,必定会掉落【脊椎骨】。需要处于余火状态,且诅咒腐烂大树必须存活。 在卡萨斯地下墓地的红眼骷髅剑士身上有低概率掉落【脊椎骨】。在卡萨斯地下墓地篝火附近可以找到一些红眼骷髅剑士,从篝火处往回走,穿过走廊就能遇到它们。 可以与其他玩家配合刷取:使用密码联机,青教群隆派玩家放置红符,其他玩家召唤他们。房主可以自杀或被幻影杀死,幻影会获得【脊椎骨】。由于疯狂幻影可以攻击房主,只要房主所在区域的 Boss 仍存活,白符联机也能生效。
誓约:青之守护者 发现青之守护者誓约。 旗帜位置:献祭之道 加入方式:在半路要塞营火处与沉默的霍拉斯对话。 誓约等级提升:亚诺尔隆德 等级 需求 奖励 1 10个誓约之证 暗月戒指 2 30个誓约之证 “暗月 Blade”奇迹 注:与暗月之剑共享相同的提交物品、领袖、奖励和掉落。
誓约:法兰的 watchdog 发现法兰的 watchdog 誓约。 旗帜位置:法兰要塞 加入方式:向法兰老狼祈祷 奉献等级提升:法兰要塞(同一地点) 等级 需求 奖励 1 10个狼血草 老狼曲剑 2 30个狼血草 狼骑士大盾和狼戒指 获取狼血草 在领土入侵中击杀宿主可获得。使用红眼宝珠或红皂石符入侵不计入。 稀有掉落自咕噜(紫色敌人)。可在两个地点刷取。法兰要塞遗迹篝火处,桥上有三个咕噜。击杀这三个后休息,重复刷取。另一个地点稍远,但更容易击杀,因为三个敌人不会同时主动攻击,可以逐个击杀。在第三个陆地区域,【营火废墟】篝火与【法兰要塞】篝火之间有一个固定刷新点。它靠近一处元素瓶汤锅。 誓约 - 第二部分
誓约:罗莎莉亚的指头 发现罗莎莉亚的指头誓约。 旗帜位置:深邃教堂 加入方法:与位于其房间内的罗莎莉亚对话,房间在【深邃教堂】奉献升级处的对面 奉献升级:深邃教堂(同一地点) 等级 需求 奖励 1 10个发青舌头 隐匿戒指 2 30个发青舌头 蛆人杖 获取发青舌头 使用红眼宝珠入侵时,击杀宿主必定获得1个发青舌头。 【幽邃教堂】的暗灵有较低概率掉落。从法兰要塞外围营火出发,向前走会看到两个暗灵正在与几只咕噜战斗。引诱咕噜后击杀暗灵。 在不死聚落与希夫沃德一同面对离群恶魔附近,有一具悬挂在小屋(左侧那间)上方的尸体,可从中获得1个发青舌头。一个位于深邃教堂中被锁链束缚的巨人旁边。 一个位于深邃教堂中可通往椽木的屋顶上。 可与其他玩家配合刷取:使用多人游戏密码,灵体放置红符,另一名玩家召唤灵体。灵体不能是太阳战士或默色灵庙成员。主机可以自杀或被灵体击杀,灵体将获得【苍白舌头】。击杀蓝灵守卫会获得【分叉舌头】,可用于兑换两个【苍白舌头】。
誓约:艾尔德里奇的信徒 发现艾尔德里奇的信徒誓约。 旗帜位置:冷冽谷的伊鲁席尔 加入方法:击败教宗沙力万后,继续在该区域探索,直到抵达有巨人庭院后的带楼梯建筑。楼梯下方左侧有一面幻影墙,攻击墙壁后爬下去,消灭两只巨型蜥蜴,然后与最左侧角落里的大主教麦克唐纳对话即可加入。 奉献等级提升:冷冽谷的伊鲁席尔(同一地点) 等级 要求 奖励 1 10个人类残渣 “大灵魂洪流”法术 2 30个人类残渣 大主教的大杖 获取人类残渣:作为领土入侵者被召唤时,击杀宿主即可获得。若在你被召唤的同时,另一名入侵者击杀了宿主,也算作你获得残渣。一个可在阿尔德里奇信徒誓约位置附近获得,需在蓄水池中击败两只巨型蜥蜴后取得。 稀有可能从深渊的执事(冷冽谷的伊鲁席尔/亚诺尔隆德)处掉落。有两个位置可以刷取:第一个是在教宗沙力万之后,乘坐电梯上去并穿过右侧的门,这里有不少执事;第二个是从“吞噬神明的阿尔德里奇”篝火处往回走,会遇到三个执事,走上每个楼梯还能找到更多。我个人更喜欢第一个区域,因为所有执事都集中在一处。 关于掉落的注意事项:执事有三种类型——普通、高大和肥胖。我从未从肥胖执事中获得过人渣,普通执事的掉落率似乎更高。
暗月之剑誓约 发现暗月之剑誓约。 旗帜位置:亚诺尔隆德/冷冽谷的伊鲁席尔 加入方法:从亚诺尔隆德篝火出发,往回走到螺旋楼梯处,不要将其降下。走到最底部,从唯一的出口出去。你会看到前方有一座带有篝火的塔。从桥的出口直走,直到与篝火对齐,然后朝着篝火跑去。你可以射箭来标记安全路径。持有暗月誓约手势时与暗月骑士团团长尤莉亚对话。如果你没有这个手势,并且已经加入了罗莎莉亚的指头,你也可以杀死尤莉亚来获取旗帜。誓约等级提升:亚诺尔隆德/冷冽谷的伊鲁席尔(同一地点) 等级要求奖励 110个誓约之证暗月戒指 230个誓约之证奇迹【暗月之剑】 获取誓约之证的方法: 在冷冽谷的伊鲁席尔的尤莉亚教堂祭坛处可获得1个。 在亚诺尔隆德,进入主厅后,位于左侧阳台上所有执事的身后可获得1个。 作为蓝灵击杀入侵者可获得1个誓约之证。 作为蓝灵击杀艾尔德里奇入侵者可获得1个誓约之证(优质),该物品可兑换为2个誓约之证。 银骑士(冷冽谷的伊鲁席尔/亚诺尔隆德)有较低概率掉落。最佳地点无疑是亚诺尔隆德篝火处,那里楼梯上有两名银骑士,右侧楼梯还有一名红眼银骑士。 表情大师 | 姿势

表情大师 学习所有手势。 手势|位置|获取方法 ---|---|--- 指向前方|初始|无 指向上方|初始|无 指向下方|初始|无 挥手|初始|无 招手|不死聚落|与隆道尔的尤艾尔对话 呼唤|传火祭祀场|需要塔之钥匙 | 向乌鸦交易一个返乡骨片 欢迎|传火祭祀场|完成柯林支线任务 鼓掌|传火祭祀场|完成莱昂哈特支线任务 沉静意志|冷冽谷的伊鲁席尔|完成安里支线任务 雀跃|初始|无 喜悦|初始|无 欣喜若狂|深邃教堂|完成希夫拉尔支线任务 欢呼!|传火祭祀场|与铁匠安德烈对话 赞美太阳|洛斯里克城|从猎龙铠甲篝火处往回走并爬上梯子,过桥进入另一栋建筑,下楼后通过较低的桥返回,找到祭坛并祈祷。我的感谢 烟熏湖 击败或被“骑士杀手”卓力格击败 鞠躬 默认 不适用 得体鞠躬 法兰要塞 在此处击败NPC入侵者“黄指头”海泽尔,向罗莎莉亚的指头教派献上1个发青舌头,然后在法兰要塞的废墟营火处(位于史莱姆建筑下方的斜坡处)召唤“黄指头”海泽尔【深渊监视者必须存活】 庄重鞠躬 传火祭祀场 与隆道尔的尤利娅交谈(需通过尤艾尔获得5个黑暗印记) 决斗鞠躬 法兰要塞 | 冷冽谷的伊鲁席尔 召唤隆道尔的白影(需5个黑暗印记) 法兰礼仪 法兰要塞 向法兰老狼祈祷 暗月忠诚 传火祭祀场 开启通往法兰要塞的大门后与希里斯交谈(在加入罗莎莉亚的指头教派之前且开启法兰要塞大门之后) 以我剑之名 冷冽谷的伊鲁席尔 召唤“黑手”歌德哈特 祈祷 传火祭祀场 与伊莉娜对话支线任务:沉默盟友:传火祭祀场:查看欧贝克支线任务 休息:篝火:在任意篝火处休息 崩溃:传火祭祀场:与楼梯上的霍克伍德交谈 帕奇蹲坐:传火祭祀场:与蹲坐状态的帕奇交谈 忏悔:传火祭祀场 | 深邃教堂:选择不原谅他或“你知道我是谁” 干杯:不死聚落 | 冷冽谷的伊鲁席尔:与希夫交谈 沉睡:不死聚落 | 冷冽谷的伊鲁席尔:在希夫入睡后与其交谈 蜷缩:传火祭祀场:将罗蕾塔的骨头交给葛雷瑞特后与其交谈 伸展:罪业之都:第一个篝火附近的尸体(据说是梯子铁匠吉尔伯特) 古龙之道:妖王庭院:击败 Boss 后的尸体上 强化大师

Master of Infusion Perform all forms of infusion. Infusions are performed by Andrei the Blacksmith in Firelink Shrine. Infusions refer to imbuing weapons with different elements and attributes (i.e. lightning, raw, poison etc). CoalsTo unlock more infusions, you have to give him a specific coal. CoalInfusionsLocationDefaultRefined, Raw, FireN/AFarron CoalHeavy, Sharp, PoisonRoad of Sacrifices: From the Halfway Fortress bonfire, follow the path and take the right road. Once you get to the doorway, take a left. At the end of this hallway, you'll find the coal on a corpse.Sage's CoalCrystal, Blessed, DeepFarron Keep: From the Farron Keep bonfire, follow the small islands on the left. You'll eventually end up to a large island with a staircase. Do not go up. Instead, take the poison pools to the left and follow it behind the giant island. You'll reach a building guarded by a Darkwraith. The coal is inside.Profaned CoalDark, Blood, HollowIrithyll Dungeon: Near the end of Irithyll Dungeon, you'll be in a wider prison area guarded by several health lowering enemies. It's in the cell opposite to Karla the Witch.Giant's CoalSimple, Chaos, LightningAnor Londo: If you recall where the Giant Blacksmith was in DS1, go there. From the bonfire, simply go up the stairs, take the left and turn right into a room with the coal. Infusions and GemsInfusionEffectGem LocationRefinedInc Str/Dex Scaling; Dec Base DmgHigh Wall of Lothric: Kill the Blue Red-Eyed Knight next to Emma | Lothric Castle: Between the two dragons in the middle, where you have two doorways to go into | Grand Archives: From where you find the Undead Bone Shard, go down the ladder, then through the doorway with a staircase. In this room to the right is a crystal lizard with the gem.RawNo Scaling; Inc Base DmgLothric Castle: From the Dragon Barracks bonfire, go inside the castle, passed the dragons and turn left. It's near the balcony with a firebomb/hunter charm throwing enemyFireNo Scaling; Dec Base Dmg; Fire DmgPossible Starting Burial Gift | Catacombs of Carthus: Crystal Lizard before the bridge that you can breakHeavyInc Str Scaling, Dec Base DmgGrand Archives: On the roof with 2 crystal lizardsSharpInc Dex Scaling, Dec Base DmgCatacombs of Carthus: After the firsrt bridge, go up the stairs and take the ladder down. You'll find it on a in the next room. | Grand Archives: On the roof with 2 crystal lizardsPoisonDec Str/Dex Scaling; Dec Base Dmg; Poison FXFarron Keep: In the poison pool with three large trees guarding it | Profaned Capital: In the toxic pools with the white spider-looking wormsCrystalDec Str/Dex Scaling, Dec Base Dmg, Magic Dmg, Inc Int ScalingRoad of Sacrifices: Crystal Lizard in the building with Orbeck of Vinheim | Grand Archives: In a narrow path after the first Crystal Sage encounter on a Crystal LizardBlessedDec Str/Dex Scaling, Dec Base Dmg, Inc Faith Scaling, HP RegenCathedral of the Deep: Located in the rafters of the cathedral accessed from outside | Grand Archives: Located in the rafters of the archives accessed through the area after the triple Golden Winged KnightsDeepDec Str/Dex Scaling; Dec Base Dmg; Dark Dmg, Inc Faith/Int ScalingCathedral of the Deep: From the second bonfire, take the first elevator shortcut you unlock (the outside one). At the top, take the stairs down and it'll be on a balcony with an enemy. | Irithyll of the Boreal Valley: In the room with the two giant lizards and the Aldrich Faithful covenantDarkDec Dex/Str Scaling; Dec Base Dmg; Dark Dmg; Inc Faith/Int ScalingCatacombs of Carthus: Drops from second skeleton boulder | Consumed King's Garden: In the toxic pools section, you'll find a staircase on the leftside that goes to a dead-end with a titanite chunk on a corpse, it's under the stairs.BloodDec Str/Dex Scaling, Dec Base Dmg, Bleed FXIrithyll of the Boreal Valley: Before descending into the river, turn right and you'll find a tree guarded by invisible enemiesHollowDec Str/Dex Scaling; Dec Base Dmg; Inc Luck (when hollow)Farron Keep: From the Farron Keep Perimeter bonfire, go backwards and through the broken wall and go down the path to find the gem on a corpse | Grand Archives: At your first gargoyle encounter on the roof, drop down and go into the hallway to find this on a corpseLightningDec Dex/Str Scaling, Dec Base Dmg, Lightning Dmg, Inc Faith ScalingIrithyll of the Boreal Valley: Located before the boss gate in the courtyard fountain | Archdragon Peak: On a cliffside before your first bonfire (right side)SimpleDec Str/Dex Scaling, Dec Base Dmg, Magic Dmg, FP RegenIrithyll of the Boreal Valley: Crystal Lizard on balcony above Pontiff Sulyvahn bonfire (access post boss area) | Irithyll Dungeon: From the first bonfire in the area cross the bridge. Take a left (through a locked door), then go right and take the stairs down. There's a locked cell containing the item here.ChaosDec Str/Dex Scaling, Dec Base Dmg, Fire Dmg, Inc Int/Faith ScalingSmouldering Lake: Corpse near giant crabs; Crystal Lizard under the floor shortcut created by the ballista (accessible by third bonfire) | Grand Archives: Dark room with two crystal lizards, it's on one of the lizards early in the level Master of Miracles

Master of Miracles Acquire all miracles. Note: If the Shrine Handmaid is listed, then you'll need the ashes of the merchant listed before her. If you lose an NPC, then the ashes will transfer the shop contents to the Shrine Handmaid. SpellLocationMerchant PriceHeal AidShrine Handmaid500 SoulsHealIrina | Shrine Handmaid1000 SoulsMed HealIrina[Braille Divine Tome of Carim]: 3500 SoulsGreat HealIrithyll of the Boreal ValleyAfter descending into the river and going under the bridge, go to your right and you'll find the spell on a corpse.Soothing SunlightLudleth of CourlandSoul of the DancerReplenishmentIrina | Shrine Handmaid1000 SoulsBountiful LightIrina [Braille Divine Tome of Lothric]: 5000 SoulsBountiful SunlightLudleth of Courland[Soul of Rosaria]Caressing TearsIrina | Shrine Handmaid1500 SoulsTears of DenialIrina[Braille Divine Tome of Carim]: 10000 SoulsHomewardIrina | Shrine Handmaid3000 SoulsSeek GuidanceCathedral of the DeepAfter the first giant on the second level of the cathedral, it's on the catwalk bridge with the ambushers over the knight.Sacred OathWarrior of the Sunlight10 Sunlight Medals [Lothric Knight]ForceIrina[Braille Divine Tome of Carim]: 1000 SoulsEmit ForceSiegward of CatarinaQuestline [Irithyll]Wrath of the GodsProfaned CapitalOn the roof of the church, drop down to the platform below for the spell in the middle.Lightning SpearFarron KeepTake the elevator next to the Watchdogs of Farron covenant. From here, go up the stairs, turn around and go towards the gate. Drop off on the ledge to the right to bypass the gate. The spell is on a corpse.Great Lightning SpearWarrior of the Sunlight30 Sunlight Medals [Lothric Knight]Sunlight SpearLudleth of Courland[Soul of the Lords]Lightning StakeSmouldering LakeKill that giant worm near the boss gateLightning StormLudleth of Courland[Soul of the Nameless King]Divine Pillars of LightGrand ArchivesFrom the roof with the golden winged knights, drop down to a bird cage. The spell is in the bird cage.Blessed WeaponIrina[Braille Divine Tome of Lothric]: 8000 SoulsLightning BladeIrithryll DungeonUsing the elevator near the dragon statues, drop off midway for the spell.Darkmoon BladeCovenant: Blade of the Darkmoon30 Proof of a Concord Kept [Silver Knight]Magic BarrierIrina[Braille Divine Tome of Lothric]: 5000 SoulsGreat Magic BarrierArchdragon PeakNear the Great Belfry bonfire, go to where you fight Havels. Drop off on the ledge away from the ladder to find this spell.Dark BladeIrina | Karla[Londor Braille Divine Tome]: 10000 SoulsVow of SilenceIrina | Karla[Londor Braille Divine Tome]: 15000 SoulsDead AgainIrina | Karla [Londor Braille Divine Tome]: 5000 SoulsAtonementFarron KeepFrom the Farron Keep Perimeter bonfire, drop down through the broken wall back towards the swamp. It'll be on this pathway.Deep ProtectionIrina | Karla[Deep Braille Divine Tome]: 4000 SoulsGnawIrina | Karla[Deep Braille Divine Tome]: 1000 SoulsDorhys' GnawIrithyll of the Boreal ValleyFrom the Central Boreal bonfire, go up the stairs, make the left. Right before you get to the intersection where you access the Church of Yorshka bonfire, you can take a set of stairs down that unlocks a shortcut back to the Central Irithyll bonfire. Take out the fat evangelist for the spell. You cannot have a summon to access this area.Lifehunt ScytheLudleth of Courland[Soul of Aldrich] Braille Divine Tome of Carim: Road of Sacrifices | Before crossing the bridge containing a caster, drop down to the right and follow the ledge to cave. Braille Divine Tome of Lothric: Lothric Castle | From the courtyard near the Dragonslayer Armour boss, go through the broken wall and drop down to find this tome. Deep Braille Divine Tome: Dropped by a Mimic in Cathedral of the Deep Londor Braille Divine Tome: Sold by Yuria of Londor for 500 Souls at Firelink Shrine. She replaces Yoel of Londor. Make sure to use Yoel's service five times before using the Dark Sigil, otherwise MISSABLE Note: If you buy one dark miracle from Irina, Egyom will kidnap her. If you buy all dark miracles, then she stops being a merchant and you will not be able to turn in tomes or buy miracles that you missed. Note 2: If you buy all her holy miracles, she becomes a firekeeper. If you gave her any dark tomes, she will return those and you can give these to Karla and learn the dark miracles from her. Master of Pyromancies

Master of Pyromancies Acquire all pyromancies. SpellLocationMerchant PriceFireballCornyx of the Great Swamp1000 SoulsFire OrbCornyx of the Great Swamp[Great Swamp]: 3000 SoulsBursting FireballCornyx of the Great Swamp[Great Swamp]: 5000 SoulsGreat Chaos Fire OrbCornyx of the Great Swamp[Izalith]: 10000 SoulsChaos Bed VestigesLudleth of Courland[Soul of the Old Demon King]: 5000 SoulsFire SurgeCornyx of the Great Swamp1000 SoulsFire WhipKarla the Witch[Quelana]: 10000 SoulsFirestormKarla the Witch[Quelana]: 15000 SoulsChaos StormCornyx of the Great Swamp[Izalith]: 12000 SoulsGreat CombustionCornyx of the Great Swamp3000 SoulsSacred FlameSmoldering LakeLocated in the lava at the end behind Knight Slayer Tsorig.Profaned FlameIrithyll DungeonUnderneath the giant with the rats.Poison MistCornyx of the Great Swamp[Great Swamp]: 2000 SoulsToxic MistSmouldering LakeLocated in the lava near Quelana's Pyromancy TomeAcid SurgeCornyx of the Great Swamp[Carthus]: 6000 SoulsFlash SweatCornyx of the Great Swamp1000 SoulsProfuse SweatCornyx of the Great Swamp[Great Swamp]: 2000 SoulsIron FleshFarron KeepFrom the Farron Keep bonfire, go out and take a right. It's in the poison pool.Power WithinGrand ArchivesBehind an illusory wall in the dark room with two crystal lizards. Doorway is to the left.Carthus BeaconCornyx of the Great Swamp[Carthus]: 8000 SoulsCarthus Flame ArcCornyx of the Great Swamp[Carthus]: 10000 SoulsWarmthMound-Makers30 Vertebra Shackles [Sacrificial Altar]RapportKarla the Witch[Quelana]: 7000 SoulsBoulder HeaveLudleth of Coutland[Soul of a Stray Demon]Black FlameKarla the Witch[Grave Warden]: 10000 SoulsBlack Fire OrbKarla the Witch[Grave Warden]: 10000 SoulsBlack SerpentLudleth of Coutland[Soul of High Lord Wolnir] Pyromancy takes a little twist with the tomes, but all is normal. There are two people who can accept pyromancy tomes. Cornyx accepts Great Swamp, Crthus, and Izalith. Karla accepts Quelana and Grave Warden. Where to Find Cornyx If you know where the Cliff Understand bonfire is in the Undead Settlement, go there, then go up the stairs and onto the roof. Go up into the tower and across the bridge. Circle around and examine the cage in the corner. Free him. Where to Find Karla First you need to get to the Profaned Capital and go on the roof of the church. Follow the stairs and the one way hallways to the very end to get the keys. Take these keys back to the large prison room in the Irithyll Dungeon. Karla is in the small cell Pyromancy Tomes Great Swamp Pyromancy Tome: In Road of Sacrifices, from the Crucifixion Woods bonfire, you will see two crabs. Near the second crab far in the back at the wall, you'll find this tome. Carthus Pyromancy Tome: In the Catacombs of Carthus, from the Abyssal Watchers bonfire, go down the stairs and follow the pathway. Cross the bridge, go inside the next area and take the stairs to the left. At the top of the stairs, take the left, then turn right and take the ladder. Leave this hallway, then take the first right and attack the illusory wall. Go straight and turn right for the tome. Grave Warden Pyromancy Tome: In the boss room of the High Lord Wolnir. It's on the corpse right in front of the boss after the cutscene. Despite the item being available only during boss fight, it actually spawns in the bonfire room if you don't pick it up during the boss fight. Izalith Pyromancy Tome: In the Smoldering Lake, from the Old King's Antechamber, take the closest door to the bonfire and go straight all the way. It's on the corpse there. Quelana Pyromancy Tome: From the same bonfire mentioned above, take the stairs down and go straight. At the end, go through the doorway and follow the linear path. Go through the hallway and turn right (left is a illusory wall to a black knight). Go straight and take the immediate left which leads you through hallway with a rat. Take the right hallway before that rat. Go straight and attack the wall straight ahead. Follow the path to find the tome at the end of the hall and a sad sight. Master of Rings - Part 1

Master of Rings Acquire all rings. You must obtain all rings and be holding all rings simultaneously. There are 107 of them. You must obtain all of them. This includes any +1, +2 and the Life Ring +3. Rings are ordered as you see them in inventory for easy comparison. Some rings require a minimum playthrough of NG+, and others require NG++. Under the how-to/description section, the description will have a + to denote with NG version this item is located in. Unfortunately, I can no longer use colors to denote this. RingLocationHow-toLife RingFirelink ShrineBuy from Shrine Handmaid for 1500 Souls | Also a Burial GiftLife Ring +1Undead Settlement+In the tower with Siegward, take the lift up, drop off to access the area with the demon. Here you had Siegward sitting on the ledge. Turn right and check the other window for the ring.Life Ring +2Lothric Castle+After fighting the first dragon's hand, go through the opposite door outside. Go right and you'll be at a corner where you go right to where the dragon was with a crystal lizard. But instead, drop off onto the ledge below to find the ring.Life Ring +3Untended Graves++Behind the main throne in Dark Firelink ShrineSun Princess RingAnor LondoAfter the Aldrich, Devourer of Gods boss fight, take the elevator up and go into Gwynevere's bedchamber. It'll be on her bed.Estus RingFirelink ShrineBuy the Tower Key from the Shrine Handmaid for 20,000 souls. Open up the right tower, go up the stairs, across the bridge, open the gate. Drpo down to the bottom for the ring.Ashen Estus RingUntended GravesFrom the Untended Graves bonfire, hug take the left path to find the ring.Chloranthy RingUndead SettlementGet to the Flynn's Ring after the Fire Demon. On this roof, there is a tower. Enter the tower, and drop down to the bottom. Ring is on a corpse there.Chloranthy Ring +1Irithyll of the Boreal Valley+From the Church of Yorshka bonfire, go backwards then take the left towards the boss gate. It's behind the fountain containing the Ring of Sun's First Born.Chloranthy Ring +2Road of Sacrifice++From the first bonfire, progress until you see a wagon. Turn left and you should see a Corvian Caster (He casts poison). Go to him, and there's a tree. Go to the left of the tree and drop down onto a ledge below for the ring.Havel's RingFirelink ShrineTrade the Soul of a Stray Demon to Ludleth of Courland. The Stray Demon is located in Farron Keep.Havel's Ring +1Archdragon Peak+After the Great Belfry bonfire, go down the stairs and up the slopes with all the enemies. After the second doorway, turn to your left to find a corpse with the ring.Havel's Ring +2Anor Londo++From the Blade of the Darkmoon Covenant, drop down 5 times to find the ring on a platform.Ring of FavorIrithyll of the Boreal ValleyDefeat both of Sulyvahn's Beast next to the Aldrich Faithful covenantRing of Favor +1Irithyll of the Boreal Valley+Located on the balcony in the Pontiff Sulyvahn boss areaRing of Favor +2Cathedral of the Deep++Before accessing the rafters to the cathedral, check the left alcove with an enemy in it for the ring.Prisoner's ChainFirelink ShrineTrade the Soul of Champion Gundyr with Ludleth of Courland. Champion Gundyr is the area boss of the Untended GravesRing of Steel ProtectionArchdragon PeakIn the area where you fight the Ancient Wyvern, take the right stairs down to the end and walk over the right edge and turn around. Walk along the ledge and you'll find the ring.Ring of Steel Protection +1Untended Graves+At Dark Firelink Shrine, check the right tower and the ring is on a corpse just to the right of the gate.Ring of Steel Protection +2Catacombs of Carthus++At the first bridge, look over to the left. You will see the ring on a pillar.Magic Stoneplate RingConsumed King's GardenDefeat the knight just before the boss gate.Magic Stoneplate Ring +1Farron Keep+From the Farron Keep bonfire, go out and go right. Go past the Iron Flesh pyromancy until you reach an area with Basilisks. The ring is on a corpse next to a tree.Magic Stoneplate Ring +2Profaned Capital++Drop through the broken wall and go right down the stairs. There is a corpse at the bottom of the stairs with a ring.Flame Stoneplate RingUndead SettlementIt's hanging on a corpse near the cage man who takes you to the Pit of Hollows. See Mound-Makers.Flame Stoneplate Ring +1Profaned Capital+In the toxic pool area, go up the ladder. Go over to where the door to the building would be. Drop down onto the ledge above the door and you'll find the ring.Flame Stoneplate Ring +2Smouldering Lake++Next to the Black Knight hidden behind the illusory wall near the King's Antechamber bonfire.Thunder Stoneplate RingArchdragon PeakFrom the second bonfire, go up the stairs, through the doorway, turn right down the stairs and left down some more stairs. Go through the hallway and turn right outside. Climb the ladder to find the ring.Thunder Stoneplate Ring +1Catacombs of Carthus+In the room with a bunch of potsThunder Stoneplate Ring +2Lothric Castle++Before the boss gate, go take the path to the right. Go up the small set of stairs, then go outside to the balcony. Drop down, and the ring is near the dead end drop on this roof. Do not drop down twice.Dark Stoneplate RingIrithyll of the Boreal ValleyAfter the Pontiff Sulyvahn boss fight, go to the field of giants. Go under the underpass to the left and in the dark corner is the ring.Dark Stoneplate Ring +1Lothric Castle+Right after you fight the white wyvern's infectious hand, go inside the room, up the stairs and out to the balcony. Look to your right on the balcony to find the ring. Master of Rings - Part 2 Dark Stoneplate Ring +2++Road of SacrificeNear the fire you extinguish closest to the Farron Keep Perimeter, the ring is behind the wall. Go through the doorway from the flame, turn right and break all the graves to the right for the ring.Speckled Stoneplate RingSmouldering LakeGet the Ballista to break the stone wall in Smouldering Lake. The wall is located on the far side from the ballista. If you're approaching from the Demon Ruins bonfire, go back out, hug the left wall. It's after the first tree, and before the second tree.Speckled Stoneplate Ring +1+Cemetery of AshesWhere you fight the first crystal lizard, it'll be on the right side before you aggro the lizard.Bloodbite RingUndead SettlementKill the giant rat in the sewersBloodbite Ring +1Smouldering Lake+On a corpse leaning on the ballista on the cliff side.Poisonbite RingCathedral of the DeepNear the big crystal lizard where you unlock your first shortcut (gate)Poisonbite Ring +1Undead SettlementIn the graveyard where the Giant throws his javelins, there is a house with a well. The ring is on the corpse behind the wallCursebite RingProfaned CapitalIn the cave with the toxic swampFleshbite RingGrand ArchivesAfter the bridge with the Crystal Sage, go up the stairs and you'll be in a big room. Go straight up some more stairs, and turn around and there ring is on a corpse. Tons of curse here.Fleshbite Ring +1High Wall of Lothric+After the Tower on the Wall bonfire, you'll be on a rooftop. First ladder is short. Second ladder ahead with a small wooden platform on the tiling. Do not go down the ladder, instead look forward and you should see a rooftop with a corpse holding the ring. Make the jump.Knight's RingLothric CastleNear the altar for the Warrior of Sunlight.Hunter's RingGrand ArchivesOn the rooftops with the three golden winged knights, go up the spiral stairs and up the ladder to find the ring.Scholar RingGrand ArchivesAt the bridge where you defeat the Crystal Sage, there is a lever you can pull that will open up a shortcut. The ring is in this shortcut.Priestess RingUntended GravesBuy it from the Shrine Handmaid in Dark Firelink Shrine for 1000 Souls.Covetous Gold Serpent RingProfaned CapitalComplete Siegward's Sidequest all the way to Profaned CapitalCovetous Gold Serpent Ring +1Irithyll of the Boreal Valley+From the Church of Yorshka bonfire, progress towards the river. You will pass a dark room. Right after the dark room, you'll be back outside and you will notice a broken railing. Drop down for the ring.Covetous Gold Serpent Ring +2Archdragon Peak++After the boss fight, the ring is located on the right side on the middle staircase.Covetous Silver Serpent RingFirelink ShrineAfter buying the Tower Key from the Shrine Handmaid, drop down to the front ledge to find a door to the rafters. Go to the end of the rafter that points towards the throne. This is an illusory wall, hit it. Continue straight and drop down. The ring is in the chest to the right.Covetous Silver Serpent Ring +1Irithyll Dungeon+From the giants feet and the rats, take the elevator. On the way up, drop off on a platform with the ring.Covetous Silver Serpent Ring +2Undead Settlement++Over where you fight the Fire Demon with Siegward, get up to Flynn's Ring on the roof of the left building. From there, look down and you'll see the ring on a roof.Saint's RingFirelink ShrineBuy from Irina for 300 SoulsDeep RingCathedral of the DeepAfter unlocking the shortcut from the Cleansing Chapel bonfire on the left, take the elevator up. There is a crossbow enemy on the ledge. Kill him, go on the ledge and take a left and you'll find a ladder. Take the ladder up and kill the deacon for the ring.Darkmoon RingAnor LondoTurn in 10 Proof of a Concord Kept to Company Captain Yorshka. See Covenants.Young Dragon RingFirelink ShrineDefault ring for Sorcerer Build | Else, buy 3 spells from Orbeck in Firelink Shrine. See sidequest for details.Bellowing Dragoncrest RingIrithyll DungeonWith the Jailerbreaker's Key, open the shortcut that leads to a drop down. The ring is on the drop down.Great Swamp RingRoad of SacrificesDefault ring for Pyromancers | Kill one of the two Great Crabs in the lakeWitch's RingSmouldering LakeRight before the Abandoned Tomb bonfire.Morne's RingRoad of SacrificesBefore the bridge that leads to the Halfway Fortress bonfire, drop down to the right to a lower path that leads to two corpses: one with the ring.Ring of the Sun's First BornIrithyll of the Boreal ValleyFrom the boss gate, turn around and go straight to the ledge. It's on the fountain below.Lingering Dragoncrest RingFarron KeepKill the Giant Crab near the Keep Ruins bonfire.Lingering Dragoncrest Ring +1Road of Sacrifices+Next to the Crucifixion Woods bonfire, look towards the close giant crab. The ring is on a corpse near a tree near that crab.Lingering Dragoncrest Ring +2Grand Archives++On the roof with the three golden winged knights, go up the spiral staircase. Do not go up the ladder. Instead, walk around to the front and you'll find the ring in a small alcove.Sage RingRoad of SacrificesNear the Crucifixion Woods bonfire, there is a sewer near the buildings away from the Giant Crabs in the lake. Inside is the ring.Sage Ring +1Grand Archives+Located on the rafters of the archives. The beam is white.Sage Ring +2Consumed King's Garden++Take the first elevator down, drop off halfway. Go out, take the left platform. At the end there is a staircase below. Drop down to it. Then look behind you and there is another set of stairs with the ring. Run towards the bottom of that staircase. Master of Rings - Part 3 Dusk Crown RingIrithyll DungeonAfter passing the two giant rats in the sewers, you'll be in a large prison room. The ring is in the cell in the opposite corner of the room from where you entered.Leo RingIrithyll of the Boreal ValleyIn the room with the black knights right after the kitchen with Siegward. It's in a chest on the second floor.Wolf RingFarron KeepTurn in 30 Wolf's Blood Swordgrass to Old Wolf Farron. See Covenants.Wolf Ring +1Farron Keep+Outside the building with the Keep Ruins bonfireWolf Ring +2Cemetery of Ashes++After the Iudex Gundyr boss fight, open the door and look immediately to your left.Hawk RingUndead SettlementDropped by the Giant | Kill him or collect all the young white branches in Undead Settlement, Farron Keep, and Cathedral of the Deep and he will die eventuallyHornet RingUntended GravesLocated outside of Dark Firelink Shrine on the right lower pathKnight Slayer's RingSmouldering LakeDefeat Knight Slayer Tsorig right after the room with all the basilisks. Turn left before the stairs and he's at the end of the wall on the stairs.Ring of the Evil EyeIrithyll of the Boreal ValleyComplete Anri's Sidequest up to the Church of Yorshka. See Anri's sidequestRing of the Evil Eye +1Cathedral of the Deep+Behind the altar right before the boss gateRing of the Evil Eye +2High Wall of Lothric++In the room with the Estus Shard, it's in the corner under some barrels and crates.Farron RingFirelink ShrineTalk to Hawkwood after defeat the Abyss WatchersDragonscale RingConsumed King's GardenOn the second elevator, drop off midway and the ring is on the corpse.Horsehoof RingFirelink ShrineSold by Unbreakable Patches by some criteria | Dropped when you kill himWood Grain RingFirelink ShrineBuy from the Shrine Handmaid after giving her the Easterner's Ashes. The ashes is on the rooftops of Irithyll of the Boreal Valley with the archer silver knights. Once you get passed the first knight and get to the top, turn right and go down the stairs.Wood Grain Ring +1Consumed King's Garden+Take the first elevator to the very bottom. Turn around and it's in the toxic pool.Wood Grain Ring +2Irithyll of the Boreal Valley++After the room with the black knights after the kitchen with Siegward, go outside and turn immediately to your right. Ring is in the corner.Flynn's RingUndead SettlementAfter killing the Fire Demon with Siegward, it's on the rooftops on the far left building on a broken platform.Magic Clutch RingIrithyll of the Boreal ValleyFrom the Church of Yorshka bonfire, go back to the middle and go towards the fountain with the three enemies. Go forward and go up the small set of stairs. From here you can either go left into an alley or go right. Go right and attack the wall to reveal the ring.Lightning Clutch RingArchdragon PeakRight before the gate before you fight the Ancient Wyvern, take a path to the left to find this ring.Fire Clutch RingUndead SettlementAfter going through the stables, you'll get to a courtyard with several firebomb throwers. To the left is a guillotine. Behind the guillotine is a broken path with the ring. It's near the Cliff Underside bonfire.Dark Clutch RingIrithyll DungeonIn the sewers, there are two chests. One is a chest, the other is a mimic. The ring is on the mimic.Red Tearstone RingLothric CastleBefore the Dragonslayer Armour fight, take the room to the right and go out to the balcony. You'll find the ring on the balcony.Blue Tearstone RingHigh Wall of LothricGiven by Greirat after you free him. See Sidequest: Greirat of the Undead Settlement.Lloyd's Sword RingCathedral of the DeepInside the cathedral using the first elevator shortcut, you'll get to a sequence where you're about hand level to a giant. The ring is on this pathway where there's another enemy.Lloyd's Shield RingFirelink ShrineBuy from Shrine Handmaid after giving her the Paladin's Ashes. The Paladin Ashes are near the first bonfire of the Cathedral of the Deep on the path to the left.Carthus MilkringCatacombs of CarthusIn the room with the potsCarthus BloodringCatacomb of CarthusAfter descending passed the second skeleton boulder, turn right. Then turn right again and its at the end of this hallway to the left.Pontiff's Right EyeIrithyll of the Boreal ValleyDefeat Sulyvahn's Beast on the very first bridge encounter. If you do not defeat it here, then it will appear on the waterway under that bridge.Pontiff's Left EyeFirelink ShrineTrade Soul of Boreal Valley Vordt to Ludleth of Courland. This is the first area boss for the High Wall of Lothric.Aldrich's RubyAnor LondoKill the giant curse beast near the main gates to the interior. It's hanging on the ceiling initially.Aldrich's SapphireCathedral of the DeepAfter dodging the giants attack on the second floor of the cathedral, descend down the stairs to the very bottom. In this room are a few ambushes and a knight. Behind the knight is a doorway where you fight a giant curse beast. Kill this beast for the ring.Silvercat RingFirelink ShrineComplete Sirris' questline up to defeating Creighton the Wanderer. Talk to Sirris in Firelink afterwards.Slumbering Dragoncrest RingFirelink ShrineSee Orbeck's Sidequest.Obscuring RingCathedral of the DeepTrade 10 Pale Tongues to Rosaria. See Covenants.Untrue Dark RingFirelink ShrineBuy from Yuria of Londor. See Usurpation Ending for details.Untrue White RingFirelink ShrineBuy from Yuria of Londor. See Usurpation Ending for details.Reversal RingIrithyll of the Boreal ValleyIn the circular temple room before the spiral elevator to Anor Londo, attack the wall on the opposite direction of the doorway to the elevator. Go inside to the Darkmoon Temple. The ring is on the right side of the temple.Skull RingFirelink ShrineAfter offering up all five Lord of Cinders, this ring appears on Ludleth's ashes. Requires you to warp.Calamity RingArchdragon PeakAt the second bonfire, go outside and there's an altar with a dragon statue. Use the 'Path of the Dragon' gesture here.Ring of SacrificeEverywhereBuy from Yuria. Trade Loretta's Bone with the crow. Master of Sorceries

Master of Sorceries Acquire all sorceries. SpellLocationMerchant PriceSoul ArrowYoel | Yuria | Orbeck1000 SoulsGreat Soul ArrowOrbeck of Vinheim3000 SoulsHeavy Soul ArrowYoel | Yuria | Orbeck2000 SoulsGreat Heavy Soul ArrowOrbeck of Vinheim4000 SoulsFarron DartYoel | Orbeck1000 Souls | 500 SoulsGreat Farron DartOrbeck of Vinheim[Sage's Scroll]: 2000 SoulsFarron HailOrbeck of Vinheim[Sage's Scroll]: 5000 SoulsHoming SoulmassOrbeck of Vinheim[Logan's Scroll]: 6000 SoulsHoming Crystal SoulmassOrbeck of Vinheim[Crystal Scroll]: 18000 SoulsCrystal HailLudleth of CourlandSoul of a Crystal Sage: 1500 SoulsSoul SpearOrbeck of Vinheim[Logan's Scroll]: 5000 SoulsCrystal Soul SpearOrbeck of Vinheim[Crystal Scroll]: 15000 SoulsWhite Dragon BreathLudleth of CourlandSoul of Consumed Ocerios: 10000 SoulsSoul StreamGrand ArchivesNear the lever where you reveal a shortcut with a ring, take the ladder up. You should see an item to the right as you climb up the ladder. Go a little forward, then look to your right at a wall. This is an illusory wall. Break this and go to the end where you should see a corpse on a chair with the spell.Soul GreatswordYoel | Yuria | Orbeck5000 SoulsFarron FlashswordOrbeck of Vinheim3000 SoulsMagic WeaponYoel | Yuria | Orbeck4500 Souls | 4500 Souls | 3000 SoulsGreat Magic WeaponFarron KeepFrom the Farron Keep Perimeter bonfire, go towards to Road of Sacrifices and you'll find the spell on a corpse near the gate shortcut.Crystal Magic WeaponOrbeck of Vinheim[Crystal Scroll]: 10000 SoulsMagic ShieldYoel | Yuria | Orbeck4500 Souls | 4500 Souls | 3000 SoulsGreat Magic ShieldIrithryll DungeonFrom the first bonfire, go straight into the room then more until you reach the ledge. Drop down, and open the cell directly behind you. Kill the enemy for the spell.SpookOrbeck of Vinheim2000 SoulsAural DecoyOrbeck of Vinheim2000 SoulsPestilent MistOrbeck of Vinheim1000 SoulsCast LightOrbeck of Vinheim[Golden Scroll]: 1000 SoulsRepairOrbeck of Vinheim[Golden Scroll]: 1500 SoulsHidden WeaponOrbeck of Vinheim[Golden Scroll]: 1500 SoulsHidden BodyOrbeck of Vinheim[Golden Scroll]: 3000 SoulsChameleonIrithryll of the Boreal ValleyAnri's Questline or kill the Pilgrim when she's in the churchTwisted Wall of LightOrbeck of Vinheim[Golden Scroll]: 6000 SoulsDeep SoulLudleth of Courland[Soul of the Deacons of the Deep]Great Deep SoulAldrich Faithful10 Human Dregs [Deacon]AffinityKarla15000 SoulsDark EdgeKarla8000 Souls Aug 25, 2017 - Pestilent Mercury name changed to Pestilent Mist. Give any scrolls to Orbeck of Vinheim. Orbeck of Vinheim is located in the Road of Sacrifices. Getting Orbeck of Vinheim Before you do this, make sure you have at least 10 intelligence. Otherwise, Orbeck will refuse your request. From the Crucifixion Woods bonfire, go through the hole in the wall. Go up the stairs and cross the bridge. Now take the left, DO NOT DROP DOWN. Take the stairs along the edge of the walls and you'll find another set of stairs going up. Go in the doorway and he'll be to your left. Scrolls Sage's Scroll: In Road of Sacrifices set, Keeps Ruin bonfire inside of Farron Keep. Go out the building towards the ramp going down towards the giant door with the braziers. Look to your left. You should see the giant crab in the background. Kill the giant crab, or go where it used to be, and then follow the wall away from where you came from and you'll find the item on a corpse. Golden Scroll: Also in Farron Keep and directing from the Keeps Ruin bonfire, go towards the giant door with the braziers. Do not go through the door. Instead, scale the wall and you'll eventually encounter basilisks. You'll also find a cave which has the scroll inside. Logan's Scroll: In the Irithryll Dungeon set, the Profaned Capital bonfire, go down and enter the through the broken wall. From here, you'll enter a swamp. Head towards the church and on the top is an unkindled enemy. The scroll will drop from him. Crystal Scroll: Dropped by Crystal Sage at Grand Archives Supreme Weapon Reinforcement

【至高武器强化】 将任意武器强化至最高等级。 “任意武器”的描述存在误导,因为该成就似乎不包含那些最高强化等级为+5的武器。此外,有多个报告显示PC版中某些武器无法正常解锁该成就。为确保安全,建议使用多个楔形石,将普通武器强化至+10。我是用黑刃太刀完成的。 强化材料: +1:2个楔形石碎片 +2:4个楔形石碎片 +3:6个楔形石碎片 +4:2个楔形石大碎片 +5:4个楔形石大碎片 +6:6个楔形石大碎片 +7:2个楔形石原盘 +8:4个楔形石原盘 +9:6个楔形石原盘 +10:1个楔形石圆盘 楔形石碎片、楔形石大碎片和楔形石大原盘在游戏中作为物品掉落非常丰富。楔形石原盘主要在到达洛斯里克城后大量出现。看到尸体就去搜查一下吧。最好检查一下里面有什么。 只要满足各种要求,防火女也会出售所有四种材料。 物品 需求 楔形石碎片 逐梦灰烬 楔形石大碎片 东方人灰烬 楔形石圆盘 追龙者灰烬 楔形石原盘(仅1个) 放置所有薪王柴薪 关于防火女出售的楔形石原盘,就是上面列出的那个。完成希夫拉德的任务线直至冷冽谷的地牢 与传火祭祀场的乌鸦交换螺旋剑碎片 古龙顶端哈维尔旁边的尸体上 无名王者篝火后的尸体上 大书库中一个移动书架的后面 击败大书库屋顶的所有三名金翼骑士 在大书库激活洛斯里克王子boss战区域的电梯后,乘电梯下到洛斯里克城。下电梯后,触碰压力板然后迅速离开,会出现第二个电梯。乘坐该电梯下去。 贪婪金蛇戒指【物品发现率】 贪婪金蛇戒指能提供100%的掉率加成,在为各种物品掉落进行游戏刷取时,它是一个极具吸引力的道具。这一点在誓约物品上体现得尤为明显,尤其是考虑到许多玩家的誓约系统存在问题。这是一顶帽子。 注意:如果你亲手杀死宝箱怪,它们就不会重生。如果你使用猎人符咒,只会迫使它们掉落物品。所以如果你想刷这顶帽子,一定要确保至少留一只宝箱怪活着。 每个被你杀死的宝箱怪都有该物品的掉落率。你可以通过反复击杀巨人尤姆 boss 房外刷新的两只宝箱怪来刷取。向宝箱投掷一枚不死人猎人符咒,就能同时杀死它们俩。检查宝箱,重复此过程。 在将圣骑士骨灰交给侍女后,即可从她那里购买不死人猎人符咒。贪婪金蛇戒指+0:50点物品发现率 +1:75点物品发现率 +2:100点物品发现率 锈蚀金币 普通:50点物品发现率 黄金:100点物品发现率 结晶老者刺剑 单持:50点物品发现率 双持:100点物品发现率 物品发现率不要求属性加点 贪婪银蛇戒指:100点物品发现率 幸运属性:每点幸运增加1点物品发现率 终极营火

终极营火 强化营火至最高等级。 可通过在传火祭祀场的营火处燃烧不死人遗骨来提升营火等级。每个周目共有10个不死人遗骨,因此可在一周目内获得该成就。若有遗漏,可在周目结束时或下一周目获取。营火初始等级为1级,最高可升至11级。每提升一级营火等级,元素瓶和原素瓶的效果都会增强,具体以+数值表示。 不死人遗骨位置 不死聚落:在有巨人投掷标枪的墓地中,右侧有一块断裂的土地。该物品位于平台上,需要跳跃过去获取。 法兰要塞:从要塞遗迹营火出发,朝着巨大城门前进。右侧是一座爬满鼻涕虫的塔,道具就在塔内。 【深邃教堂】:在巨人投掷标枪的区域,朝着悬崖边缘有一棵白树的方向下去。碎片在树旁的一具尸体上。 【卡萨斯地下墓地】:由第一个骷髅滚石掉落。杀死罐子附近戴帽子的骷髅,他是维持滚石滚动的人。杀死他滚石就会停止。在滚石路径上可以找到碎片。 【烟熏湖】:杀死巨型蠕虫。 【烟熏湖】:从恶魔遗迹营火出发,进入内部后向下跳。在下一个房间里,左转,碎片在一个恶魔身上。注意:上方有一只鼻涕虫在守护。 【伊鲁席尔冷冽谷】:从幽儿希卡教会营火出发,朝着悬崖方向走。向右转并沿着小路前进。尽头是一块巨大的墓碑,碎片就在墓碑后面。 废弃之都:第一个营火旁的尸体上。 洛斯里克城:在两只飞龙喷火的桥下,位于远端。 大书库:在书库圆形尽头附近有破窗的上层阳台上。如果你在室外,会遇到石像鬼。如果你在第一个石像鬼处,可以立即向右跳下,沿着小路找到碎片。如果你击败了所有三个石像鬼,沿着路径走,可以看到一个通往破窗的跳下点,从那里也能拿到碎片。 如果你似乎找不到某个特定的碎片,可以查看视频攻略,或者在二周目或三周目获取更熟悉的碎片。 终极元素瓶

Ultimate Estus Reinforce the Estus Flask to the highest level. You can reinforce your estus flask at Andre the Blacksmith in Firelink Shrine by giving him an Estus Shard. Each shard will increase the number of total flasks you can have up to a total of 15 flasks. You begin with 4 flasks by default, so there are a total of 11 shards per playthrough. Estus Shard Locations Firelink Shrine: In the rafters of the shrine. Accessed using the Tower Key purchased from the Shrine Handmaid. Drop onto the roof of the shrine, then the front has a doorway to the rafters. High Wall of Lothric: Before dropping down to the courtyard with the fountain and the winged knight, the shard is ontop of an anvil in a room with firebomb throwers. Undead Settlement: In the open area with the giant fire pit where you face your first evangelist, it's next to the burning tree. Road of Sacrifices: From the Crucifixion Woods bonfire, go to the right side of the building closest to you. You will go under a bridge and the shard is in a corner to your left after the bridge. Farron Keep: From the Farron Keep bonfire, follow the small patches of land to the left. You will see a fallen tower with an item under it. Cathedral of the Deep: Right before the Cleansing Chapel bonfire, you'll see several enemies praying at a monument. The shard is on the monument. Smouldering Lake: From the King's Antechamber bonfire, the opposite corner of the room has an illusory wall. Hit it and follow the linear path. There are a TON of slugs on the ceiling in this hallway. The item is after the hallway. Anor Londo: Located in a chest on the left side in the main room. Irithyll Dungeon: From the first bonfire and holding the Jailbreaker's Keys, go straight into the prison turn right. Open the gate with the keys, then drop down to the pathway below. Go right and you'll find a mimic with the shard. Consumed King's Garden: After taking the first elevator down, drop off midway. Take the right path for the shard. Grand Archives: On the rooftops near the Golden Winged Knights, there's a cordoned off section of the roof with the shard. The corpse is dead center against the wall. Note: If you can't find any of these no matter what, just recollect these in NG+ or NG++. DLC: Ashes of Ariandel Note: DLC is not required for any achievements. The DLC can be accessed by talking to Slave Knight Gael in the Cathedral of the Deep at the Cleansing Capital DLC. Painted World of Ariandel Bonfire: Snowfield From this initial bonfire, go straight until you encounter a spear throwing enemy. Turn right here and follow the path until you fall off. From here you'll drop into a wolf trap, go straight all the way towards the cliff and trace it to the next region. In this next area, explore what you want, but the tower is where you need to go. There's a Captain's Ashes near the top on a beam. Head to the bottom of the tower and take the nearest route. You can drop off again on the snow. This will take you to the second bonfire to the right. Bonfire: Rope Bridge Cave Sorcery: Frozen Weapon | From the second bonfire, backtrack and you'll find an area smothered with blood and a corpse with an item. Cross the bridge. Open the doors and head inside. Bonfire: Ariandel Chapel Ring: Chillbite Ring | Talk to Sister Friede twice. Return to the bridge and climb down the ladder close to the Rope Bridge Cave bonfire. Go down until you slide down an iced path. At the bottom, you'll arrive at a swamp. Go into it and take the door to the right. Once here, take the right fork, and go passed the bridge and climb up the ladder to the right. At the top, exit the building and turn left for a bonfire. Bonfire: Corvian Settlement Cross the bridge and go up the slope. Open the metal gates and approach the church on your left. Miracle: Way of White Corona | Inside the church to your left, behind the altar Exit the church and approach the cathedral. You'll be invaded by Sir Vilhelm. He does drop the Contraption Key, so make sure to fight him. Head inside and straight ahead is where you use the Contraption Key. This will lower a ramp to the attic. Head up and you will find the painter here. Head outside and to the right. Drop down to the bonfire before unlocking the gate. What a shortcut! Bonfire: Snowy Mountain Pass Head straight, and your target is to raise your altitude as much as possible. If you see leaning trunks over gaps, there's a good chance it's a shortcut that you kick over. At the top, you'll find a mineshaft that enters a crypt. In the crypt, do not descend. Stay up top and cross the bridge and go up teh stairs and open the door. You will be back in the Cathedral next to the bonfire. Talk to Sister Friede. Return to the crypt and head to the cesspool below. Near the middle, you will find a crank, pull it and the altar above where Sister Friede is will move. Directly to the right of this crank to the wall, is an illusory wall. Attack it and go down. Head down the stairs and out the doorway. Follow the tree trunk path down to the arena. Once you're at the arena, make sure you're embered so you can be invaded by Livid Pyromancer Dunnel. Pyromancy: Floating Chaos | Defeat Livid Pyromancer Dunnel Return to the Ariandel Chapel bonfire. Head down the slopes. Boss: Sister Friede Bonfire: Sister Friede After that, head back to Ariandel Chapel bonfire, and walk outside and the cut the bridge rope as you did in the Catacombs. Climb down the ladder rope. Traverse down the long series of tree trunks until you reach the bottom. If you turn around, you have three paths. Left, middle, and right. Middle contains the bonfire. Bonfire: Depth of the Painting From the bonfire, the path to the right leads to the boss area. So take the left path towards the giant frost crabs. Follow this path all the way. The ramp up will take you to a ladder that connects to the bridge on the other side. Sorcery: Snap Freeze | At the dead-end on ice right behind a tree enemy. Boss: Champion's Gravetender and Gravetender Greatwolf Bonfire: Champion's Gravetender DLC: The Ringed City | The Dreg Heap In order to access this DLC, you either need to complete the first DLC, or be in a game where you're at the final boss. If you're at the first DLC, warp to Sister Friede's bonfire. If you're accessing from the main game, warp to Kiln of the First Flame Bonfire. The Dreg Heap Bonfire: The Dreg Heap From the first bonfire, walk out. There's an NPC here, use if needed. Drop down twice and you'll be in an area with several enemies. Clear the area and loot if wanted. Else, run to the right to the item on the ledge. (You'll fall) After the drop, go through the opening to your left, then you'll meet your first angel. Ring: Ring of Steel Protection +3 | Where the first angel is, you run straight and there's a doorway in front of you. Do not go in. There's a wooden path that contains the ring at the end of the path. Proceed through the arched doorway with two knights inside. I will refer to this as a church. Sorcery: Great Dreg Souls | From the church, go through the doorway, and go right. Go into the building ahead, go up the stairs and into the last room. The left wall has a weird arch pattern, attack the illusory wall. Follow this one way path up to the top with a corpse. Kick the ladder in this area. Ring: Covetous Silver Ring +3 | From the Great Dred Souls, walk onto the wooden platform, then you can drop off (opposite side from ladder) with a corpse at the ledge. Miracle: Projected Heal | From that church, make sure the tower falls by going out the arched doorway and proceed between the paths. This should make a tower fall if it hasn't already. Go back inside the church and then you can walk over the fallen tower. You'll find Lapp here, and then an enemy near a the cliff and a narrow path. Ignore the path and drop down to the right onto the ash. The end of this section will contain a corpse in an alcove with an enemy and the miracle. Proceed to the next bonfire. Note: the first angel can be killed by killing the worm looking thing in the area after the falling tower. If you took the above route for Projected Heal, you will miss this, so if you want it dead, take the other route. Bonfire: Earthen Peak Ruins | This is Lapp's second location. Talk to him, and return when you retrieve the Ring of Favor +3. Talk to him and he will give you a Titanite Slab, then refresh and pick up the Siegbrau. The first area has an angel with a bunch of ashes. Cross this area til you reach an area with a poison pool. Once you drop down to the poison pool area, there is a shack in front of you. Ring: Ring of Favor +3 | From the spot you drop down, there is a branch beyond the shack where you can walk up. The ring is at the end of the branch (do not drop down). Cross the area, and you'll be invaded by Desert Pyromancer Zoey. Pyromancy: Flame Fan | Dropped by Desert Pyromancer Zoey To get rid of the angel in this swamp area, return to the area right before you encountered Zoey, so to the top of the branch, turn right and go on the roof of the house. At the end, walk over the branch to the other roof and go left. Kill the worm thing here. Next area is a death run. Get to the end of the branch drop down into the ash. If you want to kill the angel, then do not drop down to the left where there's a bonfire, go down to the right and follow the branches here to the last hollow. Proceed to the next bonfire. Bonfire: Within Earthen Peak Ruins Boss Fight: Demon in Pain & Demon from Below Bonfire: The Demon Prince DLC: The Ringed City The Ringed City Bonfire: Mausoleum Lookout So this place is just nuts. Note: You cannot kill those spirits, the giant guy summons them. Kill the giant guy. On the inside of the arced walls are several sets of tombstones, you can use these as shields from the barrage of arrows. At the last set of tombstones, notice the wall is slightly crumbled (you'll also encounter an actual physical enemy here). Run off either to the left or right of the crumbled wall and you'll land on the platform below. Do not roll or drop off from that wall, you'll probably die. Cross the path and up the ladder, up the stairs and kill the giant. This will make looting everything here easier. Head downstairs, you'll pass an NPC. Note: the path ahead has several ambushing enemies. Be wary. Bonfire: Ringed Inner Wall | If you're keeping up with Lapp's storyline, he appears at the balcony. Follow the linear path until you pass a circular room where you go downstairs (also has a chandelier). Exit that room and you'll be on a giant set of stairs. Talk to the NPC at the top, you can receive a sword from that NPC. Now instead of going down the stairs, take the right path and cross the bridge. At the end of the area with the bridge, you'll be invaded by dark spirit Seeker of the Spurned. If he does nto invade you by the time you go up the mini stairs, consume an ember (if necessary). Ring: Wolf RIng +3 | Kill Seeker of the Spurned Return to previous area and make your way down the stairs. (There's two paths you can take, they lead to the stairs) Now this isn't Dark Souls unless you get a large swamp, at least it's not poisonous. As soon as you enter the swamp, go to your left and you'll find a ladder. Go up the ladder. Ring: Covetous Gold Serpent Ring +3 | From the ladder, take the left path. You'll see two Ringed Knights across a bridge. Go there, and go all the way on this path until you find a room with some glowing fire inside. Check the corpse. If you're keeping up with Lapp's questline, he appears in the same room as the Covetous Gold Serpent Ring +3. After talking to him, if you haven't already used the Purgatory Monument, go do so. If you already have by the time you meet Lapp here, then you will clear two checkpoints. Upon returning here, he should be gone. Ring: Havel's Ring +3 | From the ladder, go up the stairs turn right. Drop down onto the rock slopes, and go towards the doorway. Do not enter, look at the door, turn around, drop down. The ring is on a corpse on one of the flat spots near the tree. Quite a few items located about the swamp, but nothing in terms of spells or rings. Loot to your heart's content. The exit is up the sunken church building with several Ringed Knights, at the end, drop off to some rocks and go up the path. Do not take the bridge left, go straight for a bonfire. Bonfire: Ringed City Streets Before we proceed, there is a secret to do. In the room before the bonfire, you should see writing on the wall that says "Show Your Humanity". Use the Chameleon Spell or a Young Tree Branch while standing in the swamp until you turn into a humanity, return to the wall and a ladder appears. Just a fun secret. Cross the bridge, force the dragon to use fire, once the fire disperses, go to the first hole in the wall. Once the dragon does his return fire (going up), run up to the end and inside. Once inside, there's two ways to go. Up towards the crystal lizard or down. You want to go down. In the first room where you drop down, you should find Lapp if you're doing his questline. This is the final spot for Lapp. Walk out for a cutscene. Return to the upper area for your reward. Ring: Ring of the Evil Eye +3 | One of the rooms here has a mimic, kill it. Bonfire: Shared Grave Now, this is where you should try to defeat the dragon. Note: if you have a friend, have one person with arrows (and probably Hawk's Ring) to shoot the dragon from afar while the other can melee/cast up close. Dragon should keep aggro onto the player at the very bottom letting the player up top land some easy damage. Once you pass the dragon area, you'll see stairs. To the right of the stairs is an illusory wall, attack it. (There's two more illusory walls behind that one) Miracle: Lightning Arrow | At the end of the illusory walls Go up the stairs and you'll arrive in a room with Gwyn's statue and an item on it. From that room, take the elevator up. Do note there is a path to drop off here. Make note of it. At the top, unlock the shortcut to the Ringed Inner Wall bonfire. On the way down, take the drop off. There are two paths here. Ring: Chloranthy Ring +3 | The path with the hole will let you land on the ring and loot it. The other room, you can attack one of the statues on the right to reveal a hidden path. Take that path. The other path is the optional boss. Optional Boss: Darkeater Midir | Note: This boss will let you join the Spears of the Church covenant. Bonfire: Darkeater Midir Now returning to the room with Gwyn's statue, you head outside. Spears of the Church covenant reward turn in is out here. Enter the church for your fight. Boss: Halflight, Spears of the Church | There is a chance that the boss you fight may be a member of the church as opposed to Halflight himself Bonfire: Church of Filianore Head up the elevator. Bonfire: Filianore's Rest Before you face off with Gael, if you defeated Darkeater Midir, you can fight Shira to the right of the desert. This fight is also available after Gael. Boss: Slave Knight Gael Bonfire: Slave Knight Gael Clean-Up Old Woman's Ashes are available just after the Dreg Heap bonfire with the shop pilgrim. Return the Blood of the Dark Soul to the Painting Girl in the Ashes of Ariandel DLC above where you fight Sister Friede. Changelog Due to some instability with guide progress, I'll throw a changelog in so you know what's been done recently. April 22, 2016 Updated Master of Infusion to include all coal locations, all permanent gem locations, and slight descriptions regarding the effect of each infusion. Finished NG+ walkthrough section Finished NG++ walkthrough section Finished Greirat of the Undead Settlement's Sidequest Finished Ringfinger Leonhard's Sidequest Finished Irina of Carim's Sidequest Finished Orbeck of Vinheim's Sidequest Finished Cornyx of the Great Swamp's Sidequest Finished Master of Expression (Gestures) Added weapon upgrade table in 'Host of Embers | Multiplayer' Finished Supreme Weapon Reinforcement April 23, 2016 Added a section regarding the Symbol of Avarice Finished Covenant sections (may add in a farming recommendation later) Added all four endings Finished Anri of Astora's Sidequest Finished Sirris of the Sunless Realm's Sidequest Finished Unbreakable Patches' Sidequest April 25, 2016 Corrected a few achievements with regards to order as well as clarified a few sidequests. April 26, 2016 100% Dark Souls III April 27, 2016 Updated NG+ and NG++ sections after confirming their locations. Also moved two rings to better locations. Havel's Ring +2 moved from Irithyll of the Boreal Valley to Anor Londo, since you're essentially there and have a bonfire access despite the ring still being located in Irithyll. Covetous Silver Serpent Ring +1 moved from Profaned Capital to Irithyll Dungeon Updated Orbeck of Vinheim's sidequest to change warning to be more broad. Updated the assassination note on Orbeck's quest given to you by Yuria. Corrected hollowing requirement for 5 dark sigils from 20 to 15. Updated Covenants section to clearly depict how to obtain covenant section. Due to character limits, it has been split into 2 sections. Briefly added a note regarding the Horsehoof Ring being sold by Patches in his sidequest. Completed Rings Location. Pyromancies have been sorted in order of appearance in inventory making it easier to compare. All How-Tos that said See Walkthrough have been updated to display their information directly in the table. Also added in Karla the Witch's location. Miracles have been sorted and locations have been updated with how to obtain them should they be item drops. Also added a few notes regarding buying miracles from Irina. Sorceries have been sorted by order of appearance in inventory. See Walkthroughs have been replaced with their actual locations making it easier to find. Created sections for Ultimate Bonfire and Ultimate Estus to list all Undead Bone Shards and Estus Shards. Both sections completed. April 28, 2016 Ending for 'To Link the First Flame' updated notes regarding requirements. Made it clear that you're welcome to do tasks that are located in Usurpation of Fire ending AS LONG AS YOU DON'T DO THE LAST STEP. Fixed 'Fire Orb' pricing. For some reason I listed the price as Cornyx himself. April 29, 2016 Corrected Ludleth's name from Courtland to Courland. Changes have been made through all instances. Name will either appear as Ludleth or Ludleth of Courland. Added a small note about Titanite Slabs for Shrine Handmaid's to be more complete. The slab was already mentioned, just added to the list of Slabs in case someone ignored the purchasing of ingredients. Completed Walkthrough for Farron Keep Completed Ludleth of Courland Transposition chart Completed Walkthrough for Cathedral of the Deep Completed Walkthrough for Catacombs of Carthus Completed Walkthrough for Smouldering Lake Completed Walkthrough for Anor Londo Completed Walkthrough for Irithyll of the Boreal Valley Completed Walkthrough for Irithyll Dungeon Completed Walkthrough for Profaned Capital April 30, 2016 Completed Walkthrough for Consumed King's Garden Completed Walkthrough for Untended Graves Completed Walkthrough for Archdragon Peak Completed Walkthrough for Lothric Castle Completed Walkthrough for Grand Archives Completed Walkthrough for Kiln of the First Flame Completed Walkthrough for NG+ and NG++ July 4, 2016 Using theme colors for title headings so it's a bit more "sorted" November 15, 2016 Fixed consistencies with walkthrough. Added section for Ashes of Ariandel (non-walkthrough) January 23, 2017 Added section for The Ringed City DLC February 2, 2017 Removed color tags April 22, 2017 Completed The Ringed City DLC (walkthrough) April 24, 2017 Completed Ashes of Ariandel DLC (walkthrough)