换一换
换一换 


作为从《铁拳5》《铁拳6》到《铁拳Tag Tournament 2》一路玩过来的史蒂夫老玩家,我会通过这份整理好的笔记,教大家如何使用史蒂夫·福克斯。希望这份内容能帮到有需要的人。本文主要面向刚上手史蒂夫、了解铁拳术语和帧数知识的玩家——毕竟万代南梦宫通常不会给出某个角色的完整指南,史蒂夫的官方指南也一直缺失。如果有人不懂帧数或铁拳术语,欢迎在评论区提问。 概述
史蒂夫是《铁拳》系列中一个独特的角色,他在很大程度上缺乏踢技,而是将指定的踢键用于闪避动作。 几乎每个角色都有某种形式的 counter hit(CH)博弈机制,但史蒂夫的设计尤其围绕这一点展开,他拥有游戏中最出色的 CH 工具。他的破防方式与众不同,不像其他角色那样依赖中/下段混合攻击来造成伤害,而是依靠强大的 CH 工具来创造重要的进攻机会。 他拥有快速的 CH 浮空高招 b1、具有追踪效果的 CH 浮空中段技 df2,以及大量延迟连段来克制对手的按键攻击。此外,他还具备多种 stance(架势),可以通过连段取消进行转换,从而保持进攻的多样性。“躲猫猫”“闪烁”和“下蹲”是他在框架陷阱博弈中的主要姿态。史蒂夫的ws1,2作为11帧的站立惩罚技,可以说是该类别中最优秀的之一,这使得在防御状态下对史蒂夫使用下段戳刺极具风险。 虽然史蒂夫的主要战术围绕着 counter hit 择,但这并不意味着他缺乏下段攻击。他的下段攻击足以消耗对手的血量,并迫使对手急躁地进行反击,从而落入史蒂夫的节奏。史蒂夫在深度下蹲姿态下有一招f2,此招若被格挡,他仍能获得确反机会,这会迫使对手不得不进行挑战,进而再次陷入史蒂夫的战术布局。 史蒂夫除了实际的惩罚能力外,并没有太多缺点。他缺少站立和蹲姿的15帧起手技,这使得某些对他有利的招式在风险回报比方面表现突出。在挥空惩罚方面,他有一个不错的远程惩罚技,但伤害不高。 优点: - 拥有最佳的11帧站立惩罚技之一。 - 出色的 counter hit 导向型玩法。 - 强大的墙壁连段和伤害。 缺点: - 缺少15帧起手技。 - 挥空惩罚收益低。 - 除11帧站立惩罚技外,其他站立惩罚能力非常弱。 推荐给喜欢以下特点的玩家: - counter hit 导向型角色。 - 良好的空间控制。 注意:许多史蒂夫玩家有两个共同点,他们会频繁使用下前+2和后+1,但彼此之间仍会是风格迥异的玩家,而且不仅限于史蒂夫,角色列表中的许多角色都有丰富的此类策略。 优势与劣势
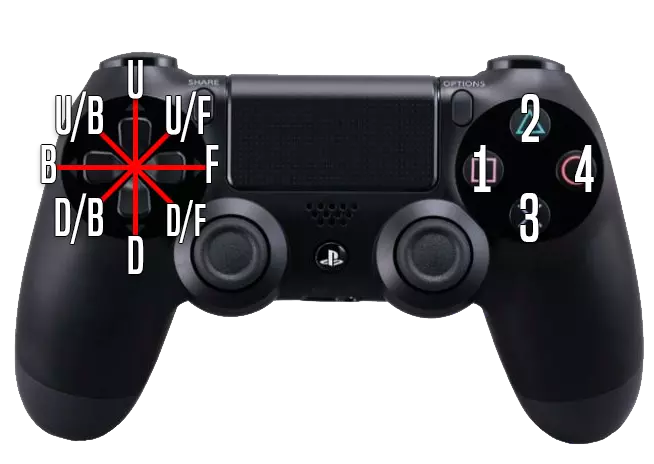
史蒂夫的设计完全围绕着打反击,他无疑拥有游戏中最出色的 counter hit 招式组合。得益于能够取消并进入闪烁 stance(Flicker stance)的能力,他在被格挡和空挥时拥有极高的安全性。作为一名拳击手,史蒂夫拥有令人惊讶的攻击范围,再加上出色的安全性,这意味着他能很好地控制空间。他强大的牵制和应急招式能有效遏制过度激进的对手。独特的闪避和移动选项让史蒂夫能轻松拉近与对手的距离,并进一步惩罚那些敢于随意出拳的对手。凭借游戏中顶尖的追踪招式,以及许多普通招式对两侧都具备良好的跟踪能力,史蒂夫很难被成功侧移躲避。通过其连续不断的连段和基于取消的压制,史蒂夫能够掩盖他众多的下段戳刺,让对手倍感棘手。史蒂夫擅长诱导对手盲目按键,从而落入他的 counter hit 策略。游戏中部分伤害最高的连招,配合出色的墙壁搬运能力,让史蒂夫在连段中能造成巨大伤害。在墙边时,史蒂夫拥有强力的择(50/50),甚至可以通过其独特的摇摆投技,在对手背靠墙壁时将其墙壁硬直。史蒂夫的普通起手技要么速度很慢,要么范围很差,要么只能从特定架势使出,这意味着他无法对其他角色能够确反的招式进行起手确反。同样,史蒂夫在应对对手空挥时也难以起手,只能依赖地面攻击。他缺乏强力下段技,投技性能也较为一般,这意味着当生命值落后时,他很难实现翻盘。史蒂夫的中距离招式虽然覆盖范围广,但威胁性并不高。他需要近身才能造成可观伤害。面对高机动性角色时,史蒂夫不得不脱离舒适区作战,这些角色能轻易避开他的大部分压制。作为一名拳击手,史蒂夫几乎所有招式都是拳击,这使他特别容易被拳系格挡克制。按钮映射控制说明 基本控制信息: f = 前进键 b = 后退键 u = 上键 d = 下键 Ch = counter hit( counter hit) 1 = 左拳键 2 = 右拳键 3 = 左踢键/左闪避(史蒂夫角色专用) 4 = 右踢键/右闪避(史蒂夫角色专用) df 或 d/f = 下+前键 uf 或 u/f = 上+前键 db 或 d/b = 下+后键 ub 或 u/b = 上+后键 WS = 站立状态 FC = 完全蹲伏(仅按住下键即可) QCF = 前半圆(通过按 d、d/f、f 实现) QCB = 后半圆(通过按 d、d/b、b 实现) SSL = 向左横移 SSR = 向右横移 S!= 螺丝移动 史蒂夫的姿态说明: PKB = 躲猫猫姿态,通过按f 3+4进入 FLK = 闪烁姿态,通过按b 3+4进入 F DUCK = 前蹲姿态,通过按f 3或f 4进入 EXT DUCK = 延伸蹲姿,通过按f 3,3或f 4,4进入(按db可取消并进入蹲姿) RWV = 右闪避,通过按3进入 LWV = 左闪避,通过按4进入 ALB = 信天翁,通过按3+4进入 2x ALB = 双重信天翁,通过按3+4 u, 3+4或3+4 d, 3+4进入 SWY = 摇摆,通过按b+3或b+4进入 姿态介绍
在了解史蒂夫的招式列表之前,有必要先理解他的 stance,因为这是他游戏策略的核心。史蒂夫总共有7种 stance: 闪烁式(FLK) 防守式(PAB) 下蹲式(DCK) 左闪避(LWV) 右闪避(RWV) 摇摆式(SWY) 信天翁式(ALB) 尽管后5种 stance 更应该被视为独特的闪避动作和移动选项,而闪烁式和防守式则分别作为史蒂夫的防御和进攻 stance。 1. 闪烁式 stance

Let’s start by analyzing perhaps his most iconic stance, flicker Flicker stance is centered around safety, space control and baiting counter-hits. He can access it manually by pressing B+3+4 or cancel into it by holding back from some of his moves. These are: B+1~B QCF+1~B df+1,2,1~B 1,2,1~B 1, d+1~B and 1,1,d+1~B 2,1~B F+2,1~B LWV 1,f+1,1~B PAB b+1,1,2,1~B FLK jabs (FLK 1~B / FLK 1,1~B / FLK 1,1,1~B) Cancelling into Flicker drastically reduces their recovery, making Steve safe on block and difficult to whiff punish on certain key spacing and keep out moves such as b+1 and qcf+1. Flicker used to be an absolute nightmare to deal with in some previous tekken games, but with nearly each new iteration, it’s been made easier to whiff punish moves that cancel into flicker, and while it’s still hard, it isn’t literally impossible anymore like it was in Tekken 4. Just to note, if you record Steve in training mode going into Flicker, he won’t be able to block even if you hold back during the recording. This isn’t an accurate reflection of what actually happens in the game. While manual flicker and peekaboo do have some startup before their auto-guard kicks in, for moves cancelled into them the guard is immediate once they enter the stance. The record function is just bugged when it comes to certain stances with auto-guard, and has been ever since Tekken Tag Tournament 2 . E-mail Harada. With that out the way, let’s know take a look at all of Steve’s Flicker moves. Flicker jabs are very fast at 12 frames, making them good at interrupting the opponent for a counter-hit. Steve can flicker jab up to three times, and continue to hold back to stay in flicker. If you wait until just after the jab connects, while continuing to hold B press 3+4 to go into Albatross spin, which we’ll cover later. Flicker 1 alb 2 also combos on counter-hit, and you can confirm in-between hits whether to finish the string, or dart in for continued pressure. Flicker 1, d+1 is a damaging string that combos on counter-hit and leads to guaranteed followups db+2 or ff+2, which floor breaks on forgotten realm for a full combo. If aligned to the opponent's far left you can also pick up with d+2,1~duck f+2 S!. FLK 1 d+1 is also neutral on block allowing Steve to continue his pressure game. Beware that both hits are high though, so can be crouched or crushed. If the second hit connects by itself on counter-hit, it leads to a combo. This is quite risky on whiff, as it is easy to punish, but a good option on block if you feel the opponent may retaliate. Finally the second hit of FLK 1, d+1 is a screw starter. As well as being an essential part of many of Steve’s combos, it will also screw opponents who mash on low crush moves like hop-kick when under pressure. Flicker 1, f+1 ends in a mid which makes it safer, but less rewarding and on block your turn is effectively over at -5, though as we’ll see soon Steve has many strong high crush options, and also a punch parry which can be used to punish opponents who try to df+1. If the second hit connects by itself on counter hit, it floors the opponent at Steve’s feet for a guaranteed ff+2. Both flicker 1 d+1 and f+1 can be delayed, and still combo on counter-hit allowing them to be confirmed, and also to punish opponents who try to interrupt. Flicker b+2 is one of the best power-crushes moves in the game. It is safe on block, comes out very fast and has excellent range, allowing Steve to muscle through attempted whiff punishes or retaliation on block. Also when combined with manual flicker’s back-step, it can be an effective tool to bait and punish whiffs. On hit this leads to a free ff+2, and if your execution is really on point you can even combo out of this. Thanks to "ASAP Marko" for figuring this out. I also highly recommend checking out this “how-to” tutorial by "cutcc". Although do note that this combo will only work if the FLK b+2 connected at close range. This move’s biggest weakness is that it is high, and can be stepped to the right. All the flicker moves listed so far have started with a high. If opponents try to slip under FLK 2 is a chunky safe, mid that guarantees a db+2 for a total of 37 damage. This is particularly useful against opponents like Feng or Xiaoyu. Beware though that is quite slow to come out, and can stepped to the right. After any of his flicker jabs, steve can also go into a mid that combos on counter. This looks similar to FLK 2, and behaves the same on hit, also safe on block. Flicker 1+2 is a throw which can be useful given all the powerful counter-hit options from flicker. However it is his only throw from this stance, so opponents just need to press 1+2 to break it, given Steve’s numerous entry options in to Flicker though, this can still catch opponents by surprise. This has strong Okizeme options afterwards. An immediate sonic fang will tag the opponent if they try to stand or do get up kicks, while a db+2 or d+1+2 will hit them on the floor. To exit flicker, Steve can either perform a flicker move, crouch cancel and also go into any of his evasive maneuvers starting from his kick buttons. Due to all of his options out of flicker, opponents often freeze up when they see a move like b+1 even at mid range, which we’ll cover in detail later. Ducking allows Steve to move forward offensively while completely going under highs, and so is his most important evasive maneuver. 2. Ducking / Extended Ducking

Ducking is the backbone of Steve’s offense. It can be done by pressing either f or d/f plus 3 or 4 and can be used to close space quickly through repeated cancels. The best way to do this, is to tap df+3 or 4, and then hold db until you see Steve enter a crouch. This is called a duck cancel. Practice this until Steve is moving forward fluidly, with no visible crouch animation. This functions like a slower, but more evasive wave-dash, since it completely goes under highs while moving Steve forward. From this he has access his incredible moves from crouch after a duck cancel, which we’ll go into later, as well as of course, duck moves which are done by simply pressing a button anytime during the duck. -Duck 2 is good to occasionally throw out, since it will launch badly timed back-dash cancels and highs. It is also one of the best responses in the game to Akuma’s fireballs. However at -14, and with reduced push-back from previous games, it is quite punishable. -Duck 1 doesn’t launch, but is safe on block. At -7 you do effectively give up your turn, but against opponents who predictably jab, perhaps thinking this is unsafe, it can be a good setup for a b+1+2 punch parry. On normal hit it gives a ff+2 (hold the dash a little). On counter hit it also leads to back-turned combo. -Duck 1+2 1,2,1,2,1,2,1,2 should only ever be used in combos, since on block it pushes the opponent back while Steve continues to punch air, basically giving them a free juggle. -Duckf+2 is a quick, safe high that knocks down on normal hit and combos on ch. This move is another of Steve’s primary screw starters in combos, and also self cancels to duck by simply doing it again during the move’s animation, or alternatively weaves and sway. DCK f+2 Flowchart Feeder DCK f+2 to another duck f+2 will beat out any move that is 13 frames or slower, which tend to be mids, but will lose to moves that are 11 frames or faster, which are almost universally highs. If the opponent is using highs to intercept, go into a duck cancel, and punish with a WS move. If they use a mid, enjoy your counter-hit combo. This will also put common low crush panic moves such as hop-kick into a screw state for a combo. Slipping under highs and counter-hitting mids is a big part of Steve’s overall game-plan. A common response to Steve’s pressure is to down-jab, since it is both fast and goes under highs. If you notice the opponent often resorting to this, try a low parry option-select. Straight after your duck cancel, tap down forward before back-dashing. Down-jabs come out very fast in just 10 frames, but you can use this against them, since if you do input for a low parry, you can still stand in time to guard other common panic moves like hop-kick, punishing both with a single series of inputs. With all these varied pressure options leading to big potential damage, the opponent will often freeze up, allowing Steve to go in for an EXT DCK mixup. Extended DCK mixup By holding forward and a kick button while ducking, Steve will enter “extended duck”, which gives a blue flash to duck 1 and duck 2 and duck f+2. As well as boosting their damage, it also gives the moves new properties: Ext duck 2 remains the same on block, but now becomes a class 1 launcher for colossal damage. Ext duck 1 also remains the same on block, but leads to a knockdown state similar to flicker b+2 that leads to a free ff+2, or if you’re feeling confident in your execution, a duck cancel to ws+1,2 for more damage, which is especially effective on the temple stage as it leads to a floor break and combo. If your execution is really on point, you can also land the same combo from FLK b+2. ext duck f+2 on normal hit will lead to a stun and combo as if it were a counterhit, and a new addition to Tekken 7 is that it breaks standing guard, leading to a free duck f+2 for a knockdown and okizeme with albatross spin, or if you’re feeling confident in your duck cancel execution, a ws+1,2 for more damage and plus frames. Now bear in mind, that the opponent needs to be well and truly conditioned before you start doing ext duck mix-ups, but if you mix up your approach well and they’re on the defensive, by the time they realize what’s going on they’ll already be in the unenviable position where they have to choose between a safe damaging mid and a high guard-break. This effectively gives Steve a 50/50 mix-up from ext duck, which is incredible for such a pressure based character. Evasive Maneuver cancels A good way to flow seamlessly into ext duck mix-ups from close range pressure is by directly cancelling into duck from a move. Steve can also cancel into his other evasive maneuvers - weave and sway. Here are all the moves Steve can cancel into evasive maneuvers: 1,1 1,2 1,1,2 1,2,1 1,2,1,2 Df+1 Df+1,2 (which actually cancels the second hit before it comes out) Df+1,2~f+1+2 (this move is hot garbage btw so let’s never speak of it again) df+2 d+2,1 d+2~n+1 DCK f+2 Ext duck f+2 WS+1,1 WS+2 Since many of these strings have extensions, or can be cancelled into flicker or peekaboo to sustain pressure, they are an effective way of slipping in to apply duck mixups. Just be sure to cover your approach, since if you get too predictable, ducking in can easily be punished with a launching mid. Let’s now look at another evasive maneuver, Steve’s weaves. 3. Weaves

摇摆步是一种闪避动作,大致上可以像侧移一样使用,但也有多种独特的应用。 3键使史蒂夫向左移动,4键向右移动。你可以在同一方向的侧移后使用此动作,形成超级侧移,其闪避效果更强,在某些情况下甚至能绕到对手身后。幸运的是,史蒂夫无法再像《铁拳5.0》的辉煌时期那样借此形成无限连了。 与侧移相比,史蒂夫在摇摆步期间还会低头,能更稳定地躲过刺拳连段,但无法躲过像神力拳这样的强力高位攻击。不过,摇摆步的风险更大,因为与侧移不同,你无法通过按住后键来取消动作进行防御。《铁拳7》中侧移的通用规则是,若处于-5或更劣势的帧数,侧移将无法生效。此规则同样适用于摇摆。 在闪烁或潜伏姿态下,史蒂夫无法侧移,但可以随时进行摇摆。这使得他能够有效规避如下前+1或下勾拳等直线攻击。 史蒂夫的招式会根据他向左或向右摇摆而有所不同。
左 weave(LWV)的1,1是中段连段中的自然连招,是他在 weave 状态下最佳的挥空惩罚技,但此招在被格挡后为-13帧。 这与右 weave(RWV)的2类似,后者伤害较低但范围更广,同样是-13帧。这两招均可造成墙壁震荡以打出高额伤害。 从左 weave 状态开始,史蒂夫还可使用1, f+1, 1。这也是一个自然连招,若在连段结束时按住后方向,会进入闪烁架势并获得+4帧优势。但遗憾的是,该连段的最后一击为上段,因此若对手有所防备,不要打完整个连段。 从左 weave 和右 weave 状态,史蒂夫分别按2或1可使出肩部冲撞。此招仍能躲过刺拳连段,且两种冲撞连段——3,2,1或4,1,2在 counter-hit 时即使稍有延迟也能形成连招,因此可以确认命中后使用。结合其闪避特性,这些招式成为非常强力的应急手段。其中4,1,2能衔接一套高伤害连招,但具有-13的不利帧,并不安全。3,2,1无法形成连招,但更为安全,且可作为不错的拳击格挡起手。由于这些连段可在 counter-hit 时确认,4,1,2因其巨大的伤害潜力更为实用,通常是游戏中最佳应急手段之一。 使用肩撞后,史蒂夫也可按住前方向键,以中立帧进入 peekaboo stance(假动作姿态)。若察觉到对手准备出拳,只需完成肩撞连段即可。4,1,2自然能造成浮空,而3,2,1在 counter-hit 时可衔接地面 d+1+2,总伤害达43。 大多数角色处于蹲姿时,只能向一个方向侧移,即背景方向。具体方向取决于你在屏幕的哪一侧。由于史蒂夫的闪避动作被分配到踢击按键上,他可以向任意方向横向移动,即使在蹲姿时也能如此。这在使出像下+1这类会让史蒂夫保持蹲姿的招式后尤其有用。 闪避动作还可以从多种招式中取消,例如1,2,1、前下+1或下+2,1,但通常不建议这样做,因为取消后的闪避不再具有横向移动能力。它们可以作为进入冲撞压制的不错方式,但由于距离太短,很容易被对手后 dash 躲开并进行挥空惩罚。 闪避动作还可以取消为蹲伏和摇摆,只需在闪避后输入前+踢或后+踢即可。编织接摇摆没什么用,但编织接闪避2在躲避具有大量后摇的招式后,是一个有用的落空惩罚技,因为编织后闪避招式的出招速度更快。 现在我们来看最后一种闪避动作:摇摆。 4. 摇摆
摇摆通过输入后+3或后+4来施展。和蹲闪避、左右闪避类似,摇摆可以在闪烁状态、偷看状态下随时施展,也能在取消为闪避动作的连段和招式之后施展。 和蹲闪避一样,摇摆能完全躲过所有上段攻击,但不会让史蒂夫向前移动。摇摆1是中段攻击,被格挡后仅-1帧,但由于史蒂夫在攻击前会将头部移回站立位置,因此可能会被快速连段打断。而摇摆2则不同,史蒂夫会保持闪避姿势并向上挥拳,能够干净利落地破解任何快速连段并打出高额伤害的连击。不过这是一个风险极高的招式,因为它会让史蒂夫完全处于无防备状态,而且攻击范围基本为零。 在墙壁场景之外,摇摆的使用场景非常有限,主要用于秀操作。当处于墙边时,这(摇摆闪避)极具威胁性,会取代蹲防成为主要的进攻/闪避手段。这是因为史蒂夫在摇摆状态下可以使用1+2投技,这有点像《铁拳4》位置转换系统的遗留机制。尽管这是摇摆状态下唯一的投技,但它的出招仅需10帧,因此很难拆解。如果史蒂夫将你逼至墙边,他可以直接使用112连招造成30点伤害,并且可以用摇摆1与摇摆投技进行择。在counter hit( counter hit)的情况下,他可以对小个子角色使用ff+2或d+1+2进行追击。 摇摆状态还让史蒂夫在背向墙壁时也变得危险。如果史蒂夫在使用摇摆投技后按住后方向与对手交换位置,他会获得足够的优势来使用qcf+1接墙壁连招。 5. 闪避式准备姿势(Peekaboo)
While FLK focuses on defense and space control, PKB is all about aggression and pressure. In PAB Steve has a powerful arsenal of chipping lows to frustrate opponents, jailing, delay-able strings to catch them out when they press buttons, and fast, powerful mids to punish them for ducking. Steve can enter peekaboo by holding forward after the following moves and strings: B+1,2 B+1,d+2 1,2,1 2,1 F+2,1 RWV 1 LWV 2 ALB FC df+1 being an automatic transition on hit or block Once in peekaboo... -d+1 is your go to for pressuring the opponent and is basically the same as his FC df+1. This is a low that goes under highs, has surprisingly good tracking to both sides, leaves Steve at +2 on hit and is only -12 on block, meaning it can’t be launch punished except by Akuma with meter. This should be used anytime the opponent freezes up or hesitates, to chip away at their health while keeping Steve at an advantage. -Against turtles you can also try his 1+2 grab, which is quite damaging, and looks very cool but is easy to break since it’s his only throw from PAB, however it does come out 1 frame fast than regular throws at 11 frames. The okizeme options from this are quite weak, but you can chase them down with albatross mix-ups or running 2. More on these later. -2 is used when you think the opponent is going to retaliate. On counter hit it leads to a combo, and also sabakis clean through punches even when Steve is at frame disadvantage. Since this is safe on block you can bully opponents with just this move alone. This is also a homing move, although trying to sidestep Steve when he’s in pkb generally isn’t a good idea since many of the key moves in this stance either track SSL, SSR or both. Don’t get too predictable with PAB 2 though as it is high, has very short range, and will only blow throw punches, not kicks, elbows or shoulders. -1,2 is neutral on block and has excellent range for a i12 jab string, making it useful to close the distance against back-dashers, though it can be stepped to the right quite easily. The mid, delay-able string ender, 1,2,1, while unsafe on block at -13, tracks well, and leads to a nice chunk of damage while forcing crouch at +8 on opponents who may be ducking in anticipation of d+1, or on counter-hit you get a free d+1 against opponents who press buttons. -F+1+2 is one of the less useful moves from PAB. It‘s quite slow for a high at i15, and only does 5 damage on hit, but tracks well, forces opponents towards the wall, and gives Steve a whopping +6 on block, though with a bit of push-back, which means you’re not in range for some of your primary PAB tools anymore, which means this is best used at the wall, or not at all. Bizarrely on hit or counter-hit this only gives +4. -D+2 is a long range low that’ll catch back-dashers. Although it is slow enough to be react-able to, and has terrible tracking, it can catch players off guard, goes under highs during the entire animation and leads to a big combo on counter-hit if they were mashing out a jab string. It’s also only -12 on block, which means you won’t get launched except by Akuma. -Steve has powerful mids to mix up his PKB d+1 with. Df+1,2 is a strong mid option, being a natural combo, safe on block and leading to a mini combo with db+2 on hit. This is also hard to step since the 2nd hit tracks, and after a PAB d+1 this will also beat out hop-kick attempts, which is a common reaction at lower levels of play to repeated d+1s. On a floated opponent the 2nd hit will put them in a screw state for a combo. -On block many opponents tend to retaliate, so a punch parry will punish their attempts to jab or df+1 you. Beware that the second hit is high, but can catch players out with df+1,1, which is a natural mid mid combo. This is unsafe on block at -10, but opponents may be hesitant to punish you due to the threat of Df+1,1, 2, 1. The last three hits of this string are a natural combo on counter hit and give a free db+2 follow up for a whopping 64 points of damage, which is basically equivalent to a juggle. The first 3 hits can all also be delayed to bait attempted button presses, however they cease to become combo-able on counter hit if you delay. Beware that this string is -13 on block, so it’s recommended to counter-hit confirm from df+1,1,2 which is -11. Note that the final 2 hits of this string jail, so with the correct timing opponents can option select blocking df+1,1,2,1 and also punishing df+1,1,2. Not many players know this though. Also the df+1,1 and it’s string extensions can be SSL for a deep sidestep combo, but between d+1, 2, df+1,2, 1,2, and f+2,1 which all catch SSL, opponents won’t be doing this often. -Df+2 is slightly slower than df+1 but leads to a launcher, and since it’s an elbow goes through parries which is very useful against opponents like Asuka. On block it is -10, so can only be punished by jabs, and has very poor tracking. -Uf+2 is another mid launcher, but slower than df+2 and launch punishable on block at -15, and also has poor tracking. As you can guess though with it’s Shoryuken type animation, it makes for it with it’s evasive properties. This will crush lows, and even go under jabs, but not most other highs . Uf+2 is sometimes used as a hard call out against low jabs which is quite a common reaction to PKB pressure. -A safer way to get around down jab is by weaving around them, or f+2. -F+2 is a mid with huge range that goes under highs and even some mids such as low jab at certain frames. This makes it the go to option to beat low jabs without having to commit to uf+2 or weaves. This also wall splats, making it very dangerous by the wall. The downside is that it is quite slow at 18 frames, can be SSR and is -13 on block, though with a bit of push-back which means they can’t punish with jabs. It now has a natural combo-ing mid string extension in f+2,1 which leaves Steve at +1 back in normal stance, albeit with quite a bit of push-back, though again this is useful by the wall. Unfortunately though if you finish this string you can’t wall combo anymore from the f+2 splat. f+2,1 will eat up any attempts to -13 punish f+2, but it can be interrupted with jabs. If you anticipate this, throw out a d+2 after f+2 to net yourself a ch combo. -B+1,1,2,1~b is a long, delay-able, safe string that ends in FLK stance leaving Steve at -3. It has surprising range, so can be used to chase down opponents who have back-dashed out of PKB, for continued pressure. This string can be ducked and launch punished during the 2nd hit by knowledgeable opponents, but good to use on players unfamiliar with Steve. -B+2 is an evasive back-swing blow mid. Not recommended since it doesn’t do much damage, is quite unsafe on block at -14, has poor tracking, and it’s usually best to just finish a string to catch buttons. Steve can also manually enter Peekaboo with f+3+4. This is particularly useful with long ranged moves like PKB 1,2 or f+2. Also you can make use of PKB uf+2 as a long range whiff punishing launcher, which is something that Steve really lacks. However your execution will need to be on point, and if you mess up you risk getting launched. As with flicker, PKB can be cancelled with db, though not immediately from manual entry like flicker, and you also have access to all his evasive maneuvers like duck, weave and sway. Similar to flicker, peekaboo’s auto-guard doesn’t activate from manual entry straight away. 6. Albatross
The Albatross spin is performed with 3+4. It can be done from both standing, crouching, peekaboo stance, and flicker after 1 or 2 jabs. It cannot be performed out of weave or sway. Albatross 2 is a mid that covers a huge amount of space very quickly, and can be used at surprising ranges to keep the opponent in check. This wall splats, is completely safe on block at -8, and comes out very quickly relative to it’s range, making it both a solid whiff punisher for situations in which you’re not sure if you can connect in time, and just an excellent overall pressure tool. The drawbacks to this move are it’s linearity, relatively low damage potential since it doesn’t do anything special on ch, and susceptibility to dedicated keep out moves, but as long as you’re not too predictable with using it, it is excellent space control tool. Once the opponent starts respecting this you have several options to go on the offensive from mid screen. Firstly you can go for the low variation in 3+4, d2, which despite looking like his db+2 is harder to react to since it comes out of spin. Like a regular db, 2 or FC db+2, this is +1 on hit, only -12 on block and knockdowns on CH, unlike those moves, you can’t hold D afterwards to recover in crouch. Alternatively you can go for a double albatross by holding u or d. The double spin makes the mid low variations, now accessed with 1 or d+1 respectively, deal much more damage, with the low even knocking down the opponent. Their frame data on block remain the same though. You can also use the 2nd spin to bait out keep out moves, but the timing is far too tight for this to be dependable. Steve can cancel the spin for a surprise entry into PKB stance by holding forward. Albatross can also be cancelled into from 1 or 2 flicker jabs, which allows him to quickly close the gap and maintain pressure from FLK stance. A particularly dirty option is to Albatross in to Steve’s db+3,2. This is a fast and powerful low, which would be amazing if not for it’s terrible range. However with an albatross approach you can quickly close the distance and mix this up with mids like df+1,2 or b+2. Top Moves 1.B+1 B+1 is one of Steve’s most iconic moves, and for good reason. It comes out fast, results in a huge combo on counter-hit, and has pretty decent range and a good hit-box for a move of this type. All of this makes it an exceptional keep out move and panic move to heavily punish opponents who rush in recklessly, use slow moves when at close range, or press buttons when at negative frames. However beware that it is high and so is vulnerable to WS and high crush moves. All in all it operates somewhat similarly to a magic 4 albeit slightly slower but with better range. What really sets b+1 apart from moves like magic 4 though, is it’s ability to cancel into flicker stance by holding back. By itself b+1 is actually -14 on block, but by cancelling into flicker, it drops all the way down to -1. This means you can jab him out of flicker jabs, but you risk getting punished by duck moves or crouch cancel to WS moves. A df+1 or other fast mid will stop ducking and crouching, and on paper trade with flicker jabs, but we’re talking about a frame perfect trade here. Since b+1 comes out so fast and a Steve player will have the luxury of auto-piloting his offense while the onus of reacting is on the opponent, df+1ing afterwards is not recommended as you run a high risk of getting hit by ch flicker jabs for significant damage. The flicker cancel makes b+1 dangerous even on whiff and indeed if a Steve is throwing b+1s just outside of range, he’s probably trying to bait you into rushing in, so that he can counter-hit you with flicker moves. Or Steve can just hang back and do nothing. The whiff recovery on b+1 is tiny, so if you’re trying to punish on reaction Steve will be able to block in time and either get a free punish, or plus frames to start enforcing his deadly counter hit tools. From B+1 Steve can also do B+1,2 which is his best -13 punisher and by holding forward can go into his aggressive Peekabo stance at +6, making moves like PAB df+1,2 uninterruptible (except Yoshi flash). Steve can also go into a low, mid string that somewhat resembles law’s junkyard by doing b+1,d+2,1, however due to the myriad of options stemming from b+1 opponents will rarely low parry the 2nd low hit unless you’re being very predictable. The second 2 hits of this will combo on counter-hit so is a good deterrent against opponents who often try to challenge you after b+1 on block, although unfortunately it doesn’t launch anymore like in Tekken 6. Stopping at the low and holding forward is also a good way to get Steve into Peekaboo at around +1. The full string is safe on block, and the low is -12, but by going into Peekabo it becomes -10. Due to the push-back on block, this can only be punished by crouch jabs from characters with especially long arms such IE Jack, Gigas and Kuma, and Lee’s WS+33. The main reason not to use Steve’s B+1, d+2 string though is that if you do connect a CH with b+1, you can’t juggle the opponent anymore. 2. Df+2 Df+2, along with b+1 is another crucial counter-hit move with Steve, and just as important to his overall game-plan. Df+2 is a relatively fast mid tracking move that leads to a combo on counter-hit. By itself it is punishable at -11, but what really sets it apart is it’s ability cancel into Steve’s evasive manouvres, most specifically ducking. By cancelling df+2 into a duck, and then duck cancelling into a crouch guard, before naturally shifting into a standing guard, this move is completely safe. The best way to do this is to continue holding df after you press 2, and then press 3 or 4 to go into a duck. If this connects on counter-hit, confirm into a duck 1 to start the combo. Be sure to practice this, since if you’re just auto-piloting into duck cancel every-time, you cannot combo anymore, but a FC d/f+2 will at least result in some decent guaranteed damage. Df+2 to a dck cancel, while safe does leave you at a fairly major disadvantage, so the opponent can get a free mix-up on you if they’re on the ball. However d/f+2 into duck is very fast, so unless you’re being very predictable with it, you’ll be able to challenge slower moves like plus on block mids or lows with Steve’s duck cancel WS+1, or duck f+2 for a combo. If you notice the opponent is jabbing after df+2, perhaps trying to punish the regular version or just out of habit, you can continue to slip under and punish with duck 2. Though it is recommended that you go into duck cancel, confirm the high and then punish with FC df+2, since duck 2 can be snuffed out. If you notice the opponent is freezing up, either go for a WS+1 / FC df+1 mix-up, or an extended duck mix-up if they’re really turtling up. The best thing the opponent can do is keep Steve in check with a quick df+1. However, this leaves them at a minor disadvantage, giving Steve exactly what he needs to start his deadly counter-hit game. Drawbacks to this move are that it’s range isn’t exactly the best for a mid-range tool, while it can be too slow to use at close range effectively, so you’ll need to compliment this move with strong movement to make it effective. Also it has quite a high hit-box for a mid, meaning it can go over certain evasive moves and stances. 3. WS+1,2 /WS+1,1 / WS+2 Ws+1 and it’s extensions are some of the best ws moves in the game. Coming out in just 11 frames, Steve can heavily punish little low pokes with ws+1,2. This does 32 points of damage, leaves Steve at +3, and the opponent in force crouch, meaning if they try to ws+4, you can b+1 for a big combo. Also, given Steve’s approach with ducking, ws+1 with it’s speed and range, also makes an excellent check, similar to a df+1. If you visually confirm a counter hit, Steve can connect ws+1,2 even at maximum delay. WS+1,2 ends in a mid and so is also good to deter the opponent from retaliating. If the 2nd hit interrupts the opponent for a counter hit, it gives Steve a free db+2. Beware though that this is unsafe at -13. Ws+1,1 on the other hand is safe, but high and deals less damage. Undelayed, it is a natural combo, and delayed it is only a natural combo on counter-hit, but there’s no reason to do that when you have ws+1,2. This string doesn’t jail, so opponents can duck between hits, but unlikely to do so due to the threat of ws+1,2, unless you’re being very predictable. Note that ws+1,2 jails when undelayed, so you need to delay to catch people who try to flash duck ws+1,1. Ws+1,1 can also be self-cancelled into more ducks for continued pressure, or weaves and sways. Another mid that is useful out of ducking is ws+2. This isn’t as fast as ws+1, but it is safe on block and on counter hit leads to a full combo. It can also be cancelled into evasive maneuvers such as duck, weaves or sway. From a duck approach, Steve can mix-up his ducking mids, duck cancel ws+1 and duck cancel FC df+2 (beware this is -15 on block) with lows FC db+2 or FC df+1. Top Moves 4. Db+2 / FC df+1 Db+2 is the same as his standing db+2. It’s quite slow, so can be blocked on reaction if the opponent is watching for it, but goes under highs. Compared to previous Tekkens, this doesn’t knockdown on normal hit anymore, only on counter hit, but it is safer on block at only -12, meaning it is only launch punishable by Akuma when he has a stock of meter. It is recommended that you hold down or down back after connecting with db+2. This doesn’t change the frame data, but leaves Steve in crouch, giving him access to ws+1. Since the opponent is also forced into crouch and Steve is at +1, this means he can easily counter-hit confirm ws+1 into ws+1,2. If the opponent crouch jabs this will trade in Steve’s favor, or alternatively a riskier but more damaging option is weave through both options. From a ducking approach Steve can also go for a FC df+1, which also goes under highs and is -12 on block. Though this does less damage, it is much faster. Most importantly, it also automatically transitions Steve into his PKB stance with frame advantage. 5. 1,1 / 1,2 / 1,2,1 (2) (d+2) / 1, d+1 / 2,1 As you would expect from a boxer, Steve's jab strings are some of the best in the game. 1,2,1 in particular is very powerful both as an offensive and defensive option. It is very fast at 10 frames, and all the hits connect on counter-hit for a total of 32 damage, so can be used both as a panic move when he’s being pressured, and also to snuff out retaliation when on the offense. You have a lot of options after 1,2,1. It can cancelled into his evasive maneuvers such as duck, to quickly slip in, and to deter retaliation you can do 1,2,1,2 which ends in a mid, which although is unsafe on block, can also be cancelled into duck to make it safe similar to df+2. This is particularly dangerous at the wall, since last hit wall splats. This whole string also has quite a bit of range, so can be used to get in from a distance, just be careful for high crush moves. You can also do 1,2,1 d+2 which ends in Steve’s db+2, but not generally recommended as it’s quite slow and quite telegraphed from a string. As well as these options, Steve can also hold back from 1,2,1 to go into flicker at only -1 on block, or hold forward to go into PKB to start pressuring the opponent. Steve’s 1,1 / 1,2 and 1,1,2 are also powerful jab strings since they can be cancelled into duck to quickly close the distance. 1,1,2 is also surprisingly safe on block for a move of this type, so can be a decent set up for punch parry. Unlike some earlier games it also jails on block. Finally 1 d+1 or 1 1 d+1 are high mid strings, and if you hold back to go into flicker are neutral on block, making them useful setting up his fast, powerful counter-hits. If the opponent turtles up, remember you can also instantly cancel flicker into crouch to start WS mix-ups, into duck to start duck cancel or ext duck mix-ups, or go for a flicker throw to catch them off guard. Speaking of fast high mid strings, in Tekken 6 2,1 used to be like this, and was very powerful since you could hold either f or b to enter peekaboo and flicker respectively at +3. This was unfortunately changed to a high, high string in Tekken tag tournament 2, with this rather awkward looking animation, but it is still +3, and so is a good option to start Steve’s pressure game and bait counter hits. On the downside it is slightly slower than Steve’s other jab strings, coming out in 12 frames. Steve can also deter retaliation by finishing the string with 2,1,2 which ends in a knockdown mid, but since this is -11 on block and you’re on plus frames anyway this generally isn’t recommended. 2,1 is also Steve's combo starter for back-turned opponents and after a deep sidestep. 2,1 to pkb df+2 is guaranteed for a total of 78 damage, which is very good. In the rare situation that only the 2nd hit connects on CH, you can connect a FLK b+2 for a lot of damage. 6. Df+1 Df+1 is one of the primary poking and pressure tools for many characters, and Steve is no different, although his string extensions are quite unique. His df+1 by itself is -3 which isn’t great, but he has lots of options stemming from it. Df+1,2 is a mid high natural combo string which is good for catching out ducking opponents and as a general poke. Beware though that it does not jail so can be ducked and launched, and on block is -6 so your turn is effectively over, though a punch parry will catch attempted counter pokes. Df+1,2,1 is also mid, high, doesn’t natural combo and doesn’t jail, but due to the flicker cancel it is very hard to punish even when ducked, with only i11ws moves being consistent. This string acts as a great check to stop opponents pressing buttons, and keep the momentum going since it neutral on block when canceled into flicker, giving you access to Steve’s powerful counter-hit options and duck mix-ups. Both of these strings end in a high, however since they come out with different timings they cover one another. In order to punish df+1,2 in time the opponent needs needs to immediately do a ws move after crouch, which will get caught by the df+1,2,1 for a combo. Though of course a high crush will beat both. If you see the that the opponent is often crouching or crushing after you do a single df+1, try another df+1,2 straight after, or even a df+2 to counter-hit slower crush moves. Alternatively do the df+1,2,2 string extension, which ends in a safe mid, though I don’t really recommend this as the damage potential is low, and even though it does a butt stun on counter-hit, nothing is guaranteed. Df+1,2,1 can be interrupted by moves that are 11 frames or faster, such as jab strings and magic 4s. If you notice that the opponent is jabbing after df+1, you can cancel this into a duck, and punish them with a FC df+2. If they freeze up, which is quite common against Steve, start applying your Duck mix-ups. If the opponent is using fast mids such as df+1 to stop duck approaches, the last hit of df+1,2,1 will counter-hit any standing move that is 12 frames or more for a big combo. Alternatively stepping or weaving after df+1 will evade linear retaliation and jab strings for big potential damage. Another way to beat out jab retaliations is with Steve’s wide selection of high crushing lows. The best of which is arguably d+2,1 Top Moves 7. D+2,1 D+2,1 is an annoying low, mid string. This doesn’t do much damage, but it is fast and goes under highs quickly, even when Steve is at -5 to -6, which are frames at which stepping and weaving don’t normally work. Both hits are guaranteed on counter hit, even at maximum delay allowing it be counter hit confirmed. Due to how awkward this string is to block at least one hit will often connect unless the opponent is really on the ball. Even if they do successfully block the mid, although it is -11, it can be duck canceled similarly to d/f2 to make it safe. Since one of the 2 hits often connects, this causes many opponents to freeze up giving access to a duck mix-up. Another common response is to mash out crouch jab, especially if the opponent sees you go into duck. This is another good opportunity to use the low parry option select we detailed in the stances section, and if you want some more aggressive options instead of just back-dashing after the low parry attempt, remember that by continuing to hold df in crouch and pressing 1, you can do FC df+1, or counter hit confirm with ws+1 strings. If the opponent insists on pressing standing buttons, d+2,1,2 ends in a high that results in a big combo on counterhit, and is only -2 on block. This can be heavily delayed to bait retaliation. The best way to deal with this string is by low parrying it, and if you’re being predictable in how you use it, for example after a df+1 or at the end of a round, this will happen. You can bait out a low parry by doing d+2 into an immediate n+1. This results in a fake out mid, which is confirm-able even on normal into a 2 follow up. This does exactly the same damage and has the same frame data on hit or block as ws+1,2. 8. QCF+1 Qcf+1 is an incredible mid, which is used both for mix-ups when at the wall and for space control in open ground due to it’s deceptively huge range. By itself it is unsafe at -10, but by holding back you can go into flicker stance leaving Steve at -3. The major drawback to this move is it’s linearity, but if you’re using a lot of df+2s, which you should be, the opponent shouldn’t be stepping much. Also similarly to albatross 2 since this doesn’t do anything special on counter hit, it doesn’t offer much damage potential. Still, it’s range, speed and safety make it a force to be reckoned with. 9. Ff+2 One of Steve’s weakest areas is whiff punishment, but ff+2 goes some way towards remedying that. It has excellent range, and comes out quickly enough to punish big whiffs on reaction. Also thanks to it’s huge hitbox, can be used to consistently swat out opponents from evasive stances like RLX or art of phoenix. Once the opponent is hit by this, they are grounded left at Steve’s feet leading to a guaranteed d+1+2 for a total of 36 damage. If the opponent tries anything except staying on the floor though, another ff+2 will smack them back down, resetting the situation. Against characters with big hitboxes like Kuma or Gigas this is guaranteed. If they do nothing Steve can db+2 them on the floor for slightly more damage than d+1+2. Although this is useful at lower levels of play, more experienced opponents may wait for Steve to do a 2nd ff+2, stand up and launch punish. Be careful that on block this leaves the opponent at -13 and in crouch, which means Kazuya, Josie and Eddy can launch him. Though against Kazuya a risky little trick is to try and make him block the ff+2 at tip range. His ws+1,2 will then whiff, allowing you to back-dash and get a free juggle with b+2. Of-course the Kazuya could always just ws+4,4 in this situation. You can also time the ff+2 to hit meaty against these characters so that it's only -12 against tech-roll. A common setup would be something like sonic fang to a deep dash ff+2 if the opponent techs. If they try to launch punish ff+2 as per usual, you can block it since it’s now only -12 , so you can feel all smug and clever while you block punish them. Implanting the seed of doubt in the opponent may also make them lose confidence in going for more max damage punishes. 10. Df+1+2 Another good whiff punisher is the aforementioned df+1+2. This is a very fast mid with excellent range, a solid hitbox, and deals a a respectable 28 points of damage. Not directly at, but near to the wall this also becomes particularly dangerous as it can wall splat for a combo. All in all a very reliable whiff punish due to it’s speed, range and ease of input, and also a good block punisher for moves with push-back, though beware that on block this is -12. Situational Moves 1. D+1 D+1 is a fast, high crushing low poke that leaves Steve in crouch in neutral frames on hit and -13 on block, so can only be launch punished by Kazuya, Josie, eddy and Akuma with meter. Overall it is quite similar to Dragunov’s d+2, except it does less damage, has no special properties on ch, and doesn’t leave the opponent in crouch, but it is slightly faster. On hit a WS+1 will beat any move that isn’t a jab, Parry or Rage Art, and FC df+1 will lead to PKB pressure if they turtle up. Due to Steve’s generally strong tracking even on normal moves, neither option can be sidestepped, except by characters with superior sidesteps like Lili and Alisa. A down jab will also beat both options, but this can be heavily punished with low crush moves, or a sidestep to a whiff punisher. Since Steve can weave in crouch, he can also move laterally to both directions. While this is overall a very solid low poke, well complimented by Steve’s move-set and unique abilities, it is slightly outdone in overall utility by d+2,1. 2. Db+3, 2 Db+3,2, as mentioned previously, is an unsee-able low that leads to a free albatross d+2 or db+2 when next to the wall, for a hefty total of 42 points of damage. If the opponent blocks this, you’re likely going to get launched though. Should the opponent block the second hit, you are safe though. While this move does sound amazing, especially considering Steve’s plethora of lock-down and pressure strings, due to it’s incredibly poor range it’s only every useful after an albatross spin, or at the wall, where it is very powerful when mixed up with QCF+1. 3. Running 2 While Steve's running 2 isn’t as dominant as say, Dragunov’s or Kazumi’s, it is still one of the better running moves in the game. Depending on the range at which the opponent blocks, it can leave Steve anywhere between +9 and +13, though nothing is guaranteed. While this does sound amazing, especially when he has that db+3,2, again due to it’s pitiful range this is easily back-dashed out of even when at a major disadvantage. Since Steve’s throw mix-up is rather weak, and his lows are mainly just used to chip at the opponent, he doesn’t really have much of a mix-up. Still, this can be a good way to get in with major plus frames. Just be careful as with most running moves this can easily sidestepped to the left, and actually this can also be stepped to the right, and is susceptible to being floated out with a jab. 3. B+2 is Steve’s fastest standing combo starter on normal hit at 17 frames. It has poor range, but is useful as a whiff punisher after a successful sidestep. While it does go under jabs in certain situations, the evasive properties are too inconsistent to be banked upon. The combo after this with manual FLK 1,d+1 takes some practice. You can make this considerably easier by using f+2,1 instead, but this leaves the opponent back-turned, so you’ll be unable to capitalize on a wall splat for a combo extension. B+2 also hits very low to the ground, so is useful against opponents with evasive stances like Eddy or Xiaoyu. On block this is -13. 5. Uf+2 / uf+1 Is Steve’s closest thing to a hop-kick. It has terrible range and is very slow at 23 frames, however it goes over lows and has a much better hit-box than before, so can be used to heavily punish predictable low pokes or low jabs. Uf+1 on the other hand is your safe low crush option. Reasonably fast and has surprisingly good range. Also hits low to the ground, making it a useful tool against characters with evasive stances or ranged lows. This can also be used as an alternative ender to combos to spike and do some okizeme setups. On block this leaves Steve at -6, so your turn is effectively over, but this can be a good opportunity for a punch parry, or to weave through particularly linear moves. 6. F+2,1 F+2,1 is a move that is generally used in combos. Due to it’s slow speed, the fact that it’s input often awkwardly parallels with ff+2, and how it’s a non jailing mid high string, this doesn’t see much use in open play, but it still has decent range, and if you hold back you are at +1 in flicker stance. There is a mid variation, in f+2,1,2, which is very similar to df,1,2,2, and will catch any attempt to crouch and WS punish. Since they can be interrupted by any move 16 frames or faster though, and lack meaningful reward on hit or counter-hit, both these mid extensions are best avoided. Situational Moves 7. B+1+2, 1 A punch parry. Useful if Steve if is at around -5 or more, meaning he can’t successfully sidestep anymore, and you think the opponent is going to use a counter-poke such as df+1 to keep you locked down. Unfortunately unlike it’s glory days in Tekken 6, this doesn’t result in a combo anymore, but does lead to a guaranteed d+1+2 for 41 points of damage. The timing on this is a little tight, so after the punch parry, hold down and a punch button while mashing the other. Some common uses are after: Df+1,2 Df+1,2~2 F+2,1~2 DCK 1 PKB df+1,2 FLK 1, f+1 Albatross 2 1,1,2 uf+1 3,2,1 Don’t get too predictable with this though, as it leaves Steve wide open on whiff. Also do note that lows, special mids, kick moves, and elbows, cannot be parried. 8. Ff+1+2 / qcb+2+4 Steve’s throw game isn’t the best, but he has some options. Ff+1+2 deals good damage and leaves Steve in a good position for okizeme, similar to his flicker 1+2 throw. However since this throw comes from a forward dash, the 1+2 break is quite telegraphed. Mix this up by instead dashing and using qcb+2+4, which is a 2 break and can surprise opponents expecting a 1+2 throw. The okizeme options on this are quite weak, but you can chase them down with albatross or running 2. 9. d/b+1+2 Steve’s power-crush in his normal stance is quite unique. Like any other PC it starts absorbing strikes on the 8th frame right up until it’s active. On the plus side it’s a mid, and can result in big damage since it leaves the opponent in a -24 frame stun where they are completely vulnerable, albeit with significant push-back. In open ground you can do a micro-dash to a sonic fang for 49 damage, or for an easier time albatross 2 for 43 damage. Both of these can convert to a combo when near the wall for absolutely huge damage. It’s recommended to stick to albatross 2 for the most consistent re-splat combo for close to 90 damage. Note that these followups will whiff unless the db+1+2 connected at close range. Why you should basically never use this move though is that it takes 36 frames to come out and is -18 on block, so can be launch punished by the entire cast. Since it takes so long to come out, even if the opponent attacked Steve, they can usually recover in time to block and punish. However, it can be useful against Hwoarang when he’s doing flamingo stance mix-ups since he can’t block, however it is still a very risky option, and even if it does land you will likely have absorbed a ton of damage. Since this move is so risky it’s generally best avoided, but for pure style points, the damage on that re-splat combo can be hard to resist. 10. f+1+2,2 Steve’s f+1+2,2 string is quite different from Tekken Tag Tournament 2. F+1+2 can no longer cancel into peekaboo, but it is significantly faster, meaning that Steve now has a somewhat decent 15 frame punisher that deals 42 damage. Both hits are mid and a natural combo. F+1+2 by itself is -14, but if opponents try to punish they’ll get hit by the 2nd hit in the string since it does not jail. This is -13, which can’t be launch punished by any character, except for a ♥♥♥♥♥ up Kazuya player on horse amphetamines. This does not lead to any guaranteed followups on hit, even at the wall. Rage Art & Rage Drives Rage art: 1+2 - Steve’s rage art, like Jin and Alisas’s high and safe on block, but just duck on activation for a duck to full launch punish. His rage art fills two big holes in his game. First of all he gets a damaging -13 block punisher, and secondly a scary whiff punishment option with decent range, but as with all Rage Arts, this is an all or nothing option. Rage drive: 1. df+3+4,1+2 - with his rage drive, Steve channels his inner anime and performs a Dempsey roll with df+3+4 that continually tracks the opponent, goes under highs, and auto-blocks all mids. You can press 1+2 at any time to start a flurry of natural combo-ing mid strikes, that leaves Steve at +1, which is generally useless in open play due to push-back. At the wall it becomes something quite different, but we’ll get to that later. The Dempsey roll by itself, which can also be accessed anytime from flicker or peekaboo, can be used as a gimmicky way to intimidate and close the distance. If the opponent is unaware of the auto-block you might get a free block punish or frame advantage, and if they think they can sidestep this just unleash the attack. You could try to bait the opponent to low or throw you, and then catch them out with the Dempsey strikes. However this doesn’t come out immediately unless Steve’s head is weaving to his left side. If you press 1+2 while Steve’s head is to the right, he will actually wait until it’s shifted to the left before attacking. Due to the very long startup Steve’s Rage Drive can’t be used in combos and is generally considered one of the weaker rage drives in the game. In open play it’s usually recommended to just hold on to your rage for the damage boost and access to the rage art. At the wall though it becomes a powerful pressure tool. If the opponent hits the wall from the push-back the rage drive causes on guard, which can happen from quite a distance away, they take a guaranteed 5 points of damage and are left at -7 at point blank range with nowhere to go. This makes Steve’s db+3,2 and qcf+1 a true 50/50 mix-up, which can potentially seal the round. Thanks to Season 4 patches the Steve's Dempsey roll is new and improved and it can now wall-splat an opponent and can also be used as a wall combo ender. 2. df+2+3 - with his second rage drive which looks like a Improved Sonic Fang, Steve's another addition to Season 2 was a very powerful. Steve can launch opponent by his rage drive and can also go to duck stance mix-ups after his rage drive on block and its +8 on block. Steve can also combo with his rage drive after the knock back moves like extended duck 2 on normal hit, df+2+2+2 on Normal hit, also most interesting one is on Flicker back+2 Power Crush can also be combo with his rage drive. Combos
Screw moves: FLK 1, d+1 DCK / ext duck f+2 PKB: df+1,2 Back 1, 2 Spike Moves: Ws+1,2 Uf +1 Ff+2 F,f,f+2 FLK 1, f+1 FLK 2 Sway 1 1.Bread & Butter ch B+1 / ch df+2~duck / ch duck f+2 / ext duck f+2 / uf+2 and down parry Easy duck1, df+1,2,1~B FLK 1, d+1 S! Dash df+1+2 Hard duck1, df+1,2,1~B FLK, duck f+2 S! Ext DCK1, micro-dash df+1+2 Extended Duck 1 Note after ch duck f+2, ext duck f+2 and b+1~B you can do ext duck for more damage. With B+1~B make sure you start ducking as soon as you’ve connected the counter hit, otherwise the ext duck 1 will whiff. Modifications With a minor modification, this is also the staple combo after duck 2 and close range PKB uf+2. Just replace the duck 1 with a b+2. Also after PKB df+2 / ch PKB 2 / CH PKB d+2 or the last hit ch df121~B FLK, again just do the B&B but replace the duck 1 with ws+1 After the last of ch d+2,1,2 so a short SSL before going into the B&B. Albatross 2 Damage Alternate This combo does more damage than even the hard B&B, and it’s easier to perform since it doesn’t require a micro-dash. duck1, df+1,2,1~B FLK 1, d+1 S! Run up b+1~B FLK 1~B 3+4, 2 The downside to this combo, is that since it ends in Alb 2 it gives you the least amount of time to go in for a wall combo, as we’ll see later. DCK 1 Wall Carry Alternate duck 1, df+1,2,1~B FLK, duck f+2 S! Duck cancel, dash df+1,2,1~B FLK, duck 1 duck 1, B+1~B FLK, duck f+2 S! Ext DCK 1 f+2,1~B FLK duck 1 UF+1 Okizeme Alternate This combo is the same as the hard B&B, but isn’t difficult at all since it doesn’t require a micro-dash. Instead it ends in uf+1 which spikes the opponent and leaves them right by Steve’s feet for some powerful okizeme options. This combo is particularly useful on wall-less stages. duck 1, df+1,2,1~B FLK, duck f+2 S! Ext Duck 1 uf+1 2. B+2 Easy F+2,1~b FLK 1, d+1 S! Dash df+1+2 Medium F+2,1~b FLK 1, d+1 S! df+1,2,1~B FLK, duck 1 The problem with both these combos is that the opponent is left back-turned, so you can’t extend your combo if you hit the wall. For this you will instead need to do: Hard B+3+4 FLK 1, d+1 S! dash df+1,2,1~B FLK 1~B 3+4, 2 The manual flicker to screw will take some practice to get down consistently. This combo is also used after a ch duck 1, but the timing on the FLK jabs is much more lenient. Wall Carry Variation B+3+4 FLK 1, d+1 S! SSR duck 1, df+1,2,1~B FLK duck 1 After SSL the manual FLK combo will not work, so stick to the f+2,1 combos. After SSR the wall carry variation combo won’t work 3. RWV 1,2 on CH 4,1,2 on counter-hit, PKB uf+2 from a distance, the last hit of FLK 1, d+1 on ch, or a floor break on the temple stage with Steve’s 2 throw, do: Df+1, 2,1~B FLK duck f+2 S! Ext duck 1, f+2,1~B FLK duck 1 Or for 1 point more damage but worse wall carry, you can do: df+1,2,1~B FLK duck f+2 S! Duck dancel, dash, df+1,2,1~B FLK 1~B 3+4, 2 With the FLK 1, d+1 combo, SSR right to realign before starting the df+1,2,1. These are also the staples after FC df+2 or ch df+2 if you didn’t cancel into FLK. Just replace the df+1, 2,1 with a f+2,1 Combos 4. Back-turned and deep sidestep combo 2,1 PAB df+2 PAB df+1,2 S! Dash df+1,2,1~B FLK 1~B 3+4, 2 5. FLK 1, d+1 (to opponent’s left) d+2,1 duck f+2 S! dash df+1,2,1~B FLK duck 1 If just slightly to the opponent’s left, the duck f+2 won’t connect. Here instead just finish the d+2,1,2 string. 6. Extended duck 2 Ext duck f+2 S! Ext duck 1, df+1,2,1~B FLK 1~B 3+4, 2 7. Temple Stage On the temple stage you can get incredible wall carry from this variation to the B&B: duck 1, df+1,2,1~B FLK DCK WS+1,2 B! B+3+4 FLK 1, d+1 S! Run in df+1+2 You can make this easier by replacing the dck cancel ws+1,2 with a ff+2, but you get less damage and wall carry. For other combos, try to hit the wall, and then either do a Running 2 (or for an easier time a ff+2) to break the floor. At the bottom do LWV 1,1 df+1+2. For one point more damage, once you hit the wall, do f+2,1~B FLK WS+1,2 and once you hit the bottom do a sonic fang, or for incredibly powerful oki for only 2 points less damage, d+2, 1 into a Duck cancel. After Ext duck 1 you can also do a duck cancel to ws+1,2 to a floor break. On the bottom floor go into the B&B. 8. Wall combos Ending combos in duck 1 or sonic fang will give you enough time to both dash and do f+2,1. Remember to input b,f+2,1 after the dash so as not to get ff+2. If you end the combo in albatross 2, you have much less time for a wall combo. If you are not in range for a raw f+2,1 it’s recommended to just dash and do a sonic fang. F+2, 1~b FLK, duck 1+2, 1,2,1,2,1,2,1,2,1,2,1,2 (far wall splat) sometimes referred to as the massaging string. To make this combo significantly easier, I recommend holding down 2 after inputting f+2,1 to button buffer the 1+2 input from duck before mashing out 1,2,1,2 F+2, 1~b FLK, ws+1,2 (okizeme - d+1+2 and qcf+1 straight 50/50) 3,1,1, df+1+2 (after close wall-splat from qcf 1 into FLK, FLK b+2, LWV 1,1 ,RWV 2, PKB f+2, ext duck 1, last hit of 2,1,2) Back-dash, 3,1,1, re-splat into any of above (close wall-splat after alb 2, QCF 1 without the FLK cancel, last hit of 1,2,1,2) note the f+2,1 combos tend to be more consistent, as the double 3,1,1s often leaves Steve too off axis to land the sonic fang. 9. Mini Combos Ch FLK 1, d+1 to ff+2 or db+2 2nd hit of CH FLK 1, f+1 to ff+2 or d+b+2 FLK 2 to db+2 or ff+2 against big characters PAB df+1,2 to db+2 PAB df+1,1,2,1 to db+2 Last hit PAB 1,2,1 to PAB d+1 Flicker B+2 to ff+2 Ext duck 1 to ff+2 / duck cancel ws+1,2 2nd hit of 2,1 on CH to FLK b+2 CH SWY 1 to ff+2 or d + 1 + 2 B+1+2, 1 to d+1+2 Punishers
Standing -10: 1,1,2 Steve’s 10 frame punisher is one of the better ones in the game. It offers solid damage and frame advantage, as well as the option to go into duck mix-ups. -12: 2,1 (b) (f) His 12 frame punisher is actually less damaging, but allows you the option of going into flicker or peekaboo at a massive +14. The opponent can still guard though, so nothing is guaranteed. -13: b+1,2 B+1,2 combines the damage of his 10 frame punish, with the powerful frame traps of his 12 frame punish. It also has better range, making it necessary to punish certain moves like King’s FC df+2. -14: df+1+2 (good against moves that have push-back like death-fist) Sonic fang, despite not being as damaging as many 14 frame punishers, has excellent range, making it very reliable to punish moves with push-back. It also offers a knockdown on hit. -15: f+1+2,2 -15 is where Steve’s punishment begins to fall behind other characters. Where as most can launch, he has to make do with 42 points of damage and a knockdown. -17: b+2 His fastest standing launcher is at -17. Even this isn’t a true launcher, instead resulting in a stun that demands some tough execution to get the most out of. -23: uf+2 His next launcher is all the way at -23. This is the only way he can access his B&B combo without a counter-hit. Crouching -10: FC 1 For crouching punishment, at -10 like most characters Steve can only do a crouch jab. -11: ws+1,2 His i11 punisher though is one of the best in the game, behind only Leo’s in damage output. This also forces the opponent in crouch, and gives Steve 3 frames of advantage to work with. -18: fc df+2 However the next punisher from crouching is all the way at -18. This means he can’t launch punish many moves that the rest of the cast can. -23: uf+2 And again at -23 he has access to his bread and butter combo starter. Anti-Strategies 1. Be patient Since Steve is a character that thrives on chs, he does exceptionally well against players who love to push buttons, but struggles somewhat against more patient players. So be patient! This rule applies to all characters, as Tekken is innately a defensive game based around movement, but especially against Steve. Make him come to you and punish his dck approach with mids. Recklessly attacking him will only too often result in a ch b+1 or df+2 for big damage. 2. High crush Many of Steve’s best keep-away and pressure options are high. You can often slip right under his attempts to control the match with high crushes. Once he starts having to use slower mids, then you can be the one to start counter hitting him with fast highs. Characters like Feng and Xiaoyu are tough match ups for this very reason. 3. Sidestep with caution Steve’s tracking is generally quite strong, and outside of predictable running 2s, albatross 2s and qcf+1s, attempts to step him will generally get you punched in the face. 4. Back-dash When being pressured, generally your best bet in terms of risk and reward is to simply back-dash and look for a whiff. His lows either have poor range or are very slow, and so can be punished with back-dashes and reactionary low parries. 5. Calculated risks If you see Steve often cancelling moves into duck to maintain pressure and close the space, intercept with a read - that is to say predicatively, not re-actively, with a mid. Steve can duck cancel into the lighting fast ws+1, which is counter hit confirm-able to ws+1,2, to keep reactive retaliation in check, or duck f+2 for a full combo. Be careful not to just thoughtlessly mash out hop-kicks though, as Steve can duck cancel into a guard to bait it out and block punish. Though showing Steve that you’re willing to take calculated risks, and aren’t going to just sit there passively taking all his pressure, should slow him down quite a bit. 6. Be more liberal with normally launch punishable moves Steve doesn’t have the ability to launch punish from standing until -17, which means that many moves that are normally highly punishable are much safer when fighting him. A good example is Law’s d+2,3, with the most guaranteed damage Steve can get is with f+1+2,2 which is better than what Steve could previously do, but still markedly worse than a full launch. Take advantage of Steve’s inability to launch punish by playing a little more recklessly. Beware though that his punishment up until -13 from standing is actually quite good, and he has one of the best i11 WS punishers in the game, so be careful with using low pokes against him. His low punishment starts dropping off tremendously in relation to other characters at around i14 though, with his fastest low punisher being a whopping 18 frames, which some characters with normally launch punishable lows like Claudio can really take advantage of. 7. Punch parry Being a boxer, nearly all of Steve’s moves are punches. Also given his suffocating, pit-bully play-style, he will likely be pressing a lot of buttons, and you will be blocking a lot. A punch parry can be a great way to disrupt Steve’s momentum and force him to think more carefully before he acts. Note that against Bryan’s punch parry, you can hold back to go into auto-sway, and punish for a combo with SWY 2. This will counter the counter, sort of like a chicken. 8. Low parry A lot of Steve’s lows are -12 which aren’t particularly punishable. Since his only mid launcher is very slow, an option select low parry, done by tapping down forward before immediately going back to stand guard, is useful in moderation. Watch out when he’s in peekaboo though, as he has access to several fast and damaging mids, though Steve players will be particularly prone to go for lows when in this stance, especially d+1, so if they’re being very predictable then by all means go for the low parry. Anti-Strings & Punishable Moves Strings with highs or lows 3, 1, f+1, 1~B + on block, but the last hit is high. Crouch and launch. PAB b+1,1,2,1 The 2nd hit is high. Quickly punish it with a WS move since the 3rd hit is mid. F+2,1 / f+2,1,2 Mid high non jailing string. The mid extension will catch any attempts to punish with a WS move, but it can be interrupted by any move that is 16 frames or faster. If you have a fast high crush move, it will beat both options in the string, no guesswork required. Df+1,2 / df+1,2,1 As mentioned previously, neither of these strings jail, but if you try to crouch and punish df+1,2 if Steve instead does df+1,2,1 you’ll eat a fat ch combo, so be careful. 1,2,1 d+2 The low at the end is react-able, so stay alert and low parry if you see this. B+1,d+2 Low parry the 2nd hit in the string if they’re getting predictable with it Uf+3,2 Launch punishable on reaction since the 2nd hit is high. Will catch you if you’re unfamiliar or caught in deer in headlights mode though, so become familiar with it. A Steve player can just use uf+3 by itself to deter punishment. This is -12 on block, but be careful not to get interrupted by the 2nd hit in the string. Punishable Moves PAB df+2: -10 PAB df+1,1: -10 B+1, d+2 F: -10 (usually out of range) Qcf+1 (can be flicker cancelled to safety): -10 1,2,1,2 (can be duck cancelled to safety): -10 PAB df+1,1,2: -11 2,1,2: -11 Df+2 (can be duck cancelled to safety): -11 D+2,1 (can be duck cancelled to safety): -11 Opponent down d+1+2: -11 PAB b+1,1,2: -11 Df+1+2: -12 PAB d+1 / FC df+1: -12 PAB d+2: -12 B+1, d+2: -12 Db+2 / FC db+2: -12 1,2,1,d+2: -12 Alb d+2: -12 2x Alb d+1: -12 Uf+3: -12 WS+1, 2: -13 B+2: -13 3,1,1: -13 4,2: -13 4,1,2: -13 F+1+2, 2: -13 d+2~n+1 , 2: -13 PAB df+1,1,2,1: -13 PAB 1,2,1: -13 PAB f+2: -13 (usually out of range - only punish at wall) Ff+2: -13 (crouching) D+1: -13 Uf+2: -14 Uf+4: -14 B+1: -14 (can be flicker crouch canceled to safety) Duck 2: -14 Ext duck 2: -14 PAB b+2: -14 F+1+2: -14 PAB uf+2: -15 FC df+2: -15 Db+3: -15 FLK 1,2: -16 d/b+1+2: -18 PAB b+1: -19 Round Up In earlier entries of Tekken, Steve’s ability to control space was at times unmatched. With each entry his safety and reward for playing keep-away has diminished, and his offensive capabilities buffed. Now he is quite a versatile character, while still retaining the focus on ch based play. Due to his unorthodox design, large move-list, reliance on stance cancelling and lack of regular launchers, Steve is challenging, but rewarding to play - both in terms of his potential strength as a character, and the freedom of expression he affords the player. Steve lacks big intimidating lows, and is very rarely at a meaningful advantage, but this plays right into his counter hit baiting game. Just when the opponent thinks it’s safe to press buttons, Steve can either interrupt with his plethora of string extensions, or evade with his unique weaves and punish heavily. With his advancing, evasive duck cancels, and annoying high crushing lows, opponents may be tempted to use mids against Steve, which only opens them up to his fast, damaging counter hit highs. Overall, Steve does exceptionally well against reckless opponents who love to push buttons, but needs to work hard against defensive players who have a firm understanding of the holes in his strings. Difficulty: Advanced Steve Fox - Season 2 Changes During Rage d/f+2+3: New move added. New Mid Rage Drive added that is Sonic Fang but its +8 on block and hits grounded as well. f+2,1~2: Changed damage from 17 to 20. Changed from -5F to -9Fon block. Recovery increased by 5F on hit. Opponent reaction on hit changed. You get knock back Animation which can sometimes be picked with Gattling gun as well. Duck In 2: Opponent reaction when hit while downed was changed. Opponents on the Ground can be hit as well as the lower hitbox of the move is increased. f+1+2: Opponent closer after 1st attack hits. Sometimes this move's first hit gets hit while second gets blocked and the 3rd move also gets blocked. So now its fixed as the opponent will be closer on 1st hit. Push back from first hit decreased. PKB f+2: Push back decreased so it hits easier. Nothing much. PKB f+2,1: Opponent reaction when hit mid-air was changed. PKB d/f+1: Damage changed from 10 to 12. Combo Damage affected. PKB b+2: Causes Wall Bounce on hit. Yes the New mechanic was introduced. Didn't changed Steve's gameplay as this was useless move given this property. The only use this move had was as Steve sway backwards as many of jabs, Magic fours, and much more gets whiff and they get wall bounced. Although Nobody uses this move to this time. PKB u/f+2: Damage changed from 20 to 23. Opponent reaction when hit while downed was changed. d/f+1,2~2: Changed damage from 17 to 20. Changed from -5F to -9Fon block. Recovery increased by 5F on hit. Opponent reaction on hit changed. You get knock back Animation which can sometimes be picked with Gattling gun as well. Same as f+2,1~2 b+1,2: New move added. This is a major Change as the Second hit now screws in Mid-air. This was Steve's very useless 13F punisher but in Season 2 it is the Major Change which definitely changed the play style. FLK 1: Damage changed from 10 to 14. Opponent closer on hit. FLK 1,1,1,2: Changed from -16F to -7F on block. Another major change change. Opponent reaction on mid-air hit was changed. FLK 2: Changed from ±0F to -5F on block. OK change. Not necessary but OK. When enemy is down d+1+2: Opponent closer on block. Now in many situations this move is guaranteed when opponent gets knock down. Changed the Oki after combos. Steve Fox - Season 3 Changes During Rage d/f,2+3: Fixed an issue in which the second half of the move could not be performed while running, side-walking, or rising. Also this does not hit grounded opponents now. During Ducking Right 2: Enabled the move to cause a wall bound if it hits. Decreased the distance between the character and the opponent when the move is blocked. This move actually changed the Wall game, Steve is now a Monster if your back is at the wall. During Ducking In f,2: Decreased the distance between the character and the opponent when the move is blocked. Not Necessary but OK. You can easily launch Punish Steve now. f,1+2,2: Changed the opponent’s behavior when hit in midair. Doesn't affect much. During Peekaboo 1,2,1: 2nd hit: Sped up the timing at which the opponent’s attack can be blocked by 2 frames. 3rd hit: Changed the opponent’s behavior when the move lands as a counter hit. These Changes actually are buffs for the Steve Players who are masters in Peekaboo stance as their main play. Me personally I use Peekaboo a lot its a powerful stance. They made it more powerful by adding the above properties. During Peekaboo f,1+2: Delayed the timing at which the opponent’s attack can be blocked by 4 frames. This move is the most useless move ever I hardly use this to get some plus frame they just made it a little faster. Its a high shove which gave Steve whopping +5F which but nothing else. During Peekaboo d/f,1: Delayed the timing at which the opponent’s attack can be blocked by 2 frames. It means that the first mid hit and the 2nd hit has now a gap of 2 frames in which if the opponent is steady will not be hit and now is slower than usual delay. Didn't affect much though. During Peekaboo b,1,1,2,1+b: Delayed the timing at which the opponent’s attack can be blocked by 2 frames. Same thing done to this move as the above one. Didn't affect much. d/f,2: Changed the opponent’s behavior when the move lands as a counter hit. This is actually a big slap in the face for Steve players. Steve is not actually an easy character now he is very difficult to master. Animation changed to knock back just like Extended Duck 1 which can now be combo with duck cancel and duck gattling gun Shirou Combo. d/f,1+21st hit/2nd hit: Increased the strength of the pushback to reduce the frequency at which the character would switch places with the opponent. Sonic Fang Adjustments. b,1+b: Delayed the timing at which the opponent’s attack can be blocked by 2 frames. Back 1 can now be ducked punished if done right. b,2: Changed the frame advantage when blocked from -13 frames to -14 frames. Unnecessary but OK. During Sway 2: Increased the strength of the pushback to reduce the frequency at which the character would switch places with the opponent. Sometimes back swaying would switch places with the opponent they fixed that. While in Flicker Stance 1,d,1: Decreased the distance between the character and the opponent when the move is blocked. This move was one OP move that Steve had in flicker Stance. They nerfed it quite well. Still can be used but the combo is little harder and they changed the opponent’s behavior when hit. Which means the opponent is not stunned he just gets screwed. Changed the move to send the opponent spinning when it lands as a counter hit. While in Flicker Stance 2: Changed the opponent’s behavior when the move lands as a counter hit. A really good buff. Changed Steve's mid Counter hit game a lot. While in Flicker Stance b,2: Changed the frame advantage when blocked from -10 frames to -9 frames. Another Good buff. Shortened the recovery animation by 1 frame when the move hits. If done right you can pickup from Power Crush knock back with gattling gun. QCF,1+b– Delayed the timing at which the opponent’s attack can be blocked by 2 frames. A little nerf like the other strings related to flicker stance. QCF,2: New move. He received a new low, launch punishable on block. QCF,2+f– New move. The new low can be transformed into Peekaboo which on block makes the move -12 on block. Which is really good guessing game for the opponent. While crouching d/f,2: Changed the opponent’s behavior when hit while downed. Hits grounded now, it can now be mixed with d/f+2 cancel into while crouching d/f,2 combo. As you can see Steve will be balanced but really hard to master in this Season. Steve Fox - Season 4 Changes In these Changes Bandai Namco Tekken team is telling why they did the certain Nerf followed by my personal comments. During Rage df+2+3: His rage drive was one of the most powerful, and properties on attack, block and hit were quite strong. In order to reduce the return on hit while retaining its effectiveness, the damage of the 1st attack is now reduced from 10 to 5. Damage Nerf. f+2 [1, 2]: Despite in theory that the 2nd attack was interruptible with a quick attack when blocking the 1st attack, in fact the 2nd attack came too fast and it was difficult to stop. Since Steve was safe in many instances when attacks are blocked, he had few vulnerabilities. Rather than reducing the return on hit, we reduced the frame advantage when blocked from -9 frames to -10 frames to make the move punishable. An unnecessary Frame Nerf. During quick-turn 2: It was very good in terms of both the amount of the aerial combo damage and the length of distance it carries the opponent. We reduced the carry distance when hitting an opponent in the air to make it more difficult to connect to a wall combo. Combo Nerf wall carry no more possible. df+1 [2, 2]: Despite in theory that the 2nd attack was interruptable with a quick attack when blocking the 1st attack, in fact the 2nd attack came too fast and it was difficult to stop. Since Steve was safe in many instances when attacks are blocked, he had few vulnerabilities. Rather than reducing the return on hit, we reduced the frame advantage when blocked from -9 frames to -10 frames to make the move punishable. An unnecessary Frame Nerf same as f+2 [1, 2]. df+2: Since it was a middle homing attack that came out quickly, when done in an advantageous situation, it was able to curb most of opponent’s actions. In order to give enough return to the opponent who successfully guessed Steve will do this attack, we removed its homing attack ability and made it weak to sidestep. The biggest Nerf in the history of Tekken 7. Since some opponents low to the ground attacks would go under it, this move’s attack range was expanded downward. d+1: Despite the fact that the frame advantage upon hit was supposed to be even, in reality Steve was able to take advantage as he was able to dodge the opponent’s quick attacks with the left and right “weaving (3 or 4)”. We changed the frame advantage upon hit from +0 frame to -2 frame to enable the opponent to stop attacks such as “while rising 1”, while keeping the strength of the unique defense actions such as “weaving”. This made Steve's Neutral game really difficult. b+1, hold b: This is Steve’s main move that has high return upon counter-hit, allows to continue attacking even when blocked, and is useful for punishment and aerial combos. However, this move also often led to a match getting deadlocked because switching to “flicker stance” after the move enabled him to reduce the time being vulnerable to attack, and doing this move at mid-long distance made it difficult for the opponent to get close to him. In order to give him more of a disadvantage when the attack misses the opponent, we made the time it takes to enable him to block the opponent’s attack 3 frames slower. Steve can now easily be whiff punished on B+1 spam. We also made the time it takes from the command input to the crouching position 3 frames slower. Its not going to be cancelled quickly from flicker. During Flicker Stance b+2 It was a powerful move as it was a Power Crush only able to do during the flicker stance. Since it was a quick attack move that can be used very frequently to hit the opponent, we reduced its return by changing the damage from 27 to 21. Damage Nerf to Flicker Stance Power Crush. I think it is finally time to hang the gloves. Its been a great run for Steve Fox. Credits This content has been generated by our beloved "Tekken Academy" The Blasted Salami The Link to Steve Fox Complete Guide: Note: This Video guide is of Season 1, they have multiple videos regarding different season changes. Special Thanks to The Blasted Salami Subscribe to them Here Players to Watch: Heera Malik tkfightspirit Knee Shirou