换一换
换一换 


这是一份逐步指南,将向你展示如何在《足球经理2019》中安装自定义图形,包括队徽、球衣、球员面部补丁、背景、比赛用球和球场纹理。它还涵盖了可以从游戏旧版本转移的图形内容以及转移方法。 简介

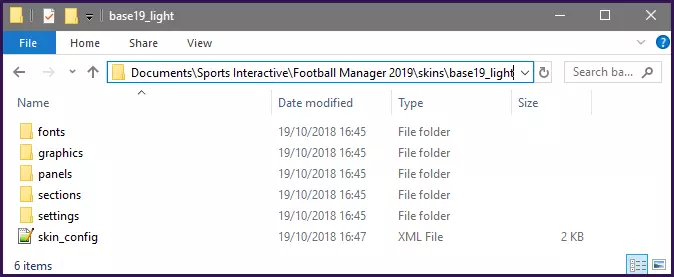
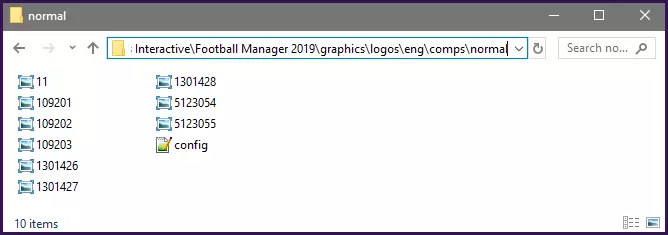
欢迎使用全新改进的《足球经理》皮肤与图形安装指南。本指南将向你展示如何将最常见类型的图形(面部、队徽、球衣)正确安装到《足球经理》中。关于皮肤安装的说明,请参考相关指南。今年我对格式进行了调整,力求使其尽可能简单易懂。首先请注意,这些说明仅适用于游戏的Steam版本(无论是盒装版、CD密钥版还是通过Steam购买的版本),且无论你使用何种操作系统,说明大体相同。另外,和往常一样,建议你对从互联网下载的任何文件进行病毒扫描。建议阅读你要安装的内容的下载页面上的任何说明(或下载文件中附带的自述文件),因为其中可能包含该文件特有的额外说明。这对于可能需要按特定顺序解压的多部分大型包尤为重要。 如何安装图形文件 本指南的这部分将介绍如何安装3D套件、2D套件、面部包、徽标、奖杯、背景和 stadium pictures。虽然这些包略有不同,但安装说明完全相同。 下载文件后,它通常会以下列三种格式之一呈现:zip、rar或7z文件。您的操作系统应自动支持Zip文件,这些文件可能会显示为压缩文件夹。Rar和7z文件可能需要您下载一些软件来解压,推荐使用以下软件: Windows:7-Zip(选择最新的.exe文件) MacOS:The Unarchiver Linux:如果您使用Linux,希望您已经知道如何下载和查找Linux程序。 7-Zip通过下载的.exe文件进行安装,按照屏幕上的说明操作。要安装The Unarchiver,只需双击从其网站下载的.zip文件,然后将解压出的名为“The Unarchiver”的程序拖到您的应用程序文件夹中。安装完成后,在你方便管理的位置(例如桌面)新建一个文件夹,并将下载好的图形文件压缩包(zip、rar或7z格式)放入其中。接下来进行解压操作: Windows系统:右键点击压缩包,从菜单中选择7-Zip,然后选择【在此处解压】。 macOS系统:右键点击(或按住Ctrl键点击)压缩包,选择【打开方式】,然后选择【The Unarchiver】。 解压完成后,通常会在同一目录下生成一个文件夹。 如果你解压的是fmf文件(或直接下载的就是fmf文件),无需担心。这些文件是通过FM资源工具打包的,作为终端用户,你无需对其进行解压操作,可将其视为解压后得到的文件夹即可。查找用户数据位置 下载并解压文件后,你需要将它们移动到用户数据位置,以便游戏能够读取。 首先确保你至少运行过一次游戏(只需进入开始菜单然后退出即可),这样游戏会为你创建所需的文件夹。用户数据位置的默认路径会因所使用的操作系统而略有不同: Windows:C: Users <用户名> Documents Sports Interactive Football Manager 2019 Mac OS X:/Users/<用户名>/Documents/Sports Interactive/Football Manager 2019 Linux:/home/documents/Sports Interactive/Football Manager 2019 (将<username>替换为你在该电脑上使用的用户账户名称) 打开《足球经理2019》文件夹后,你应该会看到一系列文件夹,需要找到名为graphics的文件夹。如果该文件夹不存在,只需新建一个文件夹并命名为graphics即可。现在打开你的图像文件夹,并将解压后的文件放入其中。 大多数情况下,你将图像放入哪个子文件夹并不重要,但最好将不同类型的图像分开放在各自的子文件夹中,这样你就不会意外地用同一球队的队徽覆盖球衣文件。整理时需要注意名为config的xml文件。这些文件至关重要,不应混合搭配。一组图像会在同一文件夹中附带一个独特的config文件。确保它们放在一起,在同一个文件夹中,并且不要在它们的文件夹中添加或覆盖新的png文件或config文件。 为获得最佳效果,请尽量保持文件夹名称简短简单,并尽可能避免使用特殊字符。例如,下面是一张截图,展示了正确操作后典型的最终文件夹应有的样子。请注意,其中包含一个配置文件和多个图形文件,文件夹结构简短简单,可防止在安装其他图形文件时意外覆盖配置文件。
在游戏中显示图像 添加所需图像后,启动游戏并进入设置->界面菜单,取消勾选“使用缓存以减少页面加载时间”,并勾选“在设置中确认更改时重新加载皮肤”。 屏幕应显示如下:
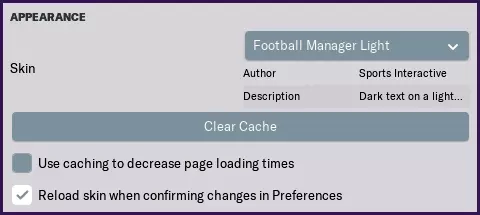
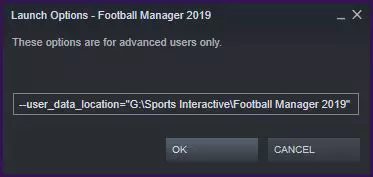
Next select confirm and your new graphics should now display. (Once the graphics are loaded and you aren't planning on adding any more you can turn the skin cache back on and un-tick the Always Reload button.) If you want to add more graphics then just repeat the above steps, just making sure you put each pack you install into it's own folder so you don't accidentally overwrite the config files from your earlier packs. How To Install Other Stuff It is also possible to replace other items in Football Manager, for the most part these are installed into various folders within your User Data Location. First make sure you have run the game at least once (just getting to the start menu and exiting is fine) so the game can create the required folders for you. The default location of your User Data Location will be slightly different depending on the OS you are using; Windows C: Users <username> Documents Sports Interactive Football Manager 2019 Mac OS X /Users/<username>/Documents/Sports Interactive/Football Manager 2019 Linux /home/documents/Sports Interactive/Football Manager 2019 (Replacing <username> with the name of the user account that you use on that computer) If you want to move or have already moved your User Data Location then please refer to this guide to move/relocate it. After you have opened the Football Manager 2019 folder you should see a list of folders and what you need to do is locate the relevant folder for the item you are wanting to install, below I have listed some common examples, for other items you are best checking the site or thread where you downloaded the item from as they should have provided installation instructions. If the below folders don't exist (and they generally won't) then just create them and once done place your extracted files in the folder indicted below: 3D Match Ball mesh ball Pitch Textures textures pitch 2D Match Ball textures match_icons 2D Winter Match Ball textures match_icons winter Also note it is generally recommended to replace these items whilst the game is not running as refreshing the skin doesn't tend to refresh the match related files. Once you have added what you want then load up the game and go into the Preferences -> Interface menu and untick 'Use Caching to decrease page loading times' and tick 'Reload Skin when confirming changes in Preferences' then select confirm and your new graphics should now display. (Once the graphics are loaded and you aren't planning on adding any more you can turn the skin cache back on and untick the Always Reload button.) How to Transfer Files from a Previous Version Nearly all user created graphics can be transferred from one version of Football Manager to the next, the exceptions are: - Skins, skins can only be used for the version of the game they were made for. It may seem that a skin from last year may initially work on the new game, however when you get to a new screen you are likely to get a broken/blank screen at best or even possibly you'll cause the game to crash, so it is best to wait for the skin maker to update the skin (or make your own with permission). - 3D kits were changed again with FM18, so if you are using FM18 on-wards you will need kits made using templates for that game on-wards, if you are playing an older version then you will need pre-FM18 templates. - Graphics that are released in the fmf format might not work across versions, if the later version of Football Manager cannot read the fmf files you'll need to use the Resource Tool from the previous to extract the contents of the fmf file, and then either keep them extracted and treat as normal files or repack them using the Resource Tool from the current version. There are two ways of transferring your graphics between versions of Football Manager; 1. Manually move your graphics folder (or the folders that contain the stuff you want transferring over) from the User Data Location of the current Football Manager, to the same location within the User Data Location of the new Football Manager. When transferring content over make sure it keeps the same folder structure (unless instructed otherwise). 2. Change the User Data Location of the new version of Football Manager to point to the location you were using for the current version. (Note if doing this you might want to move none graphical user files to another location to save you accidentally overwriting them with the new edition or you causing problems by trying to read older version files in the current edition.) Once you have done that then: Go into the Preferences -> Interface menu and un-tick 'Use Caching to decrease page loading times' and tick 'Reload Skin when confirming changes in Preferences' then select confirm and your new graphics should now display. (Once the graphics are loaded and you aren't planning on adding any more you can turn the skin cache back on and un-tick the Always Reload button.) Redistribution Terms You are free to post this content to your website provided: 1. It is not sold or behind a paywall. 2. You don't advertise it as being exclusive to your website. 3. My username and blog address are included: http://michaeltmurrayuk.blogspot.co.uk/ If you like my work then feel free to send me a donation[www.paypal.me] this is completely optional all of my content is and will always be free to access. Also if you have any questions then the best place to ask them is in the Skinning Forums[community.sigames.com] at the Official SIGames Forums where I can be found most days.