换一换
换一换 


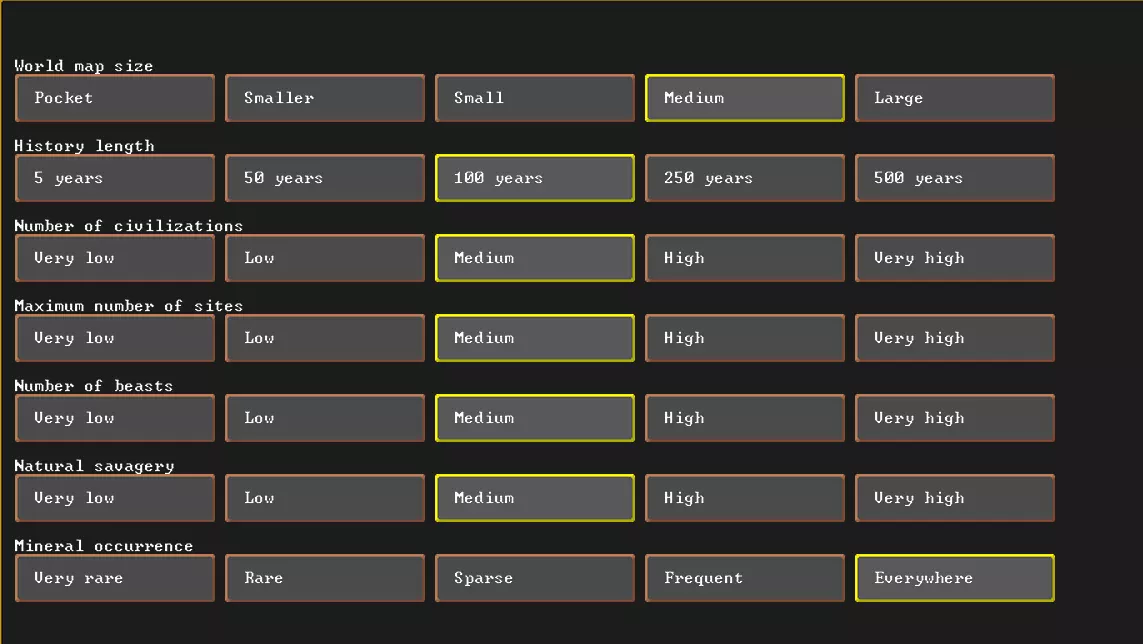
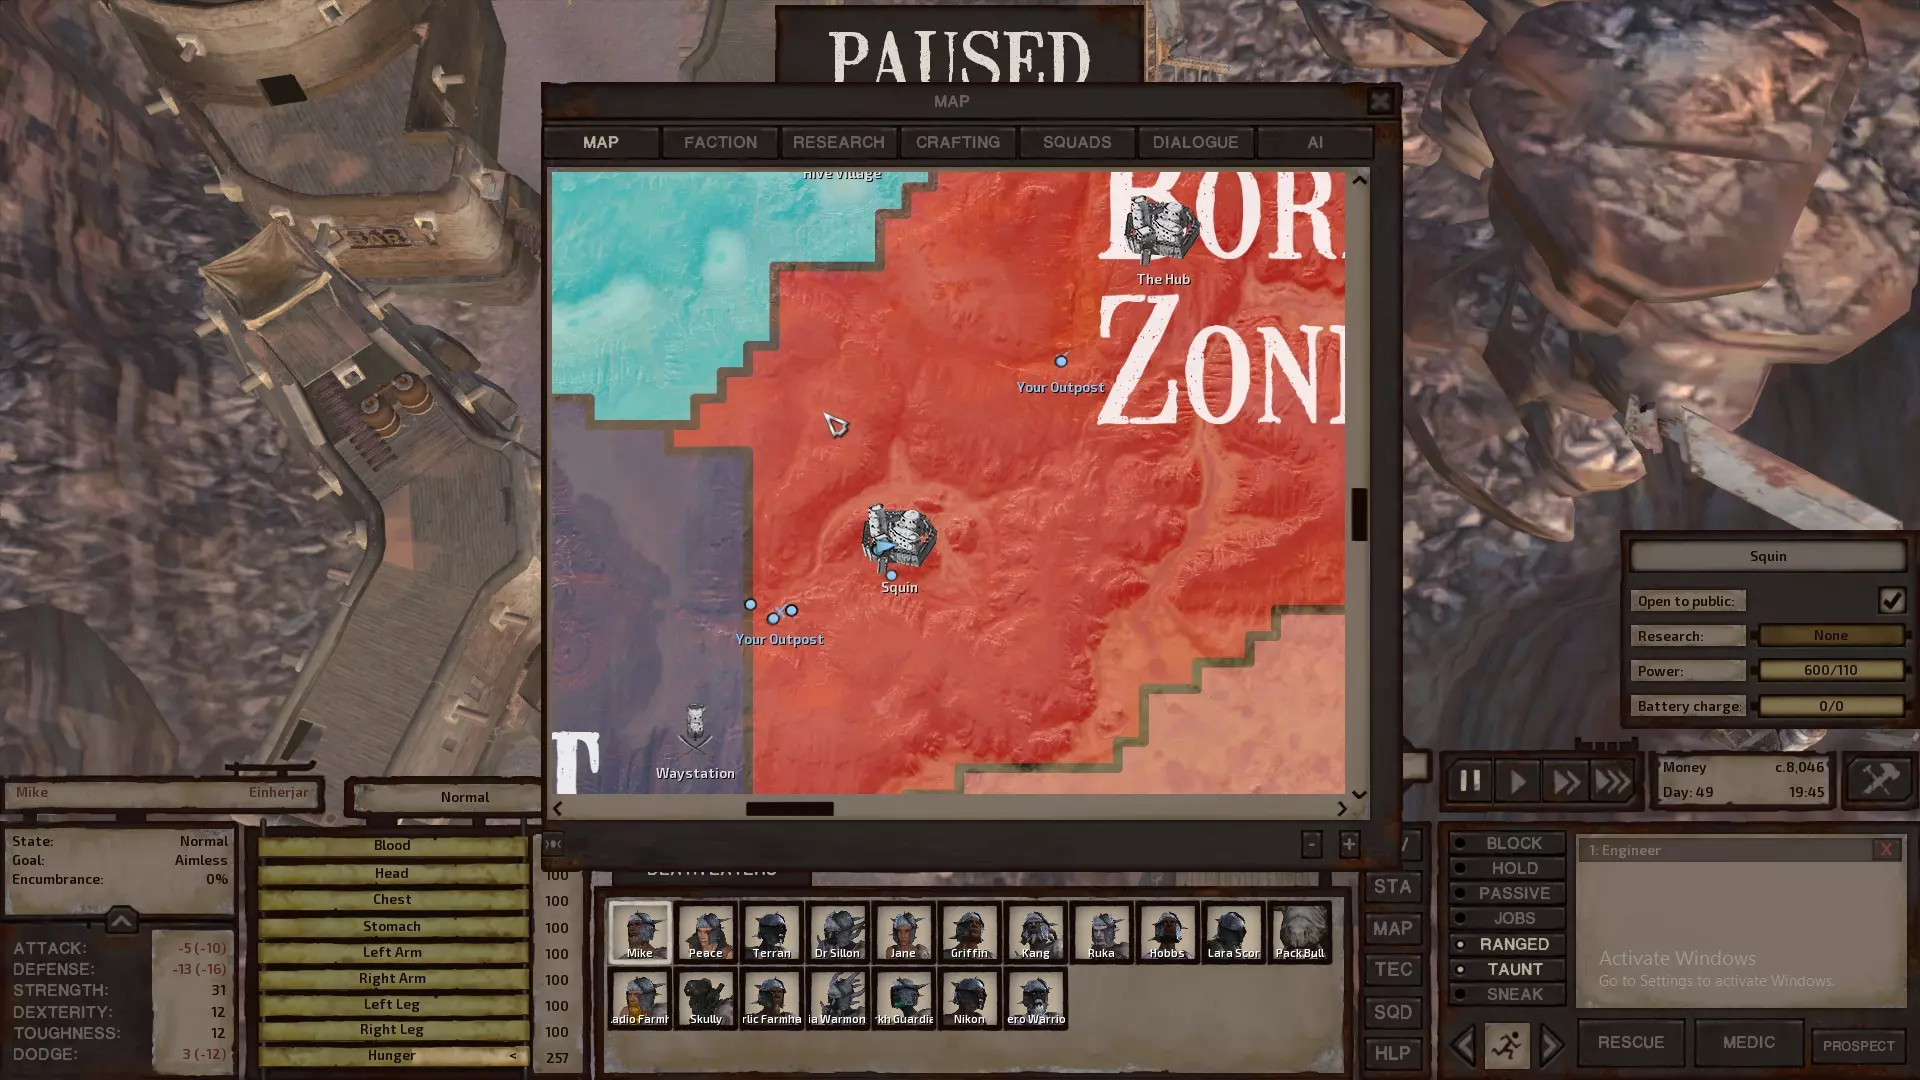
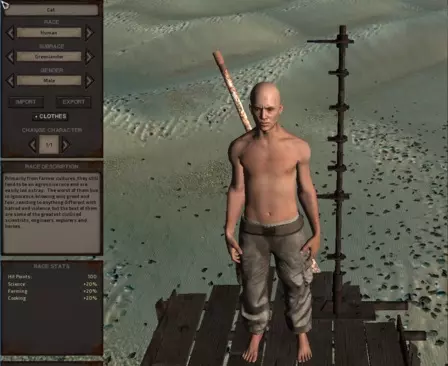
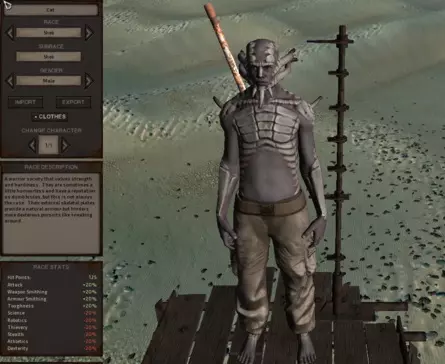
First part of this guide provides an updated Roadmap and Beginner Guide for new players, focused on basebuilding. The second part provides in-depth sections for all players on specific topics in Kenshi, including Race/Role Rankings, Farming, Autohauling and more. There are a lot of good guides out there for achieving particular goals, but few, if any, focus on basebuilding first, and warrior development second. This guide attempts to show you how to do that. Introduction Welcome, Drifter. Like many people coming into Kenshi, my first few playthroughs were rough. I wanted to establish a settlement and I didn't want to focus on training up a core group of fighters over a lengthier period of time to do it. To avoid spending hours on a death simulator, I've tried to walk you through what you need to do to successfully focus on basebuilding first, and warrior development second. There are a lot of good guides out there that focus on particular ways of achieving certain goals, and there is a really great roadmap for building a faction based on a group of well trained fighters (which I highly recommend). However, here, I will attempt to show you how to take the inverse approach. This guide has two parts: Roadmap for New Players - Using a sample playthrough, I attempt to show you how to create a settlement in the harsh lands that you'll inhabit in Kenshi. In-depth Topic Guides - Providing new or old players advice and strategies on specific topics, with an emphasis on large faction and city building. These can and should be used in conjunction with one another. For instance, at various points in the roadmap (or as early as character selection), you may need to know specifics about the different races in Kenshi that aren't covered until Section 8 and 9, so jump to those sections. When the roadmap tells you to focus on building up farm production, consult Section 5. Basically, if the roadmap doesn't contain enough of a how-to, look below, where I've provided analysis, descriptions and links. If you feel like there is a segment that needs a better explanation, please feel free to let me know in the comments and I'll try and update it. There is almost certainly a way to play the game with even less early grinding than I did here, but this guide will demonstrate a way to get to a place where you can sustain a settlement and move on to whatever aspect of the game you most aspire to. The world in Kenshi can be a tough master - it won't necessarily force your play style but it will force you to make hard decisions or punish you for rushing. If you want to strike out on your own and empire build in a tax free or lawless region, you may need to grind a bit and/or recruit a ton before you can adequately defend the settlement. If you want to live in a safe region, like the Holy Lands, you have to follow the rules (meaning you can't recruit non-greenlanders or females without some risk of bringing unholy hell down upon your new settlement). And generally speaking, if you are in a more "controlled" portion of the map, your settlement will have to pay taxes. A lot of them. Unless you want to fight the very people you hope to trade with or receive protection from. Important Initial Note: I've tried hard to refrain from putting in any spoilers, but the roadmap - by necessity - discusses the path I chose to take to get there. As such, it contains the names of a few of the towns and their relative location, an image of the map around Squin (the town I focused my start on), as well as some of the factions I had to deal with. Changelog (after 12/11/18) - 12/11/18 - Added Farming, Base Location and Layout, and Equipping your Squad Sections. Added other minor updates to various parts of it and tried to make it cleaner. -12/12/18 - Greatly expanded section on Arming and Equipping squad; added weapon breakdowns and thoughts. -12/13/18 - Pictures and a few updates added for Farming -12/14/18 - Added notes on auto-hauling and efficiency -12/16/18 - Added a few notes throughout, including base setup, farming, and stackable backpacks in auto-haul section. -12/17/18 - Added sections on Early Money Making Strategies and Faction Economy Strategies. Changed up section locations and added info throughout. -12/18/18 - Added sections on Race Breakdowns and Role Selection and Job Rankings. Additional edits made throughout. Advanced Killzone picture posted. -12/20/18 - Added War Party and Advanced Research and Looting sections, made additions and edits throughout including moving sections around. -1/6/19 - Began incorporating questions and suggestions from comments and messages, and added edits and a few tips throughout. Character Creation and Start Choice Character Creation and Start Choice I started as a lone wanderer, which is what this guide will focus on as it is the standard start. Your primary character will likely be your most complete. I chose a Male Greenlander, and if this is your first playthrough that makes a lot of sense. You won't be hated by Holy Nation, which frees up much of the center-north portion of the map. However, the cooking, farming, and science bonusses, while great overall, are not real important on your starting character which will likely be one of your primary warriors/jack of all trades throughout. If you want to play it a little less safe and get more combat bonusses, you could try: a Scorchlander due to how rare they are to recruit, they have few penalties making them a sort of jack of all trade plus combat bonuses and eat less than greenlanders or Shek. An added bonus is that while they aren't liked by the Holy Nation, they are tolerated and won't be attacked on sight, or a Shek warrior due to combat bonuses. They have a horrible hunger rate, which is painful early, and a ton of job limitations, which can also be painful. But they are good at fighting. Note that they get targeted by the Holy Nation so that might limit you for early recruiting and trade in the central northern portion of the map. Note - While Skeletons are incredible late game fighters, and a squad of them may be your desired roving warband, they are, in my opinion, a bad early selection for a new player. They will be attacked on sight by the Holy Nation, and are very expensive to repair and maintain, even if they have no hunger. That said, if you do go that route, you can rent skeleton repair beds in Hive territory (as well as in other tech areas). For more on this, look at Sections 8 and 9, which break down the various races in Kenshi, their combat roles and non-combat roles. Quick Primer on Stats For the most part you'll find this information readily available in other guides but I'll provide a quick overlay below. Attributes and skill levels cap at level 100, and racial bonuses only go towards experience earned. Attributes - your fundamental, underlying stats that drive everything, relate to combat and other skills. Strength - Ability to use heavier weapons, strike harder (particularly blunt dmg), carry more. Used to effect total blood level but may no longer do this (discussed below). This will be a skill you level on pretty much all your characters. This will go up naturally enough, especially if you're swinging heavy weapons - but classic ways of leveling this include filling sacks up with iron ore and then doing your tasks (or running around), carrying captives while you work, swinging heavy weapons, etc. Toughness - Ability to take a hit, effects damage resistance and KO level. You want this on everybody, but its the most difficult to level - Pretty much the only way to level this is to continually take a beating. I just allowed this to level up naturally, but the classic leveling for this involves prisoner training (discussed below). Dexterity - Effects attack speed, cutting damage, dodge ability. It is raised "per hit," so faster weapons will train it up faster. Very important for all chars, especially martial artists. Perception - Pretty much the only "class" dependent skill, perception governs a characters ability to see things in the wilderness, as well as ranged weapon accuracy. You pretty much will only be building this on your ranged fighters by practicing ranged combat. Skills - Task specific skill levels, which fall into six categories: Weapon Skills - Self explanatory, your ability to use particular weapon types (discussed in detail below) will level up as you use them. Also includes turret skills and friendly fire reduction (precision shooting). Combat Skills - Govern how effective your characters are in combat more generally - including success with attacks, blocks, dodges and martial arts. You will level these up through combat. Thievery Skills - Govern all things related to being a thief/ninja, including: stealth, lock picking, thievery, assassination. Athletic Skills - Athletics, and to a lesser extent swimming, are pretty important from the outset. Science Skills - Skills that govern intellectual activities include medic, engineer, robotics, and science. You will be developing medics and science from the getgo - your engineer and robotics characters come along later. Trade Skills - Skills that govern crafting, farming, and cooking. You will have a lot of characters uniquely focused on these. Basic Roadmap - Part 1: First Steps First Steps - Initial Training and Purchases RUN. Always. This is the only rule for beginning a life in Kenshi. While getting beat up isn't the end of the world (or even a bad thing), there is plenty of time for that later. Run speed is based on a characters athletics skill. Initially, you want to be running around to get your athletics up to 20 or so - that way you have a higher chance of escaping punishment. You will do this naturally by running back to the copper or iron vein you want to mine, but you can also try finding the cities north and south of Hub, just remember to keep a close eye on the horizon for bandits and your inventory relatively weight free (one food, one medkit). Recruit the freebie Hobbs (free recruit) in Hub, and start mining copper or iron nearby. Note - There is some randomness built into the spawn location of the free recruits, so, for instance, Hobbs may not automatically be spawned in Hub at the start. Exploring the Biome a bit is dangerous, but it provides an added incentive to find Squin (South of Hub), and/or Stack (north of Hub) to see if they have any free recruits. Always keep food and a medkit on each of your guys. Save up money from copper mining south of Hub to buy the large backpack (3k) and access to the Thieves Guild in Hub (10k). The Thieves Guild will allow you to train your character in basic melee (up to 5 or 10), lockpicking and sneak attacks (which you should train no higher than 17 or 18 right now, and are really only important for escaping imprisonment and stealth attacking bandits to get prisoners for training which is useful later).While I relied on safely copper mining in this playthrough, Section 1, below, provides more depth on how to mine for money, and discusses additional early money making strategies. One example of this is a strategy I read about but didn't try which requires that you find the Waystation south of Squin and hire bodyguards to attack the Dust Bandit king, heal him and turn him in for his bounty to give a sizeable starting income. I would recommend not doing this until you've looted the corpses creating by the guards at Hub or Squin. Other things to keep in mind early on City Exclusion Zones - Unless you're inside a purchased home, you can't build in cities or in the areas immediately outside of them. This will limit your ability to use a starting city as your own personal settlement bc you can't build many of the early buildings indoors (like refineries for building material). Configure your settings to reduce any potential lag while trying to maintain the highest view distance you can. Especially early on, when you need to be on the lookout for raiders and you don't have the game running your gang of 30+ workers across large areas. There are alot of different guides for reducing potential lag in Kenshi, simply turning down the display settings and selecting the option to only run the game where my screen was worked fine. Basic Roadmap - Part 2: Before You Settle Okay, you've trained your starting character up a bit, recruited the freebie in Hub (if he was available), and are now ready to build an empire, or at least some metal objects in the desert so you can say you've left your mark on the world. Squin Base Start - In this sample playthrough, our first step is to find Squin (shown in map below). Its in a good central location south of the Hub with a ton of dried meat from its two bars and an adjacent copper source. If theres a free recruit in a bar in Squin, you'll want to scoop them up immediately. You'd like to start with at least 3 people. Set one of your recruits to mining that copper source just outside the south entrance of Squin full time. Always mine while stealthed, which doesn't appear to slow down your mining and significantly reduces your chance of being attacked (plus it builds up your stealth skill when raiders wander by). Purchase and repair a long house in town and build a research bench. Try and pick the one closest to the copper source your guy is set on mining, and get one char to start researching mining and storage tech. Note: Basically, you want to rush copper storage, which is the "Storage Boxes: Ore" Research. During this time focus on buying up all the dried meat from the Bars; it is so much more affordable than other sources of food. Keep in mind that - unlike most stores - the Bars are always open, and restock daily. If Squin runs out of dried meat, do a run north to Hub (1 bar) and/or to Stack (3 Bars). Automate Route - Once you've researched copper storage, automate the first route by setting up copper storage in the town house you purchased (by this I just mean, have one worker assigned to mining copper and then hauling it to the storage, allowing the process to repeat on its own and not freeze after hitting the 5 copper limit). Early Recruiting - With your primary character focus on recruiting 1 Pack Bull (and eventually a second), freebie recruits and anyone that is 3k or less. The basic idea is to maximize the amount of mining/resource production for your two early outposts while not being forced to spend a ton of your early money on food. 3k recruits should always be picked up (and obviously freebies), because in most playthroughs they are relatively rare in the early going for this area - most recruits are 6k - and the amount you save on these guys makes an impact. I don't think my squad went higher than 10 or so in this period so if you're finding cheap recruits plentiful, you don't need to go crazy (you can, it will make the later steps easier, but will cost you alot more in food so make sure they have work). Initial Outposts - Set up two small mining "outposts" (below) which you should never defend. When you see a raid, get all but your fastest character (highest athletics skill) back to the safety of Squin asap. Then, use your fastest character to pull the raids back to guards at Squin. Don't worry about your stored resources - I never had any issues with the storage units being raided when I abandoned the bases, and you can now use the loot to upgrade your player equipment. Note - Food storage is the exception, so keep most of your foot in town and just run it back down as needed or as much as won't be missed.
第一个主要前哨站应设在斯昆南部,那里有一个双人铜矿脉,还有大量的铁矿和石头。建立一些精炼厂,开始收集石头、铁矿和铜矿。在这里放置一头驮货骡,将资源运回仓库/城镇出售,然后再把食物带回给工人。注意——如果你建造了食物储存桶,工人们会自动从里面取食,无需你单独给他们提供干肉,但要记住食物桶可能会被强盗洗劫。你也可以让斯昆的矿工回到镇上担任销售。 第二个前哨站应设在斯昆北部,那里有多个双人铜矿脉。你已经在开采铁矿和石头了,所以这里只需专注于铜矿开采。使用第二头驮牛重复之前的流程,将矿石运回城镇出售,并从城镇为矿工带回食物。 扩张准备: 1. 你可能首先需要更多空间。购买第二座房屋,并且我建议建造额外的研究台(理想情况下是三级)。 2. 确保将防御墙至少研究到二级,这样在实际建造基地时就能立即安装它们。 3. 同时开始建造通用储物箱,它们在房屋内放置最紧凑,且拥有最大的存储空间。 4. 如果你想在屋顶训练战士,也可以建造一些囚室。记住,囚犯只是需要更多食物的人口,而谢克族是最差的,因为他们的饥饿率最高。此操作仅适用于那些没有明确赚钱角色的角色。 如果你决定走这条路,那就专注于裸装训练来提升韧性。以我为例,我只培养我的主角,而其他角色则专注于提升劳动/研究技能。 继续尽可能多地囤积建筑材料和铁板。当你向南迁移时会需要大量这些物资,所以尽量多收集。 当你在城镇中囤积了相当数量的材料后,开始大量囤积仙人掌和小麦(我记得我至少有30多个仙人掌,还有15个左右的小麦),以及其他所有农场资源各2个,用于计划扩张的研究。尽可能研究你的三级工作台允许的所有城镇建设相关内容——暂时忽略训练假人、武器锻造等内容。 建设你的派系——一旦实现采矿自动化,将多余的搜刮物资和所有赏金交给斯昆守卫出售,即使你继续购买遇到的所有干肉,也应该能攒下3万到5万资源。现在是时候进行一些探索/开始认真招募了。 附近的招募对象——操控你的主角,找到位于斯昆南部的驿站和斯塔克,这两个地方都有一些3000资源可招募的人员。你也可以在斯塔克招募9000资源的神圣战士。将他们聚集起来,分配到你的两个前哨站执行任务,然后再开始向北 journey。世界尽头——你可以根据自己的判断来决定,但在这次试玩中,我想寻找焦土人来进行 crafting,谢克人来战斗,以及格林兰人来耕种。我已经遇到了不少后两者,但没有焦土人新兵,所以我带着主角向北前往世界尽头。我招募了所有能找到的3000价位的人,还有几个6000价位的(我记得其中一个是骨架人)。 之后,我继续向北前往世界尽头上方的渔镇。我在那里又招募了一些焦土人,还有一两个格林兰人。 无论你从哪里招募,都要让他们尽快向斯昆跑去。你需要留意他们,确保他们在漫长的南行旅途中不会漫无目的地游荡。此时,你需要17-20名招募人员,装备上你所掠夺的所有尘埃强盗装备,其中大约3-5人携带背包,另外配备2头驮兽。我建议从这些人中挑选2名作为医生/研究员,并让他们保持被动状态(关于这一点,装备部分会有更多说明)。如果能给你的人员配备武士刀/野太刀和长柄武器就更好了,因为这些武器使用门槛不高,而且对付你主要遇到的低甲敌人效果很好。 现在你已经准备好建立你的定居点了。 基础路线图 - 第三部分:建造定居点 开始建立定居点 - 游戏中有许多可行的地点,每个地点都有不同的优缺点。有关定居点位置的更多信息,请参见下文第2节。在本示例流程中,我们将前往“彩虹谷”(由Stormbrooke在Steam上发现)。
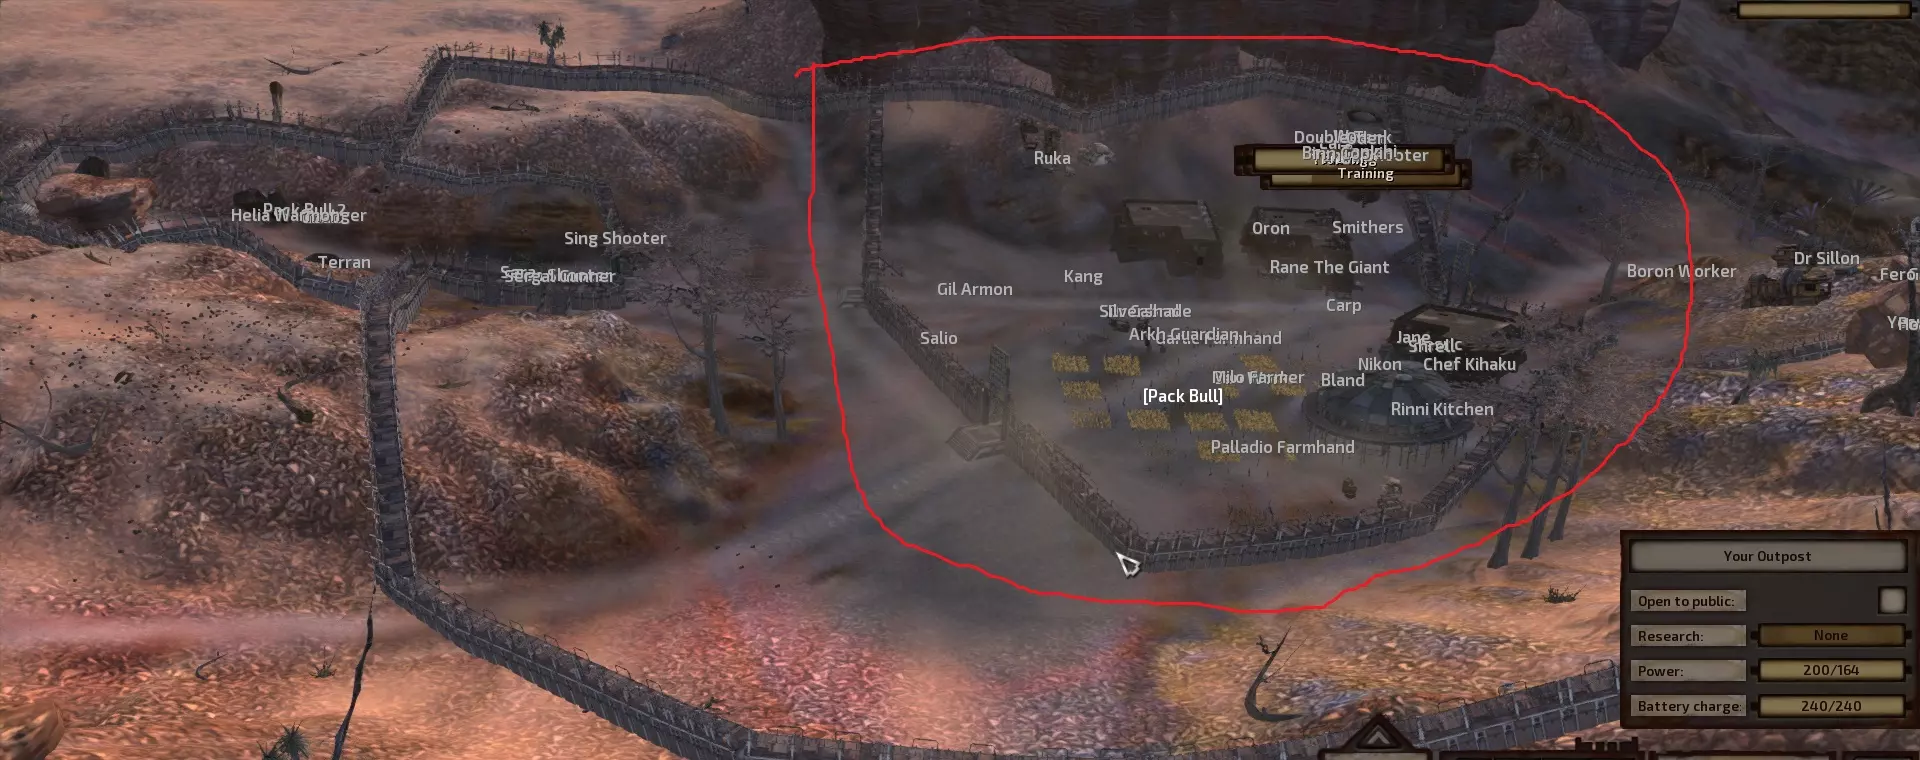
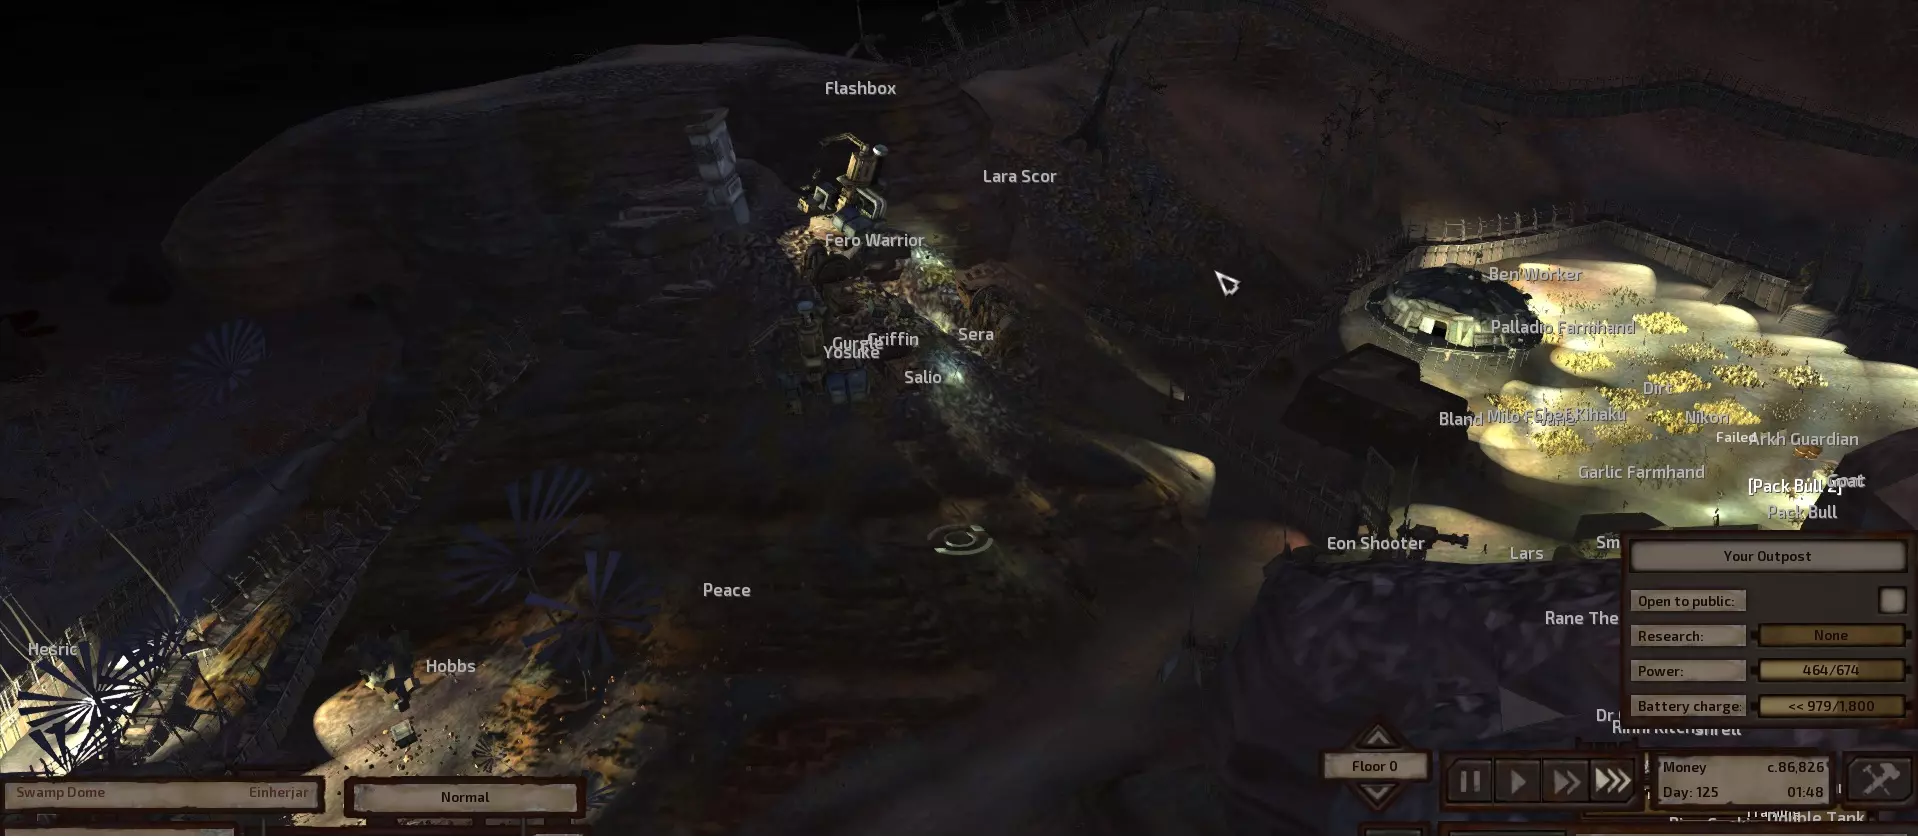
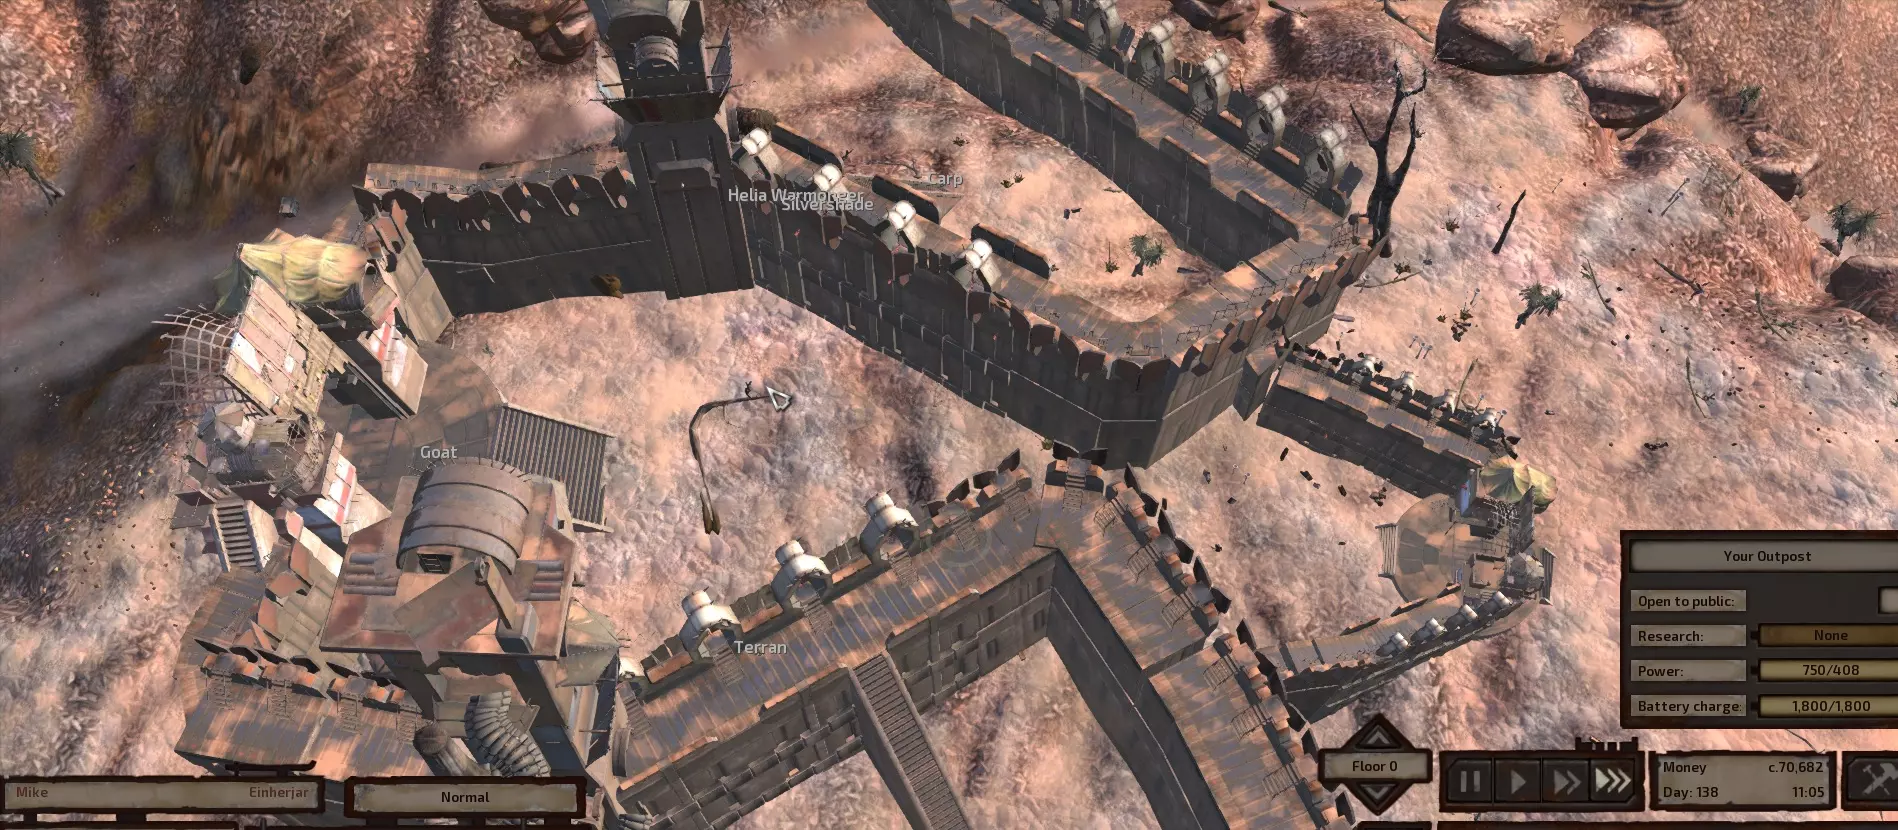
该地点背景: 位于三个不同生态 biome 之间,拥有优质的干旱农田,可获取 6 座铜矿、多座铁矿以及 100% 的石材资源。 第一个生态 biome——边境地带:属于沙克领地。主要为干旱气候,风力中等。这里是你目前的活动区域,相对安全。你遇到的大多数动物除非受到挑衅,否则不会主动攻击。你应该对在野外游荡的尘埃强盗比较熟悉。该区域有两座主要城市:斯昆和枢纽,另外在 biome 中南部还有一个非常实用的地点——科技猎人驿站。此外,还有许多任务地点,当你的小队能够离开安全区域后,你会逐渐发现它们。第二个生物群系 - 虚荣谷:位于西海岸的危险生物群系,风力较小,野生动物(喙嘴兽和大猩猩最为突出)占据主导地位。这里也是许多蜂巢族聚落的所在地,绿色和干旱环境各占一半,但我们的基地位置处于绿色区域。该区域还包含一些沼泽环境。这里有许多可供探索和搜刮的秘密地点,但你需要时间做好准备,而早期的关键举措是用大门或墙壁封锁地图的这一部分,以防止野生动物彻底摧毁你的小队。 第三个生物群系 - 斯坦沙漠:沙克族领地。完全干旱的环境,风力非常强(最适合风力发电机)。这里有沙克族领袖所在的阿德玛格城。从这里开始,你面临的最大威胁将是拒绝缴纳税款时出现的沙克族战团。 现在,你已经准备好了: 用你的驮骡将所有储存的建筑材料、铁板、食物等运到这个地点。你也可以使用几个木制/商人背包(允许堆叠)来协助运输。 首先,你需要为所有基础基地建设物品(铁板、建筑材料)创建储物箱,并将所有储存的材料转移到里面,这样你的工程师就能自动工作了。 接下来,重点建造一些初始的精炼厂、矿场和储物容器。 之后,在基地的核心区域周围建造防御墙。你现在不需要建造围墙通道,只需要一个基础的内部核心区域,之后你可以用其他围墙部分对其进行扩建,以保护你的资源免受动物侵扰、创建耕种区域、建造城垛等。 下面是我选择建造内部核心区域的位置(暂时忽略其他部分):
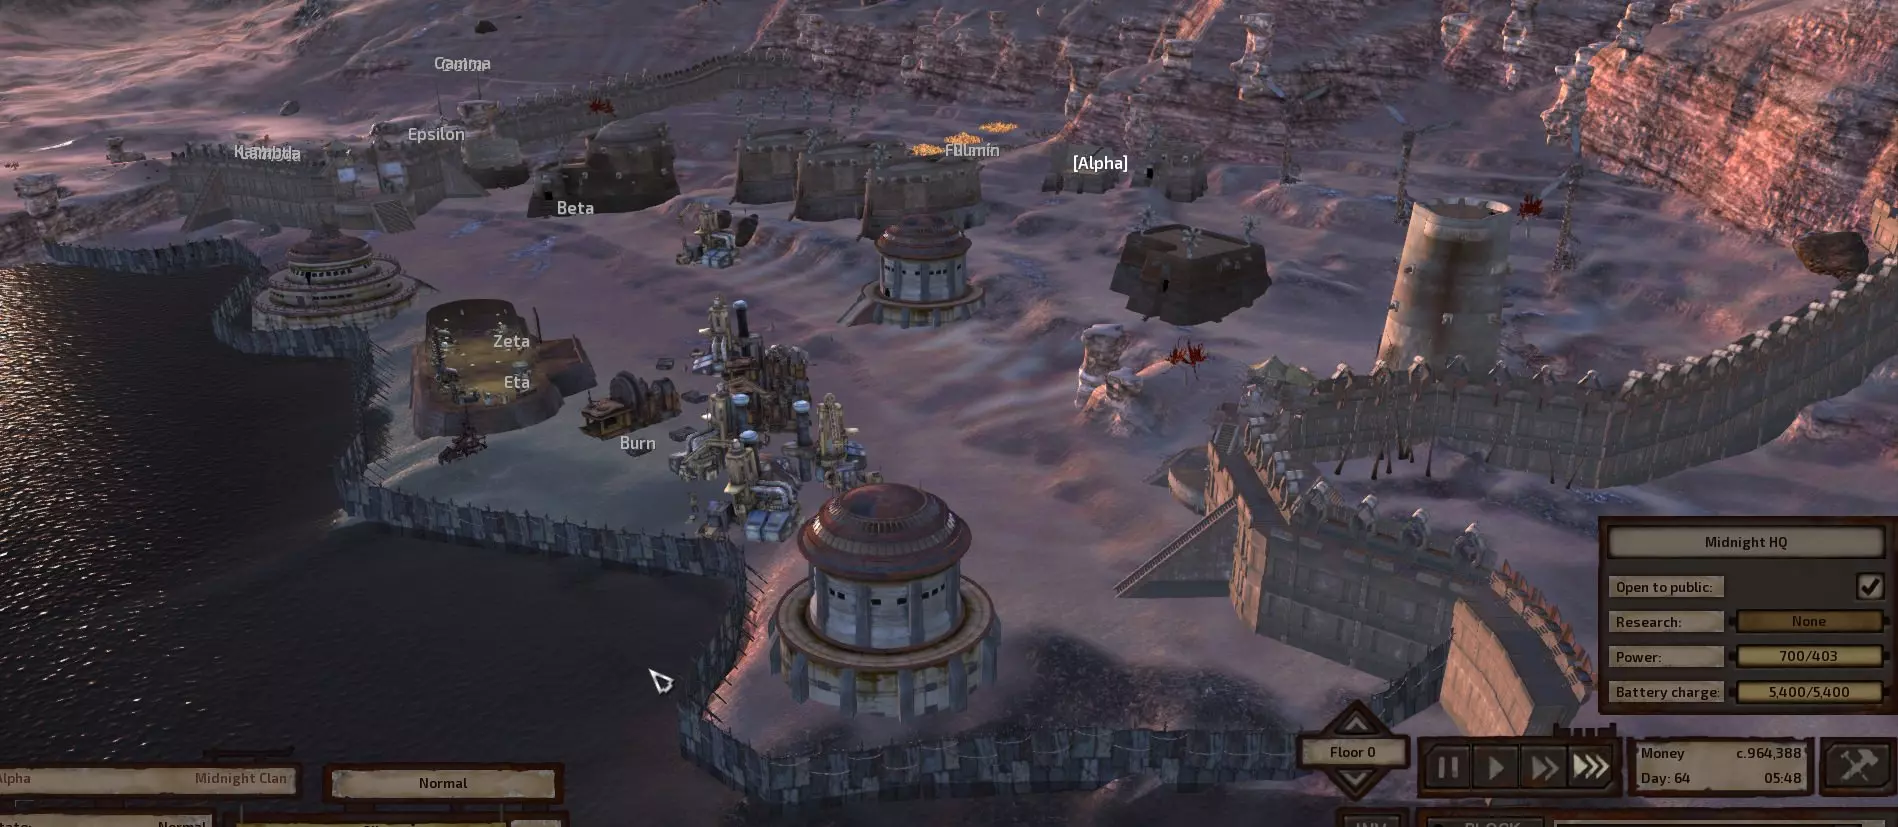
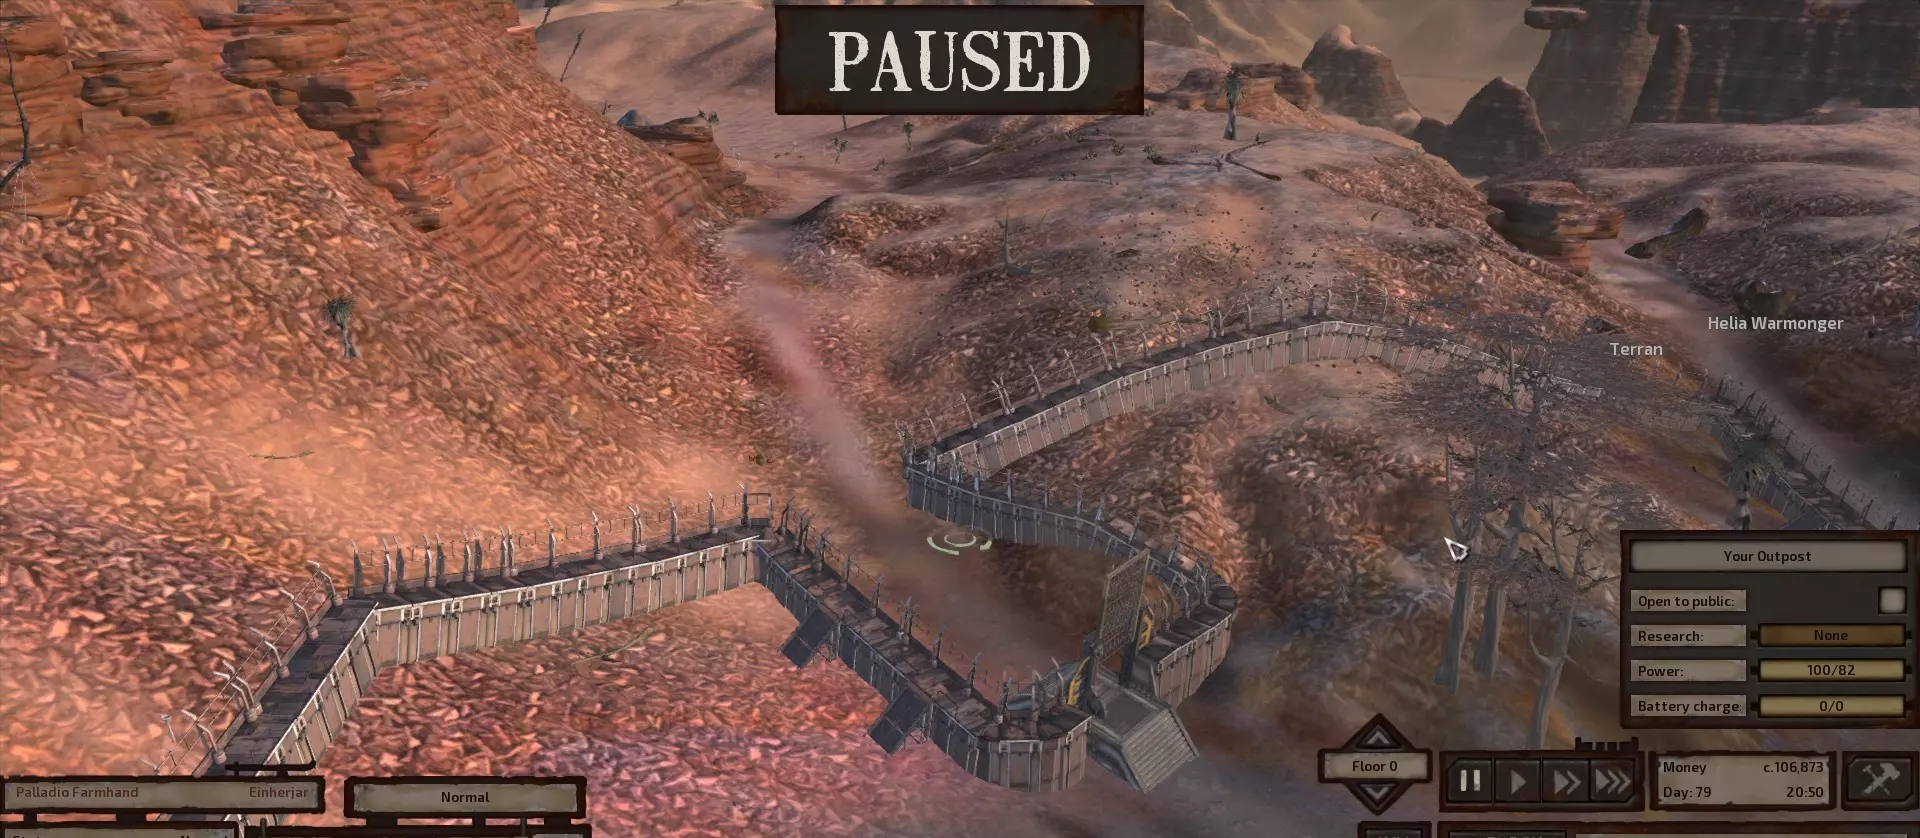
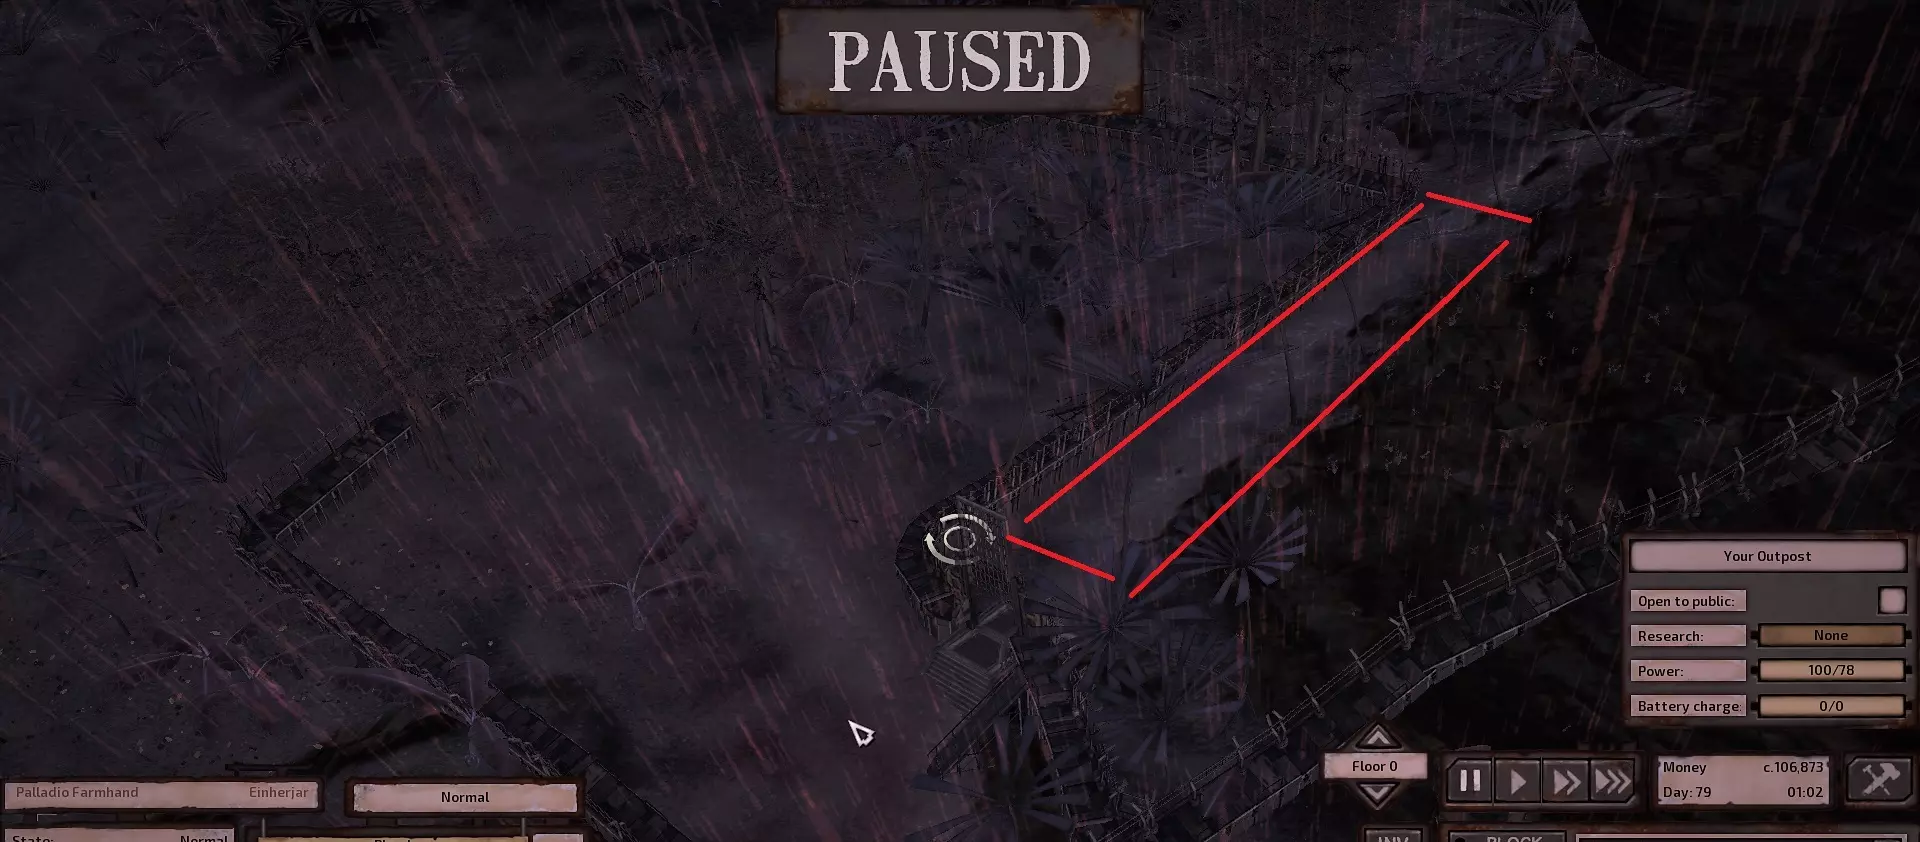
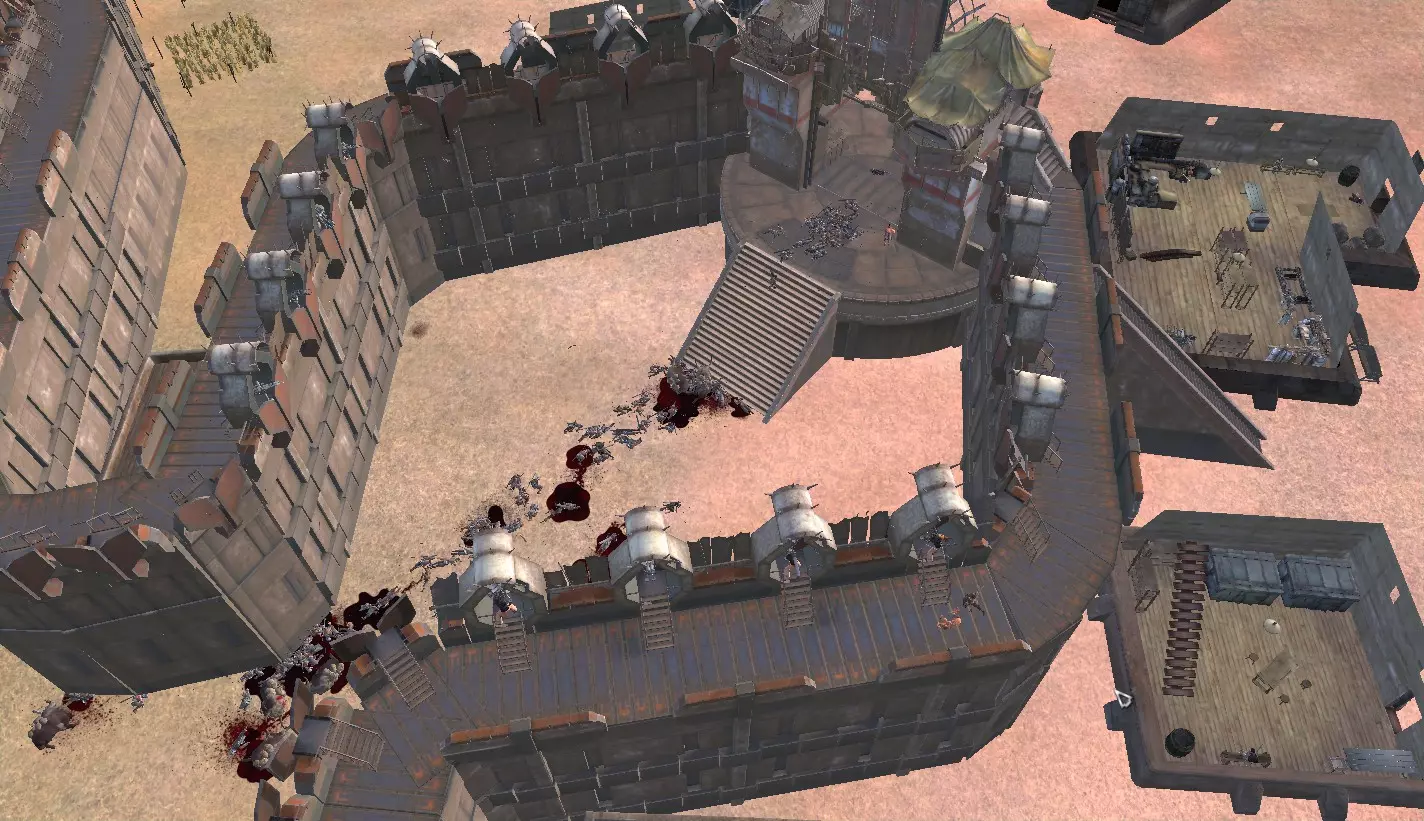
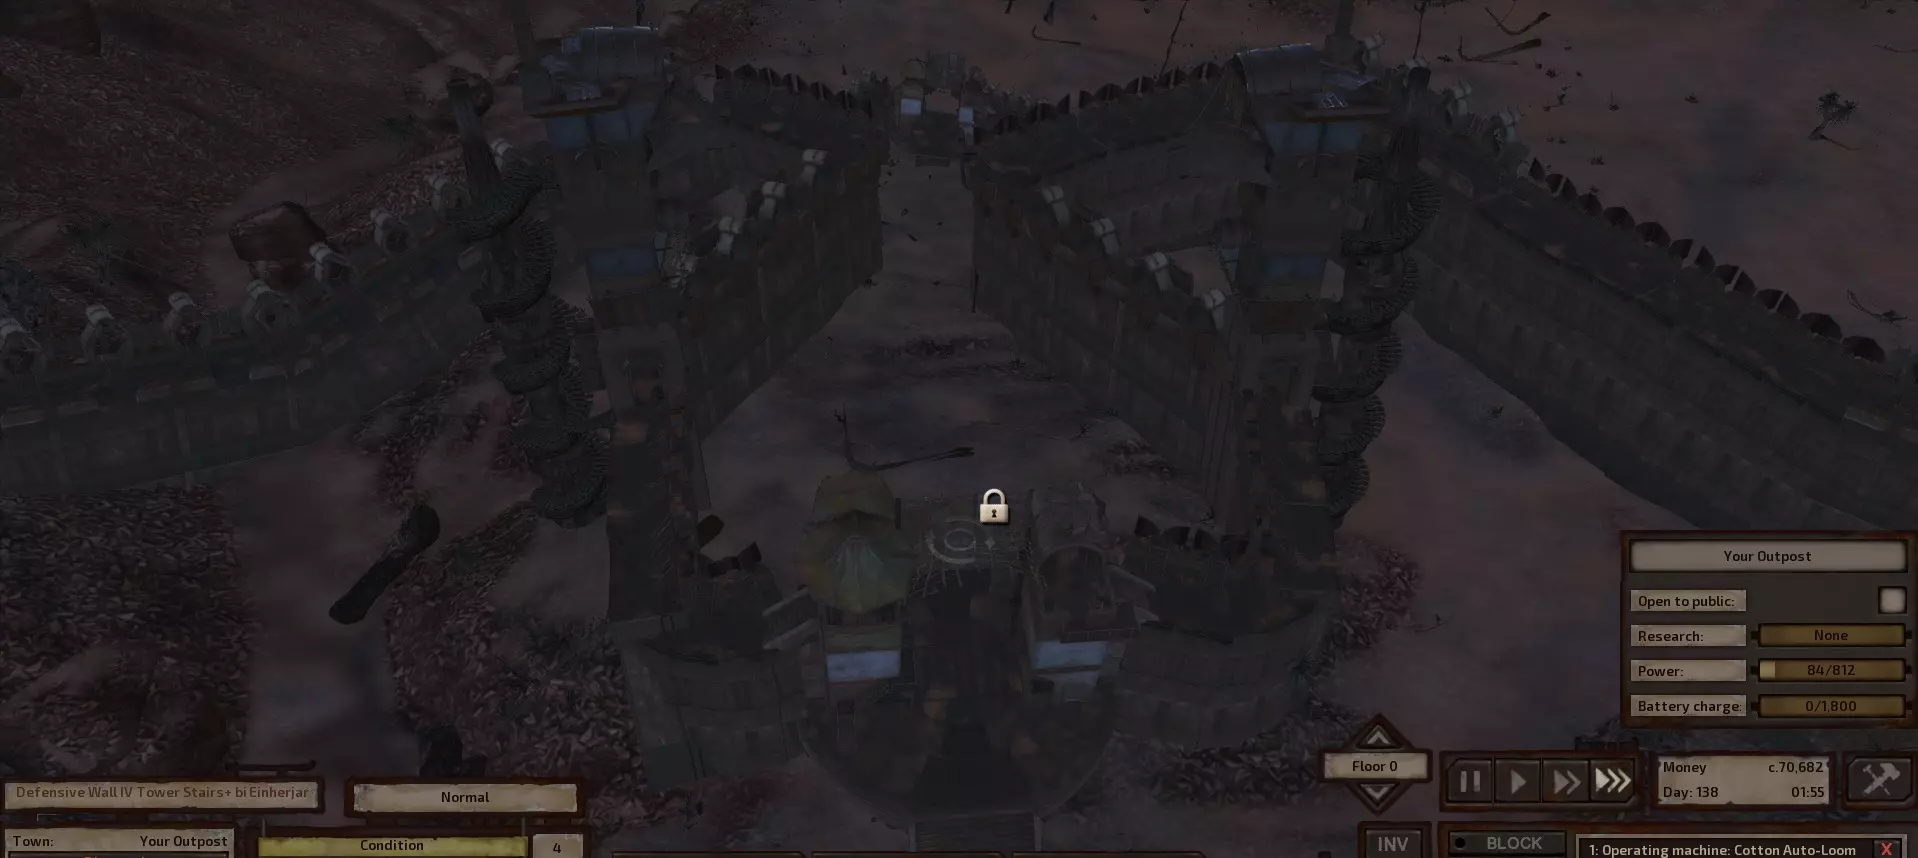
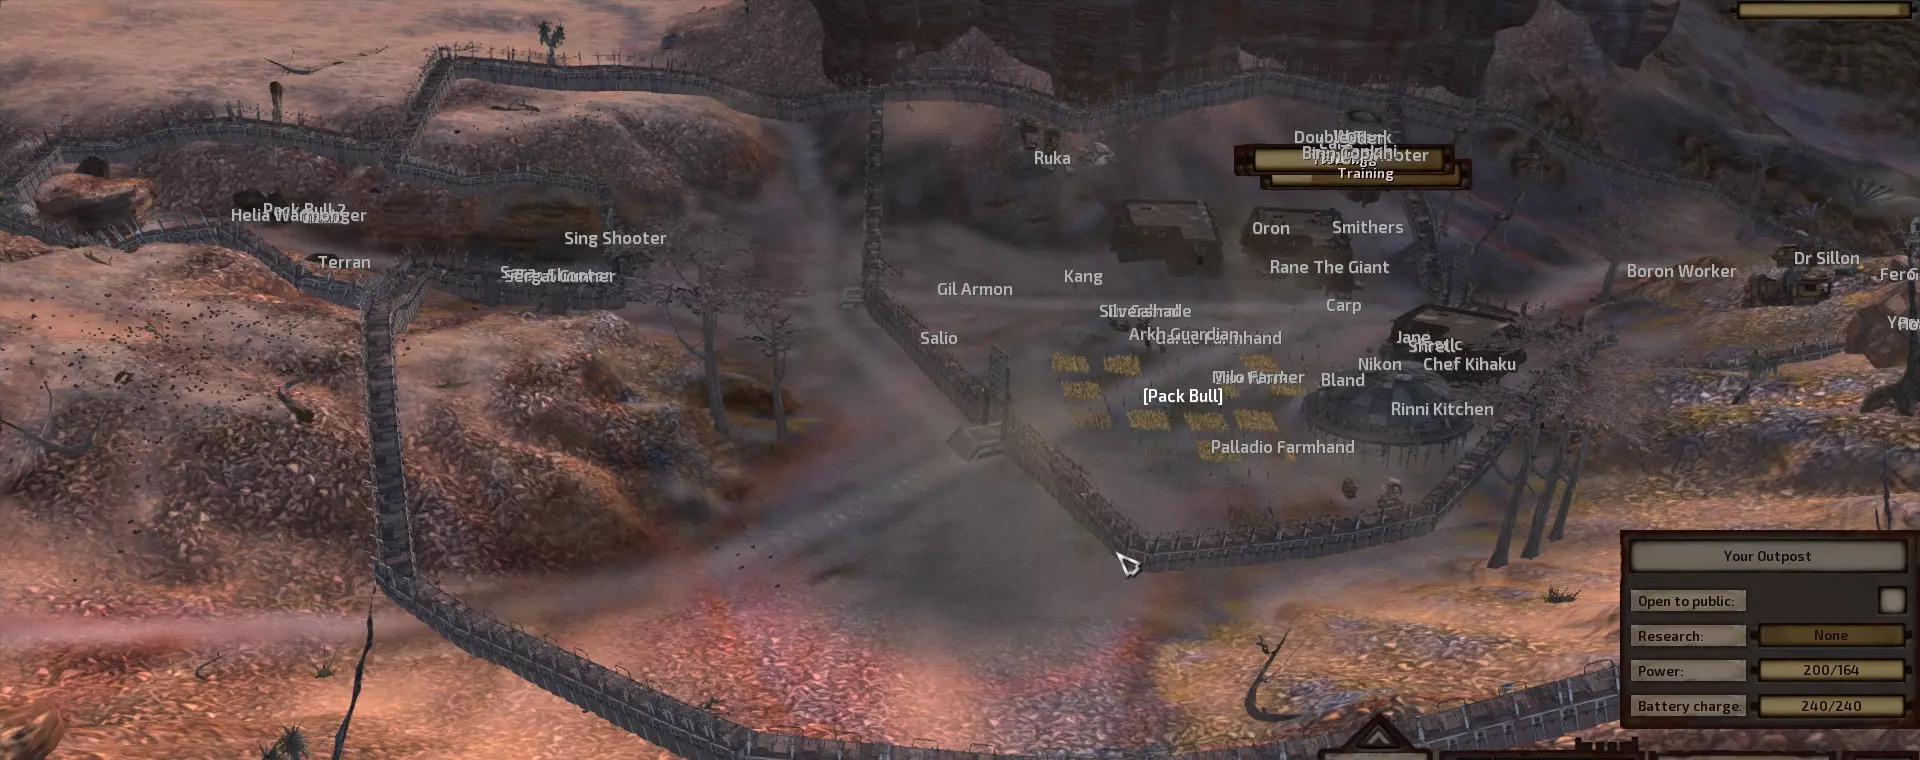
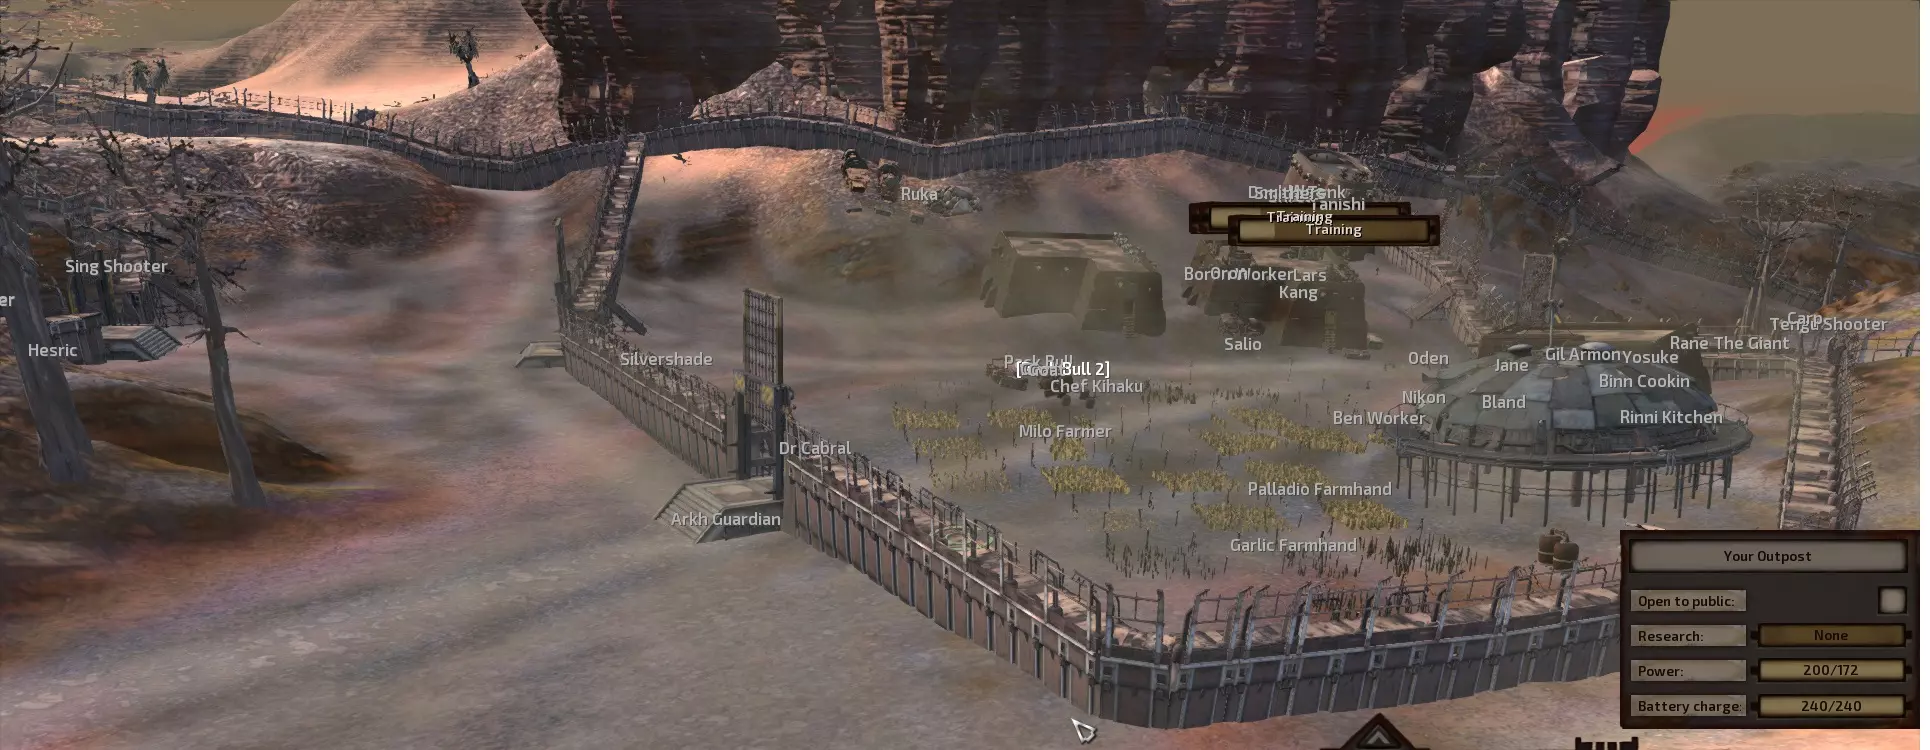
另一个或许需要同时进行的优先事项是拆除你之前建立的两个前哨站,然后前往附近的驿站为城镇尽可能多地雇佣雇佣兵(2)——如果你不拆除前哨站,雇佣兵会守卫你的旧前哨,除非你雇佣他们作为保镖(但这样你只有两天时间,而且如果你的主角要在地图各处奔波,最好还是让他们留在城镇里)。 完成这一步后,建造一个仓库,然后利用你在斯昆储存的仙人掌和小麦,专注于提升食物产量。食物生产和储备的详细说明见下文第5节【 farming 】。 接下来,你的日程上应该安排建造食物生产建筑(厨房)以及研究与制作站。接下来,重点尝试招募一些专业角色(尤其是:两名绿lander厨师,以及两名焦土lander用于盔甲和武器锻造)。如果你之前遵循了我的指南,可能已经这样做了,那也没关系。 你可以永远依赖雇佣兵,但如果不想这样,现在就是开始组建和训练“战斗小组”的时候了。有几种方法可以做到这一点——你可以使用一些训练用囚犯、训练假人等。或者你可以组建一个由几个人组成的狩猎队,尝试猎杀较弱的生物。在我进行更多实验后,我会详细介绍狩猎部分。在此期间,突袭和随机攻击也会缓慢提升你的派系战斗能力。 石族会来收税。在我的试玩过程中,我选择不向他们支付费用,因此不得不持续与他们的作战队伍战斗。这完全是可行的,尤其是在雇佣了雇佣兵的情况下,但你也可以考虑其他做法。经过这些冲突,他们最终向我宣战。 接下来的首要任务是扩建你的围墙区域,尤其是在北部靠近虚荣生物群系的地方,以保护矿工免受那里游荡的喙状生物的袭击。你可能还没有研究出大型防御墙,但可以先建造临时的,之后再拆除并建造新的。你的基地需要两个主要入口,每个入口都应设有漏斗形的杀戮区(详见下文第3节“杀戮区”)。 在你的核心区域外建造几座发电站。我使用大型风力发电机,但小型风力发电机也有其优势,因为它们不需要那么多风力就能运行。理想的位置是斯坦沙漠,但边境地带也很合适,只是要确保不要把它们放在虚荣谷。 用你的驮骡将铜运往附近的城市,主要是蜂巢镇和斯昆——即使在你发展农业到能够生产利润丰厚的贸易资源和开设商店之后,你也会一直这样做(有关如何操作的提示,请参见下面的相关部分)。此时,你需要花费大量时间处理三件事:1.继续招募人员从事耕种和运输等基础工作;2.训练炮塔炮手并在杀戮区操作炮塔;3.继续提升农场产能,以养活不断壮大的派系;4.持续为你的派系打造并配备更好的 armor(护甲)和武器。 当你觉得能够比较从容地应对基地遭遇的袭击时,可以升级基地周围的围墙和杀戮区。作为参考,在我的示例游戏流程中,升级围墙和防御设施后,基地的布局大致如下(可与上方截图对比,该截图呈现的是基地原始围墙和杀戮区的布局)。

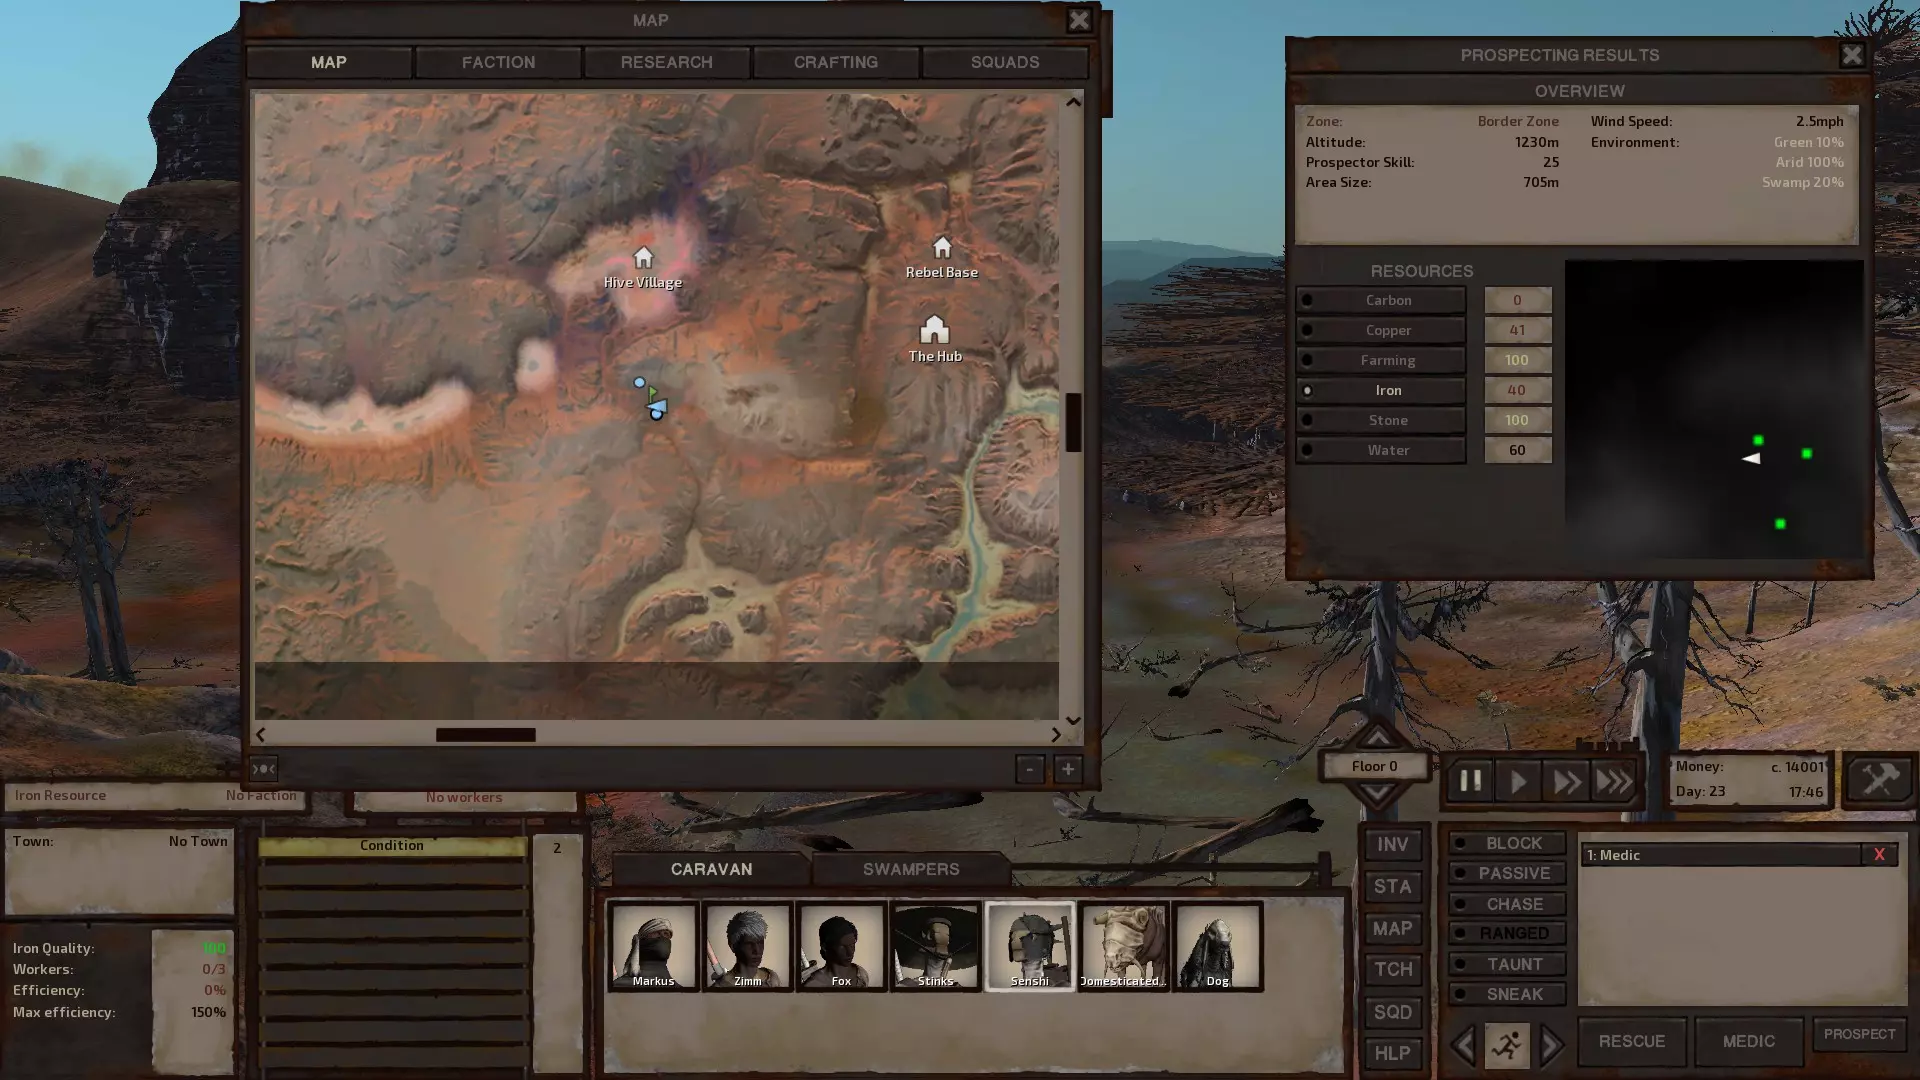
At this point, you have all that you need to continue building an empire. Consult the sections below for more in depth information and enjoy your experience in Kenshi. Expanding on Concepts from Roadmap The meat of this guide will be in the following in-depth sections that chart each of the following sections below: Early Money Making Strategies Settlement Location Base Layout Killzones Farming and Food Autohauling Faction Economy - Buildup and Strategies Race Breakdowns Role Selection and Job Rankings Arming and Equipping your Squad War Party and Fighter Training Advanced Research and LootI will be continuing to add new sections and content. If you have anything you want me to discuss in more detail, please feel free to leave a comment. This will give me a better idea of what needs to be expanded on and what players are looking for. 1. Early Money-Making Strategies Beginning Stage Income Sources: Before you've set up your base, you will need to be making money. While this section is primarily focused on building your faction economy, I will provide a few strats for making money before you've settled down (some of which are discussed in the roadmap, above). (1) Mining Ore In the initial stages of the game you want to find a safe location where you can mine and autohaul resources back into town. Preferably copper, as it sells for twice the price, but iron can work as well especially if its safe. Hub, the initial town for lone wanderers, usually spawns an iron vein within the actual walls of the city which is exceptionally safe. If you followed my roadmap, you will ALWAYS want to have some guys working on this as it trains their labor skills which will be useful later on, and is the safest source of income. Remember to stealth your miners, as this will significantly cut down on the amount they get attacked and does not appear to slow their ability to mine (only to carry goods) - which isn't a big deal if the storage is next to the vein. I've discussed strats for autohauling and mining throughout this guide, particularly in the faction economy and autohaul sections, so please look at those for specific ideas about storage locations (either in town or adjacent to the vein). (2) Scavenging and Bounties This primarily involves using town guards or in some cases mercs, as your fighting force. There are a number of different strategies that this can involve. In my roadmap, I discussed pulling enemies to the guards in Squin. These will usually not involve individuals who carry bounties (although in some cases it will). You should focus on looting downed foes for their weapons and armor, and once your squad is equipped with the basic loot, you can start selling extras. Note - I personally stored most of the armor and equipment I looted here because I was focused on expanding my faction fairly quickly and wanted to have my guys set up with basic armor and weapons right away. You'll need to balance the money you need with your desire to keep storage containers filled with enemy loot. Also remember that once you can craft, youre basically never lookin back at these items. Bounty strategies, like the Dust King strat referenced above, are more dangerous but can provide an enormous early boost. The Dust King strat alone can net you upwards of 50k starting income. A more dangerous but perhaps more long term lucrative strategy: Fog Prince Headhunting in Mongrel. The city of Mongrel is North West of Stack, in the center of the Fog Islands. The job itself is actually easier than getting mercs to take down the dust king, but it is far more difficult to get to so make sure your athletics are trained up, and you may want to get a fog mask. This was brought up on the Kenshi Wiki[kenshi.wikia.com], and involves looting the heads from Fog Princes who died attacking the city of Mongrel (which they frequently do). While you shouldn't even consider attacking them yourself, relying on the gateguards similar to the strat discussed in Squin and selling their bounties can net you 6k per head, and most attacks involve 1-4 Fog Princes. You can spot them in the mass of fogmen, by looking for their distinct yellow blood. The downside to this strategy is that you're going to want to keep your guy there while he waits for attacks to happen, and venturing outside the city itself is perilous. So you essentially lose one of your companions for mining purposes. (3) Theft After joining the Shinobi thieves (for 10k), characters can train themselves up in the art of lock picking, thievery and stealth. This can be an extremely gratifying way to make money before you've settled down with your settlement but it is NOT risk free. You're going to need training before you can do much of any "thieving." You can get some basics in at the thieves guild in Hub, but to grow beyond that a good recommendation is to focus on stealing items that are NOT in locked containers, but are left out on shelves and tables. If you see that you have a 100% chance of stealing it, do so. You can then drop it, re-steal it, etc. Never sell back to the vendor. Most items are kept in locked storage containers, so you will need to have trained up each of your theft skills to take them on. Pause is your friends. Pause is basically a requirement for viewing your surroundings, making sure the coast is clear, etc. Typically requires 2 characters. A thief, and a mule. The mule can be a packbull, or a person, who waits outside the location you're targeting, and who has a backpack on who you can instantly transfer the goods to. You never want a backpack on your thief, as it comes with penalties to your thief skills which are untenable in the early going, which is the reason for the nearby "mule." Use a packbull or garru - I've never had a packbull stopped and checked by guards for stolen goods or smuggled items (not saying it can't happen, just that it hasn't happened to me yet) so this would be my recommended mule). You can make a TON of early money doing this, and it really trains up your thief - a fun, important character to keep around throughout the game - for rescuing your kidnapped squadmates, or getting items on the cheap. Good items to target for resale are blueprints and alcohol. Alcohol in particular. However, I always try to learn the blueprint if I haven't already before considering sale. You may be able to sell these items directly to vendors, but just to be safe I've always sold to the thief fence who you have access to once youre a member of the Shinobi thieves. Will update this after some experimenting. (4) Smuggling Illegal items are faction dependent, but several items seem to be illegal in most major factions (like Hashish). You need to have your athletics trained up to at least 40. I recommend not grinding this past 20 or so, as it happens to level easily enough when focus on other sources of income like mining. You need your stealth skills leveled up to get past town guards. One thing I've thought about but hadn't tried yet was to put a backpack full of illegal items into the inventory of a captured individual (or even a squadmade) who my player is carrying, bc I'm not sure if they get checked when guards look at your inventory. Will update this with some testing. Hashish is the most reliable item to smuggle because it can be purchased in any town in The Swamp (easily distinguishable biome due south of Border Zone), as well as most Hive Settlements, and traded to a Thief Fence. Please note that the Thief Fences are the ONLY places you can sell Hashish for the profit. In places where it is legal you like the Hive and Swamp you will make very little money on it. After testing, Tekai noted in the comments that that this method is very time intensive and you will likely only get about x5 profit on your goods. The market multiplier for all items is variable, but on average are as follows: 1) Sheks = 350% 2) Holy Nation = 400% 3) United Cities (Clownsteady, Drifters Last) = 500% 4) Slave Traders = 600% 5) United Cities (Bark, Heft, Heng, Sho-Battai, Stoat) = 1200% 2. Settlement Location Finding a place for your first settlement is a big part of the adventure in Kenshi, and I don't want to provide spoilers. For the basics on prospecting and scouting, I'd refer you to Stormbrooke's guide on finding the perfect base - he's a long time player who has educated the community a lot on different base locations and ideas. [/list] Note - Use your prospect tool on the bottom right hand of your screen to find resource nodes, and rely on the colors, not the numbers.There are tons of different biomes, each with different particularities: factions, environmental combinations, wildlife, rarities, etc. Given this, there are a few things to keep in mind: Proximity to particular factions and cities Raw and proximate resources Environment types Notable Biome particularities Proximity to particular factions and cities For a first time player, you're going to want to be near a few different trading settlements - whether they are cities, or waystations, or settlements or all the above; and preferably different kinds of each. For the setup above, I am near one Holy Nation city, multiple Shek cities, Hub (Independent), and numerous Hive settlements. This is helpful for a number of reasons - for instance when you buy out all the food in one, or a merchant runs out of gold to buy your items/copper, you have backups nearby. Moreover, each provide sale of faction specific items and recruits, and biome specific farm material and food. Ultimately, this choice will based on your personal preferences and requires some exploring. I recommend not spoiling the game too much but the Wiki has some basic descriptions of the various factions in the game. Probably the most notable faction for new players at the start is the Holy Nation, which provides great safe farming regions, and controls a large portion of the early access parts of the map but has strong preferences for male greenlanders ONLY. There are various quests you can do to raise your standing with a faction and obtain allies which I highly recommend. Raw and proximate resources Iron, Fertility, Space - For pretty much the entire game you're going to need a lot of food and iron, so these should be priority considerations. A spot in between multiple biomes will allow you to have 100% fertility in multiple environments (discussed below). Copper - Early on you're probably going to depend on copper for sale, but just be aware that by mid-late game if you've pivoted to some other source of income you won't need much for production. Its a nice bonus if you have alot of it, but it isn't gamebreaking if you don't. Stone - Early on you're going to need a ton of building materials so this will be a priority but it tapers off once you're more built up. Having one good source should be sufficient throughout your playthrough. Environment Type: As discussed, your ideal settlement will be between multiple biomes so that you can get the benefits of both. Some biomes contain multiple environments within them. The environment types are as follows: Green - Grassland/forests; Good for wheat, cotton, greenfruit, trees, etc. Good for iron. Arid - Desert; Good for growing cactus. Seem to be high in copper, but I've also found good iron and stone. Swamp - Good for rice and hemp (rice products being the most nutrient rich food in the game). Notable Biome particularities Different biomes will contain different challenges. Alongside different environmental makeup, they contain different relations to the factions and different wildlife - many of whom are extremely dangerous. In the roadmap discussed above, the Vain biome in particular has dangerous beak creatures that will absolutely ravage your squad until well into the midgame. I focused on walling out a segment of that biome before I did anything else to avoid confrontations with them and typically kept these gates shut. Pay close attention while you're doing this. I will be updating this with some different descriptions of the Biomes I've explored shaded out to prevent spoilers. 3. Base Layout Base Layout Concepts There are a lot of things that you're going to be trying to juggle when laying out your base. First, I'll show you two examples posted by Fusiara on reddit that I liked in particular, and then I will go into some strategies and ideas for building a base yourself.

这些基地布局紧凑,拥有良好的击杀区,食物容量足以满足一个小型派系的需求,其中第一个基地还留有充足的空间来扩展食物生产。需要注意的是,一个基地完全被围墙包围,而另一个则在远端利用了自然屏障。 你的基地规模应恰到好处。过大,会给你带来麻烦;过小,则难以维持。 因此,在规划基地布局时,空间、地形和资源是你需要考虑的首要因素。 1. 击杀区位置:最佳的击杀区应位于平坦、无阻碍的地面,因此让地形帮助你确定它们的位置(建造方法将在第4节中介绍)。 2. 食物生产:你需要为自己提供足够的耕种空间。你实际或计划的派系规模以及环境(详见第5节)将决定所需的农场空间的确切大小。 (3)采矿——你需要让矿工和处理器安全地处于定居点范围内。 (4)紧凑——你需要以尽可能合理的方式建造最紧凑的基地,这能减少袭击、工作/自动运输等问题,总体上让生活更轻松。虽然初期会有些麻烦,但之后你总可以扩建基地或建造额外区域。 具体注意事项: 我倾向于用墙壁围起整个基地,而不使用天然屏障,因为我发现天然屏障并不可靠。 你所有的墙壁都至少应该是2级,这样人们才能在上面驻守,并放置鱼叉/弩箭。初期就赶紧进行这项研究。 将主要入口减少到1到2个——不用担心移动所花费的时间。从长远来看,这能帮你省去很多麻烦,因为你不需要训练和部署那么多炮塔炮手,并且可以快速前往冲突发生的地点。 将基地的关键区域隔离开来,尤其是关押囚犯和储存食物的地方。如果你用囚犯进行训练,这点尤为重要,额外设置一层带门的安全措施会很好,这样当你训练时,如果有派系成员跑进来打开锁着的门,囚犯也跑不了多远。 在所有地方都使用探照灯,以便在夜间照亮你的室外区域,特别是农场和其他户外工作区域。以下是使用探照灯照亮室外工作区域的示例:
我已经讨论过为什么我非常喜欢之前的例子,但现在来考虑Fusiara提出的基地可能存在的一些问题: 虽然结构紧凑,但如果你按照上述路线图建造,第二个基地对于大型派系的 farming 来说太小了。他展示的第一个基地提供了更大的 farming 生产空间,并且似乎位于一个非常适合 farming 的位置。 在基地内部使用聚光灯会带来很大不同。作为参考,可以对比上面展示的农场与 Fusiara 小型基地中使用灯柱的情况。 将采矿机安置在围墙内也是非常可取的做法,这样你可以关闭大门仍能继续生产资源。如果你的经济依赖于采矿,这一点尤为重要。在较大的基地中,看来Fusiara选择在围墙范围外进行采矿,可能是担心基地变得过大。在游戏初期,你不会希望自己的矿工在外面被击败或俘获,而为他们打开大门可能会让敌人越过你的杀戮区。如果可以避免这种情况,那就尽量避免。 4. 杀戮区 构建你的杀戮区 - 策略与攻略 你需要在每个基地入口设置杀戮区——这就是为什么你实际上最多只需要2个基地入口,即使这会稍微延长移动时间。 除非你事先知道要与突袭队伍(比如收税者)进行交流,否则请确保将你的AI选项设置为“先开枪后问话”,这会让你的杀戮区变得更加有效。如果你拥有建造塔楼的技术,可以将墙壁与塔楼相连(前提是墙壁是平直的,圆形墙壁不行),或者像我一样,在墙壁内预留出塔楼的位置,这样塔楼既能向下射击到杀戮区,又能在基地出现突破口时提供掩护。 基础的杀戮区通常是“U”形墙壁结构,底部设有大门,并有几座炮塔向下瞄准。效果最好的杀戮区几乎呈钳形(如后续图片所示)。 刚开始时,我在南部入口处建造了传统的“U”形杀戮区。由于地形原因,我在北部入口处建造了一个倾斜的漏斗形杀戮区,更像是一个长长的“V”形,炮塔只设置在靠近道路的一侧。 作为参考,这里有两张我早期杀戮区的图片。
即使在早期的杀戮区,在其前方设置第二道闸门也是个好主意,这样敌人会在到达杀戮区前停下(本节底部有示例)。 有好几次,我遇到过敌人挖穿墙壁而不是试图撞开闸门的情况(这是合理的,因为墙壁的强度大约只有闸门的二十分之一)。如果你在应对袭击时遇到问题,并且预留了空间(我其实没有预留),设置第二个U型杀戮区是确保敌人在进入基地前被消灭的好方法,这样你就可以让闸门一直开着,将敌人引导到你希望的位置。 当你解锁了更多科技后,就可以建造更高级的杀戮区。在我看来,这些杀戮区更像是【钳形】结构。在我的试玩过程中,我还改变了基地入口的位置,使其位于更平坦的地面上,从而为我提供了更多空间。 CHOCOLATExPANDA发布了一个更高级的杀戮区示例,如下所示:
建造这些结构时需要注意几点。首先,防御大门需要直接连接实际的防御墙,这些防御墙要与大门的楼梯相连,这样你才能进入防御结构(这需要一些技巧)。 其次,在建造好高级杀戮区后,要在其外部再建造一道外部大门,这样突袭敌人在到达杀戮区前就会停下来宣告自己的到来。 下方是我在路线图中使用的示例游戏过程中的相关图片示例。
5. farming与食物 farming 对于一群训练有素、保卫小型定居点的战士来说,farming可能相当简单——但如果你按照本指南操作并专注于快速扩张势力,farming将很难实现可持续发展。它需要大量劳动力、大量空间,并且耗时(就农民和厨师制作最终食物所采取的步骤而言)。不过我还是选择进行farming,因为我希望自己的城镇能够自给自足。只要付出一些努力,这完全是可行的,要知道还有其他选择——你可以组建狩猎队,或者专注发展经济直到能够进行水培farming等,但由于我没有那样做,所以无法对此发表意见。
在我设定的干旱环境中,最终目标是制作【沙尘三明治】,这种食物依赖面包,但初期你只能依靠【咀嚼棒】生存。 要制作足够30名【绿lander】食用的咀嚼棒,每个周期需要60个,这需要480个仙人掌和15单位水。这至少需要8个XL级仙人掌农场(1个XL级仙人掌农场大约需要25小时产出64个仙人掌)。 根据你储存的小麦数量,不要过快扩张。我在不使用任何小麦进行烹饪的情况下,将4个小麦农场从S级缓慢升级到XL级。之后,我又用同样的方法将小麦农场数量增加到10个。上述流程(S级→XL级)对所有作物类型基本相同,我在仙人掌上也采用了同样的方法,最终培育出8株(注意:仅需3-4个XL级仙人掌农场,就能用沙尘三明治养活30名绿lander)。 注意:一旦你在某类作物上成功建立了几个XL级农场,之后就可以直接建造XL级农场。 我建造了3个大麻农场和3个棉花农场(棉花农场我建在了有鸟嘴生物活动区域的城墙内)。最终你会需要更多的棉花和大麻,但在初期,3个农场就足够了。 我为这片区域安排了3-4名专职农民和1名运输工。 在此期间,我持续用铜交易干鱼和肉。设置好之后,我安排了两名专职厨师、两名专职面包师,还有两个人专门负责制作麦秆。我仍在摸索优化面包制作流程的最佳方法,确定后会进行更新。 如果在虚荣生物群系而非干旱生物群系进行操作,只需10个小麦农场。若在干旱生物群系,最终需要大约19个小麦农场才能生产17个面包,用于制作沙尘三明治来喂养一个大型团体。 当然,这是基于绿lander的消耗量(饥饿速率为1)。蜂巢族仅需0.5,是优秀的游侠。骷髅族无需食物,但在获得维修床或提升科技前成本较高,焦土lander仅需0.9。石族是最差的,饥饿速率为1.25。
How much do you need A steam guide by Michael recently broke down how much Food you'll need to feed your settlement. Highly recommend checking it out. It really breaks down the difficulty of large faction farming I discussed above. To feed 30 greenlanders, you need the equivalent production of 1200 NU per cycle which is about 40 bread, 17 Dustwiches, or 16 Food cubes. In arid environments, wheat farms only produce at 60% efficiency so you'd need an incredible number of them to get to 40 bread. The better strategy is to focus on producing 16 dustwiches per cycle, which means - if my math is right - you need 17 bread and 136 Cactus per cycle (about 3 XL cactus farms). The best choice for farmer recruits are: Hive Workers (best) and Greenlanders (good) - See Section 9 for a complete overview of job roles and rankings. Some additional notes @KainYusanagi pointed out that because dried meat is a fairly inefficient food source (has very low NU value, certainly compared to Rice-based meals). That said, if you are settling in an arid zone, like I was here, youre going to take some time before you can start producing the Dustwich. So I still think its your food of choice until you have the ability to stack food sources. Your choices will differ greatly in Swamp biomes. 6. Autohauling Autohauling I've made this into a separate section because its extremely important - I will update this with any ideas and strategies that I come across. Autohauling only collects a minimal number of resources at a time. For both building materials and farming (!) you will need to micromanage a bit to make it more efficienct. Apparently this was because the alternative (picking up maximum amount of needed item) created more problems than it solved. I would be nice if we could select either option, but right now that isn't possible. For farming, I keep one packbull in the center where I can pick up water and max distribute it. And also pick up all of the harvested wheat, etc. and quickly put it into its storage container. Always keep at least one or two guys autohauling the resources so that if you get focussed on something else, the work doesn't bog down. An alternative solution is to just throw numbers at the problem - have a ton of engineers (pretty common for me as a backup job), and a ton of people autohauling particular resources (i usually keep this as a primary task, but you can experiment with this as another type of backup job i imagine it would work okay). Note - There are two types of backpacks that allow humans to stack, they come with significant combat penalties: 1) Wooden Backpacks, and 2) Trader Backpacks. Once you have a few of these, you dont need to seperately run a packbull with a seller. That said, they're much smaller than the packbull so you'll probably end up running a few of them together long term. 7. Faction Economy Strategies Faction Economy Strategies: This guide is primarily focused on faction expansion, so this section is probably the most important for developing faction economies. Preliminary Notes: Consumer Traffic - towns will always have the highest numbers of consumers for your goods, so setting up stores in a town, and autohaul routes to it, are a good idea if you want to use the character vendor features. Vendors have limited funds - which is why you want to be near as many settlements as possible to offload your items. Finding a mod that increases the amount of money vendors have to spend can make this less of an issue, obviously. (1) Copper Mining This will likely be your primary source of income throughout the early and middle portions of the game, and can drive your economy for the entire game if you want. Copper mines typically require 1-2 miners per vein and train/rely on a characters "labor" skill. You want to place your copper storage adjacent to your copper vein so that your miners don't have to walk anywhere when the vein fills up. Use the autohaul strategy discussed below to keep the copper storage from getting to 100. Labor skill only effects speed that the copper is mined. Once it leaves the ground, copper is copper, and there is no quality effect applied to it. In my roadmap sample faction above, once I had abandoned the initial outposts for a settlement I had 7 people mining copper into three storage locations. I would do runs of 300 copper with my packbull for sale. Some towns have a price market on copper higher than 100%, so if you can find one you can make even more money. In my sample playthrough, Copper sold at the Hive Settlement for 175 per ore (or higher), so at 300 a run I was making $ 52,500 per run. At the base price of 160, you'd be making 48,000 per run. $52,500 per run may sound like a lot but given the cost of particular research items, you can burn through it pretty quickly. Still, it is sufficient to sustain you throughout the game if needed. (2) Grog, Rum and Sake Production Each environment type (arid, green, swamp) can produce alcohol: Rum (arid - cactus based), grog (green - wheat based), and Sake (riceweed based). Grog, rum, and Sake all profitable trade items that you can pivot your economy towards once you've developed your farming capacity. I am focused on grog production here, because it is by FAR the most profitable, selling for about 952 per unit, more than double Rum (buy price of $520/u) and Sake (buy price of $428/u). Grog uses wheatstraw and water, both of which you should have developed plenty of capacity if you followed the farming section above. However, same ideas apply to Rum or Sake. Use the excess wheatstraw capacity you developed on grog. At 1155 per unit, if you do runs of 50-100, grog will net you between $ 47,600 and 95,200 per run. Given the space used, it outstrips copper profits, and is incredibly profitably. Because you're carrying many less of them, you can fill the excess packbull space with your mined copper. Need to double check total profit on these runs and will update.(3) Farm Sales and Smuggling You can implement the smuggling strategy listed in Section 1, by mass producing your own Hashish and then smuggling it to a fence. In my sample playthrough, I was able to sell Hashish directly to the neighboring Hive Settlements, but the markup was not super high. Alternatively, you can sell safe food goods (dustwiches, etc.) either directly to vendors or from your own shops (discussed below). (4) Become a Vendor [Section being developed still] This is a long term trade option, where you have less control over what you make but you can create auto-haul routes that enable you to store particular goods in shops which, worst case, you can sell to other vendors if you overstock. Initially, use one of the town buildings you bought for your setup in in Squin. You can then branch out to the other cities around your settlement, with autohaulers to each. Shops work best with food, alcohol, medical supplies, and textiles. From Drakken: Also works with chainmail sheets, armor plating, and steel bars. You need to either be in a town (preferred method) or near one, so you can benefit from city consumers. Trader's don't buy loot from people you stripped in combat, so you need to either directly sell those items or not stock them. The store you create must always be unlocked and open to the public. 8. Race Breakdowns There are four primary "races" in Kenshi, with various sub-races. (1) Humans Contain two subraces, and have the benefit of not being attacked on sight by the Holy Nation. (A) Greenlanders - Look like normal, you know, humans.
他们几乎在任何地方都能被招募,在神圣国度领地出现频率很高,在驿站和渔村也很常见。 他们可以成为你的厨师和矿工,也能胜任农民的工作。 他们可以装备所有类型的护甲。 经验加成/惩罚: +20%经验加成:烹饪、 farming、科学 无经验惩罚 基础属性: 饥饿速率:1 肢体生命值:100 血液等级75-150,流血速率1, healing速率1。 视野范围:1 速度:战斗移动速度倍率1;移动速度16-27。 (B)焦土人 - 深色皮肤,红色眼睛,相当罕见。

在游戏初期,他们是非常优秀的招募对象,因为他们拥有战斗加成,可全副武装,移动速度出色,饥饿率比格林兰人更低,并且流血/ healing速率也更优。他们还会成为你的盔甲和武器锻造专家。 由于他们有敏捷加成和力量惩罚,你会希望他们挥舞像野太刀或其他武士刀这类快速打击武器,而非像木板这样的重型武器。 他们仍然相当稀有——在极北地区,世界尽头及其上方的渔镇,你能更规律地招募到他们。我认为地图的新区域为他们提供了更多招募途径,待获取更多信息后会更新这部分内容。 他们的所有盔甲槽位均可使用。经验加成/惩罚: +20%加成:锻造(盔甲和武器)、运动、闪避、潜行 +10%加成:敏捷 -10%惩罚:力量 -20%惩罚:烹饪、 farming、 laboring 基础属性: 饥饿速率:0.9 肢体生命值:100 血液等级75-150,流血速率0.9,愈合速率1.1。 视野范围:1 速度:战斗移动速度倍率1;移动速度18-27。 (2)骨人 长有角、外表似岩石的类人生物。他们以荣誉为驱动力,是出色的战士。没有亚种。
它们遍布整个沙克王国,在枢纽城南部的起始区域(斯昆等)极为常见。有些沙克人不喜欢被人类招募,但通常这不是大问题。 在战斗中,他们是你的重装战士。其力量加成和敏捷惩罚意味着,一旦他们成长到足以挥舞像木板这样的慢速高威力武器,给他们配备这类武器是合理的。 他们可以装备所有槽位,但在头盔佩戴方面有所限制(由于角等原因)。 经验加成/惩罚: +20%加成:韧性、攻击 +10%加成:力量 -20%惩罚:敏捷、 Athletics、闪避、农耕、劳作、 Robotics、科学、潜行、盗窃 基础属性: 饥饿速率:1.25 肢体生命值:125 血液等级75-150,流血速率为。生命值9,治疗速率0.8。 视野范围:1 速度:战斗移动速度倍率1;移动速度16-25。 (3)蜂巢族 类似 stick-like 的类人生物,由蜂巢女王控制。有三个亚种,可招募流亡者。 注意 - 招募的蜂巢族无法与蜂巢派系中的任何成员互动,因为他们是流亡者。 (A)蜂巢王子
优秀的新兵遍布各地,他们会随机出现在世界各地——通常在驿站。他们的饥饿值很低,并且有很多不错的经验加成。 他们是你的盗贼专家、医疗兵和研究员。 和焦土人一样,他们的战斗和敏捷加成以及力量惩罚意味着你应该给他们装备快速攻击武器,比如野太刀/武士刀。 他们只能穿蜂巢人衬衫,不能穿鞋。 经验加成/惩罚: +20%加成:韧性、敏捷、运动、医疗、撬锁、科学、潜行、盗窃 -20%惩罚:力量、劳动 基础属性: 饥饿率:0.5 肢体生命值:80 血液等级50,出血率0.3,愈合率1。 视野范围:1 速度:战斗移动速度倍率1.2;移动速度16-31。对酸免疫 (B)巢穴士兵
他们是相当有限的招募单位,专长于近战战斗。 他们只能穿着蜂巢人衬衫,无法穿鞋或戴头饰(但头部生命值有加成)。 经验加成/惩罚: +20%加成:韧性、攻击 -20%惩罚:烹饪、工程、 farming、医疗、感知、机器人学、科学、锻造(盔甲和武器)。 基础属性: 饥饿速率:0.6 肢体生命值:100 头部生命值:200 血液等级50,流血速率0.3, healing速率1。 视野范围:1 速度:战斗移动速度倍率1.1;移动速度16-29。 对酸免疫 (C)蜂巢工人

他们一直都是优秀的招募对象,或许是最出色的农民(得益于加成和移动速度),同时也是不错的矿工。他们只能穿着蜂巢族衬衫,无法穿鞋。 经验加成/惩罚: +20%加成:韧性、敏捷、 Athletics、工程师、 farming、 labor、潜行、盗窃、 turrets -20%惩罚:力量、烹饪、科学 基础属性: 饥饿速率:0.5 肢体生命值:75 头部生命值:125 血液等级50,流血速率0.3, healing速率1 视野范围:0.5 速度:战斗移动速度倍率1.2;移动速度18-31 对酸液免疫 机械族 机械族本质上是机器人AI,他们是极其出色的战士,分为三个亚种。【机械人】的招募难度相当高,在世界尽头的极北地区有一定几率遇到,并且在包含机器人城市的死亡之地中可能也有分布。它们无法穿戴衬衫、鞋子或头饰,但拥有高额的基础生命值加成,并且对针对金属的武术攻击具有伤害抗性。机械人不会感到饥饿,这点非常不错,但在游戏初期,它们的维修和维护成本很高。一旦力量属性提升,机械肢体就能有效地挥舞游戏中最重的武器。
Experience Bonuses/Penalties: +20% Bonus: Robotics, Heavy Weapons, Turrets -20% Penalty: Dodge, Stealth, Thievery Basic Stats: Hunger Rate: 0 Body HP: 200 Oil (aka Blood) Level 100 with a Bleed Rate of .01 and a Heal Rate of 3. Vision Range: 1.25 Speed: Combat move speed multiplier of .9; Move Speed 16-25. Immune to all Weather Hazards (B) Screamer MKI Experience Bonuses/Penalties: +20% Bonus: Melee Attack, Turrets, Assassination, Engineer, Robotics -20% Penalty: Katana, Dodge, Stealth, Thievery Basic Stats: Hunger Rate: 0 Body HP: 200 Oil (aka Blood) Level 100 with a Bleed Rate of .01 and a Heal Rate of 3. Vision Range: 1.25 Speed: Combat move speed multiplier of .9; Move Speed 16-25. Immune to all Weather Hazards (C) P4 Unit - lack space for full breakdown Bonus smithing, science, engineering, robotics, and medic. Penalty katanas, dodge, stealth, thiefn 9. Role Selection and Job Rankings Discussing Races and Patterns After considering the racial breakdown above, a few things begin to emerge: Greenlanders - The jack of all trades, they have no penalties - meaning they can fill any combat or job role - can wear all armor and even if they don't have a bonus they can still develop the skills just fine. Scorchlanders - Job Roles: they don't make good cooks, farmers, or laborers, but are flexible otherwise and are smithing specialists. Combat Roles: More limited, as they have a minor strength penalty, so lighter or ranged weapons are better here. Sheks - Combat Roles: Very tanky, can use all armors, resist every kind of damage in the game but move slower, have high food reqs, and a dexterity penalty means less cutting damage and an emphasis on strength based weapons. Job roles: Extremely limited. They can be used to plug holes, but their penalties are severe outside of combat. They have no penalties to cooking and smithing. Note on the Hive - In terms of combat, the hive are extremely fragile early before blossoming late. Hive Prince - Combat Roles: Can be glass cannons early, they get light weapon and ranged combat bonuses. The toughness bonus is nice because the penalties to armor/slots are rough early on. Job Roles: Very flexible, lots of bonuses and only the labor penalty. Hive Soldier - Combat Roles: Same as above, they get light weapon and ranged combat bonuses. Job Roles: Extremely limited, pretty much confined to labor tasks. Hive Worker - Combat Role: Glass cannons early, with bonuses to light weapons, turrets, ranged weapons (however they have a vision penalty - have not tested how much this effects this yet). Job Roles: Extremely good workers. They have a base movement speed bonus, and make great engineers, farmers, and miners/laborers with only a penalty to cooking and science. Skeletons - Combat Role: naturally tanky and have no bleeding, but can't equip numerous armor slots. They get bonuses to heavy weapons and martial arts. Job Role: Very flexible (although the Screamer and P4 Unit have more limitations built in). Combat Roles and Rankings 1) Heavy Weapon Specialists - Relies primarily on Strength and Toughness. Sheks Skeletons Hive Soldiers Scorchlanders Greenlanders 2) Light Weapon Specialists - Relies primarily on high Dexterity and Toughness. Hive Prince Hive Soldiers Scorchlanders Skeletons Greenlanders 3) Ranged Specialists - Relies primarily on Perception, Dexterity, and Precision Shooting. There are no race specific bonuses for crossbows or precision shooting right now, so it pretty much just comes down to bonuses to the base stats. Hive Prince - 20% bonus to dexterity Hive Worker - 20% bonus to dexterity, low vision Scorchlanders - 10% bonus to dexterity Soldier Bot (Skeleton) - 20% bonus to Perception Skeletons Greenlanders 4) Martial Artists - Depend HEAVILY on martial skill, strength and toughness. Dexterity is also important. Screamer MKI - Combat bonus and robotic limbs. Skeletons - No combat bonus but robotic limbs protect from fist damage, and they have no penalty to dexterity. Shek - Combat bonus and damage resistance is great. Boosts to toughness and strength are really helpful, but the dexterity penalty hurts since you can't wear heavy armor. Late game, with robotic limbs, these guys are monsters. Soldier Drone - Combat bonuses and no bad penalties, but have armor restrictions, aren't naturally tanky and take time to bloom. 5) Turret Gunners - Relies primarily on Perception, Dexterity, and Precision Shooting. Hive Worker - 20% bonus to turrets and dexterity but low vision Soldier Bot (Skeleton) - 20% bonus to Perception Hive Prince - 20% bonus to dexterity Skeletons - 20% bonus to turrets Scorchlanders - 10% bonus to dexterity Greenlanders 6) Field Medics P4 Units - Bonus to medic skills, plus they also have a bonus to robotic repair skills making them the most well rounded medic. Hive Prince - The most obtainable race/subrace with a bonus (20%) to medic skills, plus movement and athletics bonus and can use defensive weapons. Skeletons - No penalty to medic skills, plus the bonus to robotics repair allowing them to do both healing roles. Hive Worker - Movement bonus, athletics bonus. Penalty to robotics repair so they can't double as easily. Scorchlanders - Athletics bonus Greenlanders Non-Combat Jobs/Roles and Rankings: 1) Mining and Processing - Relies on the Labor skill, also can build strength and athletics. Hive Worker - Laboring bonus, Movement bonus, athletics bonus. Greenlanders - Laboring bonus Hive Soldier - No penalties, good movement, etc. 2) Farming Hive Worker - Farming bonus, Movement bonus, athletics bonus. Greenlanders - Farming bonus 3) Cooking Greenlanders - Clear winner, with only 20% bonus to cooking in game. Hive Princes Sheks Skeletons 4) Smithing (Armour and Weapon) Scorchlanders - The clear winner here, with 20% bonuses in both armor and weapon smithing. P4 Units - 20% bonus to armor and weapon smithing 5) Researcher - Tied to science skill Greenlanders - 20% bonus to science skills Hive Princes - 20% bonus to science skills Skeletons - 20% bonus to science skills Scorchlanders - No penalties to science. 6) Robotics - Crafting, Skeleton Repair, etc. Skeletons (all types) - Robotics bonus 7) Engineer - can also build strength and athletics Hive Worker - Engineering bonus; plus movement and athletics bonuses. Screamer MKI - Engineering Bonus P4 Unit - Engineering Bonus 8) Thief - Relies on Stealth, Lockpicking, and Thievery Hive Prince - Bonuses to all three skills, only race with lockpicking bonus. Hive Worker - Bonuses to stealth and thievery Scorchlanders - Stealth bonus 9) Smuggler - Relies on Stealth. However, lockpicking and thievery may be needed to escape jail, so the list is the same as above. Hive Prince - Bonuses to all three skills, only race with lockpicking bonus. Hive Worker - Bonuses to stealth and thievery Scorchlanders - Stealth bonus 10) Assassin - Relies on assassination and stealth, primarily. Screamer MKI - Interestingly, they are the only race/subrace with a bonus to assassination skills, but it is paired with an unfortunate penalty to stealth. As such, they take a long time to develop and may be inferior practical choices compared to the rest of the list. Hive Prince - Bonuses to all three skills, only race with lockpicking bonus. Hive Worker - Bonuses to stealth and thievery Scorchlanders - Stealth bonus 10. Arming and Equipping your Squaddies General Notes: Remember that characters only have one "attack slot," meaning they can only be attacked by one person at a time. Its presently unclear to me if this is applies to ranged attacks, or whether they get a separate single attack slot. Will test this a bit and update. Regardless, you need to keep this in mind, because it provides a significant bonus to player's who can micromanaging their fights - assign players to specific enemies, equip multi-hit weapons, etc. I tend not to do this too much with base defense, but its something to consider when you're controlling a smaller war party. A popular mod can expand this number to 3 (or more) attack slots. After trying it for a bit with 3x, I have to say I prefer it, it certainly seems more realistic. But if youre doing a solo run or a small squad, it certainly makes sense to keep this vanilla from a pragmatic point of view. The mod changes the gameplay to make large groups more powerful so if there is one enemy surrounded inside your base, he will die much quicker. Conversely, if you maintain a small war party, they will be more susceptible to large enemy mobs. Thoughts on Armor There are three things to always keep in mind when considering which armors to put on your squad: (1) Coverage, (2) Cut Protection, and (3) Blunt Protection. Armor coverage determines whether or not a strike will be blocked by the armor at all. One of the early mistakes I made was to equip people based solely on sell price. This led me to over-use the heart protector, when it provides only 50% coverage to the chest. That means that 50% of the time youre taking 100% damage to the chest (100% of the time everywhere else that isn't covered). Not good. Once I found the recipe, I focused on crafting Samurai armor which I found to be much more effective. Most enemy weapons will do cut or blunt damage to your characters. Heavy armor, early on, may not always be the best choice for you. For one, youll build up your toughness more slowly and probably don't have the stats to account for the skill penalties. Toughness determines a character's damage resistance and KO level. I'm not sure if the amount of "blood" that a character has to lose is determined by his/her strength statistic any longer; I believe this all is determined by racial modifiers and/or toughness. General Thoughts on Weapons and Equipment In my town, my specialized fighters were almost 50/50 warriors to rangers. That may sound high, but for base defense, I had 30+ workers in my base with melee weapons that could support my group if anyone broke through, and I wanted 6-7 rangers be turret specialists. In most instances, they would be the only ones involved in picking apart enemies at the gate. Early on, I found nodachis (primary) and katanas (secondary) on everyone to be pretty effective since I was mostly going up against Starving Bandits or Dust Bandits; they absolutely destroy low armor opponents. However, katanas have stiff armor penalties and you pretty much have to diversify your fighting group to be successful. Overall, they're still a strong early crafting choice. Note that backpack penalties do not apply to ranged combat skills, so throw them on your rangers who can carry your supplies. Also remember that you unequip backpacks in a player's actual inventory or on the ground during a fight. Pay attention to dual damage items (i.e. items that deal both cut and blunt damage). This is especially true after your fighters have +60 stats, because having secondary damage really adds up. Use tooth picks/junk bows, etc. on all of your rangers until you've leveled up their precision shooting. Giving someone an eagle's cross before thats done is just guaranteeing that hes going to blow off an ally's arm or leg. Specific Weapon Types and Style Choices There are 8 different weapon styles in Kenshi: Katanas - Covered above. They're a staple, particularly early on. Light, fast, nice range + will train dexterity, attack and defense. They also cause bleeding. However, they have defense penalties, so don't put them on your medics/designated non-combatants. Nodachis as a primary weapon for katana users was my go-to. Sabres - A slower, heavier weapon than the katana often coming with bonuses to defense. Boost your dexterity and to a lesser degree your strength skills. They're a good option for medics, particularly ones which offer real high defense buffs like the foreign sabre. I'm a fan of them even on my combat characters because they offer both cut and blunt damage which is huge once your guys are 60+ in their stats. Desert Sabre is an extremely balanced choice, but in my mind doesn't do as well as Ringed or Holed Sabres if you can get your hands on any. Blunt Weapons - Blunt damage causes very little bleeding, but these weapons great against heavily armored guys and are also useful for knocking out and capturing opponents. I don't typically have more than 1 person with one in a war party because they mostly do only stun damage. The Jitte is a decent choice for indoors, and the spiked club deals multiple types of damage which can be powerful in the hands of a well trained warrior. Hackers - Do both cutting and blunt damage and usually offer bonuses against robots (helpful in the late game). They seem good once they're trained up, and I have a few people equipped with Combat Cleavers - will add more thoughts after testing them a bit. Polearms - Long outdoor weapons, its a great idea to have at least 1-2 guys wielding these. They are quick hitting with a reach similar to that of heavy weapons; able to strike multiple enemies at once. Some appear to train dexterity. Their "affects damage" against animals is unhelpful but they more than make up for it by being lightweight, meaning that they don't require highly trained warriors to use effectively (unlike heavy weapons). They have a bad reputation in the community because of their low damage and bad affect damage but I've had a lot of success with them (try the Naginta). They're particularly helpful if you've focused on expansion over combat training early on. Make sure to equip these guys with indoor weapons. Heavy Weapons - Long, outdoor weapons which cause cutting and blunt damage and train your strength, attack and defense. They boast both high damage output and high minimum stat requirements. If you followed this guide, you probably won't be using many of them early on as your squad will simply not be trained sufficiently to wield them but long term it may be worth it to train up 1 or 2 guys with planks. Rarer heavy weapons like the falling sun may be doable with prosthetic limbs, but I have not tried this. Crossbows - They're a must have in most squads as the only ranged weapons in the game. They require ammunition, so keep in mind ammo availability when you stumble across a fancy one. Since most of my combat has been base-centric, they've been particularly useful and they build many of the same stats required for your turret gunners (which can be hard to train!). Just make sure you use low level crossbows until your precision shooting is at least above 30 or so, or you'll do more damage than good. Martial Arts - At high levels, martial artists are exceptionally strong. However, they are the most attribute dependent fighters in the game; as they receive no benefits from a weapon, their skills are entirely dependent on a character's martial arts level, toughness and strength. In some ways, they're the easiest to internally train bc you don't have to worry about bleed damage to prisoners (or the fact that they're equipped, etc.). Other considerations: You will need to train dexterity separately in order to give them some protection, and they seem to require some fist protection against heavy armor/robots. 11. War Party and Fighter Training When you're at a point where your settlement is stable, you have turrets manned and you need to venture out for research material its time to start investing in your war party. Preliminary Decisions: How big should your war party be Since I strongly prefer using the expanded squad mod, and recommend it early on, your decisions may be different than mine. Unmodded early war squads usually start around 5 or 6, with a goal size of 10-12. In my sample playthrough, I was starting my war party later and had a large faction of 70+ with the large squad mod, and went with 18+3 pets. Who to pick: I recommend recruiting with an eye for who you want warring from the getgo. Don't assign these guys to essential jobs like farming, smithing and to a certain extent turret manning. These guys should be your engineers, miners, researchers, etc. who you can afford to take off their assigned tasks for lengthy exploratory ventures. Within this group, you want to narrow down people who have the highest stats trained up - so for me, a lot of these guys were miners who had been early responders to raids and had built up 20+ toughness. You don't need that much, it just changes how you go about training them. Training Fighters I'm going to spend most of this section focused on out-of-base fighter training through war party ventures. Its the most fun, least grindy, effective way to level up your war party. There are a lot of good guides out there that focus on in-base fighter training. This one is explicitly about how to use prisoners as training material, this one discusses much of the same stuff and gets into stat development, this one goes into a bunch of different things including war party composition. They're all worth a look and I won't be adding in-base fighter training until later on because its already been covered pretty well. If you followed my playthrough advice, then you've kind of let this slide with maybe a few exceptions and just allowed your guys to naturally level up as your settlement got attacked. If your troop is super low on stats (between 10-30), you are going to gear your early fighting ventures on bandits in the border zone. This way you stay near your base and build up your stats in easily winnable fights. If your troop stats are moderate (between 20-60), you have a lot more options. You can continue harassing dust bandits but I recommend going into the foglands and fighting the fog men, who will hit you with numbers, which is great. With high level troops (60+ stats), you should start relic hunting, which is covered in the section below. War Party Composition and General Tips:Have at least 1-2 medics in your war party on passive, with defensive bonus weapons like the foreign sabre. Since this may not be enough to save them in tough battles, I like to put them on "hold" just outside the fight, so they don't get killed healing someone in the center of the combat. In my sample playthrough, my war party was made up of 15 melee attackers, 1 doctor, and 2 rangers. More rangers is recommended, but I didn't have enough trained up with precision shooting to either take off turrets or trust not hitting my own guys. As I covered in the equipment section, you want a diverse weapon setup. This will be limited by the stats of your guys. Remember that to weild a weapon, you need your strength to be 2x the weight of the weapon. So for a plank that weighs 12 kg, you'd need at least 24 strength to weild it at all. In later parties where you are artifact hunting, you also need to have one of your guys trained up in lock-picking. If you don't have a guy super high level, try and buy some tools so that you can cut open high level safes without lockpicking them. Consult the Squad Equipment section for weapon ideas, and make sure they aren't all weilding katanas - you want people who can hit an armored foe if you run into one. This isn't an issue if youre just planning on fighting bandits. Some people recommend using scouts. I never found the need, but experiment with one if youre finding yourself getting beat down a little too hard. Remember that if you use the "defensive" skill, it automatically boosts your defensive stats by 20 which makes levelling said stats a LOT slower (because it considers those stats artificially higher than they are). I recommend not using it as much as possible so that you level faster unless you specifically need it in combat. Always remember to set your war party to walk, not run, so that people don't get left behind. If you're having issues with staying together, remember that you can always set your slowest person to be the leader and just have everyone else follow him. When a few of your guys have taken a beating and need to be carried around, liberally use beds in towns your near. Its worth the cost and will make this much easier. You can also save some money by picking out places near cities with a thieves guild so you can sleep for free (if you paid the early 10k fee - which you should have done). 12. Advanced Research and Loot General Overview: To research the highest level tech, you will need to find (1) ancient science books, (2) engineering schematics, and (3) AI cores. Most factions consider these taboo, and will not talk to you about them. They are illegal in the Holy Nation so be careful when you have them in your inventory there. Purchase: They are extremely unlikely to be found in cities, but there are a few places where they can be purchased. The tech hunter faction and cities run by Skeletons are your best bet for information and items. You can run a character with high athletics and a backpack to these locations, but you may need special gear to protect you from weather effects (or just rough it out and heal at a bed in a city before running back out). Scavenging: These items can be found in ancient labs, lost towns, lost libraries, and occasionally in places that are designated "dead" or "ruins." You will encounter these primarily in the more remote and dangerous regions in Kenshi. Expect to encounter more advanced enemies. You have two options: (1) Bringing an advanced war party - the conventional route; or (2) using a highly trained Thief - a method I have not yet tried, but intend to. Breaking into Locked Containers: Regardless of your above choice, you will want one character in your war party who excels at lockpicking (over 40 is ideal to start) so that you can actually access many of the labs and containers in the game. Just remember that failing (in lockpicking or anything else) is FINE, it builds your skill, but you need to have a high enough skill to be able to pick the lock in the first place. I've started with lockpicking as low as the mid-20s for these runs, and built it up fine. Always bring tools as a backup, especially if you have a lower lockpick skill. Gathering information: I chose not to purchase maps or anything but thats an option in many travel shops. You can also ask tech hunters about them for free. A good place to start your search for these items is in the Floodlands, south of Burn's Tower, because it is fairly easy to get to if you followed my sample playthrough. Ancient Books Cost around 5k per book to purchase. Where they can be purchased (Location Spoilers): They will occasionally appear for sale at Hive Settlements and Tech Hunter Waystations and Towns, and are guaranteed to spawn at a shop in World's End, and at the Scraphouse near Black Desert City. In places where they are guaranteed to spawn, I'm not sure if the items restock once purchased. Engineering Schematics Cost around 8k per Schematic to purchase. Where they can be purchased (Location Spoilers): They will occasionally appear for sale at Hive Settlements and Tech Hunter Waystations and Towns, and are guaranteed to spawn at the Scraphouse near Black Desert City. Guaranteed scavenge locations (Location Spoilers): Post-Ancient Workshop, Workshop Complex, and Deadland Workshop. As above, in places where they are guaranteed to spawn, I'm not sure if the items restock once purchased. AI Cores Uber rare, uber expensive. You need a total of 32 cores to research everything in the game. They cost around 25k per Core to purchase. Where they can be purchased (Location Spoilers): Three of them can be purchased at the Scraphouse near Black Desert City, but they will not restock. You will need to scavenge for them using the Artifacts system, at Ancient Tech Labs or by destroying Cleanser Units, which can be found roaming the Ashlands in the Southeast corner of the map. Conclusion, Misc Tips, Notes on Mods Misc. Tips and Thoughts Reset the navmesh regularly by pressing [cntl]+[shift]+[f11] In the likely event that you eventually encounter some bugs, you can use the world editor to try and fix them by pressing [shift]+[f12] Player Stuck in Walls - One bug I encountered that could not be fixed like this was having my guys get stuck in walls. Even deleting the wall didn't allow them to move from the location. A trick that seems to work is sending another guy as close to them against the wall as you can, and issuing the "pick up" command. You can then put them down somewhere that isn't inside a wall. The added benefit being that you don't have to deconstruct/rebuild your wall. Holding down the [Alt] key will highlight items on the ground, signs in towns, etc. which can be very useful. Pathing - Certain locations that are walled off by mountains cannot be accessed without some micromanaging, so don't just send a guy off to explore or go to a town on the other side of the world without monitoring him. The game populates 9 zones immediately surrounding your character, and will populate 3 zones in the direction he moves. However, when your screen is not focused on a character, your character will (I believe) be forced to rely on AI Pathing through difficult terrain and if you aren't on one of these paths, you can can get stuck and go aimless. Some Notes on Mods There are a lot of awesome mods in the workshop that you'll no doubt want to look into eventually - I didn't want to use them until I had played through the game a bit. That said, three I used pretty early were: 256 Squad Limit - Strong recommend as soon as your squad is getting to the 20 person limit because this will expand it to 50. As Kenshi does not allow automation to ever fully take off, this makes micromanaging easier. In-Game Colored Biome Map More names - nothing is worse than having two guys named the same thing (if you forgot to change it). Better Eyes - the default eyes for greenlanders are honestly terrifying. A few others I'd recommend once you've played in the default world a bit: Recruit Prisoners Guardposts - Unfortunately, this is no longer being updated and isn't working for me. Discussed above, certain mods can make your life easier but will change the gameplay in significant ways. You have to consider whether its worth it to you to do so. 3x Attack Slots - Discussed earlier, this will change combat dynamics to favor larger groups. This is arguably more realistic but I haven't tested it yet. Reactive World - Awesome mod for the mid-endgame which will make the world more dynamic. Shops have more items - I have mixed feelings about this one. Its really awesome to have sellers with significantly more Cats to spend on your copper and goods. BUT this significantly changes the game in other ways, because shops will now regularly sell rare items and blueprints that they don't typically stock. Idle Training - This allows you to train character stats by providing additional and high level training equipment. Once you've done a playthrough where you trained up a squad using the traditional strategies, this may be a good one to check out since it cuts down on grinding. Conclusion Whatever your cup of tea, your first story will likely be about surviving the wasteland. If you followed this guide, you can really branch out and do whatever you want exploring the wastelands, basebuilding, etc. But after you've done that, my only recommendation is to have fun bringing your own story to Kenshi. An all chick group intent on bringing down the Holy Lands? A skeletal army intent on bringing death to all? Your own Hive Collective? Kenshi is a wonderful sandbox, have fun in it. Wishing you good fortunes, Drifter.