换一换
换一换 


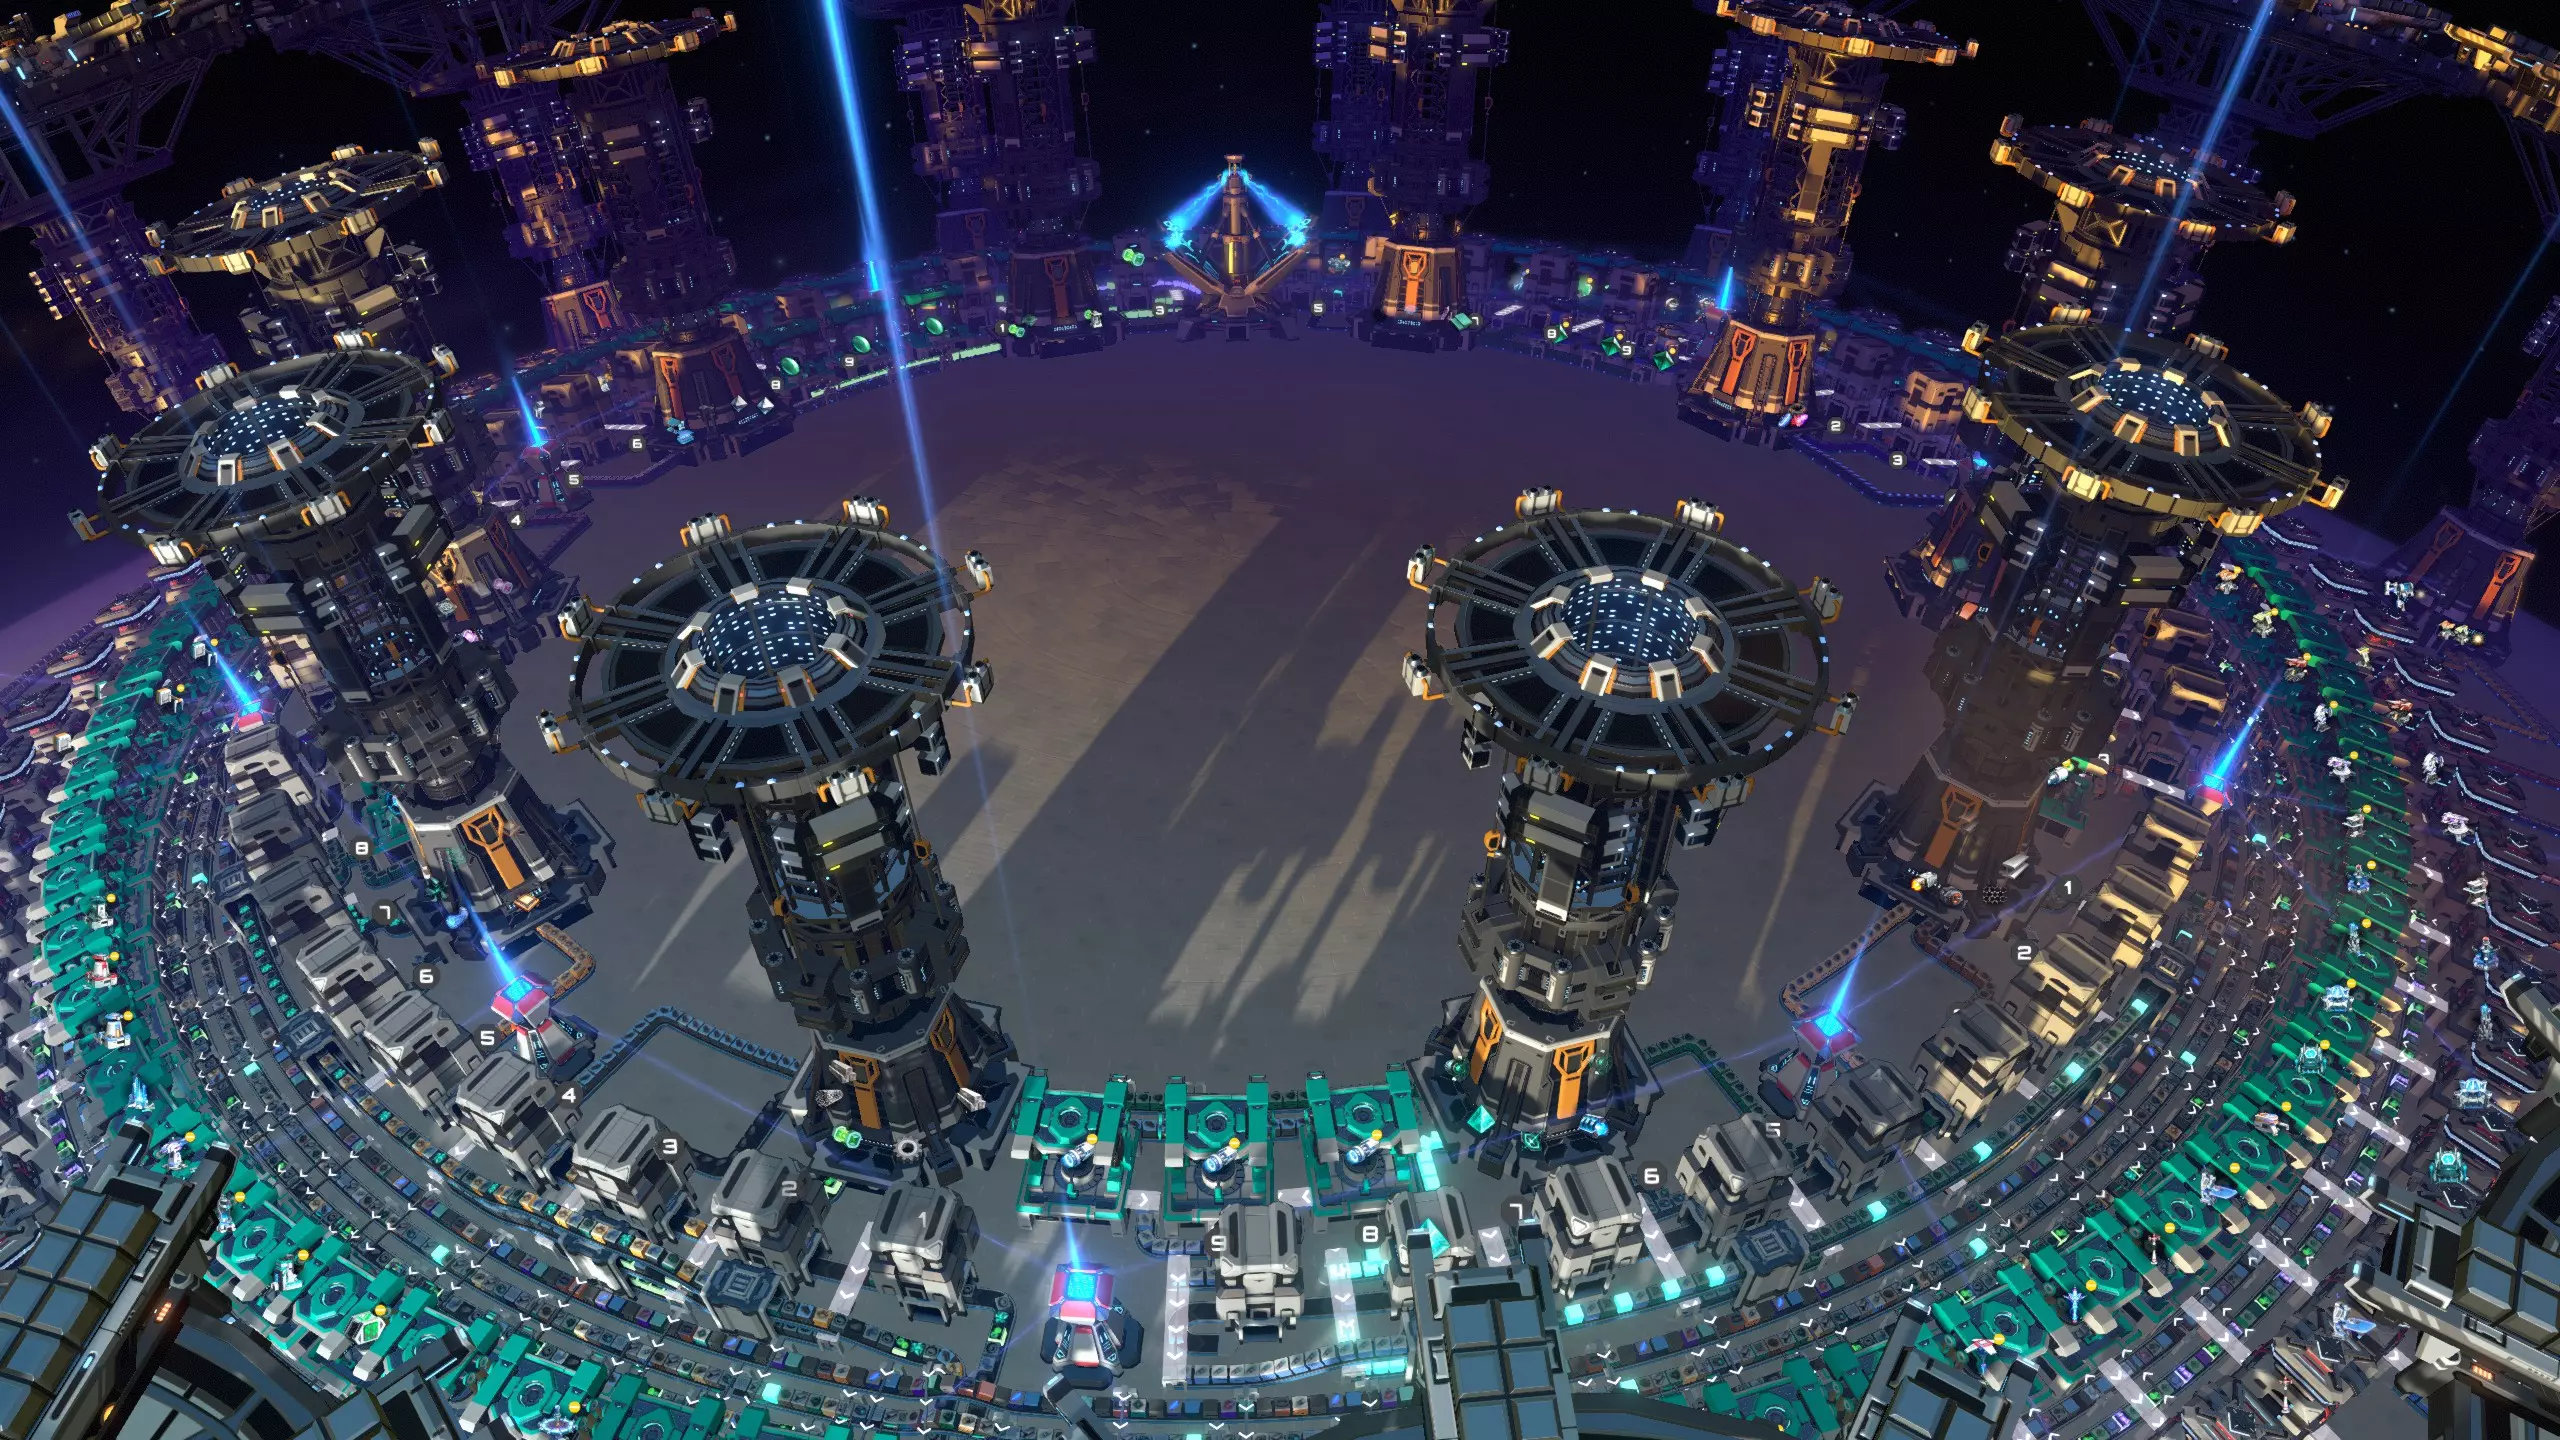
本指南介绍了一种在游戏早期(蓝色科技阶段)轻松搭建“寿司传送带工厂”(一种使用混合传送带将所有必要物品输送到正确装配机的工厂)的简单方法。这种工厂可以一路扩展到游戏后期,在游戏开始一小时后的各个阶段都能很好地为你服务。 关于工厂的说明
任何玩过这款游戏超过几个小时的玩家都知道,在早期阶段自动化生产常见建筑非常重要。 多年来,已经有了许多便捷的购物中心设计方案。最受欢迎的或许就是我所说的【5传送带购物中心】:你需要设置传送带,分别输送铁锭、电路板、电磁线圈、石砖和齿轮,然后让这些传送带沿着一排组装机运行。每台组装机负责生产一种建筑,并将其放入存储箱中。这种设计在2021年就已经由Nilaus提出,至今仍然相当实用(反正我还在使用)。
However, ever since the Dark Fog update, this design doesn't seem to satisfy players as much as it used to; people are looking for other ways to do it. You always needed a bit of a hack if you wanted to expand the mall with buildings that use steel, glass, and plasma exciters, like oil extractors and chemical plants. And the design couldn't really be extended to make late game buildings either. But it was so easy to make so early on in the game that these drawbacks seemed inconsequential. But with the Dark Fog update, new buildings got introduced, buildings that use engines and microcrystalline components. The design started to feel top-heavy, people were looking for more flexible designs that could more easily get more different types of resources to all your assemblers. A lot of new ideas in this direction are currently being developed. The main ideas I've seen fall into three categories: The most straightforward approach is to start with a 5-belt mall, but to then rush to logistics distributors and transition into making additional buildings using a bot mall. This approach can be quite convenient, and I suspect a large number of players go this route. I've made bot malls myself. However, I never quite liked transitioning from the 5 belt mall design to a bot mall; I always end up feeling like I have two half-assed malls. So with my bot mall, I found myself redoing the entire thing and just replacing the five belt mall rather than expanding on it. Other players have started to use the new ability to set filters in storage boxes to create lines of storage boxes to distribute all the building materials. The drawback is that every storage box will buffer quite a few items, which is costly and takes a lot of time in the very early game. It also isn't practical to carry all forty something source materials that way. Nilaus' own response was to embrace bus designs in Dyson Sphere Program. Opinion was divided about this design, mostly because of its voracious space requirements. But it does seem to have found traction, with many players building it and coming up with variations on the theme, probably on account of its ease of use. All these developments are interesting, but I believe that the best way to get flexibility from the early game onwards is to use sushi belts (also called mixed belts: belts that carry several different materials on them). It should be possible to start building a flexible, extensible sushi mall in the early game, long before logistics distributors are available, that can also be expanded into a late game mall with a small footprint. When I made this blueprint, it was intended to be placed in the mid-late game. I initially could not work out how to get there in a comfortable way if you wanted to start out early. The main issue is that mk1 belts are so slow. If you have several materials on the same belt, the throughput becomes so poor that the mall quickly slows down to a crawl. But I think I've now worked out a good way to do it, and that's what this guide is about. It is a step by step tutorial on how to build a sushi mall similar to the one in the picture above, in such a way that it is usable already while you're still on blue science. This guide will link to five blueprints, four of which fit in the 150 facility limit. The fifth one is stamped down later, when the 300 limit is easily within reach. Each blueprint has some use on its own, but together they allow you to build the entire mall. (Of course you can also look at the screenshots and build everything in your own style). At the end you will also find links to two versions of the full mall. It should offer roughly the same flexibility and reliability of the bus based design, and it should be roughly as easy to build, but with a much smaller footprint. Without further ado, let's get into the actual design. A word about the Dark Fog I wrote this guide while playing with Dark Fog disabled. I have not included tips as to how to keep the Dark Fog at bay in a convenient fashion, both because I'm not as interested in it and also because the amount of trouble you should expect depends greatly on your Dark Fog settings, which are different for everyone. With the default settings, the Dark Fog generally does not pose a large threat, and as long as you put up some Gauss turrets and automate some bullets you should be fine, and able to follow the steps of this guide more or less without change. While you will be asked to make large circular belts relatively early on in the game, the dark fog only attacks powered structures, so these should not increase the area you have to defend. The presence of Dark Fog might affect which pole you pick to build this mall. It may also mean that you want to build the early game blueprints for the mall a bit closer together than you would do otherwise. With very high threat settings, it is likely that this guide does not describe the easiest way to play the early game. Overview of the plan In broad strokes, the idea is to start with a 5 belt mall, where each of the 5 belts is initially populated roughly like in the normal 5 belt mall, except that each belt must form a loop, and is managed by a 3-way sushi rebalancer. A sushi rebalancer is a device that receives whatever remains on the sushi belt after it's made its loop past all the assemblers, and restocks the belt with new resources as necessary. The sushi rebalancers initially don't have to rebalance much, since the five belts will each just contain one or two materials, but as your game progresses you will be able to easily present new ingredients to the rebalancers, which will then be mixed in with the belt they're managing. Once you can upgrade the sushi belts to mk2, the throughput of the system becomes a lot better and you can start to add more materials to the rebalancers. You can get a decent midgame solution with up to 15 different ingredients this way. The 3-way rebalancers are fed by little bits of factory that receive ores from nearby mineral patches, that will mostly be on the outside of the loop. This suffices early on. However, once you're comfortably on yellow science, and you have reached the point where you have planetary logistics stations, mk3 belts and pile sorters, you can make a quantum leap by replacing the 3-way rebalancers by five 9-way rebalancers, each fed by two planetary logistics stations, on the inside of the loop, and each piling their materials high on the belt. The final step is to connect all the output boxes to 15 interstellar logistics stations that will ship your products to anywhere in the cluster. Pros and cons I see the following as advantages of this design: The mall can be built in the early game, and stays effective all the way into the late game. New buildings can be added easily since every assembler has access to every material. The mall does not do an excessive amount of buffering, and is quite compact. It allows different play styles, by letting you add new materials to the sushi belts whenever you need. Meanwhile, it has some disadvantages as well: Most importantly, it is tricky to achieve a sufficiently high rate of introducing new materials onto the belt, for common materials like iron ingots. While you could theoretically proliferate the sushi belts, a lot of common buildings are produced with direct insertion, which nullifies the benefits of proliferation. So far, I've always preferred to not proliferate this mall. Some people don't like sushi designs. Speed The biggest design problem with early game sushi belts is throughput. If your assemblers receive iron on a mk1 sushi belt that mixes three items, that means that only 2 iron ingots per second can be fed into the system, and that's not nearly enough for a convenient mall. A lot of your production would be starved a lot of the time. I find that the following measures address this problem reasonably well though: Throughput is the main reason that I've chosen this five belt design. If you try to put everything on a single sushi belt, that's just not going to deliver enough stuff to your assemblers, but with five belts, you can get a lot more done. You can improve the performance by upgrading your belts and stacking materials on the belt. The design is such that we start out with only very few materials on the belt, and we only add new materials just after a throughput upgrade. Note that roughly as soon as the mall is operational, you can start to make mk2 belts on it and do the first upgrade soon afterwards. The 9-way sushi rebalancer that is ultimately used deliberately mixes materials with an uneven distribution, so you can give priority to stuff that needs a high throughput. Finally, if throughput is still a concern for you, you can control which buildings are produced by temporarily setting the number of free slots in the storage boxes for less important buildings to zero. I don't think this should be necessary to do though, definitely not after you have upgraded the belts to mk2. Rebalancing Because the entire design revolves around making sushi belts, it's important to know how the rebalancer works. Here is the three way rebalancer, seen from the front:
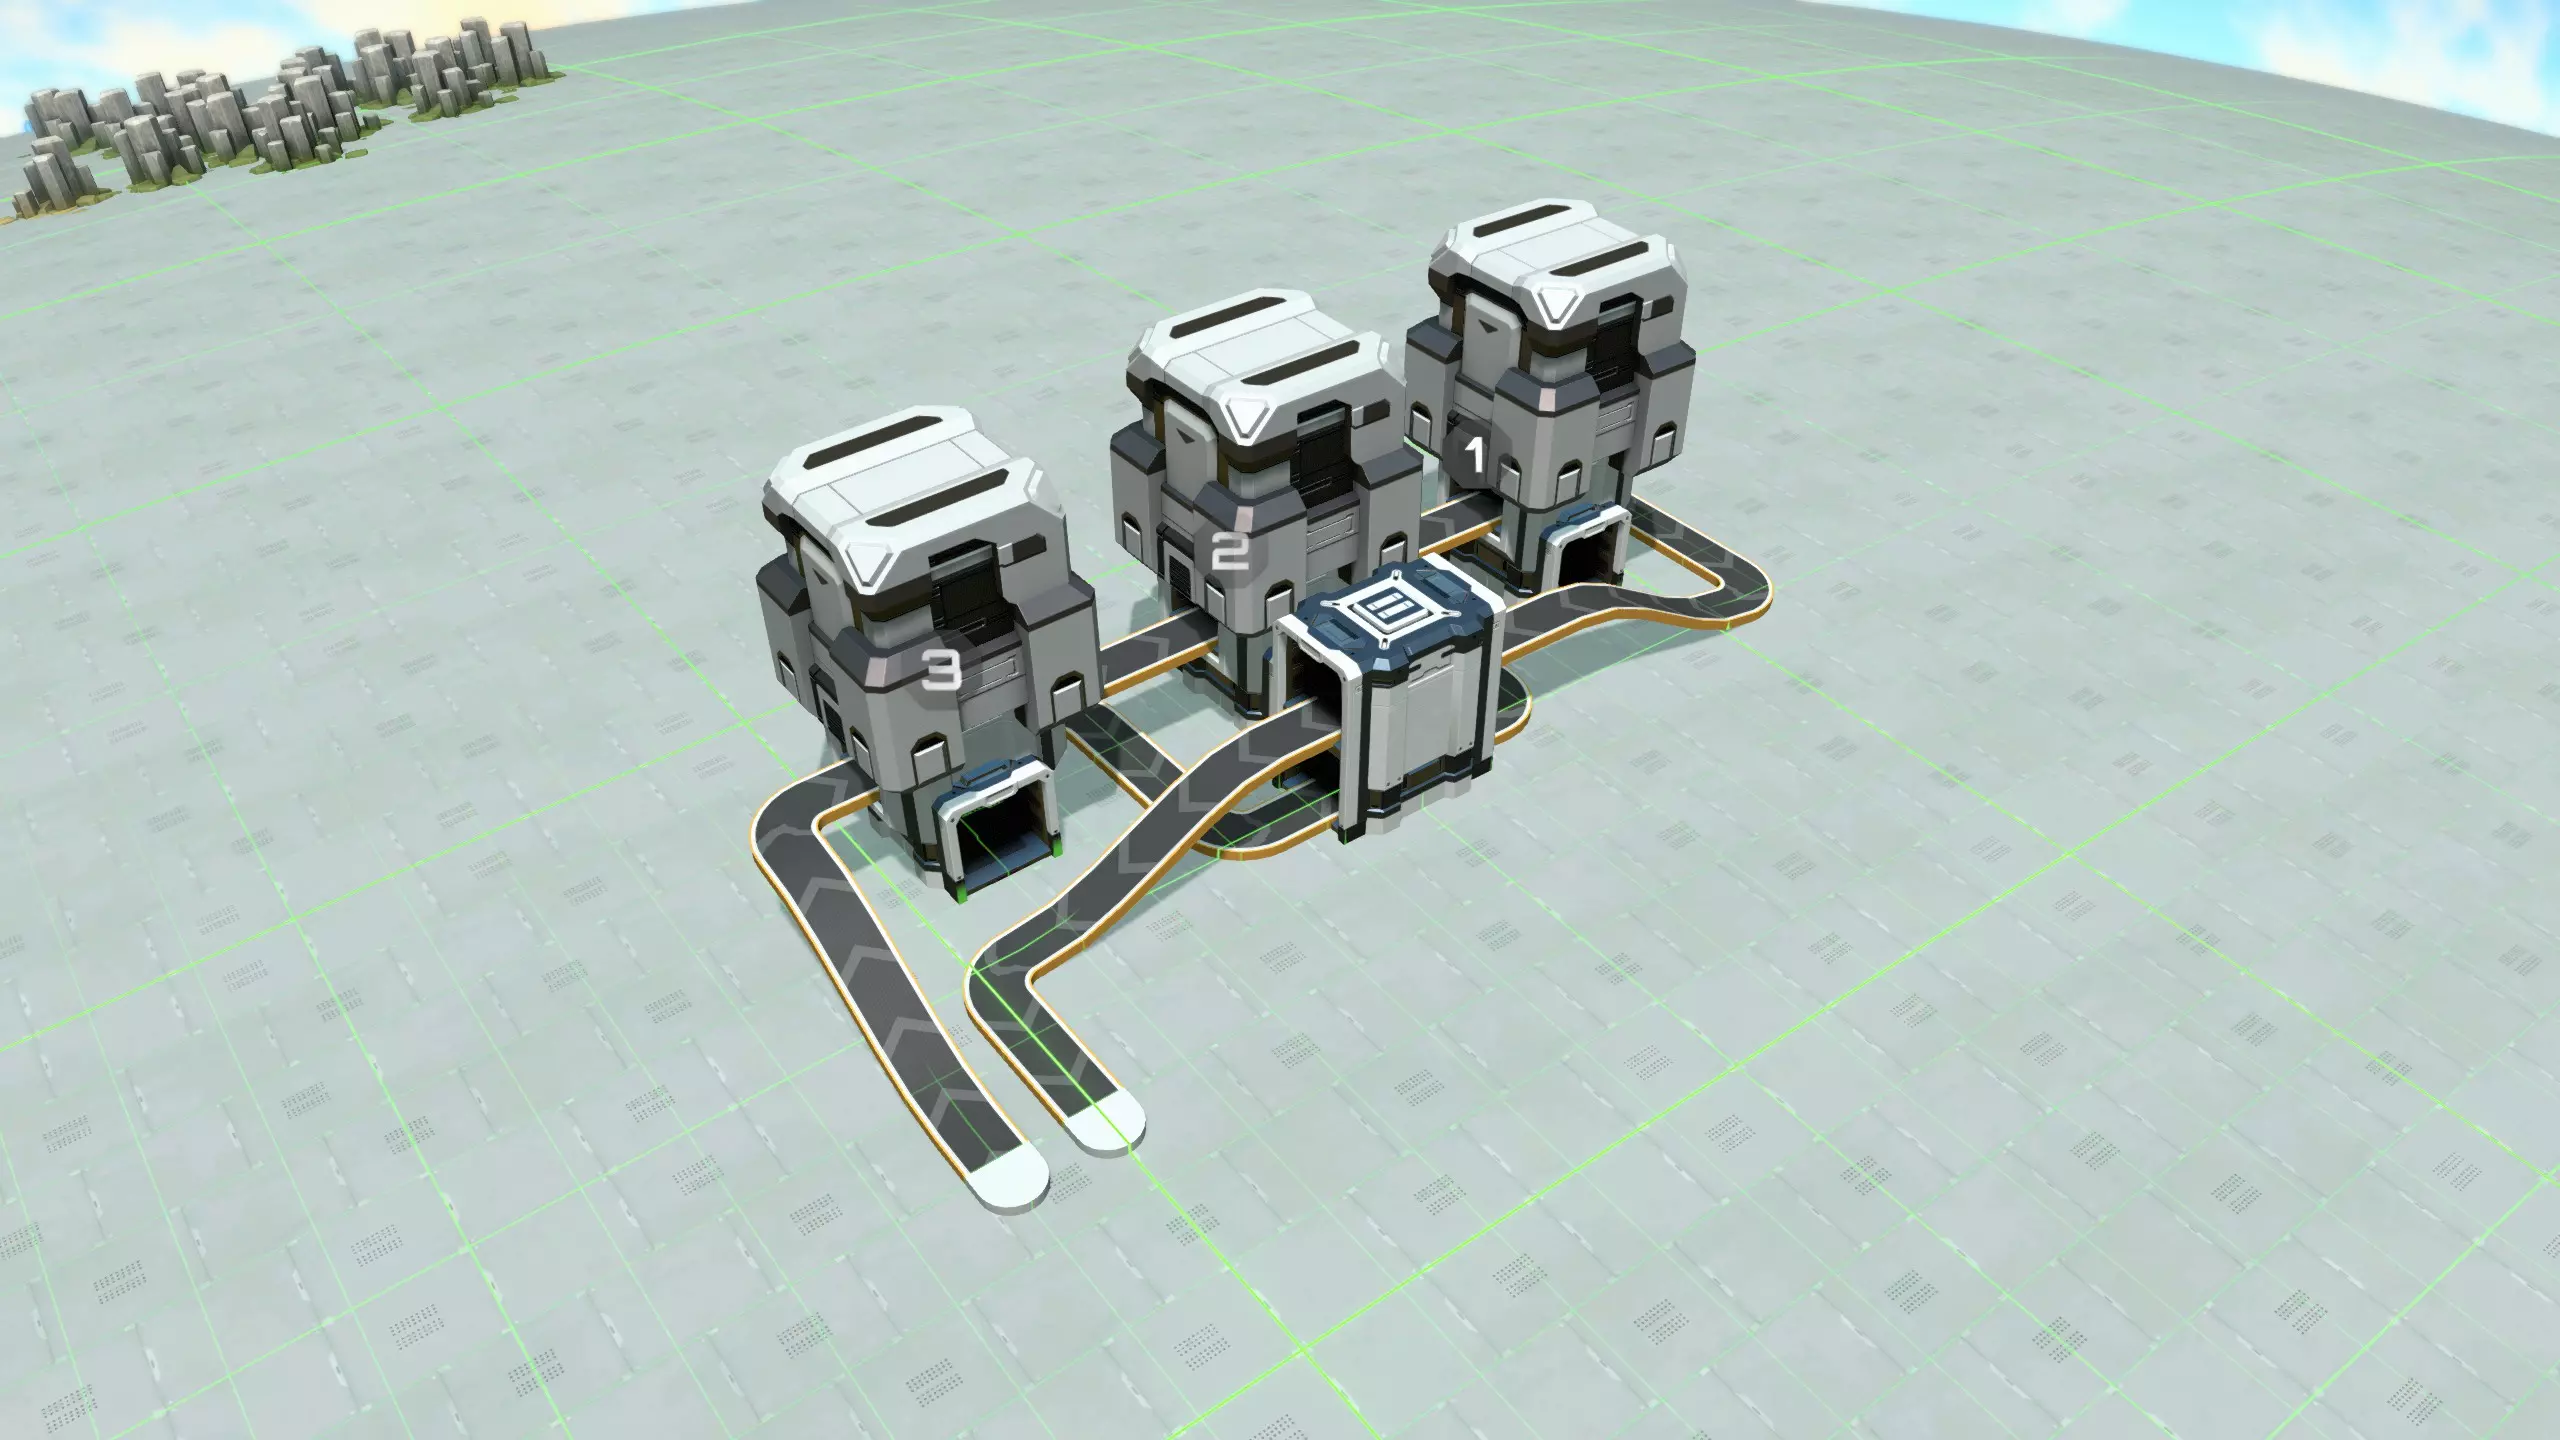
左侧的传送带是从商场输入的空寿司传送带。它进入一系列分离器,每个分离器顶部都有一个箱子。这些分离器对寿司传送带进行分流:传送带上的每种组件都会被分离出来,输送到后侧的单独传送带上(见下文)。为实现这一功能,每个分离器都设置了输出过滤器,针对传送带上出现的其中一种材料。分离器的规则是:如果设置了输出过滤器,那么被选中的组件只能通过该输出口送出,即使过滤后的输出口被阻塞而其他输出口空闲也是如此。因此,所有材料都能可靠地从正确的分离器中输出。 上一张图片中分离器的过滤输出口位于后侧,所以让我们从另一侧查看:
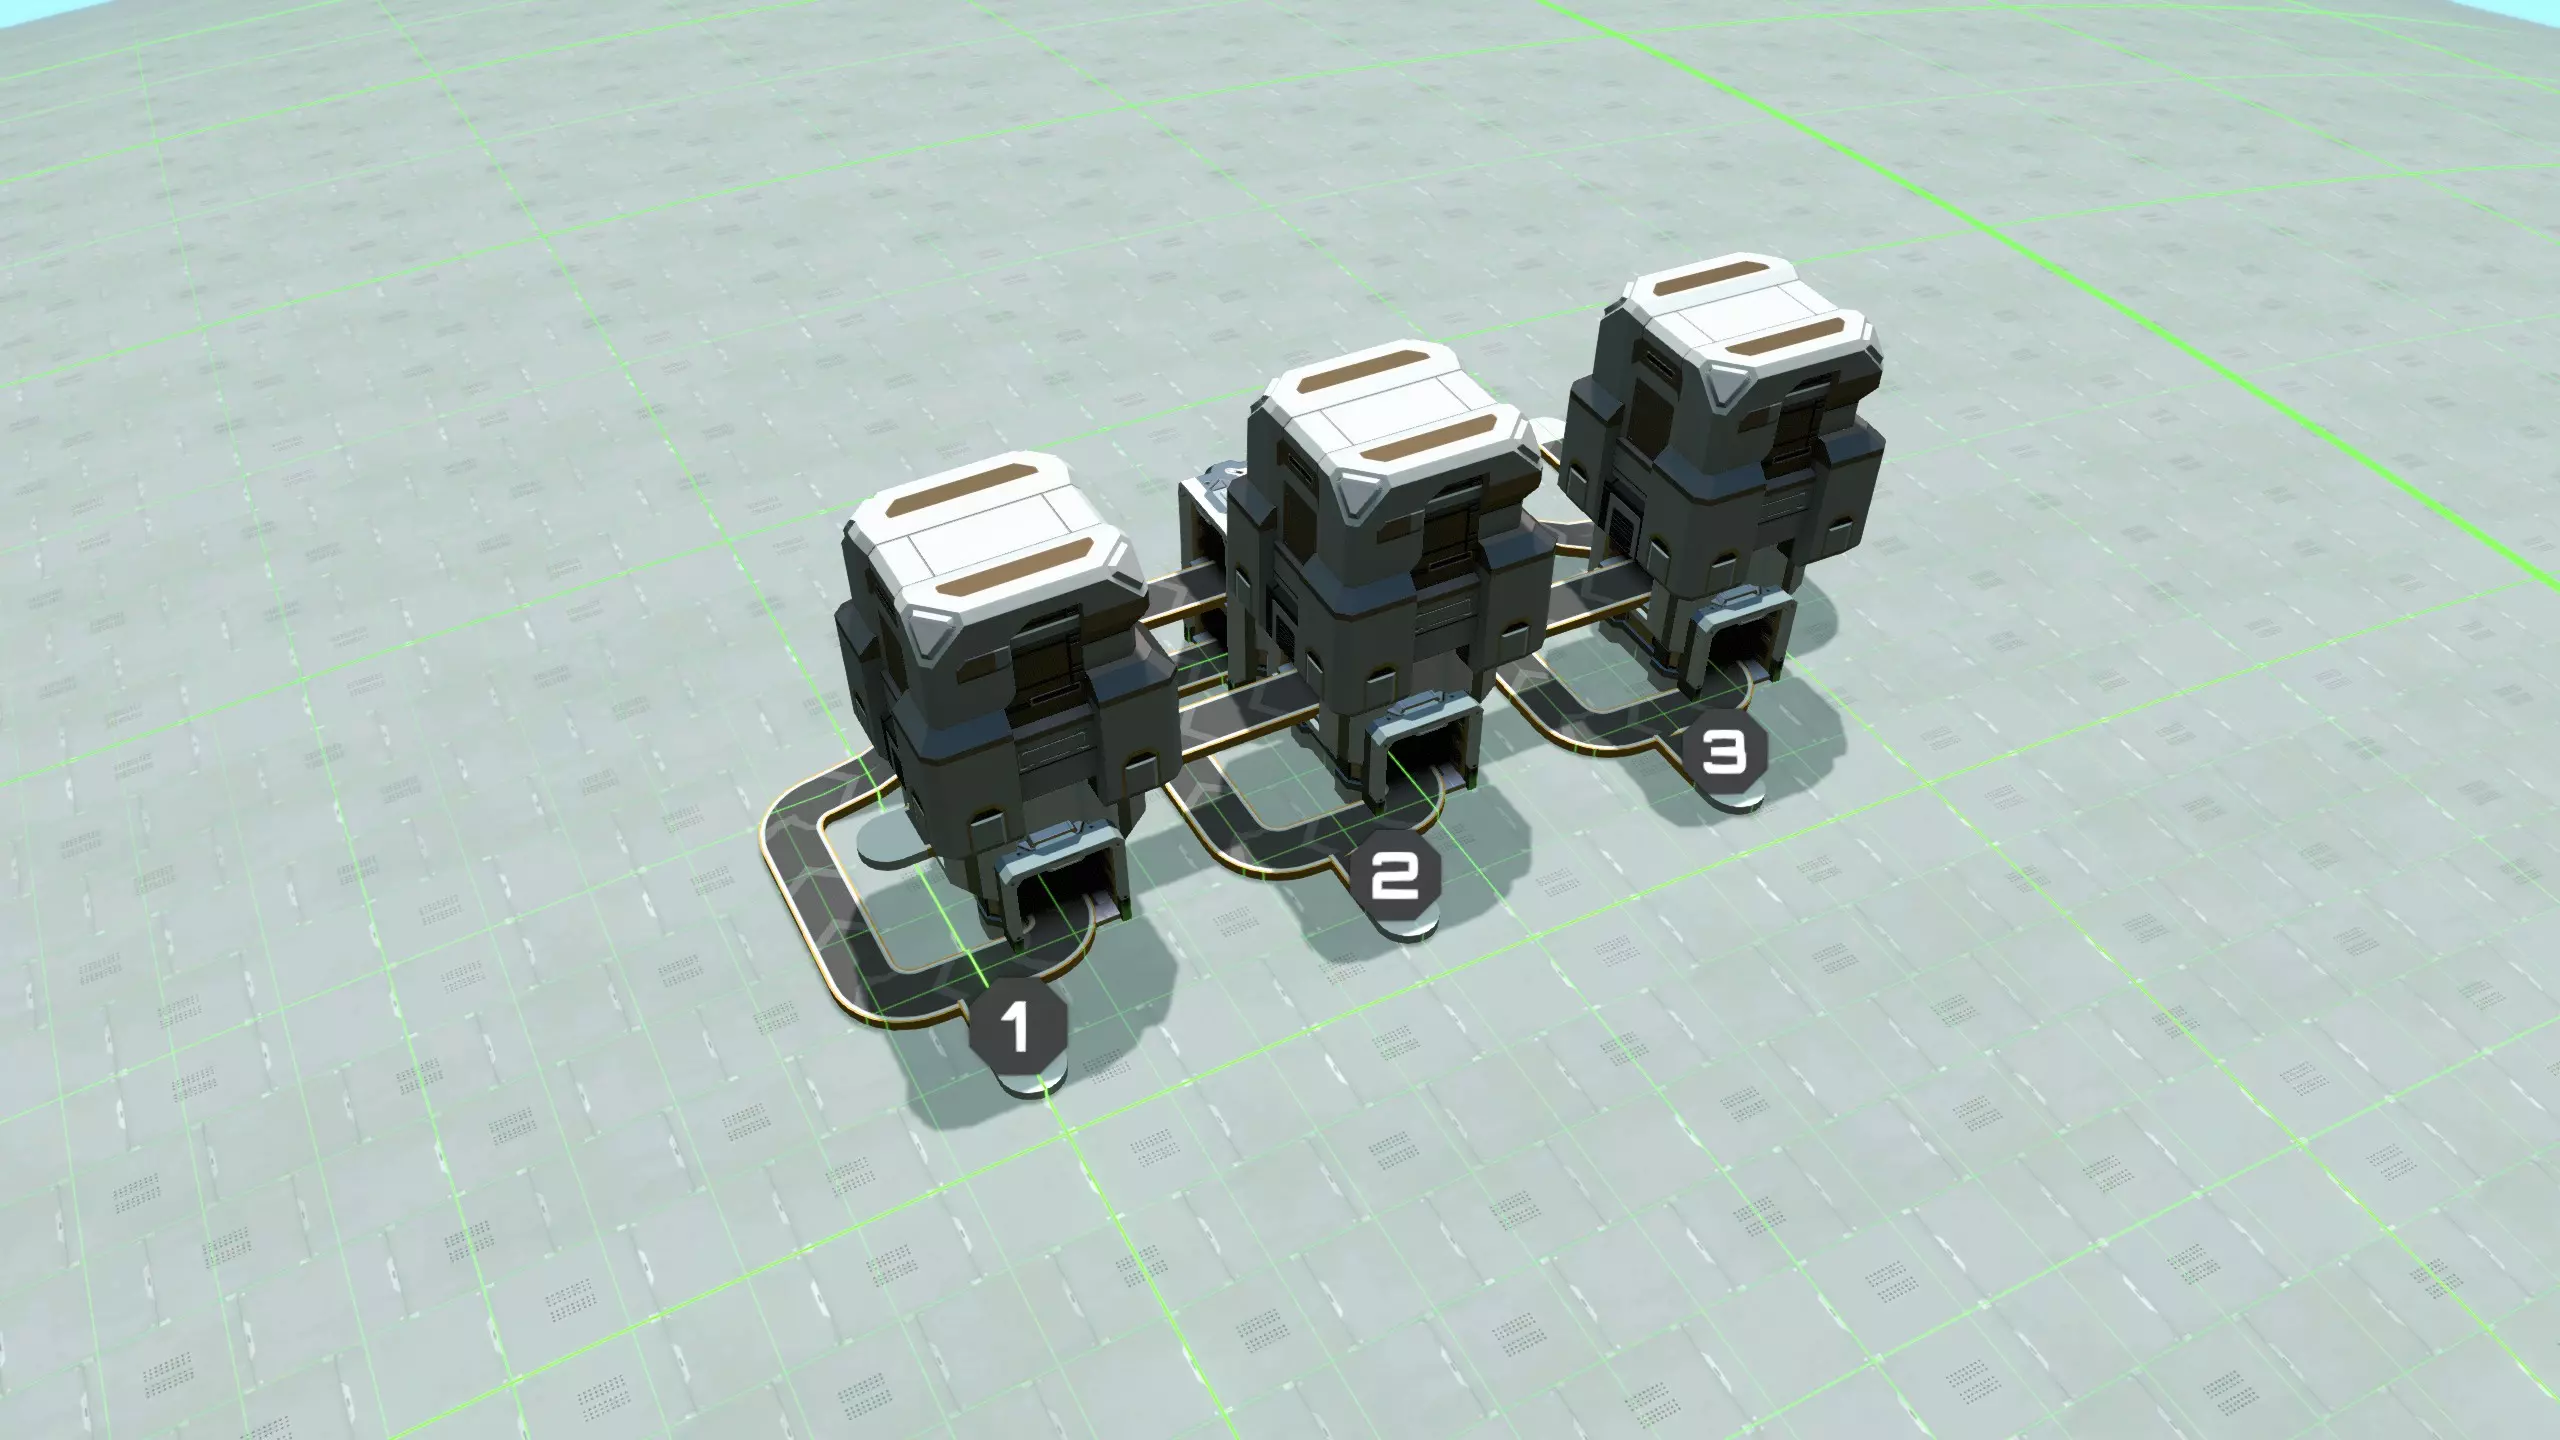
这里你可以看到从每个分流器出来的多路传送带。当然,部分材料可能已被中央工厂消耗,因此我们需要为这些传送带补充库存。这就是带标签输入口的作用。你可以在这里连接一条传送带,输入更多该种组件。由于带标签输入口通过T型接头连接,来自中央工厂的材料比新引入的材料具有优先级。例如,如果某种材料完全未被中央工厂使用,它将直接从分流器流出并转向,不会插入任何新材料。但如果部分材料已被消耗,产生的空隙将由新材料填补。然后,所有重新补充的传送带会再次通过前方图片中所示的另一个分流器进行多路传输,并被引导回基地补给区。 有两个更重要的细节。首先是分流器顶部的箱子。其工作原理是,如果分流器设置了输出过滤,那么这些箱子将只存储特定物品。这意味着它们将起到缓冲作用:当系统中流通的输出组件过多时,物品会进入分流器,但输出传送带可能会被阻塞。此时,缓冲箱会开始填充物品,而不是导致整个系统停滞。例如,当其他产品之一暂时无法供应,或有新材料被添加到传送带上时,就可能发生这种情况。 其次,你很容易忘记设置分流器的输出过滤器,或设置错误,或按错误顺序进行调整。在这种情况下,部分组件可能会错过其出口,最终穿过所有分流器,导致传送带堵塞。发生这种情况时,你会看到一些物品出现在上图左侧伸出的一小段传送带上。接下来你要做的就是:调整分流器的输出筛选设置,确保它们与输入传送带上的材料相匹配,然后从突出的一小段传送带上直接拿走所有分拣错误的物品。传送带会立即恢复运行。 好了!解决了这个问题,下面是计划。 准备工作 在游戏的第一阶段,你需要启动蓝色科学的生产。你还需要实现MK1传送带以及可能的分拣器的自动化生产。你至少需要研究“升级物流系统”以获得分流器,同时还要研究其他蓝色科技,如钢铁、电动马达和地基。 实现这些目标的方法有很多,这并非本指南的重点内容。但大多数情况下,你需要制作一些电路板和磁线圈,为此你可以使用出生点附近的小型铁矿和铜矿。在铁矿上放置一个采矿机,在铜矿上也放置一个采矿机。然后用一个装配机制作磁线圈,另一个装配机制作电路板,第三个装配机制作齿轮,并将每种产物分别放入箱子中。接下来在铁矿上放置第二个采矿机,并将所有开采的铁矿都转化为铁锭。这时你的基地大致会是这个样子。
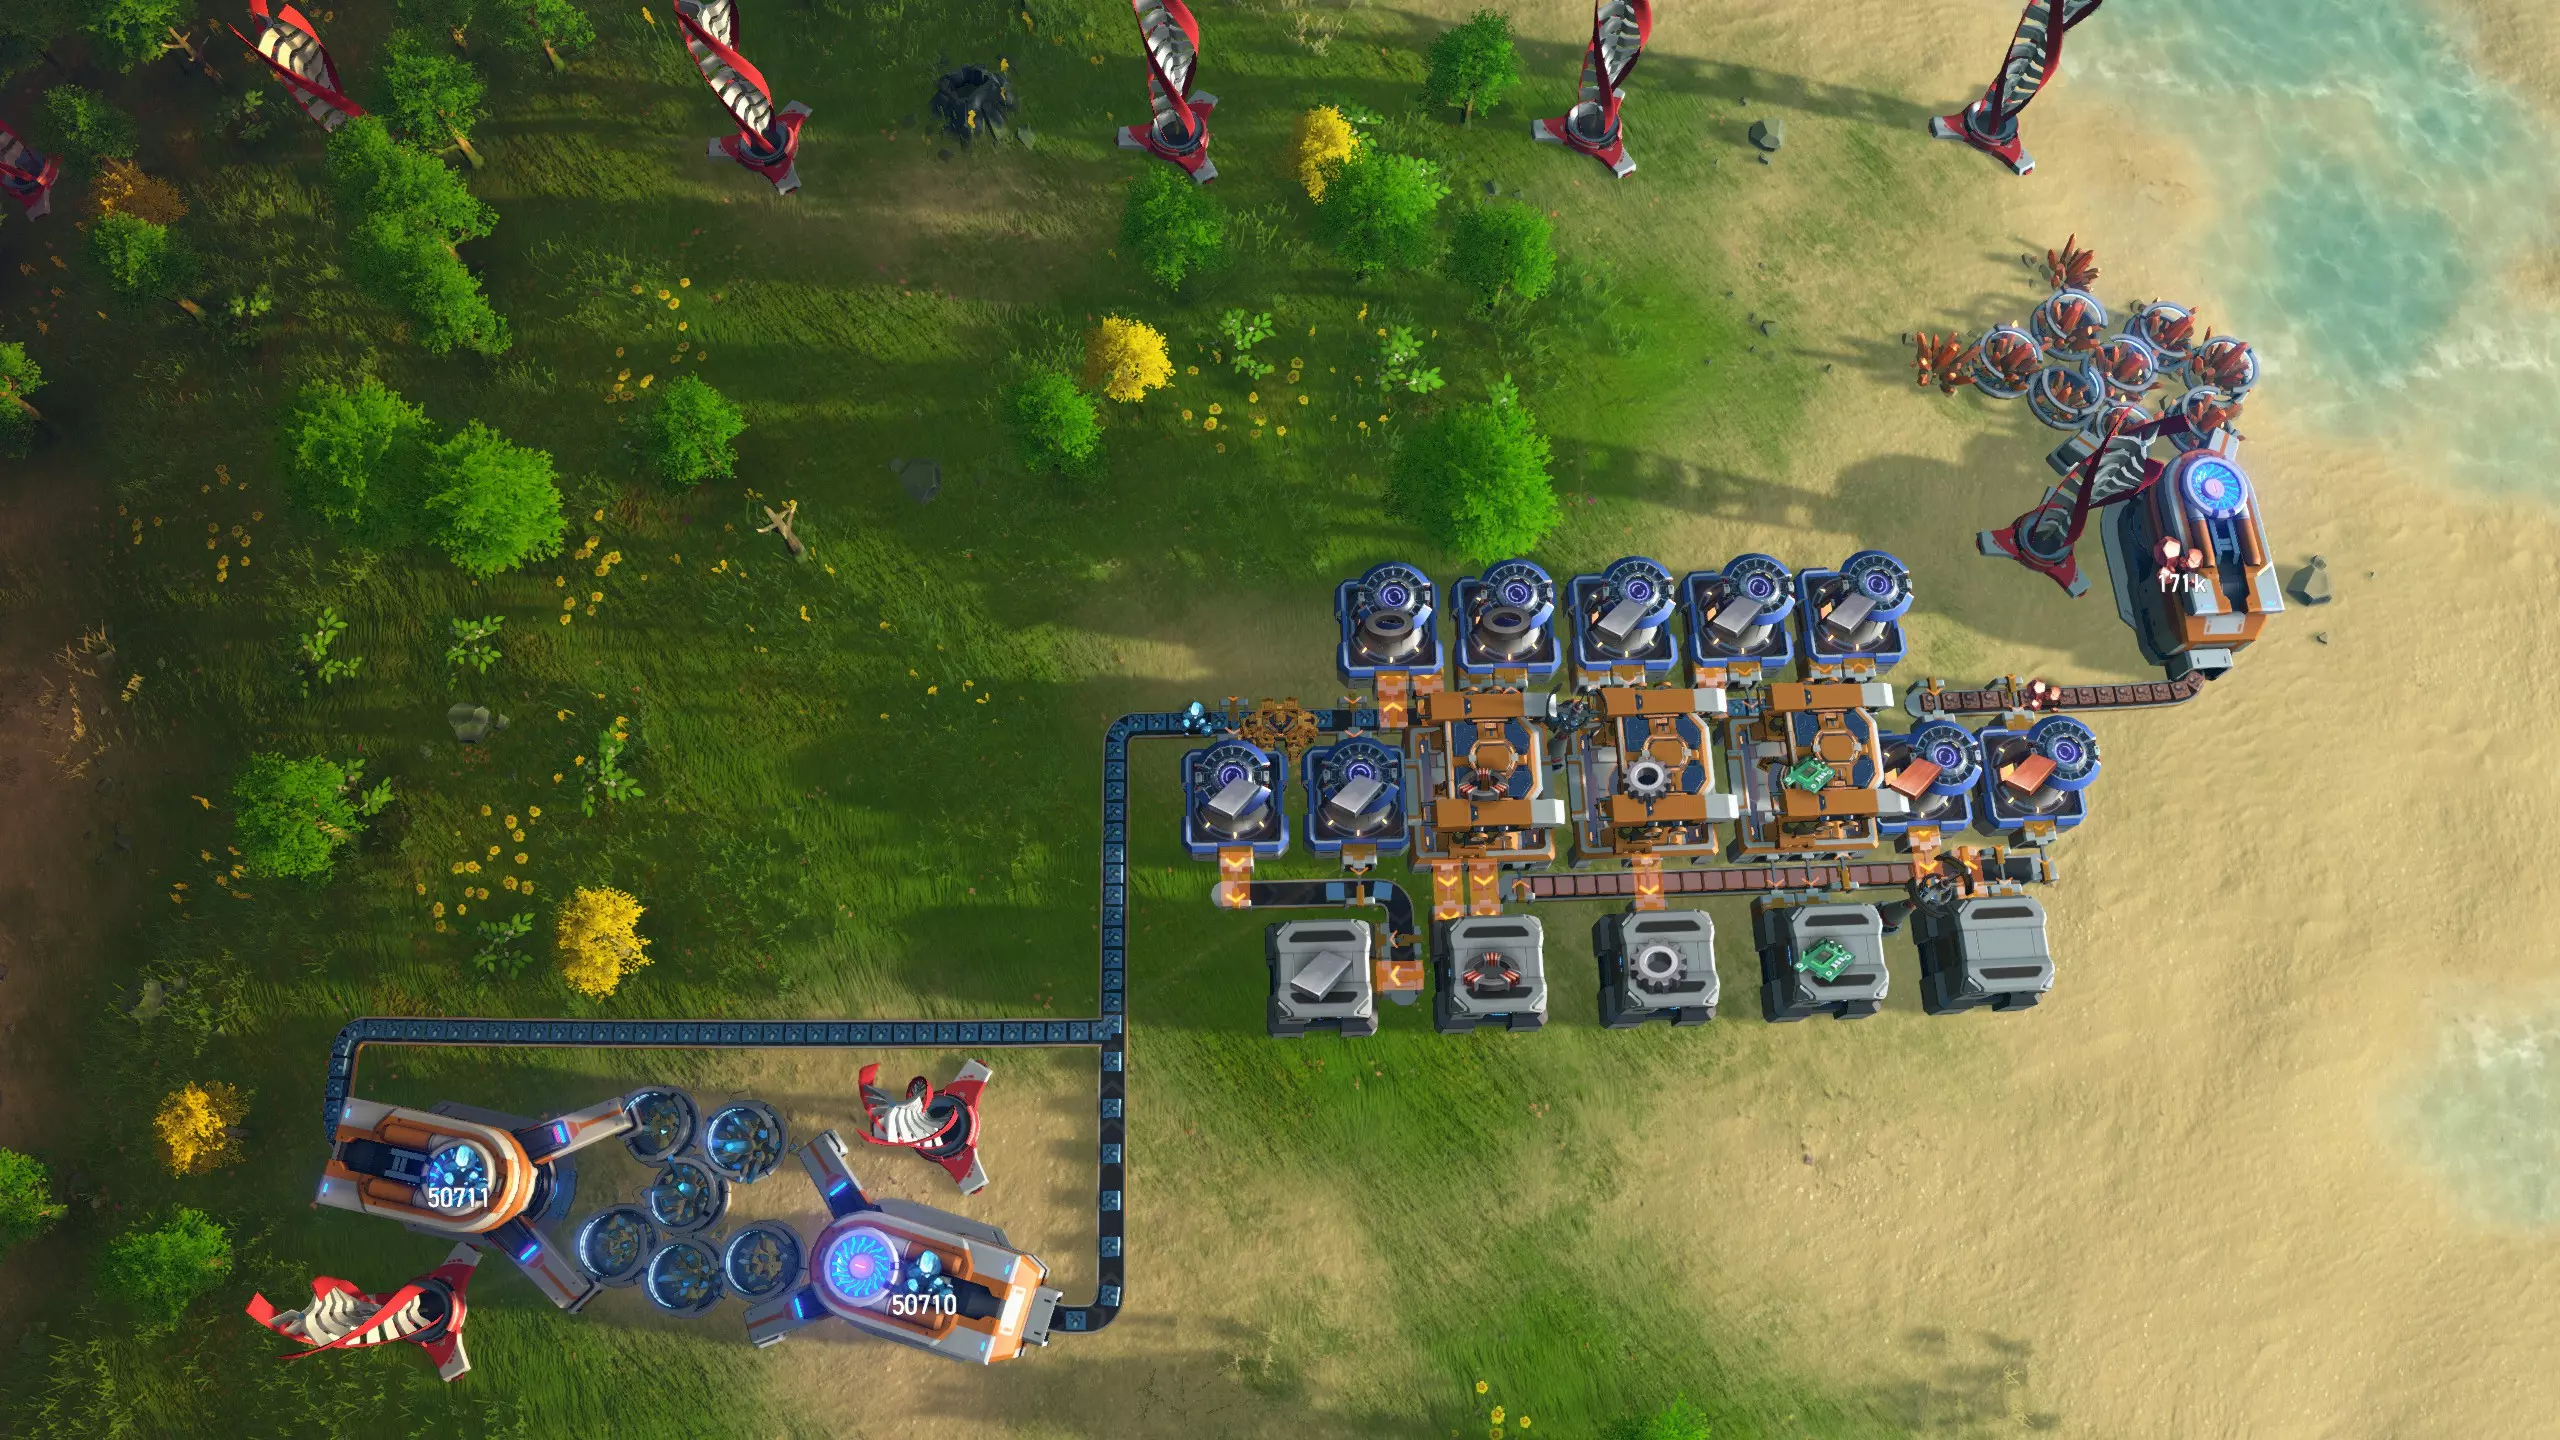
然后,建造一个小型研究站,包含三个生产蓝色矩阵的矩阵实验室和三个消耗蓝色矩阵的矩阵实验室,最后用传送带将你生产的物品输送到一群装配机,这些装配机用于制造:传送带、分拣器、风力发电机和装配机。
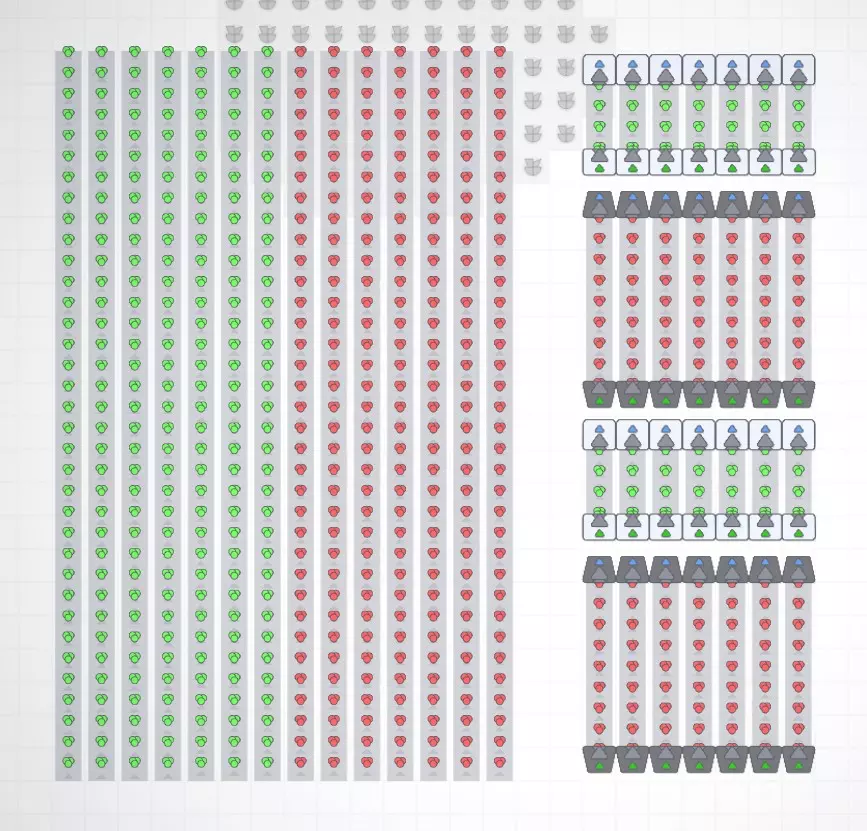
一旦你已经这样开始了,就该着手建造一个像样的购物中心了。 选择位置 我非常喜欢在极地建造我的寿司购物中心,原因有二:一是那里不是其他建筑的最佳选址,二是你可以在那里建造真正的环形传送带,这样购物中心看起来会很漂亮。在极地建造的缺点是扩建空间有限,例如如果将来游戏中要添加二十多个新建筑的话。我已经尽量确保即使建造了游戏中的所有建筑,仍会有一些剩余空间,但如果你更喜欢建造一个更容易扩展的购物中心,当然也可以在星球的其他地方遵循同样的原则。如果你打算在极点建造基地,首先要选择一个最容易施工的极点:你需要附近有铁矿、铜矿和石矿(如果你已解锁宇宙探索1,就能轻松看到这些资源)。选好极点后,我建议将最内侧的传送带建在第一条回归线处,这条线将10格区域和最初的15格区域分隔开来。然后向外建造,先再建两条传送带,留出放置组装机的空间,之后再建两条传送带,具体布局如下:
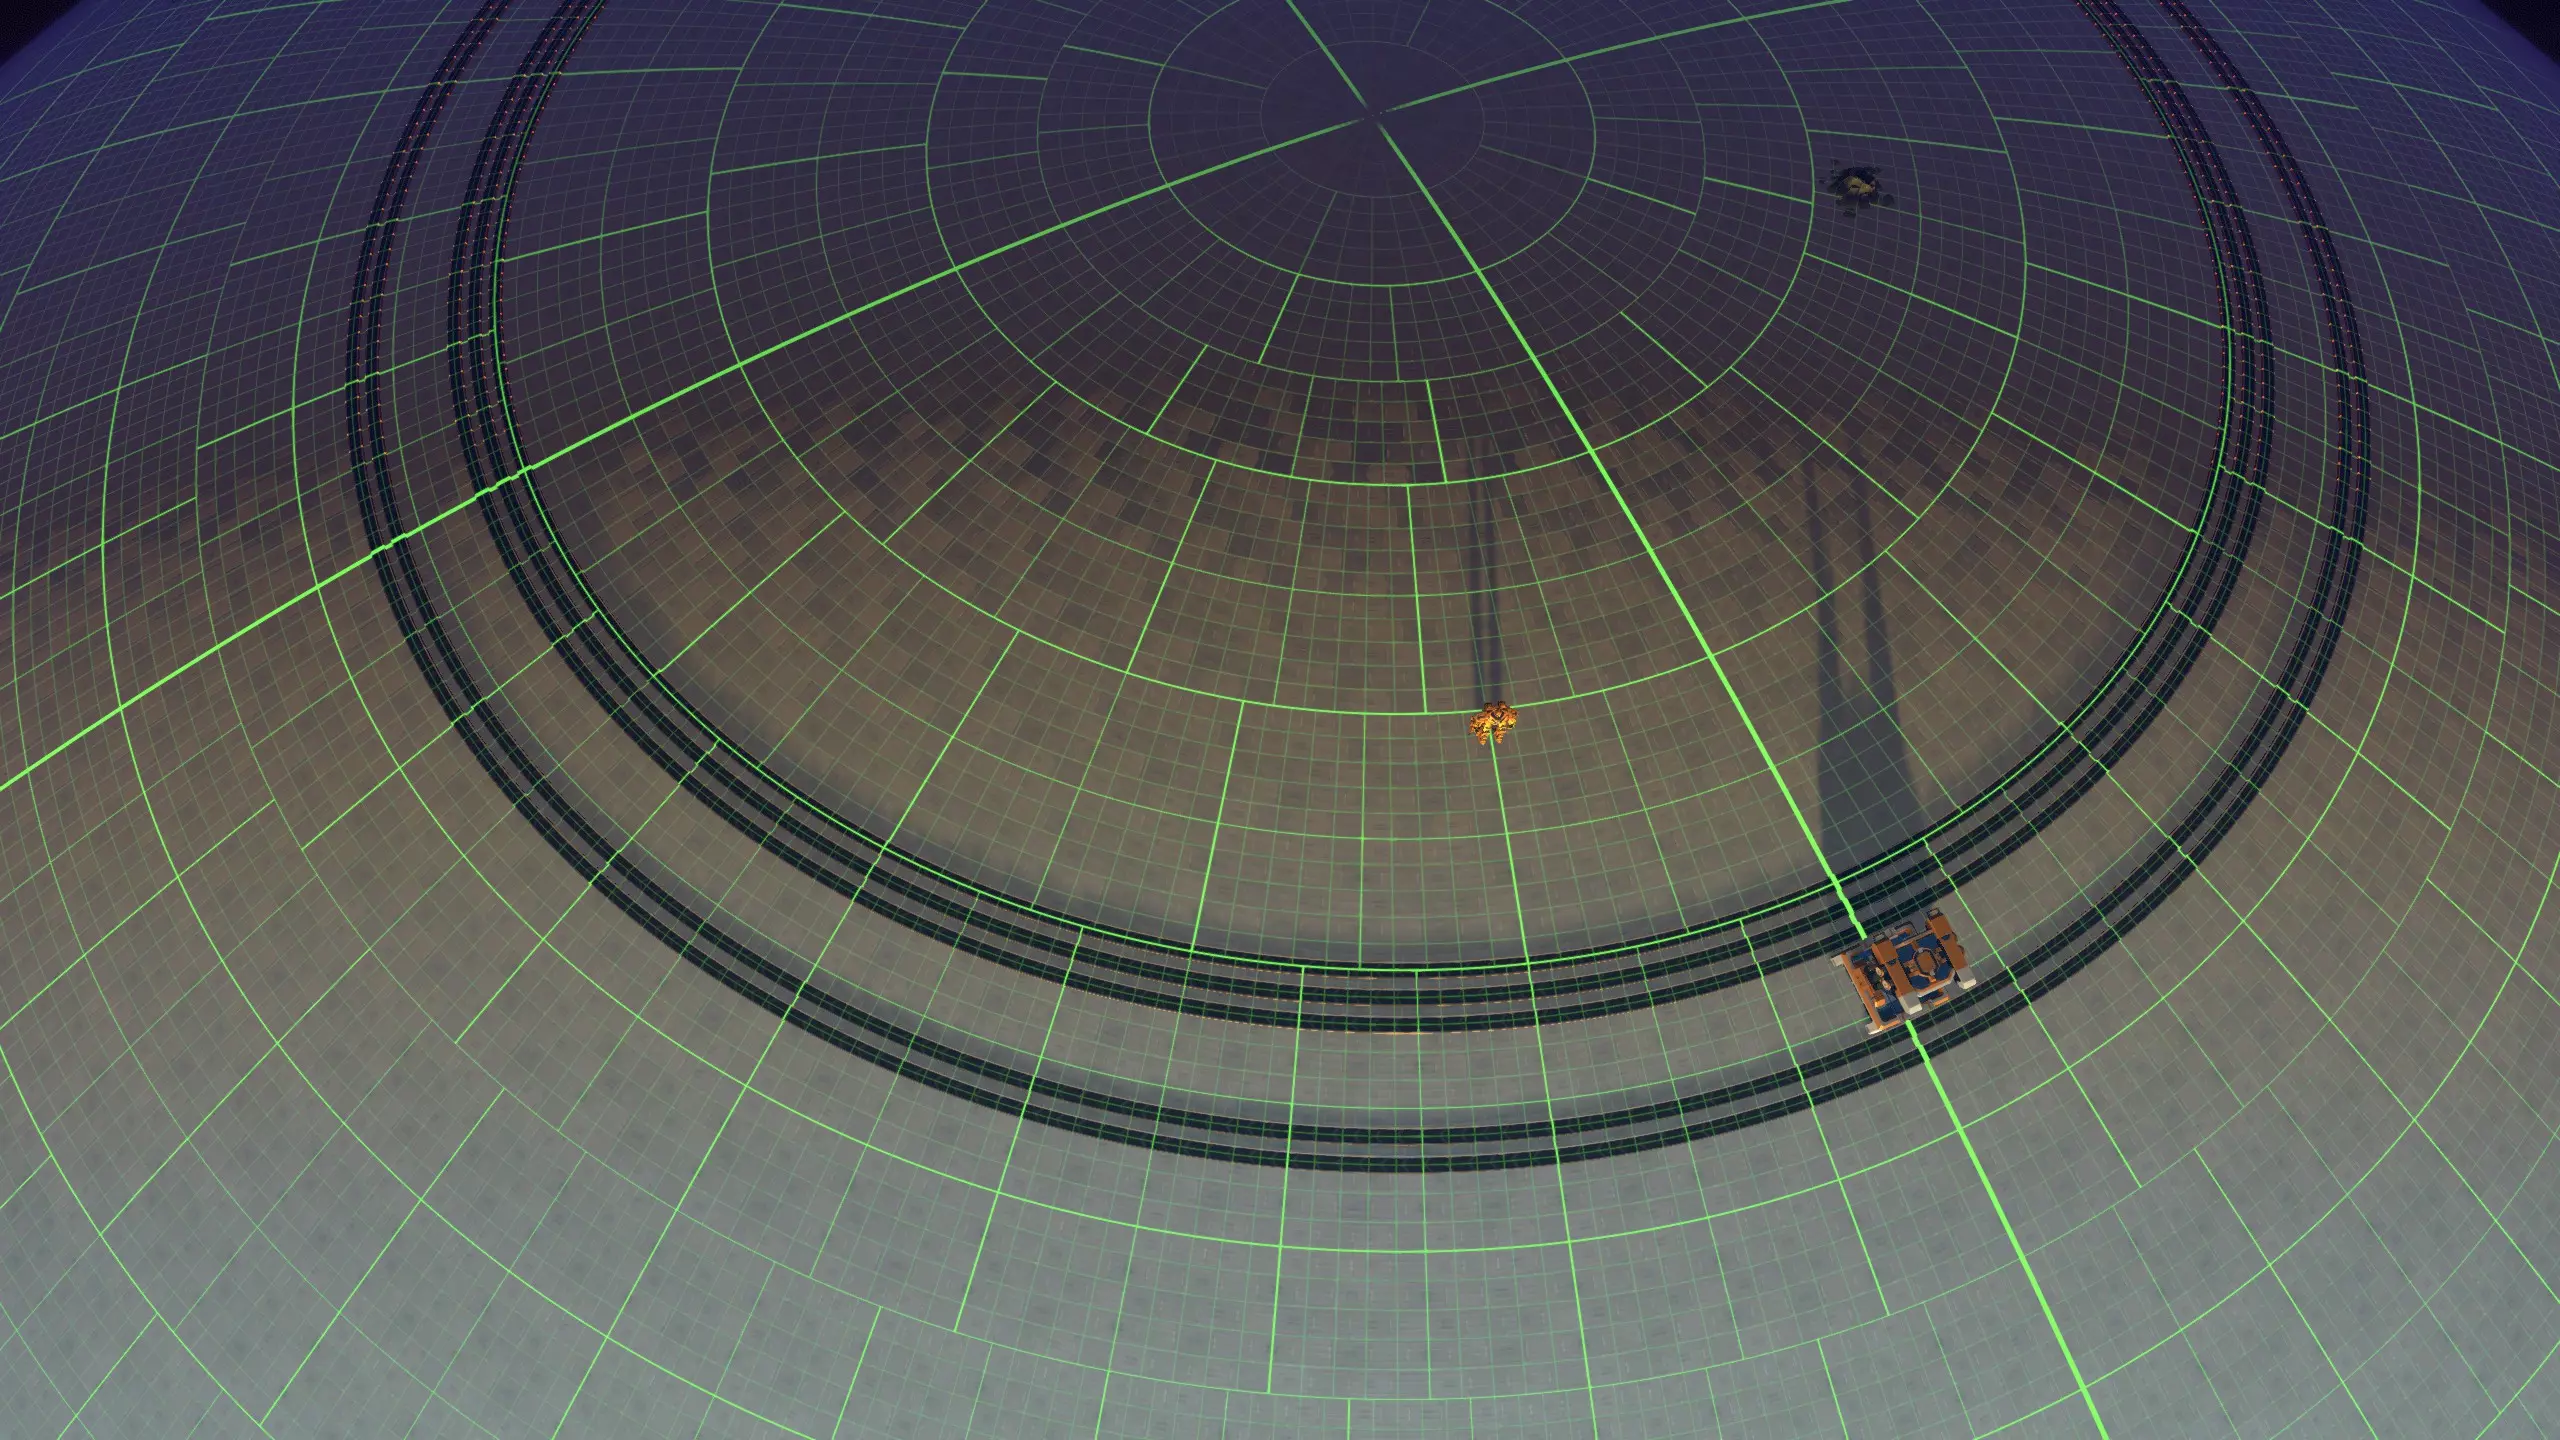
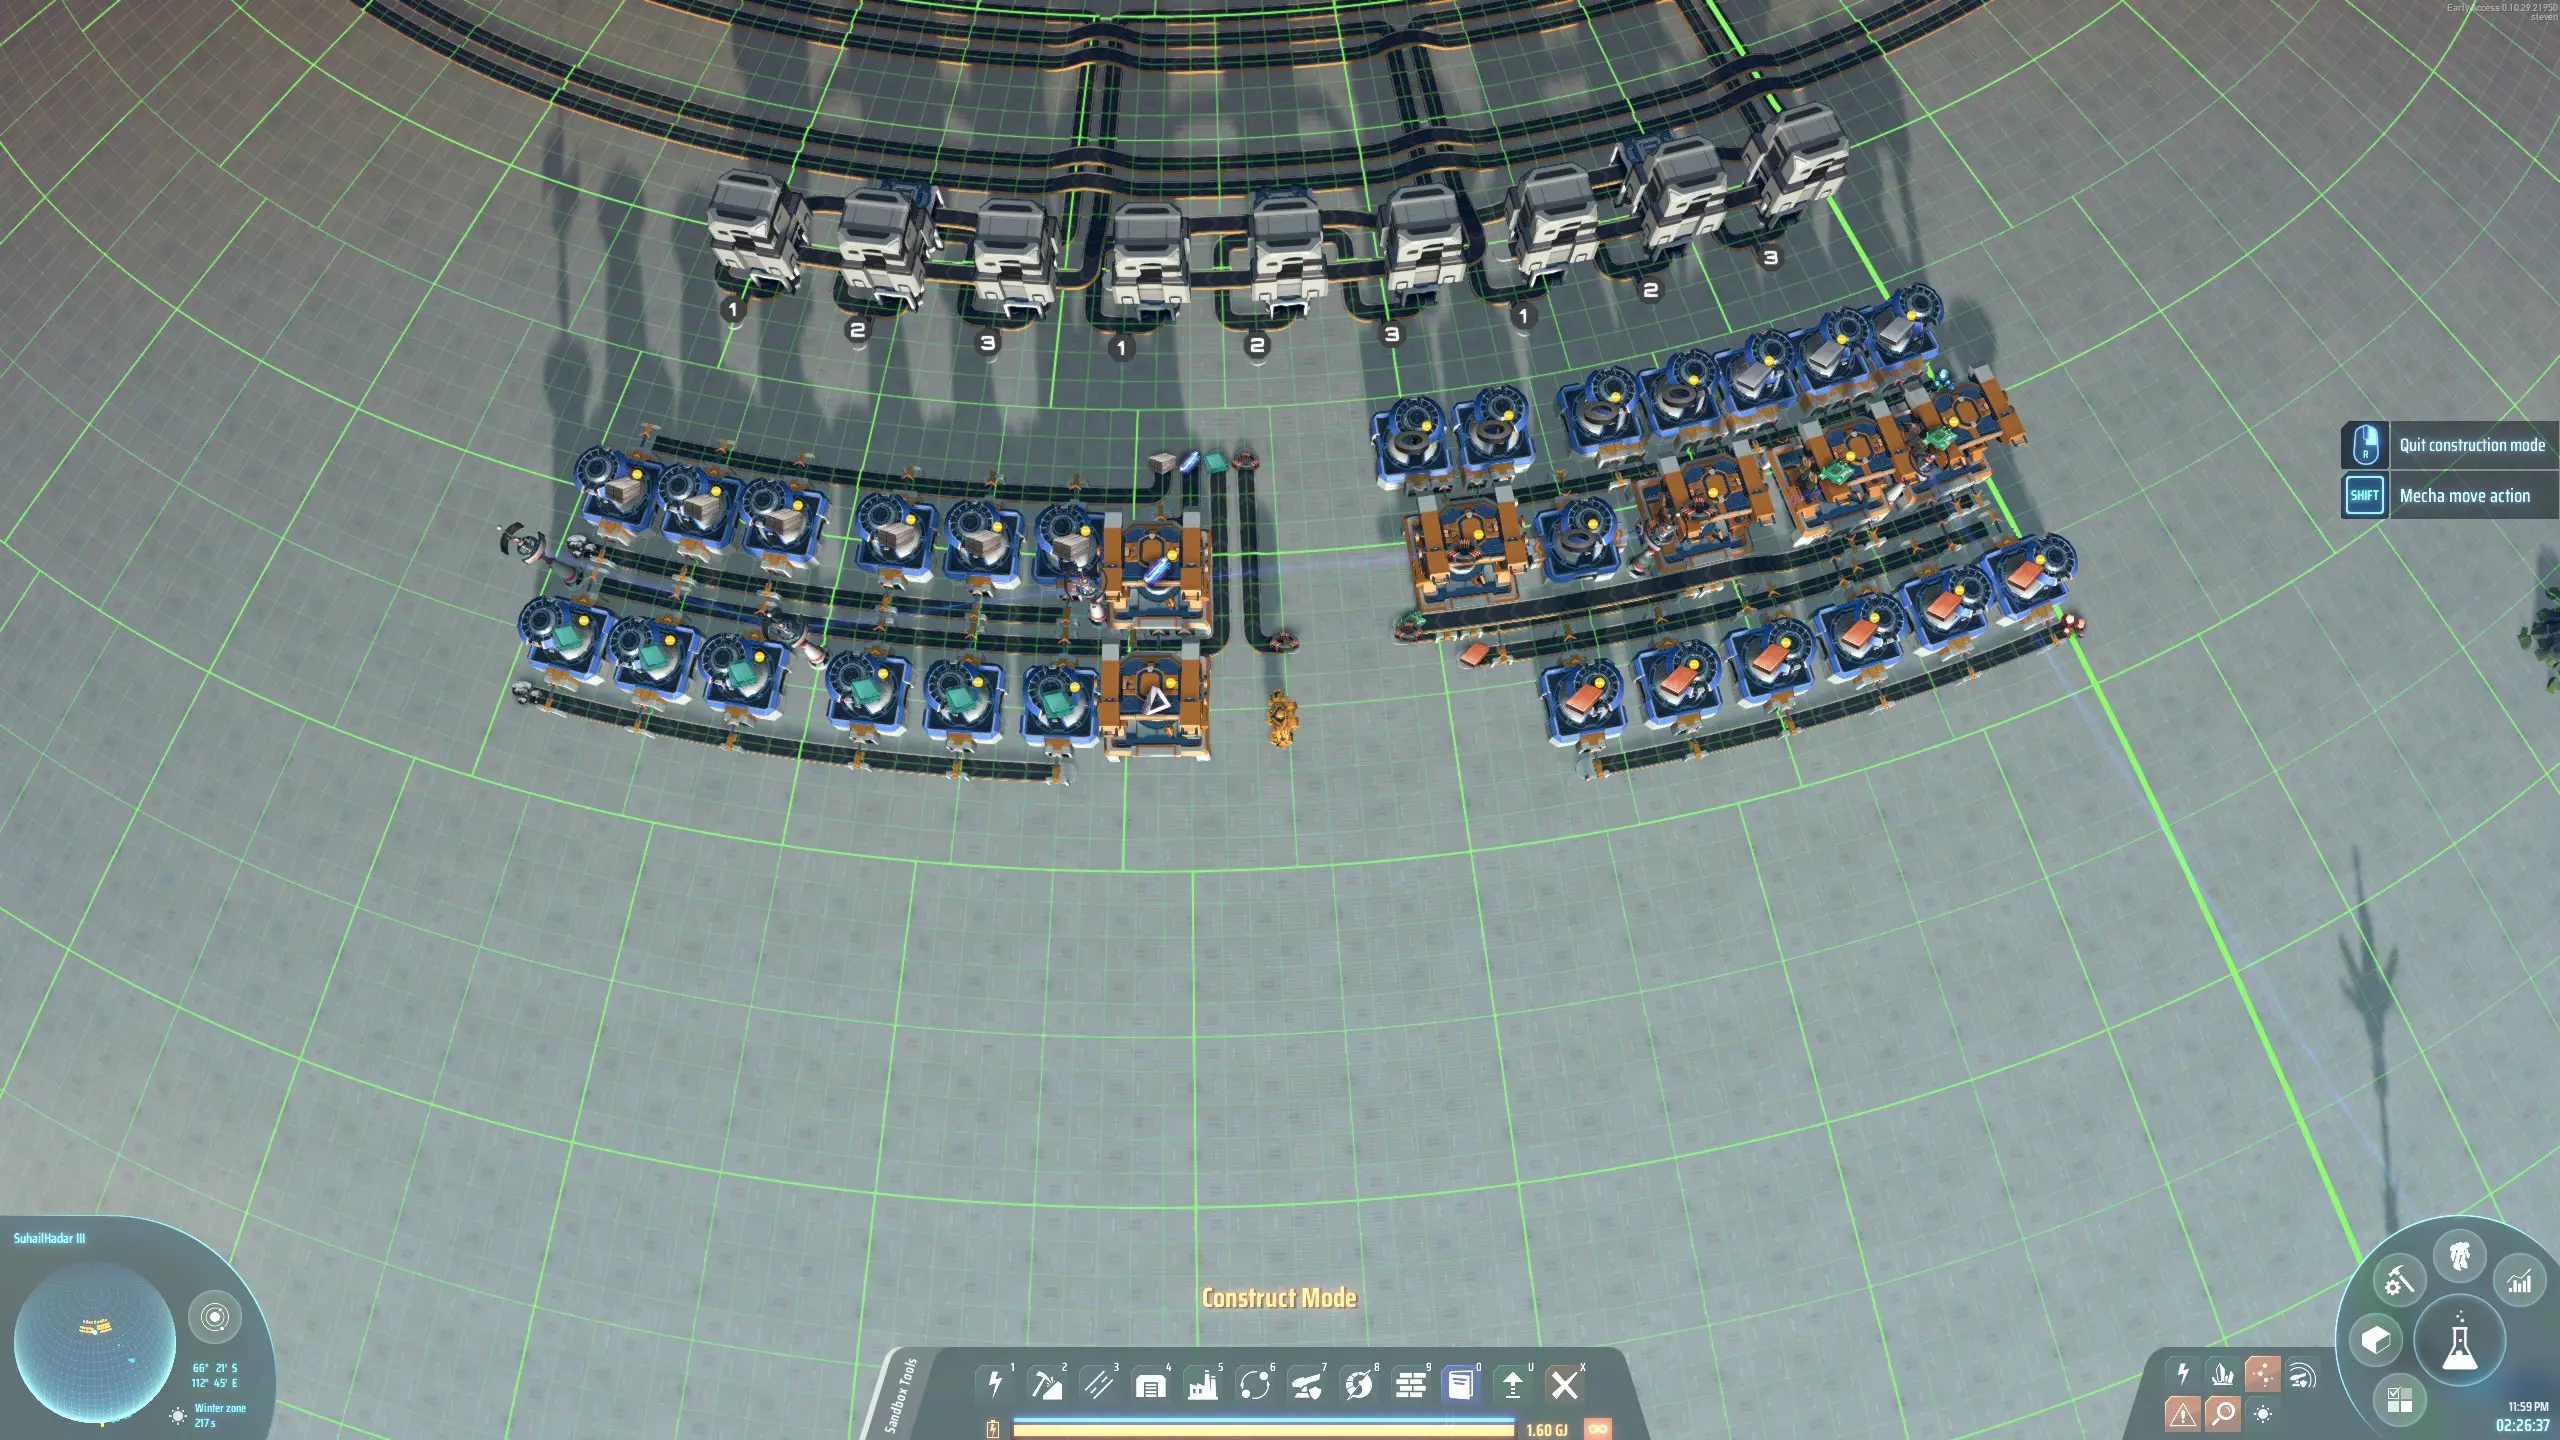
如果你想将本指南中的蓝图与传送带循环配合使用,传送带循环需要按顺时针方向运行。 此布局最终可容纳75个紧密排列的装配机,这对于一个成熟的后期综合工厂来说是个不错的数量。装配机之间还支持直接插入功能。 添加平衡器: 平衡器的最佳放置位置取决于你希望哪些材料在哪些传送带上。 我认为最简单的入门方法是按以下方式分配传送带(从最内侧到最外侧),这样能以大致合适的比例获取所需材料: 1. 石砖、玻璃、等离子激励器(如果你有的话) 2. 磁线圈、铜锭(如果你需要的话) 3. 电路板 4. 铁锭 5.钢铁、齿轮 按照这种分配方式,布置再平衡器最简单的方法是将1-3号传送带的再平衡器并排设置(这样你就能在需要制造等离子激励器的位置附近获得磁线圈)。为了填满这些传送带,我们需要一条小型装配线,该装配线需要两条满负荷的石料传送带、一条满负荷的铁矿石传送带和一条满负荷的铜矿石传送带。 4号和5号传送带的再平衡器也应并排设置;这些再平衡器需要两条满负荷的铁矿石传送带。 考虑到这些要求,你可以找到建造所有再平衡器的最便利位置。在最外侧传送带旁建造一个。

然后,在它旁边再建造两个,确保这些箱子间距相等,并将它们连接到1-3号传送带,具体如下:
连接一些临时生产设施 以下蓝图可让你制造最内侧三条传送带所需的所有材料: 蓝图:磁线圈、电路板和铜 蓝图:石砖、玻璃、等离子激励器 将它们并排放置在平衡器正下方。结果应该大致如下所示——但不必完全一致,所有这些结构都只是临时的。
你需要按照指示将电磁线圈连接到制造等离子激励器的装配机上。然后,决定将哪种材料连接到再平衡器的哪个输入端。为所有相应的分流器设置输出过滤器,**优先过滤这些材料**,然后将它们连接到生产线。如果你在设置过滤器之前不小心连接了传送带,传送带将会停滞;这种情况下不用担心:只需设置过滤器,然后拿走从再平衡器远端露出的材料,系统就会重新启动。 即使你把一些传送带翻转了方向,或者看起来不是很美观,也没什么大不了的。
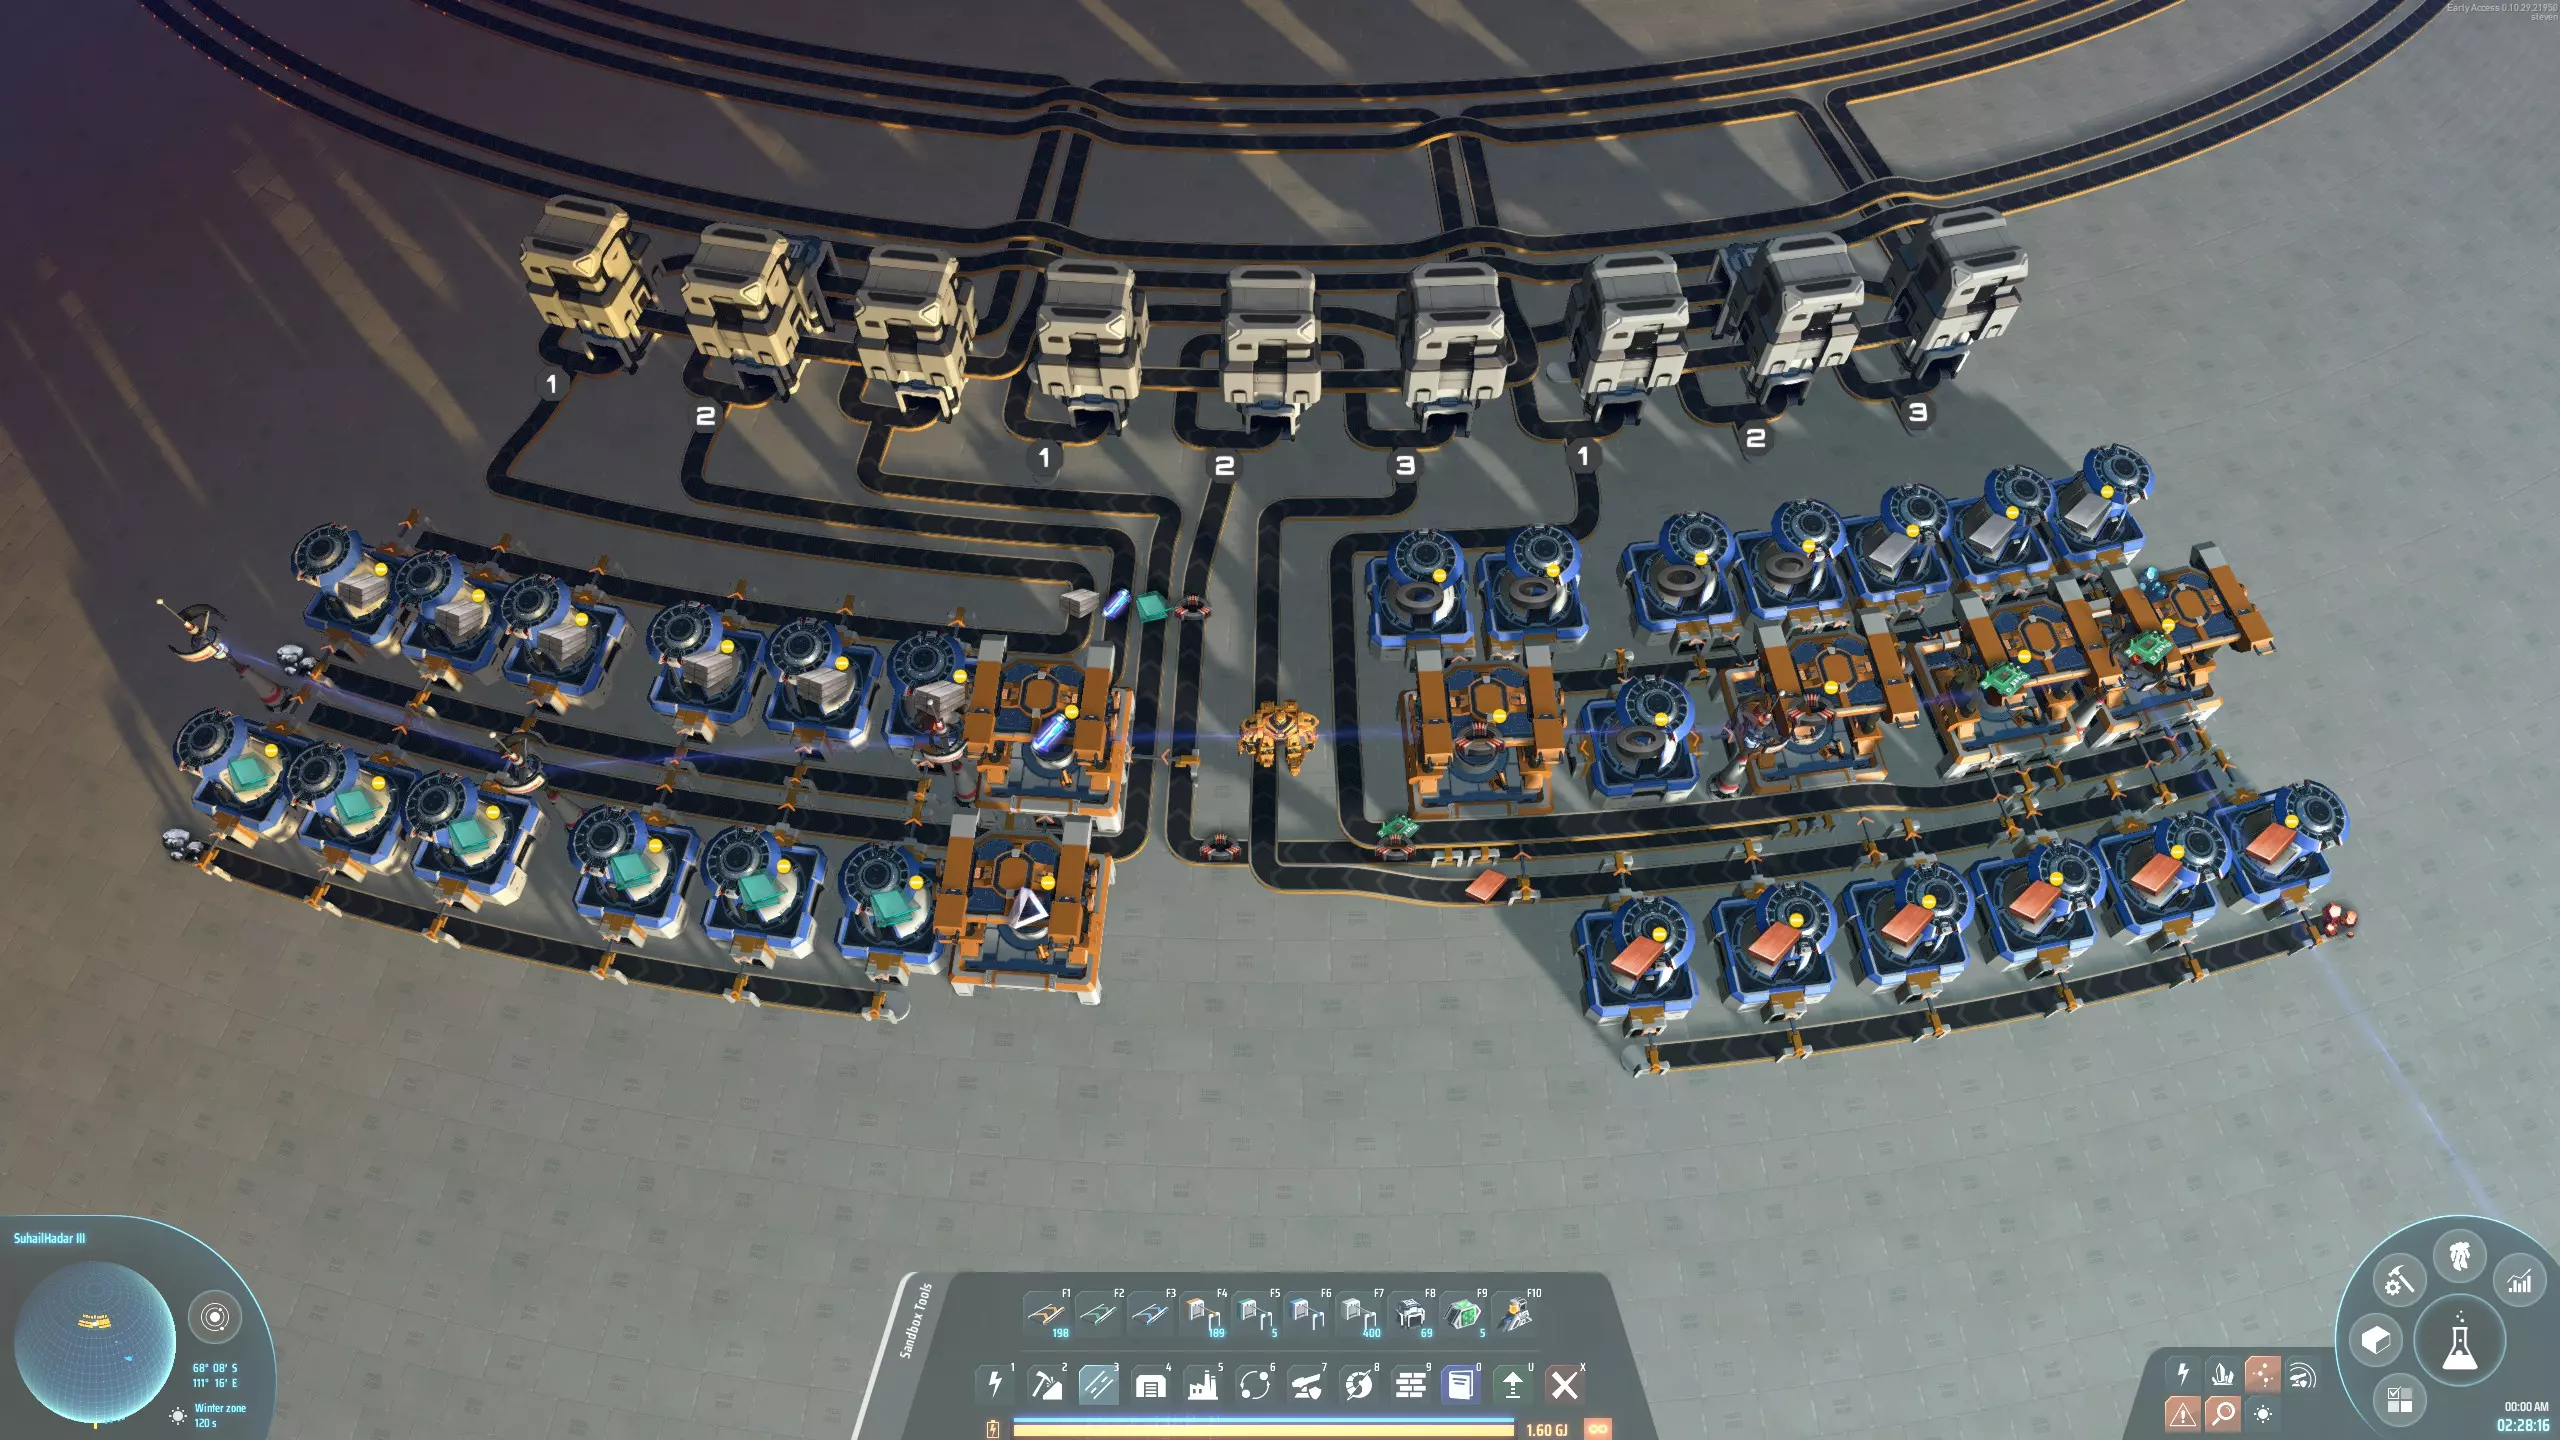
现在开采所需矿石并连接起来,你的前三条寿司传送带应该就会开始运行了。如你所见,这里有三个空闲的输入口,你可以随时添加新的材料。 当然,剩下的两条传送带也需要进行同样的操作。你可以使用以下蓝图来制作相关物品: 蓝图:铁、钢、齿轮 将其连接到两个传送带平衡器后,应该会呈现出类似这样的效果。
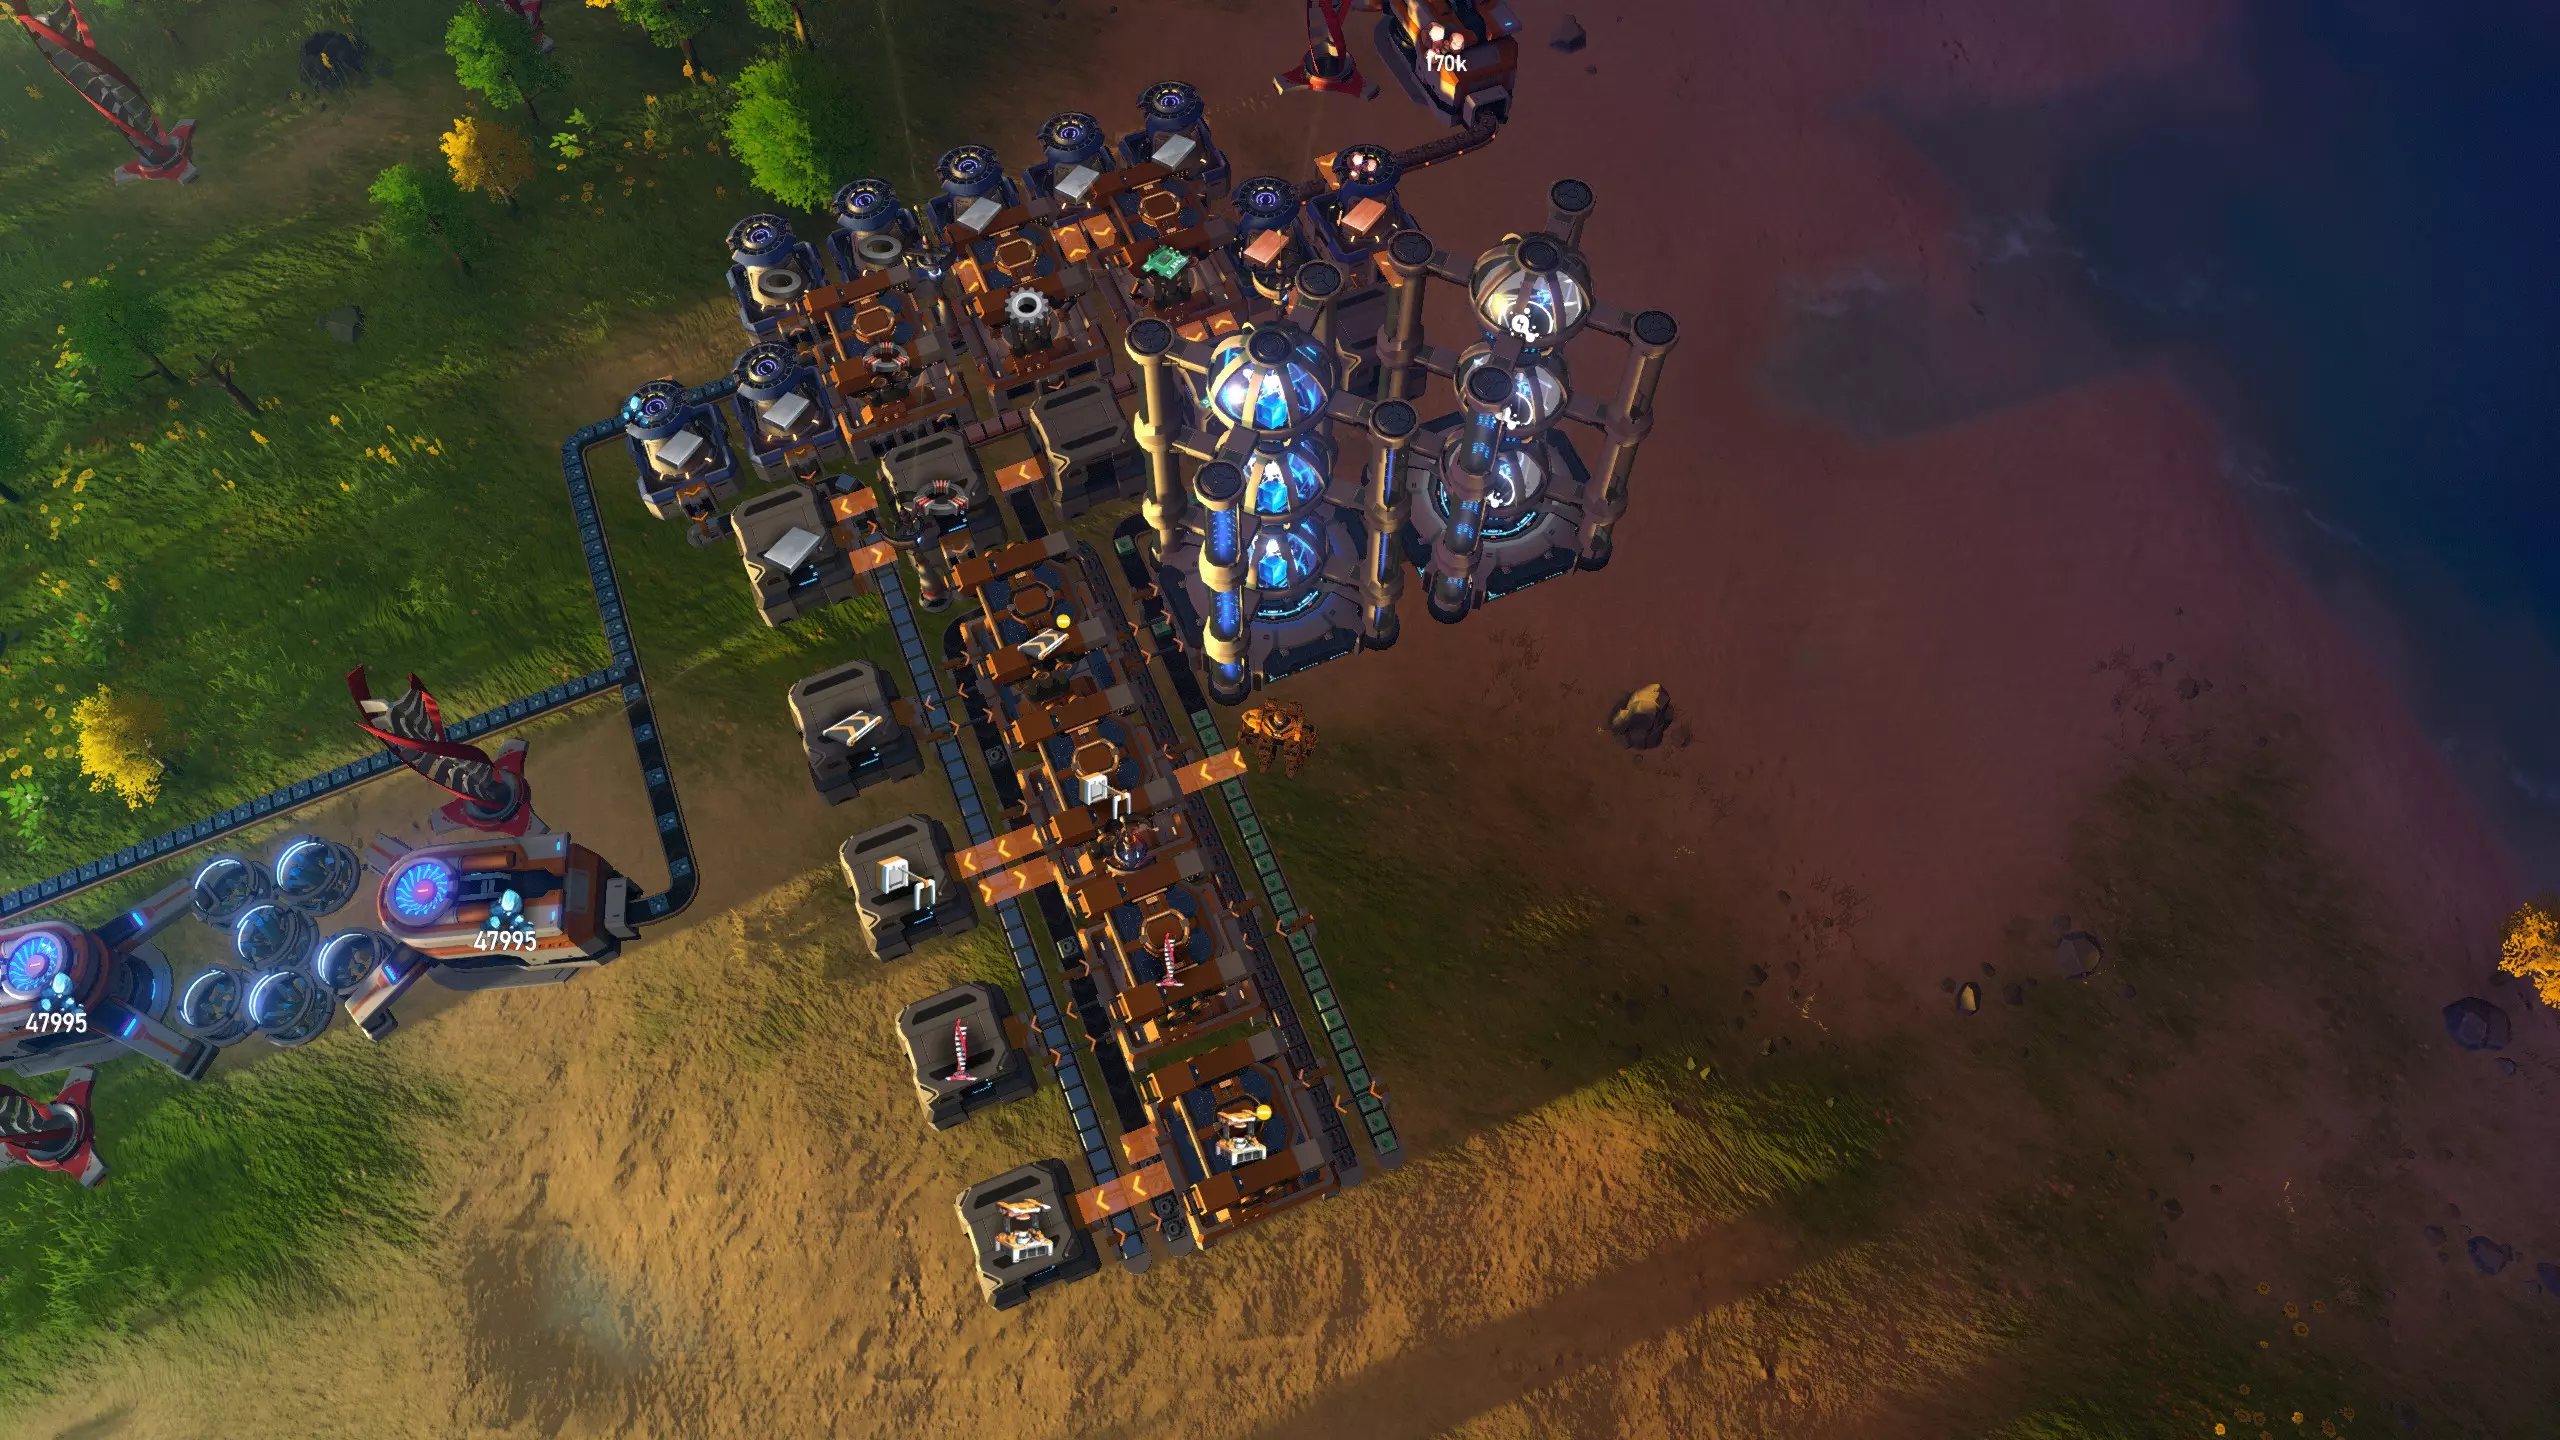
现在你已经准备就绪,可以开始生产物品了! 建造一些建筑吧! 现在你可以在传送带沿线的任何位置建造任何建筑,前提是所需材料在其中一条传送带上。我建议先建造组装机和箱子,以便扩展物资区(下图中莫名其妙地用了分流器而非组装机)。然后添加石油萃取器和精炼厂,这样你就能尽快开始进行红色科研。之后,你就可以开始建造MK2传送带和分拣器,对物资区进行第一次升级!(我们还没有在传送带上放置电动机或电磁涡轮机,所以你需要在线生产它们,但这没问题。)
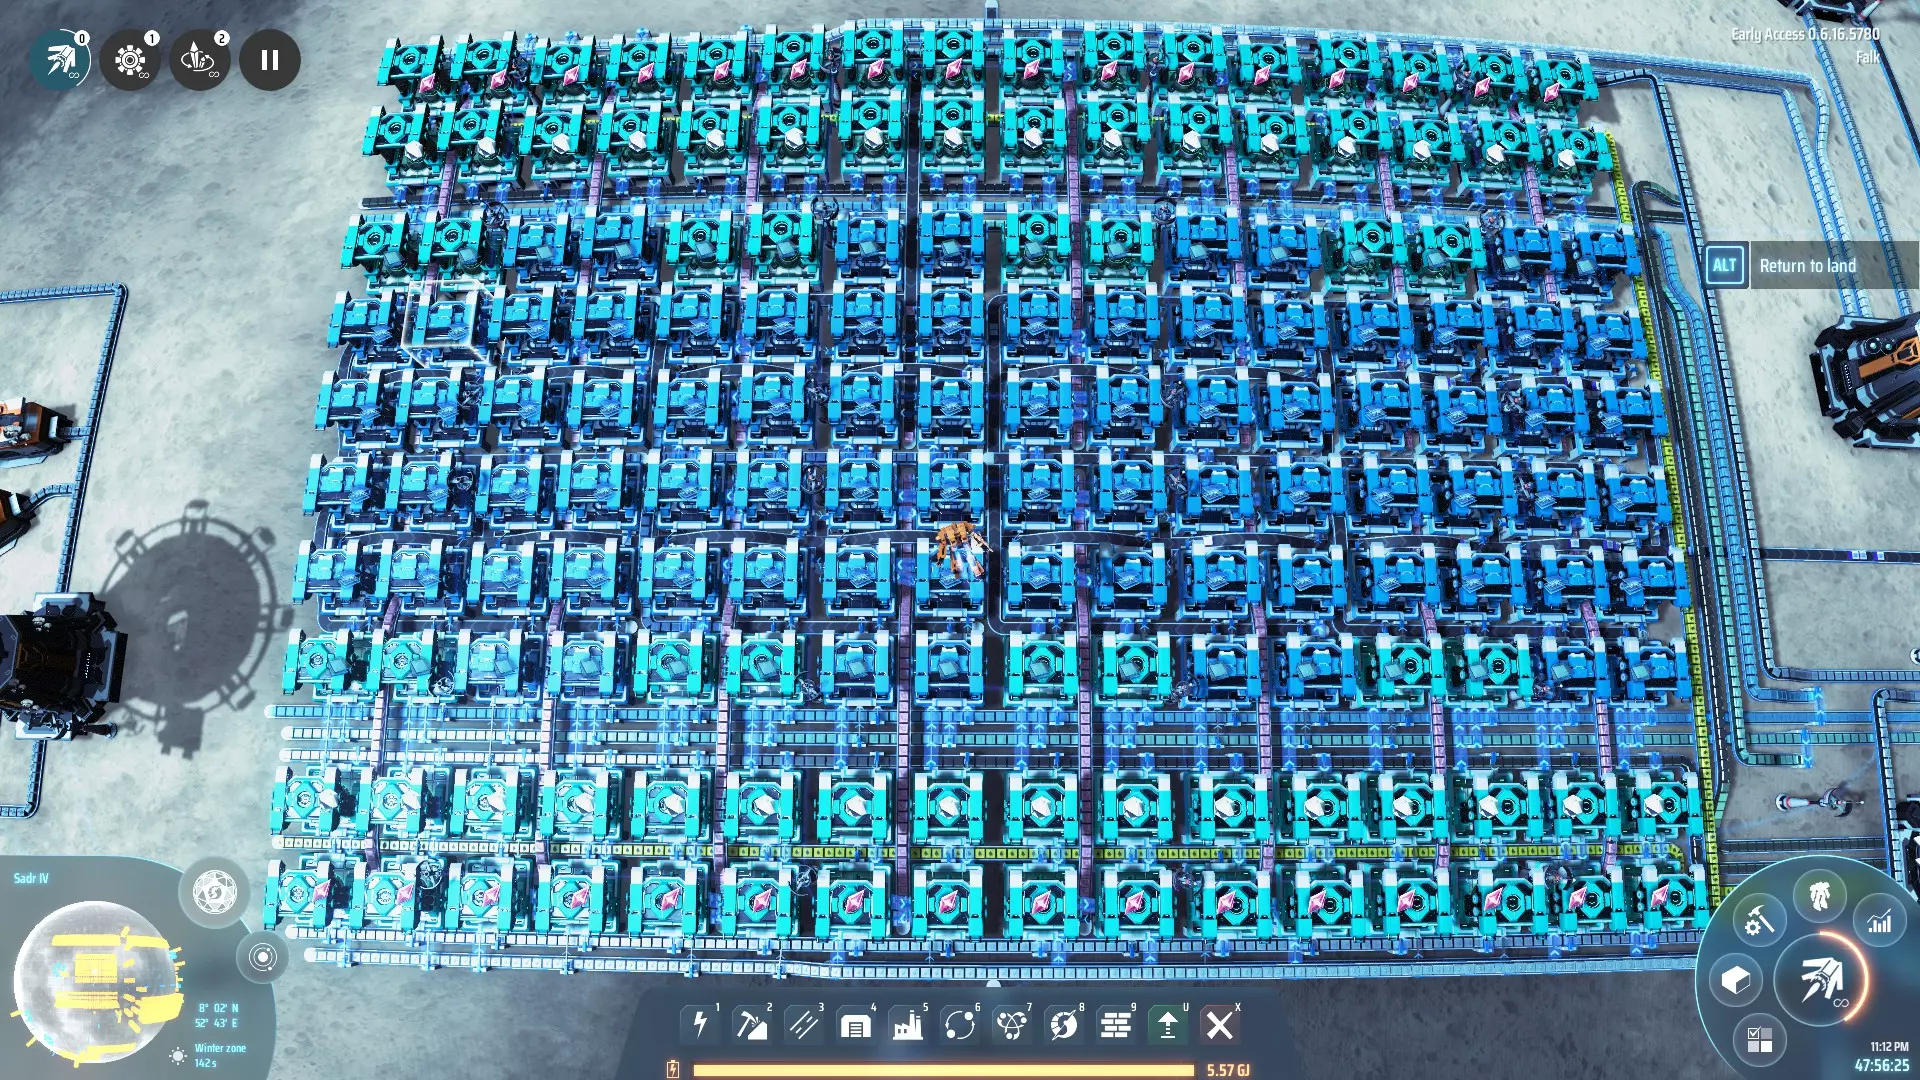
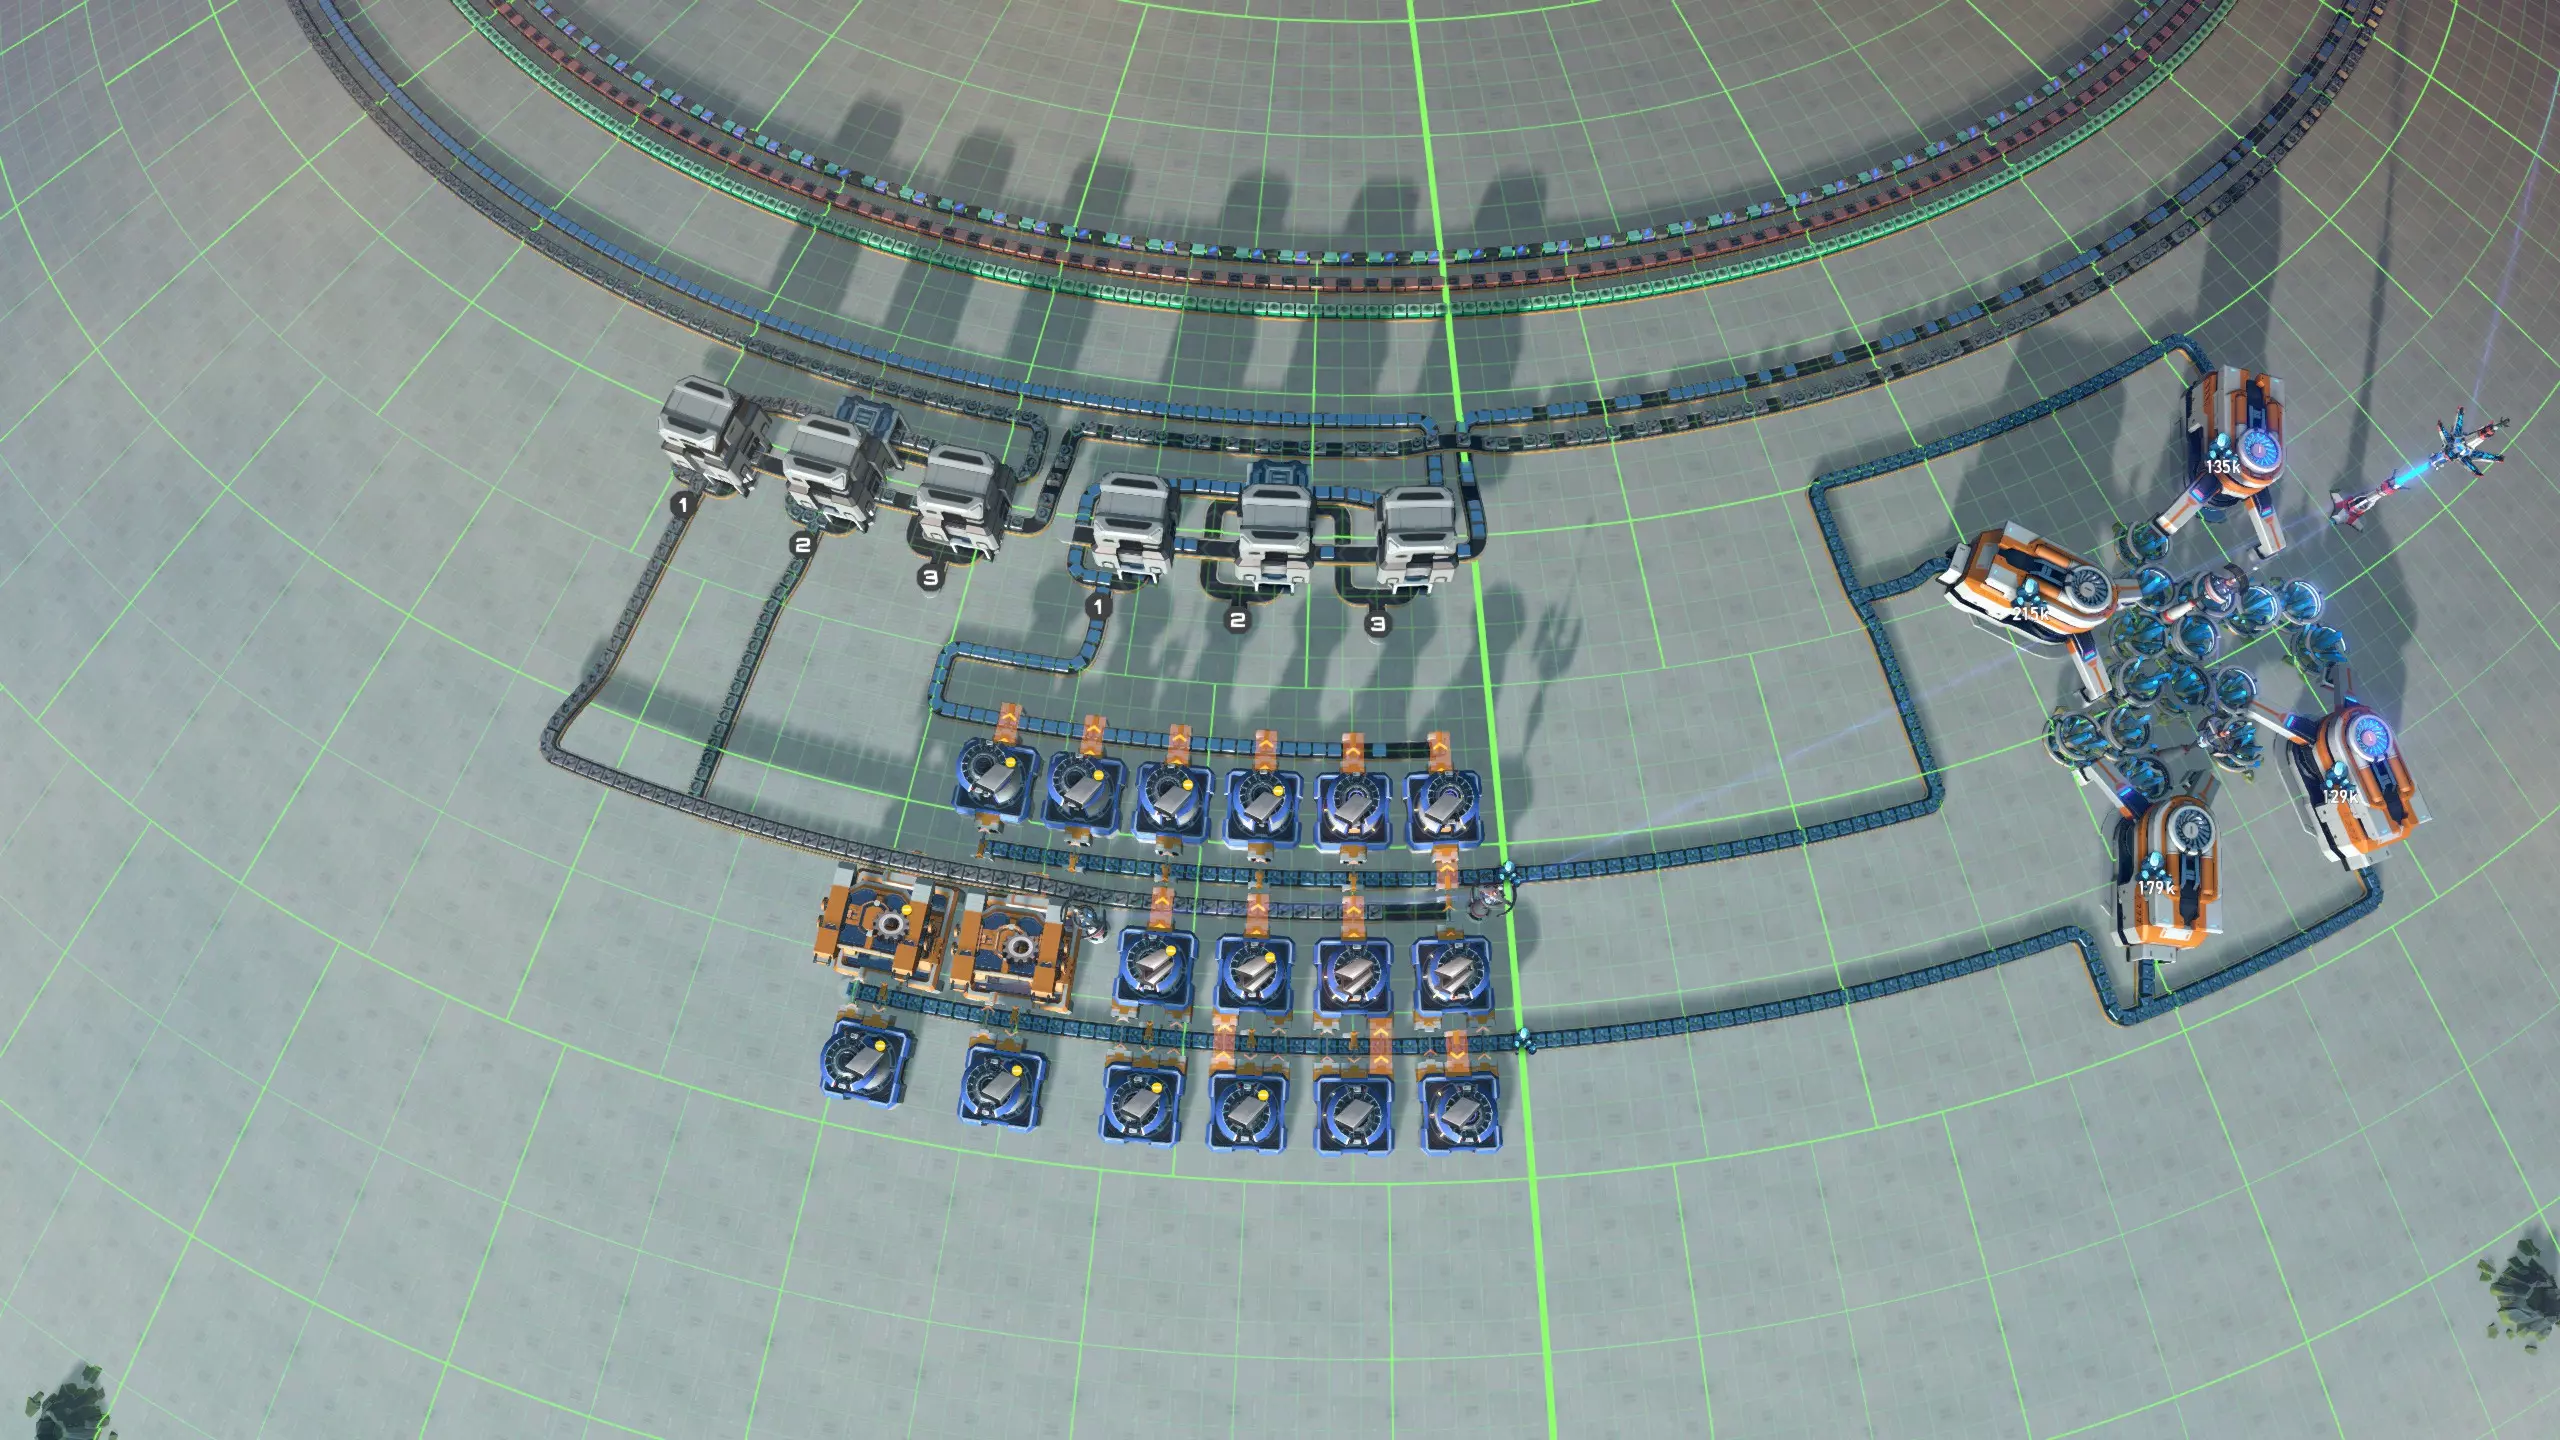
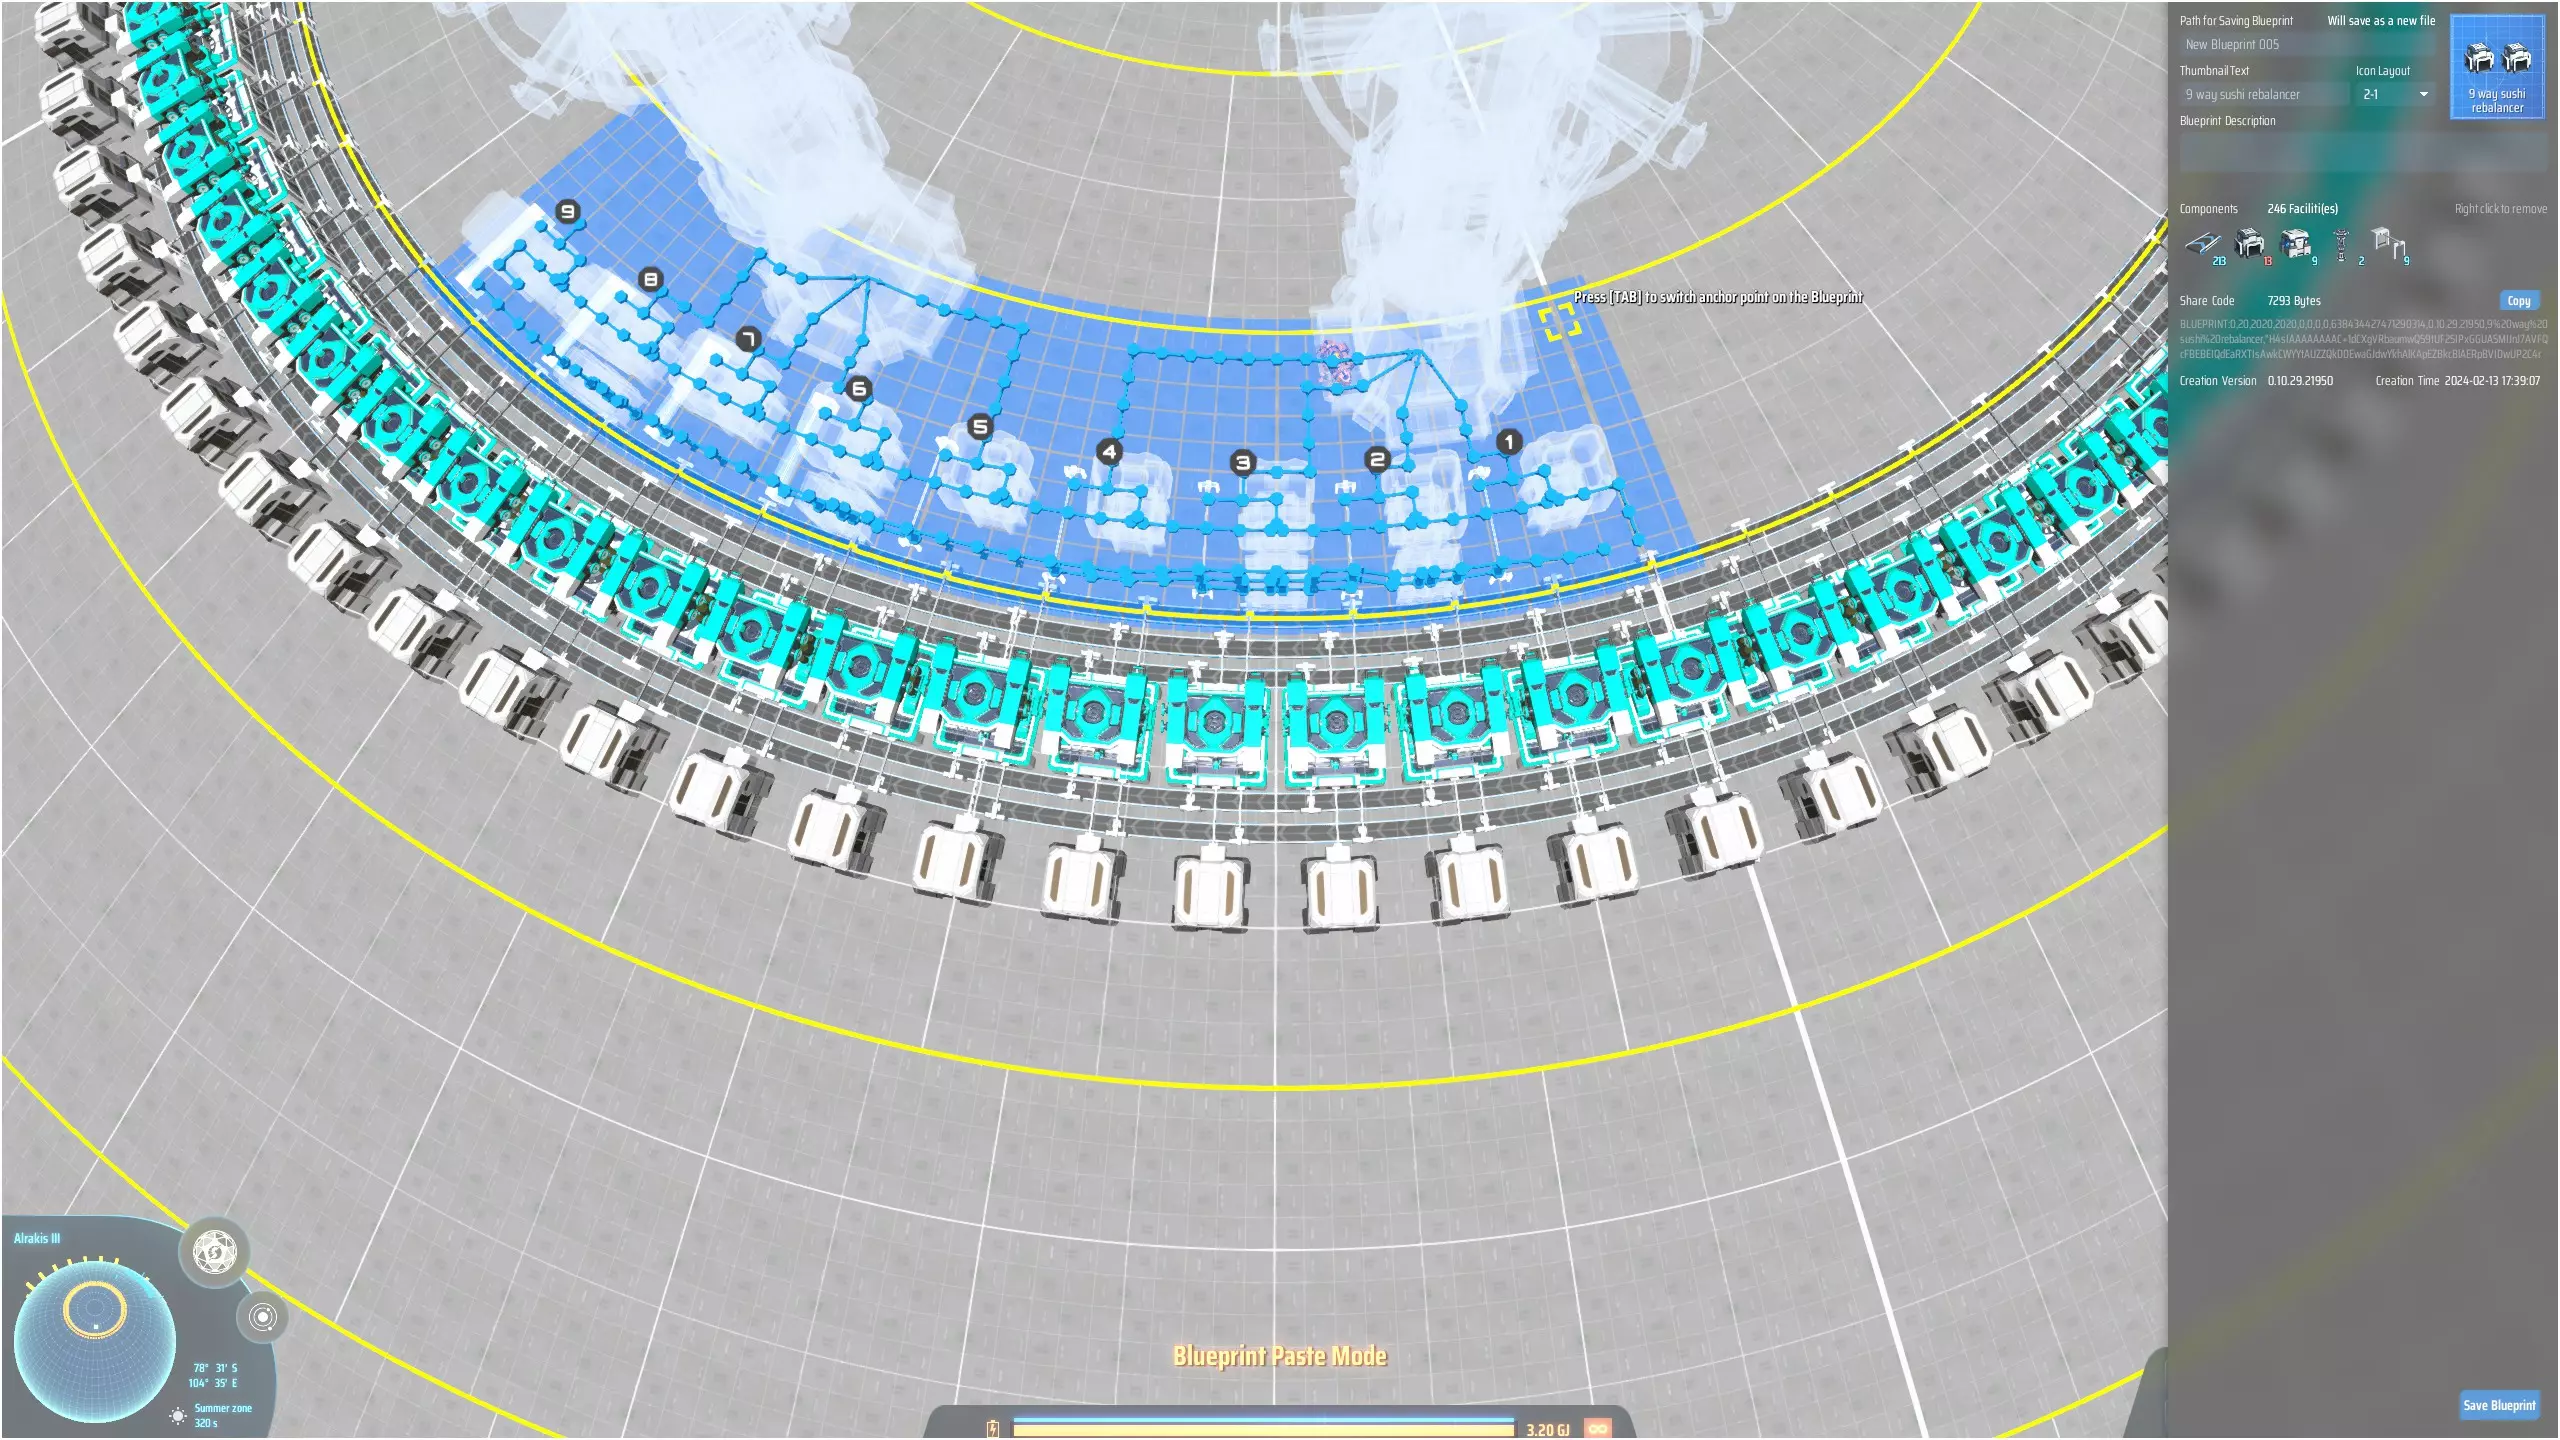
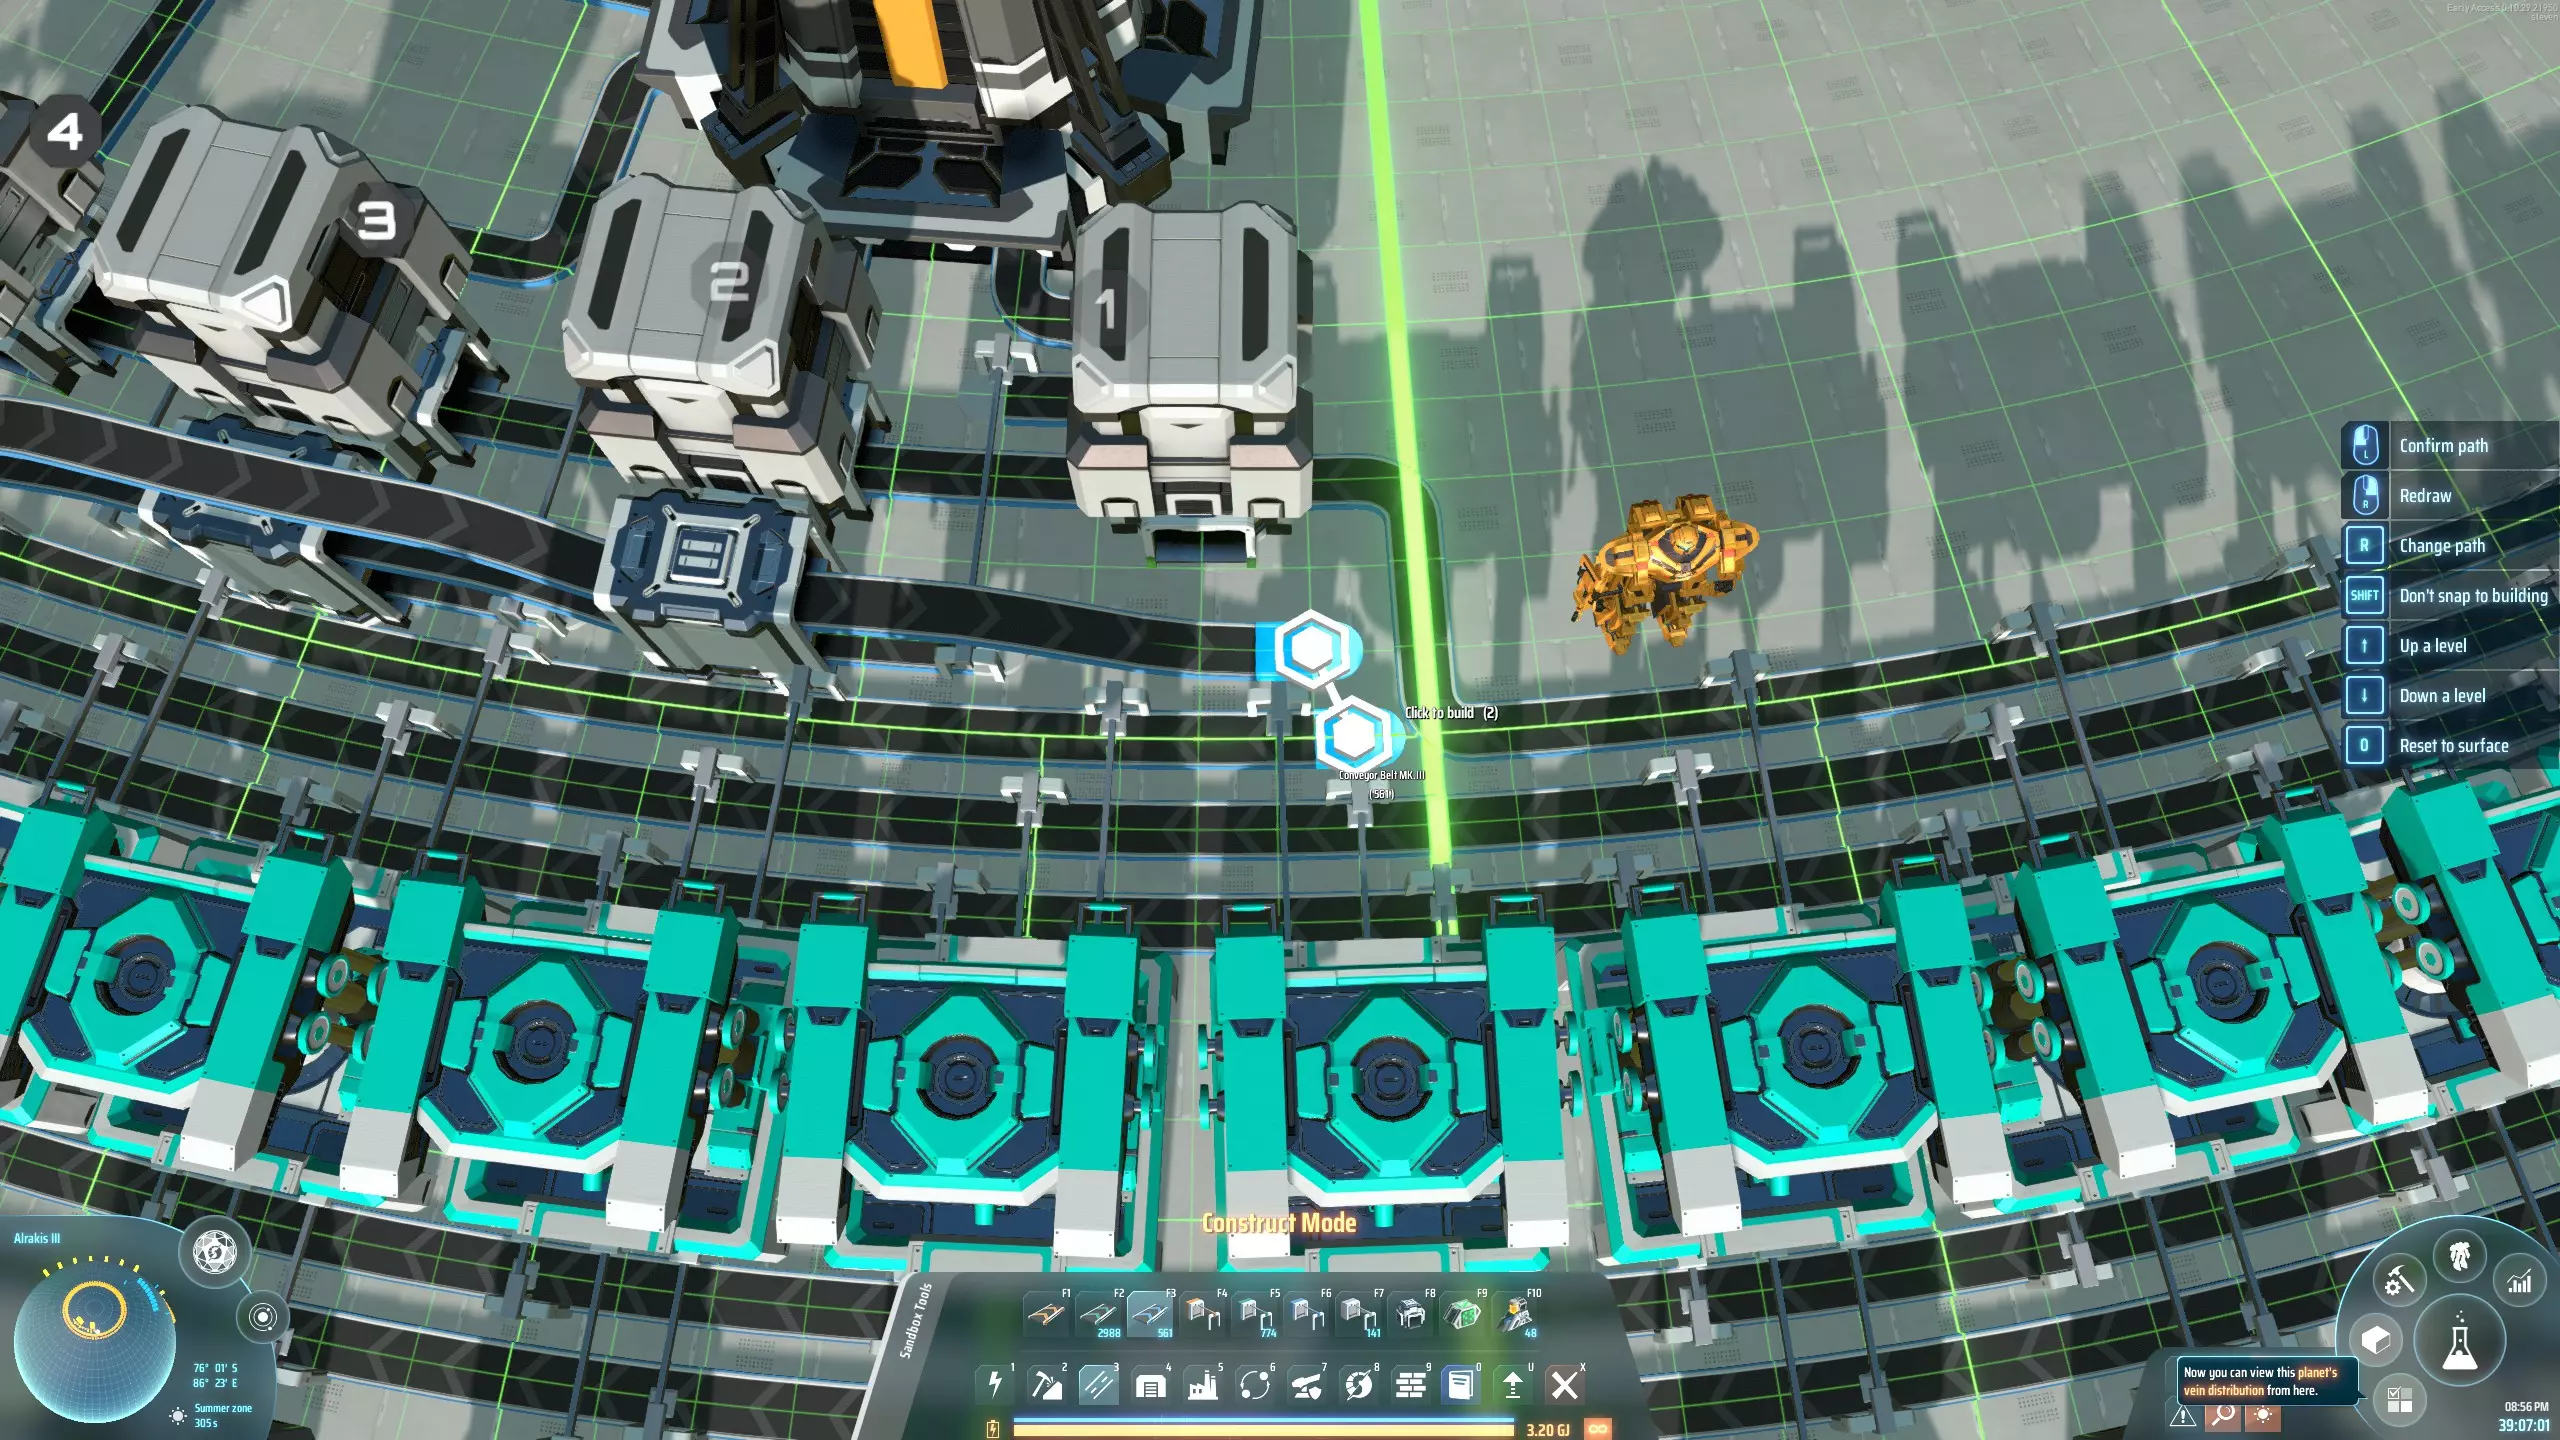
从现在开始,你可以随时添加所需物品。重要的是将储物箱的容量设置为仅一格,因为目前设计的吞吐量还不高。如果某些建筑占用了所有资源,你甚至可能需要暂时关闭它们;只需将它们的储物箱容量设为零即可。 一旦你能够生产MK2传送带和分拣器,就可以升级寿司传送带以获得更好的性能! 扩展至中期游戏 向寿司传送带添加材料并建造越来越多建筑的阶段,会一直持续到你解锁【行星物流系统】和【综合物流系统】科技为止。你可以在寿司传送带上添加新物品,例如引擎、高纯度硅、电磁涡轮机、处理器、石墨烯、钛锭和粒子容器。如果你愿意,甚至可以直接将这些材料扔进再平衡器中未使用的储物箱之一——但如果这样做,请先设置其过滤器!这是一种向所有装配机分配物品的简便方法。(如果你忘记设置过滤器,可以按照再平衡部分所述,先设置过滤器,然后清除从最后一个分流器中弹出的多余物品,以疏通传送带。)请记住,一旦我们解锁高级物流选项,我们也将朝着这个商城的最终版本迈进,所以不要在那些一旦拥有物流站就想替换的设计上花费太多精力。 此时你还可以做的一件事是为所有输出箱添加物流分配器。这将允许你自动将建筑移动到伊卡洛斯的 inventory 中,这可能是一个不错的生活质量改进。 商城的最终形态 一旦你解锁了“行星物流系统”和“综合物流系统”技术,这个阶段就开始了。你已经开始生产黄色科学和石墨烯,并且已经有了一些处理器。在这一点上,你已经拥有了将这个商城打造成最终形态所需的一切。我们将用以下9向再平衡器蓝图替换所有再平衡器: 蓝图:九向寿司再平衡器 此再平衡器放置在传送带环路内侧,这样我们最终会得到一个美观且独立的极地商城。你需要放置五个这样的装置;在这个纬度,星球的周长为200格,因此每个再平衡器应间隔40格(4条大网格线)。将它们放置在尽可能靠近寿司传送带的位置。
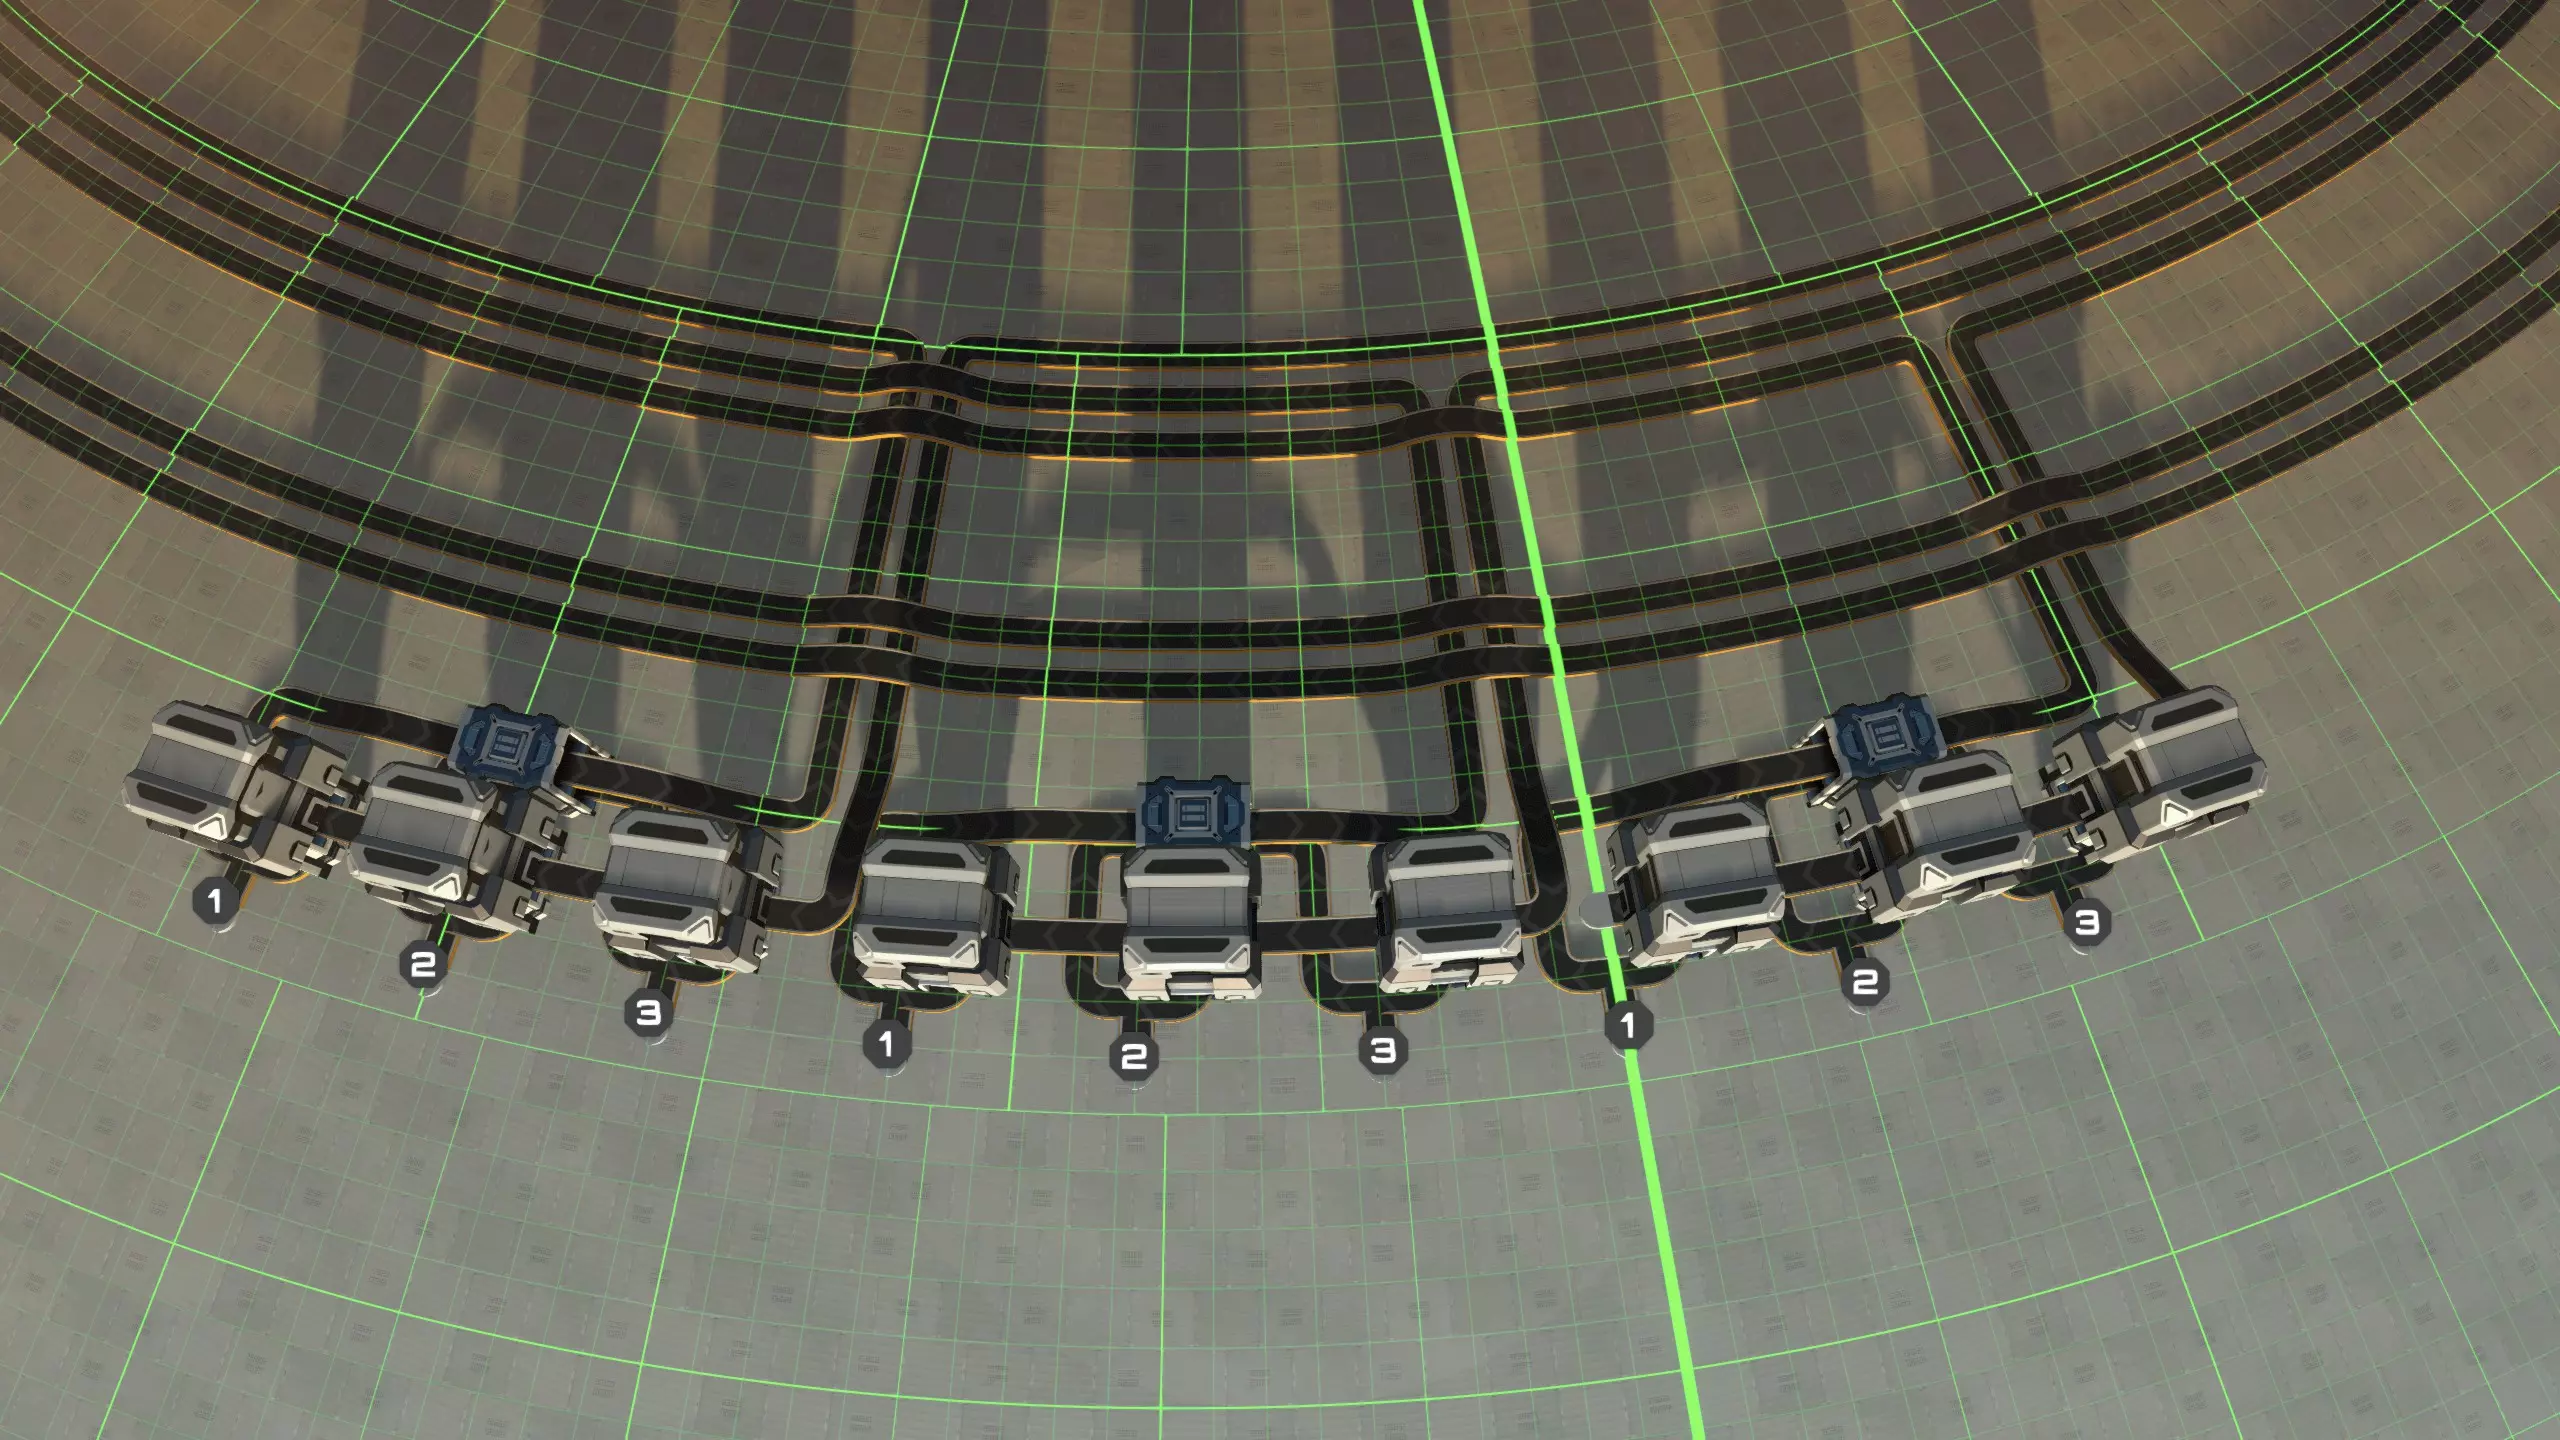
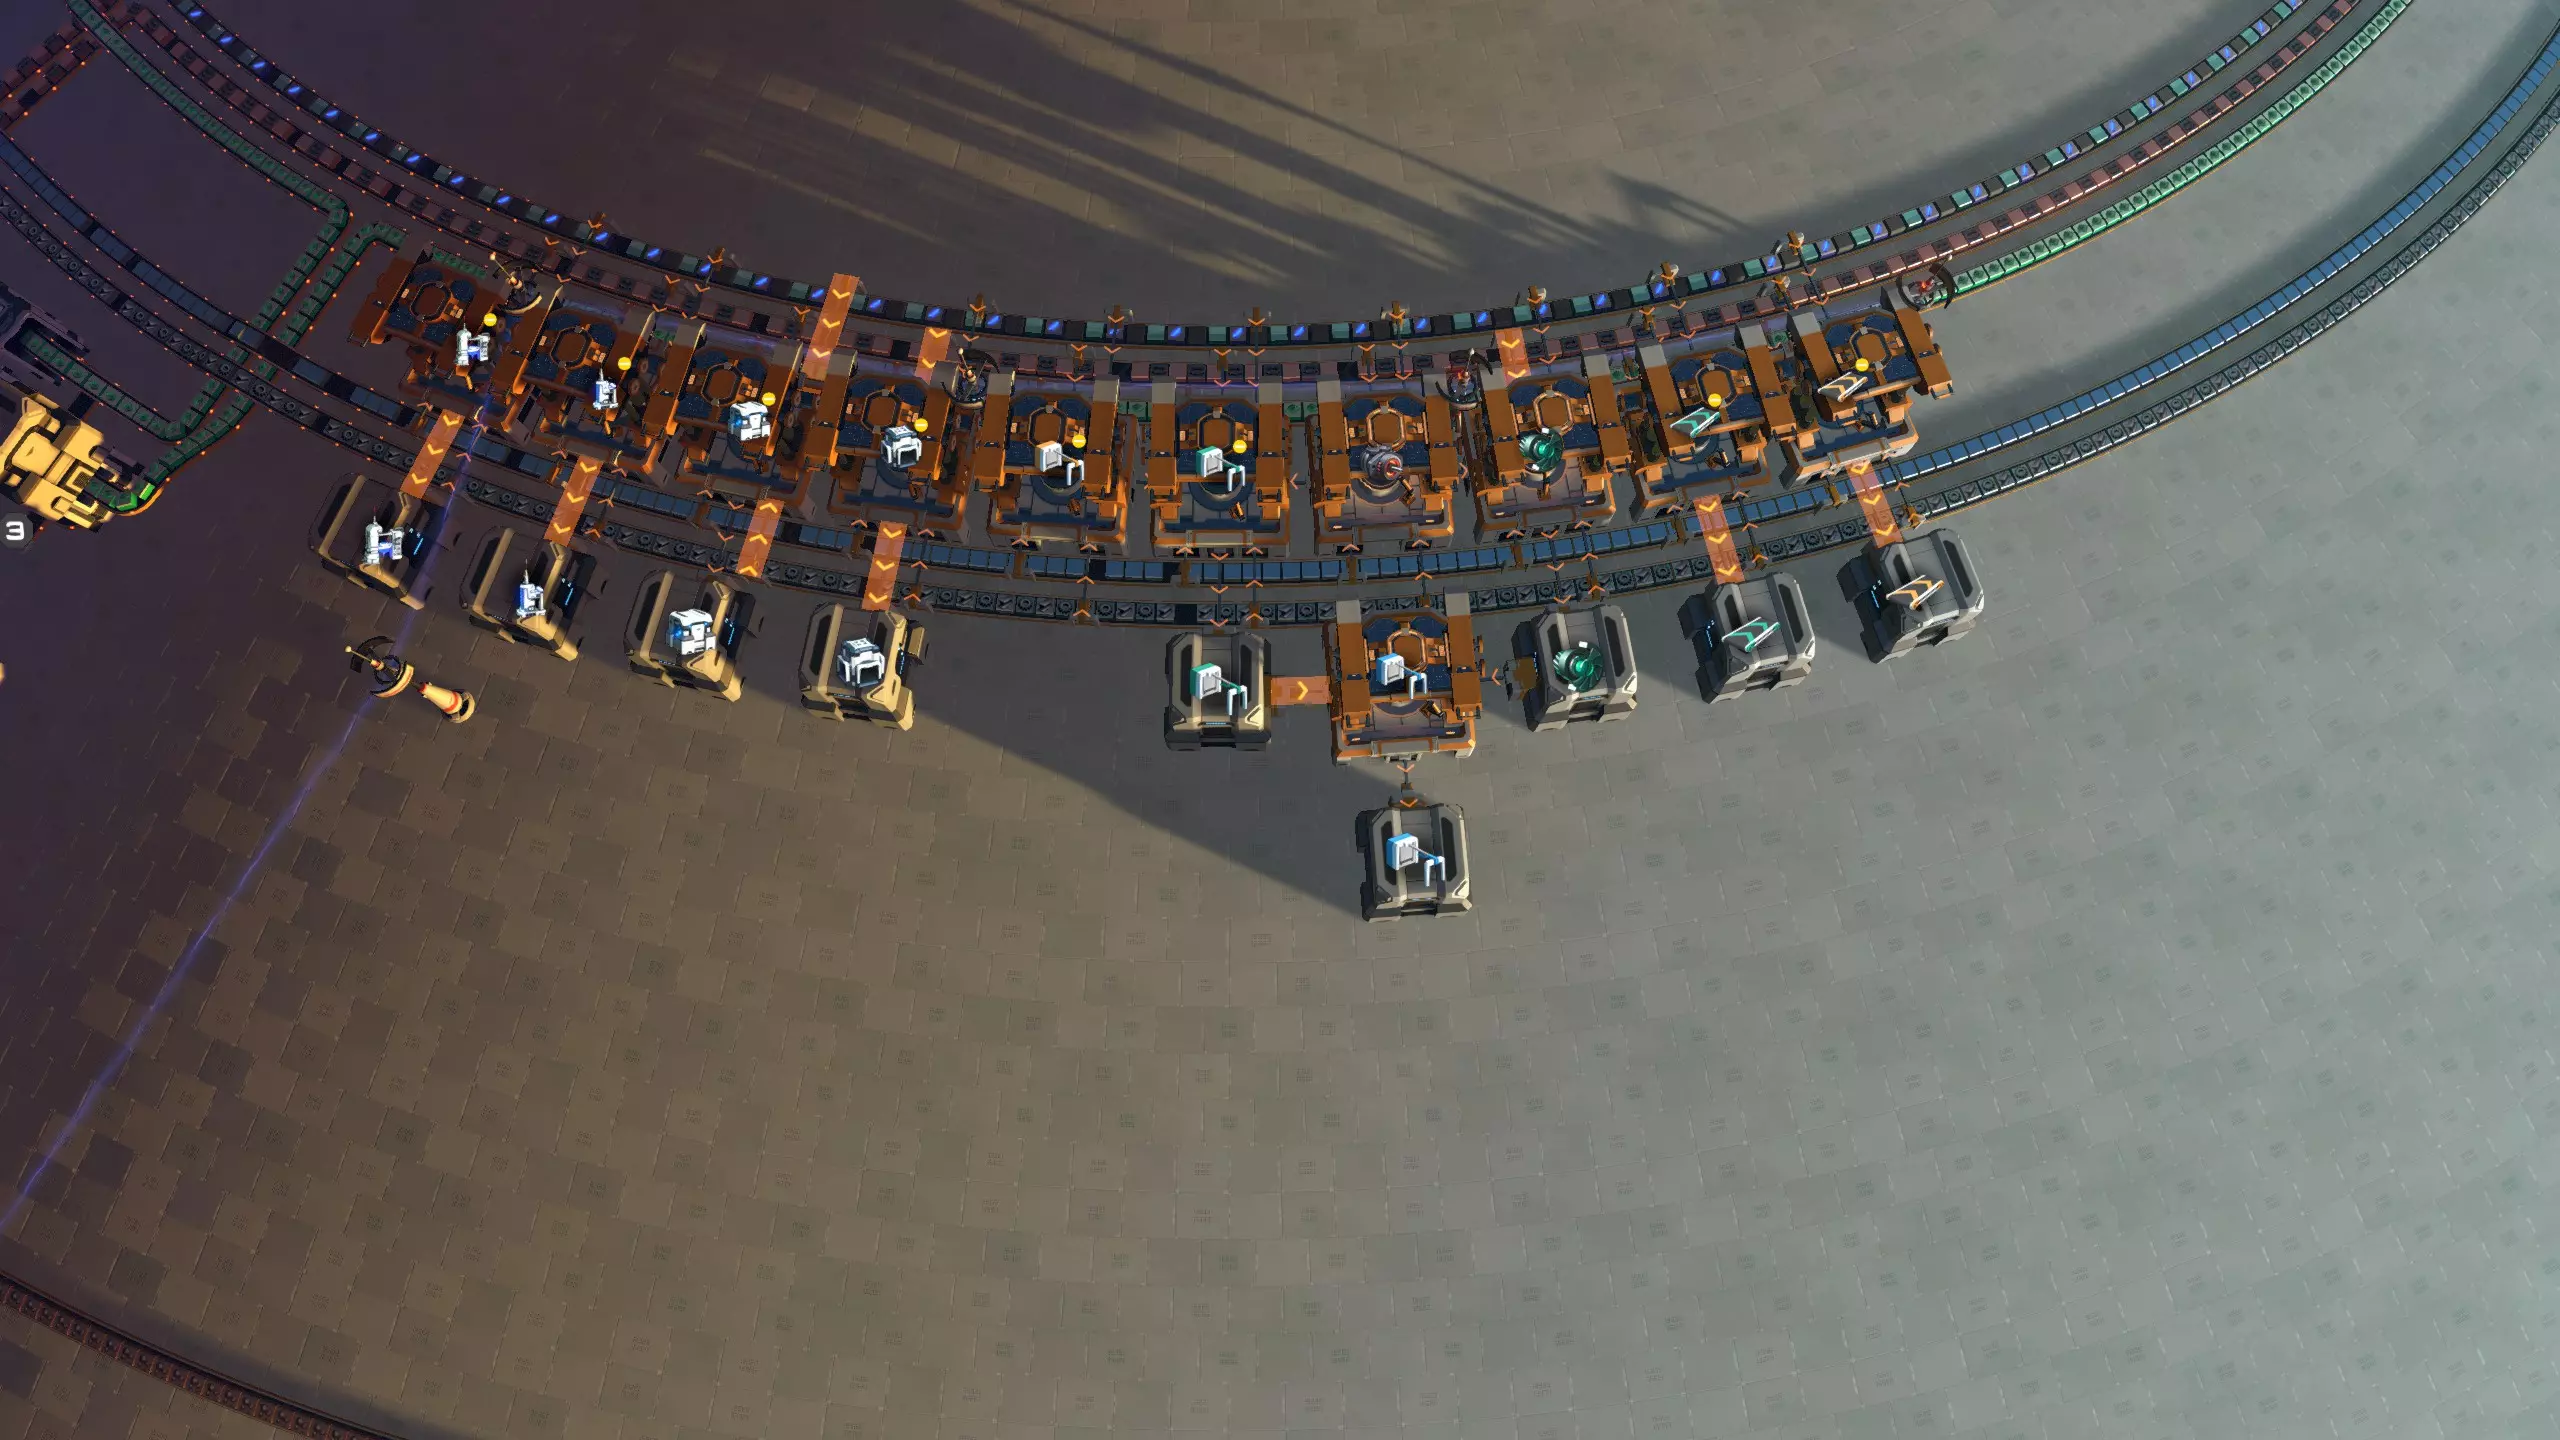
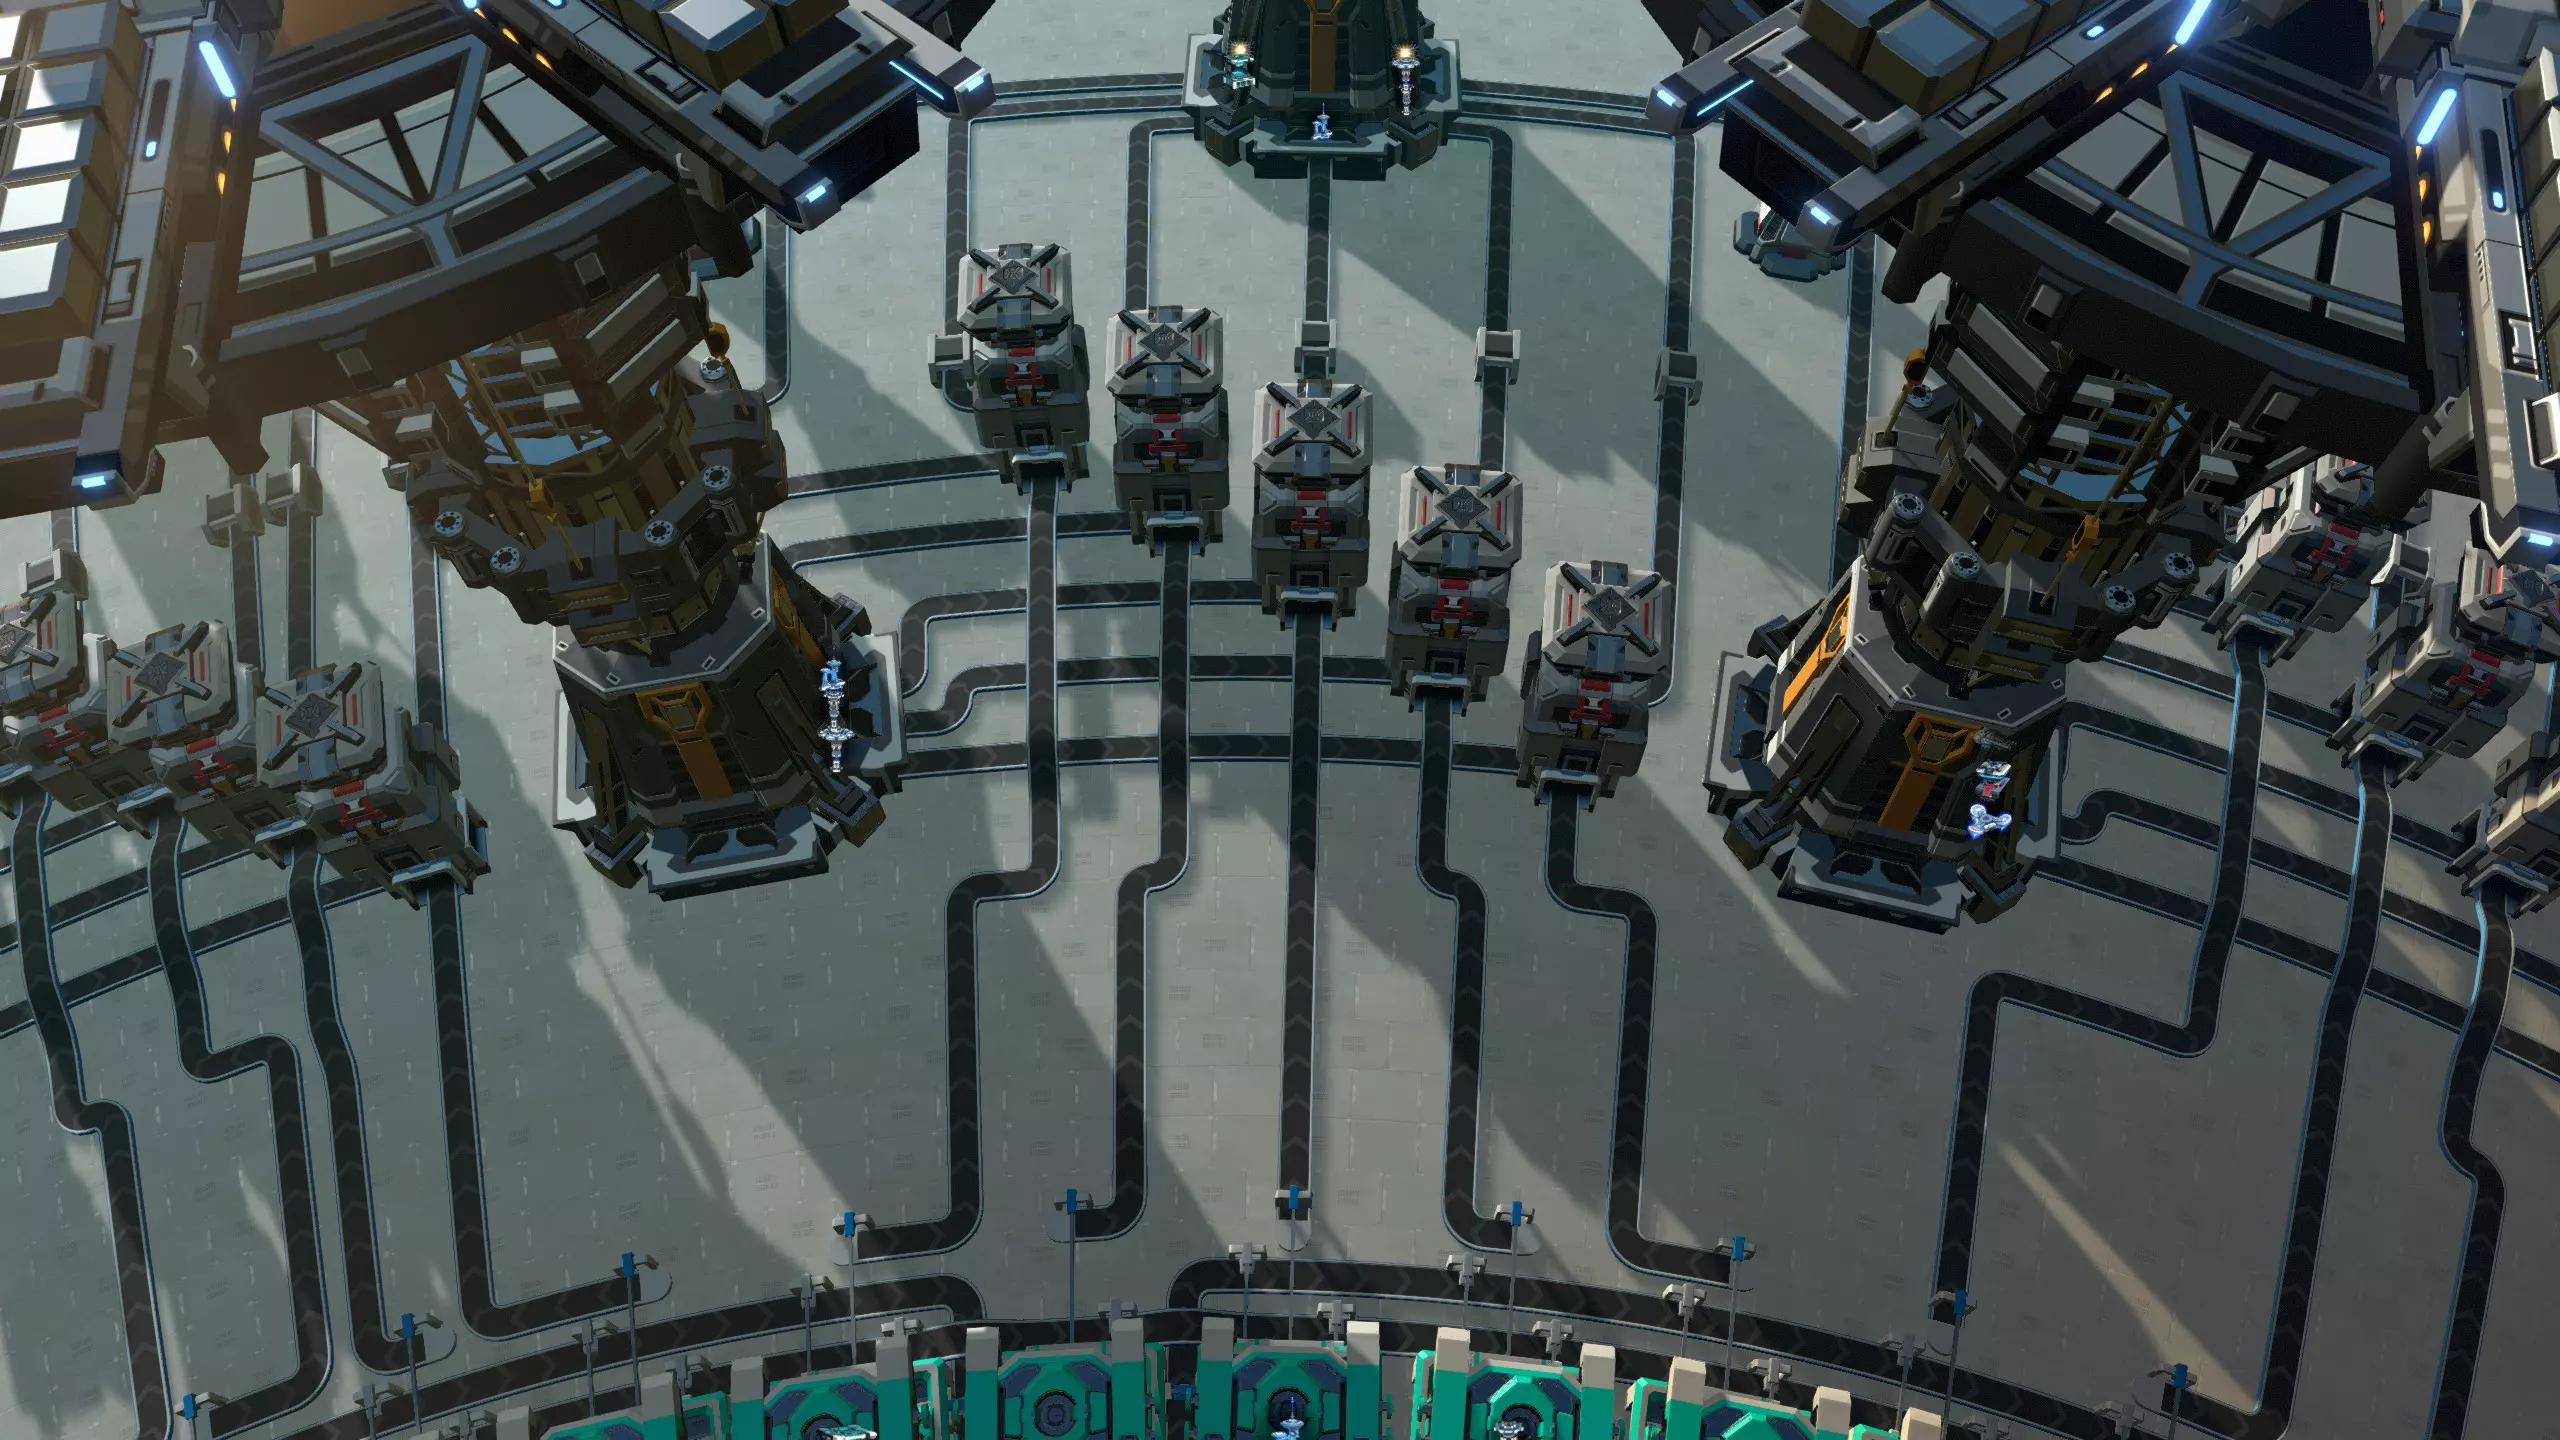
Attach each rebalancer to one of the five belts. For belts 4 and 5, you can either choose to leave out two assemblers, or you can run the belts in-between two assemblers. (I took the latter approach because I wanted to have all 75 assemblers available to make buildings.) You may have trouble properly connecting the assembler sorters to the sushi belt at the point where one of the belts gets rebalanced; usually they will still fit, just in a bit wobbly way. But sometimes I really could just get 4 out of 5 sorters to work. In that case you can set the troublesome assembler to a building that doesn't need one of the belts. Pile sorters are used to stack each material to 4 high on the belt, so as soon as you've upgraded them to stack to height 4, the throughput of the design should be more than enough to support whatever you want to build. When deciding what material to attach to which rebalancer input, you need to take into account the following: the rebalancers deliberately do not produce an even distribution. This is because some materials need a much higher throughput than others - this yet another way to make sure that the mall can support whatever you throw at it. It breaks down as follows: Input 1 makes up 1/3 of the output belt, so its throughput is up to 4*30/3 = 40/s. Inputs 2-6 make up 1/9 of the output belt each, so its throughput is up to 4*30/9 = 13.33/s. Inputs 7-9 make up 1/27 of the output belt each, so its throughput caps at 4*30/27 = 4.44/s.So, you need to make sure that the five most important materials are always on input 1 of one of the rebalancers. I chose: iron ingots, steel, stone bricks, gears, and circuit boards. Then, you need to make sure that the last three inputs always carry materials that are used in only low quantities. That's where I put materials such as unipolar magnets, plane filters, graviton lenses, a lot of the dark fog drops, and so on. Note that every rebalancer is attached to two PLSs, each of which can only import four materials. However, I like to produce some materials in the mall itself, so that I don't need to provide them. In my design, I chose to manufacture thrusters, reinforced thrusters, engines, graviton lenses, and annihilation constraint spheres in the mall itself and supply them on the 9th inputs of the five rebalancers. Alternatively you could put down one or two more logistics stations to import those items. Final note, to make the charged accumulators I have an assembler in the mall itself making regular accumulators, that are exported through an ILS as usual (see next section); a PLS in the center imports them and feeds them through an energy exchanger, then hands them to a rebalancer, so that they can be used to build orbital collectors. Global shipping: no recycling The core of the mall is now finished and you can use it to easily build all buildings in the game, as well as things like logistics drones, vessels, and bots. (I don't usually make foundation in this mall because I want to produce that in larger quantities and not have it affect production of my buildings.) The final step is to make all those things available on the interstellar logistics network. The best way to do this depends on whether you want to make a recycling mall or not. A regular mall makes buildings available on the logistics network, so that they can be requested from anywhere in the cluster. But a recycling mall also gives you the option to send back any buildings that you don't need, so that you don't have to carry them around in your inventory. A recycling mall is more work to set up and uses twice as many interstellar logistics stations. If you want to do that, skip to the next section: below we complete the mall without recycling option. To do so, we need to place 15 interstellar logistics stations in a ring around the design, just outside the storage boxes. This will place them across the next tropic line, a region with a circumference of 400 cells. To place 15 ILSs, each needs to take up 400/15=26.66... cells. The most convenient way to place them is to find the distance from the pole where you're just barely allowed to place them 26 apart. I found that to be 4 cells into the next tropic out. You then place the first such that its center is aligned with the center of one of the assemblers. Then place the second one at the same distance from the pole, as close as possible to the first, the third gets one cell extra, the one after that also gets one cell extra, and then as close as possible again... rinse, repeat. Then hook up the five closest storage boxes to each ILS, and set them to export the corresponding buildings (both locally and globally). I usually limit the ILSs to store just 100 of each item, because that is the amount you will receive when you request that item from somewhere across the cluster, and you don't want to receive 2000 miniature particle colliders. The only exceptions are items of which you do want to receive more in one go, such as belts, sorters, solar panels, smelters, ray receivers, and so on. You also need to set the "min load of vessels" to 1% or 10%, to make sure that vessels will not wait until more buildings are available, but will actually fly out with however many buildings are available at the time. The capacity for each storage box connected to the ILS should be set such that it can hold the same number of a building as the ILS. For example, if the ILS stores 100 chemical labs, then since chemical labs stack to 30, set its storage box capacity to 3 or 4 slots. All the ILSs export their buildings locally and globally, but I don't usually equip them with drones, just vessels. To make sure that you can receive buildings even in some godforsaken mining world with no power, all ILSs should be equipped with warpers; I import warpers on one of the ILSs and then run a circular belt with warpers through all ILSs. I also set one mall assembler to production of a trickle of warpers (using the default recipe); those warpers are side-loaded onto the warper belt. In principle, warpers are imported, but if warper production fails for whatever reason, the mall can produce its own. To make sure that the ILS is restocked quickly after it has shipped some building somewhere, it's best to use pile sorters to connect the storage box to the belt that leads into the ILS. There are 15 ILSs which means one logistics slot for each assembler. One slot will be used to request warpers (I like setting the corresponding assembler to make the backup warpers). This leaves 74 slots to export whichever buildings you like. Global shipping: recycling To make a recycling mall, we first place the 15 importing ILSs in a ring around the design, just outside the storage boxes. This will place them across the next tropic line, a region with a circumference of 400 cells. To place 15 ILSs, each needs to take up 400/15=26.66... cells. The most convenient way to place them is to find the distance from the pole where you're just barely allowed to place them 26 apart. I found that to be 4 cells into the next tropic out. Place the first two towers 27 cells apart, such that an assembler is centred exactly on the middle between the two ILSs. Then complete the circle of ILSs, each time placing the next one 26, 27 and 27 cells from the previous one. (This is easy to measure since 26 is the smallest distance that fits.) Now make a second ring of 15 exporting ILSs that go in-between the ones you placed before, slightly further out from the pole. Make them as close to the pole as they can go. Unfortunately we can no longer keep the storage boxes we have been using so far, so delete all of them. Instead, for each exporting ILS, place five splitters, as in the image below:
中间的分流器与输出物流站对齐。从左侧输入物流站最近的5个端口引出传送带,连接到分流器的左侧输入端;从分流器的顶部输出端引出传送带,连接到输出物流站的5个端口。最后,用传送带将分流器与最近的5个组装机连接起来。现在,将分流器设置为优先接收来自输入物流站的物料,并在顶部放置箱子。这些箱子将取代我们之前使用的输出箱子。 接下来,我们要将这5个与分流器相连的建筑与输入和输出物流站进行设置。我通常会将用于出口的星际物流站(ILS)的每种物品存储量限制在100个,因为当你从跨星系的其他地方请求该物品时,你收到的数量就是这个数,毕竟你不会想一下子收到2000个微型粒子对撞机。唯一的例外是那些你希望一次性接收更多数量的物品,比如传送带、分拣器、太阳能板、熔炉、射线接收器等等。你还需要将“运输船最小装载量”设置为1%或10%,以确保运输船不会等待更多建筑可用,而是会立即运送当时可用的任意数量的建筑。用于出口的星际物流站(ILS)应设置为本地和全球供应,但我通常不会为它们配备无人机,只配备运输船。导入型星际物流站(ILS)设置为连接相同的五个建筑,其输出选择需与组装机的建筑相匹配。在此情况下,将存储容量保持在最大值,但将每个建筑设置为【本地存储】和【全球需求】。导入型星际物流站还需将【船只最小装载量】设为1%,并配备船只。 在五个分流器上放置存储箱。每个存储箱的容量应设置为能够容纳与星际物流站相同数量的建筑。例如,如果星际物流站可容纳100个化学实验室,由于化学实验室堆叠数量为30,因此将其存储箱设置为3或4个槽位。如果预计会经常在这个物资站附近活动,也可以在顶部放置物流分配器(但在游戏后期离开母星后,我通常不会这样做)。为确保你即使在某些没有电力的偏僻采矿星球也能接收建筑,所有星际物流系统(ILS)都应配备翘曲器。我会在其中一个输出型星际物流系统上导入翘曲器,然后在所有输出型星际物流系统最外侧的传送带端口设置一条循环传送带输送翘曲器。我使用分流器将翘曲器传送带分支,以同时为每个输入型星际物流系统供料。我还将对应于该输入槽位的中央工厂装配机设置为少量生产翘曲器(使用默认配方),这些翘曲器会侧向加载到翘曲器传送带上。原则上翘曲器是通过导入获取的,但如果翘曲器生产因任何原因中断,中央工厂也能自行生产。
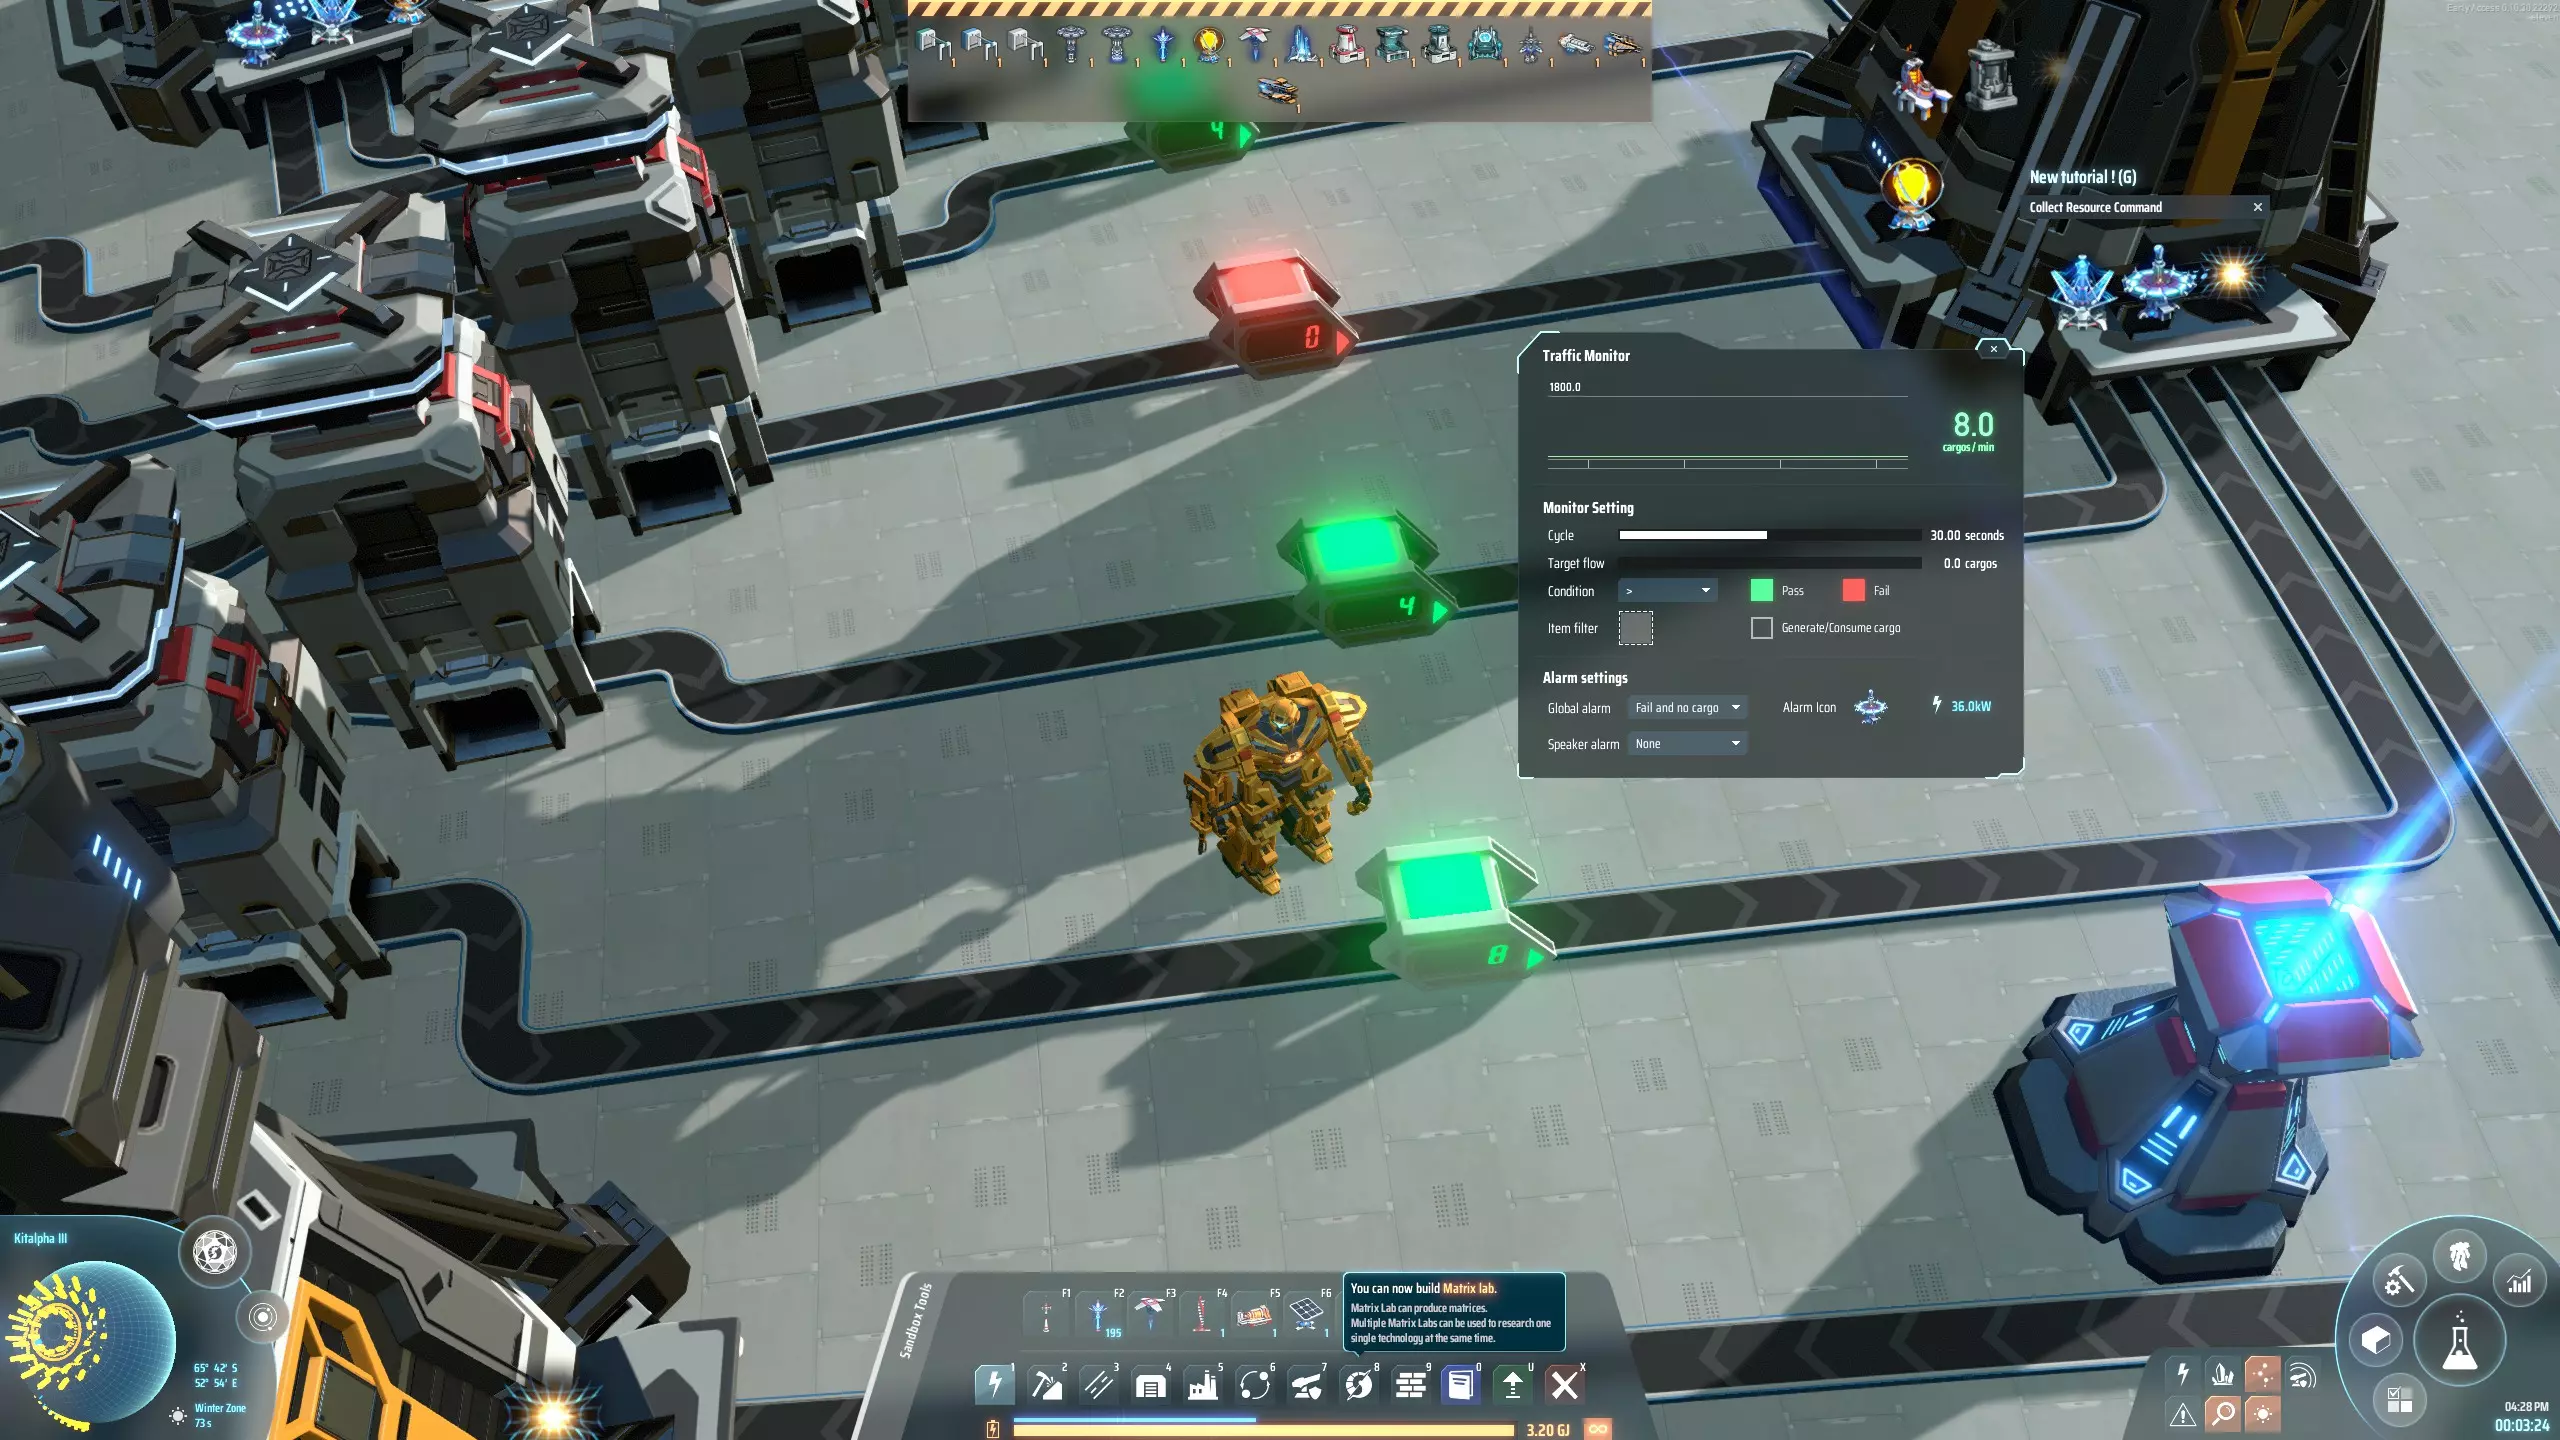
警报系统 为确保你的基地各方面运转正常,建议添加一个使用流量监测器的警报系统。 在连接至星际物流站(出口)的其中一条传输带上放置一个流量监测器。将其周期长度设为60秒,流量设为0,条件设为大于。然后将其警报设置为“失败且无货物”。将此监测器复制到所有连接至出口星际物流站的传输带上。 接下来,逐一检查所有流量监测器,将它们的警报图标设置为其所在传输带对应的建筑。这样一来,一旦某个建筑未能向星际物流站供应货物,且一分钟内都没有新货物供应,你就能准确知道是哪个建筑出了问题。然后你可以点击屏幕顶部的警报图标,获取前往商场中存在问题区域的指引线,以便解决该问题。
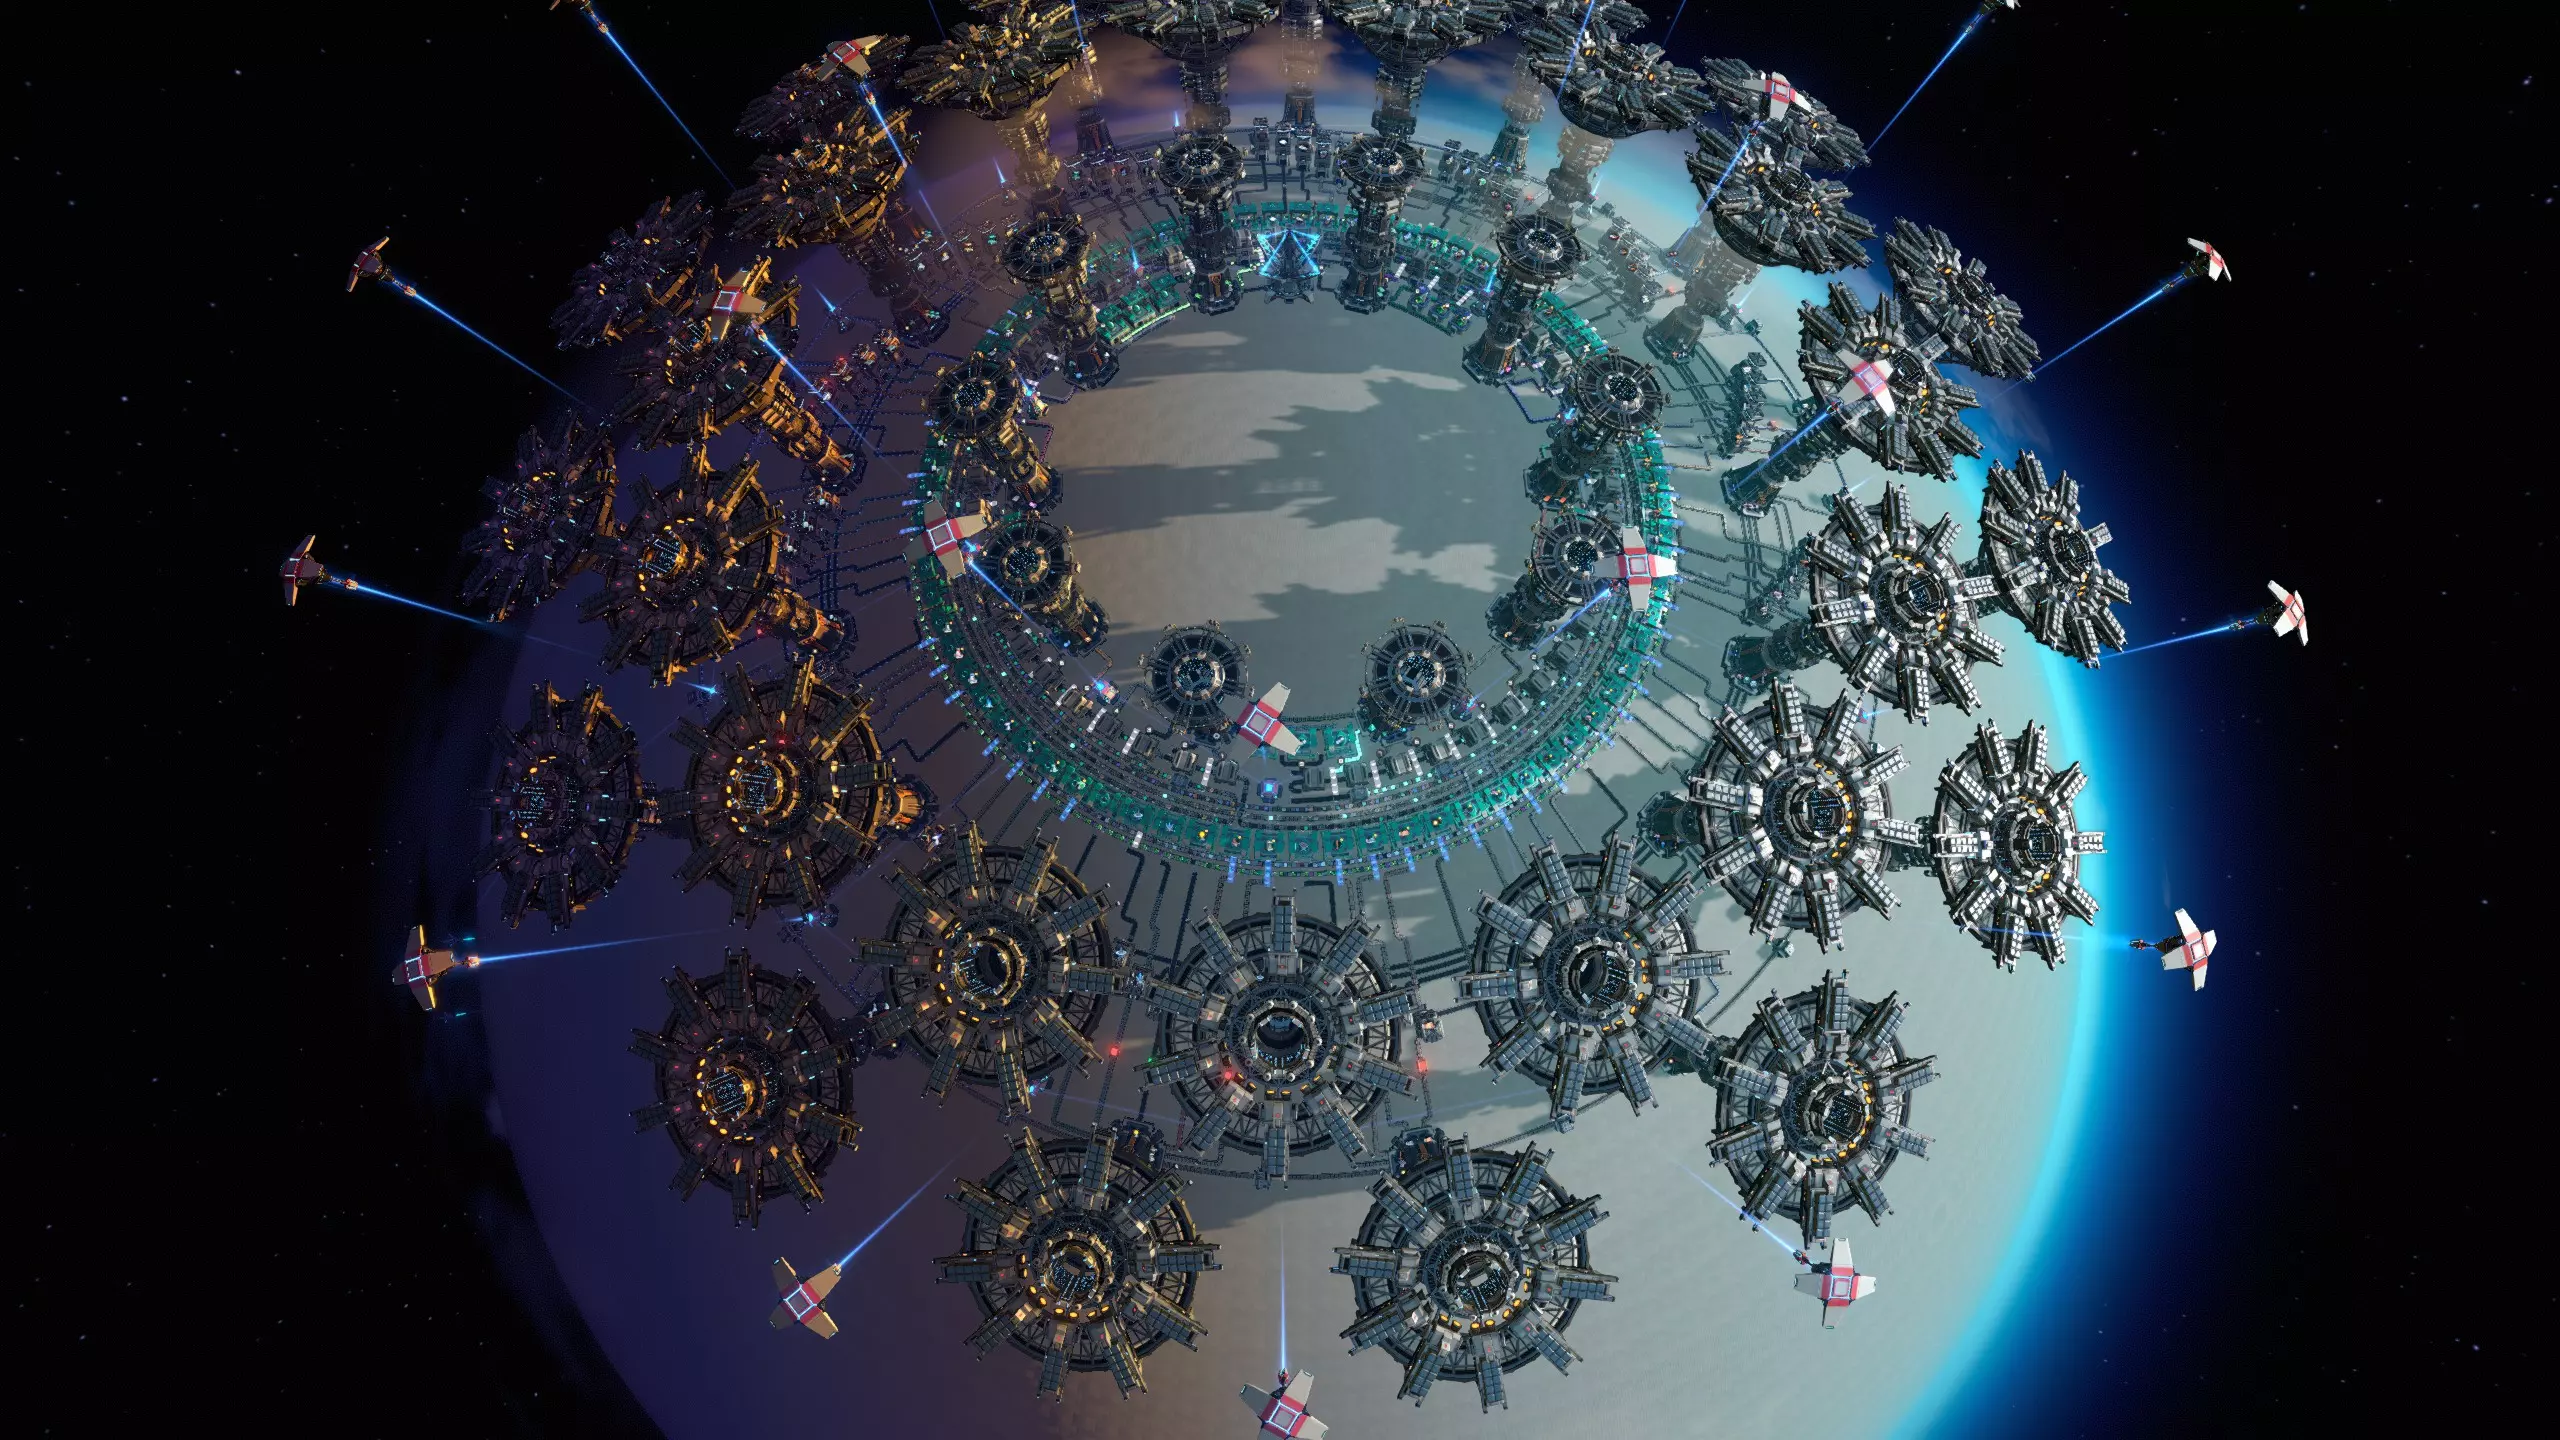
总结 如果一切顺利,你现在应该拥有一个漂亮的购物中心,它看起来很像本指南的第一张图片,或者像刚刚描述的回收购物中心。 如果没有成功,要么是你偷懒了,要么是你搞砸了。在这种情况下,你可以尝试我自己的设计方案。