换一换
换一换 


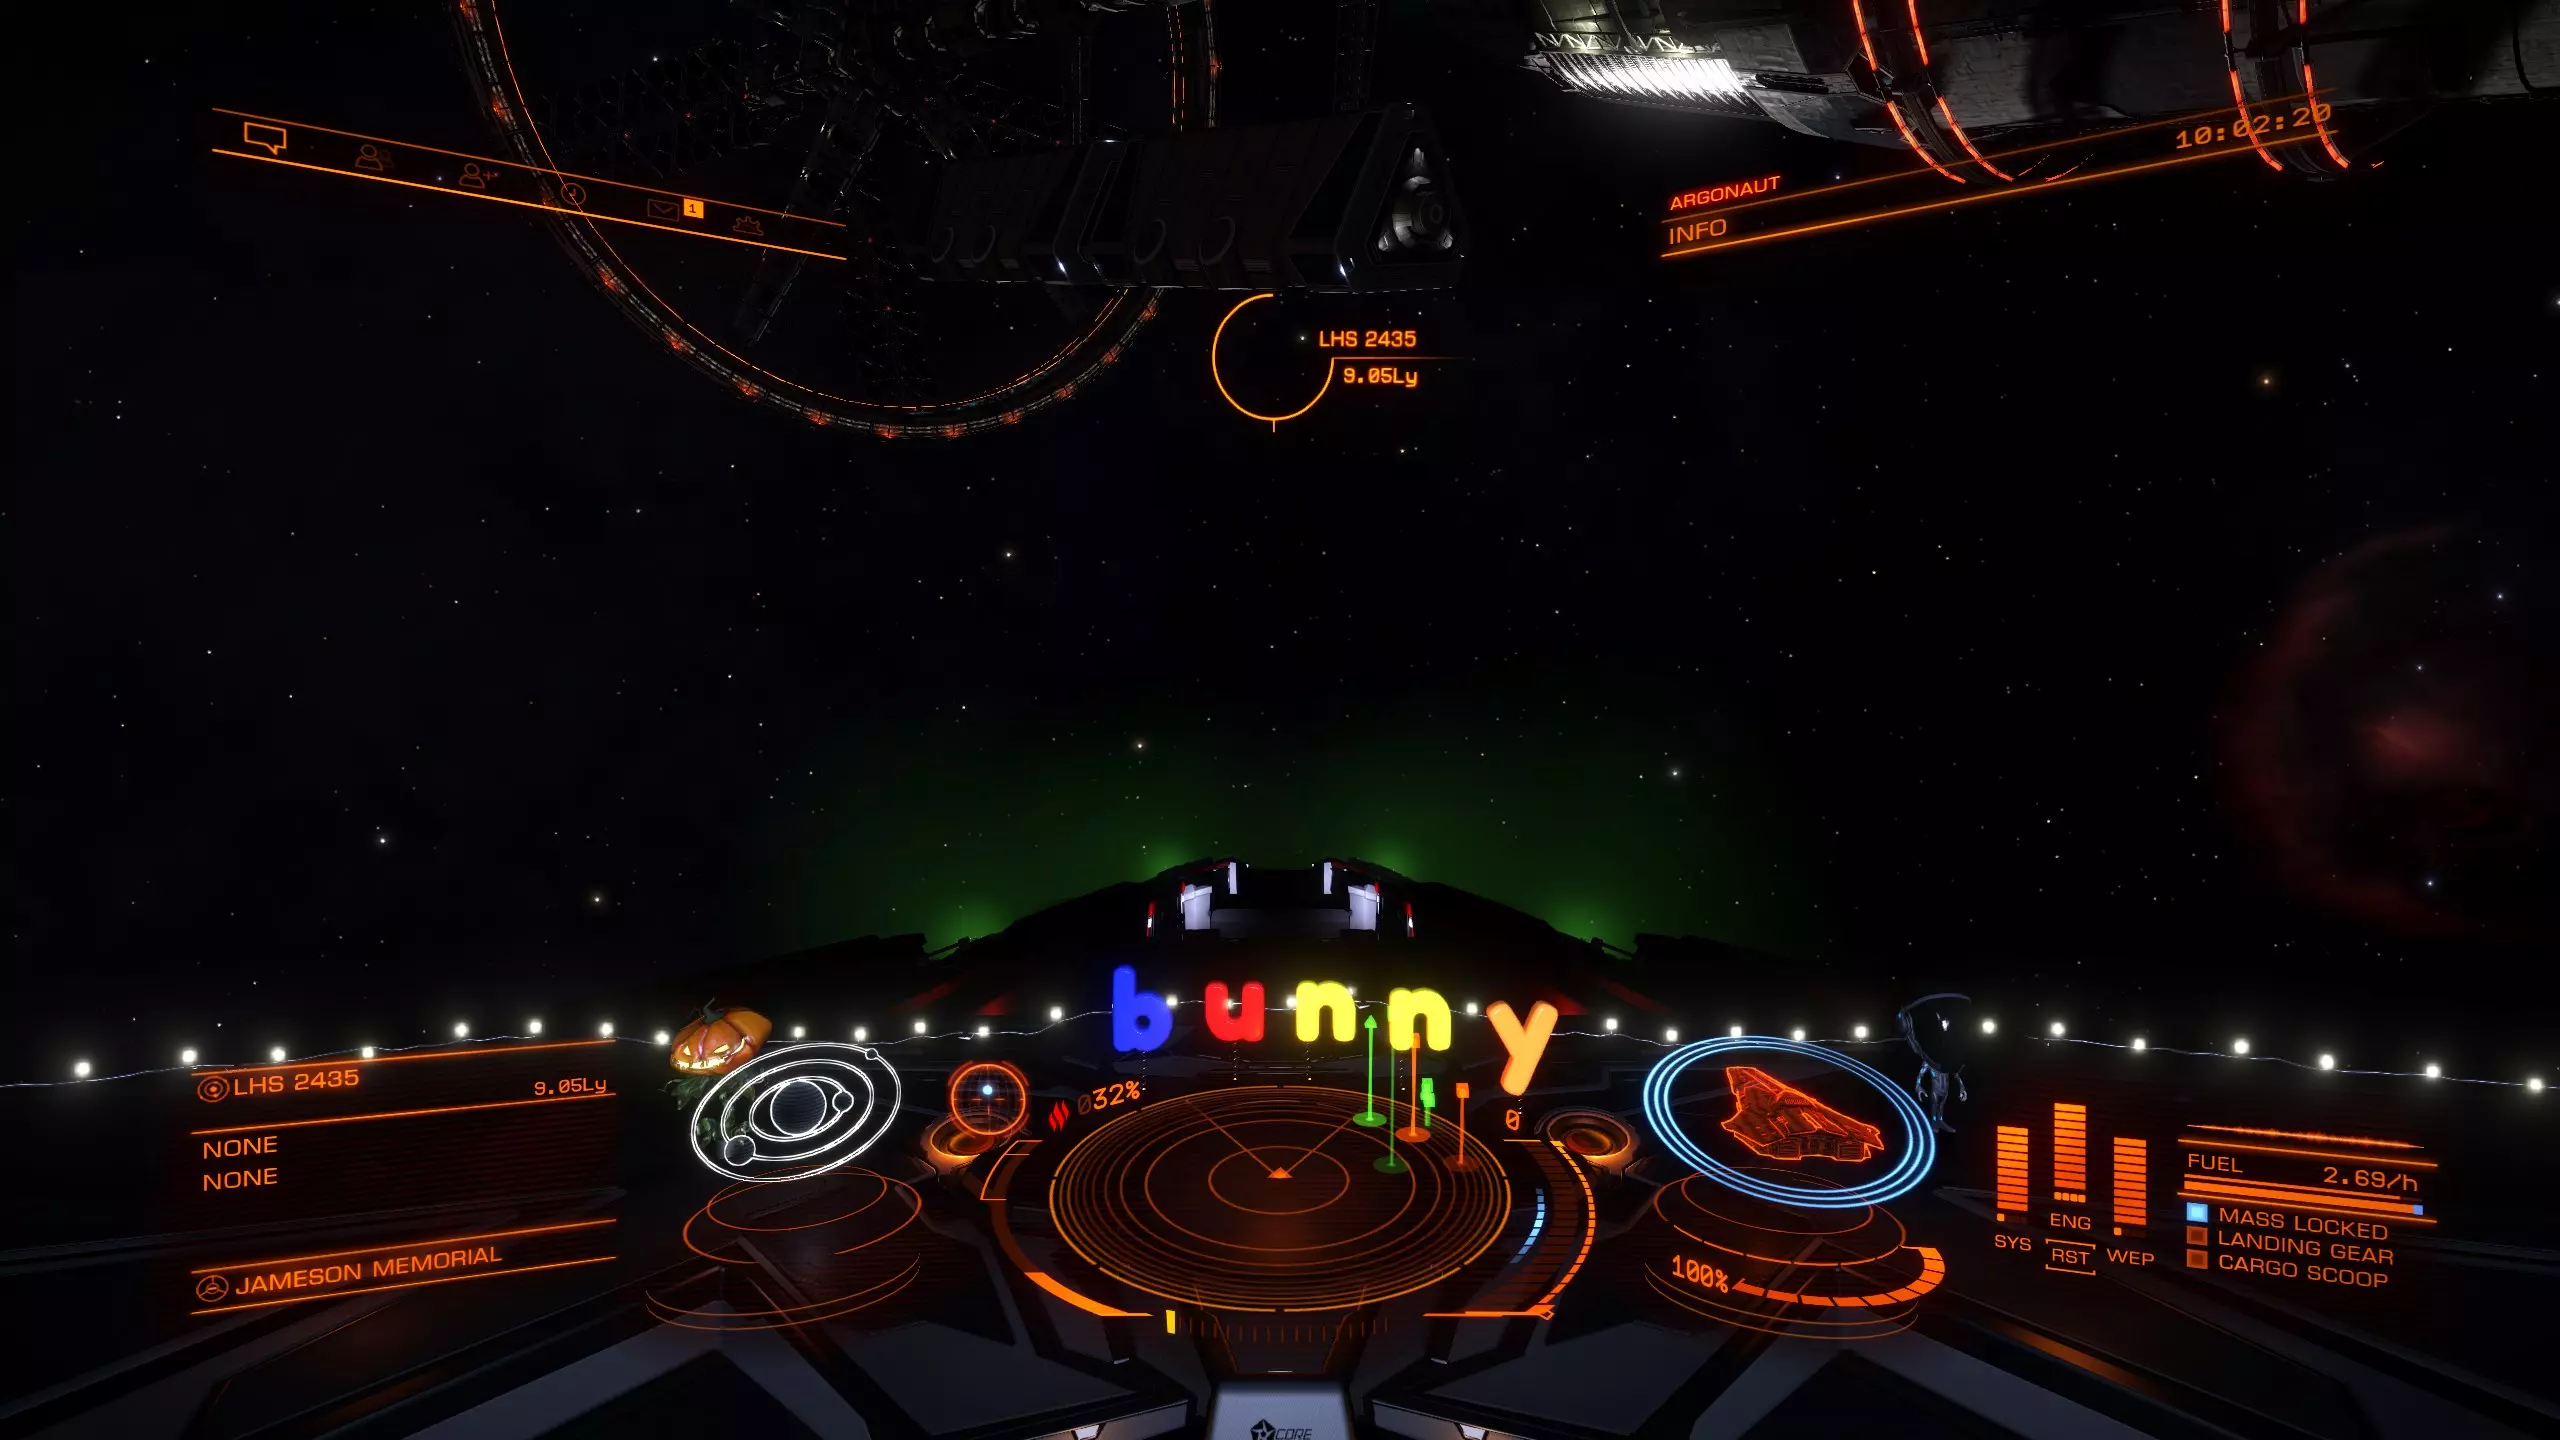
This is a indepth beginners guide that will cover most, if not all areas of the game you might encounter early in the game. I will mention some Endgame activities but they will take time to be accessed. You don't need any knowledge beforehand :3 Introduction Welcome CMDR! I play Elite since the release and i spent way to much time on it, without any end in sight. In that timeframe i have collected my fair share of tips and tricks that i hope will help you to have a easier start than i had. The learning curve is pretty hard but once you are used to it, it becomes really enjoyable. So, lets try to enjoy that as much as possible :3 ------------------------------------------------------------------------- This serves as my Update to my previous Guide: https://steamcommunity.com/sharedfiles/filedetails/?id=562708435 It will also be a bit more indepth. Controls The first and probably most important step: setting up your controls. This might take a while and varies a lot on what you chose to play on. The different options are: Mouse and Keyboard Gamepad Joystick and Throttle Dual Joystick I will go over everything you will need to start out with the game. If you have confidence that you don't need any help with setting up your controls, feel free to skip that part. The first thing you wanna do ist head from the main menu to Training. Here select Challenge Scenarios and then Docking Practice. You will find yourself inside a Ship staring at a spinning station. That offers you the possibility to test all the controls we will start filling in now directly ingame without risking of getting yourself hurt. Open the Menu with ESC, head over to Options and then Controls. As Preset i recommend using an Keyboard and Mouse one. Even if you plan to play on Joystick or Gamepad. That means we can use the Map with Mouse and Keyboard. Which is often easier than with the joystick :3 I will only go over the stuff we actually need. And only add a detailed explanation on what it does if it is missing ingame or not sufficiently explained. Keep in mind to make a Cheatsheet for important things you wanna keep in mind. Mouse Controls If you plan to play on Gamepad or Joystick make sure you set everything to off. The only thing to mention in this category is probably the difference between relative and normal mouse Axis. The relative option will just move your ship to the point you are pointing and then stop turning. That means your Mousecourse will slowly go to the center and then the ship will stop moving. On the normal version that does not happen and you ship keeps going into that one direction until you yourself return the cursor to the middle. Flight Rotation You will need Yaw, Roll and Pitch Axis here. Yaw will simply point your nose more to the left or right. Roll will roll your ship to the left or right. Pitch will let you aim up and down. Yaw into roll is pretty well explained in the game. Flight Thrust You will need Lateral Thrust Axis and Vertical Thrust Axis. Lateral is your normal strafe to the left or right move just like in any Shooter. Vertical is the same just up and down. Keep in mind that if you don't use AXIs like a Joystick but key or buttons, you want to use the "Thrust up, Thrust down, Thrust left and Thrust right" commands. Alternate Flight controls You don't need anything in here. You can bind a Key to Alternate Controls Toggle and then define new controls. And then switch freely between both setups. Purely optional but good to have in case you need it. Flight Throttle You will need Throttle Axis or Increase Throttle and Decrease Throttle. Depending on if you bind it on a Axis or a Button / Key. This will let you Accelerate and Decelerate. If you have enough buttons / keys, i highly recommend adding Set Speed to - 0%, 50% and 75%. 0% will be an "oh damn i didnt meant to boost here please Overlord Fluffy, let me not crash into the station" Button. 50% is important for Combat (more details later) 75% is important for Traveling (more details later) Flight Landing Overrides You don't need anything from here. It allows you to set up a different way to control your ship. This will automatically activate when you deploy your landing gear. Flight Miscellaneous You will need Toggle Flight Assist (press on the small + and change it to toggle for now. If you feel Hold would be better later on just switch. More about that later), Engine Boost, Toggle Frame Shift Drive and Supercruise. I recommend binding Toggle Frame Shift Drive and Supercruise out of conveniance. If your Target system is obstructed by a Planet, you would have to deselect your Target System just to be able to get into Supercruise. But if you have Supercruise bound on a different system you can just use that :3 Targeting You will need Select Target Ahead, Cycle Next Target, Cycle Previous Ship, Cycle Next Hostile Target, Cycle Previous Hostile Target, Cycle Next Subsystem and Cycle Previous Subsystem. One could argue you only need next or previous. I just prefer to have it. If you are short on keys or buttons you can shrink it down that way. Cycle Next Target and Cycle Previous Ship will cycle through all ships around you. Friendly, Neutral and Hostile. While cycle through Hostiles will only do that for Hostile Ships. Cycling Subsystems becomes more important the bigger the enemy Ship is you are trying to take down. More about that later. Weapons You will need Primary Fire, Secondary Fire, Cycle Next Firegroup, Cycle Previous Firegroup and Deploy Hardpoints. Firing Deploys Hardpoints On / Off whatever you prefer. Hardpoints are your weapons. Deploy Hardpoints will also retract them if they are already deployed. Cooling You will need Silent Running and Heatsinks. Silent Running is a very primitive form of Stealth. Only used for smuggling. Mor about that later. Heatsinks are a utility item that absorbs and stores heat from your ship and then ejects it. Miscellaneous You will need Divert Power to Engines, Weapons, Systems and Balanced power Distribution, Cargo Scoop, Landing Gear, Use Shield Cell Bank and Use Chaff Launcher. More about what divert power does exactly later. Shield Cell Bank is a way of recharging your Shields in combat. More about that later. Mode Switches You will need Target Panel, Comms Panel, Role Panel, System Panel and Game Menu. Interface Mode You will need UI Panel Up, Down, Left, Right, Select, Back, Next Panel Tab and Previous Panel Tab. Headlook Mode You need nothing here. Here you can setup your controls for Headlook. You find the Toggle Headlook bind in Mode Switches Galaxy Map You can try to set up your Joystick or Gamepad for it. I personally find both rather annoying to navigate with. So i mainly use Mouse and Keyboard for that. I don't have a single Axis bound but all Keys. Driving You will need Steering, Roll, Pitch Axis, Vertical Thrusters, SRV Primary Fire and Secondary Fire, Handbreak, Headlights and Toggle SRV Turret. Driving Targeting You will need Select Target Ahead Driving Turret Controls You need Yaw and Pitch Drive Throttle You will need Accelerate and Decelerate. Buttons or Axis depending on what you bind it to. Driving Miscellaneous You need Divert Power to Engines, Weapons, Systems, Balance Distribution and Cargo Scoop. You can use the same binds for Diver Power and Scoop that you used on your Ship. Driving Mode Switches Set them up the same way you have it done for your Ship. Congratulations. You have done it. Don't worry you will repeat that a lot of times. You will keep on working on your controls until you really feel like they fit now. Feel free to fly around and get to know the controls a little bit. Make sure to check your Pitch, roll and all the other inputs. If you Yaw to the left side and it moves to the right. go back to options, controlls and search for the Yaw, then just click to on inverted or regular to change it. Training Missions Now that you setup your controls you should jump into the training missions. There is really not too much to say about them. Do at least: Basic Flight Training Docking and Travel Training (make sure you can dock at least somewhat decently) Combat Training These 3 should be enough to get you starting. That's already it. Just follow the instructions :3 Docking So you finished at least the 3 trainings missions and have a small understanding of docking and traveling. Which is great :3 But there are some things to keep in mind while docking. First of all you can only request a docking permission while in a range of 7500m to the station, outpost, planetary station or megaship your are trying to dock with. Secondly there is right next your radar a small little circle with a dot inside.

看起来是这样的。 这会显示你的着陆垫的确切位置。 你可以多尝试一两次对接教程。 在这款游戏中,你需要进行大量的对接操作 :3 旅行 旅行可能是你最常进行的活动。 你经常处于超光速巡航状态。因此,飞过目的地或难以靠近目的地可能会非常令人烦恼。 下面我们来回顾最重要的事项。 有两种旅行方式:跳跃和超光速巡航。 跳跃允许你从一个星系前往另一个星系。而超光速巡航则允许你在星系内前往不同地点。 让我们先谈谈跳跃。 你需要知道自己的跳跃范围,即你的飞船能够跳跃的距离。 这是由很多因素计算得出的。我们稍后会详细介绍。现在,只需前往右侧的【舰船面板】并进入功能界面。
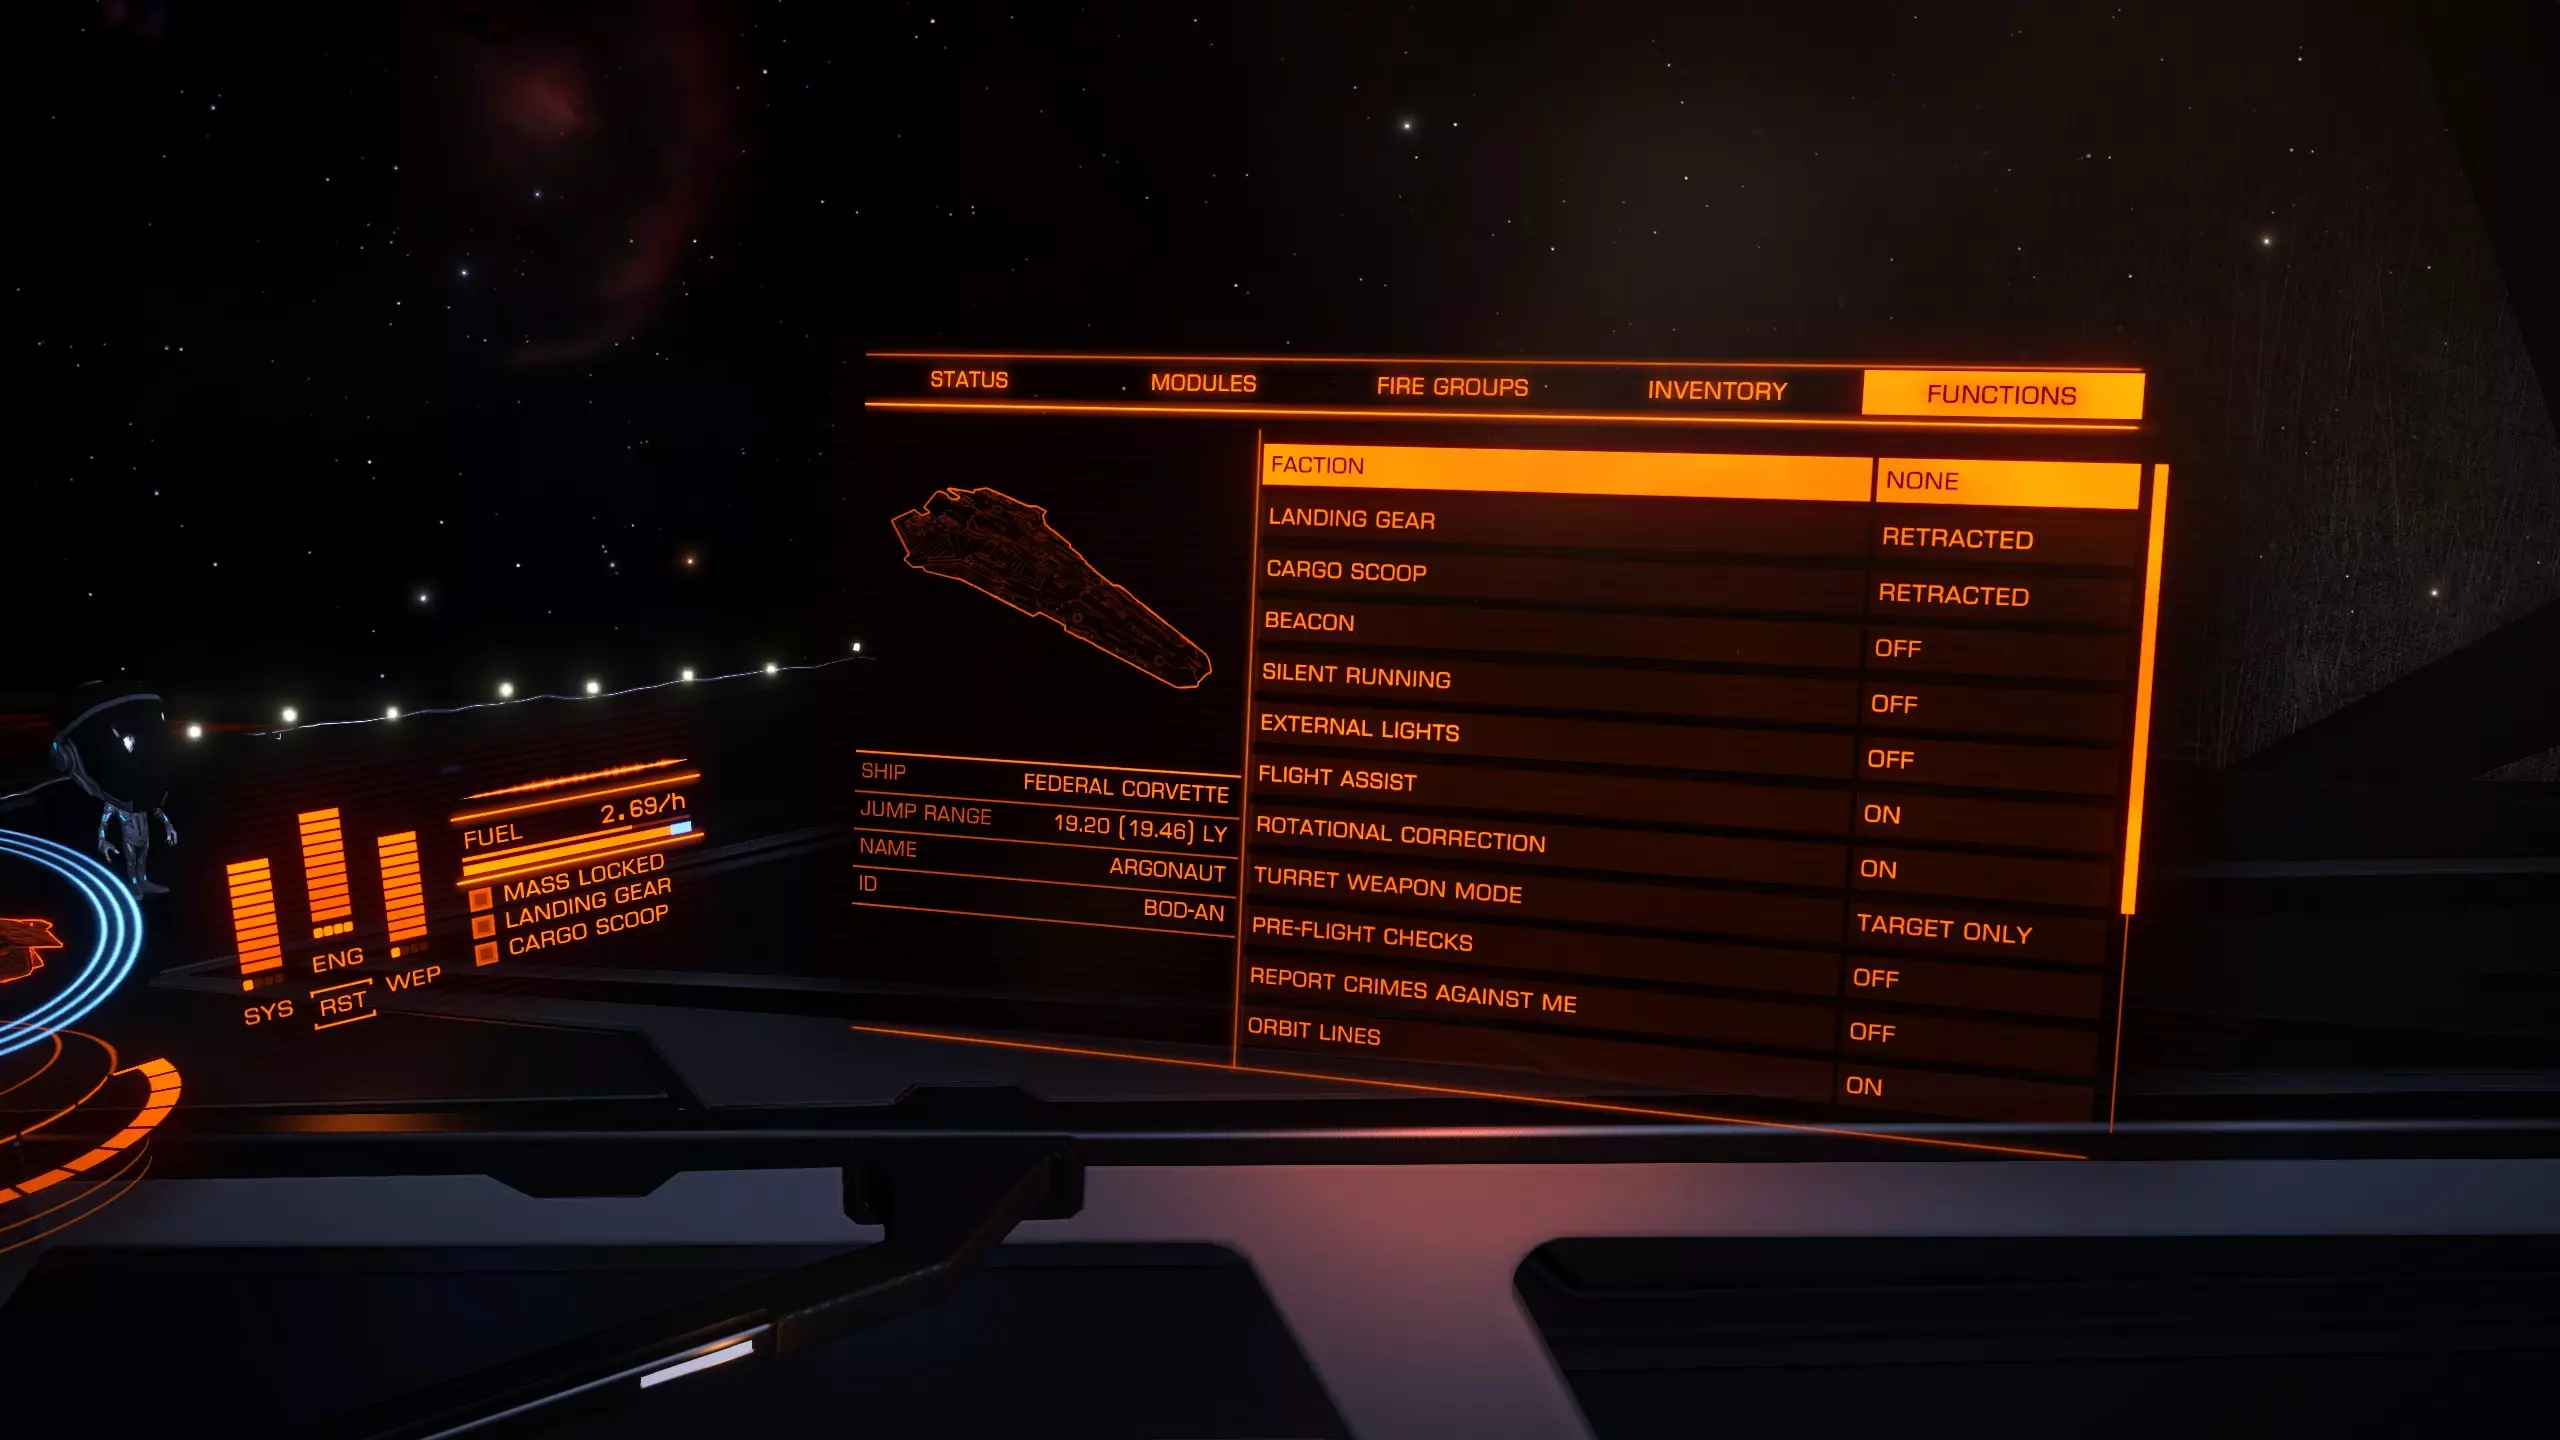
现在你将看到你的飞船、跳跃距离、名称和ID。我们只需要不带括号的那个。 如果你在右上角收到如下所示的警告消息:

这意味着你的目标距离过远,你需要规划一条前往目标星系的航线,而不是单次跳跃。那么如何规划航线呢?又该如何选择其他星系?你可以通过星系图来操作。在飞船内,选择左侧屏幕上的星系图。你应该会看到类似这样的界面:
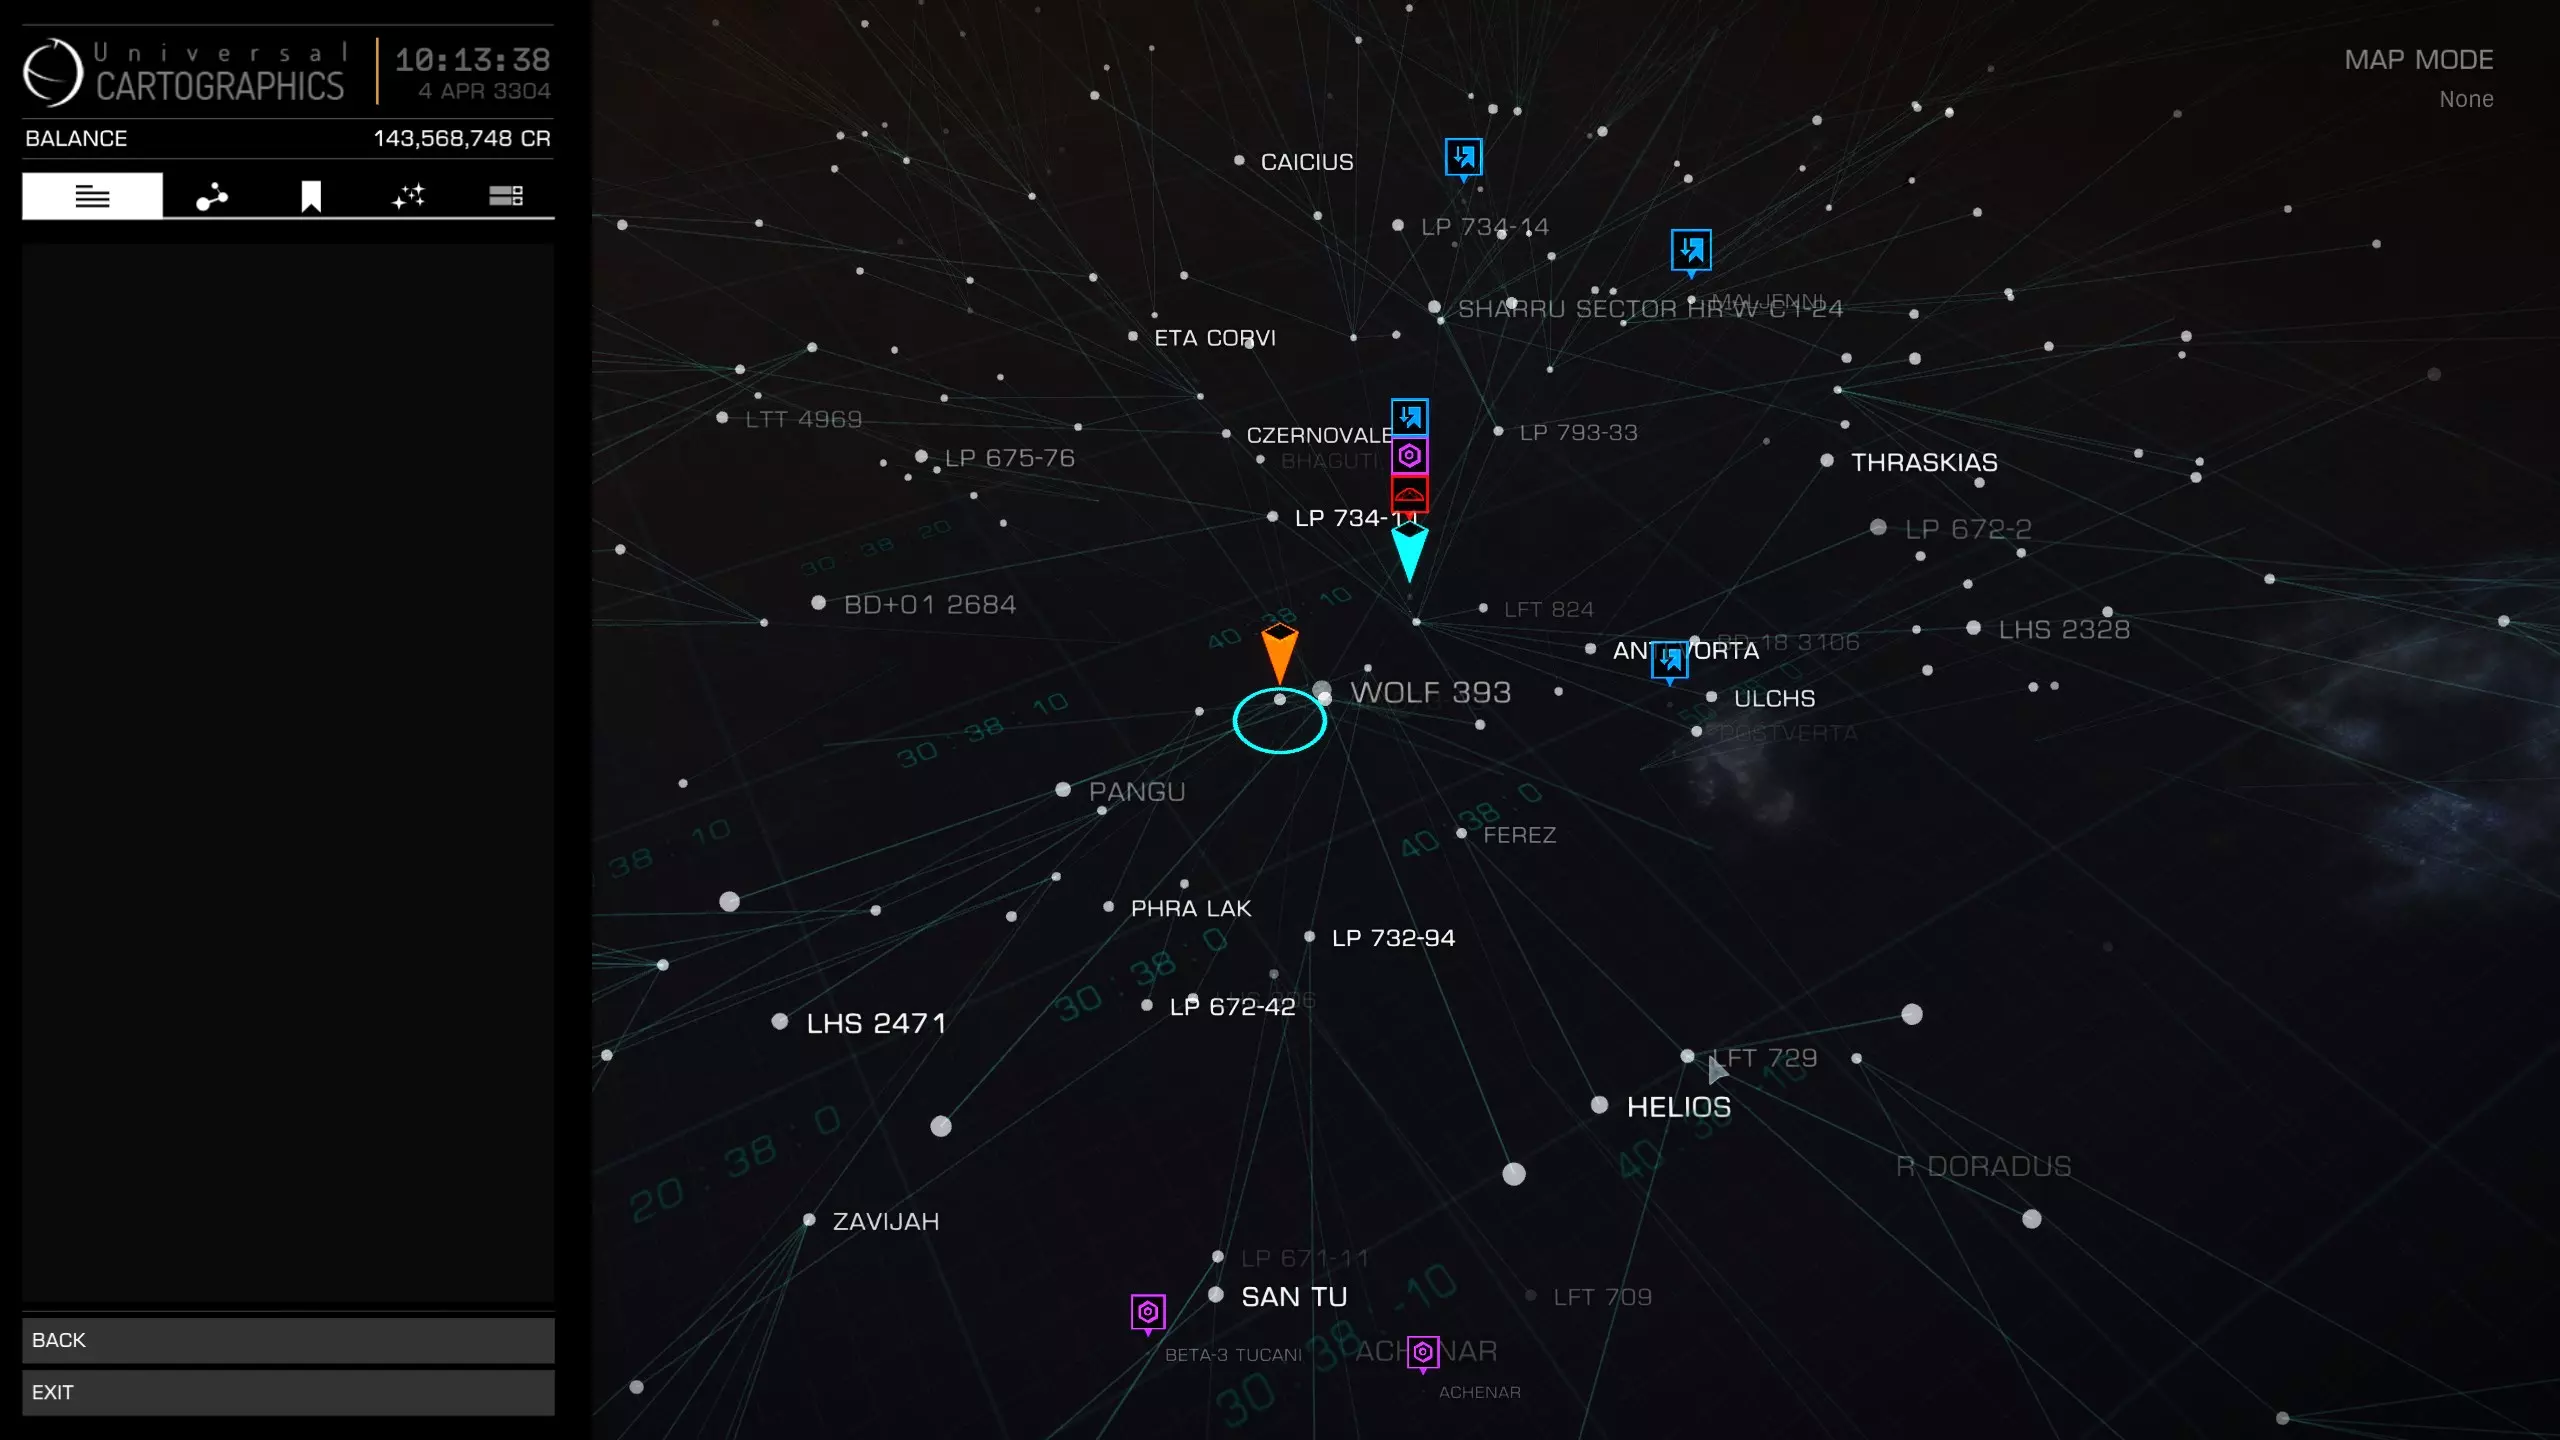
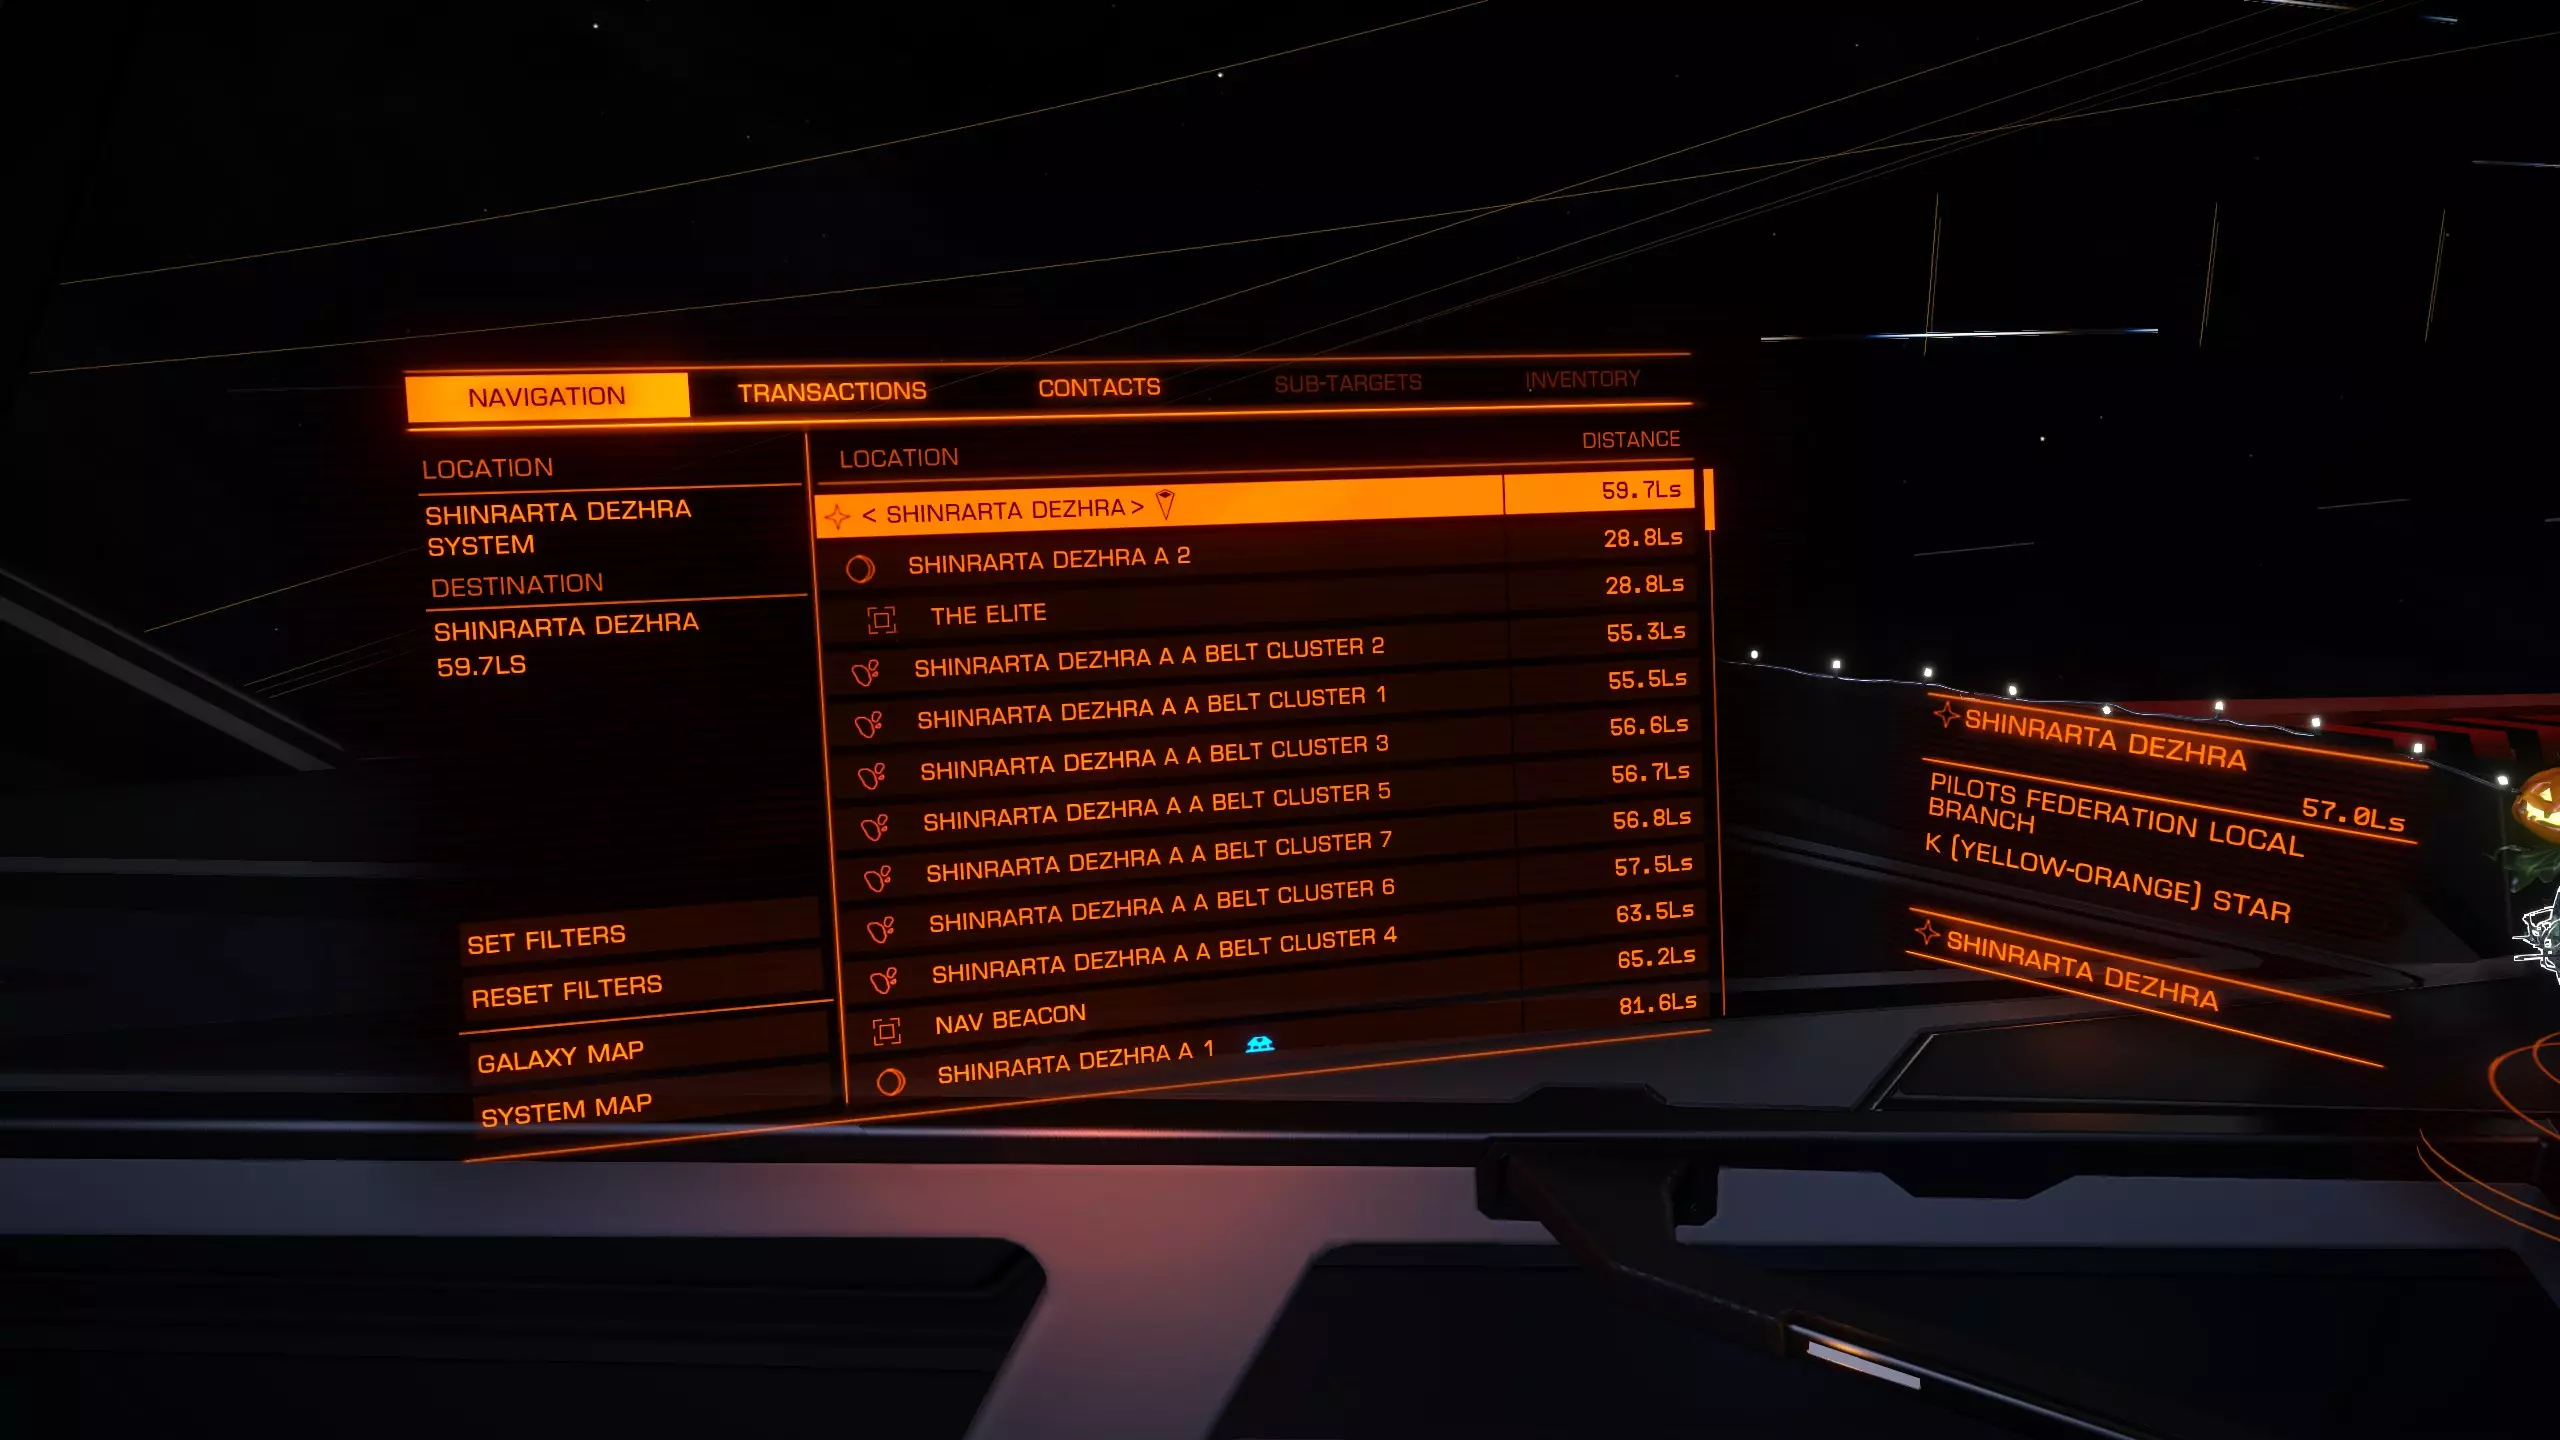
在此处你可以选择任何系统。左侧有多个不同的标签可供选择。第二个标签可用于搜索特定系统。
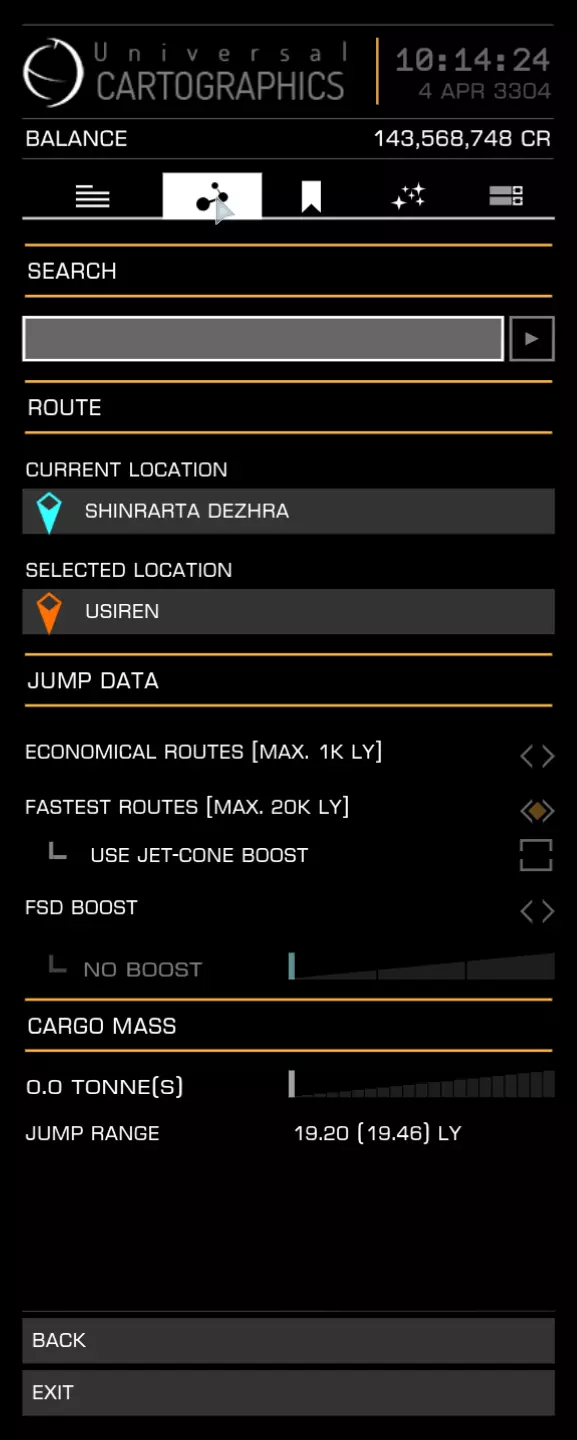
在这里你可以输入想要前往的星系。界面还会显示你的当前位置和已选择的位置。我建议使用最快路线。不要使用喷射锥推进和FSD推进,这两项功能更适合经验丰富的玩家。 第三个栏目是你所有已添加书签内容的集合。 第四个是筛选系统。你可以筛选各种内容,比如特定服务、商品、恒星类型,甚至可以将筛选应用到路线规划中。例如,你可以只选择可 scoop 的恒星(可以从中 scoop 燃料的恒星)并应用到路线上,这样你的旅途中不可 scoop 的恒星数量会大大减少。 第五个仅为地图显示选项。比如显示工程师或显示受损的太空港。现在你可以直接选择想要前往的目标星系并进行跳跃。有时可能会出现目标被阻挡的情况。
这意味着你需要先进入超光速巡航模式并绕行星飞行。目标系统若未被遮挡,则会显示清晰的航线。
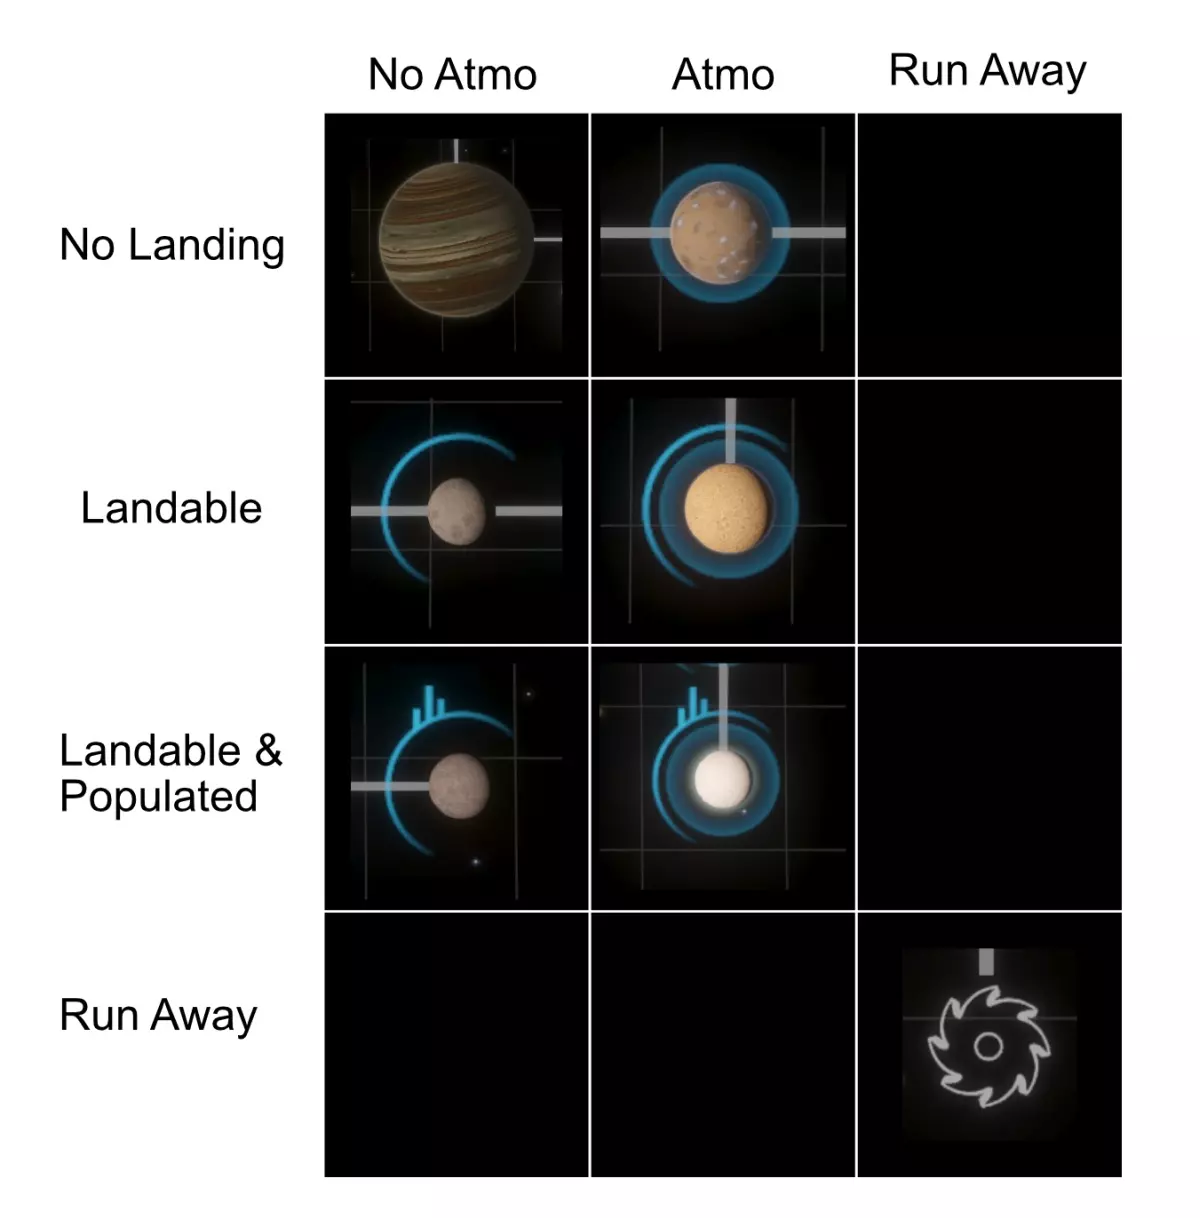
以上内容应该涵盖了跃迁到其他星系的操作。接下来我们谈谈超光速巡航。超光速巡航是在星系内进行的旅行方式,可用于在空间站之间往返,或从行星基地前往资源开采点。许多新手在刚开始使用时常常会遇到过冲的问题。那么我们先来看一下这张图片:
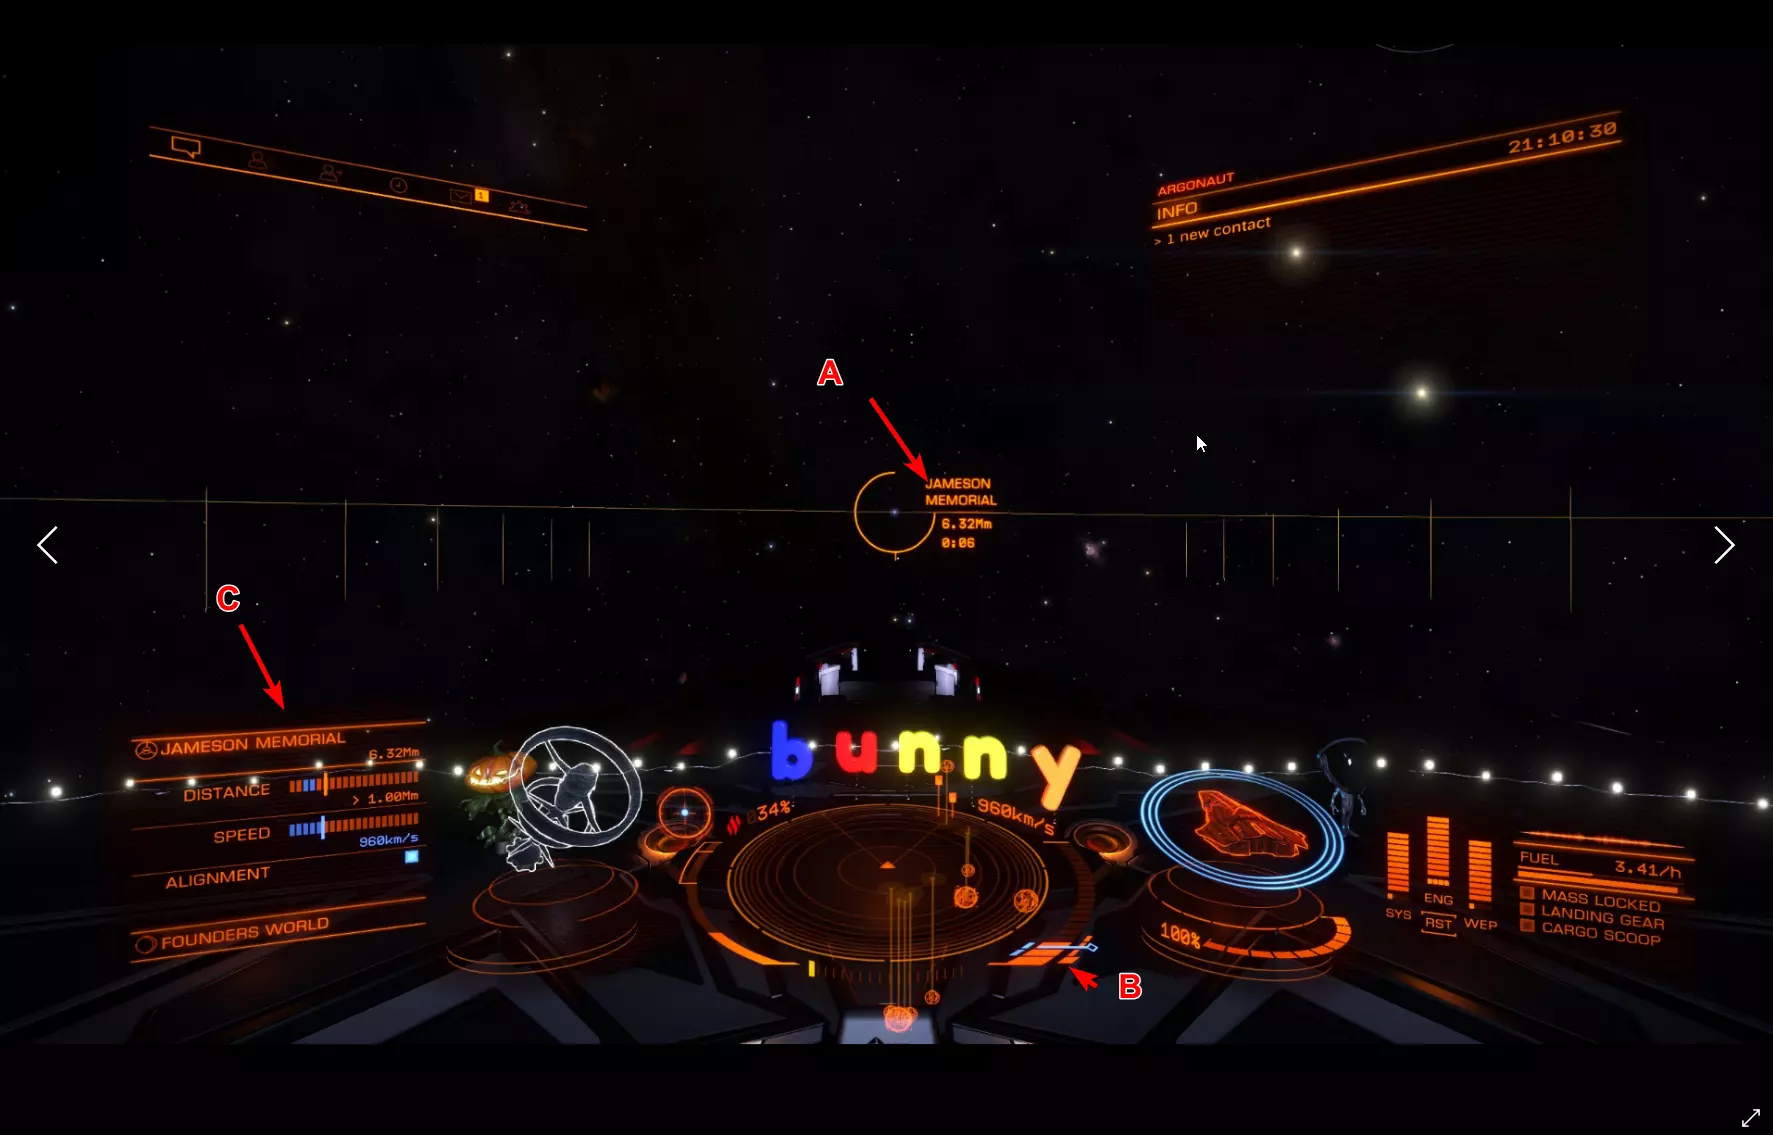
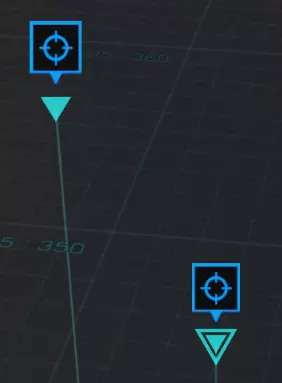
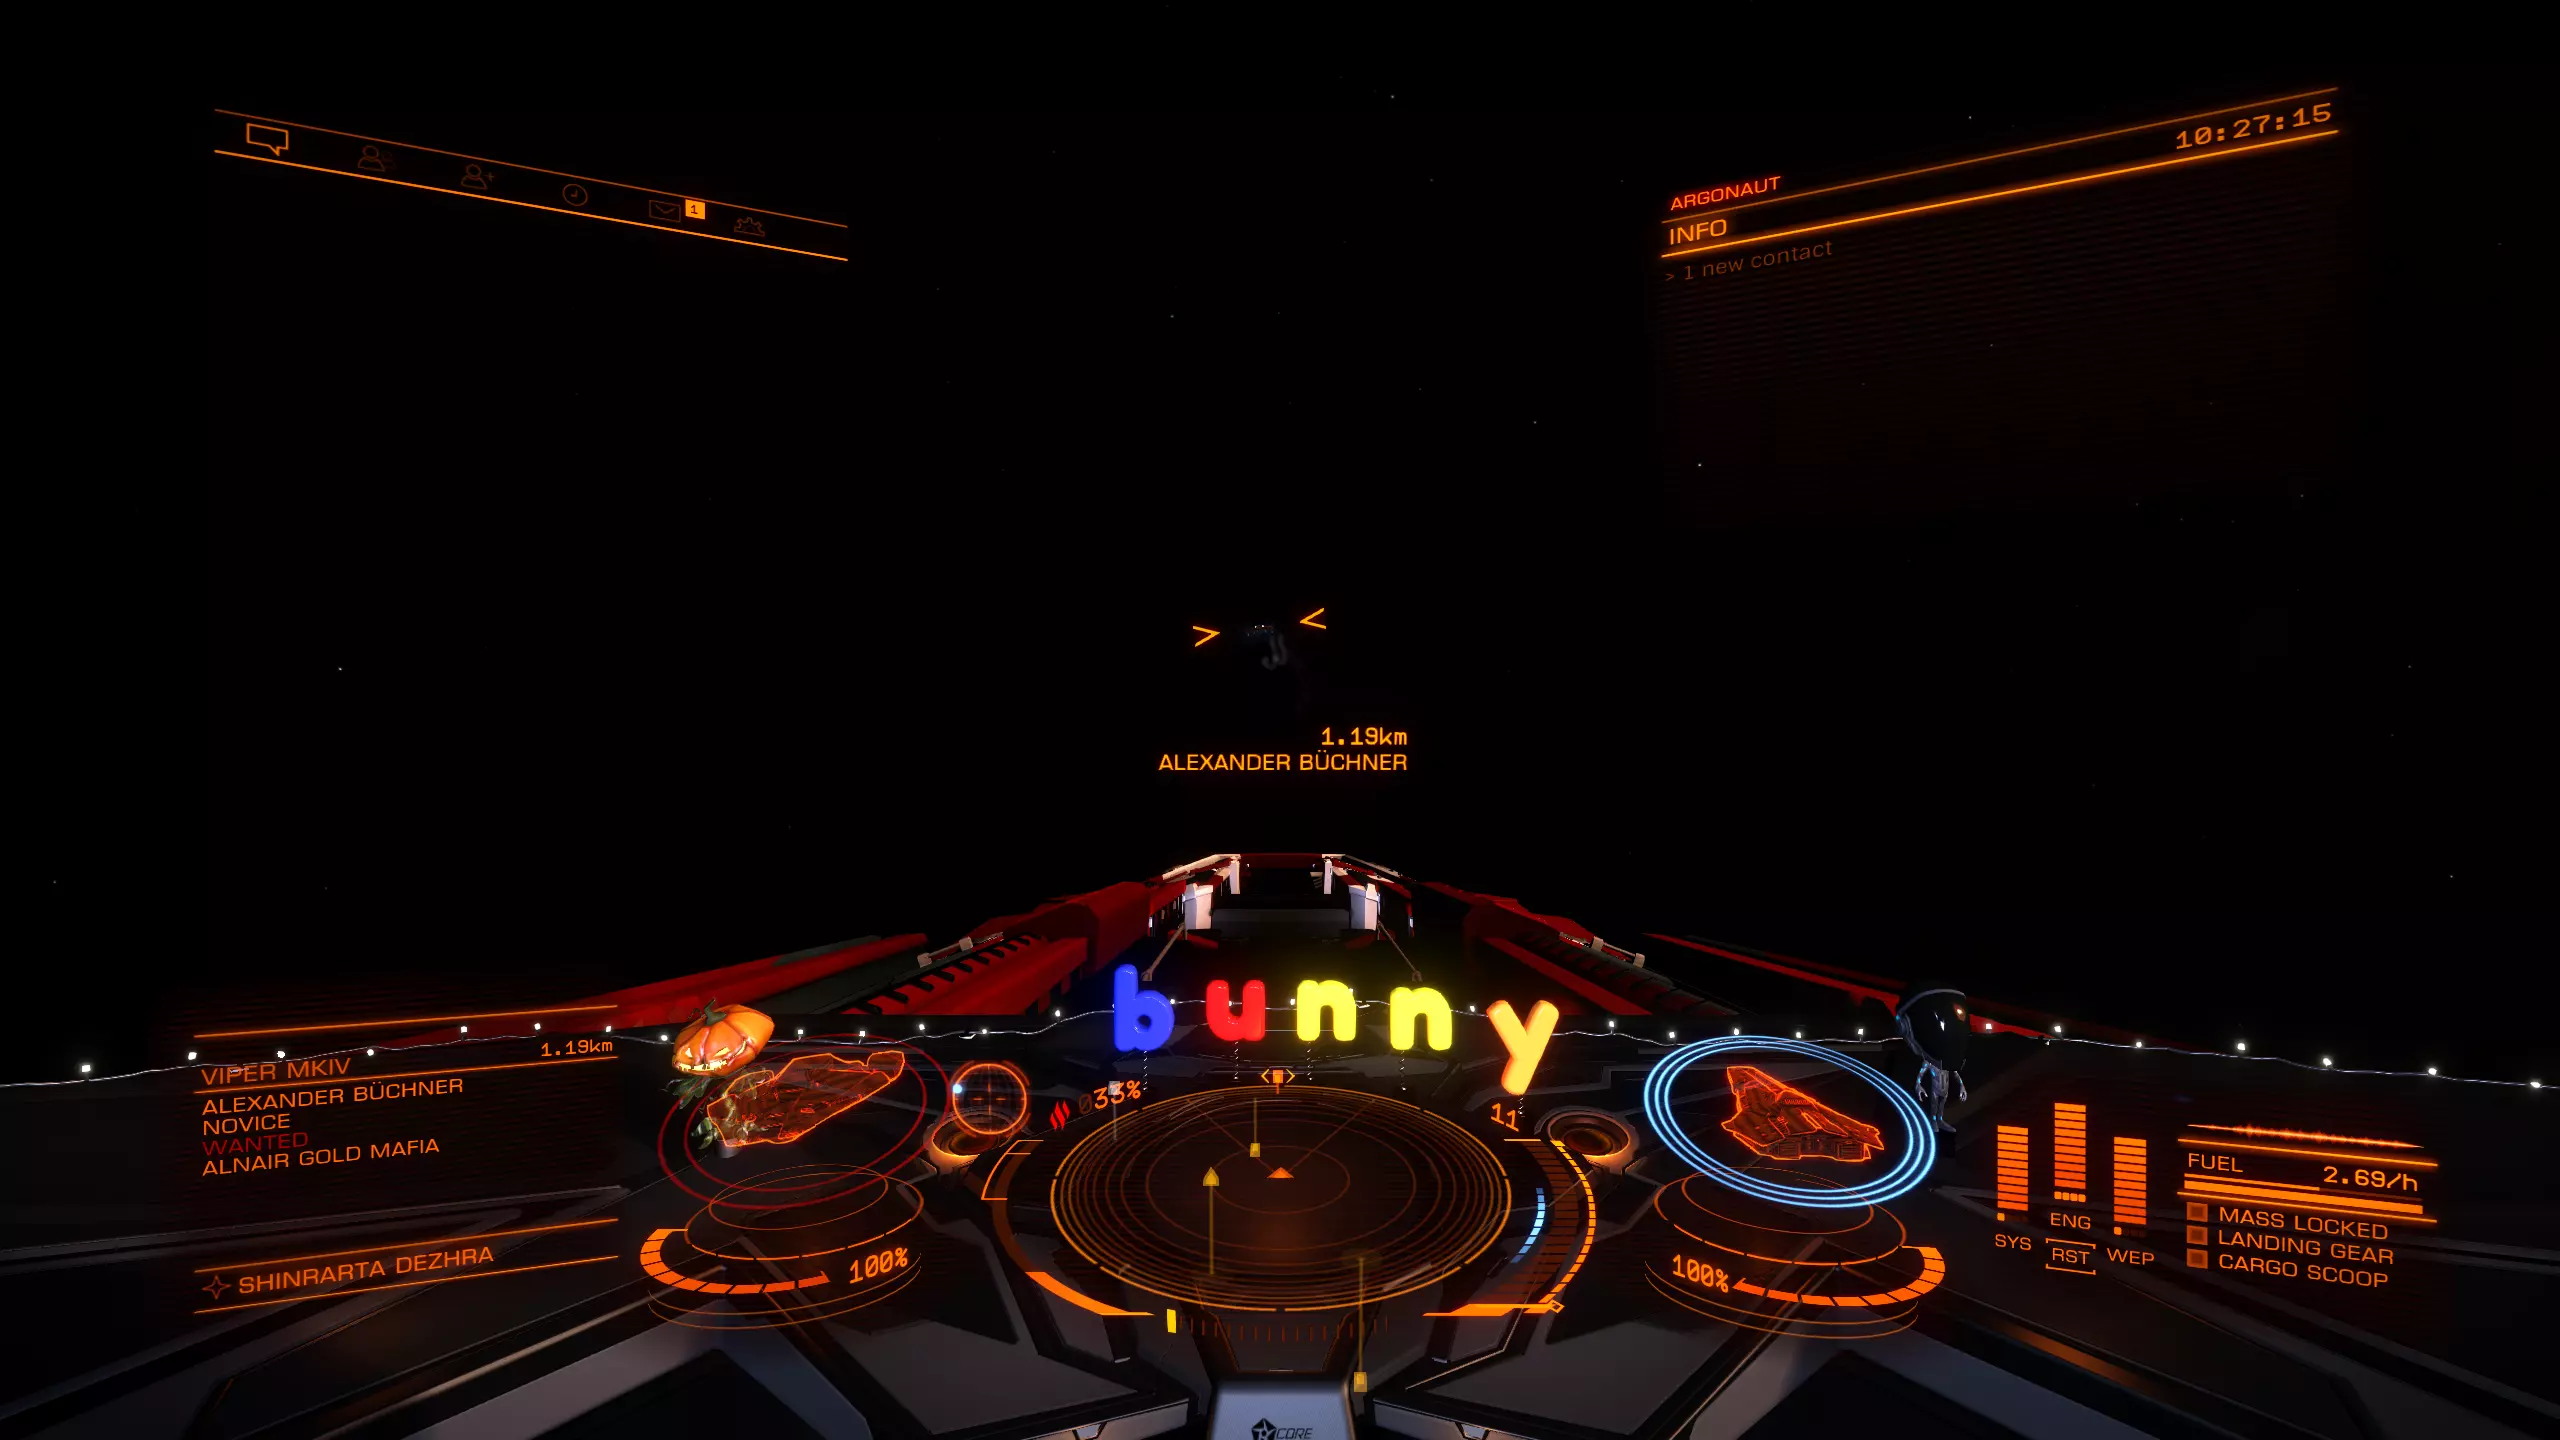
A displays the target you are heading towards. You can also use the small circle with a dot to get the target into sight that we learned about in the docking section. You see a Distance and the remaining time till arrival. Once the remaining time till arrival, also known as ETA (estimated time of arrival) hits 9 seconds, throttle down to 75%. (Remember the keybind i mentioned in controls, that can help you here) But even if you don't have a specific keybind for that, you can see on B the Blue line where your speed is displayed. Try to set your speed in the middle of that blue line. C Displays also your distance, speed and alighment. If all 3 of them are in the Blue you can safely disengage. You will also get a message in the middle of the screen that tells you that you can now safely disengage. This might take a moment to get used to. But don't be disencourage if you overshoot a lot in the beginning. That happened to everyone :3 Weapons This will only be a short overview over the normal weapons. Experimental weapons will not be covered. Since they are rather lategameish anyway. Nothing a beginner needs to worry about. So lets keep that as simple as possible. There are 3 different forms of damage. Thermal, Kinetic and Explosive. Each of these has a resistence you can improve through engineering on Shield and Armor. There is a forth one called Absolute. But, as the name implies it is absolute damage. So lets start with Thermal Weapons There 3 Major weapons in that Class. Beam laser, Burst laser and Pulse laser. Beam laser deal the most amount of damage but also produce the most heat and cost the most energy. Burst laser are the middleground. Pulse laser are really heat and energy friendly but the dmg is a lot less compared to beams. For Kinetics there are 2 weapons to highlight. Cannons and Multicannons. There is not much to say about these. The best way is simply to test the weapons out once you think about building a combat oriented ship. The information about the weapons are pretty good ingame, but i will provide later a site that can help you planing out ships. Modules Modules are your ship internals. So lets go over them one by one and i will tell you a bit about them and what exactly they do. As a beginner you sure wonder what is the most important part to upgrade. After reading through that secion, i hope, you can make that decision for yourself. There are 2 values you need to know about. Size, displayed by a number. and Rating, displayed by a letter. Normaly you always try to buy the right size. You only downgrade Modules for specific builds. Exploration Builds often use lower sized internals to save Mass to gain a better Jumprange for instance. The Rating is more like a Quality indicator. A is the best quality you can get and E is the worste. D Rated mods are the lightest mods. (That will become important once you try to build a Exploration Builde) But D mods also provide lesser output. So a D rated power plant will be lighter than an A rated the same size. But it will provide you with less power. Lets start with Core Internals: Armor: Lightweight Alloy is the Armor every ship comes equipped with when you buy it. There are different variants you can buy. They are really pricey compared to other things on the ship. Armor increases your Integrity. Your Armor Lifepoints if you so wish. It can also increase your resistances depending on what armor your pick. This shouldn't be too important for a beginner tho. Power Plant: You Powerplant does not only provide the needed power to get everything running on your ship. It also determines how heat efficient you ship will be. How good it handles heat produced from other systems. Thrusters: Thruster provide speed and how your ship handles. You also need to keep in mind how heavy you ship is. That normaly is not a problem on Multirole or Combat Ships since you aim mostly for A Rated Max Sized Thrusters on them. And they provide normaly more than enough Maximum Mass to never run into problems. Frame Shift Drive: Probably one of the most important internals for EVERY ship. You want that always in Maximum Size and A Rated. This in combination with your total ship weight, defines how far you can jump in one jump. So these can really improve your Travel experience by quite a bit. Life Support: Life Support provides oxygen in case your Canopy (the window infront of you, and no, not the Monitor, the one inside your ship which keeps you alive) breaks. The higher rated the module the longer it will provide oxygen. E Rated = 5 Minutes while A rated = 25 Minutes. Power Distributor: This is really important for Combat. The Power Distributor defines how fast you Ship recharges its boost. And your Weapon Capacity (more to that later) Sensors: Sensors Pick up the heat ships give off through emission. The higher the grade the longer the distance you can pickup ships on your sensor and the further you can scan these ships. Optional Internals: There are just a lot of optional internals. They vary from Cargo rags to Shield Generators, Shield Cell banks and a lot more. Most of them are easy to understand. One of them is really important. It is called the Fuel Scoop. This fancy little internal module lets you scoop from certain Stars fuel. Which means you don't need to dock on stations all the time. And you can travel unlimited distances without ever having to stop for a station to refuel. Hardpoints: This are the slots you have open for Weapons. They change greatly from ship to ship. Utility Mounts Utility Mounts offer you a way to bolster your defense with Shieldbooster and add certain abilities to your ship. These range from different scanners to defence abilities like Chaff Launcher. Combat (Bounties and War) Combat is the first Profession i wanna talk about. Combat is in a weird position. It is the one profession that needs you to invest heavily in the game the further you wanna take it. Currently this is split into 3 Major parts. Bountyhunting: This allows you to make money by hunting down Wanted targets. There are multiple ways to go about this. The safest one, and the one you should try first, is at Nav Beacons. Every Star in a populated system has a nav beacon. You will find it on your left Panel under Navigation. You need to be fairly close to the Star for it to pop up sometimes.
在超光速巡航状态下你可以看到它。当你足够接近时,将其选为目标并脱离超光速巡航,你会看到不同种类的飞船。在联系人列表中选择一艘飞船,然后将机头对准它进行扫描。
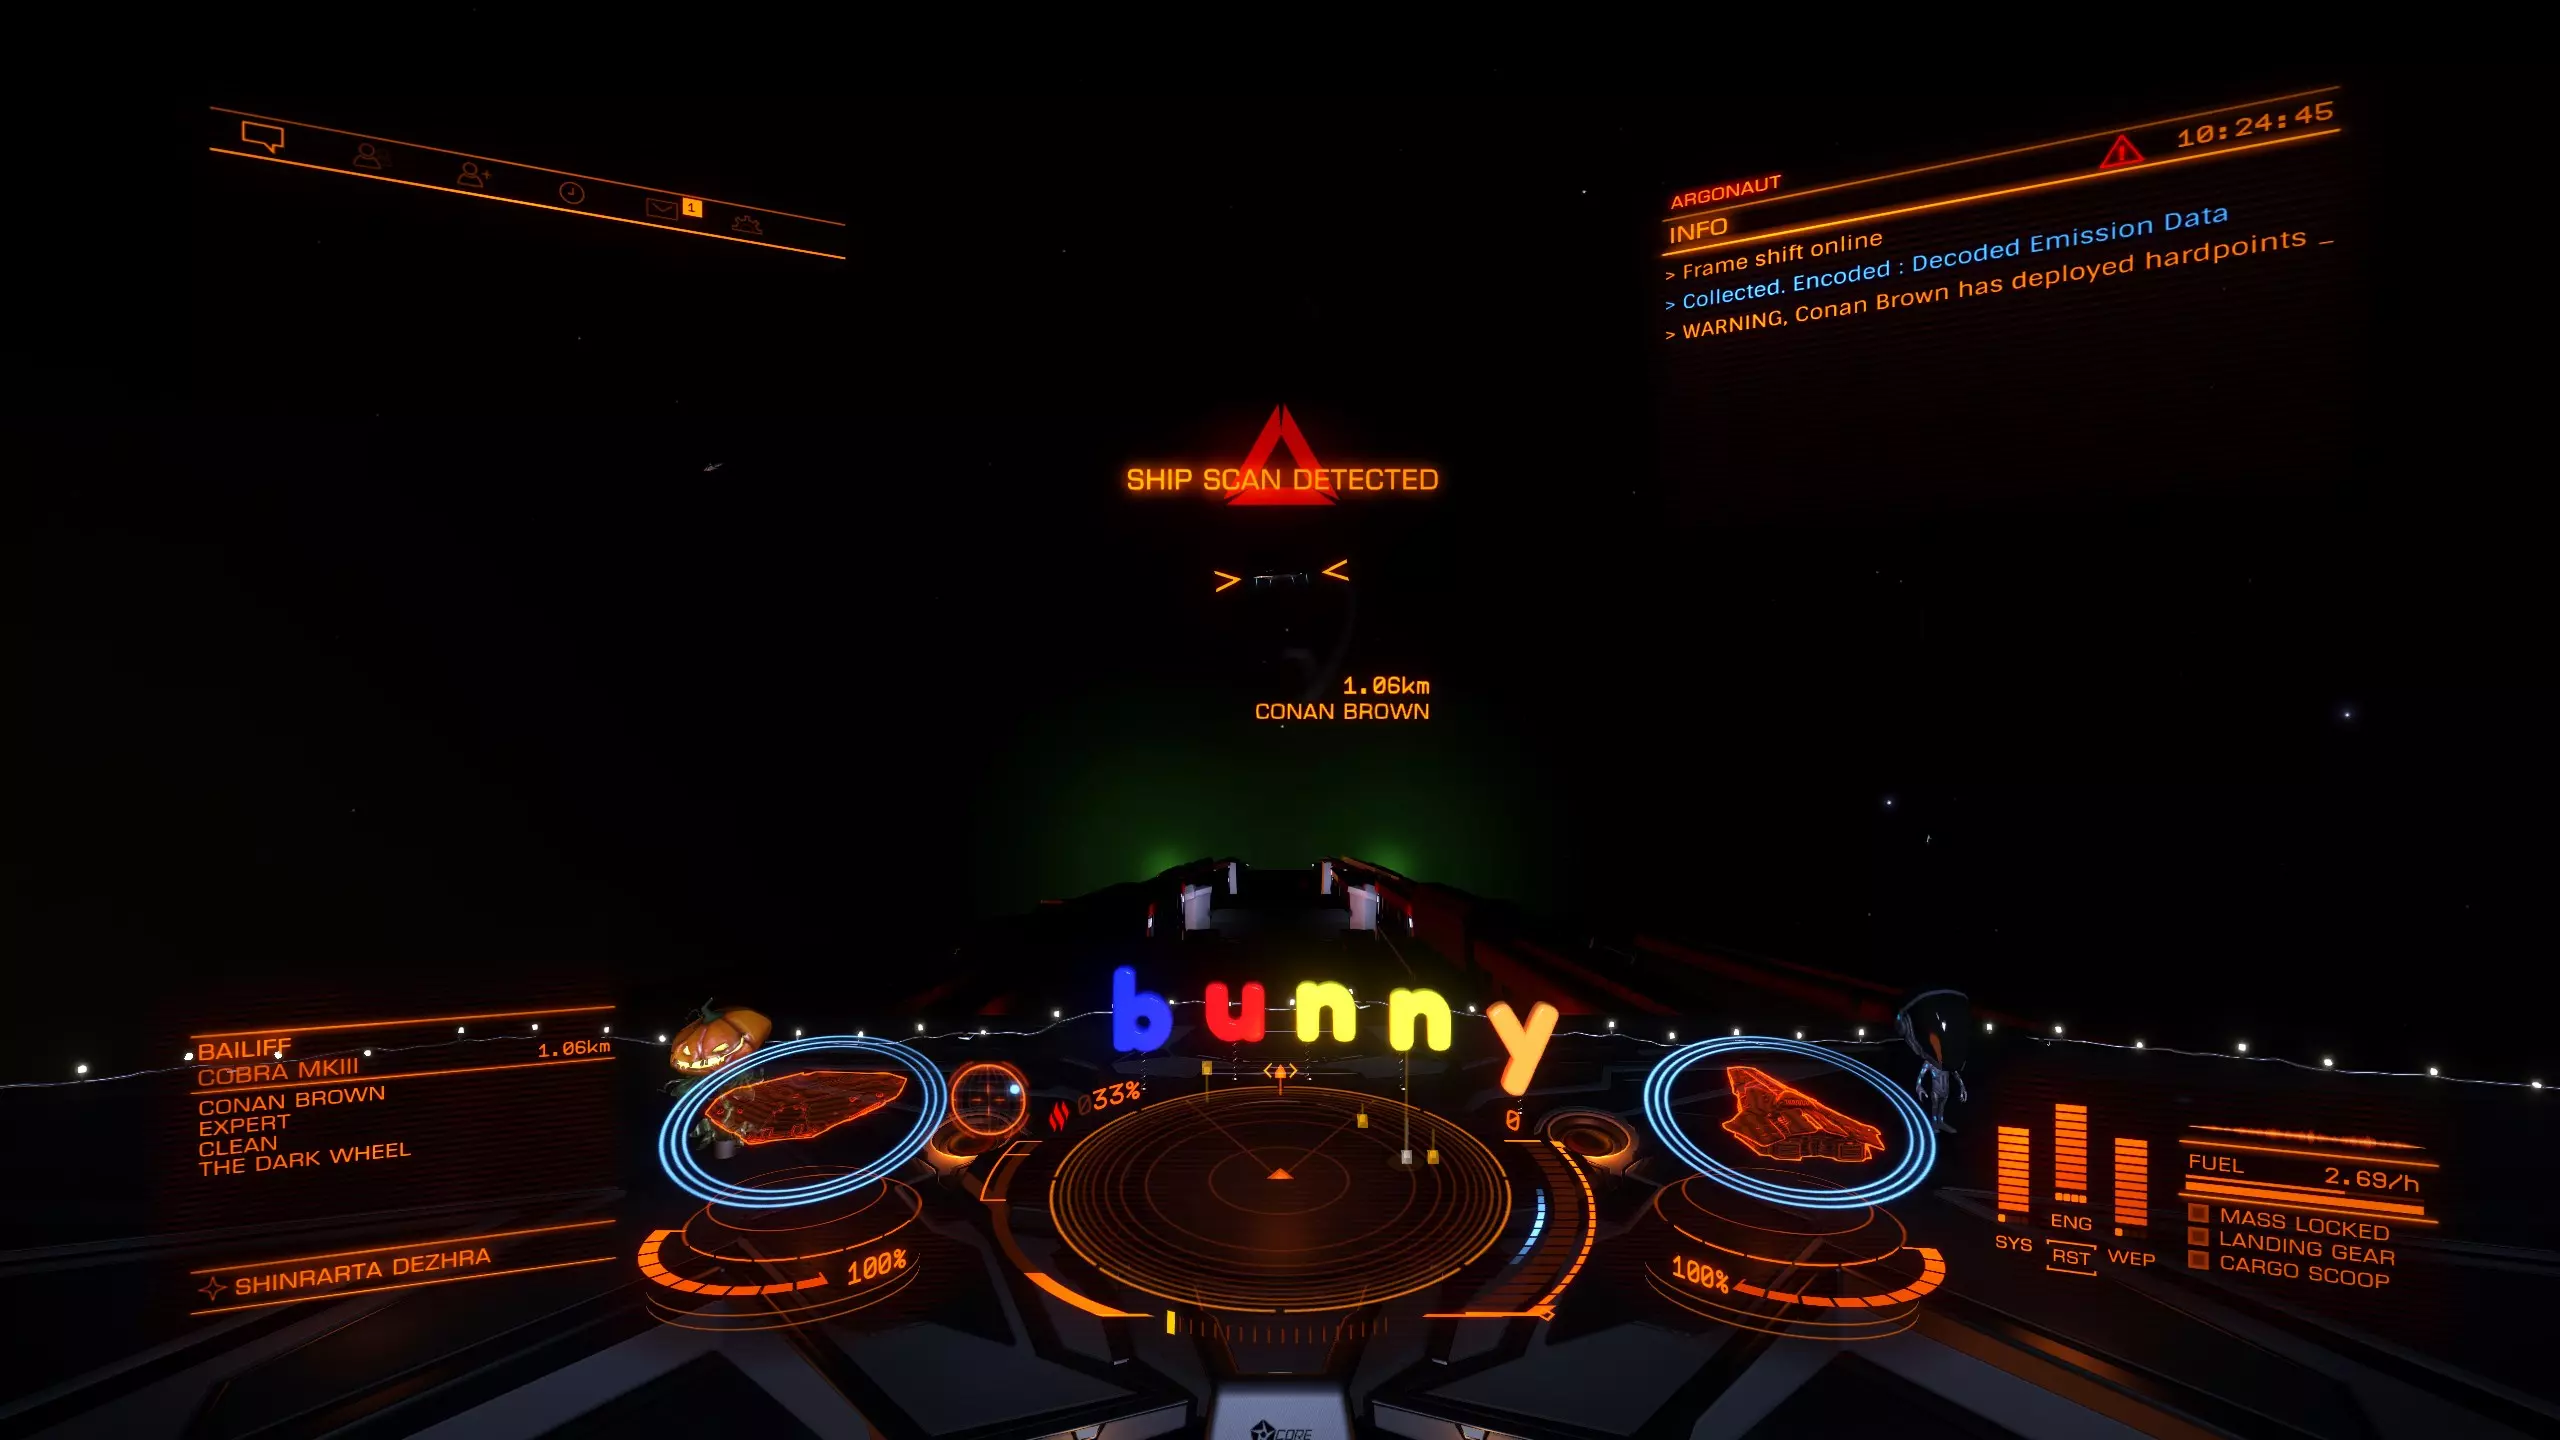
你可以在左上角看到选中的目标。
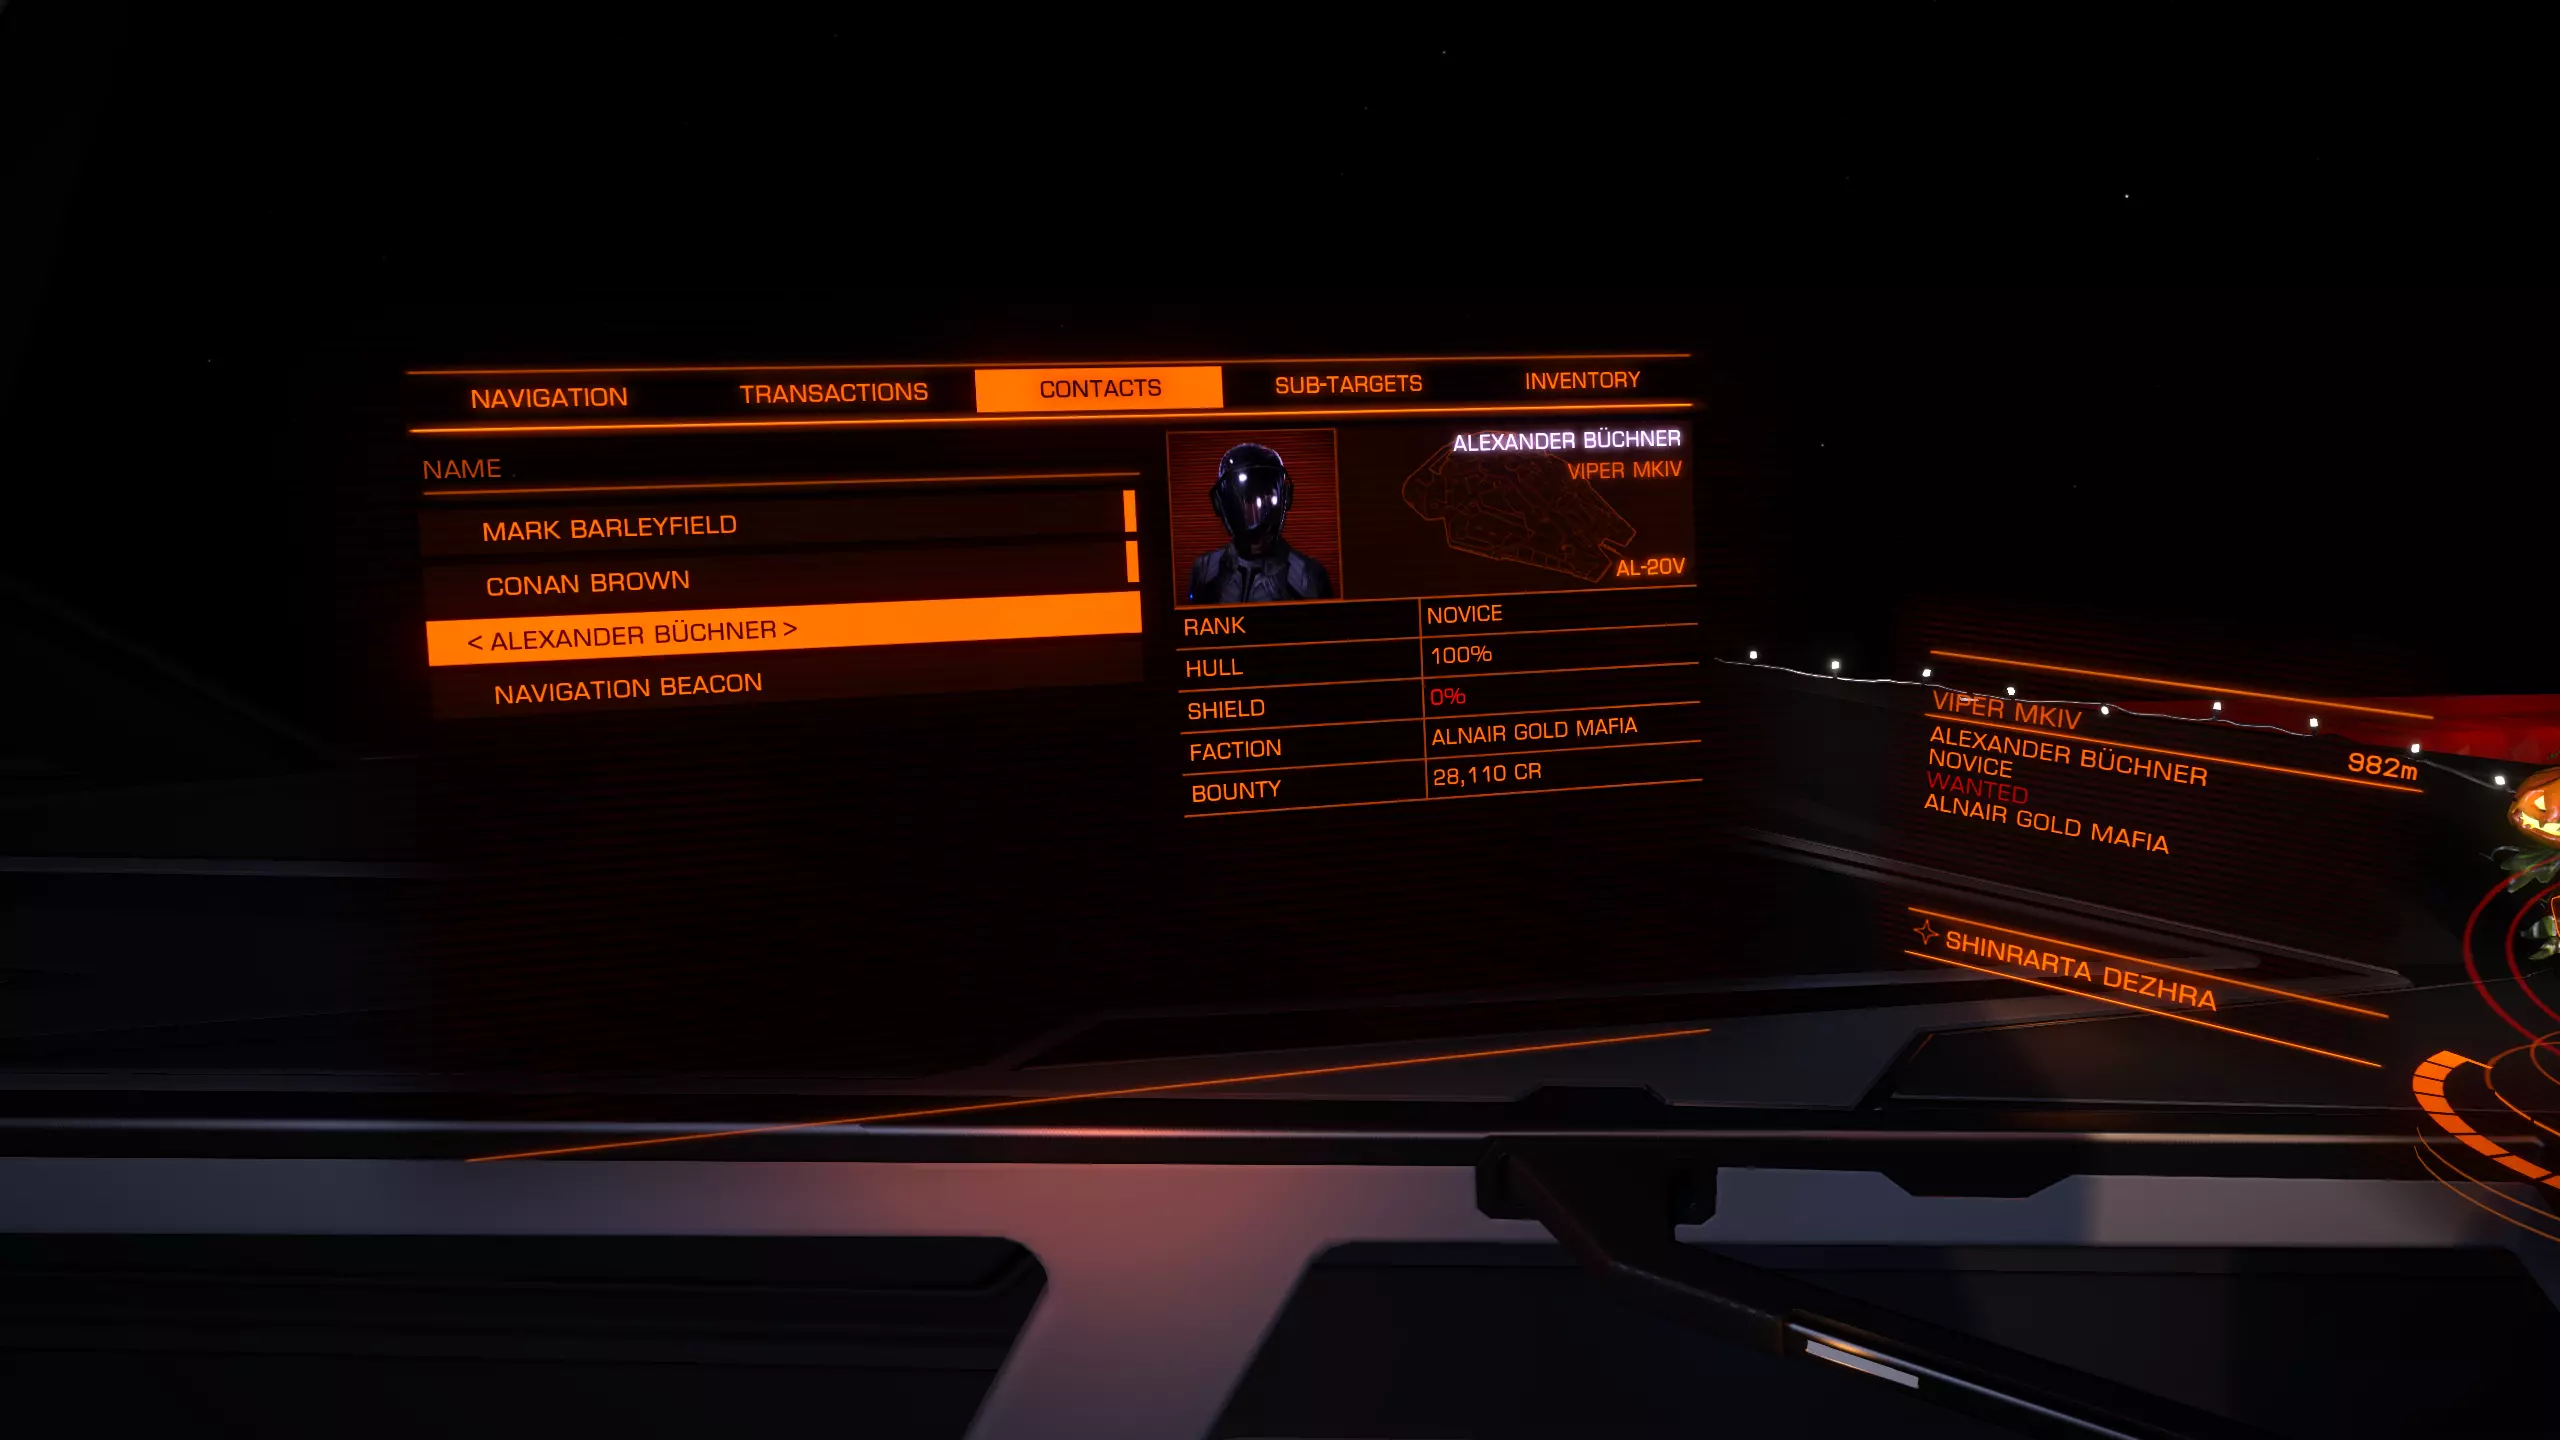
在这里你可以清楚地看到,目标在当前星系是清白的,没有被通缉。他可能在其他星系被通缉,但你需要使用【杀戮 warrants 扫描器】才能查明。不过,等你拥有一艘装备良好的飞船后再考虑这些也不迟。 那么,我们来看看被通缉的目标会是什么样子:
我们可以看到目标是被通缉的。如果你想知道具体的通缉金额,只需在选中该目标时切换到联系人列表,就能看到相关信息。
在那里你可以看到击败他后能获得多少奖励。 一开始不用太担心。即使你死亡,也会再次获得免费的【Sidewinder】,所以你可以尽情尝试。不过这只在你驾驶【Sidewinder】时有效。 寻找赏金目标的第二种方法是资源提取点。 这些地点通常位于有光环的行星周围。 资源提取点有4种不同的强度: - 低强度资源提取点 - 资源提取点 - 高强度资源提取点 - 危险资源提取点 在低强度、普通和高强度资源提取点,你会发现警察会协助你的战斗。因此,对于早期通过战斗赚钱来说,一个不错的方法是尽可能小心地支援他们。等待目标血量较低时再介入,帮助警察完成击杀。这种方法效果不错,但存在风险。如果你死亡,将失去所有当前存储的赏金收益。你需要安全返回狩猎所在星系的空间站才能兑现赏金。 在危险资源提取点没有警察支援。你只能依靠自己或你的小队。 最后,你也可以拦截单个目标。由于这是效率最低的方法,我们暂时跳过。 战争/战斗区域: 战斗区域出现在处于战争状态的星系中。你可以通过星系图使用筛选器找到此类星系,或者使用本指南第三方工具部分提到的外部网站。 与赏金狩猎相比,在这里击杀目标的收益会低很多,但目标数量也会多得多。在战斗区域要小心。与那些只使用手头现有装备的海盗船相比,战斗区域的舰船是专为战斗设计的。高护盾、强大火力和厚重装甲都很常见。 异星狩猎: 与索格族交战是目前游戏中最困难的战斗。你不仅需要特定的武器,还需要装备精良且经过改装的舰船。这属于后期游戏活动。 如何开始战斗: 就像我在开头提到的,最好的方法就是驾驶你免费获得的“响尾蛇”前往导航信标或低强度资源提取点。即使你被击毁,除了尚未提交的赏金外,不会损失任何东西。这样你可以了解可能遇到的各种舰船,以及需要注意的事项,比如哪些东西能快速杀死你等等。当你更有信心并积累了一些财富后,就可以购买新船并升级其内部组件和武器挂载点。适合战斗新手的舰船有:鹰级、帝国鹰级、毒蛇Mk III、眼镜蛇Mk III、秃鹫级。我建议在游戏初期尝试各种武器,看看自己喜欢哪种武器类型。如何提升战斗技巧:如果你发现自己经常被击毁,可能需要考虑改进战斗策略,有很多要点需要注意。首先,如何实际接近目标并保持优势位置? Vindicator Jones 有一系列关于战斗接近技巧的精彩视频教程,非常推荐观看。 第二点需要改进的是 PiP 管理。 Mercenary Thorn 提供了一个关于该主题的非常棒的视频。 最后一个能提升体验的部分是子系统瞄准。敌人越大,这一点就越重要。扫描目标后,你可以通过子系统瞄准快捷键切换所有子系统,或者进入左侧系统面板。
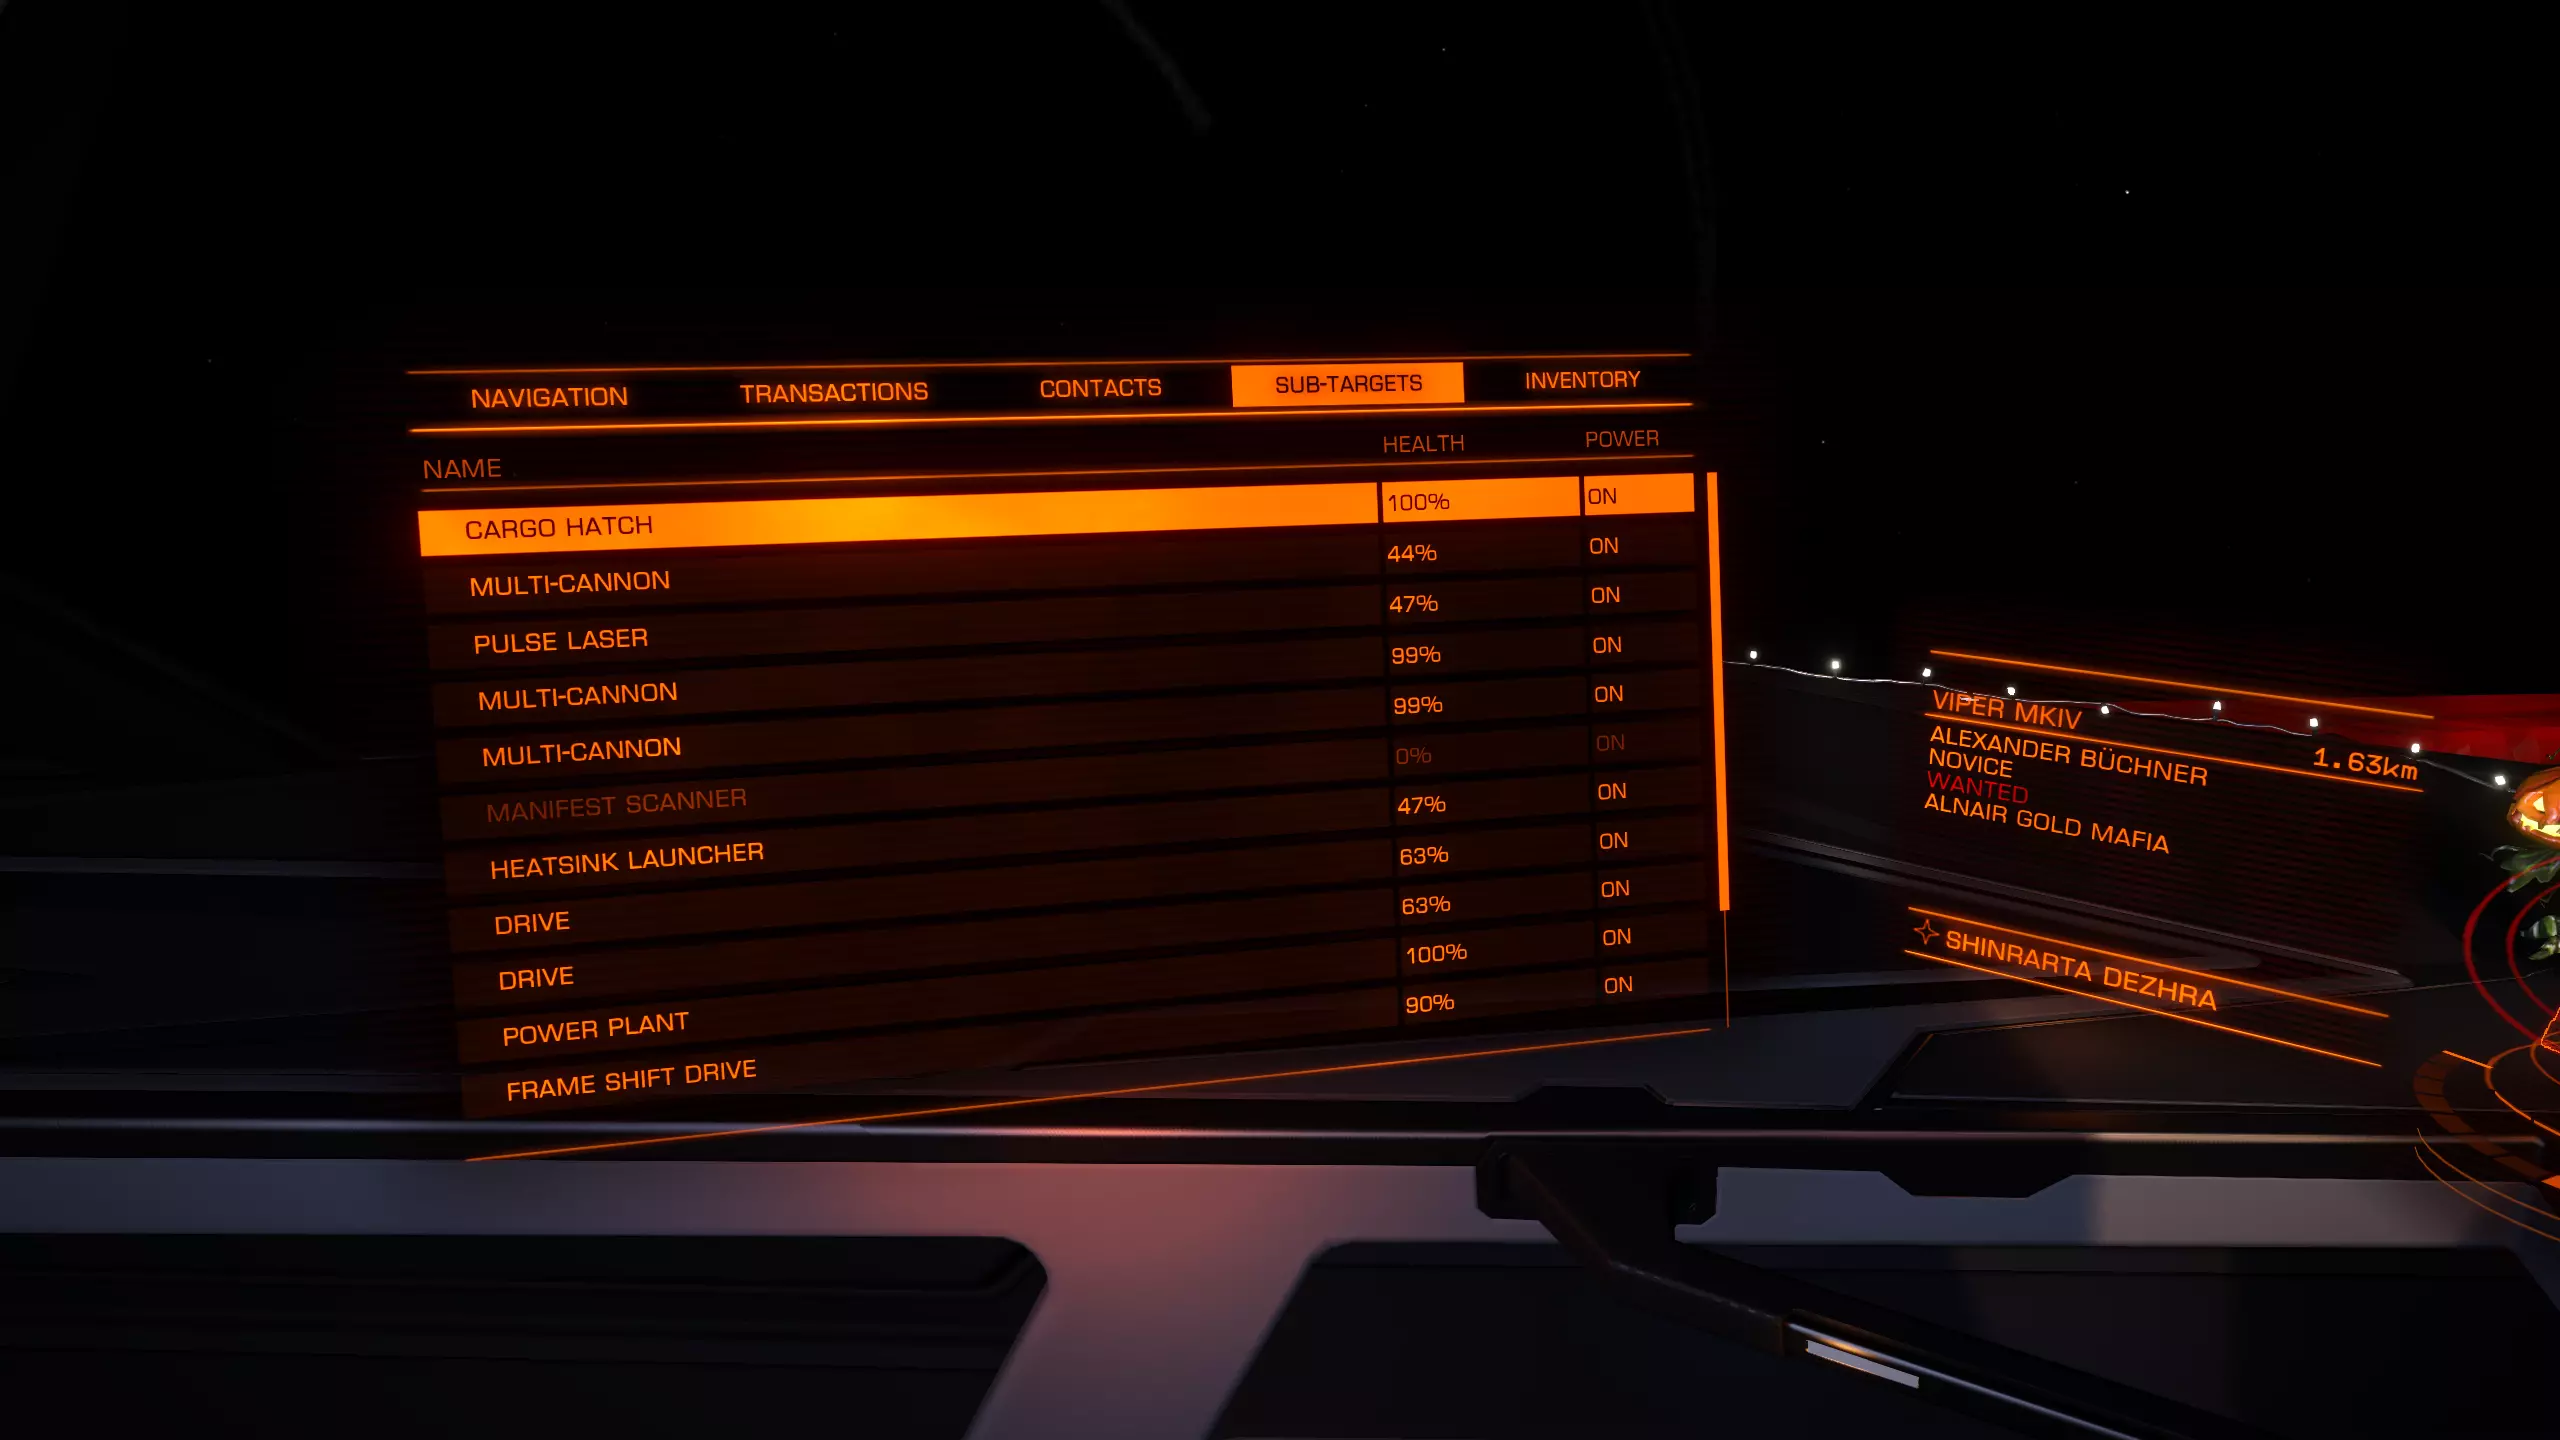
这里显示了你可以瞄准的所有子系统。【动力核心】是最重要的部分。如果你摧毁它并继续对其射击几轮,它就会爆炸并摧毁整艘飞船。最后,不要忘记将你的武器添加到【火力组】中。
This is a setup for mining but on that screen, right system panel, you will find all your installed weapons. Assign them simply to Primary 1 or Secondary 2 Fire. You can create here also additional Firegroups to switch between. That should prepare you enough if you want to start out as a combat Pilot. So, good luck o7 Exploration Exploration offers one of the most efficient ways to make money early on. You need a specific ship with a specific loadout for it, but it can make you quite a bit of money. First lets go over what exploration exactly means in Elite. You leave Civilization behind and go into the deep dark black. Equipped with Scanners you will be able to collect informations about Planets, Moons, Stars, Blackholes and a few more. Exploration can be beautiful. If you take the time to appreciate it. You can compare it with driving on a road with an amazing landscape to the site. If you are on a Vacation you can make a break, sit back and enjoy the view. If you are on the way to work and you are already late, you will just rush through. Exploration can be like that. It can become a simple loop of a few things to do which you just keep in repeating. But if you take your time to check out some of the planets and awesome views it can be mindblowing. Road to Riches: So, lets first talk about the nice way to make money early on with a really little requirements. It is called Road to Riches. What it essentially does is giving you a specific route you will folow and scan all the planets that are listed. All the Scantargets are high value and will bring in a lot of cash. So, you sure wonder what kind of ship you need, here we go: Dead Link removed. If i can find some time i might readd a new ship build. It will cost you around 2.4 million to buy everything. So aim for 3 million just to be safe. The Fuelscoop will allow you to refuel on stars without the need to dock on stations. The Advanced Discovery Scanner reveals every body in the system you use it in. So just pop it once after you enter a system. Just make sure you have it added to a firebutton. Right system panel, firegroups. The Detailed Surface Scanner does not need to be added. To scan a planet simply target it and approach it. You need to be in a certain range, so just keep flying towards it until you start scanning it. You can also add a Heatsink in case you get to close to a star. Just as a safety messurement if you want. On longer journeys into the black there are a few more modules you might want to consider. Auto Field-Maintenance Units allow you to repair damaged modules, except the powerplant and Canopy. These can only be repaired on a station. Repair limpets, repair your hull integrity, your hitpoints. A Planetary Vehicle Hangar will allow you to deploy an SRV and drive around a planet if you found a espacialy interesting one. Anyway, back to road to riches. Once you obtained the Ship with all its needed modules you want to go to: http://edtools.ddns.net/expl.php Just type by Start System your current location and it will give you a route. I recommend doing it in plain text. This way you can save it and do it over several days if you so desire. Keep in mind you can always stop. No need to finish all 300 Systems. Just do it as long as you want or until you reached your Credit Goal. Long Range Exploration: To travel to Colonia, Sagittarius A or even Beagle Point can be a worthwhile experience. I personally loved every journey i went on. Just keep in mind that it can take quite a while to reach your destination. The Galaxy is massive after all :3 As mentioned before you want a more specialized ship for long range exploration. The first one that works really well would be the Diamondback Explorer or the ASP Explorer. I personally like the ASP a lot more but it also costs quite a bit more. ASP: Dead Link removed. If i can find some time i might readd a new ship build. DBX: Dead Link removed. If i can find some time i might readd a new ship build. ASP Fully Engineered for Exploration: Dead Link removed. If i can find some time i might readd a new ship build. These Ships are only example builds. If you prefer to do your own builds, by all means :3 Its half the fun :D Trading Trading: is rather simple in this game. Buy cheap, sell high. There are a couple of ingame tools that allow you to find a decent traderoute. I still recommend Third Party tools, which you can find in the Third Party Tools section in this guide. There sadly is really not much more to say about this form of Trading. It really is rather simple and not complexe at all. Smuggling: Smuggling can be enjoyable. It pays okay but nothing to crazy. The Idea is of buying illegal wares that you sell on the blackmarket in stations that have a blackmarket. You can find out what a stations offers for Services by selectiong the station on the System Map. Then look in the Detailed informations on the left side. If you get scanned while transporting Illegal goods, you will get fined. This can becom rather expensive so make sure your docking skills are good enough for that. Cargo Transport Missions: These Missions come as Solo and Wing missions. They can pay really decently, espacially the wing versions. Wing Missions have small blue symbol next to them. They also require you to transport a lot more goods. You just dock at a station and check the mission board if they offer something you'd enjoy. You can switch between Gamemodes Solo, Private and Open to find different missions. Mining Mining is one of these odd jobs. It's just different than any other thing you can do. In theory you can use any ship to mine. It starts to become more enjoyful with better ships tho. So i don't recommend doing that with beginner ships. The first really decent Ship to do mining in is the Python. I know others can do it decently too which are not as expensive. But the from the Python upwards the ships just really work well with mining without having to wait forever. You need a couple of things to get mining going. First of all, you need a place to mine.
As you can see here in the left upper corner under the planet description you can see "pristine reserves" Pristine, the best reserve you can get. (You should only mine here) Major, second best. (Not recommended) Common Low Depleted This is the order in what Reserves are displayed. It also depends on what kind of ring you are mining on. As you can see i have selected the Planet 7 in the Delkar system. The Ring A (closer to the planet) is Metallic, which is the best it can be. So whenever you want to do some mining (except Icy rings) you want to go for Pristine Metallic or Pristine Icy Rings. Now that you know where to Mine you will need a fitting Ship for it. Like i said, the Python would be the minimum recommendation for it to not become a rather annoying experience. Somthing like this would be nice: Dead Link removed. If i can find some time i might readd a new ship build. You need to bind Mining Laser, Prospector Limpets and Collector Limpets on firebuttons. So you need at least 2 Firegroups. Approach the planet with the rings. You will see Ressource Extraction Sites. DON'T go there. Just drop into a random spot on the rings where no extraction site is around. This will keep NPC's away from you and you can Mine in freedom without being attacked all the time. Just approach the ring slowly. Make sure not the speed into it. That might damage your hull a little bit. Which wouldn't be the end of the world but try to avoid it. Don't forget to stack up on Limpets. You can buy these on any station with maintenance service. Once you are in the Asteroid Field you just use your Prospector Limpets and shoot them at an Asteroid. This will show you what the asteroid is made of. If it is a material you desire, mine it with the lasers. Before you start mining deploy all your collector Limpets. (It would be 9 limpets with the build i linked) and deploy your cargo hatch. The Limpets will collect the fragments and the refinery will turn them into ore. To know which materials are worth mining a site can help you. https://eddb.io/commodity Here you will see a list of all the commodities in the game. Scroll down to Metals and Minerals. What you normaly aim for is: Platinum Osmium Palladium Gold Painite These are at least the things i mine every time. Once you collected enough fly back to your station and find a good buyer. If you want maximum profit you can try to use Dead Link removed. to find a decent buyer. Or you can just sell it on the station you are on. Make a little bit less but you can head out again. Mining is not a particulary good way to make money. It's okay, but far from special. Third Party Tools Most of the time if you ask someone else "Where do i get?" "Where do i find?" "What is a good trade route?" And so on, they will send you to a 3rd party app or homepage. The Community is just AWESOME in Elite. So here you will find a list with the most useful Programs and Hompages for Elite. Webapp: https://inara.cz/ This is your allaround help page. It offers everything. Overview over engineering, blueprints, a huge community. Make an Account here. It helps a ton. https://eddb.io/ This is your "I need to find xyz" Homepage. You can search for nearly everything. Certain stations that sell a certain ship or module. Planets with certain ressources. Trade Routes, System with specific states like War, Outbreak or Famine. Save that page. https://coriolis.io/ Ship Builder with indepth statistics. https://www.edsm.net/ This is perfect any aspiring explorer. It offers everything you need for planing exploration trips. There are also programs that upload your progression automatically to EDSM and INARA (will cover them further down) https://docs.google.com/spreadsheets/d/1yo1iHP9KUXpoBaIzJsRsDxfAcQa7cBq0YUIFy3m2NII/edit#gid=585994681 Spreadsheet for all the Materials and how to get them. http://edtools.ddns.net/expl.php Road to Riches Route Planer (See exploration section for more details) http://edtools.ddns.net/ Miner Tool to find Pristine Metallic system. http://www.elitegalaxyonline.com/ Records for your Discoveries. Programs: EDEngineer Easy Program to create lists for engineering. It also autoupdates your materials so you have an easy overview what you are missing. EDDiscovery Can autoupload your logs to EDSM. Perfect tool for explorer but also useful for everyone else. EDMC Tool that sends information to hompages like EDDB. Can also autoupdate EDSM and Inara. Help not only yourself but also the community! EDDI Text to speech program that provides various informations. Voice Attack Immersion Program that lets you talk to your ship. In combination with HCS Voicepacks this can make quite the enjoyful addition. It can also help if you have limited buttons since you can make your own Macros with it that can be activated via voice. This Program needs to be bought. So keep that in mind. Also HCS Voicepacks need to be bought as well. This program is by no means necessary but, oh boy do i love it. Furhtermore i want to introduce 2 really great Elite Dangerous Communites that are not only friendly and helpful, but also cool and fluffy. First of is Mobius. Mobius is a Private Group you get accept by applying to it. Links to that will be provided further down. This is a pure PvE Player Group. Read the Rules and Stay friendly. https://elitepve.com/ General overview and Forum https://elitepve.com/page/join How to Join. I hope i see you guys around and in the Mobius Discord. The second Group i want to introduce consists of brave Warriors of the Dark that try to protect Human space as good as possible from the Xeno threat. Discord: https://discord.gg/gZbAWCF https://antixenoinitiative.com/ These people help with Shipbuilds to combat the Thargoids and provide assistance if you run into problems. Great Community. That should cover it :D I know it is a lot. There would be even more that could be added, but i didn't wanna go overboard. With these pages you should be able to tackle any problem you encounter, and if you still feel stuck, visit the communities i posted. Engineers Engineers, these people allow you to modify and improve your modules on your ship.
你看到那个带红圈的小图标了吗?在那里你能找到简要概述。不过我还是建议使用inara来规划你的工程师。你也能在那里找到所有工程师的概述。
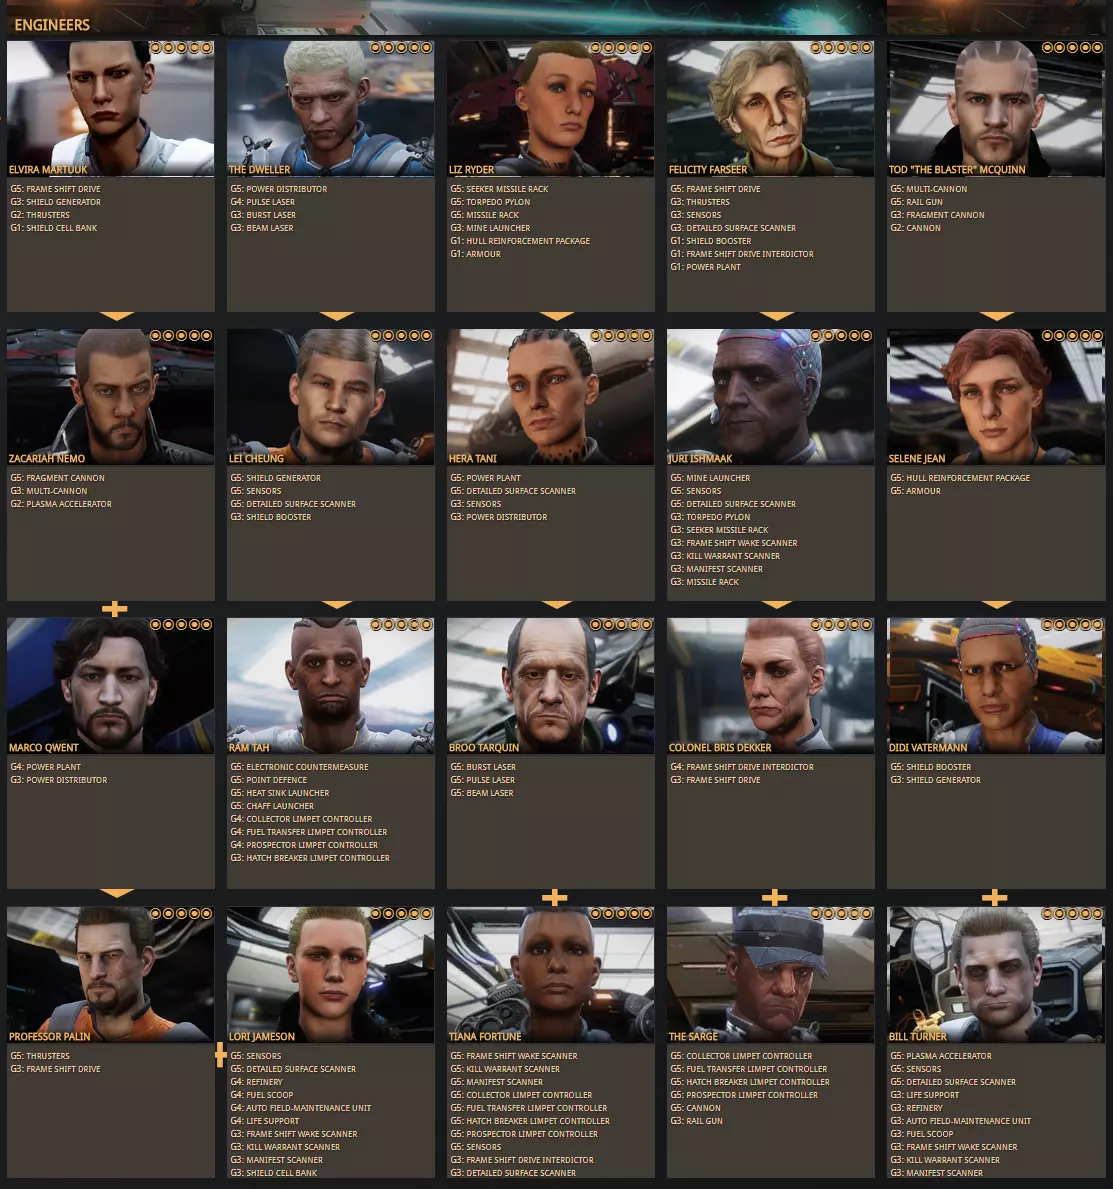
一个黄色小箭头从一名工程师指向另一名工程师,这表示如果你使用该工程师并提升其等级,你将了解到箭头所指向的工程师。 解锁工程师的方式很简单。最初的5名工程师是你已知的。 假设你想从埃尔维拉开始。只需点击她,你就会看到这个页面:
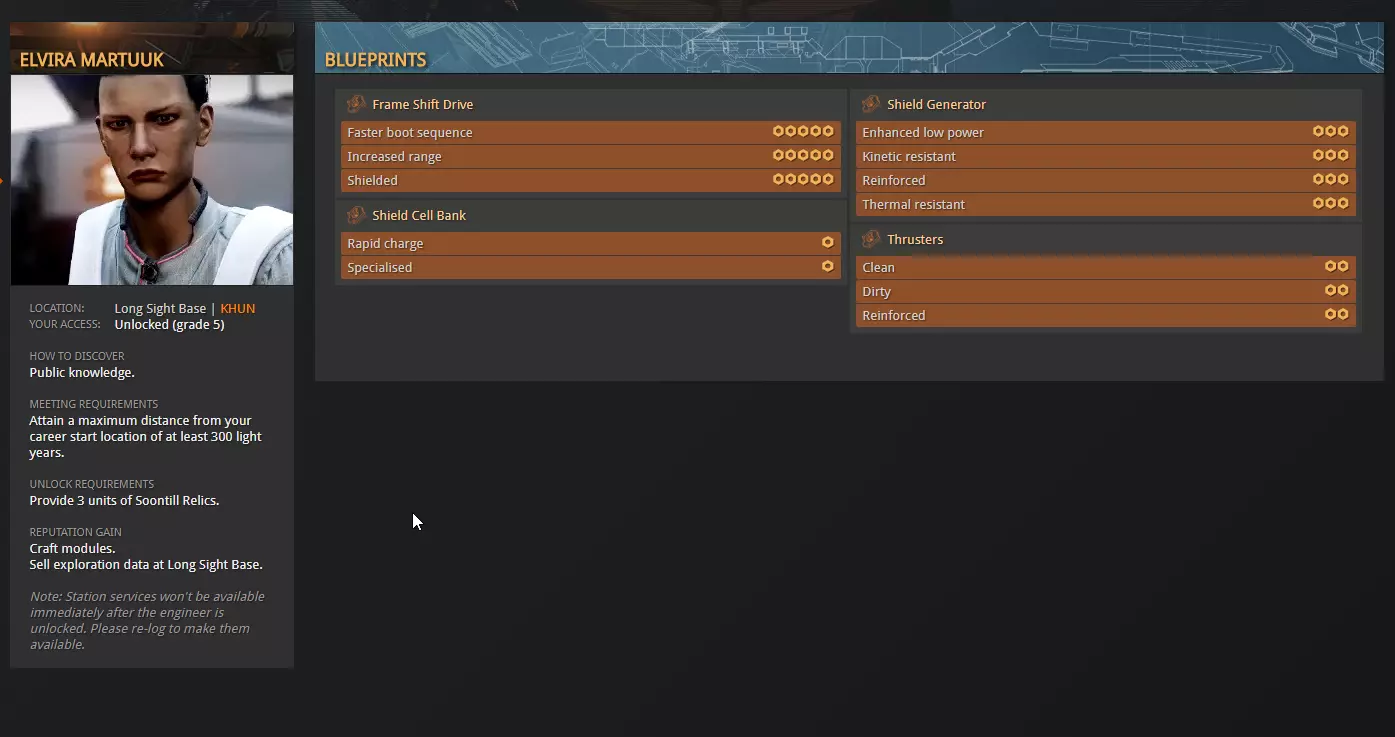
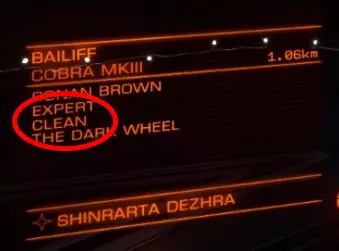
如你在左侧所见,她的头像下方列出了一些你需要完成的事项。 达成距离你职业生涯起始位置至少300光年的最大距离,是满足与她会面并停靠在她处的必要条件。 你可以在右侧系统面板的【状态】->【统计数据】中查看该要求的完成情况。 一旦你达成了她要求的300光年距离,还需要提供3个【松蒂尔遗物】。 获取这类物品最简单的方法是通过搜索引擎查询,或者如果你知道它是什么,可以在Inara上查找。【松蒂尔遗物】是一种稀有商品,你可以在Inara上点击【商品】,然后选择【稀有商品】进行查找。 【松蒂尔遗物】的获取地点:Cheranovsky City | NGURII星系,距离1266光秒,坐标195。2 Ly17,000 Cr16,978+ Cr 这就是你会找到的信息。你可以在切拉诺夫斯基城的NGURII那里获得它们。 一旦你将这些遗物交给她,你就会解锁她,并可以在工程中使用她。
在该页面的右侧,你可以看到不同的蓝图。我强烈建议在进行超光速引擎(FSD)升级时始终选择增加超光速引擎航程。所以,让我们点击“增加超光速引擎航程”。
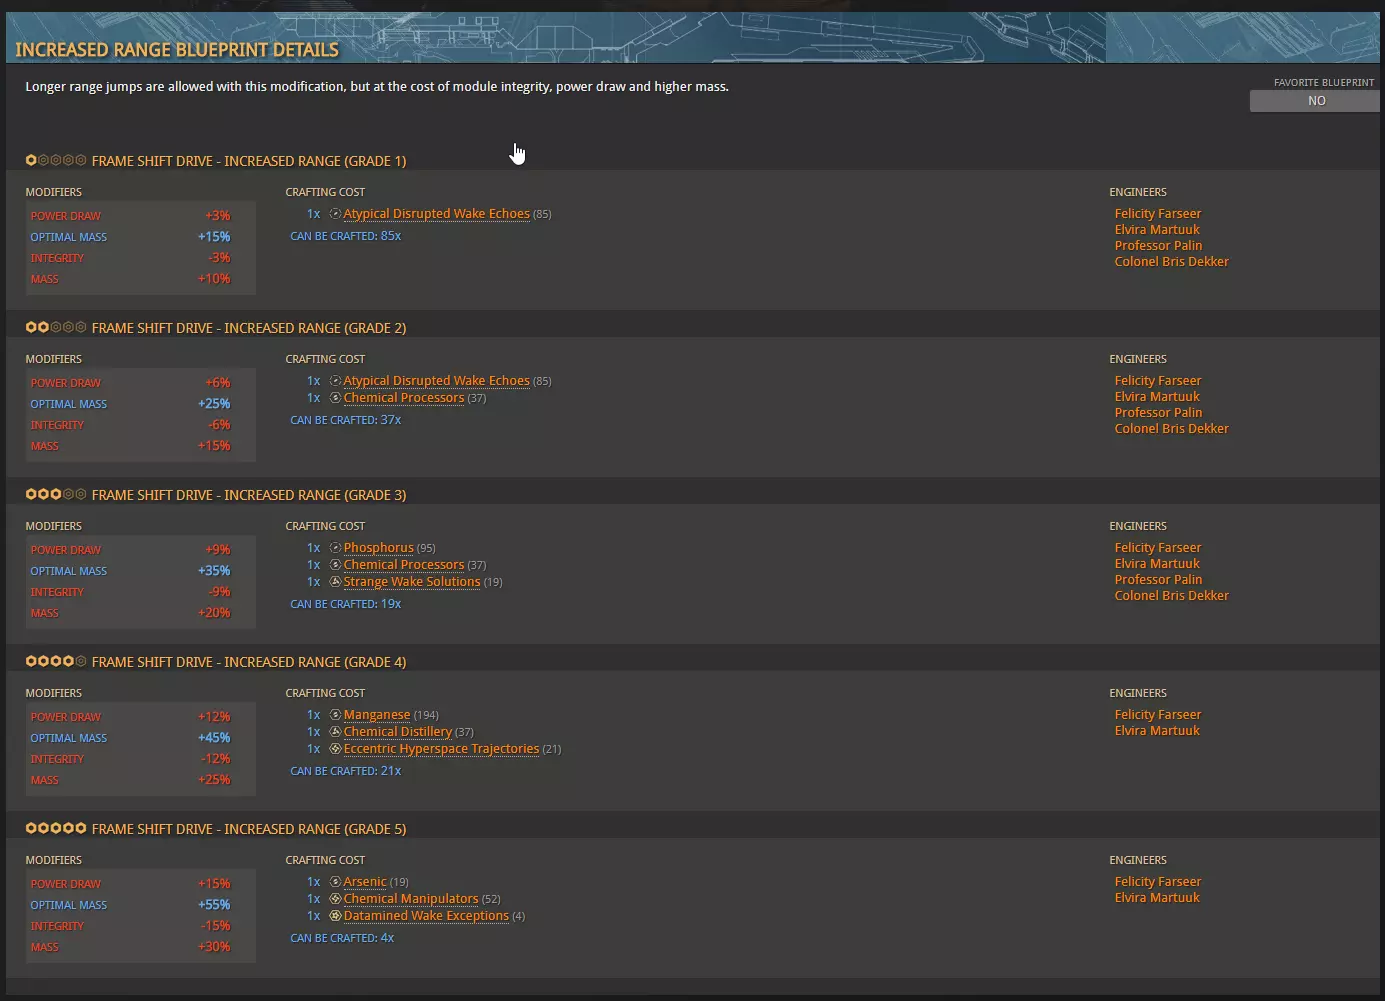
在这里你将看到她提供的5个等级。你必须依次通过每个等级才能解锁下一个等级。你只需将每个进度条填充到75%即可解锁下一个等级。 你还可以查看所需材料。 对于等级1,你需要1个非典型扰乱唤醒回声。材料也有不同的等级,和蓝图一样,材料分为1到5级。 我从不建议刷取1级或2级材料。刷取3级、4级和5级材料,然后使用材料商人将5级材料兑换为同类型的低级材料。你可以通过Inara轻松找到材料商人及其他各种内容。在此列表中,你可以直接选择你要寻找的服务。 当你将埃尔维拉升级到3级及以上后,你会听说扎卡里亚·尼莫。和他打交道时,你只需重复同样的流程:满足他的需求,通过制造物品来提升他的等级,以解锁下一位工程师。 在尼莫之后,你会看到一个小加号图标而非箭头。这意味着解锁扎卡里亚的同时,你也会解锁马可·昆特。这也意味着你可以跳过尼莫,直接去解锁佩林,除非你确实想解锁尼莫。 因此,要规划好先解锁哪些工程师,以及解锁他们的路线。 首先选择一位能提升跃迁引擎(FSD)航程的工程师。从这里开始,后续选择取决于你的游戏目标。 战斗方面:提升你的生存能力。升级你的护盾、护盾增强器、能量分配器和推进器。之后,武器可能是个不错的选择。但这只是建议。按照你觉得合适的方式游玩和解锁吧。 对于探索者、贸易商和全能型玩家来说也是如此。一旦你有了一些钱,至少能买一艘还算不错的ASP探险家,就可以开始找工程师了。他们会让你走出舒适区,为游戏的各个方面布置任务。有些任务非常烦人,有些则真的很有趣。 工程改造能极大地提升你的飞船性能。如果你想进行战斗,这是必备的。 有些模块还允许你添加实验性效果。
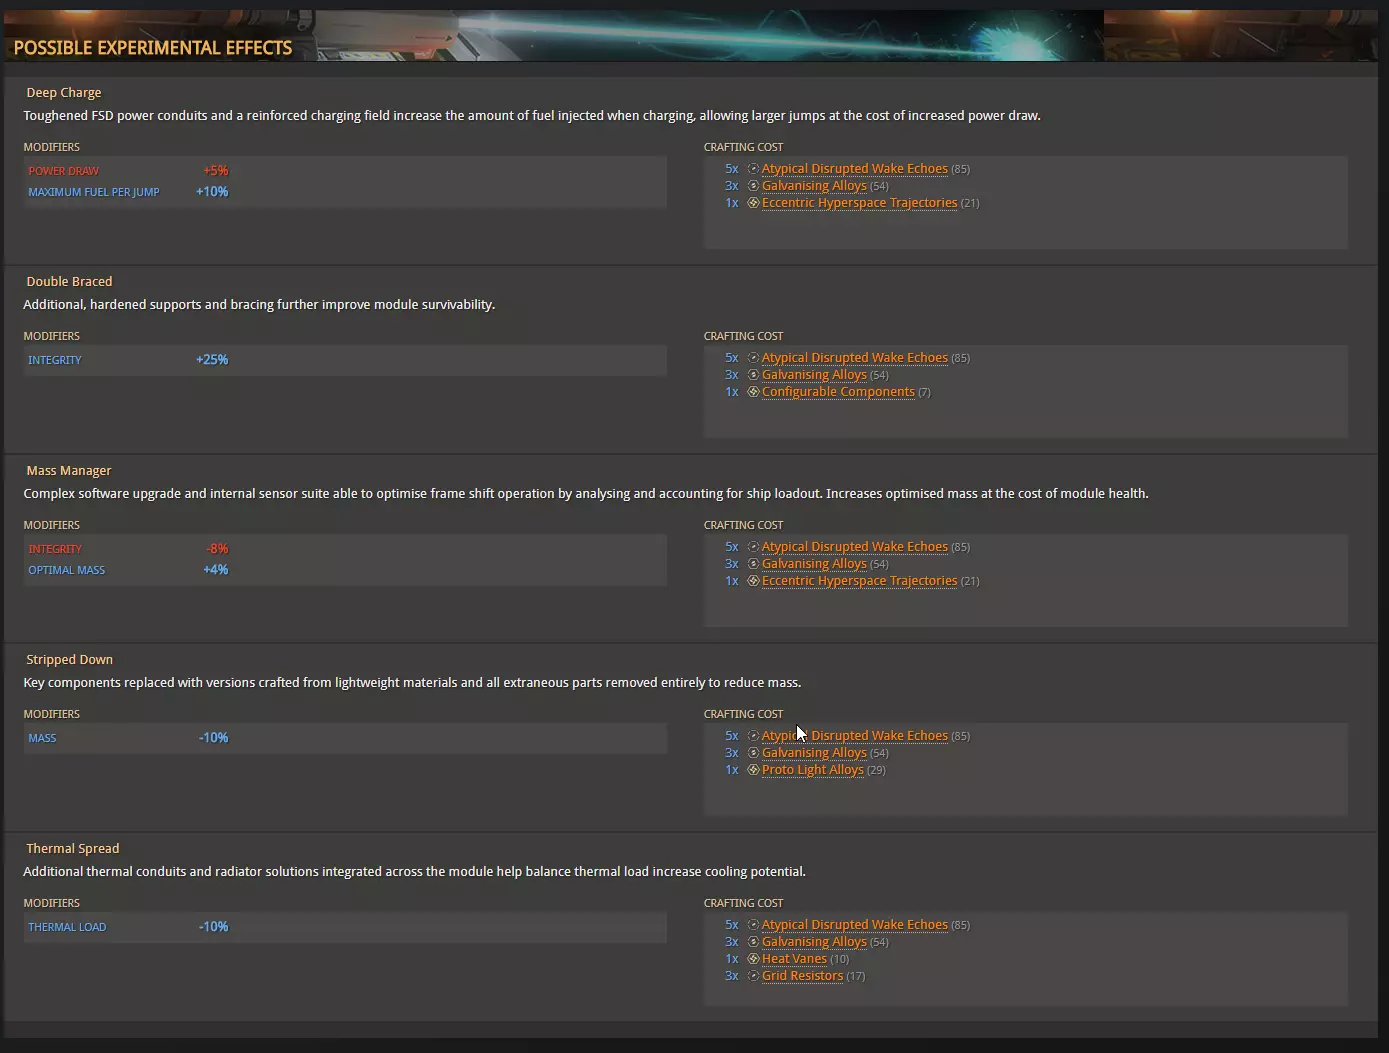
你只需要合适的材料就能添加它。即使模块尚未完全完成,你也可以添加。后续继续提升等级时,你不会丢失它。 社区目标 社区目标是每周出现的任务。它们包括收集特定商品、击杀海盗或参与战争等。 你可以在每个空间站接受社区目标。之后,只需跟随指引前往并参与即可。 这里没有太多需要说明的,流程相当直接,你也可以在inara上找到关于社区目标的信息。 海军军衔 海军军衔指的是提升特定势力(联邦或帝国)的等级。
在右侧,你可以看到每个超级势力的声望旁都有【等级】。这些等级会解锁新的系统和舰船。【切割者】和【护卫舰】就需要达到特定等级才能解锁,而且解锁过程可能需要相当长的时间。 提升等级的方法是为与某个超级势力结盟的小型派系执行任务,这会增加你的等级。有时你会接到带有【声望++++++】奖励的任务,这类任务能提供大量声望,从而显著提升你的等级。 有一些特定的星系和路线被玩家用于解锁和提升等级,但这些星系会时常变化,所以在此列出意义不大。势力玩法 由于上次更新,此部分内容已完全过时,目前我暂无时间更新。未来我会尽量抽空进行更新。 最后 希望现在你在《精英:危险》的星系中能更有信心。 如果你还有疑问,欢迎留言提问。我会尽量抽空回复。 我也在Mobius。如果你打算加入,我经常在那个Discord上。