换一换
换一换 


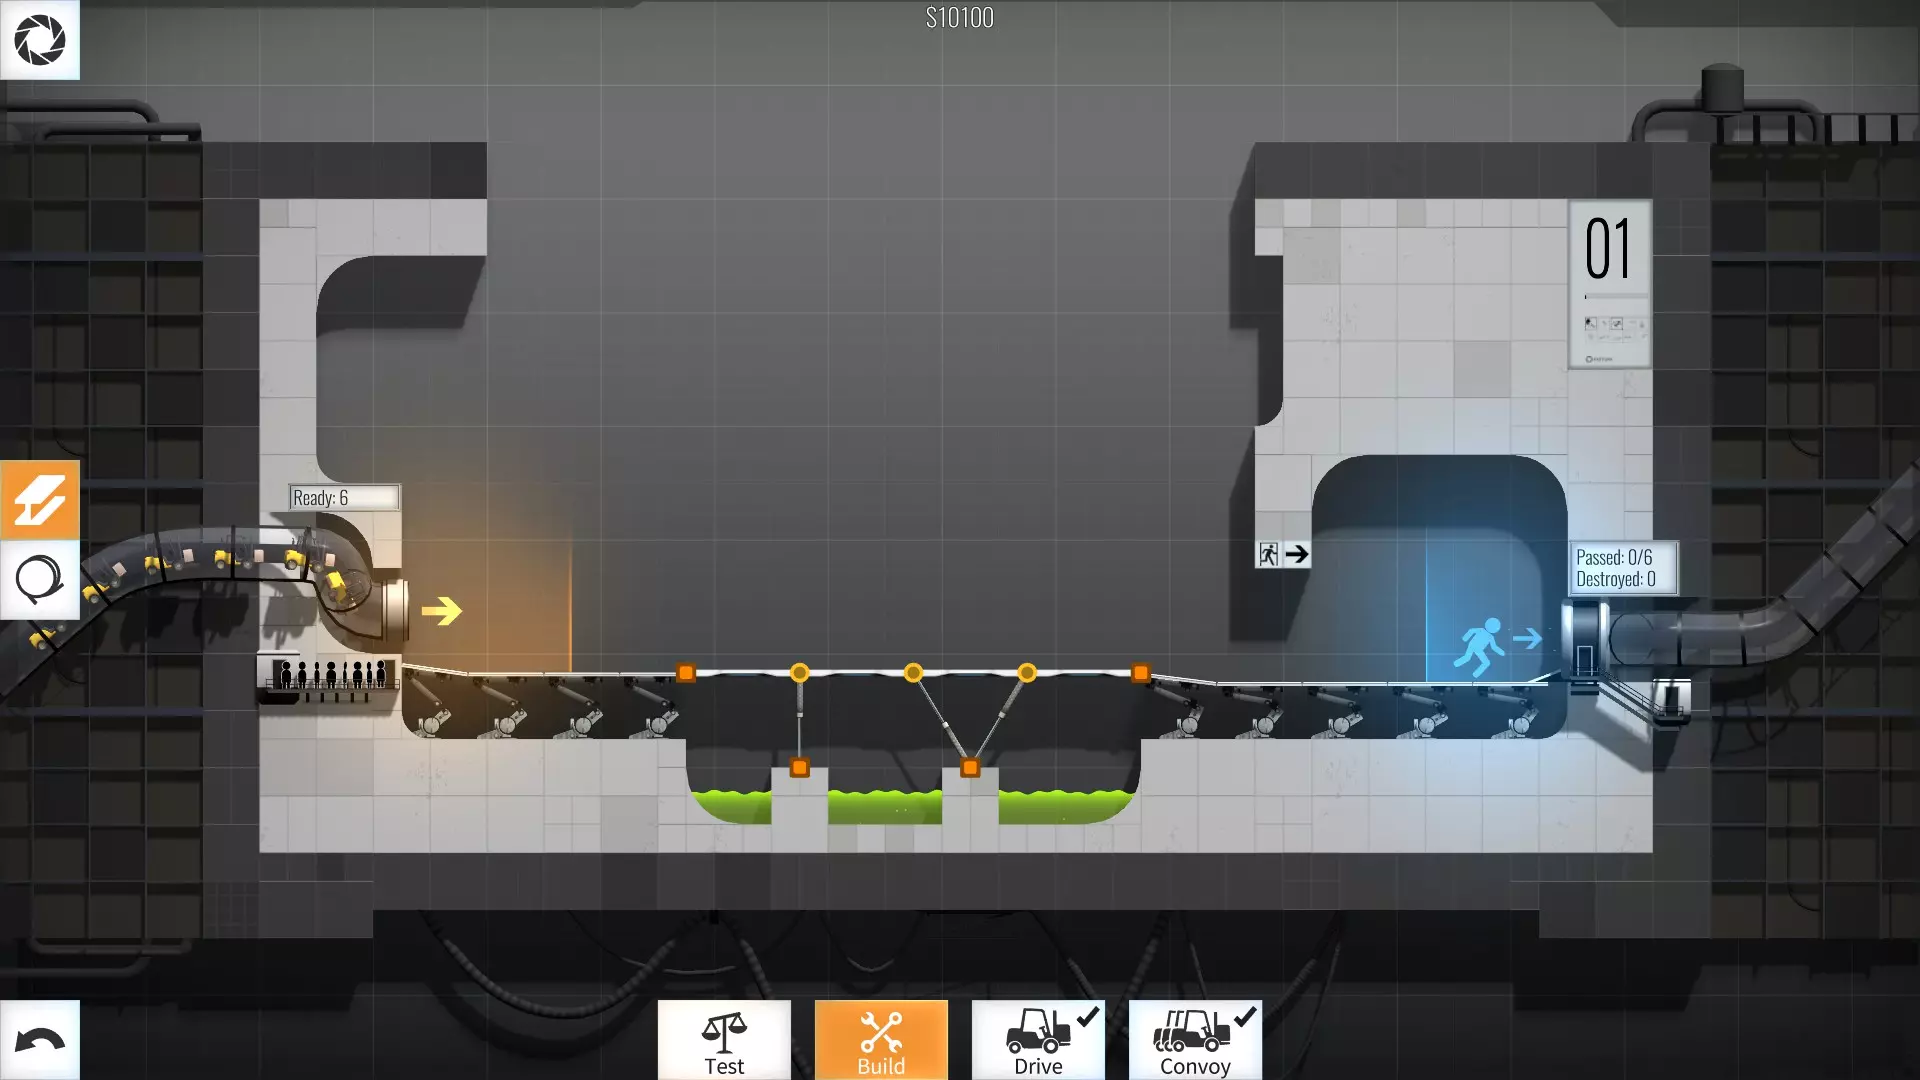
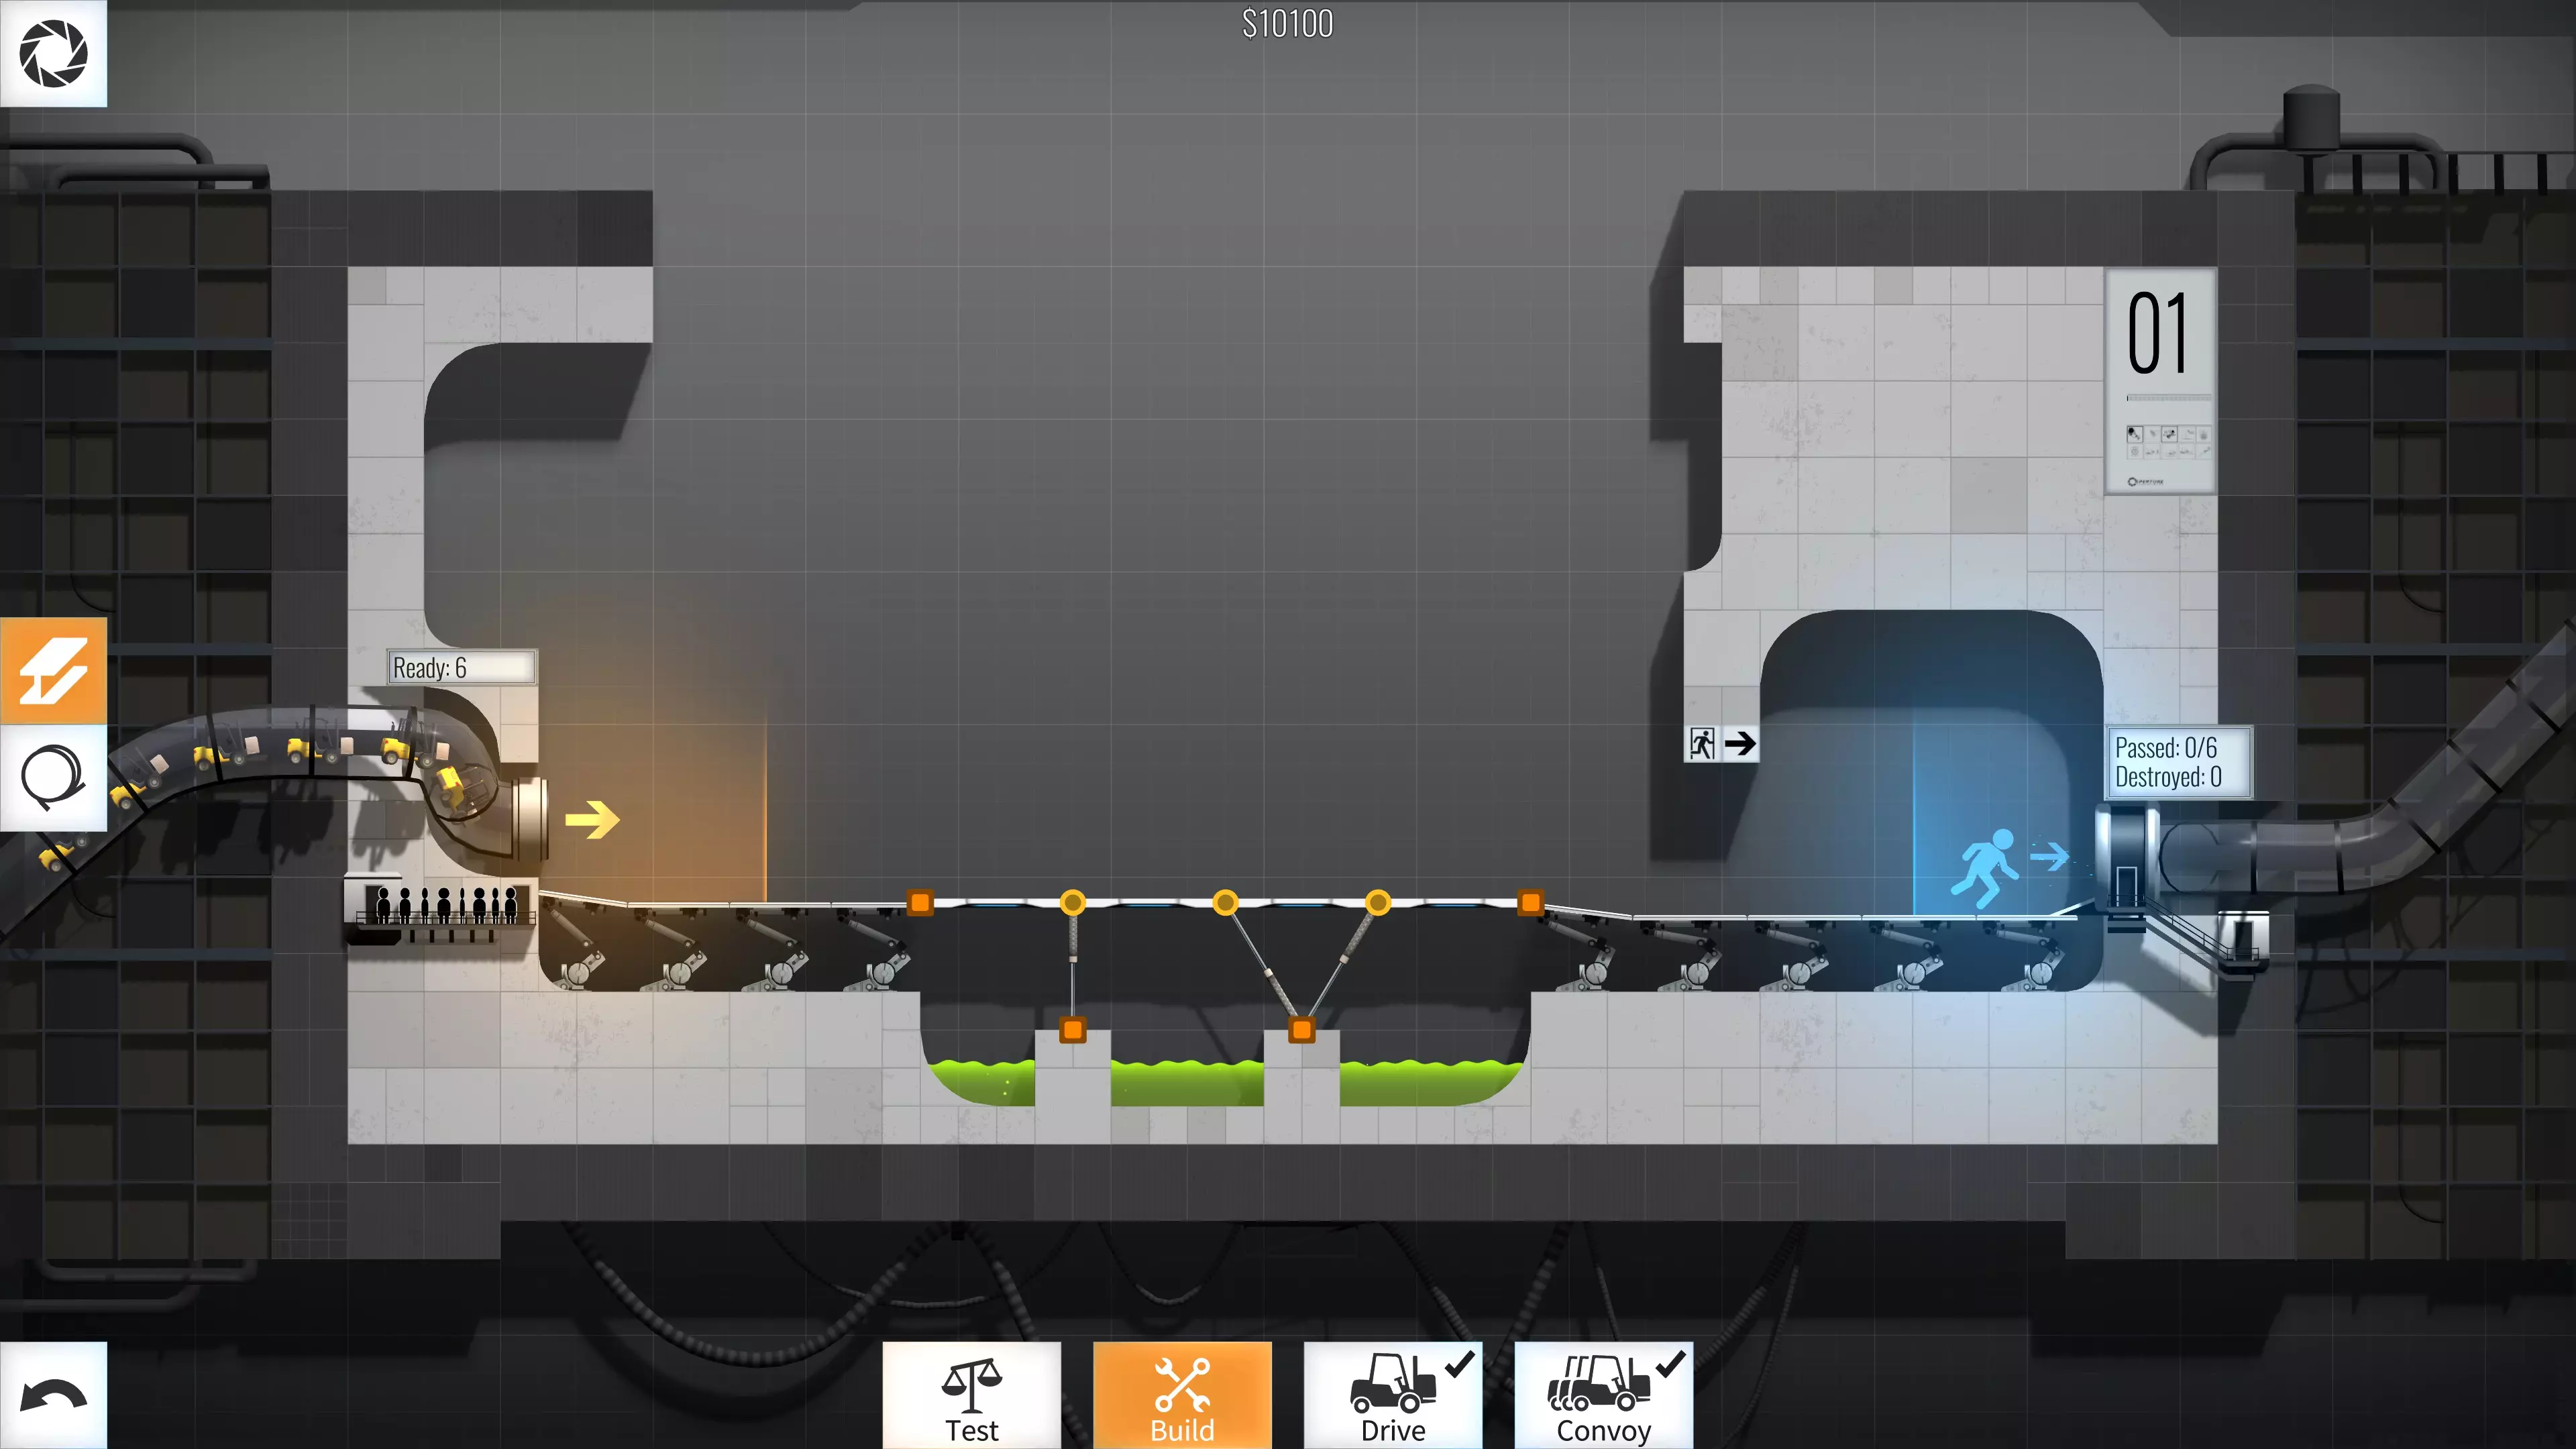
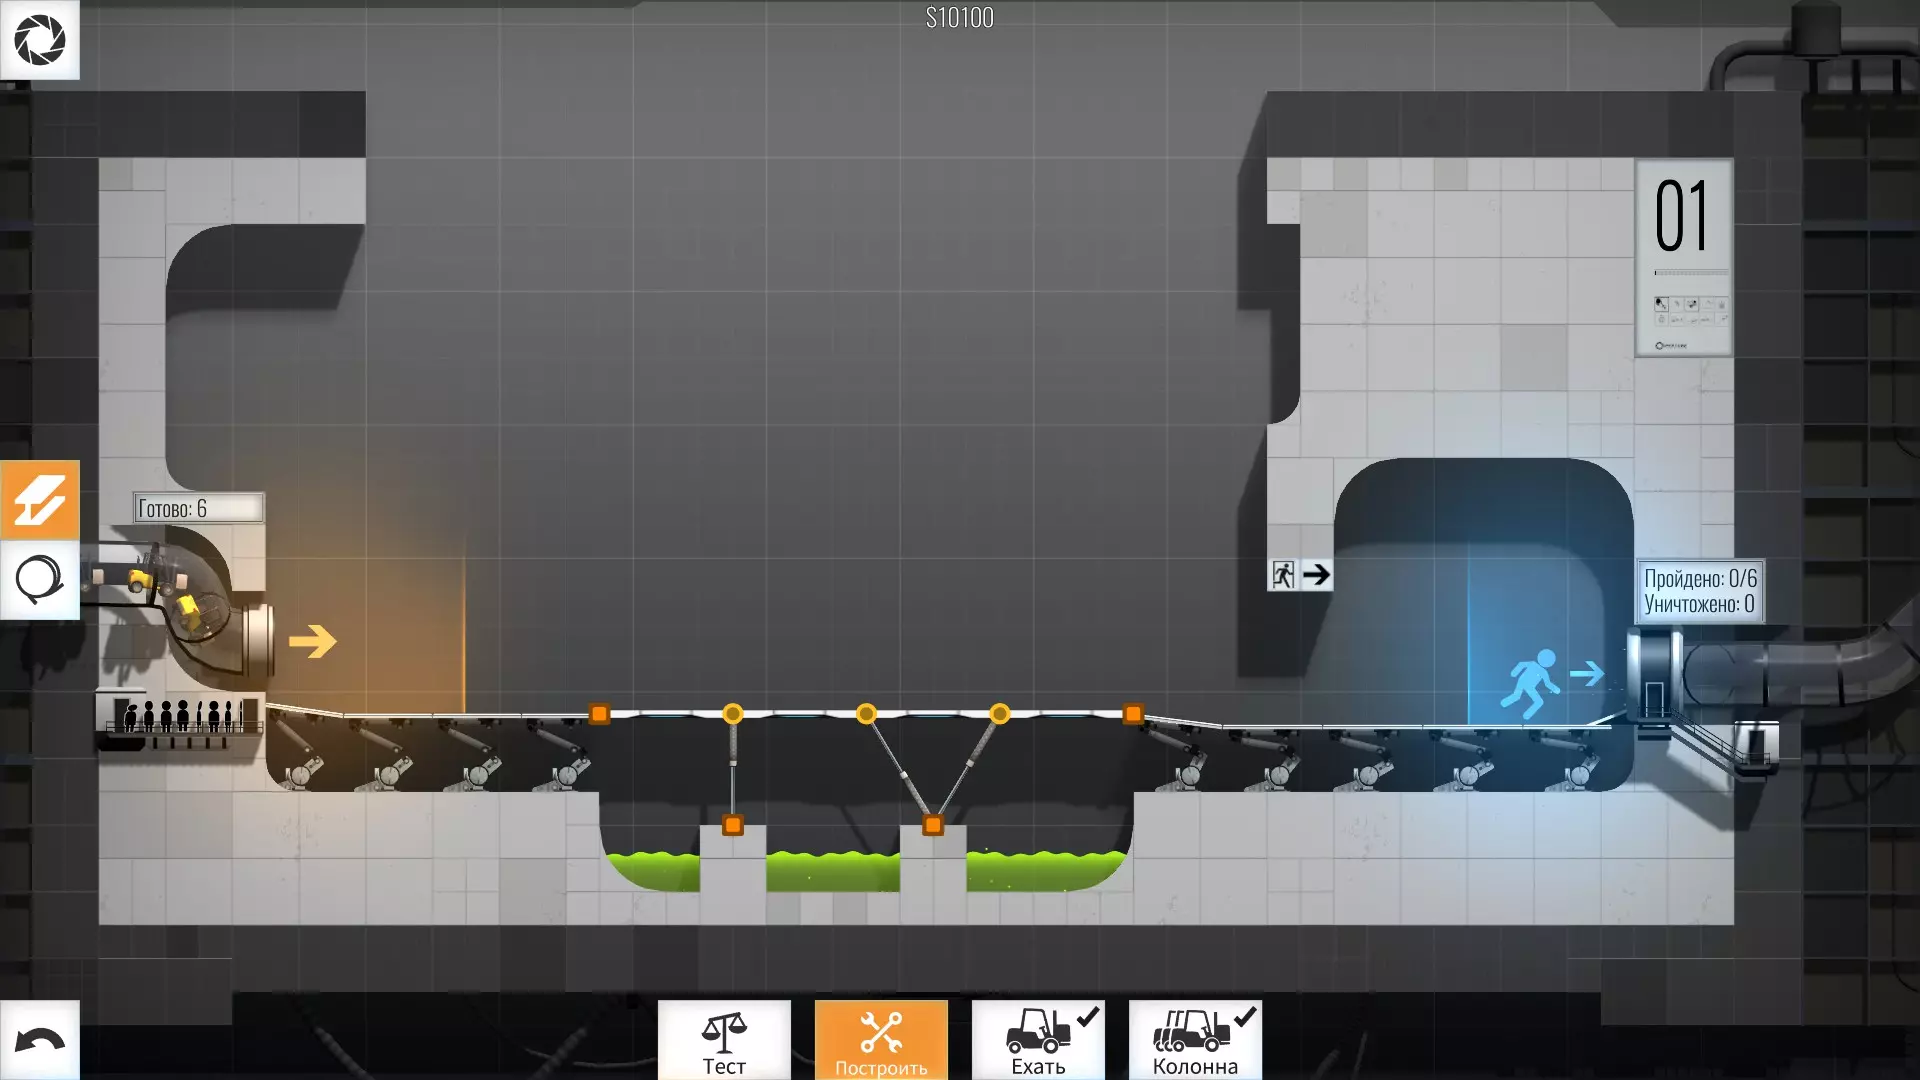
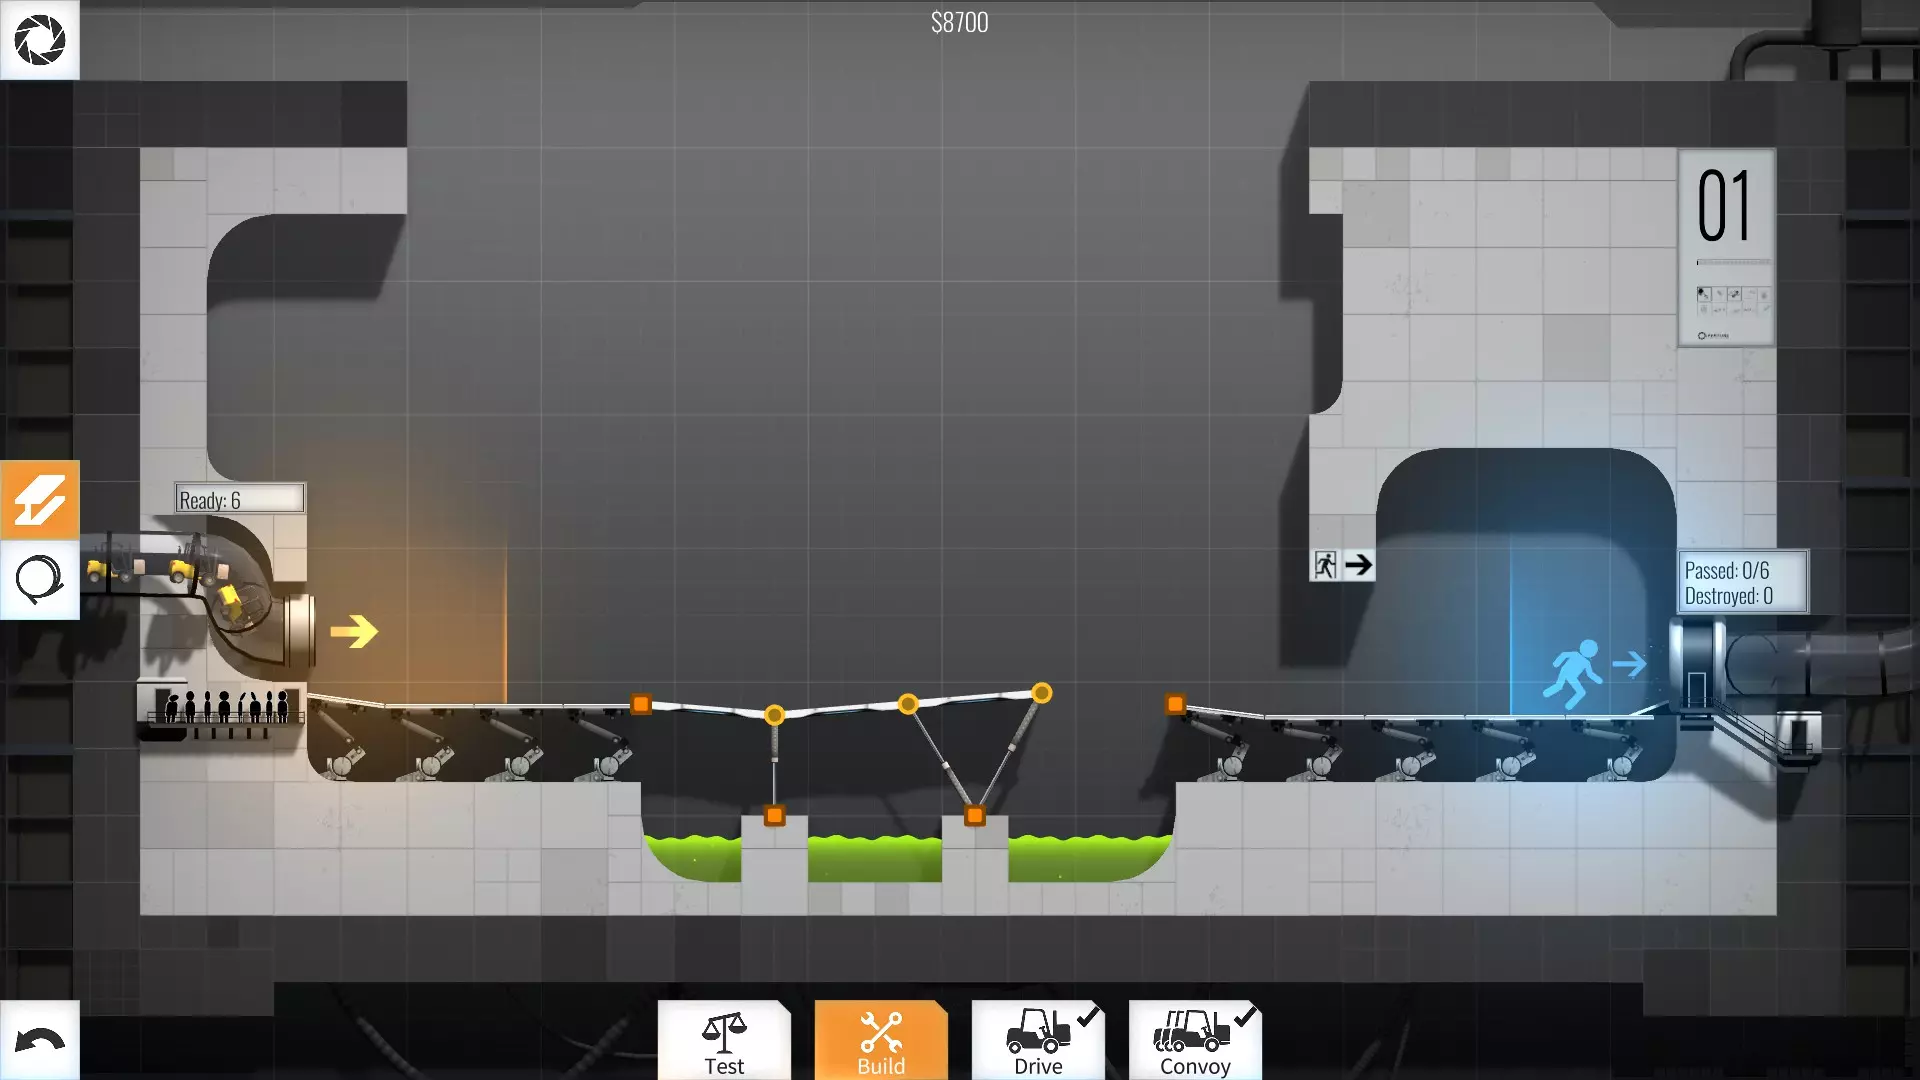
This is an advanced guide for optimizing tricks and achieving low budget, non breaking solutions FOR CONVOYS. Intro This NOT a solutions walktrhough... Do not use this if it's your first time playing and you want to see a solutionbecause these designs are SUPER unstable and finicky. Unless you copy them a 100% correctly, they will not work, since even a minor change can make the whole thing go wrong (I know because it kept happening to me while I was trying to optimize as much as possible). Instead, this is for people who like optimizing constructions, so they can either maybe see a couple of tricks, get some inspiration or at least compare solutions. Since there are no in-game leaderboards I figured this would be one way to do it. Again, do not try to copy these unless you can copy them pixel-perfect... otherwise they won't work. I'll post some videos on the more complex ones so you can see how they behave, and for proof that they don't break =P This is also, I hope, a good reference for low budget designs, in case people want to compare their scores, or try to do better. I'm sure all (or most at least) of these can be further optimized, I just don't particularly care to do it any further. HOWEVER, the rules here are not only doing the lowest possible budget, BUT ALSO under a 100% stress, meaning cheap solutions that don't break after one use or two... on some levels some pieces get dissolved (still not what I'd call "breaking") and some of them fold, which is okay as long as it doesn't break... of course, all of this is FOR CONVOYSSingle cars are too easy. Tips and Tricks I'll explain some tricks I've found here: Material cost: This is quite obvious, but I'll still say it anyways: ROPES!!! When optimizing, use ropes... they're cheaper and usually sturdy enough. Planks are sturdier but more expensive so try to use less them as support structures, or at least try to get craftier with them, you don't always need to tie them to an anchor point, for example. Triple rope: Sometimes you just don't have enough anchor points and your ropes keep breaking... so try this method... for some strange reason it actually works... You'll see this a lot in my solutions, but basically, you just add "another" rope next to the one that's breaking, by adding two more ropes connected to each anchor point (hence the word "triple"). I was gonna post a screenshot, but eh... you'll see it plenty. Extra anchor points for ropes: When you just need extra space for ropes, just use a small plank for extra anchor points, but don't over load it or it'll easily break. I think I only used it once on level 26. Ramps: Sometimes building a ramp to make cars jump over a chasm is A LOT cheaper than building a bridge to cross over it. You can see a simple example of this in levels 12, 14 and more. You can also build ramps far from anchor points and simply secure them either with ropes or planks depending on how sturdy you need them to be... you can't just let them free or they'll get pushed around by physics though. Speed bumps: A speed bump is just a sharp-angled mini ramp, mainly used to break momentum of cars for when you need them to do certain specific things, like a sharp jump or just make them wait a bit. Like ramps, you need to secure them. You can see some appliances of speed bumps in levels 48, 52 & 53. Motion/gravity tricks: Remember there are physics mechanics, which means you can get crafty and use both motion and gravity to your advantage, either to swing stuff, or to push stuff, or to simply get rid of turrets =) You can see some examples of these "tricks" in several levels, like 40, 44, 48, 49 or 51. Pay particular attention to level 40. Sometimes less is less, sometimes less is more: On some maps, you can bypass certain paths and portals... this will sometimes allow you to save money, but not always, so just think about what seems cheaper instead of what seem smarter. Angles: Angles are SUPER important in general. By angles I mean literally the angle of the planks you place, whether they're for support or roads. Using the right angles will allow your bridges to be more stable and not fold or collapse. It will also allow you to flat-out stop momentum without inflicting any stress on the structure (see level 26 or 44). The angles on ramps will greatly vary the way cars jump, which is essential to save money. And sometimes, using a weird angle also works as a way to counter wobbliness effects... so yeah, point being, you'll probably spend a LOT of time fine tuning the angles of your planks... you've been warned. =P Levels 01 - 20 These are all rather easy so I'll just add the screenshots, plus some comments if there's something worth noting. Level 1 - $8700
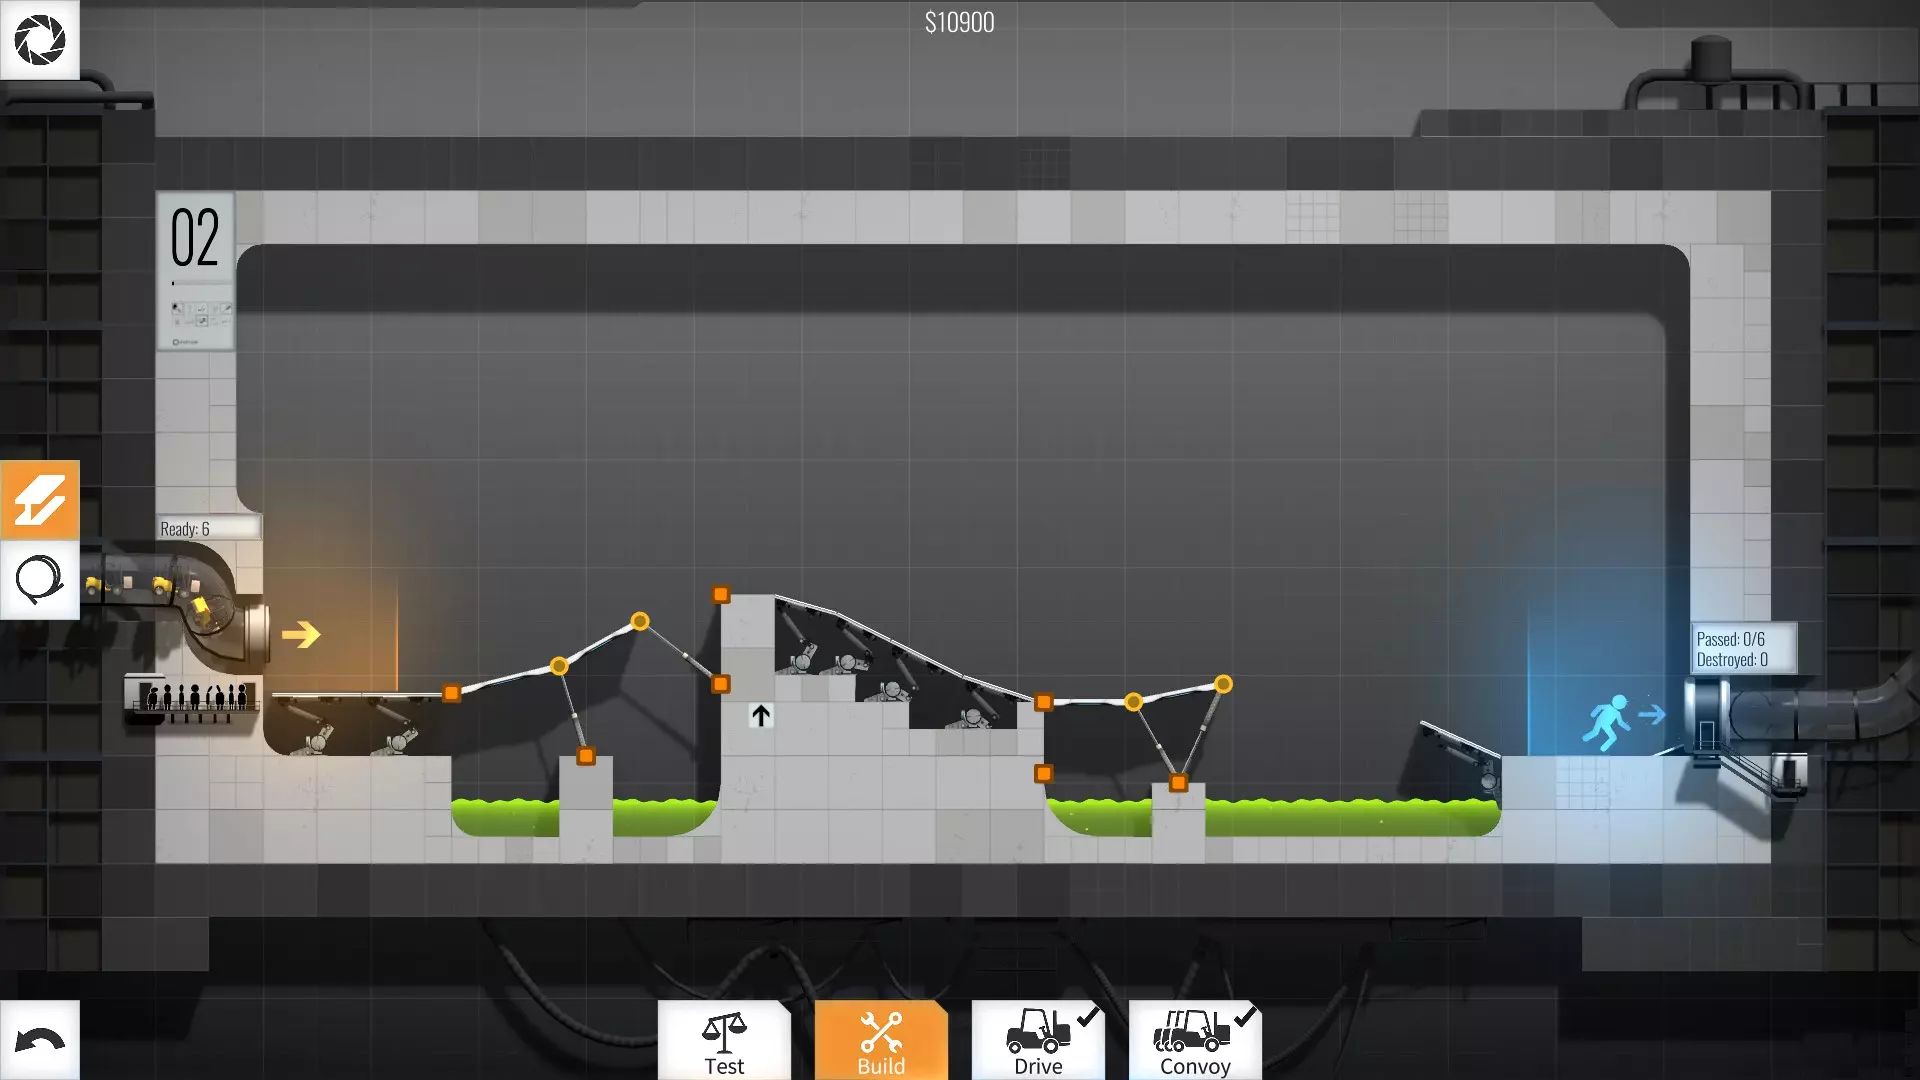
2级 - 10900美元
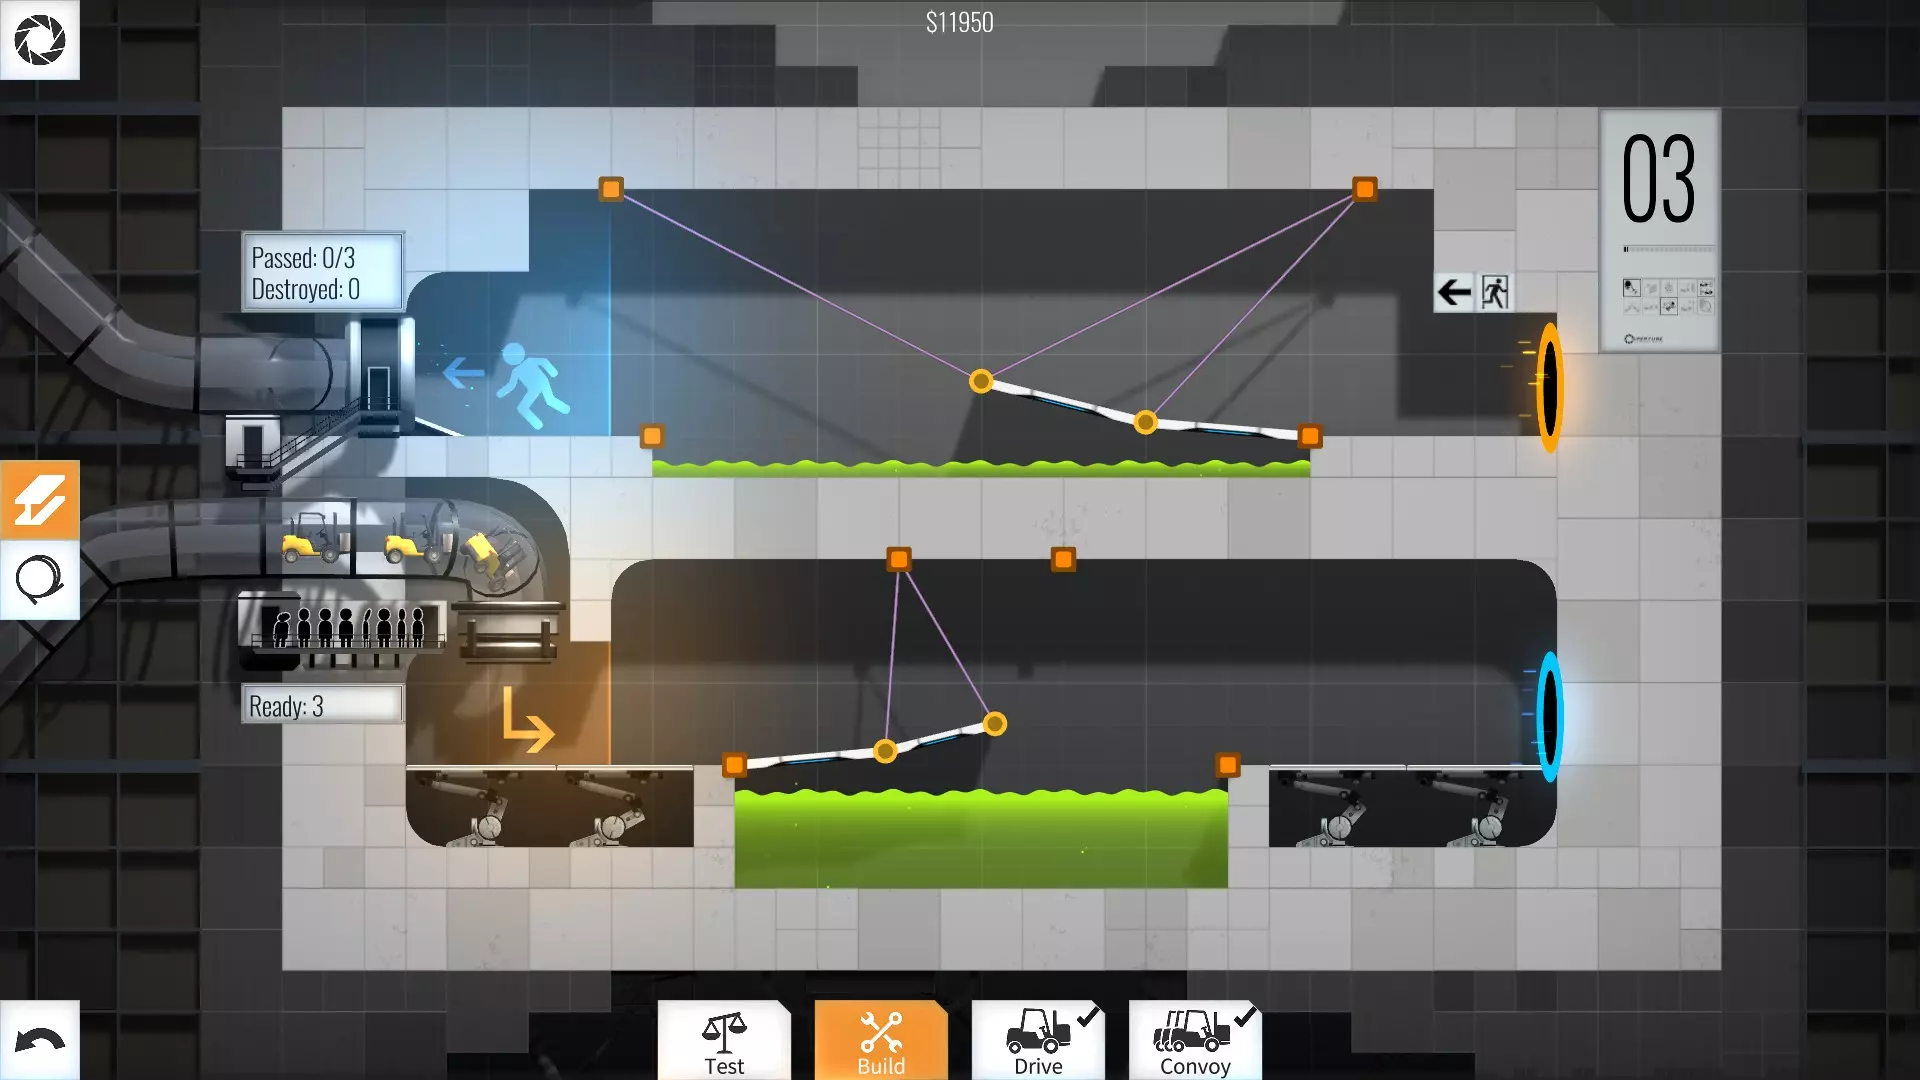
3级 - 11950美元
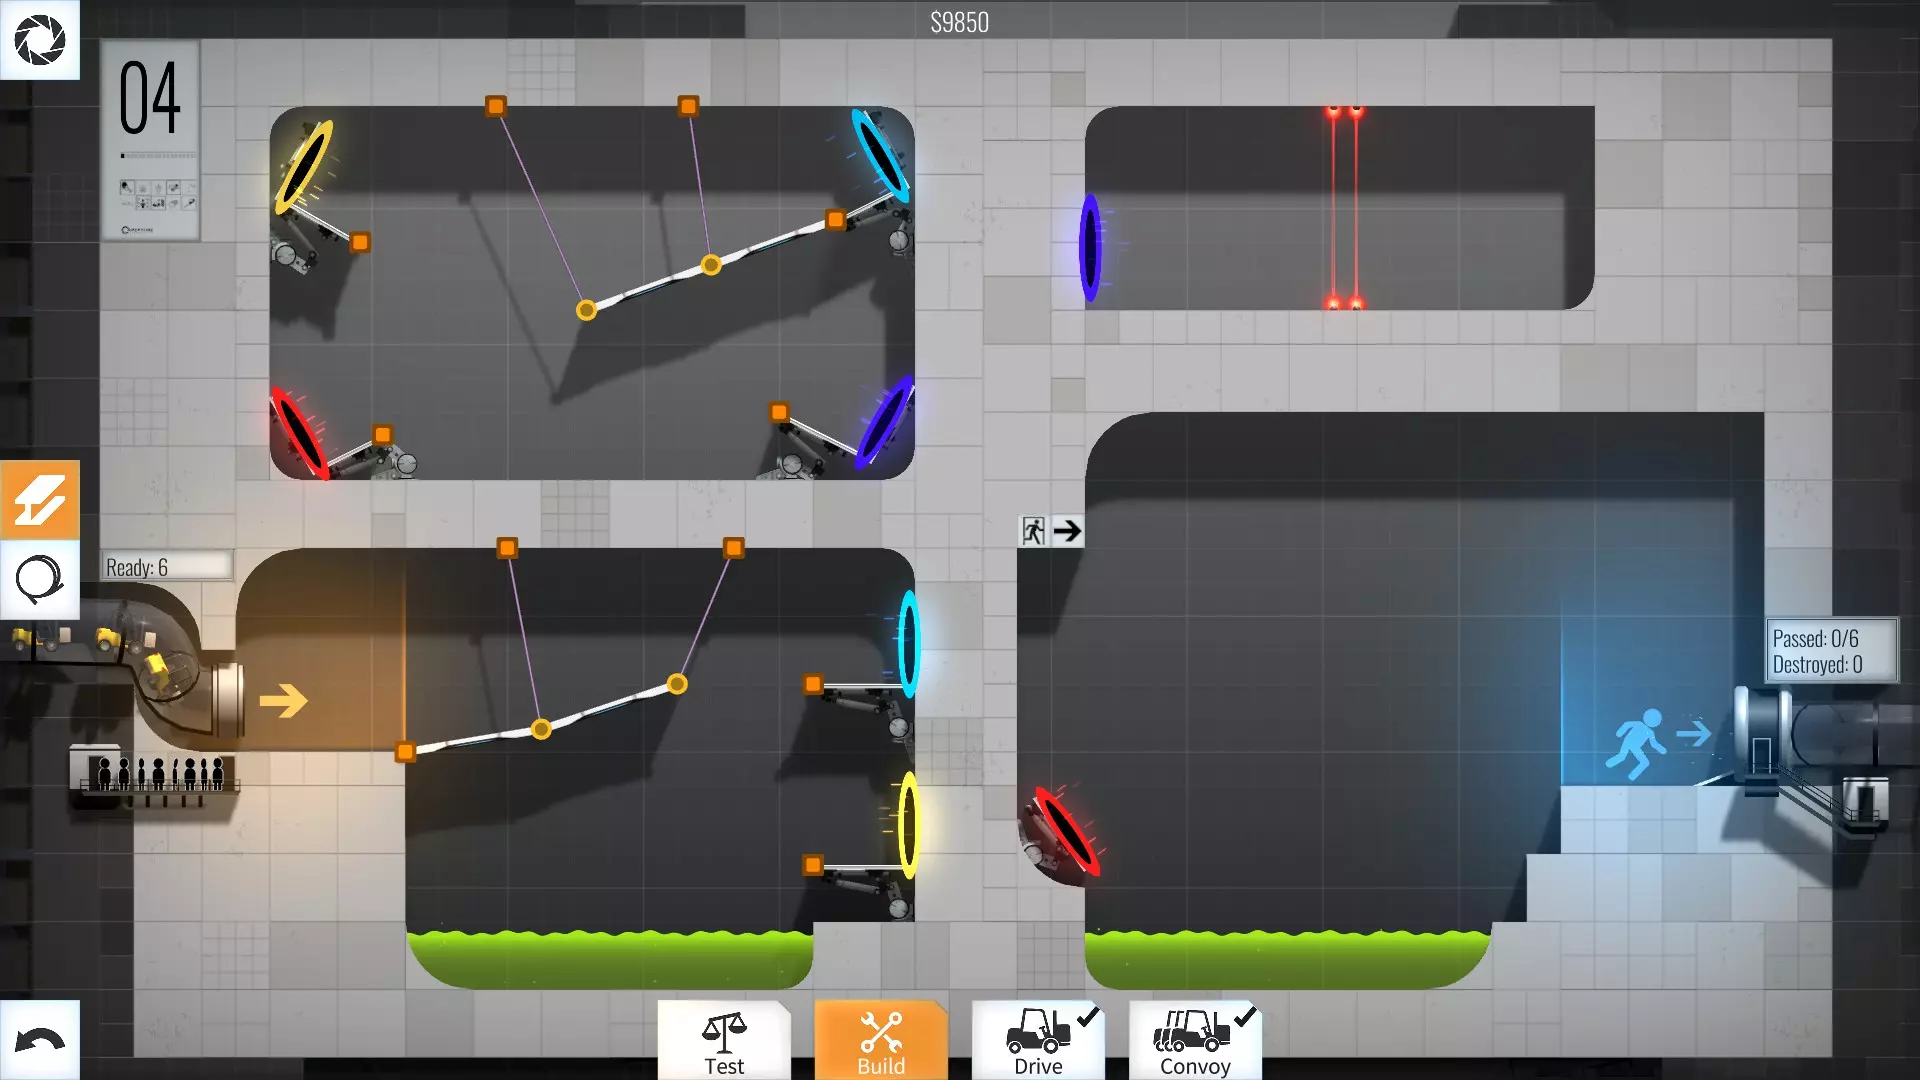
第4级 - 9850美元
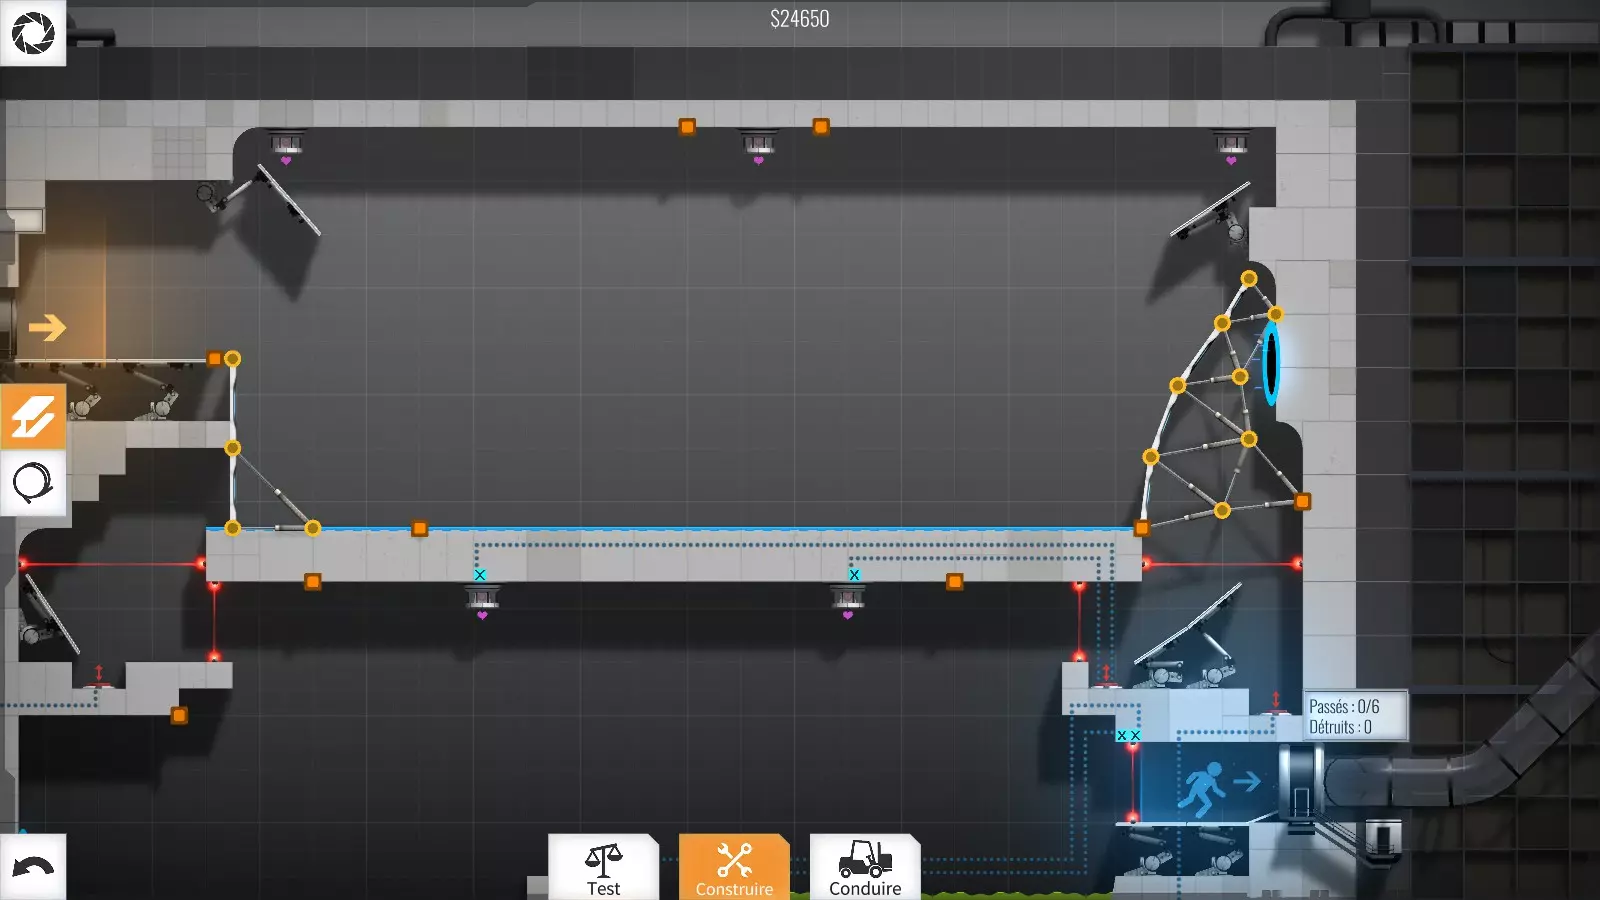
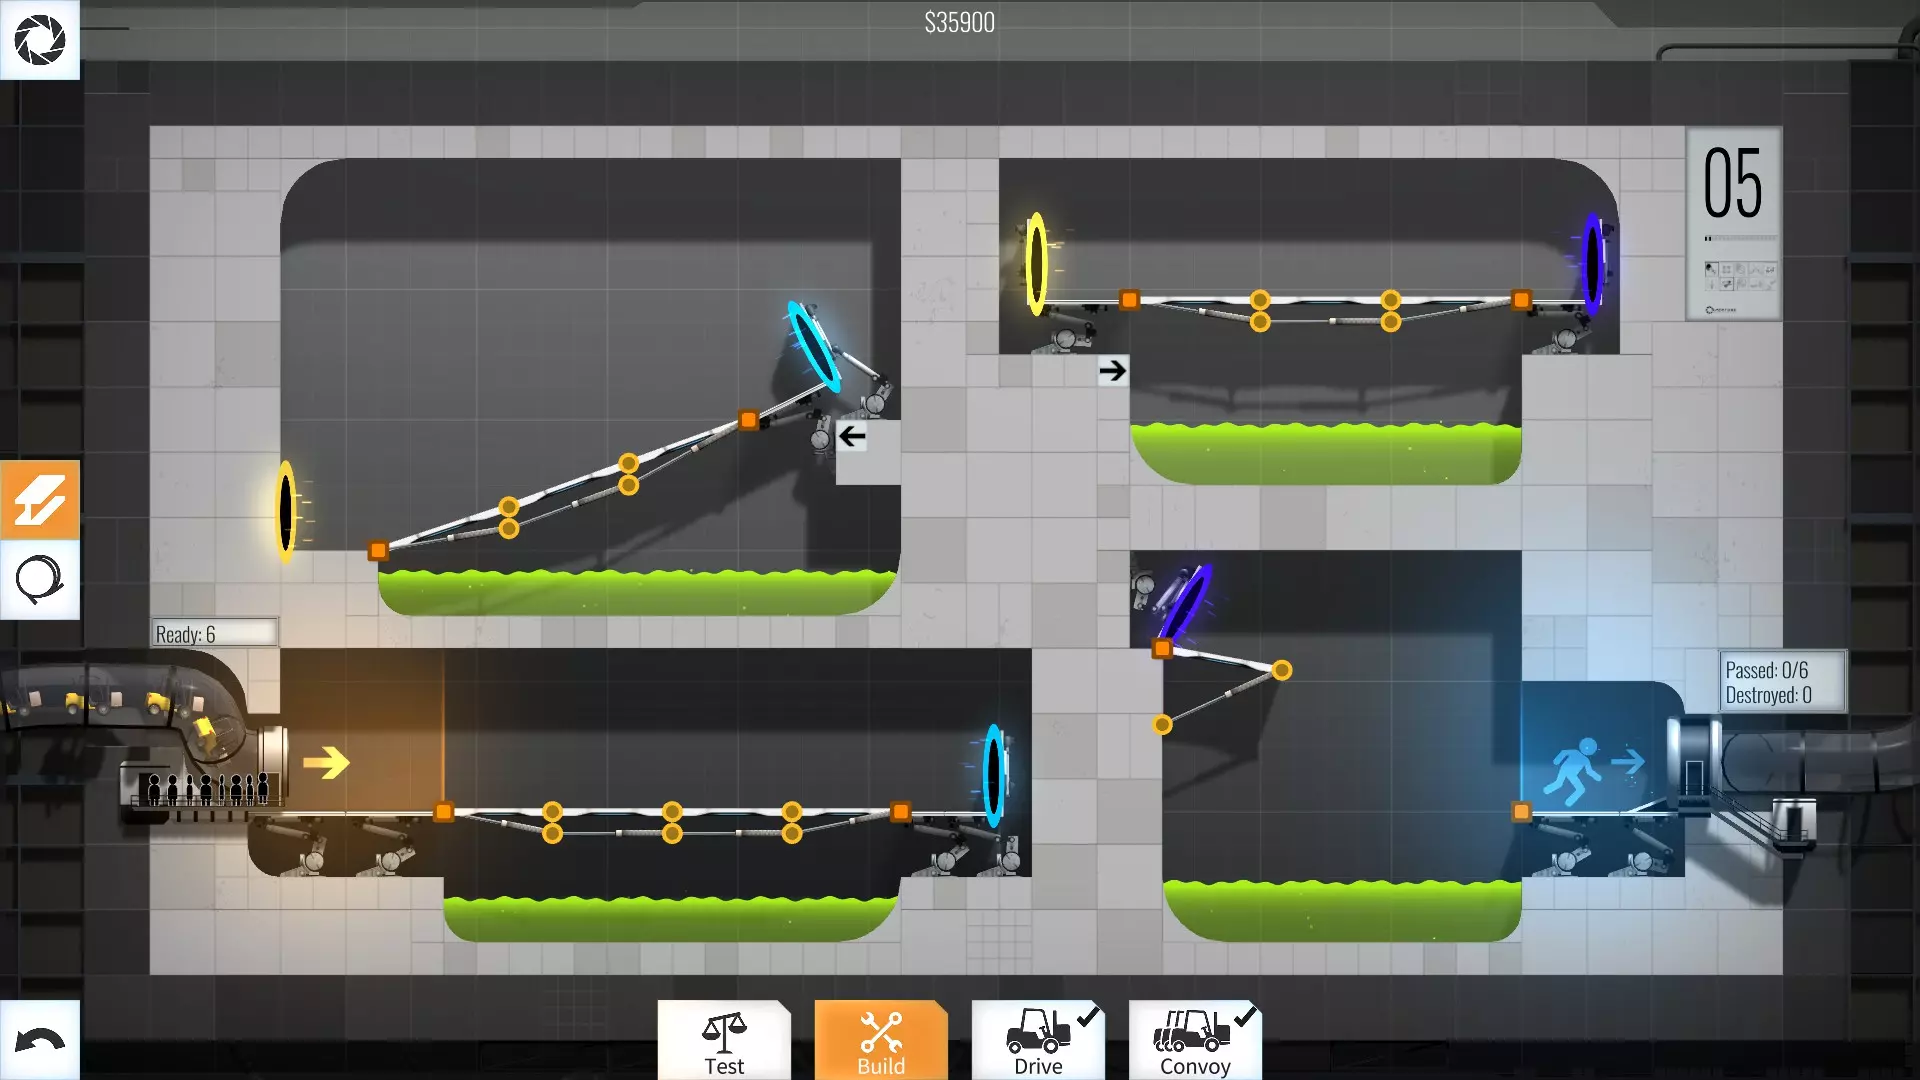
5级 - 35900美元 在《桥梁构造师》系列中,你通常可以在支撑结构下方进行操作,不过本作中的操作方式与该系列其他作品不太一样,但它们的效果仍然足够好……然而这些结构非常不稳定且晃动得厉害。我尽量不频繁使用它们,因为这感觉像是取巧,而且它们顶多只能算不可靠。
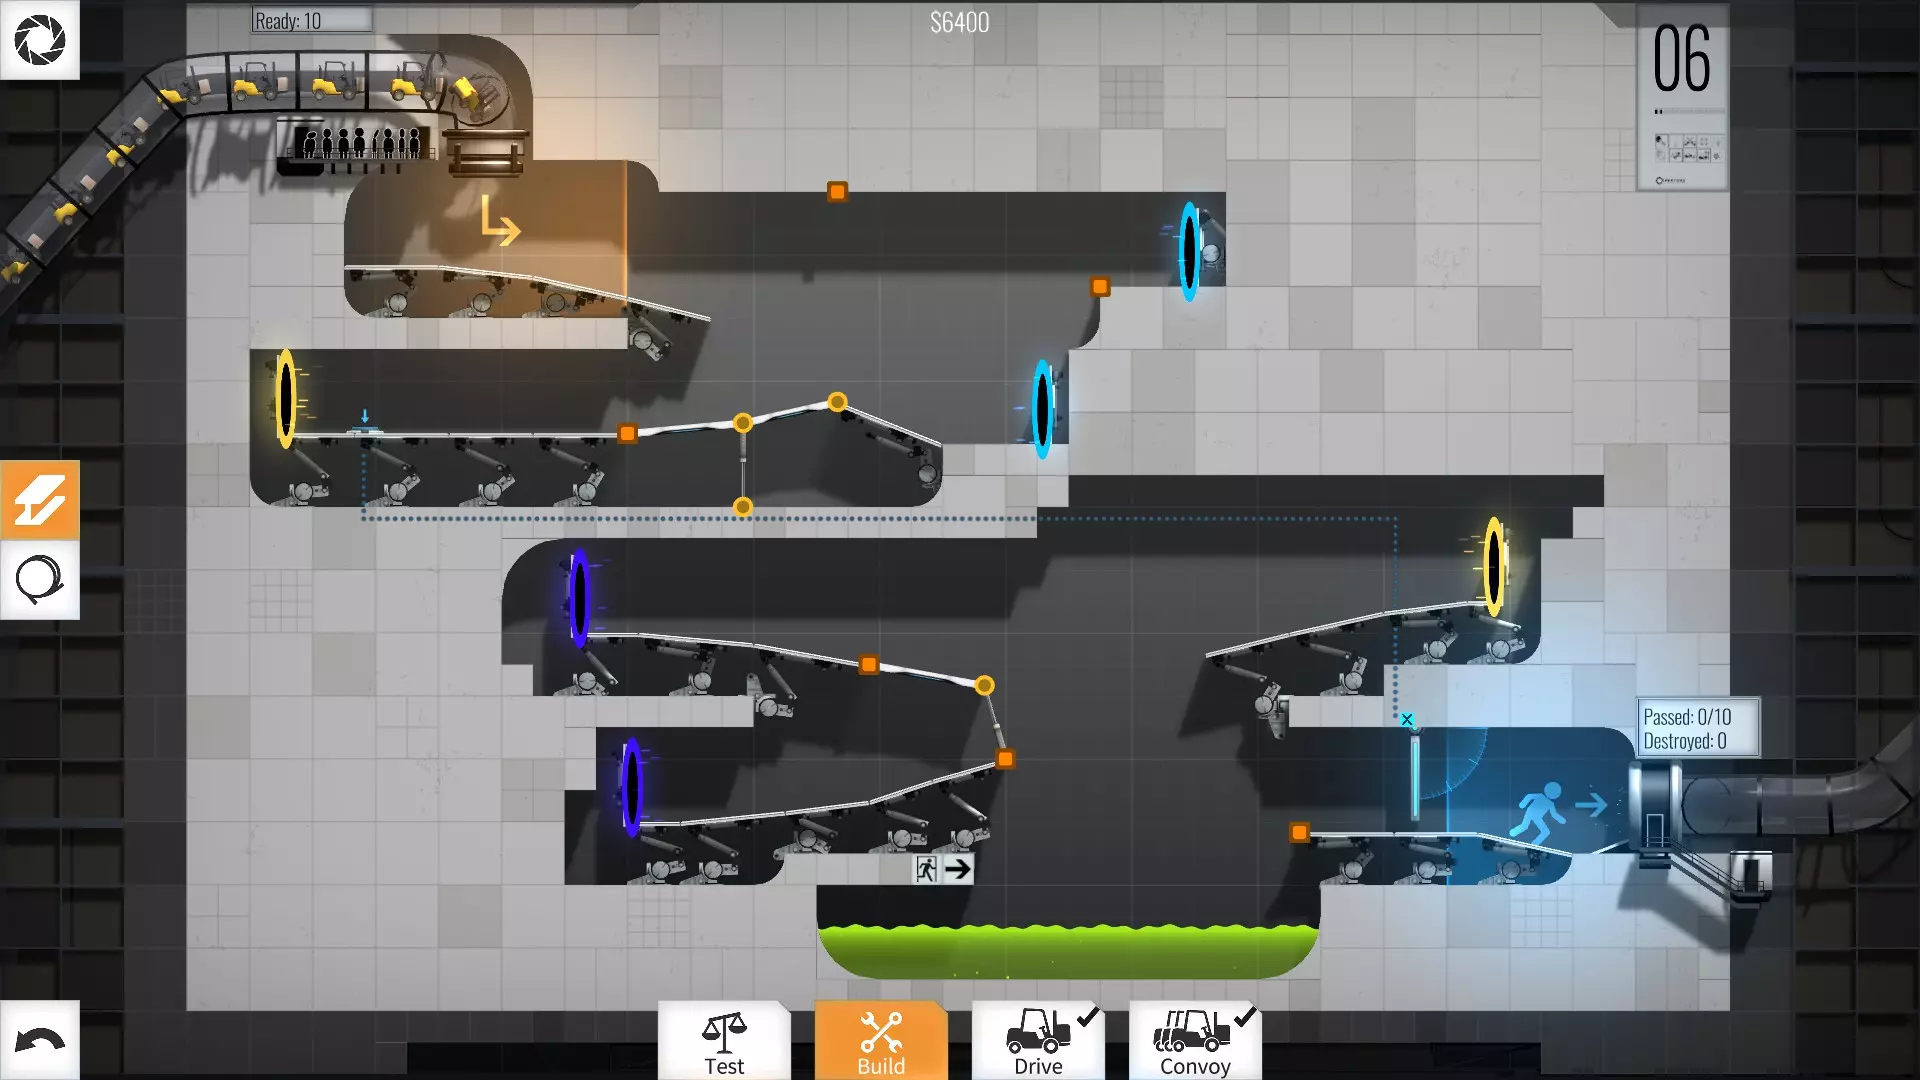
第6级 - 6400美元
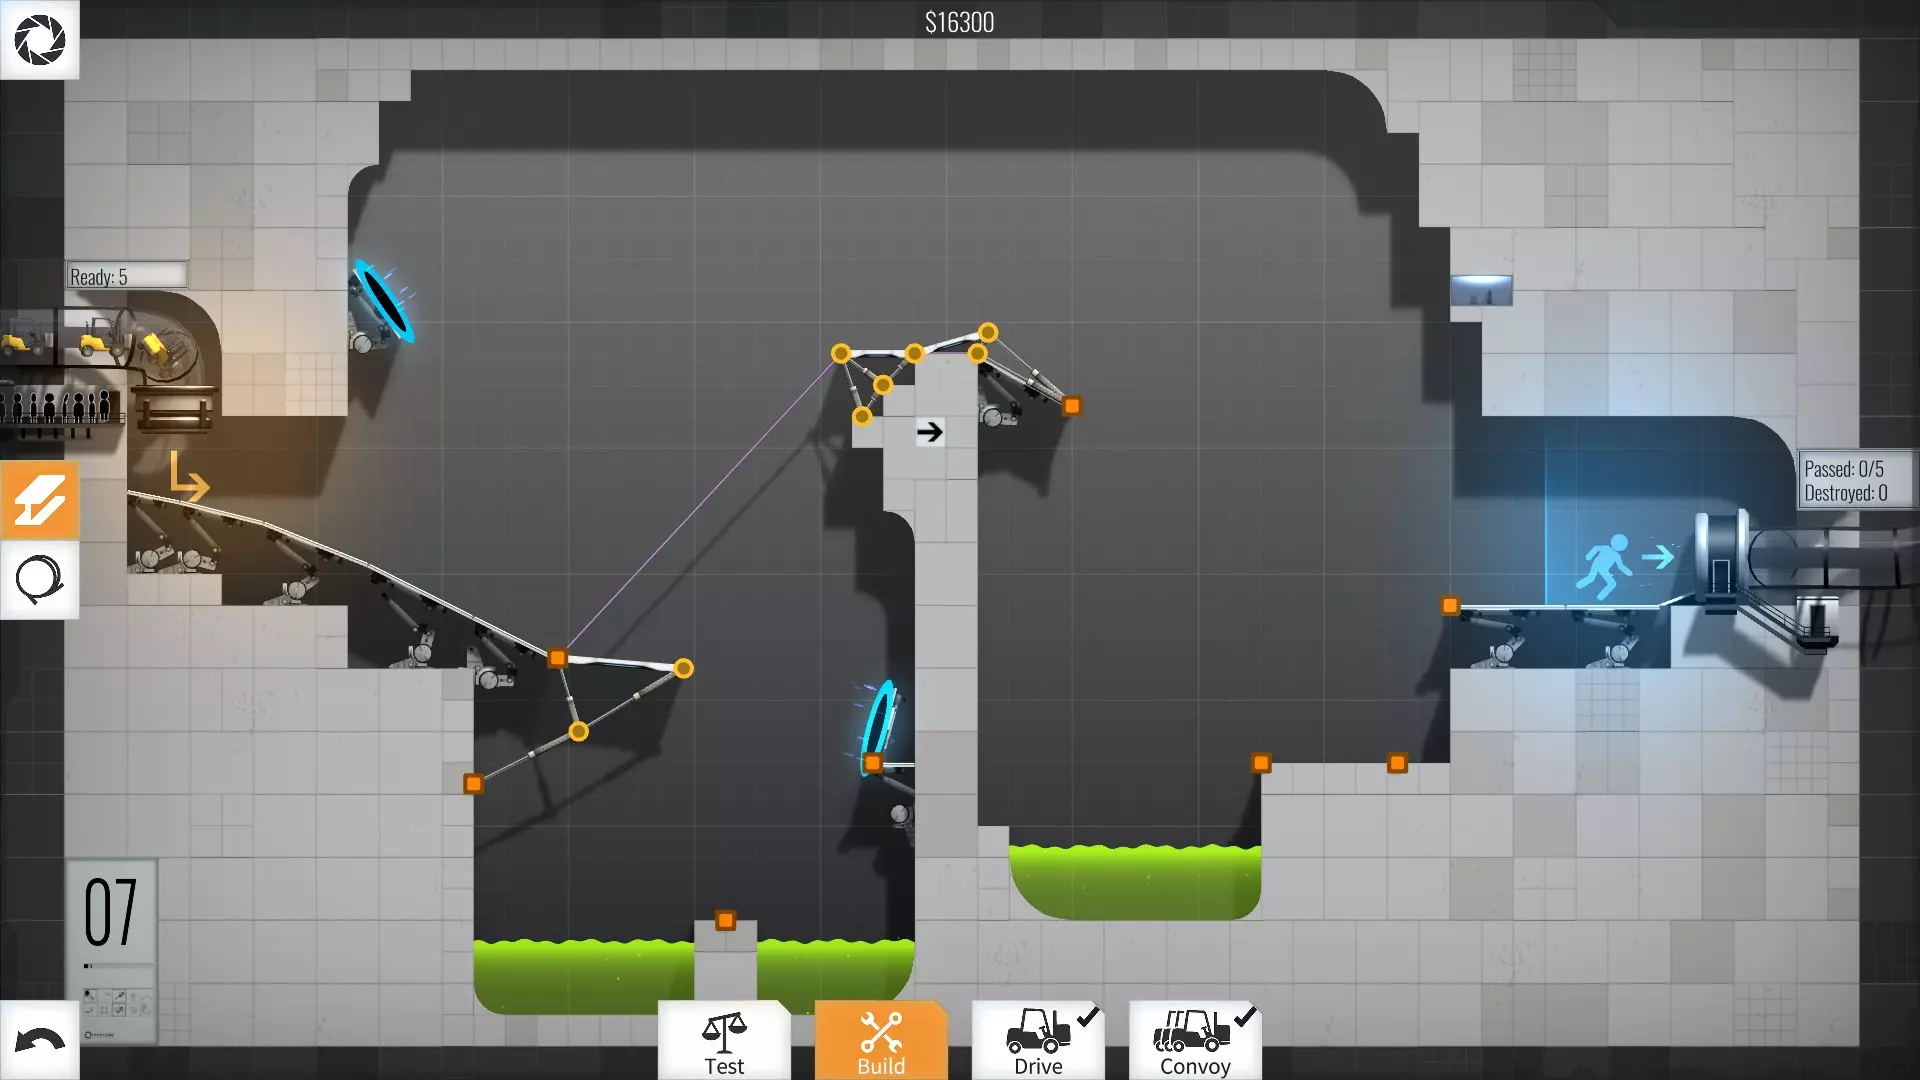
7级 - 16300美元
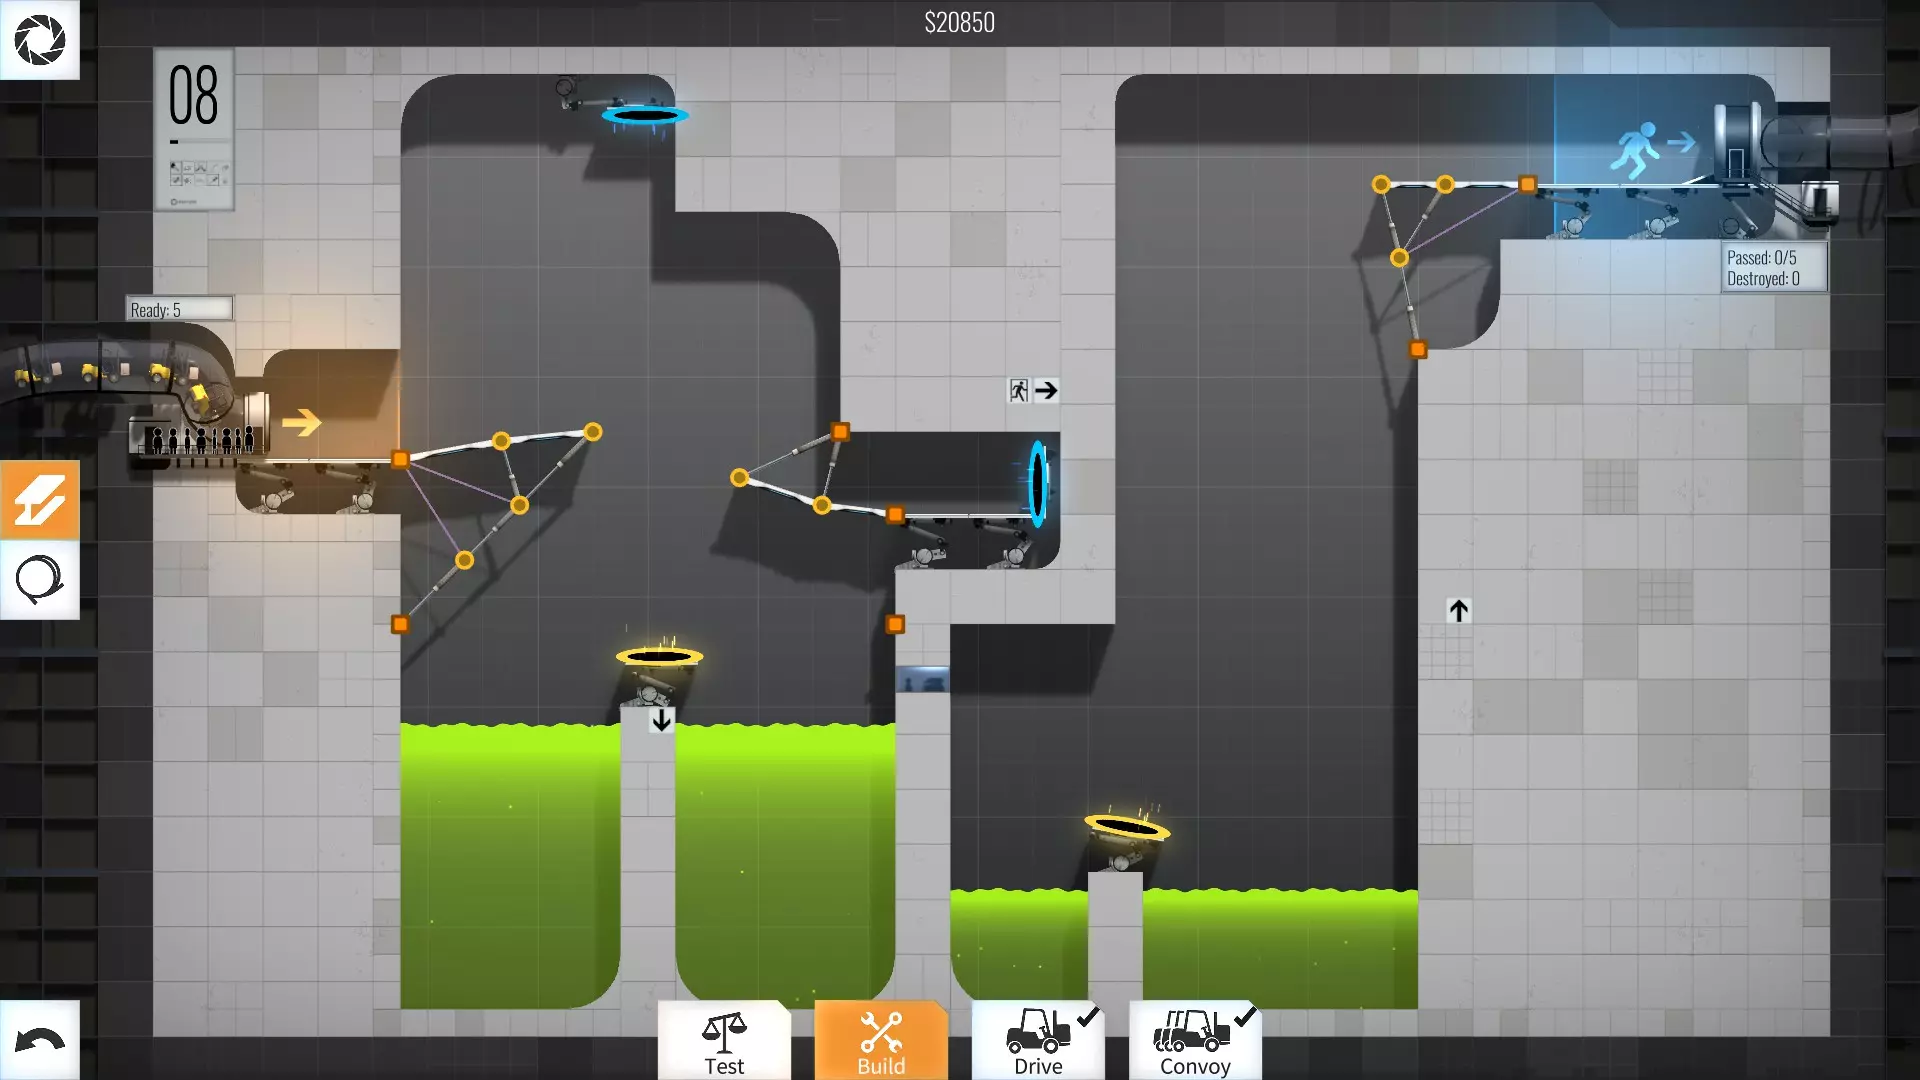
8级 - 20850美元
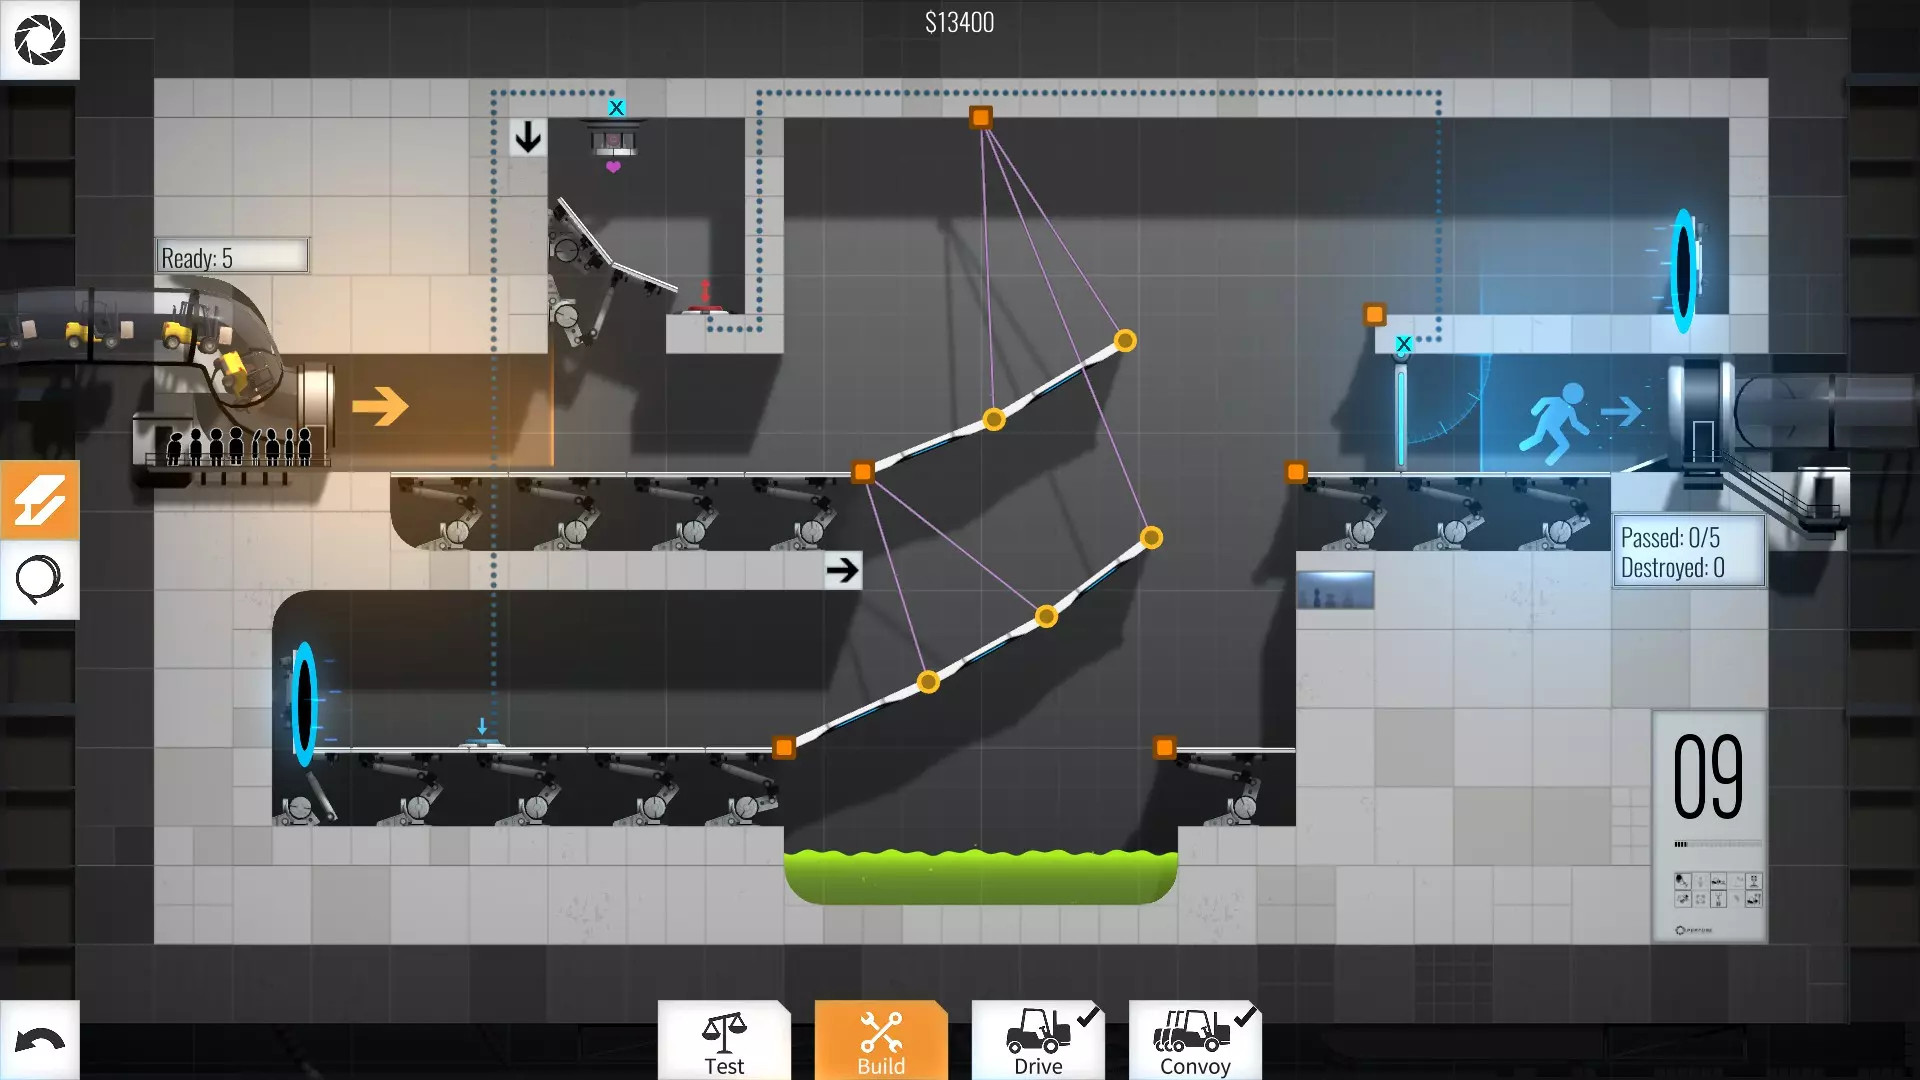
第9级 - 13400美元
10级 - 19400美元

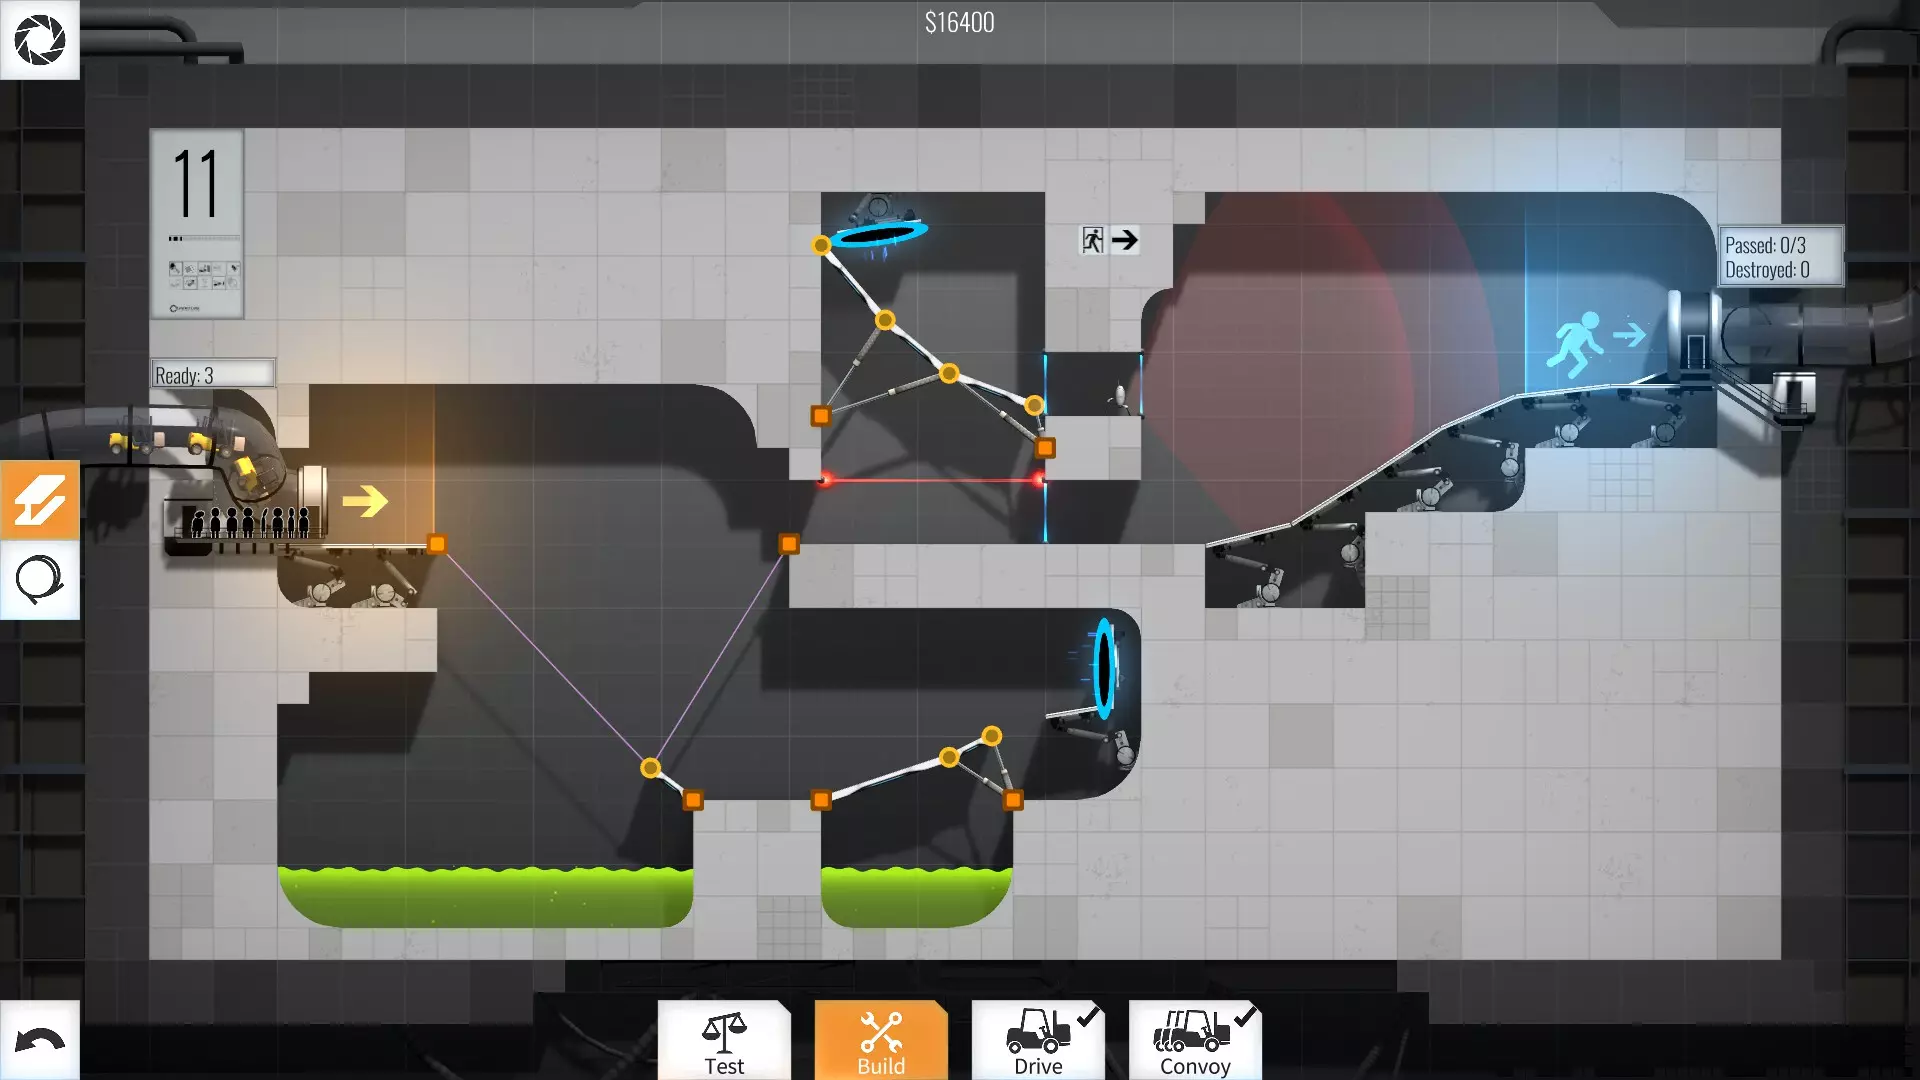
11级 - 16400美元
12级 - 14750美元

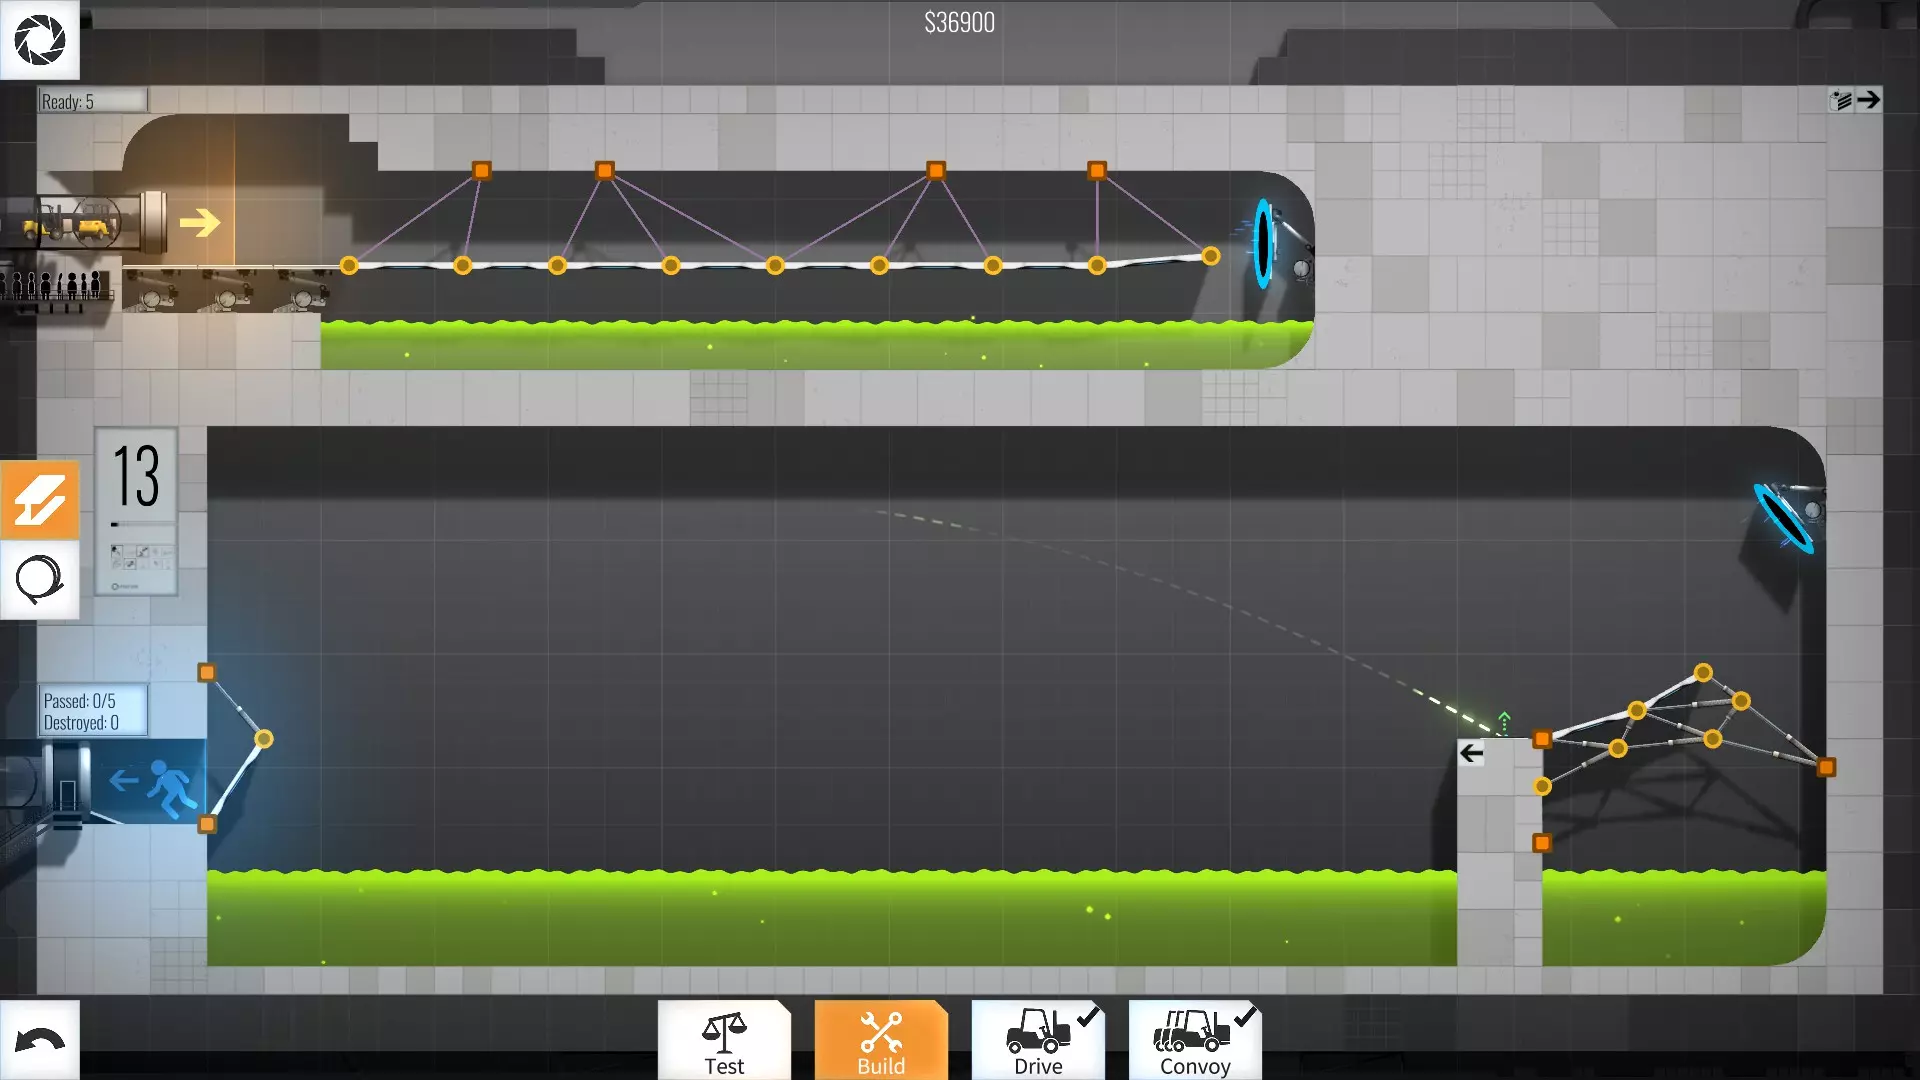
13级 - 36900美元
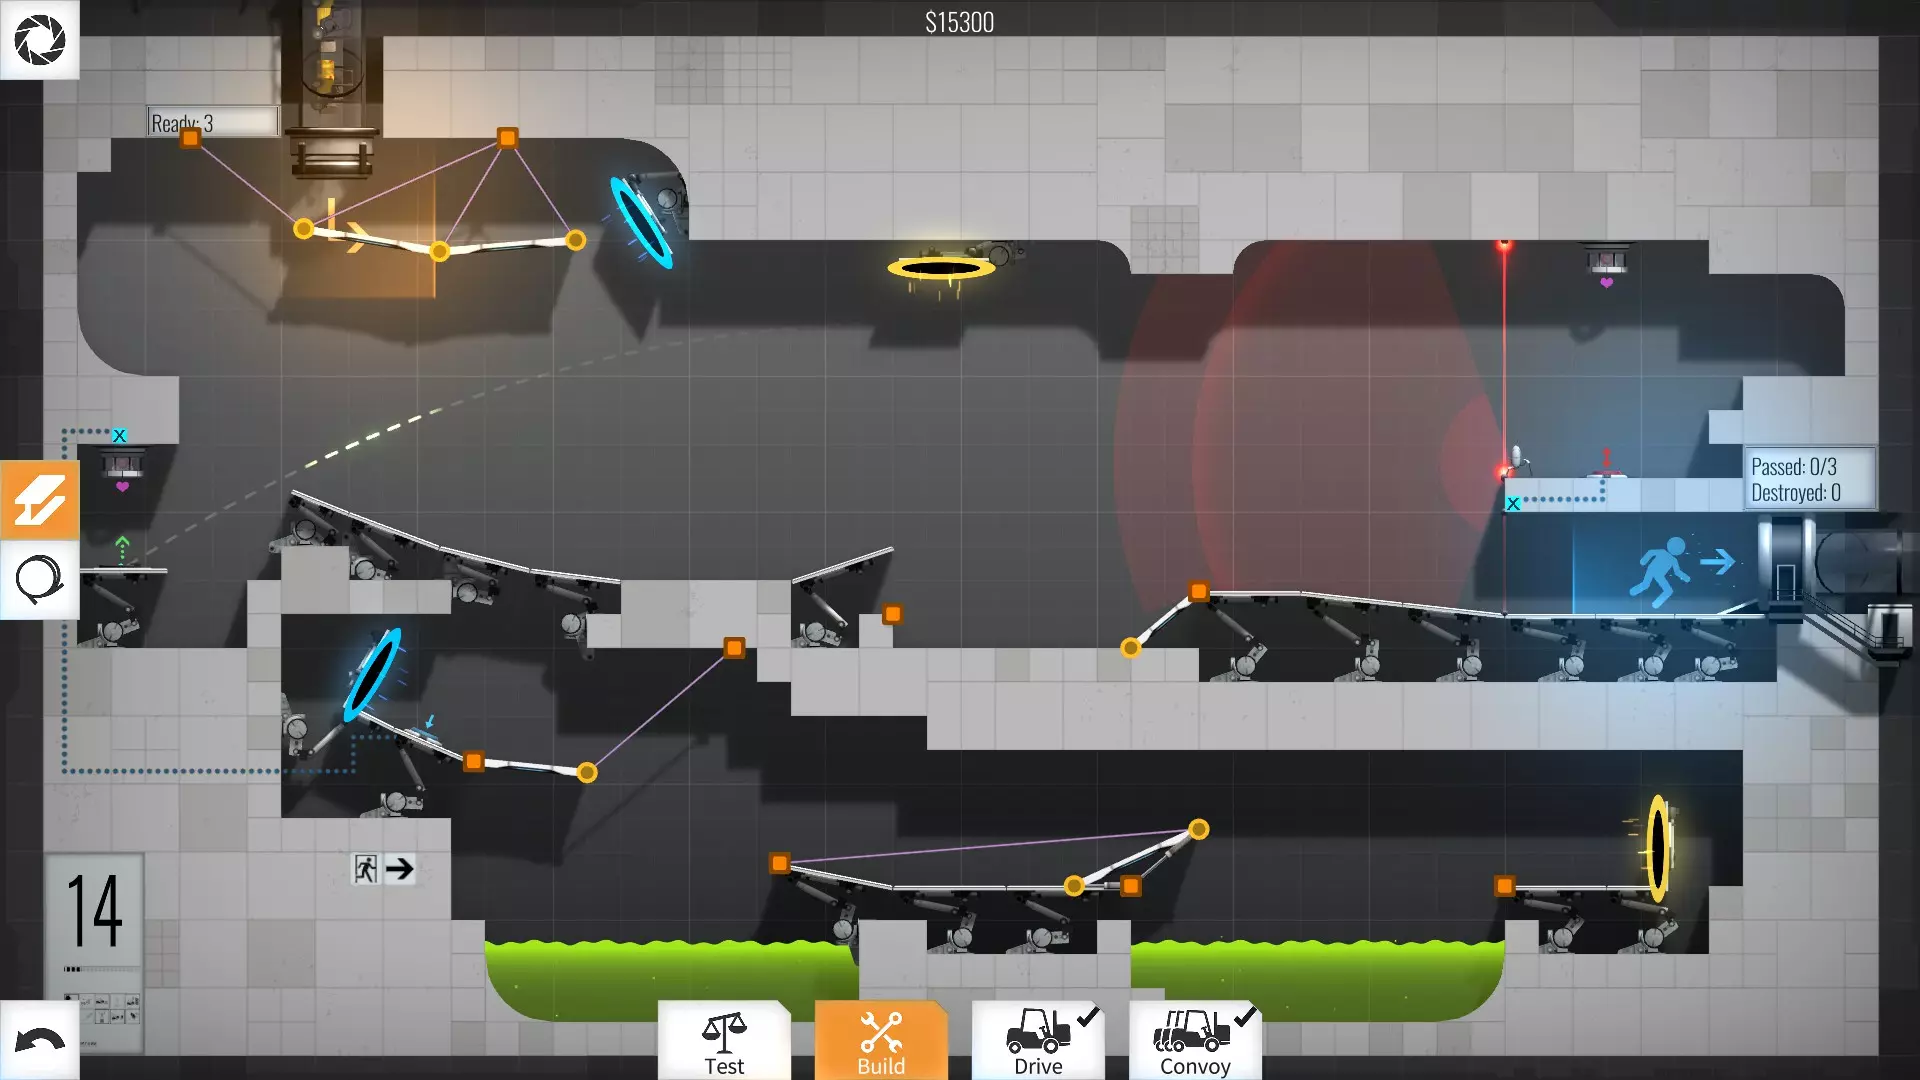
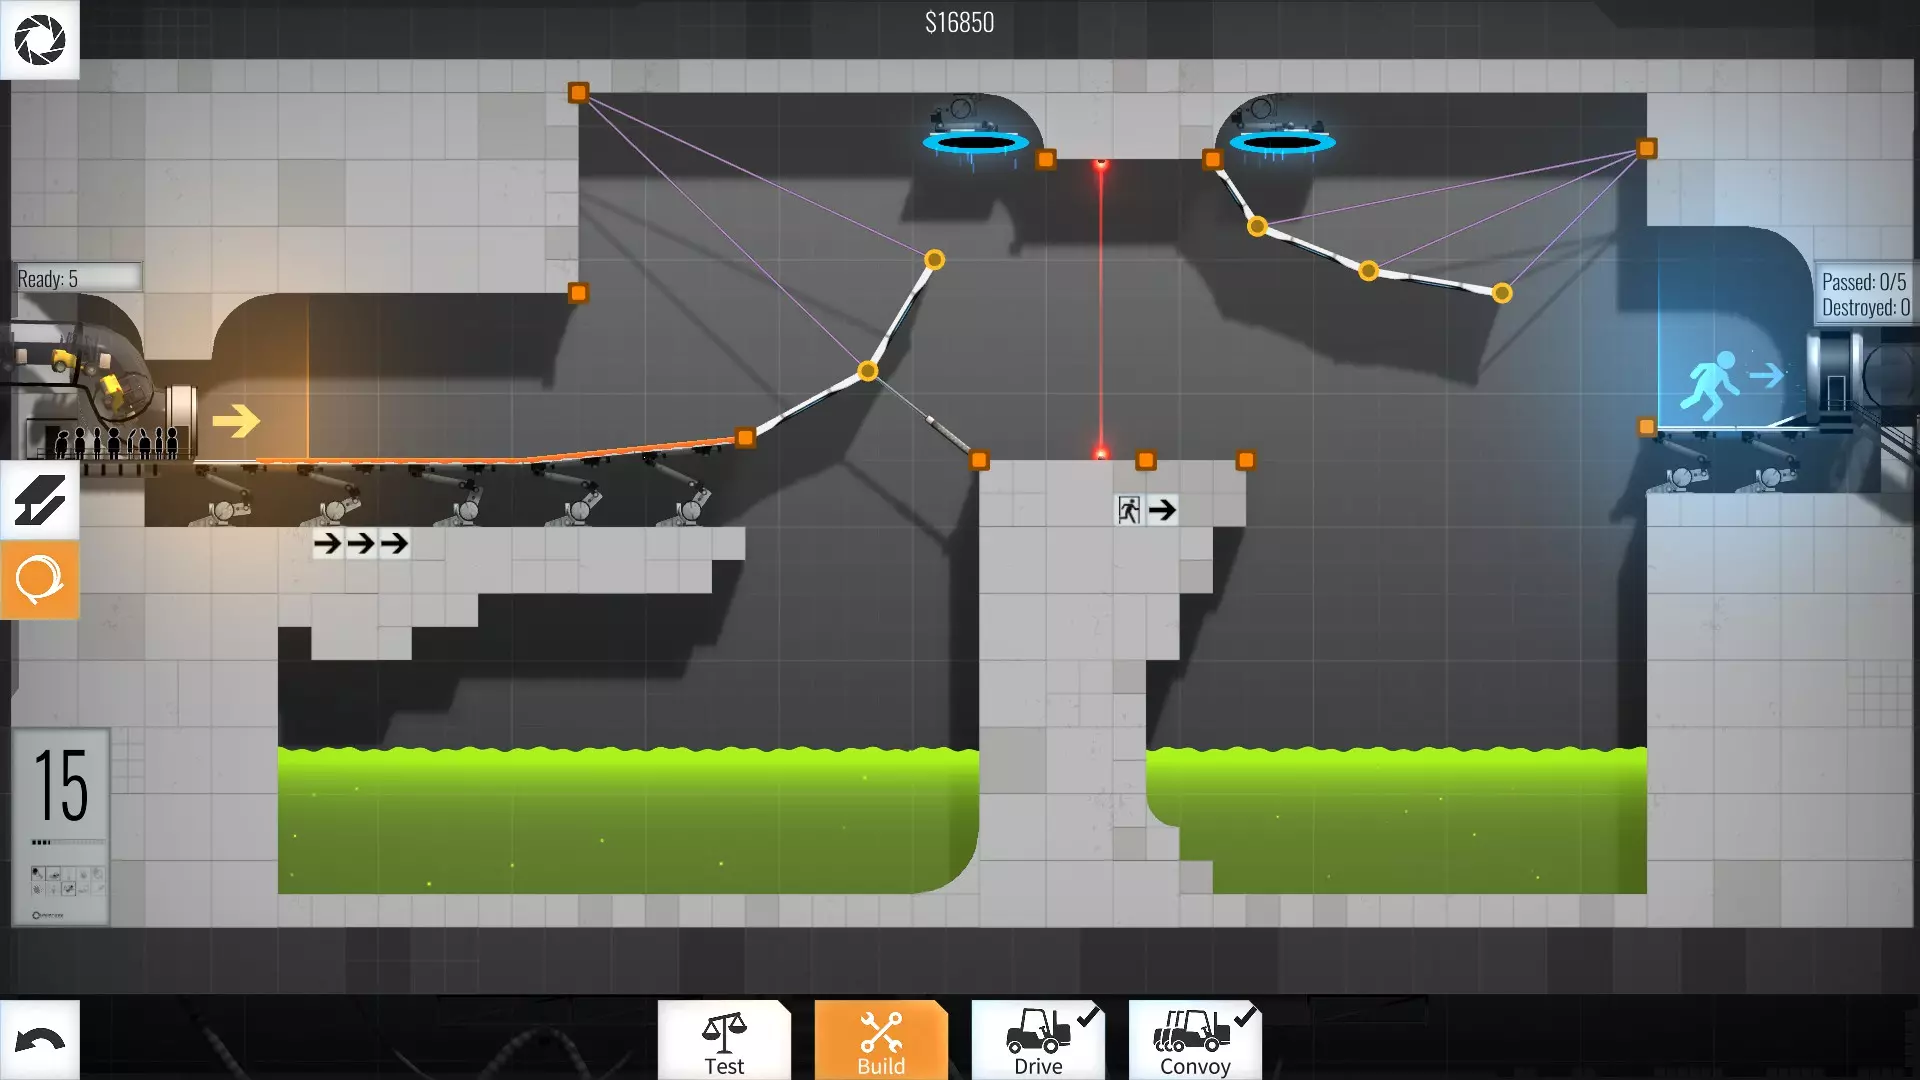
14级 - 15300美元 我不会使用桥梁,而是采用内部斜坡,这个【技巧】我会经常使用,能节省很多资金。
15级 - 25350美元
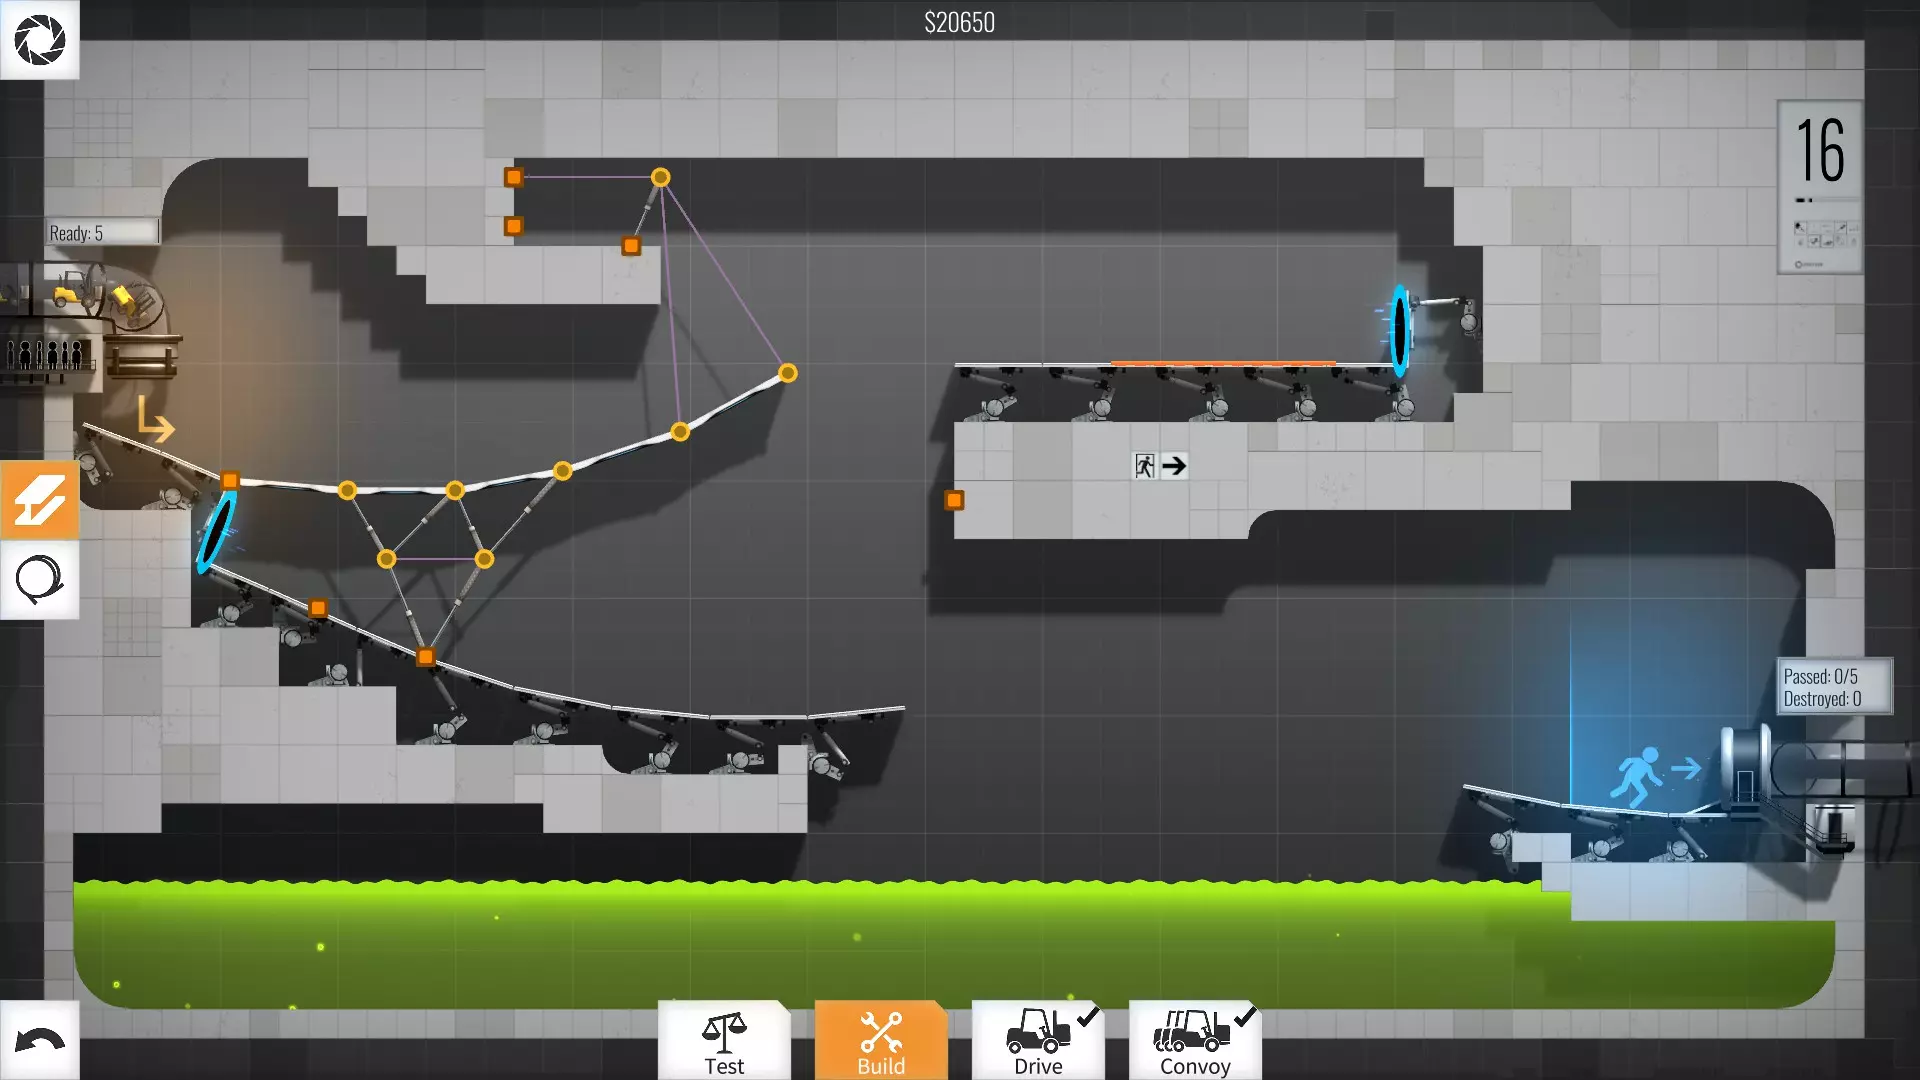
16级 - 20650美元
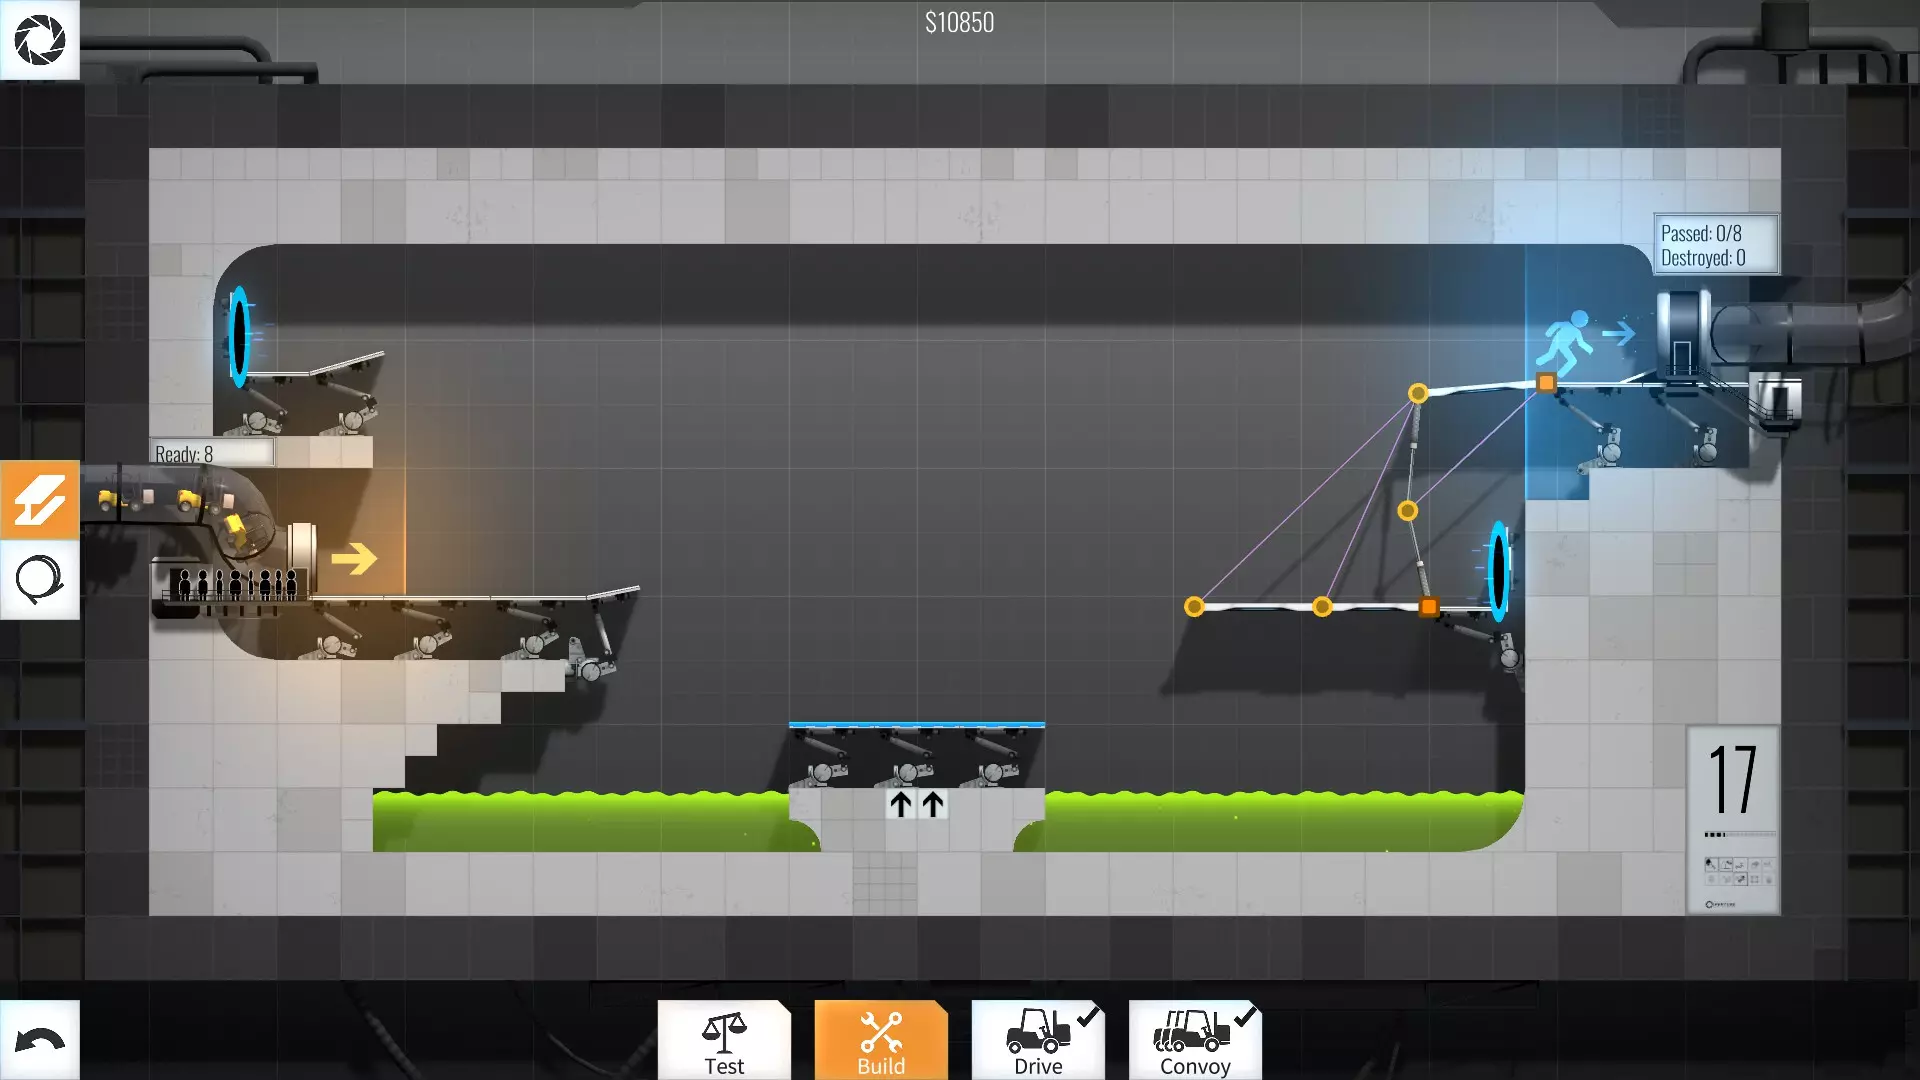
17级 - 10850美元
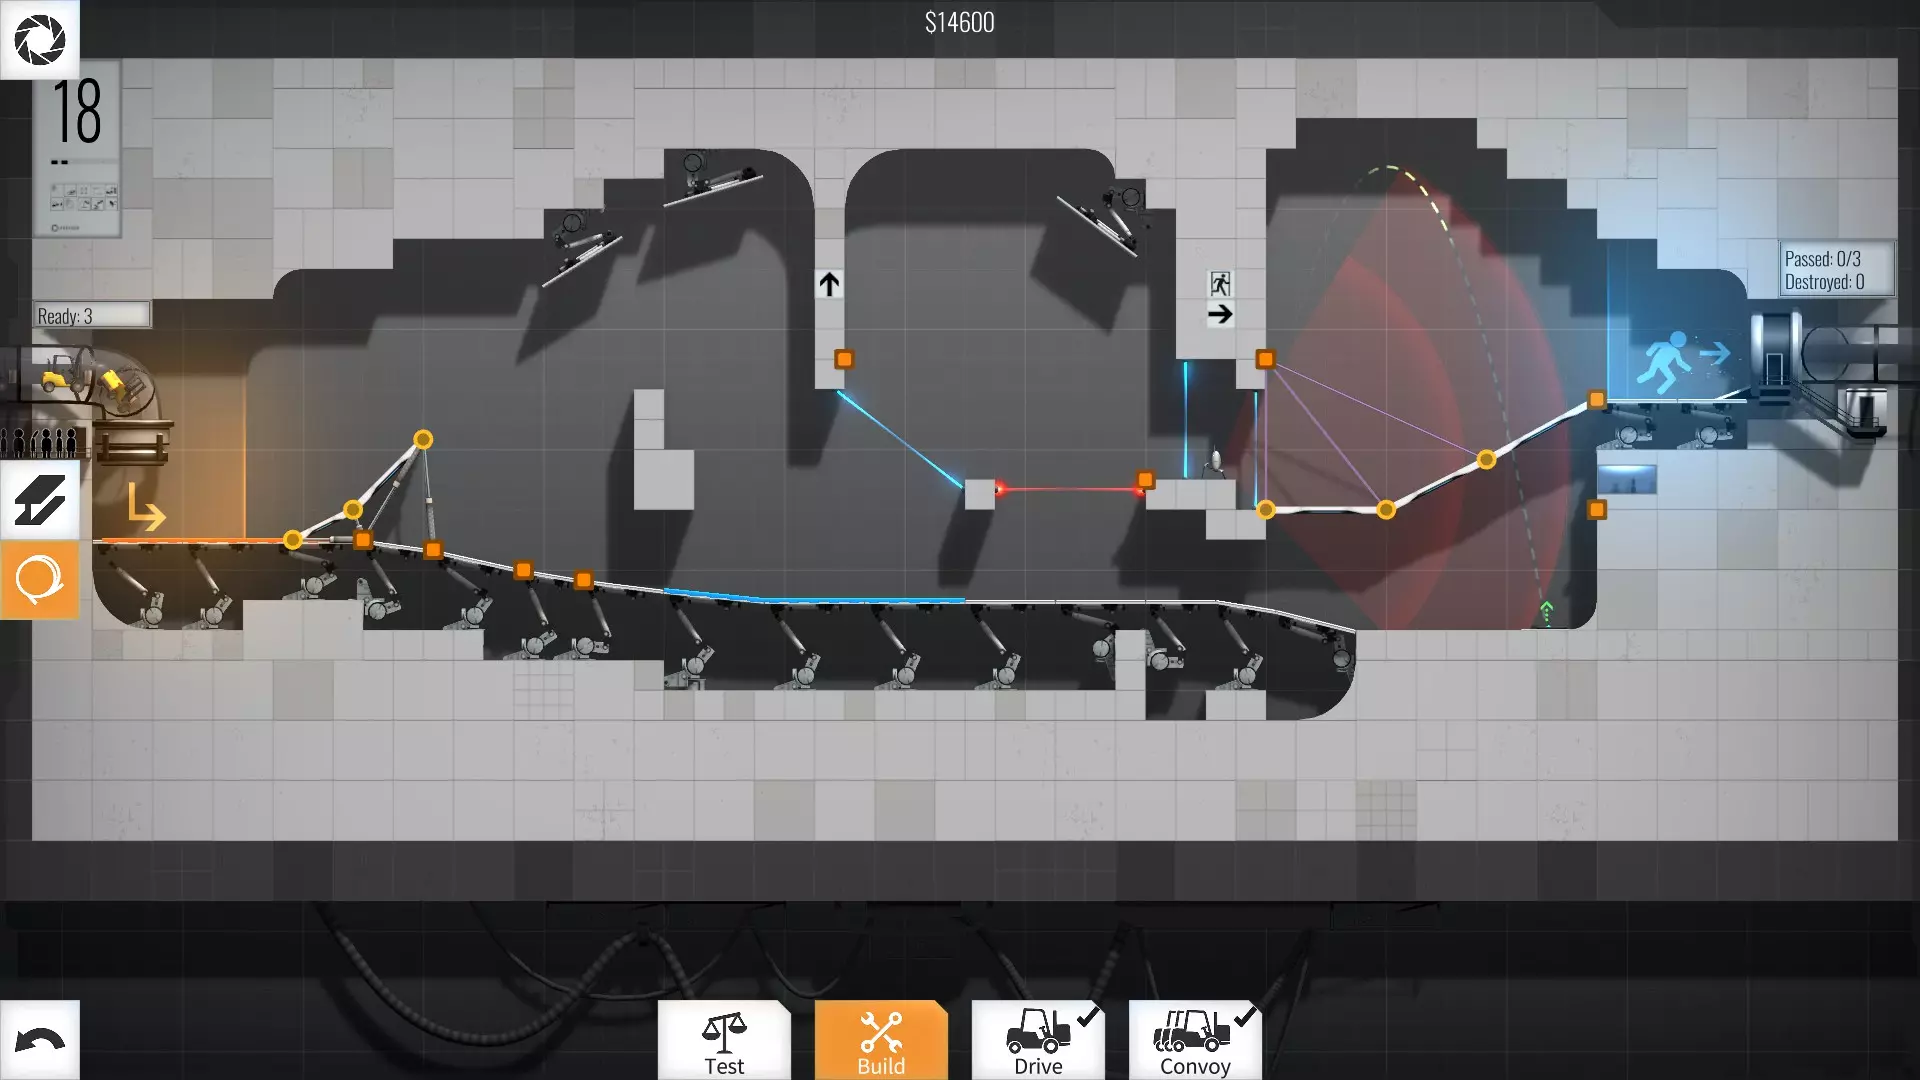
18级 - 14700美元 这是第一个需要优化的困难关卡……要让车队实现精准弹跳相当棘手。
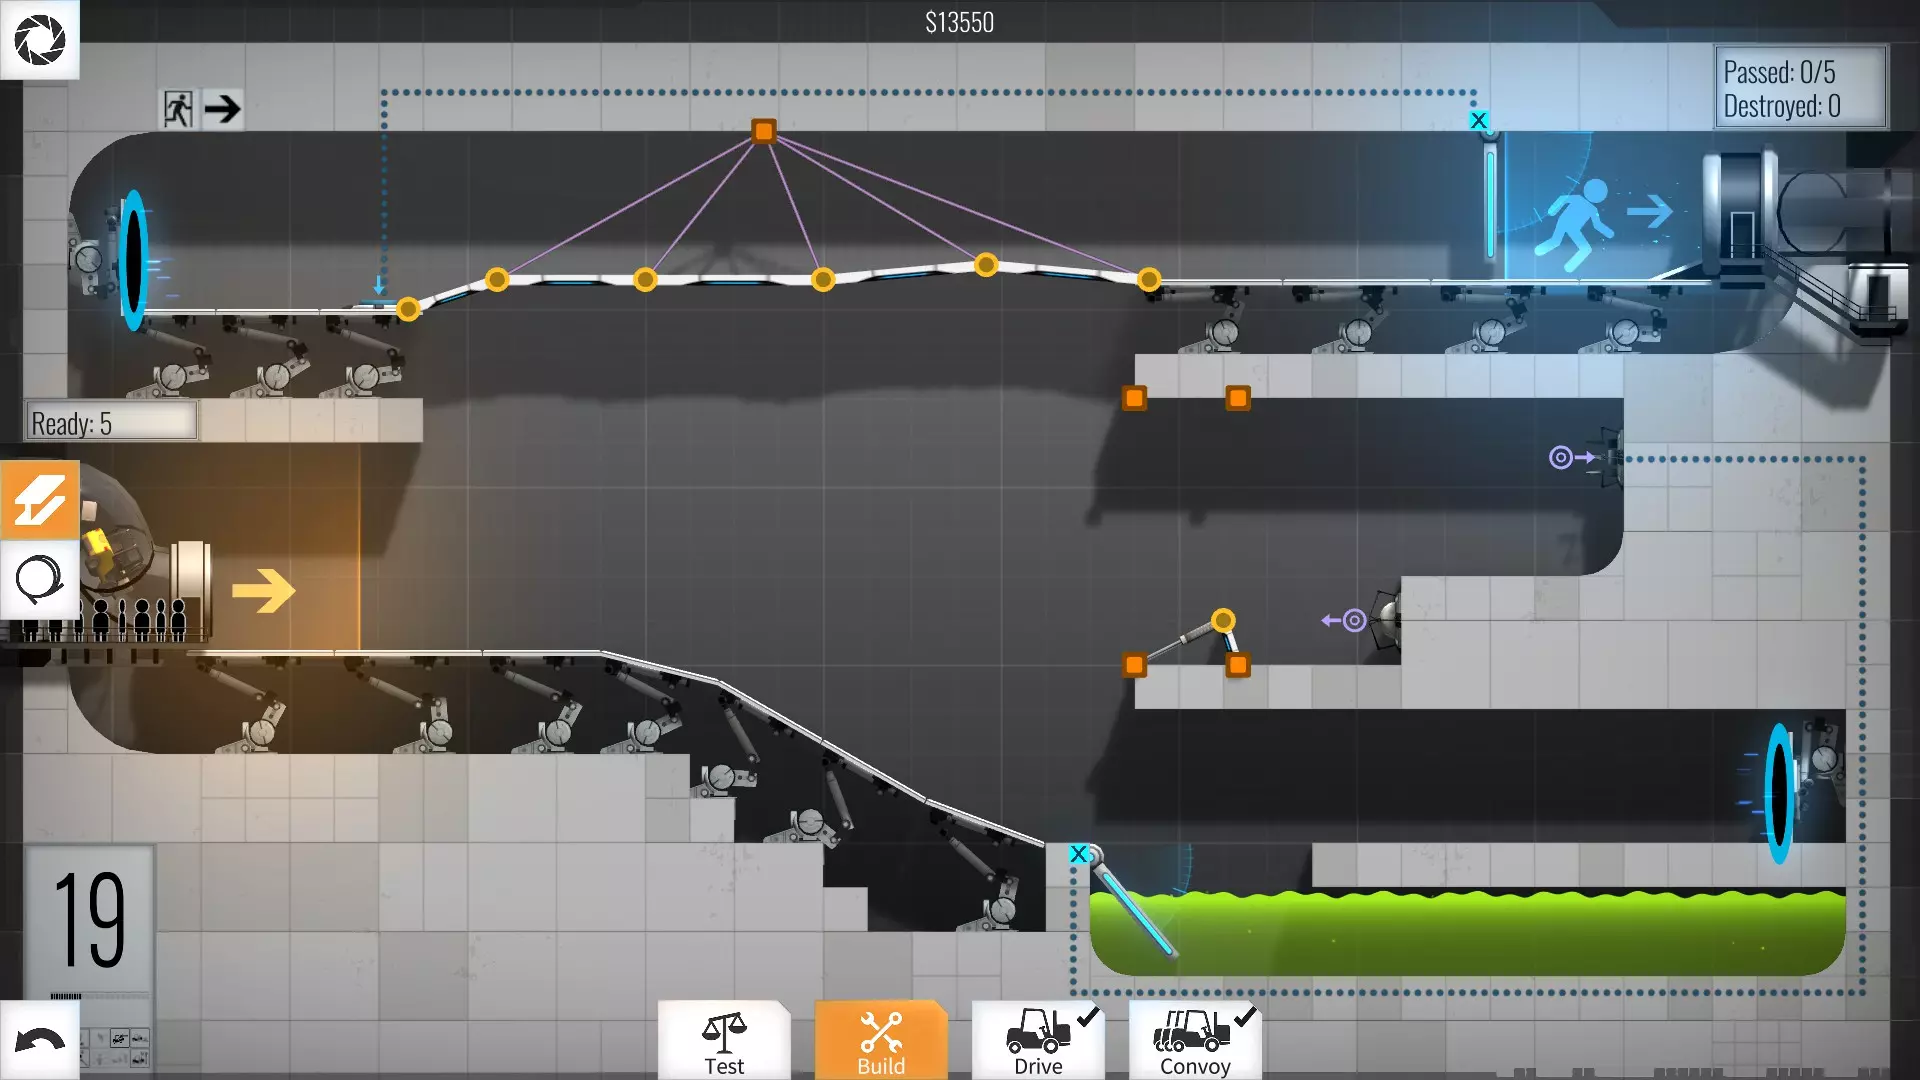
第19关 - 19250美元 注意道路块的角度以实现弹珠反弹,有时使用特殊角度可以节省资金。上侧桥梁也是如此,微小的角度差异会决定它是否会损坏。
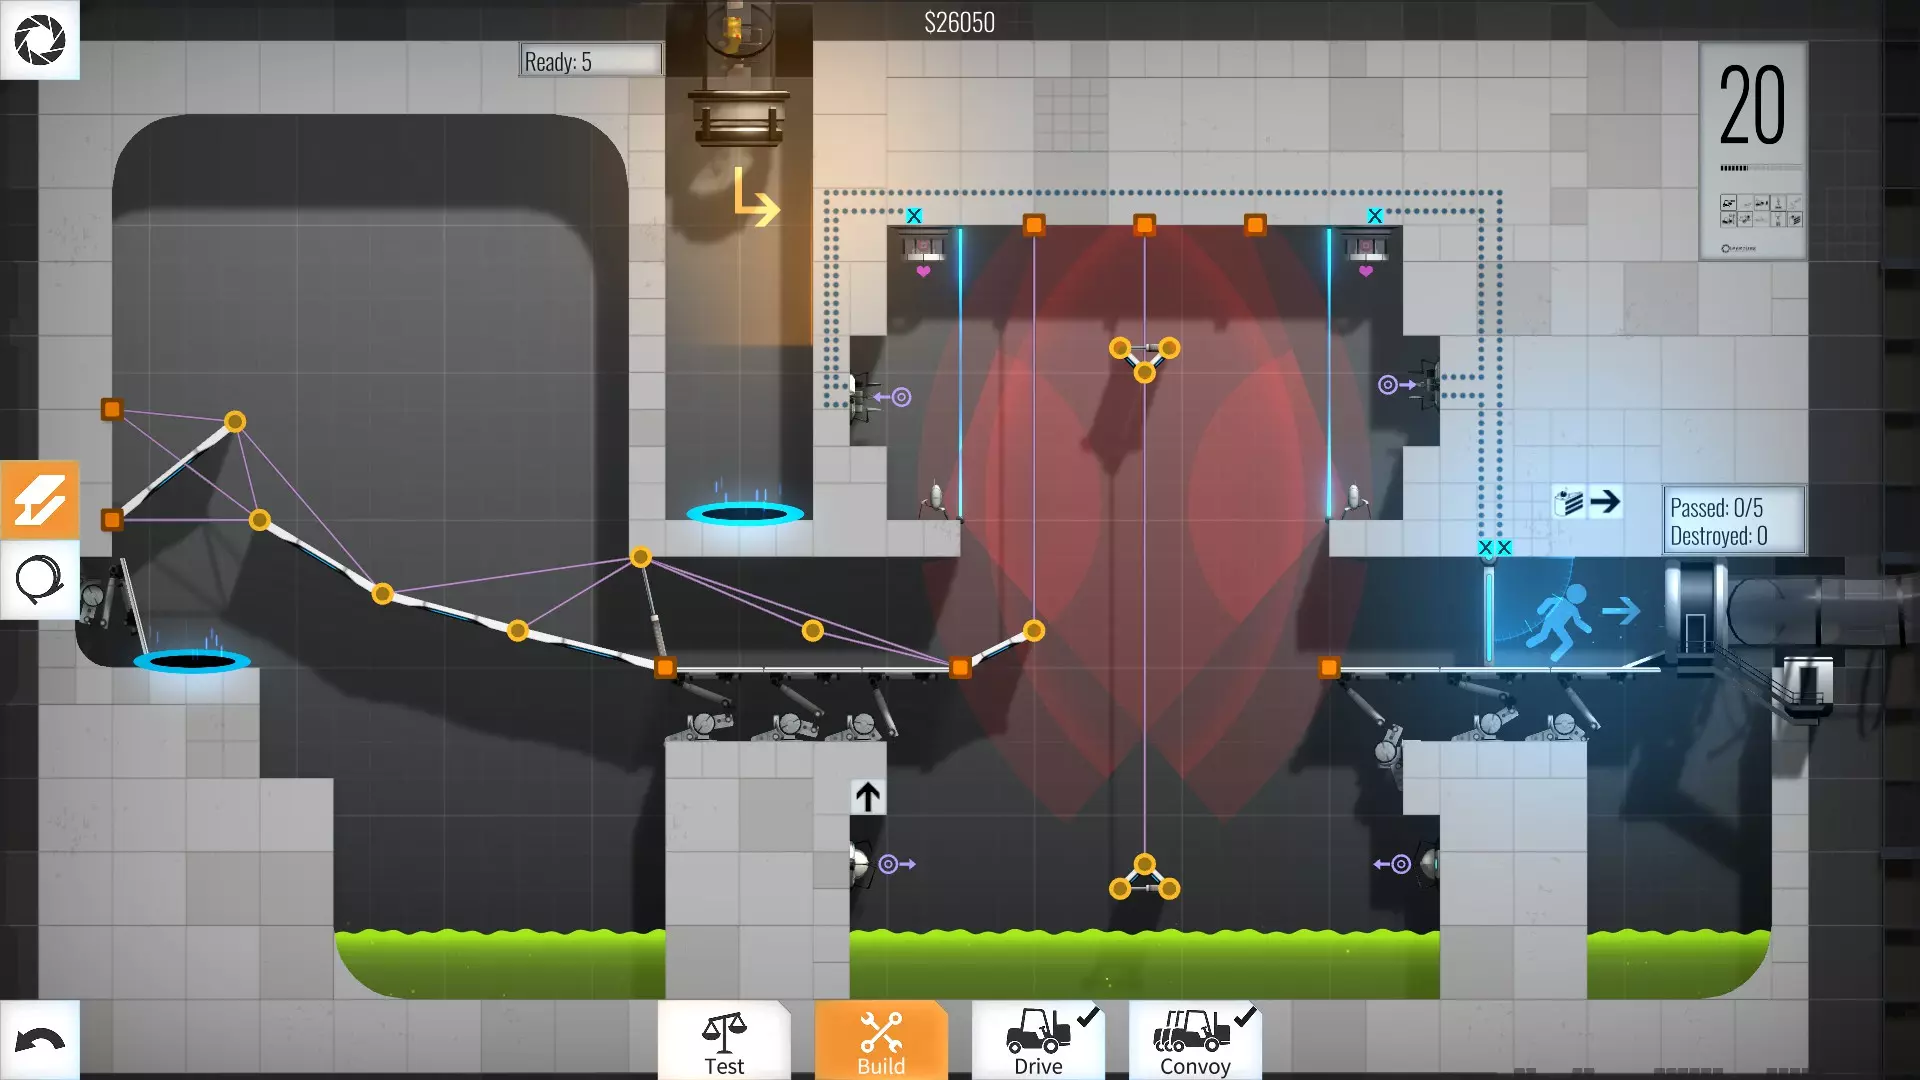
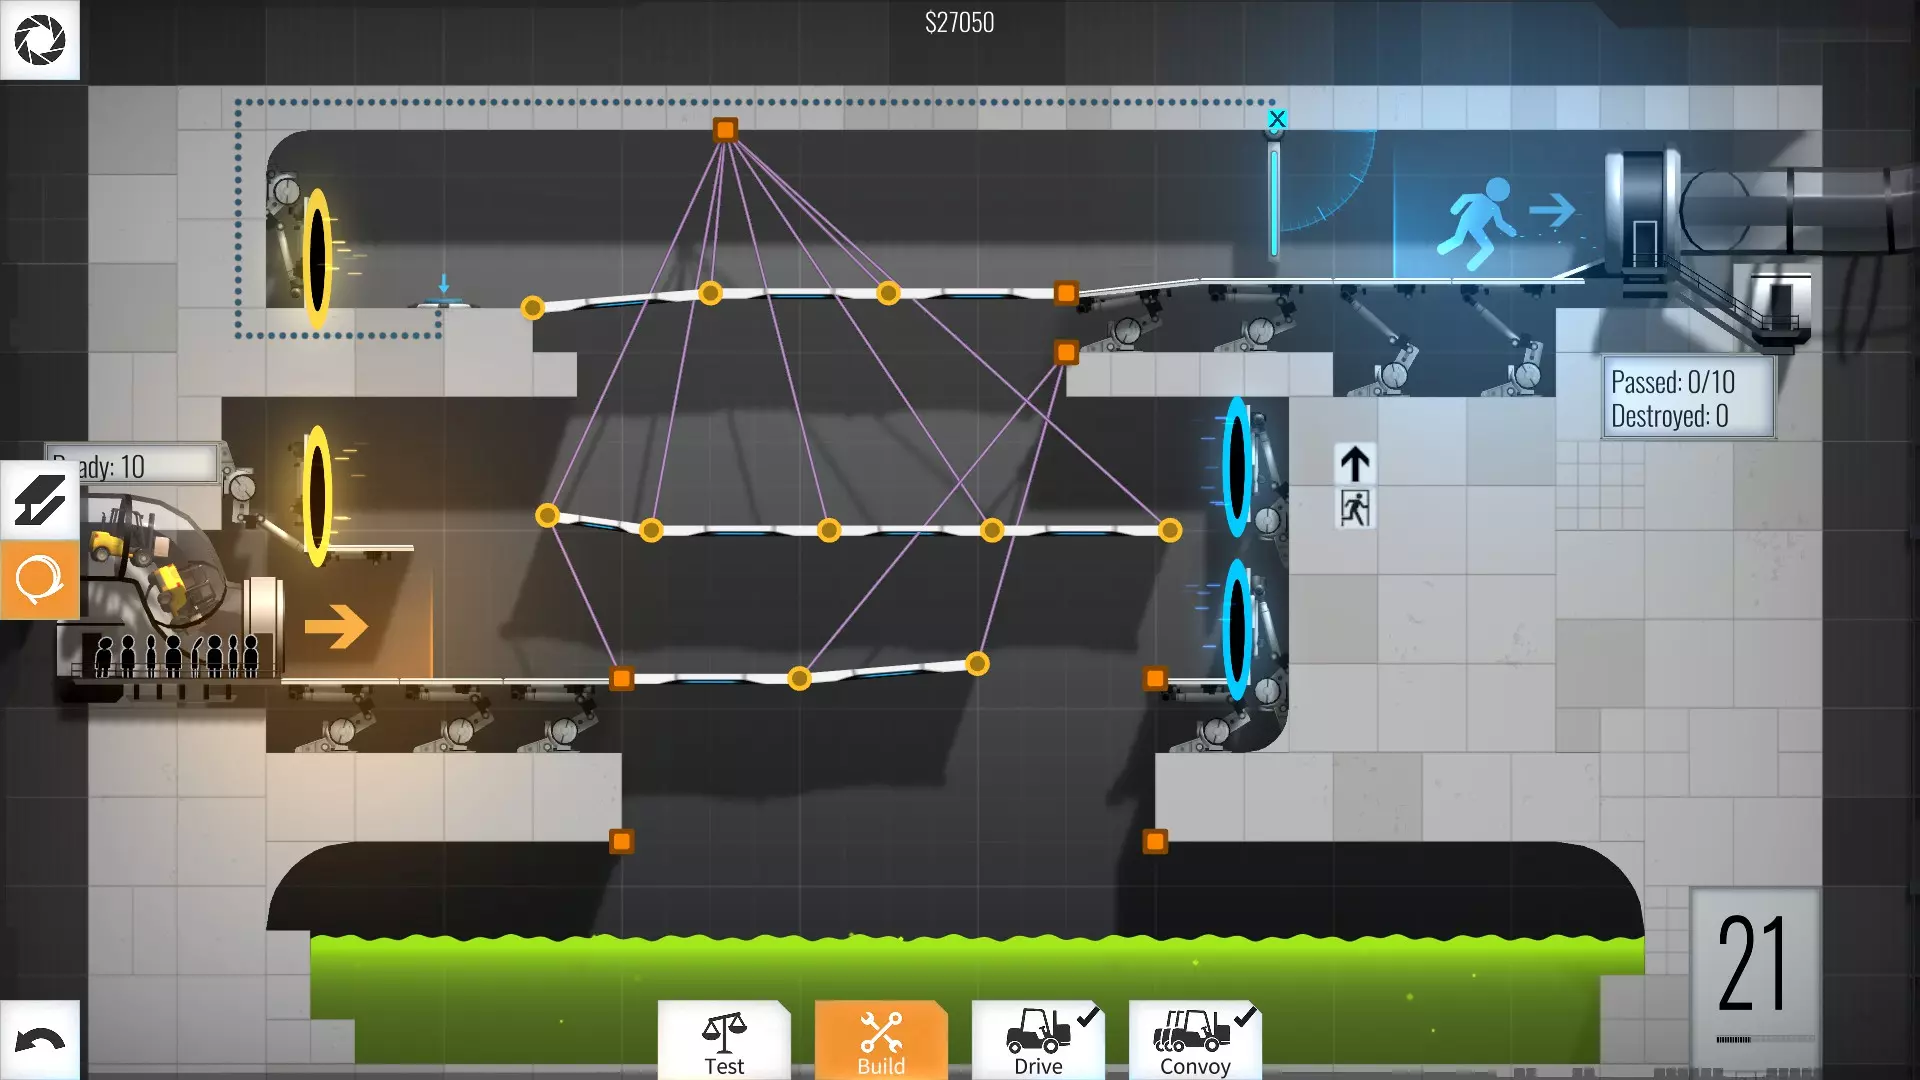
20级 - 27050美元 这里不需要在角度上花太多心思,但你可以在绳索上多下功夫=) 此外,这是【三重绳索】技巧的首次出现,我也经常使用这个技巧……出于某种奇怪的原因,它确实有效。
21-30级 21级 - 26050美元
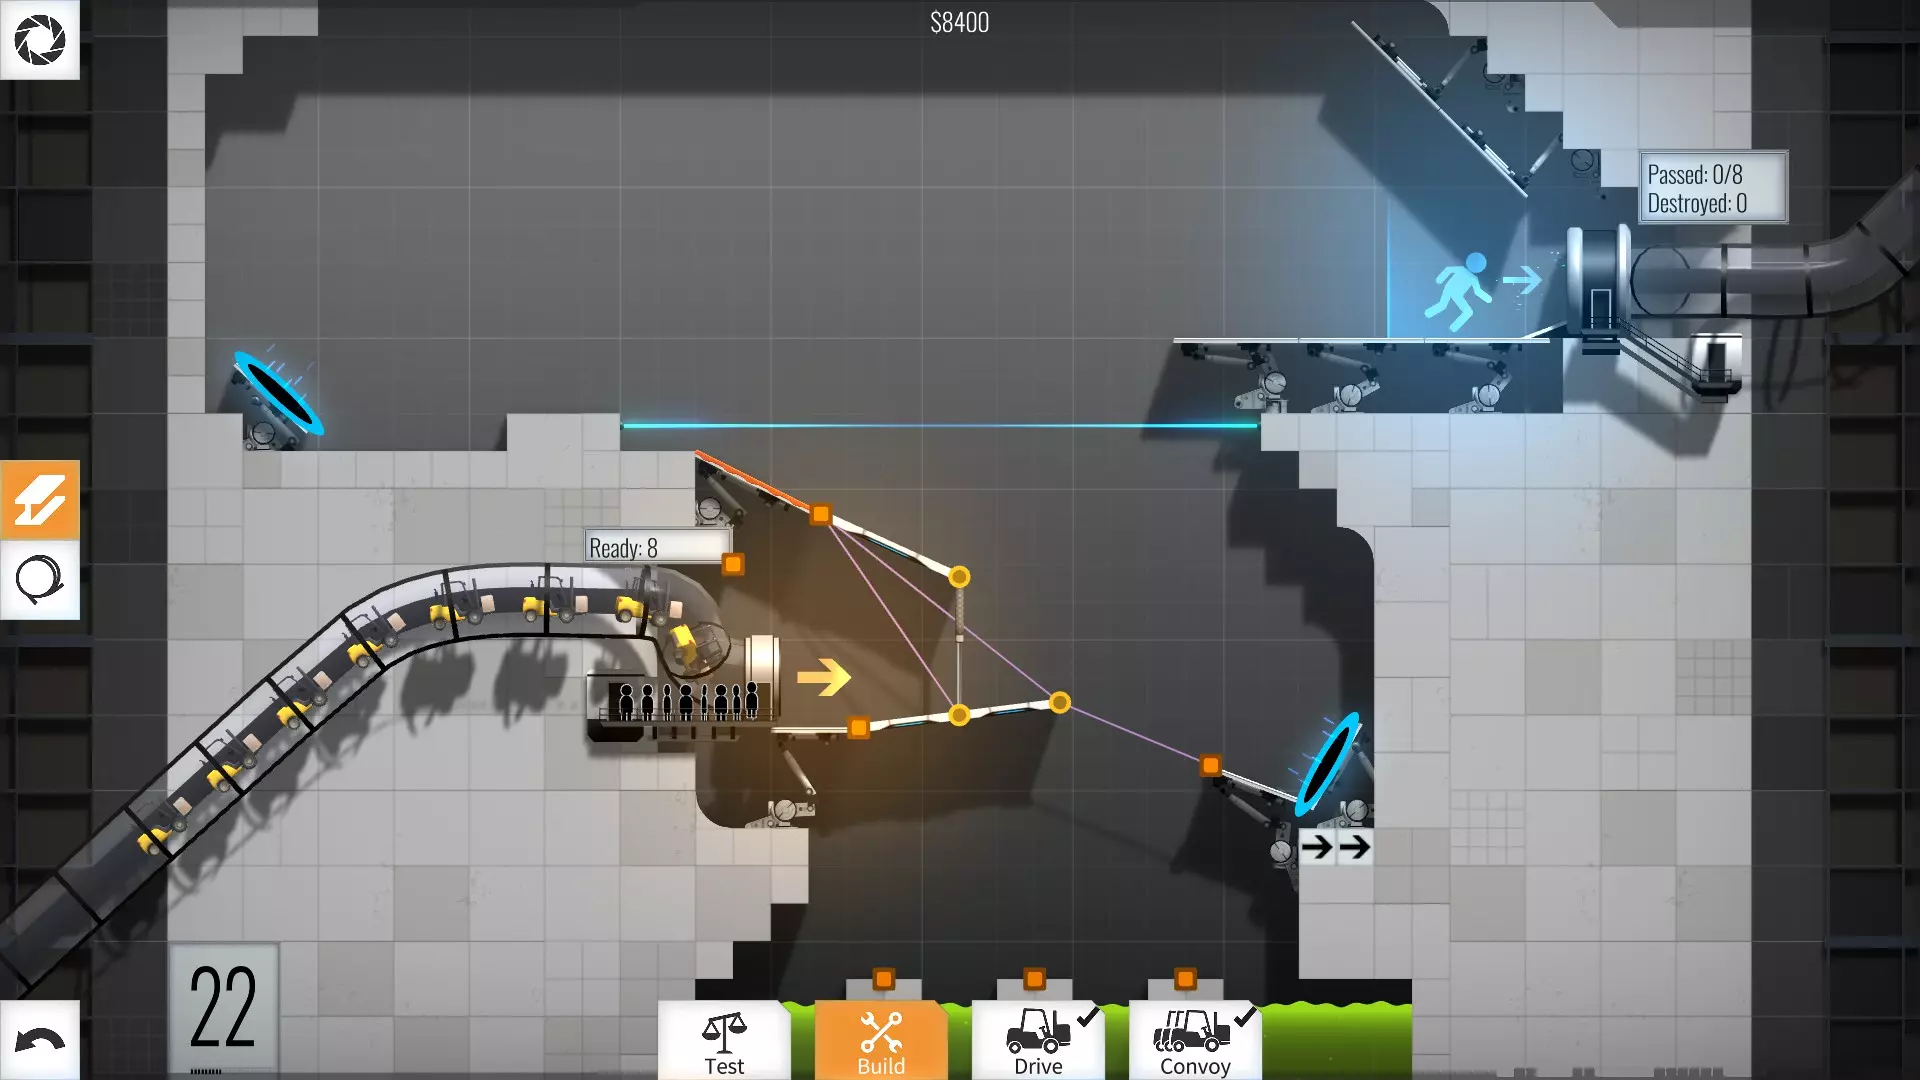
22级 - 8400美元
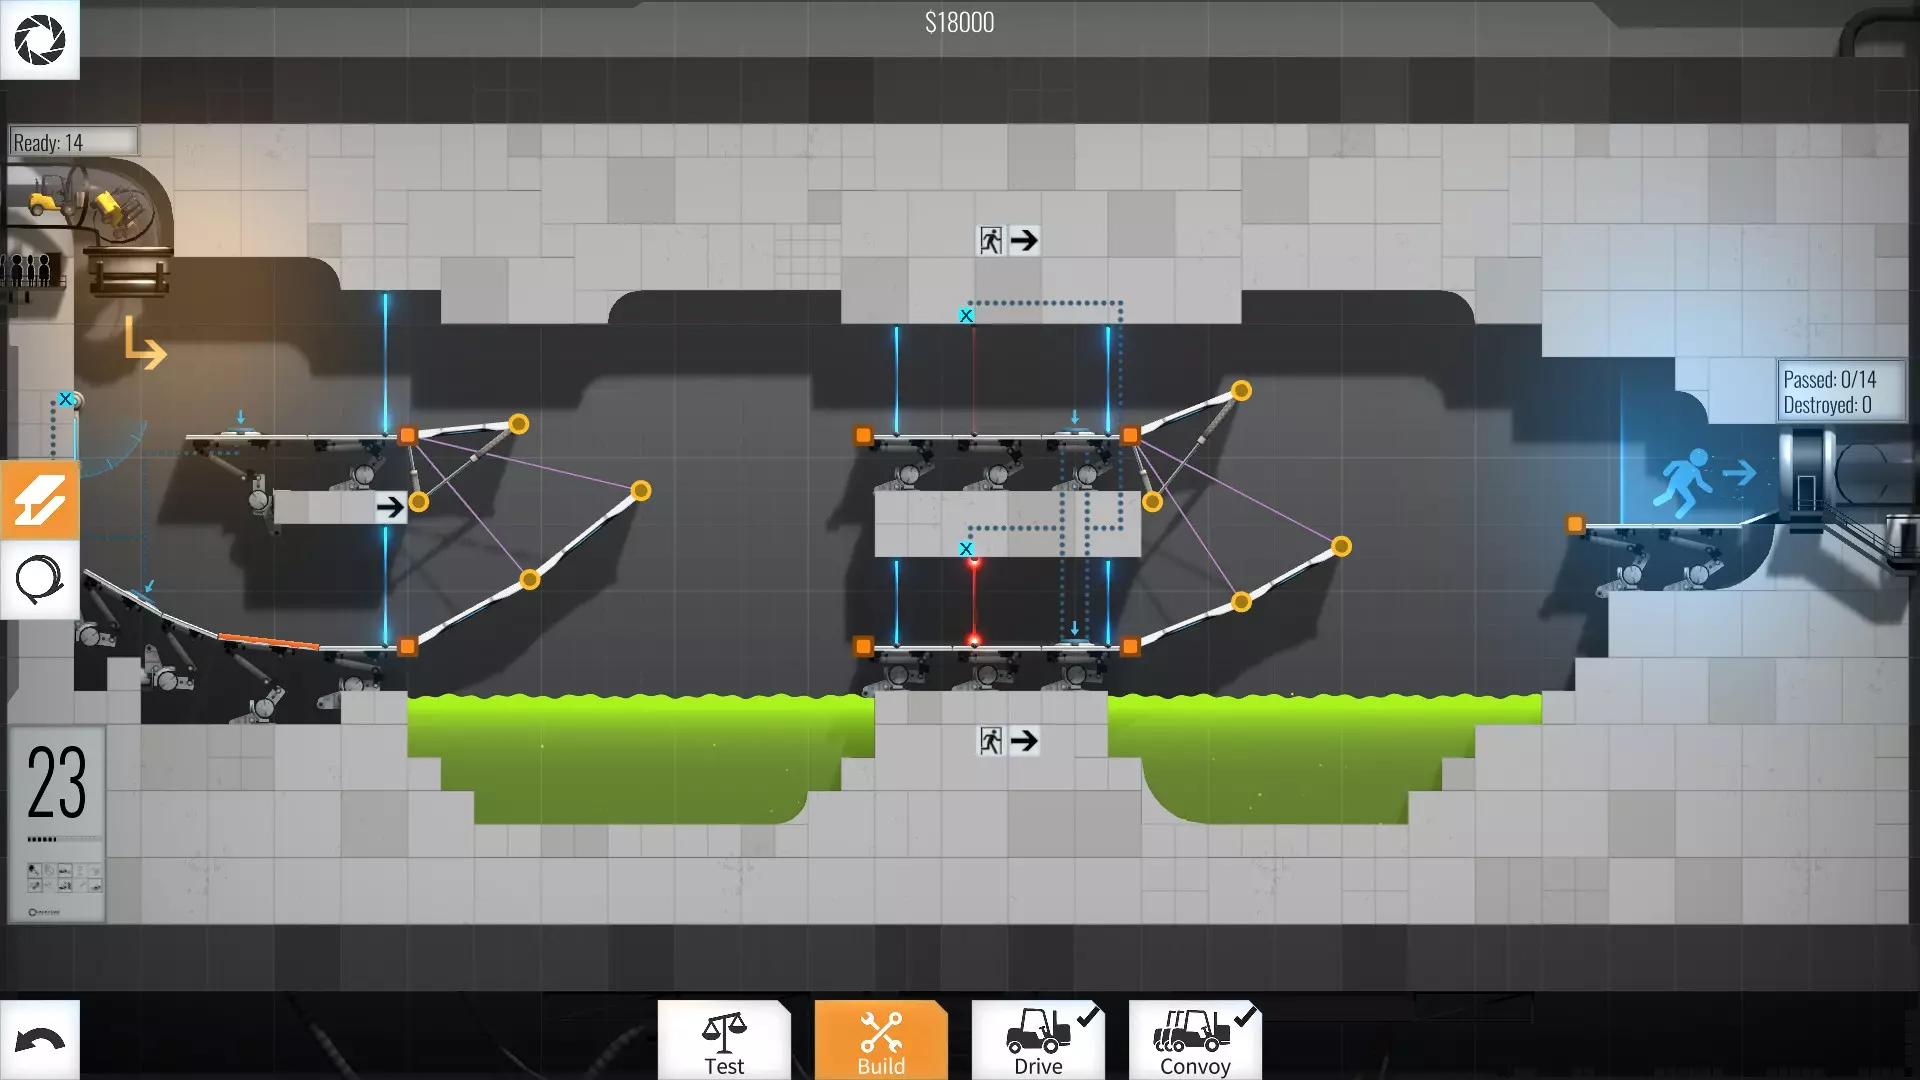
23级 - 18000美元 这里需要注意的是,上方的两个斜坡没有接触墙壁,它们与墙壁之间有微小的间距,这会使它们稍微下落并撞击墙壁,从而获得我所需的角度……出于某种奇怪的原因,将它们紧贴墙壁建造是行不通的。
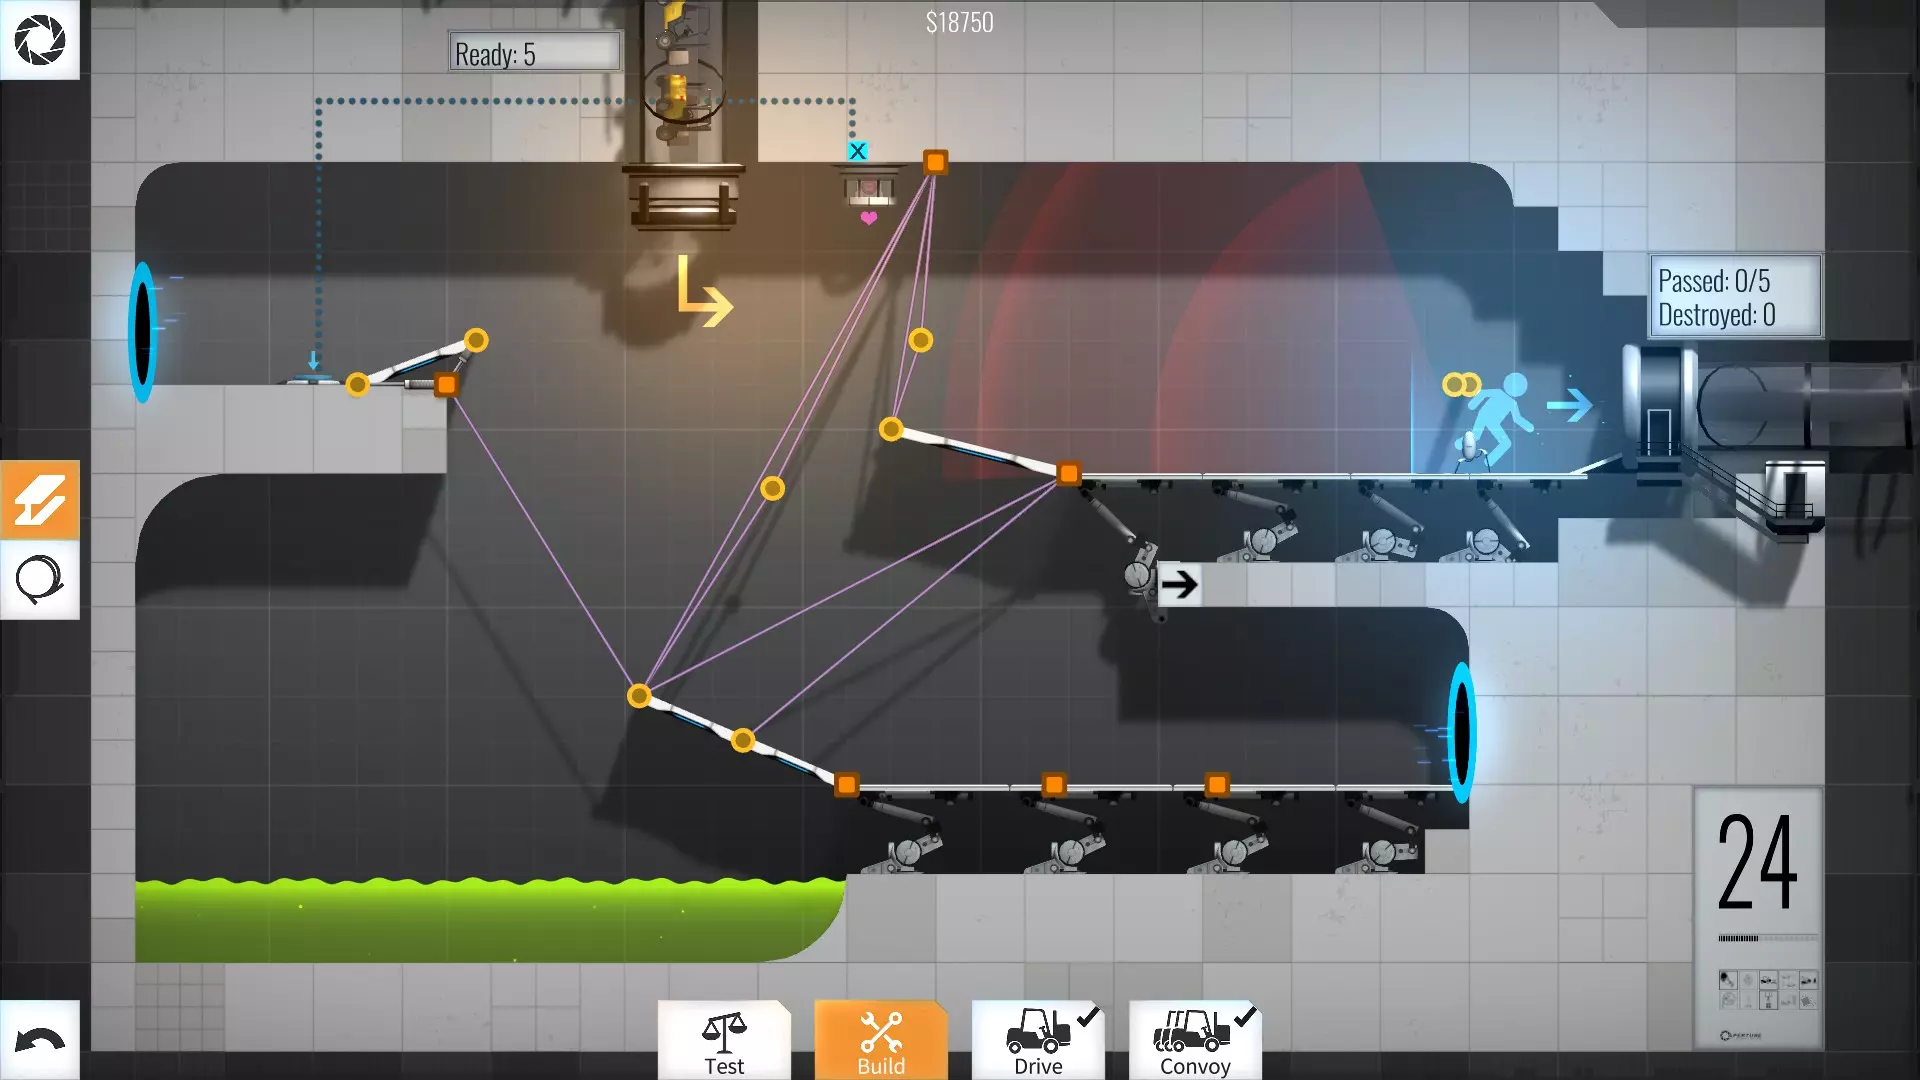
24级 - 18750美元
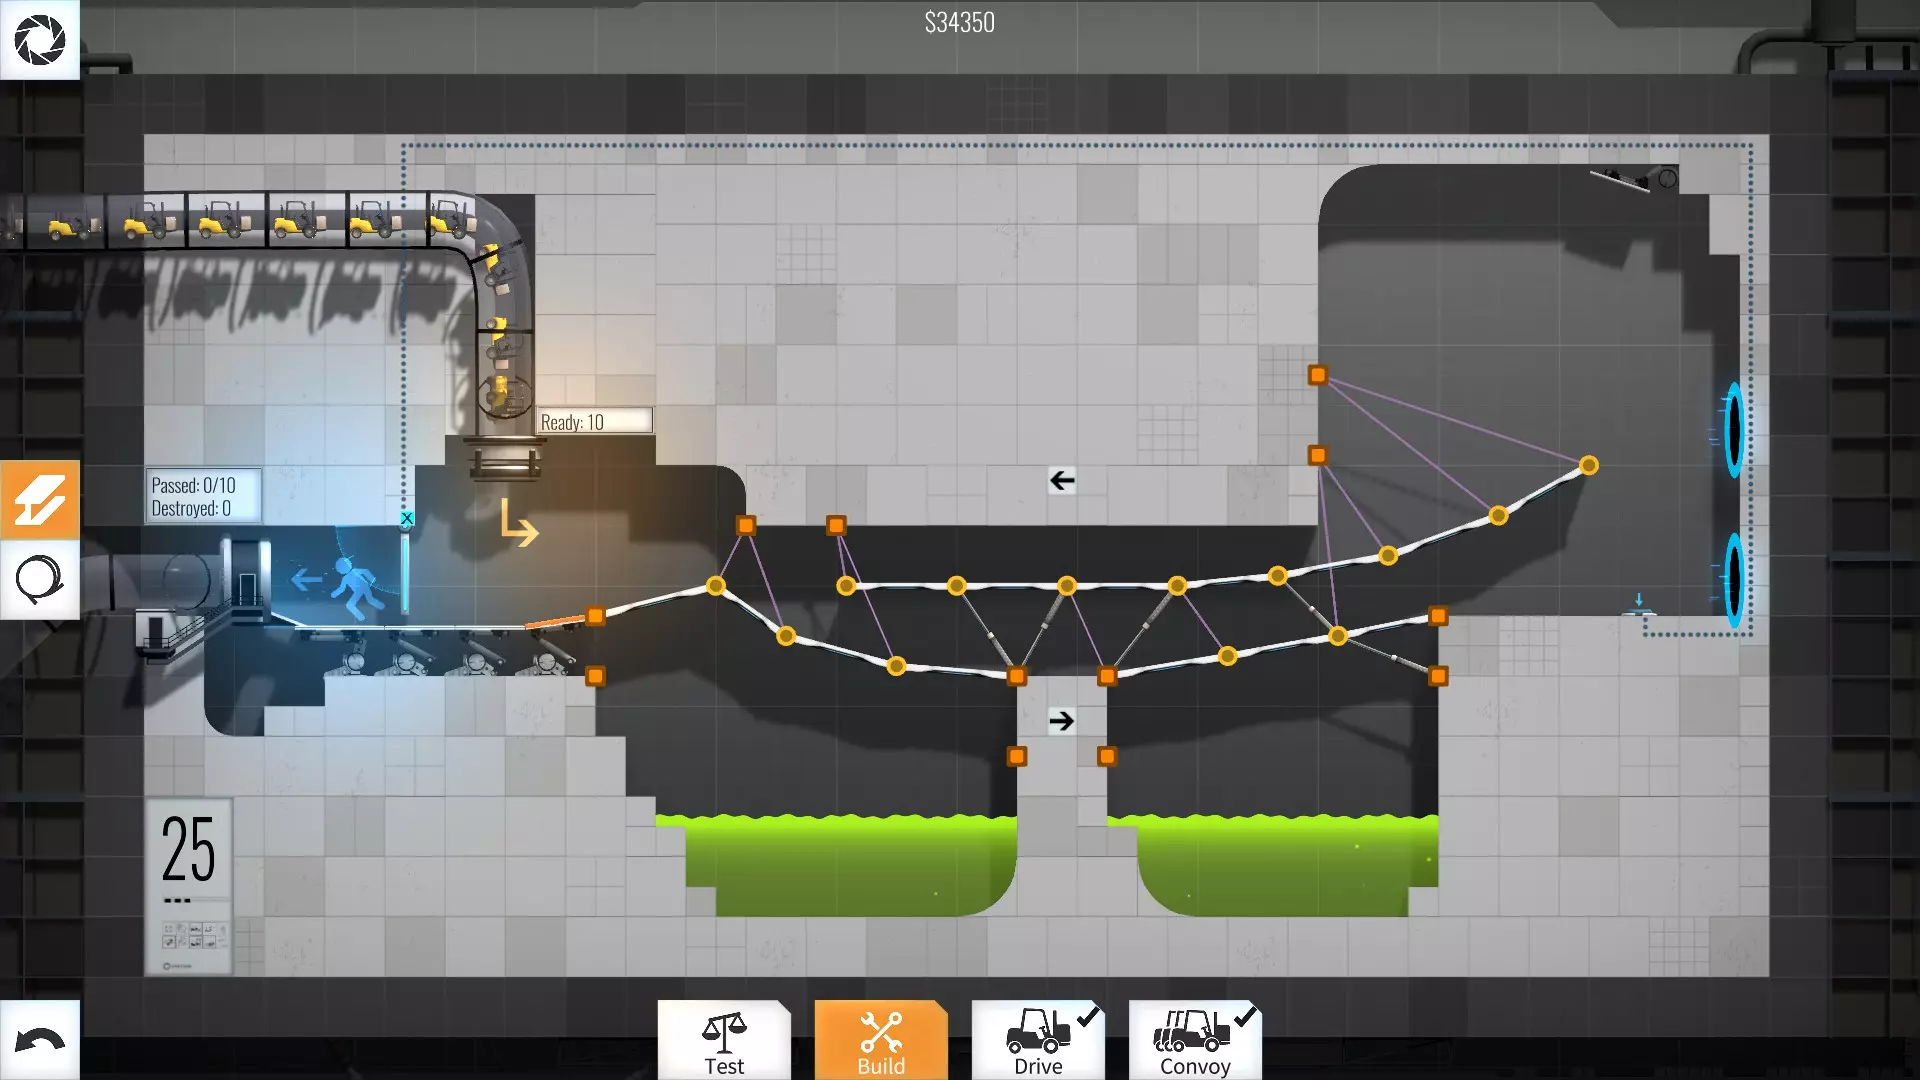
25级 - 34350美元
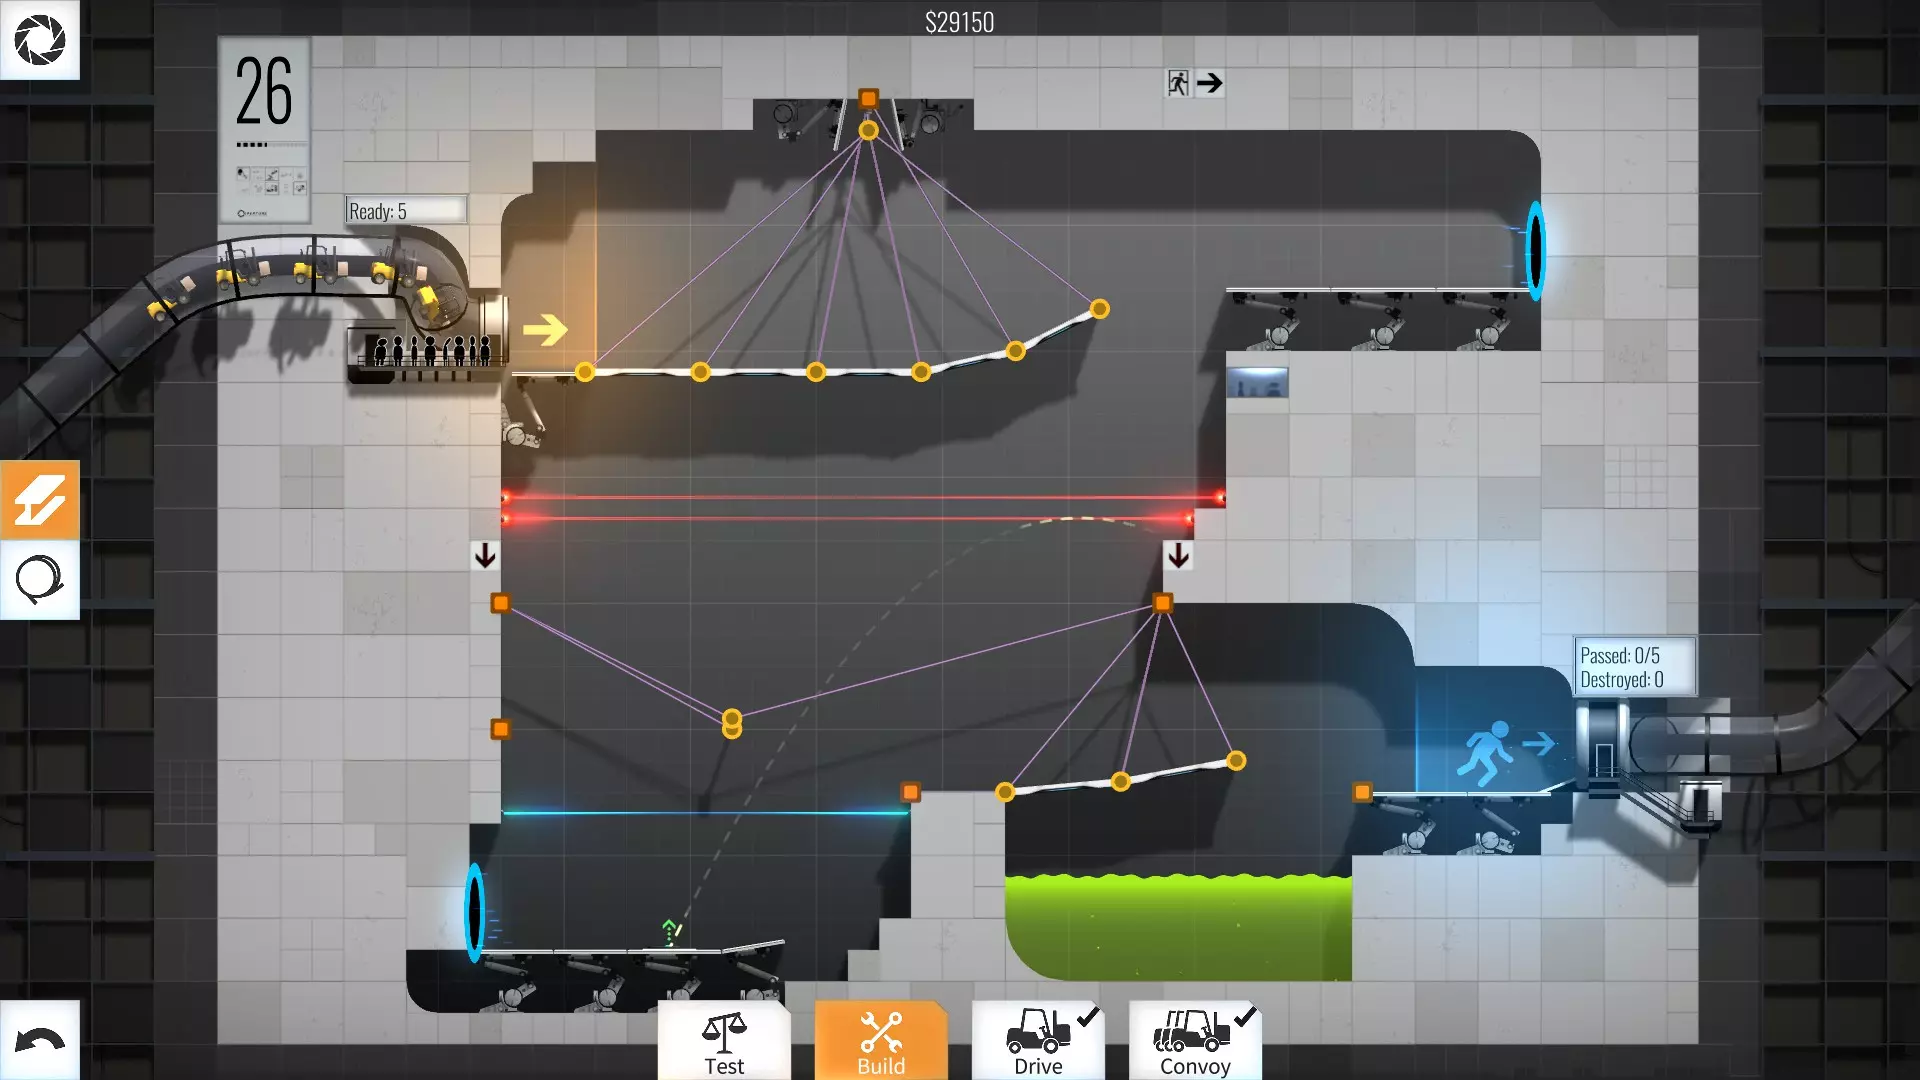
从现在开始,事情会变得更加有趣,所以我也会添加视频。 26级 - 29150美元 没错,正如你在视频中会注意到的,我用了一条小型垂直道路来彻底阻止空中车辆的轨迹……这条路甚至都不会移动……这是因为角度的问题,这也是我在提示部分一直唠叨角度的原因。
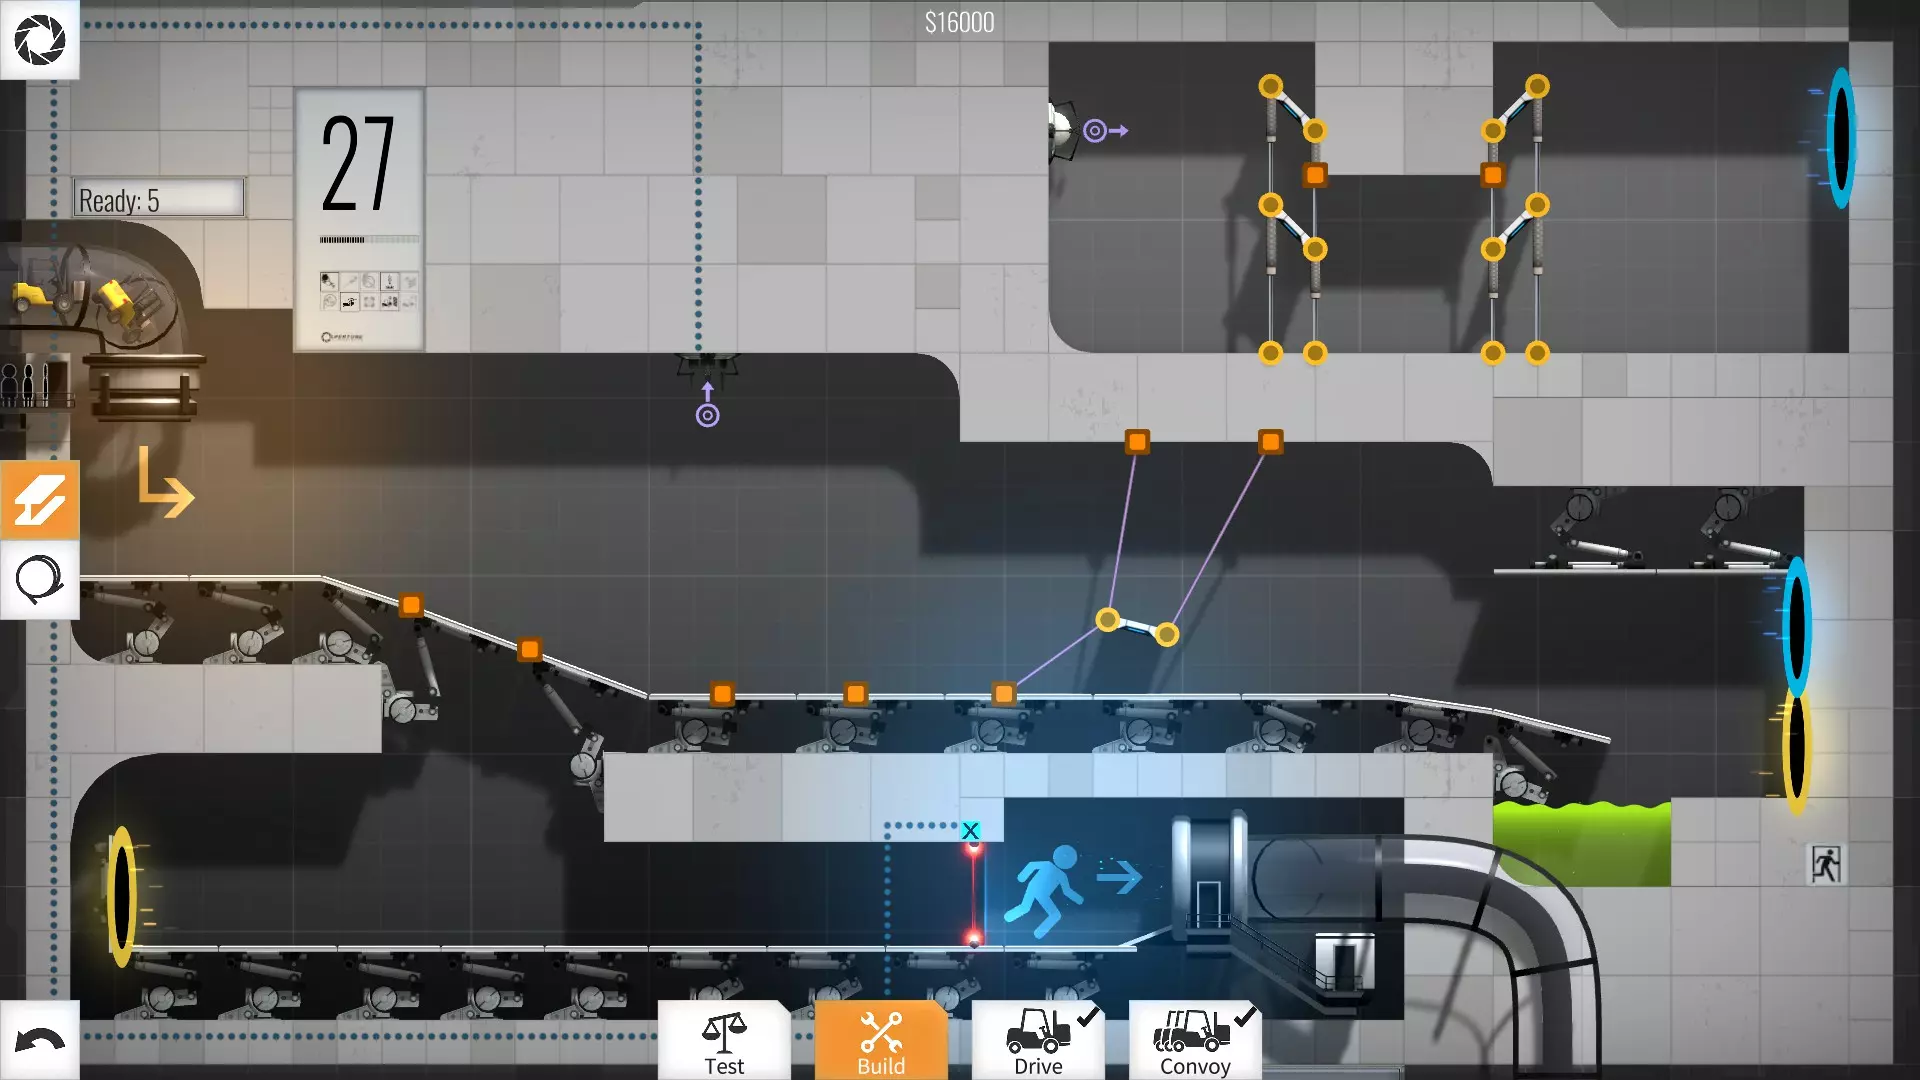
27级 - 16000美元 我使用两座可折叠塔来改变弹丸方向的原因很简单:我试过用不可折叠的塔,但它总是改变弹丸的角度……唉。 而且由于它们理论上不会损坏,我就想“算了”……我不太喜欢这个解决方案,但还是这样吧。
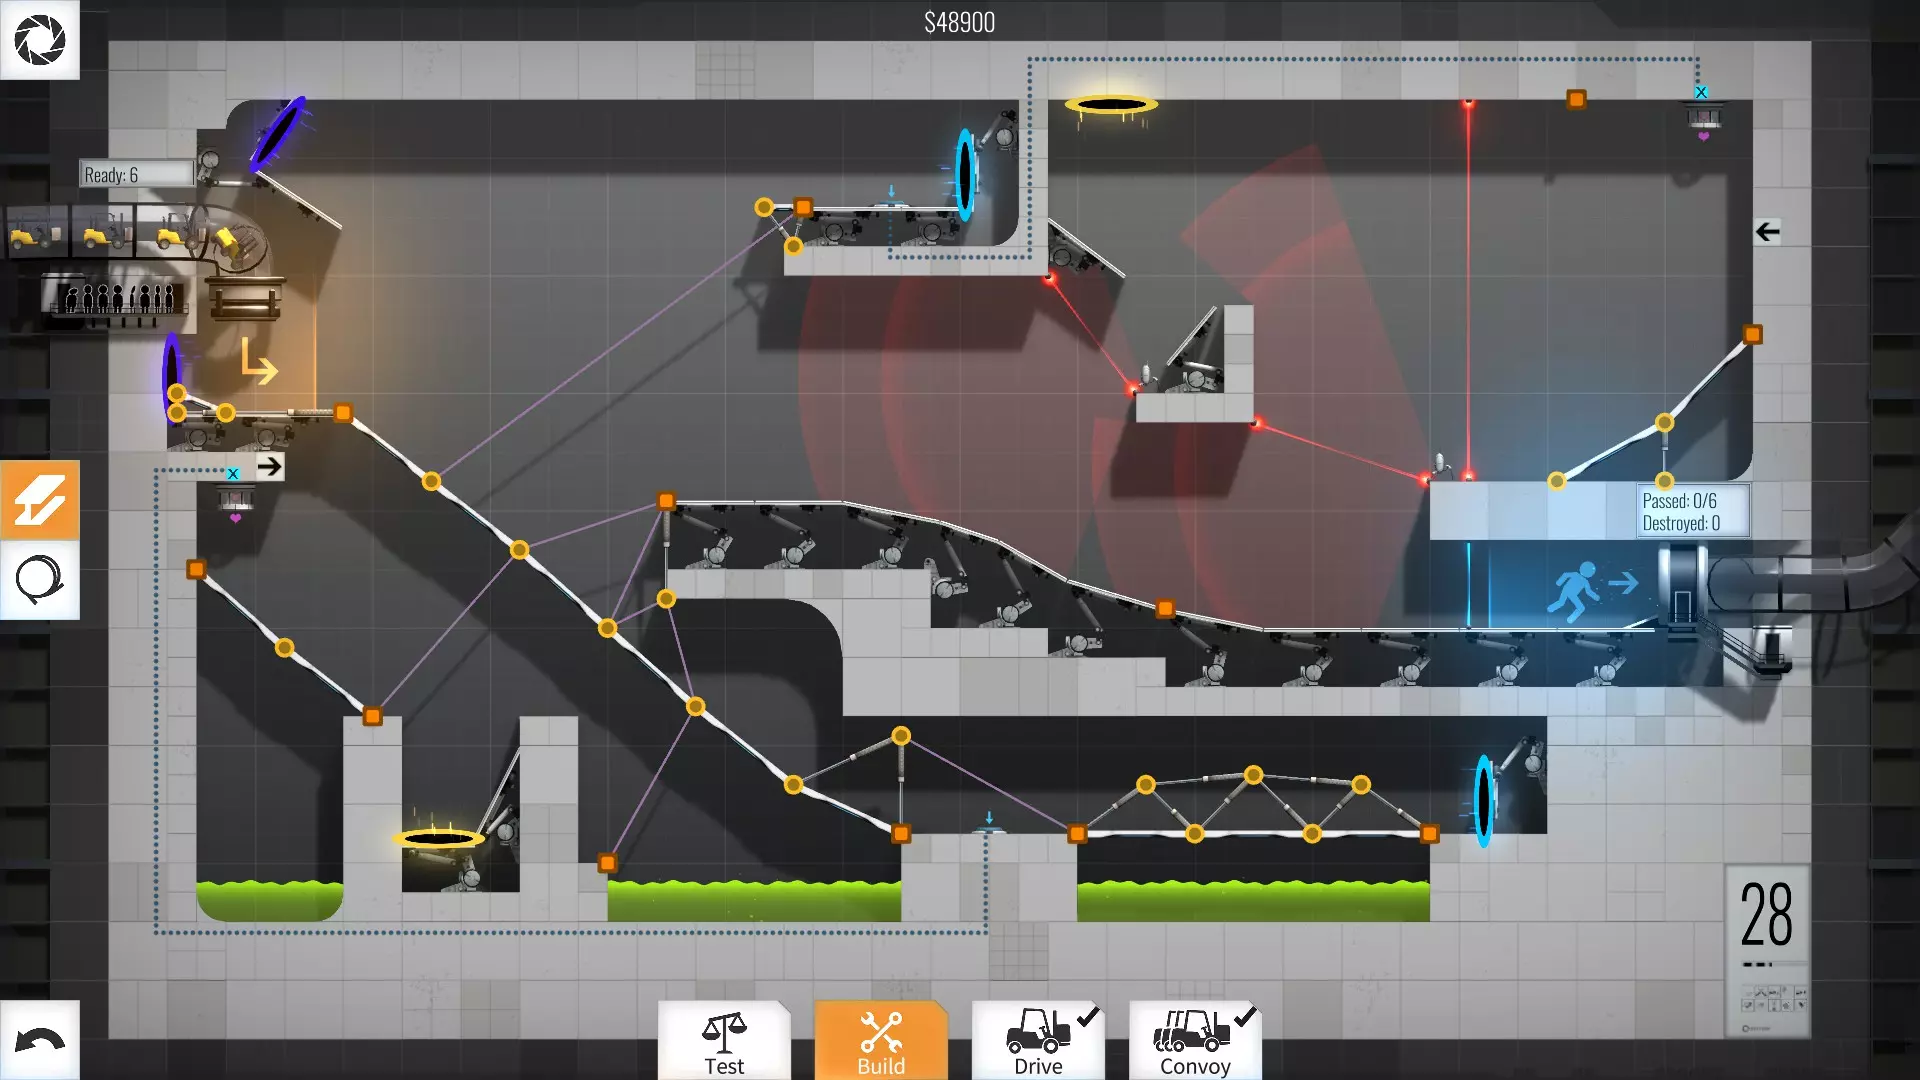
28级 - 48900美元 这是最难优化的关卡之一……最终的技巧在于深蓝色传送门前的斜坡,这样车辆就能飞出传送门并到达另一边。廉价桥梁是造成麻烦的原因,因为它们会使每辆车的动量不同,很难处理……但情况就是这样。
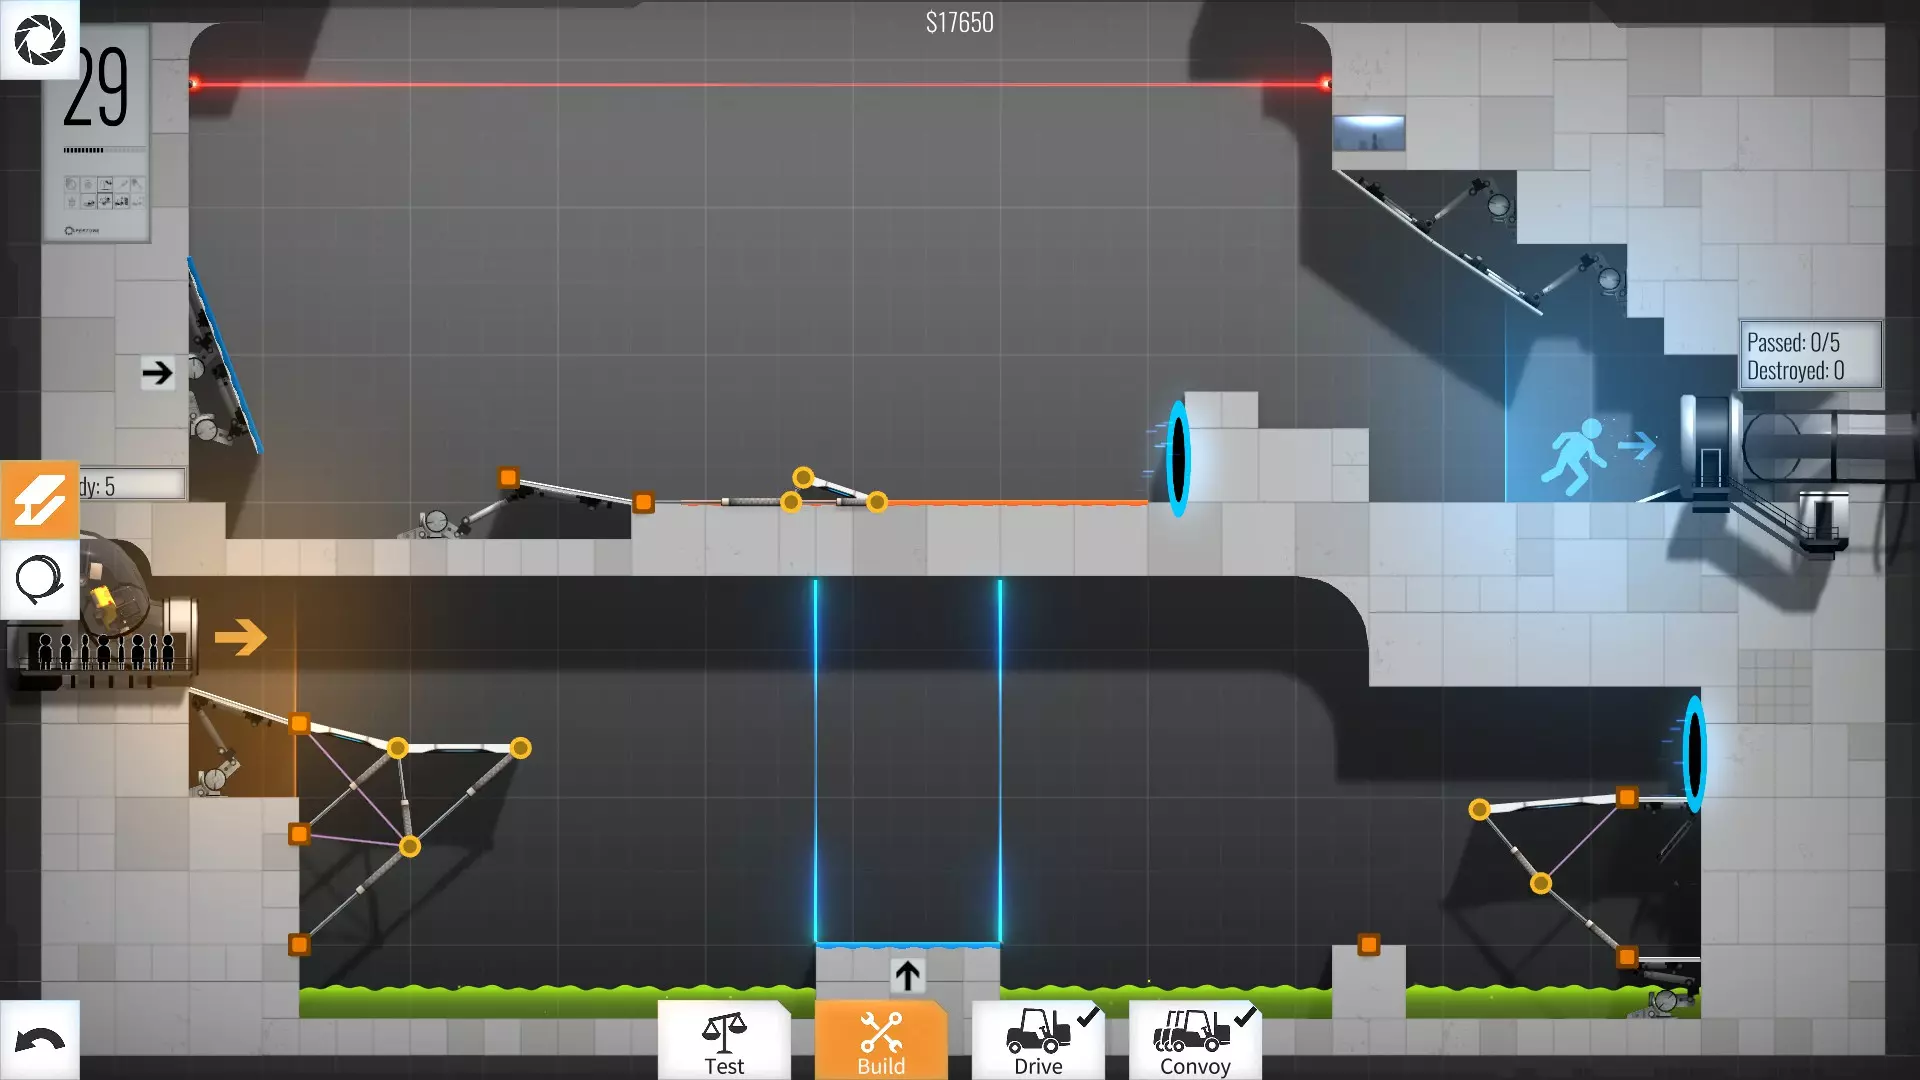
29级 - 17650美元 这一关的关键技巧是忽略预设的斜坡,使用你自己的斜坡来更好地控制弹跳角度。
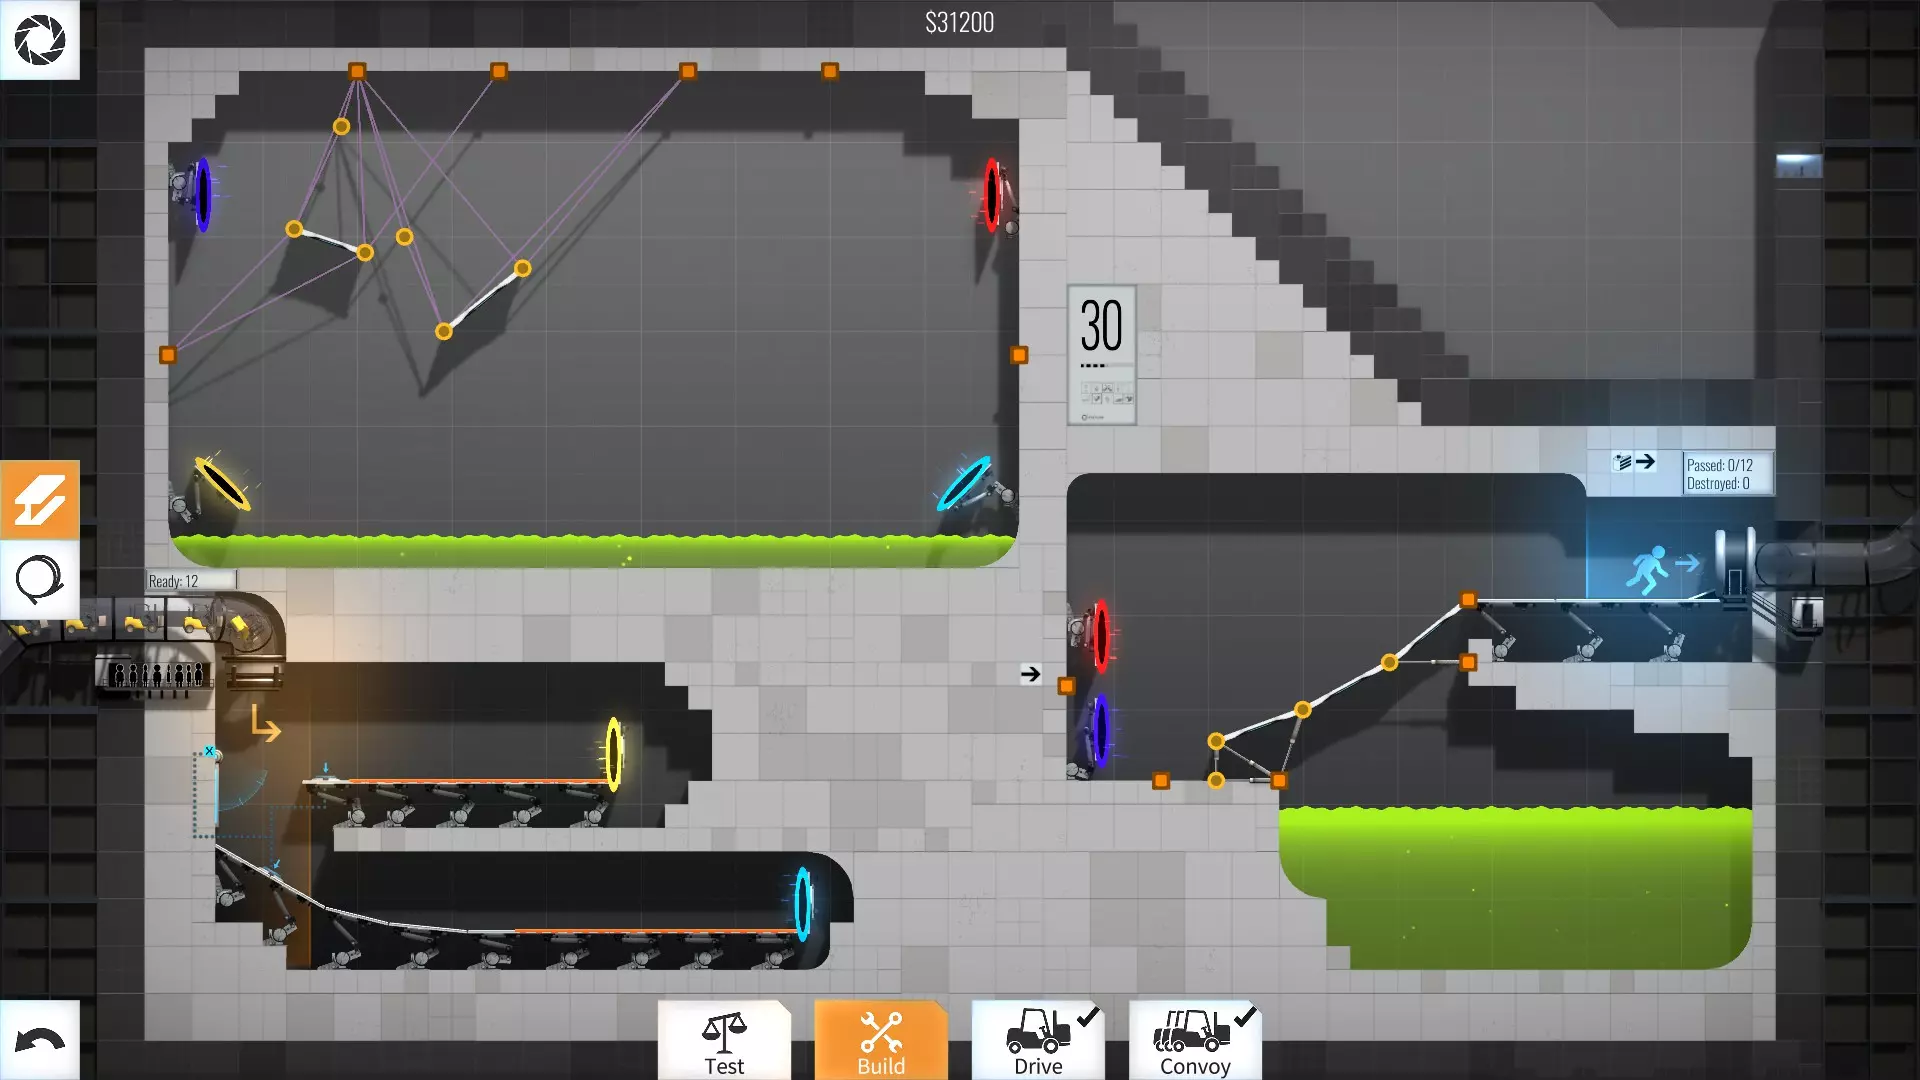
30级 - 31200美元 没什么好说的,只是一条能改变轨迹的小路能起到很大作用 =P
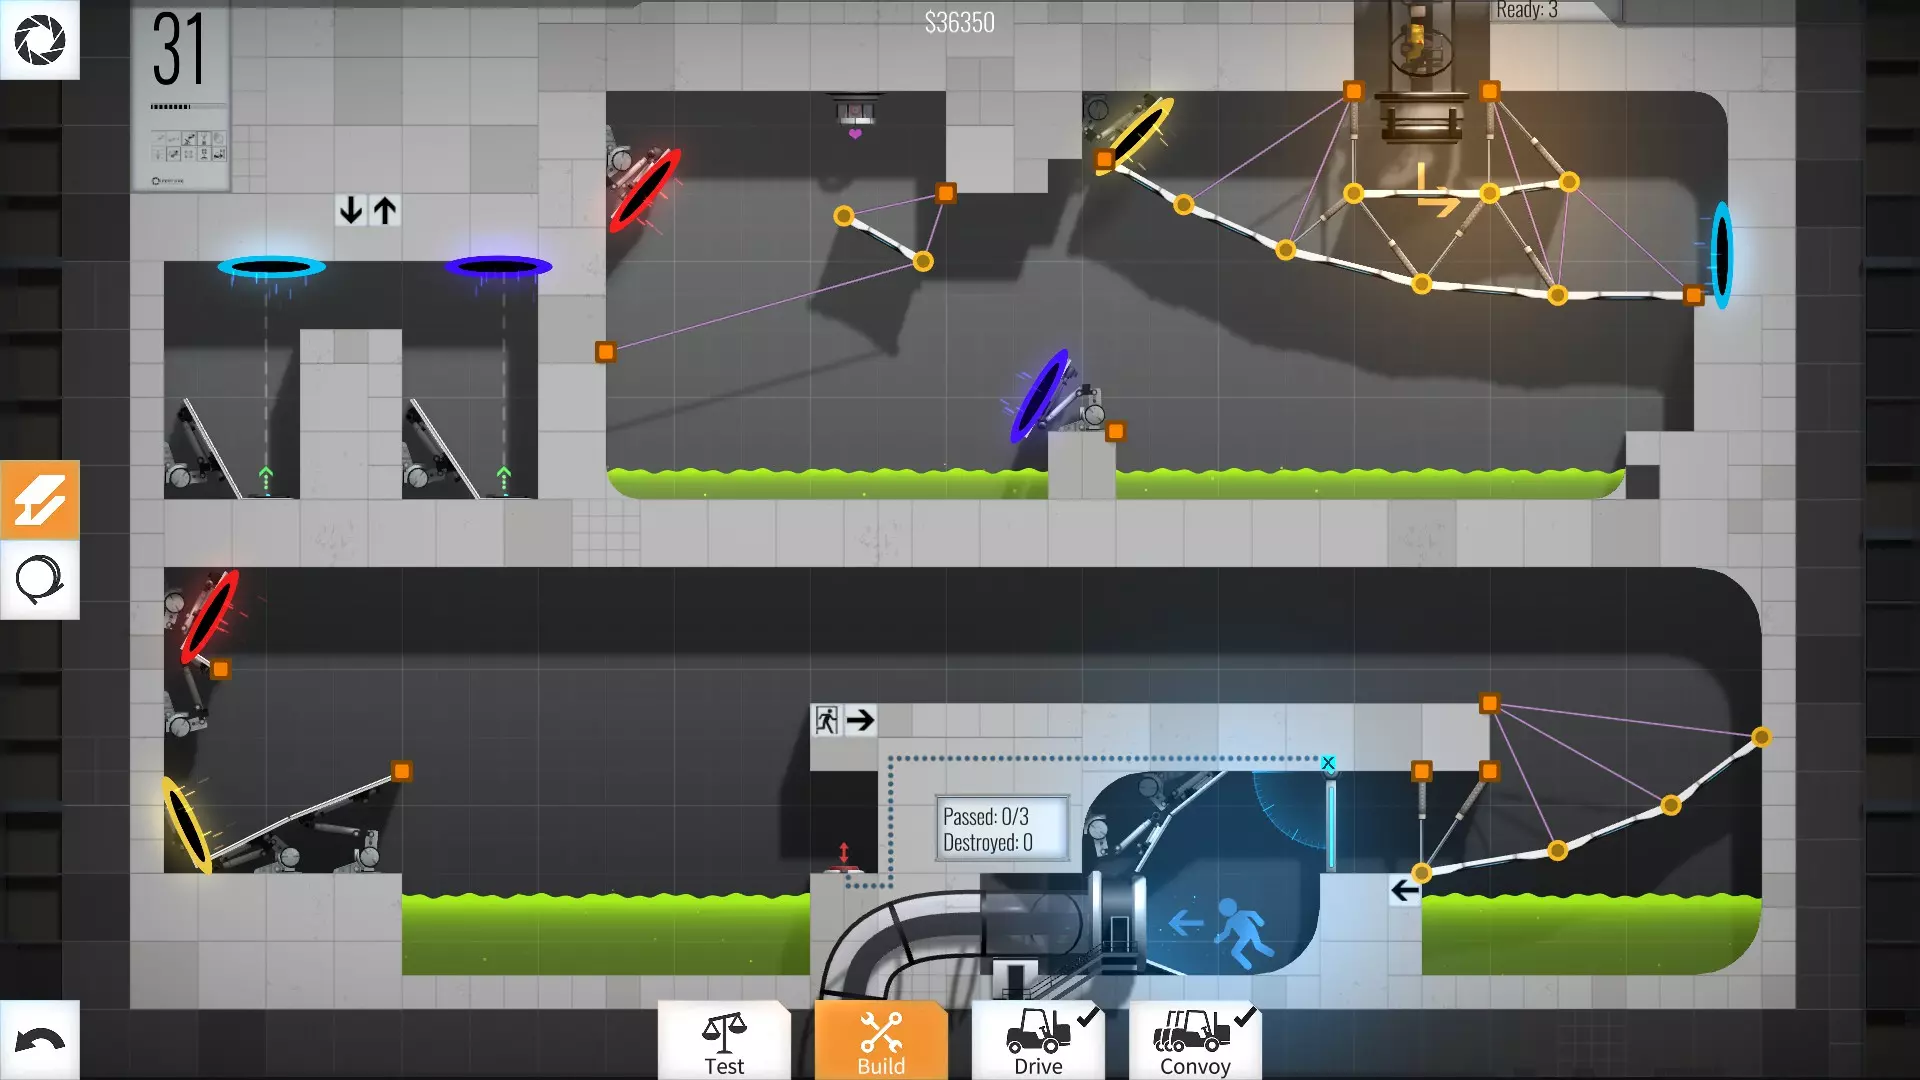
31-40级 31级 - 36350美元 哦,这也是最难优化的关卡之一,因为控制发射角度实在太麻烦了。就像视频里看到的那样,它有点不太好使,但又确实能行……所以我就放弃了,这关快把我逼疯了。我相信还能进一步优化,但这样已经够好了……唉。
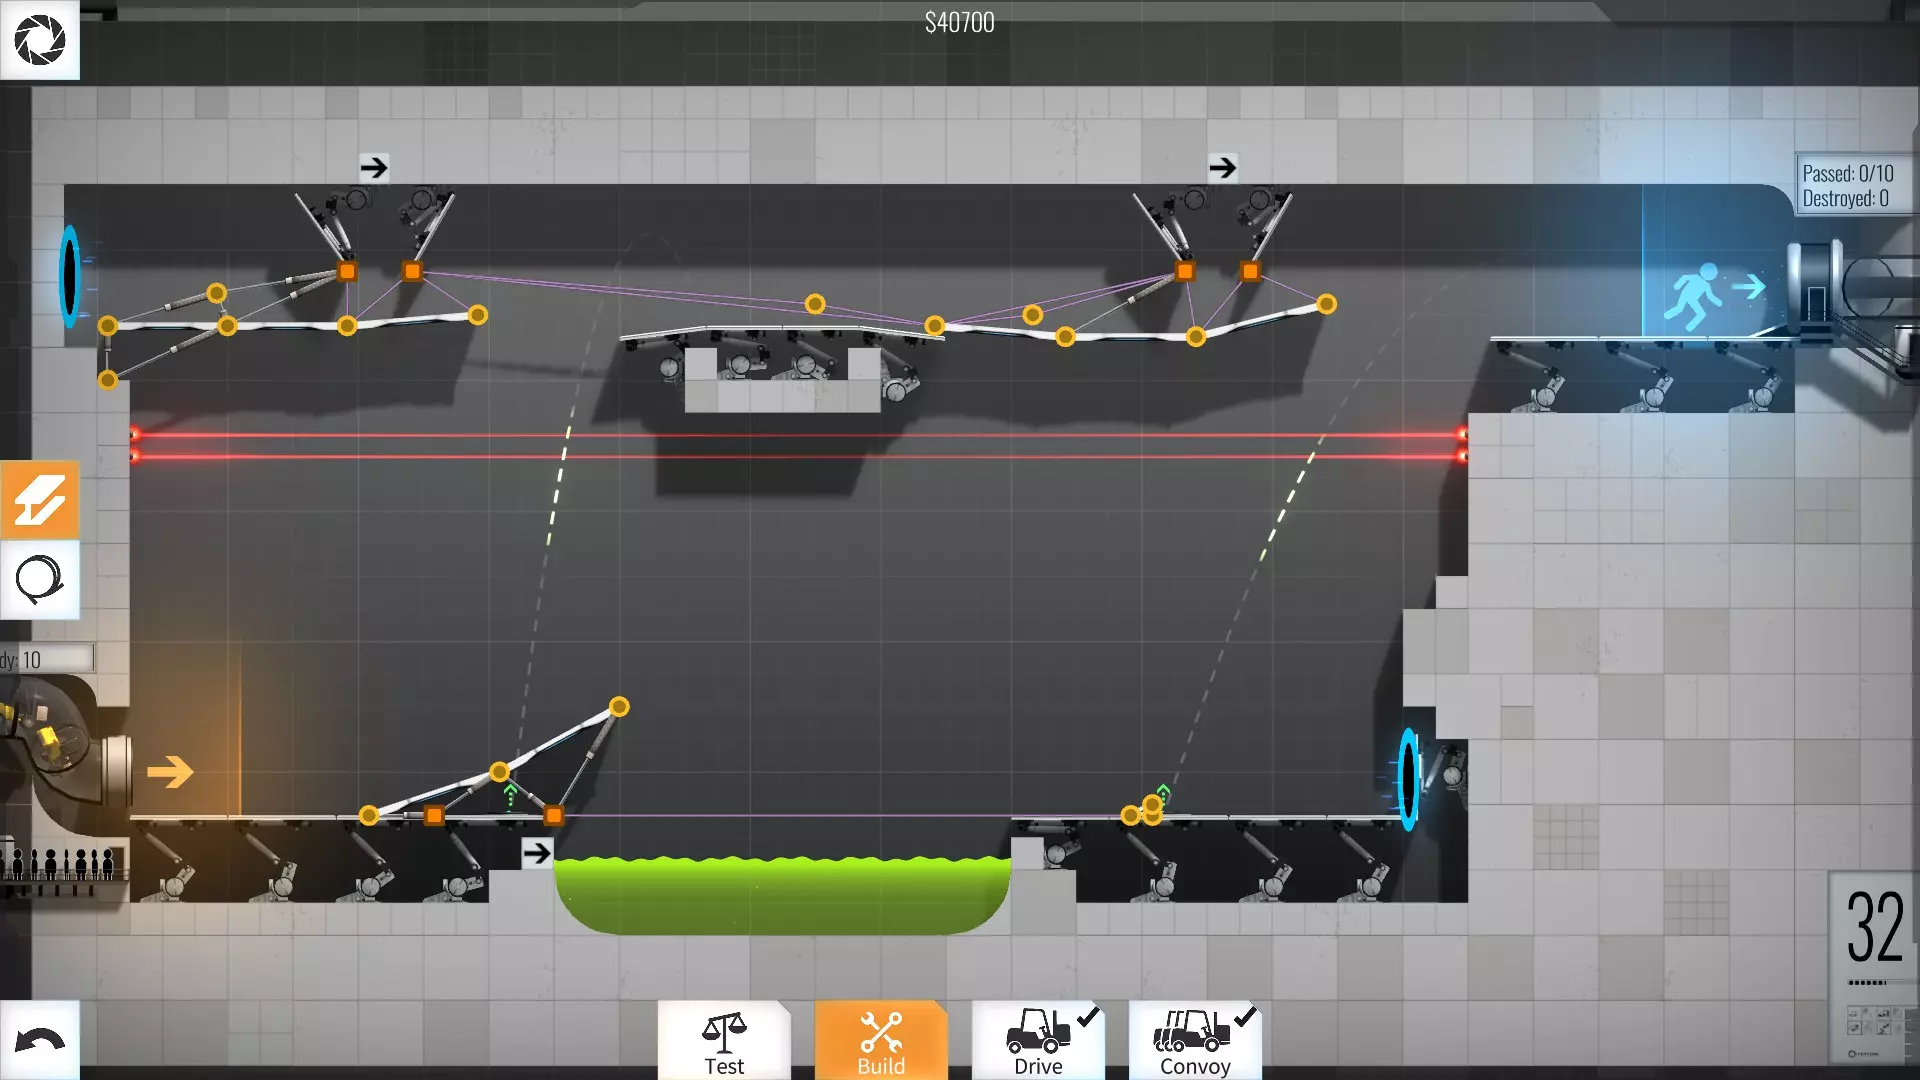
32级 - 53200美元 一个连接着绳索的小斜坡,用于避开第二个发射器。
33级 - 27200美元 说实话,这既不美观也不算特别经济,但我保留了它,以展示支撑桥梁的另一种方法……而且我喜欢它那种差点就不行了的感觉……xD

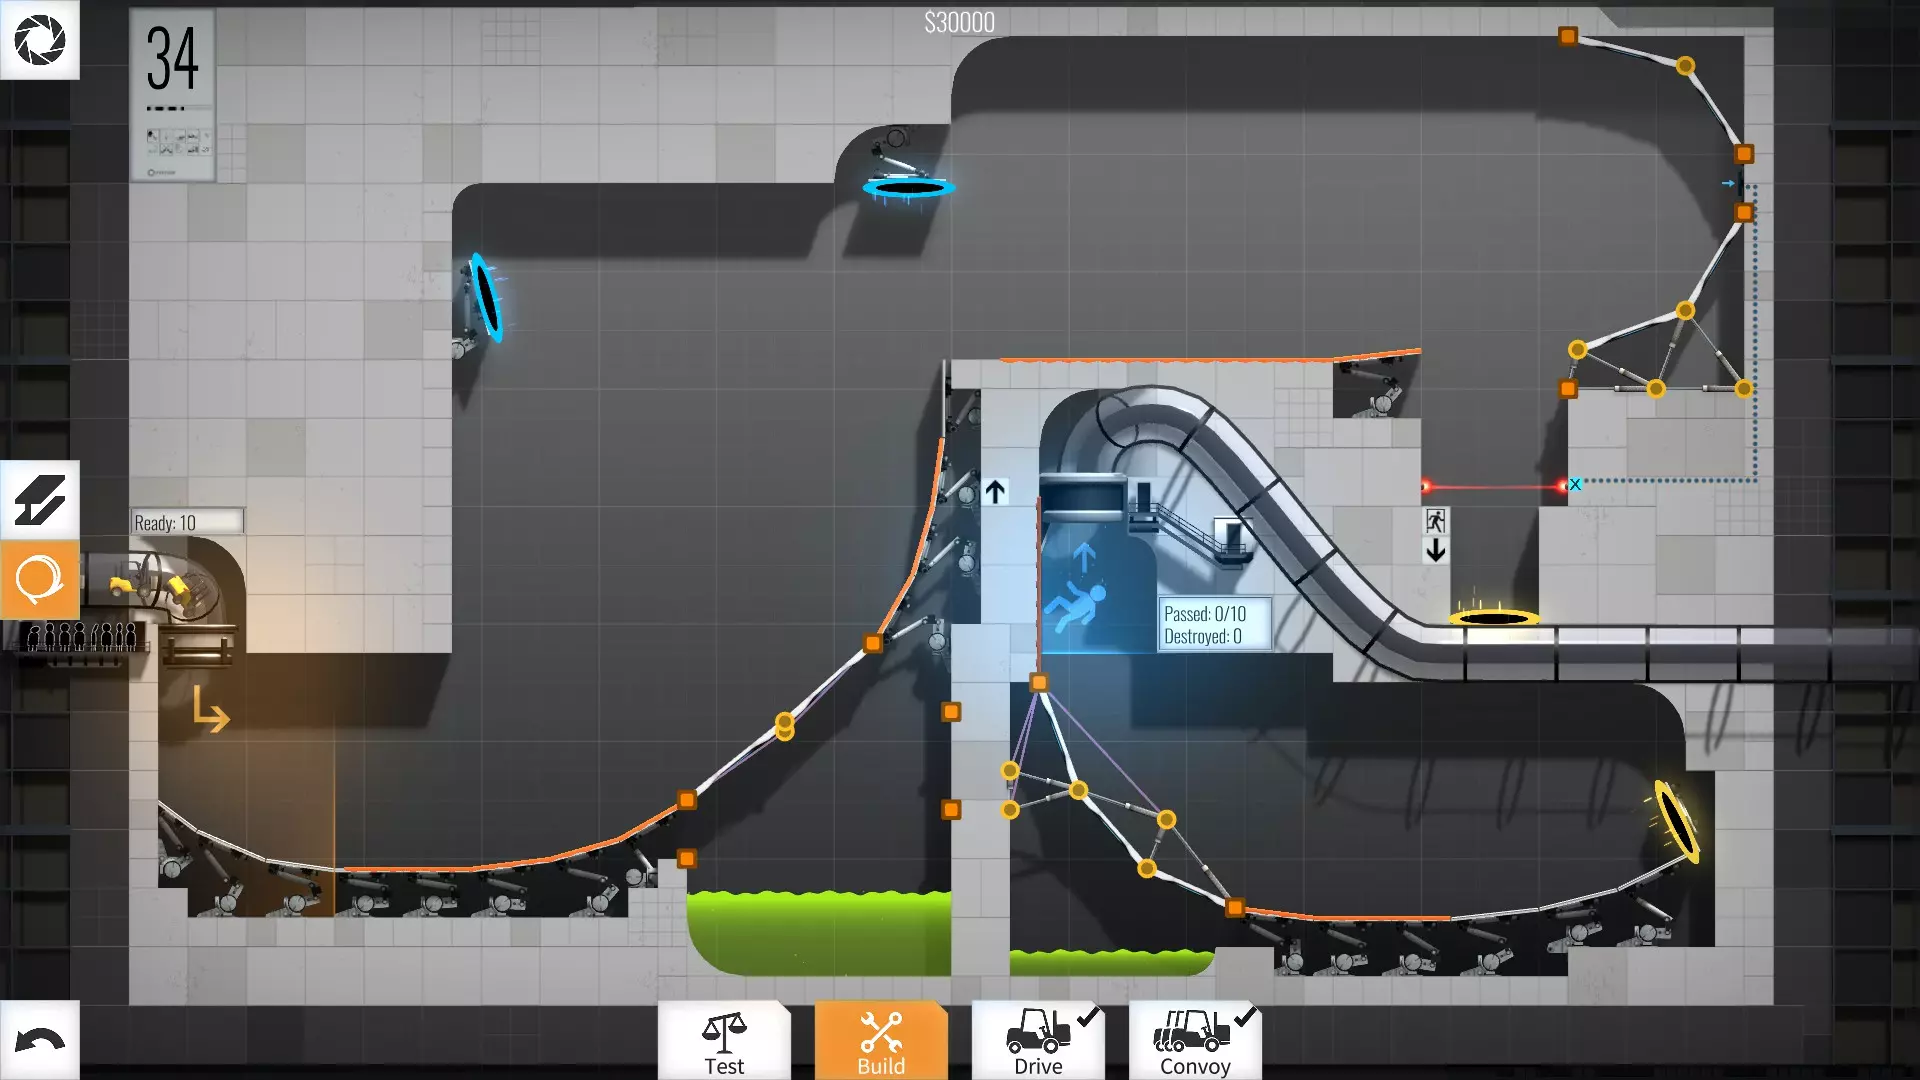
34级 - 30000美元 这个方法也不是很理想,但管它呢,反正能用 =P
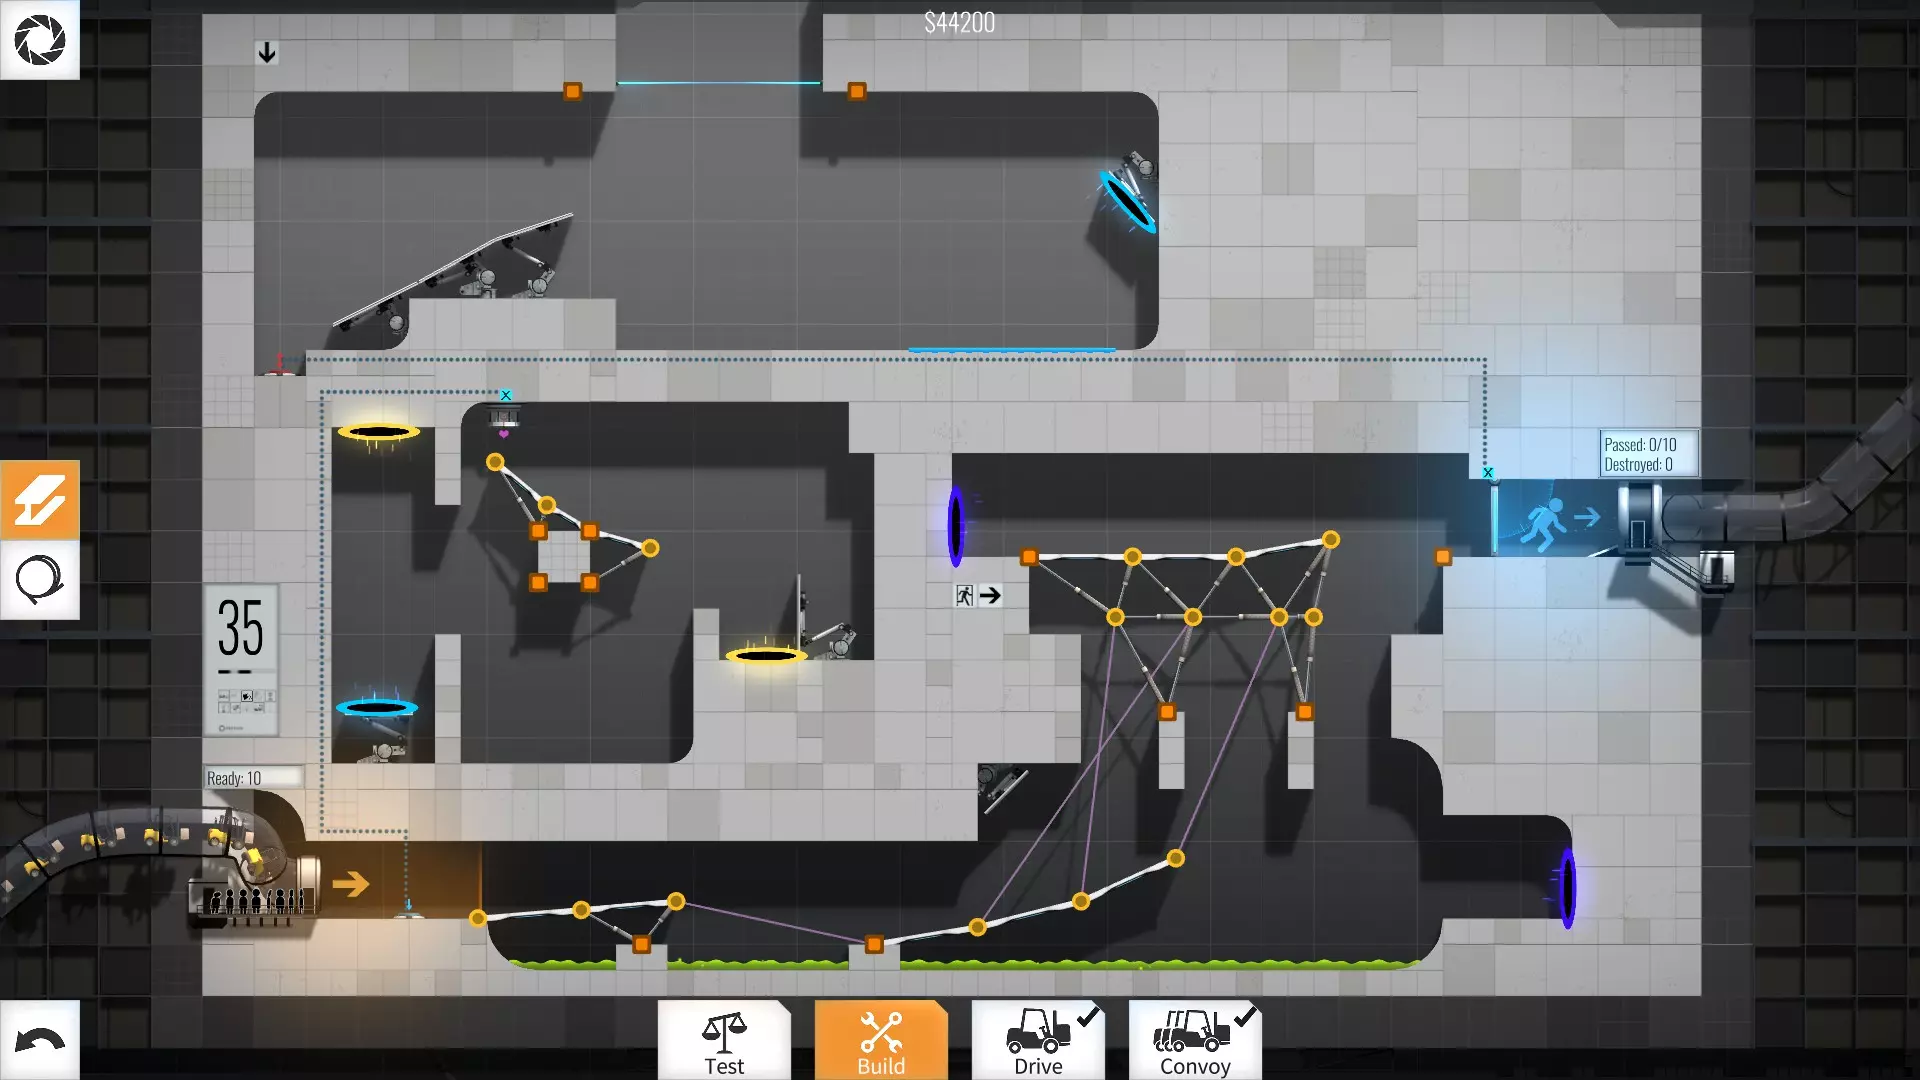
35级 - 44200美元 这里唯一真正的难点是让立方体以精确的角度穿过传送门,使其能按预期反弹。
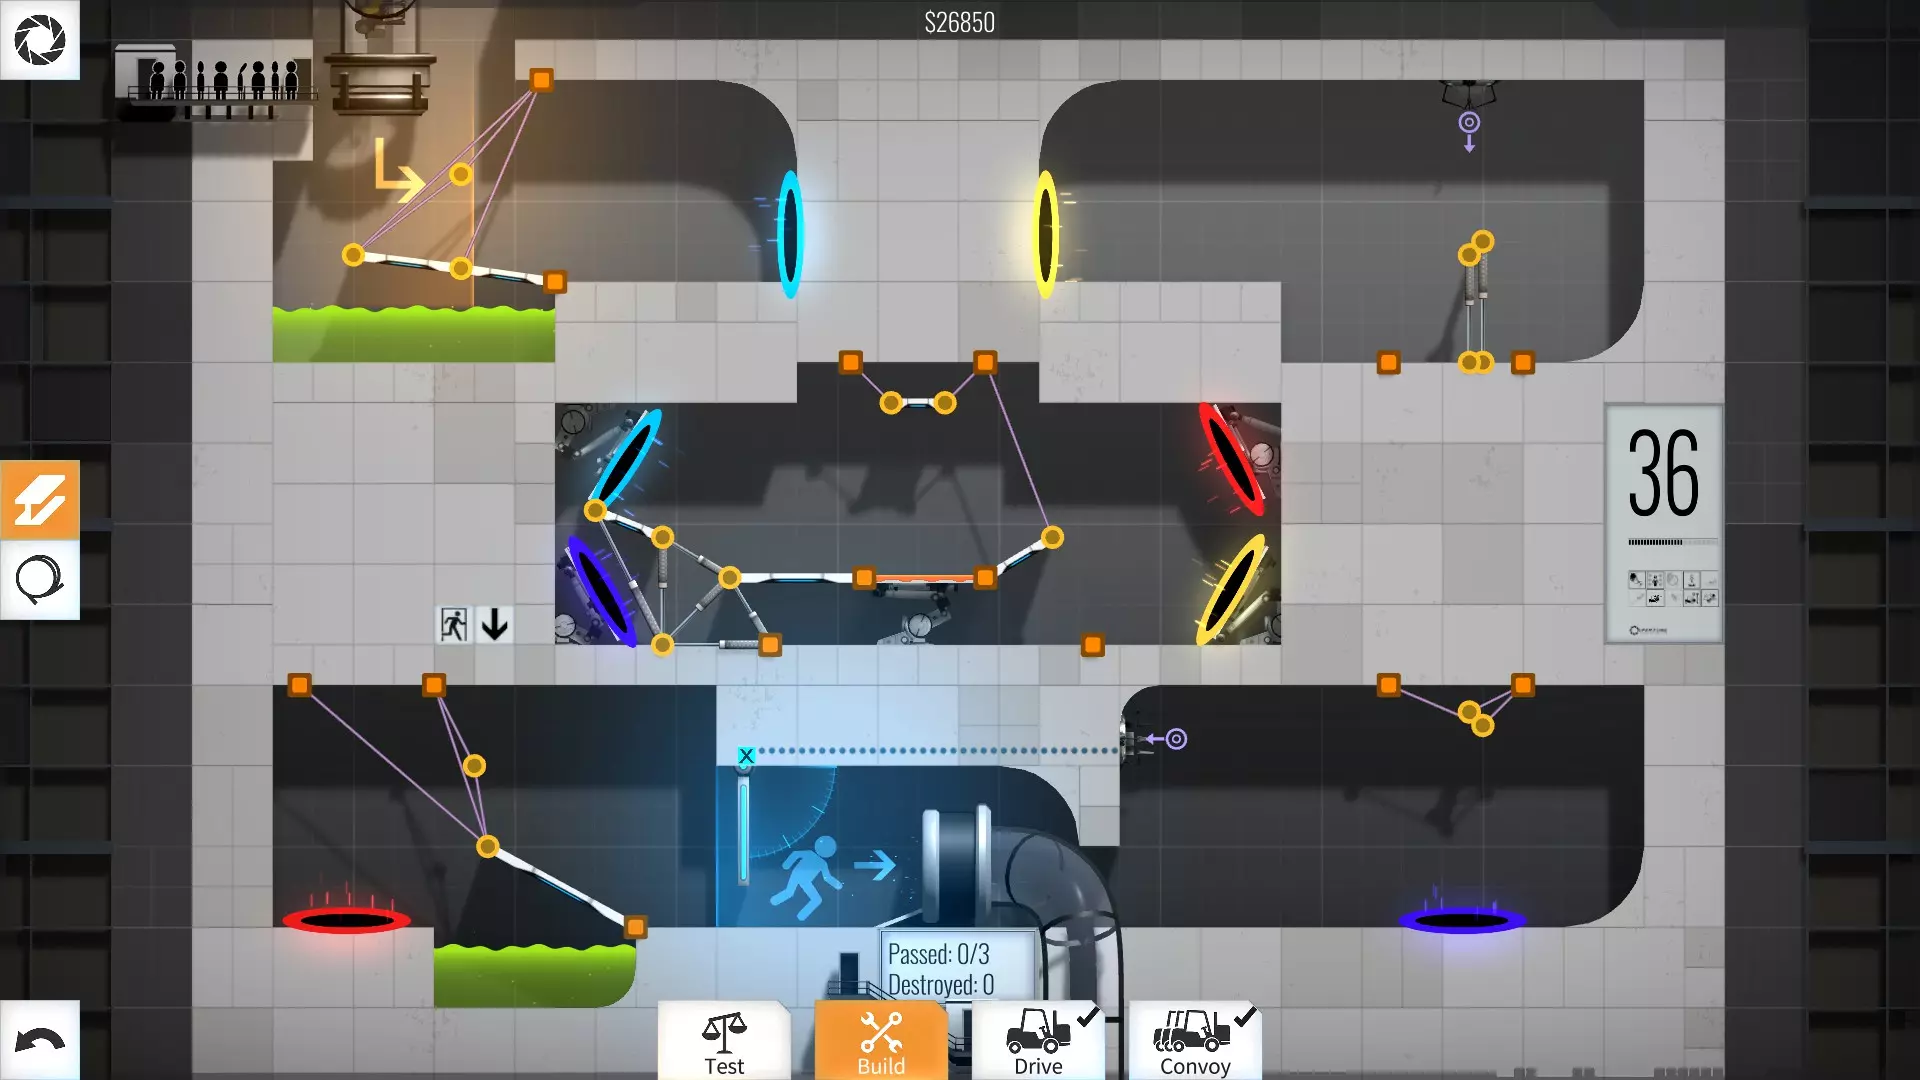
36级 - 26850美元 又一个小型可倒塌塔,用于改变弹丸方向,嗯,为什么不呢 =P
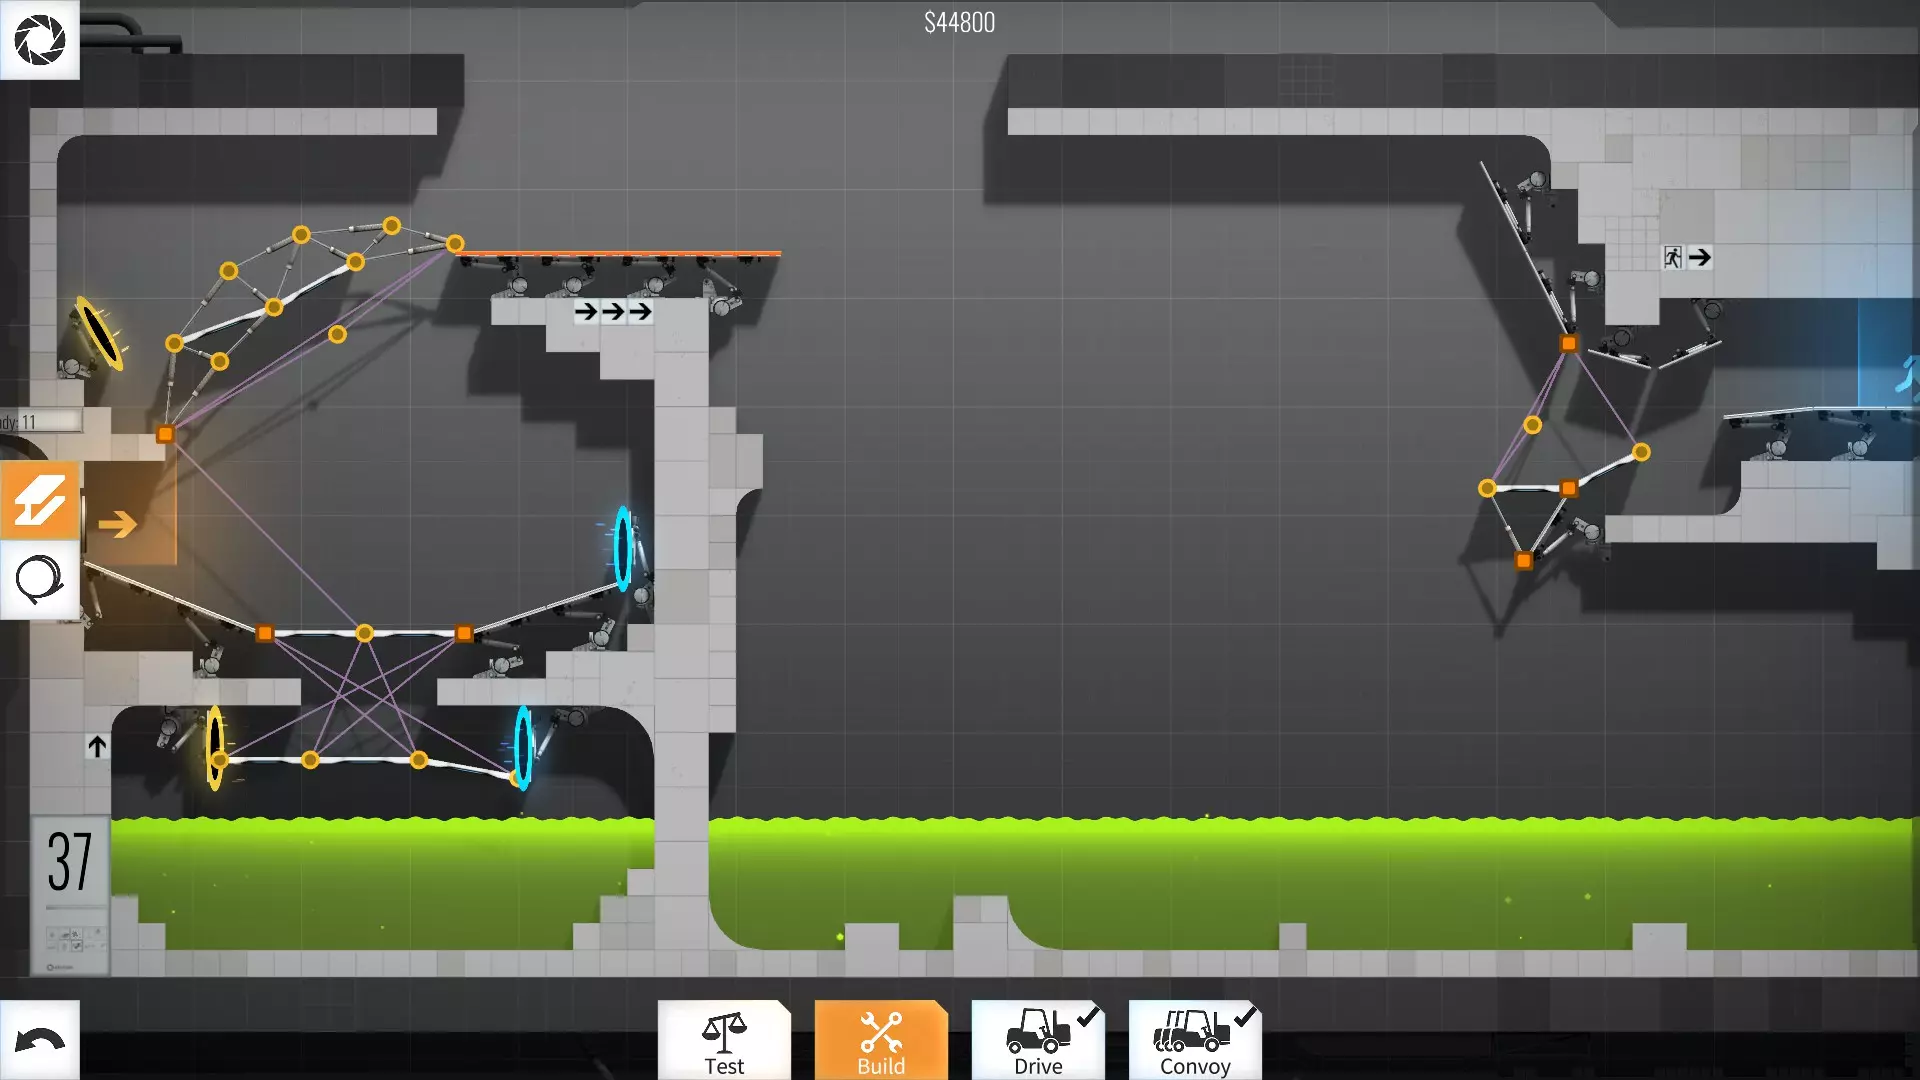
37级 - 52750美元 这关也很难优化。在这一关省钱真的相当困难……
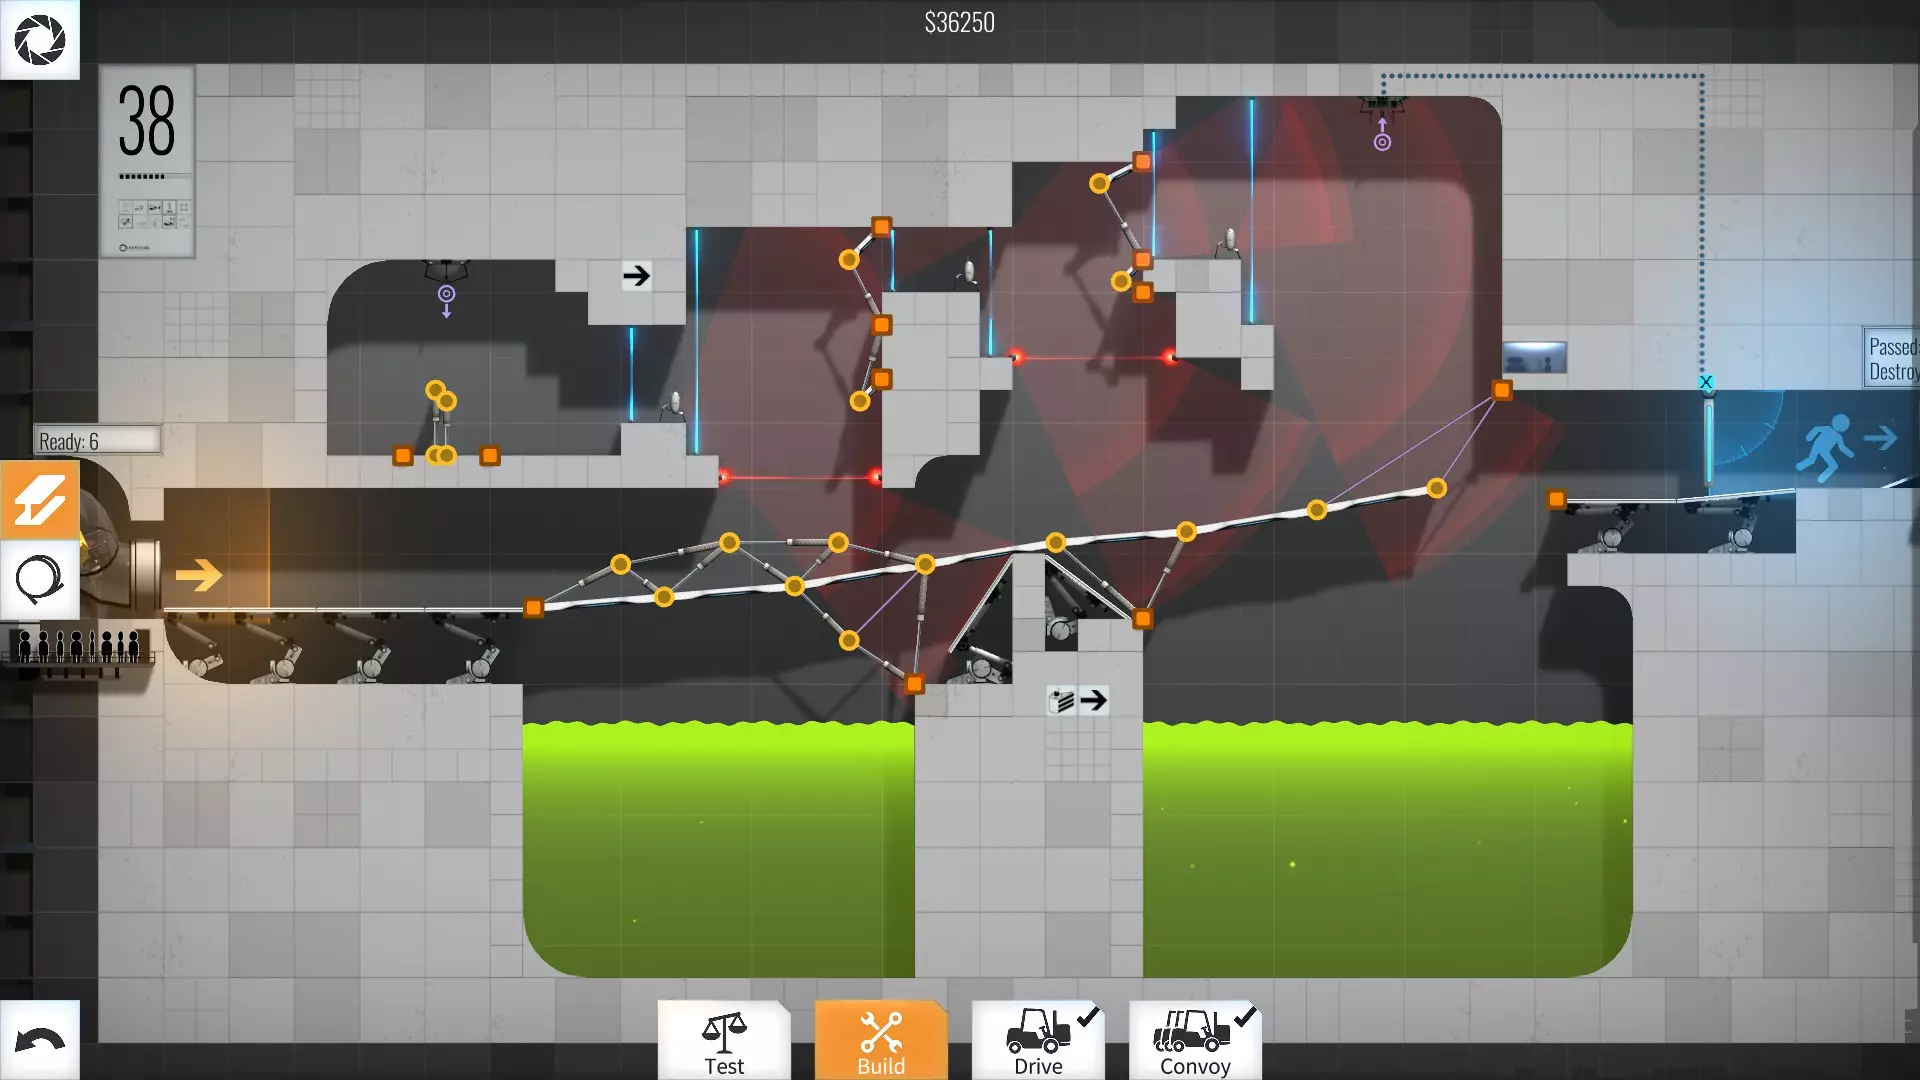
38级 - 36250美元 又是一个需要通过倒塌的塔来改变小球方向的关卡,但本关的技巧主要是在最后一个炮塔前的道路上不要使用45度角。正如视频中所示,使用更陡的角度可以摧毁炮塔并击中接收器,而无需任何额外结构,这样真的能节省很多钱。
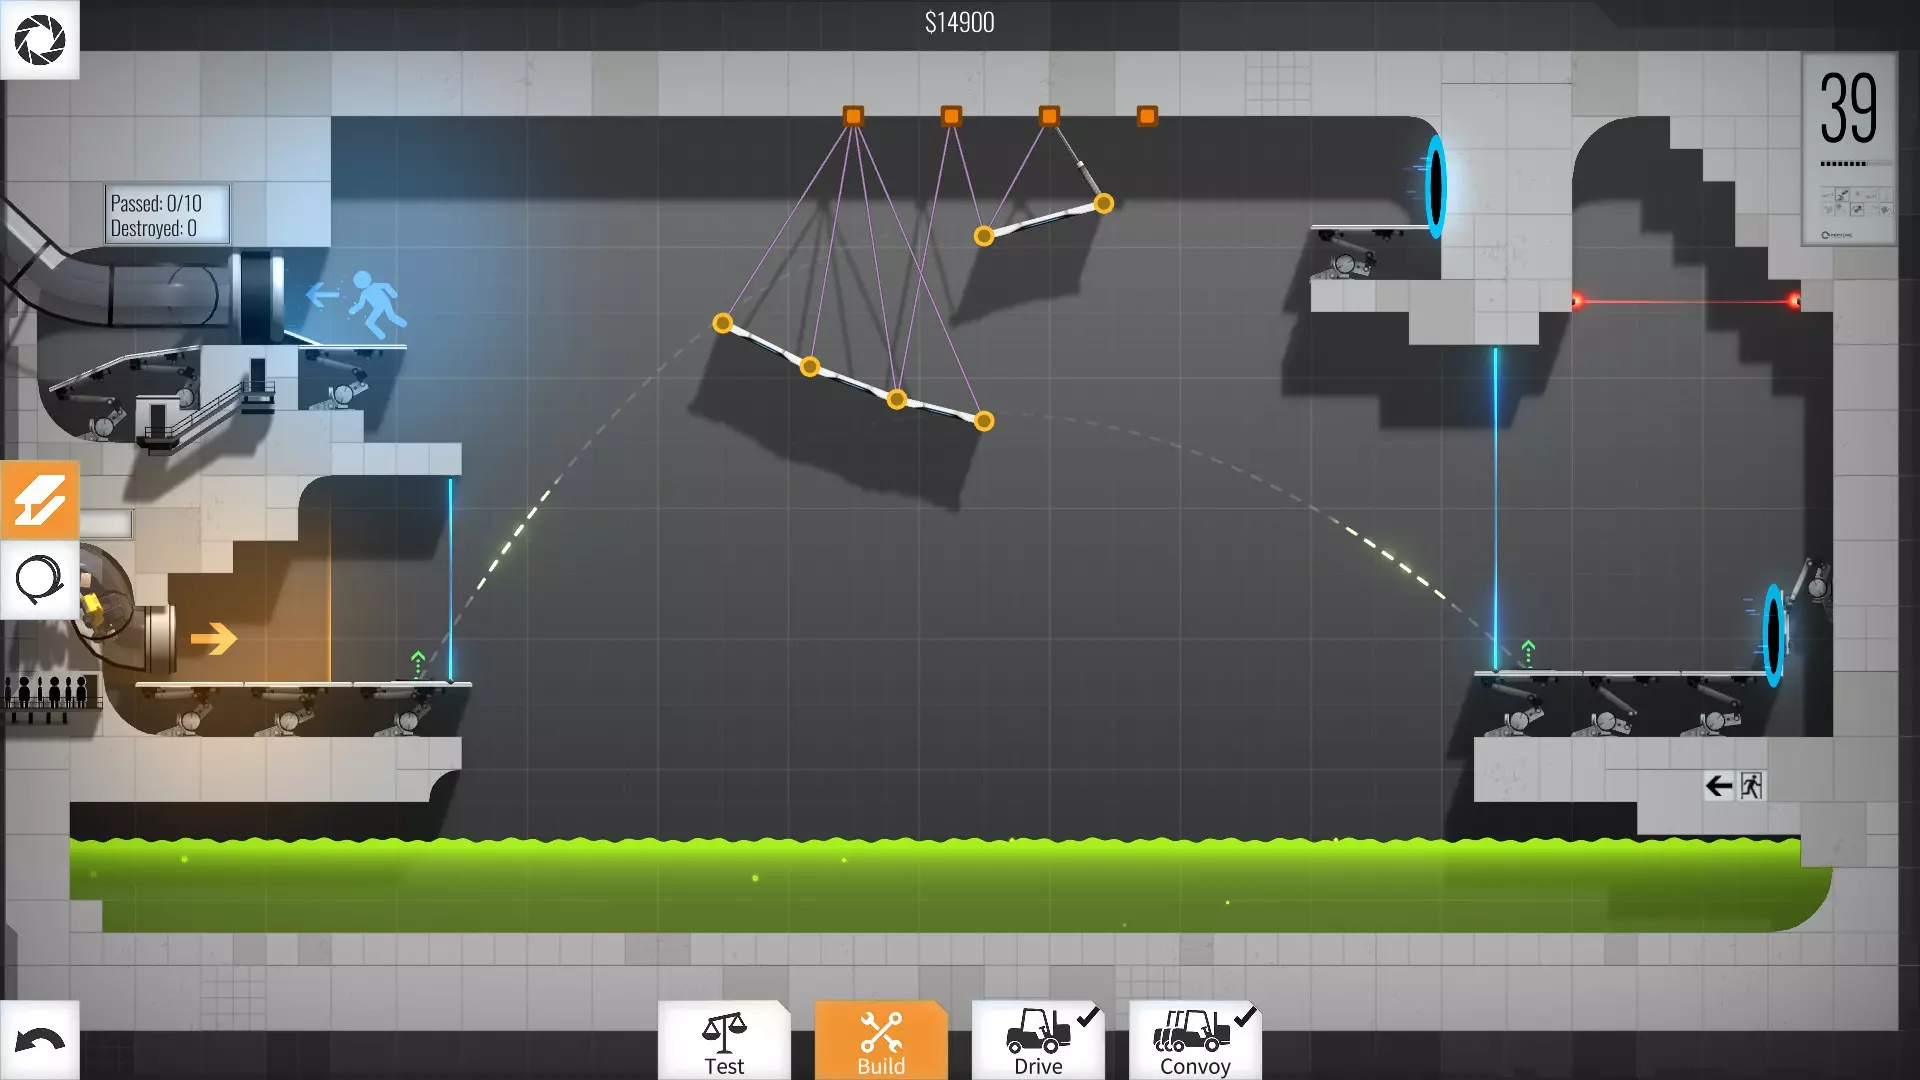
等级39 - 14900美元
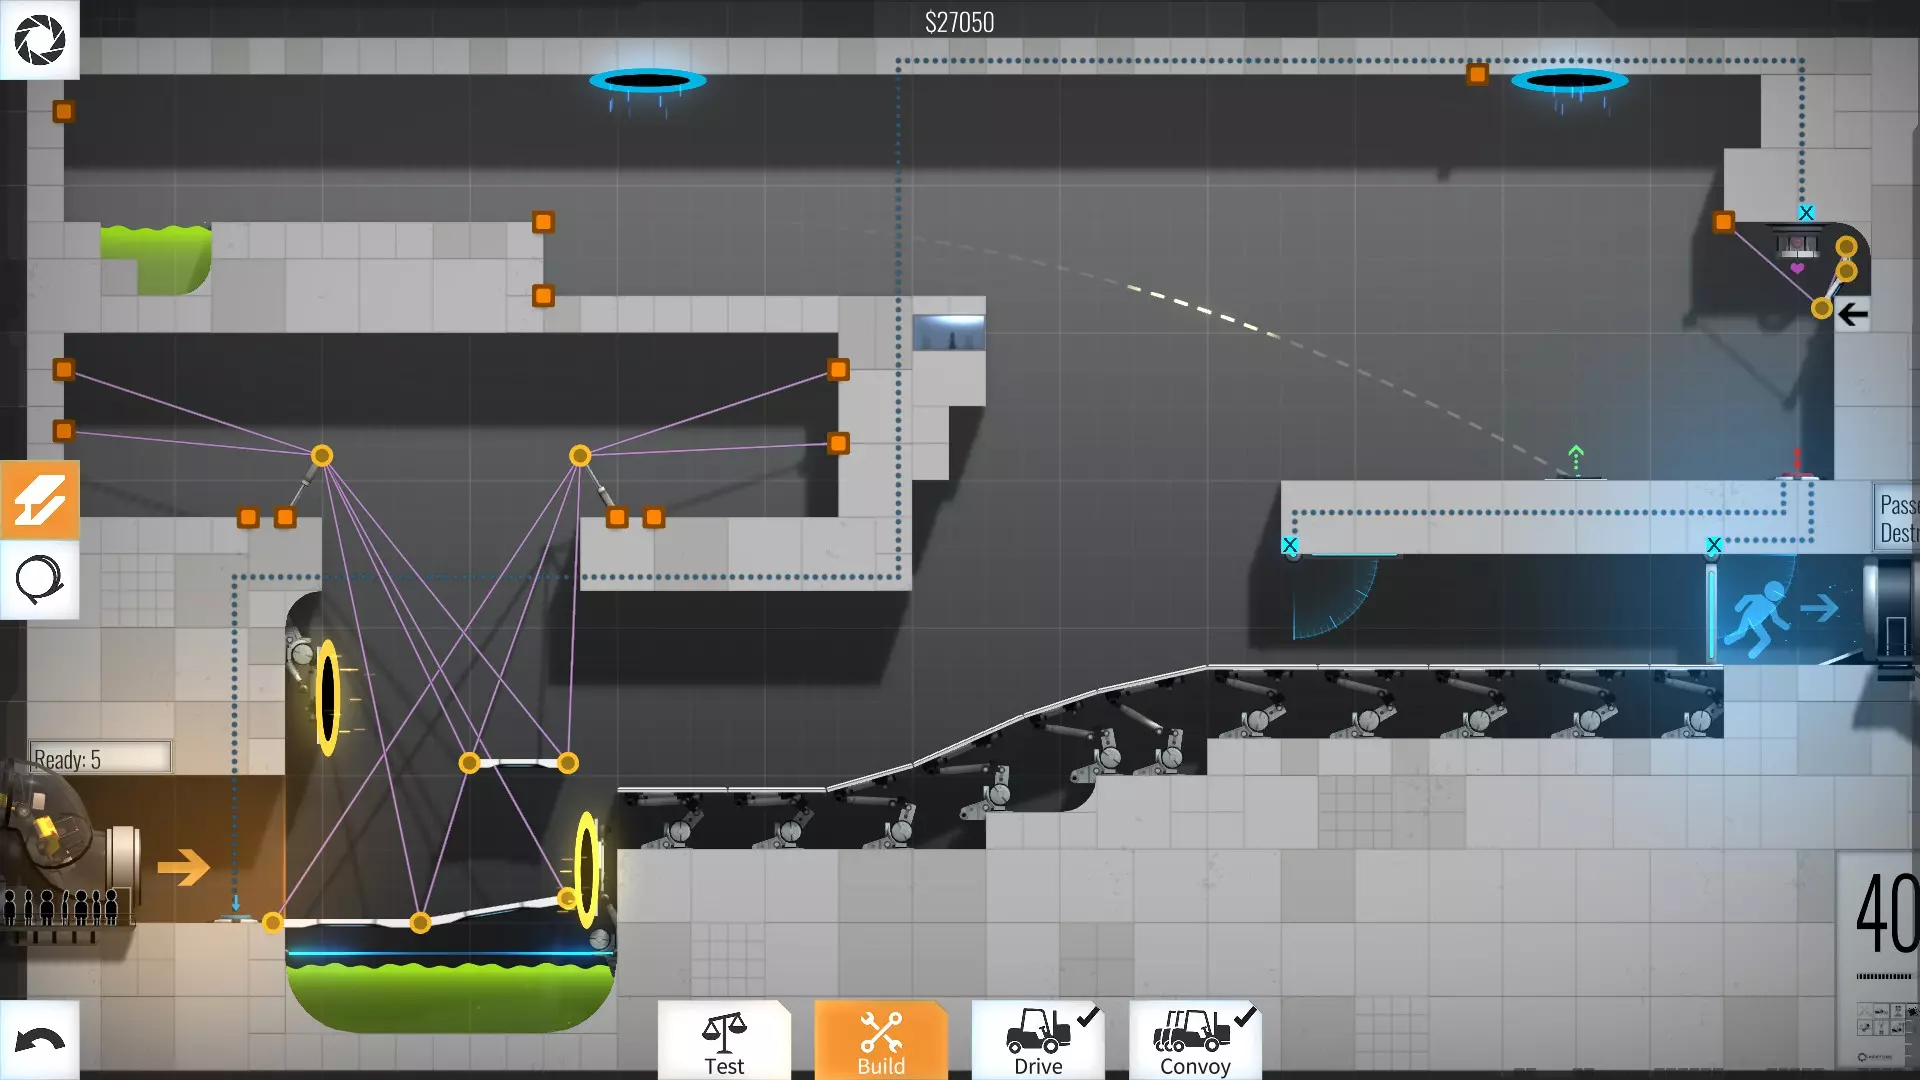
40级 - 27050美元 这一关的关键就在于那个立方体。说实话,我这关过得有点意外……我是说,我确实在尝试那么做,但试了几次就成功了,所以就保持那样了。这可能不是推动立方体最优雅的方法,但话说回来,呃……管用就行。这也是一个利用运动和重力解决问题的好例子。
41-50级 41级 - 41500美元

第42关 - 42050美元 这里唯一需要注意的是,我用了一小段路来阻止右侧的方块走得太远而错过按钮……其余部分基本不言自明。

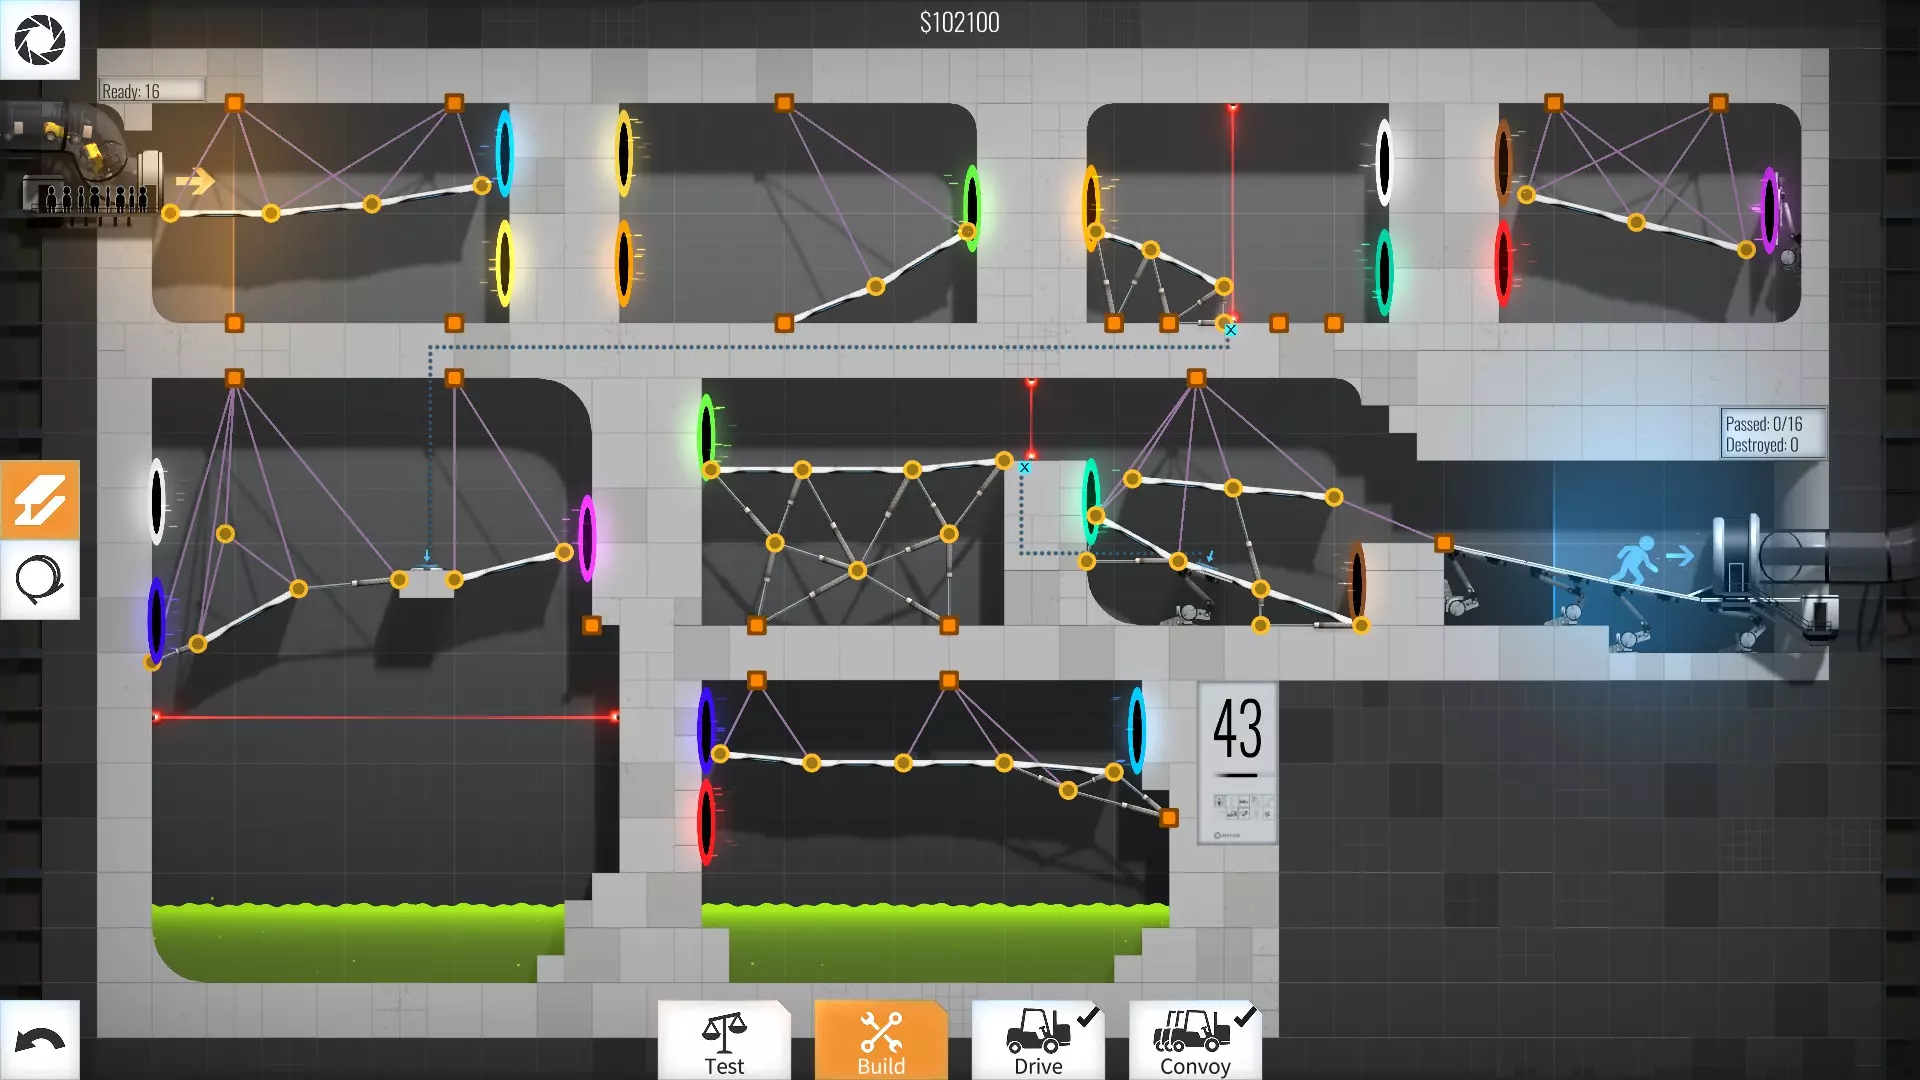
等级43 - 102100美元
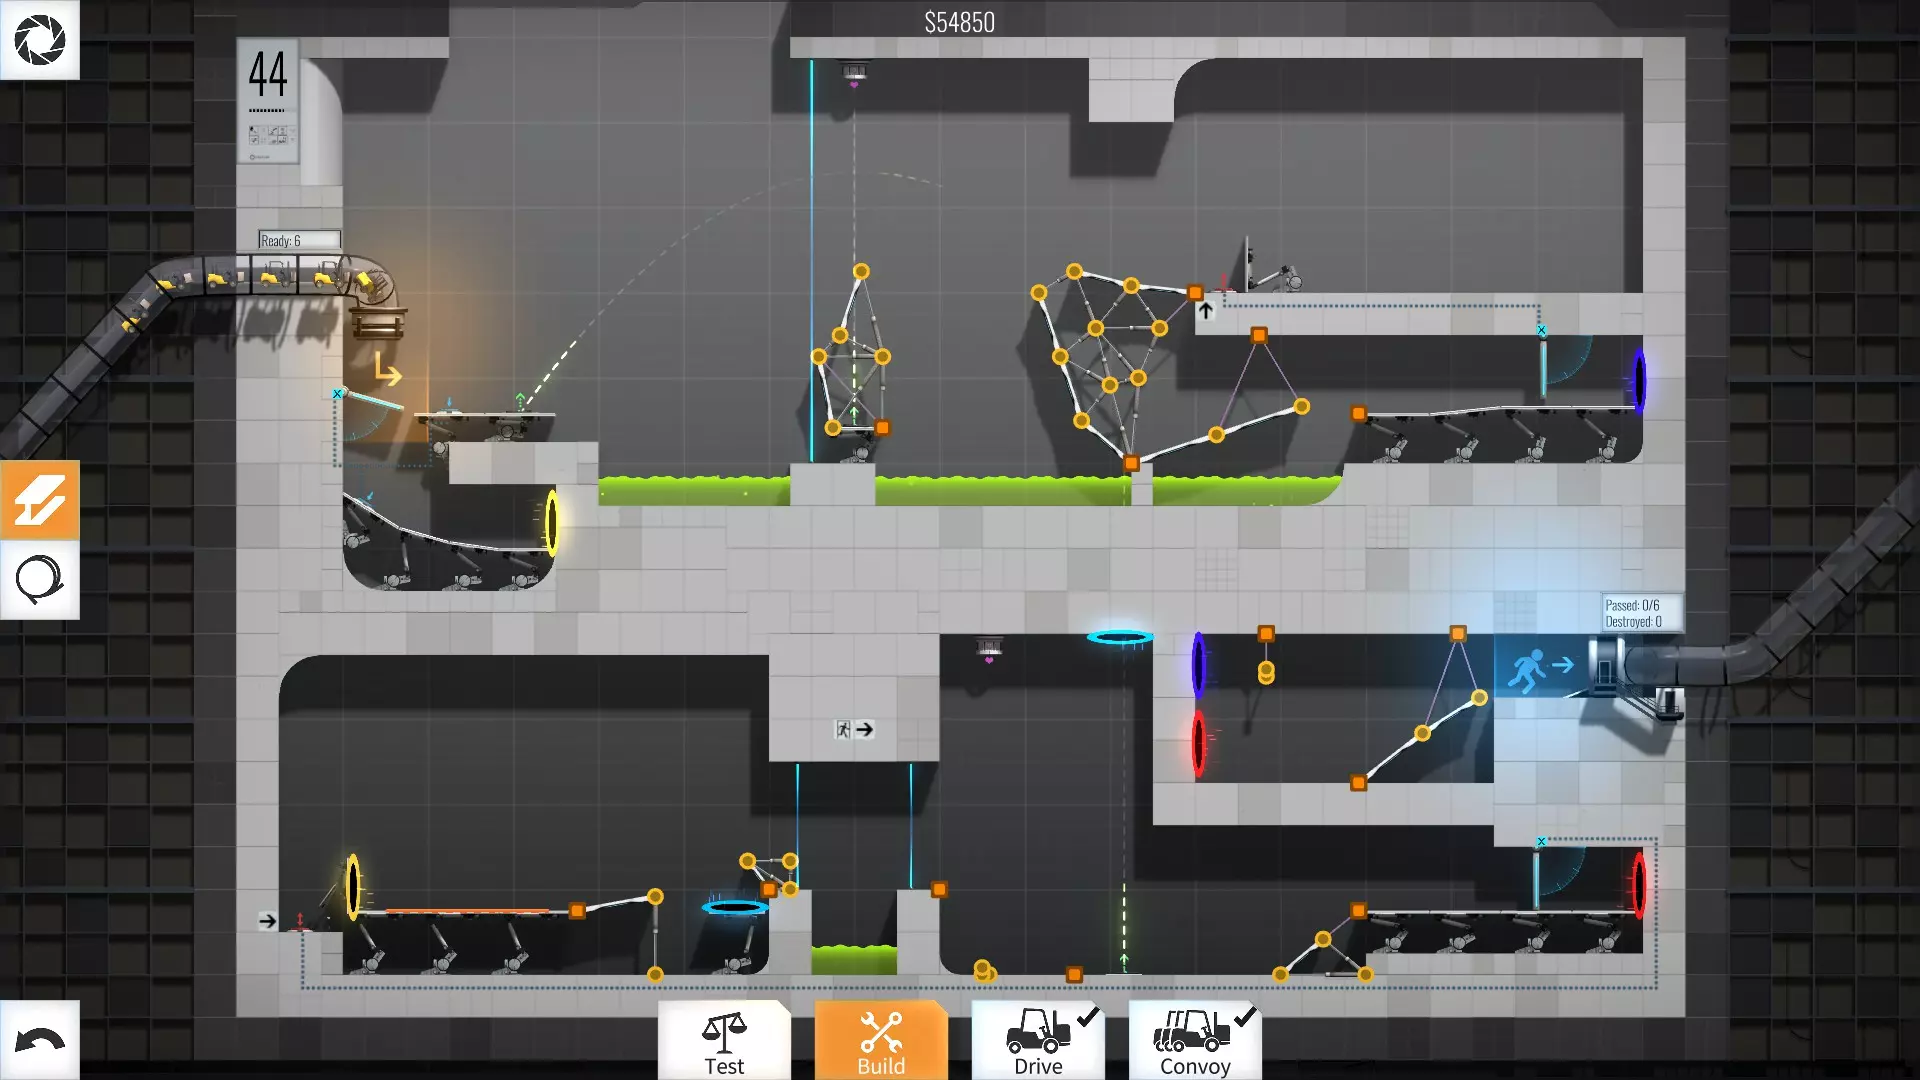
第44关 - 54850美元 啊,这关很有意思,我用了不少技巧……我花了很长时间尝试通过调整轨迹让上方的立方体直接落到按钮上,但后来觉得无聊,而且我已经能把它发射到足够好的位置,让第一辆车把它推到位…… 另外,你们会注意到我在这关用了两次道路角度来停止动量,用一个松动的斜坡推动下方的立方体,不过遗憾的是,我用来调整轨迹的道路被推到了蓝色激光束里……它没有损坏……而是分解了……它就是不会坏 =P 以后可能会重新挑战这关,尝试找到更好的解法……也可能不会,谁知道呢。
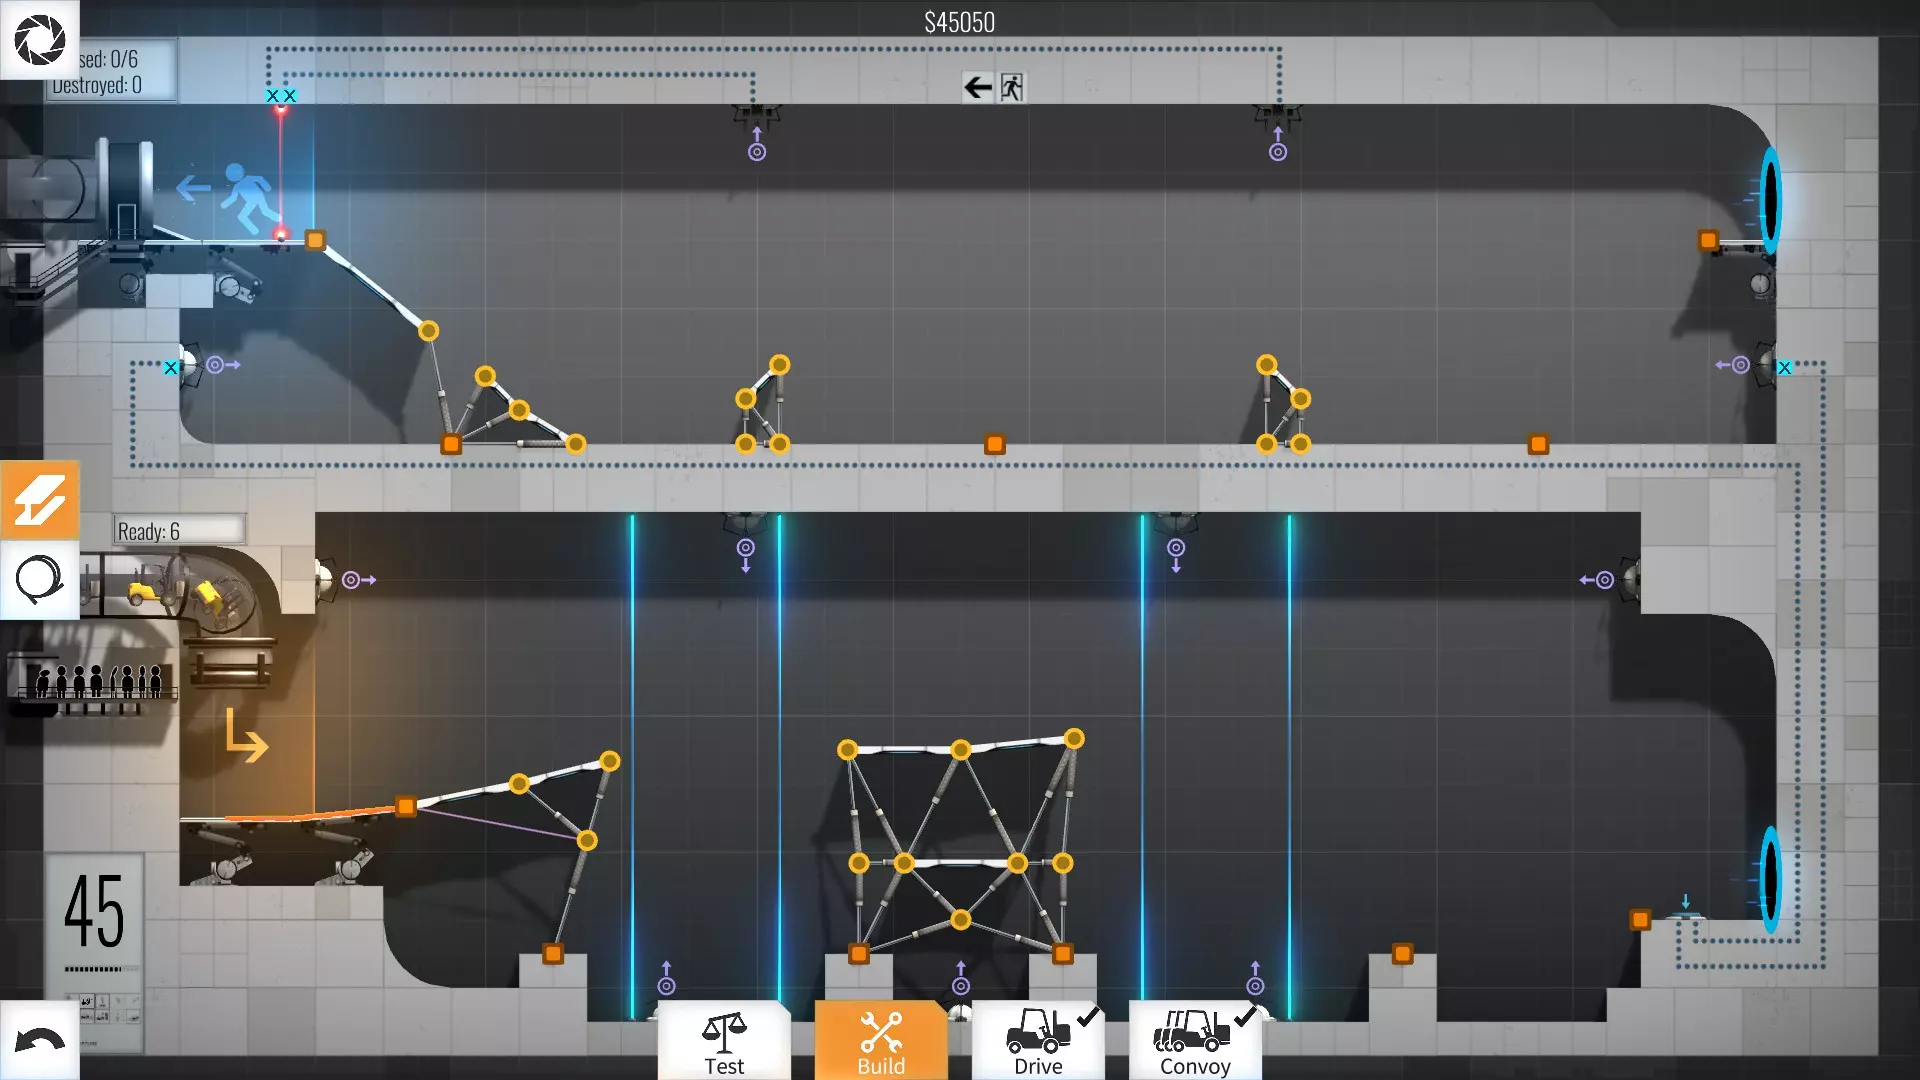
45级 - 45050美元 这次我希望车辆能故意在第二个跳跃点出现失误,这样第一辆车就不会被炮弹炸毁(如果不设法降低它的速度就会发生这种情况)。除此之外,没有其他值得注意的地方。
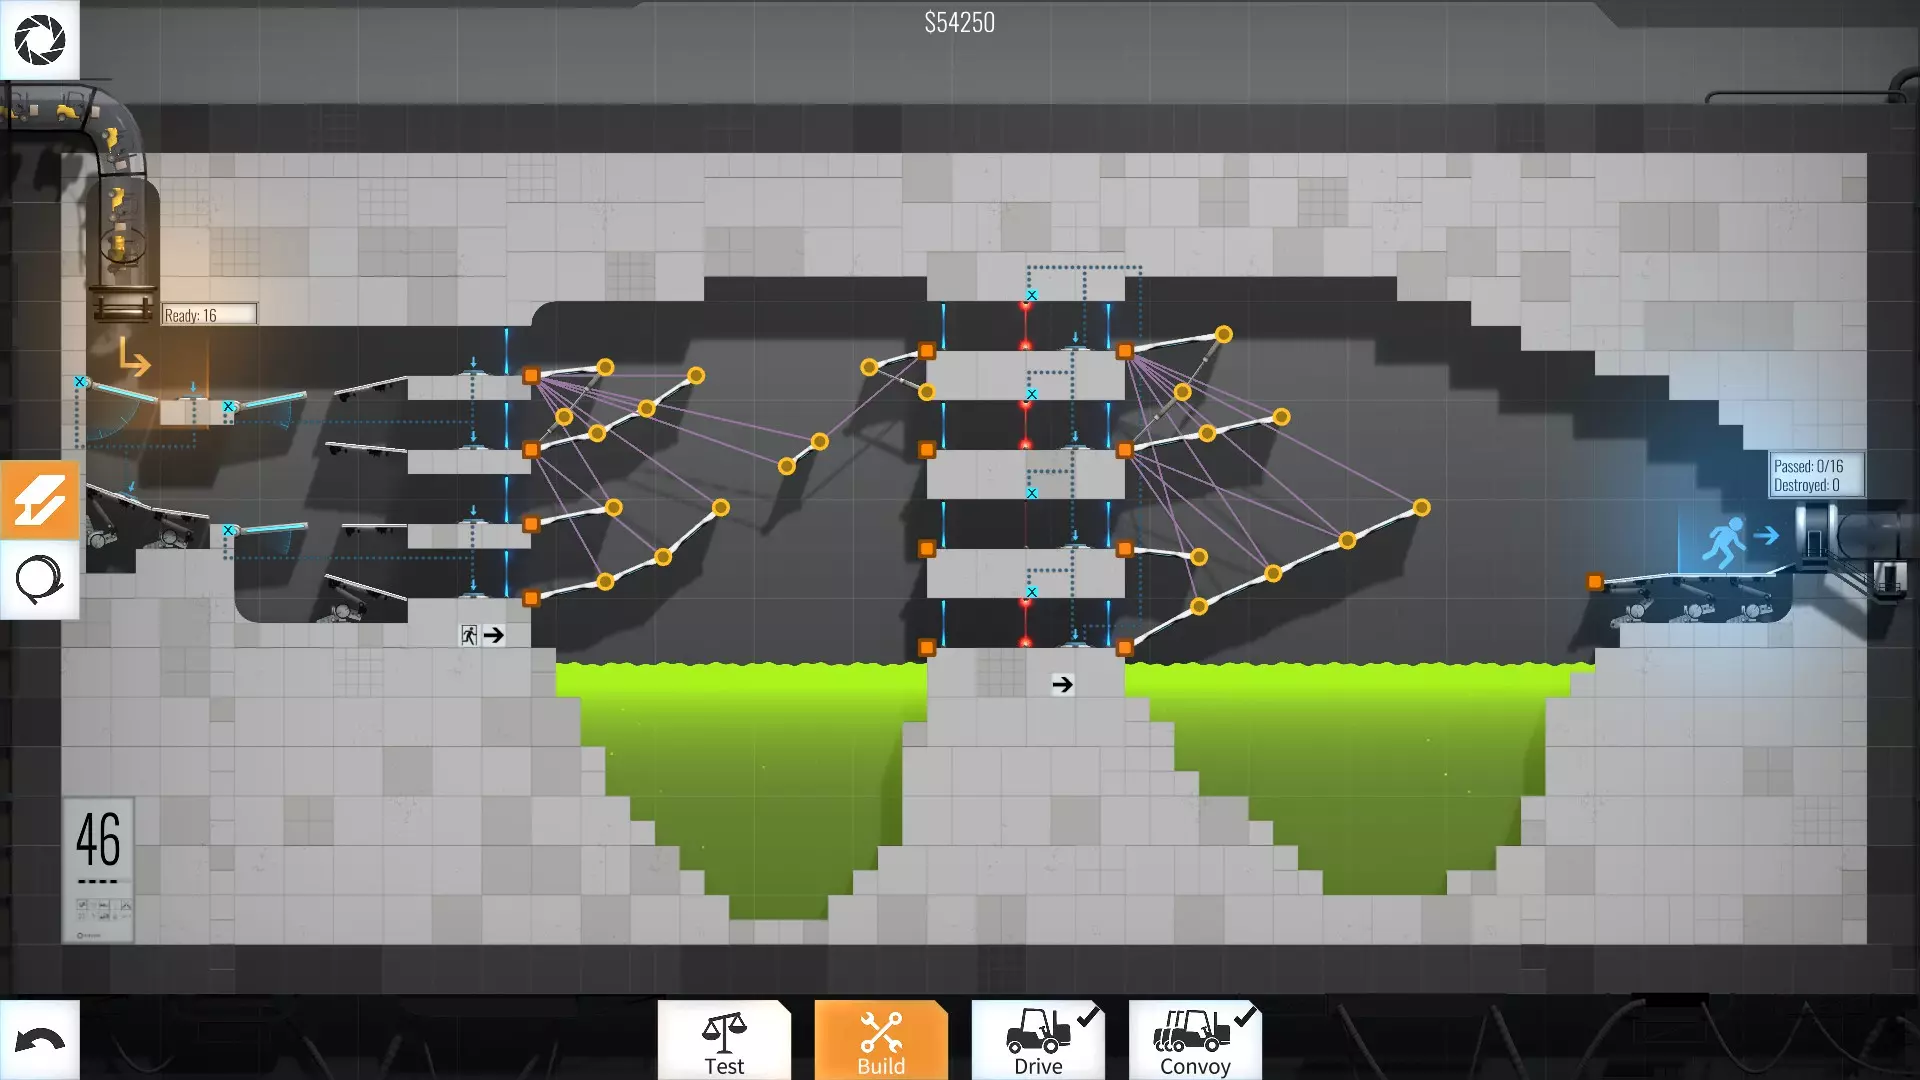
等级46 - 54250美元
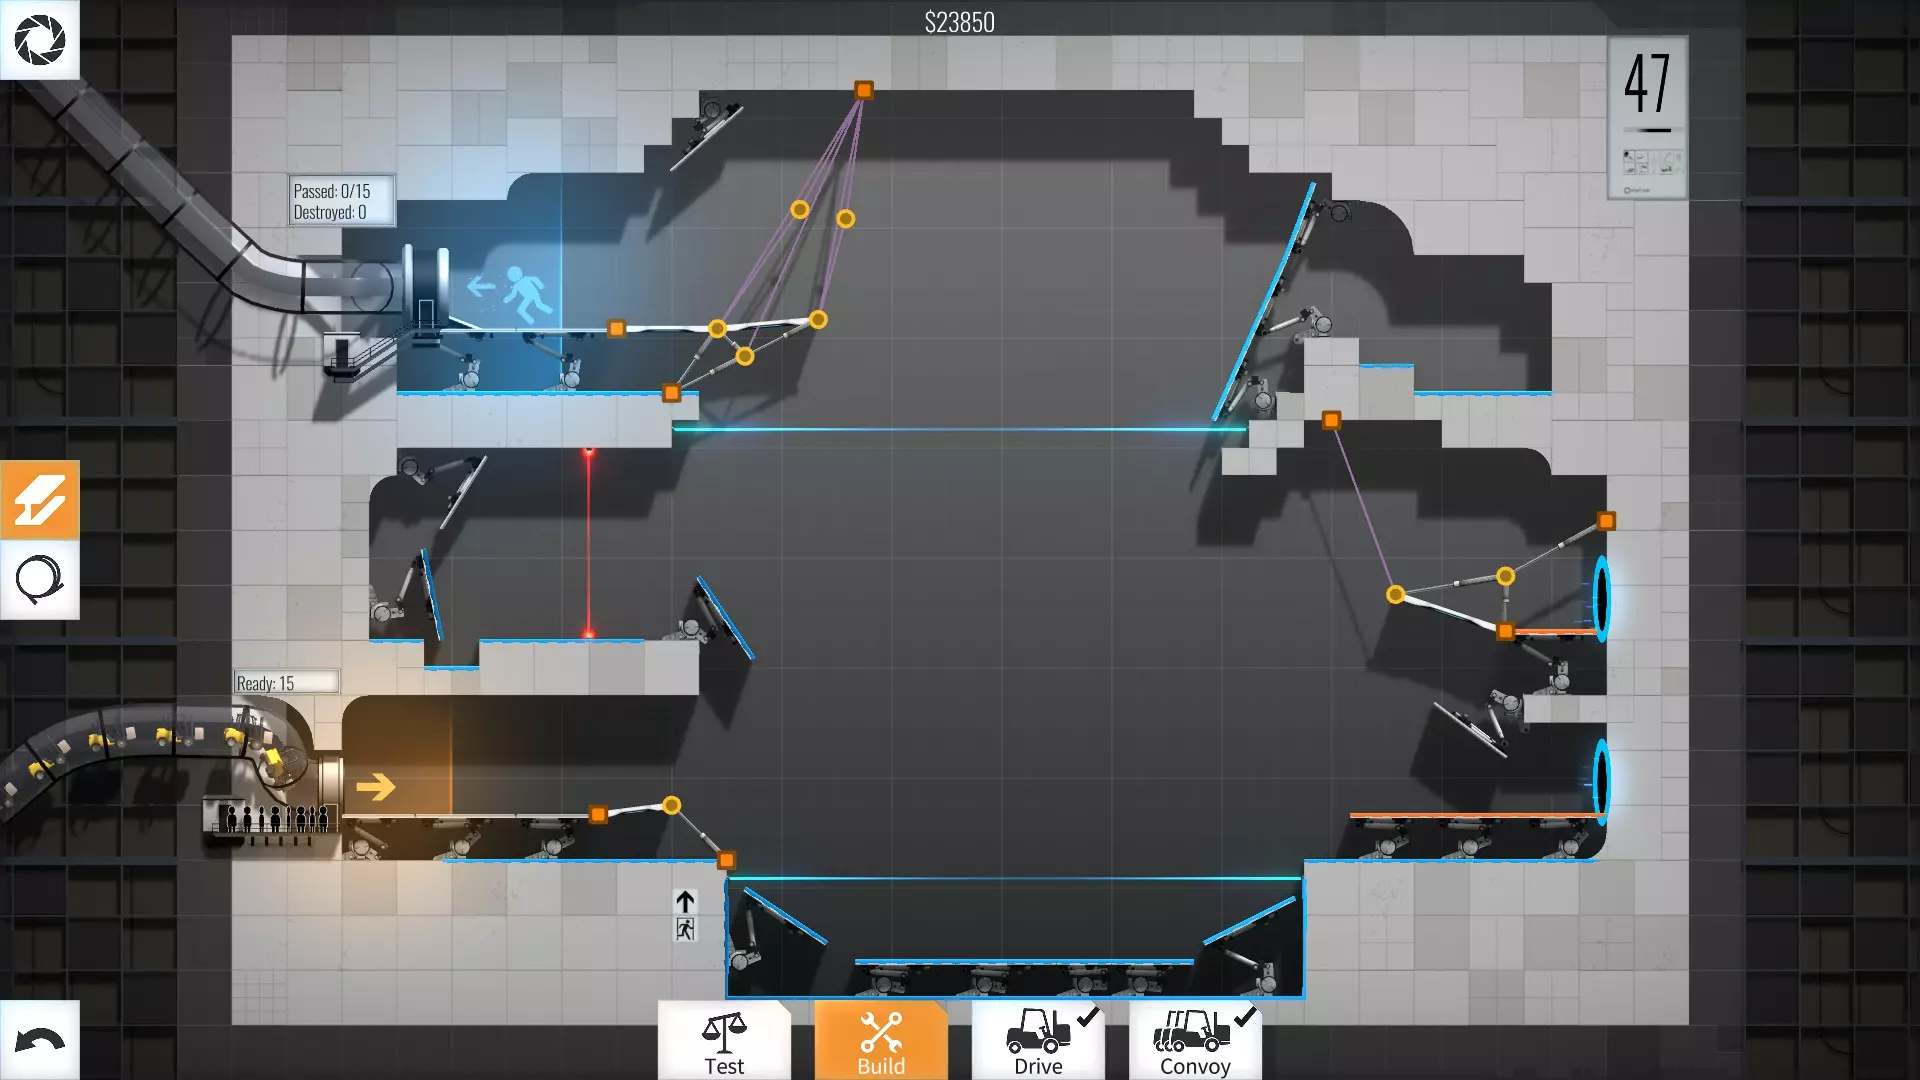
等级47 - 23850美元
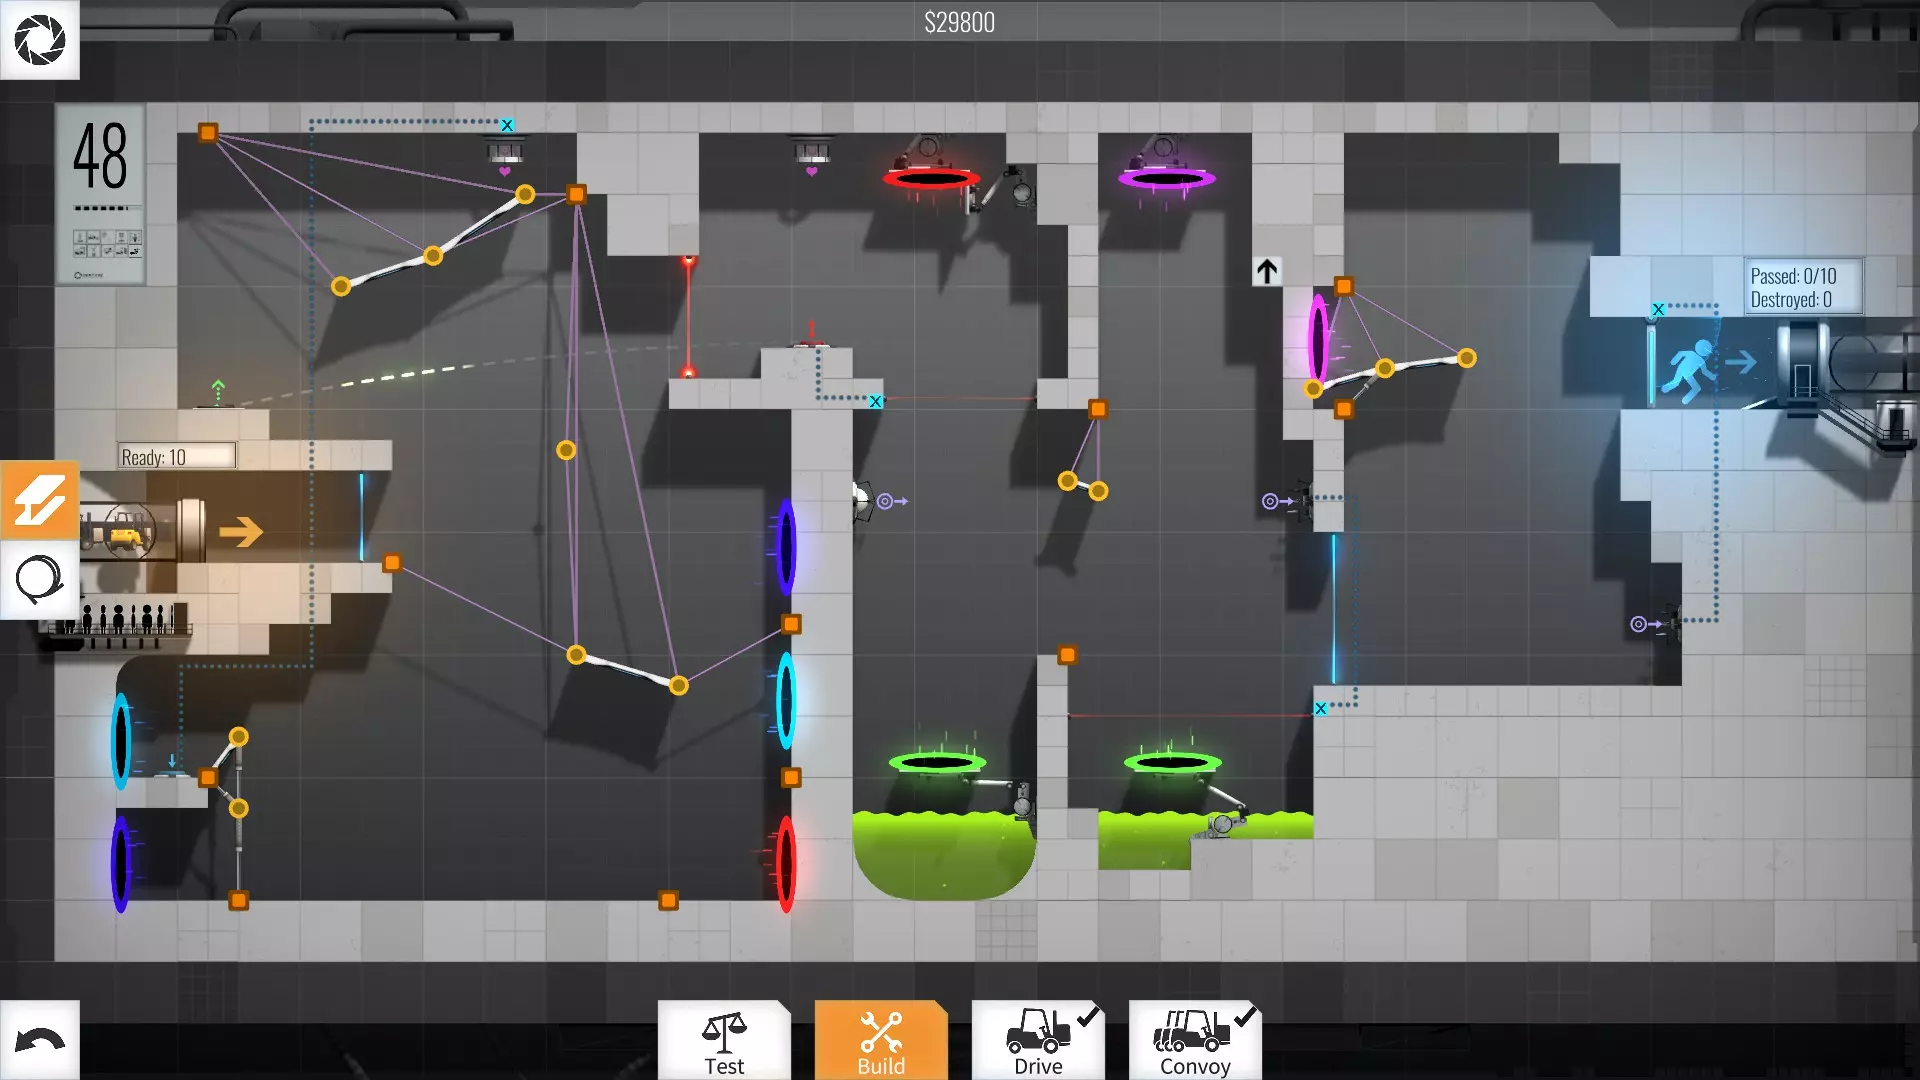
第48关 - 29800美元 在这一关,我通过在按钮后放置减速带完全绕过了深蓝色传送门,虽然看起来有些笨拙,但这样可以为一个立方体撞击另一个立方体争取时间。此外,我还利用重力和运动来节省用于引导小球的路径成本……小球会及时落入正确位置……相当巧妙。
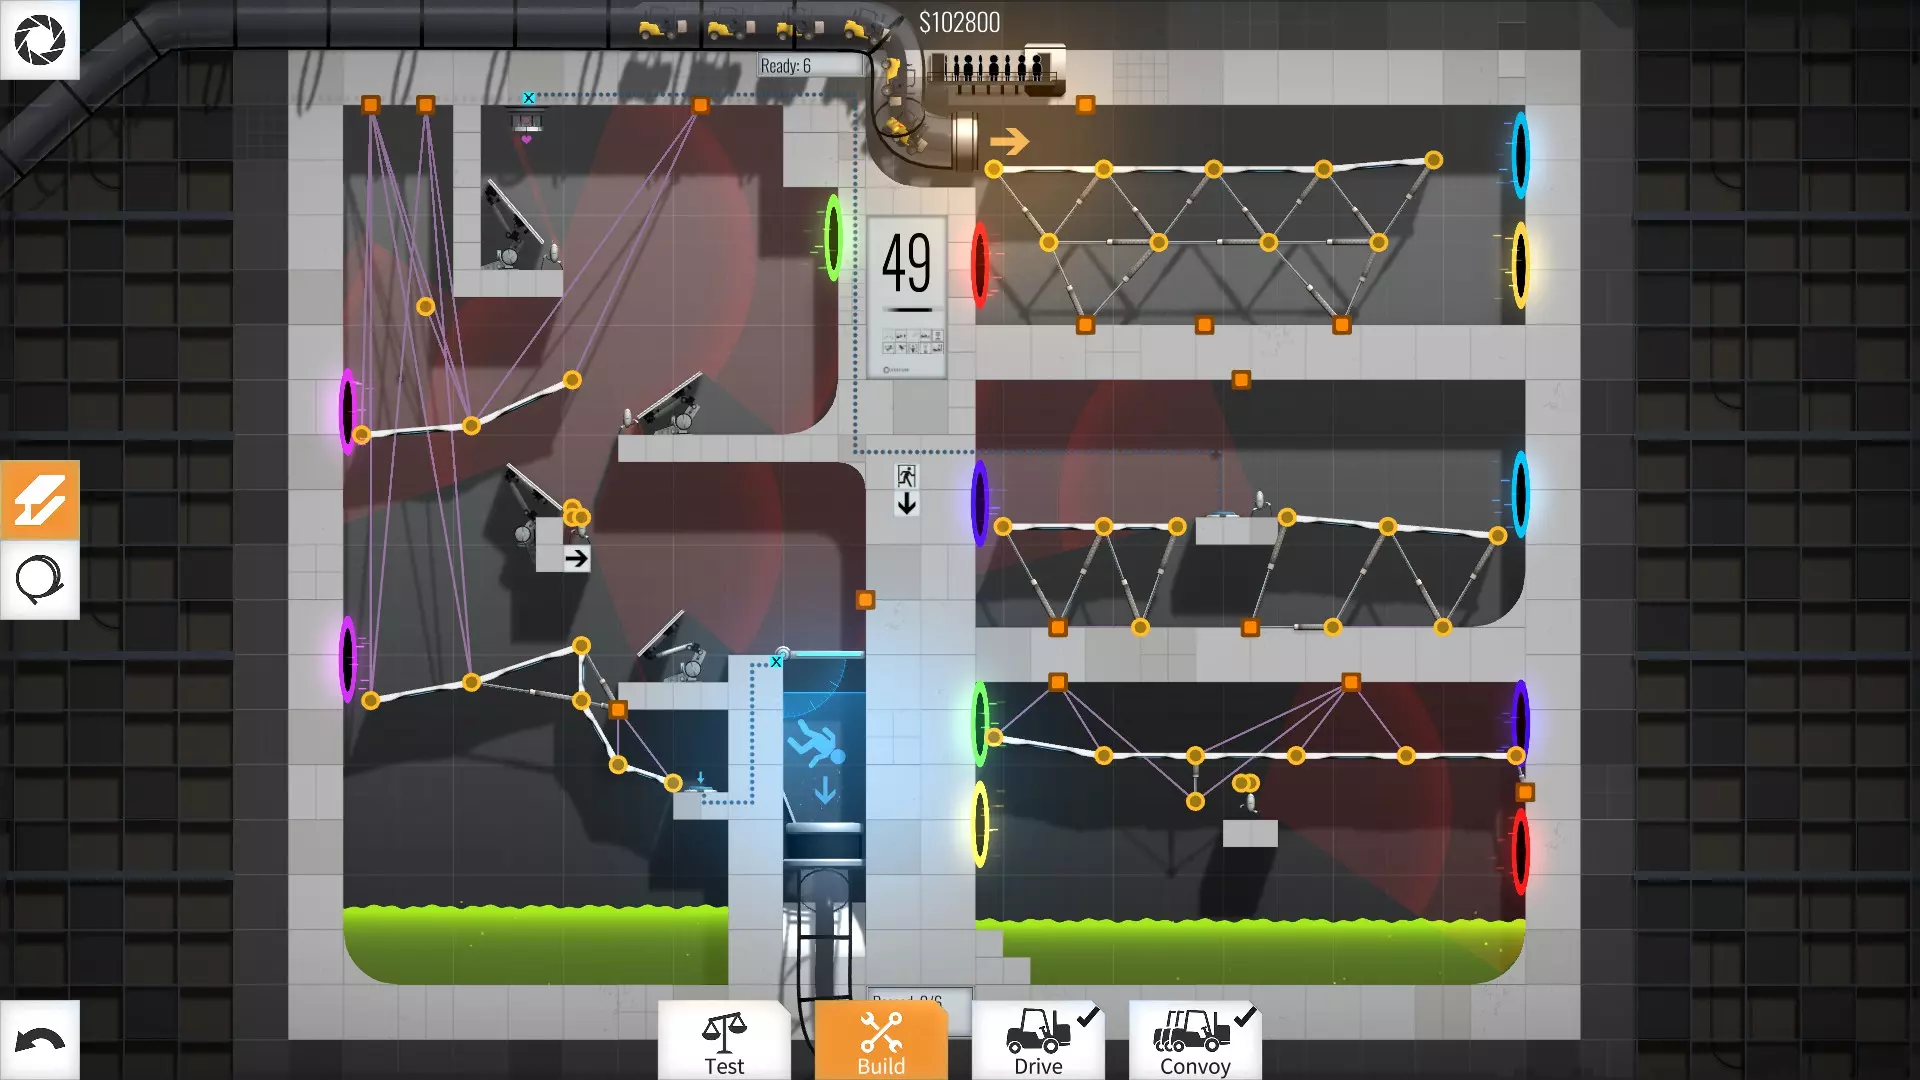
第49关 - 102800美元 这次我用了一段松动的道路来摧毁机器人,并绕过黄色和红色传送门。我还使用了另一个松动的迷你坡道,因为有时方块会卡在那里……这其实不是为了摧毁机器人,但它挡路了,所以没错……它被摧毁了。
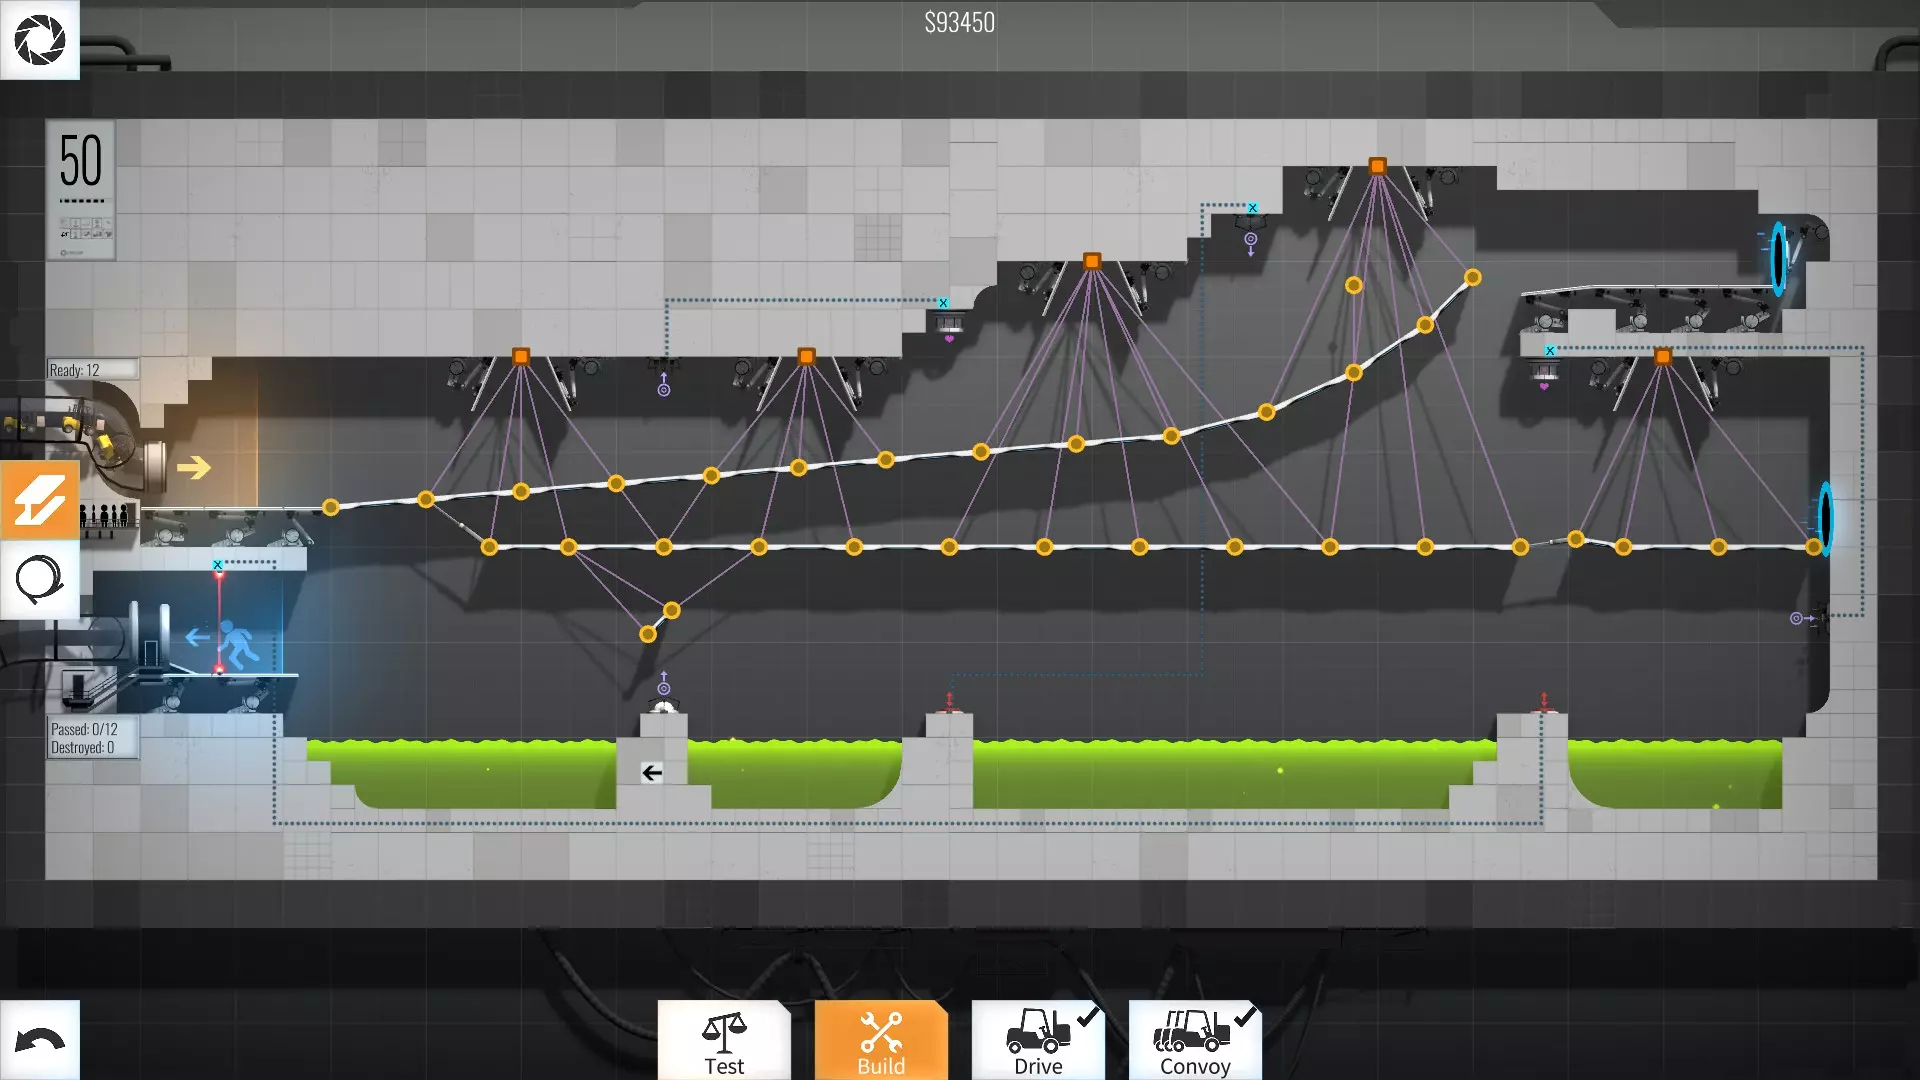
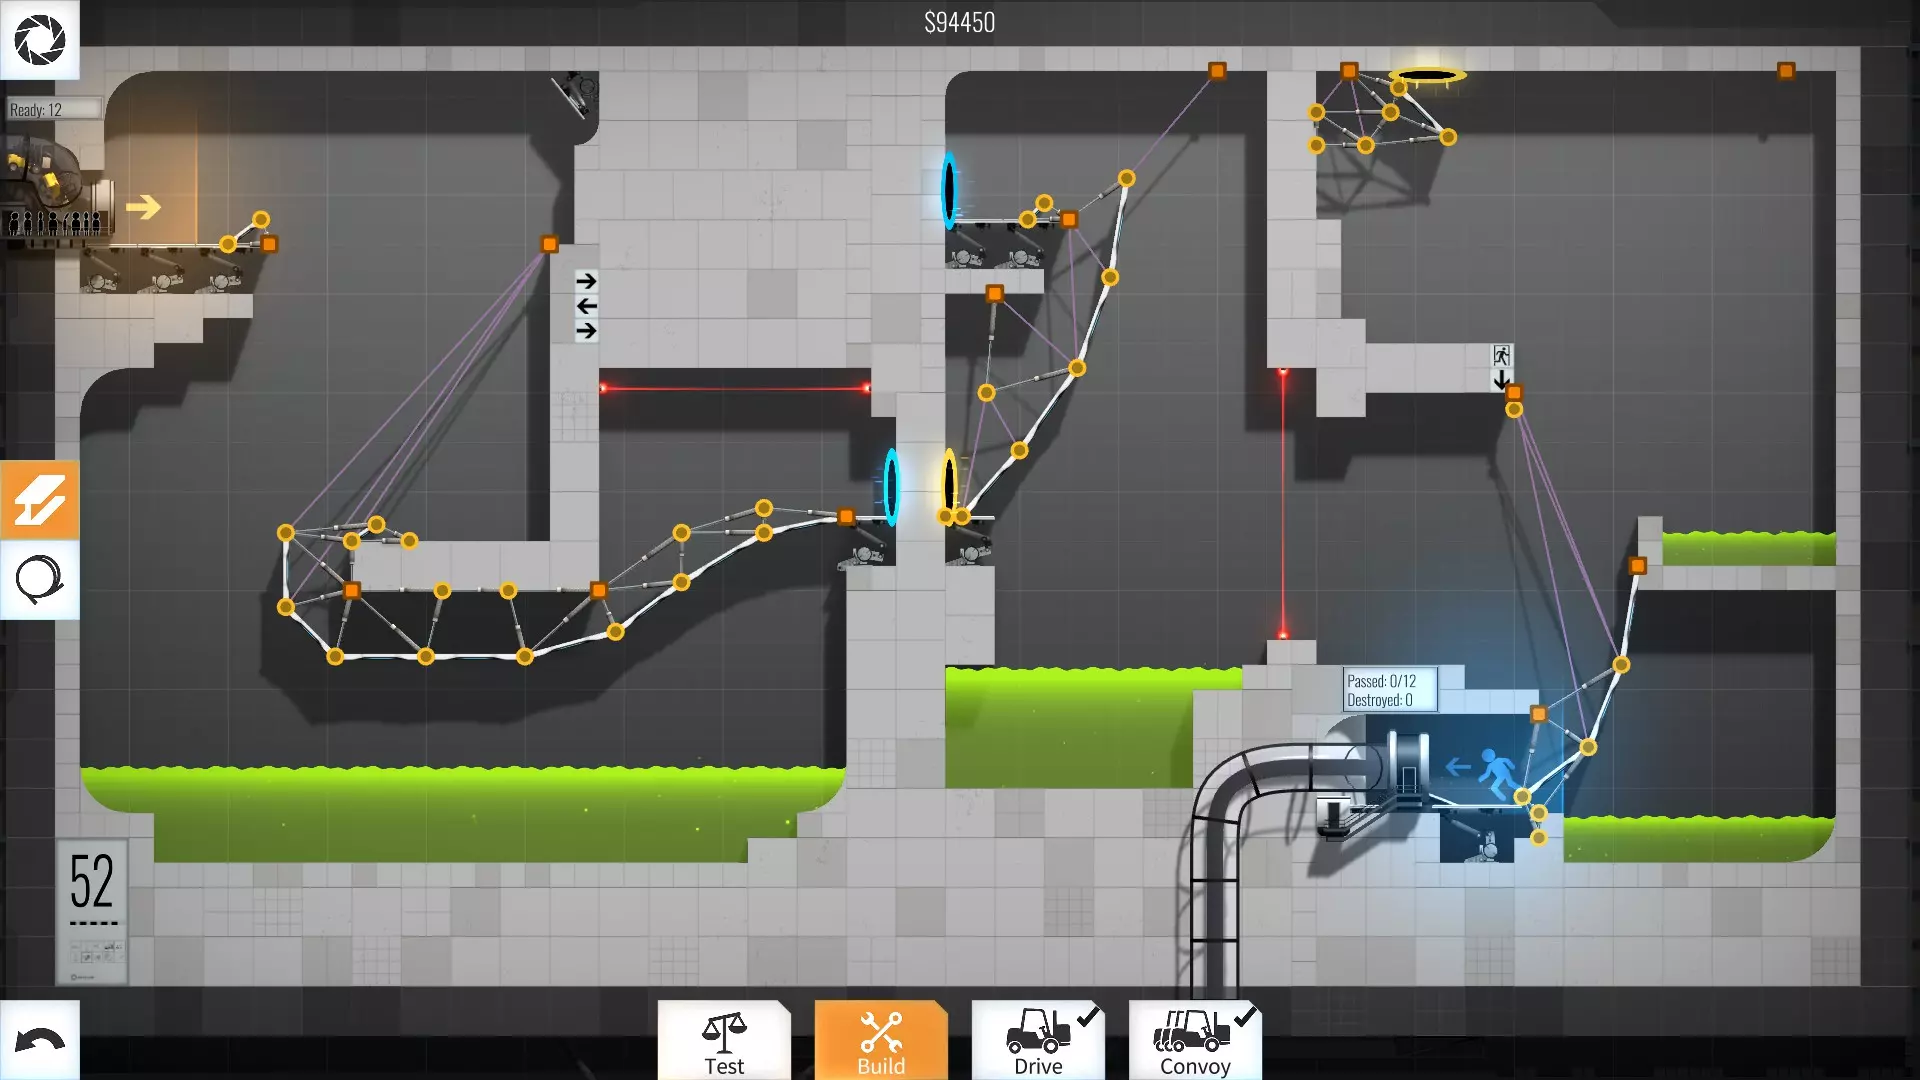
等级50 - 93450美元 这很简单,只需将第一个小球引导至第二个接收器,这样能让你自己操作起来更轻松。
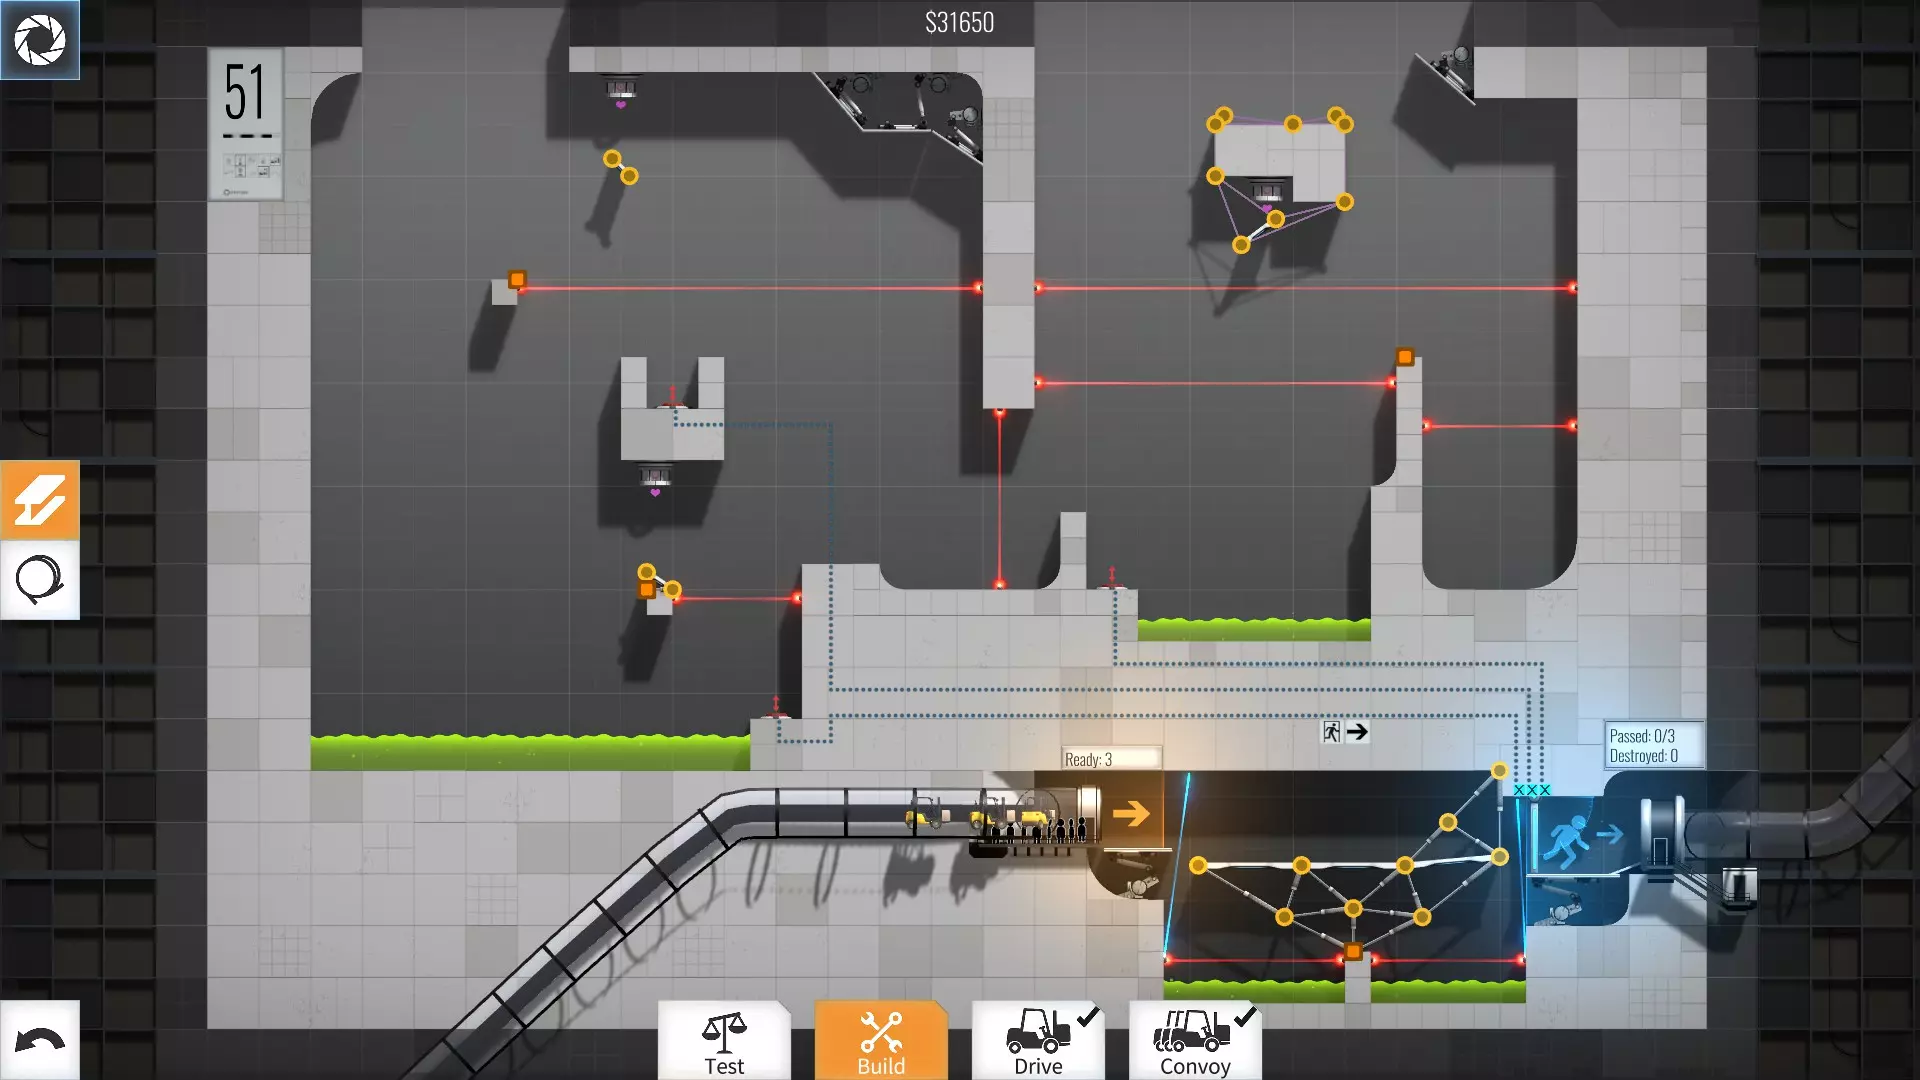
51-60级 51级 - 31650美元 好了,在这里我利用重力推动了左上角的方块,可惜它被摧毁了,不过没关系……至于右侧的方块,我用了别的方法,你自己想想我是怎么做到的(提示:使用绳索) ;)
52级 - 94450美元 设置两个减速带以减缓车队速度,从而节省增援和额外道路的成本。哦对了,出口附近的地面有点问题,所以我不得不在最后一段道路下方进行额外的加固。
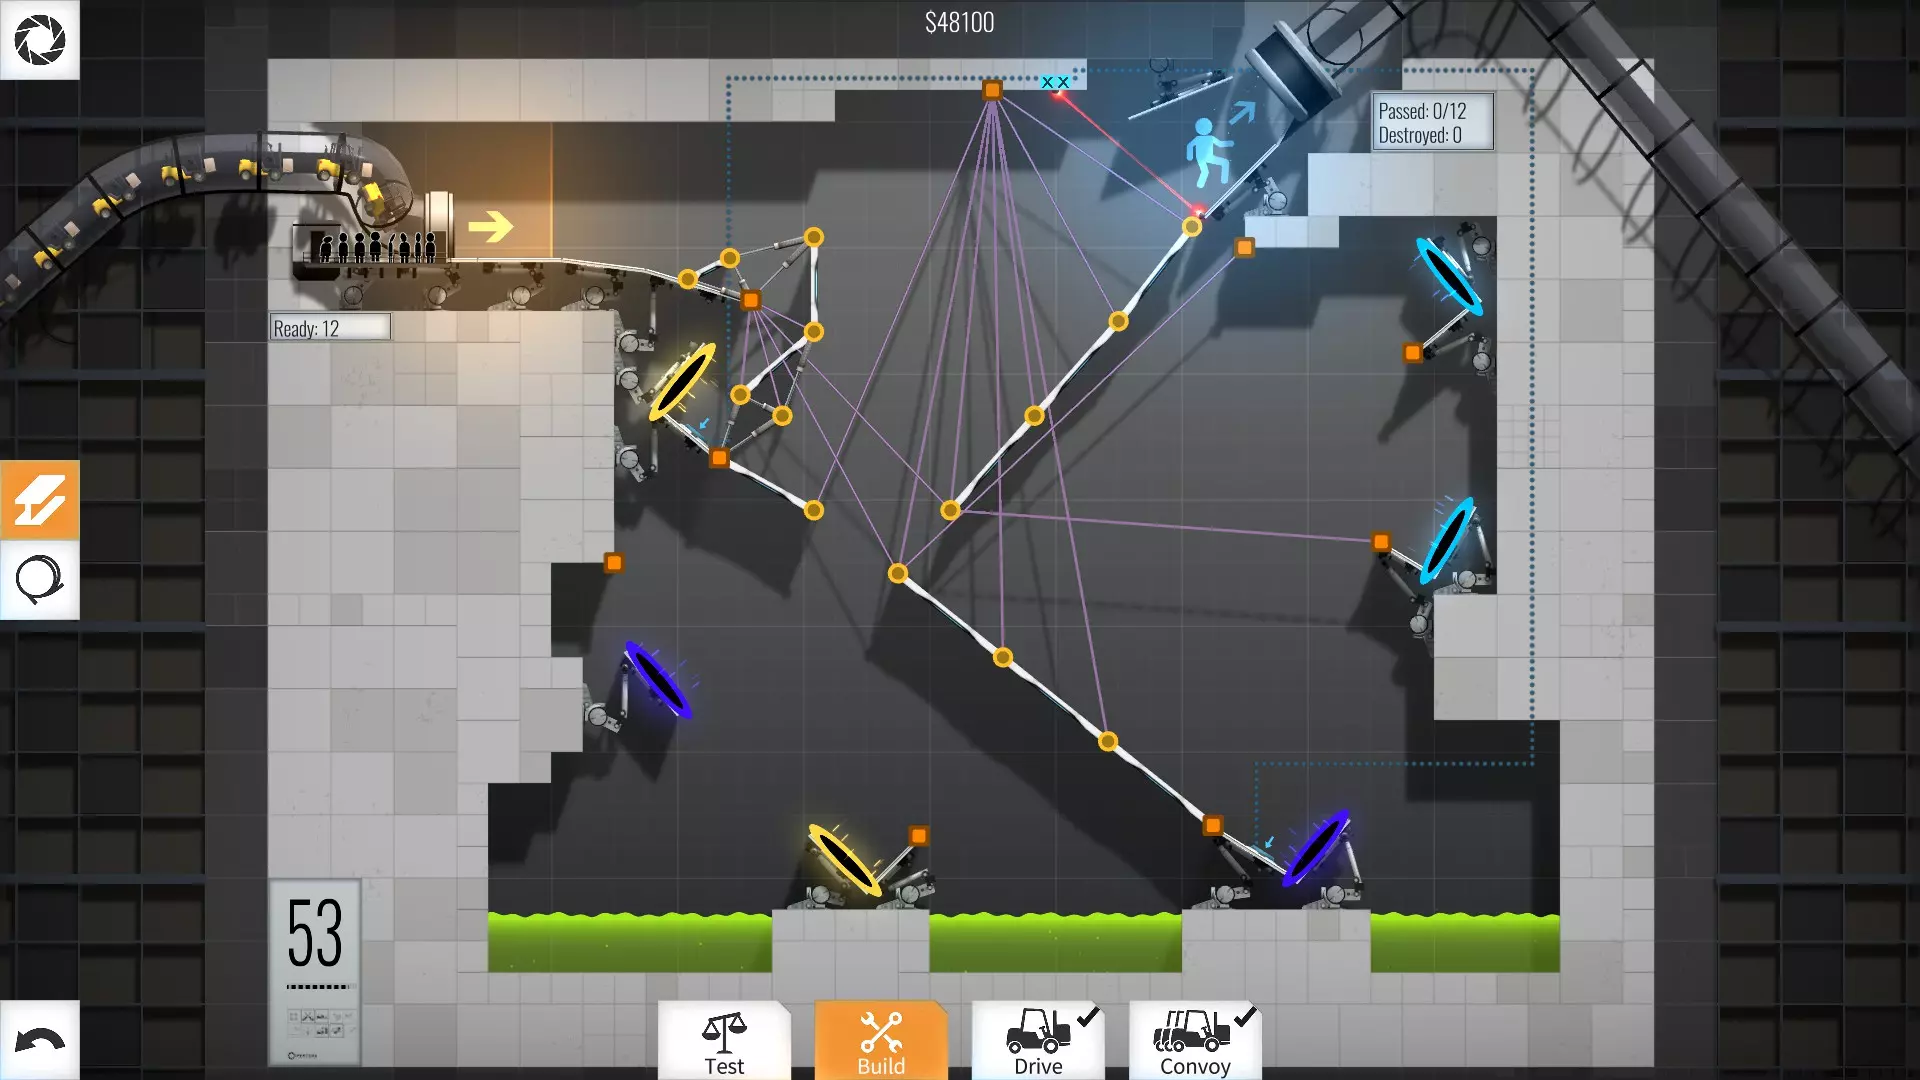
第53关 - 48100美元 设置一个减速带,巧妙地让车辆减速并落到按钮上,从而绕过黄色和浅蓝色传送门。
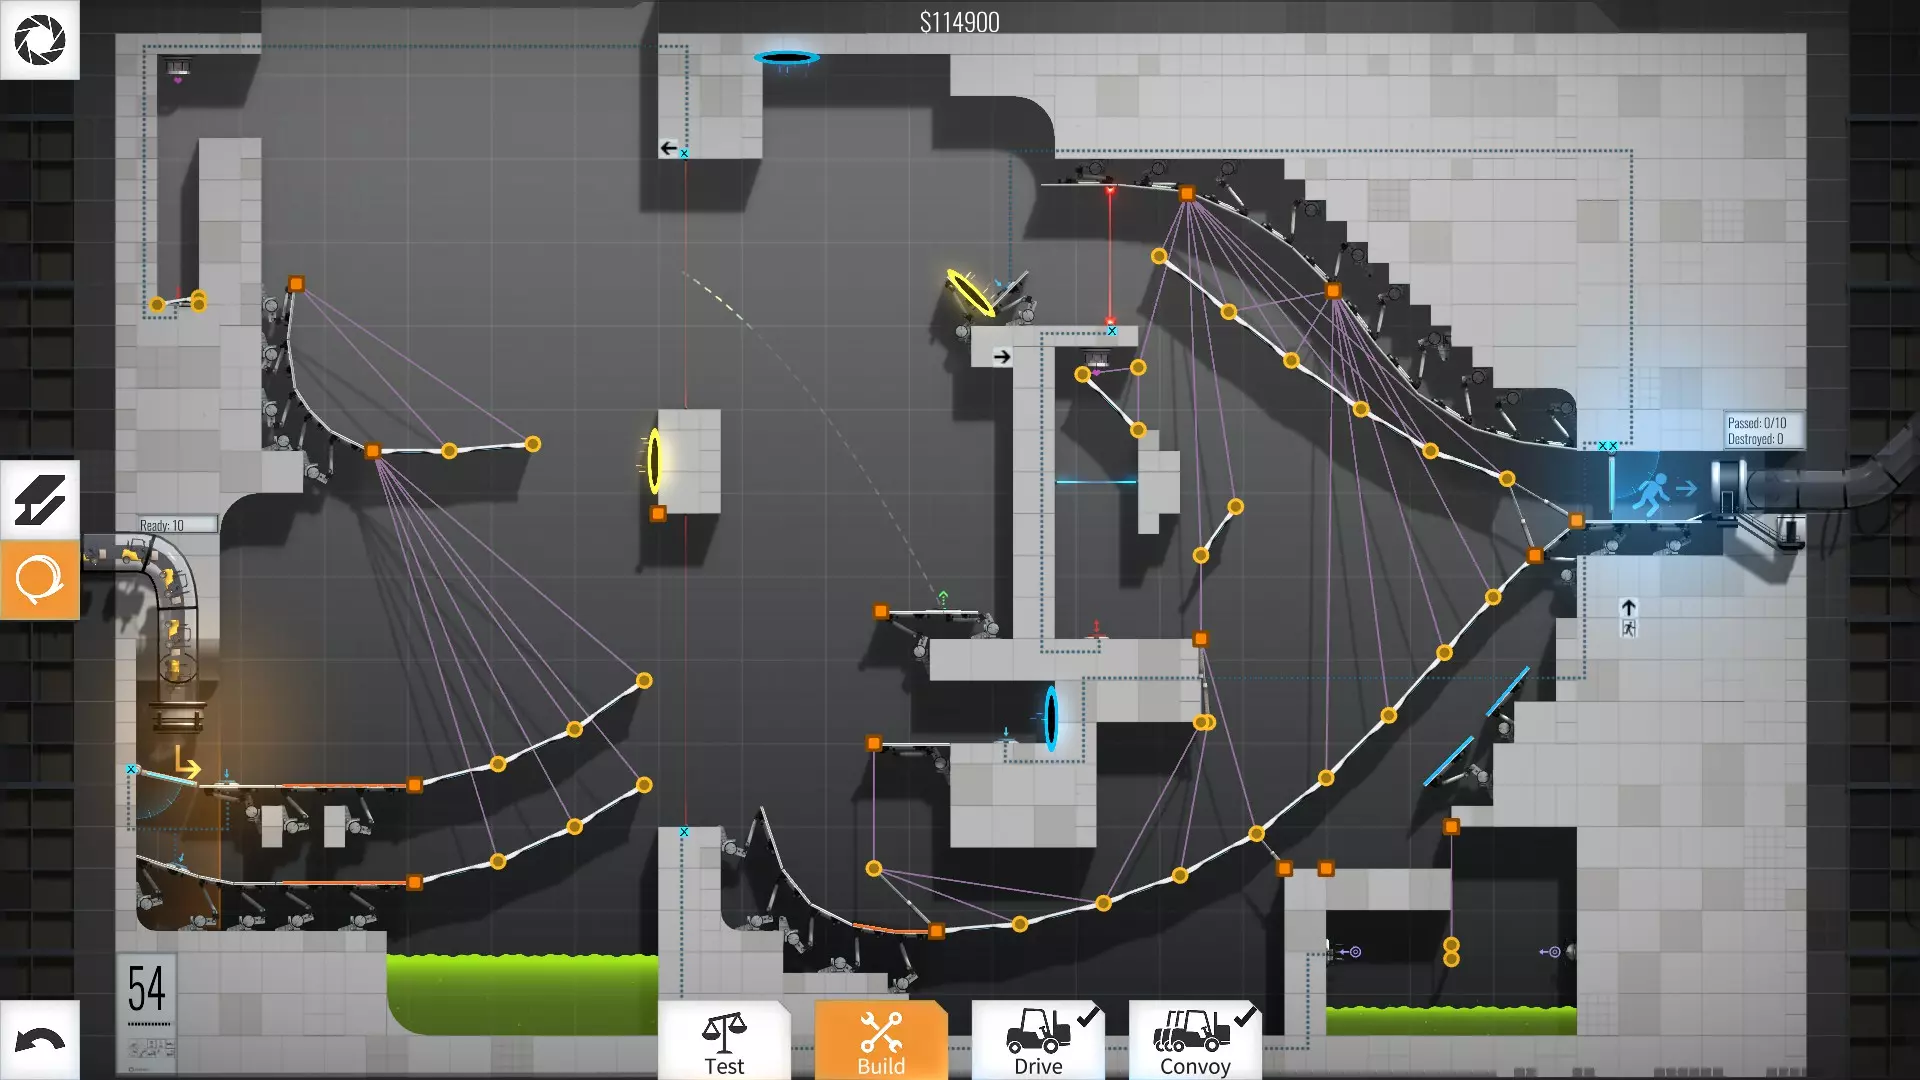
第54关 - 121550美元 正确的做法是,用一个小斜坡阻止上方的立方体触碰按钮,再用一个挂在绳子上的小道路块来改变小球的方向。从技术上讲,在这张地图中你可以绕过任意一条轨道和传送门,我建议绕过下方轨道和黄色传送门,这样能大幅降低成本(至少低于80000美元),不过具体方法还是让你自己去摸索。我用这个解法是为了展示两条轨道。
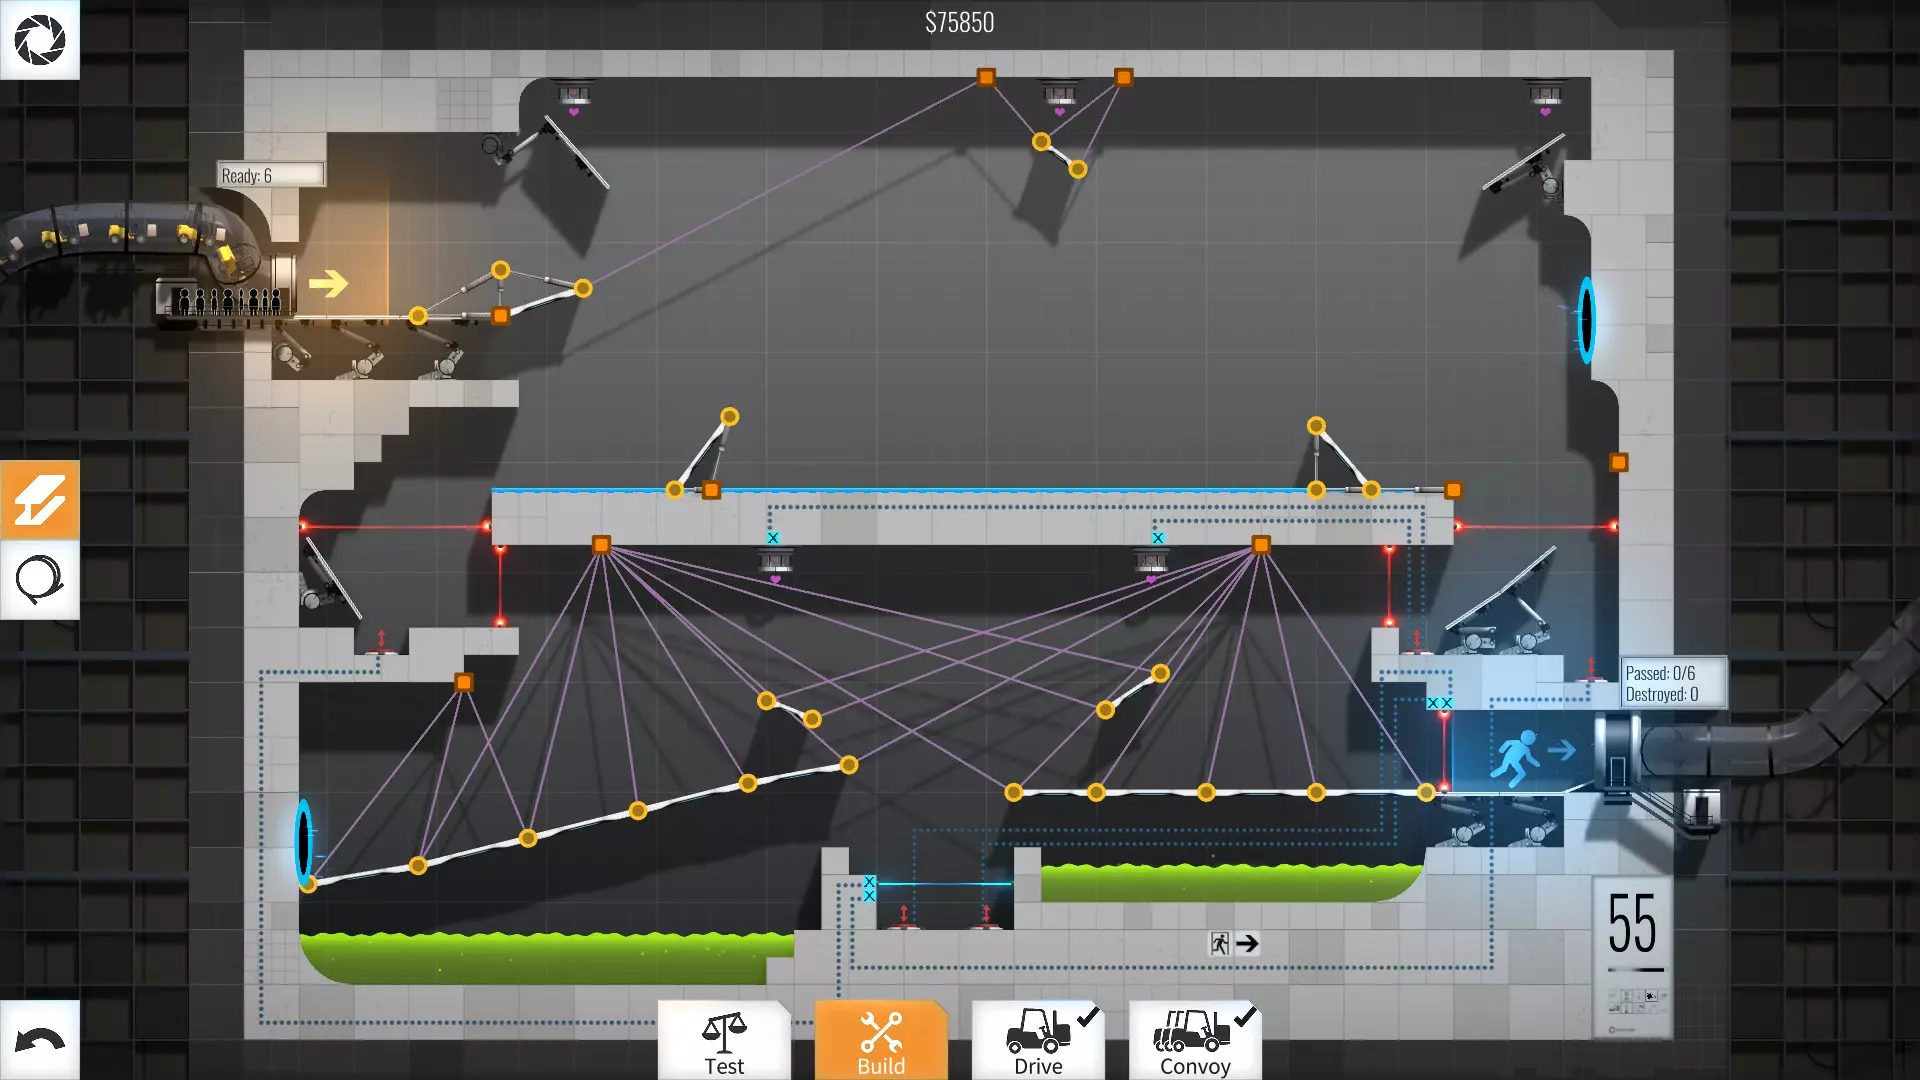
55级 - 75850美元。这一关的关键技巧是控制弹跳,让车辆能够到达传送门,除此之外就相当简单了。
56级 - 53100美元 啊,这一关……没错,正如你所见,我通过让汽车触碰按钮然后直接掉到出口来绕过传送门……这样更简单……=P

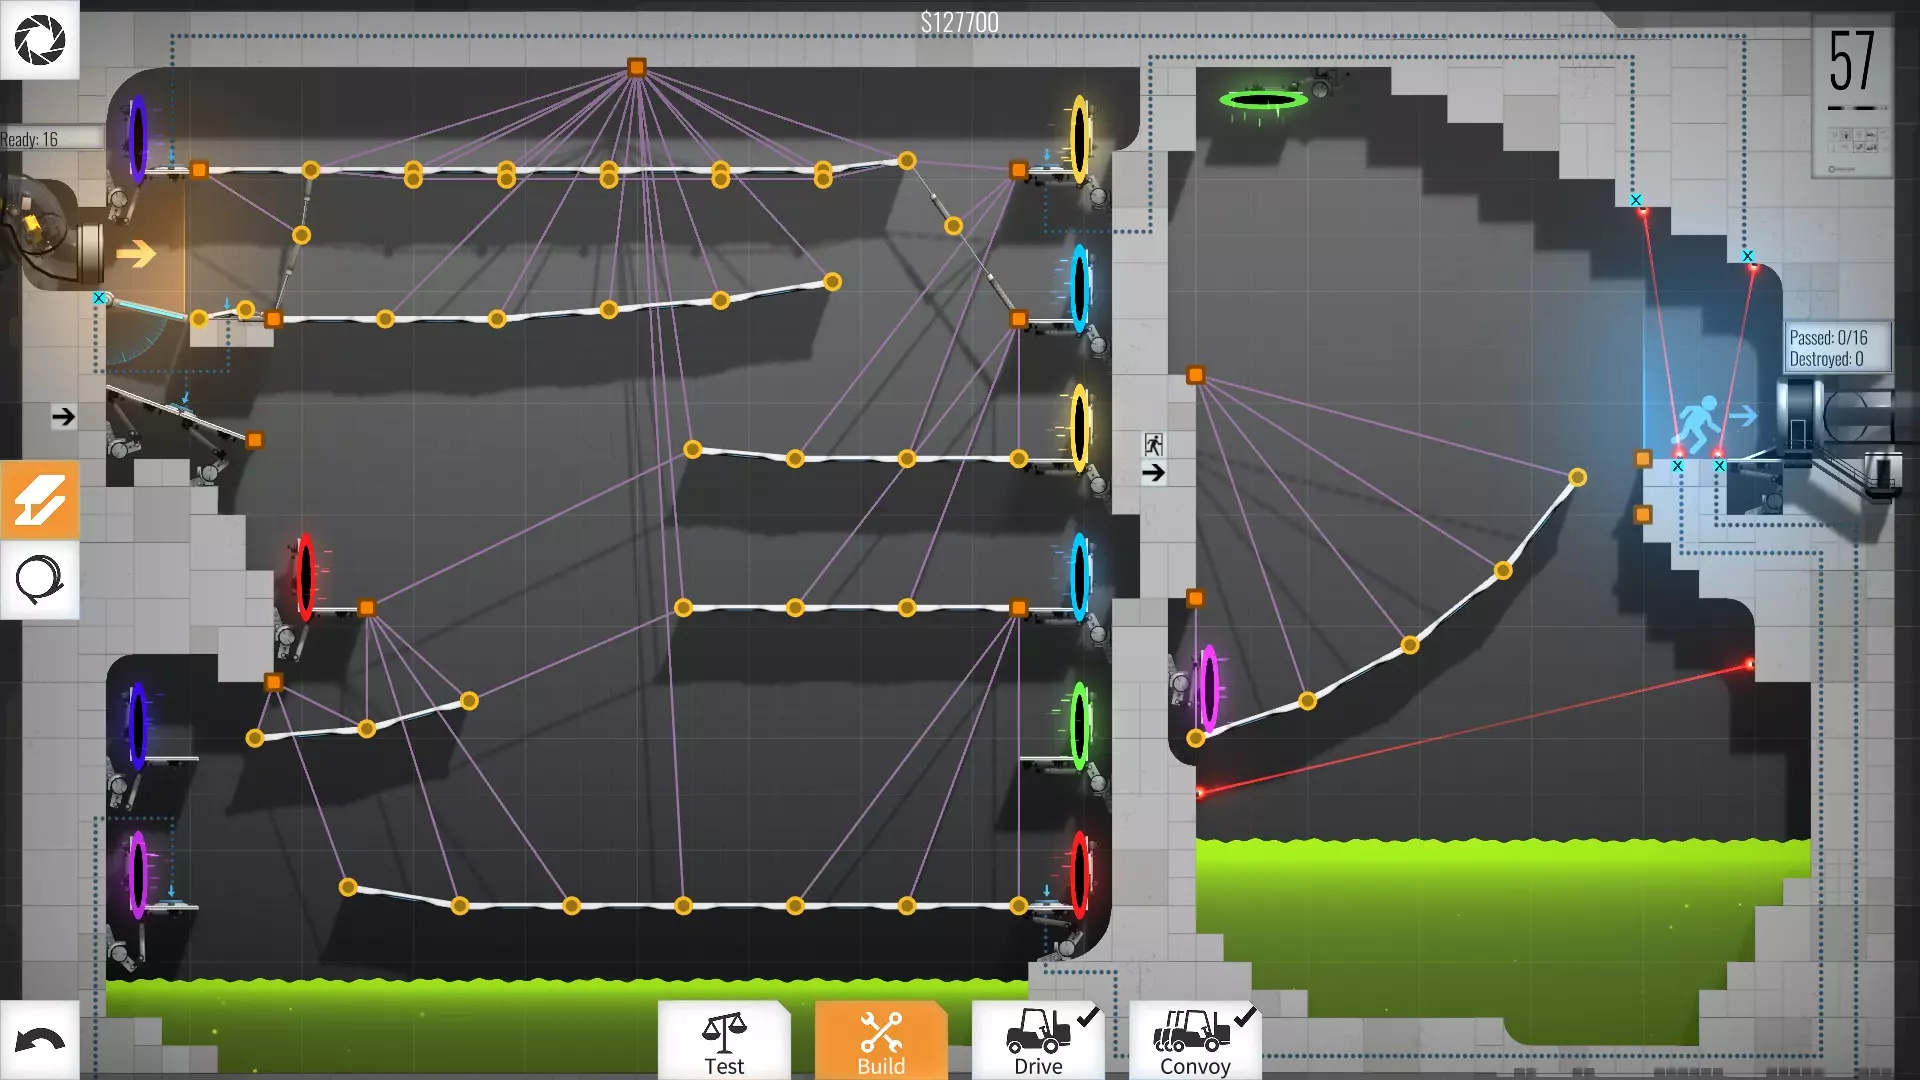
57级 - 127700美元 这次我用一个小斜坡完全绕过了下方车道,只使用了一个出口传送门。你可以选择使用绿色出口,并进行一些“智能”路径规划来稍微简化整体结构,但绿色传送门需要大量的支撑梁,而粉色出口则可以用绳索支撑,这就是我选择粉色出口的原因……不过或许值得尝试一下绿色出口……
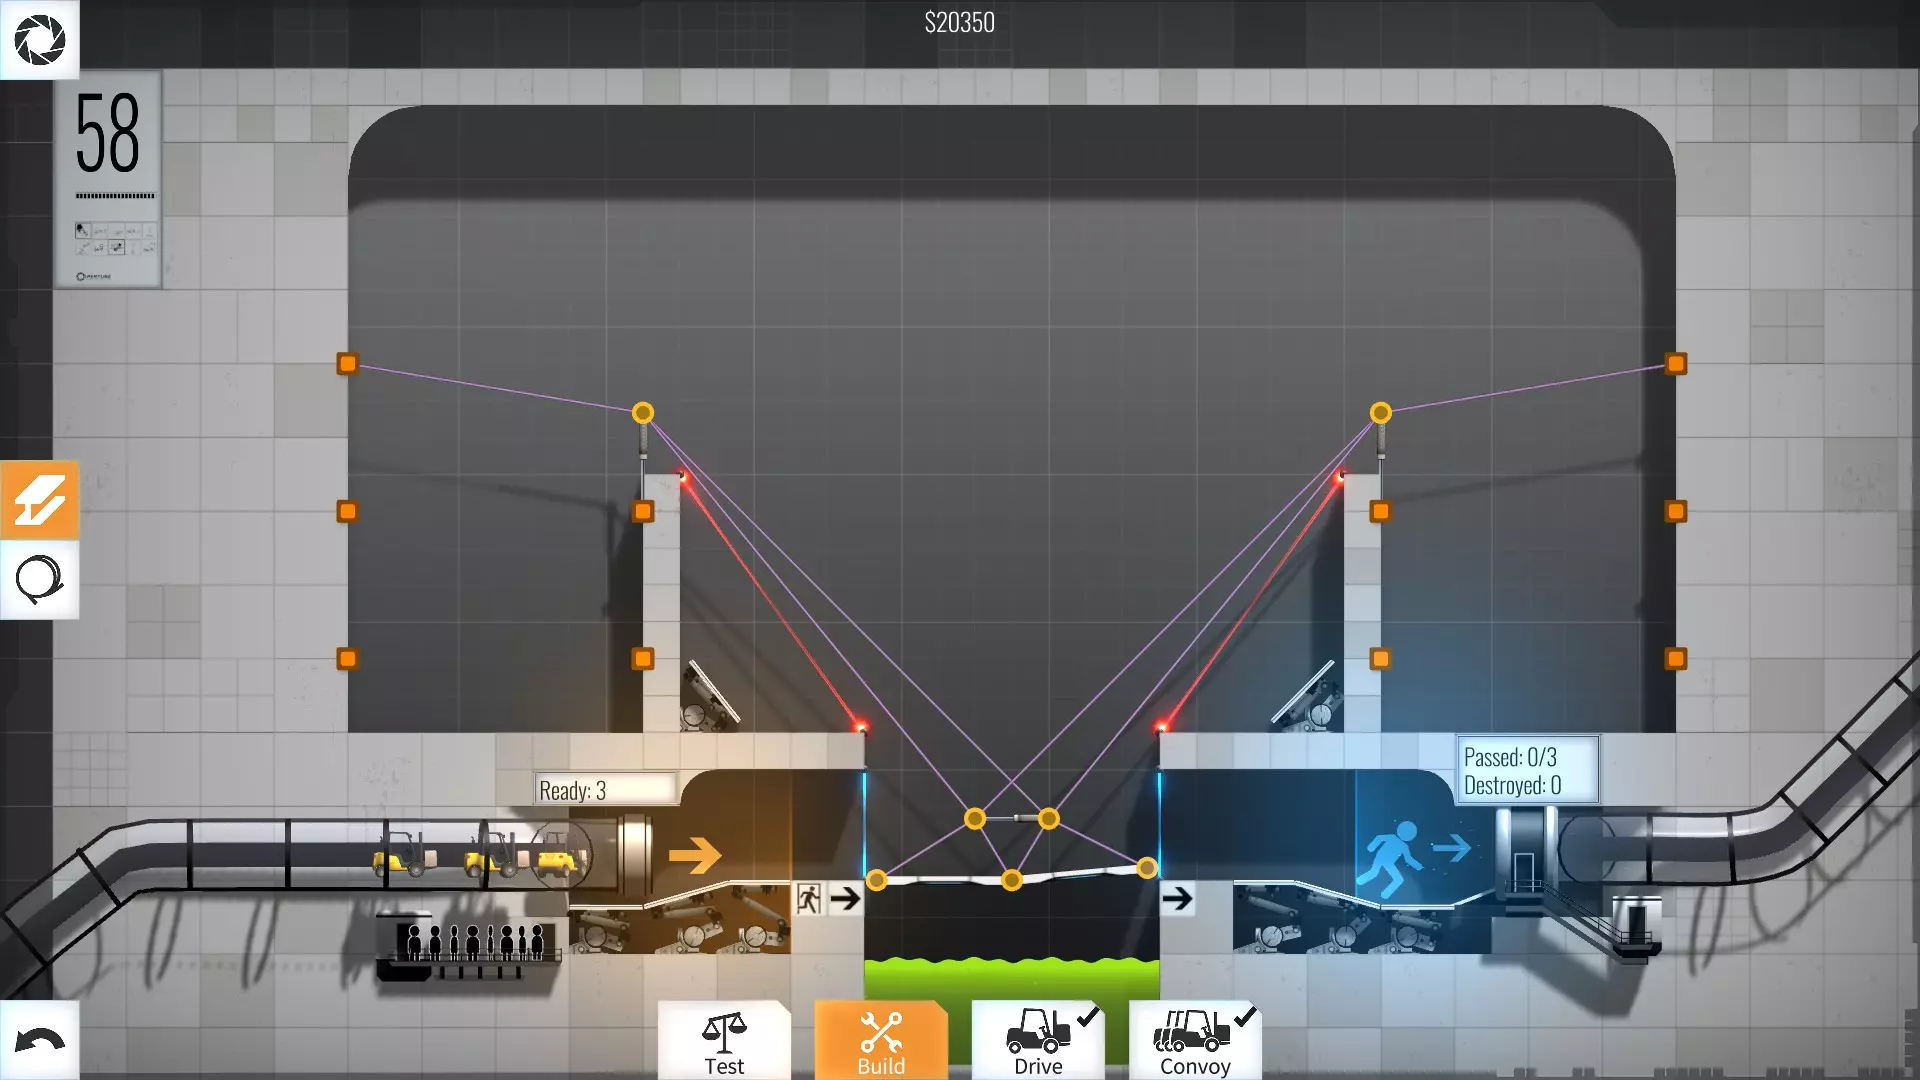
58级 - 20350美元 这个本应是“不可能”的关卡实在太简单了。很难相信这是最后几个关卡之一,但也没办法。
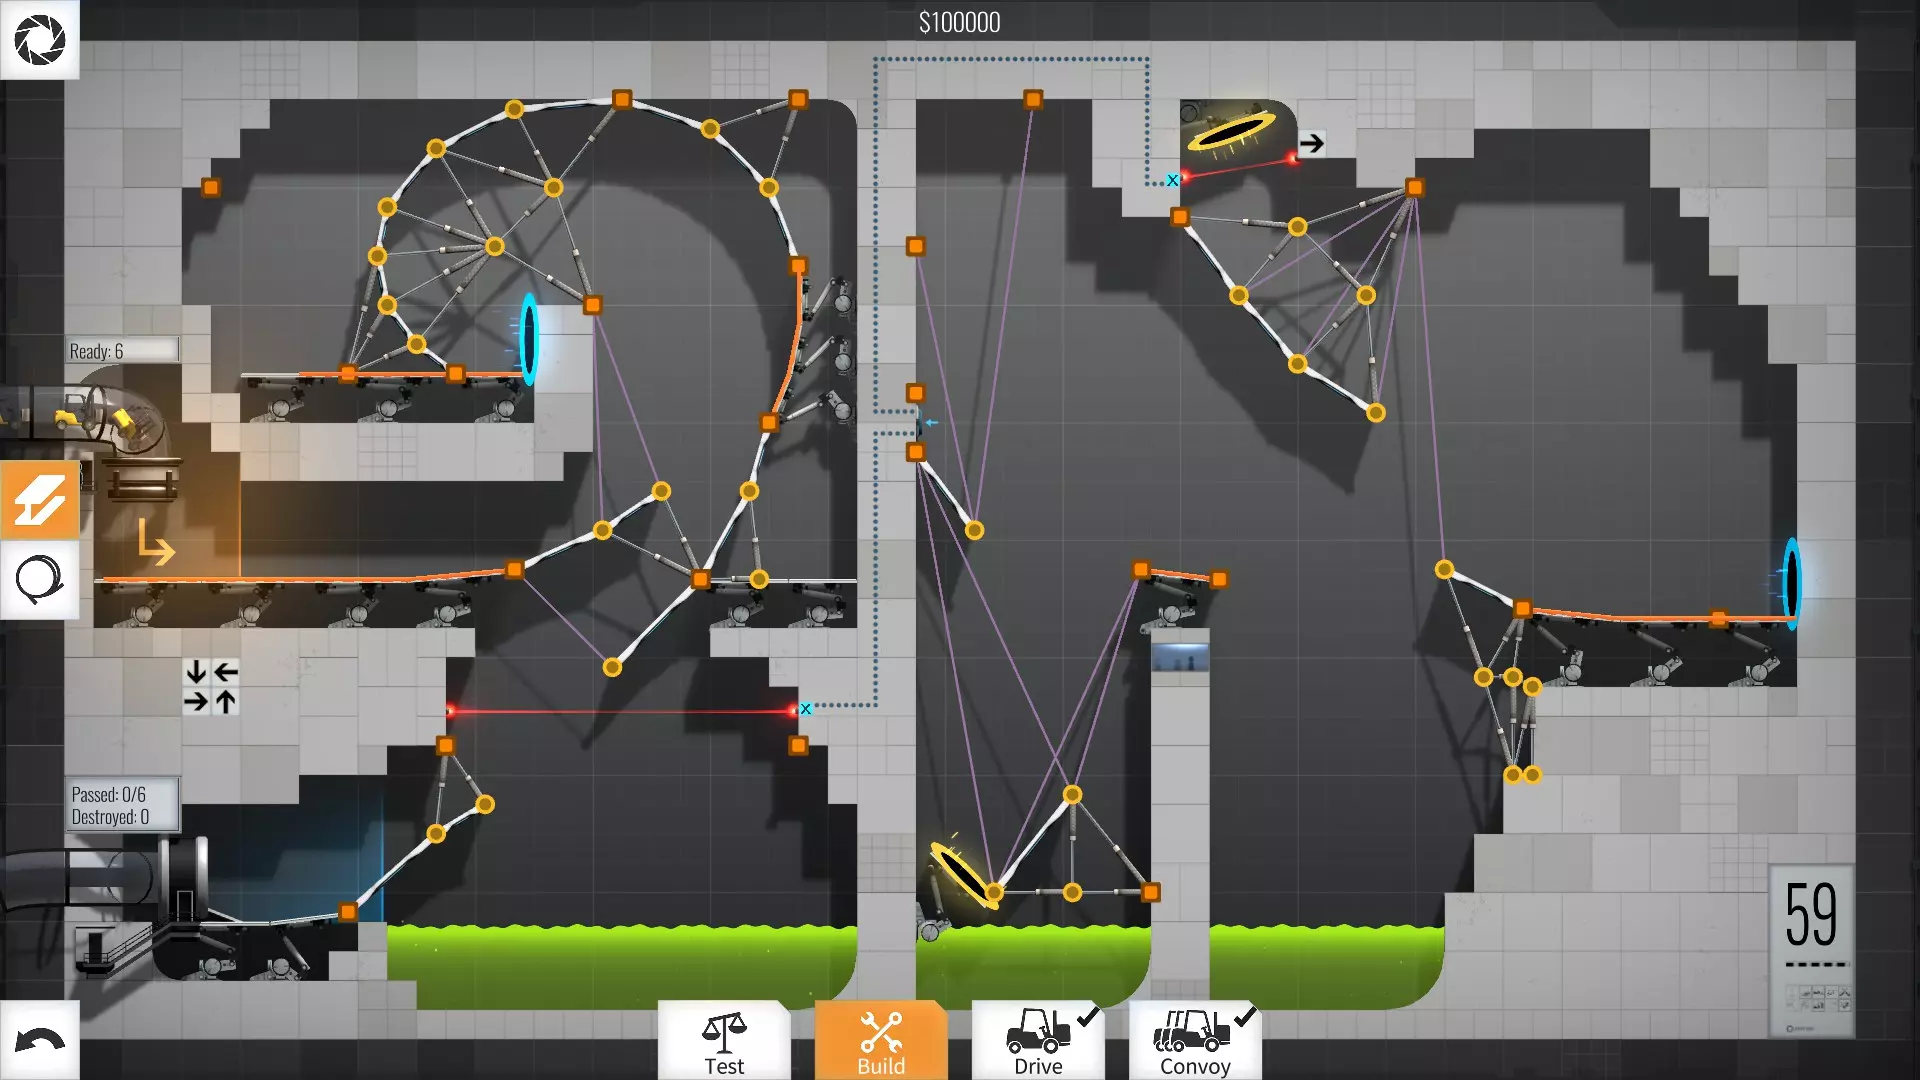
59级 - 100000美元 唉,优化这个花了好长时间,所以当我达到10万时就停下来了,这数字看起来挺整的……=P
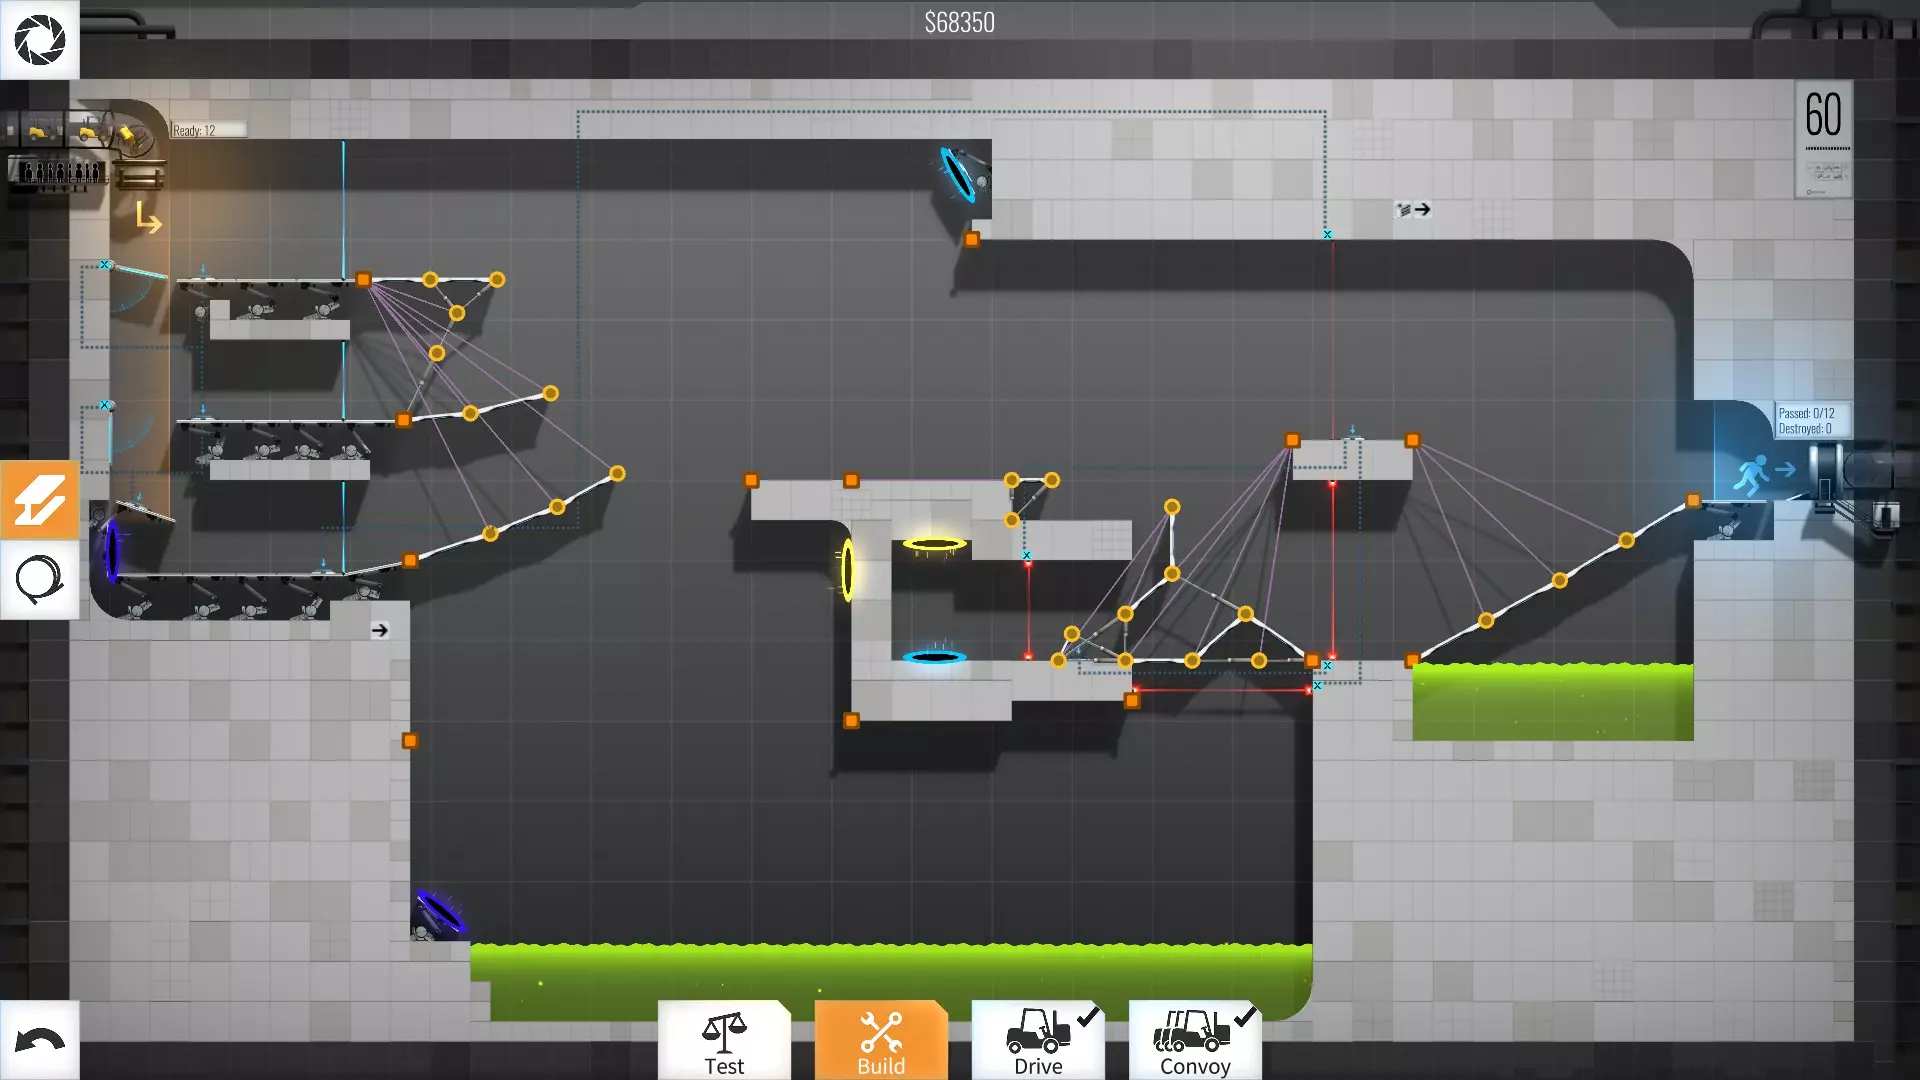
等级60 - 69750美元 这个关卡的关键技巧在于我设计的结构,它能按下按钮并绕过所有传送门……这是我在视频中唯一放大的部分,这样你就能看清它的工作原理,因为这真的很巧妙……第一辆车会撞上去,它不会损坏,但会巧妙地折叠,让后面的车能够跳过去……太酷了 =P
总结 差不多就是这些了……希望能帮到你。就像我之前说的,我相信大多数关卡都可以进一步优化,但这已经是我愿意做到的极限了……所以希望你能把这些技巧用在你的优化中,也欢迎在评论区分享你的分数……如果你超过了我就更好了 =) 我喜欢这款游戏,但有点希望它能有更多关卡,以及更难的关卡(是的,我知道有创意工坊,但我太懒了 =P)……希望他们能推出DLC之类的……总之,这是我的第一个,也可能是最后一个指南,就这样吧……好好享受! J.