换一换
换一换 


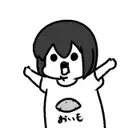

《丁卡姆》个人游戏笔记 大家好! 本指南已停止更新,但目前仍会保留,至少在收到内容过时的反馈前会一直保留。我游玩时它是一款很棒的游戏,但我已转战其他游戏,无法再提供更新和准确信息。 祝大家游戏旅途安全愉快! -----以下所有内容均已停止更新----- 本指南最初是我的个人游戏笔记。随着我在游戏内和相关社区分享并记录笔记,它逐渐丰富起来。部分信息来源于官方维基,通常维基上关于物品的细节比这里涵盖的更多。 本指南不会教你如何快速致富或速通游戏。它旨在为不使用模组、作弊或开发者模式的正常游玩流程提供参考。不过,指南末尾包含了关于作弊的说明,包括如何禁用作弊的方法。 新手玩家建议 我给新手玩家的第一个建议是按照自己的节奏享受游戏。没人能告诉你该怎么玩游戏,因为只有你自己知道什么对你来说是有趣的! 只要你没有破坏其他玩家的游戏体验,你可以用任何喜欢的方式玩。 金钱只在游戏初期比较稀缺。游戏中有很多不同的赚钱方式,但像 farming(耕种)这样的技能要到游戏后期才能带来不错的收入。根据我的经验,你通常能赚到“足够”的钱,不必非要追求赚“最多”的钱。 这款游戏比乍一看要更有深度。提升技能和购买新许可证后,你会发现更多赚钱的方法! 你还需要注意,这款游戏并非设计成让你专注于单一方式反复刷钱。例如,有些事情的收益很高,但你不能每天都做。 要经常备份存档!记住,如果发生糟糕的情况,你可以不睡觉/不存档就退出游戏——只要你没有睡觉或存档,就可以重新开始这一天! 我要分享的另一个技巧是,在完成奖励【钉子配方】的任务后,单独保存一个游戏存档作为备份。之后,当你结束一天时,通过睡觉来保存游戏,然后退出并制作游戏的备份副本。我把它命名为“全新开始”,我用它来实现“重新开始”的需求。这样,我就能带着工具、武器和一些钱(通常我会在背包里装满梭子鱼,或者收集一堆东西第二天卖给约翰),准备好进行合作模式或其他任何有趣的活动。 游戏选项/设置 你可能需要根据自己的喜好调整游戏设置。我在台式电脑上玩,发现以下设置对我来说效果最好。 游戏内打开这些设置的方法: 按Esc键 > 选项 > 设置。 标签1 - 显示 在第一个标签“显示”下,我发现我的电脑可以将“区块视野距离”调到最高8级,这样我就能看得尽可能远。窗口模式下的全屏并非设置选项,但你可以通过取消勾选全屏选项,然后按下Alt+Enter键来最大化屏幕并“隐藏”顶部窗口标题栏。 第二个标签页 - 声音 在第二个标签页“声音”中,我有时会调低音乐音量,以便在想听歌时播放自己的音乐。我通常会将“效果音量”调大,这样就能听到重要的提示音,比如附近有雷蛋时! 第三个标签页 - 相机设置 在第三个标签页“相机设置”中,我必须调整这里的设置,使其更符合我在其他游戏中的使用习惯。我在此处仅开启了“反转Y轴”和“鼠标始终移动相机”这两个选项。
第四标签页 - 游戏玩法 在第四个标签页中,我会将文本速度调至【超级】。虽然我不是速读高手,但正常速度对我来说太慢了。 “小地图始终朝北”这个选项对部分玩家来说是必备的,但我其实喜欢将其关闭。 提示:如果在游戏中导航遇到困难,可以在地图上设置一个标记,然后点击该标记,小地图上就会显示一个指示器,你可以跟着它找到目标! 选项 在单人模式下可以暂停游戏。 暂停功能可通过按【ESC】键打开日志,然后点击右上角的【选项】标签页来访问。
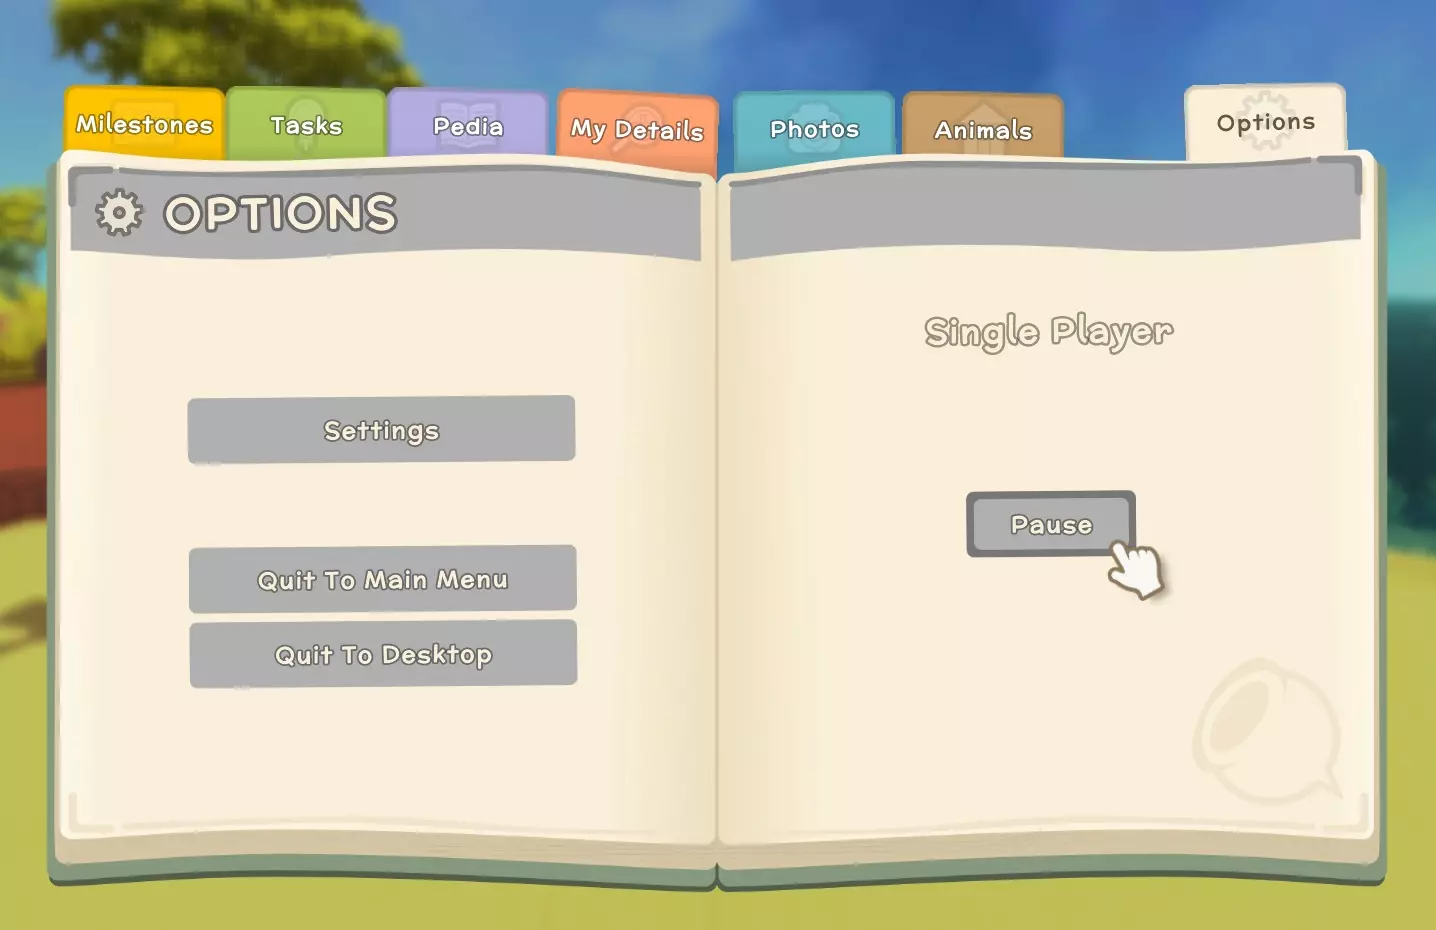
When you create a new game, pause is not available until you have slept the first day, then quit to menu and reloaded your save. Pause is only accessible through the journal, there is no hotkey for it currently. Getting Started This section has moved to the official wiki[dinkum.fandom.com]. It is also too long to live here anymore, ha-ha! Gameplay FAQs Hold shift + click to stack items from one window into another. Queen bees have a higher chance of dropping from Hardwood trees (FYI Hardwood trees drop Blackwood seeds and are not to be confused with pine trees). Pre-requisites for Jimmy (the shady visitor): rain and 1,000,000 in the bank. He will then show up on his boat sometimes (20% chance) when it rains, and you'll see a question mark on the map marking his spot. Pre-requisites for Ted: Hunting license level 2 and may appear on Saturday, Sunday or Monday. Ted's location appears to be random. You can put a sprinkler on grass to make long grass grow where you want. (Vombats eat long grass!) It is easier to keep animals in traps by lowering their health first. Most objects will stay in game for a long time, even if left on the ground, such as thunder eggs. Objects that are sold by weight at John's store, such as thunder eggs, are re-rolled each day. If you have a large pile of items, this won't change the value much overall, but it might be worth re-rolling something if it's much lower than the average. Bugs and fish cannot be put in chests, but you put them on you hotbar, highlight them and click the ground to place them in container. It appears that things, such as bugs, will sometimes stop spawning after a couple days. If you notice this, saving the game, exit and reload should reset them for you. You can place building deeds where you want them to be built. A little bit into the game you get the option to move buildings as well. All buildings can be moved for a fee (your starting tent must be upgraded before it can be moved). Shiny stones can be used in the Grinder bought from John’s Goods after it has been built. Do things regen/respawn? Rocks, trees, barrels and ore rocks regenerate over time but not in the same place. Take note of resource nodes and biomes and visit back after some time has passed. NPC spawn generators do not respawn, so keep this in mind before destroying them (bird nests, etc.). There's a bug with Franklyn currently, if you ask him to build you something and give him the materials and money, he disappears sometimes. It is suggested that you wait before getting him to do anything until he has settles in permanently into your village. The "camera" is an in-game item you can use to take photos, often used for completing bulletin board quests. You will find it in the museum after you have donated a few of bugs/fish. You will spend over 100,000 certificate points to unlock all the license available, so don't sleep on your dailies, they add up over time! The commerce license uses the following % to calculate the value of items: sell value / 10 * level of the commerce licence. Thunder eggs will randomly appear by you sometimes after a lightning strike, when it is raining. It's big, brown, electrified and can only be carried overhead. More than one can appear in a day. if the thunder egg sells for less than 105k, break it open and hold onto the opals until you get at least 50 and then sell them to Jimmy in bulk for big money (much more than John would give you for it). By that time you should have Commerce License 3 so you'll get max value for them all. Jimmy pays 1.5x the normal price John offers. Sell bulk (stack of 50+) to Jimmy (he likes meat, especially cooked meat, high quality cheese, opals, etc. (definitely worth saving for JImmy)), sell non-bulk (fish, bugs, etc.) to Ted if available, or John. Bestiary See: wiki entry[dinkum.fandom.com] Below is a list of the current beasts. Name Habitat Temperament Alpha Bush Devil Pine Forest/Cold Biome Aggressive Alpha Croco Plains/Billabongs Aggressive Alpha Jackaroo Bushland Aggressive Baby Chook N/A Passive Bug All but Ocean Passive Bush Devil Pine Forest/Cold Biome Aggressive Cave Bat Deep Mines Aggressive Chook N/A Passive Cockatoo All but Deep Mine Passive Croco Rivers, Billabong, Mangrove Aggressive Diggo Desert Neutral Fish Rivers, Ocean, Billabong Passive Glowing Croco Deep Mines Aggressive Jackaroo Bushlands, Plains Passive Jellyfish Ocean Aggressive Kidna Desert Neutral Magpie All but Deep Mine Passive Mu Plains Passive Pet Diggo Pleep N/A Passive Scrub Turkey Plains, Tropics Passive Shark Ocean Aggressive Toad Only when raining Passive Underwater Creatures Rivers, Ocean, Billabong Passive Vombat N/A Passive Vombat Joey N/A Passive Wary Mu Plains, Tropics Aggressive Question: What is up with these animals?Answer: Dinkum offers a charming twist on some animals you may already be familiar with! Bush Devil = fire spitting Tazmanian Devil Chook = Chicken Croco = Crocodile Diggo = Dingo Jackaroo = Kangaroo Kidna = Echidna Mu = Emu Pleep = Platypus + Sheep hybrid Vombat = Wombat Wary Mu = Cassowary Books See: wiki category Books[dinkum.fandom.com] Brewing See: wiki entry Keg[dinkum.fandom.com] See: wiki category Brewing[dinkum.fandom.com] Bug Catching See: wiki entry Bug Catching[dinkum.fandom.com] Bugs See: wiki entry Bugs[dinkum.fandom.com] Buildings & People Let's go over some information about some of these buildings and their purpose. Building Sizes Listed below are the spaces of blocks used by each building. Building Size Open Hours Closed Base tent / Town Hall 5x5 7am - 4pm Bulletin Board 2x0.5 always Clover's Threadspace[dinkum.fandom.com] 4x5 9am - 5pm Tuesday Deep Mine 3x3 always Franklyn's Lab[dinkum.fandom.com] 4x4 Irwin's Barn[dinkum.fandom.com] 5x4 10pm - 6pm Monday John's Goods[dinkum.fandom.com] 4x5 8am - 6pm Sunday Melvin's Furniture[dinkum.fandom.com] 4x4 10am - 5pm Tuesday & Thursday Milburn's Bank[dinkum.fandom.com] 4x4 7am - 4pm Saturday & Sunday Player tent / house 5x5 always Post Office (future content) 6x5 Rayne's Greenhouse[dinkum.fandom.com] 5x4 11am - 4pm Friday Theodore's Museum[dinkum.fandom.com] 6x5 7am - 8pm Villager's House 4x4 Visitor's Site 4x4 Base Tent / Town HallThe base tent is your headquarters or base of operations. During the early phase of the game, you'll use it for extra storage (the Travel Bag has 24 slots), to craft, buy licenses, pick up an extra sleeping bag, and pay off debts. The Town Hall is the upgraded version. Any items in the Travel Bag can also be accessed on all multiplayer worlds with your character. However, you can only access items that your specific character has deposited, if you have 2 characters they will each have their own separate travel bag inventory. Clover's ThreadspaceIt is a clothing store. The catalog will allow you to purchase anything (as far as I know) that you have acquired in the past. Clothing that is randomly on display in the store is sold at a "discounted" price. For a full list of clothing, click here[dinkum.fandom.com]. Franklyn's LabFranklyn loves discs! The more discs you turn in, the more commissions will be available. He'll move in after you donate 22 discs, or some combination of discs and dinks that equal 190k+ dinks. Commissions 0 Discs: Bomb, Repair Table, Weather Station 1 Disc: Lawn Mower 3 Discs: Jet Ski, Motor Bike 7 Discs: Gacha Machine, Quarry 10 Discs: Charging Station, Compactor 13 Discs: Chainsaw, Jack Hammer 20 Discs: Tractor 28 Discs: Helicopter Recipes (randomly available): Palm Wood Bench Repair Kit Irwin's BarnThe barn is where you go for all your animal goods, including a feeder, milk bucket, chicken whistle, vombat whistle, shears, and animal feed. Once the barn is built, you can buy Vombats and Pleeps, only Chooks are available beforehand. John's GoodsJohn sells various tools and useful items. Toward the beginning of the game, you'll be visiting his store a lot to replace worn out tools and to sell everything you don't want. Two things you definitely want besides all the hand tools, are the table saw and the stone grinder. Some players swear by the metal detector being one of their favorite early game activities to make money. Personally, I like to save everything I dig up instead of selling it, everything you dig up is very useful in the mid to late game. There is also an argument for acquiring the materials for the tele towers and tele pad as early as possible for quick transportation, it's all up to you if you want to prioritize that or not. The 'Machine Manual' will tell you what goes in each machine, but it will not list items that you don't have in your pockets or storage. When you have the money to spare I would recommend always buying the ore bar or old tech on sale, I feel it is worth the money to save time and tool on acquiring these items. I buy whichever of the two is available, each day. Melvin's FurnitureMelvin can help turn your humble abode into a fashion palace, a disco parlor, or a doll house... the stars are the limit with the selection of furniture he sells. Milburn's BankMilburn's bank offers three services currently for your hard earned Đ (dinks): Đ deposit Đ withdrawal Đ conversion to permit points. (500 Đ per permit point) Dinks in the bank can be converted to permit points. Dinks that are deposited and kept at the bank will gain interest over time, at a rate of 0.071% per day. Player House / TentThis is where you live. The tent is pretty humble and the player house has a lot of options for decoration and can be customized in appearance both inside and out. You can place furniture and objects in both, though there's not much space to do so in the tent. There's no need or benefit to sleep in your tent or house currently. Post Office (future content) Rayne's GreenhouseRayne will sell you seeds, a watering can and a hoe. You can also obtain a 'Plant Book' from Rayne, which will tell how long it will take for the plant to mature. Theodore's Museum The museum displays all the different types of bugs and fish you have donated to Theodore. Your progress is displayed here by two panels near the entrance. As you progress, you will unlock things available for purchase. One of those is a camera, which can be used to complete bulletin board "tasks" where you are asked to photograph a subject(s). There are also two books, a fish book and a bug book, which become available for purchase once you have a total of 45 collections donated. The available book for purchase changes each day at random, so getting both books takes 2 or more days. In order to "open" or use a book, put it on your hot bar, equip it, then hold down the left mouse button to keep the book open. Critters See: wiki entry Critters[dinkum.fandom.com] Deep Mine To start, I just want to warn new players who have never been down to the mine and don't know what to expect: don't rush to go into the mine, especially if you are solo. There is literally no reason to go down there until you can't get enough ore in the outside world. Just promise me you won't go down there alone with tin weapons/tools! Ha-ha. It costs 25k to buy a Mining Day Pass, and if you die, you respawn in town unless you are with friend who can revive you. When you are just getting familiar with the mines, 25k might not seem worth it if you don't know what you're doing down there. But with the help of this guide, you can not only make your trip worth it but potentially come back with some valuable treasure! Don't go down to the mines with tin tools and weapons. Iron is obviously the best but copper can get the job done if need be. Don't know how to get iron outside the mines? Mine the big rocks on the ground (the clusters taking up multiple spaces). You do not need to kill all the mobs if you don't want to, if you are able to sneak by or run passed them and take cover in the treasure rooms -- they shouldn't follow you into the treasure rooms but there is also a mob or two inside the treasure rooms. Keep in mind that rubies and fossils need to be carried over head back to the elevator room, unless you have another way to transport them back to the mine, and you may end up in combat carrying these back to the elevator. Fortunately, mobs don't respawn as far as I know, so if you've cleared a path you should be safe taking loot back to the elevator. Bats are relatively easy kills if you jump and then swing a spear, or use a scythe, it strikes in a 3-block arc in front of you instead of a single poke from the spear. Bush-devils you can kite them until they spit fire, attack them while they are spitting fireballs. Use a flaming bat if you have it, fire hurts them, even their own fireballs will hurt other bush-devils. Crocs can be trickier to kill, you just need to dodge/joust their snapping jaw attacks. If you get more than one mob at a time, it may be helpful to know that you can get bush devils and crocs to fight each other sometimes, and then finish the last one off. Even if they don't change targets onto each other, their attacks will still hit the other one. You will want 2 old keys for each treasure room. You can identify treasure rooms as grey'ish white circles on the map. Treasure chests can be picked up once it empty and/or used for storage (note that chests/boxes cannot be placed in the elevator though). There are often mobs in the treasure room, and you will need to deal with those in one way or another while trying to loot chests. For lighting in the mine, there are several different light sources available to help you out: Candle hat, obtained through RNG in the Deep Mine, Threadspace, the recycle bin, or as a random reward for doing a villager's chat task. Lots of players prefer this one since it doesn't have to be re-charged and it lights up the area much better than the miner's helmet. Miner's helmet, obtained through RNG in the Deep Mine, Threadspace, the recycle bin, or as a random reward for doing a villager's chat task. The mining hat has a timer and must be recharged periodically at a charging station (a reward from Franklyn). Torches - bought from John's Store (these are not the same as the torches you can craft). These are helpful to light up the area when you are fighting, drop them on the floor when you swap to your weapons, since you can't hold a weapon and a torch at the same time. Glowing mushrooms can be used for light as a last resort. They aren't great but they can be better than nothing if you run out of torches. What to Bring and Why Wattle Brew 2 jackhammers (or a small handful of pickaxes if don't have a jackhammer). Alternatively, you could bring a charging station but keep in mind that it takes 12-16 hours to charge. If you don't have a jackhammer yet, bring a pickaxe - iron is best, copper will get the job done. Old keys (it takes 2 to get to the treasure in each treasure room). food for health and stamina. Candle hat (or miner hat from John's store if you don't have the candle hat yet). Store bought torches; a dozen should be enough. If you are really bad at navigating map directions, you can bring a couple hundred crafted wooden torches and just throw them on the ground so you can follow a trail back to the elevator. Otherwise, it should be easy enough to find your way back by creating a waypoint on the map for the elevator, and select the waypoint to 'activate' it, and it will highlight its direction for you on the minimap (this is good to do as soon as you get down to the mines). a weapon to kill stuff (usually all you need to kill is the mobs in treasure room, the mobs outside don't follow you in currently). traps can be worth bringing to take out wounded enemies or give you time to fight off another mob on its own. You can drop an Animal Collection Point in the deep mine if you wish. a campfire IF you want to kill stuff and cook food down there. If so, consider bringing mangrove sticks as well: 'Meat on a Stick' is easy to cook and useful if you run out of food. You may also want to consider placing two storage boxes outside the entrance to the Deep Mines -- one to unload before you go in (everything including dinks!) and another box to load supplies from taking only what you need. Alternatively, you can put your money in the bank. Remember, if you pass out in the mines, you lose 10% of whatever money you are carrying, and take a big durability hit to your tools and weapons. Take advantage of extra space by filling up the elevator room with extra trapped animals and large objects and bring them all up at once when you return to the surface. While you are down there, you may also come across car wrecks or cars poking out of the ground -- you can mine these for tech! I should point out that not every run through the mines will make you rich. The real money-making items are stuff like gliders, and other goodies from the chest. Yes, rubies and trapping will recoup your money and then some for the mining day pass, but the random loot from treasure chests is what has the potential to make you big bucks! It is possible to ride the motorbike in the mines, and very useful, but remember that if you pass out down there in single player mode, you will lose it, and anything else that's not in your inventory. So be careful if you do or leave the bike at home on your first visit or two.
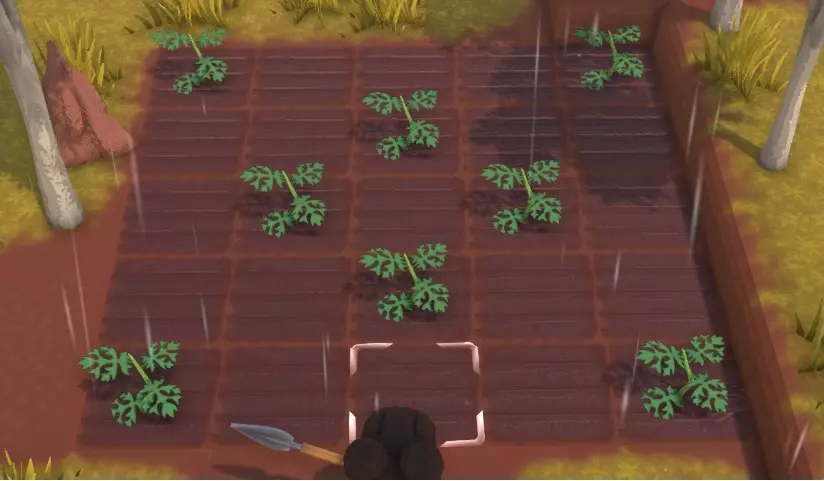
Farm Animals & Pets Please note that there are a couple bugs causing pets to sometimes walk through fenced areas. Fixes are planned to address this in the next major update. Hopefully this will fix most of the issues players are experiencing with 'escaping pets'. When naming your pets, pet names can be 1 to 16 characters in length. Chook: similar to chickens, requires a bird coop for housing and a feeder to eat. Produces eggs to use by cooking or selling. Requires Handling Licence Level 1 Vombat: similar to cows, requires an animal stall to for housing and a feeder to eat. Produces milk when they are old enough. Collecting milk requires a milk bucket which can be purchased from Irwin. Requires Handling Licence Level 2 Pleep: are a hybrid of sheep and platypus. Will eat tall grass for food and will sometimes ignore pet food if there is grass nearby. Produces wool which can be turned into clothes and sold at John's shop. Collecting wool requires sheers which can be purchased from Irwin. Requires Handling Licence Level 3 Diggo: diggo can be found scattered throughout the island, but they can also be made a pet by placing a collar on one. You can find a diggo collar in the mines. Petting the diggo toggles the commands to 'stay' and 'follow'. To get it to stay, pet it. To turn off stay, simply pet it again. You can increase hearts with your pet diggo by feeding it meat and petting it. Diggo currently do not have their own shelter and will not use the others. Mu: there is a saddle that can be randomly found in the deep mine as treasure. This will allow you to ride a mu around. To use the saddle, first put it on your hotbar. Walk up to the mu and press the corresponding hotbar key, then right click the mu to "drive." Press 'E' to stop driving. Use the diggo collar in similar fashion, and you get the option to "tame" it. Farm animals can be kept safe by surrounding their living space with fences. The fences can be a little buggy, so keep the entire fence all on same ground level. And then either dig one block down on the inside of the fences, or bring the fences up 1 more block. This ensure that your fences are effective in keeping pets in and predators out. If your animal(s) gets out, you can press enter and click on the whistle emote to lead them back to their pen (if you are using controller, it's down pad button and then whistle emote). Whistling has a short range so you will need walk a few steps and stop, and whistle again, and give the animal time to get close before doing it all again. There is an actual Chook whistle, and Vombat whistle, that you can craft in game once you learn the recipes. The Chook whistle recipe comes from Irwin, and I am not sure about the Vombat but I imagine it comes from Irwin too. Farm Animal FAQs: Vombats and Pleeps become available after Irwin's Barn is built. You can purchase Vombat and Pleep buy purchasing them from Irwin if you have the required license and rank. Pet food can be purchased from Irwin or created in a grain mill using seeds or wheat. Playing a guitar will make nearby animals and villagers happy. Each pet needs its own den or nest to be considered 'sheltered.' If you neglect your pets, they will eventually stop producing but they shouldn't die unless something attacks them. NPC's may go into fenced areas to water plants and crops. Some players seem to think that NPC's are leaving the gate open because their pets are getting out, but this should never happen because the NPCs aren't 'mechanically' opening the gates. The game keeps them closed even though they 'appear' to open when an NPC passes through them. Farming Please note that there are a couple bugs causing pets to sometimes walk through fenced areas. Fixes are planned to address this in the next major update. Hopefully this will fix most of the issues players are experiencing with 'escaping pets'. Farming is a great skill, but you should know that it is also a relatively late blooming skill as it gets easier and pays off later on. Farming FAQs: To plant crops, you will need a hoe from Rayne and some seeds. A watering can is optional but useful. To plant trees, dig a hole with the shovel, drop the tree/bush seed into the hole using Q or the left joystick on the controller, and replace the dirt on top using your shovel. A new seedling should pop up. Water Can and Hoe: default tin tools affect 1 square, Copper 3 squares, Iron 6 squares. Tractor had 3 modes, dependent upon irrigation vehicle license: harvest, till soil, and fertilize/seed -- all done 3 blocks wide. Rayne will give you a Plant Book for free once you reach 2 full hearts (40/100 heart points). The books tells you how long the plant has to mature/produce. Animal Food Once you can grow corn, you can turn it into Dagwood and sell it to re-coop come dinks, or you can make animal feed to help cut down on food costs. If you really want to make your own animal feed, using Corn in the Grain Mill gives a better return than Wheat or Seeds (1 corn = 10 animal feed). Fertilizer Fertilizer is used to make crops grow faster. And this is good because the faster your crops grow, the faster you get their yield. At level 10 Farming, you unlock the recipe for a compost bin, which can be used to make fertilizer. You can use waste like 4 roo poo, 2 vombat poo, 8 bones, or various amounts of seashells (25, 15, 10, etc.) depending on which type you are using, to make 1 fertilizer. Seashells take 2 nights to compost whereas roo poo, bone and vombat poo compost over 1 night. Roo poo is one of the best options for fertilizer. They are not only one of the faster methods, but they are zero maintenance and don't require much space! You can easily hold a few dozen Roos in a small, fenced area. You can go as small as 4x4 (and be sure to dig 1 block down inside the fenced-in area to prevent the roos from escaping. They will need to be within the loaded chunks for them to poo, so be aware that if you venture off to the deep mines or far away, they won't produce. I would suggest placing them near an area you frequent such as by your machines and crafting area, that way you can hang out and be productive while waiting for poo. If you decide to create a large animal farm with a lot of pleeps and vombats, you may end up producing all the poo you need anyway, without needing the roos. Roo poo is a great, free alternative until you get a large animal farm in production. An additional option to consider for fertilizer, is making worm farms (bug catching 20 required), but they only take roo poo (which also comes from pleeps, strangely enough). The process for planting seeds is: Till with a hoe Fertilize with compost, level 10 farming Plant seed buy or collect Water bucket or sprinkler Crop LayoutsA player in discord who makes lovely diagrams recommended this layout for watermelons (thanks Duvinn!), which is a happy medium to maximize yield and space:
提升 farming 技能需要花费不少时间。 获取 farming 经验的途径包括: - 收获(大量经验) - 加工收获的作物(例如,将小麦磨成面粉) - 堆肥 - 浇水 将所有小麦磨成面粉后,你可以用面粉制作面包,然后将 50 个以上的面包卖给吉米,这样能赚不少钱。使用其他食谱每单位面粉能多赚一点钱,但制作面包以外的食物还需要其他食材。 可在农场使用的其他工具包括: - 筒仓每天会为其周围 8x8 方格区域内的所有料仓补充物资。 - 风车总共覆盖 26x26 方格区域。风车本身占地 2x2,向每侧延伸 12 格。目前该效果影响烧烤架、熔炉、谷物研磨机和石头研磨机。 水箱可向每侧10格范围内供水。 没有拖拉机的农场会是什么样子呢! 购买适当的灌溉车辆许可证后,拖拉机具备三项功能: 功能1:收割农作物,范围为拖拉机前方3格宽区域 功能2:耕作土壤,范围为拖拉机前方3格宽区域 功能3:为已耕作的土壤施肥,范围为拖拉机前方3格宽区域,仅当物品栏中有肥料时方可使用。与常规施肥相同,每格土壤需要1份肥料(基本上每行3份)。 稻草人 稻草人可驱赶农作物周围的鸟类。 其作用范围为15格。稻草人周围有一个5x5的“区域”。该物体被设置在鸟类会感到害怕的层级。这是“范围”对象,但有效范围还会考虑鸟类对“捕食者”的检查距离,该距离为10(就像你在水中靠近鱼时它们会逃离你一样)。 “动物不应该能够在‘围栏区域’内生成,但检查只在加载时和新的一天进行。可能存在某种形状会导致围栏检查失败。此外,游戏不将土墙视为围栏,但如果土墙与围栏相邻,即使存在高度差,也会将其视为围栏的一部分。” 非常大的围栏有时可能无法通过围栏检查。你可以通过输入debug来检查某个区域是否被围栏围住。
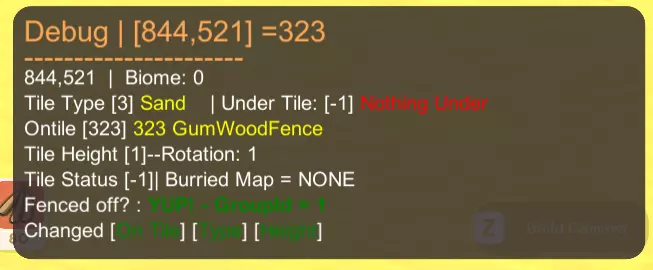
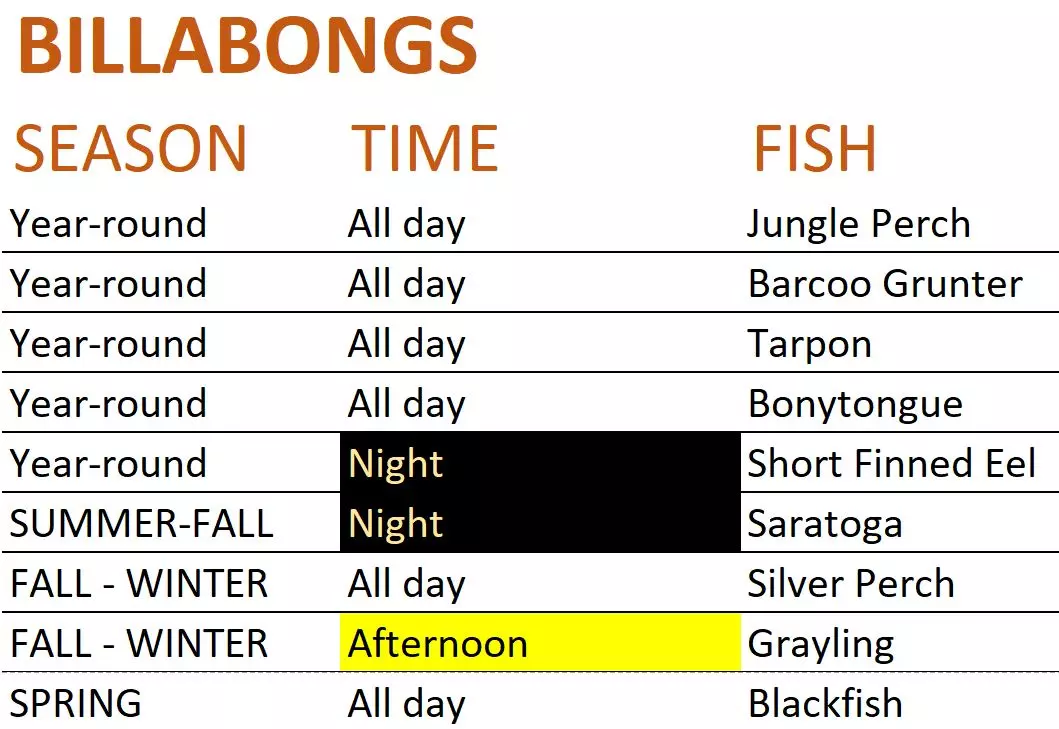
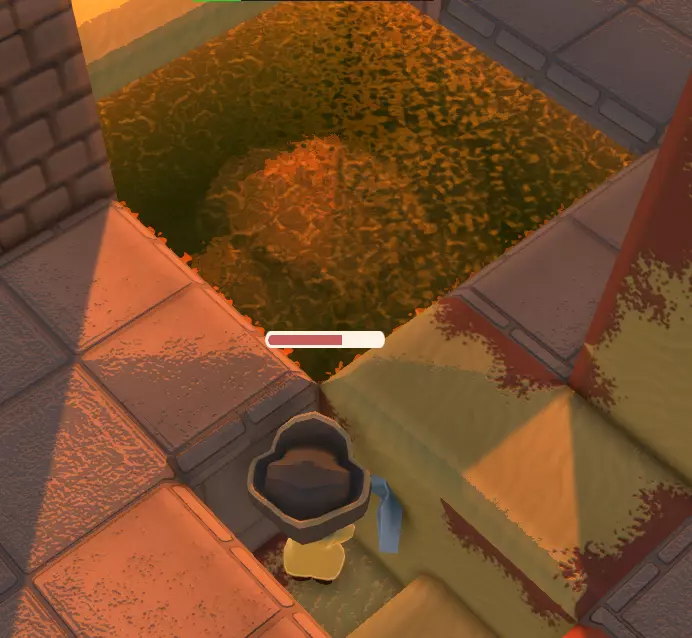
Fenced off group 1 means that tile is literally a fence. Any other number higher than 1 means that area is fenced off and the number is its "fenced off" ID. "So when the navmesh gets moved because you've move chunks there is sometimes a bug where an active animal will get "pushed" into an active navmesh area instead of de-pawning. This is why some players farm animals get out and could be why you have roos in there sometimes. -- Somewhere on your fence you might be very close to a chunks edge (that's where the pushing bug can sometimes happen)." ~ James Bendon Tenoshii adds: "Transplanting trees and flowers. It can be a great strategic move to cut down and replant the fruit trees as well as flower like bottle brush and wattle nearby your town. This is especially useful when going out on long range foraging runs to areas you don't frequent. I'd actually recommend not doing this for the trees/flowers close to your base so you can harvest them in the short-term without the waiting period that happens when you re-plant. Even though farming yields considerably more value later on in the game, having 10-50 plants next to buildings can be relatively low maintenance due to NPCs being able to water it all by themselves (depending on how many you've gotten to move in). This can help you start gaining Farming skill and the associated income or consumables early on for minimal investment." Fish See: wiki entry Fish[dinkum.fandom.com] Lists by season: Summer[dinkum.fandom.com] Autumn[dinkum.fandom.com] Winter[dinkum.fandom.com] Spring[dinkum.fandom.com] Fishing See: wiki entry Fishing[dinkum.fandom.com] Hearts & Relationships If you chat with NPC's, do requests for them and spend money at their tent, you will increase your relationship with them. Note that you need to buy items 'on display' such as Clovers clothes and Franklyn's blueprints on the back table. Buying from Clovers "catalog" or a Melvin's 'speech' menu doesn't seem to raise hearts. Franklyn may be an exception to this rule, as turning in a lot of discs seems to be all Only items which you do not own count for heart points (the items listed in the catalog or speech menu are items that you already own). Relationship "decay" due to time alone, does not currently exist. Meaning, you won't slowly lose hearts over time. However, you can lose hearts by, for example, failing to complete a chat request or giving them disliked food. As your relationship with them increases, you can have them move in to the village and hang out together on their day off. If you press escape and click on 'Pedia', then select 'People', and click on someone; you will see your relationship level with them. All you can see in game is a certain amount of hearts filled up on the page, with a total of 5 hearts. To understand the loss and gain of points, it helps to know that there are a total of 100 relationship points, and each heart represents 20 points. When a heart increase and decreases in game are only seen 5 points at a time, as the 'heart points' increase or decrease. 1/4 heart = 5. A full heart is 20 points. This is why you don't always 'see' an increase or decrease in heart points, since you only see changes in 5 point increments. ----- Now that we understand how relationship points work versus hearts, we can explore more details. To start, you should know that the NPC total relationship level is added to the towns happiness level. So you will eventually want to max out your relationships! Each villager has a favorite food, and some dislikes. Those details can be found below. The amount of heart points needed to move most NPC's into the village is 15. It is a little different in some cases but you should know that there are 3 NPC's that will not currently move in: the hair stylist (Sally) and the 2 rare/traders (Jimmy, Ted Selly). Other relationship FAQs: To hang out with an NPC, you need a relationship level of 45+. Talking to an NPC adds 1 relationship point, available once per day. Bulletin Board mission rewards 4 - 7 relationship points or mail. Complete Request (>45) = (+3 to +5) Complete Request (<45) = (+1 to +3) Fail a chat request = -1 Hang Out = +2 Hated Food = -1 ----- NPC INFO Clover: Deed: Threadspace Work Location: Threadspace spendBeforeMoveIn > 10,000 relationshipBeforeMove > 18 (1 Heart - 0.2) Favourite Food: Apple Hated Food: Cooked Drumstick Hates Animal Products Hates Vegitable Franklyn: Deed: Franklyn's Lab Work Location: Franklyn's Lab spendBeforeMoveIn > 190,000 (each disc pays 8,880, 22 discs will move him in, you can also buy the repair kit and recipes from him on the table that count toward the total spent.) relationshipBeforeMove > 15 (3/4 Heart) Favourite Food: Cooked Giant Drumstick Hated Food: Bush Lime Hates Vegitables Fletch: Deed: Base Tent Work Location: Post Office spendBeforeMoveIn > 5,000 relationshipBeforeMove > 15 (3/4 Heart) Favourite Food: Bush Lime Hated Food: Cooked Croc Meat Hates Meat Ghost: Deed: None Work Location: Bank spendBeforeMoveIn 0 relationshipBeforeMove 0 Favourite Food: None Hated Food: None Irwin: Deed: Irwin's Barn Work Location: Irwin's Barn spendBeforeMoveIn > 25,000 (buying 250 animal food, or one chook and 200 animal food, to move Irwin in). relationshipBeforeMove > 10 (1/2 Heart) Favourite Food: Banana Hated Food: Cooked Croc Meat Hates Animal Products Hates Meat Jimmy: (Special) Deed: Museum Deed Work Location: Jimmys Boat spendBeforeMoveIn > 50,000 relationshipBeforeMove > 205 (Impossible) Favourite Food: None Hated Food: None John: Deed: John's Goods Work Location: John's Goods spendBeforeMoveIn > 15,000 relationshipBeforeMove > 15 (3/4 Heart) Favourite Food: Cooked Croc Meat Hated Food: Potato Hates Animal Products Hates Fruit Melvin: Deed: Melvin Furniture Work Location: Melvin Furniture spendBeforeMoveIn > 800 relationshipBeforeMove > 20 (1 Heart) Favourite Food: Cooked Meat Hated Food: Chicken Egg Hates Animal Products Milburn: Deed: Museum Deed Work Location: Bank spendBeforeMoveIn 0 relationshipBeforeMove 0 Favourite Food: High Quality Cheese Hated Food: Cheese Hates Fruits Rayne: Deed: Rayne's Greenhouse Work Location: Rayne's Greenhouse spendBeforeMoveIn > 18,000 relationshipBeforeMove > 10 (1/2 Heart) Favourite Food: Corn Hated Food: Pumpkin Hates Animal Products Hates Meat Sally: Deed: None Work Location: Hair Dresser spendBeforeMoveIn > 305,000 relationshipBeforeMove > 205 (Impossible?) Favourite Food: Mushroom Hated Food: Cabbage Hates Animal Products Ted Selly: Deed: None Work Location: Weapon Shop spendBeforeMoveIn > 2,147,483,647 relationshipBeforeMove > 401 (Impossible?) Favourite Food: Cooked Drumstick Hated Food: Kale Hates Animal Products Hates Fruits Hates Vegitables Theodore: Deed: Museum Work Location: Museum spendBeforeMoveIn 0 relationshipBeforeMove 0 Favourite Food: Cooked Cactus Fig Hated Food: Cactus Fig Licenses See wiki entry: License[dinkum.fandom.com]. License Ranks Requirements Agriculture Vehicle 1/2/3 Farming Licence 3, Vehicle, and Irrigation Licence 2 Building 1/2/3 Logging licence 1 Cargo 1/2/3 Toolbelt licence 1 Commerce 1/2/3 Fishing, Hunting, Logging, and Mining licence 2 Deep Mining 1 Mining license 2 Excavation 1 N/A Farming 1/2/3 Farming skill 0/10/20 Fishing 1/2/3 Fishing skill 0/5/10 Handling 1/2/3 Farming licence 1 Hunting 1/2/3 Hunting skill 0/5/10 Irrigation 1/2 Farming licence 3 Landscaping 1/2 Logging licence 1 Logging 1/2/3 Foraging skill 0/10/20 Metal Detecting 1/2 Excavation licence 1 Mining 1/2/3 Mining skill 0/10/20 Toolbelt 1/2/3 Fishing, Hunting, Logging, and Mining Licence 1 Trapping 1/2 Hunting licence 1 Vehicle 1/2/3 N/A Mining & Terraforming Digging in Dinkum is fun! The Mining skill is leveled up by mining resources. While the Deep Mine provides a good source of these, there are plenty of resources to get you started on your island landscape. Iron, Copper, Tin, Rock and Quartz can all be mined. Iron is not very plentiful in the outside world but you will find some as your skill increases and time passes on your island. The best source of Iron is going to be the Deep Mine, which is plenty more goodies, too! (see the Deep Mine section for more info). Quartz is pretty plentiful starting out, and it is needed for a handful of recipes later on. Keep in mind that quartz does not respawn currently as its own resource node currently, so be sure to save all the quartz you find. In the next major update, you should be able to get more quartz in the deep mine. Until then, the only way to obtain it once you have mined it all, is through quarries and mining rocks, as both will sometimes give you crystal as well. If you join multiplayer, you can also get crystal from trading with other players and by mining on others islands (though you may want to ask before taking someone else's limited crystal spawns!). Terraforming Moving on to the topic of terraforming, let's take a look at what "sea level" looks like. The block that I have targeted in the picture below, the one that is both half in and half out of the water? When I say sea level in Dinkum, this is the block 'level' I am referring to:
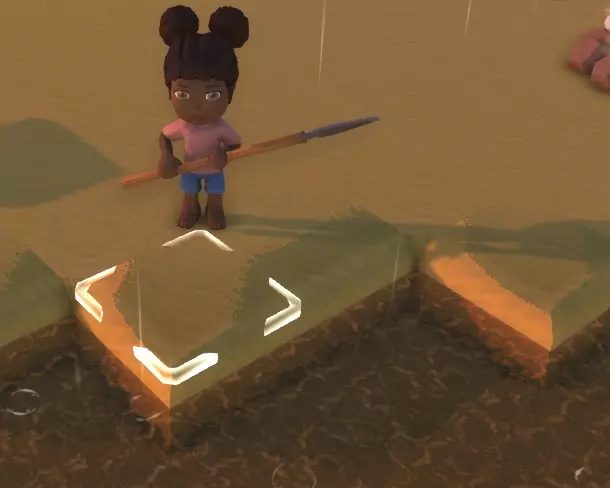
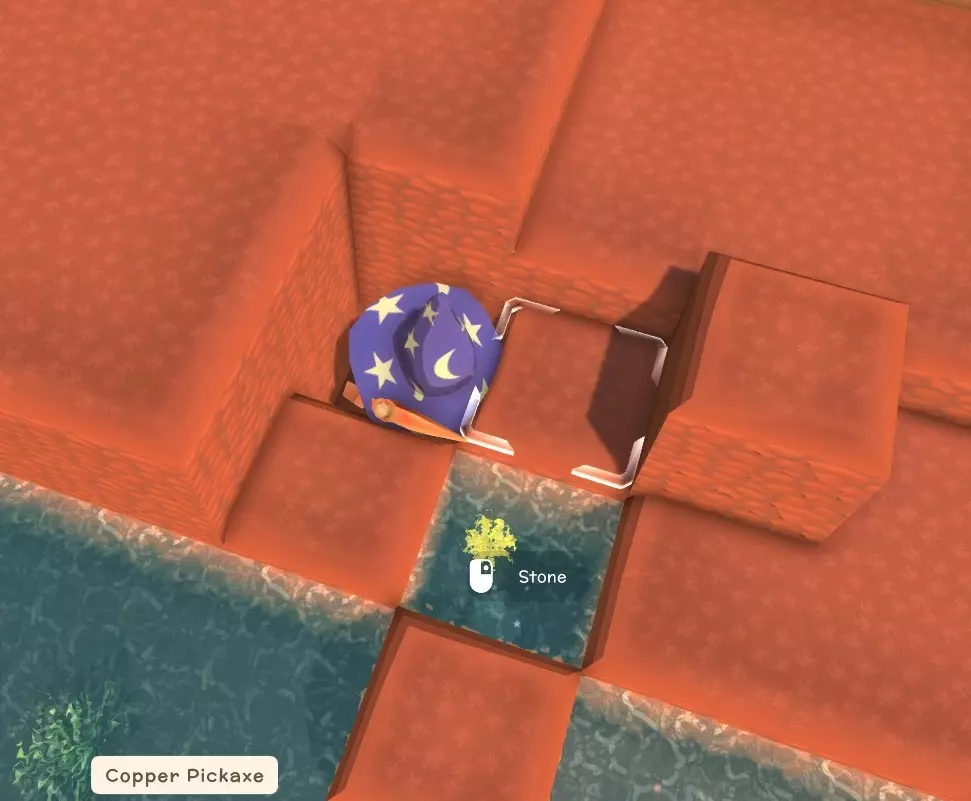
从这一层开始,你可以在达到最大高度【天花板】前在它上面堆叠11个方块。 如果你尝试堆叠超过11个方块,游戏会开始“删除”方块。 另一个有趣的现象是,即使你无法再向上堆叠方块,无论你向堆叠上放置哪种类型的方块,都会改变全部11个方块的“方块类型”!这可能是好事也可能是坏事,取决于你希望这些方块是什么类型,所以要记住这一点。 从海平面方块开始,你还可以向下挖掘6个方块,之后会到达最大深度,我们称之为【地板】,因为我们把另一个方向称为天花板。 如果你尝试挖穿地板,实际上会挖到另一个方块,但不会再向下深入一层——这基本上就是“无限方块生成”。利用无限洞穴和无限堆叠,我们可以根据挖掘项目的需求创建和移除任意数量的方块。这或许不是最便捷的地形改造方式,但却是我们目前可用的方法。再加上手推车和压实机作为挖掘工具,整体效果还算不错。 一旦开始使用升级后的工具,你几乎可以在任何地方挖掘和开采任何东西。不过,你可能会遇到一些棘手的区域,工具无法触及,炸弹也不起作用。比如看看这张图片:
在这张图片中,我们想移除该区域的岩石,以便用实心方块填充。岩石在那里时我们无法填充,用镐子够不到,炸弹也没用。 起初,我们在水边向下挖掘。当然,水开始填充我们挖掘的地方。 于是,我们用沙子把那里填起来,然后开始挖掘位于角落斜对角的方块。你可以看到我们站在洞里时周围的方块,但一旦我们挖下去并处于同一方块高度,我们的镐子就能穿过方块瞄准并开采岩石。 这是使用相同技巧的另一个例子,尝试移除河岸上的一块小岩石。
One last tip for efficiency: you can move dirt quicker by filling your toolbar with shovels. This can equate to 8 or more blocks of dirt in one quick trip versus the back and forth a single shovel takes. Plus if you have 8 or more shovels (up to 11 tool belt slots), you'll have enough shovel durability to last all day! And there you have it -- all the tools and knowledge you need to dig your way to paradise in Dinkum! Multiplayer Dinkum multiplayer is where you create your island and invite up to three friends to join you on your journey. It is not the same experience as games with dedicated servers. You do not get to start together with brand new characters on one island... each player has to start solo, you can not join other players until you create your character/island and sleep to save your progress. It is highly recommended that each player continue solo until they unlock the "nails" and "wooden crate" recipes, which will allow them to progress their skills and obtain certificate points while in other players worlds. These recipes can be unlocked on the second day. There are plans to add more multiplayer features and content, such as player housing, but it will take time to add these things. Currently, your non-host players can do everything that the host can do except: only the host can place and move buildings further the town quests move NPC's in sell farm animals Non-host players can build relationships with the townsfolk and receive requests from them. Each player can unlock their own recipes and earn certificate points in multiplayer if you have played single player far enough to unlock the nails recipe first. Money earned in multiplayer is not pooled but other players can contribute to paying off the town debt if they choose. Public lobbies are dependent on region, so if Dinkumites are playing on the other side of the world, you will not see their publicly listed lobbies. You will only see players in your region unless you are using a mod that lets you see other regions. To host a game: select multiplayer on the main menu, select your character and world, choose the restrictions you want to use: friends only, invite only, or public, and then click "Host Game" to start your island. Once you are in, you can open your journal and invite players to join through steam. To join a game: select multiplayer on the main menu, select your character and world, select the "open games" tab at the top of the screen. Choose your preference of "Friends Games" or Public Games." Click the 'Refresh' button if necessary and select the game you want to join from the list. Sleeping to end the day and save happens when everyone has gone to sleep. You do not have to sleep in the same tent, you can sleep anywhere on the map. If you pass out (AKA die) in multiplayer, just like solo, you will lose 10% of your dinks, and take a large durability hit to the tools in your pockets. In multiplayer, your friends can revive you by getting close and spamming a button to revive. Otherwise, you will respawn at the last spot you slept in or in the village. Note that the host game is saved when everyone goes to sleep, however, visiting players have their character/inventory saved as soon as they leave the host game. Making your games open to the public comes with a lot of risk to the host but restarting the day without saving offers them a way to avoid things if needed. Hopefully in the future players will have the option to lock down storage and perhaps more. Repairs Most of our tools and weapons need repairing in Dinkum. One of the ways we can repair tools and weapons are by upgrading them. For example, if your tin axe is about ready to break, you can upgrade it to copper and that act of upgrading it will also repair it to full. And the same thing happens when upgrading from copper to iron. Another topic related to tools is John's Store and when his tools are available for purchase. This matters because it effects how often we can acquire new tools. John sells some of our basic tools. We often find ourselves visiting John a lot when starting out to purchase basic axes, basic pickaxes, fishing rods and shovels. He only sells one per day, 6 days a week. What I like to do is throw down 3 wooden crates near John's Store. Each day, I go in and buy 1 axe, pickaxe, fishing rod and shovel, and I store them in one of the boxes outside the store. The second wooden crate is for upgrading the tin tools into copper tools, and the third crate is to hold iron tools once I have upgraded the surplus copper tools. When starting out, I also mix up my activities - one day I'll mine during the day time, the next day I'll chop trees. And I keep alternating my tasks so I don't completely deplete the supply of any tool in my wooden crates, but this isn't really a concern once we can start crafting and using copper weapons and tools since they perform better AND have better durability. In this way, I upgrade the tools when one box is full to make room for more, and keep buying John's tools to fill up the basic tool box. In this way, I never have to worry about John not being available when I need a tool. Once I have filled up a storage box with the basic tools, I craft another wooden crate and start stuffing extra shovels in there. Fill it full of shovels! When I feel like terraforming and shaping the land around my towns and farms, I can fill up my entire hotbar with shovels to do my digging (scoop, switch shovel, scoop, switch shovel, etc.; and dump, switch shovel, dump, switch shovel, etc.). Using the shovels this way eliminates the amount of running you need to do between each scoop and dump. It also spreads out the durability hit to multiple shovels, so if you start with shovels in full repair, you can shovel all day without breaking them. In case it wasn't clear already, don't throw away your old tools, and don't use them until they break -- store them in another wooden crate. Store all of your tools and weapons with low durability. We are going to repair them using Franklyn's repair table and repair kit. The repair kit repairs all of the tools in your toolbar and inventory. Which is great, because now we have some boxes full of almost broken copper and iron tools! The repair kit is not cheap, and a lot of players don't realize it is valuable if you repair a lot of tools at once. If fill your inventory to repair 30+ tools with just one repair kit, it becomes worth it! Hopefully by the time you have boxes full of almost broken tools, you'll have Franklyn moved into town. You need to buy both the repair table and the repair kit, in order to repair your tools and weapons. You will want to start donating shiny discs to Franklyn, so be sure to save your discs for him. You will need a total of 4 disks for teletowers, when you feel like repairing them, and 2 more to craft the telepad. But otherwise, you'll want to sell all of your discs to Franklyn, and you will unlock rewards all the way up to the 28th disc you give him. When you give him a total of 20 discs, you'll unlock the Charging Station! Once you have both the charging station and the power tools, you won't need to worry about repairing your tools -- you will focus on recharging your power tools instead. Of course, you will still need to craft and repair weapons but power tools make the repair process less tedious for sure. I would recommend multiple charging stations when you can afford to craft them, as they charge all of these tools: Chainsaw Compactor Jack Hammer Metal Detector Miners Helmet The charging station takes around 12-18 hours to charge per tool. Tele Towers
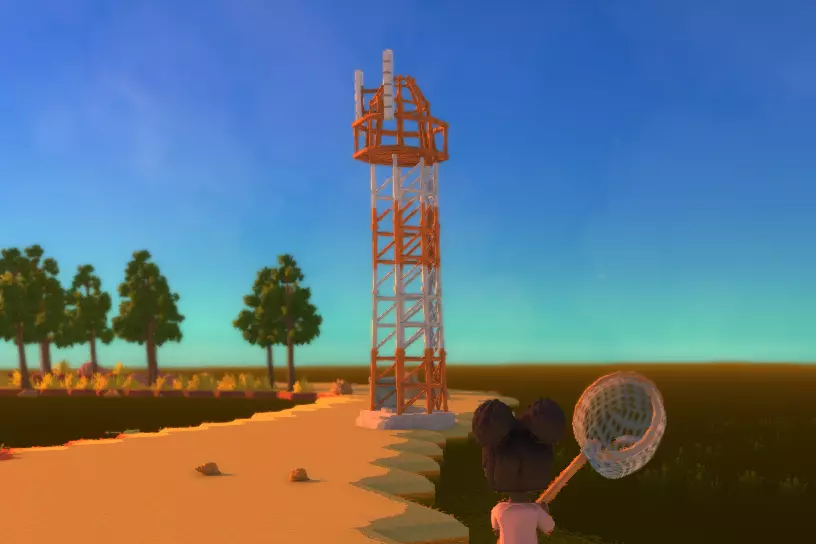
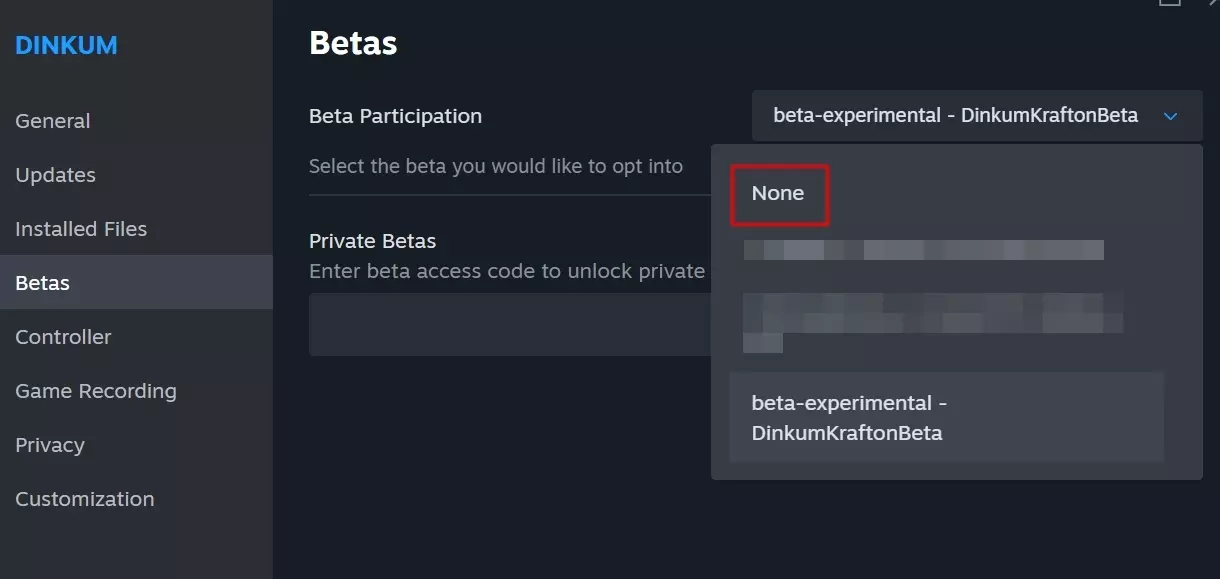
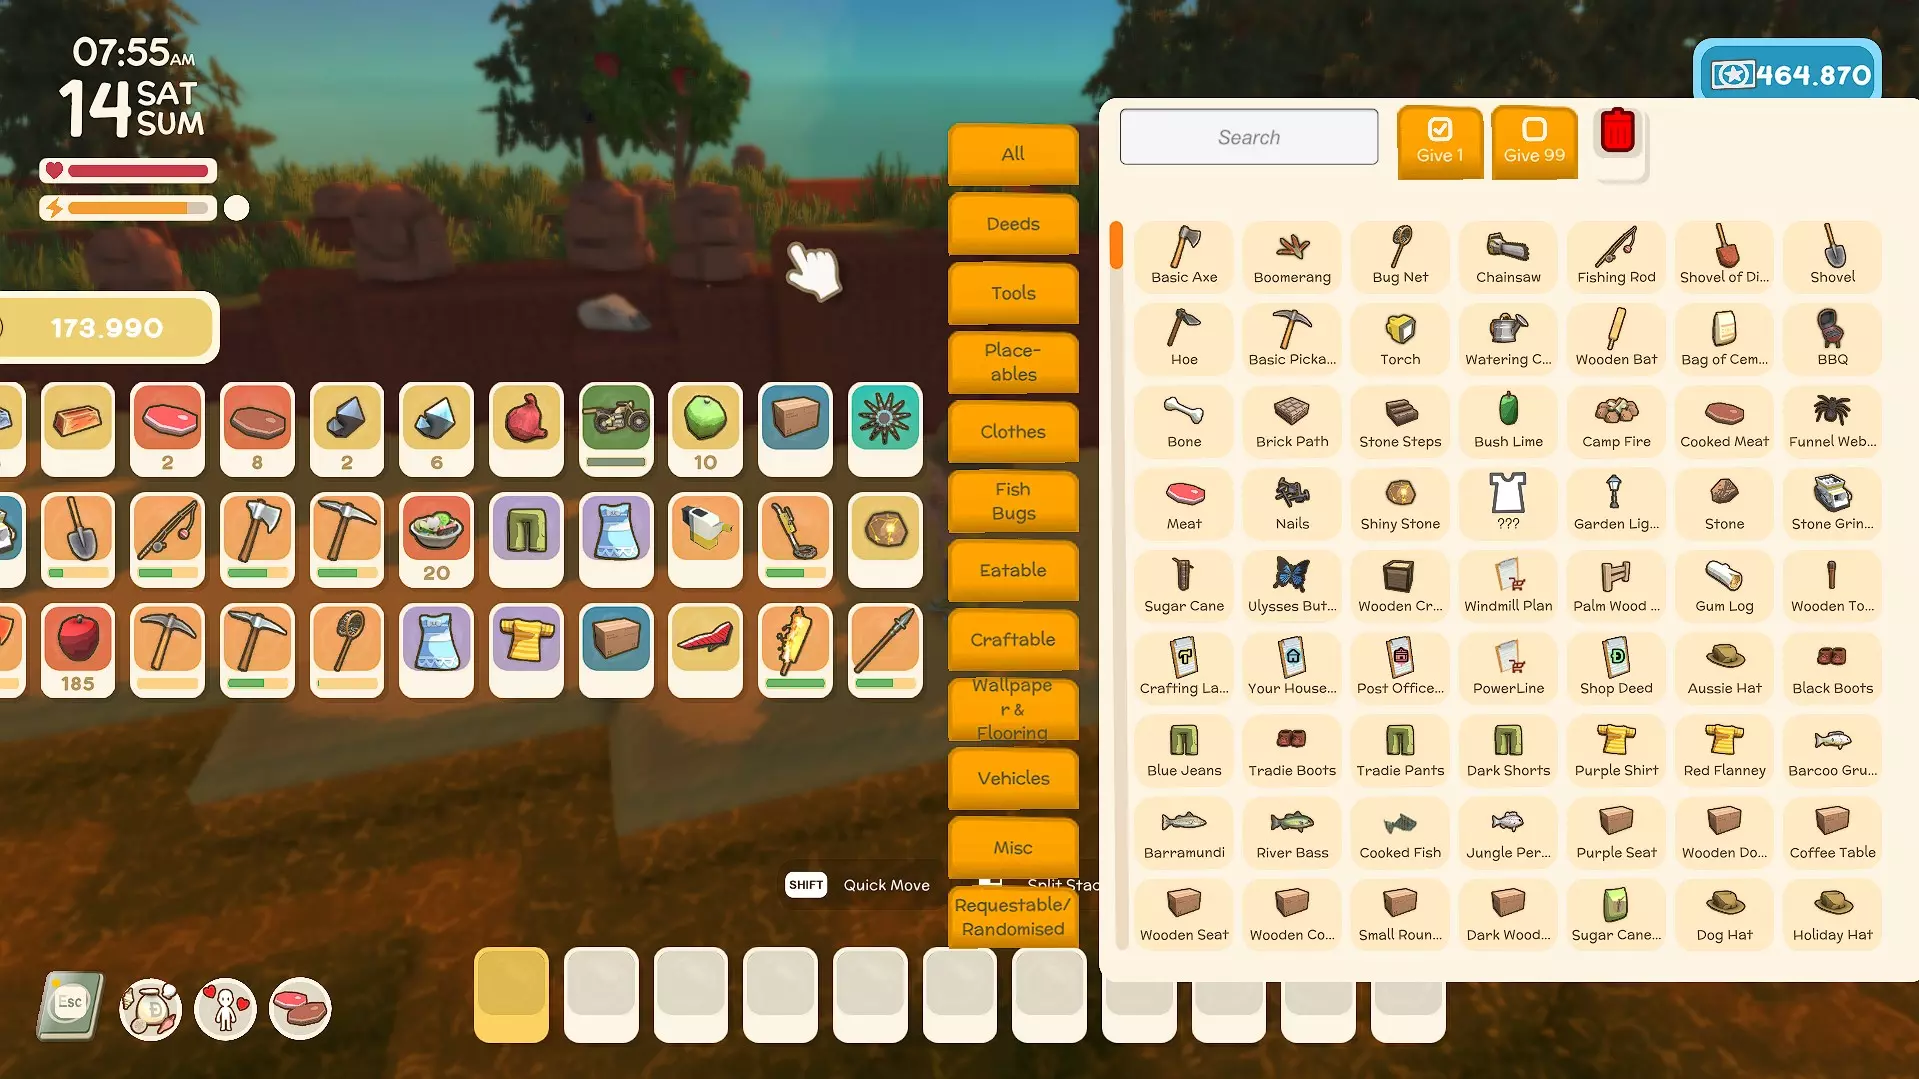
Tele Towers look similar to radio towers and can be found toward the North, East, South and West direction from the center of the island. There are four Tele towers and one Tele Pad, making five total towers you can teleport to and from. They let you teleport around the island and are very convenient. While the towers are always in the same cardinal directions, they can be placed at a random distance, typically near the shore or on a nearby island not far from shore. As with anything randomly generated though, they are occasionally place far out in the water or in far off places. In such cases you may or may not want to start a new island (this is why I often tour the island and find all four Tele Towers after I place my tent but before I talk to Fletch again). The Tele Pad can be placed where you want and while it looks different, it acts just like another Tele Tower. After you repair a Tele Tower, Franklyn will propose an idea for a Tele Pad that you can build anywhere and sends you to talk to Fletch for the deed. The ingredients needed for each Tele Tower are: 8 Bright Wire 3 Green Board 2 Hot Cylinder 1 Shiny Disc 1 Smooth Slate The ingredients needed for Tele Pad are: 8 Bag of Cement 2 Bright Wire 4 Green Board 4 Iron Bar 2 Shiny Disc 4 Smooth Slate The total ingredients for all 5 structures are: 8 Bag of Cement 34 Bright Wire 16 Green Board 8 Hot Cylinder 4 Iron Bar 6 Shiny Disc 8 Smooth Slate As a strategy, some players rush to repair/create these towers when starting a new island so that they can teleport around with ease as early as possible. Others are comfortable to hold off and do it later. Neither way is wrong, you can do it whenever you prefer! Tele Towers cannot be relocated but you can move the Tele Pad. At this point in time, if you are hanging out with a villager and you try to teleport, the villager will not teleport with you, and you may have to go back to find them. Trapping Trapping is good early game skill. To trap something, place some meat in the trap as bait. And then wait. You will need weaken some before trapping them, otherwise they may escape the trap. Higher level traps are stronger, allowing you to more easily catch tougher beasts. Trapping roos are a good idea to start your roo farm for collecting roo poo! A good method for catching roos is to wait until dark and take a torch with you. Stun the roo with the torch and place a trap at its feet. If you have a vehicle you can carry several cages at a time. When you go out trapping, you can stun some creatures at night with a torch/flashlight from john's shop and then drop a trap on them. If you are trapping magpies, make sure they have landed first or they may end up stunned up in the air. Tenoshii adds: "It's a fairly easy way to make money at the start when you place the drop points near the spawn of aggressive creatures. My favorite is the Wary Mu as they typically spawn in large groups. You get paid 8400 dinks the next day by mail after sending them off for "research"." Vehicles The following vehicles are currently available in Dinkum: Glider - obtainable as random treasure loot in deep mine, or from Ted/Jimmy Helicopter - (available after turning in 28 discs to Franklyn) Jet Ski - (available after turning in 3 discs to Franklyn) Lawnmower - (available after turning in 1 disc to Franklyn) Mu - this is an animal not a vehicle, see farm animals' section of this guide Motor Bike - (available after turning in 3 discs to Franklyn) Rowboat (available after acquiring Vehicle 1 license) Tractor - (available after turning in 20 discs to Franklyn) Wheelbarrow - randomly available for purchase in John's store All of the vehicle recipes are obtained through Franklyn except for the boat, which requires Vehicle 1 license. Each vehicles requires a specific vehicle license: Vehicle License 1 - Allows the holder to purchase and pilot water vehicles. Vehicle License 2 - Allows the holder to purchase and drive land vehicles. Vehicle License 3 - Allows the holder to purchase and pilot flying vehicles. If you wish to pick up a vehicle, you can smack it to "repack" it. This does not hurt the vehicle. If land vehicles are driven into the water, they will be destroyed, including lawn mowers and wheelbarrows. If water vehicles sink or get stuck, they should try to "resurface" if you reload the game. Any vehicles placed in the mine will be lost if you pass out in the mine. Backup & Sync Question: "Can We Have Steam Cloud Sync?" Answer: "I am looking into that and it will most likely come sometime in the future. I want to make sure that before I implement it, it won't impact your current saves." ~ James Bendon Until we get Steam Cloud Sync, creating backups and transferring game saves between devices will have to be done manually. Game saves are stored in the folder named Dinkum. This folder can be found at this location in; Windows: %userprofile% AppData LocalLow James Bendon Steam deck / Linux: ~/.local/share/Steam/steamapps/compatdata/1062520/pfx/drive_c/users/steamuser/AppData/LocalLow/James Bendon/ AppData is a hidden folder by default, so you may not be able to access unless you change your folder options to view "Hidden items": Open File Explorer from the taskbar. Select View > Show > Hidden items. To make a backup of all of your games, just copy and paste the Dinkum folder somewhere safe, in a different location, such as your desktop, or portable drive. To play the same game save(s) on different devices, just transfer the Dinkum folder between devices to access your saves. Until Steam Cloud Sync comes to Dinkum, you may wish to set up auto-sync to automate this process using an online tool or service available to you (i.e, Google Sync, OneDrive). Syncing can be done between devices as well, using USB flash drives, Warpinator / Winpinator, SMB (samba) shares, SyncThing, etc. -- setting these things up are beyond the scope of this guide. Always make backup copies! I like to make backups of my backups. :) Also, should you wish to delete the saved player settings (AKA PlayerPrefs) due to changes from mods or dev commands, you can do the following: Press WinKey + R Type regedit Search for: Computer HKEY_CURRENT_USER Software James Bendon Delete the 'James Bendon' folder and its contents Cheats Many commands are unstable and can permanently break/ruin your save files, make sure to make save backups before using mods and/or cheats! To activate dev commands, enter the following command in chat: devCommandsOn To enable the cheat inventory menu enter: cheatsOn Pressing = now opens the cheat inventory menu. To turn off dev commands, enter: devCommandsOff There is no option or command to turn off the cheat menu in game. To disable cheats, you can edit your registry, or use a mod.[www.nexusmods.com] These are the steps to take to edit your registry: Press: WinKey + R Type: regedit Search for or navigate to: Computer HKEY_CURRENT_USER Software James Bendon Dinkum Delete the following entries: Cheats_h2726597293 DevCommandOn_h1682242452 Debug menu: Debug can be toggled on or off by entering debug in chat. Cheats can be on or off while using debug. Dev commands can be on or off while using debug. Here is a list of dev commands. /e [#] - performs specified emote (/e 1) changeRain - unknown changeSpeed [0 - 60+] - Basically, you are assigning the value of X, where each in game minute equals X real world seconds (default is 2.0). cheatsOn - enables the cheat inventory menu hotkey ( = ). chunkDistance [1 - 15] clearFreeCam - unknown. compassLock - unknown (broken?), does not change minimap. completeNPC [npc id] - completes the chat request given by the specified NPC (this give you the dialogue option to turn it in but does not spawn the item(s) needed for turn in and has no effect on bulletin board quests. completeQuests - completes Fletch's quests up to the nails and wooden box recipe rewards (does not complete other quests). crocDay - unknown cropsGrowAllSeasons - allows all crops to grow in any season. debug - pulls up the debug menu/overlay that shows various game info. devCommandsOff - turns off commands. devCommandsOn - required to use commands. dropAllFurniture - drops 1 of each furniture, packed (everything tagged as "isFurniture"). freeCam - toggles free cam, same as build mode. fullPedia - auto-completes all pedia entries. giveGift - instantly gifts your character 1k dinks, used for testing purposes.mm giveMilestone - randomly awards milestones. giveMoney [amount] - gives specified amount of dinks. givePoints [amount] - gives specified amount of permit points. hairColour [1 - 26] - changes your hair color. hairStyle [1 - 25] - changes your hair style (25 is bald and bugged currently). hideGuide - unknown. hideHud - completely hides the UI for great screenshots! (press enter to show Hud again). loadFreeCam - unknown. makeWindy - unknown maxRelation [npc id] - max hearts with the specified NPC, 100/100 relationship points. moveAllCarry - unknown. moveInNPC [npc id] - moves specified NPC into your village (does not include deed currently). nextDay - saves game and advances the game 1 day, date changes, time remains the same. nextDayChange - advances game time 1 day without saving or changing the date or time. noClip - makes you appear "invisible" but can't move. noClipNoFollow - clamps your camera so it can't move but lets you move your character. npcPhoto [npc id] - unknown, creates camera flash but that appears to be it? placeItem [item id] - spawns specified item on the ground instead of inventory (use -1 to delete your target, such as a rock). placeItemFix [item id] randomClothing - randomizes clothing on your character (use stopRandom to 'stop') randomiseCharacter - randomizes your characters looks, one time. refreshInside - unknown, not the same as resetHouse. renameIsland [newName] - save/sleep and exit to save (town hall may default to "Dinkum" instead of the new name). resetHouse - reset house interior (this will delete all items) resetHouseExteriors - reset the house exterior to default. save - lets you save anywhere, anytime. saveFreeCam - unknown. scanMap - unknown. setAnimalRel [0 - 100] - sets value for all farm animal relationships. setDate [day] [week] [month] [year] setStatus - unknown. setTime [1 - 24] - uses 24 hour time. setTimeDay - sets time to 10am. setTimeNight - sets time to 7pm. setTimeReal - unknown. setTired - decreases stamina by 40 points. skinTone [1 - 6] - changes skin tone, from lightest to darkest. skipSong - skips currently played music. spawnAnimal [animal id] spawnBoat - spawns Jimmy's boat. spawnCarry [id] - spawns specified carriable Id at players position. spawnFarmAnimal [animal id] spawnNpc [npc id] stopRandom - stops randomClothing command. strikeLightning [x] [z] - lightning at the specified coordinates (coordinates = debug coords x2). teleport [x] [z] - teleport to the specified coordinates (coordinates = debug coords x2). unlockRecipes - unlocks all recipes, including deeds. List of available NPCs in game, you can use spawnNpc # to spawn one of them: 0 - Rayne 1 - John 2 - Franklyn 3 - Melvin 4 - Clover 5 - Ted Selly 6 - Fletch 7 - Irwin 8 - Sally 9 - Theodore 10 - Milburn 11 - Jimmy 12 - Ramsey (future content) 13 - Jackie (future content) 14 - Timber (future content) 15 - Ghost (future content) List of available animals in game, you can use spawnAnimal to spawn one of them. 1-10 Jackaroo 10-20 Fish 21-29 Bug 30-39 Croc 40-49 Magpie 50-59 Shark 60 Diggo 61 White Diggo 62 Black Diggo 63 Poodle 64 Collie 65 Jack Russell 66 German Shepherd 70-79 Scrub Turkey 80-89 Cockatoo 90-99 Chook 100-109 Baby Chook 110-119 Vombat 120-129 Vombat Joey 130-139 Mu 140-149 Bush Devil 150-159 Toad 160-169 Wary Mu 170-179 Pleep 180-189 Jellyfish 190-193 Pet Diggo 194 Pet Collie 195 Pet Jack Russell 196-199 Pet German Shepherd 200-209 Glowing Croco 210-219 Wild Vombat 220-229 Kidna 230-239 Random Critter 240-249 Alpha Jackaroo 250-259 Alpha Croco 260-269 Alpha Bush Devil 270-279 Cave Bat 'place item id' numbers can be found in this discord discussion: https://discord.com/channels/892654052989628436/998125977416765510/1001076140393381958 Dinkum Links Wiki Quick Links consumables[dinkum.fandom.com] equipment[dinkum.fandom.com] furniture[dinkum.fandom.com] licences[dinkum.fandom.com] milestones[dinkum.fandom.com] people[dinkum.fandom.com] recipes > cooking[dinkum.fandom.com] recipes > crafting[dinkum.fandom.com] resources[dinkum.fandom.com] tools[dinkum.fandom.com] All Things Dinkum Dinkum official site[www.playdinkum.com] Bug Reports[dinkum.featuremonkey.com] Dinkum Discord[discord.com] Dinkum Roadmap[dinkum.featuremonkey.com] Early Access Roadmap Dinkum Steam Dinkum TikTok[www.tiktok.com] Dinkum Twitter Dinkum YouTube r/Dinkum Official FAQs Q = Question, A = Answer: Q: Is Controller Support? A: Yes! PS4, Xbox, Xbox Series X and Switch Pro controllers have been tested. Q: Will Dinkum come to consoles? A: That is definitely something I will be looking into once the game is out of Early Access. Q: Will there be Steam Cloud sync? A: James Bendon is looking into that, and it will most likely come sometime in the future. He wants to make sure that before it is implemented, that it won't impact your current saves. Q: Translations to other languages? A: Hopefully this will be possible once the game is at version 1.0. Why not suggest a language you would like to see in suggestions channel on our Discord? Q: How big is the map? A: The map is not infinite, but pretty big! Your town and farm will only take up a little bit of the island and it will take a little while to walk from one side to the other. (The technical map size is currently 1000 x 1000.) Q: Help! I have lag and the game is super slow! A: Lower the quality settings, lower the chunk view distance and maybe lower the resolution if you are desperate. Playing in the top-down build camera helps too. Q: I have feedback and suggestions on how to improve Dinkum A: Great! I want to hear them all! Please post them in the Suggestions and Ideas discussion that’s pinned to the top of steam discussions or visit Dinkum’s official Discord. Q: Does Dinkum run on the Steam Deck? A: Yes, Dinkum is currently Steam Deck Verified. Q: There's a dupe bug! I can't remove or move those items! What do I do? A: If you run far enough from the house to unload the chunk and come back it should fix itself. Otherwise saving and exiting will fix it. Q: Why isn't the story progressing?! A: The game is still in Early Access! It means it’s not quite done. There is much more coming before it can be considered a full release game! Please see the Roadmap to see what else the solo Developer, James Bendon, has planned: https://dinkum.featuremonkey.com/roadmap/. Also see the Early Access Roadmap announcement by James Bendon for a general overview: https://store.steampowered.com/news/app/1062520/view/3342250434605772470. 引用自 James Bendon:"I acknowledge the Wiradjuri, Bindal and Wulgurukaba peoples as Traditional Owners of the land on which this game was created. I pay respect to Elders past, present and future and value the traditions, cultures and aspirations of the First Australians of this island." Thank You! Thank you to the Dinkum discord community for sharing your knowledge. Thank you to the Dinkum mod community for all your wonderful toys and tools. Thank you to the Dinkum wiki contributors for all your hard work. Thank you James Bendon for making such a wonderful, enjoyable game! Thank you, dear reader, for leaving comments to help improve this guide. See you in Dinkum, and have a lot of fun! Aiona