换一换
换一换 


The Netherlands is a flexible and productive civ that benefits from rivers, lakes and seas alike and can cheaply defend against flooding. Here, I detail Dutch strategies and counter-strategies. Introduction Following this guide requires the Gathering Storm expansion. It also assumes you have all other Civ 6 content, listed below, though it is not necessary to have these to utilise the key strategies of each civ. Pre-Rise and Fall content packs Vikings, Poland, Australia, Persia/Macedon, Nubia, Khmer/Indonesia Rise and Fall Expansion New Frontier content packs Maya/Grand Colombia, Ethiopia, Byzantium/Gauls, Babylon, Vietnam/Kublai Khan, Portugal These content packs include exclusive civs, city-states, districts, buildings, wonders, natural wonders, resources, and a disaster, but not core game mechanics - all you need is the base game and the Gathering Storm expansion for those. Hear this message and know there is yet hope. Hope of a time of clearing storms, of the first shoots of spring, of clean waters free from the stains of war. Into a better age where we may find strength in co-operation and not victimisation. Our ships shall sail; our arts shall flourish; our sciences shall lead. It is not the moment to surrender to your fear, but hold on to this chance for a better world. And it falls to you to create it. How to use this guide This guide is divided into multiple sections explaining how best to use and play against this specific civ. The Outline details the mechanics of how the civilization's unique features work and what their start bias is if they have one. The Victory Skew section describes to what extent the civ (and its individual leaders where applicable) is inclined towards particular victory routes. This is not a rating of its power, but an indicator of the most appropriate route to victory. Multiple sections for Uniques explain in detail how to use each special bonus of the civilization. Administration describes some of the most synergistic governments, government buildings, policy cards, age bonuses, pantheons, religious beliefs, wonders, city-states and Great People for the civ. Only the ones with the most synergy with the civ's uniques are mentioned - these are not necessarily the "best" choices when playing as the civ for a given victory route. Finally, the Counter-Strategies discusses how best to play against the civ, including a consideration of leader agendas if the civ is controlled by a computer. Note that all costs (production, science, etc.) mentioned within the guide assume a game played on the normal speed settings. To modify these values for other game speeds: Online: Divide by 2 Quick: Divide by 1.5 Epic: Multiply by 1.5 Marathon: Multiply by 3 Glossary Terminology used in this guide and not in-game is explained here. AoE (Area of Effect) - Bonuses or penalties that affect multiple tiles in a set radius. Positive examples include Factories (which offer production to cities within a 6 tile radius unless they're within range of another building of the same type) and a negative example is nuclear weapons, which cause devastation over a wide radius. Beelining - Obtaining a technology or civic quickly by only researching it and its prerequisites. Some deviation is allowed in the event that taking a technology or civic off the main track provides some kind of advantage that makes up for that (either a source of extra science/culture or access to something necessary for a eureka or inspiration boost) CA (Civ Ability) - The unique ability of a civilization, shared by all its leaders. Compact empires - Civs with cities close together (typically 3-4 tile gaps between city centres). This is useful if you want to make use of districts that gain adjacency bonuses from other districts, or to maximise the potential of area-of-effect bonuses later in the game. Dispersed empires - Civs with cities that are spread out (typically 5-6 tile gaps between city centres). Civs with unique tile improvements generally favour a more dispersed empire in order to make use of them, as do civs focused on wonder construction. GPP - Short for Great Person Points. Districts, buildings and wonders generate these points and with enough you can claim a Great Person of the corresponding type. GWAM - Collective name for Great Writers, Artists and Musicians. All of them can produce Great Works that offer tourism and culture, making them important to anyone seeking a cultural victory. LA (Leader Ability) - The unique ability of a specific leader. Usually but not always, they tend to be more specific in scope than civ abilities. Some leader abilities come with an associated unique unit or infrastucture. Prebuilding - Training a unit with the intention of upgrading it to a desired unit later. An example is building Slingers and upgrading them once Archery is unlocked. Sniping - Targeting a specific city for capture directly, ignoring other enemy cities along the way. Typically used in the context of "capital sniping" - taking a civ's original capital as quickly as possible to contribute towards domination victory without leading to a drawn-out war. Start bias - The kind of terrain, terrain feature or resource a civilization is more likely to start near. This is typically used for civilizations that have early bonuses dependent on a particular terrain type. There are five tiers of start bias; civs with a tier 1 start bias are placed before civs of tier 2 and so on, increasing their odds of receiving a favourable starting location. Super-uniques - Unique units that do not replace any others. Examples include India's Varu and Mongolia's Keshigs. Tall empires - Empires that emphasise city development over expansion, usually resulting in fewer, but bigger, cities. Uniques - Collective name for civ abilities, leader abilities, unique units, unique buildings, unique districts and unique improvements. UA (Unique Ability) - A collective name for leader abilities and civ abilities. UB (Unique Building) - A special building which may only be constructed in the cities of a single civilization, which replaces a normal building and offers a special advantage on top. UD (Unique District) - A special district which may only be constructed in the cities of a single civilization, which replaces a normal district, costs half as much to build and offers some unique advantages on top. UI (Unique Improvement) - A special improvement that can only be built by the Builders of a single civilization. "UI" always refers to unique improvements in my guides and not to "user interface" or "unique infrastructure". UU (Unique Unit) - A special unit that may only be trained by a single civilization, and in some cases only when that civilization is led by a specific leader. Wide empires - Empires that emphasise expansion over city development, usually resulting in more, but smaller, cities. Outline (Part 1/2) Start Bias


荷兰文明拥有二级河流起始倾向和四级海岸起始倾向。河流是荷兰文明能力的必要条件,而沿海地区能够支持其独特单位和独特改良设施。 文明能力:大河 学院、剧院广场和工业区若与至少一个河流 tiles 相邻,可获得+2 相邻加成。 此效果与商业中心获得的+2 金币加成机制相同,不会与多条相邻河流叠加。 建造港口区域会引发文化炸弹,使你获得周围所有 tiles。 仅会获得该 tiles 所属城市可工作范围内的 tiles(即必须位于城市中心 3 格半径内)。这包括来自其他文明的地块,但通过这种方式窃取他们的地块会导致外交惩罚。从城邦夺取土地则没有惩罚。 包含非独特改良设施的被窃取地块将保留这些设施。 包含已建成区域、奇观或国家公园的地块不会被窃取,但未完成的会被窃取并摧毁。建造堤坝区域或防洪堤建筑时获得50%生产力加成。 此加成同样适用于军事工程师充能所增加的生产力。 威廉明娜的领袖能力:橙色广播

国内贸易路线可为出发城市每回合增加2点忠诚度。 国际贸易路线(无论往返于你的城市)均为你提供2点文化值。 概述(第2/2部分) 特色单位:七省号
文艺复兴时期的海军远程单位,替代护卫舰 研究 淘汰 升级自 升级至 成本 资源 维护费用

方帆索具 科技 文艺复兴时代

精炼* 科技 现代纪元

四列桨座战船(330
10
)

战舰世界
1
无法识别内容,已删除。
无法识别内容,已删除。
10
5
如果无法获取煤炭,即使研究了精炼技术,你仍可以继续建造该单位。 力量:50 远程力量: 移动力: 射程: 视野: 负面属性: 正面属性:
60
无法翻译的内容已删除
N/A 2
无法占领城市 对城市防御造成全额伤害 +7
攻击城市中心及其他区域时 积极改动:建造消耗硝石从20减少至10(降低50%) 强度从45提升至50 远程强度从55提升至60 对城市中心及其他区域的远程强度+7 特殊改良设施:圩田

研究 地形要求 建造者 基础掠夺产出

公会 市政 中世纪时代
拥有与至少三个非山地陆地地格相邻的海岸或湖泊地格

建造者(已登船) 25
防御加成 直接产出 相邻产出 其他加成 最大可能产出 地格消耗3
进入。1
1
0.5
1
每相邻一个圩田 无 4
无法翻译,已删除。
0.5
增强内容 研究 直接加成 相邻加成 其他加成 新最大产出*

土木工程 市政 工业时代 4
无法识别内容,已删除。
无法识别内容,已删除。
无法识别或无法翻译,已删除。
0.5

可替换部件 科技 现代 era 无 额外 1
每相邻一个圩田 无 7
无法识别或无法翻译,已删除。
无法识别内容,已删除。
0.5
这部分内容假设你已拥有早期时代的强化效果。 胜利倾向 在本节中,将根据文明对特定胜利类型的倾向程度进行主观评分——而非其强度。评分达到3分或以上意味着该文明在该胜利路线上至少具备轻微优势。 领袖

ćĺ

外交的

控制模式

ĺŽć

科学 威廉敏娜 7/10 (良好) 7/10 (良好) 7/10 (良好) 3/10 (可接受) 9/10 (理想) 荷兰人擅长文化胜利,这主要依靠其文明能力。额外的科技值和文化值将帮助你更快地获得奇观,而额外的生产力有助于你更快地建造它们。圩田(Polders)有可能提供良好的食物产出,帮助城市发展并开发更多生产力地块,进一步促进奇观建设。 荷兰在外交方面也是一条不错的发展路径,这得益于其良好的金币和生产力产出,分别非常适合应对援助紧急情况和全球变暖缓解项目。话虽如此,荷兰文明特性带来的工业区相邻加成很高,这会促使玩家大量使用燃煤发电厂,而燃煤发电厂会产生大量污染,进而消耗外交支持。 荷兰的统治胜利玩法表现不错,但在一定程度上依赖地图。在攻城方面,七省号独特单位比普通单位有12点的显著优势,在攻城时本就效果显著。即使无法充分发挥独特单位的作用,圩田也是所有改良设施中金币产出最高的之一,能轻松支持大量单位,且文明特性将帮助你获得科技和生产力,以保持军队的先进性。 宗教胜利是荷兰最弱的胜利途径。一些早期文化优势能让你更快解锁关键市政,比如【宗教改革】,但也就仅此而已。 最后,科技方面的表现稳定且强大。沿河相邻的【学院】+2科技值,这使得获取更高的相邻加成变得容易得多;而沿河相邻的【工业区】+2生产力,则能帮助你应对生产力密集型的【科技启发】和【太空竞赛】项目。在以陆地为主的地图上,这通常是你走向胜利的最佳途径。 文明能力:大河(第1/2部分)
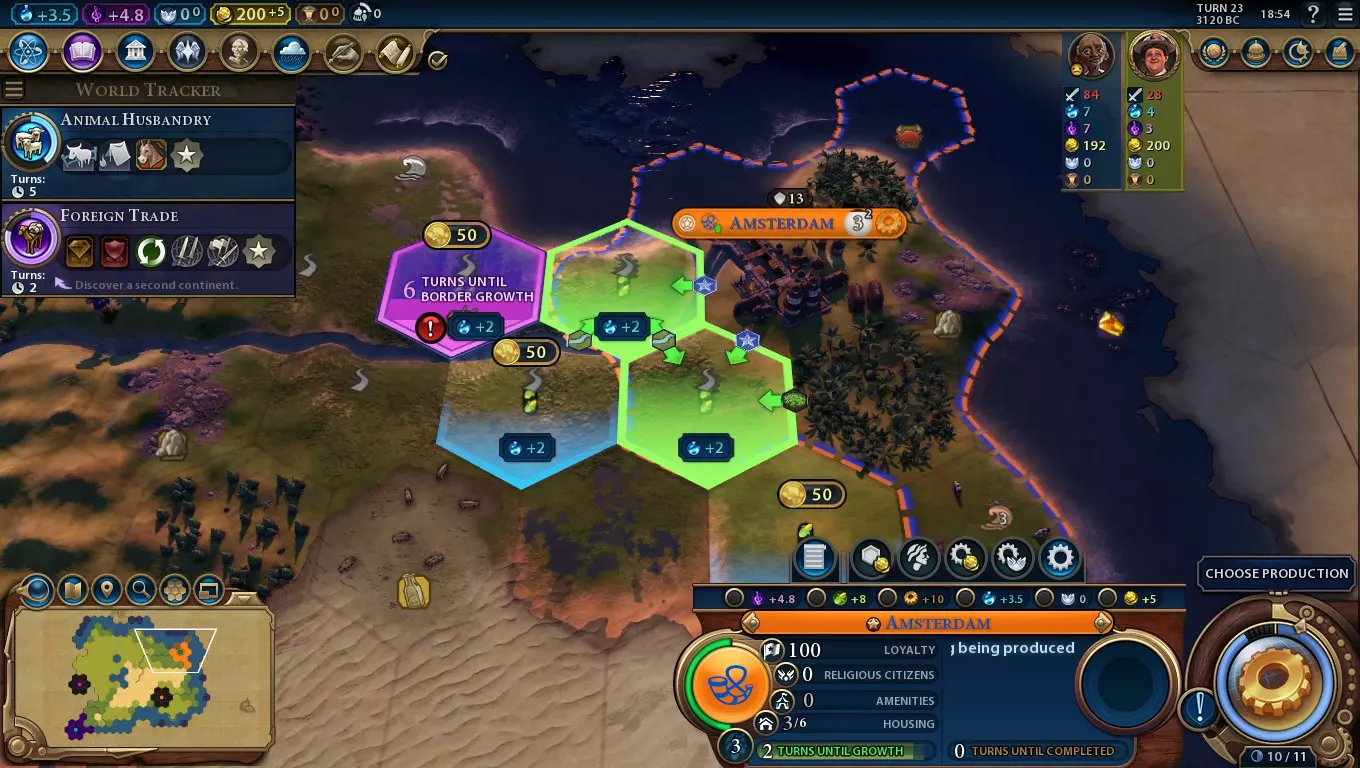
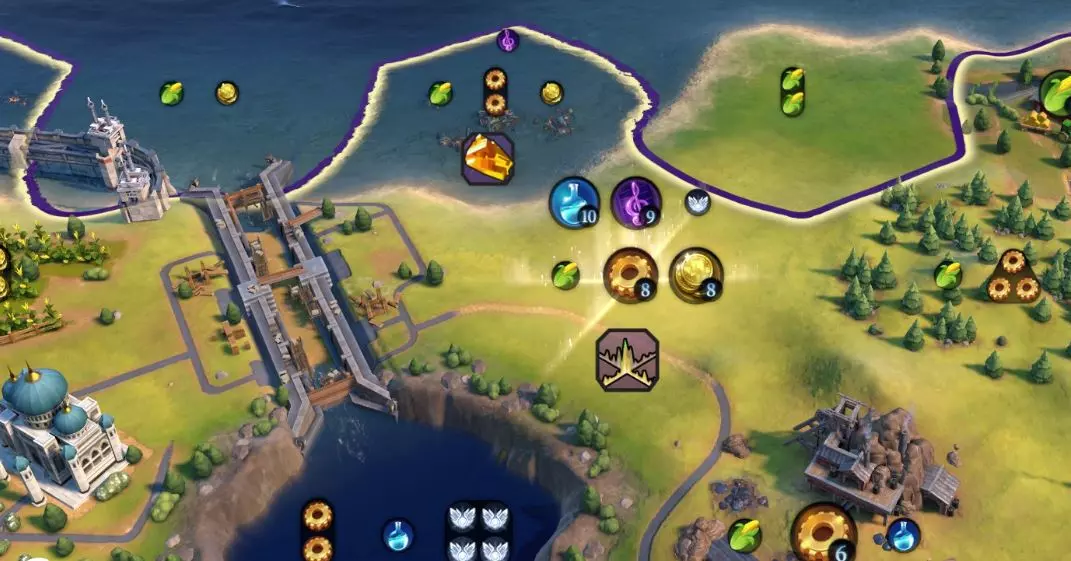
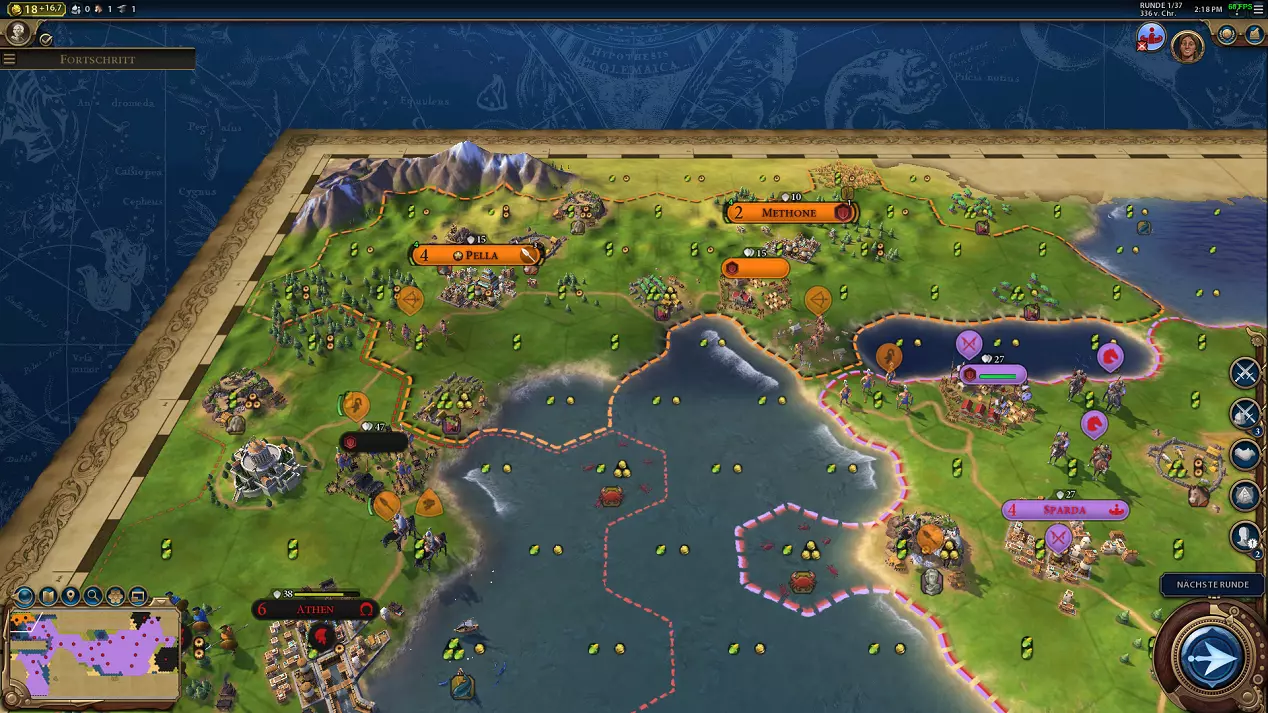
地图的这一区域山脉不多,但我仍然能获得不错的相邻加成。荷兰人在河流和沿海地格上都表现出色,不过与高棉相比,他们需要的河流地格更少;与印度尼西亚相比,他们需要的海洋地格也更少。话虽如此,在河流密集的地区进行良好投资,即使在其他科技产出较低的区域,也能为你带来惊人的生产力、良好的文化产出和可观的科技值。 河流相邻加成:学院、剧院广场和工业区与河流地格相邻时将获得可观的加成,帮助你更有效地发展领地。 由于这一能力是基于每个区域生效的,因此使用荷兰进行游戏时,通常建立大量城市是个不错的主意。这也能帮助你提升贸易路线容量,以配合威廉敏娜的领袖能力。 学院

开局至少获得+2科技值是不错的,但荷兰文明能力更出色的地方在于,无需刻意寻找山脉也能获得良好的科技相邻加成。另一个能从山脉相邻中获益的区域——圣地,在使用荷兰游玩时完全可以忽略。高吸引力区域在海边也很容易找到,所以你基本可以完全无视山脉。 不过,河源通常位于山脉中,这可能带来非常可观的科技产出。要找到河源,只需观察河流的流向并沿相反方向追溯即可。你也可以从礁石 tiles(位于海岸)和地热裂缝 tiles(位于大陆边界)获得强大的相邻加成,所以一定要留意它们。 通常来说,荷兰的学院不会特别出色,但会很可靠。 剧院广场

剧院广场通常是难以最大化相邻加成的区域。相邻的奇观每个提供+2文化,但如果无法获得多个,大多数城市将只能依靠与其他区域相邻的加成(最好是娱乐中心和水上乐园)。对于荷兰来说,你可以轻松获得至少与纪念碑相当的产出。相对早期建造几个剧院广场,将对你获取关键市政(如行会、探索和土木工程)大有帮助。工业区

工业区毗邻河流可获得+2生产力,这是一个相当大的优势,很快就能带来可观的生产力加成。其原因在于水渠和堤坝区域。这两个区域都能为相邻的工业区提供+2生产力,其中水渠有多种可能的建造位置,包括河畔地带,而堤坝则必须建在与河流相邻的泛滥平原格上。 如果这些还不够的话,荷兰人建造堤坝时还能获得50%的生产力加成,这使得堤坝的建造时间与普通特色区域大致相当,因此更快地最大化这种生产力加成会容易得多。
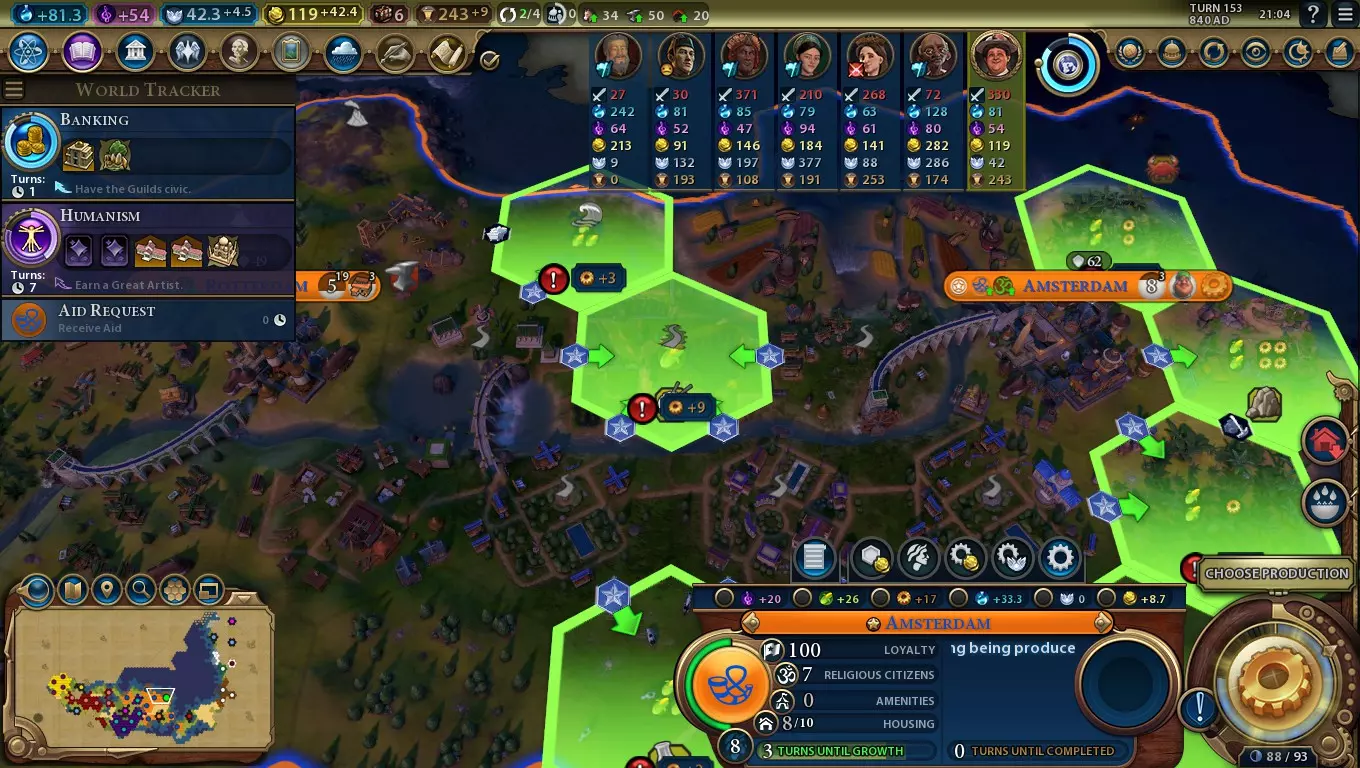
在城市中进行精心规划可以获得惊人的相邻加成! 你可以通过中世纪时代的“行会”市政解锁的“工匠”军事政策卡(该市政同样会解锁“圩田”),使工业区的相邻产出翻倍。到了现代时代的“意识形态”市政,这张政策卡会被“五年计划”经济政策卡取代,后者能使工业区和校园区的相邻加成均翻倍。 一旦你研发出工业时代的“工业化”科技,就可以在工业区建造燃煤发电厂。燃煤发电厂提供的生产力等同于该区域的相邻加成,其中包括“工匠”或“五年计划”政策卡带来的效果。一个河畔工业区,若毗邻水渠和大坝,再建造一座燃煤发电厂,并启用“工匠”或“五年计划”政策卡,每回合将产生高达28点生产力! 关于这个文明能力,有一点值得注意:与常规情况相比,该文明的区域最佳选址更有可能彼此相邻。你无需依赖山脉和雨林来获得良好的学院产出,因此可以将学院直接建在剧院广场、工业区旁边,甚至可能靠近商业中心。这样一来,更容易利用那些区域每相邻两个其他区域就获得+1相邻加成的效果,而且通过将区域集中放置,你也能更轻松地部署反间谍单位,保护这些区域免受敌方间谍的侵扰。文明能力:大河(第2/2部分) 港口文化炸弹

这个能力虽小,但能帮助荷兰确保通往开阔水域的通道、找到优质的圩田位置,或者节省用于购买含水上资源地块的金币。你不一定需要在每个城市都建造港口(毕竟商业中心从河流获得+2相邻加成,能很好地补充你的学院、剧院广场和工业区),但拥有足够的港口有助于招募中世纪或文艺复兴时期的伟大海军统帅,以配合你的特色单位。在有圩田的城市中,你也需要建造港口,这样就能将灯塔提供的+1食物和海港提供的+2金币添加到圩田地块上。记住,港口与市中心相邻时可获得+2的相邻加成,而在文艺复兴时代的大规模生产科技解锁船坞建筑后,该加成还会增加产能。如果可能,尽量将港口放置在不与三个或更多平原/丘陵陆地地格相邻的位置,这样就能在那里建造圩田。如果两种情况冲突(要么失去圩田位置,要么将港口移离城市),若急需产能且城市能建造船坞,则在该位置建造港口;否则建造圩田。即使有政策卡将相邻加成翻倍,港口在该位置的产金量通常仍低于圩田,而且圩田还能提供食物和住房。如果你无法在市中心旁建造港口(或者该位置建造圩田会更好),那么或许值得考虑刻意放置港口以充分利用文化炸弹效果。对于边境城市,将港口直接建在与敌对领土相邻的位置,可以获取一些原本需要通过战争才能得到的土地。 大坝与防洪堤建造


荷兰在修建堤坝区域或防洪屏障建筑时,生产力提升50%。这两种建筑均有助于应对环境影响——堤坝可处理河流泛滥平原的洪水,而防洪屏障则能在游戏后期缓解沿海洪水。 堤坝最早在中世纪时代的扶壁科技中解锁。由于该科技是研发三桅战舰单位所需的方帆科技的必经之路,因此无需专门绕道研究。堤坝的常规建造成本比特色区域高出50%,但荷兰的生产力加成可抵消这部分额外成本。 堤坝提供+3住房和1点宜居度,并能防止城市因干旱导致食物损失,不过对于荷兰而言,有两个效果尤为值得注意。首先,它们能防止大坝所在的整个泛滥平原区域遭受河水泛滥的破坏,这有助于保护你可能拥有的众多河畔区域。其次,它们为相邻的工业区提供+2生产力,使工业区的相邻加成达到4以上变得极为容易。尽管如此,要小心敌方间谍对你城市执行【破坏大坝】任务——在你的工业区或大坝区域部署自己的间谍,他们将能够防御这两个区域免受破坏。 在中世纪时代的【军事工程学】科技下,你可以在任何拥有【军营】和【军械库】建筑的城市训练【军事工程师】。军事工程师拥有两次建造次数,除了用其建造改良设施外,还能加速某些区域和建筑的生产——包括水坝和防洪堤。通常情况下,每次建造次数可覆盖20%的生产成本,而对于荷兰则提升至30%。
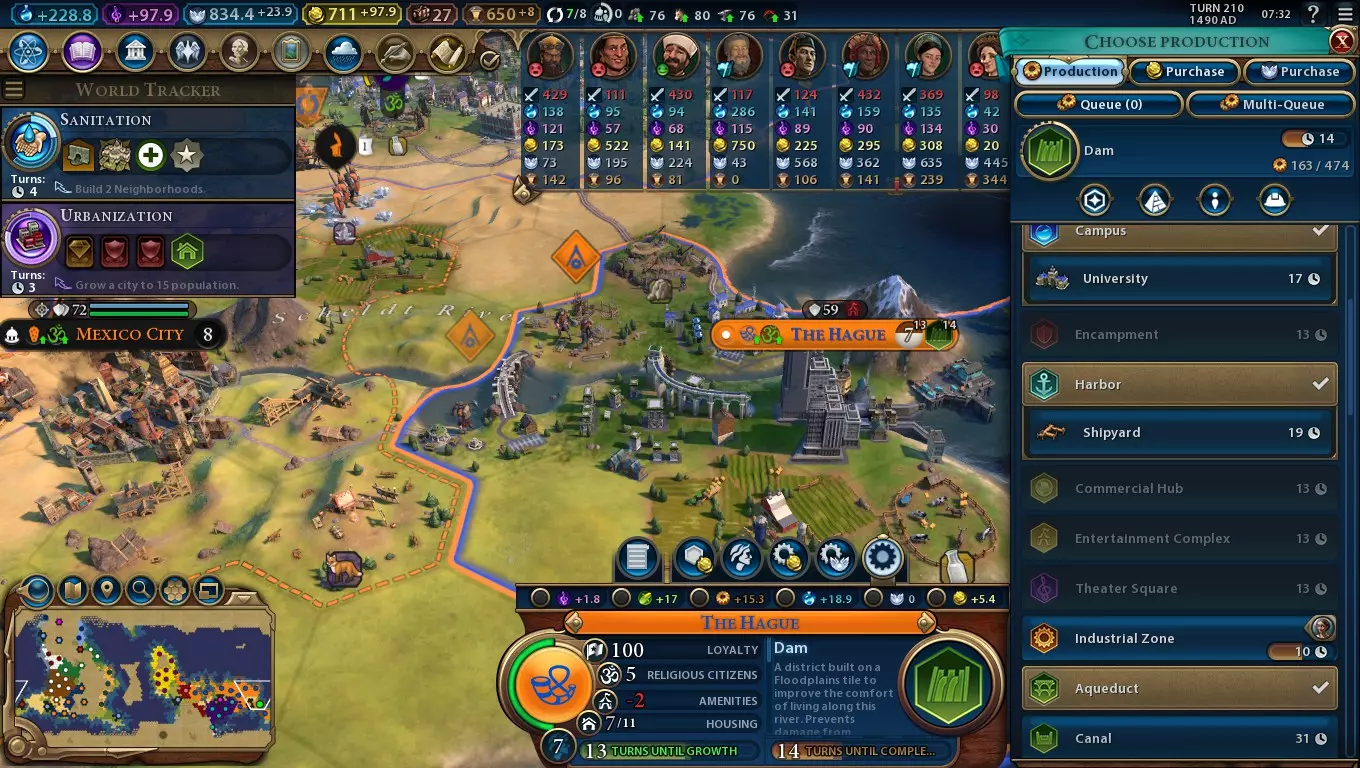
这使得在新建城市或生产力较低的城市中建造水坝变得相当容易! 军事工程学还需要用于揭示硝石,而您的独特单位需要硝石才能建造,因此无需为获取它而绕道研究。您只需要一个城市拥有军营和军械库建筑,就能受益于军事工程师,这样就不会干扰您建造其他重要区域的计划。 在游戏后期,达到现代时代的计算机科技后,您的城市可以建造防洪堤。防洪堤可以保护低洼的沿海 tiles 免受气候变化导致的海平面上升的影响。气候变化越严重,防洪堤的建造和维护成本就越高。不过幸运的是,荷兰的生产加成意味着使用军事工程师时,你可以在任何城市仅用四次建造次数就快速建成防洪堤。这一点你可能需要依赖,因为工业区的高相邻加成给了荷兰使用燃煤发电厂的巨大动力,而燃煤发电厂会显著加剧气候变化。 总结:留意城市的河畔位置。海岸和湖泊不错,但河流才是关键。 文明能力使其容易将大量区域相互相邻放置,既能最大化相邻加成,又能让你的城市更容易防御敌方间谍。 建造大量城市将有助于你从该文明能力中获得更多收益。港口文化炸弹是一项次要能力,对游戏的影响基本微乎其微。 将工业区、水坝和水渠放置在一起可获得巨大的相邻加成,并通过燃煤发电厂充分利用这些加成。 荷兰仅需两名军事工程师,就能在任意城市快速建造水坝或防洪堤。 威廉明娜的领袖能力:橙色广播
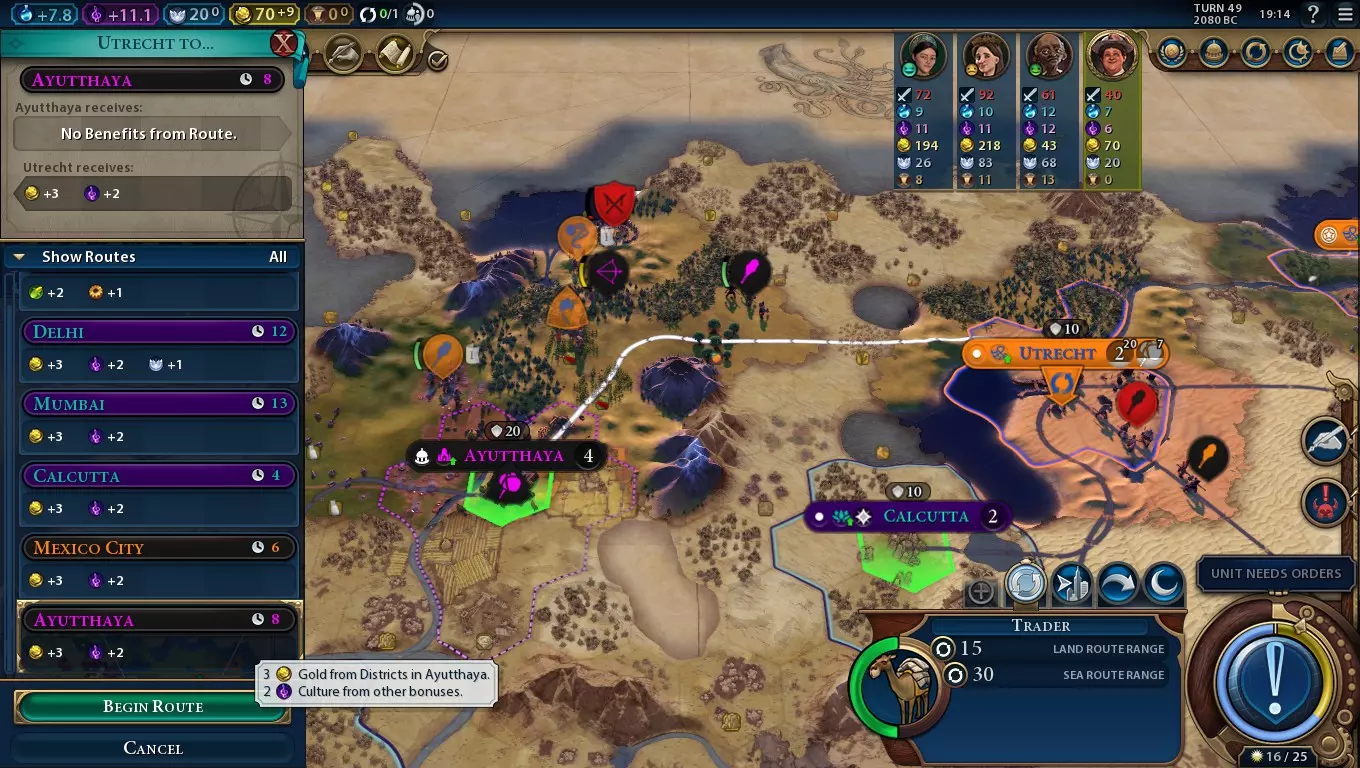
虽然威廉明娜的领袖能力不如荷兰文明能力那般强大,但它仍能帮助你更有效地使用七省号(Zeven Provinciën)独特单位和圩田(Polders)改良设施。要充分发挥这一能力,你需要大量贸易路线,因此可以考虑建立许多城市,并为这些城市建造带灯塔的港口或带市场的商业中心。 额外文化值 通过国际贸易获得额外文化值有助于你解锁一些关键的早期市政,并为研发出圩田所需的行会市政铺路。不过,也要考虑国内贸易带来的食物和生产力——为了更多文化值,牺牲部分食物和生产力是否值得呢? 其他文明与你进行贸易时,你也能获得文化值。与克利奥帕特拉的领袖能力不同,此能力不会为其他文明提供任何额外加成,因此你需要为其他文明提供特别强大的激励,促使他们向你派遣贸易路线。拥有多种特色区域(除了自然保护区和机场,这两者不会增加贸易产出)的城市对其他文明而言会特别有利可图。同盟关系也会有所帮助,尤其是与那些自身拥有贸易路线加成的文明结盟。额外忠诚度
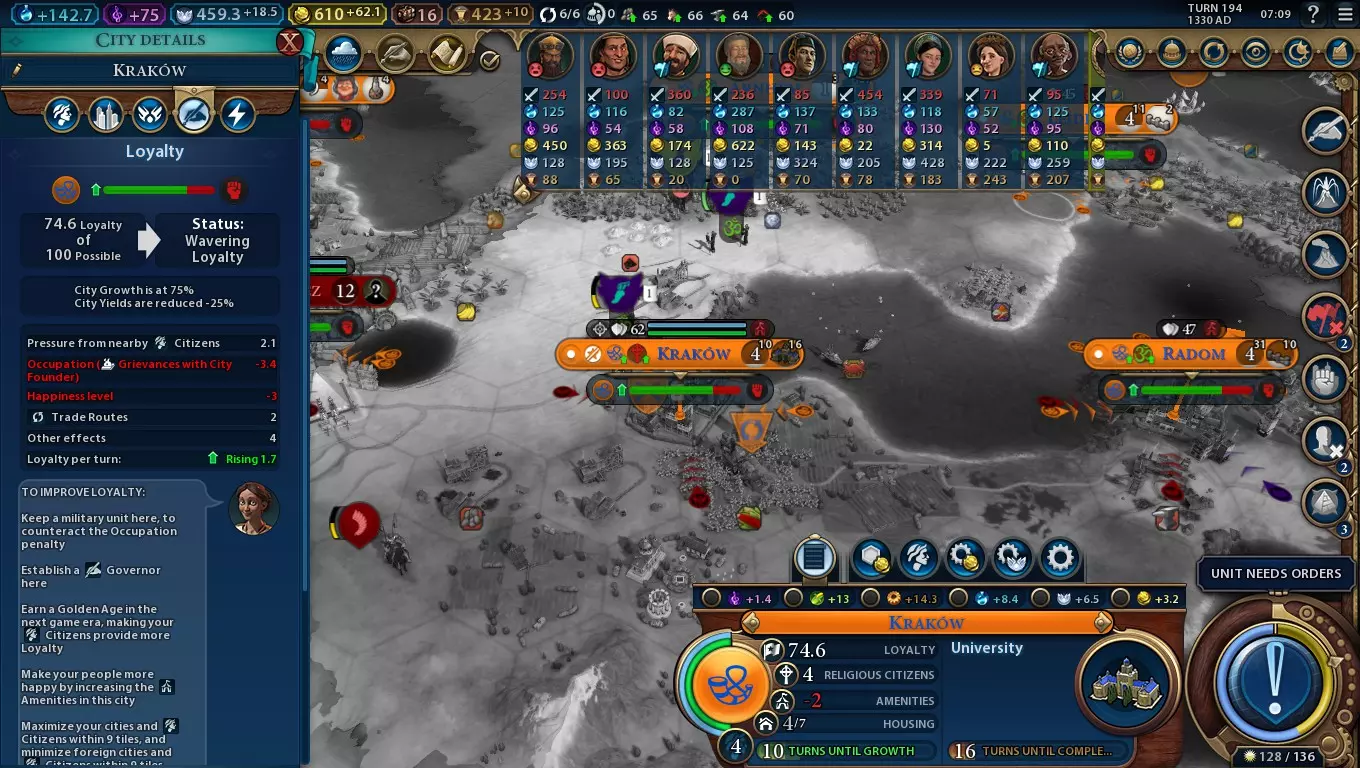
国内贸易路线可为派出贸易路线的城市提供+2忠诚度,且该效果可叠加。 此加成有两个关键应用: 1. 助力城市忠诚度转正——若某城市每回合忠诚度略有流失,无需派驻总督(从而避免损失总督带来的加成),可改用贸易路线解决。 2. 向某城市堆叠贸易路线以抵抗巨大的忠诚度压力——这在攻占沿海城市时尤为有用。 关于第二个应用,你可以保留一些未使用的商人,待捕获第一个沿海城市后立即调派过去,让他们向你的核心领土派遣贸易路线,从而获得可观的忠诚度提升。配合总督、纪念碑,或许再加上一些提升忠诚度的政策卡,你应该能争取到足够时间将城市稳固地纳入自己的版图。圩田产出的金币可用于在你攻占的城市中购买陆地单位,以便在需要时协助防御。 结论 该领袖能力的最终影响有限。它能提供一些额外的文化值,但你仍需要大量纪念碑和/或剧院广场才能更快解锁如行会等关键市政。在孤立城市中叠加贸易路线可以防止其成为自由城市,但调整贸易路线(并牺牲其他城市可能拥有的更优贸易路线)的需求使得这一能力相当小众。 独特改良设施:圩田
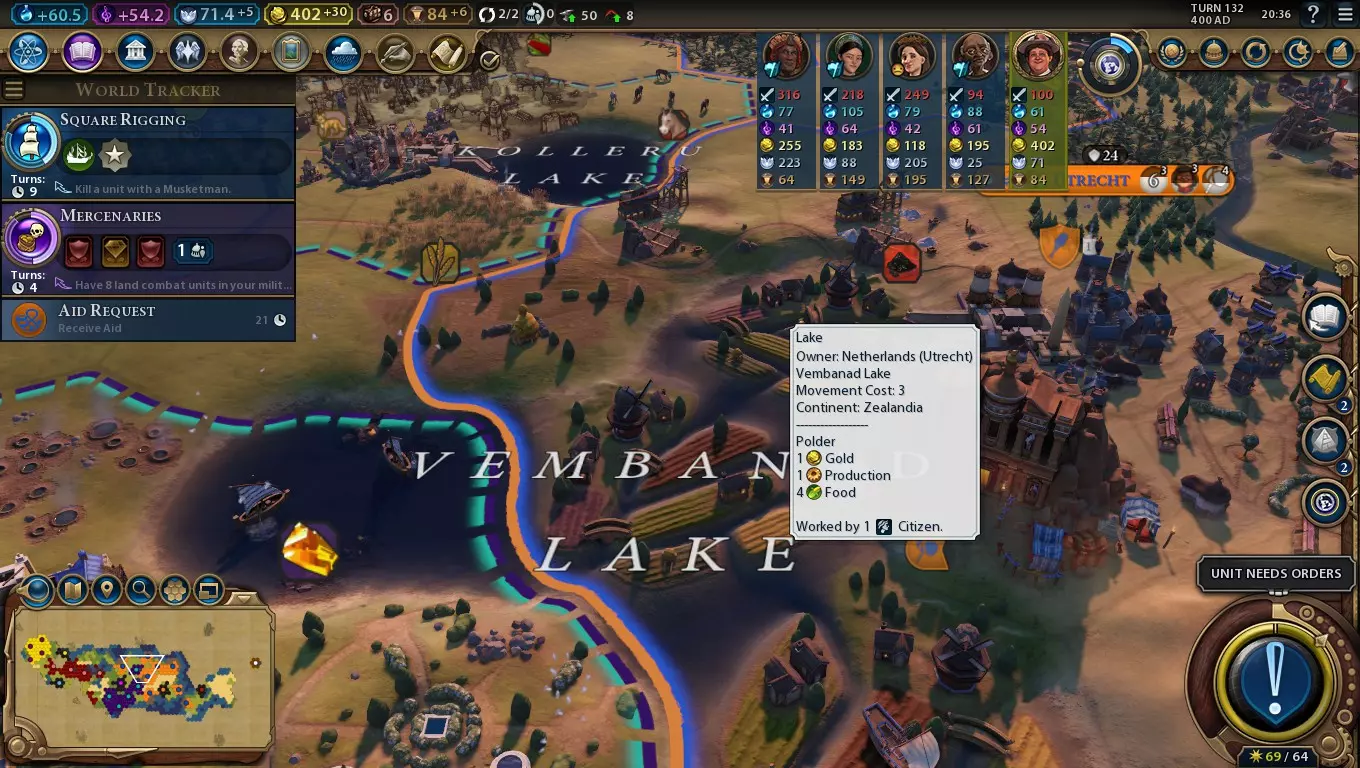
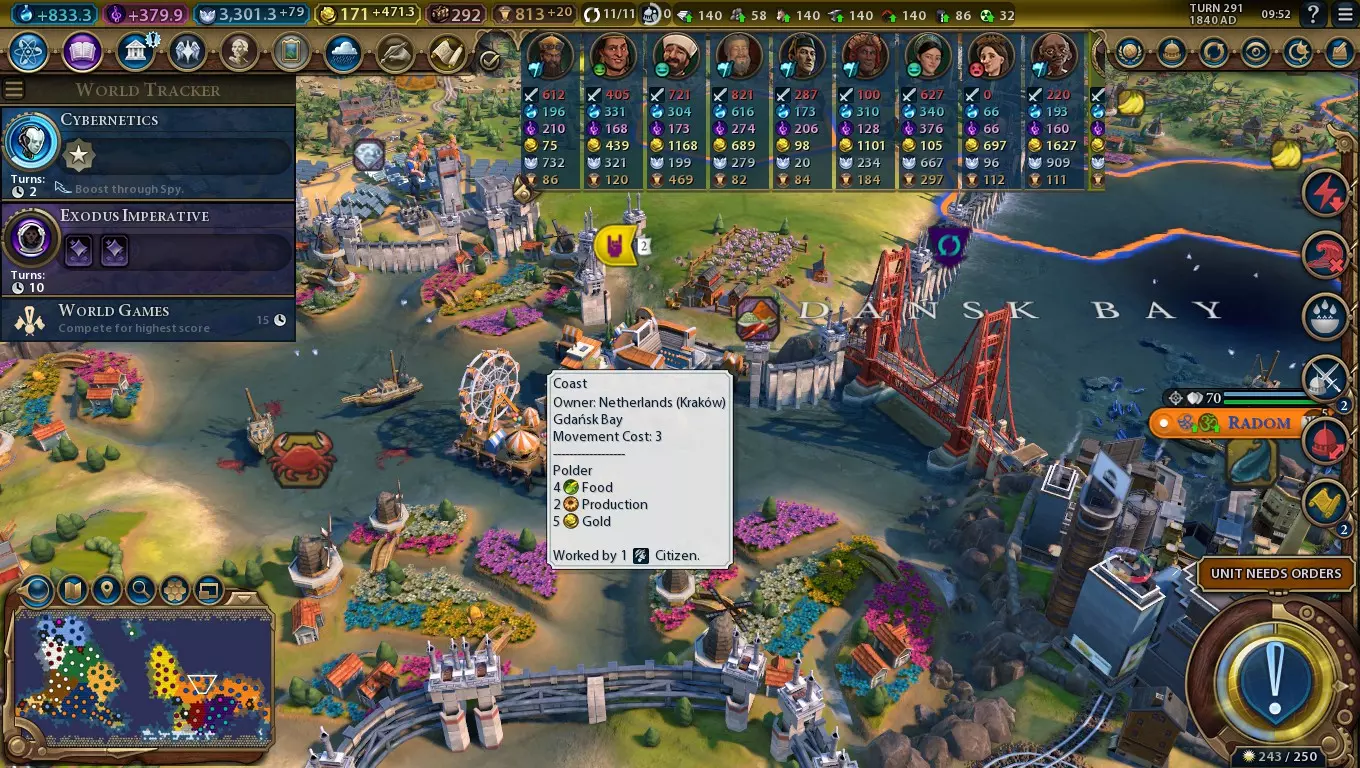
Polders turn some relatively low-value coast and lake tiles into something akin to a super farm. In the industrial era, they bloom into a mighty source of gold as well. Getting Started Early on, it helps to search for good spots for future Polders. Lakes are particularly good, as are rougher coastlines. Don't neglect rivers, though - the bonus yields for Campuses and Industrial Zones can be worth giving up one or two Polder spots. To get to Polders, you need the Guilds civic. The civ and leader abilities will help you get plenty of culture, though it's important to consider inspirations as well. Starting with the assumption you have Political Philosophy, here's what you need: Drama and Poetry (Boost: Construct a wonder - Probably best to research this first, and without the boost.) Recorded History (Boost: Construct two Campus districts - Not too hard considering your civ ability makes them better.) Games and Recreation (Boost: Research the Construction technology - Can be a fairly awkward technology to get to in time.) Defensive Tactics (Boost: Be the target of a declaration of war - Out of your control. Sometimes you'll get it, sometimes you won't.) Civil Service (Boost: Bring a city to size 10 population - Often hard to achieve in time unless you can quickly get a city to 11+ housing.) Feudalism (Boost: Construct six farms - Easy if you've expanded fairly quickly.) Guilds (Boost: Build two Markets - Again, not too hard if you've expanded fairly quickly.) It helps to train up a few Builders prior to researching Guilds so you can place Polders right away. You'll also need the Sailing technology to embark Builders, but that won't be a problem in the slightest. Practically any tile you can place a Polder on, you should do so. The only exceptions are if you really need to place a Harbour or Water Park district in a specific spot, or need to place the Huey Teocalli wonder and don't have anywhere else for it to go. Fisheries don't offer anywhere near as good yields, so Polders should always take precedence over them. The Speed Penalty One of the curious effects of Polders is that they increase the movement cost needed to enter their tiles to 3. This affects naval and embarked land units alike, and represents the only time in the entire game where naval units need more than one movement point to enter a tile. Though this can be a little bit annoying at times when moving around your own naval units, it can actually be rather useful in defence. A city build on a peninsula or headland sticking out into the sea can be relatively safe from land attacks but vulnerable to the sea. Flanking the city with Polders, however, makes it a trickier target - melee naval units will end up losing two additional movement points on the way to the city, which could delay their attacks and provide a window of opportunity for siege units to attack them back. As such, the city will be harder for other civs to take. Increasing the movement cost also makes Polders hard to pillage, and pillaging units prone to counter-attacks. Considering pillaging needs at least three movement points, naval units usually won't be able to move onto the tile and pillage it in the same turn, leaving them vulnerable. Boosting the Yield Indirectly Tiles that contain Polders start with 2 food, 1 gold, 1 production and 0.5 housing at the very least. That's a fine yield, but not particularly ground-breaking in itself. Having adjacent Polders adds more food, but that can't always be achieved. Any coastal city with a couple of Polders should have a Harbour district. Lighthouses add +1 food to all sea and lake tiles, while Seaports add +2 gold. Be careful with cities that are near lakes but not the sea - building a Harbour may come at the cost of a good Polder spot, and cost more food and gold than it grants. Thankfully, lake Polders can benefit from the Huey Teocalli wonder, which adds +1 production and +1 food to all lake tiles. The medieval-era Military Tactics technology required to build the wonder requires a bit of research detour, but it's not an especially competitive wonder and if you can secure a lot of lakes it's well worth the effort. You may even be able to complete it before you get to the Guilds civic. The Auckland city-state boosts production of all coast and lake tiles by 1, rising to +2 in the industrial era. Combined with the default +1 production boost Polders offer, it can provide the tiles with a comparable production boost to mined hills. Boosting the Yield Directly Polders gain a massive +4 gold boost at the industrial-era Civil Engineering civic. Though they aren't the strongest unique improvement in the game in terms of theoretical gold yield, they're perhaps the most consistently strong one - particularly as Polders are placed on tiles that already offer gold. There's lots of good uses for this gold bonus, but one of particular note is purchasing land units in coastal cities you capture via your UU, letting you move the fight inland. You may be able to use Wilhelmina's leader ability to buy some time by boosting the city's loyalty, assuming you have enough free trade routes.
在现代的可替换部件科技下,圩田与其他圩田相邻时能提供两倍的食物产出。这使它们能够跟上该科技给农场带来的巨大食物加成,确保其依然是值得开发的优质地块。 结论:圩田是非常出色的地块改良设施,无论你打算如何使用荷兰,它们都十分值得建造,尤其是在食物和金币产出方面。尽管有时需要寻找湖泊或崎岖海岸线,同时还要考虑文明能力对河流的需求,这可能会有些棘手,但圩田地块最终能带来的巨大产出足以弥补这些麻烦。 特色单位:七省号
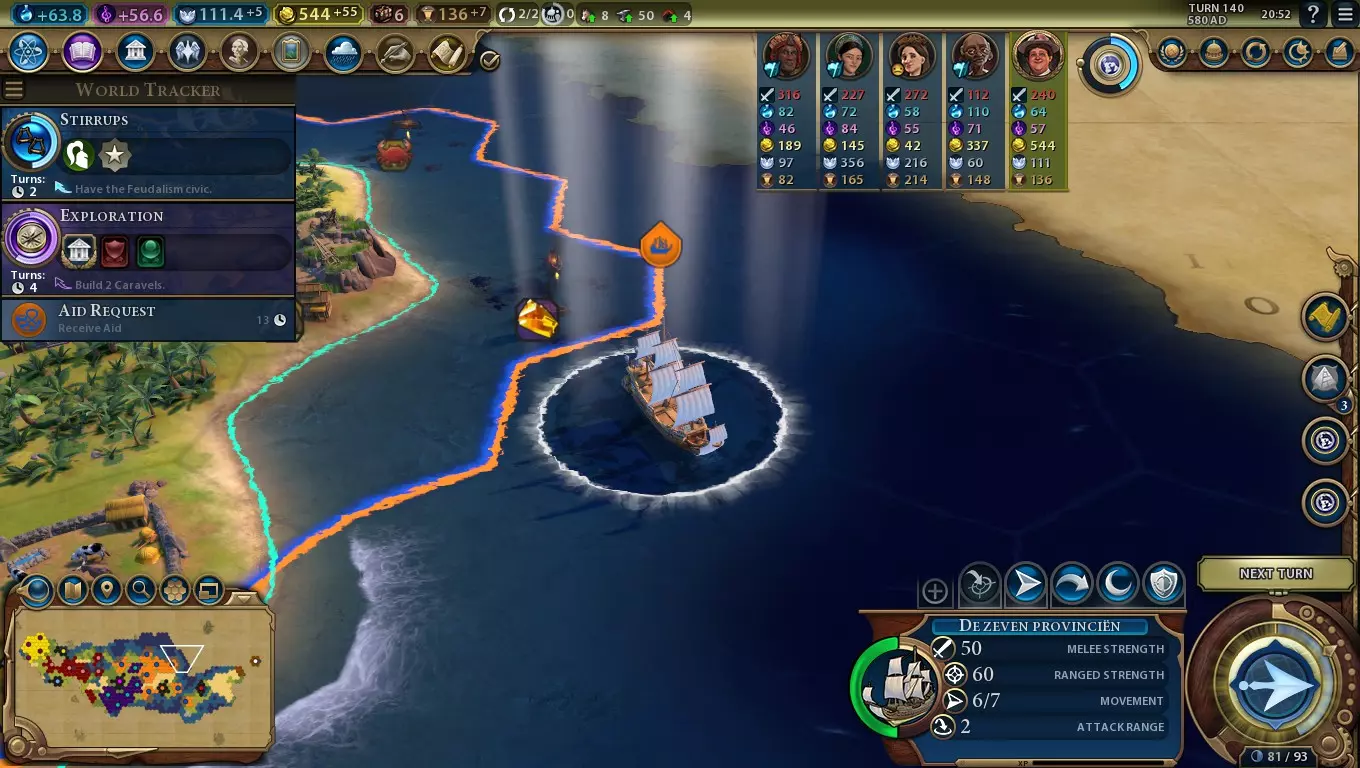
Coastal cities beware. De Zeven Provinciën comes to completely wreck their defences with a 12-point advantage relative to regular Frigates or Bombards at that role. They're not bad at fighting other units, either - they can take out enemy Bombards and Frigates in just two hits, and Caravels or Musketmen in three. Preparation To build copies of De Zeven Provinciën, you need the renaissance-era Square Rigging technology, as well as the Military Engineering technology to reveal nitre resources. Before you research them, it's a good idea to get the Apprenticeship technology (for Industrial Zones) first. Consider researching Shipbuilding fairly early so you can train Quadriremes and immediately upgrade them once you have Square Rigging and enough nitre. The Press Gangs military policy card comes available at the renaissance-era Exploration civic, and boosts the training of this unit by 100%. Once you're done researching Guilds for Polders, that may be a good choice of civic to go for next considering it also unlocks the Merchant Republic government. The Mercenaries civic is also on the way, and comes with the Professional Army and Retinues military policy cards for 50% less gold and strategic resource upgrade costs respectively - excellent for upgrading Quadrirmes to De Zeven Provinciën. In Action With 67 ranged strength versus cities, De Zeven Provinciën units can make short work of city defences. They're only three points weaker than Battleships in this role, which arrive two eras later! Bring along a few together with a medieval or renaissance-era Great Admiral and some Caravels or Ironclads and you can easily take over - or liberate - coastal cities. City-states often appear on a coast, so if any get captured, you can use this unit to quickly liberate them. If you choose to capture coastal cities, keep in mind you'll probably have severe loyalty penalties flipping that city into a free city in little time - even with a Governor present in the city. Either aim to take multiple nearby coastal cities simultaneously, use Wilhelmina's leader ability and some trade routes for extra loyalty, or use some Polder gold to buy land units and move the fight inland. A prepared opponent may have Bombards at the ready, which on average can kill your Zeven Provinciën units in three hits. Mobility will be your greatest advantage - you can scout an area with one unit by moving in and out again without attacking, or move the bulk of your naval invasion force to a different part of the enemy empire buying you a few turns until the Bombards can reposition themselves. Alternatively, a prepared foe may use Privateers against you. It helps to keep your navy fairly close together so they can search nearby seas looking for them the moment you get unexpectedly attacked. Obsoletion With the modern-era Refining technology, Battleships become available. They eclipse the combat abilities of the Zeven Provinciën UU. That being said, Zeven Provinciën units are a fair bit cheaper and are only 10 points weaker than Battleships. Forming Zeven Provinciën fleets will cancel out that strength difference, and is a good stopgap measure if you're putting off getting the Steel technology, lack access to coal or need coal for Coal Power Plants. Conclusion The Dutch UU can take on most pre-modern naval units, tear apart city defences like nothing else of its era and crush land units. Their main weakness is that it's quite difficult to hold onto captured coastal cities, so you'll need to find plenty of sources of loyalty to account for that. Administration - Government and Policy Cards Note that the Administration sections strictly cover the options that have particularly good synergy with the civ's uniques. These are not necessarily the best choices, but rather options you should consider more than usual if playing this civ relative to others. Government Tier One Classical Republic makes a good starting government. Extra Great Person Points helps you on the way to a Great Admiral, bonus amenities help you support expansion without needing to worry too much about building Entertainment Complexes, and the economic policy card slots help you use cards that complement the civ ability. The Dutch civ and leader abilities benefit from having a higher quantity of cities, so the Ancestral Hall is a good choice of government building to make that easier. Tier Two Merchant Republic is usually your best choice. Again, a good array of economic policy card slots goes well with the Dutch civ ability, and there's other good stuff here as well - the gold bonus makes Polders even more effective and faster district construction is great for getting even more boosted districts built. The Intelligence Agency is a decent choice of government building. You'll probably have a large quantity of districts spread across many cities, so an extra Spy will help cover that. Still, the Netherlands is encouraged to keep districts close together, minimising the number of Spies needed, which may let you use some offensively as well. Stealing eurekas from other civs will complement your good raw science output well. Tier Three Democracy's bonus to trading with allies nicely complements Wilhelmina's leader ability, and the array of policy card slots goes well with the civ ability, making it a good general-use government if you're unsure what to take. Communism is a good alternative for its bonus to science yields. For a scientific Netherlands, build the Royal Society building; it allows you to get space race projects done faster by using Builder charges. Tier Four Synthetic Technocracy is the ideal government for scientific games as it speeds up space race projects. Policy Cards Ancient Era Caravansaries (Economic, requires Foreign Trade) - Get a little gold out of your trade routes in addition to either culture or loyalty. Maritime Industries (Military, requires Foreign Trade) - Building some Quadriremes ready for upgrading to Zeven Provinciën units later? You'll save a lot of production with this policy card. Classical Era Natural Philosophy (Economic, requires Recorded History) - A river-adjacent Campus will now be worth 4 science at a minimum. Medieval Era Aesthetics (Economic, requires Medieval Faires) - A river-adjacent Theatre Square will now be worth 4 culture at a minimum. Theoretically, you could get a +28 adjacency boost with a riverside Theatre Square surrounded by wonders, Entertainment Complexes and/or Water Parks. Craftsmen (Military, requires Guilds) - Makes river-adjacent Industrial Zones worth at least 4 production. Position Industrial Zones adjacent to Aqueducts and Dams for even more production, and build a Coal Power Plant to capitalise upon it! Professional Army (Military, requires Mercenaries) - This policy card cuts the cost of upgrading units, including the Quadrireme to Zeven Provinciën path. Retinues (Military, requires Mercenaries) - Saves precious nitre on the Quadrireme to De Zeven Provinciën upgrade path. Serfdom (Economic, requires Feudalism) - Considering Polder-eligible tiles aren't really good for any other tile improvement, you'll need to use more Builder charges than the average civ to get everything improved. This policy card will help with that. Trade Confederation (Economic, requires Mercenaries) - Boost your international trade routes to get more culture and a little science on top. Renaissance Era Colonial Offices (Economic, requires Exploration) - Helps you hold onto and grow cities on other continents - useful in conjunction with your De Zeven Provinciën conquests. Drill Manuals (Military, requires Mercantilism) - Extra nitre for De Zeven Provinciën, and extra coal for your powerful Coal Power Plants. Press Gangs (Military, requires Exploration) - Helps you build your UU faster. Rationalism (Economic, requires The Enlightenment) - The Dutch river adjacency bonus for Campuses makes it easy to meet the 4+ adjacency requirement needed to make the most of this policy card. Triangular Trade (Economic, requires Mercantilism) - A gold boost to trade routes. Also offers a little faith. Wisselbanken (Diplomatic, requires Diplomatic Service) - Makes international trading much more lucrative if you have an ally or city-state you are suzerain over - handy if you want to pick up a little more culture. Industrial Era Colonial Taxes (Economic, requires Colonialism) - Settled or taken cities on another continent? Have Polders there? Enjoy a decent boost to your gold income. Grand Opera (Economic, requires Opera and Ballet) - It's easier to meet the full requirements for this policy card than it is for many other civs, so enjoy a good boost to culture. Raj (Diplomatic, requires Colonialism) - Extra gold for trading with city-states, on top of the culture you get as part of Wilhelmina's leader ability. Modern Era Collectivisation (Economic, Communism only, requires Class Struggle) - Need to use internal trade for a loyalty boost? This policy card will let you grow the city at a good rate at the same time, which will help boost its loyalty further. Five Year Plan (Economic, requires Ideology) - Get double Campus and Industrial Zone adjacency on just one policy card, rather than needing two! Market Economy (Economic, requires Capitalism) - Get better culture, science and gold yields from international trade. New Deal (Economic, Democracy only, requires Suffrage) - Polders offer a lot of food and gold, but never more than 0.5 housing. Use of this policy card can help you secure plenty of housing and amenities to go along with it. Atomic Era Sports Media (Economic, requires Professional Sports) - Basically Aesthetics with a potential few amenities on top. Information Era Ecommerce (Economic, requires Globalisation) - Get +2 production and +5 gold out of all your trade routes. Quite handy when you need a bit of last-minute production for space race projects. Administration - Age Bonuses and World Congress Age Bonuses Only bonuses with notable synergy with the civ's uniques are covered here. Isolationism (Dark Age, Classical to Industrial eras) - Settled enough cities? Need to boost loyalty with internal trade routes? Make good use of this policy card's food and production bonuses. Monumentality (Dedication, Classical to Renaissance eras) - The Dutch civ ability encourages districts to be built in high quantities, meaning this dedication can provide you with quite a bit of era score. Pen, Brush and Voice (Golden Age, Classical to Medieval eras) - If you can secure a classical-era Golden Age, the culture boost from this will really help you get to Polders much sooner. Hic Sunt Dracones (Golden Age, Renaissance to Modern eras) - Makes your navy even faster and makes it easier to hold onto captured coastal cities. Reform the Coinage (Dedication, Renaissance to Modern eras) - Wilhelmina's leader ability encourages you to have plenty of trade routes. This dedication gives you plenty of easy era score from completing them. Reform the Coinage (Golden Age, Renaissance to Modern eras) - Pillage immunity for all your trade routes means you can stack trade routes in a city for loyalty without risk, or alternatively enjoy extra gold to accompany your culture from international trade. Robber Barons (Dark Age, Industrial to Information eras) - If you can handle the amenity hit, this is a lovely complement to your strong Industrial Zones and Polders. Collectivism (Dark Age, Modern to Information eras) - Bonus Industrial Zone adjacency goes well with the Dutch civ ability, though the loss of Great Person Points can be an issue. World Congress How you should vote in the World Congress will often be specific to your game - if you have a strong rival, for example, it might be better to vote to hurt them than to help yourself. Furthermore, there may be general bonuses to your chosen victory route or gameplay which are more relevant than ones that have stronger synergy with civ-specific bonuses. Otherwise, here's a list of key votes that have high relevance for this civ relative to other civs. Espionage Pact - Effect B (The chosen Spy operation is unavailable) on Breach Dam or Industrial Zone Sabotage Some other Spy operations are also good to disallow, like Steal Tech Boost, but considering the Dutch incentive to settle cities extensively in river regions, the incentive to build plenty of Dams and the huge devastation a breached Dam can cause, Breach Dam is an excellent one to disallow. Industrial Zone Sabotage is also worth blocking as Dutch Industrial Zones can have huge adjacency bonuses you won't want to lose, and the mission has a higher success rate than Breach Dam. Global Energy Treaty - Effect A (50% discount on the production of buildings of this type) on Coal Power Plants Coal Power Plants add production equal to the Industrial Zone's adjacency, which can get particularly large in Dutch cities. The resulting damage to the climate is somewhat mitigated for the Netherlands thanks to the production bonus you have towards Flood Barrier buildings. Nobel Prize in Physics - Vote in favour. The Dutch incentive to build Campuses and Industrial Zones means you'll often have an advantage at this scored competition. Patronage - Effect A (Earn double points towards Great People of this class) on Great Engineers, Scientists, or any GWAM These Great People correspond to Campuses, Industrial Zones and Theatre Squares; the three speciality districts the Dutch have the most incentive to build. Trade Policy - Effect A (Trade routes sent to the chosen player provide +4 gold to the sender. The chosen player receives +1 trade route capacity) on yourself. There's two great effects from this resolution: One, the extra trade route capacity allows you to get more loyalty or culture. But two, the boost to gold for any trade route heading to your cities will add a stronger incentive for other civs to send trade routes to you, which will provide you with extra culture. Urban Development Treaty - Effect A (+100% production towards buildings in this district) on Industrial Zones Aids in getting Coal Power Plants up faster. Administration - Pantheons, Religion and City-States Pantheons City Patron Goddess - Get your civ ability off to a good start by using this pantheon to help you build the first district in each city faster. Divine Spark - Get more Great People out of your strong Campuses and Theatre Squares. God of the Sea - Helps make your coastal cities more productive, helping you make the most out of Polders. Religious Beliefs You can have one founder, one follower, one enhancer and one worship belief. Jesuit Education (Follower) - Got some excess faith you need to use? Develop your strong Campuses and Theatre Squares with it. Religious Community (Follower) - Extra gold for international trade routes to complement your culture. City-States Auckland (Trade) - Possibly the most important city-state for the Netherlands to be suzerain over due to the way it boosts the yield of every Polder. Bandar Brunei (Trade) - Trading a lot with other civs and setting up trading posts? You can get extra gold from that. Bologna (Scientific) - Get more Great Person Points out of your favoured districts. Chinguetti (Religious) - Boosts the yields for international trade routes, albeit with faith, which is a less important yield for the Netherlands. Geneva (Scientific) - Not a bad choice for a peaceful scientific game, magnifying your good Campus yield. Hattusa (Scientific) - Provides you with nitre for your UU if you have no other source, and coal for your mighty Coal Power Plants. Hunza (Trade) - Get bonus gold out of your trade routes. Kumasi (Cultural) - Get lots of culture from trading with city-states. Mogadishu (Trade) - Your traders will now be immune to being pillaged if they're on water tiles. That's rather helpful if you're using them to boost the loyalty in a distant colony. Nan Madol (Cultural) - Building districts around river mouths or setting up Harbours? Enjoy some extra culture. Ngazargamu (Militaristic) - Polder gold makes it easier to buy a lot of military units, and Ngazargamu makes that cheaper. Samarkand (Trade) - Trading dome improvements increase international trade route yields on top of the bonus culture Wilhelmina's leader ability offers. Singapore (Industrial) - Extra production from international trade. Venice (Trade) - A small additional boost to international trade routes to complement your culture boost. Vilnius (Cultural) - Trading with allies will produce better trade route yields and help you gain alliance points faster. The highest level of alliance you have will determine the bonus this city-state grants. At its best, this can increase Theatre Square adjacency bonuses by 150%, making riverside ones worth at least 5 culture per turn. Administration - Wonders and Great People Wonders Oracle (Ancient era, Mysticism civic) - The Dutch civ ability encourages building a large variety of districts early on, and the Oracle's Great Person Points bonus goes rather well with that kind of development. Colossus (Classical era, Shipbuilding technology) - A free Trader and trade route capacity, in addition to some gold and a Great Admiral Point, complementing both Wilhelmina's leader ability and the UU. Great Library (Classical era, Recorded History civic) - The Netherlands is pretty good at getting a raw science output, and this wonder will help you secure more eurekas. Great Lighthouse (Classical era, Celestial Navigation technology) - Boosts the movement points of all sea units, including your UU. Mausoleum at Halicarnassus (Classical era, Defensive Tactics civic) - With better Industrial Zones and a maritime emphasis, the Netherlands complements this wonder rather well. Enjoy better coastal tile yields in the city (which can add to Polder yields) and more charges for Great Engineers. Huey Teocalli (Medieval era, Military Tactics technology) - Boosts the food and production of all lakes you own by +1 food and +1 production. Lake Polders become rather powerful in conjunction with this wonder. University of Sankore (Medieval era, Education technology) - Adds a stronger incentive for other civs to trade with this city, helping you get more culture bonuses, as well as granting you bonus science for every trade route that goes to this city. Casa de Contratación (Renaissance era, Cartography technology) - Multipliers to gold and production work well with Polders and the boosted Dutch Industrial Zones respectively. Great Zimbabwe (Renaissance era, Banking technology) - Grants additional trade route capacity and makes trade routes from this city more powerful. Torre de Belém (Renaissance era, Mercantilism civic) - Boosts international trade route yields from this city, alongside other useful effects. Venetian Arsenal (Renaissance era, Mass Production technology) - Get double copies of your UU! Assuming you're building them from scratch and not buying them. Big Ben (Industrial era, Economics technology) - The high gold output international trade and Polders can create makes the +50% treasury bonus potentially very powerful. Furthermore, an extra economic policy card slot helps you build on the civ or leader abilities with corresponding policy cards. Oxford University (Industrial era, Scientific Theory technology) - Found a good river-and-mountain-adjacent Campus spot? Boost that good science yield further with this wonder. You'll also gain two free technologies. Ruhr Valley (Industrial era, Scientific Theory technology) - Make a good Industrial Zone city into a real powerhouse. Broadway (Modern era, Mass Media civic) - A strong Theatre Square can be boosted further with the 20% bonus this wonder offers. On the whole this wonder is best-suited to cultural games, though, so if you're not aiming for a cultural victory you should probably pass on it. Amundsen-Scott Research Station (Atomic era, Rapid Deployment civic) - Though finding a good spot for it may be difficult, finding a good use for the bonus won't be. A huge science boost and a substantial production one in every city makes great use of your civ ability and will work well for domination and scientific victories alike. Great People Great Generals and Admirals are only mentioned if their retirement bonuses have specific synergy with the civ; not merely for providing a strength bonus to a unique unit. Classical Era Gaius Duilius (Great Admiral) - You can use Gaius Duilius to create a Quadrireme fleet, and therefore a Zeven Provinciën fleet. That resulting unit will damage city defences almost as well as the Brazilian Minas Gereas UU, but a whole era earlier! Hypatia (Great Scientist) - Got lots of strong Campuses? Get lots of strong Libraries as well! Themistocles (Great Admiral) - Permanently increases your production towards naval ranged units - including your UU. Zhang Qian (Great Merchant) - Adds an extra trade route, and incentivises other civs to send routes to you - which means more culture for you! Medieval Era Ibn Fadlan (Great Merchant) - Extra trade route capacity and extra faith for trading with city-states. Leif Erikson (Great Admiral) - Increases the sight of all naval units, including your UU. Marco Polo (Great Merchant) - Also adds an extra trade route and encourages other civs to trade with you. Rajendra Chola (Great Admiral) - Makes all naval units you control - including your UU - stronger. Zheng He (Great Admiral) - An extra trade route, and an incentive for other civs to trade with you. Renaissance Era Isaac Newton (Great Scientist) - Your incentive to build a lot of Campuses will result in a lot of Universities. Boost their science output with Isaac Newton. Leonardo da Vinci (Great Engineer) - Want yet more culture? Your many Industrial Zones will soon help produce that once they have Workshops present. Mimar Sinan (Great Engineer) - Mimar Sinan makes Industrial Zones cause a culture bomb when first built. That's particularly useful for the Netherlands as that will allow you to gain control of adjacent riverside tiles ready for other districts. Raja Todar Mal (Great Merchant) - Need internal trading for the loyalty boost? You'll now generate a little gold at the same time. Santa Cruz (Great Admiral) - Make sure you have a spare medieval or renaissance-era Great Admiral before retiring Santa Cruz. Assuming you do, you can produce a Zeven Provinciën armada with 72 melee strength, 82 ranged strength and 89 strength versus city defences. For most purposes, that's stronger than a Missile Cruiser! Industrial Era James Watt (Great Engineer) - Your many Industrial Zones will now have better Factories. Modern Era Albert Einstein (Great Scientist) - Boosts the science yield of your many Campuses' many Research Labs. John Rockefeller (Great Merchant) - Boosts the gold yield from your trade routes. Nikola Tesla (Great Engineer) - In conjunction with Magnus (the Steward)'s Vertical Integration promotion and the Dutch civ ability encouraging you to build lots of Industrial Zones, this can result in immense amounts of production for one city. Atomic Era Melitta Bentz (Great Merchant) - Provides extra trade route capacity. Information Era Jamseth Tata (Great Merchant) - Turn your many Campuses into a great source of tourism. Great for a last-minute switch towards a cultural victory. Kenzo Tange (Great Engineer) - Adds tourism in a city based on the adjacency bonuses of all their districts, which is likely to be very strong in a riverside Dutch city. Masaru Ibuka (Great Merchant) - Adds tourism for all your Industrial Zones. Counter-Strategies Though the Netherlands doesn't have the weakest early-game of any civ, they're still pretty vulnerable at their point. A good chunk of their bonuses don't arrive until at least the medieval era. The Netherlands is somewhat comparable to Indonesia as an opponent, though they're better at production, are a bit less constrained regarding where best to settle but completely lack Indonesia's religious advantages. Civilization Ability: Grote Rivieren The key thing of note here is how the civ ability influences where the Netherlands tends to place their cities and districts. Getting bonuses from river adjacency for three different districts in addition to Commercial Hubs - which get them anyway - encourages them to position them all together. While it makes things easier for their counter-Spies, it also makes the districts vulnerable to pillaging sprees. Promoted light cavary can do a lot of damage to them in relatively little time. With no significant incentive to build Holy Sites, a good alternative source of Campus adjacency bonuses and a coastal emphasis which allows access to plenty of high-appeal spots, the Netherlands has less reason to settle mountainous areas relative to most other civs. This may free up more good spots that you can settle yourself. Dutch Harbours cause culture bombs. This is rarely a concern seeing as Harbours are usually best-positioned adjacent to city centres, and even if they take tiles off you, it'll usually be mainly low-value water tiles. If you see a bordering Dutch city beginning to build a Harbour adjacent to your lands or seas, either stop improving the tiles around there or try to get a district of your own there faster than them - completed districts are immune to culture bombs. The Dutch ability to build Dams faster, coupled with their incentive to place lots of districts adjacent to rivers, makes them especially vulnerable to the Breach Dam Spy mission, which pillages a Dam and all downstream improvements and districts. Be sure to promote your Spies or use the Gain Sources mission first to maximise your chances of success, as Breach Dam is one of the less likely missions to succeed. Wilhelmina's Leader Ability: Radio Oranje Sending trade routes to the Netherlands gives them culture, but gives you nothing aside from the standard yields. As such, it's a good idea not to send the Netherlands more than one trade route at a time. The first route will satisfy Wilhelmina's agenda if she is controlled by a computer opponent, will boost alliance points if you are allied to her and will provide a tourism bonus, but beyond that point the advantages of sending trade routes to her will diminish for you. You can prevent the Dutch from sending trade routes or receiving them from other civs by using option B (Cancels any international trade routes between other civilizations and the chosen player, and embargoes any new ones from starting) of the Trade Policy resolution in the World Congress. This will completely shut down Wilhelmina's culture bonus. The Dutch can also send trade routes to their own cities for extra loyalty, which can make it tough to flip their cities if they rely on it extensively. However, to make the most of this ability, they'd need to send a lot of trade routes from the same city which makes them particularly vulnerable to pillaging. Wilhelmina's Agenda: Billionaire A computer-controlled Wilhelmina likes civs that send trade routes to her, and dislikes those that don't. Though this agenda can be annoying early on where internal trading tends to be better than international trade, it's rather helpful once you reach the Civil Service civic and can start forming alliances. Having a trade route with another civ is a great way to gain alliance points, and the fact it boosts Wilhelmina's opinion of you makes it easier to hold onto that potential alliance. If you want to cause Wilhelmina trouble without declaring war on her directly, you can pillage trade routes other civs are sending to her. She'll lose a bit of culture but more importantly her relations with the civ whose route you pillaged will drop. Unique Unit: De Zeven Provinciën The Dutch UU makes short work of city defences, so it helps if you can intercept them before they get too close. Any renaissance-era naval unit can perform moderately well, but you'll want to have strength in numbers to counter their high damage output. Alternatively, using guerilla attacks with Privateers is an option if you can't spare that much production. Considering naval units can't heal outside of friendly territory, it'll take a while for them to recover. If playing the naval game isn't an option, getting a lot of Bombards on your coastline may be necessary. Though they can't defend well against Zeven Provinciën units, their attack power is good. The Crew Weapons promotion adds +7 defensive strength and is easy enough to obtain, while the Advanced Rangefinding promotion adds +10 strength versus naval units which should be enough to make the Netherlands cautious. Unique Improvement: Polder The usual counter for unique improvements - pillaging them - isn't necessarily a good move against Polders unless you have a particularly good navy. It costs three movement points to move a naval unit onto a Polder, and an extra three to pillage, meaning you'll end up using up a lot of movement points you could be using to simply capture the city. It'll also tend to leave your units vulnerable in the mean-time. Instead, if you want to really counter Polders, you'll want to deny the Netherlands access to large lakes, rough coastlines and/or the Huey Teocalli wonder. Or, to put it another way, a landlocked Netherlands is a weaker Netherlands. The fewer coastal cities they can settle, the better. Settling cities so they deny coastal spots, without actually being on the coast, can weaken the Netherlands while preventing the opportunity for them to use their UU in retaliation. Other Guides If you like these guides and want to send a tip, you can click here![ko-fi.com] Gathering Storm Compilation Guides Civ summaries (Start here for an introduction for all civs) Civ-specific tricks, secrets and clarifications (Ideal for more experienced players)Individual Civilization Guides America - no additional content* (Cultural/Diplomatic/Domination) America - all additional content* (Cultural/Diplomatic/Domination/Scientific) Arabia (Domination/Religious/Scientific) Australia (Domination/Scientific) Aztecs (Domination) Babylon (Cultural/Domination/Scientific) Brazil (Cultural/Domination/Religious/Scientific) Byzantium (Domination/Religious) Canada (Cultural/Diplomatic) China (Cultural/Domination/Scientific) Cree (Diplomatic) Egypt (Cultural/Diplomatic/Religious) England (Cultural/Domination/Scientific) Ethiopia (Cultural/Religious) France (Cultural/Domination) Gaul (Domination) Georgia (Diplomatic/Religious) Germany (Domination/Scientific) Gran Colombia (Domination) Greece (Cultural/Diplomatic/Domination) Hungary (Diplomatic/Domination) Inca (Religious/Scientific) India (Domination/Religious) Indonesia (Cultural/Domination/Religious/Scientific) Japan (All) Khmer (Cultural/Religious) Kongo (Cultural) Korea (Scientific) Macedon (Domination/Scientific) Mali (Diplomatic/Religious) Māori (Cultural/Religious) Mapuche (Cultural/Domination) Maya (Scientific) Mongolia (Domination) Netherlands (Scientific) Norway (Domination) Nubia (Domination) Ottomans (Domination) Persia (Cultural/Domination) Phoenicia (Domination) Poland (Cultural/Domination/Religious) Portugal (Diplomatic/Scientific) Rome (Domination) Russia (Cultural/Religious) Scotland (Scientific) Scythia (Domination/Religious) Spain (Domination/Religious/Scientific) Sumeria (Diplomatic/Domination/Scientific) Sweden (Cultural/Diplomatic) Vietnam (Cultural/Domination) Zulus (Domination)*The Teddy Roosevelt Persona Pack splits Roosevelt's leader ability in two, meaning the game with it is substantially different from without - hence two different versions of the America guide. Lincoln was added later and is only covered in the latter guide. Other civs with alternative leader personas are not split because the extra personas added in later content do not change the existing gameplay - as such the guides are perfectly usable by players without them. Rise and Fall These guides are for those with the Rise and Fall expansion, but not Gathering Storm. They are no longer updated and have not been kept up to date with patches released since Gathering Storm. To look at them, click here to open the Rise and Fall Civ Summaries guide. The "Other Guides" section of every Rise and Fall guide has links to every other Rise and Fall guide. Vanilla The Vanilla guides are for those without the Rise and Fall or Gathering Storm expansions. These guides are no longer updated and have not been kept up to date with patches released since Rise and Fall. To look at them, click here to open the Vanilla Civ Summaries guide. The "Other Guides" section of every Vanilla guide has links to every other Vanilla guide.