换一换
换一换 


本指南探讨了《收获日2》的VR版本,解释了VR版的相关内容以及它与桌面版之间的差异。本指南默认读者已具备桌面版的基础知识,这些基础知识可在其他地方找到。 简介 本指南仍在制作中 这是一份面向所有开始《收获日2》VR之旅的玩家,以及对两个版本差异感兴趣的玩家的指南。如果你是直接进入VR版、从未玩过桌面版的新玩家,建议除了本指南外,还在其他地方阅读有关该游戏的内容,因为游戏内容非常丰富,本指南无法涵盖所有内容,只能专注于VR特定部分。我建议先通过游玩游戏来学习基础知识,之后可以阅读更多关于游戏机制的内容。 至于VR模式与桌面模式的对比,在我看来,VR既没有过于强大,也没有处于劣势。两者的操作方式差异极大,因此很难直接比较它们之间的平衡性,这比在同一游戏中平衡PC玩家和主机玩家还要困难。我更倾向于将VR视为一种不同的游玩方式。 我撰写本指南的部分原因是为了澄清关于VR的错误假设,并帮助VR玩家轻松开始游戏。 菜单/选项
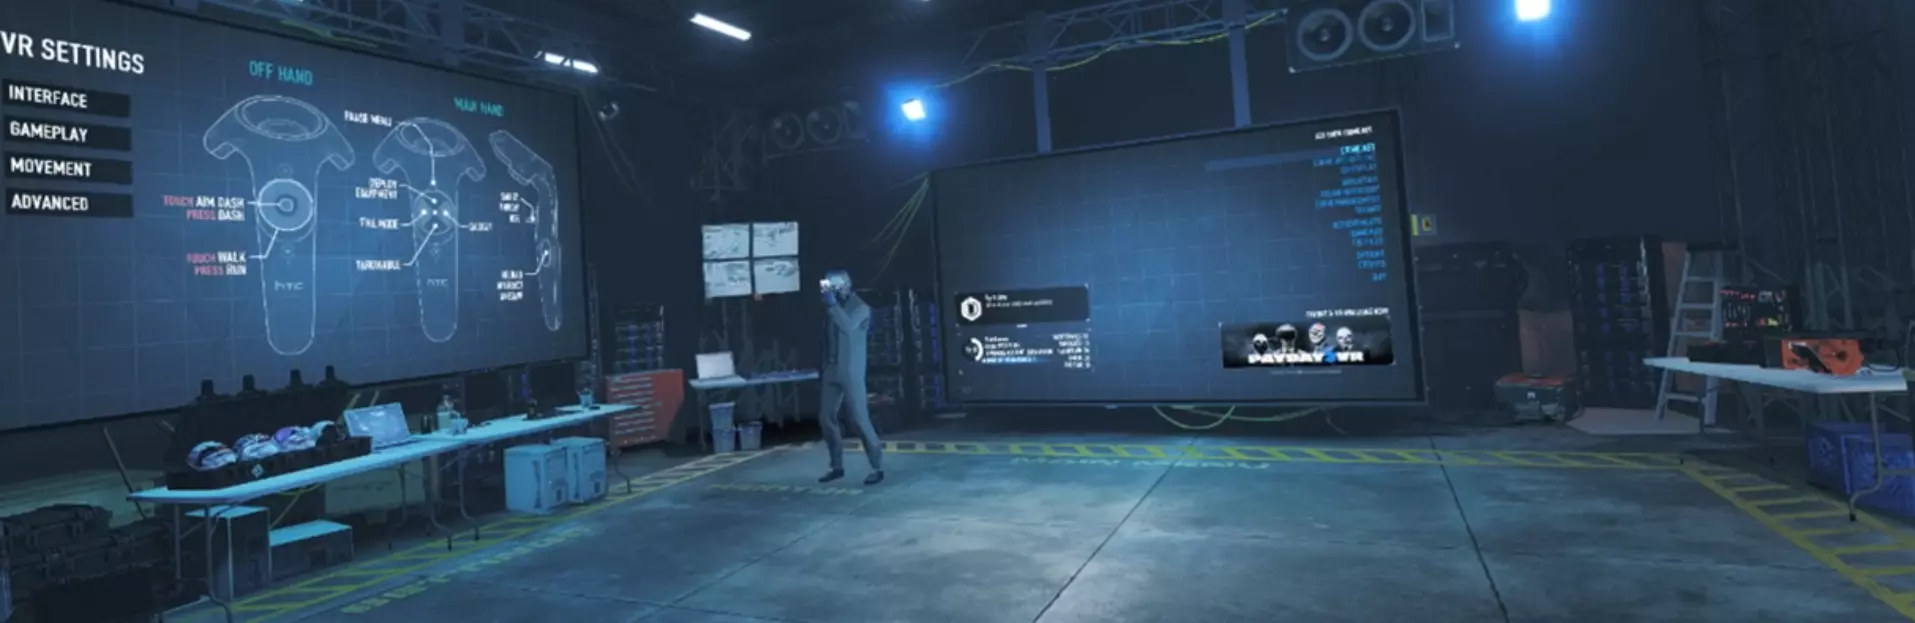
游戏启动后,你会进入主菜单或大厅环境,这里是一个仓库,内有2个巨大屏幕和一些装饰。下面介绍该环境中的主要部分。 前方屏幕 启动游戏后,你面前的是游戏主菜单。它具备与桌面菜单相同的所有功能。操作方式是:用持枪手的激光瞄准你想要选择的按钮,然后扣动扳机。按住手柄 grip 键可返回上一级菜单。 关于这部分没有太多其他说明。如果你难以看清屏幕上的文字或准确瞄准激光,可以自由靠近屏幕。 左侧屏幕 启动游戏时,你的左侧是VR选项屏幕。这是主要设置界面,包含大量VR设置以及当前使用系统的按键布局。在劫案进行时,可通过暂停菜单访问此界面,所有设置均可调整。下一章将详细介绍这些设置。 其他元素: 在两个屏幕之间,你可以看到自己的角色,其装备的武器、面具、护甲和皮肤均与桌面版显示一致。 在多人游戏大厅中,你会看到已加入的其他玩家角色站在你的右侧,与桌面版类似,会显示他们的昵称、恶名等级和当前等级。你可以在大厅区域自由移动,若想仔细查看他们佩戴的任何皮肤或面具,完全可以这样做。 图形设置

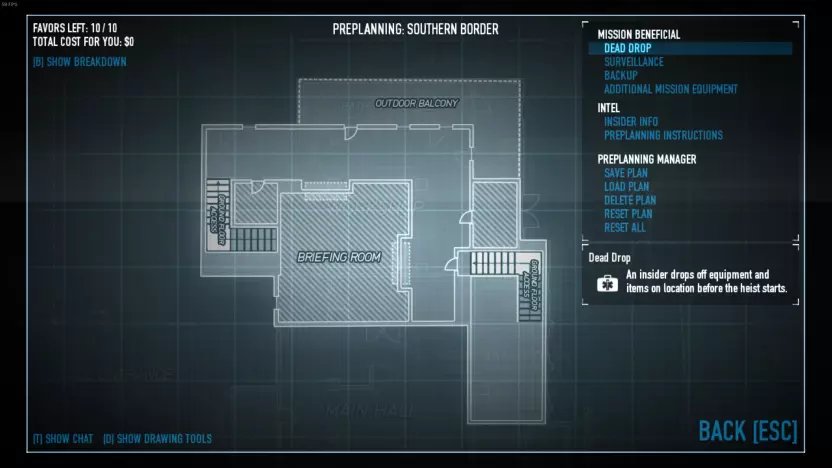
前屏幕的图形设置与桌面版非常相似,但移除了部分设置并新增了一项。虽然设置最好根据个人电脑进行调整,但以下是一些需要注意的要点。 VR中最重要的是新增的【自适应质量】设置。开启此功能后,当帧率低于理想的90帧/秒时,游戏会降低画质。帧率低于90fps,尤其是帧率波动,可能会导致部分人严重晕动症,因此强烈建议开启此功能。 如果即使开启自适应质量也无法保持稳定的90fps,请考虑调低其他设置。建议尽量保持较高的纹理质量,因为这对视觉效果的影响最为显著。我建议你仔细查看色彩分级选项,选择一个自己喜欢的,因为标准色彩在VR中看起来可能相当平淡。我个人喜欢“PD1: Dinero”这个选项,它能让色彩看起来更加逼真。 环境光遮蔽在VR中的效果非常微弱,你可以考虑将其关闭以节省性能。 暂停/计划菜单:当你加载进入任务时,你会身处一个黑暗的房间,只有脚下的地板是亮的,旁边有两个屏幕。左边的屏幕是主大厅仓库里看到的VR选项菜单。前方则是计划和装备界面。在任务过程中,你可以按下菜单按钮调出这个空间,不过此时前方的屏幕会显示桌面版的暂停菜单。如果你从拘留所进行观察或使用安全摄像头时,也会使用相同的空间,此时视图会替换前屏幕。在这种情况下,可以使用一个触控板控制摄像头角度,并通过【待定】进行放大。 如果你开启了舒适摄像头,在使用滑索和跳伞时也会使用相同的空间。 VR选项 现在让我们看看左手边的屏幕,好吗? 界面 如果你在这个菜单中向下看,可以看到你的腰带。你可以抓住不同的箭头来调整腰带的宽度、大小以及与身体的距离。 玩家身高 使用此选项校准你的身高。站直并向前直视时按下“校准”按钮。这将用于检测你何时蹲下。如果你想在游戏判定你为蹲伏状态(涉及闪避几率和匍匐穿过障碍物)前获得更大的弯腰空间,可以在略微弓背的状态下校准身高。 腰带跟随角度 此选项用于调整腰带的跟随角度,即你需要转动头部多少角度,腰带才会随之移动。增大该角度可以让你在不带动腰带的情况下拥有更大的头部转动空间。我个人觉得15度比较合适,但你可以根据自己的舒适度进行调整。低头看向腰带即可进行测试。
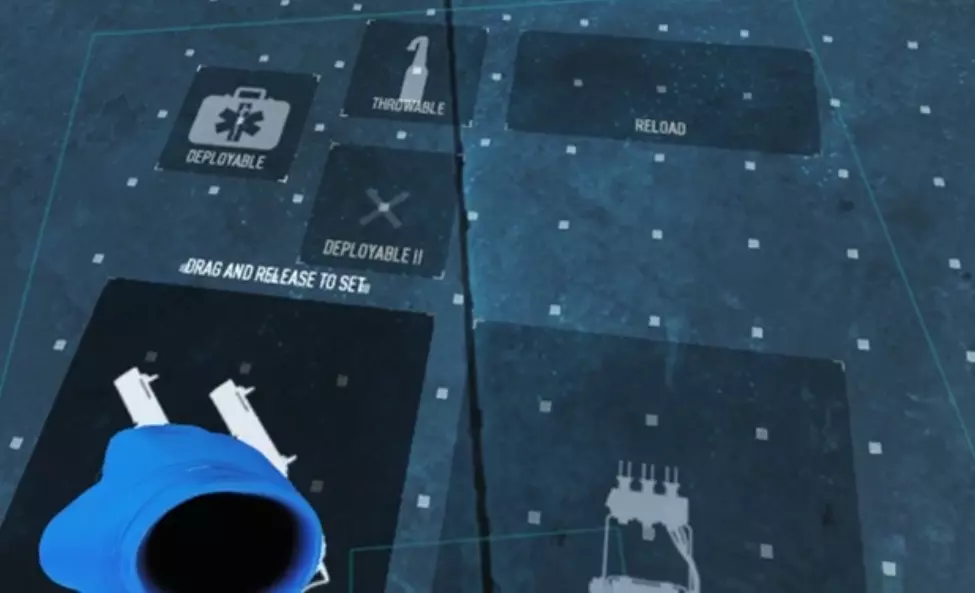
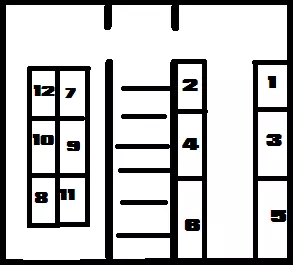
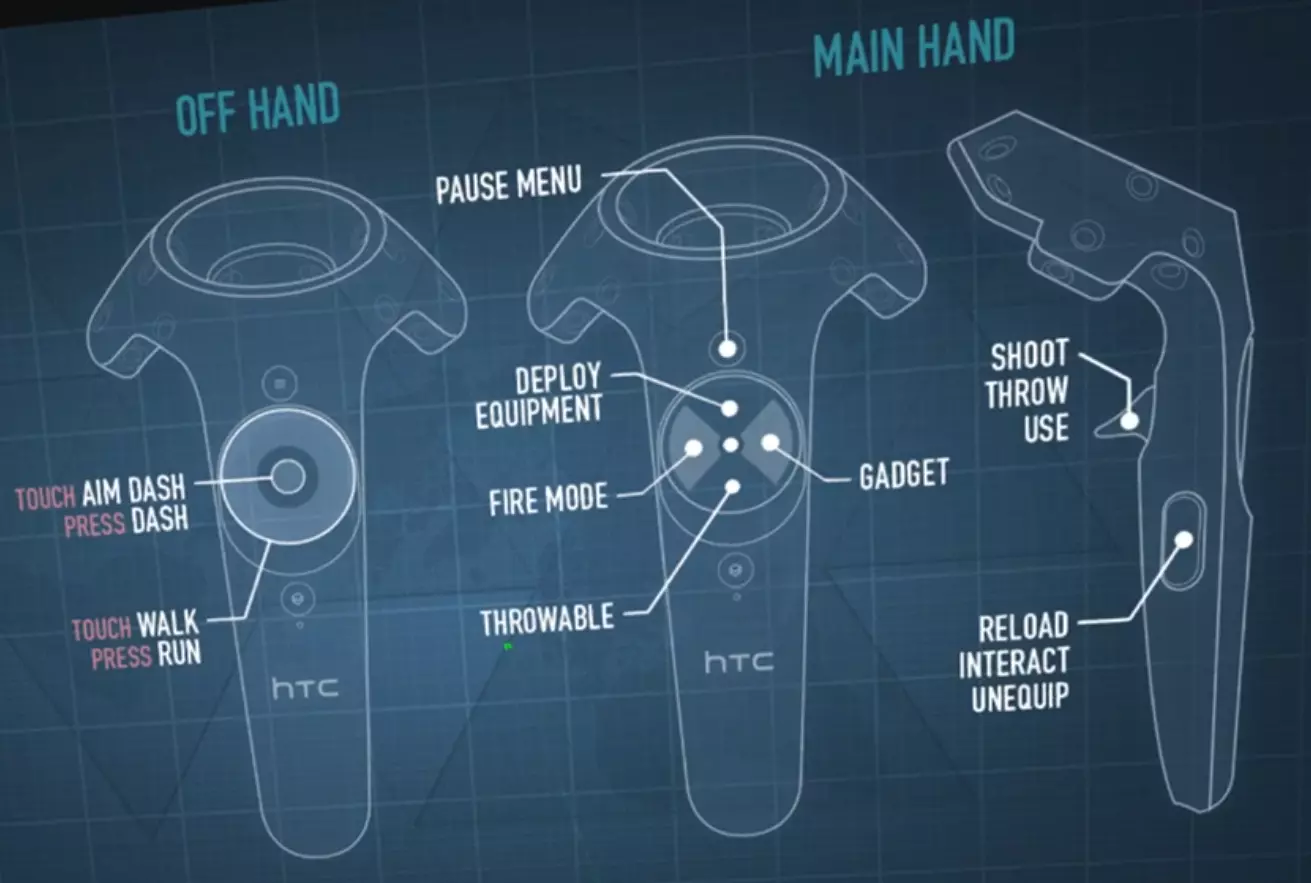
UI Belt In this menu you can customize your belt by moving the different boxes around, as on the screenshot to the right. Normally they can also be resized by grabbing the boxes with two hands, but at the time of writing this function is bugged and doesn't work. Remember to save the layout when you are done, or it will revert to the last saved layout. GameplayAuto Reload When turned on, reloading will work identically to how it does on desktop. Press Grip to reload, wait for the timer to run out, and you'll have a full magazine. When turned off, however, the reloading is slightly more complex. When pressing the grip button, a progress bar will begin in the 'reload' box on your belt. Once the bar is full, there will be a full magazine available in the box, which you can recieve by sticking your gun into the box. But at any point during the reload, you can take a partially filled mag from the box with your offhand using Grip, and take it to your gun to reload it partially. This lets you abort reloads midway for slow weapons like LMG's, making it extremely powerful. Weapon Hand Quite simple, switches which hand is used as the weapon hand. The other hand is automatically changed into the offhand which is used for movement. Tablet Hand Again, quite simple, this lets you choose which wrist the tablet is on. Aim Stabilization Adds very slight aim stabilization which is so slight that I cannot even confirm that it is functioning. Keep Items In Hand Does what it says on the tin. For example, if turned on and you throw a grenade it will automatically put another grenade in your hand until you run out of grenades or put them away by pressing grip. If turned off, grenades and other multiple use equipment will automatically holster after being used once. MovementMovement Type Here you choose whether you want to use dash only, or a combination of direct and dash movement. I recommend using direct+dash unless you get motion sickness from direct movement. Even then, I recommend trying it for a few days in very short sessions (5-15 minutes at a time) to see if you start getting used to it. Dashzone Size This adjusts how large the dash area from the middle of the touchpad is. If using dash movement only, you probably want this quite large. If using direct+dash, I recommend setting it to 5-20% on the Vive, depending on your liking. I use 5%, which can sometimes be a bit tricky to find in heavy combat. Deadzone Size This adjusts how big the deadzone in the middle of the touchpad is, where direct locomotion will not happen. I recommend having this slightly bigger than the dashzone, so that you won't move when you're aiming a teleport. I have the deadzone as 5% larger than the dashzone. Dash In Deadzone Turning this on will effectively turn the deadzone into the dashzone. Use this if you dont want an empty buffer between the dashzone and the deadzone that does nothing. Automatic Dash Turning this on will let you hold down the touchpad/joystick and automatically keep dashing in the direction you're pointing as soon as the teleport has recharged. Personally I think it's good for long distances, but in smaller spaces it's better to teleport manually. You can make the game automatically do slow long dashes or quicker short dashes, depending on your preference. Grip Toggle This is meant to lock your grip during interactions so you don't have to keep pressing the grip button. Sadly it seems to be broken, as it doesn't actually lock any interactions that I've noticed. Do not count on this when answering pagers. AdvancedComfort Camera This setting is for those that experience motion sickness. If turned on all ziplining, parachuting and other such possible movements will take you into the pause menu with a cutscene type of view. Note: This will not affect vehicles such as boats, cars or motorcycles. If possible, I recommend keeping this off as it will hinder your situational awareness. Collision Fadeout This lets you change how the game handles your head going into solid objects. 'Instant' will, well, instantly black out your screen when you go too close, which can be quite jarring. 'Smooth' will gradually darken your vision as you get closer. 'Stepped' will do the same as Smooth but with only a few steps instead of a smooth gradient. I prefer smooth, but use whatever you like. Collision Teleport If turned on, this will teleport you out of solid objects to keep you from "getting lost inside them" where you dont know which way to move to get out. This can sometimes cause issues where you are trying to take cover, accidentally go into an object and the game will keep teleporting you out of cover. Controls In this chapter we look at the various differences in the controls compared to the desktop version. Also included is a full button mapping for the HTC Vive and Oculus Rift controllers. HTC Vive Button Layout
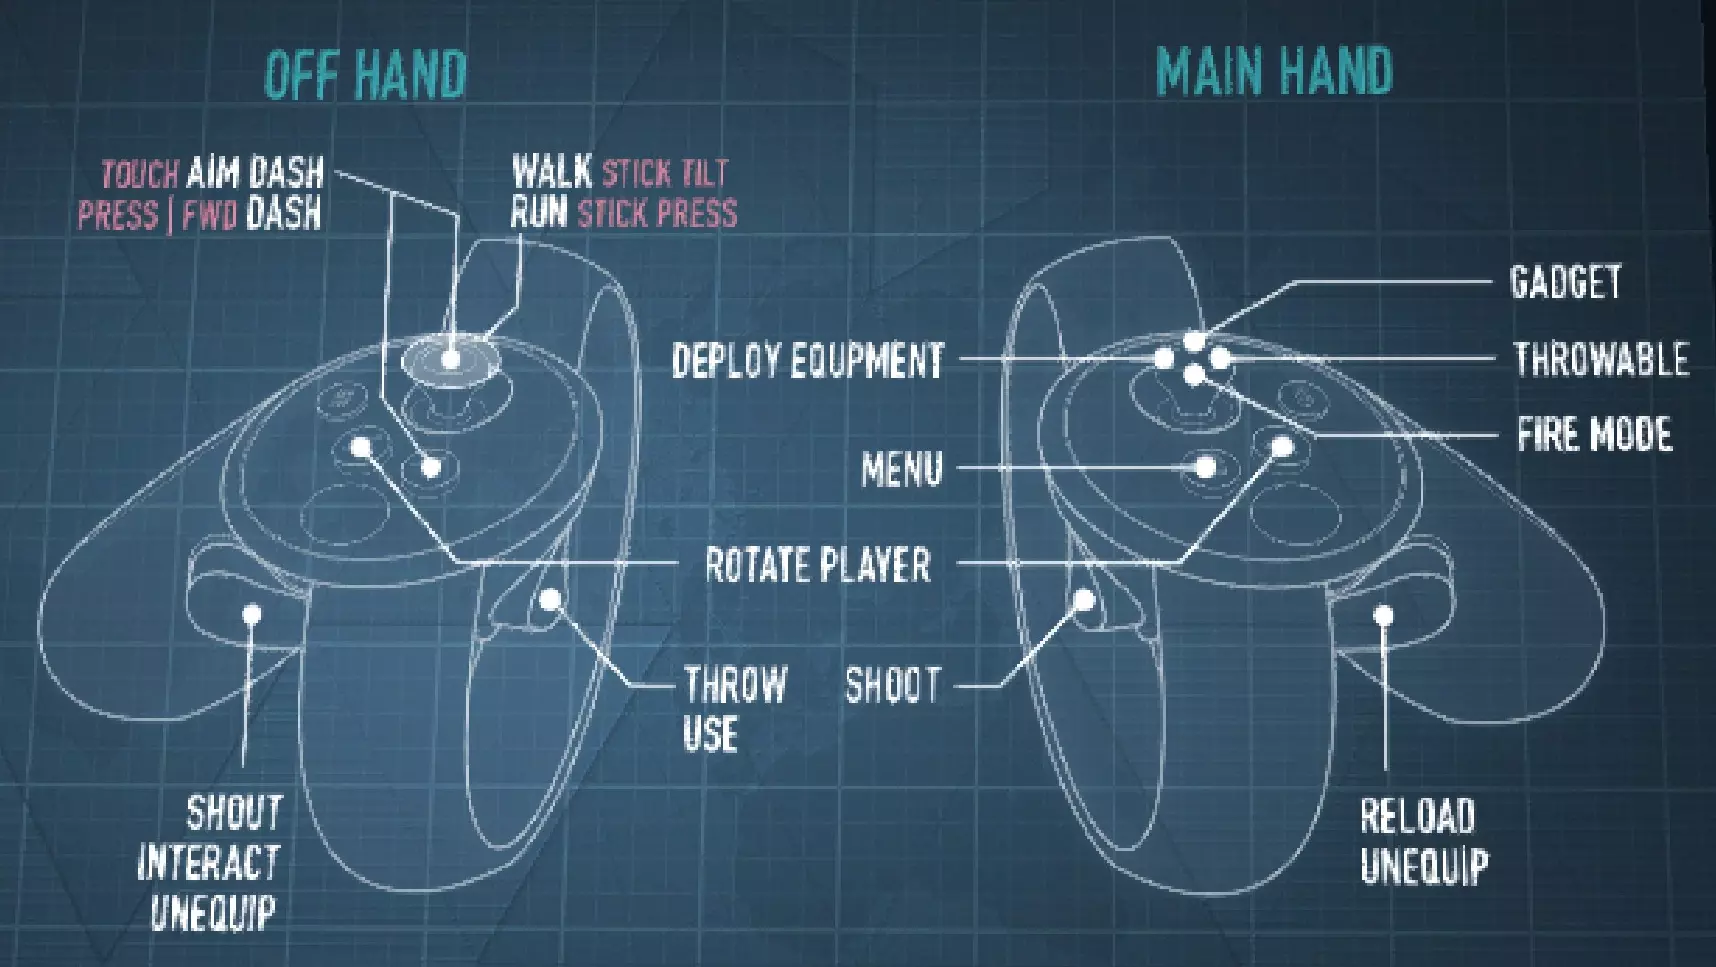
Oculus Rift 按钮布局
移动 游戏采用两种不同的移动(以下简称移动方式)系统。第一种是“冲刺”移动方式,这是《Rec Room》《实验室》以及无数其他VR游戏中最常见的移动方式,通常被称为传送移动。另一种是“直接”移动方式,常见于《Pavlov》《Onward》《Stand Out》等竞技类VR游戏,常被称为“滑动移动”“行走”“触控板移动”或其他多种名称。 冲刺移动方式: 将手指放在触控板上以调出瞄准圈。将瞄准圈指向你想要传送的位置,然后按下触控板即可传送到那里。如果开启了自动冲刺,你可以按住触控板,在冲刺完全充能后,持续传送到你指向的位置。每次传送冲刺都会消耗耐力,若耐力耗尽,你只能进行极短距离的传送。 直接移动: 你可以像在桌面端一样控制移动,用触控板/摇杆代替WASD键。无需按住Shift键冲刺,只需点击触控板即可开始冲刺,直到你停止移动。无需一直按住触控板来保持冲刺状态,只需点击一次即可,这样从长远来看能延长控制器的使用寿命。冲刺会像在桌面端一样消耗耐力。此移动方式下仍可使用冲刺,使用时仍能获得冲刺专属加成。 跳跃与梯子:若要跳上某个高处,只需将传送圈对准更高的位置并传送即可。这能让你完成一些在桌面端几乎不可能实现的极限跳跃,因为你有充足的时间来瞄准传送位置。通常情况下,通过冲刺跳下比直接移动跳下更容易,因为冲刺时你可以传送到一个中间点,从而减少坠落伤害。
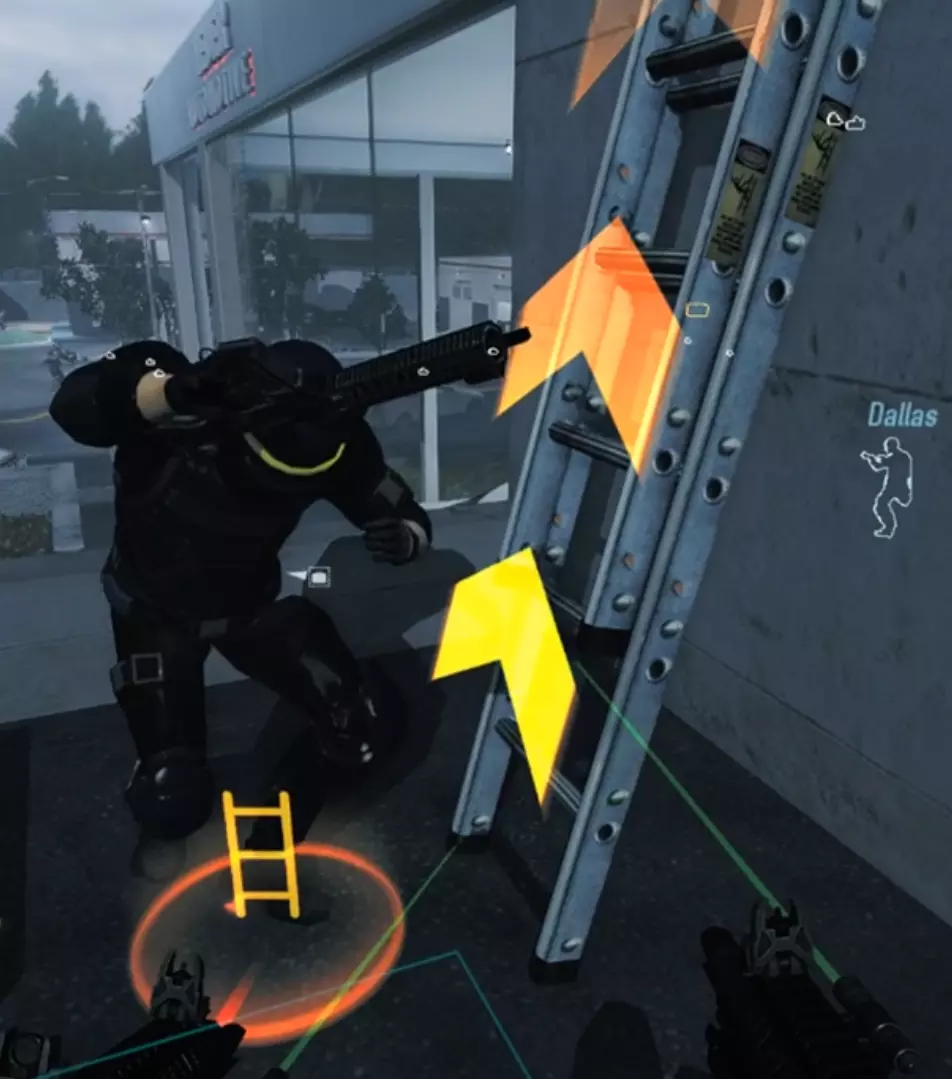
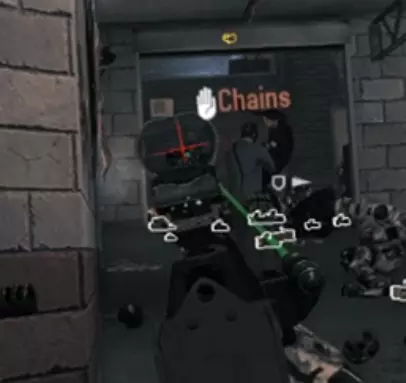
爬梯子的操作方法是:瞄准梯子顶部和底部可见的橙色圆圈,然后朝着你想要移动的方向传送。如果你想向上爬梯子,首先需要传送到梯子底部的橙色圆圈来“附着”在梯子上,接着向上传送来沿着梯子移动,直到到达顶部。这个过程的速度没有限制,但要注意不要太快,否则到达顶部时可能会意外传送到边缘外。经过一段时间的练习,你会掌握常见梯子需要多少次传送。例如,《空中降生》餐厅里的梯子需要3次传送才能爬上去。如果你过于频繁地使用传送,就会直接传送回餐厅旁边的小巷里。 武器操作:在VR中,你需要从新的角度考虑武器的操作方式,即武器是否能够稳定握持。例如,马克10是一款很棒的武器,但由于它是手枪式冲锋枪,在远距离很难稳定瞄准。 记住要放松。如果你像电影明星那样用力紧绷手部,肌肉紧张会导致手部抽搐,从而使瞄准变得困难。在游戏开始时瞄准不稳也很常见,因为你的肾上腺素水平还没有平复下来。 手枪和小型冲锋枪:单手握持。你可以将另一只手锁定为相同的握持姿势,但这除了外观外没有任何实际作用。如果将控制器移开足够远,手部就会断开连接。要实现精准瞄准,最佳方法是用非持枪手稳定持枪手,但在中近距离下,单手射击也能正常发挥。 双手武器和带前握把的冲锋枪: 你可以用另一个控制器握住前握把,从而更好地控制武器。握把越靠前,就越容易稳定瞄准。因此,虽然Kobus 90确实有前握把,但它离持枪手太近,大多数情况下反而会使瞄准变得更加困难。半自动步枪和狙击步枪: 建议在10米以上的距离使用这类武器时,务必使用物理枪托或双手握持。其他武器可以通过向大致方向倾泻更多弹药来弥补一些射击失误,但狙击步枪没有这种优势。尤其是在使用瞄准镜时,你需要尽可能地控制住枪支。 HUD VR中的HUD与桌面版类似,但被拆分成多个部分并分散排列,以提高可读性并减少对沉浸感的破坏。下面介绍不同的HUD元素及其与桌面版的区别。 弹药和生命值 主武器和副武器的弹药量,以及生命值和耐力值,会悬浮显示在持枪手旁边。这些功能与桌面版相同(除了耐力值,桌面版不显示耐力值),但需要你实际转头去看,而不是瞥一眼屏幕角落。 需要额外注意的是,【斯多葛】技能卡组添加的持续伤害生命值计量条非常淡,你需要将生命值计量条靠近面部才能看清计量条上的持续伤害虚线。 队友信息和聊天 队友信息显示在你的手腕平板上。平板有3个屏幕,每个屏幕有不同的用途,你可以用另一只手在屏幕上左右滑动来切换屏幕。即使你的另一只手拿着枪,在滑动屏幕时枪也会消失。
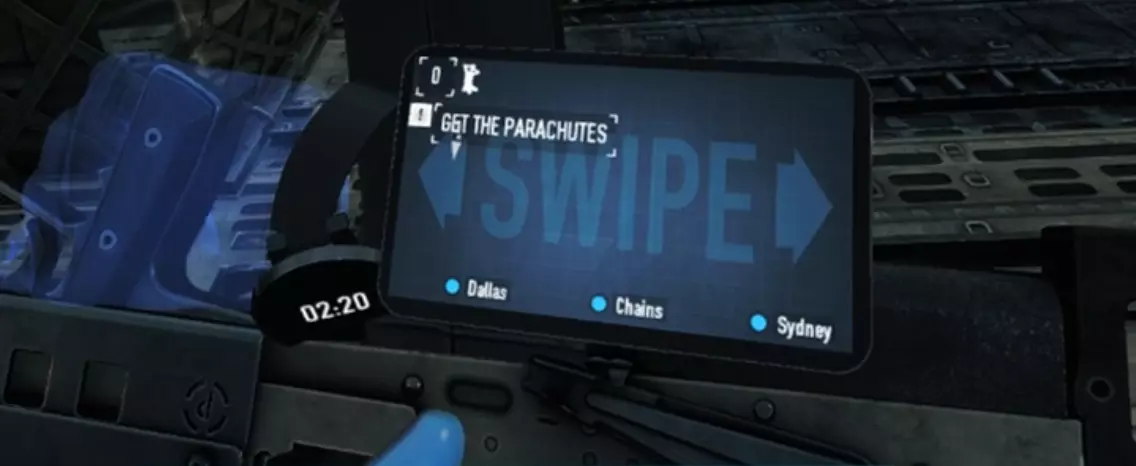
中间屏幕显示队友的生命值、护甲和弹药量。屏幕角落还会显示任务目标提示以及人质数量。右侧屏幕显示队友持有的物品,例如钥匙卡和汽油罐等。左侧屏幕是聊天窗口,与桌面版相同。如果聊天内容显示模糊,可尝试将平板靠近面部以获得更清晰的视图。需要注意的是,文字消息不会有任何通知提示,因此如果与不使用语音聊天的玩家组队,务必经常查看聊天窗口,以防他们有信息需要告知你。 平板旁边是一块腕表,会显示当前劫案已持续的时间。 平板默认握在左手,但可以在VR选项界面中切换到任意一只手。腰带 可以说,VR腰带上是你HUD中最重要的部分。它能让你切换武器、从背上取下背包以及快速放置部署物。使用腰带的方法是:将手伸到其中一个格子里,直到格子亮起,然后按下握持键来激活它。 腰带布局可以在VR选项菜单中调整。你可以缩放腰带的宽度,也可以改变它的高度和与身体的距离,以符合你的特定偏好。你还能移动不同的格子,将它们调整到合适的位置。通常情况下,你还应该能够调整格子的大小,但我上次尝试调整时,调整大小的功能出现了问题。我已经就此提交了错误报告。考虑传送带高度时,记得测试蹲下时的高度,因为传送带不会与头部按1比1的比例下移(这是为了防止传送带陷入地面)。如果蹲下时仍能使用,且站立时能够到所有箱子,那通常就没问题。 其他HUD元素:目标标记会像在电脑端一样悬浮在视野中,当你看向别处时,还会显示指向它们的箭头。 被发现的敌人、被策反的敌人以及其他玩家,其轮廓与电脑端完全相同。
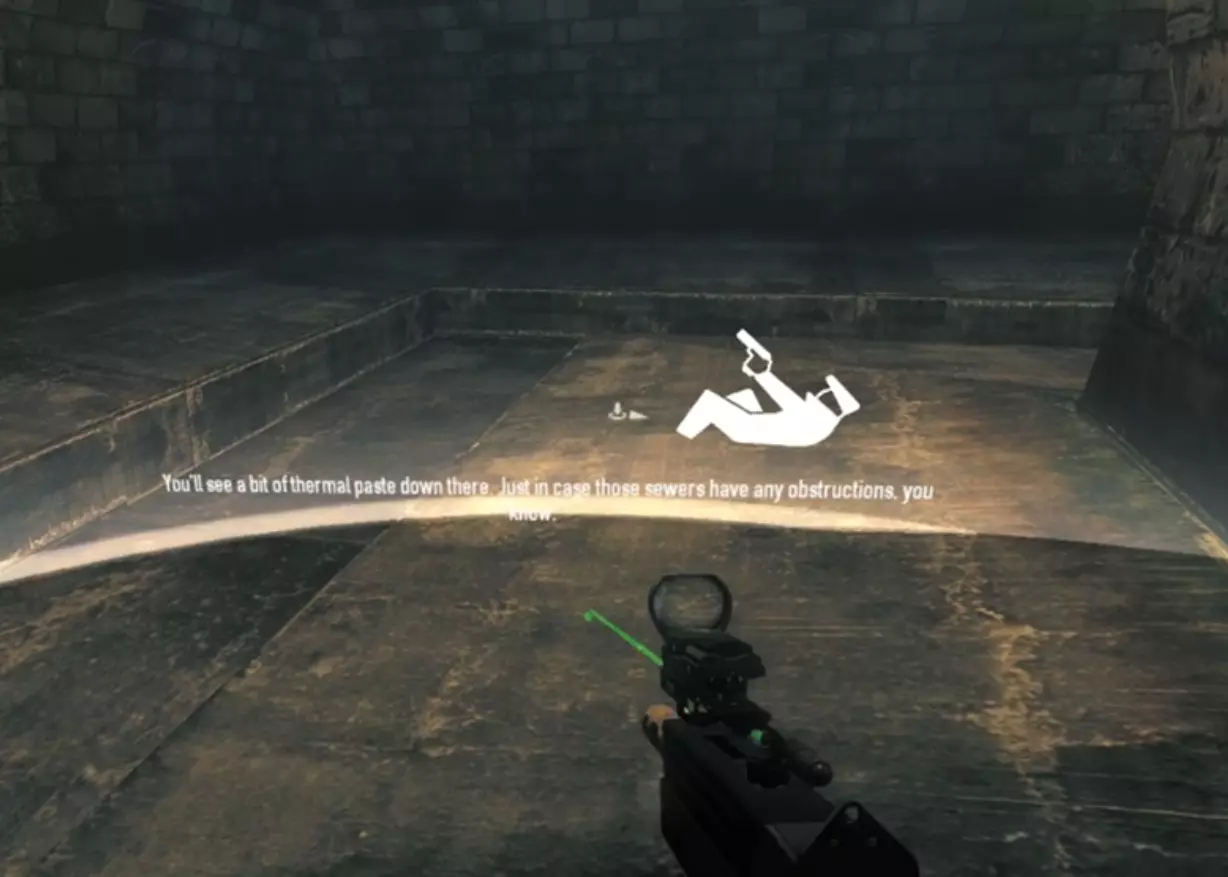
If your health drops to zero, you will go to bleedout by your camera lowering to almost ground level. A white circle appears around you with floating icons of a man lying down, signifying that you are down. If your bleedout health runs out the circle will turn red, the floating icon will turn into a red skull and your weapon will disappear from your hands until you are revived. During bleedout, your wristwatch will display the time remaining until you go into custody. Skills/Perks The VR version adds VR specific bonuses to a lot of skills, and all of the perk decks. Some of the skills are also pointless in VR because they add or affect stats that are removed in the VR version. All of the "when moving" type of bonuses function as they do on desktop if used with direct locomotion. The "when aiming down sights" bonuses will be active when you have your gun near eye height and in front of you. You don't have to be actually looking down the sights. Mastermind Quick Fix Basic: Reduced utility, since deployables can be put down instantly from the belt. Useful with FAK's. Stable Shot Basic: The stability bonus is nonfunctional. Rifleman: The only functioning effect is the increased accuracy while moving, from acing the skill. VR bonus: Basic: Each kill made while aiming down sights will regen 2% stamina. Aced: The accuracy bonus lasts 1 to 5 seconds after dashing, depending on how long the dash was. Nonfunctional with direct locomotion. Enforcer Shotgun CQB: The steel sight speed bonus from acing it is nonfunctional. VR bonus: Aced: Each kill made while aiming down sights will regen 2% stamina. Shotgun Impact Basic: The stability bonus is nonfunctional. Close By Basic: Unlike on desktop, in VR while shooting your sprint will only be slowed for the duration of the shooting, making the effect minimal since there are no animations to slow the process down. VR bonus: After dashing, all your kills have a 100% chance to fear enemies within 8 meters for 1-3 seconds, depending on how long the dash was. Nonfunctional with direct locomotion. Overkill Aced: Weapon swap speed is nonfunctional. Technician Steady Grip Aced: The stability bonus is nonfunctional. Fire Control Aced: VR bonus: The decreased accuracy penalty lasts 1-5 seconds after dashing, depending on how long the dash was. Nonfunctional with direct locomotion. Lock'n'Load Basic: See Close By Basic. VR bonus: Every 40 points of stamina consumed by dashing will refill 5% ammo to your automatic weapons. Nonfunctional with direct locomotion. Ghost Duck and Cover Aced: VR bonus: The increased dodge chance lasts 1-5 seconds after dashing, depending on how long the dash was. Nonfunctional with direct locomotion. Parkour: Ladder climbing speed bonus only has effect with direct locomotion. Aced version has no effect because VR players can always reload while sprinting in any direction. VR bonus: Aced: After dashing you will get a 20-50% reload speed bonus. No duration mentioned, possibly lasts for one reload. The Professional Basic: The stability bonus and snap to zoom bonuses are nonfunctional. VR bonus: Each kill made while aiming down sights will regen 2% stamina. Fugitive Equilibrium Basic: The effect is nonfunctional. Akimbo: The stability bonuses of both levels are nonfunctional, leaving the 50% ammo capacity as the only bonus. Running From Death Basic: The weapon swap speed bonus is nonfunctional. Perk DecksEach perk deck has a dash bonus in addition to the normal deck effects. They only trigger with dashes however, so you can't take advantage of them if you want to exclusively use the direct locomotion. For simplicitys sake, I'm going to list all of the bonuses at 1/9 and 9/9, skipping the intermediate levels since they are always just a straight increase. The format is "X-Y/X-Y", where the first 2 numbers are the range at 1/9, and the second is at 9/9. Perk Deck VR Bonus Crew Chief, Muscle, Gambler, Grinder, Ex-President, Kingpin, Stoic, Tag Team Per dash, regain 0-3/0-15 health depending on how much stamina the dash spent, capping at 50 health every 5 seconds. Armorer, Hitman, Crook, Infiltrator, Sociopath, Yakuza, Biker Per dash, regain 2-6/10-22 armor depending on how much stamina the dash spent, maximum of 3 times every 3 seconds. Rogue, Burglar, Sicario Per dash, gain 1-6%/1-10% dodge for 3 seconds depending on how much stamina the dash spent. Anarchist Per dash, regain 1-3/5-11 armor depending on how much stamina the dash spent, maximum of 3 times every 5 seconds. Extra note: The damage over time health meter added by Stoic is barely visible at present, so using Stoic will need some extra attention on the players part. Weapons and other equipment Using and customizing your weapons and other equipment has some differences compared to the desktop version. Let's have a look at some of them. WeaponsWith the exception of the bows, the Little Friend assault rifle and the chain whip, all weapons in the game can be used in VR with varying levels of efficiency. However, here are some main differences. The stability stat has very little effect on weapons. It only starts taking effect after long bursts, and works by dynamically decreasing the accuracy of your weapon. Doing short bursts negates it completely (which you should be doing anyways). Akimbo weapons can be aimed independently. You can either use them to shoot in two directions at once, or you can use them as a single weapon with twice the ammo capacity, because the two guns share the same magazine and ammo pools. And since akimbo weapons' only downside is occupying a primary slot and having a stability penalty, they are a very attractive choice for VR. LMG's can be aimed. Unline on desktop where LMG's are forced to be either hipfired or mounted on a bipod, in VR you are free to use the sights on them. However, usually it is better to aim just with the laser because the LMG iron sights are quite obstructive. Snipers are difficult to use, simply by the fact that aiming fast and accurately is hard in VR, especially if using a high powered scope. With a scope it can take several seconds just to find the reticle inside the sight. I would recommend steering clear of the zoomed scopes, since the ranges are rarely long enough to need them anyway. But again, feel free to use whatever you want if you feel you are proficient with it. MeleeMelee doesn't necessarily work as you'd expect it to, if you've played other VR games with melee combat. You can melee enemies either with the weapon butt (which is always active on whatever gun you're holding) or whatever melee weapon you bring with you. You can press the trigger when holding a melee attack to charge it for a more powerful hit, but this takes a moment depending on the weapon. The controller will vibrate more depending on how charged the melee is. After a successful melee hit (even on the environment), you temporarily do less damage depending on the expire time of the weapon (refer to the Long Guide). The damage gradually builds up to full again, assuming you don't hit anything in the meantime. The weapon butt has a 0.1 damage multiplier in VR, meaning you will deal 3 damage per hit with it. This means that even the weakest of security guards will take 14 hits to kill if they manage to spot you. For the weapon butt the expire time is 0.6 seconds so at least you will be free to hit them nearly as fast as you physically can, but in loud you should only use the weapon butt for knocking down enemies instead of killing them. Weapon CustomizationWeapon customization differs somewhat in VR from the desktop version. Since stability is never an issue, you should always avoid equipping stability increasing mods over other stats. If a weapon can only equip a mod that affects stability and nothing else, then pick one that you think looks best. Or just disregard that mod slot completely. Lasers are much stronger in VR than on desktop, because the gun can swivel around independently of your view making aiming without one harder. I recommend turning the lasers brightness to 0.70 to make it easier to see in daylight. Avoid using red lasers, they will confuse your teammates because the police snipers have red lasers. Flashlights have a visible cone of light both on desktop and in VR, but in VR it appears strong enough to obstruct your vision instead of helping it. Check the Mods chapter for a recommended mod for removing the visible cone of light, making the flashlights more useful. Check out the chapter after this one for details on the differences in scopes and sights. Other EquipmentIf you pick up a throwable from your belt, there will be a line going out from the throwable approximately in the direction you're pointing with your controller. That line works as the aiming tool for the throwables, but it's not really accurate and I wouldn't recommend using throwables further than a dozen meters or so unless you can risk missing the throw. Deployables can be instantly put down once you pick them from the belt, cutting out the interaction timer from them. Especially handy during stealth for fast deployment of ECM's, as long as you find it from your belt fast enough. Masks can also be put on instantly by bringing it to your face before pressing trigger. Handy if you're spotting for a stealther and they need help fast. Scopes and Sights Sights vary hugely compared to desktop. Many of the sights have different zoom levels, starting from the red dot style sights with no zoom, going all the way to the massive Theia scope which has an insane amount of magnification. Which you pick is up to you, however.
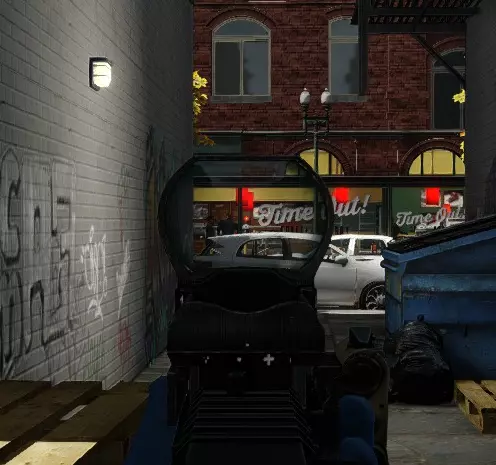
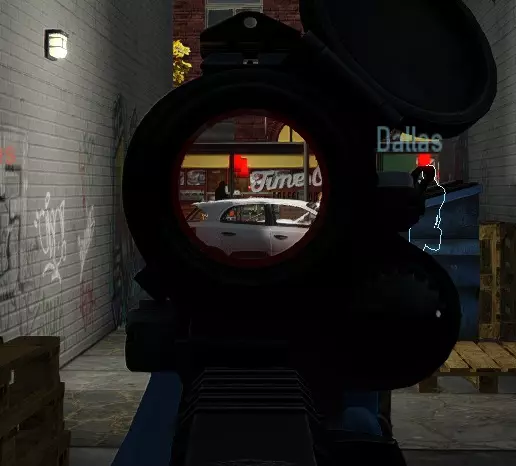
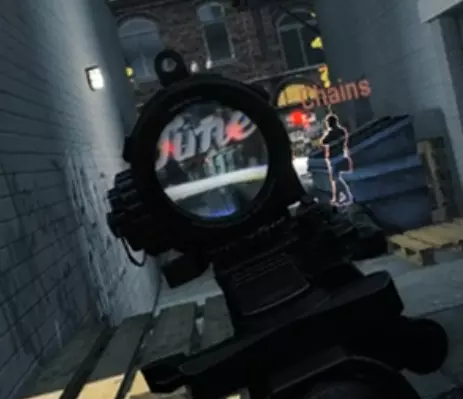
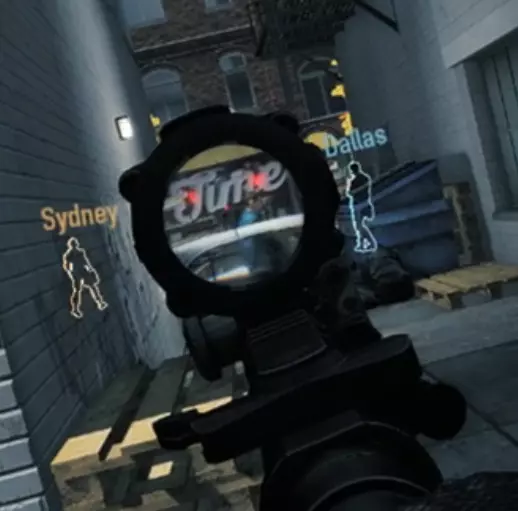
如果你难以在瞄准镜中找到红点,建议将准星切换为大十字(右侧示例)。我还建议将准星保持为红色,因为Vive的红色像素数量是其他颜色的两倍,这会使其他颜色相比红色显得暗淡。但如果你更喜欢其他颜色或想要更暗的准星,选择权在你。 忒伊亚、箱式伙伴和侦察瞄准镜上的测距仪在VR模式下同样可用。 以下是最常见瞄准镜的对比。左侧图片来自VR模式,右侧图片来自桌面版。对于部分VR截图质量较低,我深表歉意,这些是从视频中截取的帧。投机者瞄准镜 注意:游戏中所有红点瞄准镜和全息瞄准镜的放大倍率都和这款完全相同,也就是完全没有放大效果。这其中包括军用红点瞄准镜。建议选择视口最大的型号,以便更容易找到镜内的红点。避免使用外科医生瞄准镜,因为它的视口非常小。

战斗瞄准镜

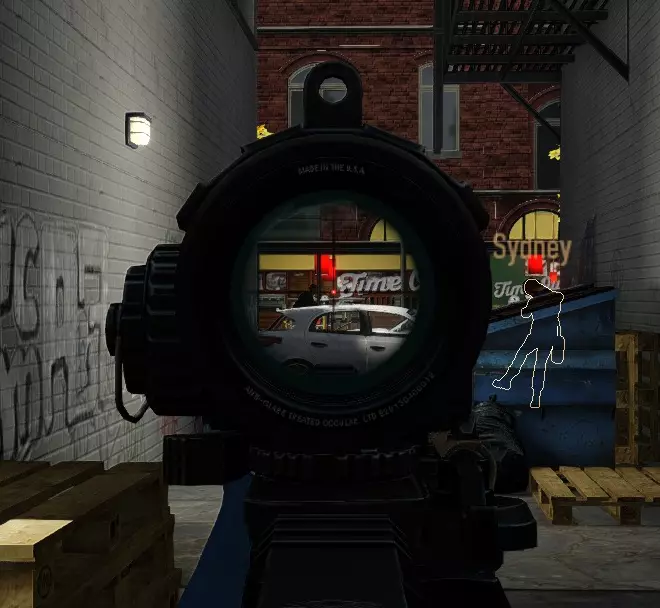
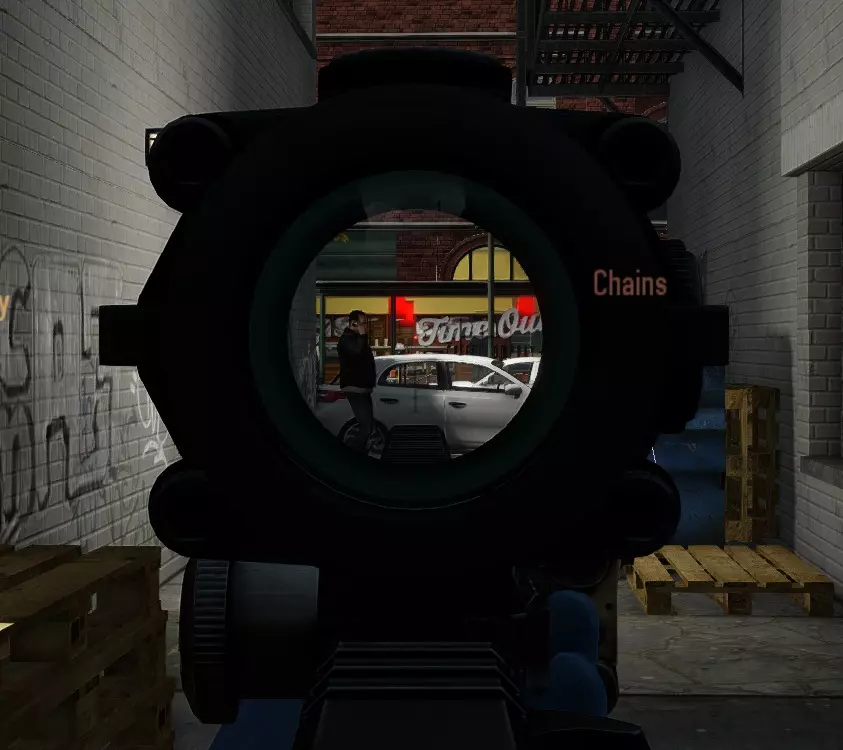
军用规格瞄准镜(Milspec Sight)
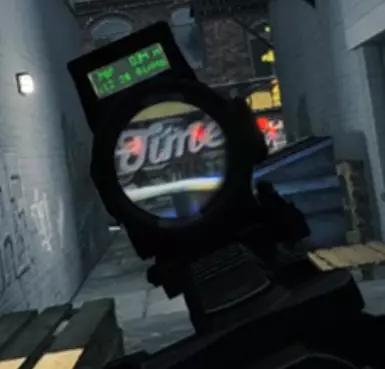
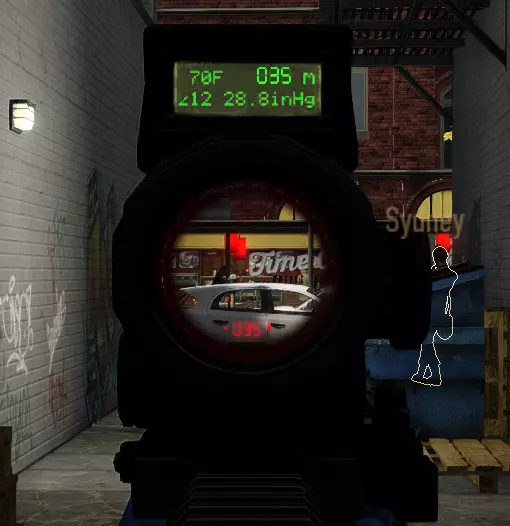
侦察瞄准镜
咳嗽瞄准镜
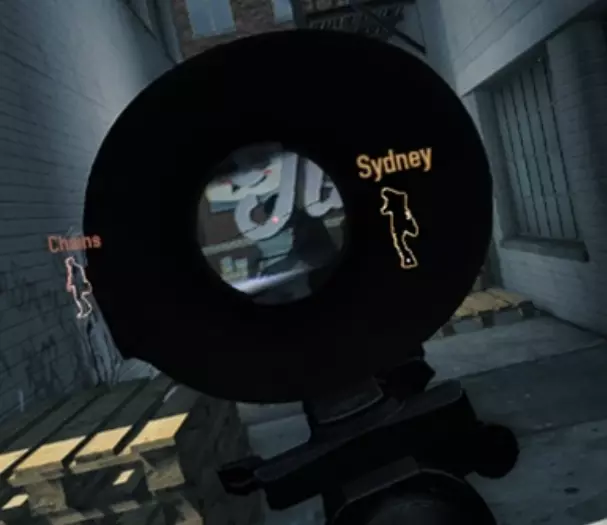
Box Buddy 瞄准镜注意事项:除了极小的视口外,瞄准镜周围的黑色橡胶眼罩还会遮挡你大部分的视野。避免使用此瞄准镜。它的放大倍数与 Theia 瞄准镜相同,因此请改用 Theia 瞄准镜。
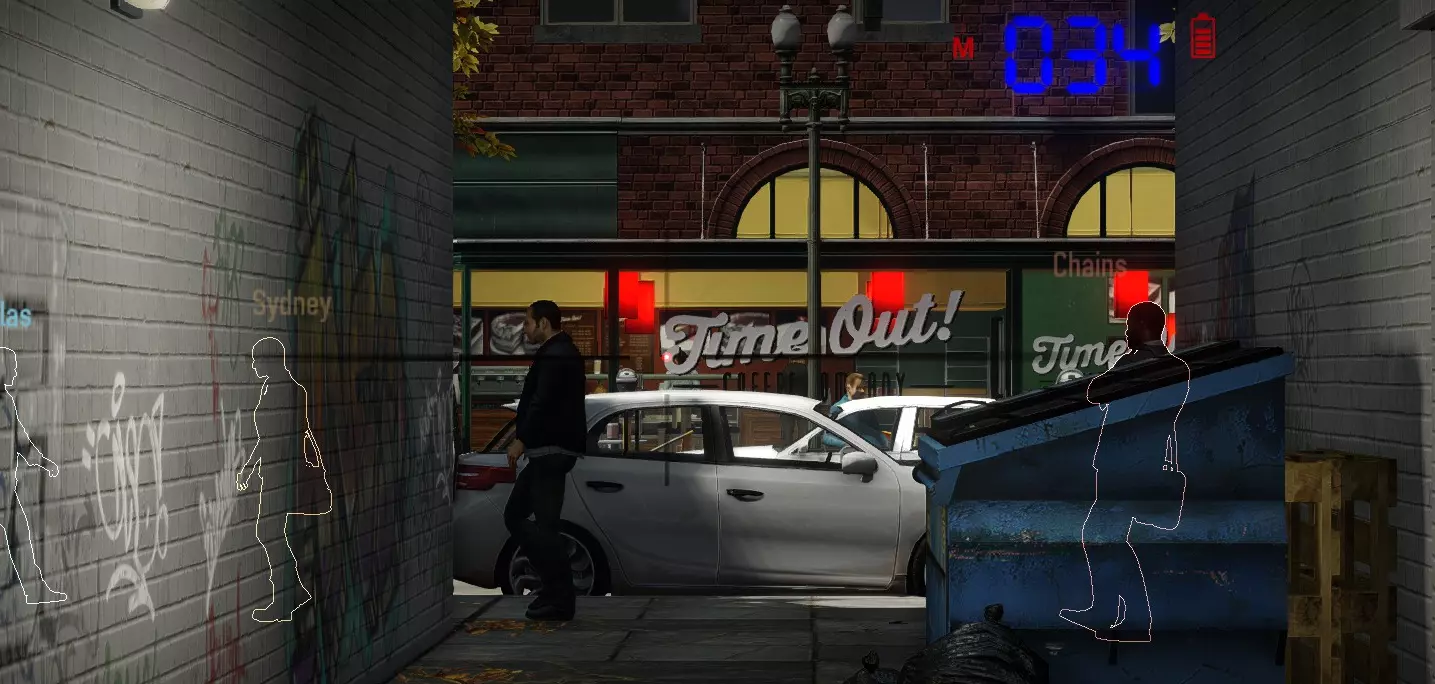
西娅之镜

游戏玩法 游戏玩法本身可能是与桌面版差异最大的部分,包含多项改变游戏风格的调整,即便是资深玩家也需要改变战术。 伤害减免 所有VR玩家拥有随距离变化的伤害减免机制,这是为了平衡VR玩家受当前VR头显分辨率限制导致视野不如敌人开阔的问题。伤害减免基础值为10%且始终生效,最高可提升至75%,该效果在60米距离时达到上限。这意味着距离60米及更远的敌人对VR玩家造成的伤害仅为正常伤害的25%。 为了平衡这一机制,所有距离VR玩家20米范围内的敌人会优先攻击VR玩家,而非其他玩家。这导致VR玩家在近距离会承受更多火力,但在远距离承受的火力较少,这是比较公平的,因为VR玩家在近距离能看得更清楚。目前尚不确定这种优先级是可以通过【光学幻象基础】和【浪人技能卡组】抵消的百分比效果,还是会使上述加成失效的硬编码效果。 在VR模式中,你不能再简单地点击蹲伏按钮来从掩体后探头,也不能快速地在矮掩体之间移动。在VR中,你必须实际蹲下,根据掩体的情况,这可能意味着真的要跪下。如果你希望反复快速地这样做,就需要良好的身体素质。正因为如此,在VR中很容易完全忘记使用掩体,因为每次想要蹲下都需要进行身体上的动作。不过话说回来,如果你真的需要掩体,在VR中反而比在电脑端更容易找到。由于敌人总是瞄准你的头部而非身体,所以你几乎可以躲在任何足够坚固能挡住子弹、且能让你把头伸到后面而不会导致游戏画面变黑的物体后面。看到一个花盆?直接趴在地上,把头伸到花盆后面,你就进入掩体了。看到一张桌子,位置正好适合防守目标?趴下,把头直接伸到桌子底下,就能获得最大程度的掩护。看到一把电脑椅?把头伸到椅子后面,就没问题了。这些机制同样适用于潜行。只要你的头部处于任何实体物体后方,守卫和平民就不会发现你。这是VR玩家潜行时最宝贵的工具。它能让你在各种桌子或其他障碍物后方极难被敌人发现,即使是在桌面端通常无法藏身的低矮障碍物也不例外。 战术换弹:通过手动换弹,你可以在换弹过程中的任何时候中断操作,换取一个部分装填的弹匣。在使用换弹速度较慢的武器时,要善用这一机制。即使某款轻机枪的换弹时间为4秒,你仍可以在不到1秒后中断换弹,且弹匣中仍能装入数十发子弹。这种进度与你开始装填时弹匣的满弹程度成正比。

Shooting and interactingOn desktop interacting with objectives or other things under fire is always a risk, because you are essentially defenseless during the interaction. But in VR your gun hand remains free to shoot, and despite interacting you are still free to move about your roomscale play area, taking cover behind objects as needed. In stealth you can cover yourself while answering a pager, and freely look around to make sure nobody is nearby. Dash bonusesThe dash bonuses from the skills and the perk decks are meant as a balancing feature to bridge the gap between dashing and direct locomotion. While using only dashing, tracking enemies with your gun while moving becomes difficult, in some cases impossible, while with direct locomotion it's easy to track enemies while smoothly moving. Dashing also requires you to point your controller in the direction of the teleport, which will hinder bag moving and almost certainly stop you from interacting with your belt with any kind of efficiency. Dashing is still available while using direct locomotion however, and gives the same bonuses. Dash allows you to stealth more effectively, because your detection only increases between the dashes, not during them. This can let you completely bypass guards standing in thin corridors by simply dashing from one side to the other, and cross larger areas by chaining together a few dashes and reaching cover by the end of it. In essence this works similarly to the crouchjumping trick on desktop. Swan SongSwan Song's effectiveness is slightly reduced in VR, because at this time there is not much else you can use to tell when you are in swan song except looking down at your health meter, or noticing that you're moving slower than usual. There is a light flash at the edges of your view when you hit swan song, but it's easy to mistake for your armor breaking. Special EnemiesShields If you're feeling too lazy to flank shields, you can stick your gun through the shield and shoot them. If you really want to get into it, bring a gun with a longer barrel so you can do so from further away. Tazers Getting tazed has no effect on your aim in VR, so the biggest obstacle is to simply find the tazer. The tazer makes an electric crackling while tazing someone, use that to your advantage. Mods Most Payday 2 mods that don't affect the HUD will work fine in VR. Glove replacement mods don't work unless they are made specifically for VR, because the VR gloves use a separate model from the desktop ones. So far there are no HUD mods made for VR. If you have a VR only mod that you would like me to link here, I can be contacted on Discord under the tag of Sienihemmo#9999. Known VR only modsVR Improvements Mod: Adds a bunch of VR exclusive options. The mod has issues though, and as it stands I wouldn't recommend using it on Deathwish or above. https://steamcommunity.com/groups/payday-2-vr-mod Other suggested modsBangHud Adds a few new hud elements which stick to your view. 2 bars, one for health and one for armor, which update correctly. The health bar has a down meter for reminding how many times you've gone down (so far the only available down counter available in VR). The armor meter has a timer for showing how long until your armor starts regenerating, or with anarchist it shows how long until the next tick of armor. http://paydaymods.com/mods/533/banghud No Flashlight Glow: Just a simple mod that removes the flashlight cone of light that can block your view, making flashlights look more realistic. https://modworkshop.net/mydownloads.php?action=view_down&did=22410 Change Log and TBD list 23.5.2018 Added BangHud into mod recommendations 7.5.2018 Added chapter on scopes, with comparison screenshots 5.5.2018 Added mention about Little Friend being unusable in VR. Added paragraph about manual reloading. Added section about weapon handling. Added mention about tazers. Improved wording and added clarifications. Added several screenshots. Changed the Rift button layout to an accurate one. Separated melee from weapons to its own thing. 4.5.2018 Added button layouts. Added VR options chapter. Added paragraph about snipers to the weapons chapter. Added a few screenshots and improved wording in places. 3.5.2018 Added a paragraph about shields to the gameplay chapter. Added a paragraph about melee to the weapons chapter. 3.5.2018 WIP version released. To be addedScreenshots everywhere Random tips End Notes The guide is still a work in progress, but I wanted to get it out for people to use while I'm still finishing it up. If anyone has suggestions that I overlooked or corrections for something I got wrong, I'm always open to constructive criticism. And as always, if you liked the guide or if it helped you get some clarity, please remember to rate it. Thanks. Credits: Admiral_Knox for suggesting improvements and giving ideas Zdann for suggesting fixes BillyCrusher for the Rift layout