换一换
换一换 


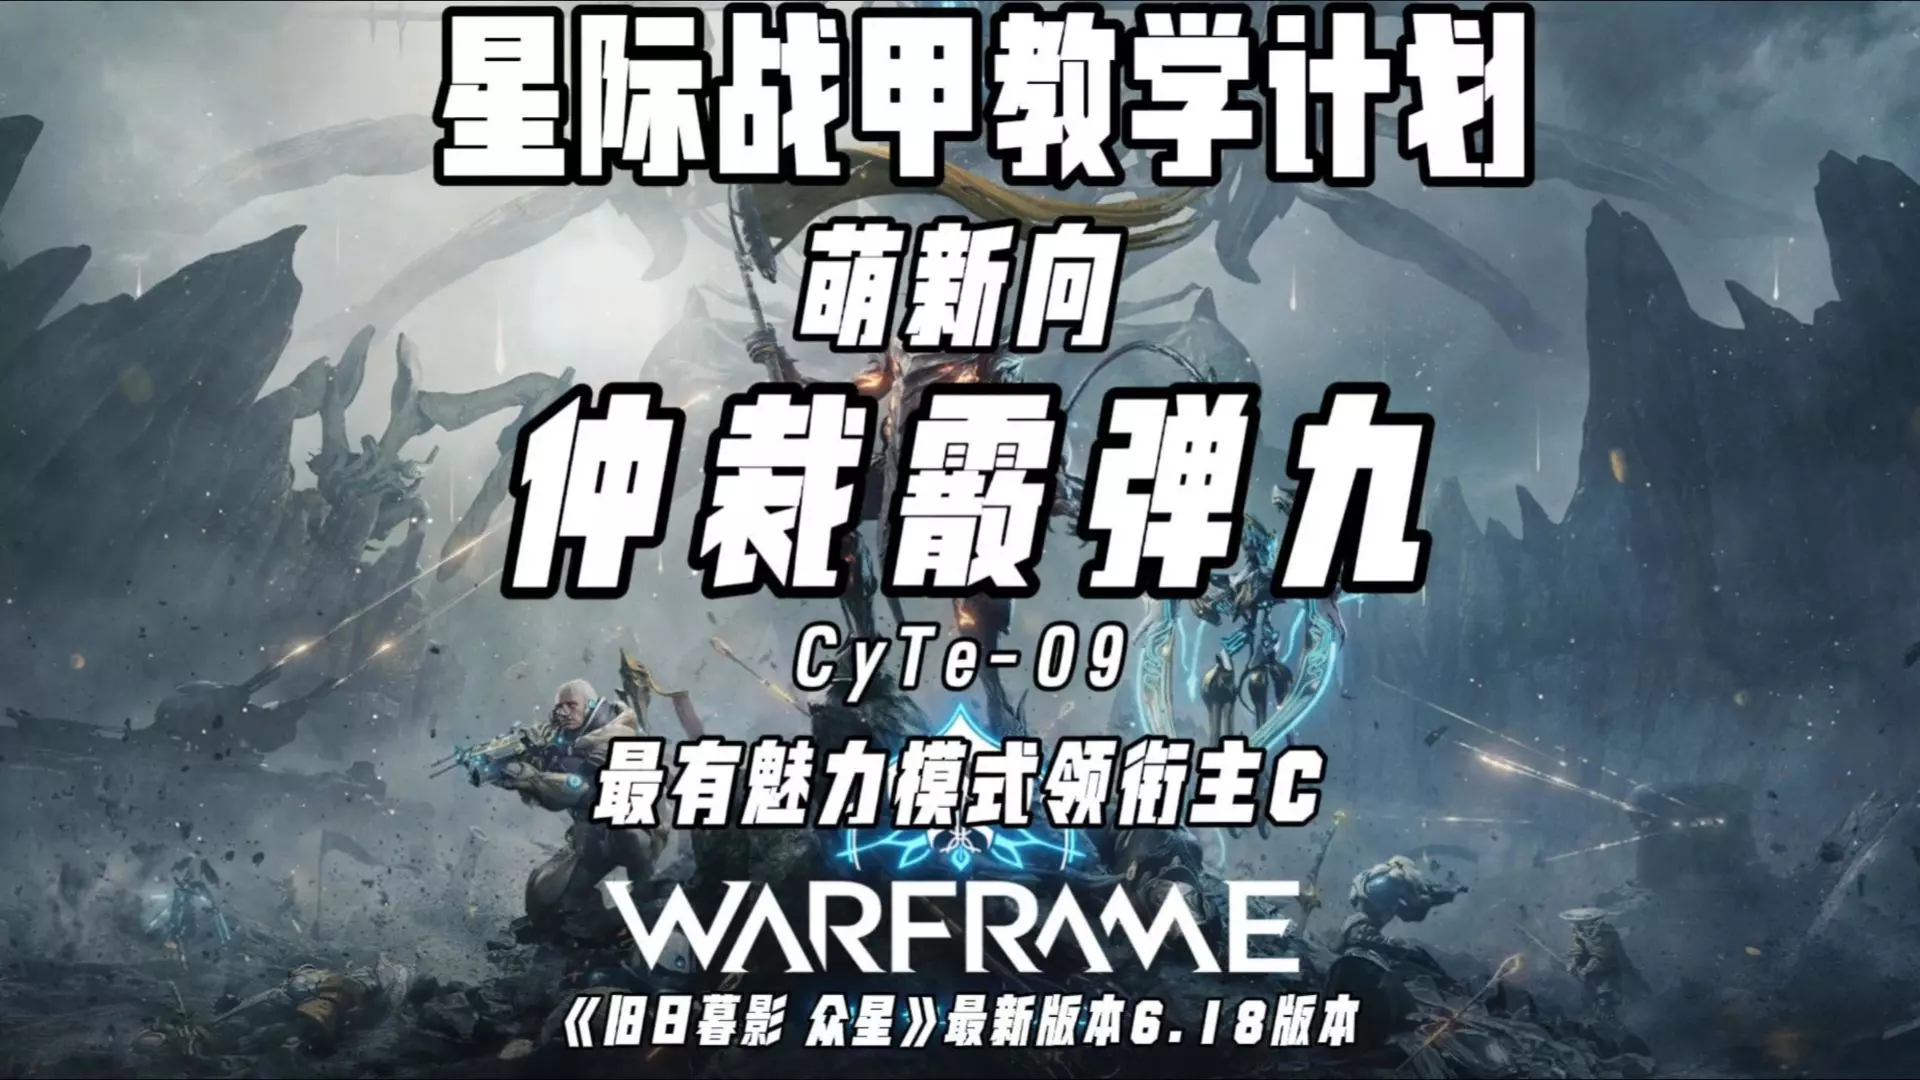
Hello, this document is ment to be a very detailed guide on Tridolon Hunting in Warframe as a team. I will talk about roles, Warframes, builds, gear, strats, focus nodes and focus schools. This will guide will mostly be in plain text form with just some screenshots for builds i/e. a quick Update to this guides future If you just want to learn about the Eidolon fights please skip this section for now and maybe give it a read afterwards! TL;DR: This guide will NOT be updated to fit the current 6x3 "meta" However this guide's content still is very valid and viable, even after a little over 1 year since it's creation, with very little to no changes in most of the sections. As some of my friends already know, I stopped caring about Warframe as there was no half decent/relevant content update in well over a year now. Fortuna is missing an endgame grind that is worth doing/rewarding and we are still missing 1 spider boss from it. The last boss update we got (talking about the Flydolon) is a health gate mess with basically NO reason to be repeated afer you got the Wisp parts. The last clan event (Hostile Mergers) was also a complete mess with way too many exploits that could have easily be prevented by proper testing on DE's side. Anyway, DE as developer/company clearly does not show any interest to release any form of repeatable "endgame"-like content that yields some form of profitable items for the more advanced players out there and it's understandable, from a business side of view at least. I will put time and efford intho this little project of mine, If DE ever decides to shake things in the Eidolon-meta up and thus make this guide unviable Till then, thank all of you for close to 9k Views and over 380 favs! Also a big thanks for the very generous gifts and messages ingame, I really appreciated them! Why do I think I'm able to write a guide on the matter. I'm a MR26 veteran player with close to 2200 hours of ingame time, keep in mind neither of those two stats matter too much for Eidolons but I also have been doing 5 sets per night for a very long time now and hit times of sub nine minutes for a trio, with my current personal record sitting at 8:16 for one full trio. At the time I started writing this guide I have captured/killed over 1700 Hydrolysts. It seems as if the animation that gets played after the Eidolon hits 0 hp determines whether it's counted as kill or capture. There is a weird glitch that sometimes triggers the wrong animation. Feel free to hit me up ingame with the IGN -exo- if you have detailed question and don't feel like it's worth discussing in the comment section. As mentioned before, this is mostly a written guide. Use the search function (CTRL+F) and type an Item/Warframe/etc. name in and it will be highlighted if you just want to read that section. English is not my main language, apologies for spelling/grammatical errors, please point them out in the comments and I'll go over them and correct them. The most important thing is knowing what time it is There are several websites with a Cetus Day-Night timer, some are more accurate than others though. https://tenno.tools/ https://hub.warframestat.us/ https://semlar.com/ https://deathsnacks.com/wf/ Just to name a few. Another big part of "knowing time" is deciding when you enter the plains. Honestly, if your team uses the "all shoot" strat you can go in a minute after night starts and you're still able to get a clean 5th Hydrolyst capture. If you want to utalize huge VS-Stacks you might want to enter about 6 minutes before the night starts. Going in any earlier is just a waste of time, it doesn't add any benefit and just increases the risk of messing the AI up and preventing the Vomvalyst spawns. The Shieldbreakers and their subroles in the Team! First of all I just want to talk about every viable Warframe and his/her tools being used for their individual role. I will include detailed section where I talk about the individual builds and strats below. Let's talk about the roles and a suitable Warframe for each role, starting with the "Shieldbuffer" and most important role/Warframe for Tridolons: Volt/Prime: His shields add a set amount of electric damage to your amp's damage. After the nerf of Adarza Kavats, Volt's shields became the only currently known external damage buff for an amp. Stacking the shields adds more Damage to the eidolons actual health, stacking up to 6 shields can enable the Void-Strikers to bust a kneecap with their amps saving about 1 second per every bust kneecap. Against the common believe, casting Shock on the shields does not increase the added damage bonus. I am aware of the different description on Volt's wiki page, The way i described seems to be exclusive for the amp damage against the Eidolon's shields. The usual 50% Electro and 200% Crit damage increases take effect once the shield is down. Volt also has a speed buff which comes in handy incase your DPS-Role uses a Rubico or Vectis to farm combo during the healing phases. Sadly a conventional Eidolon-Hunter build does not go for Power Strengh and the speed bonus is relativley weak. Volt's passive can also stack up to 1000 extra Electric damage, this comes in handy incase the DPS-Role has troubles landing a shot. Volt can also be built towards an extra DPS buff with the "Shock Trooper" augment incase your DPS has a suboptimal weapon. Coming up next are the "Lure-Sitters" these players usually gather 6-7 Lures and keep them alive during the Eidolon-Set. While there are two viable Warframes for this role I will only talk about the more used one for now. Trinity/Prime: As previously mention your job is to gather lures and watch out for them. Trinity is pretty much perfect for this job. Her ultimate ablity "Bless" uses the affinity range, which is 50m and is not effected by mods of any kind. The only way to increase it are the Flares (increase to 200m) and Vazarin Focus node "Mending Unity" (increase by 25m at max rank). Every ally in the affinity range will get a certain Damage Reduction (DR) buff and will be healed to a certain extent, I will talk about the individual stats in the Trinity Build and Strat section. Sadly Trinity's other abilities are highly situational during the hunt. While Energy Vampire (EV) can be cast on Vomvalysts it's not very efficient since the build has very minimal range and a high duration stat. Link can be used to damage Vomvs during the first healing phase but it has the same low range problem as EV. Up next are the "Protectors" Warframes here are used to negate the status procs from the energie strikes. This role also has two very viable Warframes and I will again only talk about the more used one for now, while there are some other Warframes that can negate status effects, non of the others has any other real benefit without going out of their way too far. Harrow: Harrow is often overlooked, even though his role is basically the least important, he still can be very usefull outside of just negating the damage and status procs for the energy Strike. Harrow, like Trinity, almost exclusivly uses his ultamte ability "Covenant". It is mostly used to make the whole team immune to every damage input and every status effect for a short period of time. This preserves the energy every Warframe has, the magnatic proc still steals energy if it hits your Warframe eventhough you are in Operator (OP) mode. It's second usecase is the insane critical strike chance (CC) buff. Last but not least I want to talk about the "Jack of all Trades" Oberon: Oberon can do almost everything the roles above are used for. He also is the most popular Warframe used to solo the Eidolons. Unlike the other Warframes I talked about sofar, Oberon uses a big part of his toolkit. His first Ability "Smite" has the augment "Smite Infusion" on base stats it grants 100% Radiation Damage for the 40 seconds to every ally you cast it on. This can be used as Substitude for Harrow's CC buff, or Volt's Shock Trooper for that matter. His second ability "Hallowed Ground" is can be used to Damage Vomvalysts and fill lures during the Teralyst's healing phase to full lures much faster, and the second, more common usecase is as substitude for Harrow's Covenant ability during the energy strikes to negate the energy loss on warframes. Oberon's third ability "Renewal" is a substitude for Trinity's Bless, it heals a certain amount of health per second and has an initial healing blast. This ability became viable after the lures for a buff to their health, armor and shields. The DPS Role. There are two Viable picks as DPS for the current meta in Eidolon Hunts, both of them are about at the same level in most cases, however I will also talk about two aditional Warframes, one of which will be more on a theoretical base. DPS Warframes are basically used for one single ability, thus there is not much to talk about and they get their own section because of that. I will start with the more common DPS Warframe Chroma: Chroma has the highest Damage buff among all other Warframes, this is still true even after his "fix" earlier this year. The Vex armor now works exactly like a stronger verion of Serration(and it's counterpart for Pistols, Shotguns and Melee weapons), because of this the weapon builds optimal for chroma are slighlty different than the weapon builds for conventional use, or for use on Rhino for example. Chroma's second ability "Elemental Ward" can be helpfull if you run a Toxin Chroma and use your a throwing-type secondary for self damage, a Rubico or Vectis and want to farm combo, it increases the reload speed and holster rate (switching weapons becomes faster) Coming to the other popular DPS Rhino/Prime: Rhino's Roar works slightly different than Chroma's Vex buff, or Octavias Amp for that matter, I'm trying to include a Google-Spreadsheet where I list the different Damage modifiers and when they get applied. To make understanding the difference a bit easier. Eventhough Roar's numbers are tiny when you compare it to Vex's numbers, the difference at equal Power Strengh is about 15% on a conventionally modded Weapon. Rhino's buff also can be shared quite easily incase bad stuff happens. Rhino also has the benefit of Ironskin, he becomes basically untouchable for a short while. This can come in very handy to negate staggers, knockbacks and other status effects. A less popular DPS for eidolon Hunts is Octavia: The decrease in popularity doesn't have it's source in lack of damage, the damage bonus her Ultimate ability "Amp" provides is more than potent enough to oneshot eidolons with the right weapon, it rather comes from the squishy nature of Octavia, she sadly gets oneshot by almost everything. However Octavia has some big benefits no other DPS has, mainly talking about her passive, granting herself and her allies energy regeneration upon ability casts. Theoretically Excalibur Umbra and his Exalted Blade can be very strong against Eidolons. The reason i don't include the normal or primed version of Excalibur is the lack of the Umbral-Polarities and Sacrificual Pressure and Steel being requirements. Each of those mods gives your 30% absolute damage increase against Sentients. The reason I only include Excal Umbra as theory is my lack of ability/urge to test it, I already got rid of the two Umbral polarities on the exalted weapon because neither is strong enough for me to keep them in the build before I had the chance to test his damage output. Operator101 **Slightly outdated with new Fortuna amps** Not too much changed tho and the x23 is still very viable! You will spend the majority of time in Operator mode, getting this gear right as soon as possible makes your life much easier. Let's talk Amps first. The amp is probably the most important thing you have to nail before you're able to become a professional Eidolon Hunter. The only parts that really matter are the Scaffold and Brace though. The Important Things: Sraksun Scaffold this is the highest DPS attack your amp can have, it's mostly used during eidolon hunts. Lohrin Brace it increases the CC and Critical Strike Damage (CD) by significant amounts, combined with our Virtous Shadow arcane the CC gets to ~50%. The Prism is mostly up to you, however the Rahn Prism has the highest fire rate and thus can help to depleat your remaining VS-charges if needed. After you built your Eidolonbuster amp it's time to beef it and yourself up with some arcanes. Arcanes are not required but they make your life a lot easier and enjoyable. I will start with Amp-Arcanes. Against popular opinion there is one superior arcane compared to the rest, regardless of Void-Strike(VS) - Stategy. The objectivly best arcne for your amp is Virtuos Shadow. It has 40% chance to increase CC by 60% for 12 seconds upon landing a headshot. You may think this arcane is stupid because you'll never proc it, but you are wrong. Procing this arcan is very easy by Void-Dashing against the Eidolons Head while is about to stand up. the Head doesn't change it's horizontal position while standing up, so spamming dash in the upwards direction is very easy. The other arcanes believed to be usefull for Tridolons are Virtous Strike and Virtouse Fury. Both arcanes are pretty similar in how you proc them ingame. Since neither is very usefull for Tridolons I will not waste too much time on the details and just mention why neither is usefull. Both are proced after you shoot with your amp and in the best case every Shield, outside of all Teralyst's and the very first shield of Gantu- and Hydrolyst, are drained with one single shot of each player. I will talk more about this in the VS-Strat section of this guide. After you equipped Virtous Shadow on your amp you have to think about OP-Arcanes: Unlike Amp-Arcanes we have a few viable options here. However I highly recommend at least using one Magus Vigor to give your Operator a larger health pool and one R3 Magus Anomaly to pull the Hydrolyst away from the water. DE "fixed" it only on Terry so you still can mess around with Anomaly on Gantu and Hydro. I personally have the second arcane slot empty, simply because I'm a lazy butt and think grinding the resources for a second arcane won't bring big enough improvements. However, viable options are: Magus Replenish healing whenever you void dash. (probably the best pick) Magus Vigor for an even bigger health pool Magus Nourish to give your WF a heal over time effect when you leave it Magus Elevate to heal your WF for a certain amount when you enter it Magus Anomly to pull the last Eidolon away from water during the last capture incase it is in Daytime. After you selected your Operator arcanes it's time to select the correct focus school and activate the right nodes for your role! If you're playing as DPS you most likely will run with the Unairu Focus School The only required nodes here are Magnetic Blast (can be left at rank 1) and Unairu Wisp (UW - has to be Rank 3) Magnetic Blast is only used to unlock Unairu Wisp and leaving it at a low rank can save a lot of Pool-capacity. The UW is used to double the Shieldbreaker's damage output to the shields. If you're one of the Shieldbreakers you most likely will run with the Madurai Focus School The only two required nodes here are Void Radiance (again can be left at rank 1) and Void Strike (VS - has to at max Rank) VS is used to increase the amp's damage into extremely high levels inorder to one-shot almost all Eidolon shields. There is an off-meta strat where Trinity uses Zenurik for the Energizing Dash to cut the resource costs down a bit, I only recommend this if the other Shieldbreakers are experienced enough with Virtous Shadow to kill the shield with just two people shooting. Builds for every Warframe used as one of the Shieldbreakers This section will be the only section consisting of mostly screenshots instead of text. Note: Arcane selection is mostly up to you, there are no real objectivly best arcanes until we reach the DPS role and it's weapon selection. However my Recommendation is using at least one R3 - Energize if you have it since almost every limb drops an energy ball you can pick up. Whether Coaction Drift is used or not depends on the Team Setup! The most ideal setup will be 3 Corrosive Projections and 2 Coaction Drift for a 99% armor strip, this way the DPS still can benefit from the Radiation damage bonus. Volt/Prime:
这里最重要的属性是高持续时间,其次是高效率。你可以完全放弃范围和强度,因为这两个属性不会影响你的护盾。 哈洛:
这里最重要的属性是低持续时间,通常85-90%的持续时间会比较舒适。这足以让输出职业获得肢体的控制增益,也足以抵消整个能量打击。低持续时间很重要,因为你无法在技能结束前重新施放该技能。 范围属性可以完全忽略,因为该技能使用的是亲和范围。 三位一体/三位一体Prime:
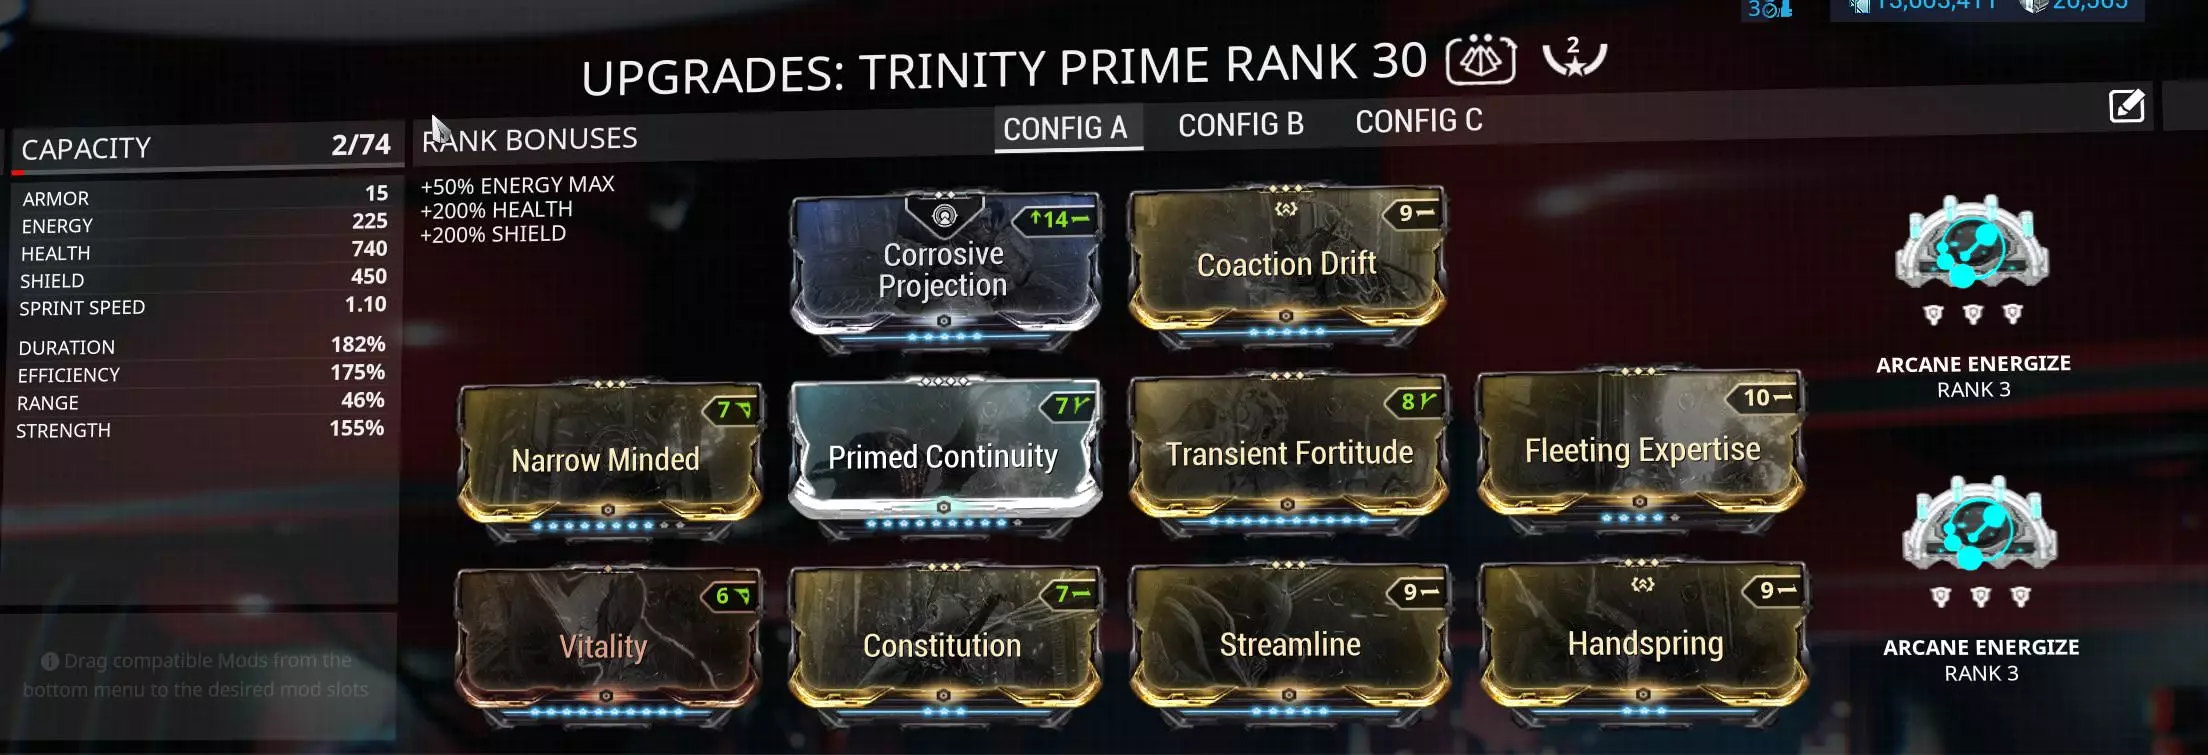
力量首次成为更重要的属性,你需要至少150%的力量强度才能将祝福技能效果最大化,之后我建议堆到175%的效率以便随时重新施放,同时保证适当的持续时间。范围属性可以完全忽略,因为祝福技能使用的是亲和范围。 奥伯龙/奥伯龙Prime:
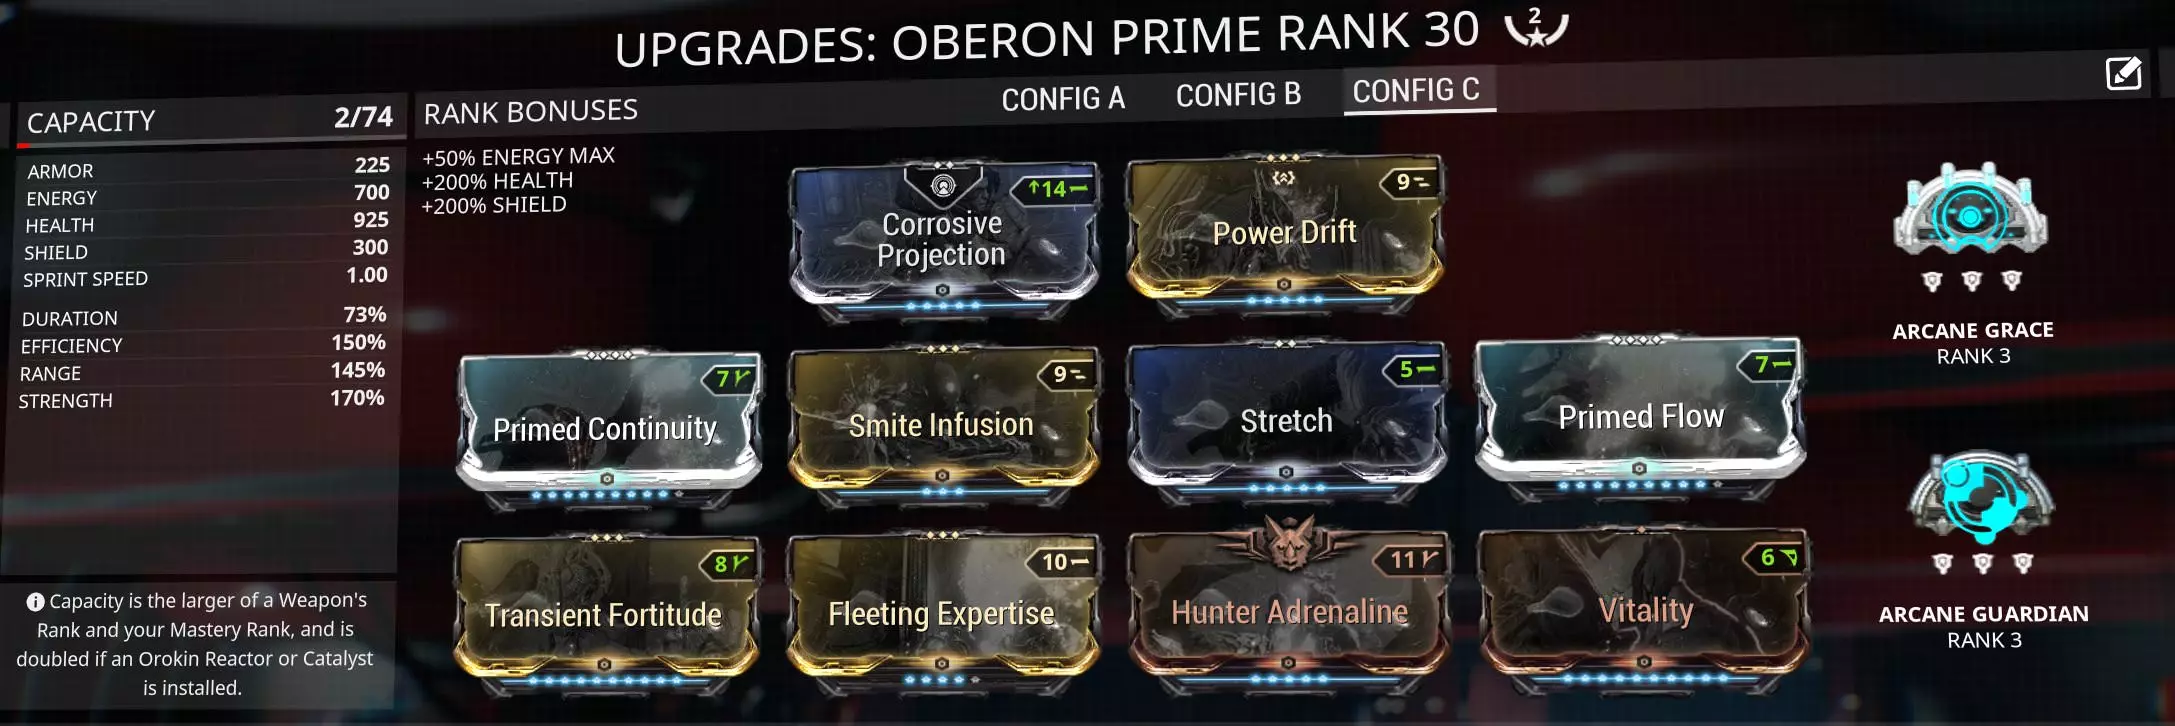
奥伯龙几乎能满足你狩猎兆力使所需的一切,因此几乎每项属性都有一定重要性。唯一不必太过在意的属性是持续时间,即便如此,使用【持久力Prime】将其提升至73%,可使【圣佑领域】持续14.5秒,这对于抵消能量打击来说已经足够。但配装中需要一些范围属性,因为你的队友必须站在技能范围内才能从中获益,你的治疗量也取决于范围属性。你还需要一些强度,它能增加治疗量。 DPS战甲的配装以及武器配装的不同方式。 【 chroma 】和【 rhino 】
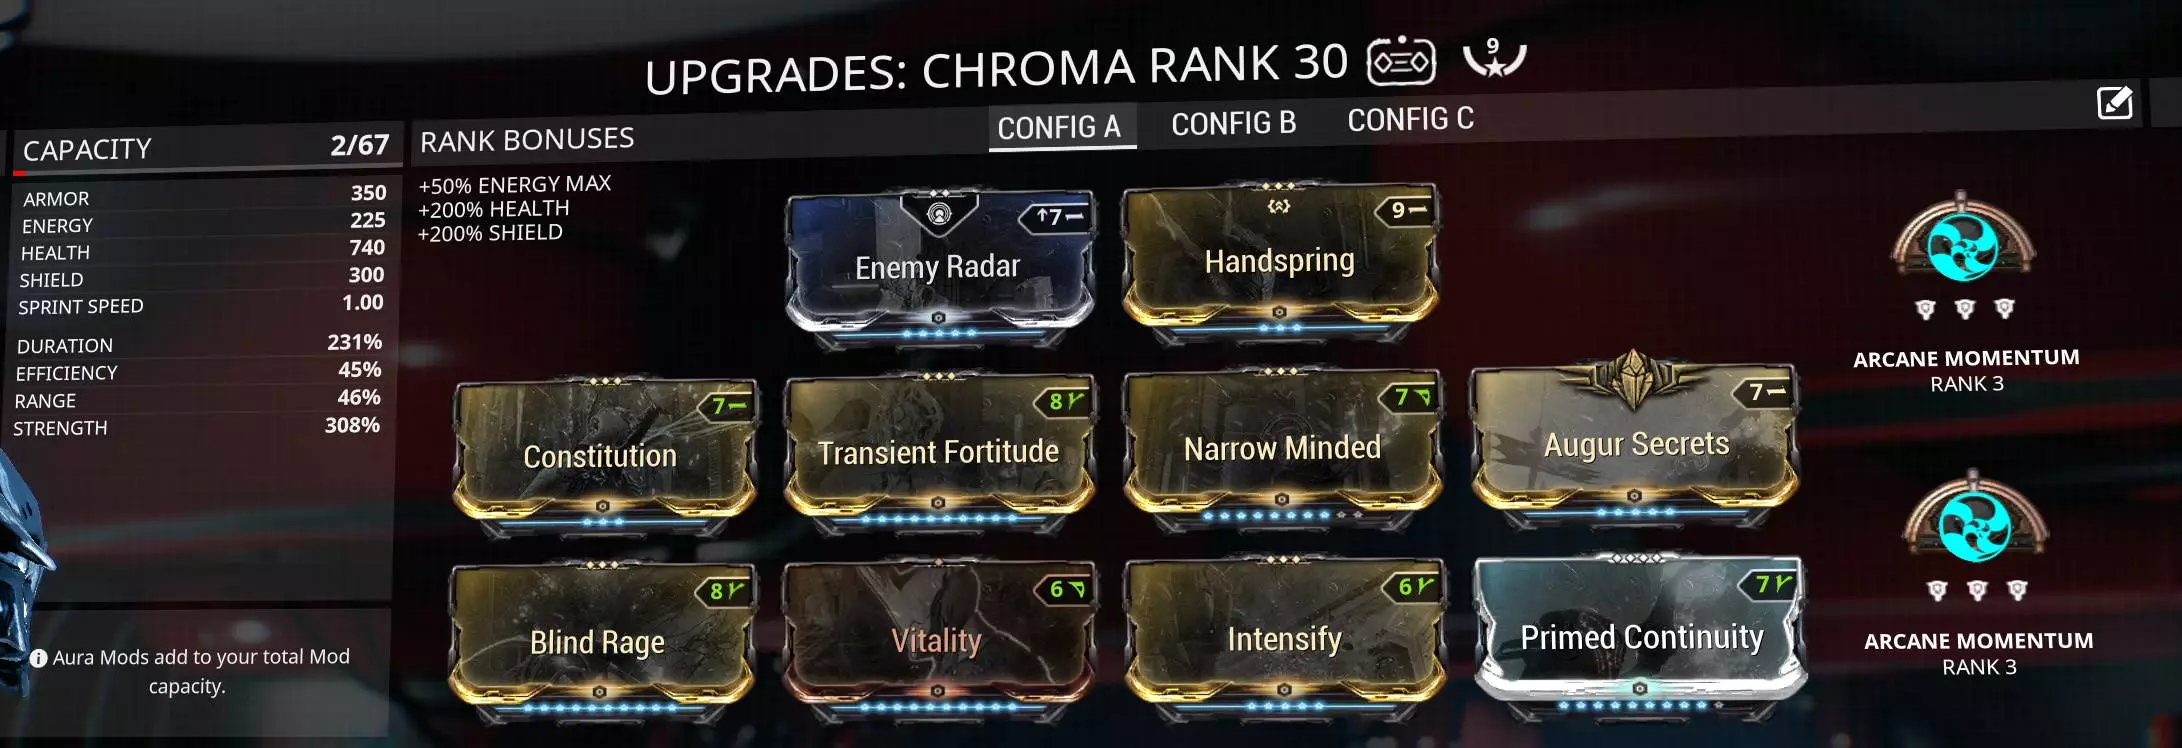
Chroma和Rhino的配装大多相同,我目前没有Rhino的配装,而且要让Rhino达到能用于 Eidolon(巨形 Sentient 敌人)的配装水平还需要一段时间,等我完成Rhino的Eidolon猎人配装后会更新这部分内容。 你可以将持续时间属性换成高效率属性,在每个肢体被摧毁后重新施放 buff。这样能最大程度降低在击杀肢体前 buff 消失的风险,因为你不能像重铸vex armor(vex 护甲)那样重铸roar(咆哮)。 这里的赋能选择在一定程度上确实很重要,并且取决于你在夜晚携带的武器。最通用的组合是一个Acceleration(加速)和一个Momentum(动量)。不过,如果你使用兰卡并装备双加速,以获得极高的射速和充能速度,可能会更好;而当你使用威斯prime甚至鲁比克时,双动量可能更适合,利用最短的装填时间来更快地堆叠连击。这在每组三人任务开始时,或者当你死亡并失去所有连击加成时都很有用。 如前所述,武器的配装方式会因你使用的输出型战甲而异。这种差异源于两种伤害 buff 之间的区别。我制作了一个电子表格,讨论《星际战甲》中的不同伤害修正,以及它们何时、如何应用到你的武器上。 现在我将讨论这些差异,并为每个输出型战甲提供一个配装示例。不过,最大的差异可能在于裂罅mod以及你希望它们拥有的属性。一个 chroma 的武器可能是这样的:
这里的重点是避免所有原始伤害数值,因为它们不再随vex护甲(Vex Armor)提升,而元素伤害类型仍然会随vex提升。Octavia的增幅(Amp)技能也是如此。 Rhino的武器可以是这样的:
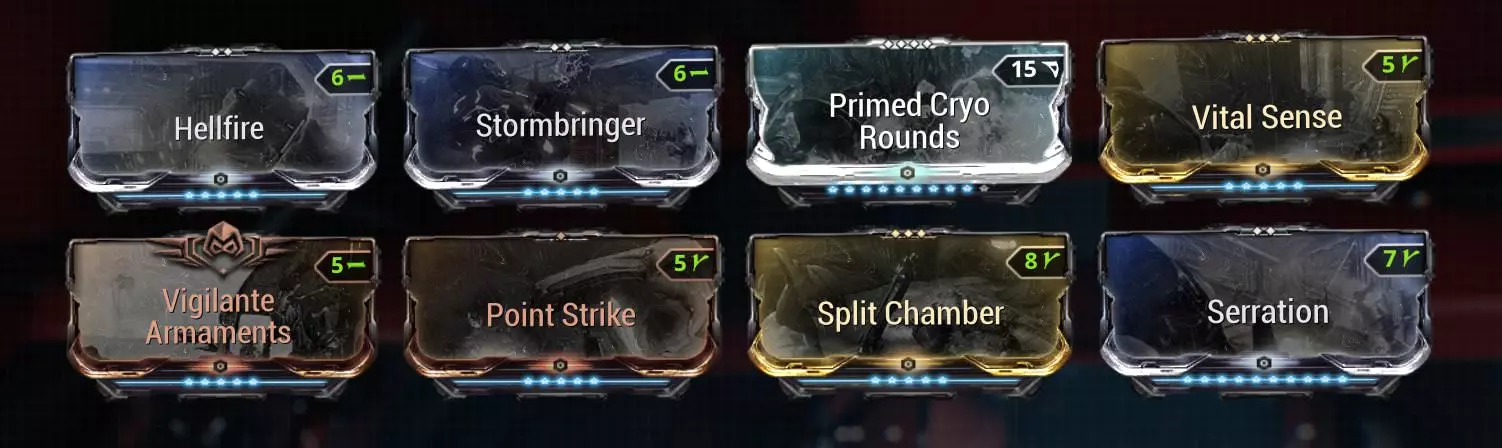
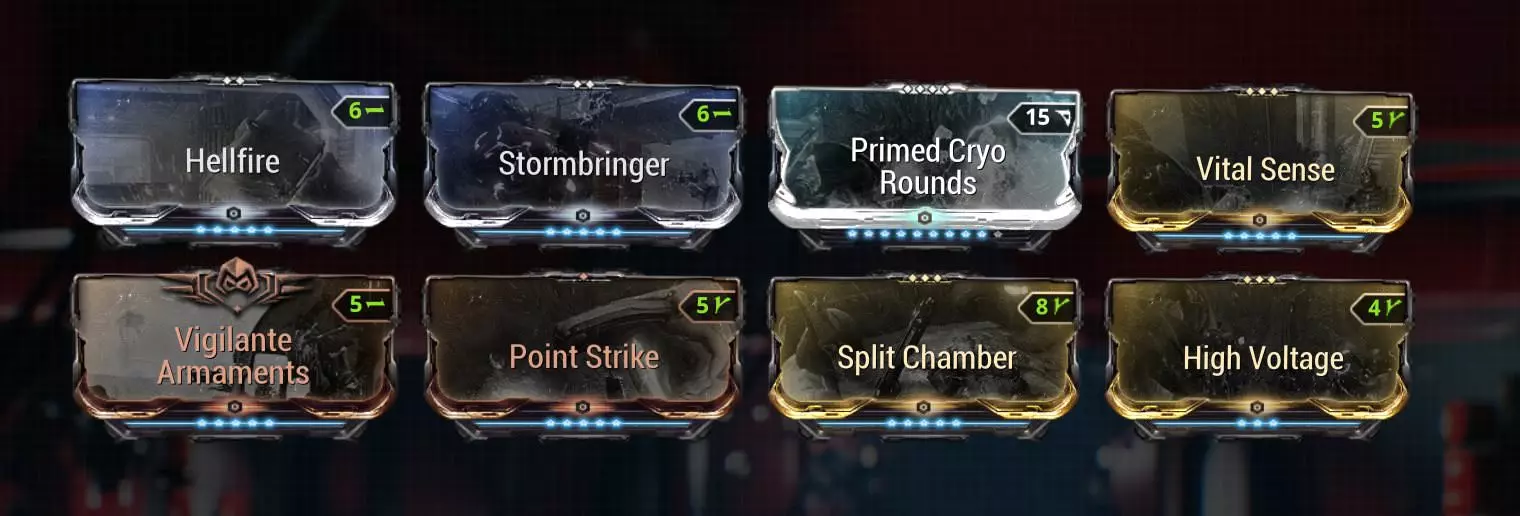
Here having a high raw damage stat modifier is benefitial. Roar is an absolute damage modifier, it works in a similar way as a Bane of "insert fraction here" mod, it takes the weapons complete modded damage and increases it by the % you have on your build. Keep in mind, a Roar-Rhino is only an objectivly better DPS if you have a Riven with the raw damage stat. Let's talk Riven: As mentioned, the biggest Difference is in the Riven you want for the different DPS. But there is no doubt about the utter God-Roll being either: Critical Chance (CC) or Critical Damage (CD) with Multishot(MS) and a good negative like -zoom or - >26% Magazine Capacity on Vectis or CD,MS, CC with a good negative However, another very viable option for a Chroma DPS would be trading the CC stat for electro or heat damge to add towards the radiation damage, or trading the CC stat for raw damage when you play Rhino. Rhino becomes superior if you have one of those raw damage riven. When it comes to intalling a Riven into your build, it highly depends on the stats of your Riven. If you have a Riven with MS and CD, but without CC you could replace Vigilante Armaments with the Riven. But if you happen to have a Riven with CD and CC, you could replace it with Point Strike. There is no direct rule to follow here, and the builds above are just rough examples. Just try a few different combinations and stick with a relyable one. The different weapons and why you should use them. I want to start this section with the more important weapons. The DPS-Player's Primary source of damage and, incase of Chroma DPS, a way to self damage. It doesn't matter if you are using a Lanka, Rubico, Vectis Prime or even a Euphona, as long as you can kill every Limb with one shot you are good to go. Please don't overlook the potential of Rubico and Vectis, they can utilize the Combo-Mechanic of sniper rifles and triple their damage quite fast. The general build for every weapon is esentially the same, however every weapon has up- and downsides and I want to go over every Sniper I find viable for Eidolon-Hunting. Lanka: The biggest benefit of a Lanka is the pure Electricity damage type, it also is the hardest hitting sniper of the bunch when it's fully charged. Thus it can become a real Eidolon-Buster with a sub-optimal Riven. The scope-bonus of a Lanka increases the CC of your weapon but it goes up to a 8x zoom, so a -zoom riven can be quite handy to reduces the zoom effect while utalizing the CC bonus of the scope. The biggest downsides of a Lanka are the charge up and projectile mechanics. Even though you're never shooting at high distances during the Eidolon fights the non-hitscane projectiles can lead to some missed shots, specially when you are firing at the armpit/neck Synovias. A missed hit can be quite a problem, especially when you have a long charge time(low fire rate) and lose a lot of time. The Lanka also has the biggest zoom while scoped in complelty, it can be quite dis-orientating. Rubico Prime: The Rubico P has a high clip with very good fire rate, combining this with double Arcane Momentums can bring some very quick combo charges. The high clip and good fire rate also make a missed shot much less of a problem since a followup shot can be place very quickly, the risk of missing is also reduced because the Rubico P is a Hit-scan based weapon. The Rubico P also has the highest Crit-Stats of the snipers, this got further amplified with the Rubico Prime. The extra 8% base cc made the cc-stat on riven or further cc mods like argon scope rather obsolete. The Rubico Prime is in my opinion the best sniper for Eidolons right now. Riven prices rose a bit and are on the same level as Lanka Riven and it makes sense, both guns are on about the same level when it comes to performance during Eidolon Hunts. The biggest downside of the Rubico P is it's relatively low base damage, it pretty much needs a half decent Riven and some Combo-Bonus to oneshot the Synovias. Vectis Prime: The Vectis Prime has pretty decent base damage with an average 2x CD multiplier, based on my experience it's head-to-head with the Rubico P, however, the Vectis doesn't have the high clip, but a much faster reload, this also makes building a decently high combo quite easy when you use dual Arcane Momentum. The two round clip and the really fast reload speed makes using Argon Scope and follow up shots really easy. I am not sure if this is a up- or downside but the Zoom-Bonus of the Vectis Prime increases just the headshot damage, thus only being used for the last shot on every Eidolon. The only real downside to the Vectis Prime is the lower base damage when compared to the Lanka, it also needs some Combo-Bonus to oneshot Synovias. Getting a good enough Riven for the Vectis can also be quite expensive since it's the best sniper and one of the best weapons for general use in normal gameplay. The fastest way to charge your Vex buff as chroma would be a throwing type melee weapon, idealy a Cerata, with this build:
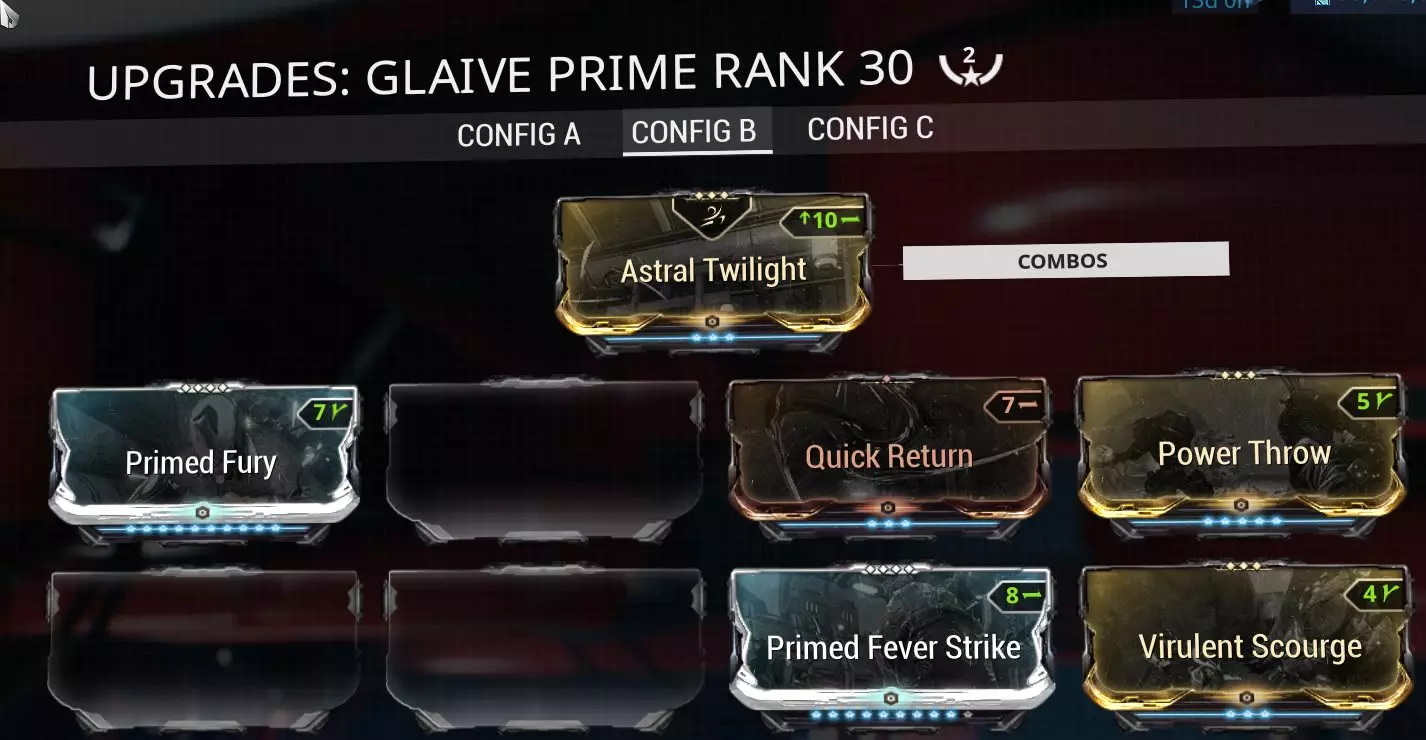
要启用自残机制,需要这些模组或其非Prime版本。 自残的次优选择是投掷型副武器,例如Spira/Prime,搭配隐蔽爆炸模组。 我强烈推荐队伍中的VS使用者使用兰卡,当输出位的增伤 buff 消失,需要有人接手时,它无疑能造成最高伤害。 除了兰卡作为主武器外,我推荐使用射速尽可能快的副武器。 双毒蛇/幽影、阿科玛提、DEX 弗里斯或光束类武器都非常适用。这样做的原因是为了在每次击败 Eidolon 后,能尽快消耗掉剩余的 VS 充能。除了上述提到的武器外,潘德洛的次要开火模式能以7的基础射速发射8发 burst。69发/秒。这能确保无论何种情况,你都能以全新的VS充能开始。记住,如果你频繁使用次要开火模式并以指挥官形态被击杀,你可能会以战甲形态卸下武器并失去所有充能。 选择的航道星舰(AW)及其配装。 对于夜灵,唯一可行的航道星舰是伊格尼斯。 其配装如下:
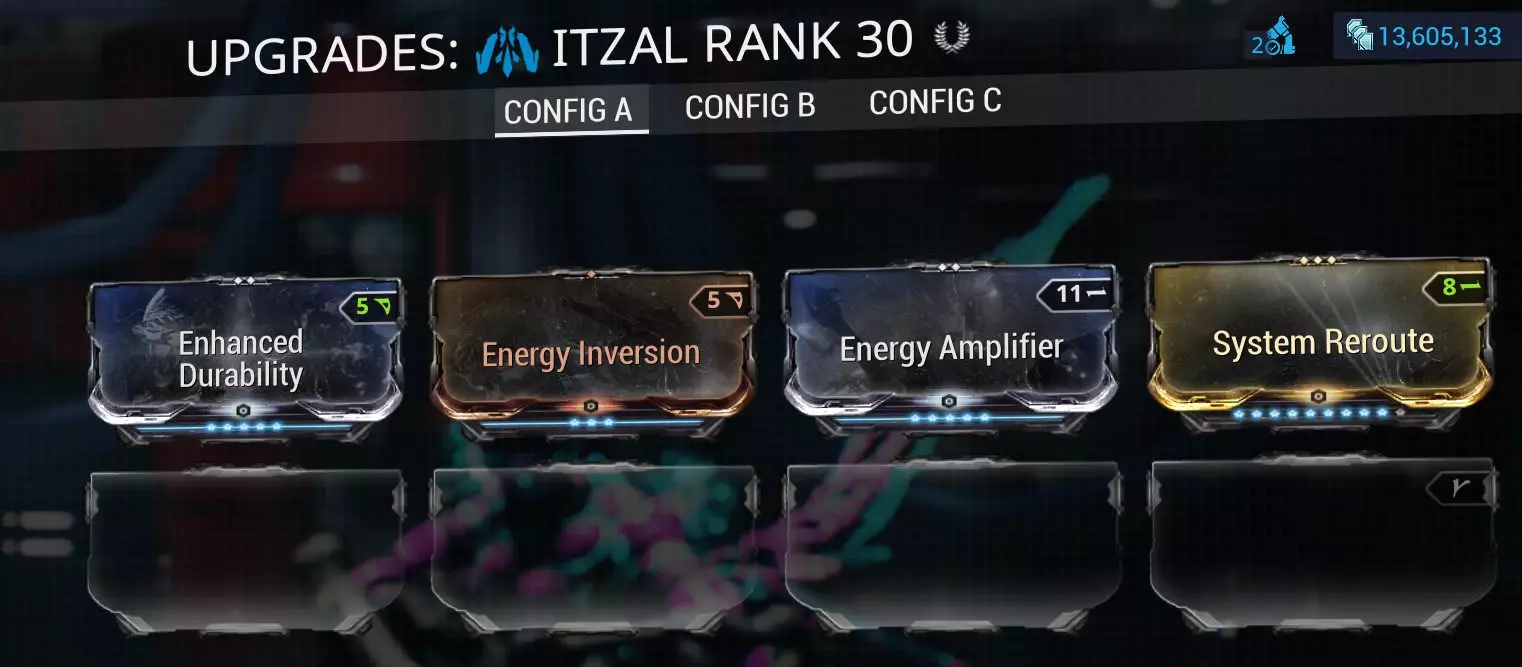
The only two mods really needed here are Energy Amplifier for a longer Blink range and System Reroute for a higher casting efficiency. The survivability mods are only usefull whenever you're the Luresitter of the team. Flightspeed mods are not needed since you'll mostly move around via the Blink ability. A mod like Auxiliary Power can increase the energy pool you can work with as DPS or Luresitter, this mostly comes in handy if the Eidolon spawns at a point very far away from the Shrine. The Void-Strike Strategie There are currently two differnt strategies on how the team uses their VS charges on a fresh set, by fresh i mean no precharge. Both starts are vastly different from eachother. I will go over the inferior "Turns"-Strat first. This strategie implies that Harrow and Trinity charge their 8-VS shots during the Teralyst and Gantulyst fight, leaving mostly Volt alone on the Teralyst shields. This strategie is still very far spread and it loses a lot of time during the Teralyst fight. However, with near perfect execution, this strat can also achive the required sub 10 minutes times you need for a 5x3 night, but keep in mind, a tiny mistake can cost you a lot of time and "kill" the 5x3 night for you and your team. However, this strat usually is used for the first set of a night because most teams enter before the night starts, this strategy starts working perfectly after as little as ~7 minutes of precharing to one-shot the Teralyst shields. Let's move on to the "all shoot"-strategy. This strategy is simpler, faster and more reliable and it can yield low 9-minute times without much practice. The main difference between the two strats is when and how much everyone charges his VS-Shots. With this strategy all three Voidstrikers are charging 8 new shots during each healing phase and using 1 or 2 shots for every shield for the next Eidolon-Fight. Because 3 people are charing and using a shot with at least 7-8x multipliers the actual damage output is equal to a single VS-user with a 21-24x charge. In the best case, Harrow can get to about 15x with the "turns" strat. So we already have more then 25% more damage than with the other strat for every shield. Also, the team has 3 times as many chances for a critical hit with the 3 different people shooting. In the end you have 8 shots for 6 shields, those shots should be used as follows: first 2 shots are burnt for the first shields since it's twice as strong. then you have 1 shot for the other 5 shields before the Eidolon enters the healing phase. If everyone does his/her job correctly everyone should have 1 extra shot, this shot can be used incase the team is unlucky with crits and doesn't oneshot a shield. Using Virtuos Shadow can increase your CC and almost ensures the Shield-"one-shot". Procing the arcane can be done via voiddashing against the eidolons head while he stands up. Let's talk about the time difference and the breaking point of this strategy The biggest and only difference in times comes from Harrow and Volt taking down the Teralyst's shields together, basically cutting that time in half. However, a good Trinity can stay with the team for the first Teralyst shield and gather 5-7 lures after that and cutting the time by about 10 seconds for each Set. Sadly this strat has two breaking points inside the team, one being much bigger than the other. The first and major breaking point is people overestimating their remaining VS-charges after the Eidolon fights and wasting time outside of the void mode and thus spending downtime not charging. The second breaking point is a very minor one if you look at breaking the shields, but it has a bigger impact on the time at a different spot. This breaking point is Trinity arriving late during the Teralyst healing phase, this means time is wasted not charging VS and it bares the risk of uncharged lures and thus delaying the Teralyst capture. I will talk about this flaw in the dedicated Trinity section. Your job as: VS-Operator In the next few section I'll go over the different jobs of each role and I will strart with the most important thing. The VS-Operators. The most important part you have to do before the team even engages the Eidolons is stay inside the marked area here:
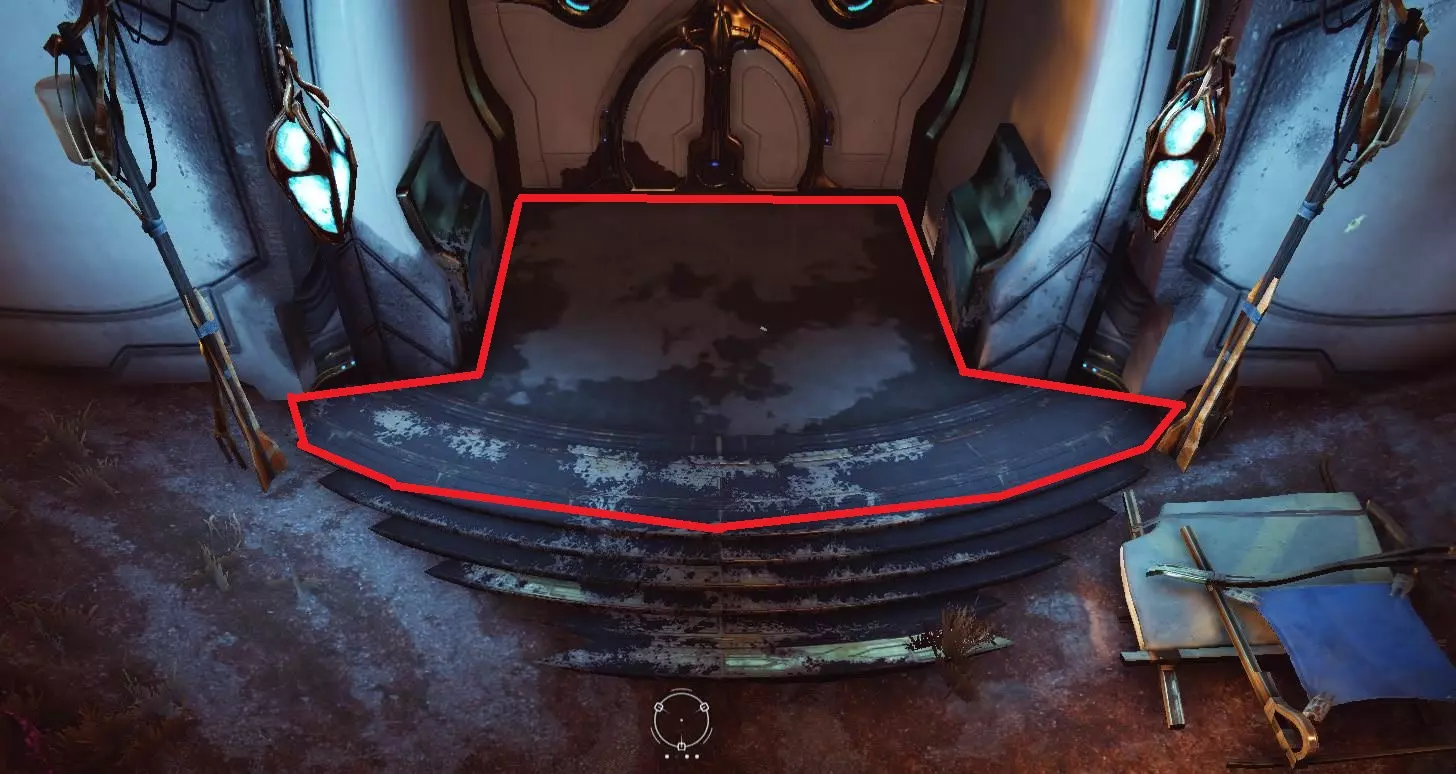
If you leave this area the AI-manipulation fails and vomvs spawn in a sup-optimal location. Your job is to take down the shields as fast as possible. I don't want to go over the two different strats again and just give you some general info here. As VS-Operator you usually spend every spare second charging your VS and increasing your damage with every second. To increase the time you can spend charging your VS, you can pick the Eidolon-Shards up as OP and insert them into the shrine if you never leave the OP-mode. The Voiddash mechanic is also the primary movement technique to get to the Gantu- and Hydrolyst spawns. If you manage your shots correctly you also can carry over some VS-charge to the next 8 shots. If you use the last shot and enter Voidmode immediately after, the game adds the time you spent in void mode towards the next set of shots. For short, just hold your crouch key while you use your last shot and let go after your VS-charge hit zero. Your Job as: Volt Your main job as Volt is providing an useable shield for the team to take down the Eidolon's shields. If you want to give your team the most from your shields you can place 6 of them at the same spot, this stacks more damage towards the Synovias and enables the team to bust the kneecaps with their amps. The shieldplacement can be crucial to ensure a shield one-shot / kneecap bust. These two targets dictate the placement of the shields. you either stack a bunch facing the Eidolon so the team can shoot directly at the kneecap and maybe destroy it with alongside the shield. Or you place it at a 45° angle right next to the Eidolon's knee joint facing the same direction as the Eidolon. This enables you to increase your overall DPS due to the way the projectile of your amp works, it travels right throught the leg and deals damage on each tick. How it exactly works is mystery, however i suspect the projectile just not realizing that it already colided with something and then just does it's normal things which would be traveling at a decent speed, dealing damage on each tick and exploding at the end of it's lifespan. The secondary jobs as Volt can be aditional DPS-buffing with the Shock Trooper augment, taking out a Synovia if something bad happens to your DPS-player or buffing your DPS with speed. A well built Shock Trooper Volt can lift a medicore Weapon to a strong enough one, however you have to invest in some Ability Strengh in your build if you want to utalize this and the speed buff. Volt's passive ability stacks pure electricity damage to your next shot. This damage bonus stacks up to 1000 electro and can combine with other elemental damage type of your weapon, it also stacks with your sniper's combo bonus and VS. This extra damage makes Volt a good substitude for DPSing. Keep in mind, stacking to 1k electro damage takes a while. If you're a more advanced Volt player you can place a shield at the four possible Eidolon spawns in the downtime between each Eidolon kill and the shrine activation Your job as: Trinity Your primary job as Trinity is gathering and taking care of the lures. There are a few points you have to keep in mind to ensure a quick and easy Teralyst kill, the most important thing is you have to be with the team as soon as the Teralyst enters the healing phase, or shortly after. If the Teralyst enter healing, you just have to head towards it, there is no "just one more lure", get your butt to the Eidolon because the lures need charging. Don't worry if you're missing one or two lures, there is a lot of downtime during the healing phases of Gantu- and Hydrolyst, the DPS-player has more than enough time to fly and get one or two more lures, this way nobody wastes VS-charges and/or time charging. A few people started to point the other 'more rely able' Lure strat out. Here is why I dislike it and why i highly advise against it. The start is basically Dao's '6cap collect' executed half as fast. Trinity stays for one shield, leaves, gets 2 lures and drops them off at Terry. I see this whole process of dropping lures of as huge time waste. Even though it basically is a guaranteed charged lure for the next fight, I advise you to convert to the full 7 lurr collecting method as soon as possible. It just gives a nice amount of VS charge time more. Let me talk about a few little "tricks" to make your life much easier before we get to the fun stuff. Hot-Key your Archwing launcher and Energy Pads. I use Mouse5 for super quick energy padding while I fly from lure to lure. Useing Itzal's 2nd ability to stop midair is quite helpfull when it comes to opening the hacking screen aswell. The last trick for hacking a lure is the Cipher-Hotkey. This key cannot be changed right now and is set to "Y" on a QWERTY-Layout keyboard and to "Z" on a QWERTZ layout. This hotkey can be spammed right after the hacking screen starts to come up to make the hacking process as fast as possible. The following map includes a few paths for Lures. The cyan color stands for the current "meta" since you're quite close to a lot of eidolon spawns during the route. The red lines are a pretty decent alternative to it. The yellow lines are your "backup" lures, just incase some lures on your normal route didn't spawn. The numbers are the possible lure spawns for each location. Get used to the map and pick a route that ends you as close to the Teralyst spawn as possible.

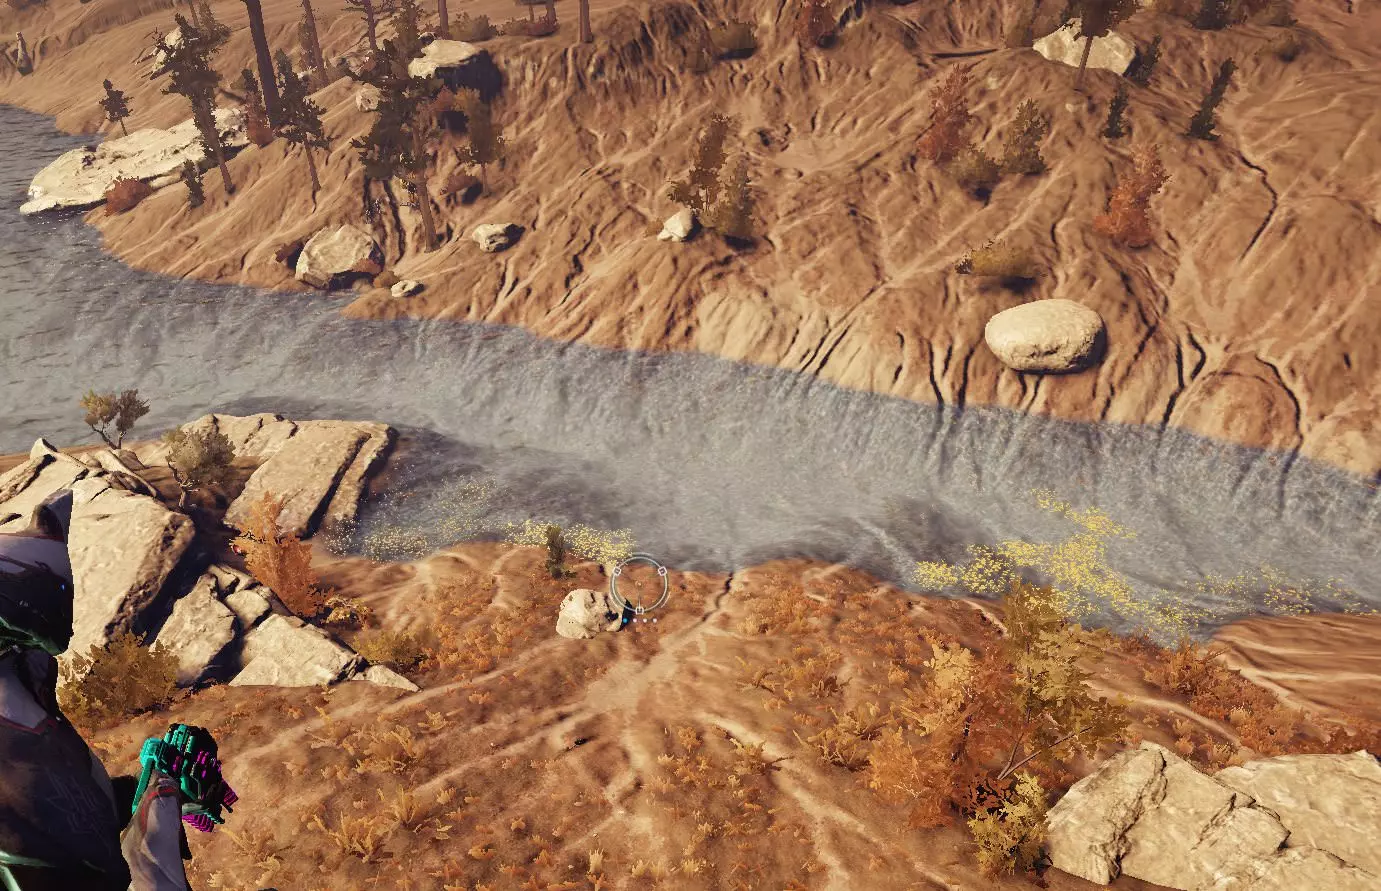
该地图的制作归功于《星际战甲》论坛的Kio-reki。你的进阶任务是协助处理首个也是最坚固的兆力使护盾。如果你开始协助处理首个护盾,你的诱饵路线可能会与常规路线有很大不同。这里我必须强调地图知识的重要性。如果你在青色或红色路线附近有诱饵生成点,那么“特殊情况”双角诱饵将发挥重要作用。诱饵的重生时间快得惊人,在70%-80%的情况下,当你的队伍摧毁首个护盾后,这里的诱饵会立即再次生成。收集到足够的诱饵后,你需要为它们充能,有几种不同的充能方法。我个人会在夜灵的两侧各放置一到两个诱饵,以便在治疗阶段捕获那些试图靠近夜灵的 Vomvs。 保持诱饵存活并不太困难,我通常会在每个关节被破坏后施放一次祝福,并且会尽量让诱饵远离甘塔乌利斯通常会释放的激光束。这些光束基本上是唯一足以杀死诱饵的攻击,而且这也需要相当长的时间。 最后,作为三位一体的职责是牵引诱饵,在夜灵被击杀到诱饵掉落战利品之间大约有10秒时间,这段时间你可以带着诱饵飞到任何你想去的地方,并让它们在你选择的位置生成。这通常是为了获取圣坛的战利品,这样队伍在拾取并将碎片放入圣坛时可以继续充能VS,或者在星门处获取Hydrolist的战利品,以最大限度缩短撤离/离开的时间。不过,若引诱失败会浪费大量时间,所以如果无法保证成功引诱,就不要尝试。 你的职责:Harrow Harrow的任务最简单,只需在每次能量打击前施放你的4号技能,以保持生存并抵消磁力异常,在Eidolon即将起身时再施放一次,为你的DPS玩家提供控制增益,确保一击必杀。 Harrow玩家唯一的进阶策略是担任主机,这能让DPS玩家确保对Eidolon的每个护盾都能获得赋能。很难确切说这种策略比传统的输出主机策略节省多少时间,我预计每个三人组大约能节省10秒。关于第一个诱饵的内容,我会在“作为输出的职责”部分进行说明,如果你想使用这个灵枢主机策略,可以查看该部分。 作为输出的职责 如果不是因为第一个诱饵,输出的工作会和灵枢的工作一样简单。你所要做的就是为每个虚空锐兵生成足够的乌奈鲁 wisps,并尽快消灭滑膜炎。 让第一个诱饵快速充能听起来比实际情况更容易,最优秀的龙骑可以通过AI/生成操控在30秒内为诱饵充能。 如果你想让诱饵充能速度达到最快,就必须使用你的航道星舰尽快到达诱饵位置。“选择诱饵”位于“双角”区域,也就是两个小湖之间、带有间歇泉的小营地。获取该诱饵最快的方法是:使用伊格尼斯的二技能急停,向诱饵方向闪烁,然后尽快破解它,最好使用密码器。 破解诱饵后,飞回大门前,等待3秒左右,之后飞到大门右侧。沃姆斯有多个可能的生成位置,我附上了最常见的两个位置的截图。
The only "advanced" strat here is the order in which you shoot every Synovia, starting the the armpits, first left then right, moving to the arms and leaving the knees for the VS users or just killing those last. The backup strat This strat is only needed if your team runs out of time on the last Set. The lures don't disapear with the Sunrise anymore, all this strat needs are charged lures. Incase you'd run out of time during the last Hydrolyst fight you just can let it walk, or even teleport away from the big lake. The important thing is to get the Eidolon away from the water. Once you have it far enough away you're save to capture it. External helpers aka. macros and a bit about the EULA Before I go over the different macros we use, keep in mind, macros are a grey-zone and not even people from the Zendesk support could tell me exactly where DE is drawing the line. My account triggered the auto-ban system a few weeks ago and I had a chat with the support guys, and sadly they couldn't tell me exactly where the line is being drawn, the guy I talked with just said the full automataion and aim/trigger-bots are not tolerated and will be banned both "permanently" and immediatly after they got detected. He also added "use macros at your own risk" to the last email he sent. Straight from the EULA[www.warframe.com] of Warframe: Section 2, §f "use cheats, automation software (bots), hacks, mods or any other unauthorized third-party software, tools or content designed to modify the Software, the Service or the Game experience;" Many people are using "spin2win" macros or melee-spamming scripts to make their life easier, so I think the stuff we use during Eidolons is also "legal" in DE's eyes. You may think, programming a "human-like" delay into your macro scrip makes it undetectable, but you are wrong. Section 4 of the EULA[www.warframe.com]: (the section is a bit too long to just copy paste into here, I highly recommend you give it a read tho) "When running the Software, Digital Extremes may monitor .. your computer’s Random Access Memory (RAM) for unauthorized third-party programs running concurrently with the Software." I will not share the exact scripts I use because I simply don't want to be held accountable for any account bans. Luckily there are only two "useful" macro tricks right now. The first being a Harrow-Animation cancle where you enter the Input for transfering into operator mode immediatly after you entered the input to cast the ability. It cancles the whole animation, the usefullness of this macro depends on the casting speed you have on your Harrow-build. The second, more usefull one, is a "Dash-spam" macro, it simply rapitly presses "Space" to spam the dash command, this makes procing Shadow quite a charm, dashing over long distances (requires energy pads of course) is also quite fast and simple with such a script. A few last words & credits Feel free to put your ideas or my spelling mistakes into the comment section of this guide. The comment section is a open discussion point and not a advertising platform, I will delete all comments linking to any platform what so ever, I also will delete comments if you just want to insult someone with it. Also feel free to add me on Steam or ingame if you want to discuss contents of this guide in detail or need further help. Don't add me if you just want free items/plat. Thank you for your time, please rate the guide and share your thoughts in the comments! Credits go to: Dao219 - provided a lot of strats in the current meta, especially for advanced trinity players xCelery, SupImNude, Eragon0413, Werxxx - perfected the fast charge lure - pre Chimera DoubleXXF, Eragon, Szczepanek, ev0, and a few others - fast charge lure - post Chimera hops - had some nice ideas all around Anhor - spellchecked a bit of this guide Yanta - pointed out that i forgot about the Harrow's crit buffing for the last headshot -Izumi- - Told me about Auxiliary Power and it's small benefits Sly_Devil - Pointed a quite crucial mistake regarding Harrow and his Penance buff out. Thanks to everyone pointing a mistake out in the comment section!