抢先体验云存档家庭共享

--

+关注

--

热度

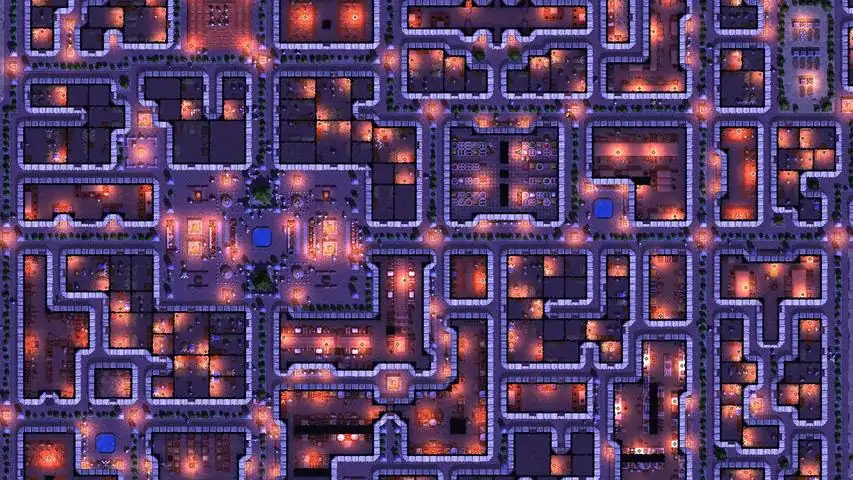
《希克斯之歌》是一款幻想城市建设游戏。您从一个小小的村庄发迹,用您那无与伦比的管理和征服才能带领你的人民走向强大,最终成为称霸一方的帝国。游戏里的机制精巧、真实且复杂,即便是最小的事件也可能引发摧垮整个王国的蝴蝶效应。好上手,难精通。游戏设置在一个浅度奇幻的世界观下,并有着激发无限想象力的游戏画面一个鲜活的世界不同的种族,文化,古老和新生的神系以及古怪的生物。昼夜交替,季节变幻,动物迁徙,人流涌动。不管我们进不进行干预,干旱与瘟疫,海盗与山贼,以及新奇的发现总归是能让王国和朝代不停变迁。没有任何两局游戏会是完全一样的——游戏内容,背景故事,以及彩蛋都是随机生成的,让你能一步一步、一片一片地拼凑出这个宏大世界观的丰富内涵。规模巨大的基地建设不管是用赢得民心、还是将他们鞭打到屈服的方式,你都可以将你的城市建设地无比繁华。将一个几十人的小定居点扩张成为一个几万人的大都会。要当心不要过度扩张——因为你所建造的所有东西都需要小心的维护。一些小小的动荡——或是生产被干扰、或是您的地位下降,都会很快引发情况的失控,而刁民则会毫不犹豫地发起暴动,尝试推翻一个无能昏君的统治。大战略随着你的首都不断发展,你将需要村庄、伐木场、城堡和贸易站来支撑王国的持续繁荣。当然了,你不是孤身一人。其他王国和暴君们正虎视眈眈地或结成同盟或扩张领土。因此,不要太早展露你的锋芒——广积粮,高筑墙,缓称王。加入庞大的大陆贸易网络,并在喜怒无常的价格波动中寻求机遇。如果你不小心,可能就在一夜之间暴富、尔后又在一夜之间跌落谷底,永世不得翻身。史诗般的战斗与战术从盟友和附庸以及你自己的领土里集结一支最多20000人的部队、雇佣军和英雄。使用狡诈的战术来包围你的敌人,或者让他们在你的威名下闻风丧胆,弃甲投降。每场战斗最多支持 40000 名士兵在同一个战场上相互拼杀——每一场战斗都决定着王朝的崛起和覆灭。贵族与奴隶让这些卑贱的奴隶在铺你的床、擦你的地板的时候累断他们的脖子!偶尔给他们扔一块没有肉的骨头就足够让他们没有反抗暴动的意愿了。指派贵族,或是从其他王国招揽它们,并让他们来协助管理王国的不同事务来加强你的生产和整体实力。不过要小心地付出你的信任和奖赏——因为有些人可能正在密谋推翻你的统治,或是投敌。契合度完美的原声带感谢大家的支持,让我们达到了第一个众筹项目的额外里程碑。游戏将有一个由 @jasinkamusic 倾心制作的原声带。我们已经制作好了一些原声音乐,并且它们和游戏的契合度非常高。看看你的臣民都有什么样的生活和性格,并做好充分的准备度过第一个严冬。狩猎、饲养、耕种,这样我们就能在饥饿的时候有食物可以吃、在寒冷的时候有衣服可以穿。你的起始居民来自不同的种族。每个种族擅长和不擅长的工作都不尽相同。每个人也都是一个个体,有着迥异的性格、作息时间、喜好、朋友和怪癖。你不能直接控制他们,但你可以通过制定整体的计划,随后他们自己就会进行智能的工作分配。如果你能很好地照顾他们,就会有越来越多的人愿意加入你的城市。如果你错待他们,他们就会工作懈怠,甚至是发起暴动。不管是用赢得民心、还是将他们鞭打到屈服的方式,你都可以将你的城市建设地无比繁华。将一个几十人的小定居点扩张成为一个几万人的大都会。最多支持 30000 个人居住在城市里。随着你的人口数量增长,你的视野和格局也会变大——从个人的喜好转向关注一整个群体的喜好——一个种族,一个社会阶层,一个宗教群体,或是一个经济体。在希克斯之歌中,人们往往不喜欢和他们不同的人。究竟是要允许不同群体共生共存并建立一个包容且多彩的社会,还是要给予某些群体特权并歧视其他的群体,都是由你来决定的。在你的旗帜下集结军队,并在需要的时候招募贪婪的雇佣军为你作战。借助英雄的力量鼓舞军队的士气。在你抵抗入侵者、又或是夺回你对一个王国的正统统治时,享受这史诗般的庞大战斗吧!但要记住——流血和杀伤永远不如脆弱的士气被摧垮来得要命。你的城市也可能被强盗掠夺。强盗们觊觎你的资源,而如果你不把好东西和盘托出的话他们就会无情地对你发起攻击。随着你不断成长,战斗更有可能发生在城市外围,或是在野外。战斗意义重大!你将需要几年的时间来重新集结部队,而敌人也会抓住机会、以极小的代价猎杀并彻底歼灭你的残兵败将。你将不得不签下一张完全谈不上公平的和平协议,除非你有着足够的人力和充盈的国库能够支持你快速东山再起。希克斯是一个鲜活的世界。不同的种族,文化,古老和新生的神系以及古怪的生物在这里生活。昼夜交替,季节变幻,动物迁徙,人流涌动。不管我们进不进行干预,干旱与瘟疫,海盗与山贼,以及新奇的发现总归是能让王国和朝代不停变迁。没有任何两局游戏会是完全一样的——游戏内容,背景故事,以及彩蛋都是随机生成的,让你能一步一步、一片一片地拼凑出这个宏大世界观的丰富内涵。古老的故事中,希克斯和生活在这片大陆上的人们曾经共同生活在一个无比强盛的帝国下,由秩序诸神亲自治理。繁荣、和谐与和平持续了数世纪之久,这期间四通八达的道路网络连接着无数灯火通明的城市。然而不幸的一天还是到来了——一群贪婪的人类意外发现了混沌之王的监牢,并为了那所谓长生不老的承诺将祂释放到了这个世界上。诸神之战爆发了大战,将无数兴盛的城市、珍宝、藏书都烧成了灰烬。在被围攻的绝望中,混沌之王释放出了一场恐怖的瘟疫,将无数死去的人变成了祂的不死士兵,并使用祂那燃烧着魔法火焰的巨大神兵将剩下的堡垒和城市也悉数夷为了平地。神的化身们在这场大战中一个一个倒下,直至最终一个不剩,全数被驱逐出了这个世界。不过,因为没能兑现长生不老的承诺,混沌之王被那些墙头草般的追随者们刺杀了。随着他的死亡,寒冰与暴雪从天而降,笼罩了希克斯整整一个时代。但是,好消息!如今冰层已经融化,这个世界在召唤一位强有力的领导者——也就是你!领导精于采矿、意志也如石头般坚韧的董达利安人。它们一生都在挖掘矿石、与他们的宿敌阿莫维安人作战、以及梦想着有朝一日重建它们传说中的瑟拉巴斯山脊上的王城。充满神秘感的他们一生下来就是成年的、而且天生就精于采矿技艺。他们能活得很长,喜欢在山脉里生活。或者也可以领导脆弱而短命的人类。虽然不如他们的董达利安表亲强壮,但他们拥有者自由的意志和聪明才智——这让他们充满超过董达利安人的潜能。将他们破碎且战事连绵不断的诸邦统一起来,并集结在你的旗帜下。不过要小心他们把你带离正轨,也要抓紧时间——因为遥远的低语告诉你,混沌之王就要回来了!随着诸神之战结束,少数的坎特巨人也留了下来,并决定前往人迹罕至的永冻北境去度过他们数万年的余生。他们充满着愤怒,并且极度厌恶人类与他们卑劣的背叛行径。尽管他们往往不喜欢接近任何文明,但如果你幸运的话,也许你会找到几个愿意加入你的城市的巨人——他们将带来无可比拟的巨大价值。罗马不是一日建成的。目前,这个游戏有着 60% - 70% 的功能,但是现有的机制仍然不完美,需要很多的打磨。9月份的发布只会有我们写的一部分功能和机制,这其中有一些我们可能会丢掉,也会有一些新功能被加进来。这个游戏已经在原型机的状态下接近 6 年了,而且也会在将来相当长的一段时间内处在抢先体验的状态下。当然了,我们仍然希望在它尚不成熟的这几年间仍然是非常好玩的。欢迎你加入我们的这场旅程——如果你喜欢我们已经创造的一切、对游戏的野心和愿景感到兴奋、并且还有一点闲钱的话。虽然理论上,这个游戏已经准备好在steam上以抢先体验的形式发布了,但是我们仍然想在此之前加入一些额外的东西,做些额外的打磨。直到现在,我们的工作重点都是加入并好好打磨那些一个城市建设游戏所必须有的哪些元素。最后我想说,这个游戏是一个长期项目。在不久的将来我们计划加入帝国管理和贵族元素。抢先体验目前计划在2020年9月21日发布。
游戏圈
共33条帖子
纳加加
2026-02-15 10:00:26 · 发布在 「希克斯之歌」
建造技巧与窍门
Building tips and room plans (Work in Progress Some rooms plans are outdated) Tips Two tile thick walls stop all noise. You can use a warehouse as a noise buffer between a workshop/refinery and your service or housing. You don't need many metal smelters unless you have large high quality ore deposits. I recommend only about a 10 worker smelter at first if your ore supply is poor. I recommend your first workshop be a carpenter with room for between 8-12 workers. Middle game workshops with between 20-60 workers +20 worker workshops for lower demand like masons (more if you have Dondorians as they both like cut stone and are good masons), smiths (Unless you have large ore deposits), paper makers, Bowers +50 worker workshops for high demand goods like clothing and furniture. Late game you will want workshops with a 100 or more workers I only set auto employ for jobs that fluctuate their demand often like warehouse, service building, dungeon, and slaver. For most workshops you don't need more than 1 storage tile if you have a nearby warehouse. I would recommend 2 storage tiles if a workshop has more than 10 workers and has a high output like a tailor. You can give tools to farmer, herders, fishers, wood cutters, miners, crafters, refiners, scientist, and scribes. Experience Boost Starts at 100 Workers in a single Industry up to 600 workers You don't need your schools to be as large as your nurseries as babies won't go to school until they become a kid. Also races that learn faster will need less school time. Humans Learning 2.00 Amevia Learning 1.00 Tilapis Learning 1.00 Cretonians Learning 0.50 Dondorians Learning 0.20 Garthimis Learning 0.10 Dondorians don't have children but can go to a university. They learn very slow but they do have a long life span to use what they learn assuming they don't die in your army. Humans are the only race that demands education. Slaves Note Slave cannot be educated or be soldiers. Slaves only require basic services like hearths, wells, food stalls, markets, latrines, and physicians. Cretonians Submission 1.25 Best slaves highly submissive farmers and ration makers. Garthimis Submission 1.00 Okay slave good miners, fishers, warehouse workers, only race good at battlecrawlers. Only down side is they also make good soldiers. Humans Submission 1.00 Okay slave only downside is they cannot be educated to be better at their job of bureaucracy and reserach. Tilapis Submission 1.00 Okay slaves for ranching, woodcutting, fruit orchards, and bow making. Only down side is they also make the best archers. Dondorians Submission 0.75 Okay slave great crafters but less submissive, expensive to buy and rare. Amevia Submission 0.50 Not great slaves not submissive and you can have Garthimis be fishers instead. But only race that is good at globien ranching. When you have about 100 scientist in upgraded labs get a library to increase your research. All rooms and Decorations will slowly decay over time, maintain them with Janitors. Maintain may requires the same material a construction/Building was made from e.g a workshop may need furniture to be maintained, a stone road would require stone You usually don't need more than 10 Janitors in one area and 5 will be fine in rural areas of your city. Remember that your people care about distance to services so space them out. Dinging deep into a mountain is very slow. Plan underground expansion ahead of time. You can get plenty of wood and stone from most maps early on so you don't need to build a stone mine or woodcutter until you have between 100-500 Pop depending on how abundant your map is. Hunting is a great early source of food and remember you can sell excess meat before it spoils. Agriculture is key for a growing settlement make sure to start farming early even if your in a cold climate. (One thing to be cautions about, their are random events that can kill your Orchards.) Livestock spoil quickly and is expensive, try to set up a pasture within the first 5 years of a new settlement. Also don't forget to sell some of your livestock after you have all your pastures full. (Note their are random events that can kill your livestock so don't sell all your stockpile.) Stockpiling food tip Vegetables are one of the easiest long lasting food to produce. Fruit spoils a little faster than vegetables but is like by many races and can be made into achool. Grain last long but must be made into bread to be eaten. Note Bread spoils much quicker than grain. Meat and fish spoil very quickly without spoil rate reducing tech. Eggs last a long time and are a great way to stockpiling food. Rations are one of the longest lasting foods but require herbs to make. Having a stockpile of rations will pleas Cretonians. V65 Trade Tips Early game I recommend importing raw materials as they can be very cheap and exporting finished goods. The game encourages specialization in a few industries for trade. Worker experience is gained by having many workers in the same job and give a production boost. Accident in a room can injure or kill everyone working in them be careful with how large a room is. New Immigrants will temporally decrease happiness and increase disease risk. Taverns produce noise so consider not adding too many entrance. Housing cannot have more than one race living in them. Large Rooms Vs Small Rooms Large Rooms Usually more space efficient than small. Easier to keep track of each rooms output If theirs an accident more people will be hurt. Small Rooms Faster to build and cheaper to upgraded. Good early game Shorter walking distance in room and shorter distance form your road network Lower maintenance cost, if you need to move your workers to another job you'll waste less resources maintenance a partial employed room. Combat Tips Trees block 50% of projectiles Archers with only a single bow are useless give at least 3 or 4 the more bow the greater range, fire rate, and damage You can have a mixed archer melee unit but the more bow you give the large penalty to speed an melee skill. A good mixed unit could be 2 units of plate armour, 4 units of falcata and 2-3 bow Armour reduces speed so you may only want skirmishing archers to only have leather armour so you can still be more manuverable then your opponents. New colony starting race tips Note your starting race is considered your royal race and gets a happiness bounce. Amevia Nice bounces but tricky race to play due to disliking other races, slow breeding, and desire to live near water. Positives Great fishers Small Boost to Clay Mining Good in melee combat Long lifespan Decent learning rate Eats 25% less often. Negatives Slow breeding Like to live near sweet water. Decant chance to commit crime or go insane. Dislikes other races Mixed Warm climate preference good for most crops and can grow opium. But hot summers can kill non warm climate races Likes Grand Buildings Wants fish and eggs stockpiled but it's easy to get plenty of fish with Amevia if you have decent fishing spots. Cretonians Okay starting race easy to keep happy but weak in combat. Positives Great farmers and rations makers Highly Submission Cheaper temple and shrine Tolerates most other races Negatives Eats more often than other races Horrible in combat Low resistance to bad temperatures Doesn't have a good learning rate Mixed Prefers wooden structures Likes to live in harmony with nature. (Build trees and dirt roads.) Average lifespan Dislikes executions but likes Imprisonment Wants rations stockpiled (Easy to stockpile but wants loads of them) Dondorians Both a very powerful and tricky race. Positives Great crafters means you need fewer workshops and can trade higher valued finished crafts more easily. Great miners you can easily produce melt if you have ore. If you have a good gem or Sithilon Ore deposit you can easily become rich. Lower insanity. Good in melee. Long lifespan They get along with Humans for research and Cretoinians for farming.Negatives Cold climate preference need to build hearths. Other race will probably die to the cold if you don't give them extra clothes. Most crops and livestock have lower crop yields. No children Very slow learning rate Expensive Temple that need Sithilon Ore and desire for Sithilon Ore stockpile. Hate Garthimis and Tilapis Bad at ranged combatMixed Likes to live in Mountains that are slow to mine into but will save on construction materiel. Mountains also provide good natural defense. Doesn't care about noise. Mushroom preference: Mushroom are slow to grow but can be grown anywhere indoors. Good bakers can help off set lower crops yields. Garthimis Low demands, fast breeding, great in combat, but wants meat and fish Positives Good Miners Faster movement speed Easy to please Good in melee combat Fast breeding Indifferent to noise Negatives Short lifespan Horrible learning rate Wants meat stockpiled Low Moral Will not get along with many spices Mixed Warm climate preference good for most crops and can grow opium. But hot summers can kill non warm climate races Likes to live in Mountains that are slow to mine into but will save on construction materiel. Mountains provide good natural defense. Likes Humidifiers and Dread Likes cannibalism Humans Good staring race for great research but more crime, inanity, and higher demands then some other races. Positives Great scientist,scribes, and administrators Fast learning rate Tolerates other races Negatives Average in combat Higher crime rate and Insanity Wants Gems Stockpiled Mixed Average lifespan Demands education Okay Farmers Likes large open space. Wants both Round and Square Buildings Tilapis Overall good staring race you get the best archers and they are not too difficult to please. Positives Great Woodcutters, Hunters, herders, fruit orchard workers, and bow crafters Great Archers Cheaper temple and shrine Decent learning rate Negatives Wants meat stockpiled Hates Dondorians and Garthimis Dislikes most other races Mixed Likes cannibalism but it will upset other species Wants lots of slaves Prefers wooden structures Likes to live in harmony with nature. (Build trees and dirt roads.) Likes Dread Likes archery training. (Archery range requires more space than melee training) Workshops Workbench 3X2 1 Worker 15X2 8 Worker Auxiliaries 2X1 6X214x9 9名工人 1个储物格9X11 10名工人 2个存储格10X10 10名工人 1个存储格10×10 10名工人 2个储物格11×18 15名工人 3个储物格10×16 17名工人 2个存储格12X13 18名工人 2个储物格12X13 26名工人 1个存储格12×14 19名工人 1个储物格19×9 19名工人 1个存储格19×9 19名工人 2个存储格20X9 20名工人 1个存储格16×12 21名工人 2个储物格19×11 24名工人 1个存储格16x16 27名工人 1个储物格34X7 27名工人 1个存储格 24x12 31名工人 存储格20x20 35名工人 1个存储格20X15 39名工人 1个存储格【注意:存储空间不足,需建造附近仓库,且不要用于高产出工坊】16×21 41名工人 2个储物格22x13 46名工人 1个存储格12X29 46名工人 1个存储格20X24 63名工人 2个存储格37×11 75名工人 2个存储格38×26 134名工人 3个储物格 非正方形工坊9X13 8名工人 1个储物格17X8 11名工人 2个存储格10×13 12名工人 1个存储格20X7 13名工人 2个存储格21X9 17名工人 1个存储格17×11 18名工人 1个储物格24X9 22名工人 2个存储格18x16 24名工人 1个储物格13X22 27名工人 2个存储格20X14 28名工人 2个存储格29X9 28名工人 2个存储格18×16 30名工人 2个存储格16X23 42名工人 1个存储格13×31 52名工人 1个存储格20X24 57名工人 1个存储格24×13 74名工人 1个存储格35X16 75名工人 1个存储格85名工人 1个存储格52×14 89名工人 1个存储格 精炼厂 工作站 4×2 2名工人 8×2 6名工人 辅助设施 3×1 4×1 4×2 5×2 3×420X7 10名工人 3个储物格9x17 13名工人 3个储物格15×12 15名工人 2个储物格12×16 18名工人 2个储物格23X9 19名工人 2个储物格16x19 29名工人 3个储物格13x17 33名工人 2个储物格10x16 37名工人 2个存储格22×21 51名工人 2个储物格45X24 126名工人 5个存储格 非正方形精炼厂12X16 16名工人 2个存储格12X16 16名工人 3个存储格18X13 19名工人 2个储物格21×11 19名工人 3个储物格21×15 24名工人 2个储物格21×17 24名工人 4个储物格21x13 30名工人 2个储物格24×16 36名工人 2个存储格22×32 82名工人 2个储物格35X 50 物流 仓库 仓库可升级2次以增加存储空间 每个板条箱容量 无升级仅消耗木材: 第一次升级需要家具: 第二次升级需要陶器和切割石材:5X21 31个板条箱9×8 13个板条箱8×7 15个板条箱8X8 19个板条箱8×9 21个板条箱8×10 26个板条箱8×10 24个板条箱8×10 26个板条箱10乘8 24个箱子23x5 29个板条箱8×11 29个板条箱10x10 30个箱子11乘8 30个箱子10×10 32个板条箱8×11 28个板条箱17×7 36个箱子10乘11 36个箱子12乘8 32个板条箱8×9 20个箱子12X8 32个板条箱22X5 29个板条箱 圆形仓库13×8 32个板条箱13x14 55个板条箱 出口仓库 5X5 6 13X11 60个板条箱 进口仓库 5X5 4个板条箱 9X11 40个板条箱 运输工 运输 清洁工 注意清洁工的最大活动范围约为135格 工作站 1x5 5名工人 公共设施 1x2 +0.05 1x4 +0.10 需要与工作站数量相等的公共设施格数以达到最大效率。4×10 5名清洁工5X7 5名清洁工7×8 10名清洁工7乘11 15名清洁工10X8 15名清洁工 圆形清洁工8x6 5名清洁工6X 10 10名清洁工无法翻译,已删除。9x7 10名清洁工 食物生产、农业 狩猎:猎人现在只猎杀地图外的动物。他们会前往地图边缘带回动物,然后进行屠宰。 猎人数量超过15名后,狩猎生产力会下降。 寒冷气候:+20%生产力 渔业:寒冷气候:+10%生产力 每16格水域需要1名渔民 每名渔民大约需要1格辅助用地 存储 2X2:存储量62 11X2:存储量620 农业:通过渠道和水井的淡水可提高生产力。 蔬菜 温暖气候:无惩罚 温带气候:无惩罚 寒冷气候:[未提及具体影响] 水果 温暖气候:无惩罚 温带气候:[未提及具体影响] 寒冷气候:[未提及具体影响] 果园能产出更多水果,但需要4年时间培育果树。果树尺寸:4x4格 谷物农场 温暖气候:无惩罚 温带气候:无惩罚 寒冷气候:无惩罚 谷物是每格产量最高的作物,但需要建造面包房。 蘑菇:产量极低,但唯一可在室内或山脉下种植的作物。 仅可室内种植 温暖气候:生产力-90% 温带气候:生产力-60% 寒冷气候:无惩罚 草药:仅用于制作口粮,因此只需少量种植。温暖气候:生产力-80% 温带气候:生产力-60% 寒冷气候:无惩罚 棉花 温暖气候:无惩罚 温带气候:生产力-20% 寒冷气候:生产力-60% 鸦片:用于医院 温暖气候:无惩罚 温带气候:生产力-60% 寒冷气候:生产力-90% 畜牧业【注:基础肥力越高,牧场可容纳的最大动物数量就越多。】 牧场若没有足够的工人,牲畜将会死亡。auroch 产出:皮革、肉类 温暖气候:生产力-90% 温带气候:生产力+10% 寒冷气候:生产力-30% onx 产出:棉花、肉类 温暖气候:生产力-80% 温带气候:生产力-50% 寒冷气候:无惩罚 entelodont 产出:肉类 温暖气候:生产力-30% 温带气候:生产力+10% 寒冷气候:生产力-30% globien 产出:蛋、肉类 温暖气候:无惩罚 温带气候: 寒冷气候: balticrawler 只能在室内或山脉下养殖。 除加西米斯和阿格诺什外的香料,在养殖balticrawler时会受到大幅惩罚。气候 温暖气候:无惩罚 温带气候: 寒冷气候: 住房 你可以将多恩多里安人和加西米人的住所建在靠近噪音源的地方,例如工坊、精炼厂、矿场和训练场。 公寓 3X3 可容纳3人 房屋 3X5 可容纳5人 长屋 6X6 可容纳10人 用于布置房屋的资源也会根据资源类型改变外观。 内室 仅用于安置贵族,且贵族只会居住在内室。 内室需要仆人进行维护。 尺寸7X8 可容纳2名贵族 法律 警卫站 提示:务必在重要仓库附近设置警卫站以防止盗窃 小型 2名警卫 3X4格 中型 3名警卫 5X5格 大型 8名警卫 8X8格 栅栏 脚手架 根据装饰数量散发恐惧值。 断头台 8X3 4次处决8号刽子手 绞刑架 10X3 5次处决 .8刽子手14X6 1 处决者 5 处决数11X7 1名刽子手 4次处决10X8 1名刽子手 4次处决 stocks( stocks) 3X3 1名囚犯 7X3 5名囚犯 对于普通城市犯罪,地牢记录不需要太大(2个牢房可能就足够了)。 牢房 5X3 每个牢房8名囚犯 0.4名守卫80名囚犯 4名守卫88名囚犯 5名守卫112名囚犯 6名守卫34X16 152名囚犯 8名守卫 奴隶主 奴隶站 1x3 1个奴隶制造容量36名囚犯 法庭 法庭 5X6 每个法庭需要20名观众16X9 1 裁判 军事 训练场 2X2 容量 1 7X4 容量 6 2X4 容量 2 7X4 容量 1219×16 60名新兵36×17 161名新兵33×20 170名新兵57X25 358名新兵 非完全平方训练场36×17 150名新兵30X28 202名新兵 箭术靶场 可在室内和室外建造 【提示】会产生大量噪音,记得建造墙壁以帮助减少噪音。 3X9 容量1 12x9 容量1050×44 148名新兵52x42 160名新兵 军队补给站 5x5 9x8 防御工事 用于登上防御工事的楼梯 木栅栏 强度 石墙 强度1875 宏伟城墙 强度 分配 市场 食品摊位10×12 可供35人食用 餐厅16×12 27容量11×7 容量3022×13 39容量12×23 42容量20X13 厨师 45容量21×12 容量4523×15 容量4527×11 容量4821×17 容量60 圆形餐厅11X17 容量30 酒馆提示:酒馆会产生噪音,因此建议不要设置过多入口。8X20 容量2712×21 52容量23X13 54容量24X12 64容量 生命值 卫生间 每个洗手池区域可支持4个马桶。 马桶 3X2 容量3 7X2 容量7 3X3 容量6 7X3 容量14 洗手池 1X5 容量4 2X5 容量8无法识别或无法翻译,已删除。10乘7 12个厕所12乘7 14个厕所7乘12 16个厕所无法识别或无法翻译,已删除。无法识别或无法翻译,已删除。无法翻译的内容已删除无法识别或无法翻译,已删除。无法识别或无法翻译,已删除。9x14 27个厕所 圆形卫生间无法识别或无法翻译,已删除。12x7 12个厕所 井 3X3 容量4 4X4 容量8 5x5 容量12 浴室 堡垒 3X3 容量2 3X4 容量3 5X6 容量1010X14 3名盆地操作员 容量2010X14 3个盆地操作员 容量2013X12 3名盆地操作员 容量2222X8 3名盆地操作员 容量244名盆地操作员 容量2816×12 4名盆地操作员 容量2916×13 容量 3530×9 6名盆地操作员 容量3714X21 7名盆地操作员 容量4618×19 容量 508名盆地操作员 容量5817×27 容量 7731X17 容量 96 理发店 每个隔间1名员工 隔间 3x2 容量 1 12x2 容量 4无法识别或无法翻译,已删除。12X12 理发店 11无法识别20X9 理发店14 圆形理发店无法识别或无法翻译,已删除。理发师10无法识别内容,已删除。16x16 理发店 15 健康部分2 医生、医院、精神病院 医生 工作台 1X4 容量 1 2x6 容量 4 每4个工作台位置可提供1名医生 每个工作台位置需要2格货架空间7X10 2名医生 容量512X6 2名医生 容量511x7 2名医生 容量 611x16 4名医生 容量1617×12 5名医生 容量1918X13 6名医生 容量22 轮班医生6X11 1名医生 容量419X11 4名医生 容量1420X10 5名医生 容量18 医院 病床 1X3 容量1 5X5 容量10无法翻译,已删除。无法识别内容,已删除。22x6 20名患者12×10 21名患者11X15 33名患者 精神病院31名患者 娱乐设施 扬声器 尺寸:3X3 服务人数:50 提示:扬声器还能提供少量教育或思想灌输,最高可达15%。 舞台 展台 尺寸:4X4 演员数量:4 服务人数:40 演奏台 尺寸:7X7 演员数量:8 服务人数:80 凉亭 尺寸:10X10 演员数量:12 服务人数:120 角斗坑 尺寸:12x11 角斗士数量:2 服务人数:54 尺寸:15x15 角斗士数量:4 服务人数:108 尺寸:17x17 角斗士数量:6 服务人数:162 大竞技场 尺寸:51X40 角斗士数量:25 服务人数:1.63K 休养所 注意:至少需要1张桌子和1个舞池 桌子 尺寸:1X3 服务人数:1 尺寸:1X7 服务人数:5 尺寸:3X4 服务人数:2 尺寸:7X4 服务人数:10 舞池容量为每格1人。 尺寸:2X2 服务人数:4 尺寸:2x3 服务人数:6 尺寸:3X3 服务人数:9 尺寸:4X4 服务人数:1619×12 容量7320x12 82容量 按摩院11×13 容量615×18 13容量17X24 19容量 知识 实验室无法翻译,已删除。无法识别或无法翻译,已删除。无法翻译,已删除。无法识别内容,已删除。16×37 135 科学家37×24 220名科学家 图书馆 书架 4×2 容量1 12×2 容量5无法识别内容,已删除。23×45 130名抄写员 学校可将教育水平提升至60% 课桌 3×2 容量19X14 16名学生13X13 24名学生24×13 48名学生20×24 80名学生 10×8 容量8名学生 大学 讲台 5×2 容量5 5×4 容量9 7×4 容量12 9×6 容量2022X14 容量 6117×25 84名学生23X18 84名学生 行政部门 文书工位 3X2 1 9X2 7 每位职员大约需要1格货架空间或2格地毯面积。20乘20 73名店员无法识别或无法翻译,已删除。28X20 108名职员 大使馆 【早期游戏提示】你需要大约20名使者来改善与邻国的关系,并在你计划征服的土地上争取支持。 工作站 3x3 1名工人 3x9 3名工人16×15 16名使者22x16 25名使者 生育 婴儿所需食物 阿米维亚族:鱼类 克雷托族:蔬菜 加斯米族:肉类 人类:水果 蒂拉皮斯族:水果 1件家具可支持4个婴儿床。 提示:所需保育员的数量在很大程度上取决于她们必须前往婴儿床送食物的距离,尽量缩短食品仓库到托儿所的距离。14×14 容量2912×18 容量3214×29 容量6426×15 64容量 非完全平方数苗圃17×20 容量4817×19 容量5221×21 容量6835X14 72容量28×17 容量8020×26 容量8822×19 容量10632X32 413容量 旅馆 每个房间需要约7块地毯或4块装饰品。 地毯 0.15 装饰品 0.3027×20 6名旅店老板 27个房间 圆形旅店26X14 3名旅店老板 15个房间 宗教 祭坛6x6 可服务42人 6x7 可服务34人 8x7 可服务48人 10x8 可服务62人 12x10 可服务102人 寺庙祭坛 7X4 祭司3名 可服务8人 11X5 祭司6名 可服务18人 方形寺庙包含墙体 48X34 可容纳5个大型祭坛和1个小型祭坛 100%庄严度与空间 32名祭司 可服务120人 圆形神庙57X30 32 Priest Serves 124 Graves Mass Grave Can be built both indoors and outdoors Note Edge tiles can not hold a grave only inner tiles. Note executed prisoners and dead enemy soldiers can only be buried in mass graves. 3X3 room for 1 grave 4X4 tiles room for 4 graves 5X5 room for 9 graves 6X6 room for 16 graves Graveyard Can only be built outdoors Crypt Can only be built indoors Species Amevia Lifespan: 150 Building Preference: Grand Buildings and Mud Buldings Climate Preference: Warm Population found most in: Sweet water and Ocean Religion: Majority Crator Food Preference: Eggs, Fish, Vegetables House Decoration: Stone, Cut Stone, Fish, Leather, Wood, Furniture Likes living near: Lighting, Sweet Water, Awe Wants city to have a stockpile of: Fish Lawfulness: 0.80 Submission: 0.50 Learning: 1.00 Sanity: 1.50 Dislikes Cannibalism Dislikes Cretonians, Dondorians, and Humans Only Species Good at raising Globien Good in combat. Slow breeding. Argonosh Lifespan: 500 Building Preference: Mountains Climate Preference: Warm Population found most in: Havens only Religion: Only Shmalor Food Preference: Eggs, Fish, Meat House Decoration: Clay, Cut Stone Likes living near: Dread, Harmony Wants city to have a stockpile of: N/A Lawfulness: 1.00 Submission: 0.30 Learning:0.00 Sanity: 1,000 Okay with Cannibalism Dislikes Dondorians and Tilapis Extremely powerful in combat. Cantors Lifespan: 1,000 Building Preference: Climate Preference: Cold Population found most in: Havens Only Religion: Only Athuri Food Preference: Eggs, Fish, Meat House Decoration: Stone, Cut Stone, Gems, Wood, Furniture Likes living near :Awe, Lighting Wants city to have a stockpile of: N/A Lawfulness: 1.00 Submission: 0.20 Learning: 0.00 Sanity: 10,000 Dislikes Cannibalism Dislikes Garthimis and Humans Extremely powerful in combat. Cretonians Lifespan: 75 Building Preference: Wood building and Round Shaped Climate Preference: Warm Population found most in: Forest and Open Land Religion: Majority Crator Food Preference: Bread, Fruit, Vegetables House Decoration: Wood, Clay, Furniture, Fabric, Pottery, Gems Likes living near: Harmony, Lighting, Dread Wants Round Buildings Wants city to have a stockpile of: Rations Lawfulness: 0.70 Submission: 1.25 Learning:0.50 Sanity: 1.00 Dislikes Cannibalism Weaker in combat Dondorians Lifespan: 180 Building Preference: Mountains and Square Shaped Climate Preference: Cold Population found most in: Mountains Religion: Majority Athuri Food Preference: Meat, Fish, Mushrooms House Decoration: Stone, Wood, Furniture, Fabric, Cut Stone, Sithilon Ore Likes living near: Awe, Lighting Wants Square Buildings Wants city to have a stockpile of: Sithilon Ore Dislike: Hate Garthimis and Dislike Tilapis Lawfulness: 0.90 Submission: 0.75 Learning: 0.20 Sanity: 5.00 Dislikes Cannibalism Get bounces to melee combat Garthimis Lifespan: 50 Building Preference: Mountains Climate Preference: Warm Population found most in: Mounatins Religion: Majority Aminion, Some Shmalor Food Preference: Fish, Meat House Decoration: Clay, Cut Stone Likes living near: Dread, Lighting Wants city to have a stockpile of: Meat Lawfulness: 0.10 Submission: 1.00 Learning: 0.10 Sanity: 1.00 Likes Cannibalism Dislikes Dondorians Get bounces to melee combat Humans Lifespan: 80 Building Preference: Grand building Climate Preference: Temperate Population found most in: Open Land Religion: Mixed but favoring Athuri and Crator Food Preference: Bread, Eggs, Meat, Mushrooms House Decoration: Wood, Furniture, Fabric, Jewelry, Pottery Likes living near: Lighting, Awe Wants both Round and Square Buildings Wants city to have a stockpile of: Gems Lawfulness: 0.20 Submission: 1.00 Learning: 2.00 Sanity: 0.80 Dislikes Cannibalism Dislikes no spices Average in combat Tilapis Lifespan: 140 Building Preference: Wood building and Round Shaped Climate Preference: Temperate Population found most in: Forest Religion: Majority Crator Food Preference: Eggs, Fruit, Meat House Decoration: Wood, Laether, Fabric, Furniture, Pottery, Livestock Likes living near: Harmony, Dread Wants Round Buildings Wants city to have a stockpile of: Meat Lawfulness: 0.50 Submission: 1.00 Learning: 0.80 Sanity: 1.00 Okay with Cannibalism Dislikes Garthimis and Dondorians Get bounces to ranged combat Decorations Tree 1 Tile Gives Harmony 6 tiles in every direction. 2X2 Gives Harmony 10 tiles in every direction. 3X3 Gives Harmony 14 tiles in every direction. Flowerbed 1 Tile Gives Harmony 6 tiles in every direction. 2X2 Gives Harmony 10 tiles in every direction. 3X3 Gives Harmony 14 tiles in every direction. Pillar 1 Tile Gives Awe 6 tiles in every direction. 2X2 Gives Awe 10 tiles in every direction. 3X3 Gives Awe 14 tiles in every direction. Statue 1 Tile Gives Awe 6 tiles in every direction. 2X2 Gives Awe 10 tiles in every direction. 3X3 Gives Awe 14 tiles in every direction. Touch 1 Tile Gives off light 5 tiles in every direction. 2X2 Gives off light 11 tiles in every direction. Humidifer 1 Tile Gives Dread 6 tiles in every direction. 2X2 Gives Dread 10 tiles in every direction. Bench Size ranges from 1 Tile to 1X8 Build benches near your decorations so citizens will sit and improve their environmental happiness. World Map Three types of climates: warm, temperate and cold. RegionsInfrastructure - Sanitation - Education - Law - Entertainment- Other KingdomsNote trade prices varies from kingdom to kingdom and are affect by distance with tolls (reduced by roads) and tariffs (reduced by higher opinion). Ruler Traits Ambitious Deceitful Doesn't keep treaties Calm Relation is less impacted by gifts or demands. Conservative Cruel Merciless in war. Honorable Will keep treaties Lazy Merciful More willing to accept peace deals. Pacifist Less likely to declare war. Proud Relation is more impacted by flattery or demands. Tolerant Tolerant to other races. Warlike More likely to declare war. Titles You can Select up to 5 titles when staring a new game. Breaker Of Chains Unlock by : Free 2000 slaves + 0.05 Happiness Harvester of Hands Unlock by : Executed 2000 people + 0.10 Lawfulness Master Of Bargains Unlock by : Earn 1,000,000 Denari from sales +.25 Bartering The Conquer Unlock by :40,000 Enemies killed - +0.10 Defence Skill (Less losses/Easier fights) The Crafter Unlock by crafting 100,000 +.10 to all Crafts The Great Unlock by : 10,000 population +0.10 Happiness The Leader Unlock by :having 1,500 people in your settlement +45 Settlers and +1000 base knowledge The Negotiator Unlock by : Spend 10,000,000 Denari on purchases +.25 Bartering The Raider Unlock by : The Ruler Unlock by :having 100 people in your settlement +10 Settlers at start The Slaver Unlock by :1500 Slaves in population - +0.10 Submission but -0.03 Happiness
明天是echo
2026-02-15 10:00:17 · 发布在 「希克斯之歌」
良好开局指南
从零开始建设你的小村庄,让自己变得足够强大,以应对各种挑战,至少在你能够自主决策之前。 简介 你好,如果你正在阅读本文,感谢你抽出时间。我将帮助你(可能是新玩家或感到困惑的玩家)了解这款游戏,并利用其机制和功能,让你在这款城市建造模拟/城镇管理游戏中获得最佳开局。 选址 显然,选址对你的行动至关重要,它将决定你能找到的资源及其丰富程度。下面我将解释一些我在地图、不同地形和资源方面的心得。开始新游戏后,你可以选择姓名和其他一些属性。本指南将默认你使用默认设置(不做任何更改)。 首先你需要了解【肥力】的重要性。简单来说,它是你鼠标光标所在位置的总体平均肥力。选择靠近森林或水域的位置会提高肥力,而靠近山脉和沙漠则会降低肥力。肥力越高,农场的产量就越高,而食物几乎是游戏全程中你最需要的资源,无论你处于哪个阶段。山脉有诸多优势,例如拥有丰富的石料,还可能存在洞穴及其他资源,这部分内容我稍后会详细说明。其中一个我强烈建议你利用的优势是,山脉能够阻断通往你村庄的潜在入口,在某些情况下,它们甚至能阻断近半个地图的区域,你在本指南的后续内容中会明白这有多么有用。 森林自然是非常理想的地形,因为地图上会有大量的木材资源。不同的水体决定了你能获得的资源。河流会穿过地图边缘,大幅提升沿岸土地的肥力,从而助力农业发展。海洋和内海则有海滩,其岸边土地没有直接肥力加成,但这完全不会消除肥力加成效果。实际上,海洋和内海在同等面积的土地上提供的肥力加成与河流大致相同。上述两种水体都提供了丰富的捕鱼机会,因此如果你想发展农业社区,选择它们是可行的。我个人喜欢山脉与森林的地形组合。The abundance of building materials certainly help and so for the sake of this guide i'll continue as if you've chosen the same set up i have, One important thing to note is that its best if you have more coal and iron deposits, Preferably close to each other, I'll explain later in this guide. Beginning Setup So by this point you're about to place your throne room somewhere on the map, As i mentioned previously its best to have extra iron and coal deposits, As far as i'm aware you will always have at least one coal and one iron deposit somewhere on the map regardless of the deposits in your region, Its best to place your throne room in throwing distance of your iron and coal deposits and of course be near a lot of fertile ground. Now your going to want to start heavily on food production, for now let's focus on farms and hunting. first, start with fruit farms, early on this is going to be your second most productive food building but it's still a priority. if your near a body of water then feel free to place it along the edge for optimal fertility (Note that "Sweet water" is fresh water and increases fertility while oceans do not) A 10 X 25 farm plot is best at this point. Also something good to do is to gather edible plants around you, things like vegetables and fruit are best. While your people are building the farm start working on a small warehouse, then fill it with your starting supplies and set it to accept fruit, wood, stone, livestock, rations, clothing, meat, leather, cotton and eggs. With that warehouse set up you'll now need to focus on housing. Housing at this point doesn't need to be fancy, a single longhouse is enough. Now lets get to the backbone of your early game food production, Hunting will be easy and straightforward so lets set up a hunting building, it doesn't need to be large so it should be easy and quick to build. Now with food production under control let's focus on our surroundings, its important to have an idea for what you want to do and how to build your settlement. Previously i said you'd want to be close to coal and iron deposits, the reason is because those two resources are probably the most important mid-late game resources you'll need, so eye out your local deposits and make a mental note that the area around them is for industry. But for now stone and wood is your bread and butter so eyes on what's important for now. You'll want to build up your population to at least 100 before doing anything new, and the way to do that is through immigration, and that means your people will need to be happy. Immigration happens when people have a happiness of over 80%, this means providing services, food and good accommodations for your people, and while im sure lots of people want fancy clothes and a super nice home, basics are important, so lets start with a well and an eatery. Ahh but lets not forget the Janitor, after all it wouldn't be good for anyone if every able bodied person is stuck repairing your home and well, so lets put one down too. By this point you'd have run out of building resources, don't worry about cutting down huge swathes of trees, they regrow quite fast, but keep an eye on your stone, unless you've got a stone mine around then there's only soo much stone to go around, Restrain yourself and build Assuming you've followed the first part of this guide, you're at the point where you want immigrants to join you, this is achieved by looking at the right side of the screen and selecting a race to allow to immigrate, simply right click on any race (It's best to select your starting race) and click the plus button on the right under Auto. This increases in increments of 25 so it should be easy to handle. With some fresh labour joining you its time to increase food production, Go ahead and copy your 1st fruit farm and place the 2nd farm plot next to your 1st plot with a 1 block gap in between, Once that's done feel free to dig a canal in between the 2 farms. Canals increase food yield by a large margin, on a small scale like this it won't add much but in the larger scale it is impressive indeed, However the amount of canals you can dig depends on the "Water Table" which is basically how much water is in the ground, of course living next to a river means lots of water table, but living next to a mountain means water is more scarce. The water table resource can be increased by removing water on the map. Now we should focus on giving people some proper houses, which race you chose to start with will depict which house is best, most races enjoy privacy but the Garthimi enjoy communal living rather than privacy, also its best to keep your houses close to where people work, if the house is too far away then people won't live in there. While growing your population its best to limit yourself to your food production, more people = more mouths to feed after all. so lets focus on simply building up our population first and foremost. once you get about 50 people then we can look at the key to unlocking the interesting stuff, The Laboratory is a labor intensive building but is critical to your success, and while im sure its enticing to build a massive laboratory, smaller is better. With a laboratory set up we should focus on what's important, and of course that's making sure people are happy and safe, so the technology you should get first and foremost is the Lavatories, the Speaker, Makeshift Weapons, and the Tailor (keep in mind that this is a guide, not a tutorial, make your own decisions). These techs will be the first stepping stones to a better society. Lets start with the Speaker, everyone enjoys the speaker and its a low cost way of fulfilling a need so its an easy choice. Next is the Lavatories, but to build that we need to build a carpenter first, so lets start with a small carpenter building, while this is building lets add furniture to what's stored in the warehouse. Once the carpenter is done then start on the lavatories building. Next the tailor should be built, this will give a use for the leather that's been building up from your hunter, and will provide some much needed clothing to your people. During all of this you shouldn't be neglecting your food production, Food is king in this game and should always be on your mind when expanding. Eventually you'll grow large enough to allow bandits to attack you so you'll want an army ready to defend yourself, and that means building a training grounds, In the upper left of your screen you'll see a bar with a sword icon, clicking on that will bring up the military menu, By default the game will try to train an army of 200 soldiers made up of your starting species, this is very unnecessary for your first threat, so lets cut down the number of desired troops to 50, lets also give them 1 or 2 levels of melee training. Ahh but a soldier cannot fight without a weapon, well the Makeshift Weapons tech allows the carpenter to make weapons out of wood and stone, so lets set the carpenter to do that while also adding weapons to the warehouse, with that done it's only a matter of time until every soldier has a weapon to defend against bandits. Managing your army Your army will obviously be very important throughout the game, but what type of army you get is determined by your population and your available resources, having a large population but not many resources means that its looking like your army is going to be a poorly equipped one that relies on number more than anything, the opposite is also true as having a small population with extensive resources means a small yet well equipped army. The amount of training they get determines their overall effectiveness, more training = better soldiers, but also requires them to spend more time training. This means finding a balance that works for you, don't try to follow a narrow path, follow the path that's best for you. In the words of Napoleon Bonaparte "An army marches on its stomach" so before you even think of conquering the world your going to need to afford to supply your army, the Army Supply Depot is what you'll need to do this. An army needs up to 6 different products to sustain itself of which i'll break down into "Core Supplies" and "Equipment". Core Supplies are supplies that every soldier uses when in an army, and Equipment is what that division is equipped with, Running out of Equipment will reduce the combat effectiveness of the army and running out of Core Supplies will lead to soldiers deserting from your army. The Core Supplies are as follows: Ration packs, Clothing, Alcohol The Equipment are : Weapons, Armour, Bows An Army Supply Depot can only hold one type of supply, so you'll need multiple depots to maintain a decent sized army, the larger and more equipped your army is, the more depots you'll need to maintain it. This can be a deceptive drain on your resources to be careful, even with a city of 12 thousand people and 3 thousand slaves i could barely sustain an army of 4 thousand, and that's with virtually everyone being devoted to supporting it, so to support an army taking 1 fifth of your population you'll need to devote at least 3 quarters of your city to supplying it. although keep in mind that for that example i was using a very well trained and decently equipped army, so a poorly equipped horde of peasants should be easier to handle, but the resource drain only happens when the divisions are in an army on the map. One more thing, an Army on the map increases loyalty in the region its located in, so breaking up your army into smaller armies to maintain control over your territory has some reasonable logic to it, afterall eventually you can only survive on taxes from those regions you've conquered. Trading and the Economy Eventually your going to have to interact with the economy, if not to buy resources your lacking then to sell resources you've got excessive amounts of to afford more slaves. So, what should you do, well obviously, by mid-game your going to realize that you've got one or more resources that are quite valuable, or a source of resources that can lead to good profits. Exploiting these resources and selling them as export will give you some money, which will make your people happy and give you the ability to either buy resources your lacking or to buy slaves when the slaver arrives. The value of a resource depends on global supply, the more available a resource is the cheaper it becomes, and likewise being the sole exporter of a product really drives up the price, although its virtually impossible for that 2nd scenario to occur it really helps understanding how flexible the economy is. Raw resources and food are obviously cheap and plentiful, everyone can gather wood, stone and food. refined resources such as cut stone, metal, and cloth are not nearly as plentiful and thus are much more valuable in the economy. But the Truly valuable items are the finished products, items such as Livestock, Furniture, Weapons, Armour, Tools, Jewelry, Clothing. These items are expensive because everyone wants and needs them and they're very resource and labor intensive, so if you want to become a very wealthy empire then try to specialize in one or two of these industries, although keep in mind that you'll likely need to source the materials locally or through taxes, and keep in mind that every region can provide different resources in taxes, so eye your neighbouring regions carefully and plan what industry your going to do. One more thing to wrap up this guide, Slavery, a controversial topic for most and something that people won't be comfortable with in this game to be sure, however it doesn't need to be viewed as a bad feature to avoid, i tend to use it to bolster my population. Just buy or gather slaves, free them and suddenly the freed slaves are now members of your society, able to work and fight for you just like anyone else. Although this does come with a drawback, people won't like loosing a cheap labour force and having less food available to them, so don't release a large amount of slaves at once otherwise loyalty will drop very quickly and you'd have a riot that can result in hundreds or even thousands of hostile people killing and destroying everything in your city, it happened to me multiple times and i'm warning you to do this tactic sparingly. Final Thank you I just want to thank you for reading my guide, I hope it helped you navigate the potentially confusing and sometimes frustrating features and mechanics of this City building/Town Management game, If you want to leave feedback fell free to leave a comment down below, If you enjoyed this guide or found it helpful throw a good rating at it and how about a like, I intend to update this guide with more info as the game get developed as well as what info you want to add, I will respond o questions as i see them in the comments or in the discussion tabs below so don't hesitate to leave an honest opinion.

下载233乐园APP

专心推荐好游戏

关于我们 · 联系我们 · 隐私政策 · 营业执照

侵权投诉 · 开发者中心 · 用户协议 · 免责声明

不良信息举报中心

纠纷处理及不良内容举报电话:

4006600910 (工作时间: 9:00-12:30,14:00-18:00)

北京市朝阳区启阳路4号院2号楼15层1803室

本公司产品适合10周岁以上玩家使用 未成年人家长监护

首页 / 希克斯之歌

抵制不良游戏 拒绝盗版游戏

注意自我保护 谨防受骗上当

适度游戏益脑 沉迷游戏伤身

合理安排时间 享受健康生活

京ICP备18003564号-3

经营许可证编号:京B2-20181741

京公网安备:11010502052873

Copyright © 2025 233leyuan.com All Rights Reserved

北京龙威互动科技有限公司版权所有

热门游戏: 我的世界 | 三角洲行动 | 原神 | 王者荣耀 | 超自然行动组 | 蛋仔派对 | 和平精英 | 火影忍者 | 二重螺旋 | 英雄联盟 | 梦幻西游 | 明日方舟 | 斗罗大陆 | 光遇 | 鸣潮 | 无畏契约 | 模拟山羊3 | 樱花校园模拟器